
:max_bytes(150000):strip_icc():format(webp)/trends_MontyRakusen_Getty-5a4aa079482c5200362b0987.jpg)
Learn to Merge Clips in DaVinci Resolve Simple Steps
Learn to Merge Clips in DaVinci Resolve [Simple Steps]
Combining two or more clips in a video doesn’t seem like a tough job. But to be fair, the video merger means a lot to professional video editors and videographers. Doing so could add that “special” element of continuity you mostly see in the long clips without noticing the cuts, breaks, and retakes between them.
And just like a few drops makes an entire ocean, the joining of multiple video clips can give life and meaning to your shots. So, how to merge clips in DaVinci Resolve to make your videos look perfect? Here’s the step-by-step guide.
In this article
02 How to Merge Clips in DaVinci Resolve?
03 How to Merge Clips in Wondershare Filmora?
Part 1: About DaVinci Resolve
DaVinci Resolve is a Blackmagic Design’s video editing software. It’s one of the favorite tools of professional video editors. And apart from video editing, the software works great when it comes to color coding, motion graphics, and even audio production.
Although DaVinci Resolve has several excellent video editing tools, it isn’t easy for beginners and intermediate users. Nevertheless, you can expect admirable outcomes if you spend a reasonable amount of time learning this software.
But on the other hand, if merging clips in DaVinci Resolve is what you want to do, you will be glad to know that it has an uncomplicated method. So let’s begin with the step-by-step process on how to merge clips in DaVinci Resolve.
Part 2: How to Merge Clips in DaVinci Resolve
Step 1: Download DaVinci Resolve
To download DaVinci Resolve , go to the official website and click on the “Free Download Now” button if you wish to use it for free.
Contrarily, if you desire to enjoy all the software features, feel free to purchase it by clicking on the “Buy Online Now” button.

Step 2: Import Clips on DaVinci Resolve Timeline
After installing the software on your PC or MAC operating systems, open DaVinci Resolve and import two or more clips on the timeline.
For example, you can see two different video clips on the timeline.

Step 3: Slide Clips and Select
In the next step, slide both clips together, so there’s no gap left between them. And then, using your mouse, select both clips, like this:

Make sure that all clips are on the same timeline.
Step 4: Merge Clips
Once you have selected all the clips, right-click anywhere on the selection. And choose the “New Compound” option from the list of options.

Now, rename the clip and hit the “Create” button.

DaVinci Resolve will merge the clips within a blink of an eye, as seen in this screenshot.

You can see that within a few steps, you can easily merge videos using DaVinci Resolve. However, you should know that this software requires a heavy system to work smoothly. And sometimes, the quality and result are not up to the mark.
That is why most video editors prefer Filmora by Wondershare when editing and merging videos. So, let’s see how you can use Filmora to do the same task in the next part.
Part 3: An Easier Way to Merge Clips in Wondershare Filmora
Filmora Video Editor is a powerful tool for video editing. With easy options and an extremely user-friendly interface, the software is nothing less than a boon for newbies, intermediated, and professional-level video editors.
For Win 7 or later (64-bit)
For macOS 10.14 or later
Compared to DaVinci Resolve, Filmora requires fewer tools to combine multiple videos in a single frame. So, without further waiting, let’s learn how to merge clips in Filmora.
Step 1: Download and Open Filmora
Go to Filmora’s official website and download the latest version for your MAC or Windows.

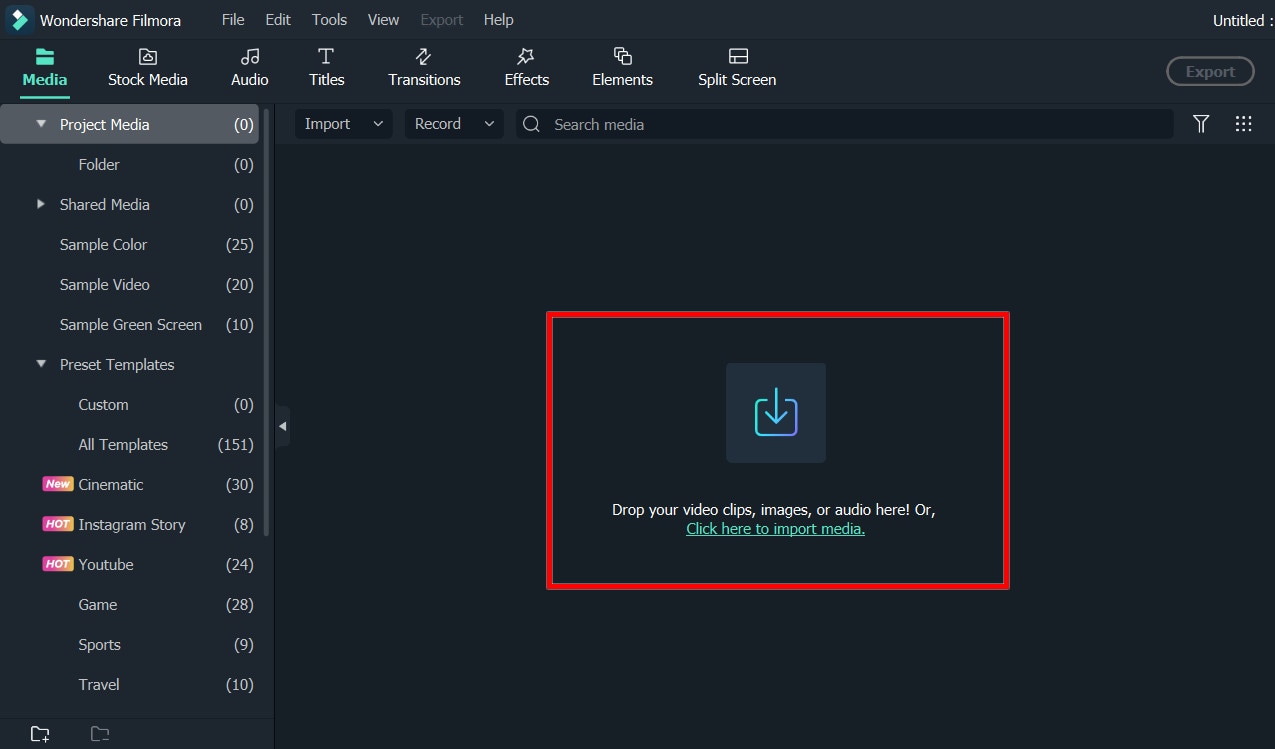
Run the setup and let the system complete the installation. Depending on the version, more or less, the software will look like this as you will open it on your system.

Step 2: Import Your Videos to Merge
Click on the “Import Media Files Here” button to choose the videos you want to merge.

For instance, here, you can see two different video clips on the timeline.

Step 3: Place Videos on the Same Timeline to Merge
First of all, you must plan the order of the clips because it will help you place the video clips correctly.
So, use your mouse and select the clip.
For example, you can see that there are two clips below. The first clip is named “Islands,” and the second clip is called “Beach.”

Then, move the selected clip (“second clip” is selected for demonstration) and place it right next to the first clip.

You must keep in mind that there shouldn’t be any gap between the clips.

Or else the final result will have a “black space” between the clips.

Step 4: Export Your File
When you are done merging clips on the timeline, click on the “Export” button to save the combined video in your system.

You can merge several clips in just four steps without wasting your time looking around for options and losing the video quality.
If you are aware of using the software, you can quickly learn how to merge clips in DaVinci Resolve. Undoubtedly, this video editing tool is helpful for professionals, and that is why new users may find it a bit difficult when using it for the first time. Contrarily, Filmora is a friendly video editor, allowing all kinds of users to merge clips quickly.
FAQs
Q1. Can I merge clips on different timelines in DaVinci Resolve?
To merge two or more clips in DaVinci Resolve, you must place the clips on the same timeline for better results.
Q2. How can I unmerge clips in DaVinci Resolve?
To unmerge clips in DaVinci, right-click on the merged clip and select the “Decompose in Place” option.
Q3. Can I use the same method to merge video clips in DaVinci Resolve 16 and 17?
Yes. You can use the same method to merge clips in any version of DaVinci Resolve.
02 How to Merge Clips in DaVinci Resolve?
03 How to Merge Clips in Wondershare Filmora?
Part 1: About DaVinci Resolve
DaVinci Resolve is a Blackmagic Design’s video editing software. It’s one of the favorite tools of professional video editors. And apart from video editing, the software works great when it comes to color coding, motion graphics, and even audio production.
Although DaVinci Resolve has several excellent video editing tools, it isn’t easy for beginners and intermediate users. Nevertheless, you can expect admirable outcomes if you spend a reasonable amount of time learning this software.
But on the other hand, if merging clips in DaVinci Resolve is what you want to do, you will be glad to know that it has an uncomplicated method. So let’s begin with the step-by-step process on how to merge clips in DaVinci Resolve.
Part 2: How to Merge Clips in DaVinci Resolve
Step 1: Download DaVinci Resolve
To download DaVinci Resolve , go to the official website and click on the “Free Download Now” button if you wish to use it for free.
Contrarily, if you desire to enjoy all the software features, feel free to purchase it by clicking on the “Buy Online Now” button.
Step 2: Import Clips on DaVinci Resolve Timeline
After installing the software on your PC or MAC operating systems, open DaVinci Resolve and import two or more clips on the timeline.
For example, you can see two different video clips on the timeline.
Step 3: Slide Clips and Select
In the next step, slide both clips together, so there’s no gap left between them. And then, using your mouse, select both clips, like this:
Make sure that all clips are on the same timeline.
Step 4: Merge Clips
Once you have selected all the clips, right-click anywhere on the selection. And choose the “New Compound” option from the list of options.
Now, rename the clip and hit the “Create” button.
DaVinci Resolve will merge the clips within a blink of an eye, as seen in this screenshot.
You can see that within a few steps, you can easily merge videos using DaVinci Resolve. However, you should know that this software requires a heavy system to work smoothly. And sometimes, the quality and result are not up to the mark.
That is why most video editors prefer Filmora by Wondershare when editing and merging videos. So, let’s see how you can use Filmora to do the same task in the next part.
Part 3: An Easier Way to Merge Clips in Wondershare Filmora
Filmora Video Editor is a powerful tool for video editing. With easy options and an extremely user-friendly interface, the software is nothing less than a boon for newbies, intermediated, and professional-level video editors.
For Win 7 or later (64-bit)
For macOS 10.14 or later
Compared to DaVinci Resolve, Filmora requires fewer tools to combine multiple videos in a single frame. So, without further waiting, let’s learn how to merge clips in Filmora.
Step 1: Download and Open Filmora
Go to Filmora’s official website and download the latest version for your MAC or Windows.
Run the setup and let the system complete the installation. Depending on the version, more or less, the software will look like this as you will open it on your system.
Step 2: Import Your Videos to Merge
Click on the “Import Media Files Here” button to choose the videos you want to merge.
For instance, here, you can see two different video clips on the timeline.
Step 3: Place Videos on the Same Timeline to Merge
First of all, you must plan the order of the clips because it will help you place the video clips correctly.
So, use your mouse and select the clip.
For example, you can see that there are two clips below. The first clip is named “Islands,” and the second clip is called “Beach.”
Then, move the selected clip (“second clip” is selected for demonstration) and place it right next to the first clip.
You must keep in mind that there shouldn’t be any gap between the clips.
Or else the final result will have a “black space” between the clips.
Step 4: Export Your File
When you are done merging clips on the timeline, click on the “Export” button to save the combined video in your system.
You can merge several clips in just four steps without wasting your time looking around for options and losing the video quality.
If you are aware of using the software, you can quickly learn how to merge clips in DaVinci Resolve. Undoubtedly, this video editing tool is helpful for professionals, and that is why new users may find it a bit difficult when using it for the first time. Contrarily, Filmora is a friendly video editor, allowing all kinds of users to merge clips quickly.
FAQs
Q1. Can I merge clips on different timelines in DaVinci Resolve?
To merge two or more clips in DaVinci Resolve, you must place the clips on the same timeline for better results.
Q2. How can I unmerge clips in DaVinci Resolve?
To unmerge clips in DaVinci, right-click on the merged clip and select the “Decompose in Place” option.
Q3. Can I use the same method to merge video clips in DaVinci Resolve 16 and 17?
Yes. You can use the same method to merge clips in any version of DaVinci Resolve.
VN Editor: A Prominent Option for Adding Luts for Video Editing
We all know we can use LUTs to improve our digital content’s color grading and tone. By applying LUTs, you can achieve various creative effects, from vintage to cinematic styles. These LUTs can be easily accessed and applied through photo and video editing software on your computers. However, with the rise of social media and the growing demand for unique content has increased.
Many websites and online communities offer a wide range of LUTs for users to download and use freely. With this high demand, there are mobile applications that provide LUT functionality. Moreover, one such application for mobile devices is VN Editor. You can search for VN LUTs free download to access many free LUTs on the internet that you can use.
- Part 2: Filter for VN - LUTs Presets: A Great Option for LUT Editing in VN Editor
- Part 3: How to Add LUTs in VN Editor?
Part 1: Best Options in LUTs That You Can Find in VN Editor?
VN Editor is a great application that allows you to add or apply LUTs. With this tool, you can easily import your LUTs and apply them to your digital media. There are many VN LUTs available, both paid and free. Here is a list of some of the best paid and free LUTs that you can use in VN Editor.
1.Cinematic LUT by Alexey_P
Enhance your videos with the Cinematic LUT, giving them a professional and cinematic look. This LUT adds a touch of cinematic magic to your footage by highlighting rich and deep colors. The warm tones create a cinematic atmosphere, transporting your audience into a movie-like world. Furthermore, this is a suitable LUT pack for shooting a short film or a travel vlog.

2.5 Free Vintage LUTs
You can give your viewers a retro feel with this Vintage LUT pack. This LUT pack brings back the nostalgic charm of old photographs and videos. It provides a soft, warm color palette with desaturation tones, giving your videos a vintage look. Moreover, this pack offers five different vintage LUTs, that you can use for your media files. Additionally, you can recreate an old retro look using these LUTs.

3.Food LUTs
Make your food videos and photography look even more appetizing with this pack. These LUTs enhance your food’s colors, making them vibrant and mouthwatering. Moreover, it brings out the natural hues of the ingredients, making them appear fresh. It is an excellent LUT pack, from showcasing culinary creations to sharing recipes or running a food blog.

4. Moody Video LUTs
Moody LUTs is an amazing color preset pack of 15 to create a moody and dramatic atmosphere. You can use this pack to add deep contrasts, shadows, and cool tones to your videos. In addition to this, it creates a sense of mystery and intensity with its color grading. It’s perfect for storytelling, fashion shoots, or adding a touch of drama to your media content.

5. Night Sky Lightroom Presets and LUTs
It is an incredible color preset and LUTs pack to enhance the beauty of the night sky. This pack offers 10 LUTs for free and 25 LUTs in the paid version. It intensifies the greens, blues and adds a subtle glow to your digital media. Additionally, you can transform ordinary nighttime media into breathtaking moments. This pack will beautify your night sky by highlighting the details and enhancing the color tones.

Part 2: Filter for VN - LUTs Presets: A Great Option for LUT Editing in VN Editor
Introducing Filter for VN - LUTs Presets , an exceptional companion app for VN Editor. This companion application is available on Android devices. You can import LUTs directly into your VN Editor for color grading using this app. Furthermore, this app has a collection of over 1000 free LUTs. These LUTs are used as color presets to transform your media in different styles and tones.
Additionally, this app offers different LUTs for the night sky, cinematic look, and more. Similarly, there are many cinematic LUTs for VN video editing that you can use. Moreover, you can use diverse color filters to bring a fresh perspective to your stories. You can apply and use different color filters using this application. In addition to this, it even offers 4K support, ensuring ultra-high-definition and crisp videos.

Part 3: How to Add LUTs in VN Editor?
If you want to apply LUTs for VN Editor, then follow these steps. Following these simple steps, you can easily import, apply, and save LUTs using the VN Editor app.
Step1 Importing LUTs
Install the VN Editor and open the app to select the “+” icon, and a new window will appear. From there, you can choose the “Creation Kits” option to select “Filters.” After selecting the Filters option, go to the “My Filter” section. You will see the “Import Filter” button, which allows you to import your LUT from the desired location.

Step2Applying LUTs and Adjusting Intensity
After selecting your desired LUT, your LUT will be imported into the VN Editor. After that, you can find your desired LUT in the “Filters” section. You can select your LUT and apply it to your media file. Adjust the intensity of the LUT according to your preference.

Step3Saving the File
After making your adjustments, tap the “Save” button. Your file will be saved with the applied LUT and your desired modifications.

Empower your videos with a new mood using different LUTs. Filmora now offers 100+ top-quality 3D LUTs cover a broad range of scenarios. Transform your videos with Filmora’s powerful 3D LUTs.
Apply LUT on Videos Apply LUT on Videos Learn More


Conclusion
In conclusion, LUTs have proven to be incredibly useful tools on computers for color grading. The availability of different LUTs on the internet has expanded the creative possibilities. The high demand for LUTs resulted in the development of excellent mobile apps, such as VN Editor. Many free LUTs for VN Editor are available, each with different styles and tones, including cinematic and more.
Part 1: Best Options in LUTs That You Can Find in VN Editor?
VN Editor is a great application that allows you to add or apply LUTs. With this tool, you can easily import your LUTs and apply them to your digital media. There are many VN LUTs available, both paid and free. Here is a list of some of the best paid and free LUTs that you can use in VN Editor.
1.Cinematic LUT by Alexey_P
Enhance your videos with the Cinematic LUT, giving them a professional and cinematic look. This LUT adds a touch of cinematic magic to your footage by highlighting rich and deep colors. The warm tones create a cinematic atmosphere, transporting your audience into a movie-like world. Furthermore, this is a suitable LUT pack for shooting a short film or a travel vlog.
2.5 Free Vintage LUTs
You can give your viewers a retro feel with this Vintage LUT pack. This LUT pack brings back the nostalgic charm of old photographs and videos. It provides a soft, warm color palette with desaturation tones, giving your videos a vintage look. Moreover, this pack offers five different vintage LUTs, that you can use for your media files. Additionally, you can recreate an old retro look using these LUTs.
3.Food LUTs
Make your food videos and photography look even more appetizing with this pack. These LUTs enhance your food’s colors, making them vibrant and mouthwatering. Moreover, it brings out the natural hues of the ingredients, making them appear fresh. It is an excellent LUT pack, from showcasing culinary creations to sharing recipes or running a food blog.
4. Moody Video LUTs
Moody LUTs is an amazing color preset pack of 15 to create a moody and dramatic atmosphere. You can use this pack to add deep contrasts, shadows, and cool tones to your videos. In addition to this, it creates a sense of mystery and intensity with its color grading. It’s perfect for storytelling, fashion shoots, or adding a touch of drama to your media content.
5. Night Sky Lightroom Presets and LUTs
It is an incredible color preset and LUTs pack to enhance the beauty of the night sky. This pack offers 10 LUTs for free and 25 LUTs in the paid version. It intensifies the greens, blues and adds a subtle glow to your digital media. Additionally, you can transform ordinary nighttime media into breathtaking moments. This pack will beautify your night sky by highlighting the details and enhancing the color tones.
Part 2: Filter for VN - LUTs Presets: A Great Option for LUT Editing in VN Editor
Introducing Filter for VN - LUTs Presets , an exceptional companion app for VN Editor. This companion application is available on Android devices. You can import LUTs directly into your VN Editor for color grading using this app. Furthermore, this app has a collection of over 1000 free LUTs. These LUTs are used as color presets to transform your media in different styles and tones.
Additionally, this app offers different LUTs for the night sky, cinematic look, and more. Similarly, there are many cinematic LUTs for VN video editing that you can use. Moreover, you can use diverse color filters to bring a fresh perspective to your stories. You can apply and use different color filters using this application. In addition to this, it even offers 4K support, ensuring ultra-high-definition and crisp videos.
Part 3: How to Add LUTs in VN Editor?
If you want to apply LUTs for VN Editor, then follow these steps. Following these simple steps, you can easily import, apply, and save LUTs using the VN Editor app.
Step1 Importing LUTs
Install the VN Editor and open the app to select the “+” icon, and a new window will appear. From there, you can choose the “Creation Kits” option to select “Filters.” After selecting the Filters option, go to the “My Filter” section. You will see the “Import Filter” button, which allows you to import your LUT from the desired location.
Step2Applying LUTs and Adjusting Intensity
After selecting your desired LUT, your LUT will be imported into the VN Editor. After that, you can find your desired LUT in the “Filters” section. You can select your LUT and apply it to your media file. Adjust the intensity of the LUT according to your preference.
Step3Saving the File
After making your adjustments, tap the “Save” button. Your file will be saved with the applied LUT and your desired modifications.
Empower your videos with a new mood using different LUTs. Filmora now offers 100+ top-quality 3D LUTs cover a broad range of scenarios. Transform your videos with Filmora’s powerful 3D LUTs.
Apply LUT on Videos Apply LUT on Videos Learn More
Conclusion
In conclusion, LUTs have proven to be incredibly useful tools on computers for color grading. The availability of different LUTs on the internet has expanded the creative possibilities. The high demand for LUTs resulted in the development of excellent mobile apps, such as VN Editor. Many free LUTs for VN Editor are available, each with different styles and tones, including cinematic and more.
How to Use Rule of Thirds in Video
So you have your work flow sorted out and you’re well on your way with Filmora but you’re not quite happy with your results or something just seems off when you watch your videos back. You may be missing an important element of all visual media and that’s composition. This is where the building blocks of every frame come together to make a visually pleasing piece for the viewer and helps the eyes concentrate on the content rather than trying to figure out what they are looking at.
I’m sure you may have heard of the rule of thirds for art or photography and you may not know or understand what it is. You may even be wondering how the rule of thirds can help you with your video creation. Well, that is what I’m going to show and explain to you today.
What is the rule of thirds
At its core the rule of thirds is a guide to follow whenever you create something visual.
You break an image into thirds both horizontally and vertically, in doing this you are left with nine boxes and four gridlines, the rule states that by placing key elements in line with gridlines you will have an overall better composition.
To gain a better understanding of this here is a visual example of the gridlines and nine boxes.

This may seem simple but is often overlooked due to time restraints and eagerness to get that video out there. By following these guidelines your overall composition will gain interesting and pleasing results that can help with viewer engagement. This is only one piece of the puzzle but as any photography professional or artist will tell you, It’s the small things that add up.
How to use the rule of thirds
To show how to use the rule of thirds I will be showing an image with and without the use of the guidelines. In doing this you will be able to see how impactful this system is and how it can help with your own creations within Filmora .
This will be our scene example, you can see buildings, boats, water and skyline. This may be typical of a backdrop or an insert for a holiday picture amongst many other things.
I will now show this picture with no compositional thought and without the use of the thirds system.

Notice how all the elements are in the scene but it just looks interesting and something just seems off when you look at it. You may find yourself searching for understanding of the image rather than taking the image in and concentrating on what the creator intended. This is seen commonly due to the need to fit every element in the scene but sometimes it is best to sacrifice something you may see as important for the sake of the whole picture.
We will now look at the example image with the rule of thirds in place and see if overall this makes a more interesting scene.

We have aligned the skyline with the first horizontal grid line and aligned the boats with the vertical grid lines. We have sacrificed the crane in the scene but overall I’m sure you can agree that this is more pleasing and makes more sense when you’re viewing this. The whole middle section of the scene now has information within it and the contrast between the middle and the rest of the scene directs your eyes to what was intended to be viewed, This is called effect use of empty space. In doing this you save yourself time from adding more information to direct the viewer.
Placing key elements directly in the center of your scene can seem static and boring but by placing elements to one side or using the first and second horizontal grid lines you create something called Dynamism , where the viewer sees an element along the grid and takes a journey through the rest of the image.
Studies have shown that this is the humans natural way of viewing imagery, we first find something interesting to look at and then journey around that. So by using this rule you are creating a more natural process for your viewer.
Tips when starting using the rule of thirds
The first tip I would say is to view other videos, YouTube is a good starting point. Watch interviews and notice where the chairs are aligned. Watch reviewers and notice where they position themselves in the scene. Lastly watch movies and pause on an interesting scene and try to deconstruct where everything is placed and why they chose that composition.
The idea with the rule is to have it become something you do naturally, by always considering the form you save yourself time in the editing process. The key things you have in your mind whenever you make a scene should be.
1. What is the key element in my scene or what am I trying to make the viewer focus on.
2. where do I intend to place these in my scene?
3. Have I created a balanced scene with enough negative space to direct the eye.
If you consider this with every video you make then in time this will become as natural as drinking water on a hot day. As a practice you could open some old projects and apply this rule to your video to see the results and you may find yourself impressed with the change.
When is it best to not use the rule of thirds?
The rule is very useful when you’re aiming to grab the attention towards a certain element but that being said, when you have a symmetrical scene you can get away with not using the rule as your eyes can make sense of symmetry very well.
Even when working with a symmetrical scene you can incorporate the rule within for elements such as people or key figures but in this situation it is down to the creator to figure what they feel is best in any given shot.
How to Use Rule of Thirds in Filmora
The tools provided within Filmora are generous and one great feature is the crop and size tool.
When inserting an image or movie file you can right click on the timeline and select crop and size bringing up a handy screen with the gridlines already there for you. It’s just a matter of aligning your shot for the best composition.
For reference I will show you what this looks like.
First right click the timeline on the image you want to reposition. Alternatively you can select the desired insert and press Alt+C this will also bring up the same editing box.

Now click on the crop and zoom option and this editor will appear.

As you can see you are able to align the shot and change the aspect ratio to align with your project. For a better look at the built in grid lines see image below.

Conclusion
To conclude, the rule of thirds is very important within visual media and is tough within the fundamentals of art and photography from beginner level right up to the highest point of education, Practice thinking about your placement of key elements within your videos and how this affects your overall composition. The goal is to have this as an automatic thought when shooting your videos or still images. This is a small change you can make but has a big impact on how a viewer engages your content and in return leaves a positive opinion towards your creativity and eye for detail.
Free Download For Win 7 or later(64-bit)
Free Download For macOS 10.14 or later
Free Download For macOS 10.14 or later
Tips to Make Cinematic Color Grading
New modern color grading software allows you to do point-and-click color grading right in your browser. Color changes are as easy and intuitive as painting or sketching.
You can choose from many different look presets and movie emulations based on Hollywood movies plus real-time previews of your favorite LUTs with this software.
Part 1. What is Cinematic Color Grading?
The cinematic look is all the rage these days and aims to mimic images captured on real film rather than digitally created. To achieve this effect, film directors use various means from lighting to cinematic color gradation. The latter is a powerful tool for bringing a cool or warm tone to a video and providing smooth color transitions to fall on an image that doesn’t look too real but feels emotional.
This kind of post-production processing, which produces beautiful results when used by color magicians, requires a deep understanding of colors and their effect on our psyche and even physiology. It’s not enough to watch a color grading video and use a LUT to get where you want. You should at the very least have an understanding of:
- Color wheel
- Color quality
- Color harmony and discord
- Warm and cool colors
- Color context
Part 2. Tips to make cinematic color grading
Here are three helpful tips to create cinematic-looking images in DaVinci Resolve.
In my 10-year career as a colorist, I’ve worked on every type of content imaginable: short, long, commercial, educational, episodic—you name it. And while each of these formats requires its approach, the one constant that spans them all is the client’s desire for a cinematic look.
Virtually all of us aspire to more cinematic color, but we often come up short—in part because the term itself has become too broad to effectively target. To focus on the goal, I like to think of “cinematic” as “an image whose key visual properties are consistent with those of printed film.”
The print film was the primary medium through which we consumed cinematic images for the first century of filmmaking and is therefore at the very heart of cinematic aesthetics. In this video, I’ll show you my top three secrets to achieving this aesthetic quickly and consistently in Davinci Resolve.
Tips1: Create Color Density
The first secret to film color is to create color density. Another key aesthetic property of film images is that colors can be either highly saturated or highly luminescent but cannot be both.
We can mimic this visual characteristic by identifying strongly saturated colors in our image and using the Hue vs. Lum to reduce their brightness. This simple technique is especially effective on pure primary colors (red, green, and blue).
Tips2: Separation Beats Saturation
The second secret to film color is prioritizing separation over saturation. When you feel like an image lacks overall color or pop, it’s all too easy to reach for the saturation knob, but that’s not a very cinematic solution.
Instead, try using split toning—pushing cool colors into shadows and warm colors into highlights—to increase tonal separation and add depth to an image. This characteristic is present in virtually every film print and is deeply evocative when applied correctly.
Tips3: Strong Contrast is Your Friend
The third secret of film colors is a strong contrast. This is not always easy, as a higher contrast look inherently requires more precision with exposure placement. Too often we pump up some contrast, end up with an image that looks blown out or too crisp, and then immediately back away from editing.
However, if you stick with high contrast long enough to improve your exposure, you’ll get a very different result and be well on your way to a more cinematic image.
Part 3. How to add color cinematic grading by using Filmora?
New modern color grading software allows you to do point-and-click color grading right in your browser. Color changes are as easy and intuitive as painting or sketching.
You can choose from many different look presets and movie emulations based on Hollywood movies plus real-time previews of your favorite LUTs with this software.
Wondershare Filmora is an option if you want to easily change the colors of your projects. You may just double-click the media after dragging it onto the editing timeline to change the contrast, saturation, brightness, and hue.
Despite its speed, it also allows you to merge, edit audio, divide, rotate, and apply as many cool video effects as you like.
Step1Add the media
After installing Wondershare Filmora, click the New Project and Import button to easily find and load your videos.
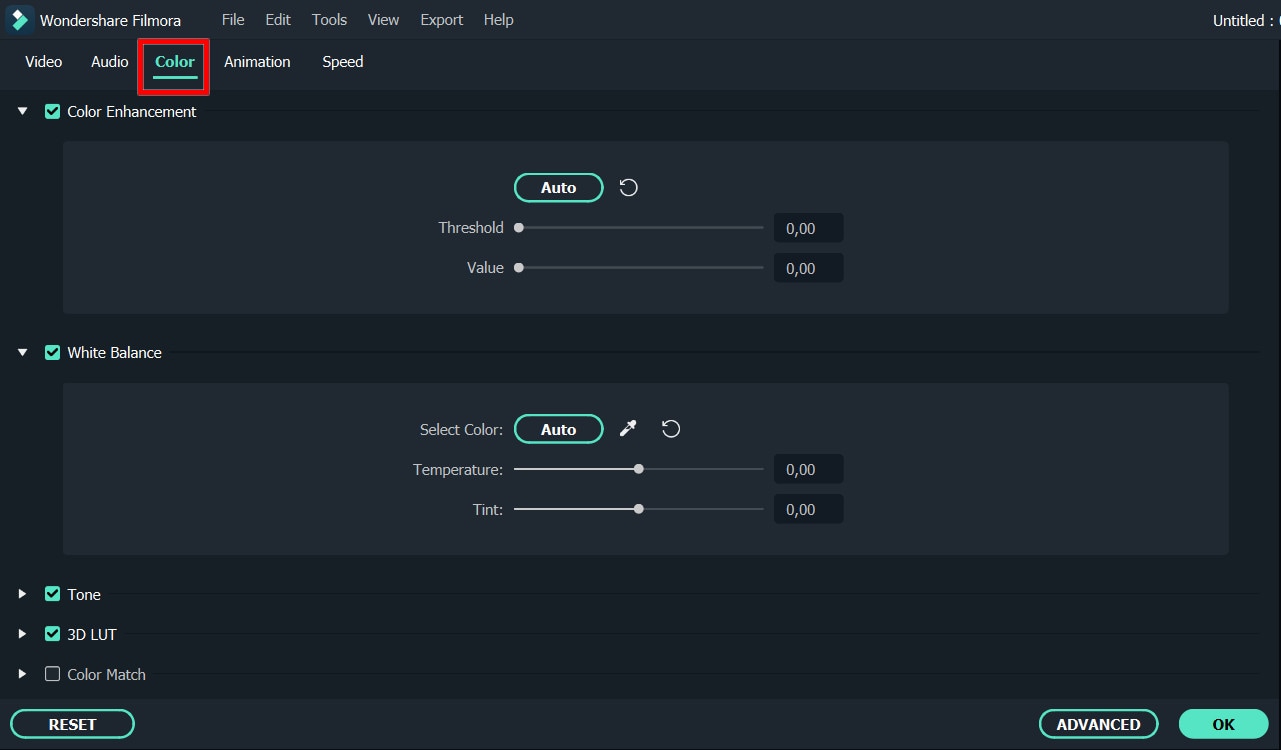
Step2Correct the color [Basic and Advanced]
In the timeline, double-click the video editing window. Select the “Color” panel and make adjustments.
- Contrast: By adjusting this setting, you can control the brightness and color in different parts of the image.
- Saturation: This setting highlights the gray part of the video to a shade. You can adjust it to make the colors of the entire video image appear more saturated or more subdued.
- Brightness: You can change this setting to adjust the overall darkness and lightness of your project.
- Hue: Hue is generally the lightness of a color. Let’s say that when red is saturated with white, it creates a shade of pink.
- 3D LUT: 3D lookup tables provide your media with Hollywood movie color sets like the 007 series, Batman, Harry Porter, etc.
Hover over the indicator to adjust the color correction settings. Then left click on it and move the slider. The corresponding value stabilizes after releasing the mouse button.
With Filmora, you also have access to advanced color correction. Click the Advanced Color Tuning icon to enter the appropriate window where you can fine-tune the color or use preset templates.
The Preferences tab has a variety of templates, including Movie, Normal, 3D LUT, and Vignette. In the Edit tab, you can adjust color temperature, white balance, hue, 3D LUT, color, HSL, light, vignette, etc.
Step3Preview and save the new video
When you are satisfied with your creation, click “Export”. Then click the Settings button and save the new videos in different formats in the Format tab. You can also export the video directly to Vimeo or YouTube or burn it to DVD for better preservation.
Filmora’s color correction tools will make your videos look natural, more attractive, more vibrant, consistent, and professional.
Color Correction Presets
Color correction presets help your video achieve an enhanced cinematic look. Adjust gives you control over fine-tuning the colors in your shots. You can make various adjustments such as color temperature and exposure.
In the “Effects > LUT” tab, you’ll see an extensive selection of preset color settings. These include Vignettes, Movie Looks Like Old Movies, and Cinematic 3D LUT effects such as Harry Potter, Game of Thrones, House of Cards, and Mission Impossible.
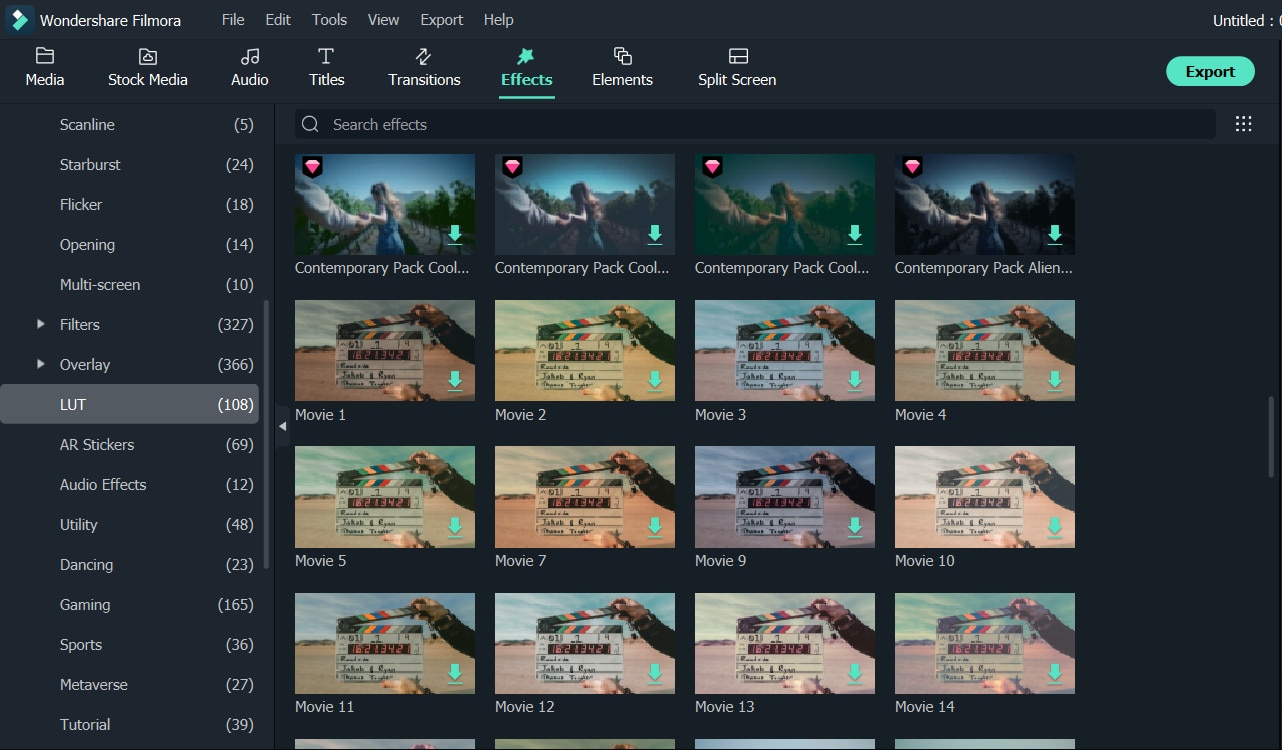
Filmora’s Color Correction Advanced Tool also categorizes your presets. Click on All Presents to see six categories: Favorites, Custom, 3D Lut, Common, Film, and Vignette.
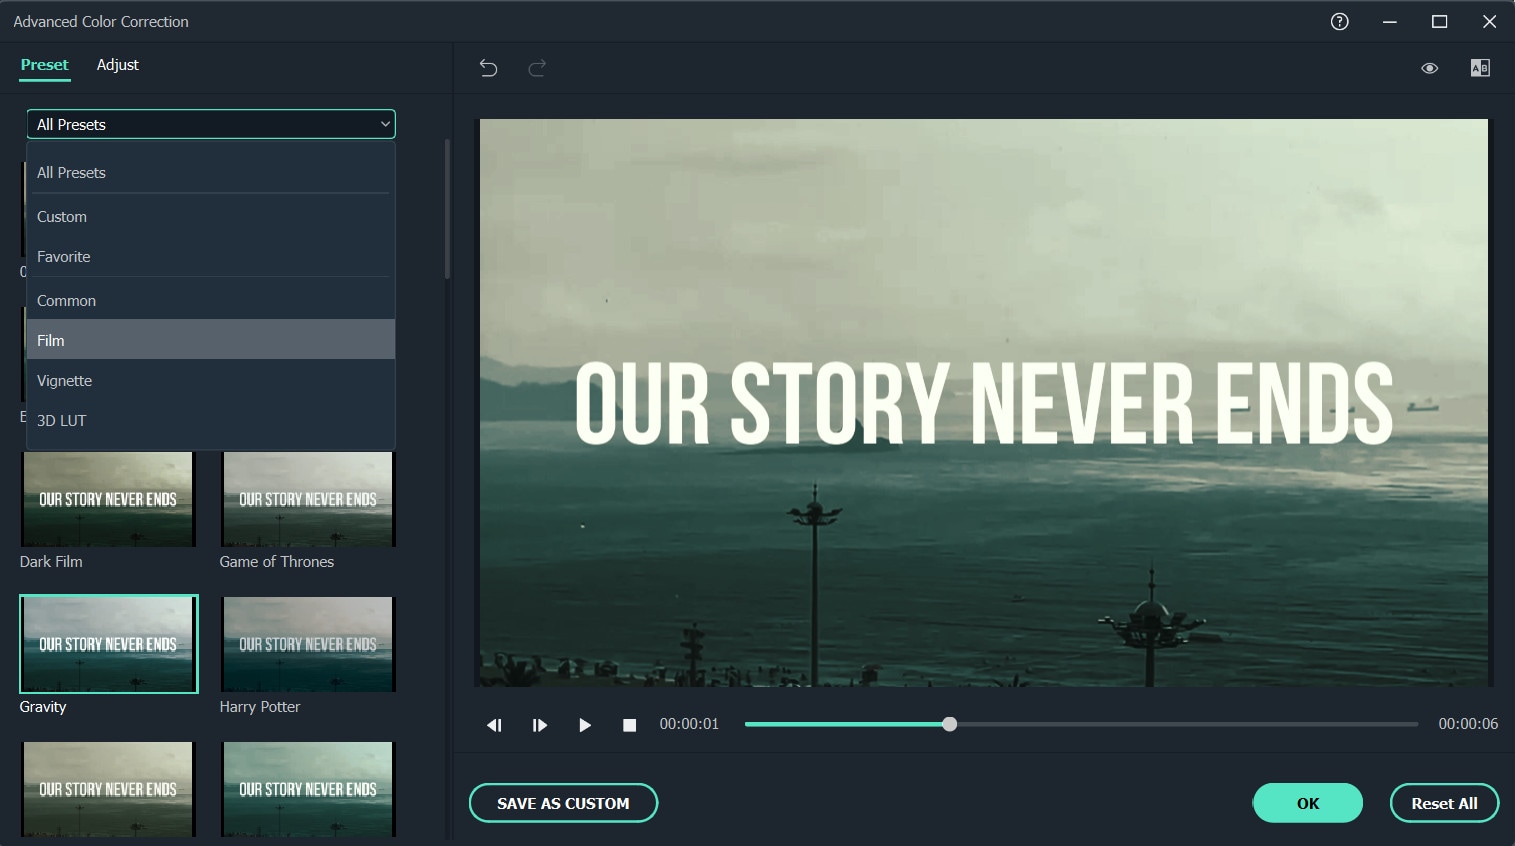
Double-click a preset to apply it to your video. You can see how it looks in the Advanced Color Correction preview window. If you are satisfied with the results, click OK.
Conclusion
Above are the steps to give your video a cinematic look using Wondershare Filmora, hope this helps if you are wondering how to do it. As we can see above, using Filmora video editor will make you more creative in making videos with a suitable emotional tone.
Free Download For Win 7 or later(64-bit)
Free Download For macOS 10.14 or later
Also read:
- Updated Learn the Step-by-Step Process of Slowing Down Time-Lapse Videos on Your iPhone
- Discover a Quick Guide to Add Personalized Video Filters in VN App. Learn How to Use Built-In Filters and Import External Ones for Creative Video Editing
- New In 2024, Take Your Video Editing to the Next Level with Video Scopes
- In 2024, Fun & Easy Masking Tricks Wondershare Filmora Tutorial
- Updated In 2024, Add Stylish Text to Videos
- In This Guidepost, Youll Learn What an HDRI Photo Is and How to Use the Best Free HDRI Program to Edit Photos. Youll Also Know the Difference Between HDR and HDRI
- New Discover Vintage LUTs Premiere Pro Free and Paid Options Available
- Updated 2024 Approved Perfecting the Art of Slowing Down Video on Instagram
- Updated 2024 Approved How to Create OBS Slideshow
- New In 2024, Detailed Guide to Rotate Videos in Blender
- Updated Have a Desire to Uplift Your Editing Creativity with Trying Hands at Working with Storyboards? Keep Reading to Have a Comprehensive Understating of the Workflow Through Stepwise User Guides
- Updated In 2024, 10 Best Meme Text to Speech Tools Windows, Mac, Android, iPhone&Online
- Updated Create Your Slow Zoom TikTok in Minutes for 2024
- 2024 Approved Change Background Color in After Effects
- Updated How to Make GIFs From Videos on Mac
- Updated Want to Loop a Video to Extend Its Duration? You Can Use iMovie to Loop a Video on Your Mac and iPhone and We Will Illustrate How to Loop a Video in iMovie
- New 2024 Approved A Guide to Adding Audio in Wondershare Filmora
- In 2024, How to Create Custom Lower Thirds in Filmora
- Updated How to Create an Aesthetic Slideshow Presentation
- Updated In 2024, | How to Share YouTube Video on Zoom?
- Updated 2024 Approved Best 12 Best Freeze Frame Video Editing Examples
- Updated Why You Should Master Slideshows In Lightroom, Fresh Insight, In 2024
- In 2024, Create Risograph Effect In Photoshop A Beginners Guide
- New Steps to Remove Background Noise From Video Sony Vegas
- Updated 2024 Approved How to Loop a Video on Android
- New Top Online Video Background Changers Transform Your Videos with Ease
- New Add Emoji to Linkedin Post – 5 Tips You Need to Know
- VN Video Editor Templates A Game-Changer for Your Videos
- Find a Solution for Effortless Sky Replacement Photoshop in This Comprehensive Guide. Also, Use the Easiest Video Editing Tool to Make Your Media Stunning for 2024
- 2024 Approved 4 Solutions to Resize a WebM File
- Updated In 2024, | Best 8 Online GIF to APNG Converters
- In 2024, Create Motion Effect with Path Blur In Photoshop
- Updated Learn Topaz Video Enhance AI Review and Achieve Powerful Video Conversion
- New Create Risograph Effect In Photoshop A Beginners Guide
- Updated 2024 Approved Updated 8 Ways to Merge SRT with MP4
- New In 2024, How to Do Perfect Match Paint 100 the Easy Way
- Updated How to Make a Video by Mouse with Filmora
- New How To Add Motion Blur In Davinci Resolve?
- New How to Make a Slideshow GIF?
- New In 2024, Dubbing Videos With Voiceovers | Wondershare Filmora Tutorial
- New 2024 Approved Whatre the Best Alternatives to Pexels?
- Best Ever Ways Make Tiktok Slideshow Solved for 2024
- How To Add Motion Blur On CapCut? (IPhone & Android)
- New 7 Solutions to Cut Video on Mac without Using FFmpeg for 2024
- In 2024, How To Change Realme 12 Pro 5G Lock Screen Clock in Seconds
- How To Transfer Data From iPhone 12 mini To Android devices? | Dr.fone
- Updated The Best 8 Places for High-Quality Royalty Free Gifs (Paid and Free) for 2024
- In 2024, How to Use Pokémon Emerald Master Ball Cheat On Apple iPhone 14 Pro | Dr.fone
- In 2024, 4 solution to get rid of pokemon fail to detect location On Apple iPhone 12 mini | Dr.fone
- How to Find iSpoofer Pro Activation Key On Oppo Reno 11 5G? | Dr.fone
- In 2024, Here are Some Pro Tips for Pokemon Go PvP Battles On Samsung Galaxy F04 | Dr.fone
- How to Upgrade iPhone 8 Plus without Losing Anything? | Dr.fone
- In 2024, Process of Screen Sharing Xiaomi Redmi 13C 5G to PC- Detailed Steps | Dr.fone
- In 2024, Forgot Apple iPhone 14 Pro Backup Password? Heres What to Do | Dr.fone
- 4 Solutions to Fix Unfortunately Your App Has Stopped Error on Nokia C210 | Dr.fone
- My Videos Arent Playing on Nokia C02 – What Can I Do? | Dr.fone
- How to Fix Android App Not Installed Error on Xiaomi 14 Pro Quickly? | Dr.fone
- Hacks to do pokemon go trainer battles For Asus ROG Phone 8 Pro | Dr.fone
- How to recover deleted photos on Meizu
- How to Reset Apple iPhone SE (2022) to Factory Settings? | Dr.fone
- How To Unlock iPhone SE (2020) 3 Ways To Unlock
- How To Transfer Data From Apple iPhone 6s Plus To Other iPhone 13 Pro Max devices? | Dr.fone
- In 2024, Bypassing Google Account With vnROM Bypass For Realme 11 Pro+
- In 2024, How to Change GPS Location on Nokia C12 Plus Easily & Safely | Dr.fone
- How to Fix Android App Not Installed Error on Asus ROG Phone 8 Pro Quickly? | Dr.fone
- In 2024, Which Pokémon can Evolve with a Moon Stone For Vivo X Fold 2? | Dr.fone
- In 2024, How to use Pokemon Go Joystick on Tecno Camon 30 Pro 5G? | Dr.fone
- AddROM Bypass An Android Tool to Unlock FRP Lock Screen For your Tecno Camon 20
- Things You Should Know When Unlocking Total Wireless Of iPhone SE (2022) | Dr.fone
- In 2024, How To Use Special Features - Virtual Location On Honor Magic 5 Pro? | Dr.fone
- In 2024, Most Asked Questions about Pokemon Go Battle League Rewards On Apple iPhone 12 mini | Dr.fone
- In 2024, A Perfect Guide To Remove or Disable Google Smart Lock On Vivo Y100
- In 2024, Apple iPhone 14 Plus Screen Mirroring You Must Know | Dr.fone
- In 2024, 8 Ways to Transfer Photos from Vivo X Fold 2 to iPhone Easily | Dr.fone
- How Do You Get Sun Stone Evolutions in Pokémon For Realme Narzo N53? | Dr.fone
- Title: Learn to Merge Clips in DaVinci Resolve Simple Steps
- Author: Chloe
- Created at : 2024-05-20 03:37:30
- Updated at : 2024-05-21 03:37:30
- Link: https://ai-editing-video.techidaily.com/learn-to-merge-clips-in-davinci-resolve-simple-steps/
- License: This work is licensed under CC BY-NC-SA 4.0.
