:max_bytes(150000):strip_icc():format(webp)/man-attaching-action-camera-to-chest-664655587-5c8c2559c9e77c0001ac184b.jpg)
Looking Into How Slow Mo Guys Have Changed the Dynamics of Slow-Motion

Looking Into How Slow Mo Guys Have Changed the Dynamics of Slow-Motion
All the aspects of our lives are inspired by someone, and we try to follow in their footsteps. Sometimes, it can be a person in your life, an influential personality, or YouTube. When it comes to editing, beginners often try to follow those who have mastered it. In a similar way, you might seek inspiration from social media or websites to create slomos.
One of the greatest inspirations in the realm of slow-motion videos is The Slow Mo Guys . Continue reading this article for a brief review of The Slow Mo Guys. In addition, the article will give you a basic guide on creating slo-mos. You can also learn how to create high-quality slo-mo videos like the Slow Motion Guys.
Slow Motion Video Maker Slow your video’s speed with better control of your keyframes to create unique cinematic effects!
Make A Slow Motion Video Make A Slow Motion Video More Features

Part 1: The Slow Mo Guys: A Real-Life Sensation in Creating Slow Motion Videos
The Slow Mo Guys is a YouTube channel with over 14.8M subscribers and is determined to deliver high-quality content. The channel appeared as a collaboration between Gavin Free and Daniel Gruchy. Both had a history of using high-speed slow-motion cameras and set their channel in 2010. The channel began to gain recognition in 2012 and became a living sensation in the slo-mo world.

In this era, if you are looking for a start to create slomos, Slow Motion Guys come to mind. One of the many things that took the channel to heights is their ability to explain everything. The normal slow-mo speed by most editors is either 120 or 240 fps. However, The Slow Mo Guys shoot videos at 1000 fps, which is ultra-slow motion. The channel usually features natural phenomena, pranks, and relevant content.
Part 2: Want to Make Such Slow-Motion Videos on Your Smartphone? Learn How
The most used and dear gadget to all of us in this era is our smartphones. It has also become a requirement to stay connected, and so we often shoot on them. To retain the video quality, we try to edit it through built-in features. This section highlights creating slow-motion videos using iPhone or Android. Learn to create professional slo-mos like Gave Slow Mo Guys here:
Step-by-Step Guide to Create a Slow Motion in iPhone
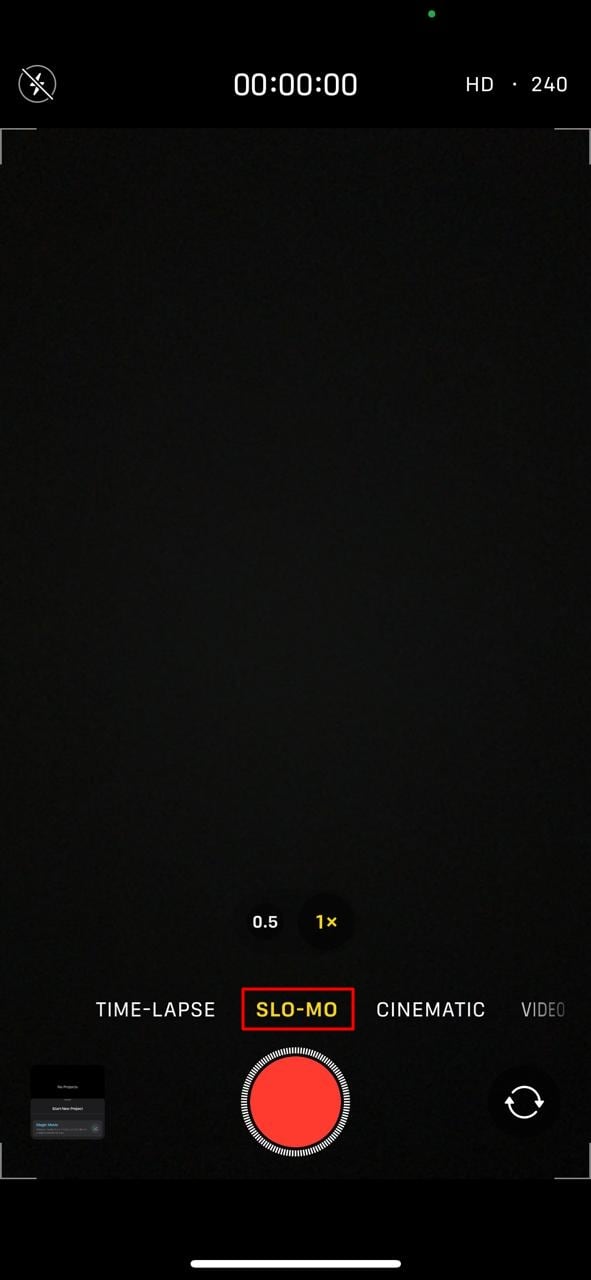
Apple offers a pre-developed feature to create slomos using a simple method. In this section, we will discuss how to shoot a video in slow motion using an iPhone. Follow the lead and create results like The Slow Mo Guys camera:
Instruction: Once you launch the “Camera” application, open the recorder and select “SLO-MO.” Now, redirect to your camera and hit the recorder button to start recording a solo.
Step-by-Step Guide to Creating a Slow Motion in Android
The Android has also introduced a slo-mo feature to record content in slow motion. It helps creators in crafting transitions or aesthetic videos. We have given a detailed procedure for recording a slow-motion video in Android:
Step 1
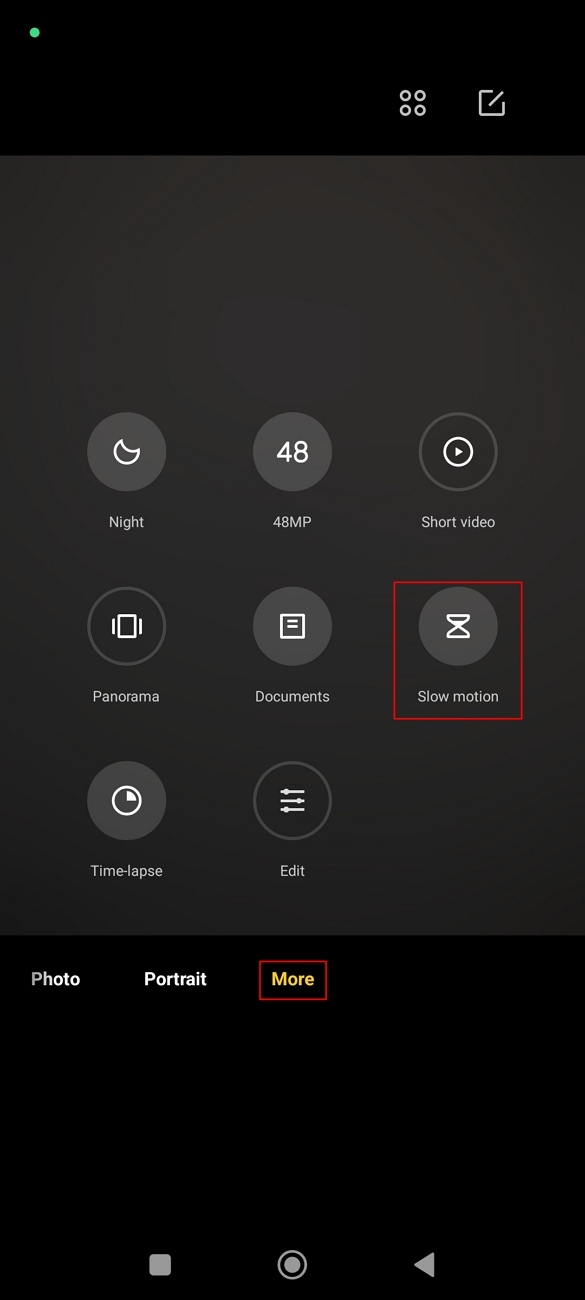
Locate and launch the “Camera” application on your Android. In the bottom bar, you’ll find multiple camera modes and settings. Drag and find the “More” option in this settings bar.
Step 2
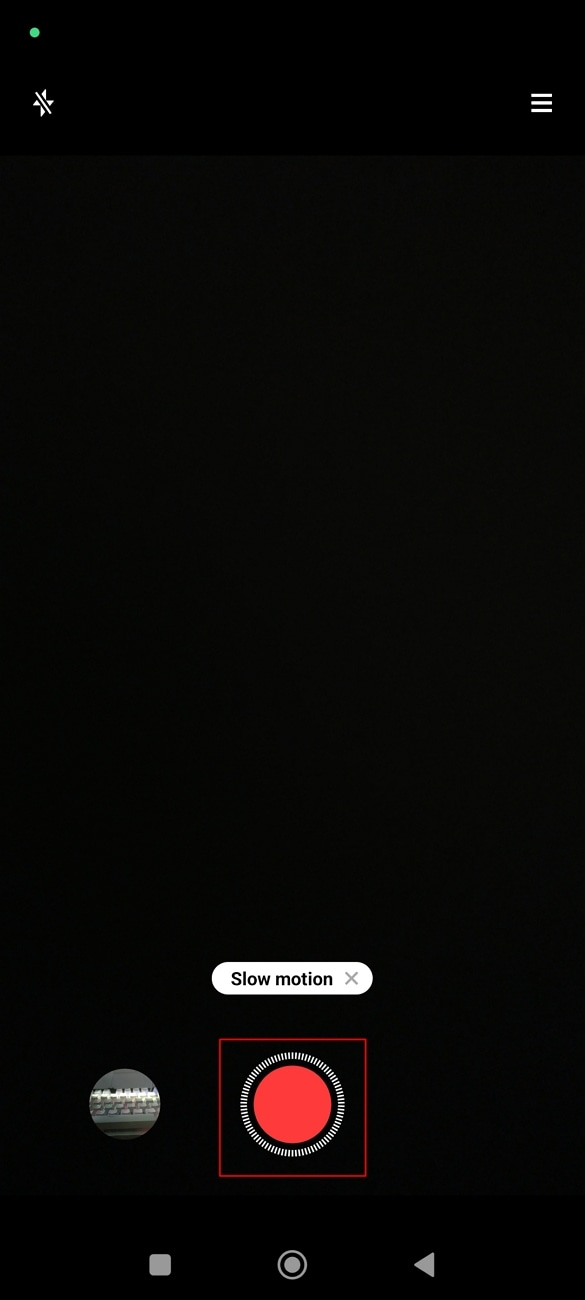
In the appearing menu, locate and select the “Slow motion” option. After setting these preferences, hit the recorder button and record the video. The video will record normally, but when you preview it later, you’ll have a slomo.
Part 3: Slow Motion Video Making and Wondershare Filmora: Make Videos Like Slow Mo Guys
All the above methods of creating slow motion are effective, but there is a drawback. You’ll have to record the complete video in slow motion, and there are no custom options. Wondershare Filmora is a professional video editing software that can resolve this. This software will help you create videos similar to Dan Slow Mo Guys.
In addition, you can infuse your slomo with multiple visual effects, transitions, and more. Filmora displays two features to create a slow-motion video, one of which is Uniform Speed. The other feature is Speed Ramping with pre-assembled slow-motion presets. With its AI-backed technology, you can increase the video frame rate as well.
Free Download For Win 7 or later(64-bit)
Free Download For macOS 10.14 or later
Using Uniform Speed to Create a Slow-Motion Video in Filmora
Uniform Speed is the basic method of creating slow motion in Filmora. It simply modifies the playback speed of video with the help of a slider. The procedure of slomo creation, like The Slow Mo Guys in Filmora, is given below:
Step 1Import Media to Start Slomo Creation
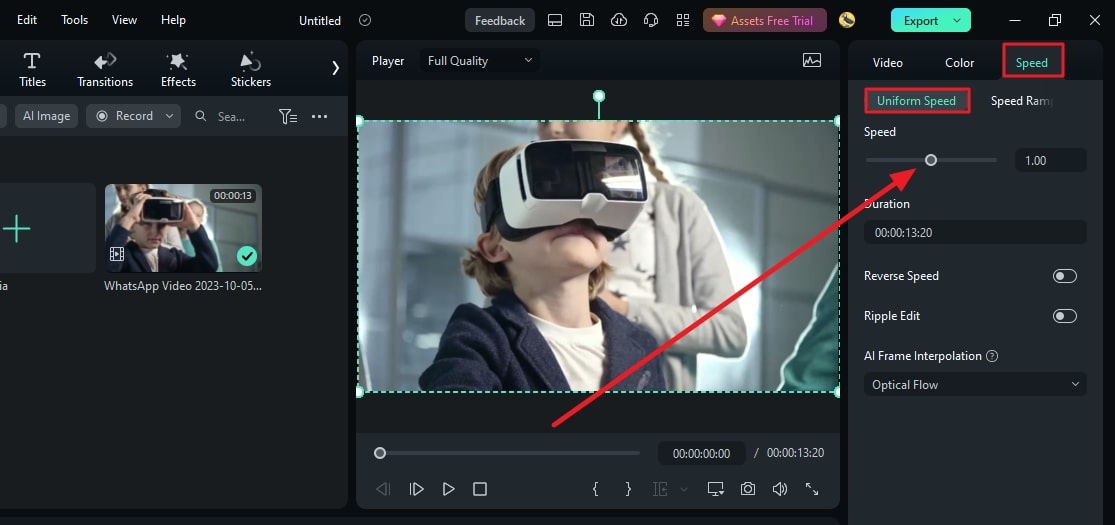
After downloading Filmora on your device, click the “New Project” button to start. From the editing interface, click the “Ctrl + I” keys, choose the video, and bring it to the timeline after import. Select the clip in the timeline and use your cursor to reach the settings panel. Go to the “Uniform Speed” section under the “Speed” tab and change the speed slider settings.
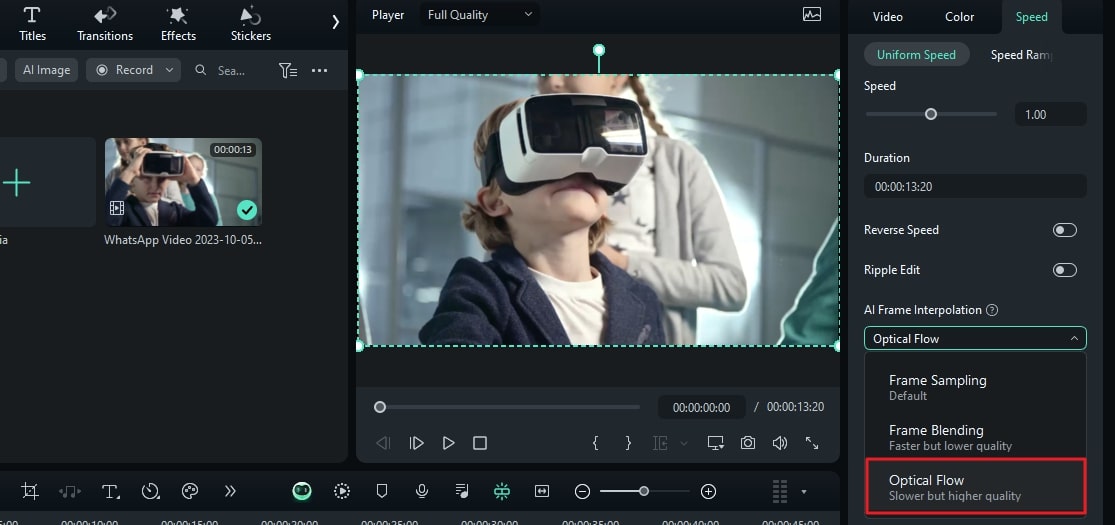
Step 2Start AI Frame Interpolation Settings
This is the AI feature that increases the video frame rate for a smooth, slow-motion effect. You can access this option at the bottom of Uniform Speed settings. Expand it and select the “Optical Flow” option for your purpose.
Step 3Enable Render Preview to See Results
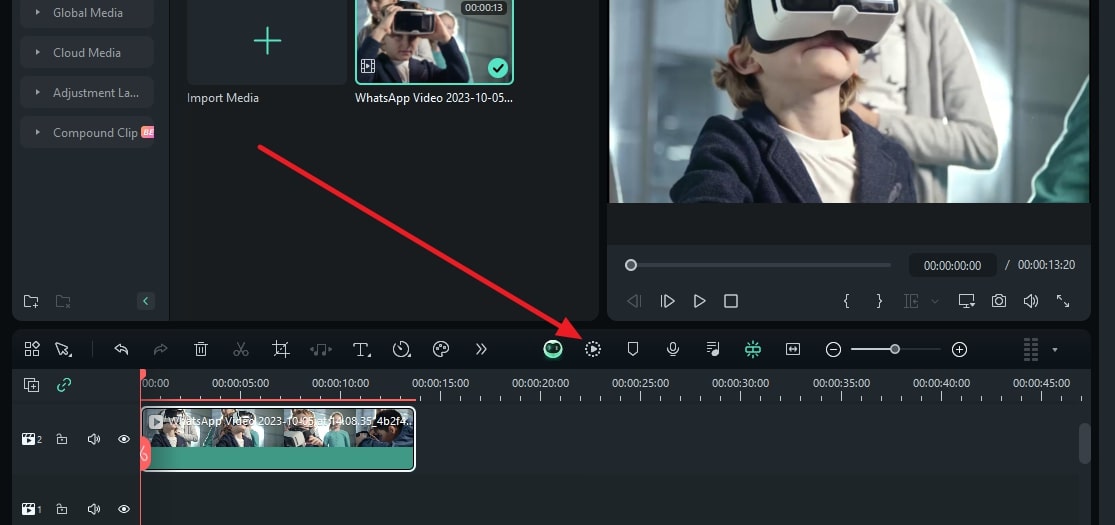
Once all is set and done, navigate towards the timeline panel to select this video again. With the help of your cursor, access the “File” tab at the top toolbar. Select the “Render Preview” option from the expanding menu. After rendering is complete, use the preview screen to observe the slo-mo and export it.
Using Speed Ramping to Create a Slow-Motion Video in Filmora
The second method is also simple, but it has more precise options to create a slow-mo. It uses the velocity graph to rise or decline video speed at certain intervals. Gather the knowledge about how The Slow Mo Guys YouTube creates slow-mo here:
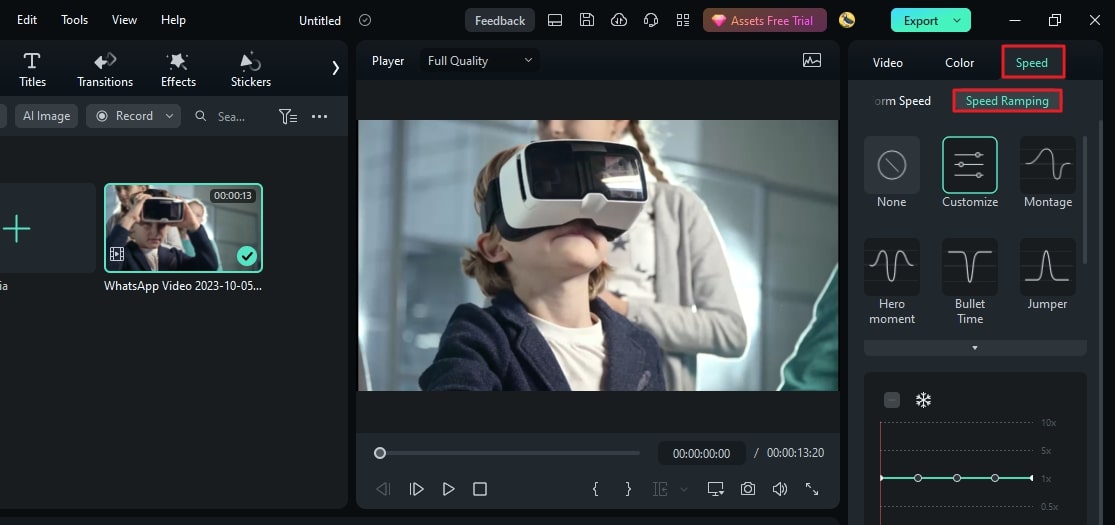
Step 1Access the Speed Ramping Feature
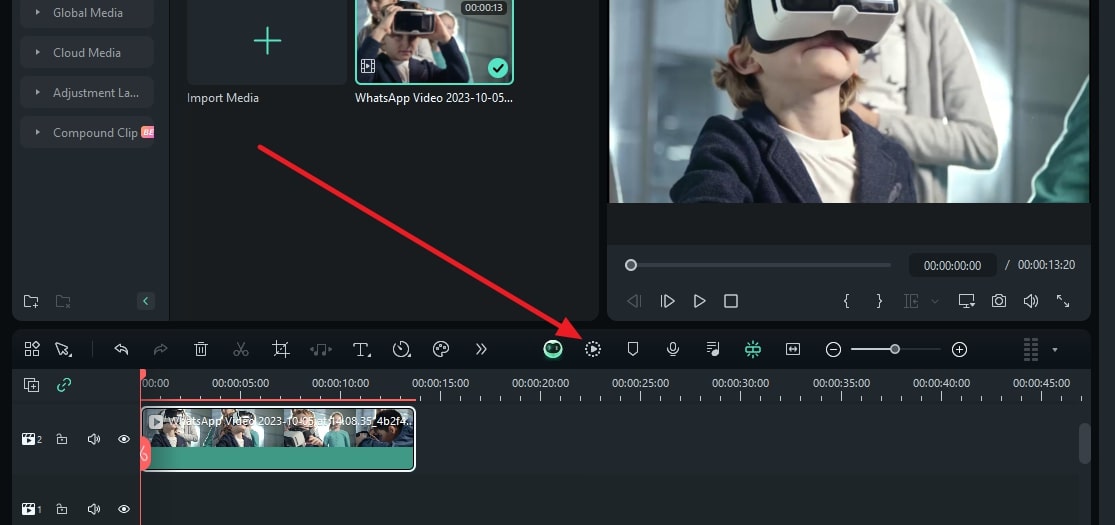
After importing and bringing media to the timeline, select it and reach the settings panel. Access the “Speed” > “Speed Ramping” option to start editing. There, you can find many custom speed presets for automated editing. However, you can also use the “Customize” preset to create from scratch. Then, reach the speed graph and move the slider downward to bring the slo-mo effect.
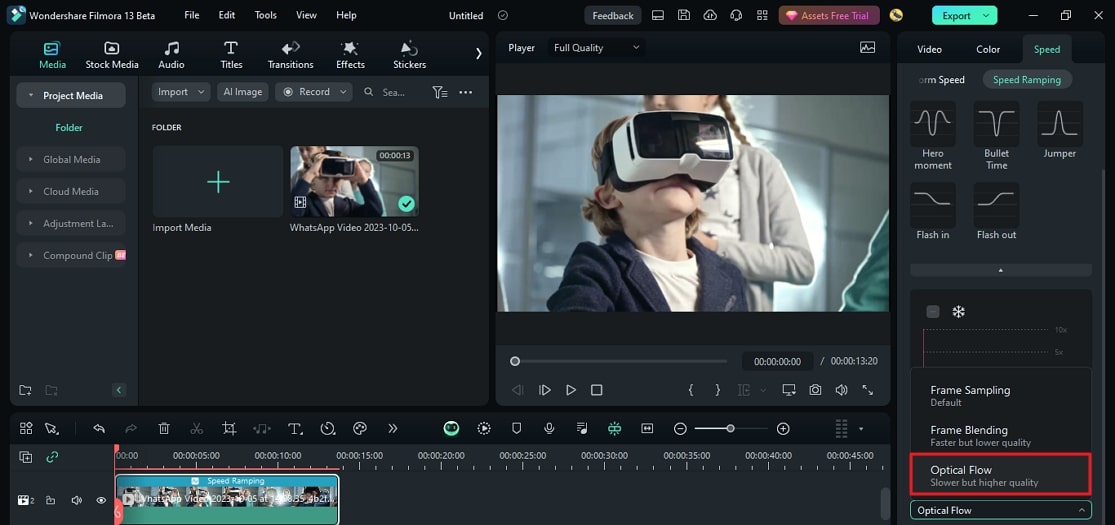
Step 2Enable the Optical Flow Option
Navigate to the bottom of this panel and expand the AI Frame Interpolation menu. Choose the “Optical Flow” option to achieve your desired outcome.
Step 3Activate Render Preview for Confirmed Results
After configuring your settings, return to the timeline panel and reselect the video. From the timeline toolbar, click the “Render Preview” option. Once the rendering process ends, see the preview before exporting.
Conclusion
This article introduced readers to The Slow Mo Guys and their work. If you haven’t heard about them before, you are now familiar with them. You can head over to YouTube to find their channel and see their work. After guiding users on creating slo-mos on Android and iPhone, we introduced Filmora.
It’s a proficient way of creating slo-mo with AI assistance and custom settings. It has recently launched the V13 upgrade, which is full of AI features and editing possibilities. Head over to their official site and download it to edit like The Slow Mo Guys.
Make A Slow Motion Video Make A Slow Motion Video More Features

Part 1: The Slow Mo Guys: A Real-Life Sensation in Creating Slow Motion Videos
The Slow Mo Guys is a YouTube channel with over 14.8M subscribers and is determined to deliver high-quality content. The channel appeared as a collaboration between Gavin Free and Daniel Gruchy. Both had a history of using high-speed slow-motion cameras and set their channel in 2010. The channel began to gain recognition in 2012 and became a living sensation in the slo-mo world.

In this era, if you are looking for a start to create slomos, Slow Motion Guys come to mind. One of the many things that took the channel to heights is their ability to explain everything. The normal slow-mo speed by most editors is either 120 or 240 fps. However, The Slow Mo Guys shoot videos at 1000 fps, which is ultra-slow motion. The channel usually features natural phenomena, pranks, and relevant content.
Part 2: Want to Make Such Slow-Motion Videos on Your Smartphone? Learn How
The most used and dear gadget to all of us in this era is our smartphones. It has also become a requirement to stay connected, and so we often shoot on them. To retain the video quality, we try to edit it through built-in features. This section highlights creating slow-motion videos using iPhone or Android. Learn to create professional slo-mos like Gave Slow Mo Guys here:
Step-by-Step Guide to Create a Slow Motion in iPhone
Apple offers a pre-developed feature to create slomos using a simple method. In this section, we will discuss how to shoot a video in slow motion using an iPhone. Follow the lead and create results like The Slow Mo Guys camera:
Instruction: Once you launch the “Camera” application, open the recorder and select “SLO-MO.” Now, redirect to your camera and hit the recorder button to start recording a solo.

Step-by-Step Guide to Creating a Slow Motion in Android
The Android has also introduced a slo-mo feature to record content in slow motion. It helps creators in crafting transitions or aesthetic videos. We have given a detailed procedure for recording a slow-motion video in Android:
Step 1
Locate and launch the “Camera” application on your Android. In the bottom bar, you’ll find multiple camera modes and settings. Drag and find the “More” option in this settings bar.

Step 2
In the appearing menu, locate and select the “Slow motion” option. After setting these preferences, hit the recorder button and record the video. The video will record normally, but when you preview it later, you’ll have a slomo.

Part 3: Slow Motion Video Making and Wondershare Filmora: Make Videos Like Slow Mo Guys
All the above methods of creating slow motion are effective, but there is a drawback. You’ll have to record the complete video in slow motion, and there are no custom options. Wondershare Filmora is a professional video editing software that can resolve this. This software will help you create videos similar to Dan Slow Mo Guys.
In addition, you can infuse your slomo with multiple visual effects, transitions, and more. Filmora displays two features to create a slow-motion video, one of which is Uniform Speed. The other feature is Speed Ramping with pre-assembled slow-motion presets. With its AI-backed technology, you can increase the video frame rate as well.
Free Download For Win 7 or later(64-bit)
Free Download For macOS 10.14 or later
Using Uniform Speed to Create a Slow-Motion Video in Filmora
Uniform Speed is the basic method of creating slow motion in Filmora. It simply modifies the playback speed of video with the help of a slider. The procedure of slomo creation, like The Slow Mo Guys in Filmora, is given below:
Step 1Import Media to Start Slomo Creation
After downloading Filmora on your device, click the “New Project” button to start. From the editing interface, click the “Ctrl + I” keys, choose the video, and bring it to the timeline after import. Select the clip in the timeline and use your cursor to reach the settings panel. Go to the “Uniform Speed” section under the “Speed” tab and change the speed slider settings.

Step 2Start AI Frame Interpolation Settings
This is the AI feature that increases the video frame rate for a smooth, slow-motion effect. You can access this option at the bottom of Uniform Speed settings. Expand it and select the “Optical Flow” option for your purpose.

Step 3Enable Render Preview to See Results
Once all is set and done, navigate towards the timeline panel to select this video again. With the help of your cursor, access the “File” tab at the top toolbar. Select the “Render Preview” option from the expanding menu. After rendering is complete, use the preview screen to observe the slo-mo and export it.

Using Speed Ramping to Create a Slow-Motion Video in Filmora
The second method is also simple, but it has more precise options to create a slow-mo. It uses the velocity graph to rise or decline video speed at certain intervals. Gather the knowledge about how The Slow Mo Guys YouTube creates slow-mo here:
Step 1Access the Speed Ramping Feature
After importing and bringing media to the timeline, select it and reach the settings panel. Access the “Speed” > “Speed Ramping” option to start editing. There, you can find many custom speed presets for automated editing. However, you can also use the “Customize” preset to create from scratch. Then, reach the speed graph and move the slider downward to bring the slo-mo effect.

Step 2Enable the Optical Flow Option
Navigate to the bottom of this panel and expand the AI Frame Interpolation menu. Choose the “Optical Flow” option to achieve your desired outcome.

Step 3Activate Render Preview for Confirmed Results
After configuring your settings, return to the timeline panel and reselect the video. From the timeline toolbar, click the “Render Preview” option. Once the rendering process ends, see the preview before exporting.

Conclusion
This article introduced readers to The Slow Mo Guys and their work. If you haven’t heard about them before, you are now familiar with them. You can head over to YouTube to find their channel and see their work. After guiding users on creating slo-mos on Android and iPhone, we introduced Filmora.
It’s a proficient way of creating slo-mo with AI assistance and custom settings. It has recently launched the V13 upgrade, which is full of AI features and editing possibilities. Head over to their official site and download it to edit like The Slow Mo Guys.
Learn How to Use and Download KineMaster Templates Like a Pro. Discover Alternative Video Templates to Elevate Your Video Creation
Creating videos has always been challenging, especially with the advent of mobile video editing apps like KineMaster. This app is for professionals and amateur content creators who want to take their videos to the next level. With KineMaster, you can easily edit, enhance and share your videos in no time. One of the best features that KineMaster offers is the ability to use video templates.
This article will guide you through using and downloading KineMaster templates. We will also share some alternative templates that you can use to elevate your video creation. Whether you’re a beginner or an advanced user, this guide will give you all the information you need to create stunning videos with KineMaster. So, let’s get started!

Overview of KineMaster & Its Video Templates
KineMaster is a powerful video editing app that allows users to create professional-looking videos on their mobile devices. It is available on both Android and iOS platforms.
With a wide range of features like multi-layer video, chroma key, and blending modes, KineMaster empowers users to edit their videos with precision and creativity. It is also one of the first mobile video editing apps that supports multiple video layers and audio keyframes.
KineMaster also provides a variety of video templates for different purposes, such as intro, outro, social media posts, and more. These templates are pre-designed and include different elements such as animation, text, and effects.
KineMaster templates provide an easy way for users to create videos with professional looks and styles. Templates are also customizable, so you can add photos, videos, and text to match your brand or style. This feature of KineMaster saves time for users to create the video from scratch and make the editing process much more seamless.
How To Use & Download KineMaster Video Templates?
KineMaster video templates are a great way to quickly create professional-looking videos without starting from scratch. With a wide range of templates to choose from, you can easily find one that suits your needs.
Whether you’re a beginner or an advanced user, these steps will provide you with all the information you need to get the most out of KineMaster’s video templates.
Step 1. Launch the KineMaster app and go to “Video Templates.“

Step 2. Search for a template category you want to use.

Step 3. Choose your template design.

Step 4. Tap the “Mix“ button to download the template.

Step 5. Edit the template to your preference. You can replace the clips with your video.
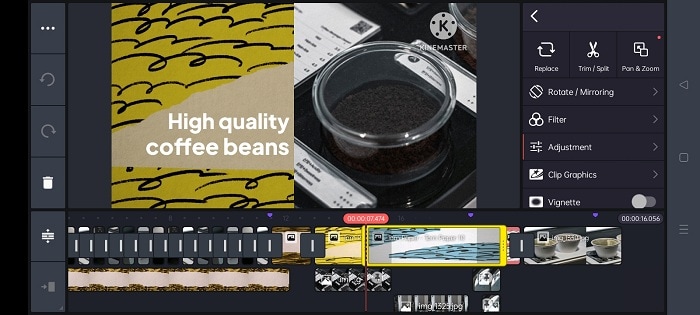
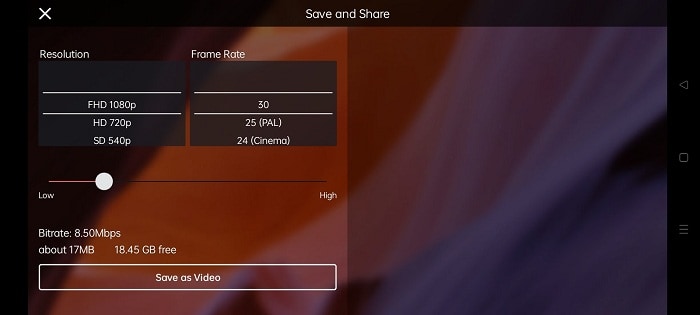
Step 6. Change the resolution of your video and tap the “Save as Video“ button to save your work.
Filmora for Mobile - KineMaster’s Alternative
Filmora for mobile is an alternative video editing app that provides features similar to KineMaster. It is a user-friendly app designed for amateur and professional content creators. The app is available on both Android and iOS platforms. Some of its key features include:
- A wide range of video effects, including filters, overlays, and elements.
- A library of music and sound effects to enhance your videos
- A variety of text and title templates for adding captions and subtitles.
- Multi-layer video editing allows you to add text, stickers, and more to your videos.
- A dedicated social media export feature that allows you to quickly share your videos on different platforms.
- A wide range of resolution and aspect ratio options.
- In-app purchase options for extra features and assets
Video Templates of Filmora - Alternative to KineMaster Template
Just like KineMaster, Filmora also offers a wide range of video templates to help users create professional-looking videos quickly. These templates include different elements such as animations, text, and effects. These templates are pre-designed and customizable, allowing users to add photos, videos, and text to match their brand or style.
Filmora also provides the feature of customizing these templates according to the user’s preference, making them flexible and versatile. The templates are regularly updated with new options and designs to match the latest trends and styles.
How To Use Video Templates of Filmora for Mobile in Video Editing?
This section will show you how to use Filmora’s video templates to enhance your video editing skills. With step-by-step instructions and visual aids, this guide will make it easy for you to use Filmora’s video templates to take your videos to the next level.
Step 1. Install and launch the Filmora app on your device.
Step 2. Tap the “Template“ button on the lower right part of the interface.

Step 3. Choose the template you want to use.
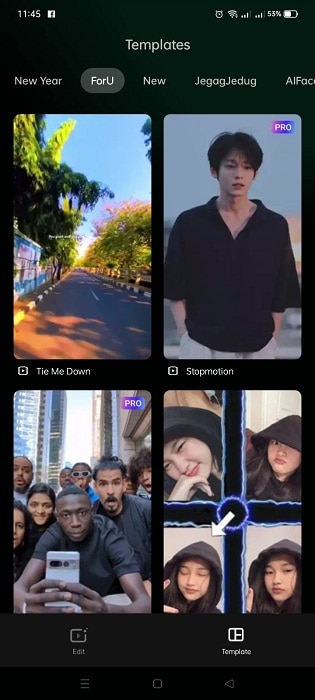
Step 4. Tap the “Make Video“ button to download the template.

Step 5. Add the required number of clips to edit the template, then tap “Next.”

Step 6. You can preview the video and edit it if necessary.
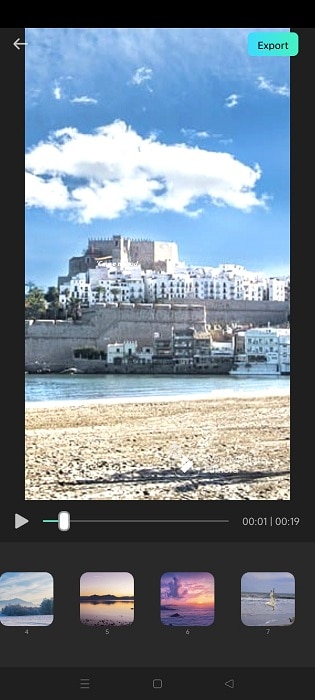
Step 7. Tap the “Export“ button to save your video.

KineMaster vs. Filmora Comparison
KineMaster and Filmora are powerful video editing apps that offer a wide range of features and tools for creating professional-looking videos. In the table below, we will compare the two apps side-by-side, highlighting the similarities and differences between the two. This will help you decide which app best fits your video editing needs.
| KineMaster | Wondershare Filmora | |
|---|---|---|
| Operating System | Android and iOS | Android and iOS |
| App Store Rating | 4.7 out of 5 | 4.7 out of 5 |
| Google Play Store Rating | 4.1 out of 5 | 4.7 out of 5 |
| Pricing | Free and offers In-App PurchasesPremium Subscriptions - $79.99 | Free and offers In-App Purchases |
| Number of Templates | 800+ Templates | 1000+ Templates |
KineMaster is a powerful video editing app available on Android and iOS platforms. It has a rating of 4.7 out of 5 on the App Store and 4.1 out of 5 on the Google Play Store. The app is free to download and use but offers in-app purchases for additional features and assets. Users can also opt for a premium subscription, priced at $79.99 per year.
One of the key features of KineMaster is its templates. These templates are suitable for various purposes, like intros, outros, social media posts, etc. It offers more than 1000 templates, giving the user more options.
KineMaster is an ideal app for amateur and professional content creators who want to take their videos to the next level. This app is great for YouTubers, Social media influencers, and small businesses looking to create engaging video content.
Filmora is another alternative video editing app available on Android and iOS platforms. It has a 4.7 out of 5 on both the App Store and the Google Play Store. Like KineMaster, Filmora is free to download and use, but it also offers in-app purchases for additional features and assets.
Filmora’s key feature is also its templates. It offers a wide range of pre-designed video templates, including animations, text, and effects. Users can customize these templates by adding photos, videos, and text to match their brand or style. It also offers more than 1000 templates, making it a great choice for users looking for various options.
Filmora is an ideal app for both amateur and professional content creators. Its user-friendly interface makes it perfect for beginners new to video editing, while its powerful features make it suitable for advanced users.
People Also Ask
Whether you’re a beginner or an advanced user, this section will provide the answers you need to make an informed decision.
Q1. Does KineMaster Have Watermarks?
KineMaster does have a watermark feature for the free version of the app. When you edit a video using the app’s free version, it will add a KineMaster watermark to the bottom-right corner of your video. However, you can remove this watermark by purchasing the full version of the app or by subscribing to the KineMaster Premium.
Q2. Is KineMaster Copyright Free?
KineMaster is not a copyright-free app, but it allows you to use copyright-free music and other media within the app. KineMaster has a library of royalty-free music and sound effects that you can use in your videos without fearing copyright infringement. However, you are responsible for ensuring that all media you use within the app is not protected by copyright.
Q3. Can KineMaster Videos Be Monetized on YouTube?
Yes, KineMaster videos can be monetized on YouTube. As long as your videos adhere to YouTube’s community guidelines and terms of service, you can monetize them on the platform.
Conclusion
KineMaster and Filmora are both powerful and versatile video editing apps that are great options for anyone looking to create professional-looking videos quickly and easily. Both apps offer a wide range of features, including templates, and are available on Android and iOS platforms.
Ultimately, the best app for you will depend on your specific needs and preferences. Consider factors such as pricing, features, and the number of templates when making your decision. Both apps are great choices, but Filmora may be more suitable for beginners.
How to Remove Motion Blur In Photoshop
The motion blur effect is created in photos when the picture is taken in poor light conditions or due to a fast-moving object. Moreover, if the shutter speed of the camera is too low, it will also produce a motion blur effect. In such a situation, the captured picture may look out of focus and tedious. In order to fix this issue, this article can help you.
By reading this article, you can learn how to remove motion blur in Photoshop with simple steps. Moreover, we will also provide the best alternatives to Photoshop that you can utilize to remove motion blur from your photos.
Part 1: How to Remove the Motion Blur in Photoshop?
To fix a motion blur in an image, you would require a professional tool such as Adobe Photoshop . Photoshop is a well-recognized tool comprising tons of features for image editing and graphic designing. It offers selection tools that enable you to choose the specific parts of a photo efficiently. You can also add layers to your photo to modify and edit specific areas of the image.
You can also apply appealing filters from this platform to transform an ordinary image drastically. Moreover, using this precise tool, you can also fix motion blur in Photoshop. You can choose the blurry areas of your photo through its selection tools. Thus, with a few clicks, you can eliminate the flaws from your image easily.
Steps to Fix Motion Blur in Photos Using Photoshop
If you are new to Photoshop and don’t know how to fix motion blur in photos, then follow the instructions described below:
Step1 Open the Photoshop tool on your PC or Mac and upload your photo. From the “Layers” section, press “Ctrl + J” or “Command + J” to copy the first layer. Afterward, convert the first layer by choosing the option “Smart Object.”

Step2 Now head to the “Filter” section and tap on “Sharpen” to proceed. Afterward, proceed with the option of “Shake Reduction” by clicking on it. Now Photoshop will automatically reduce the blur effect. From the displayed panel, uncheck the option called “Artifact Suppression.”

Step3 To continue, open the “Advanced” tab from the left panel and enhance the size of your rectangular. Manage the position of the rectangle according to your preference. By doing so, you can see the details of the image clearly.

Step4 From the left panel, manage the options like “Blur Trace Bounds” and “Smoothing” according to your desire. Once done, press the “OK” button. For adding more modifications, add a blank layer and choose the “Clone Stamp Tool.” Afterward, select “Soft Round Brush” from the general brushes.

Step5 Now adjust the Opacity to 100% and Flow to 50%. Moreover, select “Current & Below” as the sample. Press the Alt key to take a sample of any flawless part of your photo and apply it to the blurry area. Make sure that the color of the sample taken is the same as the blurry area in the photo.

Part 2: Remove the Motion Blur with an Alternative to Photoshop
It may be possible that you don’t get satisfactory results from Photoshop removing motion blur. Or, if you find the interface of Photoshop intimidating, it can affect your productivity. For your assistance, this section will bring you the best alternatives to Photoshop.
1. IMAGamigo
IMAGamigo is an online tool that allows you to perform different operations on pictures efficiently. To fix motion blur, it offers a Deblurrer feature. Using this feature, you can automatically remove blur from your photos without any external effort. It also provides other distinct features such as Background Remover, Restorer, Colorizer, Upscale, etc.
To use this tool, first, navigate to its official website. From its tools, select “Deblurrer” to proceed. A new window will open on your screen instantly. Scroll down a little bit and locate the area saying, “Drop Image Here.” Click on this area and upload your image. Afterward, the tool will automatically start analyzing the picture. Once the process gets finished, click on the Download button to save your photo.

2. Vance.AI
This online platform is also a well-trusted tool by professionals and content creators. It provides AI-supported tools such as AI Image Denoiser, AI Image Upscaler, AI Photo Enhancer, etc. You can use its AI Image Sharpener to eliminate motion blur from pictures. It supports all popular image file formats, such as JPEG, PNG, and JPG. Thus, without any installations, you can quickly utilize this tool to fix motion blur photos.
To use this tool, access the official webpage of Vance.AI and select the “AI Image Sharpener” feature. Once done, click on the “Upload Image” option and import your blurry photo. Afterward, a new window will be open from which you can adjust the settings. Select the “Sharpen” option and choose the preferred Sharpen Mode. Afterward, click on the “Start to Process” option. Once the process ends, you can download the picture with a single click.

3. AKVIS Refocus AI
AKVIS is an offline tool that produces high-end results at a fast processing speed. You can find multiple options in this tool, such as Airbrush, Retoucher, Sketch, Decorator, etc. When it comes to fixing blurry pictures, this tool provides an exclusive feature called “Refocus AI.” Through this feature, you can instantly increase the sharpness of your photo. Also, it offers different modes such as Motion Blur, Radial Blur, Refocus-AI, and Tilt-Shift.
To fix motion blur:
Step1 Launch this tool and navigate to its Refocus AI option.
Step2 Select Refocus AI as your mode and upload the blurry picture. The default preset will be AKVIS Default AI.
Step3 Disable the “Image Sharpening” feature and navigate to the “Motion Deblur AI” section.
Step4 From there, adjust your Focus accordingly.
Step5 For more enhancements, enable the Image Sharpening feature and adjust the parameters.

Bonus Tip – How to Add Motion Blur to Your Images?
Do you want to add motion blur to your images? Many people like to intentionally add a motion blur effect in their images to add an artistic element. If you are interested in doing so, the best desktop tool you can try is Wondershare Filmora . This tool offers trending and high-quality effects that you can easily apply to your images.
Free Download For Win 7 or later(64-bit)
Free Download For macOS 10.14 or later
To add a motion blur effect:
Step1 Launch Filmora and create a new project.
Step2 Import your photo on this tool and drop it into the timeline.
Step3 Split the clip where you want to add the blur effect.
Once done, go to the Effects tab and search “Blur.” By doing so, you would be able to check all the blur effects on your screen. Choose and apply the blur effect to the split part of your clip. Once done, hit the Export button.

Conclusion
Photoshop is an excellent tool to edit and modify your pictures in great quality. You can use this article to take guidance to remove motion blur from photos. However, if you are not getting desired results from Photoshop, we have also provided the best alternatives to Photoshop to remove motion blur. Moreover, to create a motion blur effect in your images, you can explore the Wondershare Filmora tool.
Part 1: How to Remove the Motion Blur in Photoshop?
To fix a motion blur in an image, you would require a professional tool such as Adobe Photoshop . Photoshop is a well-recognized tool comprising tons of features for image editing and graphic designing. It offers selection tools that enable you to choose the specific parts of a photo efficiently. You can also add layers to your photo to modify and edit specific areas of the image.
You can also apply appealing filters from this platform to transform an ordinary image drastically. Moreover, using this precise tool, you can also fix motion blur in Photoshop. You can choose the blurry areas of your photo through its selection tools. Thus, with a few clicks, you can eliminate the flaws from your image easily.
Steps to Fix Motion Blur in Photos Using Photoshop
If you are new to Photoshop and don’t know how to fix motion blur in photos, then follow the instructions described below:
Step1 Open the Photoshop tool on your PC or Mac and upload your photo. From the “Layers” section, press “Ctrl + J” or “Command + J” to copy the first layer. Afterward, convert the first layer by choosing the option “Smart Object.”

Step2 Now head to the “Filter” section and tap on “Sharpen” to proceed. Afterward, proceed with the option of “Shake Reduction” by clicking on it. Now Photoshop will automatically reduce the blur effect. From the displayed panel, uncheck the option called “Artifact Suppression.”

Step3 To continue, open the “Advanced” tab from the left panel and enhance the size of your rectangular. Manage the position of the rectangle according to your preference. By doing so, you can see the details of the image clearly.

Step4 From the left panel, manage the options like “Blur Trace Bounds” and “Smoothing” according to your desire. Once done, press the “OK” button. For adding more modifications, add a blank layer and choose the “Clone Stamp Tool.” Afterward, select “Soft Round Brush” from the general brushes.

Step5 Now adjust the Opacity to 100% and Flow to 50%. Moreover, select “Current & Below” as the sample. Press the Alt key to take a sample of any flawless part of your photo and apply it to the blurry area. Make sure that the color of the sample taken is the same as the blurry area in the photo.

Part 2: Remove the Motion Blur with an Alternative to Photoshop
It may be possible that you don’t get satisfactory results from Photoshop removing motion blur. Or, if you find the interface of Photoshop intimidating, it can affect your productivity. For your assistance, this section will bring you the best alternatives to Photoshop.
1. IMAGamigo
IMAGamigo is an online tool that allows you to perform different operations on pictures efficiently. To fix motion blur, it offers a Deblurrer feature. Using this feature, you can automatically remove blur from your photos without any external effort. It also provides other distinct features such as Background Remover, Restorer, Colorizer, Upscale, etc.
To use this tool, first, navigate to its official website. From its tools, select “Deblurrer” to proceed. A new window will open on your screen instantly. Scroll down a little bit and locate the area saying, “Drop Image Here.” Click on this area and upload your image. Afterward, the tool will automatically start analyzing the picture. Once the process gets finished, click on the Download button to save your photo.

2. Vance.AI
This online platform is also a well-trusted tool by professionals and content creators. It provides AI-supported tools such as AI Image Denoiser, AI Image Upscaler, AI Photo Enhancer, etc. You can use its AI Image Sharpener to eliminate motion blur from pictures. It supports all popular image file formats, such as JPEG, PNG, and JPG. Thus, without any installations, you can quickly utilize this tool to fix motion blur photos.
To use this tool, access the official webpage of Vance.AI and select the “AI Image Sharpener” feature. Once done, click on the “Upload Image” option and import your blurry photo. Afterward, a new window will be open from which you can adjust the settings. Select the “Sharpen” option and choose the preferred Sharpen Mode. Afterward, click on the “Start to Process” option. Once the process ends, you can download the picture with a single click.

3. AKVIS Refocus AI
AKVIS is an offline tool that produces high-end results at a fast processing speed. You can find multiple options in this tool, such as Airbrush, Retoucher, Sketch, Decorator, etc. When it comes to fixing blurry pictures, this tool provides an exclusive feature called “Refocus AI.” Through this feature, you can instantly increase the sharpness of your photo. Also, it offers different modes such as Motion Blur, Radial Blur, Refocus-AI, and Tilt-Shift.
To fix motion blur:
Step1 Launch this tool and navigate to its Refocus AI option.
Step2 Select Refocus AI as your mode and upload the blurry picture. The default preset will be AKVIS Default AI.
Step3 Disable the “Image Sharpening” feature and navigate to the “Motion Deblur AI” section.
Step4 From there, adjust your Focus accordingly.
Step5 For more enhancements, enable the Image Sharpening feature and adjust the parameters.

Bonus Tip – How to Add Motion Blur to Your Images?
Do you want to add motion blur to your images? Many people like to intentionally add a motion blur effect in their images to add an artistic element. If you are interested in doing so, the best desktop tool you can try is Wondershare Filmora . This tool offers trending and high-quality effects that you can easily apply to your images.
Free Download For Win 7 or later(64-bit)
Free Download For macOS 10.14 or later
To add a motion blur effect:
Step1 Launch Filmora and create a new project.
Step2 Import your photo on this tool and drop it into the timeline.
Step3 Split the clip where you want to add the blur effect.
Once done, go to the Effects tab and search “Blur.” By doing so, you would be able to check all the blur effects on your screen. Choose and apply the blur effect to the split part of your clip. Once done, hit the Export button.

Conclusion
Photoshop is an excellent tool to edit and modify your pictures in great quality. You can use this article to take guidance to remove motion blur from photos. However, if you are not getting desired results from Photoshop, we have also provided the best alternatives to Photoshop to remove motion blur. Moreover, to create a motion blur effect in your images, you can explore the Wondershare Filmora tool.
20 Best LUTs for Music Videos
Have you ever wondered how music videos look so good and professional? One of the secrets lies in using LUTs, or Lookup Tables. With LUTs, music videos can match the song’s mood and create a unique atmosphere for each track. Every music video has a different color grading, which helps convey the song’s emotions and feelings.
Furthermore, using LUTs, music video creators can apply a consistent color grading to their videos. And the best part? You can also use music video LUTs to make your videos look more cinematic and professional, regardless of your level of expertise.
Part 1: What Should One Know About LUTs?
LUTs are “Lookup Tables,” which are small files containing color grading presets. In video editing or color-grading software, you can apply them to images or videos. Moreover, you can use LUTs for music video color grading, but first, learn more about LUTs.
Lookup Tables are often used in the film and video industry to give footage a particular look or feel. For instance, a vintage or retro LUT creates a more old-style feel with warmth and muddiness. They can help ensure that footage has a consistent color grading throughout a project. Moreover, they map the original footage’s colors to new ones based on a predetermined color grading preset.
It makes applying a specific look to footage easy without manually adjusting individual colors or settings. There are different types of LUTs, like basic LUTs for overall color and contrast adjustments. Additionally, there are creative LUTs for specific looks and technical LUTs to correct color or exposure issues. You can create LUTs using software or purchase them from online marketplaces.
Empower your videos with a new mood using different LUTs. Filmora now offers 100+ top-quality 3D LUTs cover a broad range of scenarios. Transform your videos with Filmora’s powerful 3D LUTs.
Apply LUT on Videos Apply LUT on Videos Learn More

Part 2: Best Cinematic LUTs for Music Videos in 2024
Music enthusiasts who kept themselves busy from recording to video editing, LUTs are for you. You can download paid or free music video LUTs to give your videos a cinematic feel. For this purpose, here are some of the best cinematic LUTs for music videos you can download.
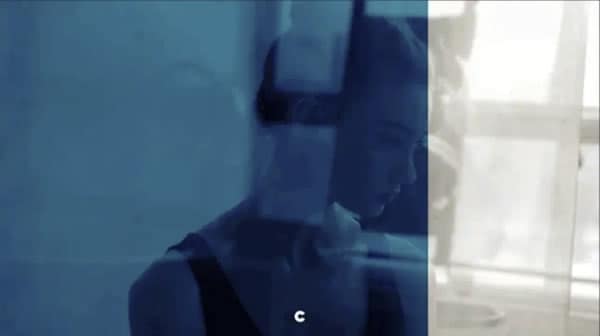
1. Blue Tone Cinematic LUTs
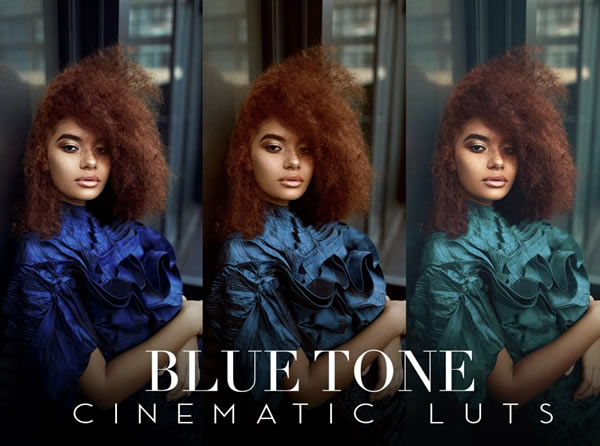
Blue Tone Cinematic LUTs is an excellent option to give your music video a dramatic and moody look. This LUT pack adds a blue hue to your footage and enhances the shadows, giving your video a more cinematic feel. It has five cinematic-style LUTs that you can use for your videos. Use it for music videos with a sad theme or to convey a sense of mystery.
2. CINEMATIC LUTS: VINTAGE
Another perfect for creating a vintage look for your music video is Cinematic LUTs: Vintage. This pack has 12 fantastic old-style 60s cinematic LUTs. It gives your footage a warm and nostalgic feel with its sepia tone and soft contrast. You can use it for music videos with a retro vibe or to create a feeling of nostalgia and longing. Furthermore, it creates a desaturated warm tone to give an old cinematic feel.

3. Cinematic Color LUTs
Cinematic Color LUTs is yet another great choice to give your music video a vibrant and energetic look. It adds a punchy and rich color to your footage, making it perfect for music videos with a lively beat. This LUT pack has 16 LUTs, giving you more saturated and brighter colors for your media. Similarly, you can use these LUTs to bring out the energy and excitement in your music.
4. Cinema LUTs Sci-Fi
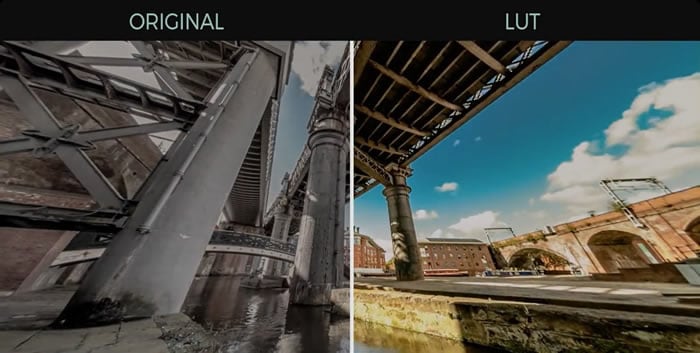
If you want to give your music video a futuristic color tone, then Cinema LUTs Sci-Fi is a great option. This pack has 20 LUTs with different opacity. Using these LUTs, you can create a cinematic look with a modern and futuristic feel. It gives your footage a high-contrast look with cool blue tones. It creates a perfect ambiance for music videos with a sci-fi or futuristic theme.

5. Cinematic DJI D-Log and Standard LUTs
Lastly, Cinematic DJI D-Log and Standard LUTs is a versatile LUT pack. You can use this pack for a variety of music video themes. It gives your footage a warm and cozy feel with its soft and natural colors. Similarly, you can use it for music videos focusing on emotions and feelings like love, friendship, or family. It’s perfect for creating a warm and intimate atmosphere.

6. VIBRANT HUE VIDEO LUTS | PIXMELLOW
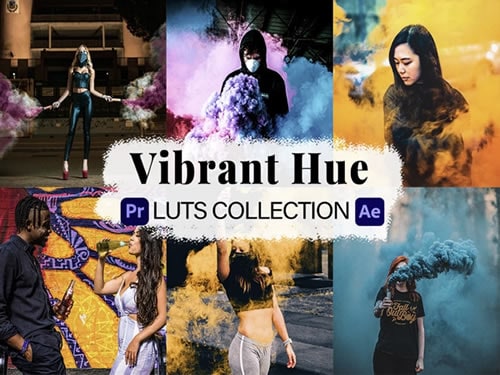
Vibrant Hue LUT pack is a pack of 15 that increases the vibrancy of colors in music videos. Moreover, it is a perfect pack for making music videos look more captivating and livelier. With this LUT, your music video will come to life with intensified reds, blues, and greens. Furthermore, using this pack, you will be able to add a burst of energy to every frame.
7. Vintage Faded
If you’re looking to add a nostalgic and timeless feel to your music video, this is the perfect pack. This LUT pack creates a vintage aesthetic for your music footage. Additionally, it gives your footage a warm and slightly desaturated look. With a touch of softness and subtle color shifts, it enhances the overall atmosphere of your video. Moreover, this pack gives you 10 old-style LUTs for music videos.

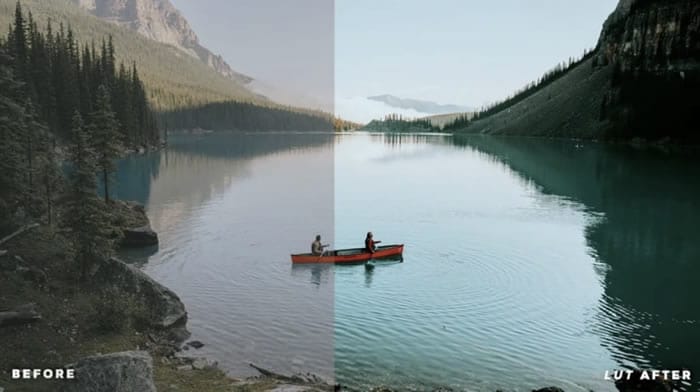
8. MOODY LUTS
For music videos that aim to create an air of mystery and intrigue, Moody LUTs is the ideal companion. This pack adds depth and shadows, creating a moody ambiance in your music video. It highlights contrasting tones and shadows, allowing for dramatic lighting effects. Furthermore, this is a pack of over 50 .cube LUTs, perfect for giving a moody look to your music videos.
9. Soft and Dreamy LUTs
If you want your music video to be soft and dreamlike, this pack is the way to go. This pack lets your music video bathes in pastel tones. Moreover, the colors appear gentle and delicate, creating a feeling of calmness. Besides this, you’ll get 11 dreamy LUTs with a soft touch of colors. Furthermore, using this pack, you can give your music video a soft and dreamlike feel.

10. +CINE MONOCHROME LUTS
The +Cine monochrome LUTs pack is the best bet for a bold and striking visual statement. It turns your music video into a monochromatic masterpiece. In addition, this pack uses shades of a single color to give your music footage a more artistic feel. Additionally, the using hue of a single tone will create a bold and modern cinematic look. You can add different monochromatic shades with this LUT pack.
11. 20 Clean and Crisp Lightroom Presets & LUTs
Clean and Crisp is a music video LUT pack that gives your video a polished and pristine look. Moreover, this pack enhances the clarity and sharpness of your footage. Furthermore, it brightens colors to make every detail stand out. Additionally, adding a touch of brightness to the colors will make your music videos appear vivid and well-defined.

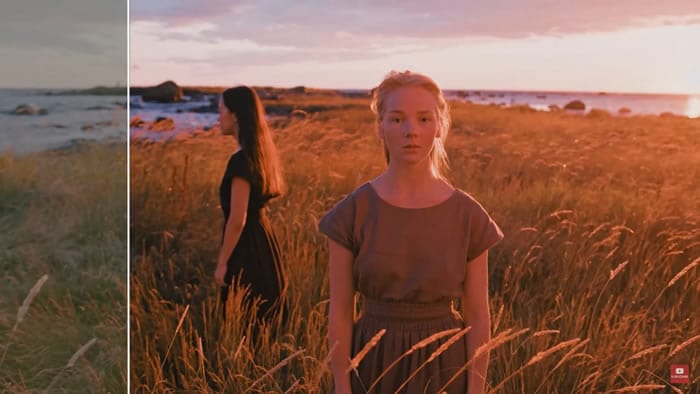
12. CL-Sunset
CL-Sunset is a fantastic choice for music videos that embrace the warmth and beauty of a sunset. This LUT adds a golden glow to your footage. Furthermore, it highlights the magical yellow hues that appear during twilight. Moreover, it enhances the oranges, yellows, and reds, creating a warm and inviting atmosphere. With this 32 LUTs pack, your music video will shine like the rays of the sun.
13. Neon City LUTs
Neon City LUTs is a pack that captures the essence of vibrant nightlife with its color grading. This pack of 25 LUTs intensifies the neon colors, making your videos appear electrifying. It adds a futuristic flair to your video, enhancing the blues, pinks, and purples. Furthermore, your music video will transport viewers to a neon-lit world filled with excitement and energy.

14. FCPX LUT Nature
It is a great pack for music videos that embrace the beauty of nature and the great outdoors. PCPX LUT Nature has over 60 landscape LUTs that you can use. Additionally, it enhances the natural colors, saturating the greens, blues, and browns. Moreover, by highlighting certain hues in your video, this pack creates a vibrant and earthy look. It brings out the richness of landscapes and the textures of natural elements.

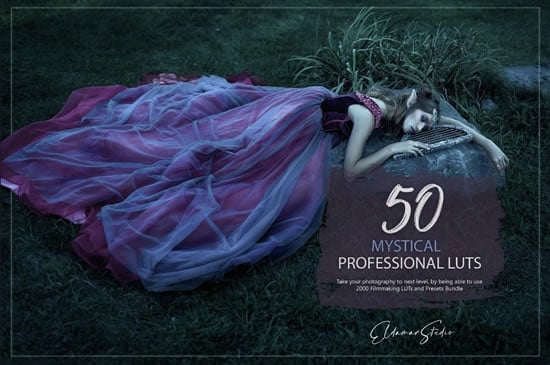
15. 50 Mystical LUTs and Presets Pack
If you want to transport your viewers to a realm of fantasy and enchantment, it is the right pack. Mystical LUT pack offers more than 50 LUTS. Moreover, it adds a touch of magic to your footage, creating a fantasy work like color grading. It introduces subtle color shifts, creating a magical palette of purples, blues, and pinks. Furthermore, using this pack, your music video will unfold like a fairy tale.
16. 100 Contrast LUTs
For music videos that demand a bold and dynamic visual style, this contrast LUT pack is a perfect choice. This high-contrast LUT pack has over 100 LUTs, each with its own uniqueness. Furthermore, it enhances the contrast between lights and darks to create an impactful look. It highlights the blacks and whites to give your music video depth and dimension.

17. 6 SOFT PASTEL LUTS
If you’re aiming for a gentle and soothing visual tone in your music video, this pack is the ideal option. This LUT saturates your footage with soft pastel colors, which creates a dreamy atmosphere. It enhances pinks, lavenders, and light blues and creates a romantic look. Moreover, your music video will have a soft and inviting feel when using any of the 6 LUTs.

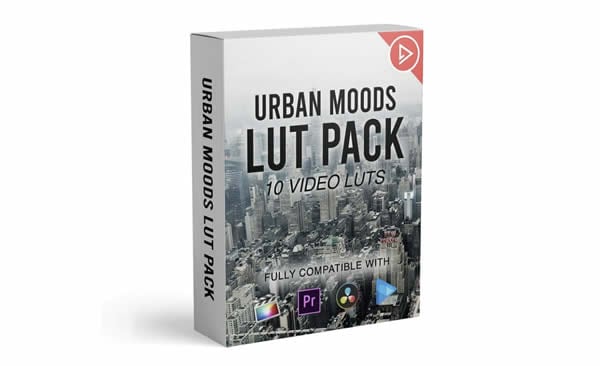
18. Urban Moods LUT Pack
Urban Moods LUT pack is for music videos that embrace the raw and gritty essence of urban environments. This pack adds a touch of desaturation and a hint of coolness to give your footage a raw urban look. It enhances the grays, blues, and muted tones to create a city-life feel. Additionally, your music video will give a faded urban vibe. It is one of the best packs of LUTs for music videos.
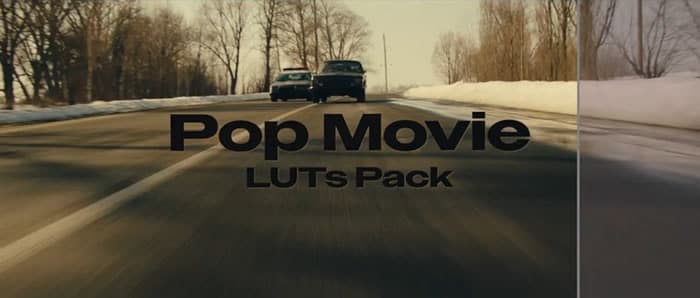
19. Pop Movie Look LUTs
Pop Movie Look is the perfect pack to infuse your music video with a vibrant and playful visual style. This LUT enhances the primary colors and introduces bold and vivid tones. Furthermore, it adds a touch of saturation and contrast, creating a visually striking and energetic look. Moreover, you can create a 90s pop music color tone for your video.
20. OLD SCHOOL MOBILE & DESKTOP VIDEO LUTS | PIXMELLOW
It is a pack of LUTs for music videos that draw inspiration from retro aesthetics and a laid-back vibe. This pack creates a vintage and nostalgic look, adding warmth and a hint of sepia tones to your footage. Furthermore, this pack has 18 high-quality LUTs to create a retro look for your music videos. Moreover, you can impress your viewers with your music video color grading.

Part 3: Wondershare Filmora: An Exquisite Video Editor for Using LUTs
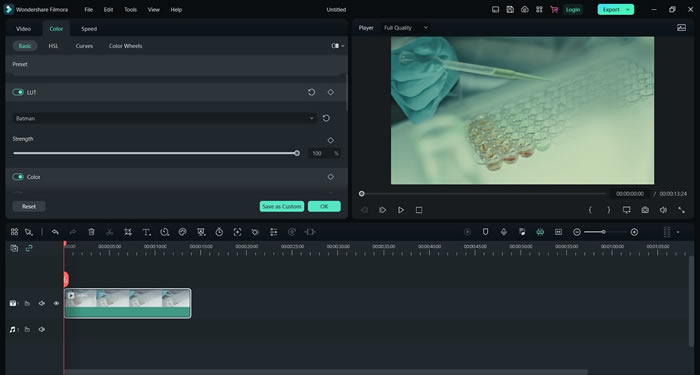
Wondershare Filmora is the right choice for you to make your music video edits stand out from others. You can create an amazing music video with its perfect blend of color adjustments, effects, and filters. Filmora has over 200+ LUTs that can help you achieve the feel and mood you want for your music video. You can apply some of the best LUTs for music videos to your footage to add a professional touch.
Add LUTs on Video For Win 7 or later(64-bit)
Add LUTs on Video For macOS 10.14 or later
Additionally, with its unique transitions, you can take your video to the next level and give it a more creative feel. You can even change the speed of your video at any point to add more visual interest. Furthermore, Filmora has an AI denoiser that removes distortion and background noises. It ensures that the music video has a crisp and clear sound.
Key Features of Wondershare Filmora
- With Wondershare Filmora, you can save your music videos in up to 4K resolution. You can save your videos with an ultra-high resolution with more sharpness and details.
- Filmora also gives you access to over 10 billion free stock media resources that you can use. It makes it easy to find the perfect media file for your video.
- Furthermore, this tool has an audio visualizer that automatically matches the sound of your video. You can choose from over 25 different audio visualizers using this tool.
Conclusion
To conclude, it’s always welcoming to try a new project from scratch and then wait to see it become successful. Music is a passion; you need talent and some tools to take this passion to a new level. If you’re a passionate musician doing all the work from recording to editing, try to use some professional tools. Use LUTs for music videos and create professional-looking music videos for the world to see.
Add LUTs on Video For Win 7 or later(64-bit)
Add LUTs on Video For macOS 10.14 or later
Apply LUT on Videos Apply LUT on Videos Learn More

Part 2: Best Cinematic LUTs for Music Videos in 2024
Music enthusiasts who kept themselves busy from recording to video editing, LUTs are for you. You can download paid or free music video LUTs to give your videos a cinematic feel. For this purpose, here are some of the best cinematic LUTs for music videos you can download.
1. Blue Tone Cinematic LUTs
Blue Tone Cinematic LUTs is an excellent option to give your music video a dramatic and moody look. This LUT pack adds a blue hue to your footage and enhances the shadows, giving your video a more cinematic feel. It has five cinematic-style LUTs that you can use for your videos. Use it for music videos with a sad theme or to convey a sense of mystery.

2. CINEMATIC LUTS: VINTAGE
Another perfect for creating a vintage look for your music video is Cinematic LUTs: Vintage. This pack has 12 fantastic old-style 60s cinematic LUTs. It gives your footage a warm and nostalgic feel with its sepia tone and soft contrast. You can use it for music videos with a retro vibe or to create a feeling of nostalgia and longing. Furthermore, it creates a desaturated warm tone to give an old cinematic feel.

3. Cinematic Color LUTs
Cinematic Color LUTs is yet another great choice to give your music video a vibrant and energetic look. It adds a punchy and rich color to your footage, making it perfect for music videos with a lively beat. This LUT pack has 16 LUTs, giving you more saturated and brighter colors for your media. Similarly, you can use these LUTs to bring out the energy and excitement in your music.

4. Cinema LUTs Sci-Fi
If you want to give your music video a futuristic color tone, then Cinema LUTs Sci-Fi is a great option. This pack has 20 LUTs with different opacity. Using these LUTs, you can create a cinematic look with a modern and futuristic feel. It gives your footage a high-contrast look with cool blue tones. It creates a perfect ambiance for music videos with a sci-fi or futuristic theme.

5. Cinematic DJI D-Log and Standard LUTs
Lastly, Cinematic DJI D-Log and Standard LUTs is a versatile LUT pack. You can use this pack for a variety of music video themes. It gives your footage a warm and cozy feel with its soft and natural colors. Similarly, you can use it for music videos focusing on emotions and feelings like love, friendship, or family. It’s perfect for creating a warm and intimate atmosphere.

6. VIBRANT HUE VIDEO LUTS | PIXMELLOW
Vibrant Hue LUT pack is a pack of 15 that increases the vibrancy of colors in music videos. Moreover, it is a perfect pack for making music videos look more captivating and livelier. With this LUT, your music video will come to life with intensified reds, blues, and greens. Furthermore, using this pack, you will be able to add a burst of energy to every frame.

7. Vintage Faded
If you’re looking to add a nostalgic and timeless feel to your music video, this is the perfect pack. This LUT pack creates a vintage aesthetic for your music footage. Additionally, it gives your footage a warm and slightly desaturated look. With a touch of softness and subtle color shifts, it enhances the overall atmosphere of your video. Moreover, this pack gives you 10 old-style LUTs for music videos.

8. MOODY LUTS
For music videos that aim to create an air of mystery and intrigue, Moody LUTs is the ideal companion. This pack adds depth and shadows, creating a moody ambiance in your music video. It highlights contrasting tones and shadows, allowing for dramatic lighting effects. Furthermore, this is a pack of over 50 .cube LUTs, perfect for giving a moody look to your music videos.

9. Soft and Dreamy LUTs
If you want your music video to be soft and dreamlike, this pack is the way to go. This pack lets your music video bathes in pastel tones. Moreover, the colors appear gentle and delicate, creating a feeling of calmness. Besides this, you’ll get 11 dreamy LUTs with a soft touch of colors. Furthermore, using this pack, you can give your music video a soft and dreamlike feel.

10. +CINE MONOCHROME LUTS
The +Cine monochrome LUTs pack is the best bet for a bold and striking visual statement. It turns your music video into a monochromatic masterpiece. In addition, this pack uses shades of a single color to give your music footage a more artistic feel. Additionally, the using hue of a single tone will create a bold and modern cinematic look. You can add different monochromatic shades with this LUT pack.

11. 20 Clean and Crisp Lightroom Presets & LUTs
Clean and Crisp is a music video LUT pack that gives your video a polished and pristine look. Moreover, this pack enhances the clarity and sharpness of your footage. Furthermore, it brightens colors to make every detail stand out. Additionally, adding a touch of brightness to the colors will make your music videos appear vivid and well-defined.

12. CL-Sunset
CL-Sunset is a fantastic choice for music videos that embrace the warmth and beauty of a sunset. This LUT adds a golden glow to your footage. Furthermore, it highlights the magical yellow hues that appear during twilight. Moreover, it enhances the oranges, yellows, and reds, creating a warm and inviting atmosphere. With this 32 LUTs pack, your music video will shine like the rays of the sun.

13. Neon City LUTs
Neon City LUTs is a pack that captures the essence of vibrant nightlife with its color grading. This pack of 25 LUTs intensifies the neon colors, making your videos appear electrifying. It adds a futuristic flair to your video, enhancing the blues, pinks, and purples. Furthermore, your music video will transport viewers to a neon-lit world filled with excitement and energy.

14. FCPX LUT Nature
It is a great pack for music videos that embrace the beauty of nature and the great outdoors. PCPX LUT Nature has over 60 landscape LUTs that you can use. Additionally, it enhances the natural colors, saturating the greens, blues, and browns. Moreover, by highlighting certain hues in your video, this pack creates a vibrant and earthy look. It brings out the richness of landscapes and the textures of natural elements.

15. 50 Mystical LUTs and Presets Pack
If you want to transport your viewers to a realm of fantasy and enchantment, it is the right pack. Mystical LUT pack offers more than 50 LUTS. Moreover, it adds a touch of magic to your footage, creating a fantasy work like color grading. It introduces subtle color shifts, creating a magical palette of purples, blues, and pinks. Furthermore, using this pack, your music video will unfold like a fairy tale.

16. 100 Contrast LUTs
For music videos that demand a bold and dynamic visual style, this contrast LUT pack is a perfect choice. This high-contrast LUT pack has over 100 LUTs, each with its own uniqueness. Furthermore, it enhances the contrast between lights and darks to create an impactful look. It highlights the blacks and whites to give your music video depth and dimension.

17. 6 SOFT PASTEL LUTS
If you’re aiming for a gentle and soothing visual tone in your music video, this pack is the ideal option. This LUT saturates your footage with soft pastel colors, which creates a dreamy atmosphere. It enhances pinks, lavenders, and light blues and creates a romantic look. Moreover, your music video will have a soft and inviting feel when using any of the 6 LUTs.

18. Urban Moods LUT Pack
Urban Moods LUT pack is for music videos that embrace the raw and gritty essence of urban environments. This pack adds a touch of desaturation and a hint of coolness to give your footage a raw urban look. It enhances the grays, blues, and muted tones to create a city-life feel. Additionally, your music video will give a faded urban vibe. It is one of the best packs of LUTs for music videos.

19. Pop Movie Look LUTs
Pop Movie Look is the perfect pack to infuse your music video with a vibrant and playful visual style. This LUT enhances the primary colors and introduces bold and vivid tones. Furthermore, it adds a touch of saturation and contrast, creating a visually striking and energetic look. Moreover, you can create a 90s pop music color tone for your video.

20. OLD SCHOOL MOBILE & DESKTOP VIDEO LUTS | PIXMELLOW
It is a pack of LUTs for music videos that draw inspiration from retro aesthetics and a laid-back vibe. This pack creates a vintage and nostalgic look, adding warmth and a hint of sepia tones to your footage. Furthermore, this pack has 18 high-quality LUTs to create a retro look for your music videos. Moreover, you can impress your viewers with your music video color grading.

Part 3: Wondershare Filmora: An Exquisite Video Editor for Using LUTs
Wondershare Filmora is the right choice for you to make your music video edits stand out from others. You can create an amazing music video with its perfect blend of color adjustments, effects, and filters. Filmora has over 200+ LUTs that can help you achieve the feel and mood you want for your music video. You can apply some of the best LUTs for music videos to your footage to add a professional touch.
Add LUTs on Video For Win 7 or later(64-bit)
Add LUTs on Video For macOS 10.14 or later
Additionally, with its unique transitions, you can take your video to the next level and give it a more creative feel. You can even change the speed of your video at any point to add more visual interest. Furthermore, Filmora has an AI denoiser that removes distortion and background noises. It ensures that the music video has a crisp and clear sound.

Key Features of Wondershare Filmora
- With Wondershare Filmora, you can save your music videos in up to 4K resolution. You can save your videos with an ultra-high resolution with more sharpness and details.
- Filmora also gives you access to over 10 billion free stock media resources that you can use. It makes it easy to find the perfect media file for your video.
- Furthermore, this tool has an audio visualizer that automatically matches the sound of your video. You can choose from over 25 different audio visualizers using this tool.
Conclusion
To conclude, it’s always welcoming to try a new project from scratch and then wait to see it become successful. Music is a passion; you need talent and some tools to take this passion to a new level. If you’re a passionate musician doing all the work from recording to editing, try to use some professional tools. Use LUTs for music videos and create professional-looking music videos for the world to see.
Add LUTs on Video For Win 7 or later(64-bit)
Add LUTs on Video For macOS 10.14 or later
Also read:
- How to Convert Images Into Video - Kapwing Tutorial for 2024
- New How to Use Canva Color Match
- New 2024 Approved How to Use the Logo Intro Templates for Your Next Video
- New 2024 Approved 3D LUT Mobile App Review - A Composite Application for Editing Media
- Updated 12 Top Picks of Video Enhancer Software
- In 2024, How to Add Filters on iMovie
- Updated 2024 Approved How to Convert Videos to Slow Motion?
- Updated How to Start a Vlog
- New In 2024, Create Risograph Effect In Photoshop A Beginners Guide
- New Do You Want to Record Videos with a Phantom High-Speed Camera? In This Guide, You Can Get a Detailed Note on the Phantom Camera
- Updated 2024 Approved Making Slow Motion Videos in Premiere Pro A Review on The Best Methods
- Updated In 2024, Record Slow Motion Videos With Phantom Slow-Mo Camera
- 2024 Approved How to Perfectly Use Canva Color Match?
- New 2024 Approved How to Be a YouTube Vlogger
- New Top Tips for Camtasia Freeze-Frame
- Updated Doable Ways to Create Transparent Background in Procreate
- Updated Find Out How to Add Subtitles in the VLC Media Player on Your Windows and Mac System with Quick and Simple Instructions
- Updated In 2024, 2 Methods to Cut Video in VLC on Windows
- 2024 Approved 100 Workable How to Mask Track with Adobe Premiere Pro
- 2024 Approved Confused as to How to Add Subtitles to a Video on iPhone? No Worries as We Bring You the Best Solution to Get the Task Done
- Updated In 2024, 20 Fantastic Video Background Templates to Make Your Video Go Viral
- 7 Best Green Screen Software for Beginners on Mac
- Tutorial How To Add Motion Blur in Blender, In 2024
- Updated The Complete Guide to Make a Text Collage
- Updated Tutorial | How to Make a Smooth Speed Ramping in Premiere Pro?
- 8 Apps to Custom Your GIF Stickers
- New Ways to Make Canva Collages
- New Want to Add Subtitles to Netflix Videos in Your Preferred Language? Read This Article to Learn Two Different Methods for Uploading Custom Subtitles to Netflix
- Updated How to Create Glowing Edge Effect in TikTok Dancing Video for 2024
- 2024 Approved Which Is the Best Video Slideshow Maker Available Online? Methods to Prepare Custom Slideshows for Google Presentation. How to Make a Slide Show Video?
- Steps to Make a Neon Dance Effect With Filmora for 2024
- Updated In 2024, Boost Your Spirit Creating Motivational Status Videos
- Getting Into The Details A Review of Kodak LUTs
- In 2024, Let Us Help You with Something that You Might Not Know. Have You Ever Worked with MOV File Format Before? Or Do You Know What that Is? Lets Talk About It
- Updated 10 Matching Color Combination That Works Together Greatly
- Updated 2024 Approved 10 Innovative AR Teaching Examples to Tell You What Is AR in Teaching
- New The Frames per Second Can Enhance or Hamper Your Ability to Enjoy Watching a Video on YouTube. This Article Will Define Frame Rates and Help You Choose the Best FPS
- Online Video Makers for 2024
- New How To Add Fade In Windows Video Editor
- New In 2024, Color Match Game Top Tips for You
- Updated In This Article, We Will Discuss What Lens Distortion Is, How It May Be Fixed, and the Factors You Need to Pay Attention to Avoid Lens Distortion when Taking or Recording Videos
- Updated 2024 Approved Kdenlive Review – Is It The Best Video Editor?
- What Is a Memoji and How to Make a Memoji? You Can Learn Top 8 Memoji Makers for PC, Android, or iOS, and the Steps to Make a Memoji
- Updated MP3 Cutter Download
- Updated This Article Covers a Lot of Information About the Freeze-Frame Effect. It Includes Its Power, Its Usage in Films, and How to Create It in Your Videos Using Filmora. It Will Get You a Super Exciting Cinematic Effect
- In 2024, A Vlog Has Many Elements to Answer. While Setting up Ideas for It, There Are Several Things Into Which You Should Look. This Article Presents a Picture of How a Vlog Video Is Made Perfectly
- How To Use Slow Zoom Effect in Your Video for 2024
- Adobe Premiere Pro Rec 709 LUTs Finding The Best Options
- Hacks to do pokemon go trainer battles For Nokia C110 | Dr.fone
- 3 Solutions to Hard Reset Infinix Smart 7 Phone Using PC | Dr.fone
- In 2024, 6 Methods for Switching from Apple iPhone 13 Pro to Samsung | Dr.fone
- Unlock Your Disabled Apple iPhone 15 Pro Max Without iTunes in 5 Ways | Dr.fone
- Ultimate guide to get the meltan box pokemon go For Vivo Y36i | Dr.fone
- 2024 Approved Live Chat With WooCommerce Leading Into the Live Selling World
- How To Repair iPhone X iOS System Issues? | Dr.fone
- 15 Best Strongest Pokémon To Use in Pokémon GO PvP Leagues For Honor 100 | Dr.fone
- In 2024, Pattern Locks Are Unsafe Secure Your Vivo S18 Phone Now with These Tips
- Itel S23+ Screen Unresponsive? Heres How to Fix It | Dr.fone
- In 2024, How To Change Your SIM PIN Code on Your Nokia C02 Phone
- How To Unlock a Xiaomi Redmi 12 Easily?
- How and Where to Find a Shiny Stone Pokémon For Oppo A38? | Dr.fone
- Useful ways that can help to effectively recover deleted files from Edge 40 Neo
- In 2024, Reset iTunes Backup Password Of iPhone 11 Pro Prevention & Solution | Dr.fone
- The Complete Guide to Xiaomi Redmi 12 FRP Bypass Everything You Need to Know
- Best Fixes For Nokia G42 5G Hard Reset | Dr.fone
- AddROM Bypass An Android Tool to Unlock FRP Lock Screen For your Oppo F25 Pro 5G
- In 2024, How to Get and Use Pokemon Go Promo Codes On Asus ROG Phone 8 | Dr.fone
- In 2024, How to Change Netflix Location to Get More Country Version On OnePlus Ace 2 | Dr.fone
- In 2024, 3 Facts You Need to Know about Screen Mirroring Motorola Moto G14 | Dr.fone
- How To Leave a Life360 Group On Realme C67 5G Without Anyone Knowing? | Dr.fone
- How to Mirror Your Honor Magic5 Ultimate Screen to PC with Chromecast | Dr.fone
- In 2024, Still Using Pattern Locks with Samsung Galaxy F15 5G? Tips, Tricks and Helpful Advice
- In 2024, About Infinix Note 30 VIP FRP Bypass
- How to use iSpoofer on Sony Xperia 1 V? | Dr.fone
- In 2024, Hassle-Free Ways to Remove FRP Lock from Xiaomi 13 Ultra Phones with/without a PC
- How To Fix Apple iPhone 12 Pro Max Unavailable Issue With Ease
- Top 7 Skype Hacker to Hack Any Skype Account On your OnePlus Ace 2V | Dr.fone
- Dose Life360 Notify Me When Someone Checks My Location On Nokia 105 Classic? | Dr.fone
- In 2024, Pokemon Go No GPS Signal? Heres Every Possible Solution On OnePlus Nord N30 SE | Dr.fone
- In 2024, How To Track IMEI Number Of Realme 12+ 5G Through Google Earth?
- How To Unlock a Samsung Galaxy M34 Easily?
- In 2024, Top 4 Ways to Trace Meizu 21 Location | Dr.fone
- How to Bypass Google FRP Lock on Asus Devices
- The way to get back lost videos from Xiaomi 13 Ultra
- In 2024, Overview of the Best Meizu 21 Screen Mirroring App | Dr.fone
- New What Is Talking Avatar?
- In 2024, Pokemon Go Error 12 Failed to Detect Location On Motorola Moto G14? | Dr.fone
- The Best Methods to Unlock the iPhone Locked to Owner for Apple iPhone 8 Plus
- Top IMEI Unlokers for iPhone XR and Android Phones
- New Have You Seen the Facebook Cartoon App Everyones Using Lately for 2024
- Recover lost data from Xiaomi Redmi K70E
- In 2024, What to do if your iPhone 6s has bad ESN or blacklisted IMEI?
- Two Ways to Track My Boyfriends Samsung Galaxy M34 without Him Knowing | Dr.fone
- Best Ways on How to Unlock/Bypass/Swipe/Remove Samsung Galaxy A24 Fingerprint Lock
- Title: Looking Into How Slow Mo Guys Have Changed the Dynamics of Slow-Motion
- Author: Chloe
- Created at : 2024-05-20 03:37:30
- Updated at : 2024-05-21 03:37:30
- Link: https://ai-editing-video.techidaily.com/looking-into-how-slow-mo-guys-have-changed-the-dynamics-of-slow-motion/
- License: This work is licensed under CC BY-NC-SA 4.0.


