:max_bytes(150000):strip_icc():format(webp)/internet-archive-logo-5980e6f0845b340011748640.png)
Mastering DaVinci Resolve Scopes A Comprehensive Guide

Mastering DaVinci Resolve Scopes: A Comprehensive Guide
How do you set up DaVinci scopes? The internal color scopes in Resolve are flexible and customizable but can be confusing. The built-in DaVinci Resolve scope used to be limited only a few possibilities. However, the new 9-scope view offers a wider range of choice, making them a powerful tool for video editing. In this article, we will explore how to set up DaVinci scopes to achieve better color results.
Color Correction Editor An easy-to-use video editor helps you make color correction and color grading experience for videos!
Free Download Use Vectorscope in Filmora Try Color Correction

Part 1. Unlocking Color Precision: Exploring the Improved Scopes in DaVinci Resolve
The Blackmagic Design continues to improve the Resolve to make it better with every iteration. The new features improve colorist workflow in less powerful ways. The major improvements include a major facelift to the scope, allowing professions to do more with DaVinci resolve. Let’s have a look at some of these changes:
1. CIE 1931 Color Space
The inclusion of the CIE chromaticity diagram is perhaps the biggest change to DaVinci scopes. It displays the gamut of the project as set in the Color Management preferences. This makes it a useful alternate way of looking at the trace of an image to judge when the values are out of legal range. It also functions as an educational tool for learning about the range of color spaces.
2. Low Pass Filter
The wavefront and parade scopes now have a low pass filter, which reduces noise in the trace. This visually sharpens the display of the scopes, allowing easier detection of elements in the frame.
The image above shows the major improvements. The second set of waveforms has more defined lines. These have the low-pass filter activated, which makes the scopes easier to read.
3. High, Mid, and Low Views in Vectorscope
The vectorscope has been added to the ability to toggle the mid-tones, shadows, and highlights of the image independently. You can set the ranges with greater visualization control.
As seen in the picture above, the vectorscope controls allow you to select the low, mid, or high range of the image. You can also set the low and high ranges as desired.
4. Histograms Over Curves
Another great DaVinci scope is the histogram, which now appears outside of the scope panel. The new improvements have embedded the histogram inside the Curves tab on the bottom Palette. Click on the three dots in the Custom Curves tab. The pulldown menu that appears includes the Input or Output of the histogram. With these settings, you can find the element in the frame that helps you make adjustments quickly.
5. Scope Quality
The GPU-accelerated scopes engine allows the scopes to respond quickly. Users have the option to set the quality to high, medium, or low and the scopes will respond to a range of hardware systems. Depending on whether you are working on a stationary short or looking to see how the scopes react in real-time, you will be able to toggle the modes quickly and easily.

6. YRGB View in Histogram and Parade
The histogram and parade now come with the ability to view luminance together with the red, green, and blue channels. Users also have the option for YCbCr mode in the Parade.

7. Extents
These are weak elements in the signore, which are of lesser importance compared to the stronger elements. However, Danvici now allows them to be revealed for a full illustration of the information that lies in the image. Consequently, extents can be used to determine whether the data is being clipped beyond legal limits.

Part 2. Mastering Scopes in DaVinci Resolve: A Brief Guide
DaVinci scopes help you to analyze images as a basis for color correction. When used properly, scopes help in fixing white balance issues and checking saturation. They also allow you to get the correct exposure and check details like skin tone. To use scopes in DaVinci Resolve, go to the color page in the bottom right corner. You can also click on the small graph icon to view the scope. Here is how to use them:
1. Waveform
The Waveform represents the brightness or luminance of your image. In this video scope, the brightest parts are at the top while the darkest are at the bottom. The pixels are represented from left to right.
The Waveform scope on DaVinci Resolve is helpful when you are checking for clipping. This simply means finding out whether the image is too bright or too dark. The waveform also ensures that the image is properly exposed. The colorize feature of the waveform shows the colors of the image while the extent shows the darkest or lightest parts of the image.
2. Parade (RGB)
The RGB Parade comprises 3 waveforms that represent the luminance of red, green, and blue channels. The approach for reading the parade video scope is similar to that of the waveform. However, you now look at the balance between the colors correct the white balance, and check for a color cast.
The Parade works almost in a similar manner as the waveform. It displays the red, green, and blue channels of the image as separate waveforms. This way, you can easily identify and correct color casts while ensuring the colors in the image are balanced. The video scope provides useful information to decide which parts of the image need to be corrected or tweaked further.
3. Vectorscope
Vectorscope in DaVinci Resolve shows hue and saturation on a circular graph. Hues (the colors) are indicated outside of the color wheel for easier color correction. Saturation is indicated by how far the graph extends from the center.
By displaying the hue and saturation of the image as a vector, this video scope helps check skin tones. The scope specifically checks whether skin tones are shifted toward colors such as yellow, magenta, or green. It allows you to make sure that the colors in your subject skin tones are not too saturated or desaturated.
4. Histogram
Histogram is a video scope in DaVinci Resolve that displays the brightness or luminance of an image from left to right for the RGB channel. The video scope is based on the number of pixels that the colors red, blue, and green have in an image.
Using the histogram video scope on DaVinci Resolve allows you to check for overexposure or underexposure in your image. You can also ensure that the image has a good overall brightness range. The scope provides a graphical representation of tonal distribution in each channel. This way, you can evaluate the tone in detail for more accurate brightness and contrast adjustments.
Part 3: Edit Like a Pro: Mastering Video Scopes in Filmora
When working on video projects, Wondershare Filmora is a great editing software. It comes with unique features to color-correct your videos on the go as you edit it. From AI-powered features to royalty-free music, there is so much more you can do with Filmora.
Free Download For Win 7 or later(64-bit)
Free Download For macOS 10.14 or later
How to Use Video Scopes on Filmora
Using video scopes on Filmora is easy. The software offers four video scope options, allowing you to color-correct and grade your visual images properly. They include parade RGB, waveform, vectorscope, and histogram. When editing videos on Filmora, the video scopes can be accessed by clicking on the video scopes icon. The icon is found on the top right corner of the media player.
Filmora has made it easy for users to manage video scopes, and color-correct videos quickly. Users can change the layout options of the video scopes to match the editing needs of their project. You can also expand the button to show the name of the scope. As you manage the scopes, you can start with the Parade to make the necessary adjustments. Then move on to waveform, vectorscope, and histogram.
The uses of the video scope on Filmora are as follows:
- Parade – Cahnge the color channel from RBG to YRGB or YCbCr
- Vectorscope – Identify skin tone
- Waveform – Adjust color channels in a different way
- Histogram – Display the multiple color adjustments in a graphical way
Conclusion
Scopes are indeed valuable to video editors and colorists. While viewing images on a monitor can be subjective, scopes allow you to analyze and define them objectively. This gives you the power to color grade and correct to ensure that viewers look at the image with a clear representation. When working on or editing your videos, we recommend Wondershare Filmora. The video editing software comes with a wide range of features and video scopes that allow you to do everything on the same platform.
Free Download Use Vectorscope in Filmora Try Color Correction

Part 1. Unlocking Color Precision: Exploring the Improved Scopes in DaVinci Resolve
The Blackmagic Design continues to improve the Resolve to make it better with every iteration. The new features improve colorist workflow in less powerful ways. The major improvements include a major facelift to the scope, allowing professions to do more with DaVinci resolve. Let’s have a look at some of these changes:
1. CIE 1931 Color Space
The inclusion of the CIE chromaticity diagram is perhaps the biggest change to DaVinci scopes. It displays the gamut of the project as set in the Color Management preferences. This makes it a useful alternate way of looking at the trace of an image to judge when the values are out of legal range. It also functions as an educational tool for learning about the range of color spaces.
2. Low Pass Filter
The wavefront and parade scopes now have a low pass filter, which reduces noise in the trace. This visually sharpens the display of the scopes, allowing easier detection of elements in the frame.
The image above shows the major improvements. The second set of waveforms has more defined lines. These have the low-pass filter activated, which makes the scopes easier to read.
3. High, Mid, and Low Views in Vectorscope
The vectorscope has been added to the ability to toggle the mid-tones, shadows, and highlights of the image independently. You can set the ranges with greater visualization control.
As seen in the picture above, the vectorscope controls allow you to select the low, mid, or high range of the image. You can also set the low and high ranges as desired.
4. Histograms Over Curves
Another great DaVinci scope is the histogram, which now appears outside of the scope panel. The new improvements have embedded the histogram inside the Curves tab on the bottom Palette. Click on the three dots in the Custom Curves tab. The pulldown menu that appears includes the Input or Output of the histogram. With these settings, you can find the element in the frame that helps you make adjustments quickly.
5. Scope Quality
The GPU-accelerated scopes engine allows the scopes to respond quickly. Users have the option to set the quality to high, medium, or low and the scopes will respond to a range of hardware systems. Depending on whether you are working on a stationary short or looking to see how the scopes react in real-time, you will be able to toggle the modes quickly and easily.

6. YRGB View in Histogram and Parade
The histogram and parade now come with the ability to view luminance together with the red, green, and blue channels. Users also have the option for YCbCr mode in the Parade.

7. Extents
These are weak elements in the signore, which are of lesser importance compared to the stronger elements. However, Danvici now allows them to be revealed for a full illustration of the information that lies in the image. Consequently, extents can be used to determine whether the data is being clipped beyond legal limits.

Part 2. Mastering Scopes in DaVinci Resolve: A Brief Guide
DaVinci scopes help you to analyze images as a basis for color correction. When used properly, scopes help in fixing white balance issues and checking saturation. They also allow you to get the correct exposure and check details like skin tone. To use scopes in DaVinci Resolve, go to the color page in the bottom right corner. You can also click on the small graph icon to view the scope. Here is how to use them:
1. Waveform
The Waveform represents the brightness or luminance of your image. In this video scope, the brightest parts are at the top while the darkest are at the bottom. The pixels are represented from left to right.
The Waveform scope on DaVinci Resolve is helpful when you are checking for clipping. This simply means finding out whether the image is too bright or too dark. The waveform also ensures that the image is properly exposed. The colorize feature of the waveform shows the colors of the image while the extent shows the darkest or lightest parts of the image.
2. Parade (RGB)
The RGB Parade comprises 3 waveforms that represent the luminance of red, green, and blue channels. The approach for reading the parade video scope is similar to that of the waveform. However, you now look at the balance between the colors correct the white balance, and check for a color cast.
The Parade works almost in a similar manner as the waveform. It displays the red, green, and blue channels of the image as separate waveforms. This way, you can easily identify and correct color casts while ensuring the colors in the image are balanced. The video scope provides useful information to decide which parts of the image need to be corrected or tweaked further.
3. Vectorscope
Vectorscope in DaVinci Resolve shows hue and saturation on a circular graph. Hues (the colors) are indicated outside of the color wheel for easier color correction. Saturation is indicated by how far the graph extends from the center.
By displaying the hue and saturation of the image as a vector, this video scope helps check skin tones. The scope specifically checks whether skin tones are shifted toward colors such as yellow, magenta, or green. It allows you to make sure that the colors in your subject skin tones are not too saturated or desaturated.
4. Histogram
Histogram is a video scope in DaVinci Resolve that displays the brightness or luminance of an image from left to right for the RGB channel. The video scope is based on the number of pixels that the colors red, blue, and green have in an image.
Using the histogram video scope on DaVinci Resolve allows you to check for overexposure or underexposure in your image. You can also ensure that the image has a good overall brightness range. The scope provides a graphical representation of tonal distribution in each channel. This way, you can evaluate the tone in detail for more accurate brightness and contrast adjustments.
Part 3: Edit Like a Pro: Mastering Video Scopes in Filmora
When working on video projects, Wondershare Filmora is a great editing software. It comes with unique features to color-correct your videos on the go as you edit it. From AI-powered features to royalty-free music, there is so much more you can do with Filmora.
Free Download For Win 7 or later(64-bit)
Free Download For macOS 10.14 or later
How to Use Video Scopes on Filmora
Using video scopes on Filmora is easy. The software offers four video scope options, allowing you to color-correct and grade your visual images properly. They include parade RGB, waveform, vectorscope, and histogram. When editing videos on Filmora, the video scopes can be accessed by clicking on the video scopes icon. The icon is found on the top right corner of the media player.
Filmora has made it easy for users to manage video scopes, and color-correct videos quickly. Users can change the layout options of the video scopes to match the editing needs of their project. You can also expand the button to show the name of the scope. As you manage the scopes, you can start with the Parade to make the necessary adjustments. Then move on to waveform, vectorscope, and histogram.
The uses of the video scope on Filmora are as follows:
- Parade – Cahnge the color channel from RBG to YRGB or YCbCr
- Vectorscope – Identify skin tone
- Waveform – Adjust color channels in a different way
- Histogram – Display the multiple color adjustments in a graphical way
Conclusion
Scopes are indeed valuable to video editors and colorists. While viewing images on a monitor can be subjective, scopes allow you to analyze and define them objectively. This gives you the power to color grade and correct to ensure that viewers look at the image with a clear representation. When working on or editing your videos, we recommend Wondershare Filmora. The video editing software comes with a wide range of features and video scopes that allow you to do everything on the same platform.
Best 8 Top Premiere Pro Slideshow Templates
Best 8 Top Premiere Pro Slideshow Templates
An easy yet powerful editor
Numerous effects to choose from
Detailed tutorials provided by the official channel
Making slideshows quickly is the demand of modern professional world. Here you can go through top 8 Premiere pro Slideshow Templates available online. The slideshow template premiere pro free download versions are ready for media to be inserted for creating beautiful slideshows.

In this article
01 [Top 9 Premiere Pro Slideshow Templates worth utilizing](#Part 1)
02 [How Do I Create a Slideshow Template in Premiere Pro?](#Part 2)
03 [FAQ of Premiere Pro Slideshow Templates](#Part 3)
Part 1 Top 8 Premiere Pro Slideshow Templates worth Utilizing
01Square Photo
If you are looking for a really awesome slideshow premiere pro which can make your square-shaped photos more attractive, you can employ slideshow – Square Photo. The presentation of pictures in this slideshow occurs like scrolling an album full of family clicks. You will love the way it presents calm pictures with your friends and family. It**’**s satisfying, nostalgic and fun to use this slideshow.
02Vintage by motion shape
Want to give your slideshow a vintage touch? Well, vintage slideshow premiere template free by Motionshape is particularly for you. It makes your creation memorable and provides an exciting template full of flickers, dust, scratch and light effects. Ultimately, the project seems to run on historical timeline. All you need to do is adding photos and putting new captions as per your picture collection.
03Digital Slideshow by Zorrin
You will be in love with this slideshow for sure. Digital slideshow by Zorrin is a beautiful way to represent you. Whether you want to create a corporate slideshow or you are interested in promotion and broadcasting of your products, you can use this slideshow without any doubt. It possesses 50 places for the photos and 25 places for text as well. You will love the creative transitions between the slides.
04Emotional memory slideshow
Planning to create an emotional and memory based slideshow? If yes, this is the best slideshow premiere pro template free that you can use. It will enhance the importance of pictures which are close to your heart and full of passion. The analogous aesthetics of this slideshow hits your mind and replays your special memories.
05Corporate slideshow
So, you are working for a company and making a corporate slideshow for presentation? If yes, this corporate premiere slideshow template is for you. It gives a classic look to the pictures and put the story of your business in an exciting manner. You can use the timeline smartly and describe the establishment and progress of your company, management and teamwork, research and production and client base etc.
06Inspire slideshow by Quartz
Inspire is a good slideshow full of custom options in color palette and you can even make the changes directly while using its pro version. It involves a simple way to move slide-wise and is really a well organized template to insert your own media and move further.

07Transmaxx’s Education Slideshow
Never bother about creating your own free premiere pro slideshow template regarding education when you can already access this exclusive education slideshow. It is based upon the theme around education and has lots of places for pictures, videos and texts. You can add captions and additional write-ups wherever required.
08Motion Media Group’s Family Slideshow
You can choose any of the four versions of this wonderful free slideshow template premiere pro that provides platform for adding your family pictures. Whether you want to make a slideshow of celebrations in your family or making a digital collage of family photos, this is the best template you can go with. The romantic and calm pace is really touchy to be used as a wedding slideshow as well.
09**Wondershare Filmora Video Editor **
One more interesting video editor and slideshow template is Filmora by wondershare which promises to meet all your editorial demands while making a slideshow. As the slideshow template premiere pro free version offers high end motion graphic, you can use it for making highly professional videos. Make creative presentations on Filmora and give your projects a technical finishing with best outcome.
For Win 7 or later (64-bit)
For macOS 10.12 or later
Part 2 How Do I Create a Slideshow Template in Premiere Pro?
Creating a slideshow template in premiere pro is not at all tough, even it is really fun. You need nothing much to do and have all the controls of customizing the presentation as per your preference. Just follow the steps mentioned below –
Step 1 Download the app and install it in your device.
Step 2 Open the adobe premiere pro slideshow templates free and select ‘new project‘ by clicking on it. The term can differ in different versions of premiere. For instance, may be you will find the way to start a new project by clicking on ‘file‘ and then ‘new‘ or something like that. So follow the path accordingly.
Step 3 It**’**s time to understand workspace in premiere. A blank workspace will be provided to you to start with your new project. There will be a set of insert and editing options, buttons and information to get help in the form of panels. You can select a panel to work on your project with the help of that particular panel. For instance, to insert your videos and pictures in the timeline, you can select ‘insert‘ panel and proceed.
Step 4 Create your project with the help of panels in adobe premiere pro slideshow template free. In the lower left of the project, you will see your sequence of videos and picture which can be controlled by you. For example, if you want to change the sequence, apply filters and effects or add text on the video clips and photos, you can do the same by clicking on that particular clip. Then choose the operation you want to apply from the project panel and edit your project as per your choice.
Step 5 In the menu bar, you can see file. Select ‘file‘ and go to ‘new‘, then ‘sequence‘. Add the audio of your choice, select the frame you want and set resolution as per your preference from here. You can also control color, depth, warmth and speed of the video etc. from this task bar.
Step 6 Once ready, you can proceed to save your project. Various resolutions will be available when you click on ‘download or save‘. Choose the resolution you prefer and save your free premiere pro templates slideshow for future use. Don**’**t forget to enter a name to describe your project such as ‘my company‘, ‘holidays 2022‘ etc.
Part 3 FAQ of Premiere Pro Slideshow Templates
Can I have Premiere Pro slideshow templates for free?
Yes, you can definitely have a premiere pro slideshow templates free download version. All you need to do is downloading the free premiere pro app from Motion Array, run and install it in your device and it**’**s ready to be used.
How many placeholders are there in Premiere Pro slideshow templates?
The no. of placeholders varies editor to editor. In Premiere pro slideshow templates, you can have more than 30 placeholders for photos and approx 23 placeholders for texts. The number is enough to create a calm, gentle slideshow without much load of content for distraction.
What are the main features of Premiere Pro slideshow templates?
The best thing to know about premiere pro slideshow template is that it is so easy to use that even a beginner can create a good slideshow on it. The user friendly interface of the app provides custom operational functions such as changing the font, color and speed of slideshow. Directly drag and drop feature is there to insert media in the slideshow and also you can control the transitions and effects. The most important thing is that all this you can get for free also.
Can I use Premiere Pro slideshow templates for making promotional videos?
Of course, you can create impressive adobe premiere slideshow templates with the help of premiere pro slideshow template. Just choose the pictures and videos of your business/company wisely and generate high tech content to catch attention. Write touchy content on your company and upload in the slideshow in the form of text use beautiful font, catchy captions and subtle background colors to make it more interesting.
How to remove watermark in Premiere Pro slideshow templates?
In the premium version, you won**’t have to employ your efforts for removing watermark as you won‘**t find it there while in the free version, you will have to remove the watermark by applying a watermark removing app or watching a small promo video shown by the app.
When should I use Premiere Pro slideshow templates?
You can use premiere slideshow template free whenever you feel the need of making a slideshow. When you come back from a vacation and want to compile all the pictures; when there is an important business meeting and you want to represent your project, when you want to make a family or friends**’** slideshow on special occasions and even personal slideshows can be created to wish someone happy birthday.
● Ending Thoughts →
● The trend of ‘ready-to-use‘ slideshow makers is on its peak as nobody have enough time to create a complete slideshow by its own nowadays. In such condition, you should choose a premiere pro slideshow template free wisely to go well with your theme.
● The procedure of slideshow making varies app to app. You should first understand the interface of a slideshow maker before putting your head into slideshow making. It**’**s better to choose a slideshow maker with user friendly interface.
● Don**’**t go with the professional version or a slideshow maker created to be used by expert only. Pick one with simple operations and quick assistance if are not so well-versed in slideshow making.
Making slideshows quickly is the demand of modern professional world. Here you can go through top 8 Premiere pro Slideshow Templates available online. The slideshow template premiere pro free download versions are ready for media to be inserted for creating beautiful slideshows.

In this article
01 [Top 9 Premiere Pro Slideshow Templates worth utilizing](#Part 1)
02 [How Do I Create a Slideshow Template in Premiere Pro?](#Part 2)
03 [FAQ of Premiere Pro Slideshow Templates](#Part 3)
Part 1 Top 8 Premiere Pro Slideshow Templates worth Utilizing
01Square Photo
If you are looking for a really awesome slideshow premiere pro which can make your square-shaped photos more attractive, you can employ slideshow – Square Photo. The presentation of pictures in this slideshow occurs like scrolling an album full of family clicks. You will love the way it presents calm pictures with your friends and family. It**’**s satisfying, nostalgic and fun to use this slideshow.
02Vintage by motion shape
Want to give your slideshow a vintage touch? Well, vintage slideshow premiere template free by Motionshape is particularly for you. It makes your creation memorable and provides an exciting template full of flickers, dust, scratch and light effects. Ultimately, the project seems to run on historical timeline. All you need to do is adding photos and putting new captions as per your picture collection.
03Digital Slideshow by Zorrin
You will be in love with this slideshow for sure. Digital slideshow by Zorrin is a beautiful way to represent you. Whether you want to create a corporate slideshow or you are interested in promotion and broadcasting of your products, you can use this slideshow without any doubt. It possesses 50 places for the photos and 25 places for text as well. You will love the creative transitions between the slides.
04Emotional memory slideshow
Planning to create an emotional and memory based slideshow? If yes, this is the best slideshow premiere pro template free that you can use. It will enhance the importance of pictures which are close to your heart and full of passion. The analogous aesthetics of this slideshow hits your mind and replays your special memories.
05Corporate slideshow
So, you are working for a company and making a corporate slideshow for presentation? If yes, this corporate premiere slideshow template is for you. It gives a classic look to the pictures and put the story of your business in an exciting manner. You can use the timeline smartly and describe the establishment and progress of your company, management and teamwork, research and production and client base etc.
06Inspire slideshow by Quartz
Inspire is a good slideshow full of custom options in color palette and you can even make the changes directly while using its pro version. It involves a simple way to move slide-wise and is really a well organized template to insert your own media and move further.

07Transmaxx’s Education Slideshow
Never bother about creating your own free premiere pro slideshow template regarding education when you can already access this exclusive education slideshow. It is based upon the theme around education and has lots of places for pictures, videos and texts. You can add captions and additional write-ups wherever required.
08Motion Media Group’s Family Slideshow
You can choose any of the four versions of this wonderful free slideshow template premiere pro that provides platform for adding your family pictures. Whether you want to make a slideshow of celebrations in your family or making a digital collage of family photos, this is the best template you can go with. The romantic and calm pace is really touchy to be used as a wedding slideshow as well.
09**Wondershare Filmora Video Editor **
One more interesting video editor and slideshow template is Filmora by wondershare which promises to meet all your editorial demands while making a slideshow. As the slideshow template premiere pro free version offers high end motion graphic, you can use it for making highly professional videos. Make creative presentations on Filmora and give your projects a technical finishing with best outcome.
For Win 7 or later (64-bit)
For macOS 10.12 or later
Part 2 How Do I Create a Slideshow Template in Premiere Pro?
Creating a slideshow template in premiere pro is not at all tough, even it is really fun. You need nothing much to do and have all the controls of customizing the presentation as per your preference. Just follow the steps mentioned below –

Step 1 Download the app and install it in your device.
Step 2 Open the adobe premiere pro slideshow templates free and select ‘new project‘ by clicking on it. The term can differ in different versions of premiere. For instance, may be you will find the way to start a new project by clicking on ‘file‘ and then ‘new‘ or something like that. So follow the path accordingly.
Step 3 It**’**s time to understand workspace in premiere. A blank workspace will be provided to you to start with your new project. There will be a set of insert and editing options, buttons and information to get help in the form of panels. You can select a panel to work on your project with the help of that particular panel. For instance, to insert your videos and pictures in the timeline, you can select ‘insert‘ panel and proceed.
Step 4 Create your project with the help of panels in adobe premiere pro slideshow template free. In the lower left of the project, you will see your sequence of videos and picture which can be controlled by you. For example, if you want to change the sequence, apply filters and effects or add text on the video clips and photos, you can do the same by clicking on that particular clip. Then choose the operation you want to apply from the project panel and edit your project as per your choice.
Step 5 In the menu bar, you can see file. Select ‘file‘ and go to ‘new‘, then ‘sequence‘. Add the audio of your choice, select the frame you want and set resolution as per your preference from here. You can also control color, depth, warmth and speed of the video etc. from this task bar.
Step 6 Once ready, you can proceed to save your project. Various resolutions will be available when you click on ‘download or save‘. Choose the resolution you prefer and save your free premiere pro templates slideshow for future use. Don**’**t forget to enter a name to describe your project such as ‘my company‘, ‘holidays 2022‘ etc.
Part 3 FAQ of Premiere Pro Slideshow Templates

Can I have Premiere Pro slideshow templates for free?
Yes, you can definitely have a premiere pro slideshow templates free download version. All you need to do is downloading the free premiere pro app from Motion Array, run and install it in your device and it**’**s ready to be used.
How many placeholders are there in Premiere Pro slideshow templates?
The no. of placeholders varies editor to editor. In Premiere pro slideshow templates, you can have more than 30 placeholders for photos and approx 23 placeholders for texts. The number is enough to create a calm, gentle slideshow without much load of content for distraction.
What are the main features of Premiere Pro slideshow templates?
The best thing to know about premiere pro slideshow template is that it is so easy to use that even a beginner can create a good slideshow on it. The user friendly interface of the app provides custom operational functions such as changing the font, color and speed of slideshow. Directly drag and drop feature is there to insert media in the slideshow and also you can control the transitions and effects. The most important thing is that all this you can get for free also.
Can I use Premiere Pro slideshow templates for making promotional videos?
Of course, you can create impressive adobe premiere slideshow templates with the help of premiere pro slideshow template. Just choose the pictures and videos of your business/company wisely and generate high tech content to catch attention. Write touchy content on your company and upload in the slideshow in the form of text use beautiful font, catchy captions and subtle background colors to make it more interesting.
How to remove watermark in Premiere Pro slideshow templates?
In the premium version, you won**’t have to employ your efforts for removing watermark as you won‘**t find it there while in the free version, you will have to remove the watermark by applying a watermark removing app or watching a small promo video shown by the app.
When should I use Premiere Pro slideshow templates?
You can use premiere slideshow template free whenever you feel the need of making a slideshow. When you come back from a vacation and want to compile all the pictures; when there is an important business meeting and you want to represent your project, when you want to make a family or friends**’** slideshow on special occasions and even personal slideshows can be created to wish someone happy birthday.
● Ending Thoughts →
● The trend of ‘ready-to-use‘ slideshow makers is on its peak as nobody have enough time to create a complete slideshow by its own nowadays. In such condition, you should choose a premiere pro slideshow template free wisely to go well with your theme.
● The procedure of slideshow making varies app to app. You should first understand the interface of a slideshow maker before putting your head into slideshow making. It**’**s better to choose a slideshow maker with user friendly interface.
● Don**’**t go with the professional version or a slideshow maker created to be used by expert only. Pick one with simple operations and quick assistance if are not so well-versed in slideshow making.
Making slideshows quickly is the demand of modern professional world. Here you can go through top 8 Premiere pro Slideshow Templates available online. The slideshow template premiere pro free download versions are ready for media to be inserted for creating beautiful slideshows.

In this article
01 [Top 9 Premiere Pro Slideshow Templates worth utilizing](#Part 1)
02 [How Do I Create a Slideshow Template in Premiere Pro?](#Part 2)
03 [FAQ of Premiere Pro Slideshow Templates](#Part 3)
Part 1 Top 8 Premiere Pro Slideshow Templates worth Utilizing
01Square Photo
If you are looking for a really awesome slideshow premiere pro which can make your square-shaped photos more attractive, you can employ slideshow – Square Photo. The presentation of pictures in this slideshow occurs like scrolling an album full of family clicks. You will love the way it presents calm pictures with your friends and family. It**’**s satisfying, nostalgic and fun to use this slideshow.
02Vintage by motion shape
Want to give your slideshow a vintage touch? Well, vintage slideshow premiere template free by Motionshape is particularly for you. It makes your creation memorable and provides an exciting template full of flickers, dust, scratch and light effects. Ultimately, the project seems to run on historical timeline. All you need to do is adding photos and putting new captions as per your picture collection.
03Digital Slideshow by Zorrin
You will be in love with this slideshow for sure. Digital slideshow by Zorrin is a beautiful way to represent you. Whether you want to create a corporate slideshow or you are interested in promotion and broadcasting of your products, you can use this slideshow without any doubt. It possesses 50 places for the photos and 25 places for text as well. You will love the creative transitions between the slides.
04Emotional memory slideshow
Planning to create an emotional and memory based slideshow? If yes, this is the best slideshow premiere pro template free that you can use. It will enhance the importance of pictures which are close to your heart and full of passion. The analogous aesthetics of this slideshow hits your mind and replays your special memories.
05Corporate slideshow
So, you are working for a company and making a corporate slideshow for presentation? If yes, this corporate premiere slideshow template is for you. It gives a classic look to the pictures and put the story of your business in an exciting manner. You can use the timeline smartly and describe the establishment and progress of your company, management and teamwork, research and production and client base etc.
06Inspire slideshow by Quartz
Inspire is a good slideshow full of custom options in color palette and you can even make the changes directly while using its pro version. It involves a simple way to move slide-wise and is really a well organized template to insert your own media and move further.

07Transmaxx’s Education Slideshow
Never bother about creating your own free premiere pro slideshow template regarding education when you can already access this exclusive education slideshow. It is based upon the theme around education and has lots of places for pictures, videos and texts. You can add captions and additional write-ups wherever required.
08Motion Media Group’s Family Slideshow
You can choose any of the four versions of this wonderful free slideshow template premiere pro that provides platform for adding your family pictures. Whether you want to make a slideshow of celebrations in your family or making a digital collage of family photos, this is the best template you can go with. The romantic and calm pace is really touchy to be used as a wedding slideshow as well.
09**Wondershare Filmora Video Editor **
One more interesting video editor and slideshow template is Filmora by wondershare which promises to meet all your editorial demands while making a slideshow. As the slideshow template premiere pro free version offers high end motion graphic, you can use it for making highly professional videos. Make creative presentations on Filmora and give your projects a technical finishing with best outcome.
For Win 7 or later (64-bit)
For macOS 10.12 or later
Part 2 How Do I Create a Slideshow Template in Premiere Pro?
Creating a slideshow template in premiere pro is not at all tough, even it is really fun. You need nothing much to do and have all the controls of customizing the presentation as per your preference. Just follow the steps mentioned below –

Step 1 Download the app and install it in your device.
Step 2 Open the adobe premiere pro slideshow templates free and select ‘new project‘ by clicking on it. The term can differ in different versions of premiere. For instance, may be you will find the way to start a new project by clicking on ‘file‘ and then ‘new‘ or something like that. So follow the path accordingly.
Step 3 It**’**s time to understand workspace in premiere. A blank workspace will be provided to you to start with your new project. There will be a set of insert and editing options, buttons and information to get help in the form of panels. You can select a panel to work on your project with the help of that particular panel. For instance, to insert your videos and pictures in the timeline, you can select ‘insert‘ panel and proceed.
Step 4 Create your project with the help of panels in adobe premiere pro slideshow template free. In the lower left of the project, you will see your sequence of videos and picture which can be controlled by you. For example, if you want to change the sequence, apply filters and effects or add text on the video clips and photos, you can do the same by clicking on that particular clip. Then choose the operation you want to apply from the project panel and edit your project as per your choice.
Step 5 In the menu bar, you can see file. Select ‘file‘ and go to ‘new‘, then ‘sequence‘. Add the audio of your choice, select the frame you want and set resolution as per your preference from here. You can also control color, depth, warmth and speed of the video etc. from this task bar.
Step 6 Once ready, you can proceed to save your project. Various resolutions will be available when you click on ‘download or save‘. Choose the resolution you prefer and save your free premiere pro templates slideshow for future use. Don**’**t forget to enter a name to describe your project such as ‘my company‘, ‘holidays 2022‘ etc.
Part 3 FAQ of Premiere Pro Slideshow Templates

Can I have Premiere Pro slideshow templates for free?
Yes, you can definitely have a premiere pro slideshow templates free download version. All you need to do is downloading the free premiere pro app from Motion Array, run and install it in your device and it**’**s ready to be used.
How many placeholders are there in Premiere Pro slideshow templates?
The no. of placeholders varies editor to editor. In Premiere pro slideshow templates, you can have more than 30 placeholders for photos and approx 23 placeholders for texts. The number is enough to create a calm, gentle slideshow without much load of content for distraction.
What are the main features of Premiere Pro slideshow templates?
The best thing to know about premiere pro slideshow template is that it is so easy to use that even a beginner can create a good slideshow on it. The user friendly interface of the app provides custom operational functions such as changing the font, color and speed of slideshow. Directly drag and drop feature is there to insert media in the slideshow and also you can control the transitions and effects. The most important thing is that all this you can get for free also.
Can I use Premiere Pro slideshow templates for making promotional videos?
Of course, you can create impressive adobe premiere slideshow templates with the help of premiere pro slideshow template. Just choose the pictures and videos of your business/company wisely and generate high tech content to catch attention. Write touchy content on your company and upload in the slideshow in the form of text use beautiful font, catchy captions and subtle background colors to make it more interesting.
How to remove watermark in Premiere Pro slideshow templates?
In the premium version, you won**’t have to employ your efforts for removing watermark as you won‘**t find it there while in the free version, you will have to remove the watermark by applying a watermark removing app or watching a small promo video shown by the app.
When should I use Premiere Pro slideshow templates?
You can use premiere slideshow template free whenever you feel the need of making a slideshow. When you come back from a vacation and want to compile all the pictures; when there is an important business meeting and you want to represent your project, when you want to make a family or friends**’** slideshow on special occasions and even personal slideshows can be created to wish someone happy birthday.
● Ending Thoughts →
● The trend of ‘ready-to-use‘ slideshow makers is on its peak as nobody have enough time to create a complete slideshow by its own nowadays. In such condition, you should choose a premiere pro slideshow template free wisely to go well with your theme.
● The procedure of slideshow making varies app to app. You should first understand the interface of a slideshow maker before putting your head into slideshow making. It**’**s better to choose a slideshow maker with user friendly interface.
● Don**’**t go with the professional version or a slideshow maker created to be used by expert only. Pick one with simple operations and quick assistance if are not so well-versed in slideshow making.
Making slideshows quickly is the demand of modern professional world. Here you can go through top 8 Premiere pro Slideshow Templates available online. The slideshow template premiere pro free download versions are ready for media to be inserted for creating beautiful slideshows.

In this article
01 [Top 9 Premiere Pro Slideshow Templates worth utilizing](#Part 1)
02 [How Do I Create a Slideshow Template in Premiere Pro?](#Part 2)
03 [FAQ of Premiere Pro Slideshow Templates](#Part 3)
Part 1 Top 8 Premiere Pro Slideshow Templates worth Utilizing
01Square Photo
If you are looking for a really awesome slideshow premiere pro which can make your square-shaped photos more attractive, you can employ slideshow – Square Photo. The presentation of pictures in this slideshow occurs like scrolling an album full of family clicks. You will love the way it presents calm pictures with your friends and family. It**’**s satisfying, nostalgic and fun to use this slideshow.
02Vintage by motion shape
Want to give your slideshow a vintage touch? Well, vintage slideshow premiere template free by Motionshape is particularly for you. It makes your creation memorable and provides an exciting template full of flickers, dust, scratch and light effects. Ultimately, the project seems to run on historical timeline. All you need to do is adding photos and putting new captions as per your picture collection.
03Digital Slideshow by Zorrin
You will be in love with this slideshow for sure. Digital slideshow by Zorrin is a beautiful way to represent you. Whether you want to create a corporate slideshow or you are interested in promotion and broadcasting of your products, you can use this slideshow without any doubt. It possesses 50 places for the photos and 25 places for text as well. You will love the creative transitions between the slides.
04Emotional memory slideshow
Planning to create an emotional and memory based slideshow? If yes, this is the best slideshow premiere pro template free that you can use. It will enhance the importance of pictures which are close to your heart and full of passion. The analogous aesthetics of this slideshow hits your mind and replays your special memories.
05Corporate slideshow
So, you are working for a company and making a corporate slideshow for presentation? If yes, this corporate premiere slideshow template is for you. It gives a classic look to the pictures and put the story of your business in an exciting manner. You can use the timeline smartly and describe the establishment and progress of your company, management and teamwork, research and production and client base etc.
06Inspire slideshow by Quartz
Inspire is a good slideshow full of custom options in color palette and you can even make the changes directly while using its pro version. It involves a simple way to move slide-wise and is really a well organized template to insert your own media and move further.

07Transmaxx’s Education Slideshow
Never bother about creating your own free premiere pro slideshow template regarding education when you can already access this exclusive education slideshow. It is based upon the theme around education and has lots of places for pictures, videos and texts. You can add captions and additional write-ups wherever required.
08Motion Media Group’s Family Slideshow
You can choose any of the four versions of this wonderful free slideshow template premiere pro that provides platform for adding your family pictures. Whether you want to make a slideshow of celebrations in your family or making a digital collage of family photos, this is the best template you can go with. The romantic and calm pace is really touchy to be used as a wedding slideshow as well.
09**Wondershare Filmora Video Editor **
One more interesting video editor and slideshow template is Filmora by wondershare which promises to meet all your editorial demands while making a slideshow. As the slideshow template premiere pro free version offers high end motion graphic, you can use it for making highly professional videos. Make creative presentations on Filmora and give your projects a technical finishing with best outcome.
For Win 7 or later (64-bit)
For macOS 10.12 or later
Part 2 How Do I Create a Slideshow Template in Premiere Pro?
Creating a slideshow template in premiere pro is not at all tough, even it is really fun. You need nothing much to do and have all the controls of customizing the presentation as per your preference. Just follow the steps mentioned below –

Step 1 Download the app and install it in your device.
Step 2 Open the adobe premiere pro slideshow templates free and select ‘new project‘ by clicking on it. The term can differ in different versions of premiere. For instance, may be you will find the way to start a new project by clicking on ‘file‘ and then ‘new‘ or something like that. So follow the path accordingly.
Step 3 It**’**s time to understand workspace in premiere. A blank workspace will be provided to you to start with your new project. There will be a set of insert and editing options, buttons and information to get help in the form of panels. You can select a panel to work on your project with the help of that particular panel. For instance, to insert your videos and pictures in the timeline, you can select ‘insert‘ panel and proceed.
Step 4 Create your project with the help of panels in adobe premiere pro slideshow template free. In the lower left of the project, you will see your sequence of videos and picture which can be controlled by you. For example, if you want to change the sequence, apply filters and effects or add text on the video clips and photos, you can do the same by clicking on that particular clip. Then choose the operation you want to apply from the project panel and edit your project as per your choice.
Step 5 In the menu bar, you can see file. Select ‘file‘ and go to ‘new‘, then ‘sequence‘. Add the audio of your choice, select the frame you want and set resolution as per your preference from here. You can also control color, depth, warmth and speed of the video etc. from this task bar.
Step 6 Once ready, you can proceed to save your project. Various resolutions will be available when you click on ‘download or save‘. Choose the resolution you prefer and save your free premiere pro templates slideshow for future use. Don**’**t forget to enter a name to describe your project such as ‘my company‘, ‘holidays 2022‘ etc.
Part 3 FAQ of Premiere Pro Slideshow Templates

Can I have Premiere Pro slideshow templates for free?
Yes, you can definitely have a premiere pro slideshow templates free download version. All you need to do is downloading the free premiere pro app from Motion Array, run and install it in your device and it**’**s ready to be used.
How many placeholders are there in Premiere Pro slideshow templates?
The no. of placeholders varies editor to editor. In Premiere pro slideshow templates, you can have more than 30 placeholders for photos and approx 23 placeholders for texts. The number is enough to create a calm, gentle slideshow without much load of content for distraction.
What are the main features of Premiere Pro slideshow templates?
The best thing to know about premiere pro slideshow template is that it is so easy to use that even a beginner can create a good slideshow on it. The user friendly interface of the app provides custom operational functions such as changing the font, color and speed of slideshow. Directly drag and drop feature is there to insert media in the slideshow and also you can control the transitions and effects. The most important thing is that all this you can get for free also.
Can I use Premiere Pro slideshow templates for making promotional videos?
Of course, you can create impressive adobe premiere slideshow templates with the help of premiere pro slideshow template. Just choose the pictures and videos of your business/company wisely and generate high tech content to catch attention. Write touchy content on your company and upload in the slideshow in the form of text use beautiful font, catchy captions and subtle background colors to make it more interesting.
How to remove watermark in Premiere Pro slideshow templates?
In the premium version, you won**’t have to employ your efforts for removing watermark as you won‘**t find it there while in the free version, you will have to remove the watermark by applying a watermark removing app or watching a small promo video shown by the app.
When should I use Premiere Pro slideshow templates?
You can use premiere slideshow template free whenever you feel the need of making a slideshow. When you come back from a vacation and want to compile all the pictures; when there is an important business meeting and you want to represent your project, when you want to make a family or friends**’** slideshow on special occasions and even personal slideshows can be created to wish someone happy birthday.
● Ending Thoughts →
● The trend of ‘ready-to-use‘ slideshow makers is on its peak as nobody have enough time to create a complete slideshow by its own nowadays. In such condition, you should choose a premiere pro slideshow template free wisely to go well with your theme.
● The procedure of slideshow making varies app to app. You should first understand the interface of a slideshow maker before putting your head into slideshow making. It**’**s better to choose a slideshow maker with user friendly interface.
● Don**’**t go with the professional version or a slideshow maker created to be used by expert only. Pick one with simple operations and quick assistance if are not so well-versed in slideshow making.
How to Add Zoom Blur Effect In Photoshop
People add blurry effects to their photos to add a sense of focus effortlessly. It helps to grasp the viewers’ attention as blurry effects add a depth of field. There are various kinds of blurry effects, such as motion blur, zoom blur, etc.
One of the commonly used blurry effects is zoom blur which helps to highlight a specific area of the image. This article will help you to add zoom blur Photoshop through simple means.
Part 1: What is Zoom Blur?
Zoom blur is a creative effect that adds a new dimension to your captured photos. It creates an illusion where the captured shot appears to blur from the center direction. It gives an abstract feel and adds a certain movement to the picture. You can quickly draw attention to your subject by adding a zoom motion blur.

To create a zoom blur effect while capturing the photo, you should consider some conditions. For example, you can successfully create this effect by taking a picture in low-light conditions. Moreover, you should use a tripod to acquire the best results.
Part 2: How to Add Zoom Blur Effect to Photos in Photoshop?
Photoshop is widely used to alter images with distinct features. It can easily handle diverse file types with great efficiency. It gives complete control to the user as it comprises a friendly user interface. Moreover, you can utilize its color grading tools to adjust the saturation, hue, contrast, and brightness of the photo.
You can also discover AI-supported neural filters that can be a game-changer for you. It also provides a sky replacement tool that you can use to replace the sky in your captured photos effortlessly. For zoom blur Photoshop, you can manually create this effect with a few clicks. For this purpose, you can take help from the following guidelines:
Step1 Navigate to your Photoshop tool and import your desired photo. Go to the “Layers” section on your screen and press “Ctrl + J” to duplicate the first layer. If you are a MacBook user, you can press “Command + J.”

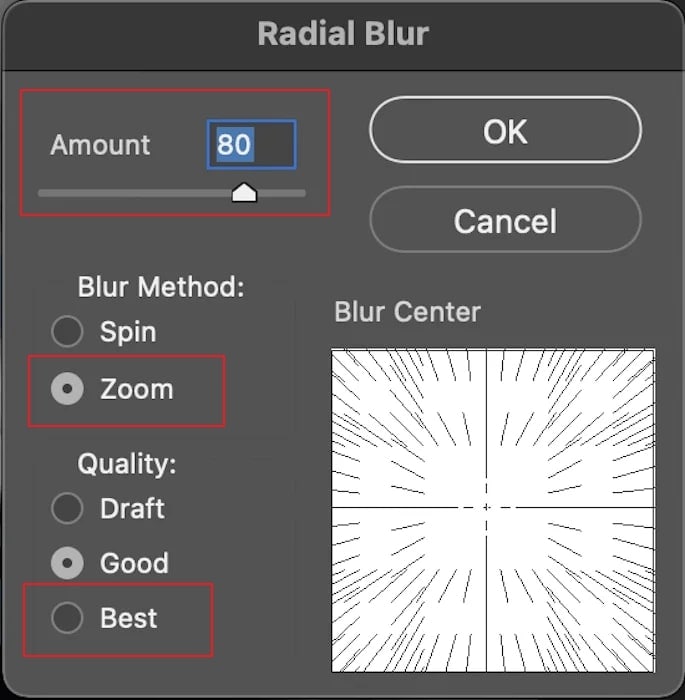
Step2 To proceed, go to the “Filter” option given above and select the “Blur” option. From its drop-down menu, select “Radial Blur .”Now you would be able to see a new window of Radial Blur on your screen. Here, change the amount to 10, and under the “Blur Method” section, select “Zoom .”Also, choose “Best” in the “Quality” section.
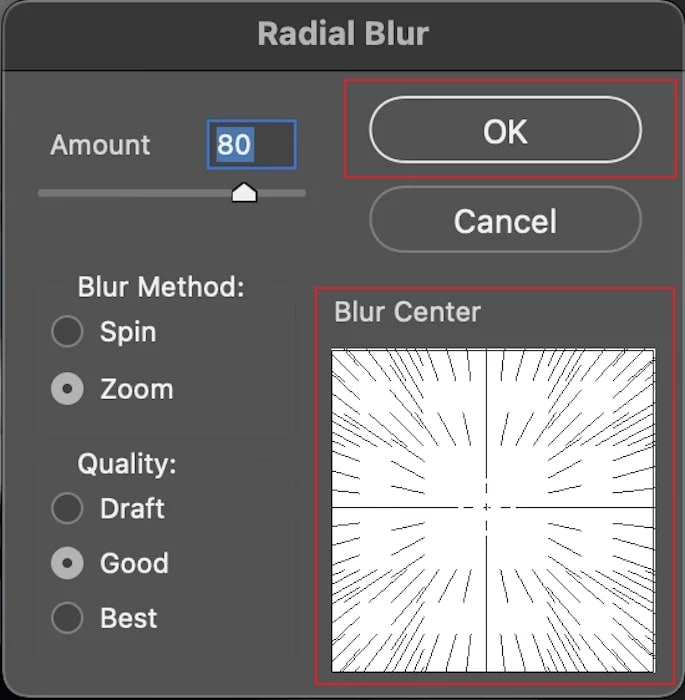
Step3 By staying on the Radial Blur window, adjust the “Blur Center” according to your desire. It will add focus to the central point while blurring the surroundings of your image. Once done, hit the “OK” button. To add further modifications, you can open the Radial Blur window again and modify the “Blur Center” easily.
Part 3: Add the Motion Blur with an Alternative to Photoshop
Are you searching the alternatives to Photoshop? It may be possible that you don’t get desired final results using zoom blur Photoshop. For this, you can check the following tools to achieve the best results.
1. GIFGIT.com
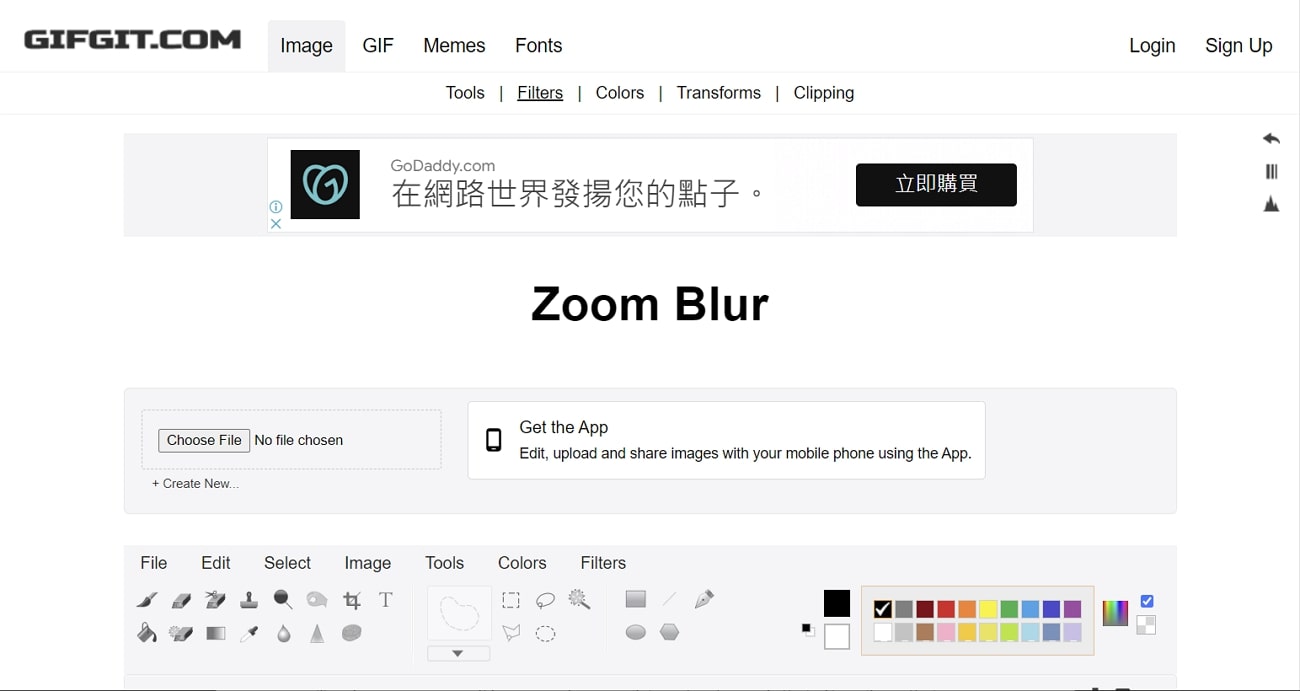
This online tool is an easy-to-use platform through which you can edit your images without any complications. It contains different tools through which you can add modifications instantly. For instance, you can utilize its advanced features such as Color Picker, Background Eraser, Gradient Tool, Magic Eraser, etc. Through its Blur Tool, you can defocus an image precisely in the desired manner.
To use this tool, navigate to the website of GIFGIT through your web browser. From its various tools, select the “Blur” tool. Afterward, click the “Choose File” button and upload your image. From the above editing toolbar, access the “Zoom Blur” slider to use the blur option. Adjust the ratio of the blur by increasing or decreasing the value through the slider or by entering the number inside the box.
2. Luxa.org
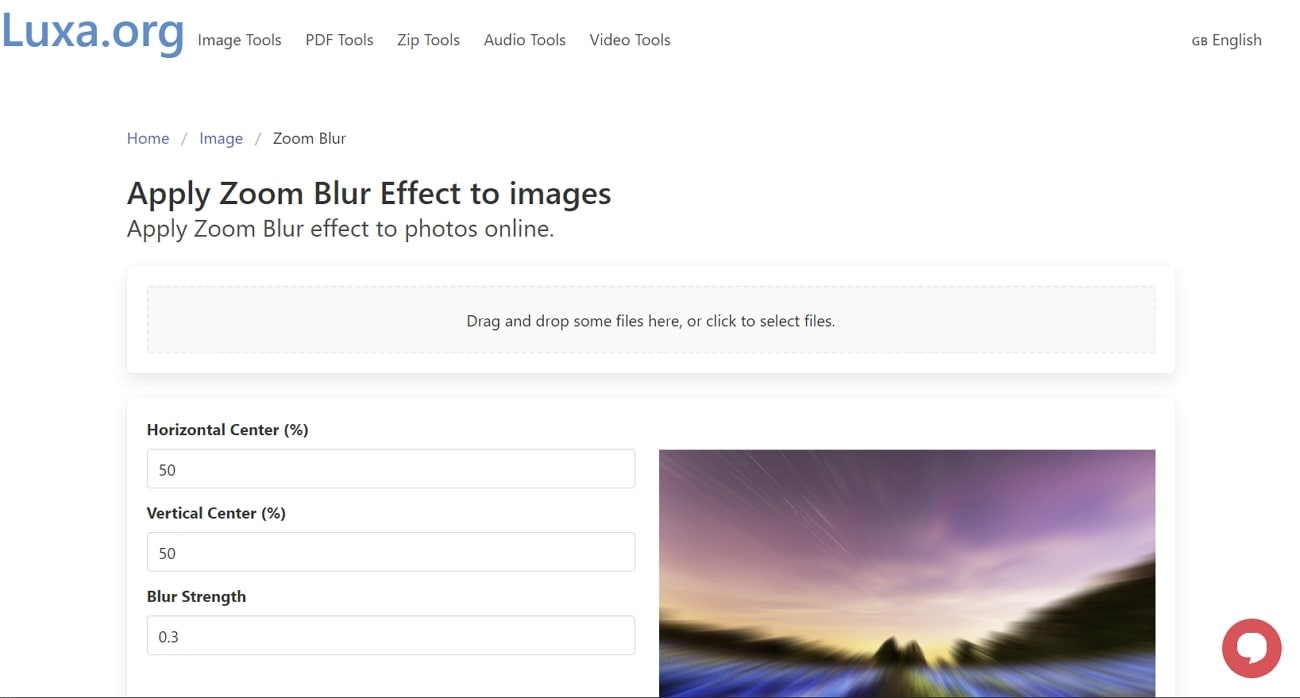
Do you want a professional tool to add a zoom blur effect? Luxa.org has a friendly user interface that comprises different options, such as PDF tools and image tools. For the image tools, you can find various options to execute the editing. For instance, you can add colored borders to your images and text in the desired font. You can also modify the brightness level of your pictures through this tool.
To add a zoom motion blur effect, this tool provides a special online blur tool. To utilize it, access the website of Luxa.org and go to its image tools. From there, navigate to the zoom blur feature. Now upload your image on this tool and set the horizontal and vertical strengths. Also, adjust the blur strength accordingly. Once the zoom blur effect gets added to your photo, click on the “Download” button.
3. Wondershare Filmora
Have you ever tried Wondershare Filmora before? Filmora is a complete toolbox through which you can execute basic and advanced image editing without complications. It contains different kinds of built-in presets that can help you express your creativity. Moreover, it provides stock images that you use without any restrictions.
Free Download For Win 7 or later(64-bit)
Free Download For macOS 10.14 or later
To enhance your images, Filmora provides you with tons of professional effects. Using these effects, you can also add a zoom blur effect to your photos along with modification options. Furthermore, you can also export the edited image in the desired file format and resolution on this platform. To use this platform for adding a zoom blur effect, check the following instructions:
Step1 Import the Particular Image
After launching Filmora, select the “Create New Project” option to begin. Afterward, import the image from your computer to which you want to add the zoom blur effect. Once done, drag and drop the picture into the timeline.

Step2 Add the Zoom Blur Effect
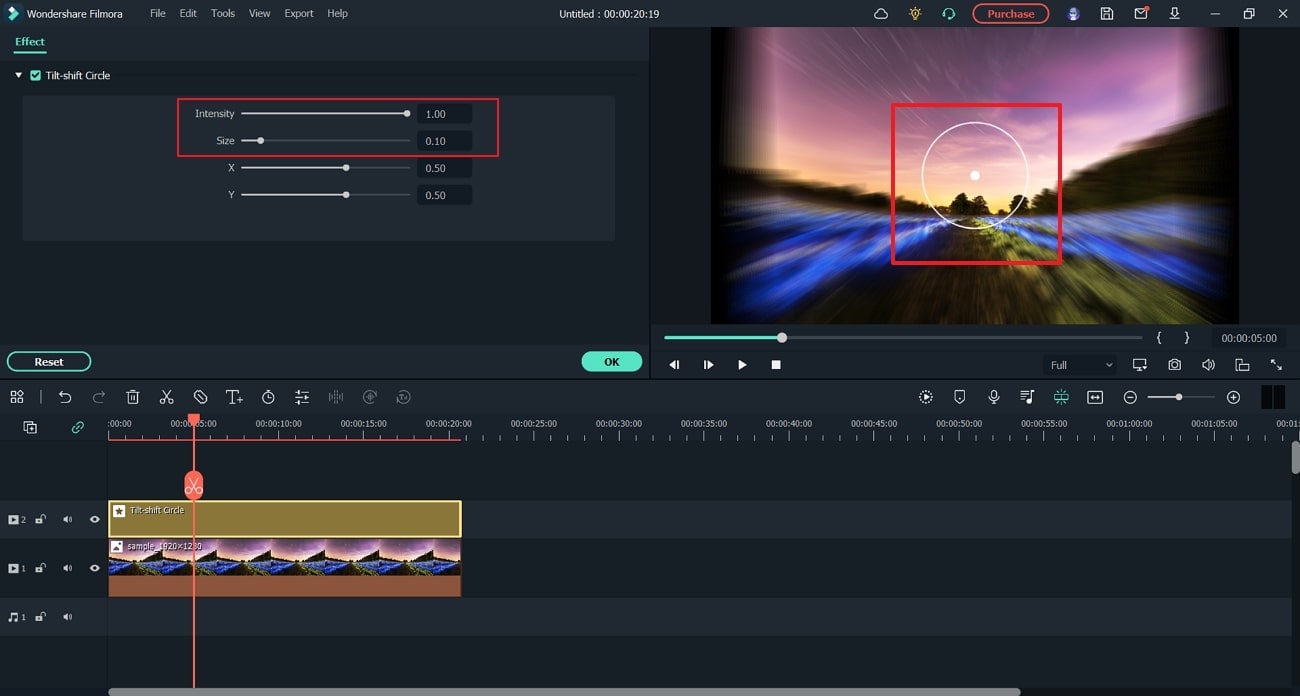
Go to the Effect section and select “Utility” under the “Video Effects” section. From there, search “Tilt-Shift Circle” effect. Select and drop this effect to the timeline to proceed. Also, make sure to adjust the duration of the added effect according to your clip.

Step3 Adjust the Blur Settings
Now, double-click the added effect to adjust the intensity of the effect. Through the circle, you can apply the zoom blur effect to the photo precisely. You can adjust the intensity and size of the zoom motion blur effect.
Last Words
The zoom blur effect can instantly add focus to the subject in a dramatic manner. It can also highlight a specific point of the image effortlessly. In this article, we have addressed how to add zoom motion blur using Photoshop. To use the best alternative to Photoshop, we highly recommend using Wondershare Filmora. This tool has an easy-to-use interface and enables you to add a zoom blur effect easily.
Part 1: What is Zoom Blur?
Zoom blur is a creative effect that adds a new dimension to your captured photos. It creates an illusion where the captured shot appears to blur from the center direction. It gives an abstract feel and adds a certain movement to the picture. You can quickly draw attention to your subject by adding a zoom motion blur.

To create a zoom blur effect while capturing the photo, you should consider some conditions. For example, you can successfully create this effect by taking a picture in low-light conditions. Moreover, you should use a tripod to acquire the best results.
Part 2: How to Add Zoom Blur Effect to Photos in Photoshop?
Photoshop is widely used to alter images with distinct features. It can easily handle diverse file types with great efficiency. It gives complete control to the user as it comprises a friendly user interface. Moreover, you can utilize its color grading tools to adjust the saturation, hue, contrast, and brightness of the photo.
You can also discover AI-supported neural filters that can be a game-changer for you. It also provides a sky replacement tool that you can use to replace the sky in your captured photos effortlessly. For zoom blur Photoshop, you can manually create this effect with a few clicks. For this purpose, you can take help from the following guidelines:
Step1 Navigate to your Photoshop tool and import your desired photo. Go to the “Layers” section on your screen and press “Ctrl + J” to duplicate the first layer. If you are a MacBook user, you can press “Command + J.”

Step2 To proceed, go to the “Filter” option given above and select the “Blur” option. From its drop-down menu, select “Radial Blur .”Now you would be able to see a new window of Radial Blur on your screen. Here, change the amount to 10, and under the “Blur Method” section, select “Zoom .”Also, choose “Best” in the “Quality” section.

Step3 By staying on the Radial Blur window, adjust the “Blur Center” according to your desire. It will add focus to the central point while blurring the surroundings of your image. Once done, hit the “OK” button. To add further modifications, you can open the Radial Blur window again and modify the “Blur Center” easily.

Part 3: Add the Motion Blur with an Alternative to Photoshop
Are you searching the alternatives to Photoshop? It may be possible that you don’t get desired final results using zoom blur Photoshop. For this, you can check the following tools to achieve the best results.
1. GIFGIT.com
This online tool is an easy-to-use platform through which you can edit your images without any complications. It contains different tools through which you can add modifications instantly. For instance, you can utilize its advanced features such as Color Picker, Background Eraser, Gradient Tool, Magic Eraser, etc. Through its Blur Tool, you can defocus an image precisely in the desired manner.
To use this tool, navigate to the website of GIFGIT through your web browser. From its various tools, select the “Blur” tool. Afterward, click the “Choose File” button and upload your image. From the above editing toolbar, access the “Zoom Blur” slider to use the blur option. Adjust the ratio of the blur by increasing or decreasing the value through the slider or by entering the number inside the box.

2. Luxa.org
Do you want a professional tool to add a zoom blur effect? Luxa.org has a friendly user interface that comprises different options, such as PDF tools and image tools. For the image tools, you can find various options to execute the editing. For instance, you can add colored borders to your images and text in the desired font. You can also modify the brightness level of your pictures through this tool.
To add a zoom motion blur effect, this tool provides a special online blur tool. To utilize it, access the website of Luxa.org and go to its image tools. From there, navigate to the zoom blur feature. Now upload your image on this tool and set the horizontal and vertical strengths. Also, adjust the blur strength accordingly. Once the zoom blur effect gets added to your photo, click on the “Download” button.

3. Wondershare Filmora
Have you ever tried Wondershare Filmora before? Filmora is a complete toolbox through which you can execute basic and advanced image editing without complications. It contains different kinds of built-in presets that can help you express your creativity. Moreover, it provides stock images that you use without any restrictions.
Free Download For Win 7 or later(64-bit)
Free Download For macOS 10.14 or later
To enhance your images, Filmora provides you with tons of professional effects. Using these effects, you can also add a zoom blur effect to your photos along with modification options. Furthermore, you can also export the edited image in the desired file format and resolution on this platform. To use this platform for adding a zoom blur effect, check the following instructions:
Step1 Import the Particular Image
After launching Filmora, select the “Create New Project” option to begin. Afterward, import the image from your computer to which you want to add the zoom blur effect. Once done, drag and drop the picture into the timeline.

Step2 Add the Zoom Blur Effect
Go to the Effect section and select “Utility” under the “Video Effects” section. From there, search “Tilt-Shift Circle” effect. Select and drop this effect to the timeline to proceed. Also, make sure to adjust the duration of the added effect according to your clip.

Step3 Adjust the Blur Settings
Now, double-click the added effect to adjust the intensity of the effect. Through the circle, you can apply the zoom blur effect to the photo precisely. You can adjust the intensity and size of the zoom motion blur effect.

Last Words
The zoom blur effect can instantly add focus to the subject in a dramatic manner. It can also highlight a specific point of the image effortlessly. In this article, we have addressed how to add zoom motion blur using Photoshop. To use the best alternative to Photoshop, we highly recommend using Wondershare Filmora. This tool has an easy-to-use interface and enables you to add a zoom blur effect easily.
Create Your Slow Zoom TikTok in Minutes
Abundant Video Effects - Wondershare Filmora
Provide abundant video effects - A creative video editor
Powerful color correction and grading
Detailed tutorials are provided by the official channel
TikTok videos have become a very common approach to interacting with the social community on a large scale. While making such videos, you may find the need to have tools that can help you make the perfect video with a range of effects. If you want to emphasize a certain part of the video that has been recorded, you can look to zoom it in. However, who knew that you could use the slow zoom effect TikTok across it according to your ease?
This article introduces you to a comprehensive guide on how to do the slow zoom in effect on TikTok with the right set of methods.
In this article
Part 1: What is TikTok Slow Zoom?
Part 2: Create a Slow Zoom TikTok Video in Minutes
Part 3: Bonus | Create Slow Zoom Videos in Wondershare Filmora
Part 1: What is TikTok Slow Zoom?
As the name implies, the slow zoom TikTok effect refers to the gradual zoom that incurs onto a video that has been recorded across the platform. While showing something important across the zoom filter, slowing it down will help the viewers observe the details present across the area that is being zoomed. This particular effect can be used across the short TikTok videos to display important content within a matter of seconds.
Part 2: Create a Slow Zoom TikTok Video in Minutes
For this part, we shall be looking into the direct approaches to slow zoom TikTok that can be adopted to bring out the best for your recorded video within a matter of minutes.
Method 1: Create Face Zoom Video in TikTok
Step 1: For the first step, you need to record a video across TikTok or have it recorded within your smartphone while covering the requirements of the platform.
Step 2: To upload the video, click on the “+” icon and follow through the process to click on “Upload” to add a pre-recorded video.

Step 3: As you’ve added the video, go to “Effects” and proceed into the “Time” section. Click on “Slo-mo” to add a slow-down effect to the video. Move into the “Visuals” section and find the “Zoom” effect in the list. Let the cursor go across the certain part where you want to slow zoom the video. Hold the effect until it is applied across the set portion.

Step 4: Once done, click on “Save” to preview the video and share the video by clicking “Next.” You can share it directly across WhatsApp, Instagram, or Facebook, as desired.

Method 2: Do Slow Zoom Easily by Finding a Slow Zoom Video
Step 1: Launch TikTok on your device and click on “Discover” on the bottom border of the screen. Type “Slow Zoom” across the search bar on the next window and locate the effects section to use the effect.

Step 2: Now, you can click on the effect to see how many people have created their videos using this TikTok effect. After that, click on “Try this effect” to shoot a similar video under the mentioned effect.

Step 3: You need to record the video by clicking on the red recording button. Once recorded, make other significant edits across the video and conclude by posting or sharing it to the appropriate platforms.
Part 3: Bonus | Create Slow Zoom Videos in Wondershare Filmora
Wondershare Filmora provides you with one of the best interfaces to perform the simplest tasks of editing slow zoom TikTok across its platform. Being one of the best third-party video editing tools in the market, Filmora ensures a complete editing platform for beginners and professionals through effective means.
While being known for its impressive editing skillset, the users can easily understand the process of using the slow zoom effect TikTok on a video. For this, you need to follow the simple steps provided below in detail.
Step 1: Launch Wondershare Filmora
Download and install the latest version of Wondershare Filmora on your computer. Launch the software and click on “New Project” to open a blank window.

Step 2: Import TikTok Video
Start by adding the TikTok video that needs to be edited across Wondershare Filmora. Click on the “Arrow” icon across the “Media” tab to import the required video. As you’ve added it, drag it across the timeline to start editing.

Step 3: Cut Down the Clip for Video Editing
At first, you need to clip the part of the video where you want to add the slow zoom effect TikTok. Place the red indicator across the pointer where you want to start the part and hit the split icon. Drag the indicator across the next frames to the point where you want to keep the audio. You will have a separate clip now.

Step 4: Specify Slow Speed of Clip
Select the clip and find the “Speed” icon across the menu above the timeline of the interface. Select the appropriate speed from the drop-down menu that appears on the screen. Go into the “Slow” section and select speeds like 0.5x to slow down the clip speed.

Step 5: Include Animation Keyframes
Proceed to add animation keyframes on the specific clip. Right-click on it and select “Add Animation” from the menu. Proceed into the “Animation” tab and find the “Customize” section across the screen. Move the indicator to the point where you want to add the first keyframe and hit “Add.” Move the indicator further across the clip to add the second keyframe across it. The reason for adding multiple keyframes is to set up the animation keyframe across the TikTok clip.

Step 6: Change the Scale Clip and Export
As you have made respective edits across the video, double click to open a new range of settings for it. Click on the “Transform” menu to open a list of different options. Locate the “Scale” option among them and manage the scaling of the clip through the slider percentages. Once done, click on the “Export” button to download the edited TikTok.

Conclusion
We have provided you with some of the best approaches that can be implemented to slow zoom TikTok video. With these methods, you will be able to make professional-level videos that can be managed within a matter of minutes. Get to know more about these tools by going through the above-mentioned guide.
TikTok videos have become a very common approach to interacting with the social community on a large scale. While making such videos, you may find the need to have tools that can help you make the perfect video with a range of effects. If you want to emphasize a certain part of the video that has been recorded, you can look to zoom it in. However, who knew that you could use the slow zoom effect TikTok across it according to your ease?
This article introduces you to a comprehensive guide on how to do the slow zoom in effect on TikTok with the right set of methods.
In this article
Part 1: What is TikTok Slow Zoom?
Part 2: Create a Slow Zoom TikTok Video in Minutes
Part 3: Bonus | Create Slow Zoom Videos in Wondershare Filmora
Part 1: What is TikTok Slow Zoom?
As the name implies, the slow zoom TikTok effect refers to the gradual zoom that incurs onto a video that has been recorded across the platform. While showing something important across the zoom filter, slowing it down will help the viewers observe the details present across the area that is being zoomed. This particular effect can be used across the short TikTok videos to display important content within a matter of seconds.
Part 2: Create a Slow Zoom TikTok Video in Minutes
For this part, we shall be looking into the direct approaches to slow zoom TikTok that can be adopted to bring out the best for your recorded video within a matter of minutes.
Method 1: Create Face Zoom Video in TikTok
Step 1: For the first step, you need to record a video across TikTok or have it recorded within your smartphone while covering the requirements of the platform.
Step 2: To upload the video, click on the “+” icon and follow through the process to click on “Upload” to add a pre-recorded video.

Step 3: As you’ve added the video, go to “Effects” and proceed into the “Time” section. Click on “Slo-mo” to add a slow-down effect to the video. Move into the “Visuals” section and find the “Zoom” effect in the list. Let the cursor go across the certain part where you want to slow zoom the video. Hold the effect until it is applied across the set portion.

Step 4: Once done, click on “Save” to preview the video and share the video by clicking “Next.” You can share it directly across WhatsApp, Instagram, or Facebook, as desired.

Method 2: Do Slow Zoom Easily by Finding a Slow Zoom Video
Step 1: Launch TikTok on your device and click on “Discover” on the bottom border of the screen. Type “Slow Zoom” across the search bar on the next window and locate the effects section to use the effect.

Step 2: Now, you can click on the effect to see how many people have created their videos using this TikTok effect. After that, click on “Try this effect” to shoot a similar video under the mentioned effect.

Step 3: You need to record the video by clicking on the red recording button. Once recorded, make other significant edits across the video and conclude by posting or sharing it to the appropriate platforms.
Part 3: Bonus | Create Slow Zoom Videos in Wondershare Filmora
Wondershare Filmora provides you with one of the best interfaces to perform the simplest tasks of editing slow zoom TikTok across its platform. Being one of the best third-party video editing tools in the market, Filmora ensures a complete editing platform for beginners and professionals through effective means.
While being known for its impressive editing skillset, the users can easily understand the process of using the slow zoom effect TikTok on a video. For this, you need to follow the simple steps provided below in detail.
Step 1: Launch Wondershare Filmora
Download and install the latest version of Wondershare Filmora on your computer. Launch the software and click on “New Project” to open a blank window.

Step 2: Import TikTok Video
Start by adding the TikTok video that needs to be edited across Wondershare Filmora. Click on the “Arrow” icon across the “Media” tab to import the required video. As you’ve added it, drag it across the timeline to start editing.

Step 3: Cut Down the Clip for Video Editing
At first, you need to clip the part of the video where you want to add the slow zoom effect TikTok. Place the red indicator across the pointer where you want to start the part and hit the split icon. Drag the indicator across the next frames to the point where you want to keep the audio. You will have a separate clip now.

Step 4: Specify Slow Speed of Clip
Select the clip and find the “Speed” icon across the menu above the timeline of the interface. Select the appropriate speed from the drop-down menu that appears on the screen. Go into the “Slow” section and select speeds like 0.5x to slow down the clip speed.

Step 5: Include Animation Keyframes
Proceed to add animation keyframes on the specific clip. Right-click on it and select “Add Animation” from the menu. Proceed into the “Animation” tab and find the “Customize” section across the screen. Move the indicator to the point where you want to add the first keyframe and hit “Add.” Move the indicator further across the clip to add the second keyframe across it. The reason for adding multiple keyframes is to set up the animation keyframe across the TikTok clip.

Step 6: Change the Scale Clip and Export
As you have made respective edits across the video, double click to open a new range of settings for it. Click on the “Transform” menu to open a list of different options. Locate the “Scale” option among them and manage the scaling of the clip through the slider percentages. Once done, click on the “Export” button to download the edited TikTok.

Conclusion
We have provided you with some of the best approaches that can be implemented to slow zoom TikTok video. With these methods, you will be able to make professional-level videos that can be managed within a matter of minutes. Get to know more about these tools by going through the above-mentioned guide.
TikTok videos have become a very common approach to interacting with the social community on a large scale. While making such videos, you may find the need to have tools that can help you make the perfect video with a range of effects. If you want to emphasize a certain part of the video that has been recorded, you can look to zoom it in. However, who knew that you could use the slow zoom effect TikTok across it according to your ease?
This article introduces you to a comprehensive guide on how to do the slow zoom in effect on TikTok with the right set of methods.
In this article
Part 1: What is TikTok Slow Zoom?
Part 2: Create a Slow Zoom TikTok Video in Minutes
Part 3: Bonus | Create Slow Zoom Videos in Wondershare Filmora
Part 1: What is TikTok Slow Zoom?
As the name implies, the slow zoom TikTok effect refers to the gradual zoom that incurs onto a video that has been recorded across the platform. While showing something important across the zoom filter, slowing it down will help the viewers observe the details present across the area that is being zoomed. This particular effect can be used across the short TikTok videos to display important content within a matter of seconds.
Part 2: Create a Slow Zoom TikTok Video in Minutes
For this part, we shall be looking into the direct approaches to slow zoom TikTok that can be adopted to bring out the best for your recorded video within a matter of minutes.
Method 1: Create Face Zoom Video in TikTok
Step 1: For the first step, you need to record a video across TikTok or have it recorded within your smartphone while covering the requirements of the platform.
Step 2: To upload the video, click on the “+” icon and follow through the process to click on “Upload” to add a pre-recorded video.

Step 3: As you’ve added the video, go to “Effects” and proceed into the “Time” section. Click on “Slo-mo” to add a slow-down effect to the video. Move into the “Visuals” section and find the “Zoom” effect in the list. Let the cursor go across the certain part where you want to slow zoom the video. Hold the effect until it is applied across the set portion.

Step 4: Once done, click on “Save” to preview the video and share the video by clicking “Next.” You can share it directly across WhatsApp, Instagram, or Facebook, as desired.

Method 2: Do Slow Zoom Easily by Finding a Slow Zoom Video
Step 1: Launch TikTok on your device and click on “Discover” on the bottom border of the screen. Type “Slow Zoom” across the search bar on the next window and locate the effects section to use the effect.

Step 2: Now, you can click on the effect to see how many people have created their videos using this TikTok effect. After that, click on “Try this effect” to shoot a similar video under the mentioned effect.

Step 3: You need to record the video by clicking on the red recording button. Once recorded, make other significant edits across the video and conclude by posting or sharing it to the appropriate platforms.
Part 3: Bonus | Create Slow Zoom Videos in Wondershare Filmora
Wondershare Filmora provides you with one of the best interfaces to perform the simplest tasks of editing slow zoom TikTok across its platform. Being one of the best third-party video editing tools in the market, Filmora ensures a complete editing platform for beginners and professionals through effective means.
While being known for its impressive editing skillset, the users can easily understand the process of using the slow zoom effect TikTok on a video. For this, you need to follow the simple steps provided below in detail.
Step 1: Launch Wondershare Filmora
Download and install the latest version of Wondershare Filmora on your computer. Launch the software and click on “New Project” to open a blank window.

Step 2: Import TikTok Video
Start by adding the TikTok video that needs to be edited across Wondershare Filmora. Click on the “Arrow” icon across the “Media” tab to import the required video. As you’ve added it, drag it across the timeline to start editing.

Step 3: Cut Down the Clip for Video Editing
At first, you need to clip the part of the video where you want to add the slow zoom effect TikTok. Place the red indicator across the pointer where you want to start the part and hit the split icon. Drag the indicator across the next frames to the point where you want to keep the audio. You will have a separate clip now.

Step 4: Specify Slow Speed of Clip
Select the clip and find the “Speed” icon across the menu above the timeline of the interface. Select the appropriate speed from the drop-down menu that appears on the screen. Go into the “Slow” section and select speeds like 0.5x to slow down the clip speed.

Step 5: Include Animation Keyframes
Proceed to add animation keyframes on the specific clip. Right-click on it and select “Add Animation” from the menu. Proceed into the “Animation” tab and find the “Customize” section across the screen. Move the indicator to the point where you want to add the first keyframe and hit “Add.” Move the indicator further across the clip to add the second keyframe across it. The reason for adding multiple keyframes is to set up the animation keyframe across the TikTok clip.

Step 6: Change the Scale Clip and Export
As you have made respective edits across the video, double click to open a new range of settings for it. Click on the “Transform” menu to open a list of different options. Locate the “Scale” option among them and manage the scaling of the clip through the slider percentages. Once done, click on the “Export” button to download the edited TikTok.

Conclusion
We have provided you with some of the best approaches that can be implemented to slow zoom TikTok video. With these methods, you will be able to make professional-level videos that can be managed within a matter of minutes. Get to know more about these tools by going through the above-mentioned guide.
TikTok videos have become a very common approach to interacting with the social community on a large scale. While making such videos, you may find the need to have tools that can help you make the perfect video with a range of effects. If you want to emphasize a certain part of the video that has been recorded, you can look to zoom it in. However, who knew that you could use the slow zoom effect TikTok across it according to your ease?
This article introduces you to a comprehensive guide on how to do the slow zoom in effect on TikTok with the right set of methods.
In this article
Part 1: What is TikTok Slow Zoom?
Part 2: Create a Slow Zoom TikTok Video in Minutes
Part 3: Bonus | Create Slow Zoom Videos in Wondershare Filmora
Part 1: What is TikTok Slow Zoom?
As the name implies, the slow zoom TikTok effect refers to the gradual zoom that incurs onto a video that has been recorded across the platform. While showing something important across the zoom filter, slowing it down will help the viewers observe the details present across the area that is being zoomed. This particular effect can be used across the short TikTok videos to display important content within a matter of seconds.
Part 2: Create a Slow Zoom TikTok Video in Minutes
For this part, we shall be looking into the direct approaches to slow zoom TikTok that can be adopted to bring out the best for your recorded video within a matter of minutes.
Method 1: Create Face Zoom Video in TikTok
Step 1: For the first step, you need to record a video across TikTok or have it recorded within your smartphone while covering the requirements of the platform.
Step 2: To upload the video, click on the “+” icon and follow through the process to click on “Upload” to add a pre-recorded video.

Step 3: As you’ve added the video, go to “Effects” and proceed into the “Time” section. Click on “Slo-mo” to add a slow-down effect to the video. Move into the “Visuals” section and find the “Zoom” effect in the list. Let the cursor go across the certain part where you want to slow zoom the video. Hold the effect until it is applied across the set portion.

Step 4: Once done, click on “Save” to preview the video and share the video by clicking “Next.” You can share it directly across WhatsApp, Instagram, or Facebook, as desired.

Method 2: Do Slow Zoom Easily by Finding a Slow Zoom Video
Step 1: Launch TikTok on your device and click on “Discover” on the bottom border of the screen. Type “Slow Zoom” across the search bar on the next window and locate the effects section to use the effect.

Step 2: Now, you can click on the effect to see how many people have created their videos using this TikTok effect. After that, click on “Try this effect” to shoot a similar video under the mentioned effect.

Step 3: You need to record the video by clicking on the red recording button. Once recorded, make other significant edits across the video and conclude by posting or sharing it to the appropriate platforms.
Part 3: Bonus | Create Slow Zoom Videos in Wondershare Filmora
Wondershare Filmora provides you with one of the best interfaces to perform the simplest tasks of editing slow zoom TikTok across its platform. Being one of the best third-party video editing tools in the market, Filmora ensures a complete editing platform for beginners and professionals through effective means.
While being known for its impressive editing skillset, the users can easily understand the process of using the slow zoom effect TikTok on a video. For this, you need to follow the simple steps provided below in detail.
Step 1: Launch Wondershare Filmora
Download and install the latest version of Wondershare Filmora on your computer. Launch the software and click on “New Project” to open a blank window.

Step 2: Import TikTok Video
Start by adding the TikTok video that needs to be edited across Wondershare Filmora. Click on the “Arrow” icon across the “Media” tab to import the required video. As you’ve added it, drag it across the timeline to start editing.

Step 3: Cut Down the Clip for Video Editing
At first, you need to clip the part of the video where you want to add the slow zoom effect TikTok. Place the red indicator across the pointer where you want to start the part and hit the split icon. Drag the indicator across the next frames to the point where you want to keep the audio. You will have a separate clip now.

Step 4: Specify Slow Speed of Clip
Select the clip and find the “Speed” icon across the menu above the timeline of the interface. Select the appropriate speed from the drop-down menu that appears on the screen. Go into the “Slow” section and select speeds like 0.5x to slow down the clip speed.

Step 5: Include Animation Keyframes
Proceed to add animation keyframes on the specific clip. Right-click on it and select “Add Animation” from the menu. Proceed into the “Animation” tab and find the “Customize” section across the screen. Move the indicator to the point where you want to add the first keyframe and hit “Add.” Move the indicator further across the clip to add the second keyframe across it. The reason for adding multiple keyframes is to set up the animation keyframe across the TikTok clip.

Step 6: Change the Scale Clip and Export
As you have made respective edits across the video, double click to open a new range of settings for it. Click on the “Transform” menu to open a list of different options. Locate the “Scale” option among them and manage the scaling of the clip through the slider percentages. Once done, click on the “Export” button to download the edited TikTok.

Conclusion
We have provided you with some of the best approaches that can be implemented to slow zoom TikTok video. With these methods, you will be able to make professional-level videos that can be managed within a matter of minutes. Get to know more about these tools by going through the above-mentioned guide.
Also read:
- 2024 Approved Competitive Guide To Use Slow Motion in After Effects
- New 2024 Approved Mastering the Technique Playing Videos in Slow Motion on Your iPhone Like a Pro
- New How To Make a Video by Mouse in Filmora for 2024
- New In 2024, 6 Instant Mp4 to GIF Online Tools
- New In 2024, Best Online MPEG to GIF Converters
- New How to Add Filter to Video Online for 2024
- New How to Create Glowing Edge Effect in TikTok Dancing Video for 2024
- New Adding Text to Your Collage Not only Makes It Look Sophisticated but Also Versatile. So, if You Too Are Looking for Ways to Create a Collage Text, Check Out Our Article for 2024
- How to Create Datamoshing Effect to Your Footage in After Effects, In 2024
- New In 2024, How to Create a Makeup Video
- New 2024 Approved Basic Knowledge About WMV Format and Best WMV Video Editor
- Updated How to Use LUTs in Adobe Premiere Pro for 2024
- Doable Ways to Create Transparent Background in Procreate
- Updated Ideas That Will Help You Out in Making Transparent Image for 2024
- 2024 Approved How to Use LUTs in Lumafusion & Free Resource
- Top 10 Free WhatsApp Video Converter for 2024
- New In 2024, How Did AI Video Games Act More Human Than Human?
- 2024 Approved Replacing the Sky in Adobe After Effects An Extensive Guide
- Updated Are You Looking for a Voice Changer to Make Your Gaming Experience More Fun? Here Is a List of the Top 6 Best Alternatives of Clownfish Voice Changers to Use
- Updated In 2024, 10 Mind-Blowing Video Collage Maker for PC
- Free 3D Intro Makers
- Updated 10 Top Free GIF Background Remover for PC and Online
- In 2024, How to Make a Bokeh Effect
- In 2024, Looking for a Free Video Editor to Edit Videos on Mac? IMovie by Apple Is a Great Choice? But Is It the Best Video Editor or Is There a Better Alternative Available? Check Out Our iMovie Review
- How to Make Discord Emoji GIF for 2024
- New Top List of Best VHS Video Effect Makers
- Updated Do You Know You Can Use Mobile Apps to Apply Camera Effects to Your Videos? Many Smartphone Applications Allow You to Apply Camcorder Effects
- Updated Add a Miniature Effect on Your Video for Filmy Looks. To Add This Effect, Read the Complete Guide and Make Your Video Cinematic by Wondershare Filmora
- Updated Best Method to Split the Video Into Parts Online for 2024
- Updated 2024 Approved 10 Crazy-Cool Examples of AR Video
- Updated As a Designer, Color Is the Most Powerful and the Most Diverse Tool at Your Disposal. Here Are Ten Matching Color Combinations to Get You Started on Your Next Project
- Storyboards Are Amazing Way if You Want to Present Your Story in a Visual Way, Like Explaining Any Process or Giving Any Information. It Is a Graphic Layout to Tell You a Story
- In 2024, How to Unlock Xiaomi Redmi 12 Phone without Google Account?
- In 2024, How to Transfer Contacts from Lava Agni 2 5G to Outlook | Dr.fone
- How PGSharp Save You from Ban While Spoofing Pokemon Go On Honor X9b? | Dr.fone
- In 2024, Unlocking Made Easy The Best 10 Apps for Unlocking Your Vivo X Flip Device
- Reinstall your hardware drivers with Device Manager on Windows 11 & 10 & 7
- In 2024, Fake the Location to Get Around the MLB Blackouts on Nokia C210 | Dr.fone
- In 2024, Ultimate Guide from iPhone SE iCloud Activation Lock Bypass
- 4 Ways to Transfer Music from Xiaomi 14 Ultra to iPhone | Dr.fone
- In 2024, AddROM Bypass An Android Tool to Unlock FRP Lock Screen For your Samsung
- Wondering the Best Alternative to Hola On Oppo A59 5G? Here Is the Answer | Dr.fone
- Title: Mastering DaVinci Resolve Scopes A Comprehensive Guide
- Author: Chloe
- Created at : 2024-05-20 03:37:23
- Updated at : 2024-05-21 03:37:23
- Link: https://ai-editing-video.techidaily.com/mastering-davinci-resolve-scopes-a-comprehensive-guide/
- License: This work is licensed under CC BY-NC-SA 4.0.


