
Mastering DaVinci Resolve Scopes A Comprehensive Guide for 2024

Mastering DaVinci Resolve Scopes: A Comprehensive Guide
How do you set up DaVinci scopes? The internal color scopes in Resolve are flexible and customizable but can be confusing. The built-in DaVinci Resolve scope used to be limited only a few possibilities. However, the new 9-scope view offers a wider range of choice, making them a powerful tool for video editing. In this article, we will explore how to set up DaVinci scopes to achieve better color results.
Color Correction Editor An easy-to-use video editor helps you make color correction and color grading experience for videos!
Free Download Use Vectorscope in Filmora Try Color Correction

Part 1. Unlocking Color Precision: Exploring the Improved Scopes in DaVinci Resolve
The Blackmagic Design continues to improve the Resolve to make it better with every iteration. The new features improve colorist workflow in less powerful ways. The major improvements include a major facelift to the scope, allowing professions to do more with DaVinci resolve. Let’s have a look at some of these changes:
1. CIE 1931 Color Space
The inclusion of the CIE chromaticity diagram is perhaps the biggest change to DaVinci scopes. It displays the gamut of the project as set in the Color Management preferences. This makes it a useful alternate way of looking at the trace of an image to judge when the values are out of legal range. It also functions as an educational tool for learning about the range of color spaces.
2. Low Pass Filter
The wavefront and parade scopes now have a low pass filter, which reduces noise in the trace. This visually sharpens the display of the scopes, allowing easier detection of elements in the frame.
The image above shows the major improvements. The second set of waveforms has more defined lines. These have the low-pass filter activated, which makes the scopes easier to read.
3. High, Mid, and Low Views in Vectorscope
The vectorscope has been added to the ability to toggle the mid-tones, shadows, and highlights of the image independently. You can set the ranges with greater visualization control.
As seen in the picture above, the vectorscope controls allow you to select the low, mid, or high range of the image. You can also set the low and high ranges as desired.
4. Histograms Over Curves
Another great DaVinci scope is the histogram, which now appears outside of the scope panel. The new improvements have embedded the histogram inside the Curves tab on the bottom Palette. Click on the three dots in the Custom Curves tab. The pulldown menu that appears includes the Input or Output of the histogram. With these settings, you can find the element in the frame that helps you make adjustments quickly.
5. Scope Quality
The GPU-accelerated scopes engine allows the scopes to respond quickly. Users have the option to set the quality to high, medium, or low and the scopes will respond to a range of hardware systems. Depending on whether you are working on a stationary short or looking to see how the scopes react in real-time, you will be able to toggle the modes quickly and easily.

6. YRGB View in Histogram and Parade
The histogram and parade now come with the ability to view luminance together with the red, green, and blue channels. Users also have the option for YCbCr mode in the Parade.

7. Extents
These are weak elements in the signore, which are of lesser importance compared to the stronger elements. However, Danvici now allows them to be revealed for a full illustration of the information that lies in the image. Consequently, extents can be used to determine whether the data is being clipped beyond legal limits.

Part 2. Mastering Scopes in DaVinci Resolve: A Brief Guide
DaVinci scopes help you to analyze images as a basis for color correction. When used properly, scopes help in fixing white balance issues and checking saturation. They also allow you to get the correct exposure and check details like skin tone. To use scopes in DaVinci Resolve, go to the color page in the bottom right corner. You can also click on the small graph icon to view the scope. Here is how to use them:
1. Waveform
The Waveform represents the brightness or luminance of your image. In this video scope, the brightest parts are at the top while the darkest are at the bottom. The pixels are represented from left to right.
The Waveform scope on DaVinci Resolve is helpful when you are checking for clipping. This simply means finding out whether the image is too bright or too dark. The waveform also ensures that the image is properly exposed. The colorize feature of the waveform shows the colors of the image while the extent shows the darkest or lightest parts of the image.
2. Parade (RGB)
The RGB Parade comprises 3 waveforms that represent the luminance of red, green, and blue channels. The approach for reading the parade video scope is similar to that of the waveform. However, you now look at the balance between the colors correct the white balance, and check for a color cast.
The Parade works almost in a similar manner as the waveform. It displays the red, green, and blue channels of the image as separate waveforms. This way, you can easily identify and correct color casts while ensuring the colors in the image are balanced. The video scope provides useful information to decide which parts of the image need to be corrected or tweaked further.
3. Vectorscope
Vectorscope in DaVinci Resolve shows hue and saturation on a circular graph. Hues (the colors) are indicated outside of the color wheel for easier color correction. Saturation is indicated by how far the graph extends from the center.
By displaying the hue and saturation of the image as a vector, this video scope helps check skin tones. The scope specifically checks whether skin tones are shifted toward colors such as yellow, magenta, or green. It allows you to make sure that the colors in your subject skin tones are not too saturated or desaturated.
4. Histogram
Histogram is a video scope in DaVinci Resolve that displays the brightness or luminance of an image from left to right for the RGB channel. The video scope is based on the number of pixels that the colors red, blue, and green have in an image.
Using the histogram video scope on DaVinci Resolve allows you to check for overexposure or underexposure in your image. You can also ensure that the image has a good overall brightness range. The scope provides a graphical representation of tonal distribution in each channel. This way, you can evaluate the tone in detail for more accurate brightness and contrast adjustments.
Part 3: Edit Like a Pro: Mastering Video Scopes in Filmora
When working on video projects, Wondershare Filmora is a great editing software. It comes with unique features to color-correct your videos on the go as you edit it. From AI-powered features to royalty-free music, there is so much more you can do with Filmora.
Free Download For Win 7 or later(64-bit)
Free Download For macOS 10.14 or later
How to Use Video Scopes on Filmora
Using video scopes on Filmora is easy. The software offers four video scope options, allowing you to color-correct and grade your visual images properly. They include parade RGB, waveform, vectorscope, and histogram. When editing videos on Filmora, the video scopes can be accessed by clicking on the video scopes icon. The icon is found on the top right corner of the media player.
Filmora has made it easy for users to manage video scopes, and color-correct videos quickly. Users can change the layout options of the video scopes to match the editing needs of their project. You can also expand the button to show the name of the scope. As you manage the scopes, you can start with the Parade to make the necessary adjustments. Then move on to waveform, vectorscope, and histogram.
The uses of the video scope on Filmora are as follows:
- Parade – Cahnge the color channel from RBG to YRGB or YCbCr
- Vectorscope – Identify skin tone
- Waveform – Adjust color channels in a different way
- Histogram – Display the multiple color adjustments in a graphical way
Conclusion
Scopes are indeed valuable to video editors and colorists. While viewing images on a monitor can be subjective, scopes allow you to analyze and define them objectively. This gives you the power to color grade and correct to ensure that viewers look at the image with a clear representation. When working on or editing your videos, we recommend Wondershare Filmora. The video editing software comes with a wide range of features and video scopes that allow you to do everything on the same platform.
Free Download Use Vectorscope in Filmora Try Color Correction

Part 1. Unlocking Color Precision: Exploring the Improved Scopes in DaVinci Resolve
The Blackmagic Design continues to improve the Resolve to make it better with every iteration. The new features improve colorist workflow in less powerful ways. The major improvements include a major facelift to the scope, allowing professions to do more with DaVinci resolve. Let’s have a look at some of these changes:
1. CIE 1931 Color Space
The inclusion of the CIE chromaticity diagram is perhaps the biggest change to DaVinci scopes. It displays the gamut of the project as set in the Color Management preferences. This makes it a useful alternate way of looking at the trace of an image to judge when the values are out of legal range. It also functions as an educational tool for learning about the range of color spaces.
2. Low Pass Filter
The wavefront and parade scopes now have a low pass filter, which reduces noise in the trace. This visually sharpens the display of the scopes, allowing easier detection of elements in the frame.
The image above shows the major improvements. The second set of waveforms has more defined lines. These have the low-pass filter activated, which makes the scopes easier to read.
3. High, Mid, and Low Views in Vectorscope
The vectorscope has been added to the ability to toggle the mid-tones, shadows, and highlights of the image independently. You can set the ranges with greater visualization control.
As seen in the picture above, the vectorscope controls allow you to select the low, mid, or high range of the image. You can also set the low and high ranges as desired.
4. Histograms Over Curves
Another great DaVinci scope is the histogram, which now appears outside of the scope panel. The new improvements have embedded the histogram inside the Curves tab on the bottom Palette. Click on the three dots in the Custom Curves tab. The pulldown menu that appears includes the Input or Output of the histogram. With these settings, you can find the element in the frame that helps you make adjustments quickly.
5. Scope Quality
The GPU-accelerated scopes engine allows the scopes to respond quickly. Users have the option to set the quality to high, medium, or low and the scopes will respond to a range of hardware systems. Depending on whether you are working on a stationary short or looking to see how the scopes react in real-time, you will be able to toggle the modes quickly and easily.

6. YRGB View in Histogram and Parade
The histogram and parade now come with the ability to view luminance together with the red, green, and blue channels. Users also have the option for YCbCr mode in the Parade.

7. Extents
These are weak elements in the signore, which are of lesser importance compared to the stronger elements. However, Danvici now allows them to be revealed for a full illustration of the information that lies in the image. Consequently, extents can be used to determine whether the data is being clipped beyond legal limits.

Part 2. Mastering Scopes in DaVinci Resolve: A Brief Guide
DaVinci scopes help you to analyze images as a basis for color correction. When used properly, scopes help in fixing white balance issues and checking saturation. They also allow you to get the correct exposure and check details like skin tone. To use scopes in DaVinci Resolve, go to the color page in the bottom right corner. You can also click on the small graph icon to view the scope. Here is how to use them:
1. Waveform
The Waveform represents the brightness or luminance of your image. In this video scope, the brightest parts are at the top while the darkest are at the bottom. The pixels are represented from left to right.
The Waveform scope on DaVinci Resolve is helpful when you are checking for clipping. This simply means finding out whether the image is too bright or too dark. The waveform also ensures that the image is properly exposed. The colorize feature of the waveform shows the colors of the image while the extent shows the darkest or lightest parts of the image.
2. Parade (RGB)
The RGB Parade comprises 3 waveforms that represent the luminance of red, green, and blue channels. The approach for reading the parade video scope is similar to that of the waveform. However, you now look at the balance between the colors correct the white balance, and check for a color cast.
The Parade works almost in a similar manner as the waveform. It displays the red, green, and blue channels of the image as separate waveforms. This way, you can easily identify and correct color casts while ensuring the colors in the image are balanced. The video scope provides useful information to decide which parts of the image need to be corrected or tweaked further.
3. Vectorscope
Vectorscope in DaVinci Resolve shows hue and saturation on a circular graph. Hues (the colors) are indicated outside of the color wheel for easier color correction. Saturation is indicated by how far the graph extends from the center.
By displaying the hue and saturation of the image as a vector, this video scope helps check skin tones. The scope specifically checks whether skin tones are shifted toward colors such as yellow, magenta, or green. It allows you to make sure that the colors in your subject skin tones are not too saturated or desaturated.
4. Histogram
Histogram is a video scope in DaVinci Resolve that displays the brightness or luminance of an image from left to right for the RGB channel. The video scope is based on the number of pixels that the colors red, blue, and green have in an image.
Using the histogram video scope on DaVinci Resolve allows you to check for overexposure or underexposure in your image. You can also ensure that the image has a good overall brightness range. The scope provides a graphical representation of tonal distribution in each channel. This way, you can evaluate the tone in detail for more accurate brightness and contrast adjustments.
Part 3: Edit Like a Pro: Mastering Video Scopes in Filmora
When working on video projects, Wondershare Filmora is a great editing software. It comes with unique features to color-correct your videos on the go as you edit it. From AI-powered features to royalty-free music, there is so much more you can do with Filmora.
Free Download For Win 7 or later(64-bit)
Free Download For macOS 10.14 or later
How to Use Video Scopes on Filmora
Using video scopes on Filmora is easy. The software offers four video scope options, allowing you to color-correct and grade your visual images properly. They include parade RGB, waveform, vectorscope, and histogram. When editing videos on Filmora, the video scopes can be accessed by clicking on the video scopes icon. The icon is found on the top right corner of the media player.
Filmora has made it easy for users to manage video scopes, and color-correct videos quickly. Users can change the layout options of the video scopes to match the editing needs of their project. You can also expand the button to show the name of the scope. As you manage the scopes, you can start with the Parade to make the necessary adjustments. Then move on to waveform, vectorscope, and histogram.
The uses of the video scope on Filmora are as follows:
- Parade – Cahnge the color channel from RBG to YRGB or YCbCr
- Vectorscope – Identify skin tone
- Waveform – Adjust color channels in a different way
- Histogram – Display the multiple color adjustments in a graphical way
Conclusion
Scopes are indeed valuable to video editors and colorists. While viewing images on a monitor can be subjective, scopes allow you to analyze and define them objectively. This gives you the power to color grade and correct to ensure that viewers look at the image with a clear representation. When working on or editing your videos, we recommend Wondershare Filmora. The video editing software comes with a wide range of features and video scopes that allow you to do everything on the same platform.
Several Tips Can Facilitate How You Edit Videos Faster and Easier. All You Need to Do Is to Read This Article to Find Out What They Are
It’s an indisputable fact that editing is an essential aspect of video creation, and it’s what brings your initial idea to life. However, it can be very daunting and time-consuming, especially when working on a video project containing lots of footage.
In this post, we will walk you through the five best tips that can come in handy to operate fast and smoothly while editing videos of any size. All you just need is the Filmora video editor. You don’t even require technical knowledge.
1. Organize your Media
Since a video project usually has various elements, keeping track of them can take a lot of work. So, the first editing step should be to organize the files so that it is easy to follow them. To do that, you need to do the following;
Create a Folder for Each Media File in your Project
Creating folders involves sorting your video files into various categories, thus making it easy for you to look into specific files and find the missing ones quickly when you need them. For example, you can create a folder for A roll, B roll, Photos, Audio, Sound FX, Music, and Drone Footage. Follow the steps below to see how you can use Filmora to create a folder for each file in your video project;
Step1 Launch Filmora and click Create Project.
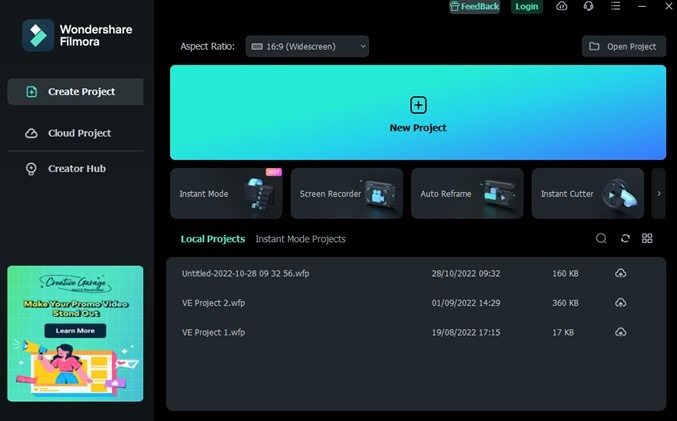
Step2 Navigate to the bottom left corner before the Timeline > click the Folder icon from there, as shown in the image below;
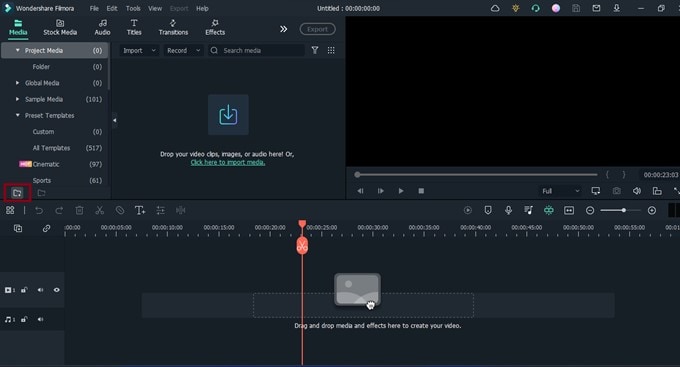
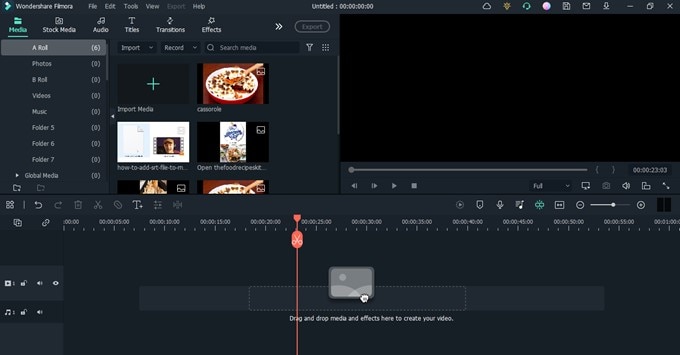
Step3 Click on the folder icon until you reach the total number of folders you need to categorize your video files.
Right-click on each folder and name it accordingly.

After you name each folder, use the Import button to upload each video files you need to edit your video.
![]()
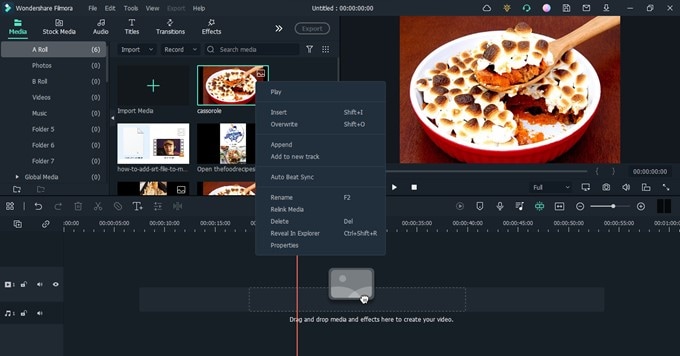
Note: since the media files you import into your project get the name associated with the code given by the source, it becomes hard to capture a specific file while editing. You need to rename each of the elements you imported for easier access.
Step4 Rename all imported files. To rename your imported files, right-click on them to add a preferred name. Then, click Rename from the pop-up list to name the files.
2. The Use of Proxies
Another tip that enhances a quick editing process is the use of proxies. Proxies can be described as low-resolution versions of your video files. So, if you’re working on video files that drag back playback speed, like 4K footage, you can create a proxy to enable your PC to handle the file seamlessly.
A tool like Filmora editor can help create proxies of your video file flawlessly. You just have to follow the steps below;
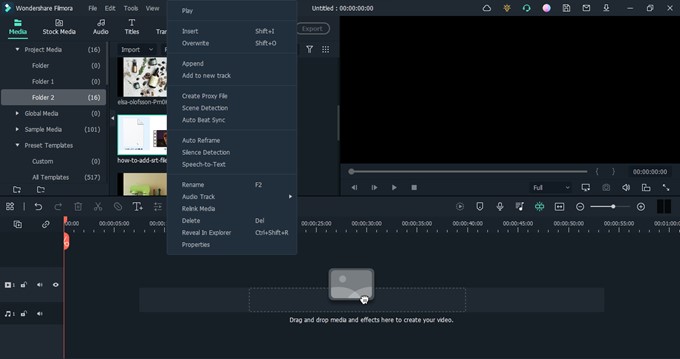
Step1 Locate the large video file you imported to Filmora and right-click it. Then, select Create Proxy File.
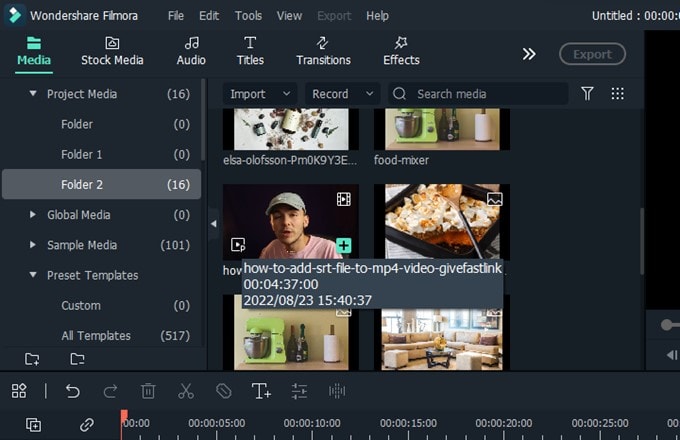
Step2 You should see the proxy icon at the bottom right corner of your video once it completes. This takes only a few minutes.
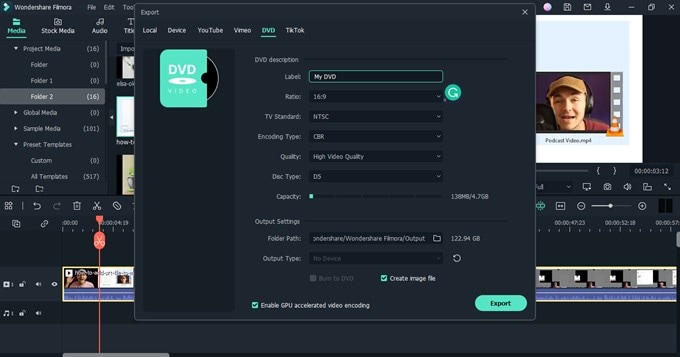
Step3 Drag-n-drop the video to the timeline and perform the necessary editing. Afterward, use the Export button to save the file to your PC.
3. Keep Your Videos and Audio Tracks Organized
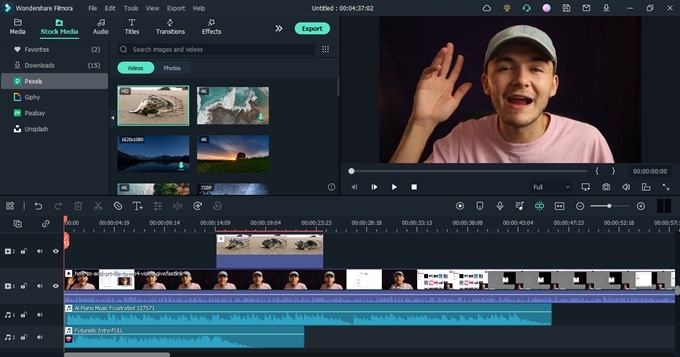
This is similar to our first tip, and fortunately, the Filmora video editor facilitates this kind of operation quickly and easily. It involves organizing video and audio clips in the timeline while editing. For instance, use video track #1 for graphics or text, #2 for your B roll, and #1 for the main footage taken.
You will also do the same for Audio, for instance, Audio track #1 for music, Audio track #2 for dialogues, and many more. This will allow you to edit various clips simultaneously, making the editing process faster and easier. Here are the steps to use this tip;
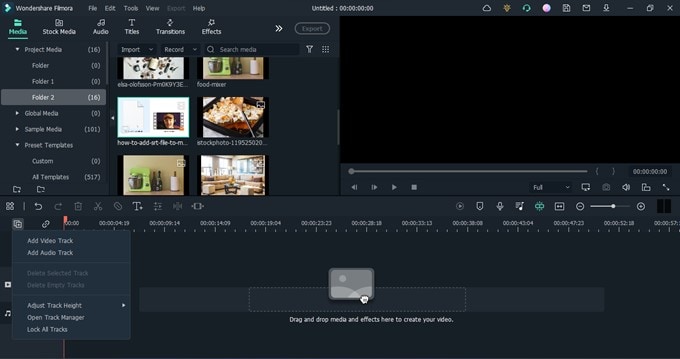
Step1 Click on the Add icon at the left side of the Timeline and select Add Video Track or Add Audio Track to add more timelines for your clips.
Step2 Drag-n-drop the video clips and audio clips to the relevant timeline.
4. Keyboard Shortcuts
These are commands on the keyboard of your pc that will enable you to edit your projects easily and quickly. Various options can be available by keying in specific orders rather than going through a long process using the mouse. This knowledge can be a real time-saver when handling projects. To get more enlightened on the setup in Filmora, follow the steps outlined below;
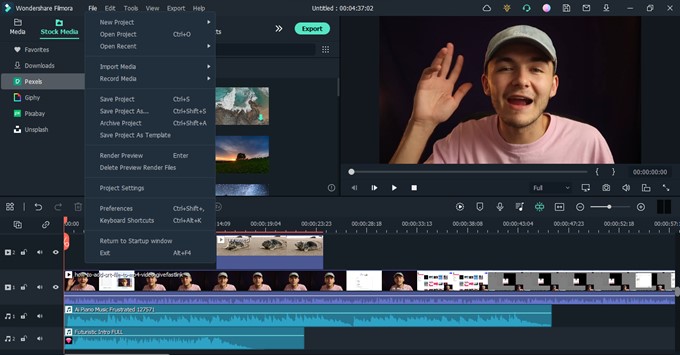
Step1 Open Filmora and click File from the top side.
Step2 Select Keyboard Shortcuts from the drop-down list.
Step3 The new pop-up window on your PC screen will display all shortcuts you can employ while using Filmora, and the interesting part is that you can customize the shortcut keys to your preference. Moreover, you can freely switch keyboard shortcuts between Filmora, Adobe Premiere Pro, and Final Cut Pro.
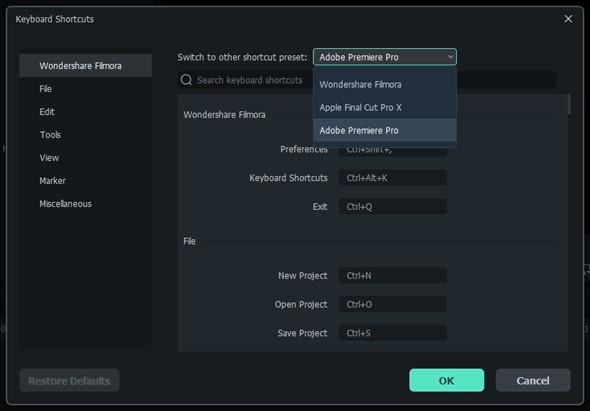
Step4 For clicking CTRL+ALT+N will allow you to create a new folder for your file.
5. Edit in Stages
Our final tip is to edit in stages. Yes, it is necessary to edit in stages when dealing with editing work. This helps to limit the time you spend on a project. In the beginning, you should do a rough cut. You can begin by editing the A roll at first and then move on to edit the B roll, moving on to the Sound FX, Music, Graphics, and Color Correction, and then reviewing the entire project before exporting it.
In case while editing the A roll, you find something that requires a quick fix in its audio, focus on it and, if possible, use a marker icon to describe it. This will help you not get confused once you get to the Audio stage. See the steps to use Filmora to do this below;
Step1 Firstly, focus on your video footage. Move them to the required timeline.
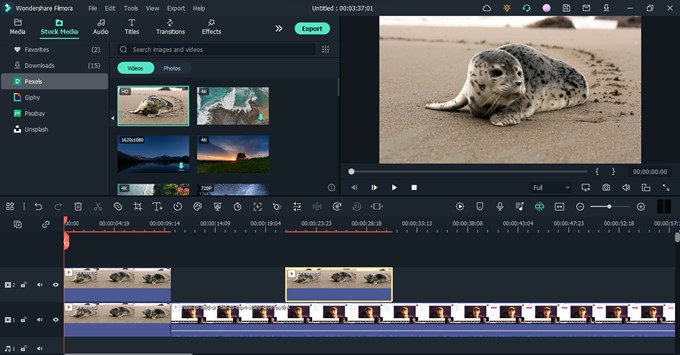
Step2 Next, move your B-roll to the relevant timeline. Then, apply the required editing.
Step3 Afterward, move drag-n-drop the audio clips to the timeline and apply the needed edits.
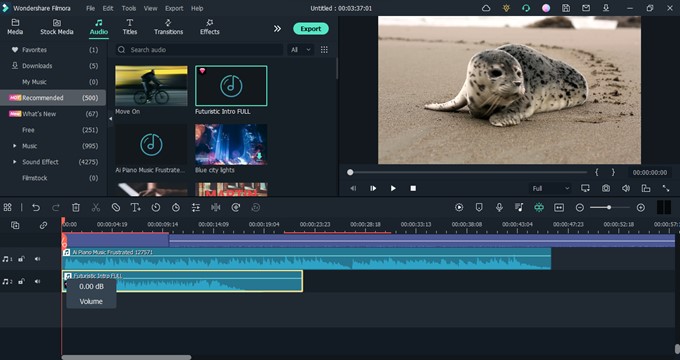
Repeat the process for different operations in stages until you finish.
Conclusion
The editing process is about having a free mind where creativity is the primary focus. When you can do that, you will be able to complete your projects in a short time and work on various tasks simultaneously. The tips discussed in this article will go a long way in helping you handle your projects using Filmora.
You can use Filmora to edit videos and other media files downloaded from YouTube, Vimeo, and many more video-sharing sites. Follow these tips and make editing your video projects quite easy and fast.
Free Download For Win 7 or later(64-bit)
Free Download For macOS 10.14 or later
Step4 Rename all imported files. To rename your imported files, right-click on them to add a preferred name. Then, click Rename from the pop-up list to name the files.

2. The Use of Proxies
Another tip that enhances a quick editing process is the use of proxies. Proxies can be described as low-resolution versions of your video files. So, if you’re working on video files that drag back playback speed, like 4K footage, you can create a proxy to enable your PC to handle the file seamlessly.
A tool like Filmora editor can help create proxies of your video file flawlessly. You just have to follow the steps below;
Step1 Locate the large video file you imported to Filmora and right-click it. Then, select Create Proxy File.

Step2 You should see the proxy icon at the bottom right corner of your video once it completes. This takes only a few minutes.

Step3 Drag-n-drop the video to the timeline and perform the necessary editing. Afterward, use the Export button to save the file to your PC.

3. Keep Your Videos and Audio Tracks Organized
This is similar to our first tip, and fortunately, the Filmora video editor facilitates this kind of operation quickly and easily. It involves organizing video and audio clips in the timeline while editing. For instance, use video track #1 for graphics or text, #2 for your B roll, and #1 for the main footage taken.
You will also do the same for Audio, for instance, Audio track #1 for music, Audio track #2 for dialogues, and many more. This will allow you to edit various clips simultaneously, making the editing process faster and easier. Here are the steps to use this tip;
Step1 Click on the Add icon at the left side of the Timeline and select Add Video Track or Add Audio Track to add more timelines for your clips.

Step2 Drag-n-drop the video clips and audio clips to the relevant timeline.

4. Keyboard Shortcuts
These are commands on the keyboard of your pc that will enable you to edit your projects easily and quickly. Various options can be available by keying in specific orders rather than going through a long process using the mouse. This knowledge can be a real time-saver when handling projects. To get more enlightened on the setup in Filmora, follow the steps outlined below;
Step1 Open Filmora and click File from the top side.
Step2 Select Keyboard Shortcuts from the drop-down list.

Step3 The new pop-up window on your PC screen will display all shortcuts you can employ while using Filmora, and the interesting part is that you can customize the shortcut keys to your preference. Moreover, you can freely switch keyboard shortcuts between Filmora, Adobe Premiere Pro, and Final Cut Pro.

Step4 For clicking CTRL+ALT+N will allow you to create a new folder for your file.
5. Edit in Stages
Our final tip is to edit in stages. Yes, it is necessary to edit in stages when dealing with editing work. This helps to limit the time you spend on a project. In the beginning, you should do a rough cut. You can begin by editing the A roll at first and then move on to edit the B roll, moving on to the Sound FX, Music, Graphics, and Color Correction, and then reviewing the entire project before exporting it.
In case while editing the A roll, you find something that requires a quick fix in its audio, focus on it and, if possible, use a marker icon to describe it. This will help you not get confused once you get to the Audio stage. See the steps to use Filmora to do this below;
Step1 Firstly, focus on your video footage. Move them to the required timeline.

Step2 Next, move your B-roll to the relevant timeline. Then, apply the required editing.
Step3 Afterward, move drag-n-drop the audio clips to the timeline and apply the needed edits.

Repeat the process for different operations in stages until you finish.
Conclusion
The editing process is about having a free mind where creativity is the primary focus. When you can do that, you will be able to complete your projects in a short time and work on various tasks simultaneously. The tips discussed in this article will go a long way in helping you handle your projects using Filmora.
You can use Filmora to edit videos and other media files downloaded from YouTube, Vimeo, and many more video-sharing sites. Follow these tips and make editing your video projects quite easy and fast.
Free Download For Win 7 or later(64-bit)
Free Download For macOS 10.14 or later
Best Ideas on Using Filmora Green Screen
Green screener chroma key is commonly used in film, tv shows, and social media videos nowadays. This article will show you how to light film and edit a green screen. Additionally, you can have some fun ideas with a chroma key. Therefore, keep reading this article to know all the information.
Part 1: Cool Ideas to Use Green Screen
1. The Magic Box
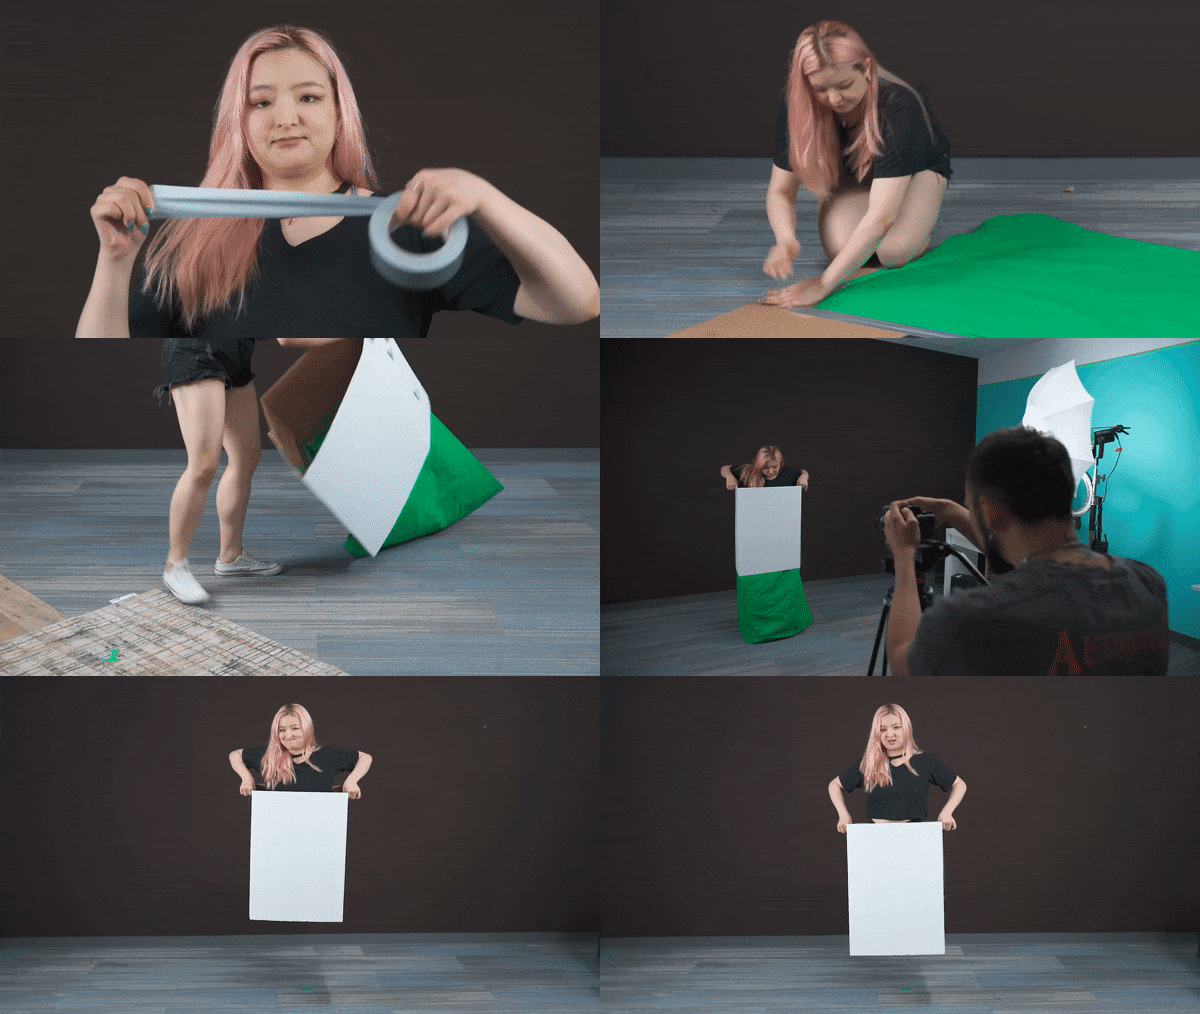
2. Liquid Transformation

3. Key Out a Body Part

4. T-shirt TV Screen

Part 2: Setting Up The Green Screen
Filming with the green screen is getting easier and easier. Anyone can do it, but before you get started, we will share some do’s and don’ts to help you get the best results.
In fact, there are many ways to set up a green screen, but the most cost-efficient way is with a green screen fabric. If you are using a green fabric as a DIY green screen, make sure you steam or iron it out, whether taping it to a wall or hanging it off the rack. Keep in mind the green screen should not leave any wrinkles.
It is because wrinkles will make lighting the green screen a nightmare, and uneven lighting will leave you with shadows and disappointing results. It would help if you also pulled the green screen tight to get a seamless background. The better you do with the setup, the easier it will be the key it out later
Part 3: Lighting a Green Screen
It doesn’t matter how nice your green screen is. You won’t get good results if you don’t light it properly. When you light a green screen, be aware of these things.
- Make sure there are at least six feet of space between you and your green screen; therefore, you’re not casting a shadow that cannot be keyed out later.
- Remember, any shadow on the green screen is bad. The lighting on the screen should be flat, even, and one-dimensional meaning. Please don’t place the screen leaning at an angle since they’ll make it harder to light evenly.
- Do light yourself and your background separately. It will ensure your subject wouldn’t bleed into the green, which will create a halo around them.
- After you key out the green screen and lighting, your subjects should emulate the lighting from your final footage. For example, if you know sunlight is coming from the left light, your subject is from the left direction as well.
Part 4. Keying out your green screen
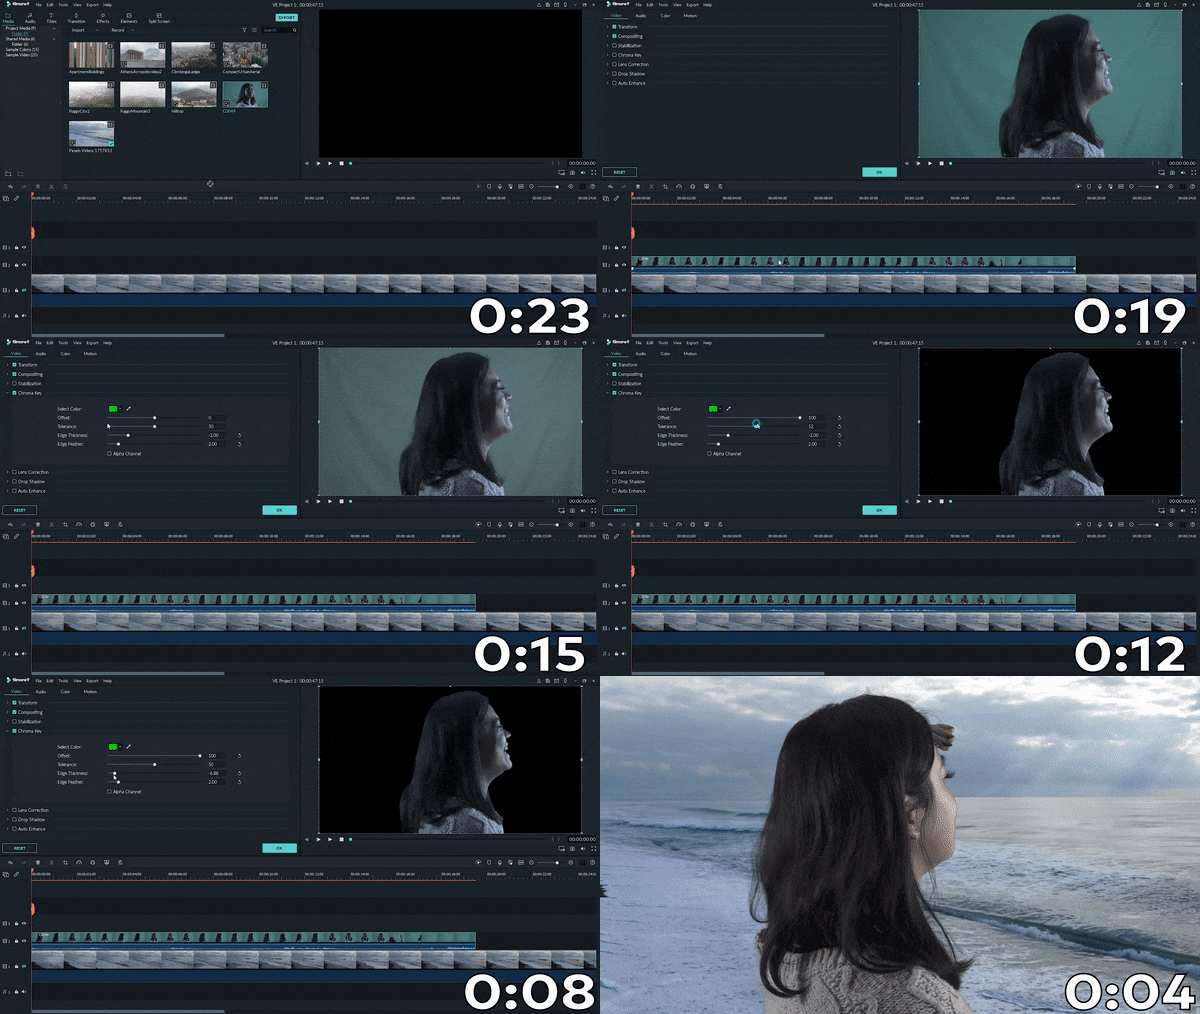
Once your footage is good, go into Filmora and import it into your timeline, then double-click it to find the chroma key menu. However, don’t stop there. Clicking the chroma key button is not enough to guarantee perfectly keyed footage, so play around with the offset tolerance edge thickness and edge feather. Lastly, adjust it to make sure your edit looks as good as possible.
Free Download For Win 7 or later(64-bit)
Free Download For macOS 10.14 or later
Summary
Aside from a video background, there are many things you can use chrome key effects on. For example, you can make liquid transformation, you can make a magic box, etc. In the meantime, it doesn’t matter how good your green screen, it won’t have a good results if are not light it properly. You can use Filmora to keying out your green screen. It just take a few clicks to be able keying out your green screen by following the tutorial above.
Free Download For macOS 10.14 or later

Summary
Aside from a video background, there are many things you can use chrome key effects on. For example, you can make liquid transformation, you can make a magic box, etc. In the meantime, it doesn’t matter how good your green screen, it won’t have a good results if are not light it properly. You can use Filmora to keying out your green screen. It just take a few clicks to be able keying out your green screen by following the tutorial above.
Turn Your Text Into a Podcast Made Possible
Being a content creator, either writing or generating videos, requires podcast text-to-speech knowledge. The impact of content depends on how many people see it. It means finding new ways to get it into real and virtual places where customers and users might be.
Depending on the context, podcasting can be a perfect alternative for sharing content.
This article will address your questions about the easiest way to turn a blog into a podcast. Let’s begin with the reasons why you should do a podcast.
Part 1. Why You Should Podcast
Podcasts are one of the simplest and most cost-effective ways. It helps to advertise yourself and your products to a highly targeted audience. Podcasts are also excellent for engaging with potential clients interested in your content. In your field, you can achieve fame and expertise.

Repurposing of Content
Podcasters can maximize their potential for successful episodes and repurposing their podcast into multiple content pieces.
This podcasting strategy can help you reach more people by putting your podcasts on more channels and engaging more people who might be interested.
More Fulfilling than Articles
Unlike music, news, TV, and social media, podcast listeners don’t have to watch the screen like they do with YouTube videos or TV shows. This means they can listen while walking or driving home from work.
Podcasts are the best way to get people to pay attention and make fundamental societal changes. They can keep people interested for a long time, so you can go into detail and get personal without turning off your audience.
Minimal Start-Up Costs
To start a podcast, you can spend a little money. Even some of the most famous podcasts use a microphone, a computer, and software for recording. But it’s common to spend more money on advertising and better hosting.
Starting a podcast doesn’t cost much, as you can get everything you need for about $145.
Expansion of Search Potential
In the past few years, many big brands and small to medium-sized businesses have started using podcasts as a marketing strategy. This is because podcasts are becoming more and more popular and can help raise your company’s profile.
Podcasting is another way to disseminate your study to a broader audience, whether that audience consists of policymakers or interested citizens.
Potential to Monetize
Using an affiliate program podcast, you can earn money. Businesses can increase their income by offering paid advertising sponsorships to monetize podcasts. Suppose you accept an affiliate offer to sell ads. In that case, you become the company’s voice and put recorded ads in your podcast episodes.
The most common way to make money from a podcast is through sponsorship. It’s also the easiest way to make money because you don’t have to make or sell anything. You just have to make a deal with a sponsor.
Part 2. Why Are Writers Hesitant to Start a Podcast?
Even after knowing all these benefits, writers are still hesitant to start a podcast. One of the main reasons a writer may be reluctant to launch a podcast is the cost of the necessary equipment. You will need at least $80 to $500 for this unpromissing business.
However, let me tell you a secret that many podcastors didn’t buy any audio equipment for the launch of their podcast channel on Spotify.
Moreover, many writers don’t want to show their voice through recordings. This is because they couldn’t just make a recording and hand it off to a sound specialist. Besides, finding their voice through the stories they write is the routine.
But we all need to get the truth that many podcastors don’t record a single word of the podcast with their own voice. Due to a solution: text-to-speech, technology like this has been around for a while and continues to improve.
The two important issues have been solved, so what are you waiting for? Platform building has always relied heavily on content marketing. With blog posts and social media, additional support was provided, and now podcasts are becoming more commonplace.
Part 3. How to Turn a Text Into a Podcast?
Text To Speech
To turn your text into audible content, Text-to-speech (TTS) is an assistive technology. With a single click, TTS reads your written text aloud. Many people also use it for writing and editing to maintain audience concentration.
Text-to-speech technology is compatible with all digital devices, including computers, tablets, and smartphones. Increasing numbers of websites and products now have developed this function. For example, you can find it within the trusted video editing software like Filmora. With Filmora’s Text to Speech (TTS) feature , you may add extra aspects to your video by turning your text files into voiceovers.
Why we regard text to speech as a good
For writers, imagination is the only tool to construct their stories. To bring our stories to life, all we need is a laptop. The same holds for text-to-speech technologies, which can significantly assist writing and editing by allowing the author to hear their words without using their voice.
- Text-to-speech applications can assist you in repurposing your material.
Your written work can be converted into spoken language or a podcast. A podcast can be converted into a YouTube video with a few alterations. All of these factors can help you reach new audiences.
Repurposing material permits your audience to consume it in a variety of ways. The audience can read, listen to, or view your content.
- Text-to-speech systems enable authors to create information that is accessible.
As per World Health Organization, there are almost 285 million visually impaired persons and 39 million blind people. We writers can create a more inclusive world by constantly keeping accessibility in mind.
The limitations of text to speech
Text-to-speech software is becoming increasingly lifelike thanks to technological advancements. However, it cannot still express genuine human emotions. However, this should allow you to utilize these tools. The positives significantly exceed the disadvantages, and technology is continually improving.
Easiest Fix: Turn Texts Into Podcasts With TTS in Filmora
So how can you use text-to-speech? Andhow you can turn your texts into audio podcasts in a daily routine? Filmora , a all-in-one video editor, gets you the solution.
Free Download For Win 7 or later(64-bit)
Free Download For macOS 10.14 or later
Step1 Download and install Filmora on your PC or Mac.
Step2 Open Filmora and select the video on which you wish to add audio.

Step3 After adding your selected video, select the option “Titles” to add text to your video.

Step4 Select your favorite position for text in the video, like “lower third,” which is used the most in video titles.
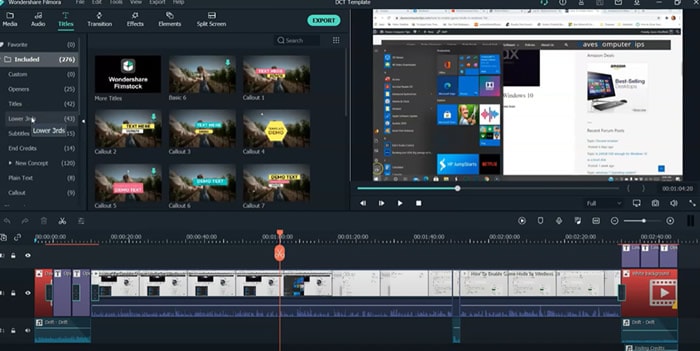
Step5 Add text to the timeline and click “Ok.” You can move the red timeline marker if you want your text in a certain spot.

Click the “+” button marked in the picture below to add text.

You can also edit the text by changing its style, color, and font or by animating it.

Step6 Press the “Text-to-Speech” button in the lower right side and choose your preferred voice. For example, Lilly’s voice resembles Siri.

You can also choose another language other than English.

Click “Ok” once you’ve selected everything according to your requirements.
Step7 Once the transcription is completed, go ahead and test the video and audio to see if it’s synching.

And that’s done. This is how easy it is to turn your texts into speech using Filmora.
Part 4. Hot FAQs on Podcast Text to Speech
How do I convert podcasts to text?
With the help of the smartphone app Google Recorder you can easily convert podcasts to texts for free.
- Open the app on your phone, start recording to it, and start recording your podcast simultaneously.
- The words will be automatically recorded and entered into the application as you talk into your phone’s microphone.
- After you click stop on the app, you can store and share the files once you finish your recording.
You have an option of sharing the text, the audio, or both. Alternatively, you can save them to your Google Drive if you don’t want to share them.
How to turn my podcast into a sound?
To convert your video podcasts into audio through Filmora. Follow these steps:
- Drag the imported video from the media library into the video timeline.
- To extract the audio from the video, right-click the video clip and select “Audio Detach.”
- After a while, audio and video will be seen on separate tracks.
Can I save the sound after converting text to speech?
Once the text has been converted to speech, you can save the sound. Select your preferred format after clicking the “export” option in Filmora.
Conclusion
Many of us wish to launch a podcast and blog. A productive podcast’s essence is turning writing into audio using various podcasting techniques. AI-powered text-to-speech softwares can quickly convert articles into podcasts. Or, you can invite significant people to your podcast to personalize it. Podcasting can give outdated content a new life.
Free Download For macOS 10.14 or later
Step1 Download and install Filmora on your PC or Mac.

Step2 Open Filmora and select the video on which you wish to add audio.

Step3 After adding your selected video, select the option “Titles” to add text to your video.

Step4 Select your favorite position for text in the video, like “lower third,” which is used the most in video titles.

Step5 Add text to the timeline and click “Ok.” You can move the red timeline marker if you want your text in a certain spot.

Click the “+” button marked in the picture below to add text.

You can also edit the text by changing its style, color, and font or by animating it.

Step6 Press the “Text-to-Speech” button in the lower right side and choose your preferred voice. For example, Lilly’s voice resembles Siri.

You can also choose another language other than English.

Click “Ok” once you’ve selected everything according to your requirements.
Step7 Once the transcription is completed, go ahead and test the video and audio to see if it’s synching.

And that’s done. This is how easy it is to turn your texts into speech using Filmora.
Part 4. Hot FAQs on Podcast Text to Speech
How do I convert podcasts to text?
With the help of the smartphone app Google Recorder you can easily convert podcasts to texts for free.
- Open the app on your phone, start recording to it, and start recording your podcast simultaneously.
- The words will be automatically recorded and entered into the application as you talk into your phone’s microphone.
- After you click stop on the app, you can store and share the files once you finish your recording.
You have an option of sharing the text, the audio, or both. Alternatively, you can save them to your Google Drive if you don’t want to share them.
How to turn my podcast into a sound?
To convert your video podcasts into audio through Filmora. Follow these steps:
- Drag the imported video from the media library into the video timeline.
- To extract the audio from the video, right-click the video clip and select “Audio Detach.”
- After a while, audio and video will be seen on separate tracks.
Can I save the sound after converting text to speech?
Once the text has been converted to speech, you can save the sound. Select your preferred format after clicking the “export” option in Filmora.
Conclusion
Many of us wish to launch a podcast and blog. A productive podcast’s essence is turning writing into audio using various podcasting techniques. AI-powered text-to-speech softwares can quickly convert articles into podcasts. Or, you can invite significant people to your podcast to personalize it. Podcasting can give outdated content a new life.
Also read:
- [New] Does Your Channel Benefit From Regular YouTube Payments?
- [Updated] Permanent Deactivation The Ultimate Guide to YouTube Shorts
- [Updated] The Ultimate Resource 50+ No-Fee Visual Effects Websites Reviewed for 2024
- 2024 Approved Make Eye Zoom Transition Effect with Filmora
- Download and Upgrade Your GeForce GTX 1660 Super Graphics Card Drivers
- Download the Latest Firmware: HP LaserJet Pro 1007 Printer Software Upgrade
- Effortless DVD to USB Conversion Techniques for PC and Apple Enthusiasts
- Ideal Screen Reporter Tech Boosting YouTubing Experience for 2024
- In 2024, How to Add Font Effect
- Looking for the Steps to Add Transitions Effects in Premiere Pro? Here Are the Steps to Add and Edit Transitions in Premiere Pro and an Alternative Way to Video Transitions for 2024
- New Difference Between Time Lapse and Hyperlapse
- New How to Create Motion Text Effects for Your Video?
- New In 2024, Make A Tattoo Disappear Like A Magic
- Understanding the Limitations: Why ChatGPT May Not Guarantee Data Security
- What Is Color Finale for 2024
- Title: Mastering DaVinci Resolve Scopes A Comprehensive Guide for 2024
- Author: Chloe
- Created at : 2024-12-06 07:00:49
- Updated at : 2024-12-12 09:30:14
- Link: https://ai-editing-video.techidaily.com/mastering-davinci-resolve-scopes-a-comprehensive-guide-for-2024/
- License: This work is licensed under CC BY-NC-SA 4.0.


