:max_bytes(150000):strip_icc():format(webp)/GettyImages-174294003-57c6ee043df78cc16eeab260.jpg)
Mastering Video Marketing An Expert Playbook for 2024

Mastering Video Marketing: An Expert Playbook
Video marketing is the process of promoting a product, service, or brand using videos intended to attract audiences’ attention and prompt them to action. With marketers and communicators working increasingly with AI, automation, chatbots, and all sorts of generative technology in 2023 and beyond, video is one of the most common digital mediums for connecting with people.
What exactly does effective video marketing look like today? This guide will take a closer look.
- Part 2. 3 Typical Types of Marketing Videos
- Part 3. 6 Tips for Making Your Video Effective
- Part 4: Useful Video Editing Tool
- Conclusion
Part 1: How to Create a Video Marketing Campaign

Launching a video marketing campaign requires considerable planning and preparation. Follow these best practices for video campaign success:
1.Set Goals and Identify Your Audience
The aim of video marketing for small businesses or large businesses should be tied to business objectives, such as raising brand awareness, educating consumers, or driving conversions. First and foremost, define these goals.
Who are you trying to reach with video content? You need a clear picture of this. Collect insights about audiences with regard to demographics, interests, values, media habits, and existing brand impressions. With these insights, you can create unique content that appeals to your target viewers.
2.Conduct Market Research
Research what kinds of videos connect with your audiences by accounting for competitors and non-competitors successfully using video. Identify videos with the most hits, shares, subscribers generated, and other metrics through channels like YouTube Analytics, Tubular Labs or SEMrush.
From the data, conclude common themes around video length, preferred formats for content, production methodologies, and so on, which should then serve to guide your own content.
3.Craft a Compelling Story
Every great marketing video is a story. Draw a story plot with rising tension and emotion leading to resolution. The story’s exposition, rising action, climax, and denouement can be outlined by famous storytelling frameworks.
Narratives that keep viewers engaged from beginning to end result in better videos. Early validation for your script ideas can be gathered through focus groups, social listening, surveys, and interviews with members of your target audience.
4.Produce Video/Audio with Quality
Bring your story to life by investing in experienced video producers. Budgets may be wildly divergent, so always aim to achieve the best production quality.
Feature crisp, bright camerawork, professional editing, and transitions. Be sure to use intense music to underscore emotional peaks and simple but eye-catching visual effects where they make sense.
For audio, manage volumes between scenes at the same level; minimize background noise; have clear dialogue and smooth mixing. Good video and audio keep viewers glued to your content.
5. Select Suitable Video Platforms
Research where video marketing is most effective in your niche, and figure out which social platforms and media sites your target audiences use.
Being present on several different platforms is every strategy’s dream. However, the real key is finding out where your audiences are most engaged and directing them there with video content tailored for the individual user experience by the platform.
6.Implement a Strong Call-to-Action
The ending of every video narrative should take the viewer toward an action. Clicks to websites? Subscriptions to YouTube channels? Form fills? App downloads?
Your final message in your video clears CTA. Add supporting calls-to-action in the form of superimposed graphics, cards, or endscreens outside of the video to direct traffic beyond that medium and give more expression to the story.
7.Track and Optimize Performance
After videos are posted, collect data on performance. Such indicators include view counts, average % viewed, changes in viewership over time, referral traffic, subscribers gained (added), conversion rates, and so on.
Feed analytics insights into an optimization road map. To inform new video projects targeting the same KPIs, look at higher versus lower-converting videos. Test repetition of the same content on different media platforms at various time intervals, with varying images of thumbnails and so forth, to improve metrics.
Part 2: 3 Typical Types of Marketing Videos

There are some video formats that particularly suit certain marketing objectives. Let’s explore some of the most versatile, effective genres with real-world examples:
1. Explainer Videos
Knowing how to simplify and explain complex products, services, or concepts is precisely what Seasoned Explainers do. They use motion graphics, cartoons, live action–it’s all good. They express it interestingly and help audiences understand value offerings they may be unfamiliar with.
2. Tutorial Videos
A good video tutorial leads audiences through a process one can use to employ the product, carry out the method, or develop the skill. Hands-on learning material meets user information needs, indirectly promoting brand owners of the know-how.
3. Behind-the-Scenes Content
These videos give audiences an insider’s perspective on making popular products. Getting a peek behind the curtain helps pique viewer curiosity while humanizing brands through interviews, b-roll footage, and more.
Part 3: 6 Tips for making your video effective

Creating personalized video marketing strategies that effectively engage your target audience and achieve your marketing goals requires careful planning and execution. You need to grab viewer attention fast, communicate your key messages clearly, and provide strong calls to action.
The key is to keep it concise, optimize for sound-off viewing, build in interactivity, showcase user-generated content, partner with influencers, and more. Apply these best practices for getting your marketing videos noticed and acted upon:
1.Keep It Concise
With a sea of content competing for viewer attention getting longer daily, shorter is better. Videos under 1 minute perform far better for driving clicks, conversions, completes, and shares. Test even 6-second bumper ads on YouTube and Facebook.
2. Capture Attention Early
You have seconds to hook audiences scrolling feeds non-stop. Dynamically edited intros with eye-catching colors, quick cuts, and dramatic questions/facts immediately grab interest versus slow fades or titles.
3.Make Sound Optional
85% of videos are now watched without sound on mobile devices. While strong audio is still important for reeled-in viewers, ensure critical info is communicated visually as well.
4.Incorporate Interactive Elements
Leverage platform tools like YouTube cards, info cards, links, hashtags, Q&As and more to keep audiences actively engaged with video content instead of passively viewing.
5. Spotlight User-Generated Content
User videos reviewing products or demonstrating branded tutorials often outperform corporate studio content now. Repurpose this UGC via reaction videos, contest highlights, and “best of” community compilations.
6.Build Influencer Partnerships
Collaborations with influencers popular with your target demos lend video credibility. Support creators with gear, access, co-promotion, etc., in exchange for branded integration and affiliate sales.
Part 4: Useful Video Editing Tool

Video Editing Now For Win 7 or later(64-bit)
Video Editing Now For macOS 10.14 or later
In creating marketing videos, the right editing software should help cut together raw material gatherings and integrate graphic elements. It must also permit an easy handling of musical components and the application of effects, among other things. The final step, polishing the product into various forms for export to a multitude of servers, should all be done with minimal effort through intelligent operating interfaces (UI). Among the options used by amateurs and professionals alike, Wondershare’s Filmora is one of the most popular.
Advertisement Video Editing in Filmora
Free Download For Win 7 or later(64-bit)
Free Download For macOS 10.14 or later
More advanced video editing for veteran editors yet an easy-to-use, intuitive software for beginners. Key features of Filmora include:
- Simple Drag-and-Drop Timeline Interface
- Library Of Visual Effects and Transitions
- Built-In Title Templates
- Color Grading and Color Matching Tools
- Support For Keyframe Animation
- Background Audio Mixer
- The Free-Use Audio, Image, Video Library
- Instant Previews of Edits
- Export For All Types of Platforms
From planning and carrying out shooting to editing, rendering and output, Filmora speeds up all the steps of bringing video projects to life. For marketing teams constantly producing clips, an intriguing aspect of the software is that its wide appeal to video skill levels combines well with pro-grade tools.
Conclusion
In the future, video marketing will only grow more critical. With virtual reality moving from gaming to experiential e-commerce, it is up to marketers to drive adoption. With these strategies, your brand can get ahead of the curve and use groundbreaking video programs to win over audiences at this time and in the years that follow.
Part 1: How to Create a Video Marketing Campaign

Launching a video marketing campaign requires considerable planning and preparation. Follow these best practices for video campaign success:
1.Set Goals and Identify Your Audience
The aim of video marketing for small businesses or large businesses should be tied to business objectives, such as raising brand awareness, educating consumers, or driving conversions. First and foremost, define these goals.
Who are you trying to reach with video content? You need a clear picture of this. Collect insights about audiences with regard to demographics, interests, values, media habits, and existing brand impressions. With these insights, you can create unique content that appeals to your target viewers.
2.Conduct Market Research
Research what kinds of videos connect with your audiences by accounting for competitors and non-competitors successfully using video. Identify videos with the most hits, shares, subscribers generated, and other metrics through channels like YouTube Analytics, Tubular Labs or SEMrush.
From the data, conclude common themes around video length, preferred formats for content, production methodologies, and so on, which should then serve to guide your own content.
3.Craft a Compelling Story
Every great marketing video is a story. Draw a story plot with rising tension and emotion leading to resolution. The story’s exposition, rising action, climax, and denouement can be outlined by famous storytelling frameworks.
Narratives that keep viewers engaged from beginning to end result in better videos. Early validation for your script ideas can be gathered through focus groups, social listening, surveys, and interviews with members of your target audience.
4.Produce Video/Audio with Quality
Bring your story to life by investing in experienced video producers. Budgets may be wildly divergent, so always aim to achieve the best production quality.
Feature crisp, bright camerawork, professional editing, and transitions. Be sure to use intense music to underscore emotional peaks and simple but eye-catching visual effects where they make sense.
For audio, manage volumes between scenes at the same level; minimize background noise; have clear dialogue and smooth mixing. Good video and audio keep viewers glued to your content.
5. Select Suitable Video Platforms
Research where video marketing is most effective in your niche, and figure out which social platforms and media sites your target audiences use.
Being present on several different platforms is every strategy’s dream. However, the real key is finding out where your audiences are most engaged and directing them there with video content tailored for the individual user experience by the platform.
6.Implement a Strong Call-to-Action
The ending of every video narrative should take the viewer toward an action. Clicks to websites? Subscriptions to YouTube channels? Form fills? App downloads?
Your final message in your video clears CTA. Add supporting calls-to-action in the form of superimposed graphics, cards, or endscreens outside of the video to direct traffic beyond that medium and give more expression to the story.
7.Track and Optimize Performance
After videos are posted, collect data on performance. Such indicators include view counts, average % viewed, changes in viewership over time, referral traffic, subscribers gained (added), conversion rates, and so on.
Feed analytics insights into an optimization road map. To inform new video projects targeting the same KPIs, look at higher versus lower-converting videos. Test repetition of the same content on different media platforms at various time intervals, with varying images of thumbnails and so forth, to improve metrics.
Part 2: 3 Typical Types of Marketing Videos

There are some video formats that particularly suit certain marketing objectives. Let’s explore some of the most versatile, effective genres with real-world examples:
1. Explainer Videos
Knowing how to simplify and explain complex products, services, or concepts is precisely what Seasoned Explainers do. They use motion graphics, cartoons, live action–it’s all good. They express it interestingly and help audiences understand value offerings they may be unfamiliar with.
2. Tutorial Videos
A good video tutorial leads audiences through a process one can use to employ the product, carry out the method, or develop the skill. Hands-on learning material meets user information needs, indirectly promoting brand owners of the know-how.
3. Behind-the-Scenes Content
These videos give audiences an insider’s perspective on making popular products. Getting a peek behind the curtain helps pique viewer curiosity while humanizing brands through interviews, b-roll footage, and more.
Part 3: 6 Tips for making your video effective

Creating personalized video marketing strategies that effectively engage your target audience and achieve your marketing goals requires careful planning and execution. You need to grab viewer attention fast, communicate your key messages clearly, and provide strong calls to action.
The key is to keep it concise, optimize for sound-off viewing, build in interactivity, showcase user-generated content, partner with influencers, and more. Apply these best practices for getting your marketing videos noticed and acted upon:
1.Keep It Concise
With a sea of content competing for viewer attention getting longer daily, shorter is better. Videos under 1 minute perform far better for driving clicks, conversions, completes, and shares. Test even 6-second bumper ads on YouTube and Facebook.
2. Capture Attention Early
You have seconds to hook audiences scrolling feeds non-stop. Dynamically edited intros with eye-catching colors, quick cuts, and dramatic questions/facts immediately grab interest versus slow fades or titles.
3.Make Sound Optional
85% of videos are now watched without sound on mobile devices. While strong audio is still important for reeled-in viewers, ensure critical info is communicated visually as well.
4.Incorporate Interactive Elements
Leverage platform tools like YouTube cards, info cards, links, hashtags, Q&As and more to keep audiences actively engaged with video content instead of passively viewing.
5. Spotlight User-Generated Content
User videos reviewing products or demonstrating branded tutorials often outperform corporate studio content now. Repurpose this UGC via reaction videos, contest highlights, and “best of” community compilations.
6.Build Influencer Partnerships
Collaborations with influencers popular with your target demos lend video credibility. Support creators with gear, access, co-promotion, etc., in exchange for branded integration and affiliate sales.
Part 4: Useful Video Editing Tool

Video Editing Now For Win 7 or later(64-bit)
Video Editing Now For macOS 10.14 or later
In creating marketing videos, the right editing software should help cut together raw material gatherings and integrate graphic elements. It must also permit an easy handling of musical components and the application of effects, among other things. The final step, polishing the product into various forms for export to a multitude of servers, should all be done with minimal effort through intelligent operating interfaces (UI). Among the options used by amateurs and professionals alike, Wondershare’s Filmora is one of the most popular.
Advertisement Video Editing in Filmora
Free Download For Win 7 or later(64-bit)
Free Download For macOS 10.14 or later
More advanced video editing for veteran editors yet an easy-to-use, intuitive software for beginners. Key features of Filmora include:
- Simple Drag-and-Drop Timeline Interface
- Library Of Visual Effects and Transitions
- Built-In Title Templates
- Color Grading and Color Matching Tools
- Support For Keyframe Animation
- Background Audio Mixer
- The Free-Use Audio, Image, Video Library
- Instant Previews of Edits
- Export For All Types of Platforms
From planning and carrying out shooting to editing, rendering and output, Filmora speeds up all the steps of bringing video projects to life. For marketing teams constantly producing clips, an intriguing aspect of the software is that its wide appeal to video skill levels combines well with pro-grade tools.
Conclusion
In the future, video marketing will only grow more critical. With virtual reality moving from gaming to experiential e-commerce, it is up to marketers to drive adoption. With these strategies, your brand can get ahead of the curve and use groundbreaking video programs to win over audiences at this time and in the years that follow.
Magic Effects Video Making [How To]
Magic inspires and fascinates everyone. Editors often rely on it to create suspense and attraction in their films. With an all-in-one video editor, Filmora, you can get creative and use ample stupefying effects to amuse your viewers. Before delving into the details of step-by-step guides of some magic effects, let’s examine these effects.
Part 1. What Are Magic Effects?
In terms of video editing, visual effects which imply the presence of supernatural forces (the ones having power over natural forces) are called magic effects. They could belong to any of the effects of charm, i.e., sudden appearance, vanishing, transposition, transformation, etc. For example, in Harry Potter’s classic scene, everyone waves a lit magic wand. To make this kinetic effect ourselves at home, read on.

Part 2. How to Create a Magic Effect with Filmora
An easy-to-use and all-in-one video editing software is necessary to realize this magic fully. Here, we use Wondershare Filmora . It can personalize anything in detail. You can also use footage from its stock media with unlimited options. By using this platform for editing, you can reduce your lengthy hours.
Free Download For Win 7 or later(64-bit)
Free Download For macOS 10.14 or later
There are many different ways you can do spellbound editing on Filmora. To learn the complete step-by-step instructions, continue scrolling.
Step1 Download and Install Wondershare Filmora
Launch the most recent version of the software on your computer to produce an outstanding film. To do this, take the following actions:
- You must first download Wondershare Filmora and open it on your PC or Mac.

Step2 Import Your Photos and Videos
When you open Wondershare Filmora, you will notice the main import window in the top left corner.
- Click in the center of the import window upon the import icon.
- After clicking, Wondershare Filmora will automatically direct you to your PC library.
- Browse to where your target Clips or Images are stored.
- Select all the objects you want to import.
- Click on Open, and you will have imported files.

Step3 Add Your Photos and Videos to the Timeline
Your next step will be to add the imported videos and images to the timeline. When you have many videos and photos imported into the timeline, you can add them simultaneously.
Or you can also add them one by one wherever you need. To add an item to your timeline, follow the steps mentioned.
- Right-click on the photo or video you want to add to the timeline.
- Keep holding the right-click and drag it down to the timeline.

Step4 Adding the Magic Imitating Effect
After these initial setups, you must add the effects from filmstock to our clips. These are pre-made presets of different clipart and graphics, executing unique movements and effects. For their introduction in the video, read along with the following procedure:
- After dragging and dropping the clip onto the first track on the timeline, go to the stickers tab on the top left ribbon, click it, and scroll down to the filmstock dropdown.

- From there, open the Bling Bling Effect Pack and choose the bling light effect of your liking. Then, drag and drop that effect onto the second video track on the timeline.

- Adjust the element’s scale according to your required size from the editing menu after double-clicking the element.

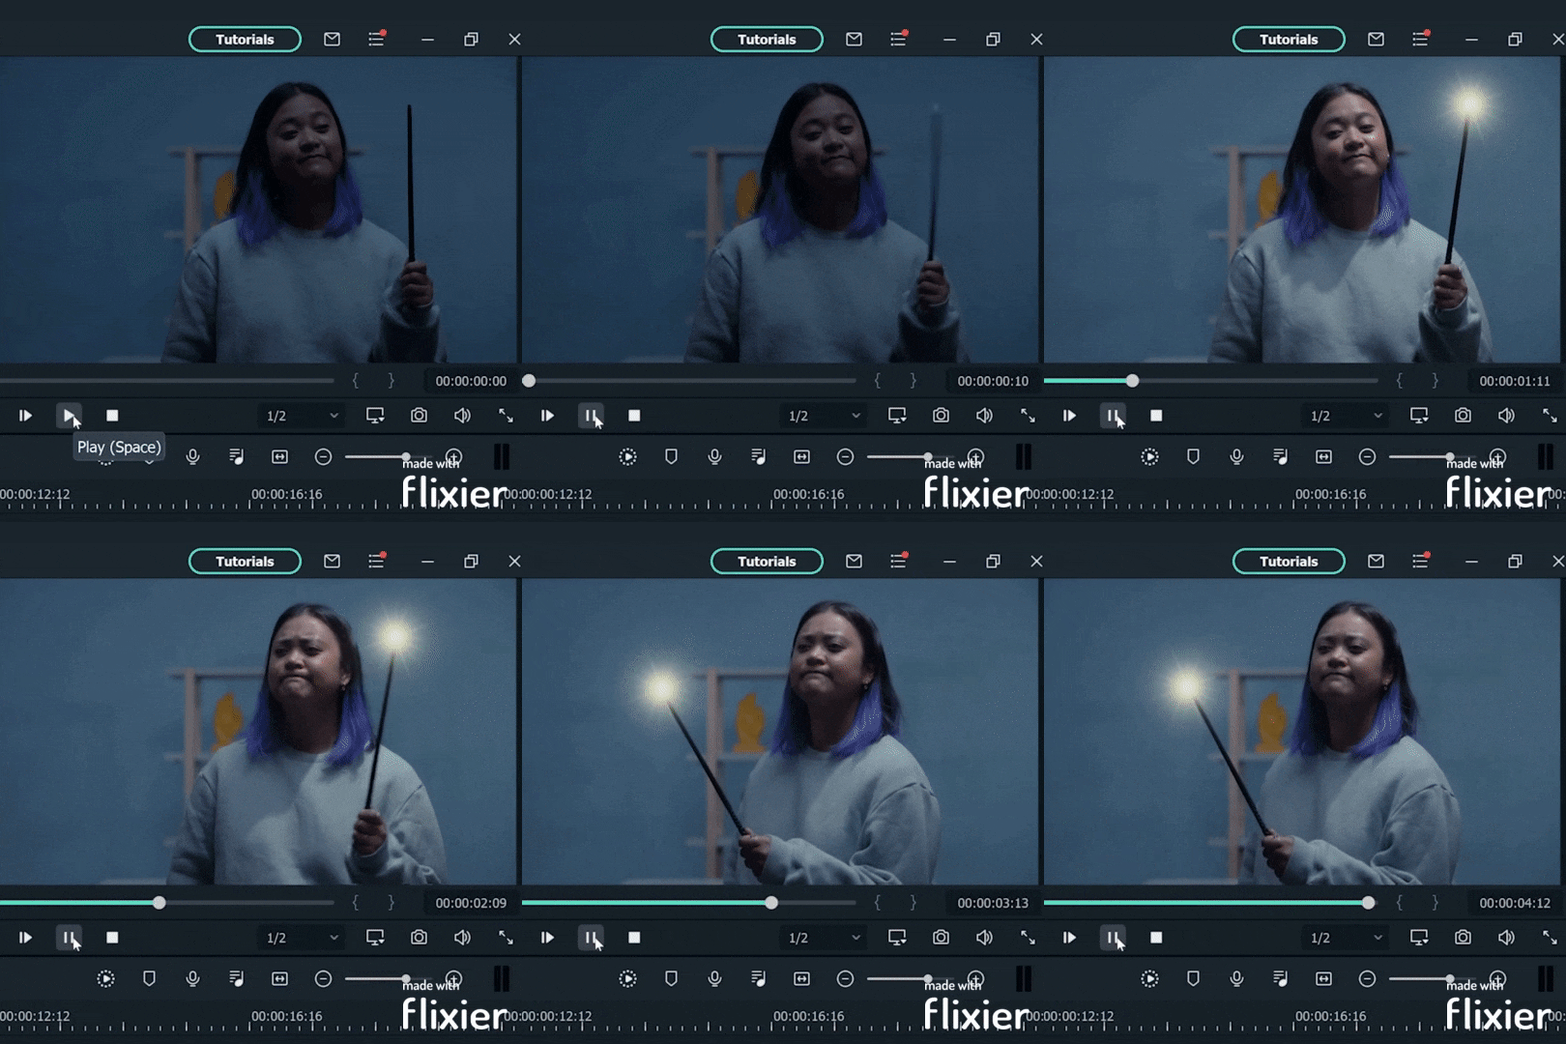
- Move the playhead to locate the brightest moment of the element. Now, right-click and select Add Freeze Frame. It will freeze the element at that exact frame

- Find the spot on the base clip’s timeline where the corresponding LED used while shooting turns on. Then, bring the element to the second track and adjust its position.
![]()
Note: ensure the element’s freeze frame starts when the anticipated magic wand light is glowing.

- Adjust the duration to match the end of the two clips on the timeline.

Step5 Adding Keyframe Movement to the Element
It is time to add some keyframes. Once you have successfully added the effect element onto your editing workspace, you have to make it do the magic. Attaching the magic effect bling to the base (background) video is like painting your canvas for the magic to occur. It is a crucial step for bringing out those Harry Potter-like magical feats. Continue scrolling for step-by-step instructions.
- Double-click the effect element and open the Editing Menu.

- In the basic tab, as visible above, Check the key-shaped button in front of the Transform button. It will create a Keyframe in the default form of your motion element. Then adjust the element’s position at the wand’s tip on the preview window.

Step6 Detailing the Effect Through Keyframing
This part of the procedure is iterative. You will see how keyframing can open several doors of creative freedom in front of you and how many motion effects are possible through it.
- Move the playhead further right and stop where the element is not on top of the magic wand’s tip. Then, add another keyframe following the same procedure and adjust the element’s position onto the wand’s tip.

Repeat the above step for as long as the wand is in motion in the clip. Feel free to spend more time on this step. The more keyframes you add, the more seamless your stunt will look.
Finally, it is time to look at the results. Witness how you have curated a magical masterpiece.
Conclusion
Magic amazes us all, and experiencing it while being creative with your projects makes it even more exciting. Filmora provides multiple tips and tricks to build the supernatural realm onto your screens. Whatever you wish to bring to the screen from the unrealistic realm, Wondershare Filmora is your genie friend. Here’s to every Filmora enthusiast casting spells onto their screens. We are eager to witness the tricks and wonders you have up your sleeves. Happy creating!
Free Download For macOS 10.14 or later
There are many different ways you can do spellbound editing on Filmora. To learn the complete step-by-step instructions, continue scrolling.
Step1 Download and Install Wondershare Filmora
Launch the most recent version of the software on your computer to produce an outstanding film. To do this, take the following actions:
- You must first download Wondershare Filmora and open it on your PC or Mac.

Step2 Import Your Photos and Videos
When you open Wondershare Filmora, you will notice the main import window in the top left corner.
- Click in the center of the import window upon the import icon.
- After clicking, Wondershare Filmora will automatically direct you to your PC library.
- Browse to where your target Clips or Images are stored.
- Select all the objects you want to import.
- Click on Open, and you will have imported files.

Step3 Add Your Photos and Videos to the Timeline
Your next step will be to add the imported videos and images to the timeline. When you have many videos and photos imported into the timeline, you can add them simultaneously.
Or you can also add them one by one wherever you need. To add an item to your timeline, follow the steps mentioned.
- Right-click on the photo or video you want to add to the timeline.
- Keep holding the right-click and drag it down to the timeline.

Step4 Adding the Magic Imitating Effect
After these initial setups, you must add the effects from filmstock to our clips. These are pre-made presets of different clipart and graphics, executing unique movements and effects. For their introduction in the video, read along with the following procedure:
- After dragging and dropping the clip onto the first track on the timeline, go to the stickers tab on the top left ribbon, click it, and scroll down to the filmstock dropdown.

- From there, open the Bling Bling Effect Pack and choose the bling light effect of your liking. Then, drag and drop that effect onto the second video track on the timeline.

- Adjust the element’s scale according to your required size from the editing menu after double-clicking the element.

- Move the playhead to locate the brightest moment of the element. Now, right-click and select Add Freeze Frame. It will freeze the element at that exact frame

- Find the spot on the base clip’s timeline where the corresponding LED used while shooting turns on. Then, bring the element to the second track and adjust its position.
![]()
Note: ensure the element’s freeze frame starts when the anticipated magic wand light is glowing.

- Adjust the duration to match the end of the two clips on the timeline.

Step5 Adding Keyframe Movement to the Element
It is time to add some keyframes. Once you have successfully added the effect element onto your editing workspace, you have to make it do the magic. Attaching the magic effect bling to the base (background) video is like painting your canvas for the magic to occur. It is a crucial step for bringing out those Harry Potter-like magical feats. Continue scrolling for step-by-step instructions.
- Double-click the effect element and open the Editing Menu.

- In the basic tab, as visible above, Check the key-shaped button in front of the Transform button. It will create a Keyframe in the default form of your motion element. Then adjust the element’s position at the wand’s tip on the preview window.

Step6 Detailing the Effect Through Keyframing
This part of the procedure is iterative. You will see how keyframing can open several doors of creative freedom in front of you and how many motion effects are possible through it.
- Move the playhead further right and stop where the element is not on top of the magic wand’s tip. Then, add another keyframe following the same procedure and adjust the element’s position onto the wand’s tip.

Repeat the above step for as long as the wand is in motion in the clip. Feel free to spend more time on this step. The more keyframes you add, the more seamless your stunt will look.
Finally, it is time to look at the results. Witness how you have curated a magical masterpiece.

Conclusion
Magic amazes us all, and experiencing it while being creative with your projects makes it even more exciting. Filmora provides multiple tips and tricks to build the supernatural realm onto your screens. Whatever you wish to bring to the screen from the unrealistic realm, Wondershare Filmora is your genie friend. Here’s to every Filmora enthusiast casting spells onto their screens. We are eager to witness the tricks and wonders you have up your sleeves. Happy creating!
Want to Add an Exciting Countdown Timer to Your Wedding, Product Launch or Any Other Video Using After Effects or an Alternative Tool? This Article Will Help You Learn All About After Effects Countdown and the Procedure
Countdown timers in a video add up to the excitement and the fun element, while in many others they become a necessity to show how fast the time is running out. After Effects is one of the most sorted out and widely used tools for adding a countdown timer.
There are different ways using which AE allows adding countdown timer and this article will help you learn in detail about all. So, whether you want to create a video showing launch of an important event or your wedding day, the below will be a good read.
- Method 1. Adding Countdown Timer in After Effects using Expression
- Method 2. Adding Countdown Timer in After Effects using the Timecode plugin
- Method 3. Creating a simple Countdown in After Effects
- Why Countdown timer is not working in After Effects
- The best After Effects alternative to make a countdown Timer
- The best 6 After Effects countdown timer templates
- Cinematic Countdown
- Neon Countdown
- Cyber Countdown
- Digital Countdown Pack
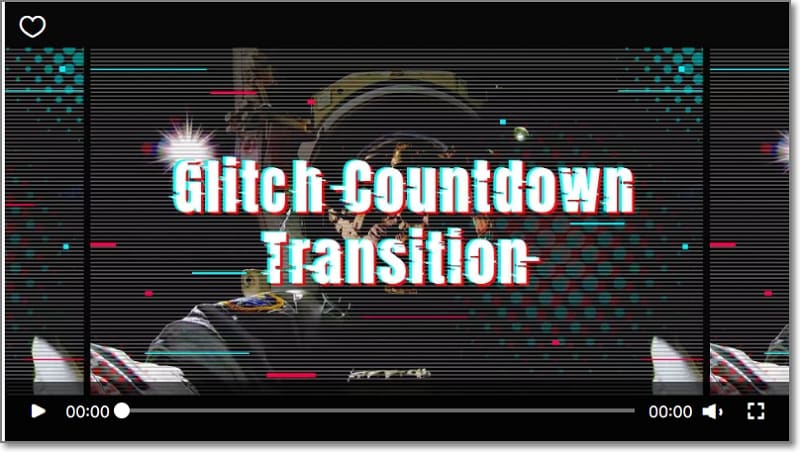
- Glitch Countdown Transition
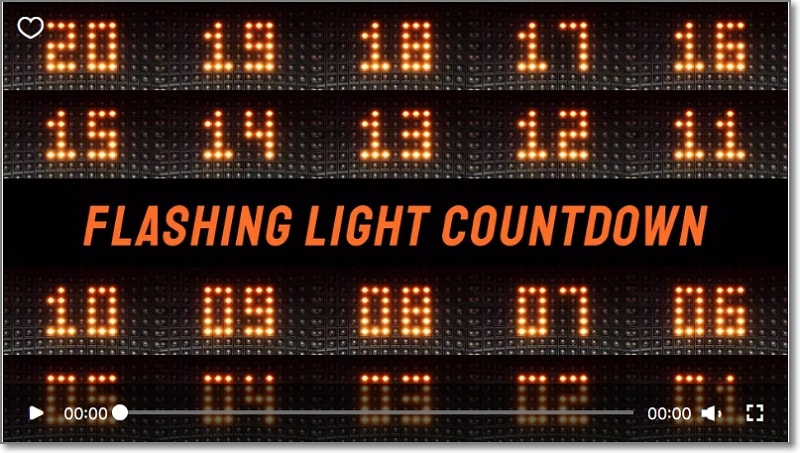
- Flashing Light Countdown
Part 1: How to Make a Countdown timer in After Effects
Developed by Adobe, After Effects is one of the most widely used animation software that is used for creating and editing videos using a wide range of functions supported by the application. Among other functions, After Effects facilitates adding a countdown timer to your videos and this task can be done in multiple ways.
Listed below are these different methods.
Method 1. Adding Countdown Timer in After Effects using Expression
Step1 Launch the software and then choose to Create a new Text Layer.
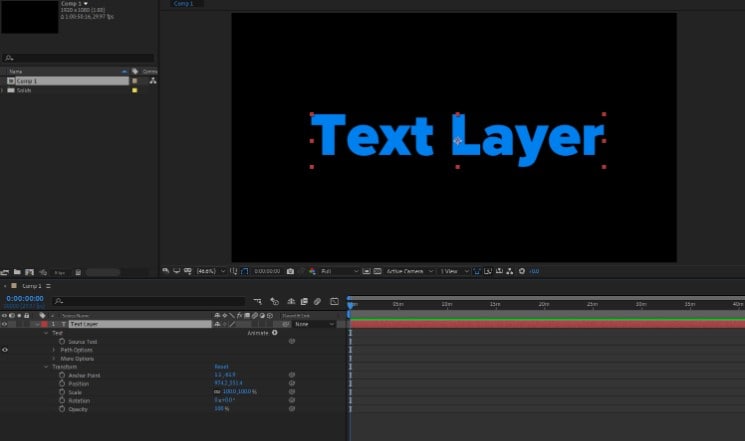
Step2 Open the text options and click on Alt + Click on your PC (For the Mac -Option + Click) on the stopwatch of the Source Text.
Step3 Next, you need to insert the expression - timeToCurrentFormat() inside the expression area.
Step4 Now, set the composition frame rate to 60fps which will make it look like an actual countdown timer.
Step5 Now count it down, pre-compose everything and then reverse the speed of the composition.
Composition speed can be reversed, right-click on the same, go to Time and then choose Time Reverse Layer.
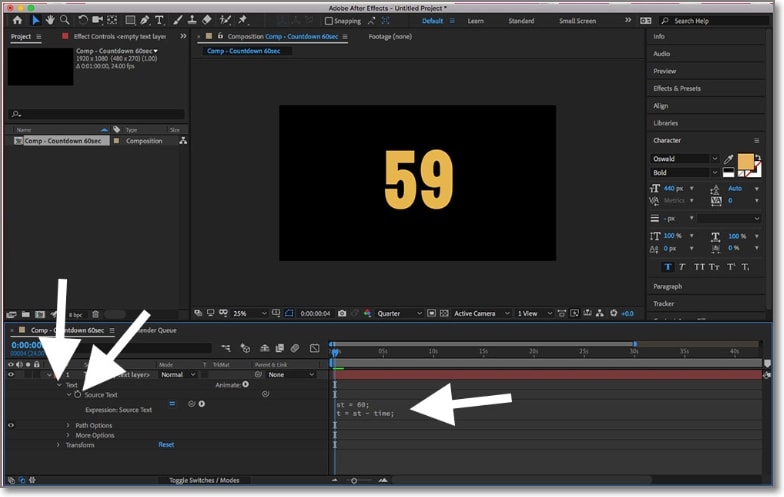
Above are the steps for timer expression after effects process.
Method 2. Adding Countdown Timer in After Effects using the Timecode plugin
In this method, you can use the Timecode plugin instead of using the “**timeToCurrentFormat()**” expression.
While using this after effects timer method, you would need to add a plugin to the New Solid that will create a timer layout automatically.
Next, follow the process as in the previous steps, and a countdown timer can be added.
Method 3. Creating a simple Countdown in After Effects
Step1 First of all, launch the software and then create a Text Layer.
Step2 Next, open the text options using Alt + Click for PC and Option + Click for Mac at the stopwatch of Source Text.
Step3 Next, at the expression area insert the expression- Math. Floor(-time) +10. Here in the place of 10, you can choose any number desired and this will be the starting countdown value.
Above we have learned 3 ways by which After Effects can be used for adding a countdown timer. Though these are workable methods, at times you may have issues with them and thus an alternate tool may be needed.
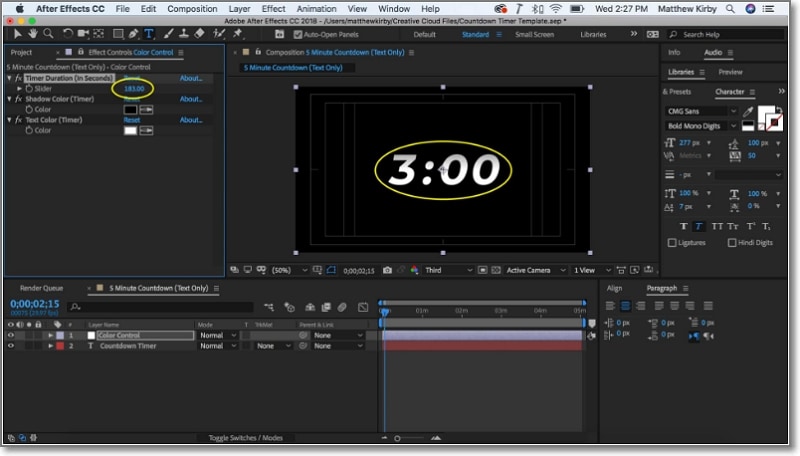
Part 2: Why Countdown timer is not working in After Effects
Though a lot of people use After Effects for creating countdown times, there are situations when the software will not serve your purpose. We have collected some of the common reasons that lead to the countdown timer not working in After Effects.
Software version out of date
If the software version of After Effects is out of date, then several features including Countdown Timer may be missing or have issues with the same.
Incorrect values or command
If the value for the countdown or the statement is incorrect while using After Effects, the countdown timer will not work properly.
The steep learning curve of the software
After Effects comes in with a wide range of features, but you need to have a thorough knowledge of the procedure to use the tool. Thus, the software has a steep learning curve which can be a problem for a lot of users and have issues while creating a countdown timer.
Part 3: The best After Effects alternative to make a countdown Timer
If you have also tried After Effects and it’s not working, no need to worry as there is an excellent tool that works as the best alternative to After Effects- Wondershare Filmora . Compatible with Windows and Mac, Wondershare Filmora is a video editing software that lets you create professional-looking videos with ease.
Using the advanced features of the tool along with video effects, transitions, and a stock library of media files, your desired video will be ready in no time. One of the latest features added to the software is a countdown timer that allows creating the countdown timer in a hassle-free and quick manner. Additionally, you can also add music/sound effects to the timer and even preview it before exporting it.
Steps to create countdown timer using Wondershare Filmora
Free Download For Win 7 or later(64-bit)
Free Download For macOS 10.14 or later
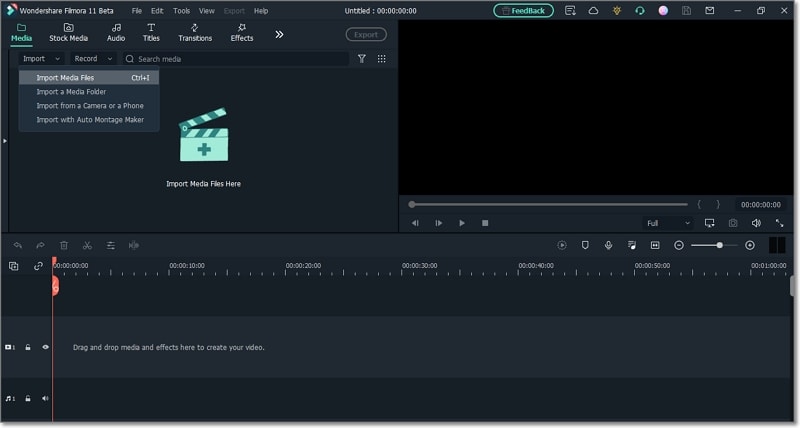
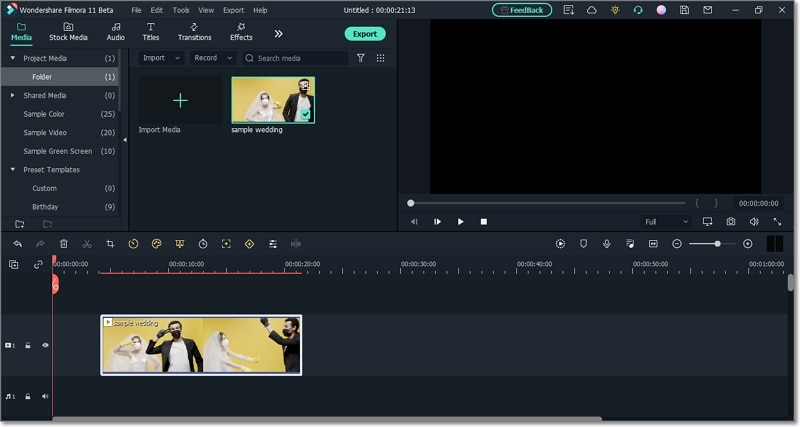
Step1 Launch the installed software and then add the desired video to which the timer has to be added by using the Import Media area. The added video now needs to be dragged and dropped to the timeline.
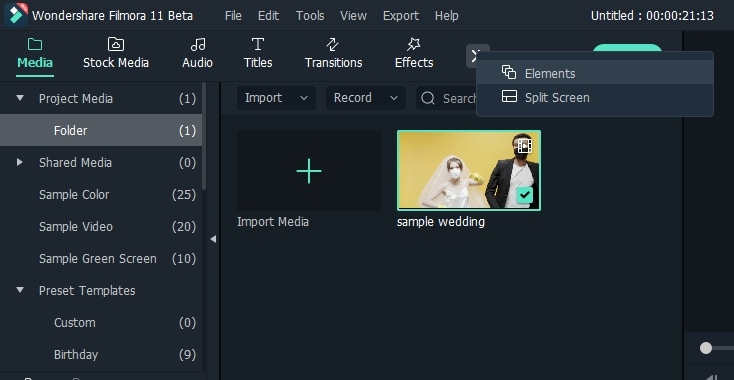
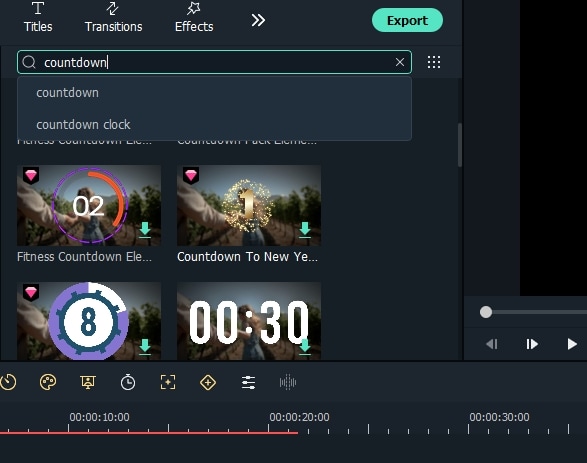
Step2 In this step, you need to select the type and design of the countdown. Tap on the double arrow button and then select the elements option. Multiple designs will be opened from which you can choose the one desired.
Step3 The selected design now needs to be resized and then relocated by double-clicking on it. On your video, place the countdown design at your choice of location.
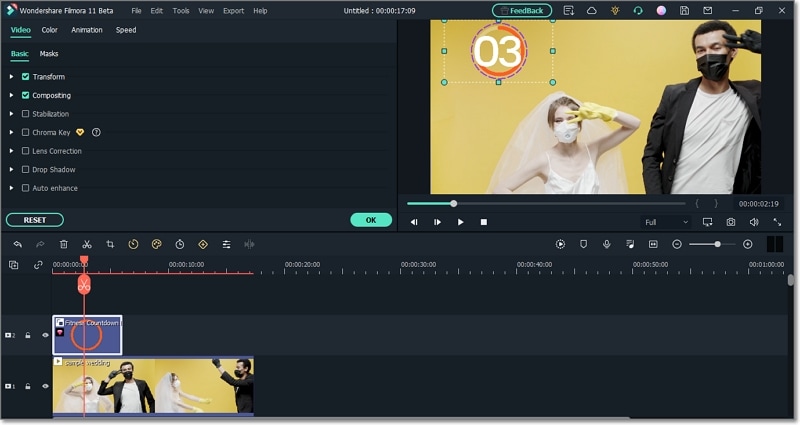
Step4 Now comes the step to add numbers to the countdown. You need to select it from the Title tab and then move it to the timeline above the elements overlay.
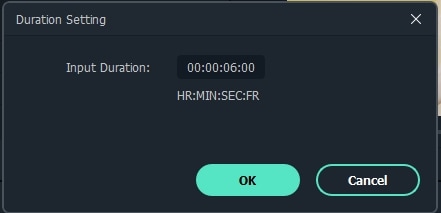
Step5 Next, adjust and change the number duration to 1 second. Select the text and then using copy-paste add as many numbers for the countdown needed. If you double-click the text, the number will change.
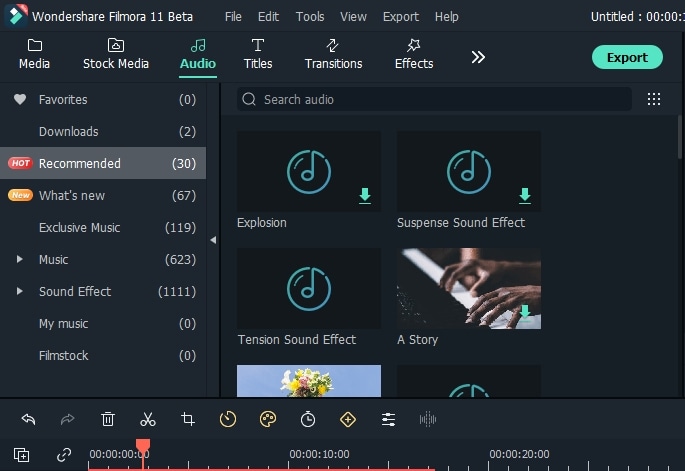
Step6 Using the Audio tab, add the desired music or sound effect to your countdown.
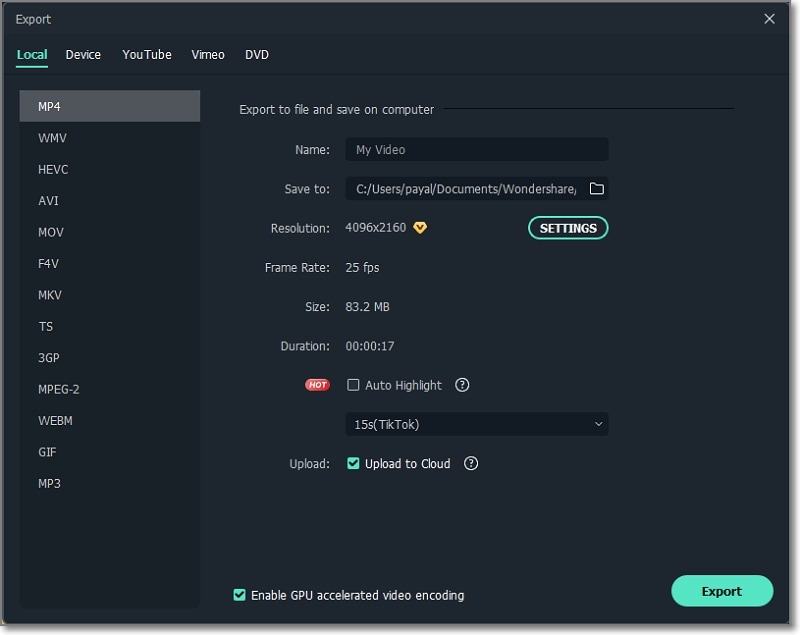
Step7 You can now check and preview the create file and then tap on the Export button to start the processing and add the countdown with the music of your video.
Part 4: The best 6 After Effects countdown timer templates
If you wish to make your countdown timers more stylish and interesting, there are several templates available. These templates are readymade designs where you just need to enter your details and your countdown timer will be ready.
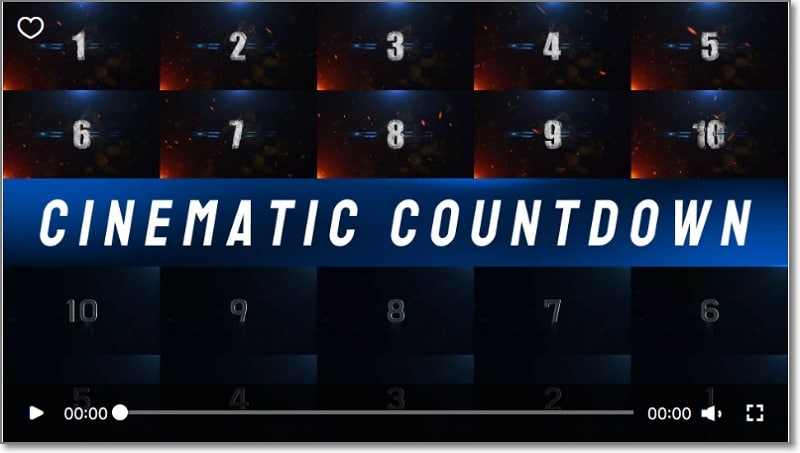
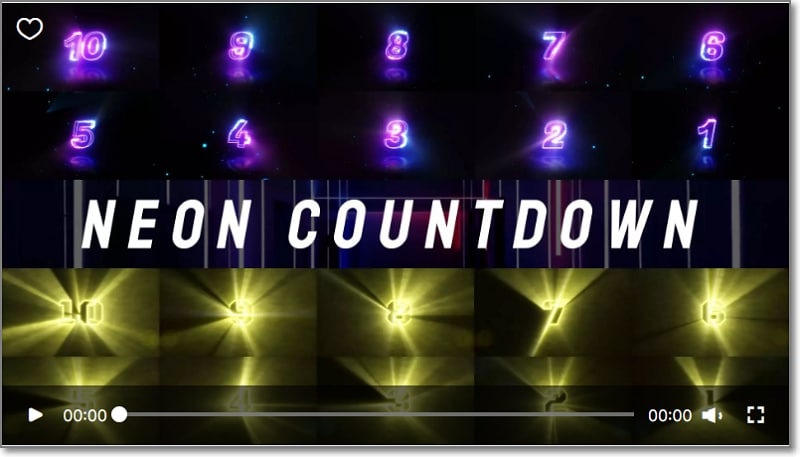
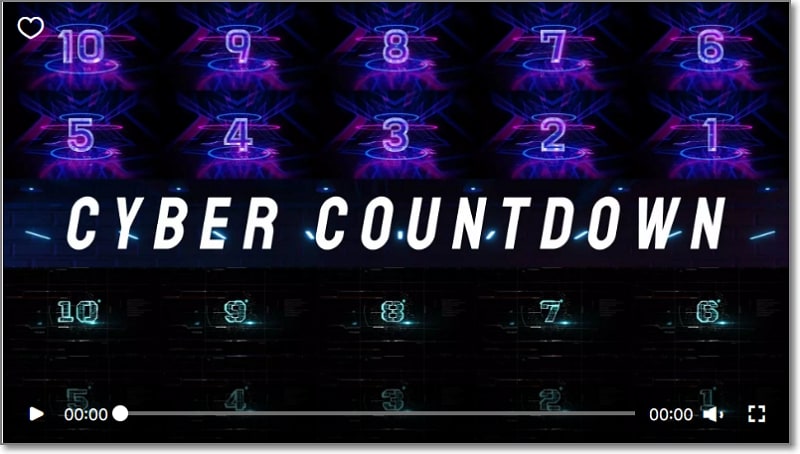
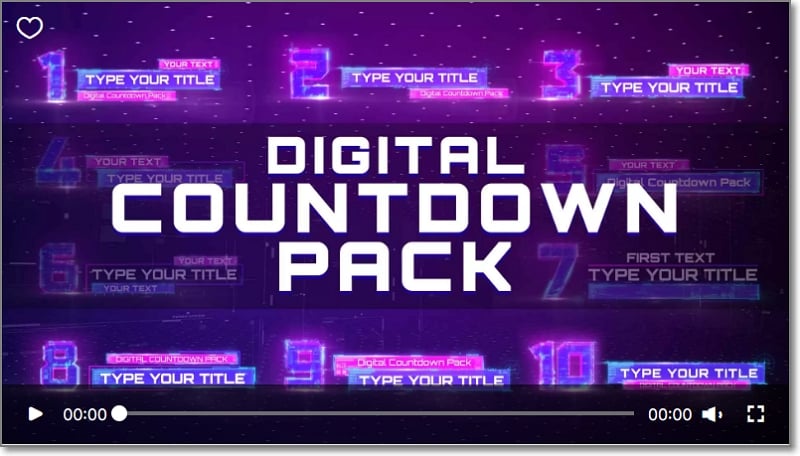
Below we have shortlisted the best After Effects Countdown Timer Templates. Check them out and apply it directly to your videos in Wondershare Filmora.
1. Cinematic Countdown
2. Neon Countdown
3. Cyber Countdown
4. Digital Countdown Pack
5. Glitch Countdown Transition
6. Flashing Light Countdown
Final Words
So, all set!! You now know the best tools for creating the countdown timer and also have details about the best templates. Go and create some stylish, and eye-grabbing timers in no time. If you have installed Wondershare Filmora , there are several other options that can be used for editing your videos like a pro.
Free Download For Win 7 or later(64-bit)
Free Download For macOS 10.14 or later
- Cinematic Countdown
- Neon Countdown
- Cyber Countdown
- Digital Countdown Pack
- Glitch Countdown Transition
- Flashing Light Countdown
Part 1: How to Make a Countdown timer in After Effects
Developed by Adobe, After Effects is one of the most widely used animation software that is used for creating and editing videos using a wide range of functions supported by the application. Among other functions, After Effects facilitates adding a countdown timer to your videos and this task can be done in multiple ways.
Listed below are these different methods.
Method 1. Adding Countdown Timer in After Effects using Expression
Step1 Launch the software and then choose to Create a new Text Layer.

Step2 Open the text options and click on Alt + Click on your PC (For the Mac -Option + Click) on the stopwatch of the Source Text.
Step3 Next, you need to insert the expression - timeToCurrentFormat() inside the expression area.
Step4 Now, set the composition frame rate to 60fps which will make it look like an actual countdown timer.
Step5 Now count it down, pre-compose everything and then reverse the speed of the composition.
Composition speed can be reversed, right-click on the same, go to Time and then choose Time Reverse Layer.

Above are the steps for timer expression after effects process.
Method 2. Adding Countdown Timer in After Effects using the Timecode plugin
In this method, you can use the Timecode plugin instead of using the “**timeToCurrentFormat()**” expression.
While using this after effects timer method, you would need to add a plugin to the New Solid that will create a timer layout automatically.
Next, follow the process as in the previous steps, and a countdown timer can be added.
Method 3. Creating a simple Countdown in After Effects
Step1 First of all, launch the software and then create a Text Layer.
Step2 Next, open the text options using Alt + Click for PC and Option + Click for Mac at the stopwatch of Source Text.
Step3 Next, at the expression area insert the expression- Math. Floor(-time) +10. Here in the place of 10, you can choose any number desired and this will be the starting countdown value.
Above we have learned 3 ways by which After Effects can be used for adding a countdown timer. Though these are workable methods, at times you may have issues with them and thus an alternate tool may be needed.

Part 2: Why Countdown timer is not working in After Effects
Though a lot of people use After Effects for creating countdown times, there are situations when the software will not serve your purpose. We have collected some of the common reasons that lead to the countdown timer not working in After Effects.
Software version out of date
If the software version of After Effects is out of date, then several features including Countdown Timer may be missing or have issues with the same.
Incorrect values or command
If the value for the countdown or the statement is incorrect while using After Effects, the countdown timer will not work properly.
The steep learning curve of the software
After Effects comes in with a wide range of features, but you need to have a thorough knowledge of the procedure to use the tool. Thus, the software has a steep learning curve which can be a problem for a lot of users and have issues while creating a countdown timer.
Part 3: The best After Effects alternative to make a countdown Timer
If you have also tried After Effects and it’s not working, no need to worry as there is an excellent tool that works as the best alternative to After Effects- Wondershare Filmora . Compatible with Windows and Mac, Wondershare Filmora is a video editing software that lets you create professional-looking videos with ease.
Using the advanced features of the tool along with video effects, transitions, and a stock library of media files, your desired video will be ready in no time. One of the latest features added to the software is a countdown timer that allows creating the countdown timer in a hassle-free and quick manner. Additionally, you can also add music/sound effects to the timer and even preview it before exporting it.
Steps to create countdown timer using Wondershare Filmora
Free Download For Win 7 or later(64-bit)
Free Download For macOS 10.14 or later
Step1 Launch the installed software and then add the desired video to which the timer has to be added by using the Import Media area. The added video now needs to be dragged and dropped to the timeline.


Step2 In this step, you need to select the type and design of the countdown. Tap on the double arrow button and then select the elements option. Multiple designs will be opened from which you can choose the one desired.


Step3 The selected design now needs to be resized and then relocated by double-clicking on it. On your video, place the countdown design at your choice of location.

Step4 Now comes the step to add numbers to the countdown. You need to select it from the Title tab and then move it to the timeline above the elements overlay.
Step5 Next, adjust and change the number duration to 1 second. Select the text and then using copy-paste add as many numbers for the countdown needed. If you double-click the text, the number will change.

Step6 Using the Audio tab, add the desired music or sound effect to your countdown.

Step7 You can now check and preview the create file and then tap on the Export button to start the processing and add the countdown with the music of your video.

Part 4: The best 6 After Effects countdown timer templates
If you wish to make your countdown timers more stylish and interesting, there are several templates available. These templates are readymade designs where you just need to enter your details and your countdown timer will be ready.
Below we have shortlisted the best After Effects Countdown Timer Templates. Check them out and apply it directly to your videos in Wondershare Filmora.
1. Cinematic Countdown

2. Neon Countdown

3. Cyber Countdown

4. Digital Countdown Pack

5. Glitch Countdown Transition

6. Flashing Light Countdown

Final Words
So, all set!! You now know the best tools for creating the countdown timer and also have details about the best templates. Go and create some stylish, and eye-grabbing timers in no time. If you have installed Wondershare Filmora , there are several other options that can be used for editing your videos like a pro.
Free Download For Win 7 or later(64-bit)
Free Download For macOS 10.14 or later
Premiere Pro Text Effects Beginner Guide
If you want to edit your raw video footage and turn ordinary clips into eye-catching videos, you will need a professional video editor. Adobe Premiere Pro is the most commonly used premium video editor that most professionals prefer. When it comes to editing videos, text effects play a major role along with video effects and animations.
If you are new to Adobe Premiere Pro, you will experience a steep learning curve. This is because the user interface is specially designed for professional video editors. Therefore, you might not get Premiere Pro text effects readily available. In this article, we will illustrate how you can add Adobe Premiere Pro text effects to your video project. We will also state the best alternative to Premiere Pro to add stunning text effects easily.
Part 1. Steps to Add Text Effects to Adobe Premiere
Text effects are an essential part of videos to enhance the video content immensely. You can add opening titles and end credits with text effects and animations. You can display the dialogues on the screen as subtitles. Showing location information and shooting date through text effects is quite regular these days. Besides, the use of lower thirds for social media promotion in videos is common. Without further ado, let us look at the steps to add Premiere text effects.
Step1 Add Your Text
First of all, you need to import your video and add text to it and apply different text effects. Here we are starting from scratch for better illustration. Go to Window> Essential Graphics> Text Tool(T). Type your text as per your requirements. You will notice a new text layer appearing under Edit tab.
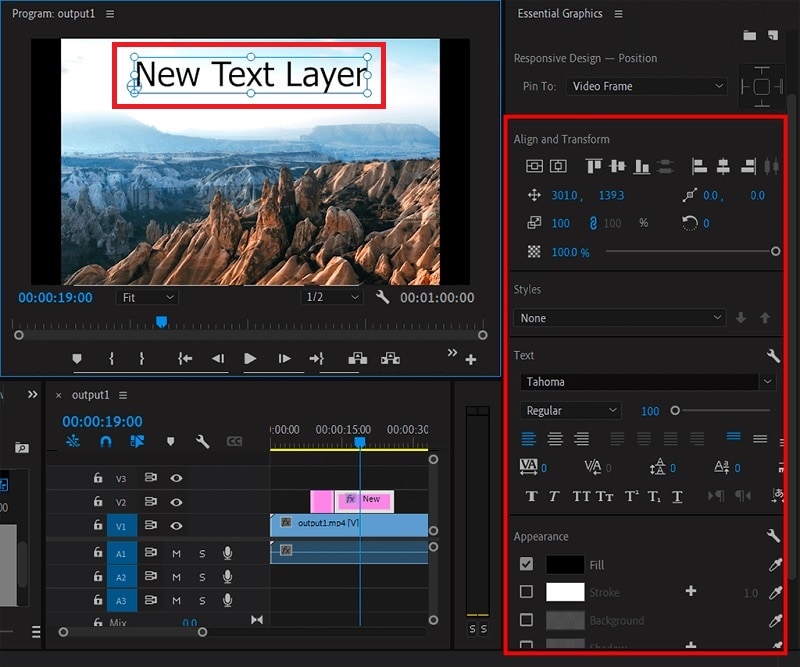
Select the text layer and you will see all the properties that you can tweak. For example, go to Align and Transform section to reposition and resize your text properly. Go to Text section to change the style of the text. Similarly, there is an Appearance section to adjust color, shadow, and much more.
Step2 Apply Pre-Animated Template
Go to Graphics> Essential Graphics and browser through the title templates available to match your requirements. Once you have selected one title template, drag and drop it into your timeline above your video clip.
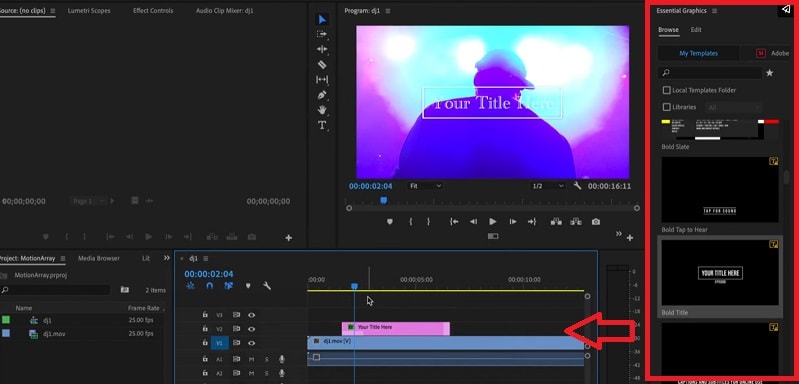
Double-click on the text to edit the content and type your title. Go to Essential Graphics panel and customize the text effect as per your preference. You can also choose the available elements included in the template to enhance the text effects as you think fit.
Step3 Edit the Text Effect and Animation
Select the text layer on your timeline to check out the keyframes applied in the template. Go to Effects Control panel and open Keyframe box by dragging it to the right. Adjust the keyframe to speed up or slow down the animation.

Bring the keyframes closer or spread them apart respectively. You can also adjust Velocity Controls present under different text properties as per the speed requirements.
Part 2. Alternative Way to Make Text Effects
If you are new to Adobe Premiere Pro, you will find title effects Premiere Pro difficult to add and edit as per your requirements. It is very common for amateur video editors to look for an easy alternative to Premiere Pro. We recommend Wondershare Filmora as the best alternative to Adobe Premiere text effects.
Filmora has a super intuitive user interface that is suitable for everyone including those who do not have prior video editing experience. There are more text effects and animations available that you can customize to get the desired effect. Here are the steps to add text effects to your video on Filmora.
Free Download For Win 7 or later(64-bit)
Free Download For macOS 10.14 or later
Step1 Download and install Wondershare Filmora and it is available for both Windows and macOS. Launch the application and click on New Project on the welcome screen.

Step2 Drag and drop your video clips under Project Media folder and then onto the timeline. Go to Titles and you will see different categories of text effects and templates.

Step3 Select a template whichever you think is perfect for your project and drop it on the timeline. Adjust its position on the timeline as per where you want it to appear. Double-click on it to edit the title and type in your text. Similarly, you can reposition the text from Viewer as per your need.
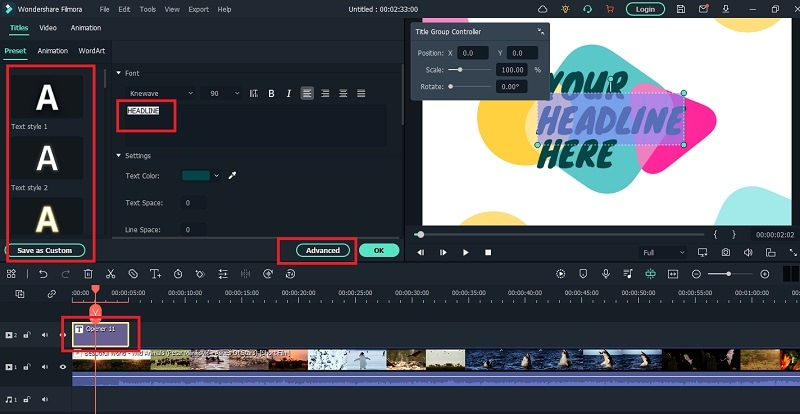
Select the text style as well as adjust fonts and settings to get different styles for your texts. There is also an Advanced section available for detailed editing and getting the desired text effect.
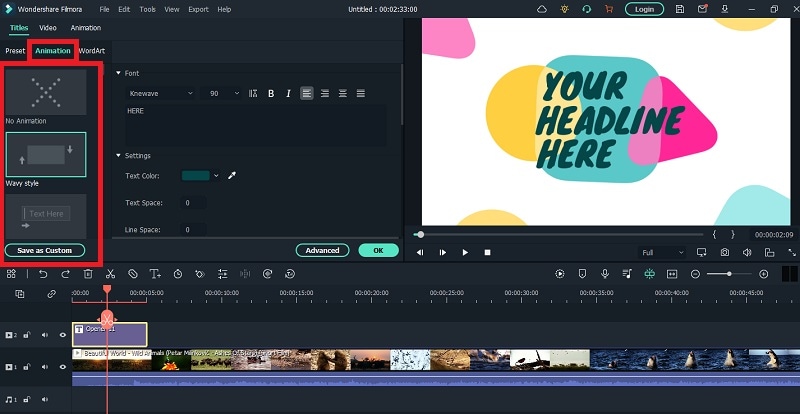
Step4 You can animate the texts in your video from Animation section. Choose from the animation presets to animate individual text in the video. Besides, you can also add keyframes and animate the text as per your preference.
Part 3. Related FAQs on Adobe Premiere Pro
1. How do you make text look good in Premiere Pro?
There are several steps you need to take to make text look good in Premiere Pro. First of all, the color of the text should be in contrast to the background. You can add a rectangle highlighter in the background. Experiment with font and text of the text. Apply a text effect from the different templates available. Customize the effect to get the desired result.
2. How do you add typing effects in Premiere?
Add your text to your video so that a text layer appears on the timeline. Animate the text Effects> Video Effects> Liner Wipe and double-click to get the typing effect. Tweak the parameters like transition completion, wipe angle, and others to smoothen out the animation. Draw a cursor icon using rectangle tool and animation it to move with the text using keyframes.
3. How do I open text effects controls in Premiere Pro?
Select the text layer from the timeline of the project. From the main menu, go to Windows> Effects Control option to open effect controls for text. Otherwise, you can directly go to Effects Control tab located below the menu bar after selecting your text layer.
The Bottom Line
Adding text effects in Premiere Pro can be slightly overwhelming for an amateur video editor who does not have enough experience with Premiere Pro. We have stated the simple steps to apply Premiere Pro text effects to your video project. However, we recommend Wondershare Filmora as the best and the easiest alternative to Premiere Pro where you get more text effects and add them instantly and effortlessly.
Free Download For macOS 10.14 or later
Step1 Download and install Wondershare Filmora and it is available for both Windows and macOS. Launch the application and click on New Project on the welcome screen.

Step2 Drag and drop your video clips under Project Media folder and then onto the timeline. Go to Titles and you will see different categories of text effects and templates.

Step3 Select a template whichever you think is perfect for your project and drop it on the timeline. Adjust its position on the timeline as per where you want it to appear. Double-click on it to edit the title and type in your text. Similarly, you can reposition the text from Viewer as per your need.

Select the text style as well as adjust fonts and settings to get different styles for your texts. There is also an Advanced section available for detailed editing and getting the desired text effect.
Step4 You can animate the texts in your video from Animation section. Choose from the animation presets to animate individual text in the video. Besides, you can also add keyframes and animate the text as per your preference.

Part 3. Related FAQs on Adobe Premiere Pro
1. How do you make text look good in Premiere Pro?
There are several steps you need to take to make text look good in Premiere Pro. First of all, the color of the text should be in contrast to the background. You can add a rectangle highlighter in the background. Experiment with font and text of the text. Apply a text effect from the different templates available. Customize the effect to get the desired result.
2. How do you add typing effects in Premiere?
Add your text to your video so that a text layer appears on the timeline. Animate the text Effects> Video Effects> Liner Wipe and double-click to get the typing effect. Tweak the parameters like transition completion, wipe angle, and others to smoothen out the animation. Draw a cursor icon using rectangle tool and animation it to move with the text using keyframes.
3. How do I open text effects controls in Premiere Pro?
Select the text layer from the timeline of the project. From the main menu, go to Windows> Effects Control option to open effect controls for text. Otherwise, you can directly go to Effects Control tab located below the menu bar after selecting your text layer.
The Bottom Line
Adding text effects in Premiere Pro can be slightly overwhelming for an amateur video editor who does not have enough experience with Premiere Pro. We have stated the simple steps to apply Premiere Pro text effects to your video project. However, we recommend Wondershare Filmora as the best and the easiest alternative to Premiere Pro where you get more text effects and add them instantly and effortlessly.
Also read:
- 2024 Approved Ways to Make Canva Collages
- New 2024 Approved Finding The Best Filmic Pro LUTs For Video Editing
- New 2024 Approved 5 Tips for Faster Editing in Filmora
- 20 Must-Have Graduation Songs for Slideshow
- Updated In 2024, Guide Create The Perfect VHS Effect Look in Premiere Pro
- New How to Remove Motion Blur In Photoshop for 2024
- Updated Why Vimeo Slideshow Maker Become Popular for 2024
- 2024 Approved This Article Discusses What Is Blender Video Editor, How to Download, Install and Use It, and Its Key Features. It Further Discusses Its Alternative for Editing Your Videos and More. Check Out Now
- New YouTube Algorithm Hacks 2024
- In 2024, Turn Your Text Into a Podcast Made Possible (+ EASY Editing Tips)
- DaVinci Resolve Scopes Have Undergone Significant Improvements. Find Out How to Use These Scopes and Improve Your Video Editing Skills for 2024
- Create Your Own Subscribe Channel Graphics
- New Top LUTs for Sony HLG
- How to Create Datamoshing Effect to Your Footage in After Effects for 2024
- New 2024 Approved Create Intro Video with Flixpress
- Do You Wish to Convert GIF to Animated PNG? Then, You Need to Know About Using a GIF to APNG Converter to Help You Carry This Process Out in No Time. Read On for 2024
- New In 2024, How to Create a Slideshow GIF?
- 2024 Approved 15 Camera Shake Preset for Premiere Pro
- New A Complete Guide to Use Distortion Effect in Premiere Pro
- 2024 Approved Are You Finding It Difficult to Freeze-Frame in After Effects? Note that Freeze-Frame Takes only a Few Seconds, and, in This Tutorial, We Will Guide You on How to Create and Add Frame Hold in After Effects
- Updated 8 Best Sites to Get Glitch Transition for Premiere Pro for 2024
- New In 2024, 10+ Top Unlimited FCPX Slideshow Templates
- Have You Ever Created a Slow Motion Video on Your Phonr or Camera? This Article Will Show You some Knowledge About Slow Motion Photography for 2024
- Updated In 2024, How to Color-Correct an S-Log Footage
- New In 2024, How to Create Intro with Renderforest
- New 22 Free Video Editing Software to Save Your Money and Time for 2024
- In 2024, Looking Into How Slow Mo Guys Have Changed the Dynamics of Slow-Motion
- New Best 5 AI Music Video Examples and Makers to Make Them
- New In 2024, Change Video Speed with FFmpeg
- How Much Information Do You Have About MP4 Digital File Storage? Let Us Tell You More About the MP4 File Format; Get Ready to Increase Your Knowledge
- Updated Top 18 Video Editors for PC and Mac
- Updated How to Create Cooking Video Intro and Outro for YouTube Channel, In 2024
- In 2024, Unlock Your Boost Mobile iPhone 6 Before the Plan Expires
- Updated In 2024, How to Cartoonize Photo Photoshop in Simple Steps
- 4 Methods to Turn off Life 360 On Nubia Red Magic 8S Pro+ without Anyone Knowing | Dr.fone
- In 2024, Here are Some of the Best Pokemon Discord Servers to Join On Realme Note 50 | Dr.fone
- In 2024, Still Using Pattern Locks with Realme GT 5 Pro? Tips, Tricks and Helpful Advice
- New In 2024, Exploring Key Components and Creation Process of AI Face Generators
- In 2024, Full Guide to Unlock Your Oppo A38
- In 2024, Hassle-Free Ways to Remove FRP Lock on OnePlus 12with/without a PC
- 8 Quick Fixes Unfortunately, Snapchat has Stopped on OnePlus Ace 2 | Dr.fone
- How to Change/Fake Your Motorola Moto G04 Location on Viber | Dr.fone
- Remove Spark Go (2024) unlock screen
- How To Repair iOS of iPhone 7? | Dr.fone
- In 2024, Hassle-Free Ways to Remove FRP Lock on ZTE Nubia Flip 5Gwith/without a PC
- Complete Review & Guide to Techeligible FRP Bypass and More For Nokia G310
- In 2024, Easy Guide to Meizu 21 FRP Bypass With Best Methods
- 5 Easy Ways to Change Location on YouTube TV On Honor 100 | Dr.fone
- In 2024, How to Change Location on TikTok to See More Content On your Vivo X Flip | Dr.fone
- In 2024, How to Unlock Poco C50 Phone without Google Account?
- How Can Realme GT Neo 5Mirror Share to PC? | Dr.fone
- Reasons for Vivo Y100t Stuck on Startup Screen and Ways To Fix Them | Dr.fone
- How to Bypass FRP from Samsung Galaxy S23 Ultra?
- In 2024, How to Show Wi-Fi Password on Nubia Red Magic 8S Pro
- How to Make a iMovie Photo Slideshow with Music?
- In 2024, Top 5 Infinix Note 30 VIP Racing Edition Bypass FRP Tools for PC That Actually Work
- How to recover old music from your Vivo Y78 5G
- How to Factory Reset iPad or Apple iPhone 6 without iCloud Password or Apple ID?
- In 2024, Easiest Guide How to Clone Vivo S17 Phone? | Dr.fone
- Title: Mastering Video Marketing An Expert Playbook for 2024
- Author: Chloe
- Created at : 2024-04-24 07:08:13
- Updated at : 2024-04-25 07:08:13
- Link: https://ai-editing-video.techidaily.com/mastering-video-marketing-an-expert-playbook-for-2024/
- License: This work is licensed under CC BY-NC-SA 4.0.

