:max_bytes(150000):strip_icc():format(webp)/GettyImages-1443716794-411cf2c5404b4f35b2a1153826e5a280.jpg)
Merging MP4 Videos Made Simple Top 5 Online Tools

Merging MP4 Videos Made Simple: Top 5 Online Tools
Welcome to the video editing world, where merging multiple MP4 files into one seamless video is a common task. Whether creating a montage or compiling footage from different cameras, merging videos can be time-consuming and challenging. However, it can be done quickly and easily with the right tools.
In this article, we’ll introduce you to 5 best online tools to merge MP4 files. These tools are user-friendly and easy to use, making merging videos a breeze. Whether you’re a professional videographer or a hobbyist, these tools will help you create professional-looking videos in no time. So let’s dive in and explore the options available to you.
- Merge MP4 Files Online Using Media.io
- Use Flixier To Combine MP4 Files Online
- Video Candy To Merge MP4 Files Online for Free
- Pixiko mp4 Joiner Online
- Join MP4 Files Online With Creatorkit
- Advantages and Disadvantages of MP4 Combiners Online
- It May Interest You – Join MP4 Videos Offline With Wondershare Filmora
- People Also Ask
5 Amazing Tools To Merge MP4 Online
There are many options available when it comes to merging MP4 files online. But to save you time and hassle, we’ve narrowed down the list to the top 5 tools that are easy to use and offer a variety of options. From basic editing to more advanced features, these tools will help you create the perfect video for any occasion.
1. Merge MP4 Files Online Using Media.io

Ratings from G2: 4.5 out of 5
Pricing:
- Free - $0
- Basic - $3.95 / monthly
- Pro - $6.66 / monthly
Pros
- Fast compression speeds
- No file limits
- No watermarks
- Smart output settings
Cons
- Lacks some functionality
Media.io is an all-in-one online tool that allows you to merge multiple videos and photos and convert audio and video formats. It’s easy to use and works on all major browsers, making it a great option for those who want a user-friendly and versatile tool.
This tool offers a wide range of output options, allowing you to export your merged video in your chosen format, making it a perfect solution for those looking for an online tool that’s easy to use and offers a wide range of features.
Merging videos and photos on Media.io is a simple process with just 3 steps:
Step1 Navigate to the Media.io video editor and select the “Upload“ button to add your videos to the media library.

Step2 Utilize the drag-and-drop feature to arrange the videos in the timeline.

Step3 Press the “Export“ button to download the newly merged video to your device.

2. Use Flixier To Combine MP4 Files Online

Ratings from G2: 4.6 out of 5
Pricing:
- Free - $0
- Basic - $14.00 / monthly
- Business - $30.00 / monthly
- Enterprise - $55.00 / monthly
Pros
- Unlimited video and audio tracks
- All future updates are included
- Video templates
- Easy for beginners
Cons
- The export hour/dollar ratio could be better
- Limited storage space
Flixier is another online tool that allows you to merge MP4 files online easily. With its user-friendly interface, you can quickly upload your videos and arrange them in the timeline using the drag-and-drop feature. You can also trim, crop, and adjust the videos to your liking. Once you are satisfied with the final output, you can export the merged video in the format of your choice.
Flixier also offers a wide range of customization options to enhance your video. This tool is a great option for those looking for an easy-to-use and versatile tool for merging MP4 files online.
Here’s how to merge mp4 online using Flixier:
Step1 Upload your videos from a computer, YouTube link, or cloud storage.

Step2 Drag videos to the timeline, trim, overlap, and add transitions.

Step3 Click the “Export and Download“ button, wait for processing and save to your computer.
3. Video Candy To Merge MP4 Files Online for Free

Ratings from G2: No rating
Pricing:
- Free - $0
Pros
- Free online tool
- User-friendly interface
- Provides a variety of output options
Cons
- Limited features
- Limited storage space
- Less advanced editing options
- Limited customer support
If you’re looking for a sweet treat for your video editing needs, look no further than Video Candy! This online tool lets you easily merge multiple MP4 files; it’s completely free to use. With its user-friendly interface, you can upload your videos, drag and drop them into the timeline, and voila! Your videos are now one cohesive masterpiece.
Not only that, but Video Candy also allows you to trim, crop, and adjust the videos to your liking before merging, giving you even more control over the final product. And once you’re happy with your creation, you can export it in various formats to be compatible with any platform. So here’s how to merge videos using Video Candy:
Step1 Upload the videos by clicking the “+Add Files“ button.
Step2 Arrange the videos you want to merge and add some transitions.

Step3 Click the “Export“ button and the “Download File“ to save the video on your device.
4. Pixiko mp4 Joiner Online

Ratings from G2: 4.8 out of 5
Pricing:
- Free - $0 with a watermark
- 1 Video - $4.89
- Monthly - $14.87
- Annually - $148.00
Pros
- The page has very good quality
- Easy to use
- Simple and brilliant
Cons
- With watermark
- Can’t change the font size
Looking for a tool to help you join your MP4 files with ease and precision? Look no further than Pixiko! This online MP4 Joiner is the perfect tool for merging multiple videos into one smooth, seamless masterpiece. With its easy-to-use interface and advanced editing options, you’ll have complete control over the final product.
To merge videos using Pixiko online tool, follow these steps:
Step1 Upload the videos you want to merge.

Step2 Click the “Merge“ button to combine all the videos

Step3 Wait for your video, then click “Download“ to save your merged video.

5. Join MP4 Files Online With Creatorkit

Ratings from G2: No Rating Yet
Pricing:
- Free - $0
- Pro - $29.00 per month
- Business - $149 per month
Pros
- User-friendly interface
- Easy to use
- Advanced editing options
Cons
- Limited features
- Limited storage capacity
This powerful platform makes it easy to combine multiple videos into one polished, professional-looking production. With its sleek and intuitive interface, you’ll be able to upload your videos, arrange them on the timeline, and tweak them to perfection with just a few clicks.
Here’s how to merge videos using Creatorkit:
Step1 Upload the videos that you want to merge.
Step2 Arrange the clips and add some transitions.

Step3 Click the “Export in HD“ button and input your email. Click the “Get the link to download.”

Advantages and Disadvantages of MP4 Combiners Online
Using an online MP4 combiner has several advantages and disadvantages.
Pros
- One of the main advantages is convenience, as you can easily access and use the tool from any device with an internet connection.
- Additionally, many online MP4 combiners are free to use, which makes them a cost-effective solution for those on a budget.
- They also provide a wide range of output options so that you can export your merged video in the format of your choice.
Cons
- One of the main disadvantages is that the tool may have limited storage capacity and file upload size, which could be a problem if you have large files to merge.
- Additionally, online MP4 combiners may have limited features compared to paid alternatives, which could limit the quality and customization of the final product.
- Some online MP4 combiners may also have a limit on the number of videos you can merge at once.
It May Interest You – Join MP4 Videos Offline With Wondershare Filmora
Free Download For Win 7 or later(64-bit)
Free Download For macOS 10.14 or later
If you prefer to merge MP4 videos offline, Wondershare Filmora is a great option. It is a powerful video editing software that offers a wide range of features to help you create professional-looking videos. One of the features it offers is the ability to merge multiple MP4 files into one cohesive video.
With Wondershare Filmora, you can easily import your MP4 files, drag and drop them into the timeline, and arrange them in the order you want. The software also allows you to trim, crop, and adjust the videos before merging, giving you complete control over the final product. Additionally, it offers a wide range of output options so that you can export your merged video in the format of your choice.
To merge videos using Wondershare Filmora Video Editor, follow these steps:
Step1 Open the software and select “New Project,” then go to “File“ > “Import Media“ > “Import Media Files“ to add the videos you want to merge.

Step2 Drag the video clips to the timeline and arrange it.

Step3 Press the “Play“ button to preview your video and edit the videos to your liking.

Step4 Once you are satisfied with the result, save your merged video.
People Also Ask
Here are some frequently asked questions about merging videos using online tools.
Q1. How To Combine 2 Videos Into 1?
Combining two or more videos into one is a common task for video editing. There are two main ways to do this: online and offline. Online tools such as Media.io, Flixier, Video Candy, Pixiko mp4 Joiner Online, and Creatorkit allow you to upload your videos, arrange them on a timeline, and merge them into one cohesive video. These tools are easy to use and accessible from any device with an internet connection.
On the other hand, offline tools, such as Wondershare Filmora, are powerful video editing software that can be installed on your computer. Additionally, these tools offer advanced video editing features like adding text, effects, and transitions.
Q2. What Is the Best Free App To Combine Videos ?
Some popular free apps to combine videos for Android include Video Joiner, AndroVid Video Editor, VideoShow, Video Merger Free, Video Merge, VidTrim, and InVideo. These apps offer a variety of features, such as the ability to trim, crop, and adjust videos before merging, as well as add text, effects, and transitions.
For iOS, some popular free apps to combine videos include Apple iMovie, Splice, Vimeo, Videorama, Filmmaker, and WeVideo. These apps offer similar features to the Android apps, such as trimming, cropping, and adjusting videos before merging and adding text, effects, and transitions. iMovie is a built-in app for iOS users which is user-friendly and offers a wide range of features.
Q3. How Can I Merge Videos on My Laptop Without Software?
You can use online tools to merge videos on your laptop without using the software. Some of the online tools recommended in the previous part are Media.io, Flixier, Video Candy, Pixiko mp4 Joiner Online, and Creatorkit.
These tools allow you to upload your videos, arrange them on a timeline, and merge them into one cohesive video. They are easy to use and accessible from any device with an internet connection. Additionally, these tools offer a wide range of output options so that you can export your merged video in the format of your choice.
Conclusion
Merging MP4 files is a common task for video editing, and many options are available for both online and offline tools. Online tools such as Media.io, Flixier, Video Candy, Pixiko mp4 Joiner Online, and Creatorkit are easy to use, accessible from any device with an internet connection, and offer a wide range of output options.
Offline tools such as Wondershare Filmora are powerful video editing software that offers advanced video editing features. No matter which tool you choose, you can easily create professional-looking videos.
5 Amazing Tools To Merge MP4 Online
There are many options available when it comes to merging MP4 files online. But to save you time and hassle, we’ve narrowed down the list to the top 5 tools that are easy to use and offer a variety of options. From basic editing to more advanced features, these tools will help you create the perfect video for any occasion.
1. Merge MP4 Files Online Using Media.io

Ratings from G2: 4.5 out of 5
Pricing:
- Free - $0
- Basic - $3.95 / monthly
- Pro - $6.66 / monthly
Pros
- Fast compression speeds
- No file limits
- No watermarks
- Smart output settings
Cons
- Lacks some functionality
Media.io is an all-in-one online tool that allows you to merge multiple videos and photos and convert audio and video formats. It’s easy to use and works on all major browsers, making it a great option for those who want a user-friendly and versatile tool.
This tool offers a wide range of output options, allowing you to export your merged video in your chosen format, making it a perfect solution for those looking for an online tool that’s easy to use and offers a wide range of features.
Merging videos and photos on Media.io is a simple process with just 3 steps:
Step1 Navigate to the Media.io video editor and select the “Upload“ button to add your videos to the media library.

Step2 Utilize the drag-and-drop feature to arrange the videos in the timeline.

Step3 Press the “Export“ button to download the newly merged video to your device.

2. Use Flixier To Combine MP4 Files Online

Ratings from G2: 4.6 out of 5
Pricing:
- Free - $0
- Basic - $14.00 / monthly
- Business - $30.00 / monthly
- Enterprise - $55.00 / monthly
Pros
- Unlimited video and audio tracks
- All future updates are included
- Video templates
- Easy for beginners
Cons
- The export hour/dollar ratio could be better
- Limited storage space
Flixier is another online tool that allows you to merge MP4 files online easily. With its user-friendly interface, you can quickly upload your videos and arrange them in the timeline using the drag-and-drop feature. You can also trim, crop, and adjust the videos to your liking. Once you are satisfied with the final output, you can export the merged video in the format of your choice.
Flixier also offers a wide range of customization options to enhance your video. This tool is a great option for those looking for an easy-to-use and versatile tool for merging MP4 files online.
Here’s how to merge mp4 online using Flixier:
Step1 Upload your videos from a computer, YouTube link, or cloud storage.

Step2 Drag videos to the timeline, trim, overlap, and add transitions.

Step3 Click the “Export and Download“ button, wait for processing and save to your computer.
3. Video Candy To Merge MP4 Files Online for Free

Ratings from G2: No rating
Pricing:
- Free - $0
Pros
- Free online tool
- User-friendly interface
- Provides a variety of output options
Cons
- Limited features
- Limited storage space
- Less advanced editing options
- Limited customer support
If you’re looking for a sweet treat for your video editing needs, look no further than Video Candy! This online tool lets you easily merge multiple MP4 files; it’s completely free to use. With its user-friendly interface, you can upload your videos, drag and drop them into the timeline, and voila! Your videos are now one cohesive masterpiece.
Not only that, but Video Candy also allows you to trim, crop, and adjust the videos to your liking before merging, giving you even more control over the final product. And once you’re happy with your creation, you can export it in various formats to be compatible with any platform. So here’s how to merge videos using Video Candy:
Step1 Upload the videos by clicking the “+Add Files“ button.
Step2 Arrange the videos you want to merge and add some transitions.

Step3 Click the “Export“ button and the “Download File“ to save the video on your device.
4. Pixiko mp4 Joiner Online

Ratings from G2: 4.8 out of 5
Pricing:
- Free - $0 with a watermark
- 1 Video - $4.89
- Monthly - $14.87
- Annually - $148.00
Pros
- The page has very good quality
- Easy to use
- Simple and brilliant
Cons
- With watermark
- Can’t change the font size
Looking for a tool to help you join your MP4 files with ease and precision? Look no further than Pixiko! This online MP4 Joiner is the perfect tool for merging multiple videos into one smooth, seamless masterpiece. With its easy-to-use interface and advanced editing options, you’ll have complete control over the final product.
To merge videos using Pixiko online tool, follow these steps:
Step1 Upload the videos you want to merge.

Step2 Click the “Merge“ button to combine all the videos

Step3 Wait for your video, then click “Download“ to save your merged video.

5. Join MP4 Files Online With Creatorkit

Ratings from G2: No Rating Yet
Pricing:
- Free - $0
- Pro - $29.00 per month
- Business - $149 per month
Pros
- User-friendly interface
- Easy to use
- Advanced editing options
Cons
- Limited features
- Limited storage capacity
This powerful platform makes it easy to combine multiple videos into one polished, professional-looking production. With its sleek and intuitive interface, you’ll be able to upload your videos, arrange them on the timeline, and tweak them to perfection with just a few clicks.
Here’s how to merge videos using Creatorkit:
Step1 Upload the videos that you want to merge.
Step2 Arrange the clips and add some transitions.

Step3 Click the “Export in HD“ button and input your email. Click the “Get the link to download.”

Advantages and Disadvantages of MP4 Combiners Online
Using an online MP4 combiner has several advantages and disadvantages.
Pros
- One of the main advantages is convenience, as you can easily access and use the tool from any device with an internet connection.
- Additionally, many online MP4 combiners are free to use, which makes them a cost-effective solution for those on a budget.
- They also provide a wide range of output options so that you can export your merged video in the format of your choice.
Cons
- One of the main disadvantages is that the tool may have limited storage capacity and file upload size, which could be a problem if you have large files to merge.
- Additionally, online MP4 combiners may have limited features compared to paid alternatives, which could limit the quality and customization of the final product.
- Some online MP4 combiners may also have a limit on the number of videos you can merge at once.
It May Interest You – Join MP4 Videos Offline With Wondershare Filmora
Free Download For Win 7 or later(64-bit)
Free Download For macOS 10.14 or later
If you prefer to merge MP4 videos offline, Wondershare Filmora is a great option. It is a powerful video editing software that offers a wide range of features to help you create professional-looking videos. One of the features it offers is the ability to merge multiple MP4 files into one cohesive video.
With Wondershare Filmora, you can easily import your MP4 files, drag and drop them into the timeline, and arrange them in the order you want. The software also allows you to trim, crop, and adjust the videos before merging, giving you complete control over the final product. Additionally, it offers a wide range of output options so that you can export your merged video in the format of your choice.
To merge videos using Wondershare Filmora Video Editor, follow these steps:
Step1 Open the software and select “New Project,” then go to “File“ > “Import Media“ > “Import Media Files“ to add the videos you want to merge.

Step2 Drag the video clips to the timeline and arrange it.

Step3 Press the “Play“ button to preview your video and edit the videos to your liking.

Step4 Once you are satisfied with the result, save your merged video.
People Also Ask
Here are some frequently asked questions about merging videos using online tools.
Q1. How To Combine 2 Videos Into 1?
Combining two or more videos into one is a common task for video editing. There are two main ways to do this: online and offline. Online tools such as Media.io, Flixier, Video Candy, Pixiko mp4 Joiner Online, and Creatorkit allow you to upload your videos, arrange them on a timeline, and merge them into one cohesive video. These tools are easy to use and accessible from any device with an internet connection.
On the other hand, offline tools, such as Wondershare Filmora, are powerful video editing software that can be installed on your computer. Additionally, these tools offer advanced video editing features like adding text, effects, and transitions.
Q2. What Is the Best Free App To Combine Videos ?
Some popular free apps to combine videos for Android include Video Joiner, AndroVid Video Editor, VideoShow, Video Merger Free, Video Merge, VidTrim, and InVideo. These apps offer a variety of features, such as the ability to trim, crop, and adjust videos before merging, as well as add text, effects, and transitions.
For iOS, some popular free apps to combine videos include Apple iMovie, Splice, Vimeo, Videorama, Filmmaker, and WeVideo. These apps offer similar features to the Android apps, such as trimming, cropping, and adjusting videos before merging and adding text, effects, and transitions. iMovie is a built-in app for iOS users which is user-friendly and offers a wide range of features.
Q3. How Can I Merge Videos on My Laptop Without Software?
You can use online tools to merge videos on your laptop without using the software. Some of the online tools recommended in the previous part are Media.io, Flixier, Video Candy, Pixiko mp4 Joiner Online, and Creatorkit.
These tools allow you to upload your videos, arrange them on a timeline, and merge them into one cohesive video. They are easy to use and accessible from any device with an internet connection. Additionally, these tools offer a wide range of output options so that you can export your merged video in the format of your choice.
Conclusion
Merging MP4 files is a common task for video editing, and many options are available for both online and offline tools. Online tools such as Media.io, Flixier, Video Candy, Pixiko mp4 Joiner Online, and Creatorkit are easy to use, accessible from any device with an internet connection, and offer a wide range of output options.
Offline tools such as Wondershare Filmora are powerful video editing software that offers advanced video editing features. No matter which tool you choose, you can easily create professional-looking videos.
Discover the Top 10 Video Editing Apps with Templates for Professional-Grade Results. Edit Like a Pro with These Tools
Are you tired of spending hours trying to perfect your video edits? It’s time to upgrade to a video editing app with built-in templates. Not only do these apps save time and effort, but they also allow you to create professional-grade videos with a consistent look and feel. This article will showcase the 10 best video editing apps with templates that will take your editing skills to the next level.
But before we dive into the list, let’s discuss the benefits of using a video editing app with templates. Not only do templates save time and effort, but they also ensure that your videos have a cohesive and polished look. So whether you’re a beginner or a seasoned pro, a video editing app with templates is a must-have for any video creator.

- Filmora for Mobile (Formerly Known as Filmora) - Best for Beginners & Vloggers
- Promeo Video Making App With Templates for Mobile
- LumaFusion Video Editing App With Templates for iPhone/iPad
- KineMaster Video Editor Program With Templates
- VivaVideo
Benefits of Using Video Makers With Templates
There are many benefits to using a video maker with built-in templates. Here are just a few:
- Save time: Templates allow you to quickly and easily create professional-grade videos without starting from scratch.
- Consistent look and feel: Templates ensure that all your videos have a cohesive and polished look.
- Easy to use: Most video makers with templates are user-friendly and easy to learn, even for beginners.
- Wide variety of options: Many video makers offer a wide range of templates to choose from, covering a variety of styles and themes.
Overall, using a video maker with templates is a great way to save time and effort while creating professional-grade videos with a consistent look and feel. Whether a beginner or a seasoned pro, a video maker with templates is valuable in your video creation toolkit.
5 Best Video Editing Apps With Templates for iOS/Android
Looking for the best video editing app with templates for your iOS or Android device? Look no further! These apps are user-friendly, feature-rich, and offer many templates. Whether a beginner or a seasoned pro, you’ll find an app on this list that suits your needs.
1. Filmora for Mobile (Formerly Known as Filmora) - Best for Beginners & Vloggers

Filmora for Mobile (formerly known as Filmora) is a powerful and user-friendly video editing app with many templates to choose from.
Editor’s Verdict: It’s perfect for beginners and vloggers who want to create professional-grade videos on the go.
Ratings in App Store: 4.7 out of 5
Ratings in Google Play Store: 4.7 out of 5
Operating Systems: Android and iOS
Pricing: Free and offers In-App Purchases
In the app, you’ll find a variety of templates for different occasions, including holidays, birthdays, and more. You can easily customize these templates to fit your specific needs or create your own from scratch. Filmora for Mobile also offers a range of video editing tools, including trimming, splitting, and merging, as well as adding text, music, and other media to your videos.
2. Promeo Video Making App With Templates for Mobile

Promeo is a video-making app with many templates to choose from. Whether you’re looking to create a promotional video, a tutorial, or something else, you’ll find a template in Promeo that fits your needs.
Editor’s Verdict: The app’s templates are easy to use and customize, allowing you to create professional-grade videos with a consistent look and feel.
Ratings in App Store: 4.8 out of 5
Ratings in Google Play Store: 4.5 out of 5
Operating Systems: Android and iOS
Pricing: Free and offers In-App Purchases
Promeo’s templates are a great asset for anyone seeking to create top-notch videos on their mobile device. In addition to the templates, the app also provides various video editing tools such as cutting, separating, and combining clips and the option to insert text, music, and other elements into the videos.
3. LumaFusion Video Editing App With Templates for iPhone/iPad
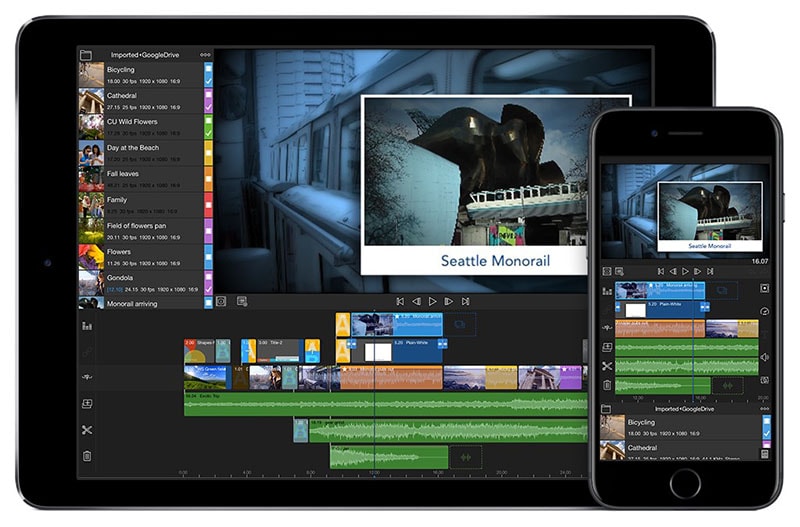
LumaFusion is a powerful and feature-rich video editing app with templates for iPhone and iPad. It’s a favorite among professional video editors and has features that make it easy to create high-quality videos on the go.
Editor’s Verdict: LumaFusion’s templates are a valuable resource for anyone seeking to create professional videos on their iOS device.
Ratings in App Store: 4.8 out of 5
Ratings in Google Play Store: 4.5 out of 5
Operating Systems: Android and iOS
Pricing: $29.99 and offers In-App Purchases
One standout feature is the app’s collection of templates, which allow users to produce professional-grade videos with a cohesive look and feel quickly and easily. In addition to a wide selection of templates, LumaFusion also provides video editing tools such as trimming, splitting and merging.
4. KineMaster Video Editor Program With Templates

KineMaster is a full-featured video editor program with many templates to choose from. Whether you’re looking to create a promotional video, a tutorial, or something else, you’ll find a template in KineMaster that fits your needs.
Editor’s Verdict: The app’s templates are easy to use and customize, allowing you to create professional-grade videos with a consistent look and feel.
Ratings in App Store: 4.7 out of 5
Ratings in Google Play Store: 4.1 out of 5
Operating Systems: Android and iOS
Pricing: Free and offers In-App Purchases
KineMaster’s templates are easy to use and customize, making them a valuable tool for anyone looking to create high-quality videos on their mobile device. KineMaster is a feature-rich video editor program with templates perfect for beginners and professionals.
5. VivaVideo

VivaVideo is a fantastic video editing app that makes it easy to create professional-grade videos on your mobile device.
Editor’s Verdict: Whether a beginner or a seasoned pro, you’ll find VivaVideo’s templates easy to use and customize to fit your specific needs.
Ratings in App Store: 4.8 out of 5
Ratings in Google Play Store: 4.6 out of 5
Operating Systems: Android and iOS
Pricing: Free and offers In-App Purchases
One of the app’s standout features is its wide range of templates, which allow you to create polished and cohesive videos with just a few taps. Give VivaVideo a try and see how its templates can elevate your video editing game!
2 Best Video Makers With Templates for Desktop
If you’re looking to create professional-grade videos on your desktop computer, a video maker with templates is a must-have tool. These video makers are feature-rich and offer a wide range of templates to choose from, making it easy to create high-quality videos on your desktop.
6. Wondershare Filmora for Windows/Mac
Free Download For Win 7 or later(64-bit)
Free Download For macOS 10.14 or later

Wondershare Filmora is a top-notch video editor suitable for both beginners and more advanced users. It has a wide range of features that make it a valuable tool for video editing.
Editor’s Verdict: While some users may initially find the interface confusing, it is easy to learn and navigate. With Filmora, you’ll be able to start editing videos in no time.
Ratings from G2: 4.4 out of 5
Operating Systems: Windows and Mac
Pricing:
● $49.99 Filmora Annual
● $79.99 Filmora Perpetual
● $59.99 Filmora Cross-Platform Plan
Filmora is a versatile video editor available for both Mac and Windows platforms. It offers a wide range of tools suitable for novice editors and advanced features for more experienced users. With Filmora, you’ll have everything you need to create professional-grade videos.
7. PowerDirector 365 Business
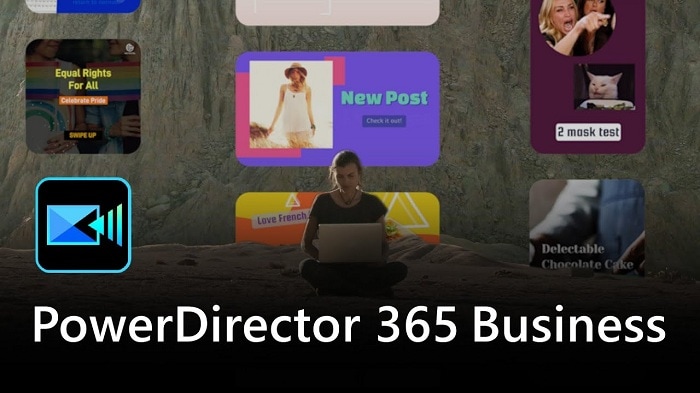
PowerDirector is an extremely feature-rich video maker perfect for those who plan on regularly editing videos.
Editor’s Verdict: Its subscription service, offered by CyberLink, is a great value for those who will be using the app’s many features regularly.
Ratings from G2: 4.4 out of 5
Operating Systems: Windows and Mac
Pricing:
● $12.50 monthly subscription
PowerDirector offers great value subscriptions with regular feature updates, making it a flexible and adaptable choice for video editing. The app also includes free premium effects and plugins, adding even more value to its subscriptions.
3 Best Video Creators With Templates Online
Are you looking to create professional-grade videos online without downloading any software? A video creator with templates is the perfect solution! These video creators make it easy to create high-quality videos from the comfort of your web browser.
8. Canva

Canva is a feature-rich video creator with templates perfect for beginners and professionals.
Editor’s Verdict: Canva is a user-friendly and feature-rich video creator with many templates.
Ratings from G2: 4.7 out of 5
Pricing:
● $0 - Free subscription
● $12.99/month - Pro subscription
● $14.99/month - Team subscription
Canva’s templates are easy to use and customize, making them a valuable tool for creating high-quality videos online.
9. Animoto

With Animoto, creating stunning, professional-grade videos on your computer and mobile device is simple. Give it a try and see how easy it is to create high-quality videos with Animoto.
Editor’s Verdict: Any video from the template collection can be selected and modified to fit the user’s needs.
Ratings from G2: 4.4 out of 5
Pricing:
● $0 - Personal
● $8.00 /month - Basic
● $15.00/month - Professional
● $39.00/month - Business
Animoto’s pre-made templates are designed to make video marketing a breeze! Customizable with your photos, videos, text, and branding, these templates follow best practices and can be easily updated to fit your needs.
10. InVideo

InVideo is a powerful online video creator that provides users with a large collection of assets, including high-quality images and footage from industry leaders such as Shutterstock and iStock.
Editor’s Verdict: With its extensive collection of assets and powerful editing tools, InVideo is a valuable resource for businesses and professionals looking to create high-quality videos.
Ratings from G2: 4.7 out of 5
Pricing:
● $0 - Free
● $16.0/month - Basic
● $29.00/month - Professional
● $79.00/month - Professional Plus
InVideo enables full customization of the videos, providing options such as the addition of emojis, filters, animated transitions, special effects, and animated objects to make the videos more visually engaging and interesting.
How To Make a Video With Templates
Creating a professional-grade video with templates has always been challenging, thanks to video editing software such as Filmora. Whether a beginner or a seasoned pro, you’ll find this step-by-step guide easy to follow and customize to fit your specific needs. So let’s get started and learn how to make a video with Filmora’s templates!
l How To Create Video With Templetes Using Filmora for Desktop
Step1 Launch Filmora, click Instant Mode, and select the template you want for your video.

Step2 Import all your media and click “Auto Create.”

Step3 Edit your video with the “Quick Edit“ features.
Step4 After you edit, you can export your video to your device.
l How To Create Video With Templetes Using Filmora for Mobile
Step1 Download and install Filmora for Mobile from the App Store or Google Play Store.
Step2 Tap on the “Template” button at the bottom.

Step3 Select a desired template and tap on its icon.

Step4 Tap on “Make Video” icon to download the template.

Step5 Import your own footage/photo into the template.

Step6 Export the final video.

Conclusion
Creating a professional-grade video has always been challenging, thanks to the wide range of video editing software and templates available. Filmora is a great choice for easy-to-use yet feature-rich video editing software. Its wide range of templates and powerful editing tools make it easy to create high-quality videos quickly and easily. Whether you’re a beginner or a seasoned pro, Filmora’s template are a valuable resource for anyone looking to create professional-grade videos.
- Wondershare Filmora for Windows/Mac
- PowerDirector 365 Business
- 3 Best Video Creators With Templates Online
Benefits of Using Video Makers With Templates
There are many benefits to using a video maker with built-in templates. Here are just a few:
- Save time: Templates allow you to quickly and easily create professional-grade videos without starting from scratch.
- Consistent look and feel: Templates ensure that all your videos have a cohesive and polished look.
- Easy to use: Most video makers with templates are user-friendly and easy to learn, even for beginners.
- Wide variety of options: Many video makers offer a wide range of templates to choose from, covering a variety of styles and themes.
Overall, using a video maker with templates is a great way to save time and effort while creating professional-grade videos with a consistent look and feel. Whether a beginner or a seasoned pro, a video maker with templates is valuable in your video creation toolkit.
5 Best Video Editing Apps With Templates for iOS/Android
Looking for the best video editing app with templates for your iOS or Android device? Look no further! These apps are user-friendly, feature-rich, and offer many templates. Whether a beginner or a seasoned pro, you’ll find an app on this list that suits your needs.
1. Filmora for Mobile (Formerly Known as Filmora) - Best for Beginners & Vloggers

Filmora for Mobile (formerly known as Filmora) is a powerful and user-friendly video editing app with many templates to choose from.
Editor’s Verdict: It’s perfect for beginners and vloggers who want to create professional-grade videos on the go.
Ratings in App Store: 4.7 out of 5
Ratings in Google Play Store: 4.7 out of 5
Operating Systems: Android and iOS
Pricing: Free and offers In-App Purchases
In the app, you’ll find a variety of templates for different occasions, including holidays, birthdays, and more. You can easily customize these templates to fit your specific needs or create your own from scratch. Filmora for Mobile also offers a range of video editing tools, including trimming, splitting, and merging, as well as adding text, music, and other media to your videos.
2. Promeo Video Making App With Templates for Mobile

Promeo is a video-making app with many templates to choose from. Whether you’re looking to create a promotional video, a tutorial, or something else, you’ll find a template in Promeo that fits your needs.
Editor’s Verdict: The app’s templates are easy to use and customize, allowing you to create professional-grade videos with a consistent look and feel.
Ratings in App Store: 4.8 out of 5
Ratings in Google Play Store: 4.5 out of 5
Operating Systems: Android and iOS
Pricing: Free and offers In-App Purchases
Promeo’s templates are a great asset for anyone seeking to create top-notch videos on their mobile device. In addition to the templates, the app also provides various video editing tools such as cutting, separating, and combining clips and the option to insert text, music, and other elements into the videos.
3. LumaFusion Video Editing App With Templates for iPhone/iPad

LumaFusion is a powerful and feature-rich video editing app with templates for iPhone and iPad. It’s a favorite among professional video editors and has features that make it easy to create high-quality videos on the go.
Editor’s Verdict: LumaFusion’s templates are a valuable resource for anyone seeking to create professional videos on their iOS device.
Ratings in App Store: 4.8 out of 5
Ratings in Google Play Store: 4.5 out of 5
Operating Systems: Android and iOS
Pricing: $29.99 and offers In-App Purchases
One standout feature is the app’s collection of templates, which allow users to produce professional-grade videos with a cohesive look and feel quickly and easily. In addition to a wide selection of templates, LumaFusion also provides video editing tools such as trimming, splitting and merging.
4. KineMaster Video Editor Program With Templates

KineMaster is a full-featured video editor program with many templates to choose from. Whether you’re looking to create a promotional video, a tutorial, or something else, you’ll find a template in KineMaster that fits your needs.
Editor’s Verdict: The app’s templates are easy to use and customize, allowing you to create professional-grade videos with a consistent look and feel.
Ratings in App Store: 4.7 out of 5
Ratings in Google Play Store: 4.1 out of 5
Operating Systems: Android and iOS
Pricing: Free and offers In-App Purchases
KineMaster’s templates are easy to use and customize, making them a valuable tool for anyone looking to create high-quality videos on their mobile device. KineMaster is a feature-rich video editor program with templates perfect for beginners and professionals.
5. VivaVideo

VivaVideo is a fantastic video editing app that makes it easy to create professional-grade videos on your mobile device.
Editor’s Verdict: Whether a beginner or a seasoned pro, you’ll find VivaVideo’s templates easy to use and customize to fit your specific needs.
Ratings in App Store: 4.8 out of 5
Ratings in Google Play Store: 4.6 out of 5
Operating Systems: Android and iOS
Pricing: Free and offers In-App Purchases
One of the app’s standout features is its wide range of templates, which allow you to create polished and cohesive videos with just a few taps. Give VivaVideo a try and see how its templates can elevate your video editing game!
2 Best Video Makers With Templates for Desktop
If you’re looking to create professional-grade videos on your desktop computer, a video maker with templates is a must-have tool. These video makers are feature-rich and offer a wide range of templates to choose from, making it easy to create high-quality videos on your desktop.
6. Wondershare Filmora for Windows/Mac
Free Download For Win 7 or later(64-bit)
Free Download For macOS 10.14 or later

Wondershare Filmora is a top-notch video editor suitable for both beginners and more advanced users. It has a wide range of features that make it a valuable tool for video editing.
Editor’s Verdict: While some users may initially find the interface confusing, it is easy to learn and navigate. With Filmora, you’ll be able to start editing videos in no time.
Ratings from G2: 4.4 out of 5
Operating Systems: Windows and Mac
Pricing:
● $49.99 Filmora Annual
● $79.99 Filmora Perpetual
● $59.99 Filmora Cross-Platform Plan
Filmora is a versatile video editor available for both Mac and Windows platforms. It offers a wide range of tools suitable for novice editors and advanced features for more experienced users. With Filmora, you’ll have everything you need to create professional-grade videos.
7. PowerDirector 365 Business

PowerDirector is an extremely feature-rich video maker perfect for those who plan on regularly editing videos.
Editor’s Verdict: Its subscription service, offered by CyberLink, is a great value for those who will be using the app’s many features regularly.
Ratings from G2: 4.4 out of 5
Operating Systems: Windows and Mac
Pricing:
● $12.50 monthly subscription
PowerDirector offers great value subscriptions with regular feature updates, making it a flexible and adaptable choice for video editing. The app also includes free premium effects and plugins, adding even more value to its subscriptions.
3 Best Video Creators With Templates Online
Are you looking to create professional-grade videos online without downloading any software? A video creator with templates is the perfect solution! These video creators make it easy to create high-quality videos from the comfort of your web browser.
8. Canva

Canva is a feature-rich video creator with templates perfect for beginners and professionals.
Editor’s Verdict: Canva is a user-friendly and feature-rich video creator with many templates.
Ratings from G2: 4.7 out of 5
Pricing:
● $0 - Free subscription
● $12.99/month - Pro subscription
● $14.99/month - Team subscription
Canva’s templates are easy to use and customize, making them a valuable tool for creating high-quality videos online.
9. Animoto

With Animoto, creating stunning, professional-grade videos on your computer and mobile device is simple. Give it a try and see how easy it is to create high-quality videos with Animoto.
Editor’s Verdict: Any video from the template collection can be selected and modified to fit the user’s needs.
Ratings from G2: 4.4 out of 5
Pricing:
● $0 - Personal
● $8.00 /month - Basic
● $15.00/month - Professional
● $39.00/month - Business
Animoto’s pre-made templates are designed to make video marketing a breeze! Customizable with your photos, videos, text, and branding, these templates follow best practices and can be easily updated to fit your needs.
10. InVideo

InVideo is a powerful online video creator that provides users with a large collection of assets, including high-quality images and footage from industry leaders such as Shutterstock and iStock.
Editor’s Verdict: With its extensive collection of assets and powerful editing tools, InVideo is a valuable resource for businesses and professionals looking to create high-quality videos.
Ratings from G2: 4.7 out of 5
Pricing:
● $0 - Free
● $16.0/month - Basic
● $29.00/month - Professional
● $79.00/month - Professional Plus
InVideo enables full customization of the videos, providing options such as the addition of emojis, filters, animated transitions, special effects, and animated objects to make the videos more visually engaging and interesting.
How To Make a Video With Templates
Creating a professional-grade video with templates has always been challenging, thanks to video editing software such as Filmora. Whether a beginner or a seasoned pro, you’ll find this step-by-step guide easy to follow and customize to fit your specific needs. So let’s get started and learn how to make a video with Filmora’s templates!
l How To Create Video With Templetes Using Filmora for Desktop
Step1 Launch Filmora, click Instant Mode, and select the template you want for your video.

Step2 Import all your media and click “Auto Create.”

Step3 Edit your video with the “Quick Edit“ features.
Step4 After you edit, you can export your video to your device.
l How To Create Video With Templetes Using Filmora for Mobile
Step1 Download and install Filmora for Mobile from the App Store or Google Play Store.
Step2 Tap on the “Template” button at the bottom.

Step3 Select a desired template and tap on its icon.

Step4 Tap on “Make Video” icon to download the template.

Step5 Import your own footage/photo into the template.

Step6 Export the final video.

Conclusion
Creating a professional-grade video has always been challenging, thanks to the wide range of video editing software and templates available. Filmora is a great choice for easy-to-use yet feature-rich video editing software. Its wide range of templates and powerful editing tools make it easy to create high-quality videos quickly and easily. Whether you’re a beginner or a seasoned pro, Filmora’s template are a valuable resource for anyone looking to create professional-grade videos.
How to Brighten a Video in Windows 10 Easily
Create High-Quality Video - Wondershare Filmora
An easy and powerful YouTube video editor
Numerous video and audio effects to choose from
Detailed tutorials provided by the official channel
Have you ever had a video with good audio but poor visual quality? Maybe it was a recorded talk, and the presenter was sitting in front of a poorly lit screen, or it might as well be your own home video. There are many reasons why your video could look dark and unappealing. Brightening a video is a great way to remove your editing mistakes and add some artistic flair to your videos. Some editing software has this option built-in, but if you use Windows 10 to edit, it’s hard to find out how to brighten a video in Windows 10 without the help of additional software.
We sometimes know video quality can affect the way content is perceived. That can be particularly frustrating, especially with all the hi-res content online now. Are you in a situation where you need to brighten up a video that has been recorded in low light? If so, look no further. It’s now a breeze to adjust the brightness of your videos on Windows 10. This article will show you how to brighten a video windows 10.
In this article
01 Does Windows 10 have built-in video editing software?
02 3 Simple Methods to Brighten a Video on iPhone
03 Adjust your video brightness and more using Filmora on PC/Mac
Does Windows 10 have built-in video editing software?
The answer is yes. Windows 10 has an easy-to-use video editing app. This is handy for simple home video editing, but it doesn’t work well for professional movie making. Windows Movie Maker was how we edited video in the old days of Windows XP and Vista. Today, Movie Maker is still available on Windows 10, but the new video editor is built-in to the operating system.
You can use it to trim videos or create your own home movies and slideshows. You can even have it create videos automatically by taking photos as you go. Forget about buying expensive editing software. With Windows 10, you have a free video editor built into the operating system where you can trim videos, create home movies, and even create automatic montages. You’ll be surprised at what you can do without ever leaving the Windows 10 Photos app.
Some people say that windows video editor has a very simple interface and it only has very basic features. In this case, having something is more important than not having anything at all. Also, you should keep in mind that not everyone needs a fully-fledged video editor . Some people have to do just basic tasks like trimming a video and increasing the brightness of a video. It is not feasible for them to purchase expensive video editing software for that purpose. So the Windows 10 video editor is the best in this case.
How To Brighten A Video In Windows 10 Easily
This article will discuss two different methods using which you can easily brighten your videos in Windows 10. So, without wasting any more time, let’s get started.
1. Using Filmora to brighten a video in Windows 10
You may think that all video editing software is created equal, but that’s where you’re wrong. The best video editor for your needs is drastically different depending on what you want to do with the end product. Some people want a quick way to make a trailer or showcase their products, and others want to put together an amateur movie.
Filmora is one of the best video editing software for Windows that can improve or fix your dark videos. Filmora is an all-in-one video editor for Windows and Mac. With Filmora, you can easily edit videos and make simple videos with transitions and effects, and you can give any video a professional touch. It’s a great piece of software that works incredibly smoothly. Filmora is an attractive and easy-to-use application that will give your video the final polish it needs. If you’ve ever had a video that looked too dark to use, there are ways to fix it aside from taking an entirely new video.
If you’ve ever had a video that looked too dark to use, then you can easily brighten it up using Filmora. Just follow the steps given below:
Step 1
First of all, make sure that you have installed the latest version of Filmora on your computer. If you haven’t already installed it, then you can download it easily from the official website of Wondershare.
Step 2
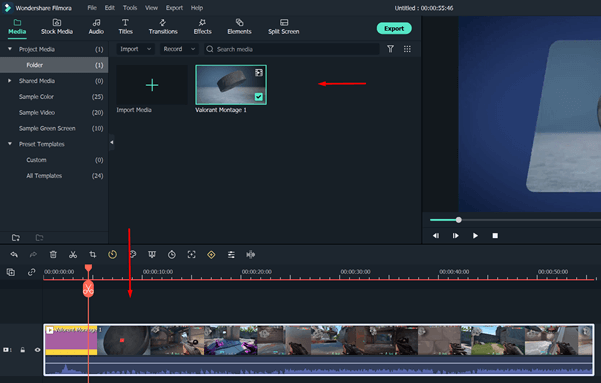
Upon starting Wondershare Filmora, click the “Import” button. The import media item window will open and show you all the files on your computer. The program will now display a thumbnail of your selected video in its media area. Drag the video from the media library and drop it into the Filmora timeline.
Step 3
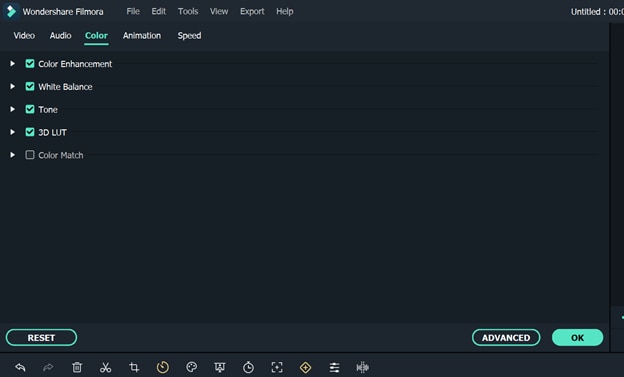
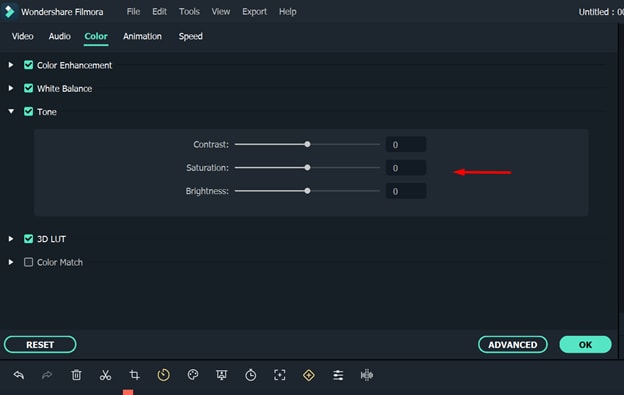
You will see the editing interface when you double-click the video in the Timeline. You can switch between the Video, Audio, Color, and Motion tabs from here. You can change how the clip looks with the Rotate, Flip, Scale, and Position settings in the Video tab. When you select the Color tab, you will be presented with the White Balance, Tone, and 3D LUT options.
Step 4
You can increase the brightness of the video by dragging the Brightness slider in the Tone option to the right. Click the spacebar to play the video to see the real-time result. The video will appear brighter as a result of your operation. Repeat the previous step if the video remains dark. You will see a brighter video each time you increase its brightness and contrast.
Step 5
Click “Export” to save the result when you’re satisfied with it. You can export videos in any popular format from the “Format” tab, including AVI, FLV, MKV, MP4, M4V, PSP, 3GP, MOV, and more. The video can be viewed on mobile devices such as an iPhone, iPad, or iPod by clicking “Device” and choosing a device. You can burn DVDs as well as upload videos directly to YouTube and Vimeo.
For Win 7 or later (64-bit)
For macOS 10.12 or later
2. Using Windows Video Editor to brighten a video
Windows video editor is an easy-to-use tool in which you can do basic video editing. This simple tool can easily cut, trim, and merge different video clips. The best thing about windows video editor is that it comes as built-in software in windows ten, so you won’t need to download any additional programs and plugins. Suppose you are just a beginner, and you need to perform basic video editing functions. In that case, you can easily use this app without worrying about purchasing expensive video editing programs. To increase the brightness of a video in the windows video editor, follow the steps given below:
Step 1
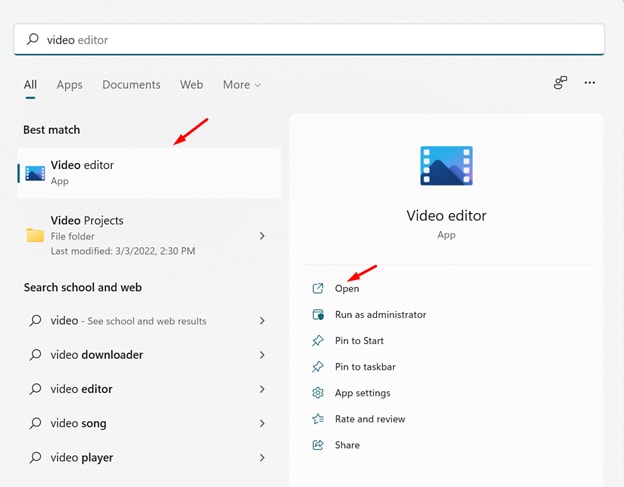
Go to the search section of windows 10 present right after the start menu icon and type “video editor.” Click the search icon and then open the video editor app.
Step 2
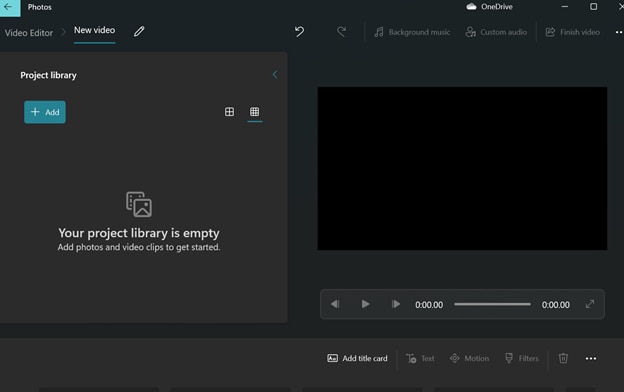
A new interface will appear on your screen. Just click on the new project button to start a new project. From the project library, click on the add new project button and select the video from your computer that you want to edit.
Step 3
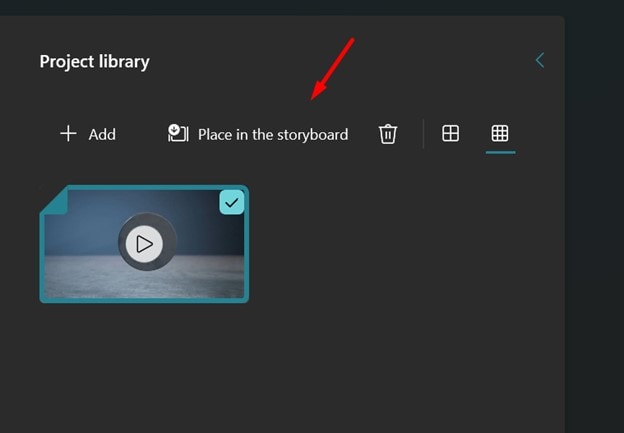
Click on the video icon in the project library and then click on the “add to storyboard” button. It will open all the editing options for the video.
Step 4
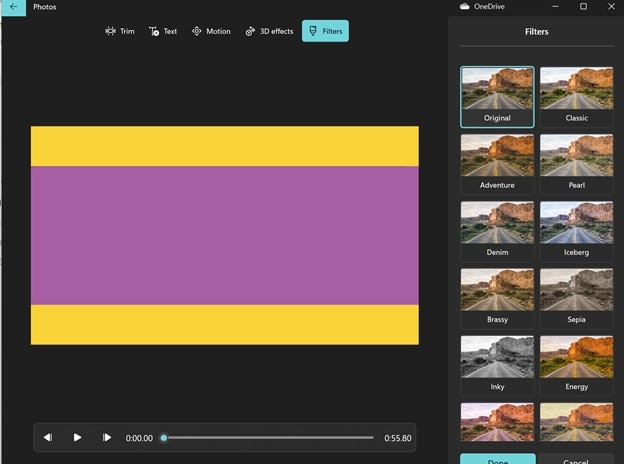
From the menu present at the bottom of the screen, click on the filters option, and it will open a lot of filters on your screen. Click on the filters one by one and check which filter brightens your video.
Step 5
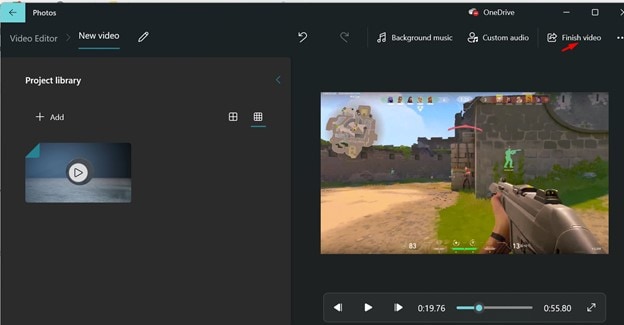
Once you have added the filter, click on the done button and export the video by clicking on the finish button. You can also select your desired resolution in which you want to export your video.
Conclusion
● As you can see, it’s very easy to brighten a video on Windows 10. You have many options depending on what you want to do with your videos after editing them. The point is that you no longer need complex video editing software to get the job done because there are many other options available to help you achieve your desired look and feel. We have described two different methods in this article. Give one a try if you feel like your videos could use a brighter touch.
Have you ever had a video with good audio but poor visual quality? Maybe it was a recorded talk, and the presenter was sitting in front of a poorly lit screen, or it might as well be your own home video. There are many reasons why your video could look dark and unappealing. Brightening a video is a great way to remove your editing mistakes and add some artistic flair to your videos. Some editing software has this option built-in, but if you use Windows 10 to edit, it’s hard to find out how to brighten a video in Windows 10 without the help of additional software.
We sometimes know video quality can affect the way content is perceived. That can be particularly frustrating, especially with all the hi-res content online now. Are you in a situation where you need to brighten up a video that has been recorded in low light? If so, look no further. It’s now a breeze to adjust the brightness of your videos on Windows 10. This article will show you how to brighten a video windows 10.
In this article
01 Does Windows 10 have built-in video editing software?
02 3 Simple Methods to Brighten a Video on iPhone
03 Adjust your video brightness and more using Filmora on PC/Mac
Does Windows 10 have built-in video editing software?
The answer is yes. Windows 10 has an easy-to-use video editing app. This is handy for simple home video editing, but it doesn’t work well for professional movie making. Windows Movie Maker was how we edited video in the old days of Windows XP and Vista. Today, Movie Maker is still available on Windows 10, but the new video editor is built-in to the operating system.
You can use it to trim videos or create your own home movies and slideshows. You can even have it create videos automatically by taking photos as you go. Forget about buying expensive editing software. With Windows 10, you have a free video editor built into the operating system where you can trim videos, create home movies, and even create automatic montages. You’ll be surprised at what you can do without ever leaving the Windows 10 Photos app.
Some people say that windows video editor has a very simple interface and it only has very basic features. In this case, having something is more important than not having anything at all. Also, you should keep in mind that not everyone needs a fully-fledged video editor . Some people have to do just basic tasks like trimming a video and increasing the brightness of a video. It is not feasible for them to purchase expensive video editing software for that purpose. So the Windows 10 video editor is the best in this case.
How To Brighten A Video In Windows 10 Easily
This article will discuss two different methods using which you can easily brighten your videos in Windows 10. So, without wasting any more time, let’s get started.
1. Using Filmora to brighten a video in Windows 10
You may think that all video editing software is created equal, but that’s where you’re wrong. The best video editor for your needs is drastically different depending on what you want to do with the end product. Some people want a quick way to make a trailer or showcase their products, and others want to put together an amateur movie.
Filmora is one of the best video editing software for Windows that can improve or fix your dark videos. Filmora is an all-in-one video editor for Windows and Mac. With Filmora, you can easily edit videos and make simple videos with transitions and effects, and you can give any video a professional touch. It’s a great piece of software that works incredibly smoothly. Filmora is an attractive and easy-to-use application that will give your video the final polish it needs. If you’ve ever had a video that looked too dark to use, there are ways to fix it aside from taking an entirely new video.
If you’ve ever had a video that looked too dark to use, then you can easily brighten it up using Filmora. Just follow the steps given below:
Step 1
First of all, make sure that you have installed the latest version of Filmora on your computer. If you haven’t already installed it, then you can download it easily from the official website of Wondershare.
Step 2
Upon starting Wondershare Filmora, click the “Import” button. The import media item window will open and show you all the files on your computer. The program will now display a thumbnail of your selected video in its media area. Drag the video from the media library and drop it into the Filmora timeline.

Step 3
You will see the editing interface when you double-click the video in the Timeline. You can switch between the Video, Audio, Color, and Motion tabs from here. You can change how the clip looks with the Rotate, Flip, Scale, and Position settings in the Video tab. When you select the Color tab, you will be presented with the White Balance, Tone, and 3D LUT options.

Step 4
You can increase the brightness of the video by dragging the Brightness slider in the Tone option to the right. Click the spacebar to play the video to see the real-time result. The video will appear brighter as a result of your operation. Repeat the previous step if the video remains dark. You will see a brighter video each time you increase its brightness and contrast.

Step 5
Click “Export” to save the result when you’re satisfied with it. You can export videos in any popular format from the “Format” tab, including AVI, FLV, MKV, MP4, M4V, PSP, 3GP, MOV, and more. The video can be viewed on mobile devices such as an iPhone, iPad, or iPod by clicking “Device” and choosing a device. You can burn DVDs as well as upload videos directly to YouTube and Vimeo.
For Win 7 or later (64-bit)
For macOS 10.12 or later
2. Using Windows Video Editor to brighten a video
Windows video editor is an easy-to-use tool in which you can do basic video editing. This simple tool can easily cut, trim, and merge different video clips. The best thing about windows video editor is that it comes as built-in software in windows ten, so you won’t need to download any additional programs and plugins. Suppose you are just a beginner, and you need to perform basic video editing functions. In that case, you can easily use this app without worrying about purchasing expensive video editing programs. To increase the brightness of a video in the windows video editor, follow the steps given below:
Step 1
Go to the search section of windows 10 present right after the start menu icon and type “video editor.” Click the search icon and then open the video editor app.

Step 2
A new interface will appear on your screen. Just click on the new project button to start a new project. From the project library, click on the add new project button and select the video from your computer that you want to edit.

Step 3
Click on the video icon in the project library and then click on the “add to storyboard” button. It will open all the editing options for the video.

Step 4
From the menu present at the bottom of the screen, click on the filters option, and it will open a lot of filters on your screen. Click on the filters one by one and check which filter brightens your video.

Step 5
Once you have added the filter, click on the done button and export the video by clicking on the finish button. You can also select your desired resolution in which you want to export your video.

Conclusion
● As you can see, it’s very easy to brighten a video on Windows 10. You have many options depending on what you want to do with your videos after editing them. The point is that you no longer need complex video editing software to get the job done because there are many other options available to help you achieve your desired look and feel. We have described two different methods in this article. Give one a try if you feel like your videos could use a brighter touch.
Have you ever had a video with good audio but poor visual quality? Maybe it was a recorded talk, and the presenter was sitting in front of a poorly lit screen, or it might as well be your own home video. There are many reasons why your video could look dark and unappealing. Brightening a video is a great way to remove your editing mistakes and add some artistic flair to your videos. Some editing software has this option built-in, but if you use Windows 10 to edit, it’s hard to find out how to brighten a video in Windows 10 without the help of additional software.
We sometimes know video quality can affect the way content is perceived. That can be particularly frustrating, especially with all the hi-res content online now. Are you in a situation where you need to brighten up a video that has been recorded in low light? If so, look no further. It’s now a breeze to adjust the brightness of your videos on Windows 10. This article will show you how to brighten a video windows 10.
In this article
01 Does Windows 10 have built-in video editing software?
02 3 Simple Methods to Brighten a Video on iPhone
03 Adjust your video brightness and more using Filmora on PC/Mac
Does Windows 10 have built-in video editing software?
The answer is yes. Windows 10 has an easy-to-use video editing app. This is handy for simple home video editing, but it doesn’t work well for professional movie making. Windows Movie Maker was how we edited video in the old days of Windows XP and Vista. Today, Movie Maker is still available on Windows 10, but the new video editor is built-in to the operating system.
You can use it to trim videos or create your own home movies and slideshows. You can even have it create videos automatically by taking photos as you go. Forget about buying expensive editing software. With Windows 10, you have a free video editor built into the operating system where you can trim videos, create home movies, and even create automatic montages. You’ll be surprised at what you can do without ever leaving the Windows 10 Photos app.
Some people say that windows video editor has a very simple interface and it only has very basic features. In this case, having something is more important than not having anything at all. Also, you should keep in mind that not everyone needs a fully-fledged video editor . Some people have to do just basic tasks like trimming a video and increasing the brightness of a video. It is not feasible for them to purchase expensive video editing software for that purpose. So the Windows 10 video editor is the best in this case.
How To Brighten A Video In Windows 10 Easily
This article will discuss two different methods using which you can easily brighten your videos in Windows 10. So, without wasting any more time, let’s get started.
1. Using Filmora to brighten a video in Windows 10
You may think that all video editing software is created equal, but that’s where you’re wrong. The best video editor for your needs is drastically different depending on what you want to do with the end product. Some people want a quick way to make a trailer or showcase their products, and others want to put together an amateur movie.
Filmora is one of the best video editing software for Windows that can improve or fix your dark videos. Filmora is an all-in-one video editor for Windows and Mac. With Filmora, you can easily edit videos and make simple videos with transitions and effects, and you can give any video a professional touch. It’s a great piece of software that works incredibly smoothly. Filmora is an attractive and easy-to-use application that will give your video the final polish it needs. If you’ve ever had a video that looked too dark to use, there are ways to fix it aside from taking an entirely new video.
If you’ve ever had a video that looked too dark to use, then you can easily brighten it up using Filmora. Just follow the steps given below:
Step 1
First of all, make sure that you have installed the latest version of Filmora on your computer. If you haven’t already installed it, then you can download it easily from the official website of Wondershare.
Step 2
Upon starting Wondershare Filmora, click the “Import” button. The import media item window will open and show you all the files on your computer. The program will now display a thumbnail of your selected video in its media area. Drag the video from the media library and drop it into the Filmora timeline.

Step 3
You will see the editing interface when you double-click the video in the Timeline. You can switch between the Video, Audio, Color, and Motion tabs from here. You can change how the clip looks with the Rotate, Flip, Scale, and Position settings in the Video tab. When you select the Color tab, you will be presented with the White Balance, Tone, and 3D LUT options.

Step 4
You can increase the brightness of the video by dragging the Brightness slider in the Tone option to the right. Click the spacebar to play the video to see the real-time result. The video will appear brighter as a result of your operation. Repeat the previous step if the video remains dark. You will see a brighter video each time you increase its brightness and contrast.

Step 5
Click “Export” to save the result when you’re satisfied with it. You can export videos in any popular format from the “Format” tab, including AVI, FLV, MKV, MP4, M4V, PSP, 3GP, MOV, and more. The video can be viewed on mobile devices such as an iPhone, iPad, or iPod by clicking “Device” and choosing a device. You can burn DVDs as well as upload videos directly to YouTube and Vimeo.
For Win 7 or later (64-bit)
For macOS 10.12 or later
2. Using Windows Video Editor to brighten a video
Windows video editor is an easy-to-use tool in which you can do basic video editing. This simple tool can easily cut, trim, and merge different video clips. The best thing about windows video editor is that it comes as built-in software in windows ten, so you won’t need to download any additional programs and plugins. Suppose you are just a beginner, and you need to perform basic video editing functions. In that case, you can easily use this app without worrying about purchasing expensive video editing programs. To increase the brightness of a video in the windows video editor, follow the steps given below:
Step 1
Go to the search section of windows 10 present right after the start menu icon and type “video editor.” Click the search icon and then open the video editor app.

Step 2
A new interface will appear on your screen. Just click on the new project button to start a new project. From the project library, click on the add new project button and select the video from your computer that you want to edit.

Step 3
Click on the video icon in the project library and then click on the “add to storyboard” button. It will open all the editing options for the video.

Step 4
From the menu present at the bottom of the screen, click on the filters option, and it will open a lot of filters on your screen. Click on the filters one by one and check which filter brightens your video.

Step 5
Once you have added the filter, click on the done button and export the video by clicking on the finish button. You can also select your desired resolution in which you want to export your video.

Conclusion
● As you can see, it’s very easy to brighten a video on Windows 10. You have many options depending on what you want to do with your videos after editing them. The point is that you no longer need complex video editing software to get the job done because there are many other options available to help you achieve your desired look and feel. We have described two different methods in this article. Give one a try if you feel like your videos could use a brighter touch.
Have you ever had a video with good audio but poor visual quality? Maybe it was a recorded talk, and the presenter was sitting in front of a poorly lit screen, or it might as well be your own home video. There are many reasons why your video could look dark and unappealing. Brightening a video is a great way to remove your editing mistakes and add some artistic flair to your videos. Some editing software has this option built-in, but if you use Windows 10 to edit, it’s hard to find out how to brighten a video in Windows 10 without the help of additional software.
We sometimes know video quality can affect the way content is perceived. That can be particularly frustrating, especially with all the hi-res content online now. Are you in a situation where you need to brighten up a video that has been recorded in low light? If so, look no further. It’s now a breeze to adjust the brightness of your videos on Windows 10. This article will show you how to brighten a video windows 10.
In this article
01 Does Windows 10 have built-in video editing software?
02 3 Simple Methods to Brighten a Video on iPhone
03 Adjust your video brightness and more using Filmora on PC/Mac
Does Windows 10 have built-in video editing software?
The answer is yes. Windows 10 has an easy-to-use video editing app. This is handy for simple home video editing, but it doesn’t work well for professional movie making. Windows Movie Maker was how we edited video in the old days of Windows XP and Vista. Today, Movie Maker is still available on Windows 10, but the new video editor is built-in to the operating system.
You can use it to trim videos or create your own home movies and slideshows. You can even have it create videos automatically by taking photos as you go. Forget about buying expensive editing software. With Windows 10, you have a free video editor built into the operating system where you can trim videos, create home movies, and even create automatic montages. You’ll be surprised at what you can do without ever leaving the Windows 10 Photos app.
Some people say that windows video editor has a very simple interface and it only has very basic features. In this case, having something is more important than not having anything at all. Also, you should keep in mind that not everyone needs a fully-fledged video editor . Some people have to do just basic tasks like trimming a video and increasing the brightness of a video. It is not feasible for them to purchase expensive video editing software for that purpose. So the Windows 10 video editor is the best in this case.
How To Brighten A Video In Windows 10 Easily
This article will discuss two different methods using which you can easily brighten your videos in Windows 10. So, without wasting any more time, let’s get started.
1. Using Filmora to brighten a video in Windows 10
You may think that all video editing software is created equal, but that’s where you’re wrong. The best video editor for your needs is drastically different depending on what you want to do with the end product. Some people want a quick way to make a trailer or showcase their products, and others want to put together an amateur movie.
Filmora is one of the best video editing software for Windows that can improve or fix your dark videos. Filmora is an all-in-one video editor for Windows and Mac. With Filmora, you can easily edit videos and make simple videos with transitions and effects, and you can give any video a professional touch. It’s a great piece of software that works incredibly smoothly. Filmora is an attractive and easy-to-use application that will give your video the final polish it needs. If you’ve ever had a video that looked too dark to use, there are ways to fix it aside from taking an entirely new video.
If you’ve ever had a video that looked too dark to use, then you can easily brighten it up using Filmora. Just follow the steps given below:
Step 1
First of all, make sure that you have installed the latest version of Filmora on your computer. If you haven’t already installed it, then you can download it easily from the official website of Wondershare.
Step 2
Upon starting Wondershare Filmora, click the “Import” button. The import media item window will open and show you all the files on your computer. The program will now display a thumbnail of your selected video in its media area. Drag the video from the media library and drop it into the Filmora timeline.

Step 3
You will see the editing interface when you double-click the video in the Timeline. You can switch between the Video, Audio, Color, and Motion tabs from here. You can change how the clip looks with the Rotate, Flip, Scale, and Position settings in the Video tab. When you select the Color tab, you will be presented with the White Balance, Tone, and 3D LUT options.

Step 4
You can increase the brightness of the video by dragging the Brightness slider in the Tone option to the right. Click the spacebar to play the video to see the real-time result. The video will appear brighter as a result of your operation. Repeat the previous step if the video remains dark. You will see a brighter video each time you increase its brightness and contrast.

Step 5
Click “Export” to save the result when you’re satisfied with it. You can export videos in any popular format from the “Format” tab, including AVI, FLV, MKV, MP4, M4V, PSP, 3GP, MOV, and more. The video can be viewed on mobile devices such as an iPhone, iPad, or iPod by clicking “Device” and choosing a device. You can burn DVDs as well as upload videos directly to YouTube and Vimeo.
For Win 7 or later (64-bit)
For macOS 10.12 or later
2. Using Windows Video Editor to brighten a video
Windows video editor is an easy-to-use tool in which you can do basic video editing. This simple tool can easily cut, trim, and merge different video clips. The best thing about windows video editor is that it comes as built-in software in windows ten, so you won’t need to download any additional programs and plugins. Suppose you are just a beginner, and you need to perform basic video editing functions. In that case, you can easily use this app without worrying about purchasing expensive video editing programs. To increase the brightness of a video in the windows video editor, follow the steps given below:
Step 1
Go to the search section of windows 10 present right after the start menu icon and type “video editor.” Click the search icon and then open the video editor app.

Step 2
A new interface will appear on your screen. Just click on the new project button to start a new project. From the project library, click on the add new project button and select the video from your computer that you want to edit.

Step 3
Click on the video icon in the project library and then click on the “add to storyboard” button. It will open all the editing options for the video.

Step 4
From the menu present at the bottom of the screen, click on the filters option, and it will open a lot of filters on your screen. Click on the filters one by one and check which filter brightens your video.

Step 5
Once you have added the filter, click on the done button and export the video by clicking on the finish button. You can also select your desired resolution in which you want to export your video.

Conclusion
● As you can see, it’s very easy to brighten a video on Windows 10. You have many options depending on what you want to do with your videos after editing them. The point is that you no longer need complex video editing software to get the job done because there are many other options available to help you achieve your desired look and feel. We have described two different methods in this article. Give one a try if you feel like your videos could use a brighter touch.
Create Kinetice Typography Text Effect in Filmora
Preparation
What you need to prepare:
- A computer (Windows or macOS)
- Your video materials.
- Filmora video editor
Step 1
Go ahead and download the Filmora video editor before all else. The program will install and start automatically. Just hit “Download” and then “Install”.
Step 2
Once the program starts, open a New Project. Then, go to “Sample Color” and drag any color you want to the Timeline.
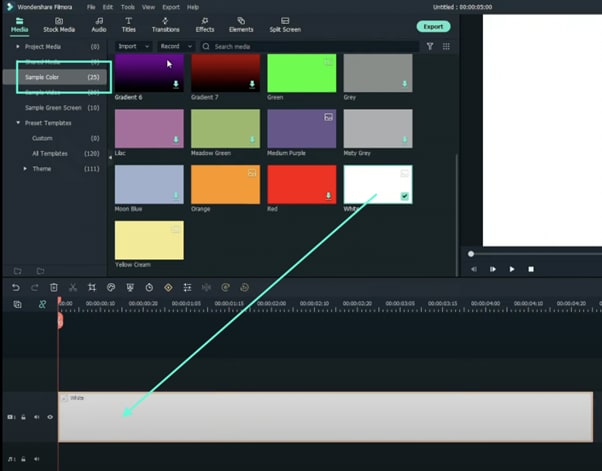
Step 3
Now, head over to the “Titles” tab and drag the Basic Title to the Timeline. Place it above the Sample Color clip.
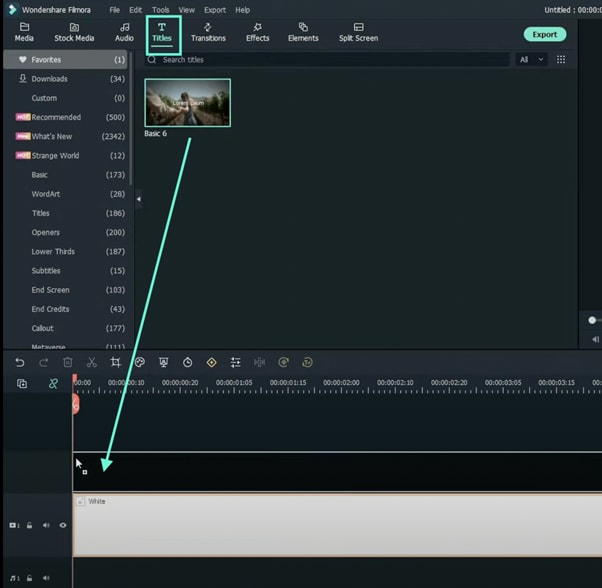
Step 4
Right-click on the Title clip in the Timeline and select Edit Properties from the menu. From there, click on “ADVANCED” to open the advanced settings. Here, you can change the font, adjust the text size, and place your titles wherever you want on the screen.
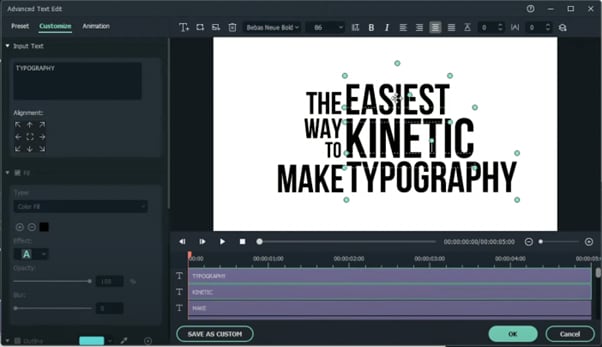
Step 5
Now, start with the second text layer from the bottom and move it 5 frames forward. Move each text layer above 5 layers forward from the previous layer. This will display each word a few milliseconds after the previous one.
When you’re done, click OK.
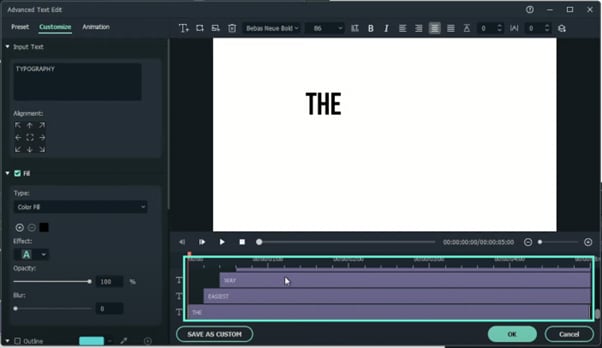
Step 6
Export the Timeline to save your text animation as a new clip.
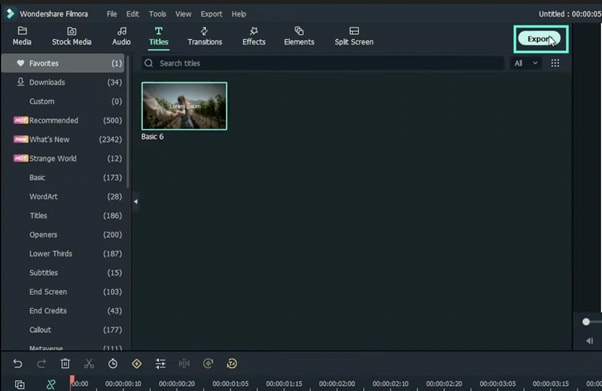
Step 7
Now, delete all the clips from the Timeline and import the text video you just exported. Drag it to the Timeline.
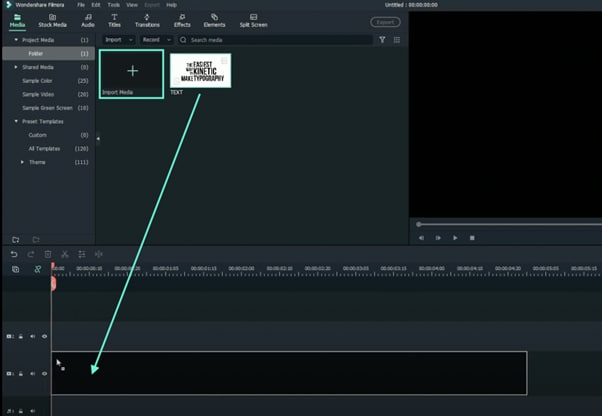
Step 8
Right-click on the clip in the Timeline and go to Edit Properties.
Step 9
Click on the Animation tab. Then, go to the Customize tab. Here, change the Scale setting to 120%.
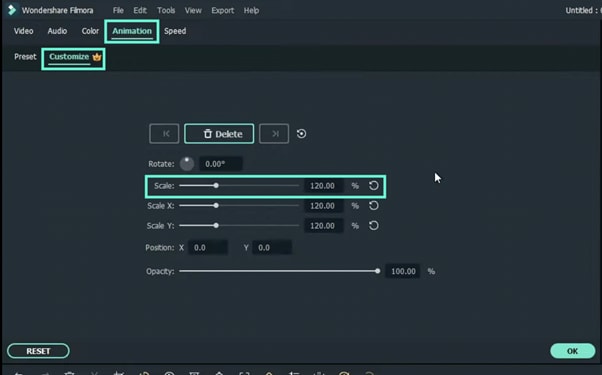
Step 10
Next, move the Playhead to the end of the clip in the timeline. Then, reset the Scale and click OK.
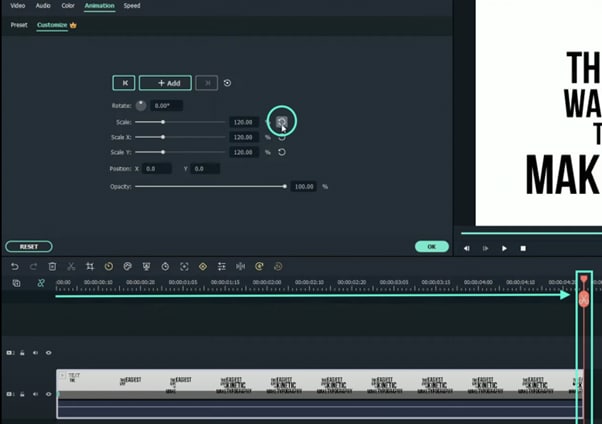
Step 11
Watch the final preview. Then, Render and Export the video and you’re done. Congratulations.
Summary
What you’ve learned:
- How to create a kinetic movement effect on text in Filmora
- How to adjust the scale of a video in Filmora
- Adjust and manipulate text layers
What you need to prepare:
- A computer (Windows or macOS)
- Your video materials.
- Filmora video editor
Step 1
Go ahead and download the Filmora video editor before all else. The program will install and start automatically. Just hit “Download” and then “Install”.
Step 2
Once the program starts, open a New Project. Then, go to “Sample Color” and drag any color you want to the Timeline.

Step 3
Now, head over to the “Titles” tab and drag the Basic Title to the Timeline. Place it above the Sample Color clip.

Step 4
Right-click on the Title clip in the Timeline and select Edit Properties from the menu. From there, click on “ADVANCED” to open the advanced settings. Here, you can change the font, adjust the text size, and place your titles wherever you want on the screen.

Step 5
Now, start with the second text layer from the bottom and move it 5 frames forward. Move each text layer above 5 layers forward from the previous layer. This will display each word a few milliseconds after the previous one.
When you’re done, click OK.

Step 6
Export the Timeline to save your text animation as a new clip.

Step 7
Now, delete all the clips from the Timeline and import the text video you just exported. Drag it to the Timeline.

Step 8
Right-click on the clip in the Timeline and go to Edit Properties.
Step 9
Click on the Animation tab. Then, go to the Customize tab. Here, change the Scale setting to 120%.

Step 10
Next, move the Playhead to the end of the clip in the timeline. Then, reset the Scale and click OK.

Step 11
Watch the final preview. Then, Render and Export the video and you’re done. Congratulations.
Summary
What you’ve learned:
- How to create a kinetic movement effect on text in Filmora
- How to adjust the scale of a video in Filmora
- Adjust and manipulate text layers
What you need to prepare:
- A computer (Windows or macOS)
- Your video materials.
- Filmora video editor
Step 1
Go ahead and download the Filmora video editor before all else. The program will install and start automatically. Just hit “Download” and then “Install”.
Step 2
Once the program starts, open a New Project. Then, go to “Sample Color” and drag any color you want to the Timeline.

Step 3
Now, head over to the “Titles” tab and drag the Basic Title to the Timeline. Place it above the Sample Color clip.

Step 4
Right-click on the Title clip in the Timeline and select Edit Properties from the menu. From there, click on “ADVANCED” to open the advanced settings. Here, you can change the font, adjust the text size, and place your titles wherever you want on the screen.

Step 5
Now, start with the second text layer from the bottom and move it 5 frames forward. Move each text layer above 5 layers forward from the previous layer. This will display each word a few milliseconds after the previous one.
When you’re done, click OK.

Step 6
Export the Timeline to save your text animation as a new clip.

Step 7
Now, delete all the clips from the Timeline and import the text video you just exported. Drag it to the Timeline.

Step 8
Right-click on the clip in the Timeline and go to Edit Properties.
Step 9
Click on the Animation tab. Then, go to the Customize tab. Here, change the Scale setting to 120%.

Step 10
Next, move the Playhead to the end of the clip in the timeline. Then, reset the Scale and click OK.

Step 11
Watch the final preview. Then, Render and Export the video and you’re done. Congratulations.
Summary
What you’ve learned:
- How to create a kinetic movement effect on text in Filmora
- How to adjust the scale of a video in Filmora
- Adjust and manipulate text layers
What you need to prepare:
- A computer (Windows or macOS)
- Your video materials.
- Filmora video editor
Step 1
Go ahead and download the Filmora video editor before all else. The program will install and start automatically. Just hit “Download” and then “Install”.
Step 2
Once the program starts, open a New Project. Then, go to “Sample Color” and drag any color you want to the Timeline.

Step 3
Now, head over to the “Titles” tab and drag the Basic Title to the Timeline. Place it above the Sample Color clip.

Step 4
Right-click on the Title clip in the Timeline and select Edit Properties from the menu. From there, click on “ADVANCED” to open the advanced settings. Here, you can change the font, adjust the text size, and place your titles wherever you want on the screen.

Step 5
Now, start with the second text layer from the bottom and move it 5 frames forward. Move each text layer above 5 layers forward from the previous layer. This will display each word a few milliseconds after the previous one.
When you’re done, click OK.

Step 6
Export the Timeline to save your text animation as a new clip.

Step 7
Now, delete all the clips from the Timeline and import the text video you just exported. Drag it to the Timeline.

Step 8
Right-click on the clip in the Timeline and go to Edit Properties.
Step 9
Click on the Animation tab. Then, go to the Customize tab. Here, change the Scale setting to 120%.

Step 10
Next, move the Playhead to the end of the clip in the timeline. Then, reset the Scale and click OK.

Step 11
Watch the final preview. Then, Render and Export the video and you’re done. Congratulations.
Summary
What you’ve learned:
- How to create a kinetic movement effect on text in Filmora
- How to adjust the scale of a video in Filmora
- Adjust and manipulate text layers
Also read:
- Use Mobile Phones to Shoot a Video Is Very Convenient Compare with Professional Cameras. In This Article, Well List You some Tips to Help Capture a High-Quality Video on Your Phone
- In 2024, Its Always a Cool Thing to Use a 3D Intro Maker to Create Intro Videos for Your Clips. This Post Will Introduce You 4 of the Best Intro Video Makers to Help You Improve Your Video
- 2024 Approved Looking For a Cheap Camera to Make Slow Motion Video? Get It Now
- Updated Split a Video in the Lightworks Step by Step
- Create Kinetice Typography Text Effect in Filmora for 2024
- Adding Slow Motion in DaVinci Resolve A Comprehensive Overview for 2024
- Updated Add Camera Shake to Video in Adobe After Effects
- New Are You Looking to Store Your Videos Securely and Efficiently? Look No Further than Our Top Pick for the Best Cloud Storage Service for Videos
- Updated In 2024, How to Clone Yourself in Videos with Filmora?
- New Motion Blur Photo With GIMP Step-By-Step Guide for 2024
- New Create Motion Effect with Path Blur In Photoshop for 2024
- Updated Best Free Slow Motion Apps For Android and iPhone for 2024
- Updated How to Create Your Own LOL Montage Video
- Updated In 2024, Discovering The Best Wedding LUTs for Premiere Pro | An Overview
- 2024 Approved Do You Waste Time Making Transparent Background in Paint
- Have You Ever Tried Using the Premiere Pro Motion Blur Plugin? Read This Article to Learn How to Efficiently Use the ReelSmart Motion Blur Plugin in Premiere Pro
- New Adding Shake Effects to Your Video With Alight Motion
- How to Save As MP4 File on Windows Movie Maker?
- New In 2024, How to Use Blender Green Screen
- Updated Learning The Details Of How To Replace Sky in Lightroom
- Updated In 2024, 3 Effective Methods to Correct Color Distortion in Videos
- Updated Top 5 Apps To Add Song To Video for 2024
- Updated Best 5 Tips to Freeze-Frame in After Effects
- Do You Want to Make TikTok Videos More Elemental by Using Countdown but Dont Know How to Do This? Here We Will Thoroughly Guide You About This for 2024
- How to Transfer Text Messages from Poco X5 to New Phone | Dr.fone
- Hassle-Free Ways to Remove FRP Lock on Vivo Y17s Phones with/without a PC
- In 2024, A Step-by-Step Guide on Using ADB and Fastboot to Remove FRP Lock on your Infinix Note 30
- How To Restore Missing Messages Files from Infinix GT 10 Pro
- In 2024, How to Transfer Data from Infinix Zero 5G 2023 Turbo to Any iOS Devices | Dr.fone
- Best Methods for Sony Xperia 10 V Wont Turn On | Dr.fone
- In 2024, Is Fake GPS Location Spoofer a Good Choice On Apple iPhone 6? | Dr.fone
- Is your Tecno Pova 6 Pro 5G working too slow? Heres how you can hard reset it | Dr.fone
- What Is Anime? Anime VS Manga VS Cartoon
- Will iSpoofer update On Infinix Smart 8 Plus | Dr.fone
- 3uTools Virtual Location Not Working On Tecno Spark Go (2023)? Fix Now | Dr.fone
- Bypass iCloud Activation Lock with IMEI Code On your Apple iPhone 14 Pro Max
- How To Factory Unlock Your Telstra iPhone 8 Plus
- Effective Ways To Fix Checkra1n Error 31 From Apple iPhone SE (2022)
- In 2024, Here are Some of the Best Pokemon Discord Servers to Join On Samsung Galaxy A14 5G | Dr.fone
- In 2024, How to Bypass Android Lock Screen Using Emergency Call On Vivo T2 Pro 5G?
- The Top Free 12 GIF Meme Maker at a Glance for 2024
- Methods to Change GPS Location On Samsung Galaxy Z Flip 5 | Dr.fone
- How To Transfer WhatsApp From Apple iPhone SE (2022) to other iPhone 13 Pro Max devices? | Dr.fone
- How To Recover Whatsapp Chat History From iPhone X | Stellar
- How Can I Catch the Regional Pokémon without Traveling On Itel P55T | Dr.fone
- Ultimate Guide to Free PPTP VPN For Beginners On OnePlus 11R | Dr.fone
- Is GSM Flasher ADB Legit? Full Review To Bypass Your Oppo A79 5GFRP Lock
- How to Sign Out of Apple ID On iPhone SE (2022) without Password?
- Title: Merging MP4 Videos Made Simple Top 5 Online Tools
- Author: Chloe
- Created at : 2024-05-20 03:37:30
- Updated at : 2024-05-21 03:37:30
- Link: https://ai-editing-video.techidaily.com/merging-mp4-videos-made-simple-top-5-online-tools/
- License: This work is licensed under CC BY-NC-SA 4.0.


