:max_bytes(150000):strip_icc():format(webp)/Robothandholdinganapple-fbe6ff482ed641e188dd6650b9ac132e.jpg)
Most-Used 3 Ways to Compress Video for Instagram Story, Feed, and IGTV

Most-Used 3 Ways to Compress Video for Instagram Story, Feed, and IGTV
Did your high-quality 4K video become total garbage when uploaded to Instagram? If it’s a yes from your side, then what you need now is a video compressor for Instagram. This article will cover how to compress a video for Instagram while maintaining its quality with a professional video editing tool, online video editors, and mobile phone applications.
But first, let’s look for the things we need to know before compressing a video for Instagram.
Part 1: Before reducing video size for Instagram, things you need to know
If you want to use a video compressor for Instagram, you must know the specific requirements of an Instagram video. Instagram only accepts MP4, MOV, or GIF videos and has concrete limitations on almost every video aspect. But you don’t have to be tense because for your ease, we have compiled all those limitations on Story, Reel, Live, or feed videos into a tabular form. Here it is,
| Features | Feed Video (landscape, square, portrait) | Story | Reels | Live |
|---|---|---|---|---|
| Size guide | Max 60 sec | Max 15 sec | Max 90 sec | Max 60 min |
| Aspect ratio | 16:9 for landscape, 1:1 for square, 4:5 for portrait | 9:16 | 9:16 | 9:16 |
| Frame rate.( frame per sec) | 23 - 60 FPS | Min 30 FPS | Min 30 FPS | Min 30 FPS |
| File size | Max 4 GB | Max 4 GB | Max 4 GB | Max 4 GB |
| Upload video captions | Can upload a full caption and Up to 30 Hashtags | No caption Upto 10 hashtags per story. | Can upload a full caption and up to 30 Hashtags | Auto-generated captions uploaded if enabled |
| 60- second feed reviews | MP4/MOV/GIF | MP4/MOV/GIF | MP4/MOV | MP4/MOV |
| Minimum dimensions.(pixels) | 600×315 for landscape, 600×600 for square, 600×750 for portrait | 600 x 1067 | 600 x 1067 | 600 x 1067 |
| Maximum dimension(pixels) | 1080 x 608 for landscape, 1080 x 1080 for square, 1080 x 1350 for portrait | 1080 x 1920 | 1080 x 1920 | 1080 x 1920 |
That’s a lot of information, right? That’s why we have sorted out the best Instagram video compression settings recommended to make a high-quality video for Instagram, which are as.
Format:
Resolution: 720P or 1080P
Bitrate:
3Mbps-6Mbps
Frame rate:
30Fps
Now that you know all the specific requirements and the recommended video compression settings. Let us show you how to compress a video without losing quality for Instagram with a professional Video-Editing Tool.
Part 2: Compress Video Without Losing Quality for Instagram with a Professional Video-Editing Tool
Wondershare Filmora
Speaking of the simplest video compressor for Instagram on all recent Windows or macOS computers, Wondershare Filmora stands out as one of the best bets. In addition to video-editing, most users prefer this tool for compressing their videos before uploading them to Instagram. It is highly reliable and takes less time when compared to other methods and tools in the digital market.
Wondershare Filmora is not only trusted by a community of over 85 Million Users but is also an award-winning video editing tool in the market. Here are some awards and some customer reviews which it boasts of.
Free Download For Win 7 or later(64-bit)
Free Download For macOS 10.14 or later
Awards:
- G2 Leader Spring 2022: with a winning streak of 17 Quarters.
- Shorty Awards: “Best in Photo and Video” and “Audience Honor” awards on the 13th edition of shorty awards.
- Category Leaders 2022: “ Category Leaders in Video Editing” award.

Now some customer reviews.
Reviews
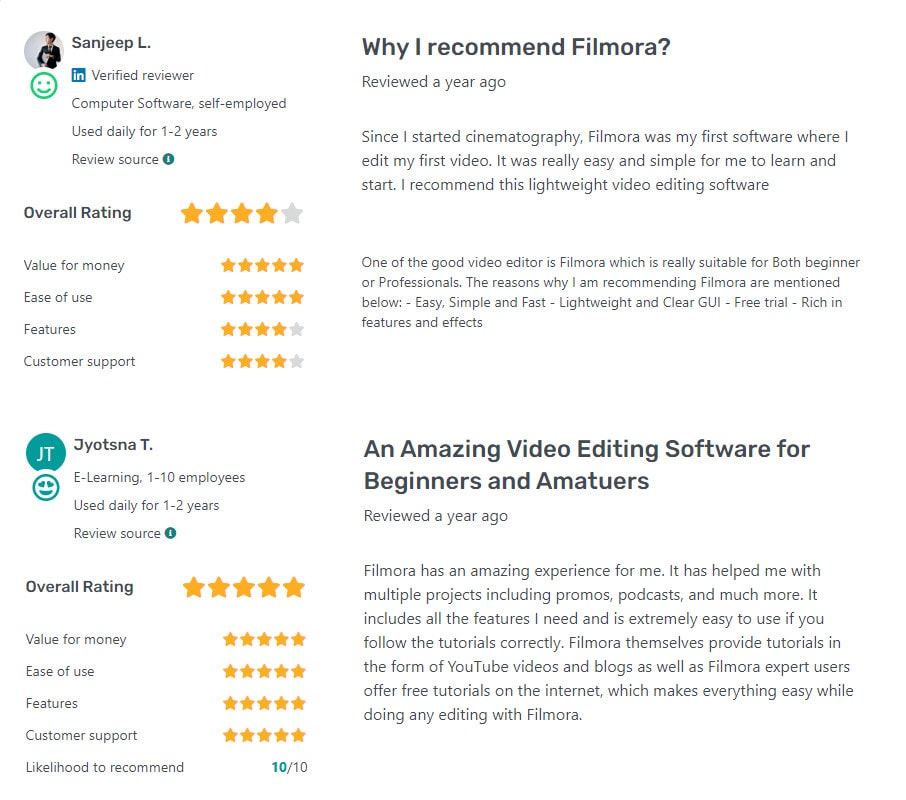
The evaluation of Wondershare Filmora by the people who have purchased or experienced it is almost always positive. This can be shown by the amazing reviews which people leave after using Wondershare Filmora. Here are some of the reviews about it.
Now, let’s move forward and see the key features provided byWondershare Filmora.
Main Features
WondrShare Filmora is one of the best Video Editing tools out there. Not only it’s an excellent video compressor for Instagram, but it also provides all the powerful editing tools one could want. Here are the main features which Wondershare Filmora provides.
- Filmora allows users to create GIF from all popular video formats like .wmv, .mp4, .mkv, .evo, .dat, .wav, .mpeg and .avi etc. so you need not to worry about compatibility issues.
- The best thing to know about the Filmora video editing software tool is that it allows users to edit GIF files with some basic editing tools like color correction, cropping, splitting, rotation, combining two or more frames, speeding up frame motion or slow down as per requirement.
- It allows you to edit files with text and other similar interesting elements.
- Moreover, you can also add some incredible effects to your videos by using Filmora.
- On top of that, its video compressing feature makes it an excellent video compressor for Instagram.
Now moving on to the Pros and Cons of using Wondershare Filmora.
Pros
- It is easy to use, even for beginners
- Multiple formats are supported
- Tutorials are available on youtube for their every feature
- Free trial is available for everyone
Cons
- Leaves a watermark (can be removed after buying the full version)
- Full features are available only in the premium version
- Latest versions operate slowly in weak capability computers
We’ve known that Wondershare Filmora is a great video compressor for Instagram. Let’s move to the step-by-step guide for using Wondershare Filmora to compress a video for Instagram.
Step1Download, install, and launch the program (buy the full version to enjoy its all features.)
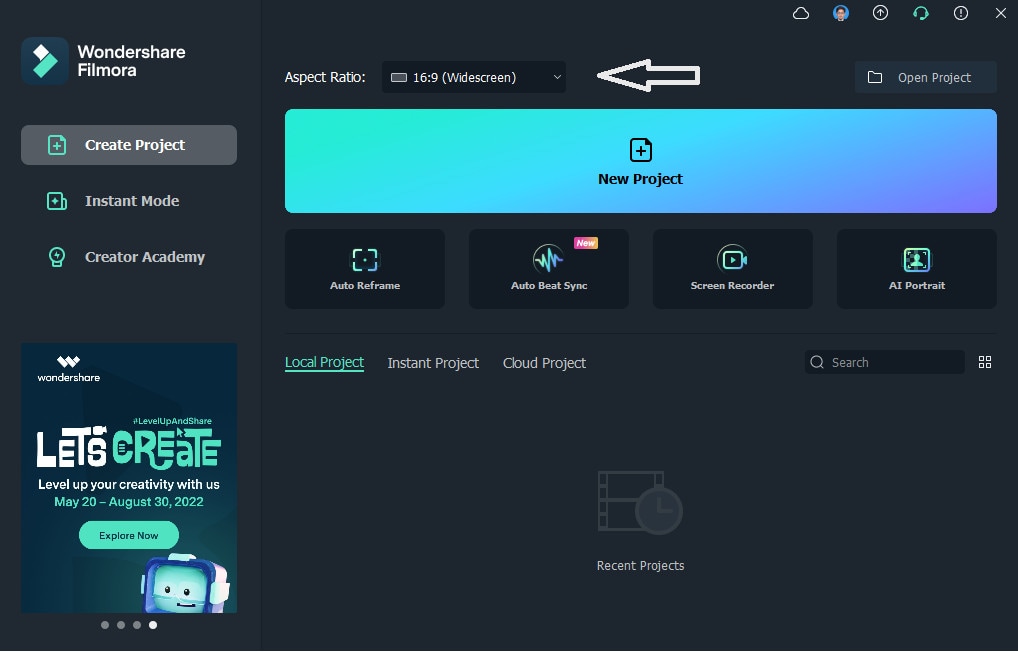
Step2Change the Aspect Ratio from the first screen that appears and click on the “New Project” option.
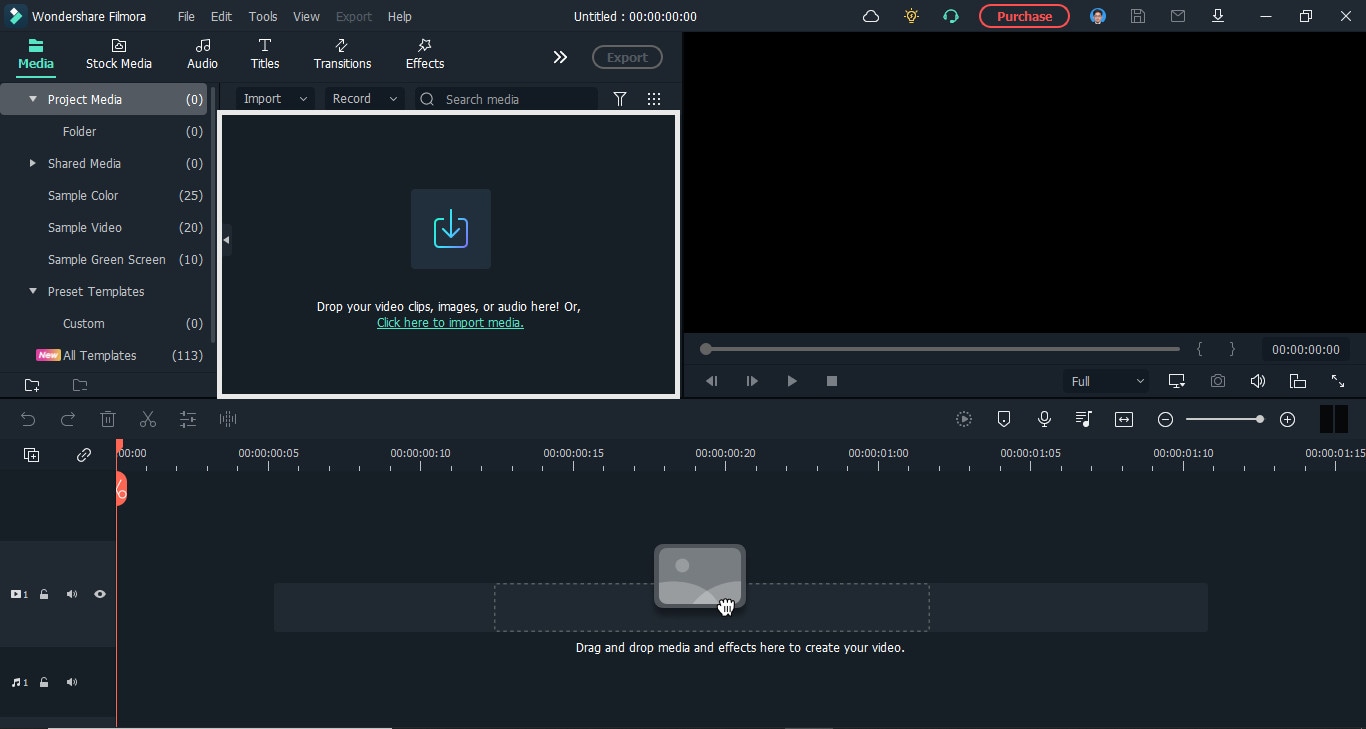
Step3When the main screen appears, drag the video to the area shown below or click here to select the video from your storage to import the video to the software.
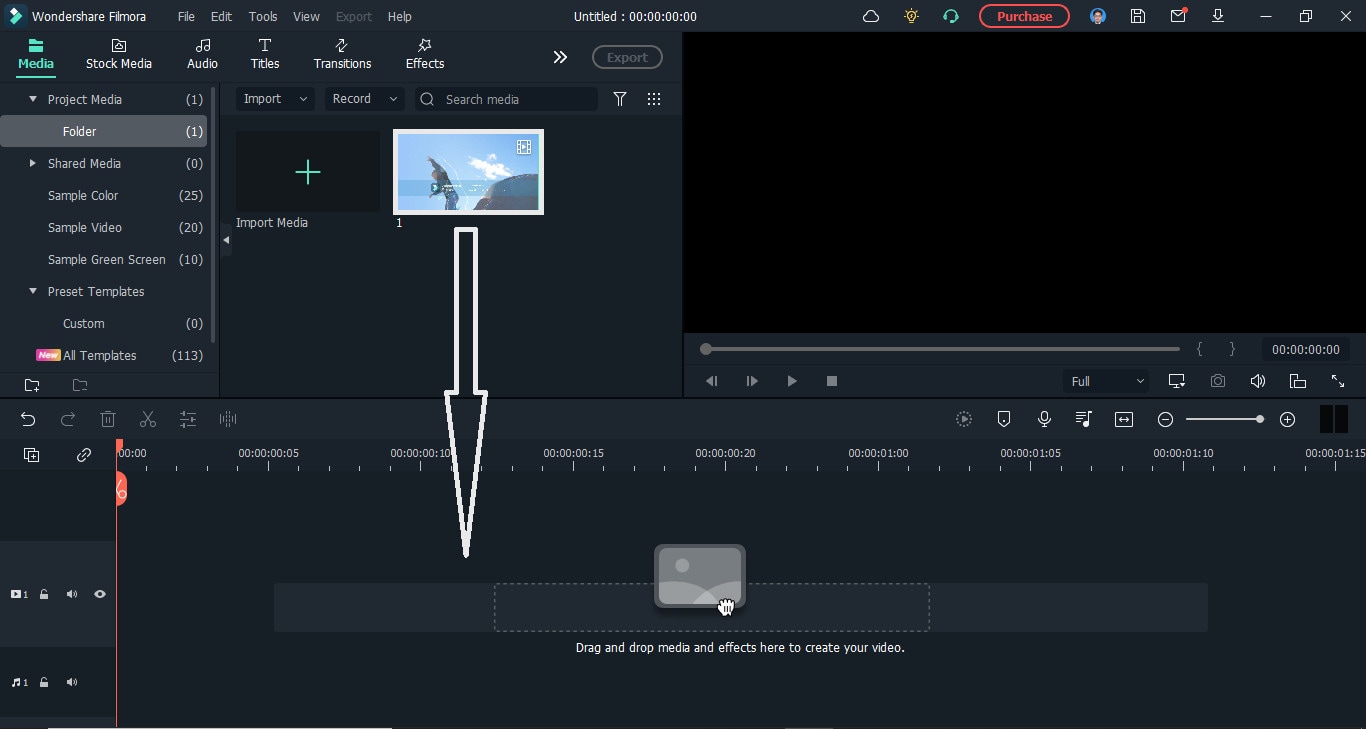
Step4Drag the video to the bottom area.
Step5Then click the “export” button above, and a new screen will appear.
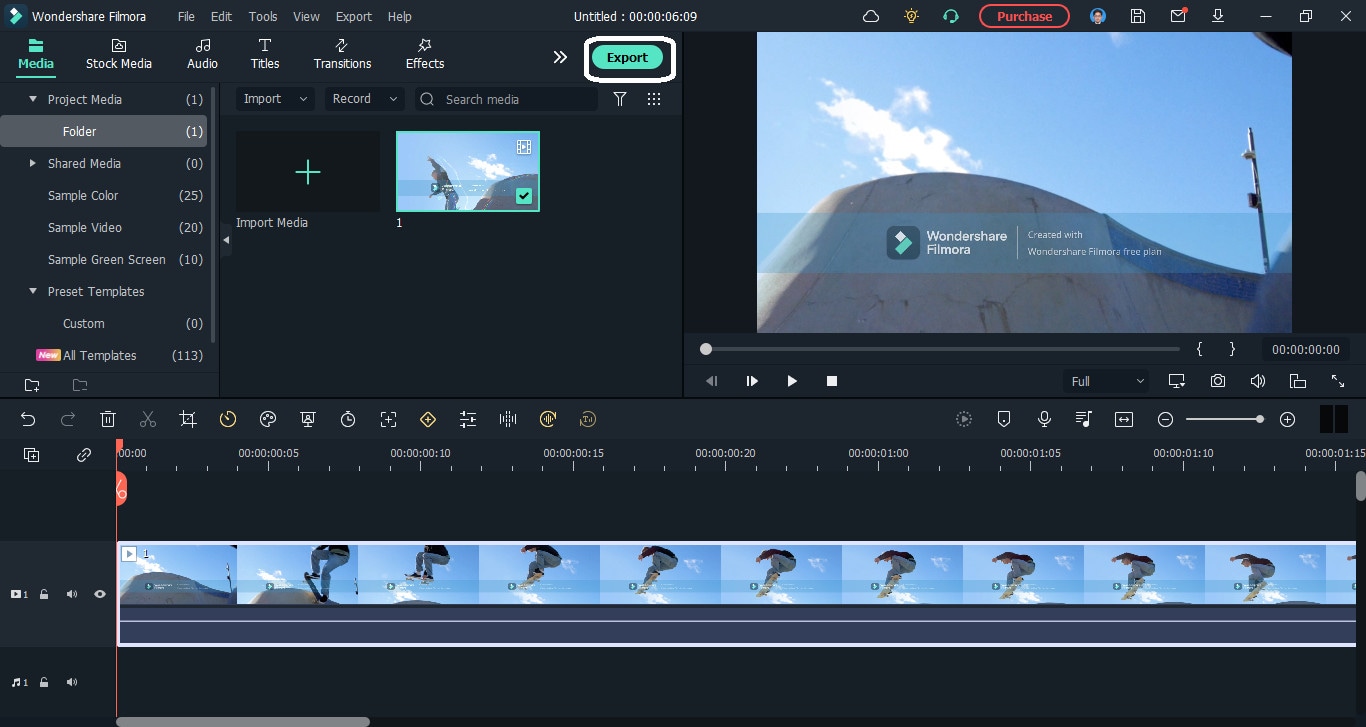
Step6Change the video format from the left area to MP4 and click the “SETTINGS” button to change further settings.
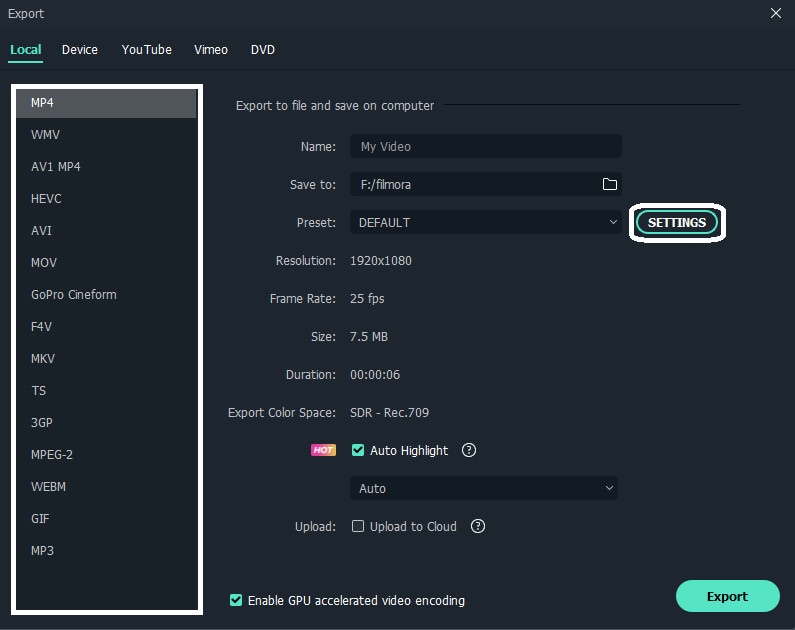
Step7Then change the resolution, frame rate, and bit rate to the recommended values shown in part 1 of this article.
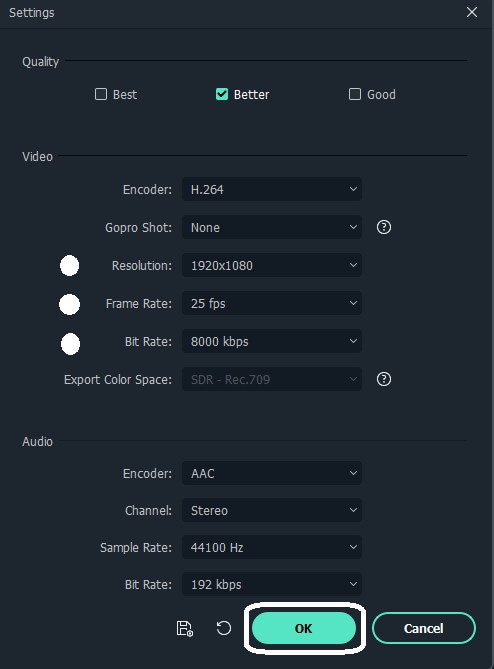
Step8Now the settings have been changed. Just click the export button to convert the video to the changed settings.
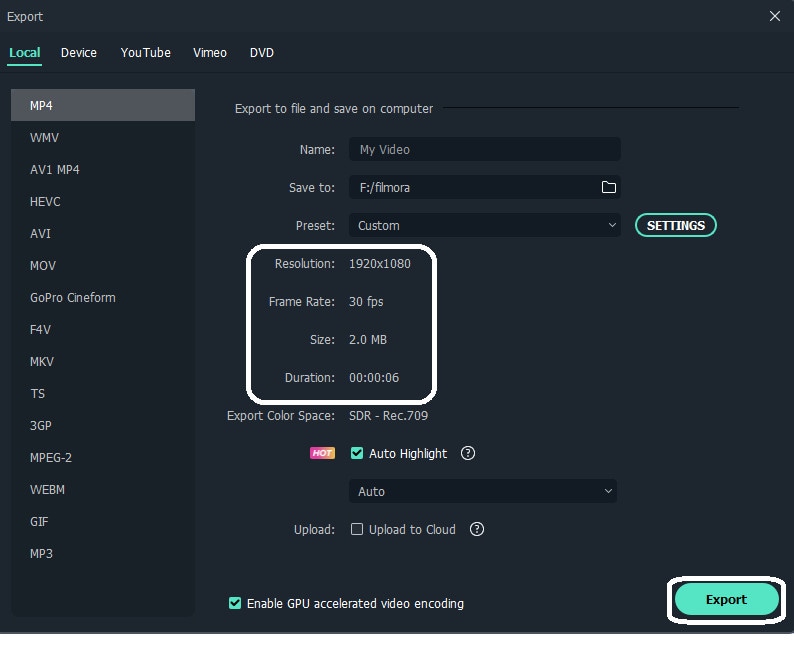
Easy right? Now let’s see how we can use an online video compressor for Instagram.
Part 3: Free Online Video Compressor to Resize Your Videos for Instagram
Although Wondershare Filmora is an incredible video compressor for Instagram, there are instances when someone’s computer doesn’t support it or if someone only uses video compressors once in a while.
If that is your case, you don’t need to buy expensive video compressors because we have made it easy for you. In this part of the article, we will discuss some outstanding free online video compressors to resize your videos for Instagram. So why wait? Let’s move on.
But there are myriad online video compressors, like VEED.IO, FreeConvert, Clipchamp, VideoSmaller, and Adobe Express. So which one to choose? Of course, it’s Adobe Express.
Adobe Express
Adobe Express is a free online tool for making quality images, videos, and texts for all your projects, all in one place.
On top of that, it enables you to quickly create standard social graphics, flyers, and logos without hassle. And the video editing tools in it make it an excellent video compressor for Instagram.
Let’s see some Pros and Cons of using Adobe Express as a video compressor for Instagram.
Pros
- Easy to use interface
- Free accounts are available and can also be upgraded to enjoy more amazing features
Cons
- Bitrate and framerate can’t be changed
Here are the step-by-step instructions to compress a video for Instagram.
Step1Go to Adobe Express and click the “start for free” button.

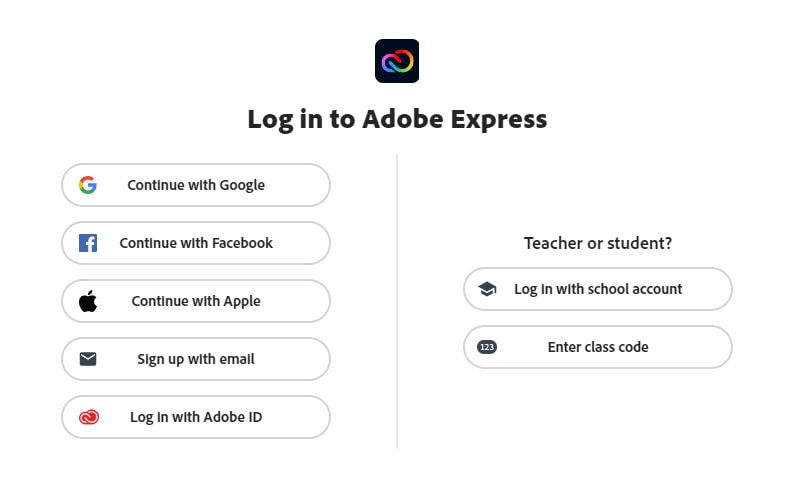
Step2Sign in using Google, Facebook, Apple, Email, or Adobe ID. Then the main screen of the Adobe Express will be shown.
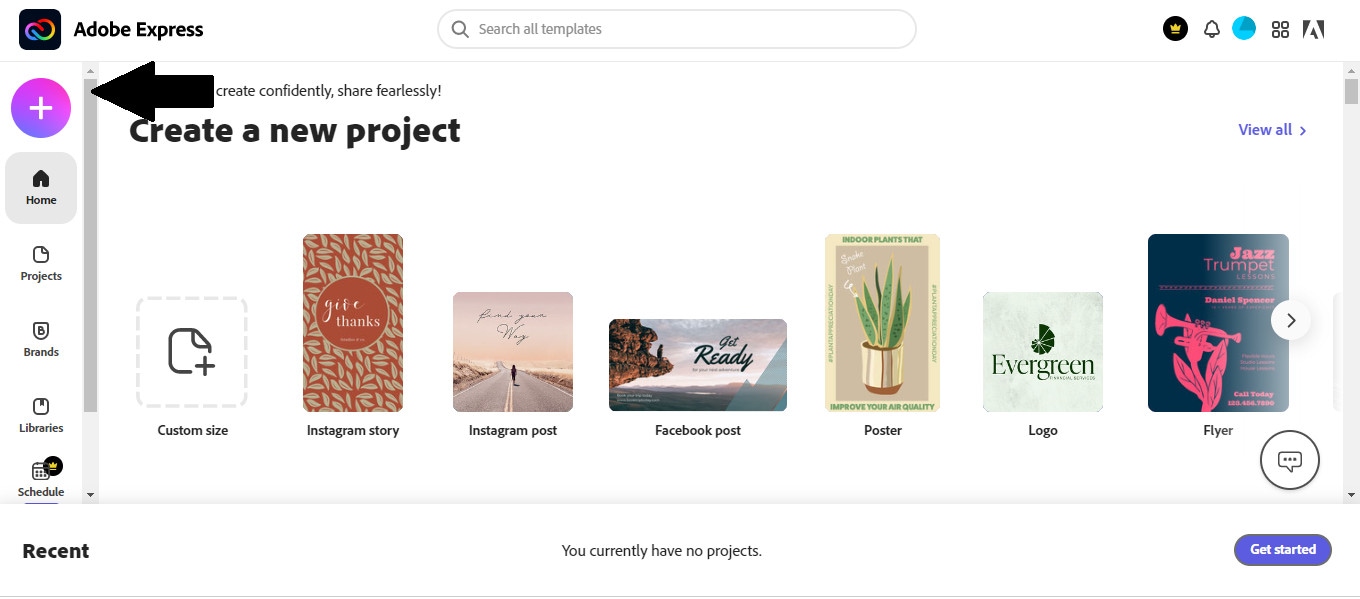
Step3Click on the “ + “ sign in the top left corner.
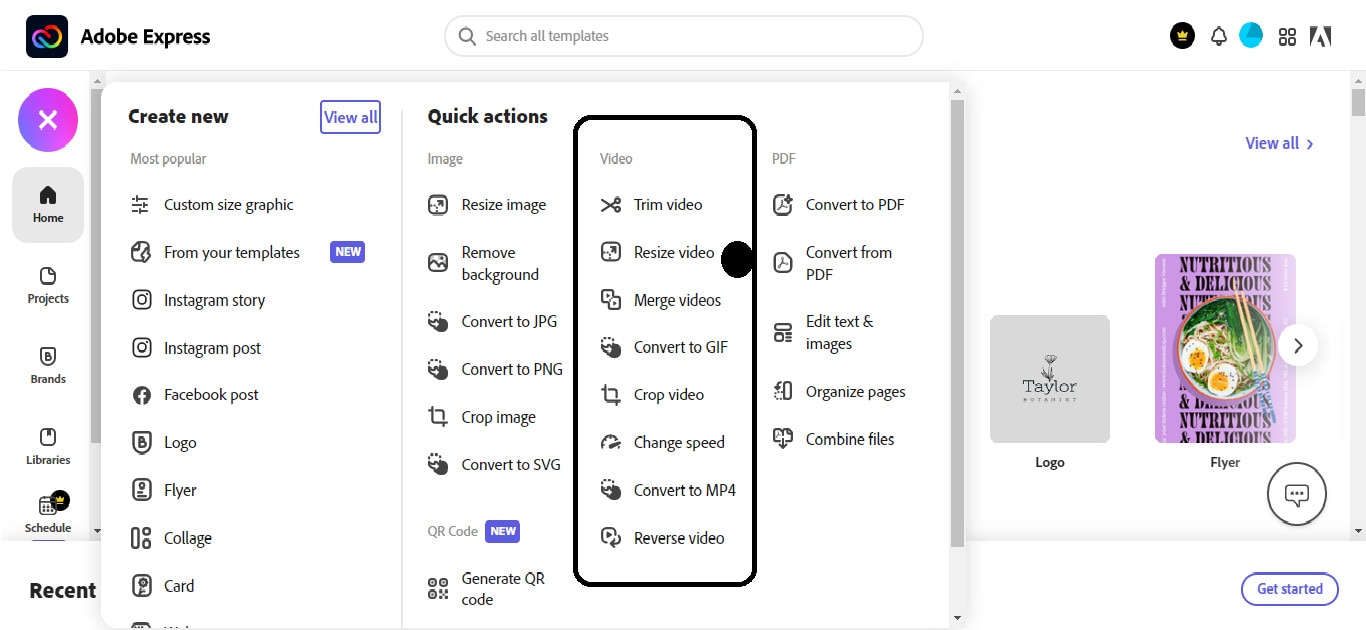
Step4Here from the video editing tools section, select the “ Resize video .“
Step5Drag the video you want to compress here or open it from your storage.
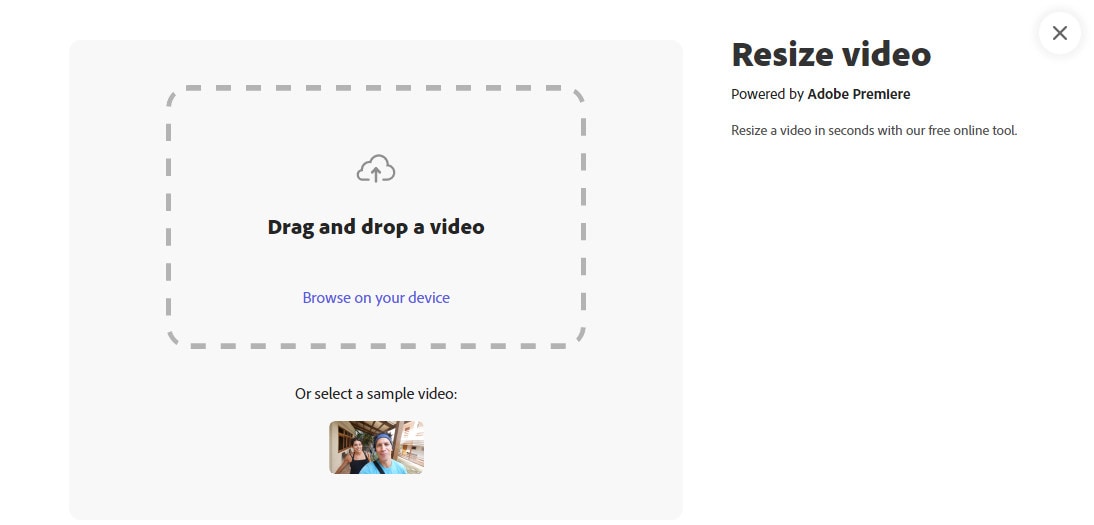
Step6Now select the shape and resolution and click the Download button.
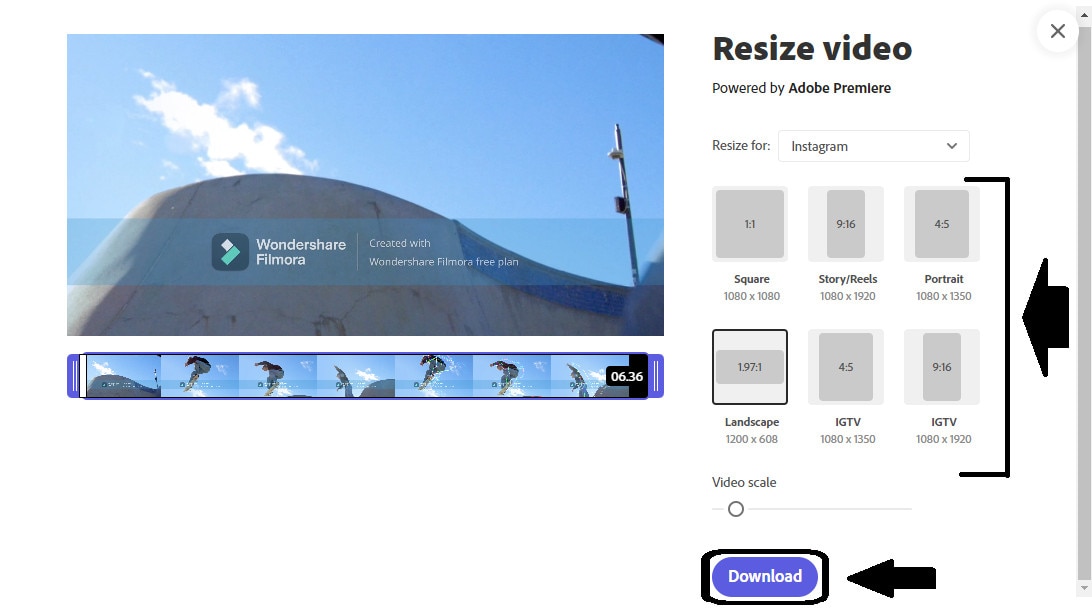
Step7Adobe Express will compress your video, and it will be downloaded automatically.
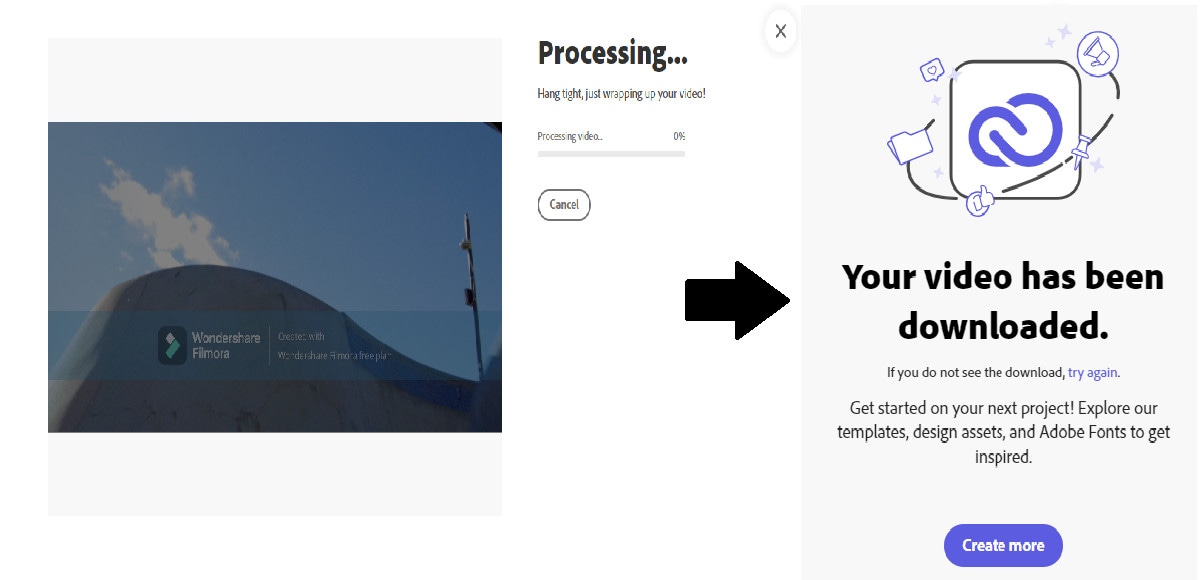
But What if someone wants to compress videos on their mobile phones? Is that possible? Of course, it is! Let us show you some amazing video compressors for Instagram on iPhone and Android.
Part 4: How to reduce video/mp4 size for Instagram on iPhone and Android
As the era of mobile phones is improving day by day, most social media applications, including Instagram, are used on either Android or iPhones. So if you took a high-quality 4K video from your mobile and are looking for a video compressor for Instagram, you don’t need to open your computer for this trivial matter. Because here are some of the best video compressor apps for android and video compressor apps for iOS.
All these have pros and cons, but we recommend using “Video Compress” to compress your high-quality video on Android or iPhone. And why is that? Because not only does it support all video formats but also provides the function of trimming, cropping, or rotating the video. Moreover, it also allows the audio removal to increase the video’s compression further.
Here are some Pros and Cons of using “Video Compress”
Pros
- Very simple to use
- On top of adjusting the quality between low and high, you can also make custom settings
- Can share the video directly from the app
Cons
- There is no search option; you must manually select the video from your storage
- No option for merging multiple videos into one
Here are the steps to compress video using Video Compress on Android phones.
Step1Download, Install and Launch the “Video Compress” from the AppStore.

Step2Open the folder containing the file, then select the video you want to compress.
Step3“Compress Video” will show you many options for editing your video. Press on the compress video option.

Step4Go to the Custom Settings and change the video resolution and bitrate to the ones recommended in Part 1 of this article.
Step5Finally, press the video compress icon on the bottom of the screen, and “Video Compress” will compress your video with the selected settings.

But there are some limitations, too, like it doesn’t change the aspect ratio and frame rate of the video, which are crucial for uploading it on Instagram. So we recommend using Wondershare Filmora if you are looking for a video compressor for Instagram.
Final Words
Compressing a high-quality video before uploading it on Instagram is necessary because of the concrete limitations of Instagram. In this article, we have gone over different video compressors for Instagram. Each of these video compressors can shrink the video without compromising its quality. So you can upload those videos on your Instagram feed, story, reels, or live videos effectively.
Did you use one of these video compressors for Instagram? Let us know your thoughts in the comments section below. Thanks for reading.
Part 1: Before reducing video size for Instagram, things you need to know
If you want to use a video compressor for Instagram, you must know the specific requirements of an Instagram video. Instagram only accepts MP4, MOV, or GIF videos and has concrete limitations on almost every video aspect. But you don’t have to be tense because for your ease, we have compiled all those limitations on Story, Reel, Live, or feed videos into a tabular form. Here it is,
| Features | Feed Video (landscape, square, portrait) | Story | Reels | Live |
|---|---|---|---|---|
| Size guide | Max 60 sec | Max 15 sec | Max 90 sec | Max 60 min |
| Aspect ratio | 16:9 for landscape, 1:1 for square, 4:5 for portrait | 9:16 | 9:16 | 9:16 |
| Frame rate.( frame per sec) | 23 - 60 FPS | Min 30 FPS | Min 30 FPS | Min 30 FPS |
| File size | Max 4 GB | Max 4 GB | Max 4 GB | Max 4 GB |
| Upload video captions | Can upload a full caption and Up to 30 Hashtags | No caption Upto 10 hashtags per story. | Can upload a full caption and up to 30 Hashtags | Auto-generated captions uploaded if enabled |
| 60- second feed reviews | MP4/MOV/GIF | MP4/MOV/GIF | MP4/MOV | MP4/MOV |
| Minimum dimensions.(pixels) | 600×315 for landscape, 600×600 for square, 600×750 for portrait | 600 x 1067 | 600 x 1067 | 600 x 1067 |
| Maximum dimension(pixels) | 1080 x 608 for landscape, 1080 x 1080 for square, 1080 x 1350 for portrait | 1080 x 1920 | 1080 x 1920 | 1080 x 1920 |
That’s a lot of information, right? That’s why we have sorted out the best Instagram video compression settings recommended to make a high-quality video for Instagram, which are as.
Format:
Resolution: 720P or 1080P
Bitrate:
3Mbps-6Mbps
Frame rate:
30Fps
Now that you know all the specific requirements and the recommended video compression settings. Let us show you how to compress a video without losing quality for Instagram with a professional Video-Editing Tool.
Part 2: Compress Video Without Losing Quality for Instagram with a Professional Video-Editing Tool
Wondershare Filmora
Speaking of the simplest video compressor for Instagram on all recent Windows or macOS computers, Wondershare Filmora stands out as one of the best bets. In addition to video-editing, most users prefer this tool for compressing their videos before uploading them to Instagram. It is highly reliable and takes less time when compared to other methods and tools in the digital market.
Wondershare Filmora is not only trusted by a community of over 85 Million Users but is also an award-winning video editing tool in the market. Here are some awards and some customer reviews which it boasts of.
Free Download For Win 7 or later(64-bit)
Free Download For macOS 10.14 or later
Awards:
- G2 Leader Spring 2022: with a winning streak of 17 Quarters.
- Shorty Awards: “Best in Photo and Video” and “Audience Honor” awards on the 13th edition of shorty awards.
- Category Leaders 2022: “ Category Leaders in Video Editing” award.

Now some customer reviews.
Reviews
The evaluation of Wondershare Filmora by the people who have purchased or experienced it is almost always positive. This can be shown by the amazing reviews which people leave after using Wondershare Filmora. Here are some of the reviews about it.

Now, let’s move forward and see the key features provided byWondershare Filmora.
Main Features
WondrShare Filmora is one of the best Video Editing tools out there. Not only it’s an excellent video compressor for Instagram, but it also provides all the powerful editing tools one could want. Here are the main features which Wondershare Filmora provides.
- Filmora allows users to create GIF from all popular video formats like .wmv, .mp4, .mkv, .evo, .dat, .wav, .mpeg and .avi etc. so you need not to worry about compatibility issues.
- The best thing to know about the Filmora video editing software tool is that it allows users to edit GIF files with some basic editing tools like color correction, cropping, splitting, rotation, combining two or more frames, speeding up frame motion or slow down as per requirement.
- It allows you to edit files with text and other similar interesting elements.
- Moreover, you can also add some incredible effects to your videos by using Filmora.
- On top of that, its video compressing feature makes it an excellent video compressor for Instagram.
Now moving on to the Pros and Cons of using Wondershare Filmora.
Pros
- It is easy to use, even for beginners
- Multiple formats are supported
- Tutorials are available on youtube for their every feature
- Free trial is available for everyone
Cons
- Leaves a watermark (can be removed after buying the full version)
- Full features are available only in the premium version
- Latest versions operate slowly in weak capability computers
We’ve known that Wondershare Filmora is a great video compressor for Instagram. Let’s move to the step-by-step guide for using Wondershare Filmora to compress a video for Instagram.
Step1Download, install, and launch the program (buy the full version to enjoy its all features.)
Step2Change the Aspect Ratio from the first screen that appears and click on the “New Project” option.

Step3When the main screen appears, drag the video to the area shown below or click here to select the video from your storage to import the video to the software.

Step4Drag the video to the bottom area.

Step5Then click the “export” button above, and a new screen will appear.

Step6Change the video format from the left area to MP4 and click the “SETTINGS” button to change further settings.

Step7Then change the resolution, frame rate, and bit rate to the recommended values shown in part 1 of this article.

Step8Now the settings have been changed. Just click the export button to convert the video to the changed settings.

Easy right? Now let’s see how we can use an online video compressor for Instagram.
Part 3: Free Online Video Compressor to Resize Your Videos for Instagram
Although Wondershare Filmora is an incredible video compressor for Instagram, there are instances when someone’s computer doesn’t support it or if someone only uses video compressors once in a while.
If that is your case, you don’t need to buy expensive video compressors because we have made it easy for you. In this part of the article, we will discuss some outstanding free online video compressors to resize your videos for Instagram. So why wait? Let’s move on.
But there are myriad online video compressors, like VEED.IO, FreeConvert, Clipchamp, VideoSmaller, and Adobe Express. So which one to choose? Of course, it’s Adobe Express.
Adobe Express
Adobe Express is a free online tool for making quality images, videos, and texts for all your projects, all in one place.
On top of that, it enables you to quickly create standard social graphics, flyers, and logos without hassle. And the video editing tools in it make it an excellent video compressor for Instagram.
Let’s see some Pros and Cons of using Adobe Express as a video compressor for Instagram.
Pros
- Easy to use interface
- Free accounts are available and can also be upgraded to enjoy more amazing features
Cons
- Bitrate and framerate can’t be changed
Here are the step-by-step instructions to compress a video for Instagram.
Step1Go to Adobe Express and click the “start for free” button.

Step2Sign in using Google, Facebook, Apple, Email, or Adobe ID. Then the main screen of the Adobe Express will be shown.

Step3Click on the “ + “ sign in the top left corner.

Step4Here from the video editing tools section, select the “ Resize video .“

Step5Drag the video you want to compress here or open it from your storage.

Step6Now select the shape and resolution and click the Download button.

Step7Adobe Express will compress your video, and it will be downloaded automatically.

But What if someone wants to compress videos on their mobile phones? Is that possible? Of course, it is! Let us show you some amazing video compressors for Instagram on iPhone and Android.
Part 4: How to reduce video/mp4 size for Instagram on iPhone and Android
As the era of mobile phones is improving day by day, most social media applications, including Instagram, are used on either Android or iPhones. So if you took a high-quality 4K video from your mobile and are looking for a video compressor for Instagram, you don’t need to open your computer for this trivial matter. Because here are some of the best video compressor apps for android and video compressor apps for iOS.
All these have pros and cons, but we recommend using “Video Compress” to compress your high-quality video on Android or iPhone. And why is that? Because not only does it support all video formats but also provides the function of trimming, cropping, or rotating the video. Moreover, it also allows the audio removal to increase the video’s compression further.
Here are some Pros and Cons of using “Video Compress”
Pros
- Very simple to use
- On top of adjusting the quality between low and high, you can also make custom settings
- Can share the video directly from the app
Cons
- There is no search option; you must manually select the video from your storage
- No option for merging multiple videos into one
Here are the steps to compress video using Video Compress on Android phones.
Step1Download, Install and Launch the “Video Compress” from the AppStore.

Step2Open the folder containing the file, then select the video you want to compress.
Step3“Compress Video” will show you many options for editing your video. Press on the compress video option.

Step4Go to the Custom Settings and change the video resolution and bitrate to the ones recommended in Part 1 of this article.
Step5Finally, press the video compress icon on the bottom of the screen, and “Video Compress” will compress your video with the selected settings.

But there are some limitations, too, like it doesn’t change the aspect ratio and frame rate of the video, which are crucial for uploading it on Instagram. So we recommend using Wondershare Filmora if you are looking for a video compressor for Instagram.
Final Words
Compressing a high-quality video before uploading it on Instagram is necessary because of the concrete limitations of Instagram. In this article, we have gone over different video compressors for Instagram. Each of these video compressors can shrink the video without compromising its quality. So you can upload those videos on your Instagram feed, story, reels, or live videos effectively.
Did you use one of these video compressors for Instagram? Let us know your thoughts in the comments section below. Thanks for reading.
How To Create Transparent Background On Picsart
How To Make Transparent Background On Picsart
An easy yet powerful editor
Numerous effects to choose from
Detailed tutorials provided by the official channel
Here you can find various ways of making a transparent logo using different video editors. Choosing a video creator and using simple steps for transparent image making is really a fun.
In this article
01 [Easy Steps to create Transparent PNG Image in Picsart](#Part 1)
02 [3 Cool Ways To Make A Transparent Logo](#Part 2)
03 [How To Make Transparent Background On Phone; Three Simple Ways](#Part 3)
Part 1 Easy Steps to create Transparent PNG Image in Picsart

There are times when you feel the need of creating a transparent image. With the rapidly changing scenario regarding picture collage, graphic designing and logo designing for branding, the requirement of making transparent background Picsartis increasing day by day. Although, there are many good video editing apps online for designing transparent images but you will love using Picsart for its simple and easy processing.
Picsart is one of the easiest and advance picture editors to meet your demands.
Here is the whole process of creating transparent PNG image in Picsart –
Step 1
Choose a photo and select it to make particular areas transparent
Step 2
Click picture Tools>recolor>set transparent color.
Step 3
You can click particular colors in the picture to make them transparent
In case a picture has transparent areas, the areas can be changed to opaque or opaque to transparent again for setting back the background color. But the limitation is that opacity can’t be used for creating a semi-opaque background.
Now, changing the transparent picture into opaque one is so easy that you just need to press CTRL+T after selecting the picture.
You will find your transparent picture converted into opaque. Lets create your picsart bike background with this cool trick.
Part 2 Cool Ways To Make A Transparent Logo

You can feel the requirement of generating a transparent logo while creation of graphics for promotional purpose. Although, making a transparent logo is not a tough task and can be done easily with any random video editor but using an efficient and reputed app with lots of features is a better option. So, know here how u can make a transparent logo without wasting much time. Whether you want to make a happy birthday sticker or graphics for branding, this simple process will help you.
● Online tool –Pixcut, create fully transparent logo
Do you want to achieve the result with an intelligent tool? If yes, use wondershare Pixcut as t is capable of removing all kind of background from the picture. You can use this app for editing of portrait, picture, logos and even regular landscapes. So, here you go –
Step 1
Visit wondershare.com and upload an image by clicking on ‘upload’. You can select the image from your local storage as well as prefer drag and drop method too according to your choice.
Step 2
Once your image gets upload, you will see the Pixcut app that it’s removing the background automatically. The final result can be seen on the right side of the screen.
Step 3
Click on ‘download’ in the top of the right corner and save the transparent logo generated this way. Find the image in ‘download’ folder of your device.
So you can see how quick and effective is the process of background removing with Pixcut.
● Use Canva, have control on the level of transparency
Another well known name in the world of video editors is Canva. This extremely effective video editing and graphic designing tool helps you to bring the along with a transparent slider. If you don’t want to spend money for making transparent logo and want to make it balanced and beautiful, go with Canva without second thought.
Step 1
Go to Canva site. Start a new project. You can select your project regardless to shape and size here. The app redirects you to the project window and you just need to click on upload in the menu given in left. Pick the logo you want to make transparent.
Step 2
After uploading the logo in editing window (which you can also drag and drop), click on your logo. Go to the top right corner of the screen and check transparency feature below the download option. You will see the transparency option has a slider here and you can select the percentage of transparency here. Go to the highest level of the slider if you need to create fully transparent logo.
You can create an impressive picsaart background banner also this way.
Step 3
So, making a transparent logo using Canva is this much easy. Now download the logo and use it however you need. Interesting, isn’t it?
● Use Wondershare Filmora, add transparent logo to video directly
Want to work on an really interesting platform with a variety of tools and features? Well, use Wondershare Filmora. It gives you easy, free and quick way of generating transparent logo. Let’s know how to create a transparent logo in Wondershare Filmora Video Editor
For Win 7 or later (64-bit)
For macOS 10.12 or later
Step 1
Download Filmora app in your device and install it. The app can easily be downloaded and installed in windows or Mac computer. Then, open the app and visit file import media. Import the logo and video file you want from here or drag and drop your file to media library.
Step 2
Next you need to drag and drop the video file and logo both on the timeline simultaneously. Put your cursor on logo and right click, you will find the green screen option. Select it.
Step 3
You will find Chroma key settings and your logo overlaying the video in the preview window.
Just enable the Chroma key and your logo becomes transparent. The background found this way will be green and you can change the color of the background by picking an color from the color icon.
Step 4
Finally, you can change the size of the logo and add it to your video. It’s too easy, right?
Part 3 How To Make Transparent Background On Phone; Three Simple Ways

So, you are planning to create your own logo and havepicsart background hd downloadfor promoting your brand. Well there are many attractive ideas to make transparent images and logo but making background transparent is important when you want to layer the logos.
Here find out the idea of generating transparent background with 3 different video editors –
● Apowersoft Background Eraser
The best app to make a transparent background on phone is Apowersoft background eraser. It works on iOS and android platform both. Removing a background is so easy with this app. Here is stepwise guideline for creating transparent background on Apowersoft –
Step 1
Install the app apowersoft background eraser and let the app allow you to upload a photo by tapping on recognition.
Step 2
Upload the photo and the app will delete the background automatically.
Step 3
Save the file by tapping on ‘save’ button
Step 4
Download the file for use.
The entire process is automated and keeps your photo with original quality despite editing.
The app is compatible for android and iOS both platforms but sometimes you can face delay in the process of background removal.
Black picsart background will look cool too.
● Lunapic
Another good tool for easy background removal is Lunapic. It is known for making transparent background for free. You need nothing but to visit official website of lunapic and upload the file that you want to make transparent. Then click on the background that you want to remove and great, you will find your file with transparent background. D
Download the file and save it to apply for the purpose you want.
● Adobe photoshop mix
Adobe photoshop is a fool proof editof for making transparent background on your phone. The app is known for its quick processing and lots of designs. The procedure of background removal or making transparent background is so easy. Go through the steps mentioned here –
Step 1
Open your logo file.
Step 2
Go to menu and Select ‘layer’ and add a transparent layer by clicking on new layer. A dialog box will appear and ask to rename the layer. If you don’t want to rename, just leave the layer default as layer 0 and click OK.
Step 3
This is how you unlock the background layer and make anything transparent by deleting it.
Step 4
Now you can create your selection by using magic wand too. Check the left hand side of your app screen and go to ‘select subject’. Then visit ‘options’ bar at the top of the screen. Using this tool, you can remove the background of selection. The clearness of the background and beauty of the picture depends upon the efficiency of using this tool.
Step 5
After selecting the product, type SHIFT + CTRL+ I and use this short key to select the inverse from dropdown menu at top application.
Step 6
You can deselect the selection by typing CTRL + D
Step 7
This is the entire process for creating transparent background. Save the product image in proper format so that you can display it online easily. PNG – 24 is known to be the best suitable format for this purpose.
● Ending Thoughts →
● Check the list of video creators and pick the one that suits you the most from operation point of view.
● Go with the trend and select design of picsart background.
● Use the easiest application if features are not important.
Here you can find various ways of making a transparent logo using different video editors. Choosing a video creator and using simple steps for transparent image making is really a fun.
In this article
01 [Easy Steps to create Transparent PNG Image in Picsart](#Part 1)
02 [3 Cool Ways To Make A Transparent Logo](#Part 2)
03 [How To Make Transparent Background On Phone; Three Simple Ways](#Part 3)
Part 1 Easy Steps to create Transparent PNG Image in Picsart

There are times when you feel the need of creating a transparent image. With the rapidly changing scenario regarding picture collage, graphic designing and logo designing for branding, the requirement of making transparent background Picsartis increasing day by day. Although, there are many good video editing apps online for designing transparent images but you will love using Picsart for its simple and easy processing.
Picsart is one of the easiest and advance picture editors to meet your demands.
Here is the whole process of creating transparent PNG image in Picsart –
Step 1
Choose a photo and select it to make particular areas transparent
Step 2
Click picture Tools>recolor>set transparent color.
Step 3
You can click particular colors in the picture to make them transparent
In case a picture has transparent areas, the areas can be changed to opaque or opaque to transparent again for setting back the background color. But the limitation is that opacity can’t be used for creating a semi-opaque background.
Now, changing the transparent picture into opaque one is so easy that you just need to press CTRL+T after selecting the picture.
You will find your transparent picture converted into opaque. Lets create your picsart bike background with this cool trick.
Part 2 Cool Ways To Make A Transparent Logo

You can feel the requirement of generating a transparent logo while creation of graphics for promotional purpose. Although, making a transparent logo is not a tough task and can be done easily with any random video editor but using an efficient and reputed app with lots of features is a better option. So, know here how u can make a transparent logo without wasting much time. Whether you want to make a happy birthday sticker or graphics for branding, this simple process will help you.
● Online tool –Pixcut, create fully transparent logo
Do you want to achieve the result with an intelligent tool? If yes, use wondershare Pixcut as t is capable of removing all kind of background from the picture. You can use this app for editing of portrait, picture, logos and even regular landscapes. So, here you go –
Step 1
Visit wondershare.com and upload an image by clicking on ‘upload’. You can select the image from your local storage as well as prefer drag and drop method too according to your choice.
Step 2
Once your image gets upload, you will see the Pixcut app that it’s removing the background automatically. The final result can be seen on the right side of the screen.
Step 3
Click on ‘download’ in the top of the right corner and save the transparent logo generated this way. Find the image in ‘download’ folder of your device.
So you can see how quick and effective is the process of background removing with Pixcut.
● Use Canva, have control on the level of transparency
Another well known name in the world of video editors is Canva. This extremely effective video editing and graphic designing tool helps you to bring the along with a transparent slider. If you don’t want to spend money for making transparent logo and want to make it balanced and beautiful, go with Canva without second thought.
Step 1
Go to Canva site. Start a new project. You can select your project regardless to shape and size here. The app redirects you to the project window and you just need to click on upload in the menu given in left. Pick the logo you want to make transparent.
Step 2
After uploading the logo in editing window (which you can also drag and drop), click on your logo. Go to the top right corner of the screen and check transparency feature below the download option. You will see the transparency option has a slider here and you can select the percentage of transparency here. Go to the highest level of the slider if you need to create fully transparent logo.
You can create an impressive picsaart background banner also this way.
Step 3
So, making a transparent logo using Canva is this much easy. Now download the logo and use it however you need. Interesting, isn’t it?
● Use Wondershare Filmora, add transparent logo to video directly
Want to work on an really interesting platform with a variety of tools and features? Well, use Wondershare Filmora. It gives you easy, free and quick way of generating transparent logo. Let’s know how to create a transparent logo in Wondershare Filmora Video Editor
For Win 7 or later (64-bit)
For macOS 10.12 or later
Step 1
Download Filmora app in your device and install it. The app can easily be downloaded and installed in windows or Mac computer. Then, open the app and visit file import media. Import the logo and video file you want from here or drag and drop your file to media library.
Step 2
Next you need to drag and drop the video file and logo both on the timeline simultaneously. Put your cursor on logo and right click, you will find the green screen option. Select it.
Step 3
You will find Chroma key settings and your logo overlaying the video in the preview window.
Just enable the Chroma key and your logo becomes transparent. The background found this way will be green and you can change the color of the background by picking an color from the color icon.
Step 4
Finally, you can change the size of the logo and add it to your video. It’s too easy, right?
Part 3 How To Make Transparent Background On Phone; Three Simple Ways

So, you are planning to create your own logo and havepicsart background hd downloadfor promoting your brand. Well there are many attractive ideas to make transparent images and logo but making background transparent is important when you want to layer the logos.
Here find out the idea of generating transparent background with 3 different video editors –
● Apowersoft Background Eraser
The best app to make a transparent background on phone is Apowersoft background eraser. It works on iOS and android platform both. Removing a background is so easy with this app. Here is stepwise guideline for creating transparent background on Apowersoft –
Step 1
Install the app apowersoft background eraser and let the app allow you to upload a photo by tapping on recognition.
Step 2
Upload the photo and the app will delete the background automatically.
Step 3
Save the file by tapping on ‘save’ button
Step 4
Download the file for use.
The entire process is automated and keeps your photo with original quality despite editing.
The app is compatible for android and iOS both platforms but sometimes you can face delay in the process of background removal.
Black picsart background will look cool too.
● Lunapic
Another good tool for easy background removal is Lunapic. It is known for making transparent background for free. You need nothing but to visit official website of lunapic and upload the file that you want to make transparent. Then click on the background that you want to remove and great, you will find your file with transparent background. D
Download the file and save it to apply for the purpose you want.
● Adobe photoshop mix
Adobe photoshop is a fool proof editof for making transparent background on your phone. The app is known for its quick processing and lots of designs. The procedure of background removal or making transparent background is so easy. Go through the steps mentioned here –
Step 1
Open your logo file.
Step 2
Go to menu and Select ‘layer’ and add a transparent layer by clicking on new layer. A dialog box will appear and ask to rename the layer. If you don’t want to rename, just leave the layer default as layer 0 and click OK.
Step 3
This is how you unlock the background layer and make anything transparent by deleting it.
Step 4
Now you can create your selection by using magic wand too. Check the left hand side of your app screen and go to ‘select subject’. Then visit ‘options’ bar at the top of the screen. Using this tool, you can remove the background of selection. The clearness of the background and beauty of the picture depends upon the efficiency of using this tool.
Step 5
After selecting the product, type SHIFT + CTRL+ I and use this short key to select the inverse from dropdown menu at top application.
Step 6
You can deselect the selection by typing CTRL + D
Step 7
This is the entire process for creating transparent background. Save the product image in proper format so that you can display it online easily. PNG – 24 is known to be the best suitable format for this purpose.
● Ending Thoughts →
● Check the list of video creators and pick the one that suits you the most from operation point of view.
● Go with the trend and select design of picsart background.
● Use the easiest application if features are not important.
Here you can find various ways of making a transparent logo using different video editors. Choosing a video creator and using simple steps for transparent image making is really a fun.
In this article
01 [Easy Steps to create Transparent PNG Image in Picsart](#Part 1)
02 [3 Cool Ways To Make A Transparent Logo](#Part 2)
03 [How To Make Transparent Background On Phone; Three Simple Ways](#Part 3)
Part 1 Easy Steps to create Transparent PNG Image in Picsart

There are times when you feel the need of creating a transparent image. With the rapidly changing scenario regarding picture collage, graphic designing and logo designing for branding, the requirement of making transparent background Picsartis increasing day by day. Although, there are many good video editing apps online for designing transparent images but you will love using Picsart for its simple and easy processing.
Picsart is one of the easiest and advance picture editors to meet your demands.
Here is the whole process of creating transparent PNG image in Picsart –
Step 1
Choose a photo and select it to make particular areas transparent
Step 2
Click picture Tools>recolor>set transparent color.
Step 3
You can click particular colors in the picture to make them transparent
In case a picture has transparent areas, the areas can be changed to opaque or opaque to transparent again for setting back the background color. But the limitation is that opacity can’t be used for creating a semi-opaque background.
Now, changing the transparent picture into opaque one is so easy that you just need to press CTRL+T after selecting the picture.
You will find your transparent picture converted into opaque. Lets create your picsart bike background with this cool trick.
Part 2 Cool Ways To Make A Transparent Logo

You can feel the requirement of generating a transparent logo while creation of graphics for promotional purpose. Although, making a transparent logo is not a tough task and can be done easily with any random video editor but using an efficient and reputed app with lots of features is a better option. So, know here how u can make a transparent logo without wasting much time. Whether you want to make a happy birthday sticker or graphics for branding, this simple process will help you.
● Online tool –Pixcut, create fully transparent logo
Do you want to achieve the result with an intelligent tool? If yes, use wondershare Pixcut as t is capable of removing all kind of background from the picture. You can use this app for editing of portrait, picture, logos and even regular landscapes. So, here you go –
Step 1
Visit wondershare.com and upload an image by clicking on ‘upload’. You can select the image from your local storage as well as prefer drag and drop method too according to your choice.
Step 2
Once your image gets upload, you will see the Pixcut app that it’s removing the background automatically. The final result can be seen on the right side of the screen.
Step 3
Click on ‘download’ in the top of the right corner and save the transparent logo generated this way. Find the image in ‘download’ folder of your device.
So you can see how quick and effective is the process of background removing with Pixcut.
● Use Canva, have control on the level of transparency
Another well known name in the world of video editors is Canva. This extremely effective video editing and graphic designing tool helps you to bring the along with a transparent slider. If you don’t want to spend money for making transparent logo and want to make it balanced and beautiful, go with Canva without second thought.
Step 1
Go to Canva site. Start a new project. You can select your project regardless to shape and size here. The app redirects you to the project window and you just need to click on upload in the menu given in left. Pick the logo you want to make transparent.
Step 2
After uploading the logo in editing window (which you can also drag and drop), click on your logo. Go to the top right corner of the screen and check transparency feature below the download option. You will see the transparency option has a slider here and you can select the percentage of transparency here. Go to the highest level of the slider if you need to create fully transparent logo.
You can create an impressive picsaart background banner also this way.
Step 3
So, making a transparent logo using Canva is this much easy. Now download the logo and use it however you need. Interesting, isn’t it?
● Use Wondershare Filmora, add transparent logo to video directly
Want to work on an really interesting platform with a variety of tools and features? Well, use Wondershare Filmora. It gives you easy, free and quick way of generating transparent logo. Let’s know how to create a transparent logo in Wondershare Filmora Video Editor
For Win 7 or later (64-bit)
For macOS 10.12 or later
Step 1
Download Filmora app in your device and install it. The app can easily be downloaded and installed in windows or Mac computer. Then, open the app and visit file import media. Import the logo and video file you want from here or drag and drop your file to media library.
Step 2
Next you need to drag and drop the video file and logo both on the timeline simultaneously. Put your cursor on logo and right click, you will find the green screen option. Select it.
Step 3
You will find Chroma key settings and your logo overlaying the video in the preview window.
Just enable the Chroma key and your logo becomes transparent. The background found this way will be green and you can change the color of the background by picking an color from the color icon.
Step 4
Finally, you can change the size of the logo and add it to your video. It’s too easy, right?
Part 3 How To Make Transparent Background On Phone; Three Simple Ways

So, you are planning to create your own logo and havepicsart background hd downloadfor promoting your brand. Well there are many attractive ideas to make transparent images and logo but making background transparent is important when you want to layer the logos.
Here find out the idea of generating transparent background with 3 different video editors –
● Apowersoft Background Eraser
The best app to make a transparent background on phone is Apowersoft background eraser. It works on iOS and android platform both. Removing a background is so easy with this app. Here is stepwise guideline for creating transparent background on Apowersoft –
Step 1
Install the app apowersoft background eraser and let the app allow you to upload a photo by tapping on recognition.
Step 2
Upload the photo and the app will delete the background automatically.
Step 3
Save the file by tapping on ‘save’ button
Step 4
Download the file for use.
The entire process is automated and keeps your photo with original quality despite editing.
The app is compatible for android and iOS both platforms but sometimes you can face delay in the process of background removal.
Black picsart background will look cool too.
● Lunapic
Another good tool for easy background removal is Lunapic. It is known for making transparent background for free. You need nothing but to visit official website of lunapic and upload the file that you want to make transparent. Then click on the background that you want to remove and great, you will find your file with transparent background. D
Download the file and save it to apply for the purpose you want.
● Adobe photoshop mix
Adobe photoshop is a fool proof editof for making transparent background on your phone. The app is known for its quick processing and lots of designs. The procedure of background removal or making transparent background is so easy. Go through the steps mentioned here –
Step 1
Open your logo file.
Step 2
Go to menu and Select ‘layer’ and add a transparent layer by clicking on new layer. A dialog box will appear and ask to rename the layer. If you don’t want to rename, just leave the layer default as layer 0 and click OK.
Step 3
This is how you unlock the background layer and make anything transparent by deleting it.
Step 4
Now you can create your selection by using magic wand too. Check the left hand side of your app screen and go to ‘select subject’. Then visit ‘options’ bar at the top of the screen. Using this tool, you can remove the background of selection. The clearness of the background and beauty of the picture depends upon the efficiency of using this tool.
Step 5
After selecting the product, type SHIFT + CTRL+ I and use this short key to select the inverse from dropdown menu at top application.
Step 6
You can deselect the selection by typing CTRL + D
Step 7
This is the entire process for creating transparent background. Save the product image in proper format so that you can display it online easily. PNG – 24 is known to be the best suitable format for this purpose.
● Ending Thoughts →
● Check the list of video creators and pick the one that suits you the most from operation point of view.
● Go with the trend and select design of picsart background.
● Use the easiest application if features are not important.
Here you can find various ways of making a transparent logo using different video editors. Choosing a video creator and using simple steps for transparent image making is really a fun.
In this article
01 [Easy Steps to create Transparent PNG Image in Picsart](#Part 1)
02 [3 Cool Ways To Make A Transparent Logo](#Part 2)
03 [How To Make Transparent Background On Phone; Three Simple Ways](#Part 3)
Part 1 Easy Steps to create Transparent PNG Image in Picsart

There are times when you feel the need of creating a transparent image. With the rapidly changing scenario regarding picture collage, graphic designing and logo designing for branding, the requirement of making transparent background Picsartis increasing day by day. Although, there are many good video editing apps online for designing transparent images but you will love using Picsart for its simple and easy processing.
Picsart is one of the easiest and advance picture editors to meet your demands.
Here is the whole process of creating transparent PNG image in Picsart –
Step 1
Choose a photo and select it to make particular areas transparent
Step 2
Click picture Tools>recolor>set transparent color.
Step 3
You can click particular colors in the picture to make them transparent
In case a picture has transparent areas, the areas can be changed to opaque or opaque to transparent again for setting back the background color. But the limitation is that opacity can’t be used for creating a semi-opaque background.
Now, changing the transparent picture into opaque one is so easy that you just need to press CTRL+T after selecting the picture.
You will find your transparent picture converted into opaque. Lets create your picsart bike background with this cool trick.
Part 2 Cool Ways To Make A Transparent Logo

You can feel the requirement of generating a transparent logo while creation of graphics for promotional purpose. Although, making a transparent logo is not a tough task and can be done easily with any random video editor but using an efficient and reputed app with lots of features is a better option. So, know here how u can make a transparent logo without wasting much time. Whether you want to make a happy birthday sticker or graphics for branding, this simple process will help you.
● Online tool –Pixcut, create fully transparent logo
Do you want to achieve the result with an intelligent tool? If yes, use wondershare Pixcut as t is capable of removing all kind of background from the picture. You can use this app for editing of portrait, picture, logos and even regular landscapes. So, here you go –
Step 1
Visit wondershare.com and upload an image by clicking on ‘upload’. You can select the image from your local storage as well as prefer drag and drop method too according to your choice.
Step 2
Once your image gets upload, you will see the Pixcut app that it’s removing the background automatically. The final result can be seen on the right side of the screen.
Step 3
Click on ‘download’ in the top of the right corner and save the transparent logo generated this way. Find the image in ‘download’ folder of your device.
So you can see how quick and effective is the process of background removing with Pixcut.
● Use Canva, have control on the level of transparency
Another well known name in the world of video editors is Canva. This extremely effective video editing and graphic designing tool helps you to bring the along with a transparent slider. If you don’t want to spend money for making transparent logo and want to make it balanced and beautiful, go with Canva without second thought.
Step 1
Go to Canva site. Start a new project. You can select your project regardless to shape and size here. The app redirects you to the project window and you just need to click on upload in the menu given in left. Pick the logo you want to make transparent.
Step 2
After uploading the logo in editing window (which you can also drag and drop), click on your logo. Go to the top right corner of the screen and check transparency feature below the download option. You will see the transparency option has a slider here and you can select the percentage of transparency here. Go to the highest level of the slider if you need to create fully transparent logo.
You can create an impressive picsaart background banner also this way.
Step 3
So, making a transparent logo using Canva is this much easy. Now download the logo and use it however you need. Interesting, isn’t it?
● Use Wondershare Filmora, add transparent logo to video directly
Want to work on an really interesting platform with a variety of tools and features? Well, use Wondershare Filmora. It gives you easy, free and quick way of generating transparent logo. Let’s know how to create a transparent logo in Wondershare Filmora Video Editor
For Win 7 or later (64-bit)
For macOS 10.12 or later
Step 1
Download Filmora app in your device and install it. The app can easily be downloaded and installed in windows or Mac computer. Then, open the app and visit file import media. Import the logo and video file you want from here or drag and drop your file to media library.
Step 2
Next you need to drag and drop the video file and logo both on the timeline simultaneously. Put your cursor on logo and right click, you will find the green screen option. Select it.
Step 3
You will find Chroma key settings and your logo overlaying the video in the preview window.
Just enable the Chroma key and your logo becomes transparent. The background found this way will be green and you can change the color of the background by picking an color from the color icon.
Step 4
Finally, you can change the size of the logo and add it to your video. It’s too easy, right?
Part 3 How To Make Transparent Background On Phone; Three Simple Ways

So, you are planning to create your own logo and havepicsart background hd downloadfor promoting your brand. Well there are many attractive ideas to make transparent images and logo but making background transparent is important when you want to layer the logos.
Here find out the idea of generating transparent background with 3 different video editors –
● Apowersoft Background Eraser
The best app to make a transparent background on phone is Apowersoft background eraser. It works on iOS and android platform both. Removing a background is so easy with this app. Here is stepwise guideline for creating transparent background on Apowersoft –
Step 1
Install the app apowersoft background eraser and let the app allow you to upload a photo by tapping on recognition.
Step 2
Upload the photo and the app will delete the background automatically.
Step 3
Save the file by tapping on ‘save’ button
Step 4
Download the file for use.
The entire process is automated and keeps your photo with original quality despite editing.
The app is compatible for android and iOS both platforms but sometimes you can face delay in the process of background removal.
Black picsart background will look cool too.
● Lunapic
Another good tool for easy background removal is Lunapic. It is known for making transparent background for free. You need nothing but to visit official website of lunapic and upload the file that you want to make transparent. Then click on the background that you want to remove and great, you will find your file with transparent background. D
Download the file and save it to apply for the purpose you want.
● Adobe photoshop mix
Adobe photoshop is a fool proof editof for making transparent background on your phone. The app is known for its quick processing and lots of designs. The procedure of background removal or making transparent background is so easy. Go through the steps mentioned here –
Step 1
Open your logo file.
Step 2
Go to menu and Select ‘layer’ and add a transparent layer by clicking on new layer. A dialog box will appear and ask to rename the layer. If you don’t want to rename, just leave the layer default as layer 0 and click OK.
Step 3
This is how you unlock the background layer and make anything transparent by deleting it.
Step 4
Now you can create your selection by using magic wand too. Check the left hand side of your app screen and go to ‘select subject’. Then visit ‘options’ bar at the top of the screen. Using this tool, you can remove the background of selection. The clearness of the background and beauty of the picture depends upon the efficiency of using this tool.
Step 5
After selecting the product, type SHIFT + CTRL+ I and use this short key to select the inverse from dropdown menu at top application.
Step 6
You can deselect the selection by typing CTRL + D
Step 7
This is the entire process for creating transparent background. Save the product image in proper format so that you can display it online easily. PNG – 24 is known to be the best suitable format for this purpose.
● Ending Thoughts →
● Check the list of video creators and pick the one that suits you the most from operation point of view.
● Go with the trend and select design of picsart background.
● Use the easiest application if features are not important.
How to Use Adjustment Layer in Final Cut Pro
Final Cut Pro is an advanced editing software that is available for Mac users exclusively. Using this high-end software, you can create compelling storytelling in your video clips. It offers different features through which you can effortlessly add audio and motion graphics to your videos. You can also add cinematic effects to your videos using Final Cut Pro to modify their focus points.
You can also add adjustment layers in Final Cut Pro to efficiently add the effects in video clips. By reading this article, you will learn how to add an adjustment layer in Final Cut Pro.

Part 1: What is Adjustment Layer in Final Cut Pro?
The adjustment layer in video editing can provide you with great ease as you can apply effects to multiple videos using this particular layer. Using the adjustment layer, you can apply effects and color grading to your video clips that come beneath this layer. So, apart from adding effects and executing color correction to individual clips, you can use an adjustment layer to generate quicker results.
After creating an adjustment layer in any video editor, you can easily cut and extend it like any other clip. You can also remove it anytime from your timeline with a single tap. In Final Cut Pro, you cannot insert adjustment layers in its timeline directly, like in Premiere Pro or After Effects.
To do so, you have to use third-party tools to create adjustment layers from scratch in Final Cut Pro. The process of creating an adjustment layer in Final Cut Pro is a little bit longer compared to other editors. To learn more about the adjustment layer in FCPX, continue reading this article.

Part 2: How to Add an Adjustment Layer in Final Cut Pro?
Are you eager to know how to add adjustment layers in Final Cut Pro? In this section, you can find simple instructions to generate an adjustment layer in Final Cut Pro without hassle.
Step1 First, click on this link to download the adjustment layer in your MacBook. Once done, copy your “Adjustment Layer” folder to the “User” folder. Afterward, move it to “Movies” and then “Motion Templates.” Once done, copy it to the “Titles” folder eventually.

Step2 Now open Final Cut Pro and locate the “Adjustment Layer” under the “Titles” section. After locating it, drag and drop it into the timeline. This adjustment layer was created as a title layer in Apple Motion that got published in Final Cut Pro using the built-in publishing tools.

Step3 Once you have created the adjustment layer, you can apply any sort of effects to the video clips. However, you should make sure to place the adjustment layer above in the layers stack.

Bonus Tips – How to Use Adjustment Layers in the Best Alternative to FCPX?
If you want to use an alternative to Final Cut Pro for creating the adjustment layer, you can try Wondershare Filmora 12 . You can edit your videos in an advanced and secure environment using this tool. It supports all multiple platforms, such as Windows, Mac, Android, and iOS. You can do color correction in your videos to manage the saturation, brightness, contrast, exposure, and other factors in Filmora.
Free Download For Win 7 or later(64-bit)
Free Download For macOS 10.14 or later
Moreover, you can also create 3D animated titles in Filmora to give your project a unique look. It also provides a wide range of keyboard shortcut presets through which you can make your editing easier and faster. Apart from editing and modifying your videos, you can also increase their vibrancy by using Filmora effects. You can explore and select a diverse range of visual effects in Filmora to give a new dimension to your video clips.
Key Features of Filmora
- Filmora offers cloud services that allow you to collaborate with your team members effectively. On its workspace cloud platform, you can share and review the edited video clips with your team members in a comfortable environment.
- It offers a pen tool through which you can draw complex mask shapes, such as straight lines or curves around the objects.
- Using the AI Smart Cutout feature, you can use advanced technology to select people or objects in the video effectively.
- Are you annoyed by the background noises in your video clips? You can try the AI Denoise feature of Filmora that can help you to eradicate background noises from the video clips precisely.
How to Add an Adjustment Layer Using Filmora
To create and use the adjustment layer in Wondershare Filmora 12, you can proceed to the following steps:
Step1 Import the Video Clip
Launch Filmora and click on the “New Project” button. Afterward, upload the video file on the project media and then drag and drop it into the timeline.

Step2 Add the Adjustment Layer
Now head to the “Media” section on the left side, where you can find the option of the “Adjustment Layer.” Next, drag and drop the adjustment layer into the timeline. You can double-click on it to change its settings effectively.

Step3 Add Multiple Presets to Adjustment Layer
From the settings, you can change blending mode, rotation, position, and opacity easily. Moreover, you can add different presets to the adjustment layer for more modifications. You can use the color match tool to adjust the colors in your video clip. With this tool, you can also add a border across the video clips using the adjustment layer. Also, you can color code the adjustment layer to create a more attractive look in the video clip.

Conclusion
Adjustment layers can make your editing process easy and fast. If you want to pursue video editing as your profession, you should know how to use the adjustment layer in famous tools like Final Cut Pro. After reading this article, you have learned how to create an adjustment layer in Final Cut Pro without complications.
However, if you want a more compatible and easier-to-use tool to generate adjustment layers, you can try Wondershare Filmora. It’s a powerful video editor that you can use to perform professional editing using adjustment layers.
Free Download For macOS 10.14 or later
Moreover, you can also create 3D animated titles in Filmora to give your project a unique look. It also provides a wide range of keyboard shortcut presets through which you can make your editing easier and faster. Apart from editing and modifying your videos, you can also increase their vibrancy by using Filmora effects. You can explore and select a diverse range of visual effects in Filmora to give a new dimension to your video clips.
Key Features of Filmora
- Filmora offers cloud services that allow you to collaborate with your team members effectively. On its workspace cloud platform, you can share and review the edited video clips with your team members in a comfortable environment.
- It offers a pen tool through which you can draw complex mask shapes, such as straight lines or curves around the objects.
- Using the AI Smart Cutout feature, you can use advanced technology to select people or objects in the video effectively.
- Are you annoyed by the background noises in your video clips? You can try the AI Denoise feature of Filmora that can help you to eradicate background noises from the video clips precisely.
How to Add an Adjustment Layer Using Filmora
To create and use the adjustment layer in Wondershare Filmora 12, you can proceed to the following steps:
Step1 Import the Video Clip
Launch Filmora and click on the “New Project” button. Afterward, upload the video file on the project media and then drag and drop it into the timeline.

Step2 Add the Adjustment Layer
Now head to the “Media” section on the left side, where you can find the option of the “Adjustment Layer.” Next, drag and drop the adjustment layer into the timeline. You can double-click on it to change its settings effectively.

Step3 Add Multiple Presets to Adjustment Layer
From the settings, you can change blending mode, rotation, position, and opacity easily. Moreover, you can add different presets to the adjustment layer for more modifications. You can use the color match tool to adjust the colors in your video clip. With this tool, you can also add a border across the video clips using the adjustment layer. Also, you can color code the adjustment layer to create a more attractive look in the video clip.

Conclusion
Adjustment layers can make your editing process easy and fast. If you want to pursue video editing as your profession, you should know how to use the adjustment layer in famous tools like Final Cut Pro. After reading this article, you have learned how to create an adjustment layer in Final Cut Pro without complications.
However, if you want a more compatible and easier-to-use tool to generate adjustment layers, you can try Wondershare Filmora. It’s a powerful video editor that you can use to perform professional editing using adjustment layers.
Some Top Methods to Create AI Slow Motion Videos
The prediction was that AI would take over the world with its advanced algorithms and efficiency. Many believe that AI can achieve task completion better than humans. Even though it hasn’t been able to replace the human race, it surpasses many fields. One such field is the media and entertainment industry for content editing. Today’s article topic revolves around AI editing and editors.
Specifically, we will dive into understanding AI slow motion in depth. We will discuss its purpose, significance, and process along the way. You can find many slow-motion AI tools to compare and choose a suitable one. The article will conclude by recommending an AI slow-motion tool that tops all.
Slow Motion Video Maker Slow your video’s speed with better control of your keyframes to create unique cinematic effects!
Make A Slow Motion Video Make A Slow Motion Video More Features

Part 1: How Does AI Improve Slow Motion Video Editing?
AI can enhance the quality of content and the mechanism of crafting slow-mo AI video. It not only contributes to task achievement but also improves various aspects. Find out about the influence that AI has in achieving a perfect slow-mo effect below:
1. Frame Interpolation
If you create an AI slow-motion video, the slow motion is often abrupt. To resolve this problem and bring smoothness to slow-mo, AI frame interpolation can help. Users must activate this function, and AI will handle all the technicalities. The AI adds extra frames to your video to ensure a smooth, slow motion.
2. Minimizing Artifacts
When you convert a video into slow motion, certain changes take place. It introduces artifacts such as motion blur or unwanted distortions. They decline the quality of content, and the view becomes distorted. Reducing these factors magnifies the slow-motion effect and brings perfection to it.
3. AI Auto Enhancement
Many slow-motion AI creators have a built-in auto enhancement feature or effect. They incorporate this function to minimize the negative elements. They increase sharpness for clarity and light settings for visual appeal. While slowing down footage, these enhancements act as a helping hand.
4. Time Remapping Option
In slow-motion AI video editors, users have the option to manipulate time at different frames. It is a video editing technique that gives you control over pacing and timing. This helps you bring precision to your slow-mo videos through detailed settings. You can manipulate video frames and speed better with this option.
5. Automated Noise Cancellation
Just when you think the AI is done for the day, it comes up with another feature. Another significance of AI in slow-motion video creation is reducing noise. Advanced AI algorithms are designed to assist in providing high-quality audio. It is because the audio track quality often declines during a slow-mo.
Part 2: Top Tools Available Online for AI Slow Motion Editing
Creating slow-motion videos enhances your video content as it emphasizes the parts of it. In addition, it contributes to creative storytelling, flashbacks, and showing emotions. In this section, discover some slow-mo AI video creators here:
1. RunwayML
Do you have a short video frame rate clip and want to convert it into a slow-mo? This slow-motion AI tool helps increase the video frames for creating a slow-mo. This tool offers an adjustable speed option to create according to your preferences. It has a Super-Slow Motion AI Magic Tool that smoothens out the video slow-mo of any duration.

Key Features
- It is a multifunctional video editor with unlimited features, so you don’t need a plugin.
- With its AI-backed algorithms, it makes rotoscoping and motion tracking easier.
- Collaborative cloud storage lets you pick from where you left editing.
Pricing
| Pricing Plans | Annual Pricing/month |
|---|---|
| Standard | $12 |
| Pro | $28 |
| Unlimited | $76 |
| Enterprise | Contact Sales |
2. Neural Love
Are you looking for an AI slow-motion tool with multiple customization options? Neural Love is the best fit as it offers naturalistic slow-mo effects and speed adjustments. In addition, the tool supports MP4 and MOV video formats to do so. You can also manipulate slow motion settings via the FPS option in it. The tool can slow down a video by 2 to 8 times and crafts realistic effects.

Key Features
- This tool offers multiple generative AI services like Avatar or Art Generation.
- It offers both audio and video enhancement functionality that you can use to enhance a slow-mo.
- You can also use its AI Face enhancement feature to improve slow-motion results.
Pricing
| Pricing Plans | Price Per 100 Credits |
|---|---|
| Subscription | $10 |
| Pay As You Go | $19 |
3. VEED.io
Creating a slow-motion video without any prior experience can be confusing. There are so many terms to learn, but with this slow-mo AI tool, anyone can do it. Whether a video clip or a GIF, it can transform both into a slow-mo. Once you upload a video, select a speed option to slow down the clip. You can start editing with this tool without any sign-up or sign-in before.

Key Features
- Users can split a clip’s frames to edit or introduce different effects and filters to a specific part.
- The editing interface of this tool to create slow motions is very easy and intuitive.
- Whether it is MP4, MOV, or AVI, it shows compatibility with all video formats.
Pricing
| Pricing Plans | Annual Pricing/month |
|---|---|
| Basic | $12 |
| Pro | $24 |
| Business | $59 |
| Enterprise | Contact Sales |
4. CapCut
With the help of this powerful AI slow-motion video generator, sit back and see the magic. Its AI algorithms analyze a clip and apply the automated slow-mo effect. Along with automated slow-motion adjustment, you can do some personalization. It has slow-motion effects like criminal investigation, cinema trailers, and smooth processing. Once you have created a slow motion, it allows you to edit it.

Key Features
- You can transform a declined video resolution to 4K with this tool.
- It also has a video resizer option to transform your video into any size.
- If you want to change a video format, this tool also offers a video converter tool to do so.
Pricing
Free
Part 3: How to Use AI Slow Motion Videos for High-Quality Edits?
Now that you have been made aware of plenty of the slow-motion AI tools, let’s move forward. Although operating all these tools is easy for proficient results, you must master them. Here is a detailed guide to two of the above AI slow-motion tools:
1. RunwayML
Editing a video from simple to slow motion is very laidback with this tool. The AI does most of the work, and you need to give a few directions. Here is a step-by-step guide to using this slow-mo AI tool:
Step 1: Once logged in and reached its editing interface, navigate towards the left panel. Then, opt for the “Edit videos” option under the “Video” section. From the display menu, locate and select the “Super-Slow Motion” option.

Step 2: In the Super Slow Motion window, click the “Upload” option and drop a file.

Step 3: Once the video has been uploaded, modify the speed of the video. You can do this by accessing the “Speed” slider at the right. After editing, click the “Process” button to finalize the slow-motion settings. The edited video will appear on the screen; play it to see if the results are satisfactory. Then, click the “Export” button at the right to download the video.

2. Neural Love
This is another slow-motion AI tool for those with little knowledge of creating slow-mo. It uses AI tech to facilitate users and automate the major editing elements. Following are the steps to operate this online tool seamlessly:
Step 1: After accessing this tool, click the “Upload Video” button to import media. Once the import progress is completed, the tool will analyze your video.

Step 2: Scroll down and set the percentage slider for slowing down the video. You can also select to upscale your video or change its frame rate. Moreover, you can select to colorize the video as well.

Step 3: Click the “Start Full Video Processing” button after setting preferences. Once you have subscribed to a plan, the video slow motion will be ready.
Part 4: Desktop Alternative: Slowing Down Videos Using AI With Wondershare Filmora
Indeed, all these tools are experts in what they do. However, they all have some drawbacks. All these slow-motion AI tools require internet access to create a slow-mo. In such circumstances, users require a desktop tool that masters this task. Wondershare Filmora is an efficient tool for creating videos slow-mo with ease. Amongst slow-motion AI, it has other AI features, a resource library, and custom setting options.
Free Download For Win 7 or later(64-bit)
Free Download For macOS 10.14 or later
Speed Ramping for Creating Slow Motion in Wondershare Filmora
This feature can do everything, whether it’s about creating slow motion or speeding up your video. You can customize the speed of your video at specific frame rates with this. In addition, there are 6 pre-assembled speed ramping presets that you can apply. All presets are popular and tailored to fit most of the video contexts.
Along with speed, you can also maintain the audio pitch to align with the speed of the video. The feature later uses AI assistance in frame interpolation to smooth the added effect. There are 3 options for AI frame interpolation, and one of them is Optical Flow. This option helps with bringing smoothness to your AI slow-motion videos. In short, Filmora offers a professional ground for making a slow-mo.
Guide to Manage Speed Ramping in Wondershare Filmora
Now that you know its speed ramping option, it is time to try it. Although Filmora rules out the technicalities, there is still much to learn. In this section, find the step-by-step guide to creating a slow-motion AI video:
Step 1Import Files and Access the Speed Ramping Option
Once you have created a new project in Filmora, use the “Ctrl + I” keys to import files. After that, bring this clip to the timeline and select it. Navigate towards the right-side panel and go to the “Speed > Speed Ramping” tab. Under this tab, choose a preset or the “Customize” option to set a speed.

Step 2Enable Optical Flow Option
Once you have set speed preferences, reach the “AI Frame Interpolation” section at the bottom. From there, select the “Optical Flow” option to add extra frames. The AI will smoothen out the slow-motion effect in your video on its own.

Step 3Enable Render Preview to See Results
Once you have enabled the Optical Flow option, go to the timeline panel and locate the respective option. Once you find the “Render Preview” icon, click it to see results.

Conclusion
Upon reaching the end, you must have gained a brief knowledge of slow-motion AI. The article discussed the advantages of AI integration in slow-motion video generators. In addition, there was a brief knowledge about some of the effective slow-mo makers. Wondershare Filmora is an AI-driven desktop tool for making such videos. If you haven’t already used it, we suggest this user-friendly tool for creation.
Make A Slow Motion Video Make A Slow Motion Video More Features

Part 1: How Does AI Improve Slow Motion Video Editing?
AI can enhance the quality of content and the mechanism of crafting slow-mo AI video. It not only contributes to task achievement but also improves various aspects. Find out about the influence that AI has in achieving a perfect slow-mo effect below:
1. Frame Interpolation
If you create an AI slow-motion video, the slow motion is often abrupt. To resolve this problem and bring smoothness to slow-mo, AI frame interpolation can help. Users must activate this function, and AI will handle all the technicalities. The AI adds extra frames to your video to ensure a smooth, slow motion.
2. Minimizing Artifacts
When you convert a video into slow motion, certain changes take place. It introduces artifacts such as motion blur or unwanted distortions. They decline the quality of content, and the view becomes distorted. Reducing these factors magnifies the slow-motion effect and brings perfection to it.
3. AI Auto Enhancement
Many slow-motion AI creators have a built-in auto enhancement feature or effect. They incorporate this function to minimize the negative elements. They increase sharpness for clarity and light settings for visual appeal. While slowing down footage, these enhancements act as a helping hand.
4. Time Remapping Option
In slow-motion AI video editors, users have the option to manipulate time at different frames. It is a video editing technique that gives you control over pacing and timing. This helps you bring precision to your slow-mo videos through detailed settings. You can manipulate video frames and speed better with this option.
5. Automated Noise Cancellation
Just when you think the AI is done for the day, it comes up with another feature. Another significance of AI in slow-motion video creation is reducing noise. Advanced AI algorithms are designed to assist in providing high-quality audio. It is because the audio track quality often declines during a slow-mo.
Part 2: Top Tools Available Online for AI Slow Motion Editing
Creating slow-motion videos enhances your video content as it emphasizes the parts of it. In addition, it contributes to creative storytelling, flashbacks, and showing emotions. In this section, discover some slow-mo AI video creators here:
1. RunwayML
Do you have a short video frame rate clip and want to convert it into a slow-mo? This slow-motion AI tool helps increase the video frames for creating a slow-mo. This tool offers an adjustable speed option to create according to your preferences. It has a Super-Slow Motion AI Magic Tool that smoothens out the video slow-mo of any duration.

Key Features
- It is a multifunctional video editor with unlimited features, so you don’t need a plugin.
- With its AI-backed algorithms, it makes rotoscoping and motion tracking easier.
- Collaborative cloud storage lets you pick from where you left editing.
Pricing
| Pricing Plans | Annual Pricing/month |
|---|---|
| Standard | $12 |
| Pro | $28 |
| Unlimited | $76 |
| Enterprise | Contact Sales |
2. Neural Love
Are you looking for an AI slow-motion tool with multiple customization options? Neural Love is the best fit as it offers naturalistic slow-mo effects and speed adjustments. In addition, the tool supports MP4 and MOV video formats to do so. You can also manipulate slow motion settings via the FPS option in it. The tool can slow down a video by 2 to 8 times and crafts realistic effects.

Key Features
- This tool offers multiple generative AI services like Avatar or Art Generation.
- It offers both audio and video enhancement functionality that you can use to enhance a slow-mo.
- You can also use its AI Face enhancement feature to improve slow-motion results.
Pricing
| Pricing Plans | Price Per 100 Credits |
|---|---|
| Subscription | $10 |
| Pay As You Go | $19 |
3. VEED.io
Creating a slow-motion video without any prior experience can be confusing. There are so many terms to learn, but with this slow-mo AI tool, anyone can do it. Whether a video clip or a GIF, it can transform both into a slow-mo. Once you upload a video, select a speed option to slow down the clip. You can start editing with this tool without any sign-up or sign-in before.

Key Features
- Users can split a clip’s frames to edit or introduce different effects and filters to a specific part.
- The editing interface of this tool to create slow motions is very easy and intuitive.
- Whether it is MP4, MOV, or AVI, it shows compatibility with all video formats.
Pricing
| Pricing Plans | Annual Pricing/month |
|---|---|
| Basic | $12 |
| Pro | $24 |
| Business | $59 |
| Enterprise | Contact Sales |
4. CapCut
With the help of this powerful AI slow-motion video generator, sit back and see the magic. Its AI algorithms analyze a clip and apply the automated slow-mo effect. Along with automated slow-motion adjustment, you can do some personalization. It has slow-motion effects like criminal investigation, cinema trailers, and smooth processing. Once you have created a slow motion, it allows you to edit it.

Key Features
- You can transform a declined video resolution to 4K with this tool.
- It also has a video resizer option to transform your video into any size.
- If you want to change a video format, this tool also offers a video converter tool to do so.
Pricing
Free
Part 3: How to Use AI Slow Motion Videos for High-Quality Edits?
Now that you have been made aware of plenty of the slow-motion AI tools, let’s move forward. Although operating all these tools is easy for proficient results, you must master them. Here is a detailed guide to two of the above AI slow-motion tools:
1. RunwayML
Editing a video from simple to slow motion is very laidback with this tool. The AI does most of the work, and you need to give a few directions. Here is a step-by-step guide to using this slow-mo AI tool:
Step 1: Once logged in and reached its editing interface, navigate towards the left panel. Then, opt for the “Edit videos” option under the “Video” section. From the display menu, locate and select the “Super-Slow Motion” option.

Step 2: In the Super Slow Motion window, click the “Upload” option and drop a file.

Step 3: Once the video has been uploaded, modify the speed of the video. You can do this by accessing the “Speed” slider at the right. After editing, click the “Process” button to finalize the slow-motion settings. The edited video will appear on the screen; play it to see if the results are satisfactory. Then, click the “Export” button at the right to download the video.

2. Neural Love
This is another slow-motion AI tool for those with little knowledge of creating slow-mo. It uses AI tech to facilitate users and automate the major editing elements. Following are the steps to operate this online tool seamlessly:
Step 1: After accessing this tool, click the “Upload Video” button to import media. Once the import progress is completed, the tool will analyze your video.

Step 2: Scroll down and set the percentage slider for slowing down the video. You can also select to upscale your video or change its frame rate. Moreover, you can select to colorize the video as well.

Step 3: Click the “Start Full Video Processing” button after setting preferences. Once you have subscribed to a plan, the video slow motion will be ready.
Part 4: Desktop Alternative: Slowing Down Videos Using AI With Wondershare Filmora
Indeed, all these tools are experts in what they do. However, they all have some drawbacks. All these slow-motion AI tools require internet access to create a slow-mo. In such circumstances, users require a desktop tool that masters this task. Wondershare Filmora is an efficient tool for creating videos slow-mo with ease. Amongst slow-motion AI, it has other AI features, a resource library, and custom setting options.
Free Download For Win 7 or later(64-bit)
Free Download For macOS 10.14 or later
Speed Ramping for Creating Slow Motion in Wondershare Filmora
This feature can do everything, whether it’s about creating slow motion or speeding up your video. You can customize the speed of your video at specific frame rates with this. In addition, there are 6 pre-assembled speed ramping presets that you can apply. All presets are popular and tailored to fit most of the video contexts.
Along with speed, you can also maintain the audio pitch to align with the speed of the video. The feature later uses AI assistance in frame interpolation to smooth the added effect. There are 3 options for AI frame interpolation, and one of them is Optical Flow. This option helps with bringing smoothness to your AI slow-motion videos. In short, Filmora offers a professional ground for making a slow-mo.
Guide to Manage Speed Ramping in Wondershare Filmora
Now that you know its speed ramping option, it is time to try it. Although Filmora rules out the technicalities, there is still much to learn. In this section, find the step-by-step guide to creating a slow-motion AI video:
Step 1Import Files and Access the Speed Ramping Option
Once you have created a new project in Filmora, use the “Ctrl + I” keys to import files. After that, bring this clip to the timeline and select it. Navigate towards the right-side panel and go to the “Speed > Speed Ramping” tab. Under this tab, choose a preset or the “Customize” option to set a speed.

Step 2Enable Optical Flow Option
Once you have set speed preferences, reach the “AI Frame Interpolation” section at the bottom. From there, select the “Optical Flow” option to add extra frames. The AI will smoothen out the slow-motion effect in your video on its own.

Step 3Enable Render Preview to See Results
Once you have enabled the Optical Flow option, go to the timeline panel and locate the respective option. Once you find the “Render Preview” icon, click it to see results.

Conclusion
Upon reaching the end, you must have gained a brief knowledge of slow-motion AI. The article discussed the advantages of AI integration in slow-motion video generators. In addition, there was a brief knowledge about some of the effective slow-mo makers. Wondershare Filmora is an AI-driven desktop tool for making such videos. If you haven’t already used it, we suggest this user-friendly tool for creation.
Also read:
- Guide Add LUTs in Premiere Pro with Ease for 2024
- How to Export iMovie for 2024
- New 2024 Approved Camtasia Video Editor Review
- Updated Is Augmented Reality Conferencing the Future of Workplace Collaboration for 2024
- Updated This Easy Hack Using Wondershare Filmora New Masking Feature Will Be a Great Addition to Your Next Horror Video Content
- Updated How to Create the Stranger Things Upside Down Effect for 2024
- 2024 Approved How to Make Your CSGO Montage Impressive
- Updated In 2024, | Best 8 Online GIF to APNG Converters
- Updated Mix and Match The Ultimate List of 8 Video and Photo Merging Tools for 2024
- Steps to Add Subtitles in Canva for 2024
- Updated 2024 Approved Best Tips for Camtasia Freeze-Frame
- How to Easily Add VHS Green Screen to Your Video for 2024
- How to Achieve GoPro Slow Motion With Quality for 2024
- Updated Learn How to Create Your Own Custom Animated Text Intro in the Filmora Video Editor. Follow a Few Simple Steps to Create Something that Looks Incredible
- Step by Step to Cut a Video in Lightworks for 2024
- In 2024, Best Tips for Camtasia Freeze-Frame
- How to Make a Slideshow on iPhone
- Updated Guiding Principles of Track Matte and Tracking in Adobe After Effects for 2024
- Updated 7 Solutions to Edit GoPro Video on Mac
- New Here We Will Investigate AI-Based Video Interview, How It Is Being Used, and How to Master an Artificial Intelligence Video Interview Act
- Updated In 2024, Splitting the Clips in Adobe After Effects Step by Step
- New 2024 Approved The Best 10 GIF to JPGPNG Converters
- In 2024, How To Make a Photo Collage in Microsoft Word — Step by Step Guide
- 2024 Approved Best Ever Ways Make Tiktok Slideshow Solved
- Updated Text Animation Intro Tutorial in Filmora
- Finding the Best Game Recorder for PC
- How to Resize FLV Video Efficiently Windows, Mac,Android, iPhone & O for 2024
- Updated In 2024, How to Speed up a Video on Splice
- How to Add Freeze Frame to Your Video From Any Device for 2024
- The Background in Your Footage Might Be Bland or Unpleasant. This Article Will Discuss Video Background Templates You Can Use to Spice Things up and Make Your Videos Go Viral
- Want to Convert MP4 Video To 60 FPS GIF? Read This
- Updated In 2024, How to Edit A Time Lapse Video on iPhone?
- Boost the Pace of Your Instagram Reels Videos with These Simple Tricks for 2024
- In 2024, iCloud Unlocker Download Unlock iCloud Lock for your iPhone 14 Pro Max
- In 2024, Complete Review & Guide to Techeligible FRP Bypass and More For Nubia Red Magic 8S Pro+
- In 2024, Bypass Activation Lock From Apple iPhone 13 Pro Max - 4 Easy Ways
- How Vivo V29 Pro Mirror Screen to PC? | Dr.fone
- How to Cast Poco C50 Screen to PC Using WiFi | Dr.fone
- A Step-by-Step Guide on Using ADB and Fastboot to Remove FRP Lock on your Tecno Spark Go (2023)
- Tutorial to Change Xiaomi Redmi Note 12 Pro 4G IMEI without Root A Comprehensive Guide
- In 2024, iSpoofer is not working On Honor X50? Fixed | Dr.fone
- How to Share/Fake Location on WhatsApp for Vivo T2 Pro 5G | Dr.fone
- How to Unlock iPhone 13 Passcode without iTunes without Knowing Passcode? | Dr.fone
- Ultimate Guide from iPhone 14 Pro Max iCloud Activation Lock Bypass
- In 2024, Best Ways on How to Unlock/Bypass/Swipe/Remove Xiaomi Redmi A2+ Fingerprint Lock
- How To Transfer WhatsApp From Apple iPhone 11 to Android? | Dr.fone
- Updated How to Make a Talking AI Avatar From Photos Easy Guide for 2024
- Title: Most-Used 3 Ways to Compress Video for Instagram Story, Feed, and IGTV
- Author: Chloe
- Created at : 2024-05-20 03:37:30
- Updated at : 2024-05-21 03:37:30
- Link: https://ai-editing-video.techidaily.com/most-used-3-ways-to-compress-video-for-instagram-story-feed-and-igtv/
- License: This work is licensed under CC BY-NC-SA 4.0.

