:max_bytes(150000):strip_icc():format(webp)/Rearviewofboywithlaptoponsofa-31ba45dfa7fb4553a257c133b352ef64.jpg)
Multi Object Tracking The Ultimate Guide

Multi Object Tracking: The Ultimate Guide
Multi Object Tracking (MOT) in a video is a challenging process with many applications in both the public and private sectors. Surveillance cameras in public places can track potential criminals, while retail stores can use object tracking to monitor customer behavior.
Developed in 1988 by Zenon Pylyshyn, MOT is a technique first designed to study the human visual system’s ability to track multiple moving objects. However, since then, various methods have been introduced for Object Tracking through computer vision.
In this article, we will explore Multi Object Tracking and provide a detailed guide on object tracking and the requirement to track multiple objects.
Part 1. What Is Object Tracking
Object Tracking is an application of computer vision that involves tracking the movement of objects in real-time. It is a useful tool for many different purposes, such as video surveillance, human-computer interaction, and automotive safety.
The Object Tracking algorithm is a deep-learning-based program that works by developing a model for each individual object and creating a set of trajectories to represent their movement. This is done through an indication, such as a square that follows the object and tells the users about its location on the screen in real-time.
Its algorithms are designed to work with various types of inputs, including everything from images and videos to real-time footage. The input you expect to use will impact the category, use cases, and object tracking applications.
![]()
Part 2. Types Of Object Tracking
There are two main types or levels of Object Tracking: SOT and MOT
SOT
Single Object Tracking or Visual Object Tracking is a process in which the bounding box of the target object is assigned to the tracker in the first frame. The tracker then detects the same object in all the other frames.
SOT only detects and tracks a single object and comes under the category of detection-free tracking, which implies that it is manually initialized with a fixed number of objects, even though other objects are present in the frames.
Let’s understand it with an example: A police department is resolving a murder case that involves a car on the highway. They received surveillance camera footage and wanted to track the vehicle to resolve the mystery. However, it might take time to do it manually. Therefore, they will use the Single Object Tracking process and will assign the tracker a bounding box for the target car to check what happens to it.
![]()
MOT
Multiple Object Tracking involves tracking multiple objects in a frame. Since its development in 1988 by Zenon Pylyshyn, several experiments have been conducted to see how human and computer vision systems can detect and track multiple objects in a frame.
As an output, multiple tracking creates several bounding boxes and are identified using certain parameters such as coordinates, width, height, etc. MOT program is not pre-trained regarding the appearance or amount of objects to be tracked.
Moreover, the algorithm assigns a detection ID to each box which helps the model in identifying the objects within a class. For instance, if multiple cars are in a frame, the MOT algorithm will identify each car as a separate object and assign them a unique ID.
![]()
Part 3. What Multi Object Tracking Needs?
Above is the explaination of MOT. In this part, we will focus on its mechanism. Following are some of the most important requirements of Multi Object Tracking:
1. Detection
The best approach to detect objects of your interest depends on what you’re trying to track and if the camera is stationary or moving.
MOT Using Stationary Camera
The vision.ForegroundDetector System object can be used to detect objects in motion against a stationary background by performing background subtraction. This approach is efficient but requires that the camera be stationary.
MOT Using Moving Camera
A sliding-window detection approach is often used with a moving camera to detect objects in motion. However, this approach is slower than the background subtraction method.
Use the following approaches for tracing the given categories of objects.
| Type of the Tracking Object | Camera Position | Approach |
|---|---|---|
| Custom object category | Stationary/Moving | custom sliding window detector using selectStrongestBbox and extractHOGFeatures or trainCascadeObjectDetector function |
| Pedestrians | Stationary/Moving | vision.PeopleDetector System object |
| Moving object | Stationary | vision.ForegroundDetector System object™ |
| Faces, upper body, mouth, nose, eyes, etc. | Stationary/Moving | vision.CascadeObjectDetector System object |
2. Prediction
The second requirement for Multi Object Tracking is “Prediction.” In this, you have to predict the position of the tracking object in the next frame. To do this, you can design the model to use the Kalman filter (vision.KalmanFilter ).
This will help predict the next location of the object in the frames. For this, it will take into account the object’s constant velocity, constant acceleration measurement noise, and process noise. Measurement noise is the detection of an error, while process noise is the variation in the object’s actual motion from that of the motion model.
3. Data Association
Data association is a critical step in Multiple Object Tracking and involves linking the data points together that represent the same thing across different frames.
A “track” is the temporal history of an object consisting of multiple detections and can include the entire history of past locations of the object or simply the object’s last known location and current velocity.
Part 4. Approaches Of Object Tracking
After understanding what MOT needs, let’s learn about the theory of how Object Tracking works.
The following are the most popular approaches for Object Tracking:
1. OpenCV-Based Object Tracking
There are many ways to approach object tracking, but one of the most popular is through the use of built-in algorithms in the OpenCV library.
The library has a tracking API containing Object Tracking algorithms and eight trackers: BOOSTING, MEDIANFLOW, MIL, KCF, CSRT, TLD, GOTURN, and MOSSE. Each tracker has its own advantages and disadvantages and has different goals. For instance, the MOSSE tracker is best for the fastest object tracking.
To have a deeper review of OpenCV Object Tracking and what is OpenCV, please read our article about: OpenCV Tracking: A complete Guide in 2022. (同期交付,可以插这个文章主题的内链)
2. MDNet
MDNet is a breakthrough in the field of tracking because it is the first network to use classification-based models instead of the more traditional approach. This makes MDNet much faster and more accurate than other tracking methods.
Inspired by the R-CNN object detection network, the MDNet algorithm can detect objects in real-time more efficiently and with high speed, making it a state-of-the-art visual tracker.
![]()
3. DeepSort
DeepSort is the most popular Object Tracking algorithm choice. The integration of appearance information or deep appearance distance metrics vastly improves DeepSORT performance.
The addition of the “Deep Appearance” distance metric enables DeepSort to avoid identifying switches by 45% and handle complex scenarios. On the MOT17 dataset, DeepSORT has received 77.2 IDF1 and 75.4 MOTA with 239 ID switches but a lower FPS of 13.
4. ROLO
ROLO - a combination of YOLO and LSTM is a Spatio-temporal convolutional neural network that uses the YOLO module and LTSM network for collecting visual features, location inference priors, and locating the target object’s trajectory.
The LSTM network uses an input feature vector of length 4096 for each frame to predict the target object’s location. This vector is obtained by combining the high-level visual features with the YOLO detection. By working together, the LSTM and YOLO can predict the target object’s location more accurately.
ALT TEXT: rolo for object tracking
![]()
Conclusion
In this ultimate guide, we’ve discussed Multi Object Tracking and its requirements. We also explored different approaches for object tracking to help you determine which one is best for your needs.
Hopefully, you found this guide helpful, and your queries related to Object Tracking and its types have been resolved.
Free Download For Win 7 or later(64-bit)
Free Download For macOS 10.14 or later
Learning How to Create LUTs with LUTs Generator
Lookup Tables can make your videos and pictures look more attractive. LUTs are like filters that give your media files different styles and emotions. There are many presets available on the internet that you can download to use for your media content. Moreover, LUTs help you to quickly change the look and mood of your photos and videos.
You can find LUTs for free or buy them online; some editing software already has LUTs included. Nevertheless, you can create your own LUTs using different online and offline tools. If you can’t find any online LUT generator, search for LUT generator free download. You’ll get many options allowing you to generate LUTs offline.
- Part 2: How to Create LUTs Using LUT Generator Free Download?
- Part 3: How to Create Online LUTs Using Online LUT Creator?
- Bonus Part: Wondershare Filmora – The Perfect Tool to Use Your LUTs
Part 1: An Overview of LUT Generator - The Best Platform for Creating LUTs
LUT Generator is an excellent tool for creating color-grading picture and video presets. This powerful LUT generator-free tool is available on both Windows and Mac. Moreover, you can create LUTs from any photo and video editing application, including Lightroom and Camera Raw. Not only can you create your LUTs, but you can also download presets that are already available.
Furthermore, it offers over 290 cinematic styles LUTs and 50+ LUTs that are optimized for drones and GoPro videos. If you want a surreal look, you can also use 70+ Psychedelia LUTs. This tool allows you to apply third-party effects easily on your photos and videos. Moreover, you can even match the tone of clips from different cameras to give a uniform look.
Part 2: How to Create LUTs Using LUT Generator Free Download?
If you don’t want to apply online LUTs that are available, you can create your own. To do so, you have to download the LUT Generator tool and follow these simple steps to create LUTs.
Step1
To create a LUT of your liking, search for the LUT Generator free download on your browser and download the tool.
Step2
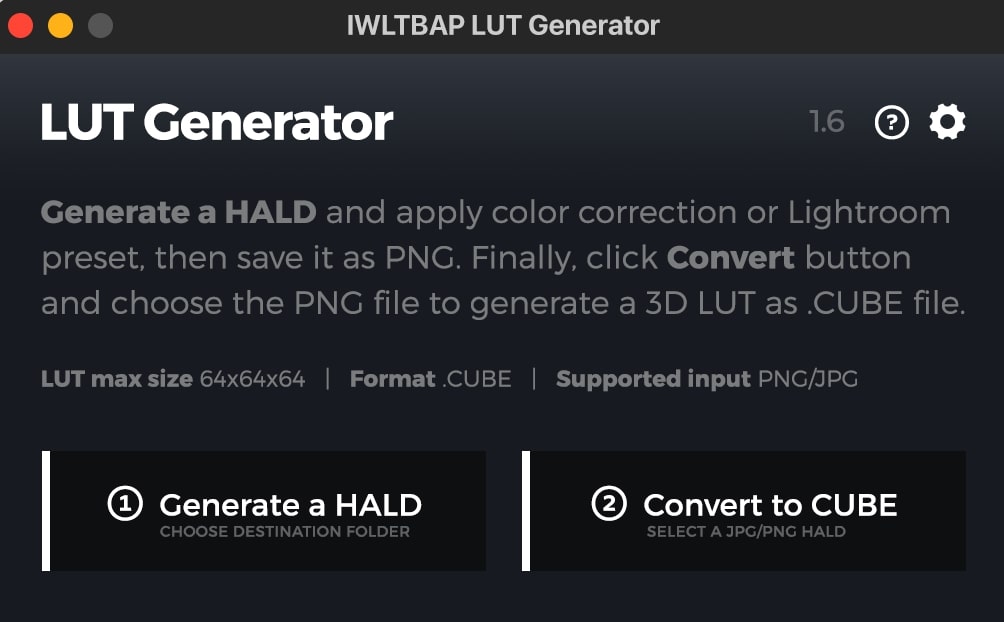
As you launch it, continue to select the “Generate a HALD” option. This option will let you generate a PNG HALD that you can use for color grading using editing software.
Step3
Open the generated PNG HALD into your preferred photo editing application. Apply the desired color correction on the PNG HALD. Save the modified PNG HALD without compression as PNG or at 100% quality in JPG format.
Step4
Click the “Convert to CUBE” button in the LUT Generator and select the modified PNG HALD you saved in the previous step.
Step5
In Preferences, choose the desired size of the 3D LUT as .CUBE format. You can choose between 25x25x25 or 64x64x64. After selecting your desired size, your customized LUT will be created in .CUBE format.
Part 3: How to Create Online LUTs Using Online LUT Creator?
There are two methods to create a LUT online and offline. Previously you’ve learned to generate LUTs using offline tools. However, you can also create LUTs online without installing any tool. This portion will teach you how to create online LUTs in this step-by-step guide.
Step1
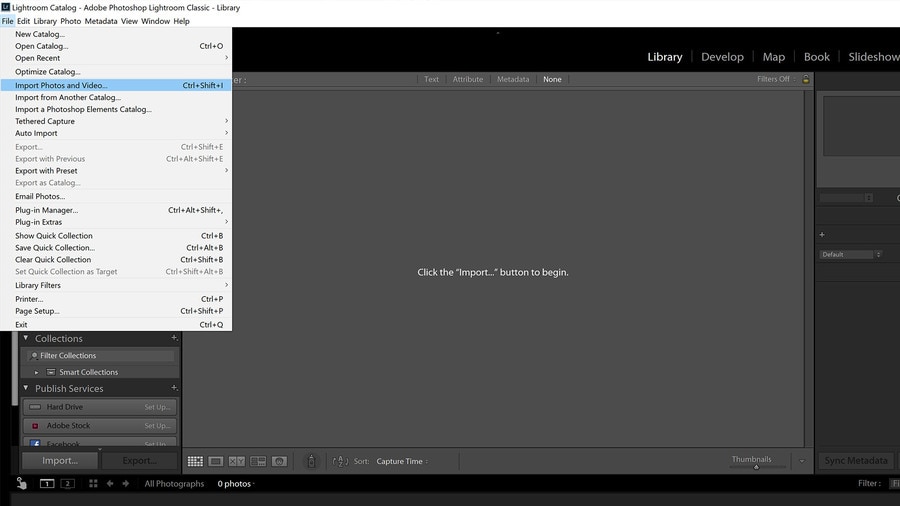
Import your photo into Lightroom by dragging and dropping it. You can also import the file by clicking the “File” button and selecting “Import Photos and Video.” For best results, ensure that the photo you will edit is still.
Step2
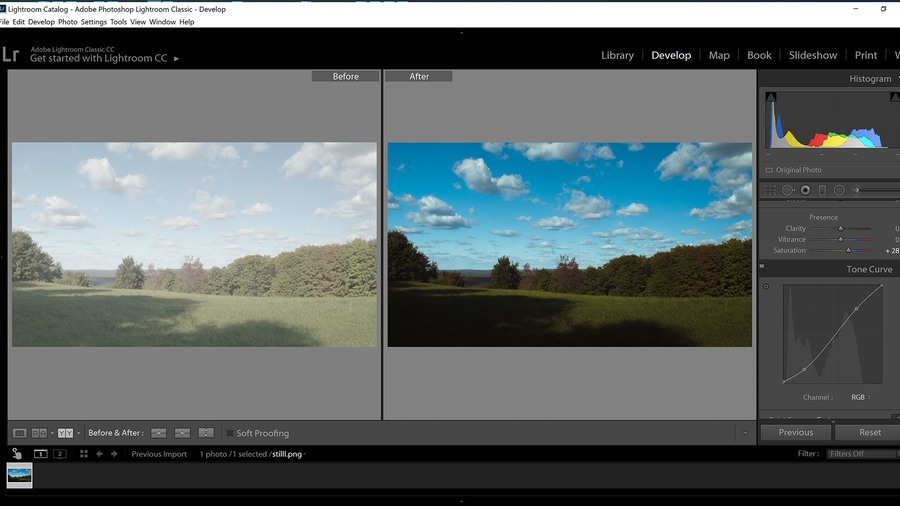
Edit your photo inside the “Develop” module in Lightroom with your desired preference and style. Only apply changes affecting the colors, not adjustments like noise reduction, vignette, or grain.
Step3
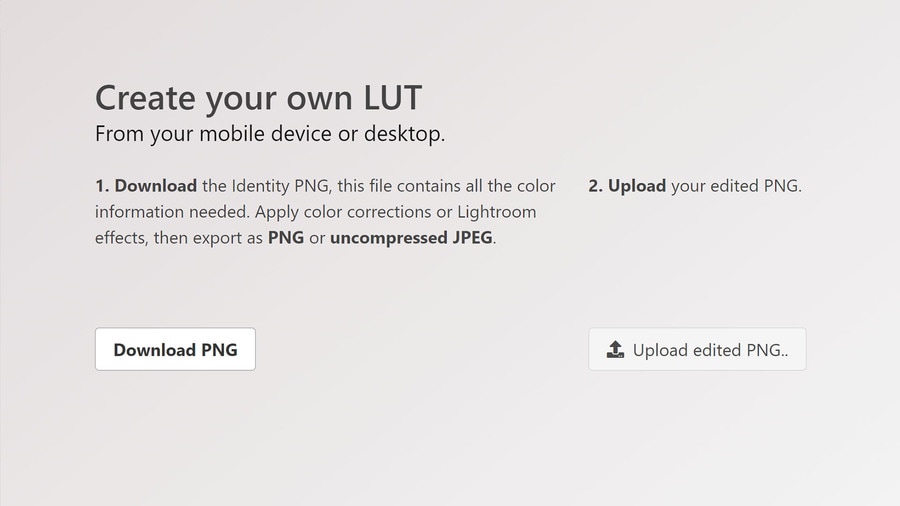
Download the original PNG from <www.onlinelutcreator.com/lutcreator> . Import it into Lightroom as you did in the first step.
Step4
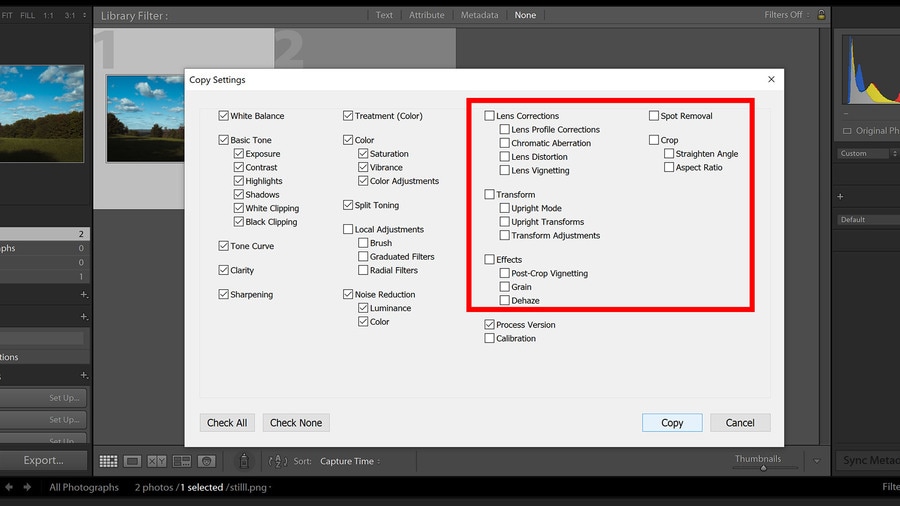
Right-click on your edited photo in the Develop module. Click “Develop Settings,” and select “Copy Settings.” After that, a new window will pop up; make sure you have the same things checked as in the screenshot.
Step5
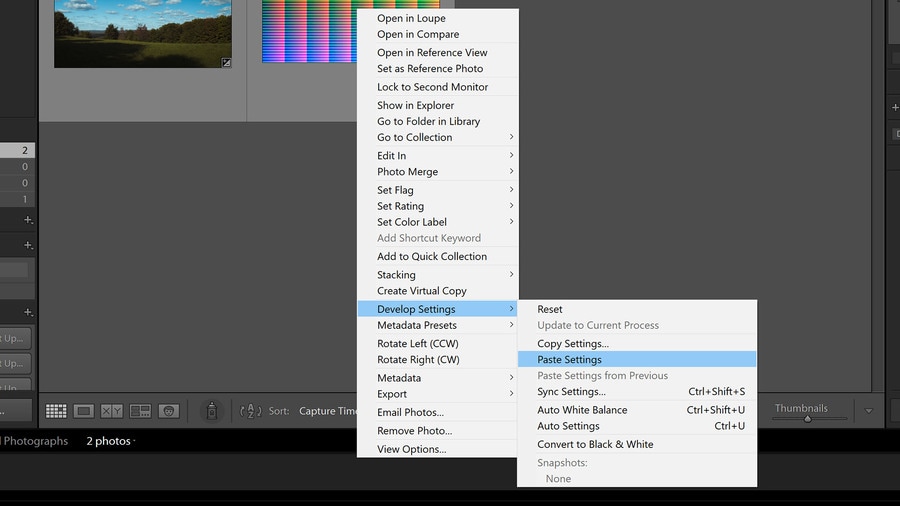
Right-click the original downloaded PNG file in the Develop module. Go to “Develop Settings,” and choose “Paste Settings.” This will paste the settings from your edited photo onto the original PNG.
Step6
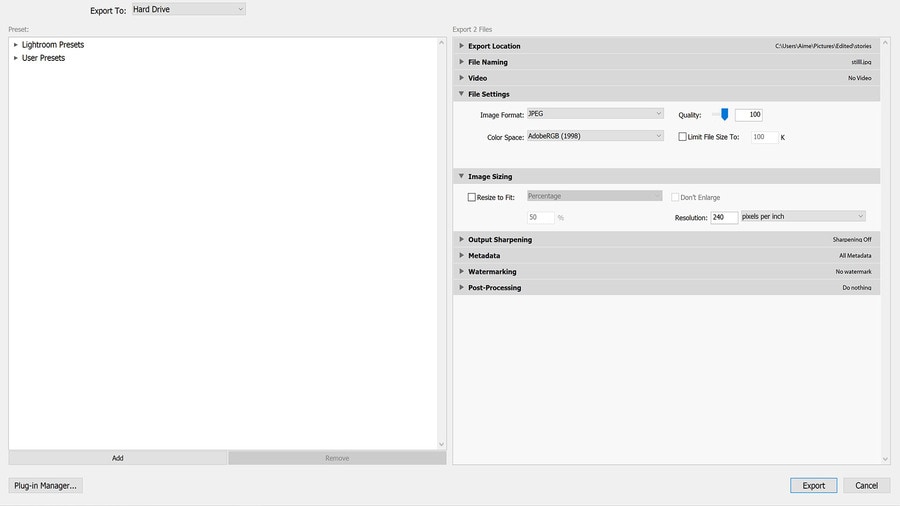
Now export the edited PNG by right-clicking on the PNG and selecting “Export.” In the Export popup menu, ensure you have the same settings as in the screenshot.
Step7
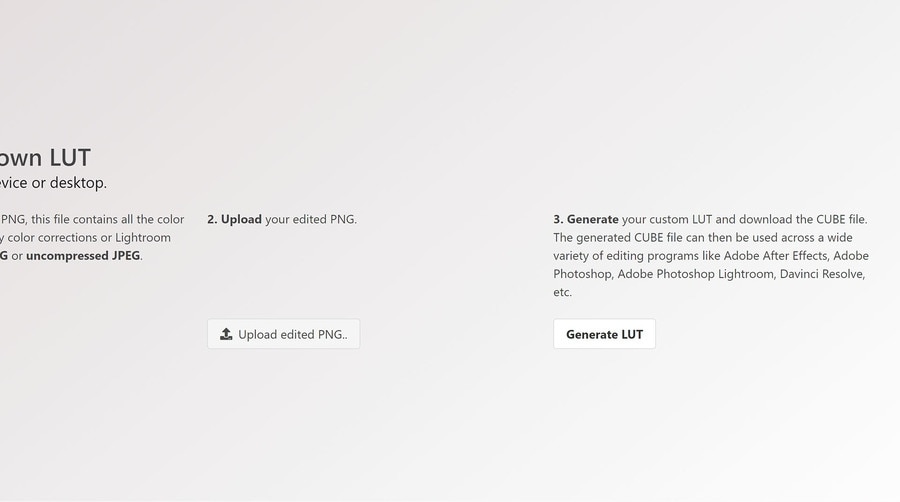
Go back to <www.onlinelutcreator.com/lutcreator> and upload the edited PNG. Generate your LUT and download it. You can now use this LUT to adjust the same color to other videos or photos.
Bonus Part: Wondershare Filmora – The Perfect Tool to Use Your LUTs
Wondershare Filmora is a powerful video editing tool that allows you to use your customized LUTs using this tool. With this tool, you can apply your custom LUTs. Moreover, you can choose from over 200+ pre-made LUTs in its library. Additionally, you can fine-tune your videos with various adjustment and correction options.
Furthermore, you can make changes frame-by-frame to your video footage. This tool also allows you to remove background noises with its AI feature. Moreover, this tool can automatically remove all your long pauses and awkward silence moments from your videos. However, to create a professional video with more options and control, it is a great tool to use.

Key Features To Keep Note of For Wondershare Filmora
- With Filmora, you can select any object or person and change its background. The AI Smart Cutout feature allows you to choose a person to change their background.
- Another fantastic feature is that it gives you access to 10 billion free media files. Moreover, you can select over 200 presets from its in-built for your videos.
- Wondershare Filmora has another unique feature, especially for vloggers and podcasters. With the Auto Ducking feature, music will fade when someone is speaking.
Empower your videos with a new mood using different LUTs. Filmora now offers 100+ top-quality 3D LUTs cover a broad range of scenarios. Transform your videos with Filmora’s powerful 3D LUTs.
Apply LUT on Videos Apply LUT on Videos Learn More

Conclusion
In conclusion, LUTs are essential in modern video and photo editing. They allow editors to apply different color adjustments to color-correct their digital media. There are many pre-made LUTs available online, covering various styles and moods. However, you can create your LUTs with LUT generator-free tools online and offline. You can apply these LUTs using tools like Wondershare Filmora.
- Part 3: How to Create Online LUTs Using Online LUT Creator?
- Bonus Part: Wondershare Filmora – The Perfect Tool to Use Your LUTs
Part 1: An Overview of LUT Generator - The Best Platform for Creating LUTs
LUT Generator is an excellent tool for creating color-grading picture and video presets. This powerful LUT generator-free tool is available on both Windows and Mac. Moreover, you can create LUTs from any photo and video editing application, including Lightroom and Camera Raw. Not only can you create your LUTs, but you can also download presets that are already available.
Furthermore, it offers over 290 cinematic styles LUTs and 50+ LUTs that are optimized for drones and GoPro videos. If you want a surreal look, you can also use 70+ Psychedelia LUTs. This tool allows you to apply third-party effects easily on your photos and videos. Moreover, you can even match the tone of clips from different cameras to give a uniform look.
Part 2: How to Create LUTs Using LUT Generator Free Download?
If you don’t want to apply online LUTs that are available, you can create your own. To do so, you have to download the LUT Generator tool and follow these simple steps to create LUTs.
Step1
To create a LUT of your liking, search for the LUT Generator free download on your browser and download the tool.
Step2
As you launch it, continue to select the “Generate a HALD” option. This option will let you generate a PNG HALD that you can use for color grading using editing software.
Step3
Open the generated PNG HALD into your preferred photo editing application. Apply the desired color correction on the PNG HALD. Save the modified PNG HALD without compression as PNG or at 100% quality in JPG format.
Step4
Click the “Convert to CUBE” button in the LUT Generator and select the modified PNG HALD you saved in the previous step.
Step5
In Preferences, choose the desired size of the 3D LUT as .CUBE format. You can choose between 25x25x25 or 64x64x64. After selecting your desired size, your customized LUT will be created in .CUBE format.

Part 3: How to Create Online LUTs Using Online LUT Creator?
There are two methods to create a LUT online and offline. Previously you’ve learned to generate LUTs using offline tools. However, you can also create LUTs online without installing any tool. This portion will teach you how to create online LUTs in this step-by-step guide.
Step1
Import your photo into Lightroom by dragging and dropping it. You can also import the file by clicking the “File” button and selecting “Import Photos and Video.” For best results, ensure that the photo you will edit is still.

Step2
Edit your photo inside the “Develop” module in Lightroom with your desired preference and style. Only apply changes affecting the colors, not adjustments like noise reduction, vignette, or grain.

Step3
Download the original PNG from <www.onlinelutcreator.com/lutcreator> . Import it into Lightroom as you did in the first step.

Step4
Right-click on your edited photo in the Develop module. Click “Develop Settings,” and select “Copy Settings.” After that, a new window will pop up; make sure you have the same things checked as in the screenshot.

Step5
Right-click the original downloaded PNG file in the Develop module. Go to “Develop Settings,” and choose “Paste Settings.” This will paste the settings from your edited photo onto the original PNG.

Step6
Now export the edited PNG by right-clicking on the PNG and selecting “Export.” In the Export popup menu, ensure you have the same settings as in the screenshot.

Step7
Go back to <www.onlinelutcreator.com/lutcreator> and upload the edited PNG. Generate your LUT and download it. You can now use this LUT to adjust the same color to other videos or photos.

Bonus Part: Wondershare Filmora – The Perfect Tool to Use Your LUTs
Wondershare Filmora is a powerful video editing tool that allows you to use your customized LUTs using this tool. With this tool, you can apply your custom LUTs. Moreover, you can choose from over 200+ pre-made LUTs in its library. Additionally, you can fine-tune your videos with various adjustment and correction options.
Furthermore, you can make changes frame-by-frame to your video footage. This tool also allows you to remove background noises with its AI feature. Moreover, this tool can automatically remove all your long pauses and awkward silence moments from your videos. However, to create a professional video with more options and control, it is a great tool to use.

Key Features To Keep Note of For Wondershare Filmora
- With Filmora, you can select any object or person and change its background. The AI Smart Cutout feature allows you to choose a person to change their background.
- Another fantastic feature is that it gives you access to 10 billion free media files. Moreover, you can select over 200 presets from its in-built for your videos.
- Wondershare Filmora has another unique feature, especially for vloggers and podcasters. With the Auto Ducking feature, music will fade when someone is speaking.
Empower your videos with a new mood using different LUTs. Filmora now offers 100+ top-quality 3D LUTs cover a broad range of scenarios. Transform your videos with Filmora’s powerful 3D LUTs.
Apply LUT on Videos Apply LUT on Videos Learn More

Conclusion
In conclusion, LUTs are essential in modern video and photo editing. They allow editors to apply different color adjustments to color-correct their digital media. There are many pre-made LUTs available online, covering various styles and moods. However, you can create your LUTs with LUT generator-free tools online and offline. You can apply these LUTs using tools like Wondershare Filmora.
Overview of Perfect Moody LUTs for VN Editor
Content creators and professionals express their emotions and mood through our photos and videos. You can also convey your feelings through your content by using LUTs. With the help of color grading and color adjustments, you can enhance the mood and tone of our content. Moody LUTs are a popular element many use to highlight their mood and emotions in their work.
These LUTs are designed to add a unique color grade to your footage to change the mood and feel. Additionally, with certain changes, you can change the perspective of your story. This article recognizes some top LUTs that you can use to create a mood for your video that is being edited on a mobile video editor, VN Editor.
- Part 2: Learning The Top Best Moody LUTs for Easy Video Editing
- Part 3: How to Use Moody LUTs for VN Editor?
- Bonus Part: Find Better LUTs in Wondershare Filmora for Video Editing
Part 1: Where Should You Use a Moody LUT in Video Editing?
Moody LUTs are a type of lookup table to show a specific mood in your content. There are many LUTs available that add emotion and feel to your photos and videos. Some of its uses are discussed below.
- Narrative Films: If you’re making a story-based film, using a moody LUT can help you set the right tone for your audience. It can make your content feel more cinematic and add a dark or dramatic mood to the story.
- Music Videos: Using such LUTs in a music video can help match the song’s emotions. It can enhance the feelings conveyed in the lyrics and music and make the video more impactful.
- Fashion Films: These LUTs can also make fashion films or lookbook videos look more high-end and editorial. You can add depth and drama to the footage that matches the clothing style being showcased.
- Travel Videos: If you’re making a travel video, these LUTs can help you improve the mood and feel of the location. You can add a sense of mystery or moodiness to your videos, making the location more cinematic.
- Horror Films: Finally, moody LUTs can help create a dark and unsettling atmosphere if you’re making a horror film. Applying such LUT can change the color composition to make your content feel more ghostly and scary.
Part 2: Learning The Top Best Moody LUTs for Easy Video Editing
We all know it gets difficult when you have so many options available. You don’t need to search for moody LUTs for premiere pro free download because here are some of the best mentioned for you.
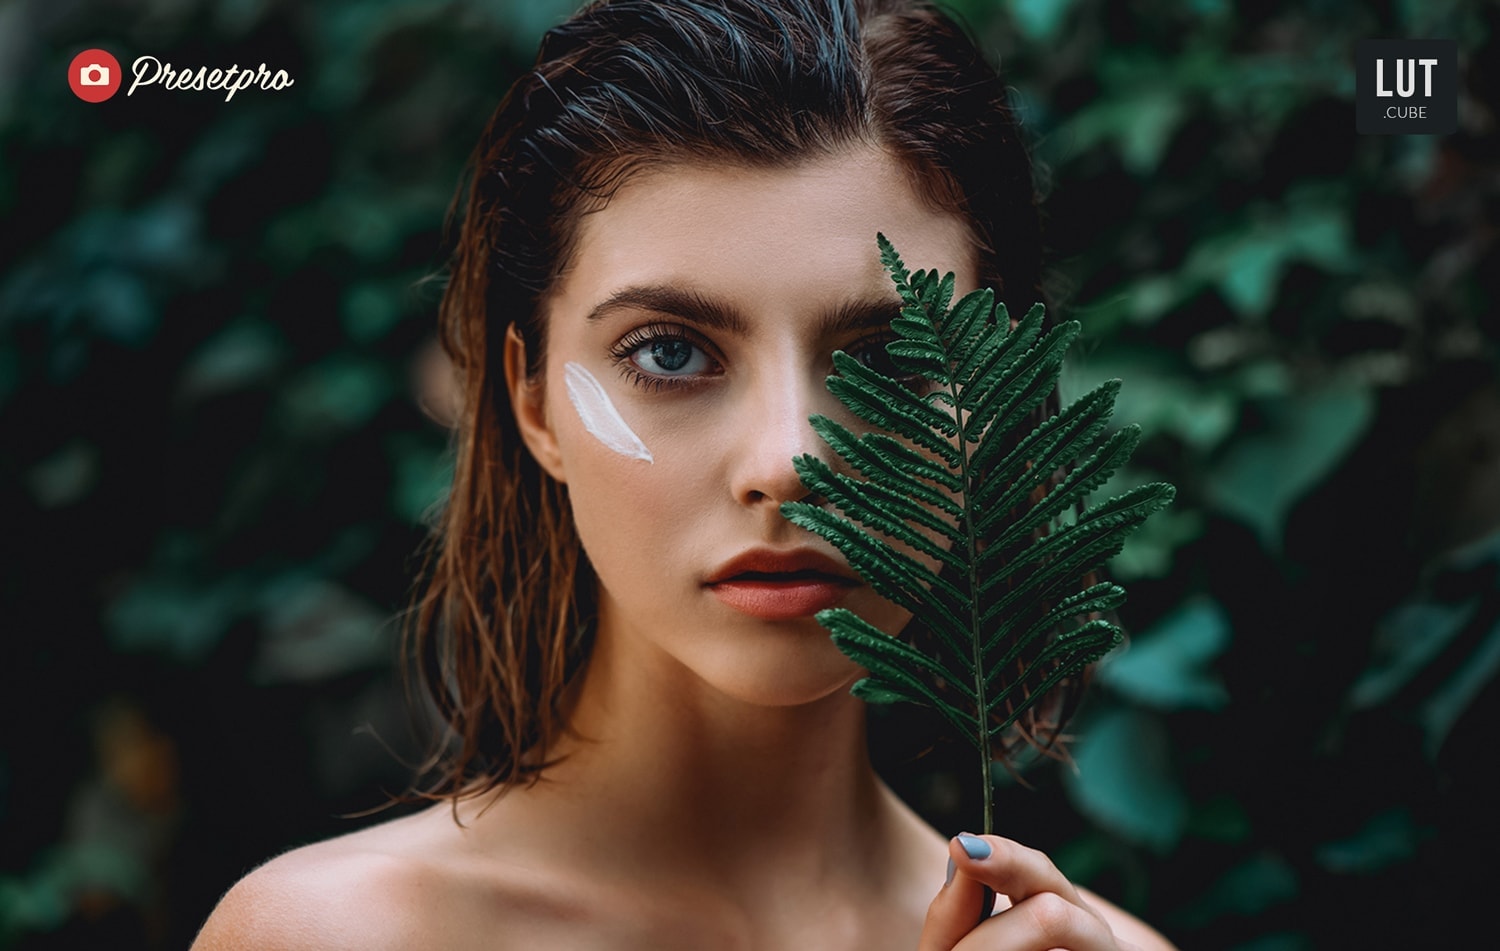
1.Free LUTs Mood
The Free LUTs Mood pack includes different LUTs presets for different moods. You can add a feel to your photos and videos using this pack. Moreover, you add a warm, inviting, cold, and sad feel to your content. These LUTs can help you to give your content a new look and feel by changing and adjusting its colors. This pack can be used on travel, Instagram, or professional videos.
2.Moody LUT Pack | 30 Creative Film LUTs
The Moody LUT Pack includes 30 creative film LUTs that can be used to add mood and emotion to your photos and videos. These LUTs give your content a film-like look and feel with a range of moods to select. It darkens your shades and highlights certain colors to give your photos and videos a dramatic look. Moreover, it also adds a perspective to your content.

3. Axinite
Axinite is packed with multiple LUTs, each with its unique mood and style. This LUT pack shows a brighter and lighter mood in your videos and pictures. It increases the white balance in your media files, giving your content a calmer and lighter perspective. Furthermore, you can create more elegant content with a brighter touch to your digital files.

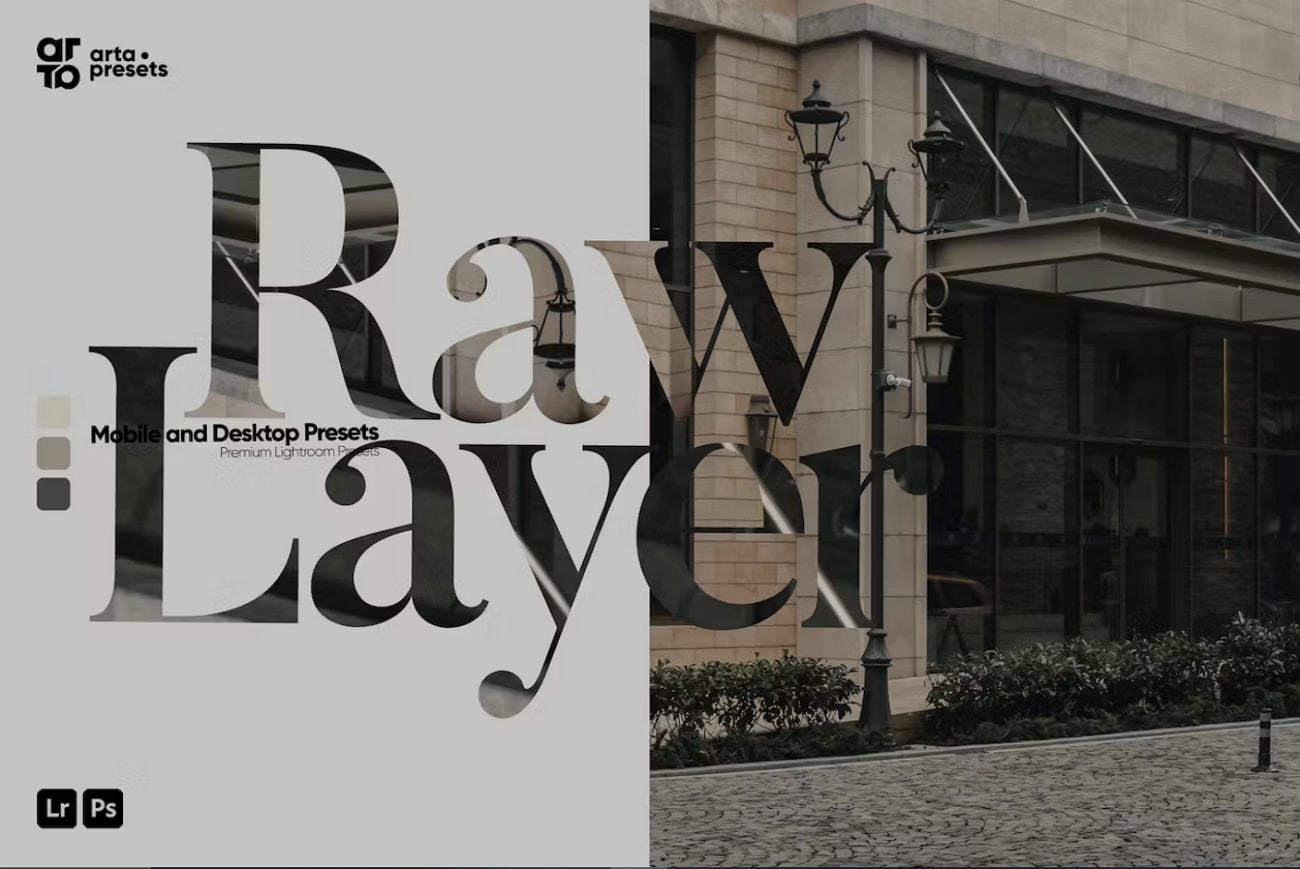
4. Raw Layer
The Raw Layer LUT pack provides 4 moody LUTs that can add a cinematic touch to your edits. This pack provides a darker version that gives your media files a dramatic feel. It changes your color composition in such a way that it highlights the subject and creates a more serious mood. You can use these LUTs to give your media files a more serious and dramatic appeal.
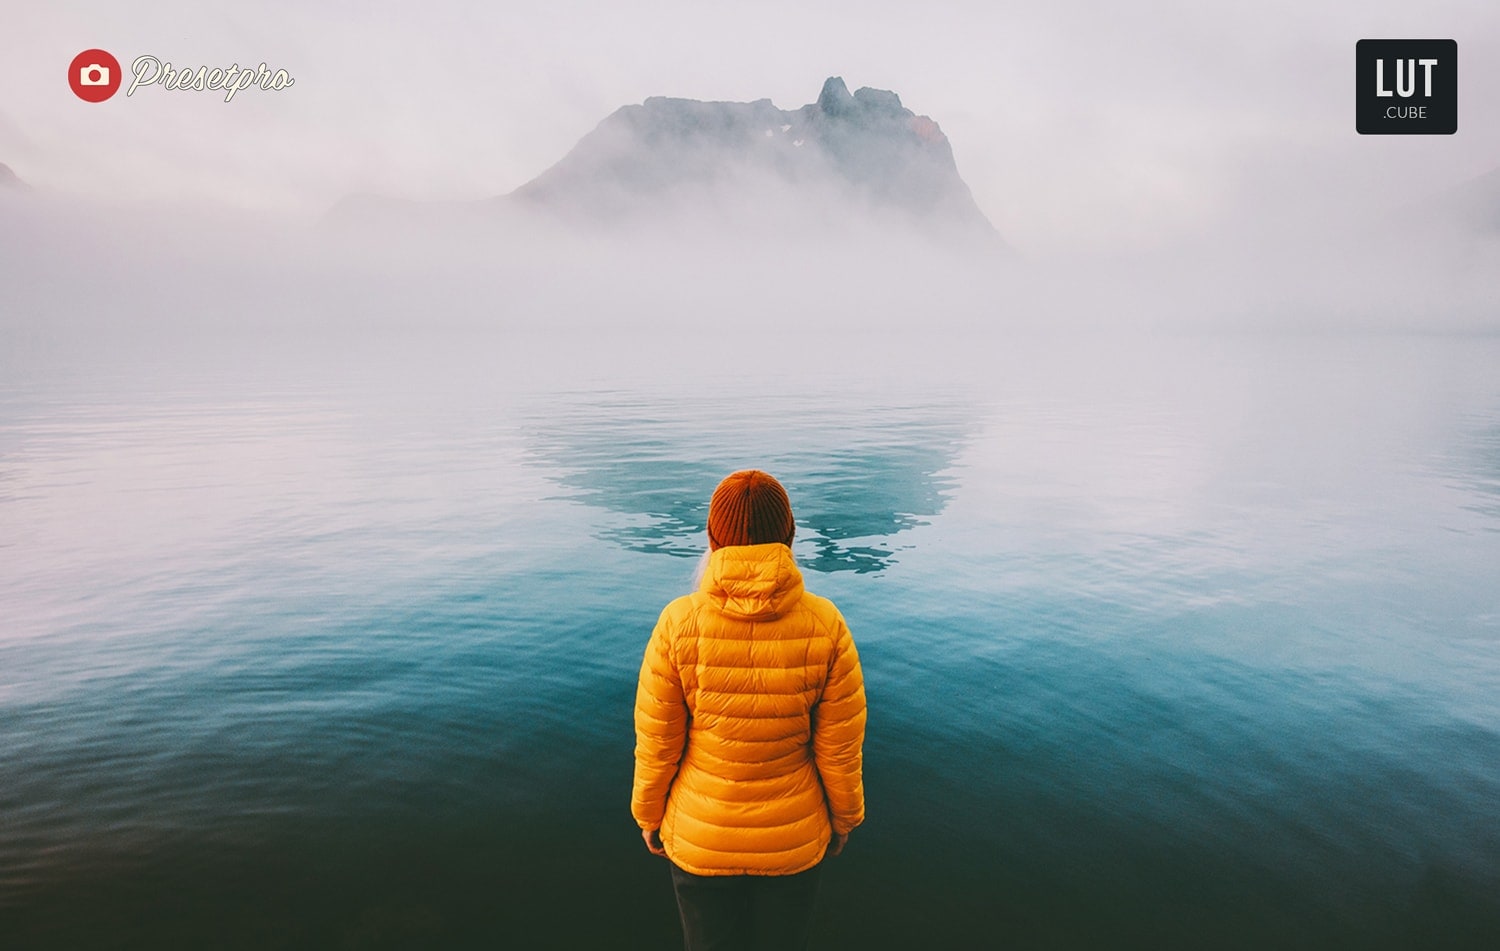
5. Moody Lake
Moody Lake is a LUT pack that gives your photos and videos a colder look. It exposes your image or video footage and adds shades of blue to give a colder mood feel. These shades will add a more serious perspective to your digital media files. You can change your happy-looking media file to a more cold and sad-looking story using this LUT.
6.15 Earth Tones Moody Lightroom Preset
Another impressive moody LUTs pack that comes with multiple options is Earth Tones Lightroom Preset. It includes 15 presets that can add a moody and atmospheric look to your photos and videos. Moreover, this preset highlights the natural colors to give your content an earthy feel. This LUT pack is perfect for color-grading traveling videos and photos.

7.Wedding & Rich LUTs by Moody Presets
Wedding & Rich LUTs by Moody Presets is a collection of LUT packs that adds a romantic mood to your wedding videos and photos. This pack of 66 LUTs adds a soft, dreamy look to your content by highlighting light colors. Moreover, it softens the light and increases the white balance of your media files to give a romantic and soft feel. Each LUT creates a newer impression on your digital media files in this pack.

Part 3: How to Use Moody LUTs for VN Editor?
If you are searching for how to use your favorite moody LUTs for VN Editor, you are at the right place. These simple steps allow you to apply any LUT in your VN Editor app.
Step1 Open the App to Import LUTs
Open the VN Editor and select the “+” sign. Then a new window will appear where you should choose the “Creation Kits” option. After this, tap the “Filters” button, and lead into the “My Filter” option. After selecting that, tap on “Import Filter” to import your LUT. Then, choose the folder where you want to import your favorite LUT.

Step2 Apply LUTs and Save the File
After choosing the LUT you want to use, VN Editor will extract and process it. You can find the LUT in the “Filters” section and apply it to your media file. You can also adjust the intensity of the LUT to your liking. Once done with your adjustments, save your file by tapping the “Save” button.

Bonus Part: Find Better LUTs in Wondershare Filmora for Video Editing
Wondershare Filmora is an amazing video editing software that has a library of over 200 LUTs available. These LUTs can help you give your content a feel and emotion by enhancing the mood and atmosphere of your videos. Many LUTs change the color grade of your footage, creating a dark, dramatic, or sad mood.
Nevertheless, you can adjust the LUT’s intensity with its latest update. Moreover, you can change the hue of mid-tones, shadows, and highlights of your digital files. In addition, you can get sharper and more improved results in its latest version.

Key Features of The Exceptional LUTs Editor
Wondershare Filmora provides an exquisite suit for applying and editing LUTs on videos. Being a complete video editor, it offers other exceptional features, out of which a few are mentioned as follows:
- With AI Smart Cutout, you can easily remove the background of your videos and change it. This feature uses AI technology to accurately cut out the subject of your video to add new background.
- Auto Reframe is a feature that automatically changes the aspect ratio of your video. You can easily change the size and shape of your video to fit different screens and platforms.
- Filmora has an amazing feature that syncs your digital files’ audio with the length of your video. With AI Audio Stretch, you don’t have to worry about matching your audio with your video.
Empower your videos with a new mood using different LUTs. Filmora now offers 100+ top-quality 3D LUTs cover a broad range of scenarios. Transform your videos with Filmora’s powerful 3D LUTs.
Apply LUT on Videos Apply LUT on Videos Learn More

Conclusion
In conclusion, adding mood and emotion to your digital content can improve its impact on the viewer. Lookup tables are a great option to add a specific mood to your media files by changing colors. Furthermore, with many moody LUTs for VN Editor, you can apply LUTs using your smartphone. However, Wondershare Filmora is another tool that can be used to apply and explore different LUTs
- Part 3: How to Use Moody LUTs for VN Editor?
- Bonus Part: Find Better LUTs in Wondershare Filmora for Video Editing
Part 1: Where Should You Use a Moody LUT in Video Editing?
Moody LUTs are a type of lookup table to show a specific mood in your content. There are many LUTs available that add emotion and feel to your photos and videos. Some of its uses are discussed below.
- Narrative Films: If you’re making a story-based film, using a moody LUT can help you set the right tone for your audience. It can make your content feel more cinematic and add a dark or dramatic mood to the story.
- Music Videos: Using such LUTs in a music video can help match the song’s emotions. It can enhance the feelings conveyed in the lyrics and music and make the video more impactful.
- Fashion Films: These LUTs can also make fashion films or lookbook videos look more high-end and editorial. You can add depth and drama to the footage that matches the clothing style being showcased.
- Travel Videos: If you’re making a travel video, these LUTs can help you improve the mood and feel of the location. You can add a sense of mystery or moodiness to your videos, making the location more cinematic.
- Horror Films: Finally, moody LUTs can help create a dark and unsettling atmosphere if you’re making a horror film. Applying such LUT can change the color composition to make your content feel more ghostly and scary.
Part 2: Learning The Top Best Moody LUTs for Easy Video Editing
We all know it gets difficult when you have so many options available. You don’t need to search for moody LUTs for premiere pro free download because here are some of the best mentioned for you.
1.Free LUTs Mood
The Free LUTs Mood pack includes different LUTs presets for different moods. You can add a feel to your photos and videos using this pack. Moreover, you add a warm, inviting, cold, and sad feel to your content. These LUTs can help you to give your content a new look and feel by changing and adjusting its colors. This pack can be used on travel, Instagram, or professional videos.

2.Moody LUT Pack | 30 Creative Film LUTs
The Moody LUT Pack includes 30 creative film LUTs that can be used to add mood and emotion to your photos and videos. These LUTs give your content a film-like look and feel with a range of moods to select. It darkens your shades and highlights certain colors to give your photos and videos a dramatic look. Moreover, it also adds a perspective to your content.

3. Axinite
Axinite is packed with multiple LUTs, each with its unique mood and style. This LUT pack shows a brighter and lighter mood in your videos and pictures. It increases the white balance in your media files, giving your content a calmer and lighter perspective. Furthermore, you can create more elegant content with a brighter touch to your digital files.

4. Raw Layer
The Raw Layer LUT pack provides 4 moody LUTs that can add a cinematic touch to your edits. This pack provides a darker version that gives your media files a dramatic feel. It changes your color composition in such a way that it highlights the subject and creates a more serious mood. You can use these LUTs to give your media files a more serious and dramatic appeal.

5. Moody Lake
Moody Lake is a LUT pack that gives your photos and videos a colder look. It exposes your image or video footage and adds shades of blue to give a colder mood feel. These shades will add a more serious perspective to your digital media files. You can change your happy-looking media file to a more cold and sad-looking story using this LUT.

6.15 Earth Tones Moody Lightroom Preset
Another impressive moody LUTs pack that comes with multiple options is Earth Tones Lightroom Preset. It includes 15 presets that can add a moody and atmospheric look to your photos and videos. Moreover, this preset highlights the natural colors to give your content an earthy feel. This LUT pack is perfect for color-grading traveling videos and photos.

7.Wedding & Rich LUTs by Moody Presets
Wedding & Rich LUTs by Moody Presets is a collection of LUT packs that adds a romantic mood to your wedding videos and photos. This pack of 66 LUTs adds a soft, dreamy look to your content by highlighting light colors. Moreover, it softens the light and increases the white balance of your media files to give a romantic and soft feel. Each LUT creates a newer impression on your digital media files in this pack.

Part 3: How to Use Moody LUTs for VN Editor?
If you are searching for how to use your favorite moody LUTs for VN Editor, you are at the right place. These simple steps allow you to apply any LUT in your VN Editor app.
Step1 Open the App to Import LUTs
Open the VN Editor and select the “+” sign. Then a new window will appear where you should choose the “Creation Kits” option. After this, tap the “Filters” button, and lead into the “My Filter” option. After selecting that, tap on “Import Filter” to import your LUT. Then, choose the folder where you want to import your favorite LUT.

Step2 Apply LUTs and Save the File
After choosing the LUT you want to use, VN Editor will extract and process it. You can find the LUT in the “Filters” section and apply it to your media file. You can also adjust the intensity of the LUT to your liking. Once done with your adjustments, save your file by tapping the “Save” button.

Bonus Part: Find Better LUTs in Wondershare Filmora for Video Editing
Wondershare Filmora is an amazing video editing software that has a library of over 200 LUTs available. These LUTs can help you give your content a feel and emotion by enhancing the mood and atmosphere of your videos. Many LUTs change the color grade of your footage, creating a dark, dramatic, or sad mood.
Nevertheless, you can adjust the LUT’s intensity with its latest update. Moreover, you can change the hue of mid-tones, shadows, and highlights of your digital files. In addition, you can get sharper and more improved results in its latest version.

Key Features of The Exceptional LUTs Editor
Wondershare Filmora provides an exquisite suit for applying and editing LUTs on videos. Being a complete video editor, it offers other exceptional features, out of which a few are mentioned as follows:
- With AI Smart Cutout, you can easily remove the background of your videos and change it. This feature uses AI technology to accurately cut out the subject of your video to add new background.
- Auto Reframe is a feature that automatically changes the aspect ratio of your video. You can easily change the size and shape of your video to fit different screens and platforms.
- Filmora has an amazing feature that syncs your digital files’ audio with the length of your video. With AI Audio Stretch, you don’t have to worry about matching your audio with your video.
Empower your videos with a new mood using different LUTs. Filmora now offers 100+ top-quality 3D LUTs cover a broad range of scenarios. Transform your videos with Filmora’s powerful 3D LUTs.
Apply LUT on Videos Apply LUT on Videos Learn More

Conclusion
In conclusion, adding mood and emotion to your digital content can improve its impact on the viewer. Lookup tables are a great option to add a specific mood to your media files by changing colors. Furthermore, with many moody LUTs for VN Editor, you can apply LUTs using your smartphone. However, Wondershare Filmora is another tool that can be used to apply and explore different LUTs
How to Brighten a Video in Windows 10 Easily
Create High-Quality Video - Wondershare Filmora
An easy and powerful YouTube video editor
Numerous video and audio effects to choose from
Detailed tutorials provided by the official channel
Have you ever had a video with good audio but poor visual quality? Maybe it was a recorded talk, and the presenter was sitting in front of a poorly lit screen, or it might as well be your own home video. There are many reasons why your video could look dark and unappealing. Brightening a video is a great way to remove your editing mistakes and add some artistic flair to your videos. Some editing software has this option built-in, but if you use Windows 10 to edit, it’s hard to find out how to brighten a video in Windows 10 without the help of additional software.
We sometimes know video quality can affect the way content is perceived. That can be particularly frustrating, especially with all the hi-res content online now. Are you in a situation where you need to brighten up a video that has been recorded in low light? If so, look no further. It’s now a breeze to adjust the brightness of your videos on Windows 10. This article will show you how to brighten a video windows 10.
In this article
01 Does Windows 10 have built-in video editing software?
02 3 Simple Methods to Brighten a Video on iPhone
03 Adjust your video brightness and more using Filmora on PC/Mac
Does Windows 10 have built-in video editing software?
The answer is yes. Windows 10 has an easy-to-use video editing app. This is handy for simple home video editing, but it doesn’t work well for professional movie making. Windows Movie Maker was how we edited video in the old days of Windows XP and Vista. Today, Movie Maker is still available on Windows 10, but the new video editor is built-in to the operating system.
You can use it to trim videos or create your own home movies and slideshows. You can even have it create videos automatically by taking photos as you go. Forget about buying expensive editing software. With Windows 10, you have a free video editor built into the operating system where you can trim videos, create home movies, and even create automatic montages. You’ll be surprised at what you can do without ever leaving the Windows 10 Photos app.
Some people say that windows video editor has a very simple interface and it only has very basic features. In this case, having something is more important than not having anything at all. Also, you should keep in mind that not everyone needs a fully-fledged video editor . Some people have to do just basic tasks like trimming a video and increasing the brightness of a video. It is not feasible for them to purchase expensive video editing software for that purpose. So the Windows 10 video editor is the best in this case.
How To Brighten A Video In Windows 10 Easily
This article will discuss two different methods using which you can easily brighten your videos in Windows 10. So, without wasting any more time, let’s get started.
1. Using Filmora to brighten a video in Windows 10
You may think that all video editing software is created equal, but that’s where you’re wrong. The best video editor for your needs is drastically different depending on what you want to do with the end product. Some people want a quick way to make a trailer or showcase their products, and others want to put together an amateur movie.
Filmora is one of the best video editing software for Windows that can improve or fix your dark videos. Filmora is an all-in-one video editor for Windows and Mac. With Filmora, you can easily edit videos and make simple videos with transitions and effects, and you can give any video a professional touch. It’s a great piece of software that works incredibly smoothly. Filmora is an attractive and easy-to-use application that will give your video the final polish it needs. If you’ve ever had a video that looked too dark to use, there are ways to fix it aside from taking an entirely new video.
If you’ve ever had a video that looked too dark to use, then you can easily brighten it up using Filmora. Just follow the steps given below:
Step 1
First of all, make sure that you have installed the latest version of Filmora on your computer. If you haven’t already installed it, then you can download it easily from the official website of Wondershare.
Step 2
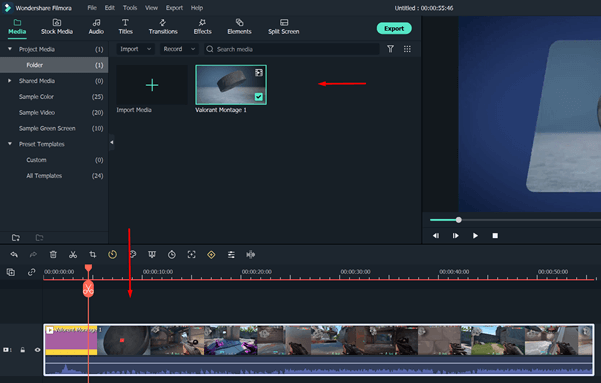
Upon starting Wondershare Filmora, click the “Import” button. The import media item window will open and show you all the files on your computer. The program will now display a thumbnail of your selected video in its media area. Drag the video from the media library and drop it into the Filmora timeline.
Step 3
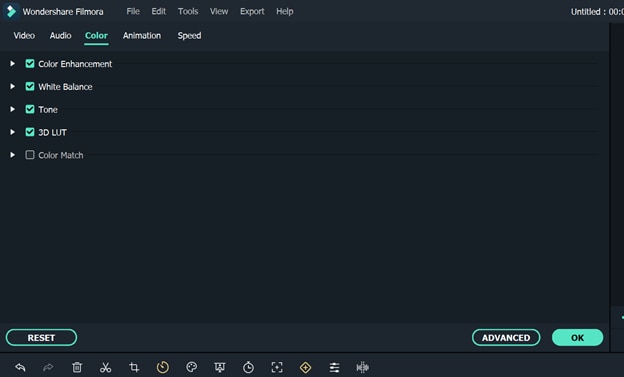
You will see the editing interface when you double-click the video in the Timeline. You can switch between the Video, Audio, Color, and Motion tabs from here. You can change how the clip looks with the Rotate, Flip, Scale, and Position settings in the Video tab. When you select the Color tab, you will be presented with the White Balance, Tone, and 3D LUT options.
Step 4
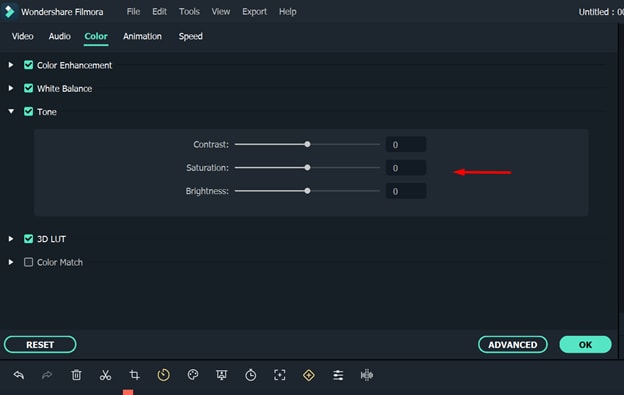
You can increase the brightness of the video by dragging the Brightness slider in the Tone option to the right. Click the spacebar to play the video to see the real-time result. The video will appear brighter as a result of your operation. Repeat the previous step if the video remains dark. You will see a brighter video each time you increase its brightness and contrast.
Step 5
Click “Export” to save the result when you’re satisfied with it. You can export videos in any popular format from the “Format” tab, including AVI, FLV, MKV, MP4, M4V, PSP, 3GP, MOV, and more. The video can be viewed on mobile devices such as an iPhone, iPad, or iPod by clicking “Device” and choosing a device. You can burn DVDs as well as upload videos directly to YouTube and Vimeo.
For Win 7 or later (64-bit)
For macOS 10.12 or later
2. Using Windows Video Editor to brighten a video
Windows video editor is an easy-to-use tool in which you can do basic video editing. This simple tool can easily cut, trim, and merge different video clips. The best thing about windows video editor is that it comes as built-in software in windows ten, so you won’t need to download any additional programs and plugins. Suppose you are just a beginner, and you need to perform basic video editing functions. In that case, you can easily use this app without worrying about purchasing expensive video editing programs. To increase the brightness of a video in the windows video editor, follow the steps given below:
Step 1
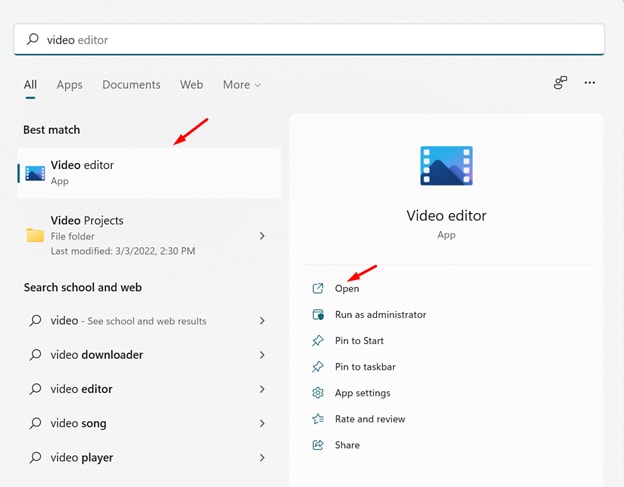
Go to the search section of windows 10 present right after the start menu icon and type “video editor.” Click the search icon and then open the video editor app.
Step 2
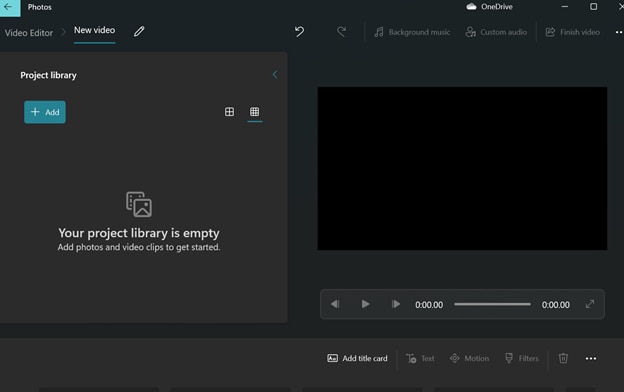
A new interface will appear on your screen. Just click on the new project button to start a new project. From the project library, click on the add new project button and select the video from your computer that you want to edit.
Step 3
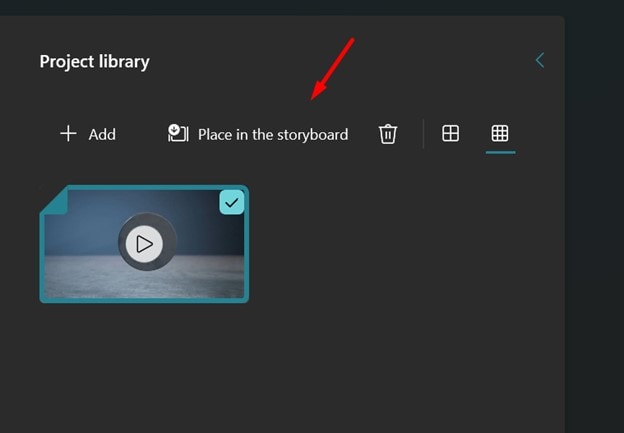
Click on the video icon in the project library and then click on the “add to storyboard” button. It will open all the editing options for the video.
Step 4
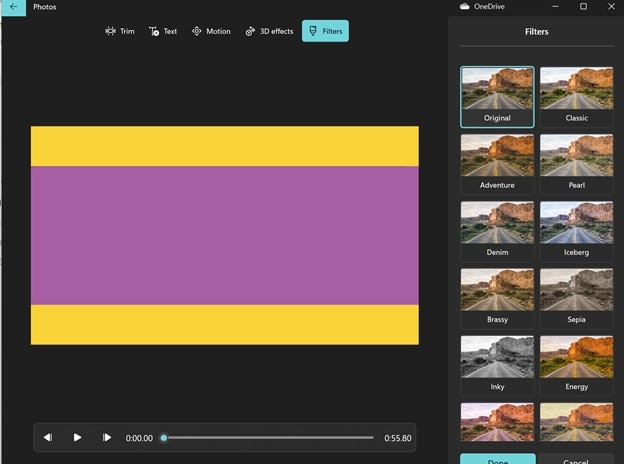
From the menu present at the bottom of the screen, click on the filters option, and it will open a lot of filters on your screen. Click on the filters one by one and check which filter brightens your video.
Step 5
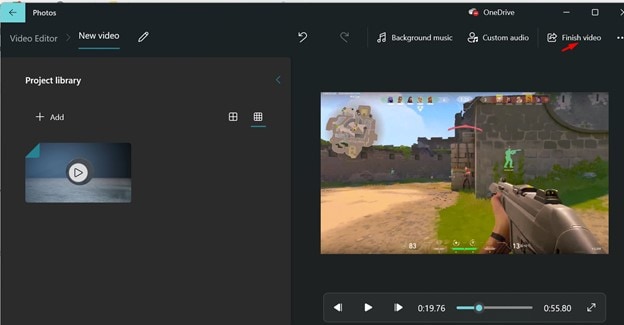
Once you have added the filter, click on the done button and export the video by clicking on the finish button. You can also select your desired resolution in which you want to export your video.
Conclusion
● As you can see, it’s very easy to brighten a video on Windows 10. You have many options depending on what you want to do with your videos after editing them. The point is that you no longer need complex video editing software to get the job done because there are many other options available to help you achieve your desired look and feel. We have described two different methods in this article. Give one a try if you feel like your videos could use a brighter touch.
Have you ever had a video with good audio but poor visual quality? Maybe it was a recorded talk, and the presenter was sitting in front of a poorly lit screen, or it might as well be your own home video. There are many reasons why your video could look dark and unappealing. Brightening a video is a great way to remove your editing mistakes and add some artistic flair to your videos. Some editing software has this option built-in, but if you use Windows 10 to edit, it’s hard to find out how to brighten a video in Windows 10 without the help of additional software.
We sometimes know video quality can affect the way content is perceived. That can be particularly frustrating, especially with all the hi-res content online now. Are you in a situation where you need to brighten up a video that has been recorded in low light? If so, look no further. It’s now a breeze to adjust the brightness of your videos on Windows 10. This article will show you how to brighten a video windows 10.
In this article
01 Does Windows 10 have built-in video editing software?
02 3 Simple Methods to Brighten a Video on iPhone
03 Adjust your video brightness and more using Filmora on PC/Mac
Does Windows 10 have built-in video editing software?
The answer is yes. Windows 10 has an easy-to-use video editing app. This is handy for simple home video editing, but it doesn’t work well for professional movie making. Windows Movie Maker was how we edited video in the old days of Windows XP and Vista. Today, Movie Maker is still available on Windows 10, but the new video editor is built-in to the operating system.
You can use it to trim videos or create your own home movies and slideshows. You can even have it create videos automatically by taking photos as you go. Forget about buying expensive editing software. With Windows 10, you have a free video editor built into the operating system where you can trim videos, create home movies, and even create automatic montages. You’ll be surprised at what you can do without ever leaving the Windows 10 Photos app.
Some people say that windows video editor has a very simple interface and it only has very basic features. In this case, having something is more important than not having anything at all. Also, you should keep in mind that not everyone needs a fully-fledged video editor . Some people have to do just basic tasks like trimming a video and increasing the brightness of a video. It is not feasible for them to purchase expensive video editing software for that purpose. So the Windows 10 video editor is the best in this case.
How To Brighten A Video In Windows 10 Easily
This article will discuss two different methods using which you can easily brighten your videos in Windows 10. So, without wasting any more time, let’s get started.
1. Using Filmora to brighten a video in Windows 10
You may think that all video editing software is created equal, but that’s where you’re wrong. The best video editor for your needs is drastically different depending on what you want to do with the end product. Some people want a quick way to make a trailer or showcase their products, and others want to put together an amateur movie.
Filmora is one of the best video editing software for Windows that can improve or fix your dark videos. Filmora is an all-in-one video editor for Windows and Mac. With Filmora, you can easily edit videos and make simple videos with transitions and effects, and you can give any video a professional touch. It’s a great piece of software that works incredibly smoothly. Filmora is an attractive and easy-to-use application that will give your video the final polish it needs. If you’ve ever had a video that looked too dark to use, there are ways to fix it aside from taking an entirely new video.
If you’ve ever had a video that looked too dark to use, then you can easily brighten it up using Filmora. Just follow the steps given below:
Step 1
First of all, make sure that you have installed the latest version of Filmora on your computer. If you haven’t already installed it, then you can download it easily from the official website of Wondershare.
Step 2
Upon starting Wondershare Filmora, click the “Import” button. The import media item window will open and show you all the files on your computer. The program will now display a thumbnail of your selected video in its media area. Drag the video from the media library and drop it into the Filmora timeline.

Step 3
You will see the editing interface when you double-click the video in the Timeline. You can switch between the Video, Audio, Color, and Motion tabs from here. You can change how the clip looks with the Rotate, Flip, Scale, and Position settings in the Video tab. When you select the Color tab, you will be presented with the White Balance, Tone, and 3D LUT options.

Step 4
You can increase the brightness of the video by dragging the Brightness slider in the Tone option to the right. Click the spacebar to play the video to see the real-time result. The video will appear brighter as a result of your operation. Repeat the previous step if the video remains dark. You will see a brighter video each time you increase its brightness and contrast.

Step 5
Click “Export” to save the result when you’re satisfied with it. You can export videos in any popular format from the “Format” tab, including AVI, FLV, MKV, MP4, M4V, PSP, 3GP, MOV, and more. The video can be viewed on mobile devices such as an iPhone, iPad, or iPod by clicking “Device” and choosing a device. You can burn DVDs as well as upload videos directly to YouTube and Vimeo.
For Win 7 or later (64-bit)
For macOS 10.12 or later
2. Using Windows Video Editor to brighten a video
Windows video editor is an easy-to-use tool in which you can do basic video editing. This simple tool can easily cut, trim, and merge different video clips. The best thing about windows video editor is that it comes as built-in software in windows ten, so you won’t need to download any additional programs and plugins. Suppose you are just a beginner, and you need to perform basic video editing functions. In that case, you can easily use this app without worrying about purchasing expensive video editing programs. To increase the brightness of a video in the windows video editor, follow the steps given below:
Step 1
Go to the search section of windows 10 present right after the start menu icon and type “video editor.” Click the search icon and then open the video editor app.

Step 2
A new interface will appear on your screen. Just click on the new project button to start a new project. From the project library, click on the add new project button and select the video from your computer that you want to edit.

Step 3
Click on the video icon in the project library and then click on the “add to storyboard” button. It will open all the editing options for the video.

Step 4
From the menu present at the bottom of the screen, click on the filters option, and it will open a lot of filters on your screen. Click on the filters one by one and check which filter brightens your video.

Step 5
Once you have added the filter, click on the done button and export the video by clicking on the finish button. You can also select your desired resolution in which you want to export your video.

Conclusion
● As you can see, it’s very easy to brighten a video on Windows 10. You have many options depending on what you want to do with your videos after editing them. The point is that you no longer need complex video editing software to get the job done because there are many other options available to help you achieve your desired look and feel. We have described two different methods in this article. Give one a try if you feel like your videos could use a brighter touch.
Have you ever had a video with good audio but poor visual quality? Maybe it was a recorded talk, and the presenter was sitting in front of a poorly lit screen, or it might as well be your own home video. There are many reasons why your video could look dark and unappealing. Brightening a video is a great way to remove your editing mistakes and add some artistic flair to your videos. Some editing software has this option built-in, but if you use Windows 10 to edit, it’s hard to find out how to brighten a video in Windows 10 without the help of additional software.
We sometimes know video quality can affect the way content is perceived. That can be particularly frustrating, especially with all the hi-res content online now. Are you in a situation where you need to brighten up a video that has been recorded in low light? If so, look no further. It’s now a breeze to adjust the brightness of your videos on Windows 10. This article will show you how to brighten a video windows 10.
In this article
01 Does Windows 10 have built-in video editing software?
02 3 Simple Methods to Brighten a Video on iPhone
03 Adjust your video brightness and more using Filmora on PC/Mac
Does Windows 10 have built-in video editing software?
The answer is yes. Windows 10 has an easy-to-use video editing app. This is handy for simple home video editing, but it doesn’t work well for professional movie making. Windows Movie Maker was how we edited video in the old days of Windows XP and Vista. Today, Movie Maker is still available on Windows 10, but the new video editor is built-in to the operating system.
You can use it to trim videos or create your own home movies and slideshows. You can even have it create videos automatically by taking photos as you go. Forget about buying expensive editing software. With Windows 10, you have a free video editor built into the operating system where you can trim videos, create home movies, and even create automatic montages. You’ll be surprised at what you can do without ever leaving the Windows 10 Photos app.
Some people say that windows video editor has a very simple interface and it only has very basic features. In this case, having something is more important than not having anything at all. Also, you should keep in mind that not everyone needs a fully-fledged video editor . Some people have to do just basic tasks like trimming a video and increasing the brightness of a video. It is not feasible for them to purchase expensive video editing software for that purpose. So the Windows 10 video editor is the best in this case.
How To Brighten A Video In Windows 10 Easily
This article will discuss two different methods using which you can easily brighten your videos in Windows 10. So, without wasting any more time, let’s get started.
1. Using Filmora to brighten a video in Windows 10
You may think that all video editing software is created equal, but that’s where you’re wrong. The best video editor for your needs is drastically different depending on what you want to do with the end product. Some people want a quick way to make a trailer or showcase their products, and others want to put together an amateur movie.
Filmora is one of the best video editing software for Windows that can improve or fix your dark videos. Filmora is an all-in-one video editor for Windows and Mac. With Filmora, you can easily edit videos and make simple videos with transitions and effects, and you can give any video a professional touch. It’s a great piece of software that works incredibly smoothly. Filmora is an attractive and easy-to-use application that will give your video the final polish it needs. If you’ve ever had a video that looked too dark to use, there are ways to fix it aside from taking an entirely new video.
If you’ve ever had a video that looked too dark to use, then you can easily brighten it up using Filmora. Just follow the steps given below:
Step 1
First of all, make sure that you have installed the latest version of Filmora on your computer. If you haven’t already installed it, then you can download it easily from the official website of Wondershare.
Step 2
Upon starting Wondershare Filmora, click the “Import” button. The import media item window will open and show you all the files on your computer. The program will now display a thumbnail of your selected video in its media area. Drag the video from the media library and drop it into the Filmora timeline.

Step 3
You will see the editing interface when you double-click the video in the Timeline. You can switch between the Video, Audio, Color, and Motion tabs from here. You can change how the clip looks with the Rotate, Flip, Scale, and Position settings in the Video tab. When you select the Color tab, you will be presented with the White Balance, Tone, and 3D LUT options.

Step 4
You can increase the brightness of the video by dragging the Brightness slider in the Tone option to the right. Click the spacebar to play the video to see the real-time result. The video will appear brighter as a result of your operation. Repeat the previous step if the video remains dark. You will see a brighter video each time you increase its brightness and contrast.

Step 5
Click “Export” to save the result when you’re satisfied with it. You can export videos in any popular format from the “Format” tab, including AVI, FLV, MKV, MP4, M4V, PSP, 3GP, MOV, and more. The video can be viewed on mobile devices such as an iPhone, iPad, or iPod by clicking “Device” and choosing a device. You can burn DVDs as well as upload videos directly to YouTube and Vimeo.
For Win 7 or later (64-bit)
For macOS 10.12 or later
2. Using Windows Video Editor to brighten a video
Windows video editor is an easy-to-use tool in which you can do basic video editing. This simple tool can easily cut, trim, and merge different video clips. The best thing about windows video editor is that it comes as built-in software in windows ten, so you won’t need to download any additional programs and plugins. Suppose you are just a beginner, and you need to perform basic video editing functions. In that case, you can easily use this app without worrying about purchasing expensive video editing programs. To increase the brightness of a video in the windows video editor, follow the steps given below:
Step 1
Go to the search section of windows 10 present right after the start menu icon and type “video editor.” Click the search icon and then open the video editor app.

Step 2
A new interface will appear on your screen. Just click on the new project button to start a new project. From the project library, click on the add new project button and select the video from your computer that you want to edit.

Step 3
Click on the video icon in the project library and then click on the “add to storyboard” button. It will open all the editing options for the video.

Step 4
From the menu present at the bottom of the screen, click on the filters option, and it will open a lot of filters on your screen. Click on the filters one by one and check which filter brightens your video.

Step 5
Once you have added the filter, click on the done button and export the video by clicking on the finish button. You can also select your desired resolution in which you want to export your video.

Conclusion
● As you can see, it’s very easy to brighten a video on Windows 10. You have many options depending on what you want to do with your videos after editing them. The point is that you no longer need complex video editing software to get the job done because there are many other options available to help you achieve your desired look and feel. We have described two different methods in this article. Give one a try if you feel like your videos could use a brighter touch.
Have you ever had a video with good audio but poor visual quality? Maybe it was a recorded talk, and the presenter was sitting in front of a poorly lit screen, or it might as well be your own home video. There are many reasons why your video could look dark and unappealing. Brightening a video is a great way to remove your editing mistakes and add some artistic flair to your videos. Some editing software has this option built-in, but if you use Windows 10 to edit, it’s hard to find out how to brighten a video in Windows 10 without the help of additional software.
We sometimes know video quality can affect the way content is perceived. That can be particularly frustrating, especially with all the hi-res content online now. Are you in a situation where you need to brighten up a video that has been recorded in low light? If so, look no further. It’s now a breeze to adjust the brightness of your videos on Windows 10. This article will show you how to brighten a video windows 10.
In this article
01 Does Windows 10 have built-in video editing software?
02 3 Simple Methods to Brighten a Video on iPhone
03 Adjust your video brightness and more using Filmora on PC/Mac
Does Windows 10 have built-in video editing software?
The answer is yes. Windows 10 has an easy-to-use video editing app. This is handy for simple home video editing, but it doesn’t work well for professional movie making. Windows Movie Maker was how we edited video in the old days of Windows XP and Vista. Today, Movie Maker is still available on Windows 10, but the new video editor is built-in to the operating system.
You can use it to trim videos or create your own home movies and slideshows. You can even have it create videos automatically by taking photos as you go. Forget about buying expensive editing software. With Windows 10, you have a free video editor built into the operating system where you can trim videos, create home movies, and even create automatic montages. You’ll be surprised at what you can do without ever leaving the Windows 10 Photos app.
Some people say that windows video editor has a very simple interface and it only has very basic features. In this case, having something is more important than not having anything at all. Also, you should keep in mind that not everyone needs a fully-fledged video editor . Some people have to do just basic tasks like trimming a video and increasing the brightness of a video. It is not feasible for them to purchase expensive video editing software for that purpose. So the Windows 10 video editor is the best in this case.
How To Brighten A Video In Windows 10 Easily
This article will discuss two different methods using which you can easily brighten your videos in Windows 10. So, without wasting any more time, let’s get started.
1. Using Filmora to brighten a video in Windows 10
You may think that all video editing software is created equal, but that’s where you’re wrong. The best video editor for your needs is drastically different depending on what you want to do with the end product. Some people want a quick way to make a trailer or showcase their products, and others want to put together an amateur movie.
Filmora is one of the best video editing software for Windows that can improve or fix your dark videos. Filmora is an all-in-one video editor for Windows and Mac. With Filmora, you can easily edit videos and make simple videos with transitions and effects, and you can give any video a professional touch. It’s a great piece of software that works incredibly smoothly. Filmora is an attractive and easy-to-use application that will give your video the final polish it needs. If you’ve ever had a video that looked too dark to use, there are ways to fix it aside from taking an entirely new video.
If you’ve ever had a video that looked too dark to use, then you can easily brighten it up using Filmora. Just follow the steps given below:
Step 1
First of all, make sure that you have installed the latest version of Filmora on your computer. If you haven’t already installed it, then you can download it easily from the official website of Wondershare.
Step 2
Upon starting Wondershare Filmora, click the “Import” button. The import media item window will open and show you all the files on your computer. The program will now display a thumbnail of your selected video in its media area. Drag the video from the media library and drop it into the Filmora timeline.

Step 3
You will see the editing interface when you double-click the video in the Timeline. You can switch between the Video, Audio, Color, and Motion tabs from here. You can change how the clip looks with the Rotate, Flip, Scale, and Position settings in the Video tab. When you select the Color tab, you will be presented with the White Balance, Tone, and 3D LUT options.

Step 4
You can increase the brightness of the video by dragging the Brightness slider in the Tone option to the right. Click the spacebar to play the video to see the real-time result. The video will appear brighter as a result of your operation. Repeat the previous step if the video remains dark. You will see a brighter video each time you increase its brightness and contrast.

Step 5
Click “Export” to save the result when you’re satisfied with it. You can export videos in any popular format from the “Format” tab, including AVI, FLV, MKV, MP4, M4V, PSP, 3GP, MOV, and more. The video can be viewed on mobile devices such as an iPhone, iPad, or iPod by clicking “Device” and choosing a device. You can burn DVDs as well as upload videos directly to YouTube and Vimeo.
For Win 7 or later (64-bit)
For macOS 10.12 or later
2. Using Windows Video Editor to brighten a video
Windows video editor is an easy-to-use tool in which you can do basic video editing. This simple tool can easily cut, trim, and merge different video clips. The best thing about windows video editor is that it comes as built-in software in windows ten, so you won’t need to download any additional programs and plugins. Suppose you are just a beginner, and you need to perform basic video editing functions. In that case, you can easily use this app without worrying about purchasing expensive video editing programs. To increase the brightness of a video in the windows video editor, follow the steps given below:
Step 1
Go to the search section of windows 10 present right after the start menu icon and type “video editor.” Click the search icon and then open the video editor app.

Step 2
A new interface will appear on your screen. Just click on the new project button to start a new project. From the project library, click on the add new project button and select the video from your computer that you want to edit.

Step 3
Click on the video icon in the project library and then click on the “add to storyboard” button. It will open all the editing options for the video.

Step 4
From the menu present at the bottom of the screen, click on the filters option, and it will open a lot of filters on your screen. Click on the filters one by one and check which filter brightens your video.

Step 5
Once you have added the filter, click on the done button and export the video by clicking on the finish button. You can also select your desired resolution in which you want to export your video.

Conclusion
● As you can see, it’s very easy to brighten a video on Windows 10. You have many options depending on what you want to do with your videos after editing them. The point is that you no longer need complex video editing software to get the job done because there are many other options available to help you achieve your desired look and feel. We have described two different methods in this article. Give one a try if you feel like your videos could use a brighter touch.
Also read:
- In This Article, We Will Cover the Stages of Film Production You Need to Keep in Mind.Without Further Ado, Lets Get Started for 2024
- In 2024, AR Is a Trend These Days. Here, You Can Browse the List of Top 10 Picks for AR Video Editing Apps
- New Having Difficulty in Choosing the Most Affordable 3D Slideshow Software? Stay Here for the Best Application Choices of All Times to Create the Most Stunning Slideshows Ever
- New 2024 Approved Create Slow Motion Videos Using Final Cut Pro with Ease
- New In 2024, 15 Camera Shake Preset for Adobe Premiere Pro
- New In 2024, Experience Time Differently with The Top Slow-Motion Applications
- Updated How to Customize Your Loading Text Effect for 2024
- New How to Create Glowing Edge Effect in TikTok Dancing Video
- 2024 Approved 3D Ray Traced Settings In After Effects
- Updated 2024 Approved Reviewing Efectum App and The Best Alternatives for Smartphone Users
- Updated In 2024, Best 7 Color Match Paint Apps
- Updated In 2024, Easy Ways to Change Aspect Ratio in iMovie?
- In 2024, How to Get VHS Filter and Glitch Filter to Your Images or Videos?
- New 2024 Approved How to Make a Smooth Speed Ramping in Premiere Pro?
- New Change Video Speed with FFmpeg
- 2024 Approved Best Method to Split the Video Into Parts Online
- New What Are the 10 Best GIF Creator for 2024
- In 2024, Best 10 Anime Movies for All Time
- Updated In 2024, Discover the Process of Slowing Down Time-Lapse Videos on Your iPhone
- 2024 Approved How to Create a Custom Sequence Preset in Premiere Pro
- There Are Several Video Players that You Can Use to Watch Videos on Your PC. To Have a Better Experience Viewing Videos and Enhancing Them Across a Similar Platform, You Can Try Out VLC Media Player for PC for 2024
- Top List 20 Best LUTs for Music Videos
- New 2024 Approved Voice Changer for Discord | Use Voicemod on Discord
- New Do You Want to Know How to Remove Audio From a Video without a Watermark? Keep Reading This Article Since We Have the Answers for You. Complete with the Guide on How to Do It
- In 2024, Do You Want to Learn How to Use Premiere Pro Distortion Effects in Your Videos? We Have Provided a List of Distortion Premiere Pro Effects and How to Use Them
- New How to Make A Tattoo Disappear Like A Magic
- New 18 Video Editors Weve Tested Heres What We Learned for 2024
- End Your Struggles with Choppy Playback on DaVinci Resolve. Read This Guide to Find Effective Fixes and Reliable DaVinci Resolve Slow Playback Alternatives
- Online Video Makers
- In 2024, Do You Want to Add Voiceovers to Your Video Project? Wondershare Filmora Is an Amazing Tool that Lets You Add Audio Files, Including Voiceovers
- Best Free LUTs To Use in Shotcut
- An Introduction to LUTs | Their Overview and Benefits for 2024
- In 2024, The Complete Guide to Zoho Slides with Ease
- Updated 2024 Approved Easy Guide to Zoom Video in VLC
- New Some Facts That Few People Know on How to Make Transparent Background in Canva for 2024
- 2024 Approved Add Effects to Video Online
- Updated Learn How to Create Your Own Custom Animated Text Intro in the Filmora Video Editor. Follow a Few Simple Steps to Create Something that Looks Incredible
- In 2024, How to Comment on YouTube Live Chat
- Do You Want to Learn How to Film a TikTok with Multiple Clips? Worry No More because You Can Do This by Following the Methods Instructed in This Article
- Are You the One Who Is Confused About What to Opt Between Camtasia vs Captivate? No More Confusion! Here We Are Going to Reveal the Answer to Camtasia vs Captivate Which Is Better? Learn More
- If You Are Into GIFs and Want to Know a Great Extent of Information About It Then We Have Got You Covered in This Article. Here Is What We Have Learned so Far About It
- This Well-Written Article Will Share a Descriptive Method on How to Stream Zoom to YouTube Quickly. By Doing so, You Can Share Your Zoom Session Live with Your YouTube Audience Effortlessly for 2024
- Create Chroma Key Written Text Effects in Filmora
- 2024 Approved 7 Solutions to Cut Video on Mac without Using FFmpeg?
- Updated Ultimate Guide To Make A Political Video
- Unlock Apple ID without Phone Number On Apple iPhone 8 Plus
- Is your Oppo Reno 10 Pro 5G working too slow? Heres how you can hard reset it | Dr.fone
- How to Remove MDM from iPhone 8 Plus without Apple ID?
- The Ultimate Guide to Poco F5 5G Pattern Lock Screen Everything You Need to Know
- Different Methods for Resetting Vivo Y27 4G Phones with Screen Locked and Not | Dr.fone
- 8 Workable Fixes to the SIM not provisioned MM#2 Error on Samsung Galaxy XCover 6 Pro Tactical Edition | Dr.fone
- In 2024, Lock Your Itel A60 Phone in Style The Top 5 Gesture Lock Screen Apps
- A Step-by-Step Guide on Using ADB and Fastboot to Remove FRP Lock on your OnePlus Nord N30 SE
- Bypass iCloud Activation Lock with IMEI Code From your iPhone 8 Plus
- A Step-by-Step Guide to Finding Your Apple ID From Your iPhone 13
- Tips and Tricks for Apple ID Locked Issue From Apple iPhone 6s
- Tutorial to Change Vivo X90S IMEI without Root A Comprehensive Guide
- How To Restore Missing Messages Files from Oppo Reno 11 Pro 5G
- FRP Hijacker by Hagard Download and Bypass your Xiaomi Redmi Note 13 5G FRP Locks
- How to Transfer Text Messages from Nokia C110 to New Phone | Dr.fone
- Fix Apple iPhone 8 Stuck on Data Transfer Verified Solution! | Dr.fone
- How To Change Your Apple ID Password On your Apple iPhone 15 Plus | Dr.fone
- In 2024, Latest Guide How To Bypass Xiaomi Redmi Note 12 4G FRP Without Computer
- How To Change Realme Narzo 60x 5G Lock Screen Password?
- Fixing Persistent Pandora Crashes on Realme V30 | Dr.fone
- How to Unlock Apple ID Activation Lock From iPhone 6s Plus?
- Updated Device/Network/Browser Requirements for 2024
- What Is an AI Avatar for 2024
- In 2024, How to Mirror Vivo Y56 5G to Mac? | Dr.fone
- Best Anti Tracker Software For Realme 10T 5G | Dr.fone
- In 2024, Ways to stop parent tracking your Samsung Galaxy A25 5G | Dr.fone
- How to Transfer Photos from Realme 11 Pro+ to Laptop Without USB | Dr.fone
- In 2024, How does the stardust trade cost In pokemon go On Tecno Pop 8? | Dr.fone
- In 2024, Here are Some of the Best Pokemon Discord Servers to Join On Honor 80 Pro Straight Screen Edition | Dr.fone
- In 2024, How Lava Blaze Pro 5G Mirror Screen to PC? | Dr.fone
- Title: Multi Object Tracking The Ultimate Guide
- Author: Chloe
- Created at : 2024-05-20 03:37:30
- Updated at : 2024-05-21 03:37:30
- Link: https://ai-editing-video.techidaily.com/multi-object-tracking-the-ultimate-guide/
- License: This work is licensed under CC BY-NC-SA 4.0.


