
:max_bytes(150000):strip_icc():format(webp)/GettyImages-104288650-cd3f369f8ead449f94d1a1ce6f55c9de.jpg)
New 10 Best Voice Over Generators Windows, Mac, Android, iPhone, and Online
10 Best Voice Over Generators [Windows, Mac, Android, iPhone, and Online]
Best Voice Generator and Video Editor
Filmora’s Text to Speech (TTS) function allows you to convert your text files to voiceover and bring more elements to enrich your video.
Free Download Free Download Free Download Learn More >

Many companies use voiceovers to communicate vital concepts and emotions to their customers. Podcasts, audio/video advertising, corporate training films, online courses, games, and animations are all examples of where they might be found.
Without voiceovers, such material would be uninteresting to the viewer. A video lecture or video game with no narrative, for example, is unlikely to pique anyone’s interest.
Good voiceovers, on the other hand, are not inexpensive to make.
Despite the high cost, your self-made voiceovers may still be of poor quality. Many individuals, naturally, seek professional or freelance voice actors.
Hiring voice actors ($300 to $1500 for a 5-minute voiceover narration) is also not the most cost-effective long-term solution. Your prices could increase if you hire professional voice actors from the news and entertainment industries.
There are resources available. Voice over generators is available online. Most software products come in both free and premium versions, which you can pick from depending on your needs. These programs will swiftly help you reach your text to audio transformation goals, whether you’re a YouTube content maker in need of an informative voiceover or a disabled person looking for a user-friendly text-to-speech converter.
Yes! That’s correct. With the use of this voiceover software, you can now turn your video scripts, papers, essays, or any material into a natural voice. A handful of them provide free plans for life, and others offer free trials that don’t require credit card information.
Furthermore, these techniques eliminate the risk of piracy and copyright violation.
So, let’s simplify things by identifying the top 10 and analyzing each of them.
- ai (Supports Web)
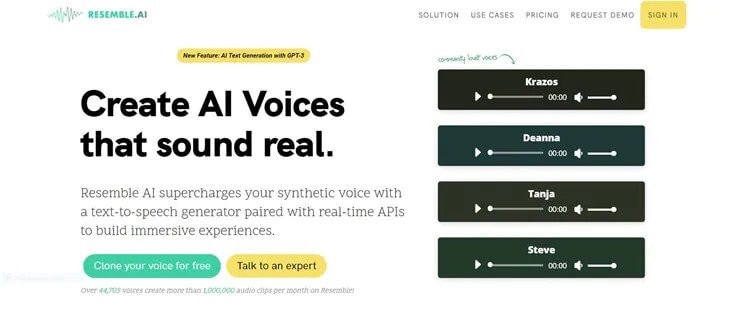
Resemble.ai operates in a variety of ways. It can not only help you make a speech out of the text, but it can also generate text for adverts with a single click. The platform can also produce a personalized voice that you can use as a voice assistant for Alexa, Google, and other services. The technique can also be used by call centres to clone their agents’ voices and customize them.
Resemble gives you four alternative ways to create synthetic voices. You can use the API to generate voices, record up to 50 samples immediately on the online platform, choose from a large number of voice actors, or submit raw audio without a script.
Features
- The software allows you to Customize your brand’s tone.
- It creates responsive IVR agents.
- Possible to do Advertisement text generation with AI with one click.
- Allows Instant language translation.
Cons
- The user interface could be enhanced.
- - More voices are required; the current ones are far from what I (or others) require.
Price
The cheapest package is $30 per month.
For a personalized plan, contact a Resemble representative.
- ai ( Supports Web, Mobile
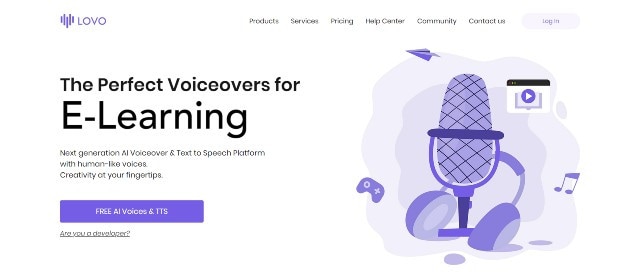
Lovo.ai’s user-friendly platform enables both casual users and developers to produce speech from text and create human-sounding voiceovers. Over 180 voice styles in 33 languages are available on the platform. The site is also regularly updated with new voices every day, giving consumers a wide range of options.
In just 15 minutes, the tool can generate personalized voices. On this platform, converting text to speech requires only three simple steps. Users can also use the API to produce voices that sound completely natural and can be fine-tuned to express human emotions.
Features
- Listening, conversion and sharing are all unlimited.
- A large voice library is available.
- Up to 15000 characters can be converted at once.
- Collection of unique voices. Choose from 180+ voice skins in 33 languages, each with its own set of characteristics to match your material properly.
- Genuine voices. Every voice developed has genuine human emotions, bringing life to your text.
Cons
- While the UI/UX is simple to use, it feels a little bland and dull.”
- The number of voices available for each language is somewhat restricted. More voice samples are available.”
- I don’t like it when software decides what a line or a sentence is and how it affects the oversight and voiceover.”
Pricing
Lovo.ai now offers two pricing options: (all pricing is for annual plans).
$34.99 per month for personal
$99.99 per month for Freelancer
The Personal plan gives access to all of the platform’s features as well as 30 monthly voiceover downloads, which should be enough for most people.
Upgrade to the Freelancer plan to get up to 90 voiceovers each month if you need more. Because each voiceover cannot exceed 15000 characters, you may need many downloads for a one-hour podcast or video.
You will have to pay an additional $69.99 per month per voice for voice cloning. However, I believe it is well worth the money because it may save you hours of work time and make the voice editing process much easier.
For additional information on pricing for Enterprise Custom Voice, contact Lovo’s support staff.
- Synthesia ( Supports Web, Mobile
Synthesia is the fourth stage cheval cheval cheval cheval cheval cheval cheval cheval cheval cheval cheval
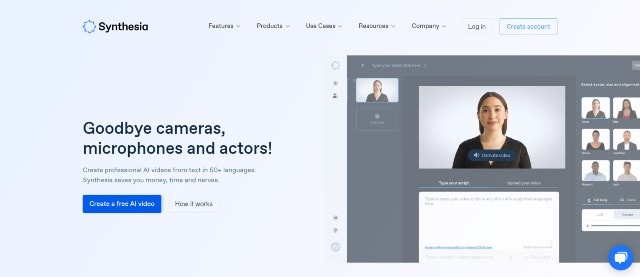
Synthesia stands apart from the rest of the software on this list. It’s a video maker that also has an AI presenter.
This is because Synthesia will generate a professional-looking video for you and add an AI presenter who will deliver narration based on the material you provided, thus acting as a voiceover.
Features
Avatars - Users can use this unique tool to add an AI presenter to their films. There are many pre-built avatars to pick from.
Video with AI Presenter — Once you’ve chosen your avatar, all you have to do now is fill in your script. Synthesia allows you to make videos up to 2.5 hours long.
From text to video For the first time, turn plain words into a professional-looking video.
There are more than 60 languages available. We now support over 60 distinct languages.
There are over 45 AI avatars. Synthesia comes with 40+ avatars right out of the box.
These are Avatars that are unique to you.
Uploads of audio are possible using synthesis.
There is Music available for the background.
Ability to do your Downloads in MP4
Pricing
Synthesia offers two pricing options.
$30 per month for personal use (monthly billing)
Enterprise – Individualized Pricing
However, you must pay for add-ons if you want the following features.
Synthesia API – beginning at $49 per month. Custom Avatar – $1000 one-time.
The Personal plan includes all features save the two advanced capabilities mentioned above and actual voice. As a result, you can make up to 10 minutes of video per month.
Assume you’ve exhausted your video credits. More credits can be purchased for $30 for ten credits. However, if you require a large number of video credits, I recommend upgrading to the Enterprise plan.
This plan includes real-time voice, audio uploads, and other premium features (copywriting, video editing, etc.)
Cons
- Only video producers can use it. If you’re a podcaster, you’ll be disappointed with the tool.
- Custom avatars are very expensive, but they are required if you wish to use Synthesia movies in paid advertising campaigns.
4.Murf.ai ( Supports Web, Mobile)
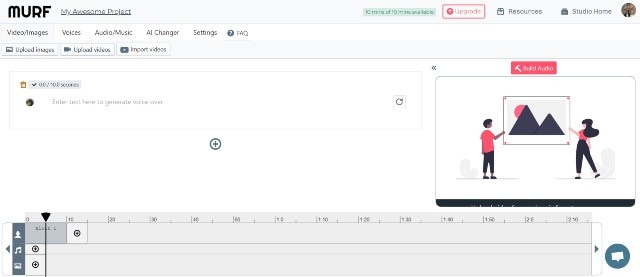
Murf.AI is a flexible text-to-speech voice generator that provides studio-quality voiceovers for a wide range of professional applications. The tool has a large voice library with over 115 distinct voices in 15 languages. Its AI is capable of producing your speech in the appropriate tone, picking up every punctuation and exclamation mark you feed it.
It also has a grammatical assistant, so you can create proofread scripts that will only improve your voiceover work. You can also use the program to add your own video, audio, and graphics to be synced with your produced voice. With its enterprise plan, the tool also has a powerful collaboration capability.
Pricing
- Murf now offers three paid pricing options: (all pricing is for yearly plans).
- Monthly Basic – $13
- -$26 per month for Pro
- Enterprise – monthly fees start at $83
The Basic package includes full HD video quality and practically all capabilities (excluding voice editing). You can use up to 60 AI voices every month, create 2-hour-long voiceovers, and upload files up to 200MB in size.
For most users, I believe this plan is adequate. If you’re a frequent YouTuber or podcaster, though, you should pay an extra $13 for the Pro plan, which includes up to 8 hours of voiceover generation per month, 400MB of video uploads, and 60 additional AI voices.
Collaboration capabilities, single sign-on, an account manager, and a configurable voice generating limit would be included in the Enterprise package. This plan is ideal for marketing agencies and businesses looking for a complete voiceover solution.
Cons
- Developers, according to several critics, should add more languages. Murf has many fewer AI voices in the library than his competitors.
5.Play.ht
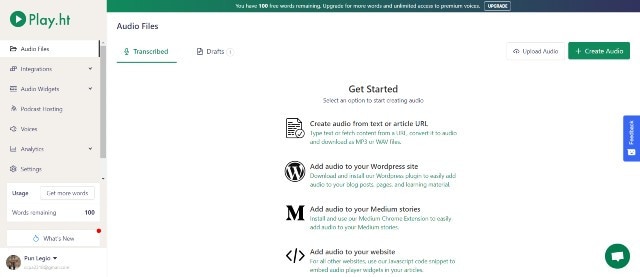
Play. Ht is a web-based voice generator that allows you to generate high-quality text-to-speech. Because of its basic user interface, the platform is exceptionally simple to use. It has a text box on the home page where you may input your text, choose the language, gender, and voice style, and choose the conversion speed.
Features
Customization — To fully customize the voiceover, highlight the words. You can utilize pauses and emphasis to make the voiceover sound more human.
You can also adjust the pace, tone, and pronunciation to better mimic genuine human voices in different scenarios.
Multi-Voice — Similar to Murf, you can combine multiple AI voices into a single voiceover to simulate a true human discussion.
Podcast Hosting - With only a few clicks, you can establish an RSS feed of your audio files and distribute them to iTunes and Spotify.
Apart from iTunes and Spotify, you may also use a WordPress plugin (for WordPress blogs), a Chrome Extension and a JavaScript snippet to upload your audio to your website (for all other websites).
Sounds Analytics - Play. It will gather information on all audio. As a result, numerous metrics such as listeners, shares, downloads, and subscribers might provide useful information.
Pricing
Play. ht has four pricing tiers as of August 2021. (all pricing below is for yearly plans).
$14.25 per month for personal use
$29.25 per month for professionals
$74.25 per month in Growth
$149.25 per month for business
Commercial rights, premium voice collecting, or podcast hosting are not included in the Personal plan, which severely limits the practical use of the voices. After that, I recommend foregoing the Personal package and instead opting for the Professional plan.
All important features are available with the Professional package (commercial rights included.) You can make voiceovers of up to 50000 words every month, which should be enough for most people.
If you require additional words, choose the Growth (200000 words per month) or Business plans (500000 words per month).
Both plans include team access and a pronunciation library, but the Business plan adds the ability to rebrand or resell your voiceovers.
Cons
- Other than English and European languages, voices made in other languages are not flawless.
- There isn’t a built-in video editor for adding voiceovers to videos.
- Clipchamp
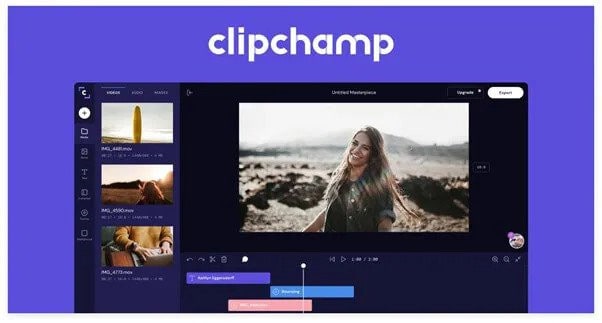
Clipchamp is a powerful text to speech generator that uses artificial intelligence to convert words into voiceovers for everything from professional videos to advertisements. In a matter of seconds, it can convert an imported script into speech.
Because of its simplicity, Clipchamp is another excellent choice for beginners. To generate a preview, simply select your voice, language, and speed before uploading a script. The AI technology in the tool analyzes the script to identify areas that need to be changed.
Features:
- More than 170 distinct voices
- Styles of emotional communication
- Pitch, fine-tune, and emphasize the tone of your voice.
- Simple to operate
Pricing
Clipchamp is available for a monthly fee of $6.0. Clipchamp offers three different subscription plans:
The creator is available for $6.00 per month.
$13.00 per month for a business.
$27.00 per month for Business Platinum.
Clipchamp also offers a limited-featured Free Plan.
Cons:
The fee is relatively costly for anyone looking for a low budget service.
- Balabolka ( Supports Windows)
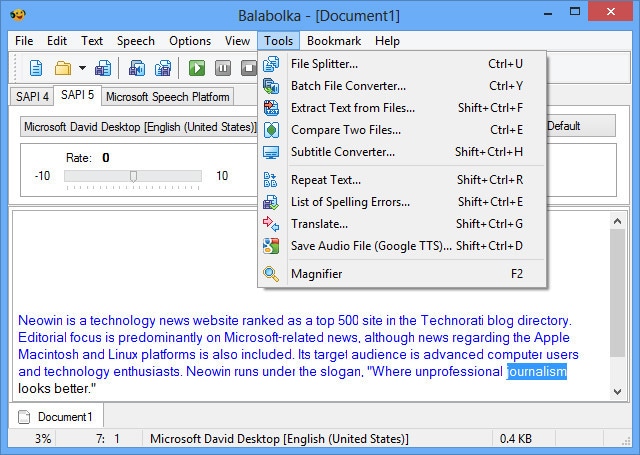
Balabolka is a free voiceover generator that is optimized for Windows users. It can read and write DOC, EPUB, DOCX, PDF, PPT, and RTF files. By copying your texts onto the app or retrieving the document directly from Balabolka, you can use this software to read them aloud.
You can also change the pitch and pace of the voiceover with Balabolka. Microsoft Speech API is used in this program. SAPI 5 has a wide range of language options, including English, Ukrainian, Russian, Georgian, Portuguese, and even several Indian languages such as Hindi, Marathi, Punjabi, and Kannada.
Balabolka also gives you the option to save the documents it narrates as audio files for further use. Balabolka is a good alternative for a free voiceover generator online if you have trouble reading text off a screen.
Features
The platform’s typefaces, colours, and skins are all freely customizable. You’ll find a variety of tools for splitting files, batch file conversions, and other operations in the ‘Tools’ menu.
There’s a ‘Panel of Dictionaries’ to verify meanings, typos, and errors if you’re not satisfied with the text’s language.
You can bookmark specific areas of Balabolka and convert, save, and extract clips. Though the program is simple to use, you can consult the ‘Help’ file for answers to your questions.
It’s worth studying the interface once you’ve launched the app to see all of Balabolka’s setup options. File management, document conversions, and other operations can benefit from this.
Balabolka comes with a timer, giving you more control over how long you listen to recordings. Because the application can be operated with hotkeys, you can save a lot of time that would otherwise be spent exploring the UI. Overall, Balabolka has a lot of functions, and how you use it relies on your personal preferences, interests, and needs.
Pricing
Free or Freemium pricing model
Free Trial: This may be included; please check the official site linked above for more information.
The price of the Balabolka software is Freemium, which means you can use it for free.
Cons
- Needs updates for new languages
8.. MorphVOX Junior ( Supports Mac)
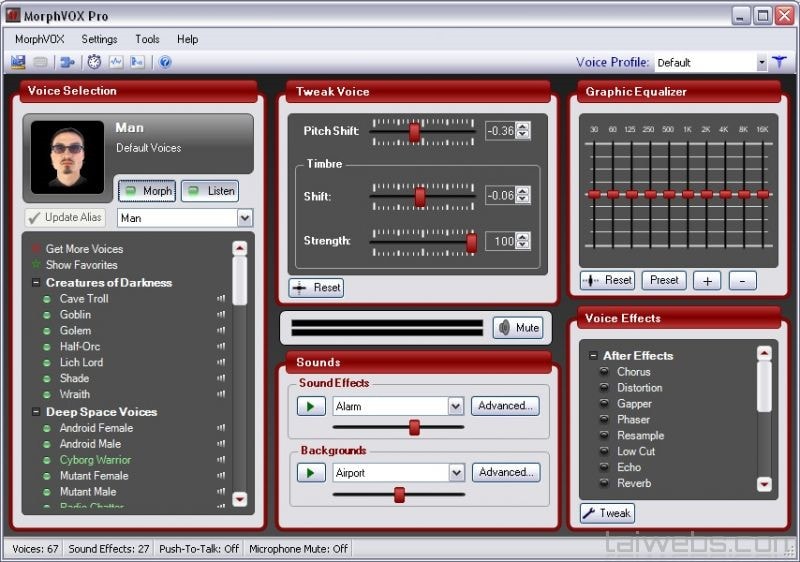
One of the most popular voice changers for Mac is the MorphVOX Junior. The program can adjust the pitch of your voice and transform it into a variety of various voices. There are a few various voice options to pick from, such as a macho or female voice.
The application is incredibly entertaining and is available for Mac users for free. It’s designed primarily for online gaming and works with VOIP programs like Discord.
Features:
- Assists you in recording high-quality audio.
- Background noise should be avoided and adjusted.
- To create a specific ambience, add your own background score.
- Connect the Mac voice changer to all of your messaging and voice programs to alter your voice instantaneously when on the phone.
- It only consumes a small amount of bandwidth and CPU memory.
Pricing
- It’s Free but the
MorphVox Pro 4 starts at $39.99
Cons
- The use of this voice changer is somewhat difficult. Before using it, the user must master its settings.
- It has Limited functionality.
- 9. Voicechanger plus (Supports iPhone)
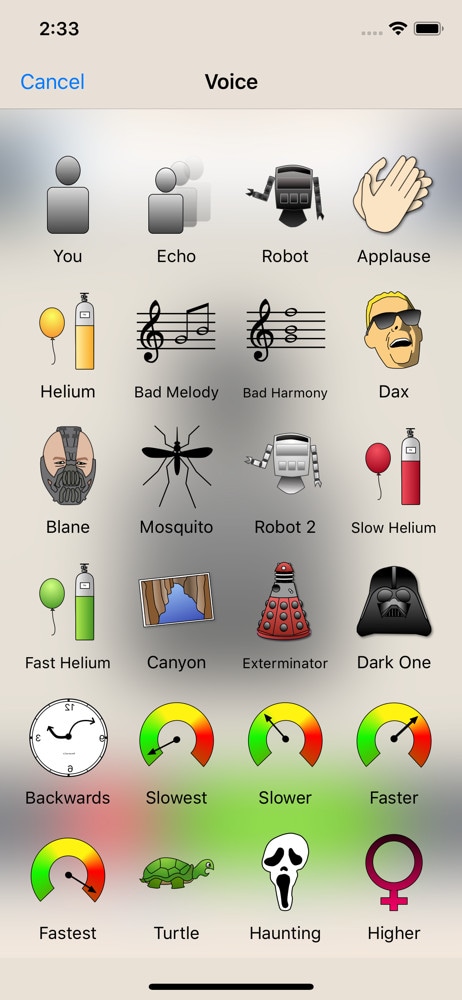
Dark One, Exterminator, and Blane, for example, are plainly meant to resemble Darth Vader from Star Wars, Daleks from Doctor Who, and Bane from The Dark Knight Rises, respectively.
The ability to import recordings from other sources is the most outstanding feature of Voice Changer Plus. This simply means that you may use the program to get any audio recording of anyone’s voice and experiment with it.
Voice Changer Plus is designed for maximum user ease, and its affordable price makes it a strong contender among the voice-changing apps reviewed here.
Features
- Backward playback of recorded audio is possible.
- Basic editing features are available.
- Various editing effects are available.
Pricing
Free but offers in-app purchases.
Cons
- Real-time recording is not possible.
- The free version is ambiguous and filled with advertisements.
- compatibility is low
- 10. Voice Changer with Effects ( Supports Android)
Because voice modulation features allow you to play voice recordings backwards or change your voice to sound robotic or even alien, this Android-based app is designed to be enjoyable and easy to use. Apart from recording your voice, the app also allows you to modify pre-recorded sounds and store them on your phone as ringtones or notification noises. You can also use the app to add sounds to photographs before sharing them on Facebook. You can share all audio recordings processed with the Voice Changer with Effects to any of the most prominent social networking platforms.
Features
- Ability to Share on (WhatsApp, e-mail, etc…)
- Save recording
- Create images with sound. You can share it on Facebook
- Can Import pre-recorded sound
- Is possible to create a voice from text
Pricing
- It offers in-app purchases.
Cons
- Advertisements are present.
- There are no other options for audio or video editing.
Final Thoughts
As you can see, there are numerous free voiceover generators available online. Most software products come in both free and premium versions, which you can pick from depending on your needs. These programs will swiftly help you reach your text to audio transformation goals, whether you’re a YouTube content maker in need of an informative voiceover or a disabled person looking for a user-friendly text-to-speech converter.
Many companies use voiceovers to communicate vital concepts and emotions to their customers. Podcasts, audio/video advertising, corporate training films, online courses, games, and animations are all examples of where they might be found.
Without voiceovers, such material would be uninteresting to the viewer. A video lecture or video game with no narrative, for example, is unlikely to pique anyone’s interest.
Good voiceovers, on the other hand, are not inexpensive to make.
Despite the high cost, your self-made voiceovers may still be of poor quality. Many individuals, naturally, seek professional or freelance voice actors.
Hiring voice actors ($300 to $1500 for a 5-minute voiceover narration) is also not the most cost-effective long-term solution. Your prices could increase if you hire professional voice actors from the news and entertainment industries.
There are resources available. Voice over generators is available online. Most software products come in both free and premium versions, which you can pick from depending on your needs. These programs will swiftly help you reach your text to audio transformation goals, whether you’re a YouTube content maker in need of an informative voiceover or a disabled person looking for a user-friendly text-to-speech converter.
Yes! That’s correct. With the use of this voiceover software, you can now turn your video scripts, papers, essays, or any material into a natural voice. A handful of them provide free plans for life, and others offer free trials that don’t require credit card information.
Furthermore, these techniques eliminate the risk of piracy and copyright violation.
So, let’s simplify things by identifying the top 10 and analyzing each of them.
- ai (Supports Web)
Resemble.ai operates in a variety of ways. It can not only help you make a speech out of the text, but it can also generate text for adverts with a single click. The platform can also produce a personalized voice that you can use as a voice assistant for Alexa, Google, and other services. The technique can also be used by call centres to clone their agents’ voices and customize them.
Resemble gives you four alternative ways to create synthetic voices. You can use the API to generate voices, record up to 50 samples immediately on the online platform, choose from a large number of voice actors, or submit raw audio without a script.
Features
- The software allows you to Customize your brand’s tone.
- It creates responsive IVR agents.
- Possible to do Advertisement text generation with AI with one click.
- Allows Instant language translation.
Cons
- The user interface could be enhanced.
- - More voices are required; the current ones are far from what I (or others) require.
Price
The cheapest package is $30 per month.
For a personalized plan, contact a Resemble representative.
- ai ( Supports Web, Mobile
Lovo.ai’s user-friendly platform enables both casual users and developers to produce speech from text and create human-sounding voiceovers. Over 180 voice styles in 33 languages are available on the platform. The site is also regularly updated with new voices every day, giving consumers a wide range of options.
In just 15 minutes, the tool can generate personalized voices. On this platform, converting text to speech requires only three simple steps. Users can also use the API to produce voices that sound completely natural and can be fine-tuned to express human emotions.
Features
- Listening, conversion and sharing are all unlimited.
- A large voice library is available.
- Up to 15000 characters can be converted at once.
- Collection of unique voices. Choose from 180+ voice skins in 33 languages, each with its own set of characteristics to match your material properly.
- Genuine voices. Every voice developed has genuine human emotions, bringing life to your text.
Cons
- While the UI/UX is simple to use, it feels a little bland and dull.”
- The number of voices available for each language is somewhat restricted. More voice samples are available.”
- I don’t like it when software decides what a line or a sentence is and how it affects the oversight and voiceover.”
Pricing
Lovo.ai now offers two pricing options: (all pricing is for annual plans).
$34.99 per month for personal
$99.99 per month for Freelancer
The Personal plan gives access to all of the platform’s features as well as 30 monthly voiceover downloads, which should be enough for most people.
Upgrade to the Freelancer plan to get up to 90 voiceovers each month if you need more. Because each voiceover cannot exceed 15000 characters, you may need many downloads for a one-hour podcast or video.
You will have to pay an additional $69.99 per month per voice for voice cloning. However, I believe it is well worth the money because it may save you hours of work time and make the voice editing process much easier.
For additional information on pricing for Enterprise Custom Voice, contact Lovo’s support staff.
- Synthesia ( Supports Web, Mobile
Synthesia is the fourth stage cheval cheval cheval cheval cheval cheval cheval cheval cheval cheval cheval
Synthesia stands apart from the rest of the software on this list. It’s a video maker that also has an AI presenter.
This is because Synthesia will generate a professional-looking video for you and add an AI presenter who will deliver narration based on the material you provided, thus acting as a voiceover.
Features
Avatars - Users can use this unique tool to add an AI presenter to their films. There are many pre-built avatars to pick from.
Video with AI Presenter — Once you’ve chosen your avatar, all you have to do now is fill in your script. Synthesia allows you to make videos up to 2.5 hours long.
From text to video For the first time, turn plain words into a professional-looking video.
There are more than 60 languages available. We now support over 60 distinct languages.
There are over 45 AI avatars. Synthesia comes with 40+ avatars right out of the box.
These are Avatars that are unique to you.
Uploads of audio are possible using synthesis.
There is Music available for the background.
Ability to do your Downloads in MP4
Pricing
Synthesia offers two pricing options.
$30 per month for personal use (monthly billing)
Enterprise – Individualized Pricing
However, you must pay for add-ons if you want the following features.
Synthesia API – beginning at $49 per month. Custom Avatar – $1000 one-time.
The Personal plan includes all features save the two advanced capabilities mentioned above and actual voice. As a result, you can make up to 10 minutes of video per month.
Assume you’ve exhausted your video credits. More credits can be purchased for $30 for ten credits. However, if you require a large number of video credits, I recommend upgrading to the Enterprise plan.
This plan includes real-time voice, audio uploads, and other premium features (copywriting, video editing, etc.)
Cons
- Only video producers can use it. If you’re a podcaster, you’ll be disappointed with the tool.
- Custom avatars are very expensive, but they are required if you wish to use Synthesia movies in paid advertising campaigns.
4.Murf.ai ( Supports Web, Mobile)
Murf.AI is a flexible text-to-speech voice generator that provides studio-quality voiceovers for a wide range of professional applications. The tool has a large voice library with over 115 distinct voices in 15 languages. Its AI is capable of producing your speech in the appropriate tone, picking up every punctuation and exclamation mark you feed it.
It also has a grammatical assistant, so you can create proofread scripts that will only improve your voiceover work. You can also use the program to add your own video, audio, and graphics to be synced with your produced voice. With its enterprise plan, the tool also has a powerful collaboration capability.
Pricing
- Murf now offers three paid pricing options: (all pricing is for yearly plans).
- Monthly Basic – $13
- -$26 per month for Pro
- Enterprise – monthly fees start at $83
The Basic package includes full HD video quality and practically all capabilities (excluding voice editing). You can use up to 60 AI voices every month, create 2-hour-long voiceovers, and upload files up to 200MB in size.
For most users, I believe this plan is adequate. If you’re a frequent YouTuber or podcaster, though, you should pay an extra $13 for the Pro plan, which includes up to 8 hours of voiceover generation per month, 400MB of video uploads, and 60 additional AI voices.
Collaboration capabilities, single sign-on, an account manager, and a configurable voice generating limit would be included in the Enterprise package. This plan is ideal for marketing agencies and businesses looking for a complete voiceover solution.
Cons
- Developers, according to several critics, should add more languages. Murf has many fewer AI voices in the library than his competitors.
5.Play.ht
Play. Ht is a web-based voice generator that allows you to generate high-quality text-to-speech. Because of its basic user interface, the platform is exceptionally simple to use. It has a text box on the home page where you may input your text, choose the language, gender, and voice style, and choose the conversion speed.
Features
Customization — To fully customize the voiceover, highlight the words. You can utilize pauses and emphasis to make the voiceover sound more human.
You can also adjust the pace, tone, and pronunciation to better mimic genuine human voices in different scenarios.
Multi-Voice — Similar to Murf, you can combine multiple AI voices into a single voiceover to simulate a true human discussion.
Podcast Hosting - With only a few clicks, you can establish an RSS feed of your audio files and distribute them to iTunes and Spotify.
Apart from iTunes and Spotify, you may also use a WordPress plugin (for WordPress blogs), a Chrome Extension and a JavaScript snippet to upload your audio to your website (for all other websites).
Sounds Analytics - Play. It will gather information on all audio. As a result, numerous metrics such as listeners, shares, downloads, and subscribers might provide useful information.
Pricing
Play. ht has four pricing tiers as of August 2021. (all pricing below is for yearly plans).
$14.25 per month for personal use
$29.25 per month for professionals
$74.25 per month in Growth
$149.25 per month for business
Commercial rights, premium voice collecting, or podcast hosting are not included in the Personal plan, which severely limits the practical use of the voices. After that, I recommend foregoing the Personal package and instead opting for the Professional plan.
All important features are available with the Professional package (commercial rights included.) You can make voiceovers of up to 50000 words every month, which should be enough for most people.
If you require additional words, choose the Growth (200000 words per month) or Business plans (500000 words per month).
Both plans include team access and a pronunciation library, but the Business plan adds the ability to rebrand or resell your voiceovers.
Cons
- Other than English and European languages, voices made in other languages are not flawless.
- There isn’t a built-in video editor for adding voiceovers to videos.
- Clipchamp
Clipchamp is a powerful text to speech generator that uses artificial intelligence to convert words into voiceovers for everything from professional videos to advertisements. In a matter of seconds, it can convert an imported script into speech.
Because of its simplicity, Clipchamp is another excellent choice for beginners. To generate a preview, simply select your voice, language, and speed before uploading a script. The AI technology in the tool analyzes the script to identify areas that need to be changed.
Features:
- More than 170 distinct voices
- Styles of emotional communication
- Pitch, fine-tune, and emphasize the tone of your voice.
- Simple to operate
Pricing
Clipchamp is available for a monthly fee of $6.0. Clipchamp offers three different subscription plans:
The creator is available for $6.00 per month.
$13.00 per month for a business.
$27.00 per month for Business Platinum.
Clipchamp also offers a limited-featured Free Plan.
Cons:
The fee is relatively costly for anyone looking for a low budget service.
- Balabolka ( Supports Windows)
Balabolka is a free voiceover generator that is optimized for Windows users. It can read and write DOC, EPUB, DOCX, PDF, PPT, and RTF files. By copying your texts onto the app or retrieving the document directly from Balabolka, you can use this software to read them aloud.
You can also change the pitch and pace of the voiceover with Balabolka. Microsoft Speech API is used in this program. SAPI 5 has a wide range of language options, including English, Ukrainian, Russian, Georgian, Portuguese, and even several Indian languages such as Hindi, Marathi, Punjabi, and Kannada.
Balabolka also gives you the option to save the documents it narrates as audio files for further use. Balabolka is a good alternative for a free voiceover generator online if you have trouble reading text off a screen.
Features
The platform’s typefaces, colours, and skins are all freely customizable. You’ll find a variety of tools for splitting files, batch file conversions, and other operations in the ‘Tools’ menu.
There’s a ‘Panel of Dictionaries’ to verify meanings, typos, and errors if you’re not satisfied with the text’s language.
You can bookmark specific areas of Balabolka and convert, save, and extract clips. Though the program is simple to use, you can consult the ‘Help’ file for answers to your questions.
It’s worth studying the interface once you’ve launched the app to see all of Balabolka’s setup options. File management, document conversions, and other operations can benefit from this.
Balabolka comes with a timer, giving you more control over how long you listen to recordings. Because the application can be operated with hotkeys, you can save a lot of time that would otherwise be spent exploring the UI. Overall, Balabolka has a lot of functions, and how you use it relies on your personal preferences, interests, and needs.
Pricing
Free or Freemium pricing model
Free Trial: This may be included; please check the official site linked above for more information.
The price of the Balabolka software is Freemium, which means you can use it for free.
Cons
- Needs updates for new languages
8.. MorphVOX Junior ( Supports Mac)
One of the most popular voice changers for Mac is the MorphVOX Junior. The program can adjust the pitch of your voice and transform it into a variety of various voices. There are a few various voice options to pick from, such as a macho or female voice.
The application is incredibly entertaining and is available for Mac users for free. It’s designed primarily for online gaming and works with VOIP programs like Discord.
Features:
- Assists you in recording high-quality audio.
- Background noise should be avoided and adjusted.
- To create a specific ambience, add your own background score.
- Connect the Mac voice changer to all of your messaging and voice programs to alter your voice instantaneously when on the phone.
- It only consumes a small amount of bandwidth and CPU memory.
Pricing
- It’s Free but the
MorphVox Pro 4 starts at $39.99
Cons
- The use of this voice changer is somewhat difficult. Before using it, the user must master its settings.
- It has Limited functionality.
- 9. Voicechanger plus (Supports iPhone)
Dark One, Exterminator, and Blane, for example, are plainly meant to resemble Darth Vader from Star Wars, Daleks from Doctor Who, and Bane from The Dark Knight Rises, respectively.
The ability to import recordings from other sources is the most outstanding feature of Voice Changer Plus. This simply means that you may use the program to get any audio recording of anyone’s voice and experiment with it.
Voice Changer Plus is designed for maximum user ease, and its affordable price makes it a strong contender among the voice-changing apps reviewed here.
Features
- Backward playback of recorded audio is possible.
- Basic editing features are available.
- Various editing effects are available.
Pricing
Free but offers in-app purchases.
Cons
- Real-time recording is not possible.
- The free version is ambiguous and filled with advertisements.
- compatibility is low
- 10. Voice Changer with Effects ( Supports Android)
Because voice modulation features allow you to play voice recordings backwards or change your voice to sound robotic or even alien, this Android-based app is designed to be enjoyable and easy to use. Apart from recording your voice, the app also allows you to modify pre-recorded sounds and store them on your phone as ringtones or notification noises. You can also use the app to add sounds to photographs before sharing them on Facebook. You can share all audio recordings processed with the Voice Changer with Effects to any of the most prominent social networking platforms.
Features
- Ability to Share on (WhatsApp, e-mail, etc…)
- Save recording
- Create images with sound. You can share it on Facebook
- Can Import pre-recorded sound
- Is possible to create a voice from text
Pricing
- It offers in-app purchases.
Cons
- Advertisements are present.
- There are no other options for audio or video editing.
Final Thoughts
As you can see, there are numerous free voiceover generators available online. Most software products come in both free and premium versions, which you can pick from depending on your needs. These programs will swiftly help you reach your text to audio transformation goals, whether you’re a YouTube content maker in need of an informative voiceover or a disabled person looking for a user-friendly text-to-speech converter.
How to Change Video Thumbnail in Google Drive
What is a Google drive?
“Google drive is a self-hosted cloud-based site that provides free space to store your files and pictures to share them with your friends and family”.
Google Drive is also used to promote businesses or websites. You can upload a video to Google Drive and embed the file in your blog or any other website.
What is a Thumbnail?
“A Thumbnail is a still image that acts as
a preview image of your video.”
A thumbnail is the first thing seen by the viewers while watching videos. It is the only thing that forces the viewer either to watch the video or not because it previews the video content. It is also shown in the search results. A thumbnail is just like the cover or title of a book. You will read a book by its cover. In the same way, a video is viewed by its thumbnail.
Google drive is also used for the promotion of websites and businesses. It does not offer to add a thumbnail or cover image like YouTube has the option to set and can change the thumbnail of the video. As we all know Google drive is not a streaming platform and has its own boundaries.
Normally, the google drive can generate a thumbnail from the video and uses the generated thumbnail ignoring the one you have uploaded. But on the other hand, if it cannot generate a thumbnail the uploaded thumbnail will be displayed. Usually, the default thumbnail may have weird facial expressions or may not be attractive for the viewers to open the video.
Here we are discussing a few alternatives to change the thumbnail of the video in Google drive.
Select a separate image to be housed in a separate column to set as a thumbnail image and then go into the details, title, and Image settings.

How to Add Thumbnails to the Video Using Wonder Share Filmora 11
Wonder Share Filmora 11 is an all-in-one video editing platform that provides powerful, creative, and simple interphase to edit videos and images in a few clicks. It has a ton of amazing features that make your videos, images, and audio stands out. You can edit your videos and images in a great cinematic form using its effects, transitions, overlays, text, and a lot more. Do not wait, go and download Filmora 11 and there are more tools for you to discover.
I am going to show you how to create a thumbnail of the video in Filmora11.
Let us get started!
- Open Wonder Share Filmora 11 and click on New Project.

- Drag the image of your choice into the timeline.

- Drag the image of your choice into the timeline.
- Click on the AI-Portrait option from the Effects
- Drag the Human Segmentation effect over the clip into the timeline.
Now you see that the subject of the video thumbnail is selected and the background has been removed.
The AI-Portrait is a very useful effect, it allows you to quickly remove the background through artificial intelligence.

Now you can see the subject has been selected and the background has been removed.
- Now Scale up the photo to be visible on the screen.
- You can set the border settings here to make it more smooth and attractive.

I have dragged my image to the left as I want my text to the right side.
- Let’s drag the desired background into the timeline. ( I got this background from Pexel.com)

- Click on sample colors under the media option to add the gradient overlay.
- Drag your favorite Gradient and drop it below the background layer.

- Now select the Overlay option under the Effects tab and then Hit Frames.
- Add your desired frame between a photo layer and a background layer to show depth in your thumbnail.

So, I choose cinema 21.9 frames to add two black bars behind our subject.
Let’s choose your desired Title from the Library. Here are tons of title packs, you can choose from.
- Select the Titles option under the Titles tab then select your desired Title.
- Drag and locate the title in the place of your taste and then write the text you want.
- Adjust your text accordingly, you can change the font size, color, style, and much more

- Now simply click the snapshot button below the preview screen and the snapshot will be saved in default directory and automatically imported to the medium room.
- Right-click on the snapshot in the media pool and click on Reveal in explorer.
- Your thumbnail will be saved in the folder, you can upload it on the Google drive.

Unfortunately, there is no way to change the thumbnail of the video on Google drive. But we can take help from other websites to customize the thumbnail image and then upload it to Google drive. Let us discuss a few free websites used for the thumbnail of a video on Google drive.
Here are the best possible ways to change the thumbnail of the video stored in the Google drive.
1. Change the Thumbnails of Google drive using the Wix.
The Wix editor is a platform that is used to edit and make your own website. It provides easy interphase to customize the site using its amazing features. There are hundreds of features to build your own site or image by adding customizing elements and choosing color and text theme.

You can use the Wix to set or change your thumbnail to make your video attractive and eye-catching. The cover image can be by uploading and a frame can be selected from the video.
Let’s get started!
- Open the Wix editor from the browser.
- Select a video from your video library.
- Hit the Edit icon at the video

- Click on change cover under the cover image.

- Select the desired frame from the list, or you can upload your own by clicking the “+”
- Click on the Set as Cover

- Now upload the video on Google drive.

- If the file fails to upload, clear your cache and cookies and check your internet connection.
2. Change the Thumbnails of Google drive using Canvas.
Canvas is an online graphic design platform that allows and provides you with user-friendly interphase to make eye-catching logos, thumbnails, posters, and a ton of other visual content. You need not download any application and moreover, it is free to use. It saves your previous tasks and has hundreds of frames, and designs to select according to your taste or you can make your own design by editing.
So let’s start!
- Select a template of your choice from the library.
- Canvas provides you with more than 2 million images in the library but you can also upload your own image for Thumbnail.
- Click on the placeholder text to write your own text.
- You can change your image fonts, color, size, and
- You can easily customize your video thumbnail and upload it on Google drive.
- Download the video thumbnail.
- Now upload the Thumbnail on Google Drive.

3. Change the Thumbnails of Google drive using VLC Media Player.
VLC Media Player is a free and open-source media player that plays wide range of media files like images, video files as well as audio and DVDs. It is 100% free software and safe from viruses.

Here are the steps used to change the cover photo of your video using the VLC Media Player.
Let’s dive in…
- Go to the tools and select information from the drop-down list.
- The Current Media Information tab will be shown.
- There will be a picture or VLC icon at the bottom-right corner.
- Right-click on that picture or icon and select the download cover art or add cover art from file.
- Download cover art; if you want to add pictures from the album from the internet.
- Add cover art from file; if you want to put your own thumbnail image and browse from the storage.

The information will be saved automatically and the thumbnail will be changed when you open the file.
Important points.
You can use any other video editor to change the thumbnail of the video but keep a few points in mind.
- Thumbnails should be added at the start of the video.
- The Thumbnail should be a few seconds long so that google drive considers it as a cover image.
- It works for short videos but it can be applied for long videos.
- Use a high-quality HD image for the thumbnail so that Google Drive can accept it as valuable for the thumbnail image.
- Thumbnails should be uploaded in PNG, GIF, or JPG
- The image ratio should be 16:9 and resolution of 1920x1080 pixels for PNG and JPG and 960x480 pixels for GIFs.
- The maximum file size should be
- The minimum width should be 220 pixels.

Even after keeping an eye on these important points, google drive sometimes does not show the thumbnail as a cover photo.
Conclusion.
In the above article, I have discussed a couple of different ways to add a thumbnail of the video and upload it on Google drive. I personally recommend Wonder Share Filmora 11 to make and change thumbnail image of the video as it is a very powerful as well as simple tool.
How to Add Thumbnails to the Video Using Wonder Share Filmora 11
Wonder Share Filmora 11 is an all-in-one video editing platform that provides powerful, creative, and simple interphase to edit videos and images in a few clicks. It has a ton of amazing features that make your videos, images, and audio stands out. You can edit your videos and images in a great cinematic form using its effects, transitions, overlays, text, and a lot more. Do not wait, go and download Filmora 11 and there are more tools for you to discover.
I am going to show you how to create a thumbnail of the video in Filmora11.
Let us get started!
- Open Wonder Share Filmora 11 and click on New Project.
- Drag the image of your choice into the timeline.
- Drag the image of your choice into the timeline.
- Click on the AI-Portrait option from the Effects
- Drag the Human Segmentation effect over the clip into the timeline.
Now you see that the subject of the video thumbnail is selected and the background has been removed.
The AI-Portrait is a very useful effect, it allows you to quickly remove the background through artificial intelligence.
Now you can see the subject has been selected and the background has been removed.
- Now Scale up the photo to be visible on the screen.
- You can set the border settings here to make it more smooth and attractive.
I have dragged my image to the left as I want my text to the right side.
- Let’s drag the desired background into the timeline. ( I got this background from Pexel.com)
- Click on sample colors under the media option to add the gradient overlay.
- Drag your favorite Gradient and drop it below the background layer.
- Now select the Overlay option under the Effects tab and then Hit Frames.
- Add your desired frame between a photo layer and a background layer to show depth in your thumbnail.
So, I choose cinema 21.9 frames to add two black bars behind our subject.
Let’s choose your desired Title from the Library. Here are tons of title packs, you can choose from.
- Select the Titles option under the Titles tab then select your desired Title.
- Drag and locate the title in the place of your taste and then write the text you want.
- Adjust your text accordingly, you can change the font size, color, style, and much more
- Now simply click the snapshot button below the preview screen and the snapshot will be saved in default directory and automatically imported to the medium room.
- Right-click on the snapshot in the media pool and click on Reveal in explorer.
- Your thumbnail will be saved in the folder, you can upload it on the Google drive.
Unfortunately, there is no way to change the thumbnail of the video on Google drive. But we can take help from other websites to customize the thumbnail image and then upload it to Google drive. Let us discuss a few free websites used for the thumbnail of a video on Google drive.
Here are the best possible ways to change the thumbnail of the video stored in the Google drive.
1. Change the Thumbnails of Google drive using the Wix.
The Wix editor is a platform that is used to edit and make your own website. It provides easy interphase to customize the site using its amazing features. There are hundreds of features to build your own site or image by adding customizing elements and choosing color and text theme.
You can use the Wix to set or change your thumbnail to make your video attractive and eye-catching. The cover image can be by uploading and a frame can be selected from the video.
Let’s get started!
- Open the Wix editor from the browser.
- Select a video from your video library.
- Hit the Edit icon at the video
- Click on change cover under the cover image.
- Select the desired frame from the list, or you can upload your own by clicking the “+”
- Click on the Set as Cover
- Now upload the video on Google drive.
- If the file fails to upload, clear your cache and cookies and check your internet connection.
2. Change the Thumbnails of Google drive using Canvas.
Canvas is an online graphic design platform that allows and provides you with user-friendly interphase to make eye-catching logos, thumbnails, posters, and a ton of other visual content. You need not download any application and moreover, it is free to use. It saves your previous tasks and has hundreds of frames, and designs to select according to your taste or you can make your own design by editing.
So let’s start!
- Select a template of your choice from the library.
- Canvas provides you with more than 2 million images in the library but you can also upload your own image for Thumbnail.
- Click on the placeholder text to write your own text.
- You can change your image fonts, color, size, and
- You can easily customize your video thumbnail and upload it on Google drive.
- Download the video thumbnail.
- Now upload the Thumbnail on Google Drive.
3. Change the Thumbnails of Google drive using VLC Media Player.
VLC Media Player is a free and open-source media player that plays wide range of media files like images, video files as well as audio and DVDs. It is 100% free software and safe from viruses.
Here are the steps used to change the cover photo of your video using the VLC Media Player.
Let’s dive in…
- Go to the tools and select information from the drop-down list.
- The Current Media Information tab will be shown.
- There will be a picture or VLC icon at the bottom-right corner.
- Right-click on that picture or icon and select the download cover art or add cover art from file.
- Download cover art; if you want to add pictures from the album from the internet.
- Add cover art from file; if you want to put your own thumbnail image and browse from the storage.
The information will be saved automatically and the thumbnail will be changed when you open the file.
Important points.
You can use any other video editor to change the thumbnail of the video but keep a few points in mind.
- Thumbnails should be added at the start of the video.
- The Thumbnail should be a few seconds long so that google drive considers it as a cover image.
- It works for short videos but it can be applied for long videos.
- Use a high-quality HD image for the thumbnail so that Google Drive can accept it as valuable for the thumbnail image.
- Thumbnails should be uploaded in PNG, GIF, or JPG
- The image ratio should be 16:9 and resolution of 1920x1080 pixels for PNG and JPG and 960x480 pixels for GIFs.
- The maximum file size should be
- The minimum width should be 220 pixels.
Even after keeping an eye on these important points, google drive sometimes does not show the thumbnail as a cover photo.
Conclusion.
In the above article, I have discussed a couple of different ways to add a thumbnail of the video and upload it on Google drive. I personally recommend Wonder Share Filmora 11 to make and change thumbnail image of the video as it is a very powerful as well as simple tool.
Camtasia Vs Captivate Which Is Better
Being a video editor, it’s critical to keep ahead of the curve in our fast-changing global world. From small enterprises to major corporations, eLearning applications have shown to be a significant tool for cutting expenses and increasing profits. Software like Camtasia and Captivate are in high demand as e-learning becomes a more vital aspect of our life. When it comes to creating a course or video instruction, these two applications are quite quick and useful. Whether you should choose a Camtasia or a Captivate relies entirely on your industry and what you want to accomplish with this application.
Often times between Camtasia vs Captivate, the question arises: “Which software is superior?” As a result, we’ve compared Camtasia and Captivate based on the software packages themselves, as well as some important features, similarities, and differences. Software stimulation, production, demonstration screencasts, and translation of PowerPoint presentations into various formats are all possible using TechSmith Camtasia and Adobe Captivate. Camtasia offers fewer online learning alternatives, but it boasts incredible screen and video capture, as well as video editing facilities. This application allows you to alter the sound and visual characteristics manually. Video artists may improve video quality by using auxiliary microphones and cameras. The editing of the video is Camtasia’s most impressive function. It allows you to cut and paste films, add transitions and subtitles to them, as well as do color grading and color correction.
Part 1. Overall Comparison
Each piece of software may be used to create eLearning and lesson material. Despite the fact that Adobe Captivate offers amazing transitional features and visual effect tools, it does not include video editing, which is, in my view, the backbone of developing eLearning material that adheres to the learning management system. As a result, Adobe Captivate needs the use of Adobe Premiere to edit and correct any problems in your films. Adobe Captivate, on the other hand, is the greatest alternative for developing quality eLearning and lesson software material. It’s an excellent tool for developing online courses and tutorials. However, as previously said, Adobe Captivate is not simple to use and is not recommended for novices. Camtasia, on the other hand, seems to be the most economical and practical alternative for you based on your abilities if you are an entry-level editor and want to master the fundamentals of video editing and lesson production on your own.
Attributes360-degree Learning Experience
| | Camtasia | Adobe Captivate | |
| ——————- | ———————————————————————- | ———————————————————————- |
| Ease of Use | Easy and simple User Interface | User-friendly and simple gestures for adding and creating |
| Requirement | Camtasia supports a dual-core processor with a clock speed of 2.0GHz. | A 1.0GHz CPU can run Captivate. |
| Special Feature | Annotations for Multi-Track Timelines Learning in all directions | |
| Support system | Camtasia is only compatible with 64-bit operating systems. | Captivate is compatible with both 32-bit and 64-bit operating systems. |
| Price | Camtasia costs $249 | Captivate comes for $34/month. |
| Best for | Best for professional video editing and production | It’s great for transferring and watching videos. |
| Value For Money | Value for Money is a bit high | It provides both monthly and one-time subscription options. |
| Recording | Camtasia features a function that allows you to record screens. | Captivate has a clever function that enables you to capture videos. |
| Overall Rating | Less than Adobe Captivate in terms of overall rating and user reviews. | Higher Rating and user feedbacks. |
Part 2. Camtasia Software Review
Camtasia by TechSmith is a straightforward video editing and screen recording application. Camtasia was created with novices in mind, allowing designers to quickly and easily make excellent instructional films. Both Windows and MacOS are supported. Camtasia is one of the most popular video editing applications on the market. Camtasia is available for both Windows and iOS. Camtasia is simple to use and supports a wide range of media formats. This software package has several features and controls. On the same platform, you can capture screens and edit movies with Camtasia. The benefits don’t stop there; you can also share your work with others through YouTube and Google Drive.

Pros:
- Camtasia is designed for video-editing novices, with a simple setup and user interface.
- The screen capture capability is fantastic. Not only is the resolution excellent, but it is also simple to operate.
- Camtasia’s built-in effects are, on the whole, minimal. Their cursor effects, on the other hand, are spectacular.
- You may use Camtasia to add interactive quizzes to your videos.
- Camtasia provides many of the fundamentals you’ll need if you’re short on time and need to search assets straight immediately.
- TechSmith is a free app for iOS and Android that allows you to make screen recordings from your smartphone or tablet.
- TechSmith offers an excellent customer service department.
Cons:
- Crashing and bugs very often
- Many instructions are missing, despite the fact that they have restricted keyboard controls.
- Camtasia is designed for novices; therefore, it does not allow for much modification.
- Camtasia makes it tough to move and animate things.
- Camtasia video encoding and exporting difficulties have been reported by certain users.
Part 3. Adobe Captivate Review
Captivate is an Adobe tool designed to make online learning more engaging and interactive. Students save time since they can take their classes with them. Captivate has no built-in video editing tools. To do so, you’ll need to use additional Adobe applications. Captivate allows students to study at any time and from any location. However, if you’re the one creating the course, Adobe Captivate could be a little frightening since it requires Adobe experience to utilize.

Pros:
- It’s quite simple to use! Each frame may be easily shortened or lengthened.
- It’s simple to record motions onscreen, and it comes with a range of choices for recording various things (the application smooths down mouse movements).
- When the user is through shooting, the video is divided into multiple frames to make editing easy.
- A built-in editor enables users to manipulate audio by cutting, pasting, altering levels, and adding silences.
- Captivate can capture what’s occurring onscreen and provide step-by-step subtitles for popular menu actions automatically.
- Captivate has some fantastic interactive elements. Tutorials may be created so that users can follow along with pre-recorded comments on the screen.
- Adding audio or importing from another source is simple.
Cons:
- The sound’s bit rate was automatically reduced, making it seem more robotic and muffled.
- It might take a long time to preview and save works-in-progress.
- The finished flash flicks are fairly big.
Part 4. Alternative Way to Edit Videos [The Best Method]
Wondershare Filmora is a robust screen capture tool that allows you to manually alter all video and audio parameters, as well as edit your recordings in the software’s video editor. By tweaking a few basic parameters and exporting your eLearning material in MP4, MOV, or GIF file formats, you may make PIP movies. Filmora is a less expensive alternative to Camtasia 9 or Adobe Captivate for creating high-quality screen recordings. Filmora has the resources to make it possible. It’s both sound and video editing software that comes with a lot of instructions and activities to help you handle the fundamentals and create excellent recordings.
For Win 7 or later (64-bit)
For macOS 10.12 or later
This video editorial manager for PC and Mac comes with a natural point of connection that makes it simple to use for both new and experienced users. Because it is a freemium instrument, the free version will allow you to examine all of the components, albeit the final video will include a watermark. Change over, chop, change the examining rate, add effects, and that’s only the beginning of what you can do with your digital recording on the app’s schedule. Wondershare Filmora is simple to use and maintains the best sound and video toolkit. It’s best suited for novice and intermediate users since it allows you to create professional recordings in seconds and supports all of the popular designs.
Steps to Edit Video using Filmora
Step 1: Download and install Filmora Toolkit.
To begin using Filmora for editing, go to the official website and download the most current version of Wondershare Filmora. Launch the software when the download is complete and click the New Project button to see the product’s underlying window interface.

Step 2: Remove Any Unnecessary Background Sounds
Filmora Audio Editor, in addition to the video editor, allowing you to enhance the sound of your video. If your voice-over has any background noise, you may simply eliminate it from the whole clip or a segment of the video where the sound is inappropriate. In Filmora, you may also add your favourite ones to the videos by importing the files and adding them to the timeline. You may also isolate the audio from your video clips and chop or sync it with the video using the timeline of this video editor.

Step 3: Perform Professional Video Editing
Right-click the video and choose edit from the menu. Then, by hitting the proper effects buttons, you may rotate the movie. You may also swivel 90 degrees anticlockwise/clockwise, flip level, or go vertical, depending on your requirements. Then, in that instance. You can also add a variety of video effects, and the greatest part is that you can use others from the standard library as well, allowing you to put it with greater adjustment. The Editor in Filmora allows you to add Animated Titles, amazing effects, Audio Enhancements, and more to your recorded video.

Step 4: Enhance Audio Quality
The Wondershare Filmora Audio Editor allows you to change the volume, add fade-in and fade-out effects, and silence audio in certain parts of the video. All of the options are easily accessible on the right side of the software interface when you click on the audio component of the movie in Wondershare Filmora’s timeline. You may check the audio sound within the application to see whether it’s in sync with your recorded video clip once you’ve made any necessary edits to your audio.
Step 5: Download/Share the video
Click “Export” in the Toolbar to export the video to the specified format and also, you may share it on-spot. Finally, when you’ve done the video editing, you may completely utilize the Filmora editor as above. And, to publish your work of art immediately to YouTube or another well-known site, select the Export option and pick the platform where you want to share your video clip. You may even alter the movie before sharing it if you desire.

Conclusion
Camtasia’s technique of making a presentation using an individual movie works well for developers who are knowledgeable with video applications. Developers inexperienced with the method may have significant trouble with the editing operation in Camtasia since screen grabs occur in real time. Editing material using slides in Captivate 2 is often less onerous than the video format utilized in Camtasia. The biggest issue is that long presentations might result in a large number of slides that can be time consuming to look through and result in a greater file size for the Flash file that user’s access. Hence, we like to advocate Filmora as a reasonable method between these two.
Part 2. Camtasia Software Review
Camtasia by TechSmith is a straightforward video editing and screen recording application. Camtasia was created with novices in mind, allowing designers to quickly and easily make excellent instructional films. Both Windows and MacOS are supported. Camtasia is one of the most popular video editing applications on the market. Camtasia is available for both Windows and iOS. Camtasia is simple to use and supports a wide range of media formats. This software package has several features and controls. On the same platform, you can capture screens and edit movies with Camtasia. The benefits don’t stop there; you can also share your work with others through YouTube and Google Drive.
Pros:
- Camtasia is designed for video-editing novices, with a simple setup and user interface.
- The screen capture capability is fantastic. Not only is the resolution excellent, but it is also simple to operate.
- Camtasia’s built-in effects are, on the whole, minimal. Their cursor effects, on the other hand, are spectacular.
- You may use Camtasia to add interactive quizzes to your videos.
- Camtasia provides many of the fundamentals you’ll need if you’re short on time and need to search assets straight immediately.
- TechSmith is a free app for iOS and Android that allows you to make screen recordings from your smartphone or tablet.
- TechSmith offers an excellent customer service department.
Cons:
- Crashing and bugs very often
- Many instructions are missing, despite the fact that they have restricted keyboard controls.
- Camtasia is designed for novices; therefore, it does not allow for much modification.
- Camtasia makes it tough to move and animate things.
- Camtasia video encoding and exporting difficulties have been reported by certain users.
Part 3. Adobe Captivate Review
Captivate is an Adobe tool designed to make online learning more engaging and interactive. Students save time since they can take their classes with them. Captivate has no built-in video editing tools. To do so, you’ll need to use additional Adobe applications. Captivate allows students to study at any time and from any location. However, if you’re the one creating the course, Adobe Captivate could be a little frightening since it requires Adobe experience to utilize.
Pros:
- It’s quite simple to use! Each frame may be easily shortened or lengthened.
- It’s simple to record motions onscreen, and it comes with a range of choices for recording various things (the application smooths down mouse movements).
- When the user is through shooting, the video is divided into multiple frames to make editing easy.
- A built-in editor enables users to manipulate audio by cutting, pasting, altering levels, and adding silences.
- Captivate can capture what’s occurring onscreen and provide step-by-step subtitles for popular menu actions automatically.
- Captivate has some fantastic interactive elements. Tutorials may be created so that users can follow along with pre-recorded comments on the screen.
- Adding audio or importing from another source is simple.
Cons:
- The sound’s bit rate was automatically reduced, making it seem more robotic and muffled.
- It might take a long time to preview and save works-in-progress.
- The finished flash flicks are fairly big.
Part 4. Alternative Way to Edit Videos [The Best Method]
Wondershare Filmora is a robust screen capture tool that allows you to manually alter all video and audio parameters, as well as edit your recordings in the software’s video editor. By tweaking a few basic parameters and exporting your eLearning material in MP4, MOV, or GIF file formats, you may make PIP movies. Filmora is a less expensive alternative to Camtasia 9 or Adobe Captivate for creating high-quality screen recordings. Filmora has the resources to make it possible. It’s both sound and video editing software that comes with a lot of instructions and activities to help you handle the fundamentals and create excellent recordings.
For Win 7 or later (64-bit)
For macOS 10.12 or later
This video editorial manager for PC and Mac comes with a natural point of connection that makes it simple to use for both new and experienced users. Because it is a freemium instrument, the free version will allow you to examine all of the components, albeit the final video will include a watermark. Change over, chop, change the examining rate, add effects, and that’s only the beginning of what you can do with your digital recording on the app’s schedule. Wondershare Filmora is simple to use and maintains the best sound and video toolkit. It’s best suited for novice and intermediate users since it allows you to create professional recordings in seconds and supports all of the popular designs.
Steps to Edit Video using Filmora
Step 1: Download and install Filmora Toolkit.
To begin using Filmora for editing, go to the official website and download the most current version of Wondershare Filmora. Launch the software when the download is complete and click the New Project button to see the product’s underlying window interface.
Step 2: Remove Any Unnecessary Background Sounds
Filmora Audio Editor, in addition to the video editor, allowing you to enhance the sound of your video. If your voice-over has any background noise, you may simply eliminate it from the whole clip or a segment of the video where the sound is inappropriate. In Filmora, you may also add your favourite ones to the videos by importing the files and adding them to the timeline. You may also isolate the audio from your video clips and chop or sync it with the video using the timeline of this video editor.
Step 3: Perform Professional Video Editing
Right-click the video and choose edit from the menu. Then, by hitting the proper effects buttons, you may rotate the movie. You may also swivel 90 degrees anticlockwise/clockwise, flip level, or go vertical, depending on your requirements. Then, in that instance. You can also add a variety of video effects, and the greatest part is that you can use others from the standard library as well, allowing you to put it with greater adjustment. The Editor in Filmora allows you to add Animated Titles, amazing effects, Audio Enhancements, and more to your recorded video.
Step 4: Enhance Audio Quality
The Wondershare Filmora Audio Editor allows you to change the volume, add fade-in and fade-out effects, and silence audio in certain parts of the video. All of the options are easily accessible on the right side of the software interface when you click on the audio component of the movie in Wondershare Filmora’s timeline. You may check the audio sound within the application to see whether it’s in sync with your recorded video clip once you’ve made any necessary edits to your audio.
Step 5: Download/Share the video
Click “Export” in the Toolbar to export the video to the specified format and also, you may share it on-spot. Finally, when you’ve done the video editing, you may completely utilize the Filmora editor as above. And, to publish your work of art immediately to YouTube or another well-known site, select the Export option and pick the platform where you want to share your video clip. You may even alter the movie before sharing it if you desire.
Conclusion
Camtasia’s technique of making a presentation using an individual movie works well for developers who are knowledgeable with video applications. Developers inexperienced with the method may have significant trouble with the editing operation in Camtasia since screen grabs occur in real time. Editing material using slides in Captivate 2 is often less onerous than the video format utilized in Camtasia. The biggest issue is that long presentations might result in a large number of slides that can be time consuming to look through and result in a greater file size for the Flash file that user’s access. Hence, we like to advocate Filmora as a reasonable method between these two.
How to Record Video Streams With FFmpeg on Windows and Mac?
FFmpeg is an open-source video processing tool with many powerful features. Many of these features are exposed through FFmpeg’s command line interface but can also be accessed from the program’s Python bindings and its Qt GUI frontend, called QFFMpeg.
This article will explain using FFmpeg command line tools to record video streams on Windows and Mac computers with step-by-step examples and screenshots.
Part 1. What is FFmpeg?
FFmpeg stands for “FF Multi-Platform Executable” and was originally developed by Fabrice Bellard in the year 2000 as an extension of the MPlayer project. The sole purpose of the software command-line design is to provide a complete solution for users to record live streams (audio and/or video) from any type of device that supports either the RTSP or HTTP streaming protocols.
FFmpeg is a complete, cross-platform solution to record, convert, mix, and edit audio and video files. The software has over 250 input formats, which allows users to record video streams in any media format. The FFmpeg commands stream the video back after recording, convert it into MP4 or MKV file, and process incoming data on the fly, such as rtmpdump.
Part 2. How to Record a Video Stream With FFmpeg on Windows?
The free FFmpeg command line tool is a great way to record a live internet stream and listen back to it later. If you have a Windows PC and want to record a video stream or screen using FFmpeg, our following step-by-step method will help you go through this process without facing many difficulties.
Step1 First, launch a browser of your choice on your Windows PC and head to the FFmpeg website. Hover over the Windows icon in the middle pane and select either the gyan.dev or BTbn build.

On the next screen, select the latest Windows 64-bit file from the list. Why? You need to use a computer compatible with the Windows 64-bit version. Next, download the ZIP file on your PC and use ZIP file extraction software to open the file contents.
Step2 Locate the ffmpeg.exe file on the extracted file and copy it to a new folder on your computer hard drive (e.g., C:\VideoRecorder).

Step3 In the next step, click the Start icon on your Windows dashboard and type cmd in the search box. Right-click on Command Prompt, select “Run as Administrator,” and launch the program.

Now, write the command to select the FFmpeg directory. For example, cd C:\VideoRecorder, and hit the “Enter” key.
Step4 To start recording the video stream, simply call FFmpeg and use the following command line. In this case, we are taking the example of capturing a YouTube video of “Running up that hill” from the top-rated TV show Stranger Things.
ffmpeg.exe -y -i https://www.youtube.com/watch?v=bV0RAcuG2Ao runningup.mp4
Hit the “Enter” key, and the output of this command will be displayed on the Command Prompt interface.
The command options have the following meanings:
-y allows automatic rewriting of existing files.
-i https://www.youtube.com/watch?v=bV0RAcuG2Ao is the stream URL that FFmpeg will record. You can change it with any video stream URL.
runningup.mp4 is the name of the output file.
Tips: Automatically Recording Video Streams on Windows PC
If you want your computer to record a specific video stream time automatically, use the Windows Task Scheduler to create a Timer to stop the recording after a particular time is passed.
Part 3. How to Record a Video Stream With FFmpeg on Mac?
You can use the Mac Terminal to record video streams via FFmpeg in the following way.
Step1 First, launch a browser on your Mac computer and head to the FFmpeg website. Hover over the Apple icon in the middle pane and select the macOS 64-bit static build option.

Download the ZIP file on your Mac and use ZIP file extraction software to open the file contents.
Step2 Launch the terminal on your Mac from the Apple menu, type the “ffmpeg -f avfoundation -list_devices true -i” command to let the system know which device to record from, and hit the Enter key.
Step3 Next, designate the path where you want to save your video, e.g., cd Path/to/my/videostream and press Enter.
Step4 Type in the “ffmpeg -f avfoundation -i “1:1”-c:v libx264 -qp 0-preset ultrafast out.mp4” command and hit Enter to start recording the video stream.

Stop recording the video stream by pressing “q.”

Part 4. How to Record Video Stream More Easily?
Sometimes, using FFmpeg to record a video stream on your Windows or Mac computer is too complicated. So, we recommend using Filmora Screen Recorder to make things a little easier for you.
A few benefits of using the Filmora Screen Recording software are as follows:
- Capture the computer screen and webcam at the same time.
- Select whether to record an entire screen or a part of it.
- Record your Windows or Mac computer audio and microphone voice at the same time.
Step1 Launch a browser on your Windows or Mac computer, install the Filmora Screen Recorder software, launch it, and select a New Project from the dashboard. Next, click the File option and select Record PC.

Step2 On the new Scrn pop-up window, customize the recording size by entering your desired dimensions. Also, choose if you want to record audio and which device to record it from.

Step3 Click Record to start recording the video stream. Once you are done capturing the video stream on the computer screen, click the F9 button to stop the recording.
Conclusion
In this guide, we have discussed FFmpeg and explored how you can use it to record video streams on your Windows and Mac computer.
We have also discussed Filmora Screen Recorder as an easy alternative to FFmpeg. You can get started immediately with recordings or dive deeper into advanced options as you gain more experience with this software. To help you out, we’ve also shared easy step-by-step instructions to use Filmora Screen Recorder on your computer.
Hopefully, you can now record your video streams and save them in high quality to view or share later.
Free Download For Win 7 or later(64-bit)
Free Download For macOS 10.14 or later
Free Download For macOS 10.14 or later
Also read:
- Updated In 2024, Figuring Out Proper Ways to Play a Video in Slow Motion on iPhone
- YouTube Being One of the Most Used Video Platforms Uses Artificial Intelligence to Recommend Videos. Click Here to Know About YouTube AI in Detail for 2024
- How to Make Tutorial Video with Filmora
- The Definite Guide to Craig Bot Discord for 2024
- New In 2024, Top 5 Apps To Add Song To Video
- 2024 Approved Best 4 Love Video Maker with Music
- Have You Ever Applied the Gaussian Blur Effect to Your Videos? Read This Article to Find a Reliable and Convenient Tool to Generate the Gaussian Blur Effect for 2024
- In 2024, 11 Ways To Radial Blur To Images (iPhone/Android/Mac/Windows)
- Spooky Halloween Best 15+ Halloween Countdown Video Clips
- New Learn How to Create a Unique Repeated Text Animation in the Filmora Video Editor. Follow the Simple Step-by-Step Instructions
- 8 Excellent Video and Photo Mergers on Desktop/Mobile/Online
- Learn How to Rotate Videos with Ease Using Shotcut with Our Comprehensive Guide. Discover Tips and Tricks to Get the Perfect Footage Every Time. Start Using Shotcut Today
- VSDC Free Video Editor Review for 2024
- Updated In 2024, 15 Best Vloggers That You Should Follow for Travel
- Updated In 2024, 10 Best Vlogging Cameras for Beginners
- In 2024, Top 8 AI Video Denoise Software
- Updated How to Polish Your Music Video Edits Using Filmora for 2024
- New Premiere Pro Slow Playback Issues Finding The Best Solutions
- Updated Splitting Audio From a Video in Sony Vegas Step by Step
- Discover the Top 5 Free Online Video Filter Editors to Transform Your Videos with Captivating Color Grading and Correction Presets. Elevate Your Digital Storytelling Effortlessly
- General Knowledge About MP4 Format and Best MP4 Video Editor for 2024
- Best Online YouTube Video Trimmer
- Updated In 2024, Merge MP4 Online? Its Easy With These 5 Tools
- Updated Cropping Videos in VLC Step by Step
- Guide To Make a YouTube Intro by Filmora
- Twitch Green Screen Guide for 2024
- New How to Make a Movie with Windows Movie Maker for 2024
- New Best 31 Video Trimmers for Computer, Phone and Online
- Freeze Frame Clone Effect Is a Creative Effect to Use for Many Video Creators. This Article Will Show You How to Use Filmora to Make a Frozen Frame Clone Video Effect
- Tips & Tricks To Perfectly Use the Audio Mixer in Filmora
- New In 2024, Easy Steps to Add Miniature Effect to Videos
- Best Free LUTs To Use in Shotcut
- Do You Wish to Design the Perfect Slow-Motion Video on Your Smartphone? Learn some Top-Rated Free Slow-Mo Apps for Android and iOS Users in This Article
- New Unlink Audio and Video in DaVinci Resolve Detailed Steps for 2024
- 2024 Approved How To Remove Audio From Video
- Updated This Article Talks in Detail About How to Edit Videos with Windows Movie Maker 10, How to Download or Install It, and so On. It Further Involves the Use of an Alternative to This Tool. Check Out Now
- Updated After Reading This Article, You Can Add a B-Roll Feature From Filmora and Captivate More Audience. Explanation Video B-Roll and Story-Telling B-Roll Are Well Illustrated for 2024
- Updated 2024 Approved How to Add Adjustment Layer (Clip) in DaVinci Resolve?
- Updated What Is AI Composite Video App and AI Composite Video Guide
- Kdenlive Review – Is It The Best Video Editor for 2024
- In 2024, How to Fix Pokemon Go Route Not Working On HTC U23? | Dr.fone
- How to restore wiped videos on Motorola Razr 40
- How to Exit Android Factory Mode On Xiaomi Redmi 13C? | Dr.fone
- In 2024, Edit and Send Fake Location on Telegram For your Apple iPhone 13 mini in 3 Ways | Dr.fone
- In 2024, How to use Pokemon Go Joystick on Sony Xperia 1 V? | Dr.fone
- Unlock Your Infinix Smart 8 HDs Potential The Top 20 Lock Screen Apps You Need to Try
- How to Change Your Location on Apple iPhone 15 Plus | Dr.fone
- How to Fake GPS on Android without Mock Location For your Tecno Spark 10 Pro | Dr.fone
- In 2024, Pokemon Go Error 12 Failed to Detect Location On Apple iPhone 14 Plus? | Dr.fone
- All You Need To Know About Mega Greninja For Nokia G42 5G | Dr.fone
- Complete guide for recovering call logs on Nokia G310
- Easy steps to recover deleted data from Asus
- How to use iSpoofer on Motorola Defy 2? | Dr.fone
- Title: New 10 Best Voice Over Generators Windows, Mac, Android, iPhone, and Online
- Author: Chloe
- Created at : 2024-04-24 07:07:57
- Updated at : 2024-04-25 07:07:57
- Link: https://ai-editing-video.techidaily.com/new-10-best-voice-over-generators-windows-mac-android-iphone-and-online/
- License: This work is licensed under CC BY-NC-SA 4.0.
