
New 2 Actionable Ways to Extract Subtitles From MKV Videos without Quality Loss

2 Actionable Ways to Extract Subtitles From MKV Videos without Quality Loss
The subtitles are a great way of watching movies in a foreign language, but in several situations, you would need to extract or remove these subtitles from your MKV videos. For instance, if you are fond of watching movies with a clear screen, getting a clean video at times can be a task, and here the need to remove the subtitle SRT files arises. Some of the other possible reasons for removing the subtitles are synchronization issues, changing the subtitle language, using the extracted subtitles in other high-quality videos, incompatible codec issues, and more.
MKV is a popularly used multimedia format that is capable of containing multiple metadata including videos, audio, chapters, subtitles, and more. So, if you too have downloaded an MKV video having subtitles online or ripped it from a DVD. This article will help you to know the 2 actionable ways for extracting the subtitles. So, keep reading to learn about srt extractor tools.

Part 1: Not All Subtitles for MKV files Can Be Extracted (Hardsub Vs. Softsub)
As we have mentioned that there are tools and programs available that can help you remove the subtitle srt files, but here one thing needs to be remembered not all types of subtitle files can be extracted from the MKV videos. The reason for this lies in the type of subtitles used in the videos. So, first, let’s learn about subtitle types and their differences.
There are two major types of forms of subtitles- hardsubs (also known as hardcoded subtitles or open subtitles) or softsubs (also known as closed subtitles or softcoded subtitles).
Hardsubs are the subtitles that are burned in the image of the videos and thus cannot be extracted, removed, hidden, or disabled when the video files are played.
Softsubs are the subtitles that are added as external files to the video container as an independent stream and thus can be turned off, removed, or extracted.
So, what we guide here is for ripping softsubs from videos in MKV videos. Now, let’s dive into the details.
Part 2. 2 Actionable ways for extracting subtitles from MKV videos
There are two different ways by which subtitles can be extracted from MKV files.
Solution 1: Extract Subtitles from MKV Videos Online Extractors
If you are looking for a quick and simple solution for subtitle removal, online tools work as an apt choice. There are several browser-based programs available that works directly from your browser, are simple to use, and need no software download or installation. Below listed are popularly used 3 tools in the category.
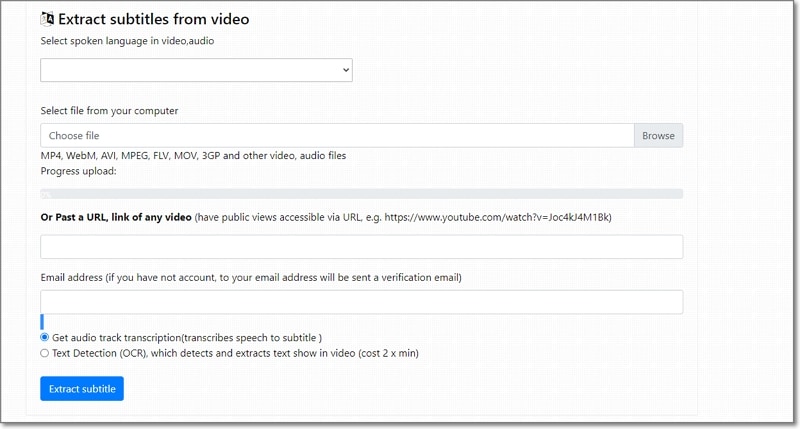
This is a widely used online tool that allows extracting subtitle srt files from an array of video files including MKV, MP4, FLV, MOV, and others.
Key Feature
- Free to use online tool for srt extract.
- Support to a wide range of video formats including MKV, MP$, 3GP, FLV, and others.
- Support to a wide range of video languages.
- Allows extracting subtitles from a local video or using a video link.
Pros
- Simple and free tool.
- Support for multiple video formats
- Allows getting audio transcription.
- Support to Text Detection (OCR).
- Subtitles can be downloaded in SRT and VTT format.
- Option to preview the video.
- Offers 24X7 support.
Cons
- Internet dependency.
- Need to provide a valid email id for processing the files.
- The free version allows uploading videos of only up to 25MB.
- The free version has a slow subtitle extraction speed.
Best for: This online tool is best when you wish to extract subtitles not only from your local files but also from videos on video sites like YouTube and others. Using the tool, you can also add captions to YouTube, Facebook, and other sites.
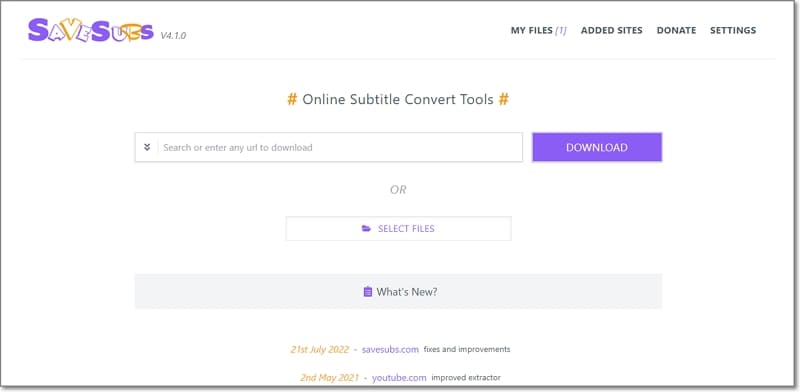
This is a multitasking online tool that allows you to convert, edit, download, as well as extract subtitles.
Key features
- Allows downloading subtitles from local as well as online sites like YouTube, Facebook, DailyMotion, and more.
- Simple and user-friendly interface.
- Free to use browser-based program.
Pros
- No need for any software download or registration.
- Simple and quick file processing.
- Add URL or local files.
- Option to share with friends.
Cons
- Works only when the internet is available.
- Limited format supported for local files.
- Limited additional features.
Best for- When you want to extract and download subtitles from YouTube, Facebook, and other online sites in a simple manner, Savesubs works as the best tool.
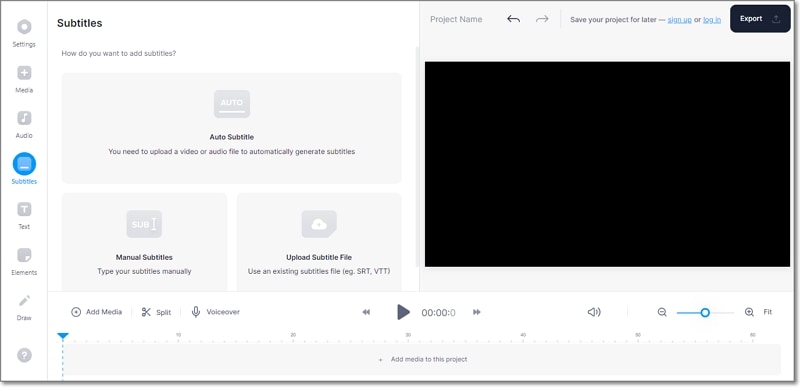
Relied by all, Veed is a feature-packed tool for performing an array of video-related tasks including subtitle extraction.
Key features
- Free to use online tools for a variety of video tasks.
- Allows extracting and downloading subtitles from videos in an array of formats.
- Online videos from popular sites can be added.
- Allows to work manually or through auto-generated subtitles.
- Option to edit the subtitles if needed.
Pros
- Easy to use tool without any training required.
- Support to local, and online files.
- Subtitles support multiple formats including SRT, ASS, VTT, SSA, and TXT.
- Allows editing the subtitles and also choosing their font.
Cons
- Dependency on internet connectivity.
- The free version has a watermark on the processed files.
- With too many features and options, the interface may appear confusing to many.
Best for: Veed is an apt tool for users who want subtitles in an array of formats.
Steps for extracting subtitles
Above we have listed 3 online tools and the steps for extracting subtitles using them are more or less the same. To run you through the general process and steps, below we have listed the steps using Savesubs.
Steps to extract subtitles using Savesubs
Step1On your system browser and vist Savesubs .
Step2Next, add the video URL or enter any keyword related to the video for which you wish to extract the subtitles. Alternatively, you can also add local files by clicking on the
Select Files button. Click on the Download button.
Step3Tap on the Click here to extract button for the tool to start extracting the subtitles.
Solution 2: Rip Subtitles from MKV Video with Extractor Software
Though online tools are simple to use, they are dependent on internet connectivity and have limited additional features. So, if you want to extract SRT subtitles even when there is no network and with added functions, desktop software works as the best choice.
With a wide range of these extractor software available, selecting one can be a daunting task and to help you with this, we have shortlisted a few popular and reliable programs as below.
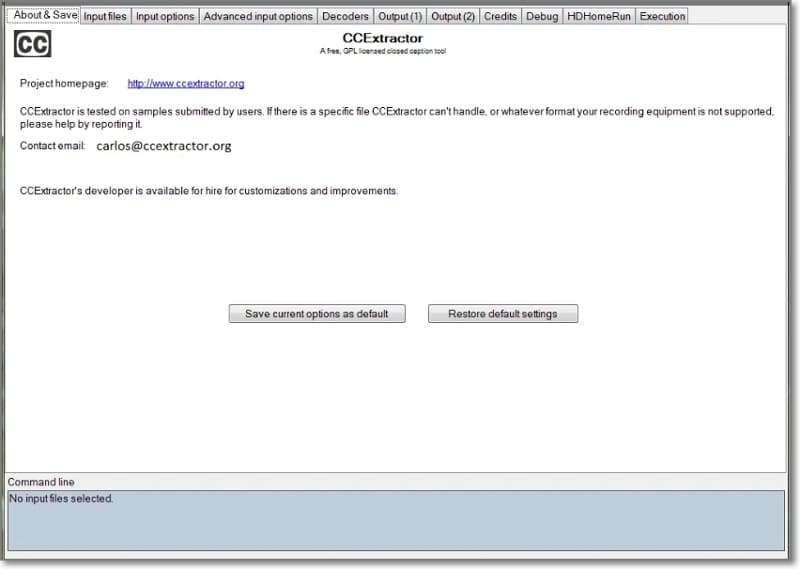
Popular among users across the globe, this free desktop software is known as “de-factor open source for closed captions”.
Key features of the software
- Allows extracting subtitles from a wide range of media files.
- Support to multiple formats including MKV, MP4, MPEG, and more.
- Free to use software with a user-friendly interface.
- Compatible with Windows, Linux, and OSX platforms.
Pros
- Simple to use free tool for subtitle extraction.
- Multi-platform support.
- A small and portable program that is fast in functioning.
Cons
- Software needs to be downloaded and installed on your system.
- Too many settings and features on the interface make it look crammed.
Best for: If you are looking for a free and open-source tool that can work on multiple platforms, CCExtractor is an apt choice.
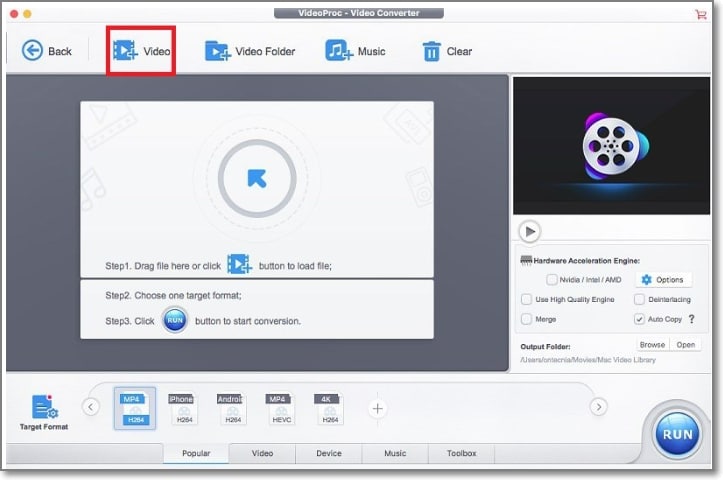
For Windows and Mac users, VideoProc works as a great tool to extract subtitles from videos in MKV, MP4, VOB, AVI, and other formats.
Key features of the software
- Multi-tasking desktop software supporting subtitle extraction as well.
- Allows extracting subtitles from videos in an array of formats including MKV, AVI, MP4, and more.
- Multiple video editing options are supported like cutting, cropping, rotating, merging, and more.
- Also allows searching and adding subtitles files.
Pros
- Subtitles can be extracted from multiple video file formats. So, you can extract SRT from MP4 as well as other video formats.
- Subtitles can be downloaded and added in srt, ss, and ssa format in one go.
- Support for downloading subtitles for movies and TV shows in multiple languages.
- Multiple video editing options are supported.
Cons
- Lack tutorials which might take time for first-time users to understand the tool.
- A lot of users complain of lagging issues.
- Paid software.
Best for: If you are looking for a tool that not only lets you extract the subtitles but also performs other video editing functions, VideoProc will work great.
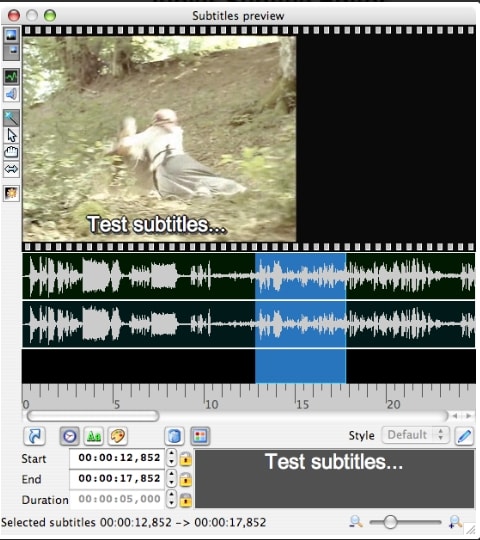
This is a free and open-source tool known for editing text-based subtitles. The most popular subtitle formats can be used. Preview of the subtitles in real-time or in design time, spell checking, translation mode and styles editing are some of the main features.
Key Features of the software
- Free and open-source tool under GNU public license.
- Allows editing text-based subtitles by converting, correcting, transforming, and converting.
- New subtitles can also be added using the software.
- Support to preview the subtitles in the design-time or real-time.
- Support additional features like style editing, spell-check, translation mode, and more.
Pros
- Free and open-source tool.
- Allows adding new subtitles as well as editing the existing ones.
- Allows using the popular subtitle formats.
- Feature to preview the subtitles in design-time or real-time.
Cons
- Software download is needed.
- Limited format support.
Best for: The tool is apt for users who need a free tool that can work on Windows as well as Mac systems.
How to extract subtitles using extractor software?
The main key steps for extracting the subtitles using desktop software may differ from tool to tool. Below listed are the steps using CCExtractor for your reference.
Steps to extract subtitles using CCExtractor
Step1Download and install the software on your system.
Step2Next, run CCExtractorGUI.exe and drag the video file to the program under the Input file tab.
Step3Next at the Output (1) tab choose output type as .srt and at the Output (2) tab select UTF-8 Encoding.
Step4Tap on the Execution tab bar and then click on the Start button. The program will start processing and the subtitle SRT file will be generated and will appear with the source video in the same folder.
Pro Tips: How do I Edit embedded SRT subtitles in MKV?
Above we have talked about the ways by which subtitles can be extracted from MKV files. But if you need to edit the embedded SRT subtitles in your MKV videos, professional software would be needed and here we recommend Wondershare Filmora as the best choice.
Wondershare Filmora is a versatile Windows and Mac-based video editing tool that supports a wide range of editing functions like visual effects, transitions, PIP, green screen, split screen, AI portrait, auto reframe, and screen recorder, masking, and many more.
The software supports multiple subtitles-related functions like editing embedded SRT files, speech-to-text, and text to speech.
Free Download For Win 7 or later(64-bit)
Free Download For macOS 10.14 or later
Steps to edit embedded SRT subtitles in MKV files using Wondershare Filmora
Step1Download, install, and launch the software on your system. In the Media Resources area import the SRT subtitles files.
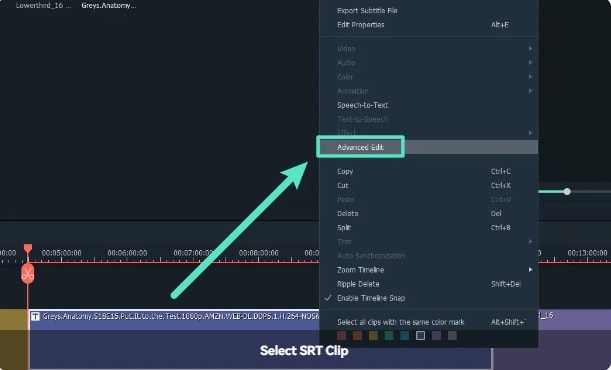
Step2Next, right-click on the timeline and then choose Advanced Edit or double-click on the selected SRT file to clip.
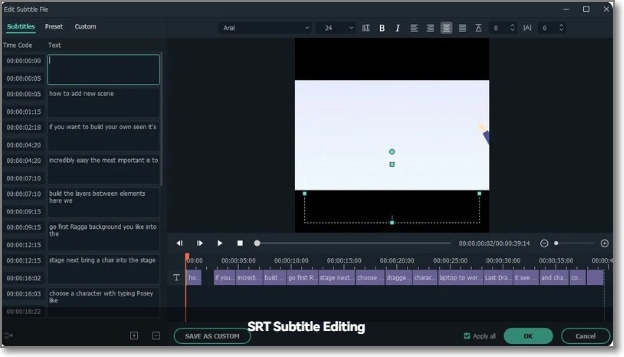
Step3In the next step, multiple subtitle editing tasks can be done like – editing time code, changing the subtitles, add/remove/merge subtitle strips, and changing subtitle styles.
Step4Finally, choose the SRT file at the timeline and then right-click and choose Export Subtitle File.
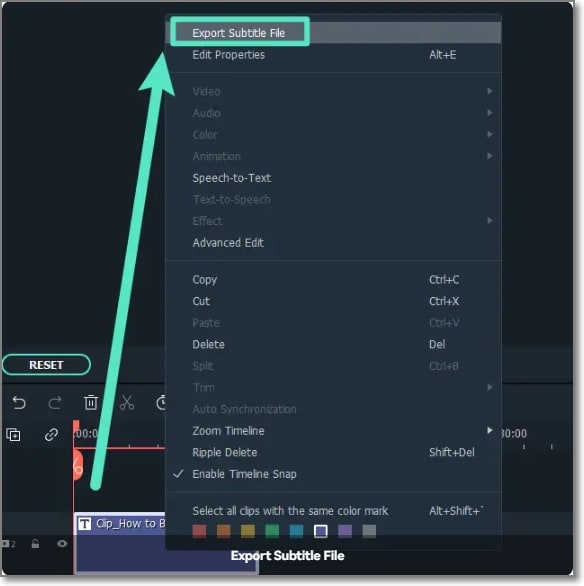
Above are the brief steps for editing the subtitles. You can check the detailed steps at this link here.
Hot FAQs on Extracting SRT from MKV
Below listed are some commonly asked questions and their answers.
1. Except for SRT, what types of subtitle formats does MKV support?
The subtitle formats supported by the MKV file include SRT, PGS/SUP, VobSub, and SSA.
2. Can VLC extract subtitles?
Though VLC is a media player, it supports an array of additional features as well including subtitle extraction. Using the software, you can also add subtitles to the video.
3. How can I extract hardcoded subtitles from a video?
The only solution for extracting hardcoded subtitles from a video is by using the Optical Character Recognition (OTR) technology.
Final Words
We hope, we have answered all your queries and doubts related to subtitle extraction in the article above. The choice of choosing an online tool or a desktop software depends on your requirements and the subtitle file. For editing the subtitles, you can rely on Wondershare Filmora which is an excellent all-in-one video editing tool.
Free Download For Win 7 or later(64-bit)
Free Download For macOS 10.14 or later
Best for: This online tool is best when you wish to extract subtitles not only from your local files but also from videos on video sites like YouTube and others. Using the tool, you can also add captions to YouTube, Facebook, and other sites.

This is a multitasking online tool that allows you to convert, edit, download, as well as extract subtitles.
Key features
- Allows downloading subtitles from local as well as online sites like YouTube, Facebook, DailyMotion, and more.
- Simple and user-friendly interface.
- Free to use browser-based program.
Pros
- No need for any software download or registration.
- Simple and quick file processing.
- Add URL or local files.
- Option to share with friends.
Cons
- Works only when the internet is available.
- Limited format supported for local files.
- Limited additional features.
Best for- When you want to extract and download subtitles from YouTube, Facebook, and other online sites in a simple manner, Savesubs works as the best tool.

Relied by all, Veed is a feature-packed tool for performing an array of video-related tasks including subtitle extraction.
Key features
- Free to use online tools for a variety of video tasks.
- Allows extracting and downloading subtitles from videos in an array of formats.
- Online videos from popular sites can be added.
- Allows to work manually or through auto-generated subtitles.
- Option to edit the subtitles if needed.
Pros
- Easy to use tool without any training required.
- Support to local, and online files.
- Subtitles support multiple formats including SRT, ASS, VTT, SSA, and TXT.
- Allows editing the subtitles and also choosing their font.
Cons
- Dependency on internet connectivity.
- The free version has a watermark on the processed files.
- With too many features and options, the interface may appear confusing to many.
Best for: Veed is an apt tool for users who want subtitles in an array of formats.

Steps for extracting subtitles
Above we have listed 3 online tools and the steps for extracting subtitles using them are more or less the same. To run you through the general process and steps, below we have listed the steps using Savesubs.
Steps to extract subtitles using Savesubs
Step1On your system browser and vist Savesubs .
Step2Next, add the video URL or enter any keyword related to the video for which you wish to extract the subtitles. Alternatively, you can also add local files by clicking on the
Select Files button. Click on the Download button.
Step3Tap on the Click here to extract button for the tool to start extracting the subtitles.
Solution 2: Rip Subtitles from MKV Video with Extractor Software
Though online tools are simple to use, they are dependent on internet connectivity and have limited additional features. So, if you want to extract SRT subtitles even when there is no network and with added functions, desktop software works as the best choice.
With a wide range of these extractor software available, selecting one can be a daunting task and to help you with this, we have shortlisted a few popular and reliable programs as below.
Popular among users across the globe, this free desktop software is known as “de-factor open source for closed captions”.
Key features of the software
- Allows extracting subtitles from a wide range of media files.
- Support to multiple formats including MKV, MP4, MPEG, and more.
- Free to use software with a user-friendly interface.
- Compatible with Windows, Linux, and OSX platforms.
Pros
- Simple to use free tool for subtitle extraction.
- Multi-platform support.
- A small and portable program that is fast in functioning.
Cons
- Software needs to be downloaded and installed on your system.
- Too many settings and features on the interface make it look crammed.
Best for: If you are looking for a free and open-source tool that can work on multiple platforms, CCExtractor is an apt choice.

For Windows and Mac users, VideoProc works as a great tool to extract subtitles from videos in MKV, MP4, VOB, AVI, and other formats.
Key features of the software
- Multi-tasking desktop software supporting subtitle extraction as well.
- Allows extracting subtitles from videos in an array of formats including MKV, AVI, MP4, and more.
- Multiple video editing options are supported like cutting, cropping, rotating, merging, and more.
- Also allows searching and adding subtitles files.
Pros
- Subtitles can be extracted from multiple video file formats. So, you can extract SRT from MP4 as well as other video formats.
- Subtitles can be downloaded and added in srt, ss, and ssa format in one go.
- Support for downloading subtitles for movies and TV shows in multiple languages.
- Multiple video editing options are supported.
Cons
- Lack tutorials which might take time for first-time users to understand the tool.
- A lot of users complain of lagging issues.
- Paid software.
Best for: If you are looking for a tool that not only lets you extract the subtitles but also performs other video editing functions, VideoProc will work great.

This is a free and open-source tool known for editing text-based subtitles. The most popular subtitle formats can be used. Preview of the subtitles in real-time or in design time, spell checking, translation mode and styles editing are some of the main features.
Key Features of the software
- Free and open-source tool under GNU public license.
- Allows editing text-based subtitles by converting, correcting, transforming, and converting.
- New subtitles can also be added using the software.
- Support to preview the subtitles in the design-time or real-time.
- Support additional features like style editing, spell-check, translation mode, and more.
Pros
- Free and open-source tool.
- Allows adding new subtitles as well as editing the existing ones.
- Allows using the popular subtitle formats.
- Feature to preview the subtitles in design-time or real-time.
Cons
- Software download is needed.
- Limited format support.
Best for: The tool is apt for users who need a free tool that can work on Windows as well as Mac systems.

How to extract subtitles using extractor software?
The main key steps for extracting the subtitles using desktop software may differ from tool to tool. Below listed are the steps using CCExtractor for your reference.
Steps to extract subtitles using CCExtractor
Step1Download and install the software on your system.
Step2Next, run CCExtractorGUI.exe and drag the video file to the program under the Input file tab.
Step3Next at the Output (1) tab choose output type as .srt and at the Output (2) tab select UTF-8 Encoding.
Step4Tap on the Execution tab bar and then click on the Start button. The program will start processing and the subtitle SRT file will be generated and will appear with the source video in the same folder.
Pro Tips: How do I Edit embedded SRT subtitles in MKV?
Above we have talked about the ways by which subtitles can be extracted from MKV files. But if you need to edit the embedded SRT subtitles in your MKV videos, professional software would be needed and here we recommend Wondershare Filmora as the best choice.
Wondershare Filmora is a versatile Windows and Mac-based video editing tool that supports a wide range of editing functions like visual effects, transitions, PIP, green screen, split screen, AI portrait, auto reframe, and screen recorder, masking, and many more.
The software supports multiple subtitles-related functions like editing embedded SRT files, speech-to-text, and text to speech.
Free Download For Win 7 or later(64-bit)
Free Download For macOS 10.14 or later
Steps to edit embedded SRT subtitles in MKV files using Wondershare Filmora
Step1Download, install, and launch the software on your system. In the Media Resources area import the SRT subtitles files.
Step2Next, right-click on the timeline and then choose Advanced Edit or double-click on the selected SRT file to clip.

Step3In the next step, multiple subtitle editing tasks can be done like – editing time code, changing the subtitles, add/remove/merge subtitle strips, and changing subtitle styles.

Step4Finally, choose the SRT file at the timeline and then right-click and choose Export Subtitle File.

Above are the brief steps for editing the subtitles. You can check the detailed steps at this link here.
Hot FAQs on Extracting SRT from MKV
Below listed are some commonly asked questions and their answers.
1. Except for SRT, what types of subtitle formats does MKV support?
The subtitle formats supported by the MKV file include SRT, PGS/SUP, VobSub, and SSA.
2. Can VLC extract subtitles?
Though VLC is a media player, it supports an array of additional features as well including subtitle extraction. Using the software, you can also add subtitles to the video.
3. How can I extract hardcoded subtitles from a video?
The only solution for extracting hardcoded subtitles from a video is by using the Optical Character Recognition (OTR) technology.
Final Words
We hope, we have answered all your queries and doubts related to subtitle extraction in the article above. The choice of choosing an online tool or a desktop software depends on your requirements and the subtitle file. For editing the subtitles, you can rely on Wondershare Filmora which is an excellent all-in-one video editing tool.
Free Download For Win 7 or later(64-bit)
Free Download For macOS 10.14 or later
How To Make Flying Objects in Wondershare Filmora
Let us be honest here, you want to create fly objects in the air but don’t want to get into the witchcraft school. In that case, we have got your back!
In this article, you can learn how to make objects fly in the air! Technically you will not do that in real-time, but with the latest technology and editing tools at your disposal, you will exactly do that.
Use Wondershare Filmora to create the flying object effect. Scroll below to get the guide to the whole process of creation.
Part 1. What will you need to make a flying object?
This is not witchcraft, so we will abstain from using potions and herbs. Instead, to fly objects in our videos, we will use simple techniques that you may also be familiar with.
Video Cameras
The camera, in this scenario, will be the essential accessory as it will capture your video with the proper aspect ratio. This video camera can now be from a mobile phone or a high-quality DSLR. It will all depend upon your preference for quality and frame rate.

Tri-Pod
Selecting the Tri-Pod is also crucial to your quality of video taking as it will ensure stability while capturing the video from the camera.

Stability is the key here, as the captured videos will be masked and combined in the later stages of the steps. To do so, consistently capturing the video in the same ratio is necessary. You can stabilize the video with a simple gorilla pod that you can get of good quality or a simple tripod.
The prop
The prop will be the object that we will be flying in the video. It could be a fluffy toy, a ball, a box, or anything you desire to be flying in your video.
![]()
Note: In this article, we are going to use a ball as a prop.

Wondershare Filmora
Now that we have all the physical requirements for the video, our next goal is to ensure that we have the correct video editing software. And what’s best than Wondershare Filmora? Obviously, there’s nothing 
Free Download For Win 7 or later(64-bit)
Free Download For macOS 10.14 or later 
Good presentation
Now, if you want your video to shine like the good ones, you will need to know how to present it. In this section, the requirement will be yourself. As you are not flying an object, you must act the part.
A good presentation will allow you to make the video more natural. Because no matter how skilled you are with video editing, a video with props will only be of quality until the subject acts their part with quality.
Part 2. How to capture the footage?
Before we get into how we edit our footage, we need to know how to shoot the video to edit. Follow the steps mentioned below:
- Set up your camera on a tripod or a gorilla pod.
- After setting up the camera, record an empty frame.
![]()
Note: An empty frame video will be the one you will use to mask the original clip.
Reference video
Start recording a five-second clip of the sofa where you will be sitting without yourself or the prop. Here you don’t need to add anything except the reference. Follow the guidelines below when making the reference video:
- The video should be plain.
- It should be simple.
- There should be no moving object or subject.

Main video
After shooting the empty frame video, move on to shooting the video with yourself in it. Follow the below to achieve something unique:
- Your focus should be on the prop.
- Use a thread or a rope to attach the prop to it. (In this case, we are using a ball.)
- Attach the ball to the thread and hand it on the roof.
- Record yourself now with the prop with your desired content or script.

After completing the video, simply stop recording. Now you will end up with two video clips.
Adding these two clips in the Wondershare Filmora , you can easily create the flying object effect. To do so, follow the steps explained in the section ahead.
Part 3. Stepwise guide to making flying objects in Wondershare Filmora
Now that we have looked into our requirements, let us dive into how we will apply our skills to achieve an object to fly in Wondershare Filmora .
Of course, without the software, our editing will not be possible, so download Wondershare Filmora from the steps explained below.
Free Download For Win 7 or later(64-bit)
Free Download For macOS 10.14 or later
Step1Open the Wondershare Filmora software
- Open the Wondershare Filmora software and Click on the New Project icon on the window.
- After you have clicked on the New Project icon, our main workplace will be launched.
- Here you can see various options.
- To get started, we need to import our video clips to edit them.

- Here, you can see two ways to import your clips in Wondershare Filmora.
- Shows you how to import by Right-Clicking on File and selecting the import media option.
- Shows you to drag and drop the file from your main directory simply.
You can choose whatever suits you the best!
Step2Add your clips to your timeline
Now that we have imported our videos into the timeline, our next step will be to add our videos to the timeline.
- Simply click on the imported clips on the import window.
- Then drag it to the timeline below.
- Doing so will create a working timeline you can view and edit as you go along the editing process.

Step3Size the reference video to the original video
Now, remember that we recorded a five-second clip that we will use to create the masking effect. You will need to size it to the original video for that to work. Doing so is simple and will require you to take some easy steps.
- First, click on the clip.
- Then, when it is selected, move on to the tab above to choose the speed option from the bar.
- Here, you will also see options such as cropping, Green screen, and color.
- Choose the option of speed.
- Then, a drop-down tile will pop up. Here you can see different options available to speed up your video.

- You can speed up your video and slow it down.
- For now, we will have to slow it down.
![]()
Note: Slowing it down will increase the time of the video clip and allow you to match it with the original video clip.
Don’t worry about the speed, as the video is already empty, and there will be no distractions to disturb our editing.
Step4Add the masking effect
Now that we have our video aligned with the reference video we are using. Let’s move to the next step.
This step will try to remove the thread attached to the ball; otherwise, it will show in the video, and our effect will be ruined. However, before we do that, we will need to know what masking is.
What is the Masking effect in Wondershare Filmora?
Have you ever seen the behind-the-scenes of those big-budget movies? Then you might have seen the actors and the stunt workers hanging from big ropes performing stunts in front of green screens.
Well, the directors capture the video in real-time. But they can do those big stunts on TV with editing and CGI, and one of the effects is “Masking.”
The masking effect allows you to mask the object on the screen with a reference video. So that’s how the ropes attached to the stuntmen get removed in the original videos.
How to add a masking effect?
Although there are numerous ways to do that, the one we will use in this video is to remove the thread. For this, follow the below steps:
- Simply go to the effect icon that you can see in the bar above.
- In the effects bar, move to the utility tab.
- You will see a window showing you the many effects Wondershare Filmora provides you from default.
- Select the shape mask tile.
- Now drag and drop it on the timeline below.

![]()
Note: You must ensure the effect is applied to the main video, not the reference video.
- When you drag the effect into the main video, you will notice a transparent shape added to the video. This is your Mask.
Step5Edit the masking effect
You must hide the thread attached to the ball with the masking effect. To do this, follow the below guidelines:
- Double-click on the effect added to the main video.
- You will notice another window pop up on the import library.
![]()
Note: In the pop-up window, you will see the multiple options and edits you can apply to the masking effect, such as Transform, Compositing, Motion tracking, and stabilization.

- Scroll down on the window and notice a video effect tab.
In the effect tab, you will have multiple options, such as the shape mask, X, Y, and scale and blur strength options, as shown below.
- Now adjust the mask to hide the string. It may be easy to invert the mask.
![]()
Note: That the borders of the mask are blurred. But you can also change them by inverting the mask, which turns the borders and the space between them.
Remember the invisibility cloak from Harry Potter? It works just like that, only with a solid shape.
- Now use the X and Y options to move the mask anywhere in the video.

Step6Hide the sharp borders
You may notice the shape of borders that do not blend with the background. To blend the borders with the background, follow the steps below:
- Simply Double-click on the effect in the timeline.
- Then, in the editing tab, find out the blur strength option.

- Simply drag the bar to increase the blur strength.
![]()
Note: Please keep looking in the window on the right. Check and increase the blur strength until you are satisfied with the result.
- Lastly, click on OK when you are done.
Step7Creating the popup effect
Now, if you want your object to appear out of thin air, you must create that pop-up effect. You can create the pop-up effect in simple and easy steps, as shown below:
- First, drag the timeline dragger to the point where you want the prop or the ball to pop up.
Your presentation should be accurate and precise!
Imagine you were doing a “swoosh“ action, similar to swinging a wand. Now you want your object to appear at that time.
Split the Video:
- Drag the timeline dragger to that point.
- Now press Ctrl+B to split both videos.
Add Popup Effect:
The masking effect will be applied from the start. Our goal is to hide the masking effect before the ball pop-ups. For this, follow the below steps:
- Go into the setting by Double-Clicking the masking effect on the original video.
- Then move the mask over the ball instead of on the thread. Doing so would make the ball disappear.

Final Results:
- Lastly, click on Ok when done.
Play the clip from the start, and you will notice the ball popping up according to your action.

Congratulations! You did it. You are now able to fly objects with the power of your mind.
Following the abovementioned steps, you can control objects and make them fly in the air. The catch is that you will have to use Wondershare Filmora . But, of course, this is not a witchcraft school now.
Free Download For Win 7 or later(64-bit)
Free Download For macOS 10.14 or later
Conclusion
Well, there comes a time when one needs to make flying objects. Wondershare Filmora is an excellent tool that will allow you to add the masking effect to create the illusion of flying objects in the air.
The video quality at the end will only depend upon how clearly you show during the editing process. Try the above steps and enjoy the results!

Wondershare Filmora
Now that we have all the physical requirements for the video, our next goal is to ensure that we have the correct video editing software. And what’s best than Wondershare Filmora? Obviously, there’s nothing 
Free Download For Win 7 or later(64-bit)
Free Download For macOS 10.14 or later 
Good presentation
Now, if you want your video to shine like the good ones, you will need to know how to present it. In this section, the requirement will be yourself. As you are not flying an object, you must act the part.
A good presentation will allow you to make the video more natural. Because no matter how skilled you are with video editing, a video with props will only be of quality until the subject acts their part with quality.
Part 2. How to capture the footage?
Before we get into how we edit our footage, we need to know how to shoot the video to edit. Follow the steps mentioned below:
- Set up your camera on a tripod or a gorilla pod.
- After setting up the camera, record an empty frame.
![]()
Note: An empty frame video will be the one you will use to mask the original clip.
Reference video
Start recording a five-second clip of the sofa where you will be sitting without yourself or the prop. Here you don’t need to add anything except the reference. Follow the guidelines below when making the reference video:
- The video should be plain.
- It should be simple.
- There should be no moving object or subject.

Main video
After shooting the empty frame video, move on to shooting the video with yourself in it. Follow the below to achieve something unique:
- Your focus should be on the prop.
- Use a thread or a rope to attach the prop to it. (In this case, we are using a ball.)
- Attach the ball to the thread and hand it on the roof.
- Record yourself now with the prop with your desired content or script.

After completing the video, simply stop recording. Now you will end up with two video clips.
Adding these two clips in the Wondershare Filmora , you can easily create the flying object effect. To do so, follow the steps explained in the section ahead.
Part 3. Stepwise guide to making flying objects in Wondershare Filmora
Now that we have looked into our requirements, let us dive into how we will apply our skills to achieve an object to fly in Wondershare Filmora .
Of course, without the software, our editing will not be possible, so download Wondershare Filmora from the steps explained below.
Free Download For Win 7 or later(64-bit)
Free Download For macOS 10.14 or later
Step1Open the Wondershare Filmora software
- Open the Wondershare Filmora software and Click on the New Project icon on the window.
- After you have clicked on the New Project icon, our main workplace will be launched.
- Here you can see various options.
- To get started, we need to import our video clips to edit them.

- Here, you can see two ways to import your clips in Wondershare Filmora.
- Shows you how to import by Right-Clicking on File and selecting the import media option.
- Shows you to drag and drop the file from your main directory simply.
You can choose whatever suits you the best!
Step2Add your clips to your timeline
Now that we have imported our videos into the timeline, our next step will be to add our videos to the timeline.
- Simply click on the imported clips on the import window.
- Then drag it to the timeline below.
- Doing so will create a working timeline you can view and edit as you go along the editing process.

Step3Size the reference video to the original video
Now, remember that we recorded a five-second clip that we will use to create the masking effect. You will need to size it to the original video for that to work. Doing so is simple and will require you to take some easy steps.
- First, click on the clip.
- Then, when it is selected, move on to the tab above to choose the speed option from the bar.
- Here, you will also see options such as cropping, Green screen, and color.
- Choose the option of speed.
- Then, a drop-down tile will pop up. Here you can see different options available to speed up your video.

- You can speed up your video and slow it down.
- For now, we will have to slow it down.
![]()
Note: Slowing it down will increase the time of the video clip and allow you to match it with the original video clip.
Don’t worry about the speed, as the video is already empty, and there will be no distractions to disturb our editing.
Step4Add the masking effect
Now that we have our video aligned with the reference video we are using. Let’s move to the next step.
This step will try to remove the thread attached to the ball; otherwise, it will show in the video, and our effect will be ruined. However, before we do that, we will need to know what masking is.
What is the Masking effect in Wondershare Filmora?
Have you ever seen the behind-the-scenes of those big-budget movies? Then you might have seen the actors and the stunt workers hanging from big ropes performing stunts in front of green screens.
Well, the directors capture the video in real-time. But they can do those big stunts on TV with editing and CGI, and one of the effects is “Masking.”
The masking effect allows you to mask the object on the screen with a reference video. So that’s how the ropes attached to the stuntmen get removed in the original videos.
How to add a masking effect?
Although there are numerous ways to do that, the one we will use in this video is to remove the thread. For this, follow the below steps:
- Simply go to the effect icon that you can see in the bar above.
- In the effects bar, move to the utility tab.
- You will see a window showing you the many effects Wondershare Filmora provides you from default.
- Select the shape mask tile.
- Now drag and drop it on the timeline below.

![]()
Note: You must ensure the effect is applied to the main video, not the reference video.
- When you drag the effect into the main video, you will notice a transparent shape added to the video. This is your Mask.
Step5Edit the masking effect
You must hide the thread attached to the ball with the masking effect. To do this, follow the below guidelines:
- Double-click on the effect added to the main video.
- You will notice another window pop up on the import library.
![]()
Note: In the pop-up window, you will see the multiple options and edits you can apply to the masking effect, such as Transform, Compositing, Motion tracking, and stabilization.

- Scroll down on the window and notice a video effect tab.
In the effect tab, you will have multiple options, such as the shape mask, X, Y, and scale and blur strength options, as shown below.
- Now adjust the mask to hide the string. It may be easy to invert the mask.
![]()
Note: That the borders of the mask are blurred. But you can also change them by inverting the mask, which turns the borders and the space between them.
Remember the invisibility cloak from Harry Potter? It works just like that, only with a solid shape.
- Now use the X and Y options to move the mask anywhere in the video.

Step6Hide the sharp borders
You may notice the shape of borders that do not blend with the background. To blend the borders with the background, follow the steps below:
- Simply Double-click on the effect in the timeline.
- Then, in the editing tab, find out the blur strength option.

- Simply drag the bar to increase the blur strength.
![]()
Note: Please keep looking in the window on the right. Check and increase the blur strength until you are satisfied with the result.
- Lastly, click on OK when you are done.
Step7Creating the popup effect
Now, if you want your object to appear out of thin air, you must create that pop-up effect. You can create the pop-up effect in simple and easy steps, as shown below:
- First, drag the timeline dragger to the point where you want the prop or the ball to pop up.
Your presentation should be accurate and precise!
Imagine you were doing a “swoosh“ action, similar to swinging a wand. Now you want your object to appear at that time.
Split the Video:
- Drag the timeline dragger to that point.
- Now press Ctrl+B to split both videos.
Add Popup Effect:
The masking effect will be applied from the start. Our goal is to hide the masking effect before the ball pop-ups. For this, follow the below steps:
- Go into the setting by Double-Clicking the masking effect on the original video.
- Then move the mask over the ball instead of on the thread. Doing so would make the ball disappear.

Final Results:
- Lastly, click on Ok when done.
Play the clip from the start, and you will notice the ball popping up according to your action.

Congratulations! You did it. You are now able to fly objects with the power of your mind.
Following the abovementioned steps, you can control objects and make them fly in the air. The catch is that you will have to use Wondershare Filmora . But, of course, this is not a witchcraft school now.
Free Download For Win 7 or later(64-bit)
Free Download For macOS 10.14 or later
Conclusion
Well, there comes a time when one needs to make flying objects. Wondershare Filmora is an excellent tool that will allow you to add the masking effect to create the illusion of flying objects in the air.
The video quality at the end will only depend upon how clearly you show during the editing process. Try the above steps and enjoy the results!
Step by Step to Cut Video in Adobe Premiere Pro
Video editing is an essential skill in a world that has a growing focus on creative fields. And if you work with videos, knowing which clips to use and where to cut is essential in conveying your story and increasing its impact. So, if you are a beginner and want to familiarise yourself with steps and terms used in video editing, in this article, we will go through the steps you will need to cut your video file in Adobe Premiere Pro and Wondershare Filmora.
This guide uses Adobe Premiere Pro 2022 and Wondershare Filmora X.
How to cut video in Adobe Premiere Pro?
Once you have Adobe Premiere Pro open on your computer, follow the steps listed below.
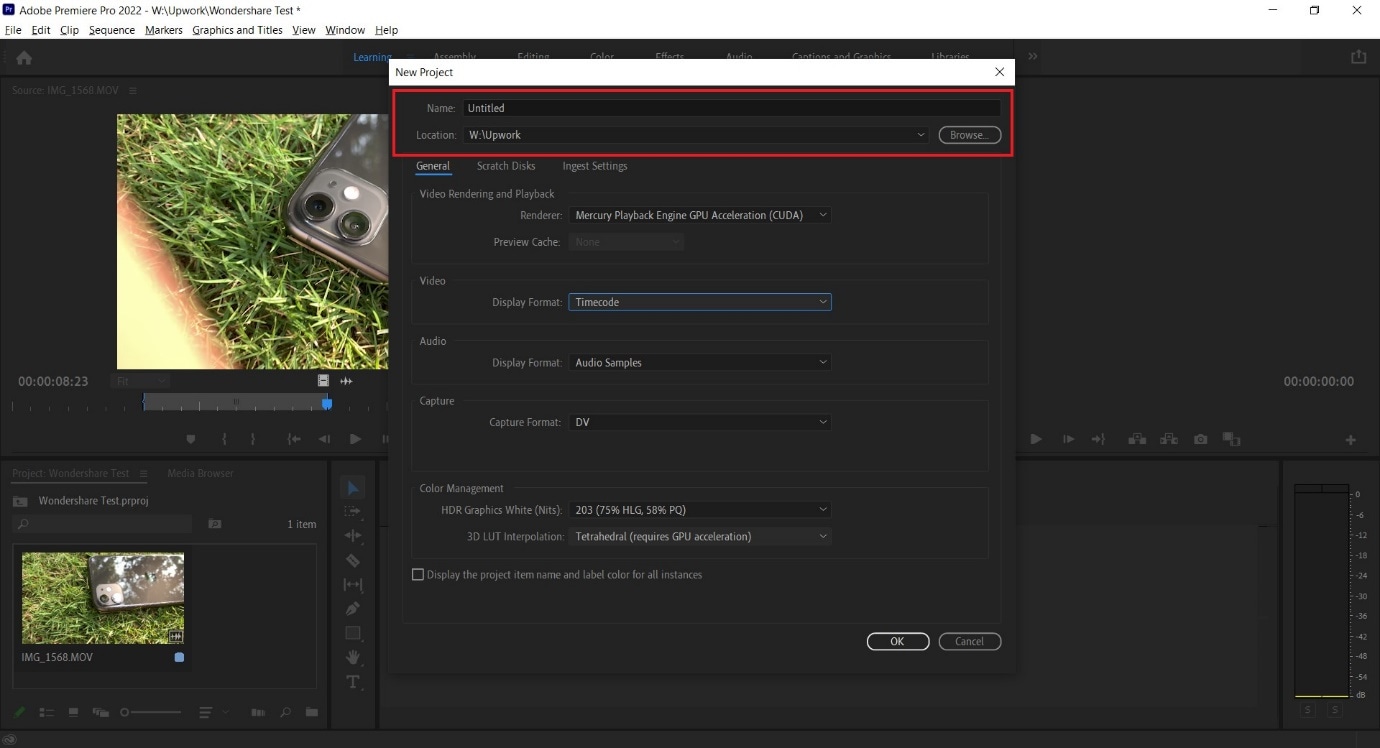
Step 1: Create a new project in Premiere Pro.
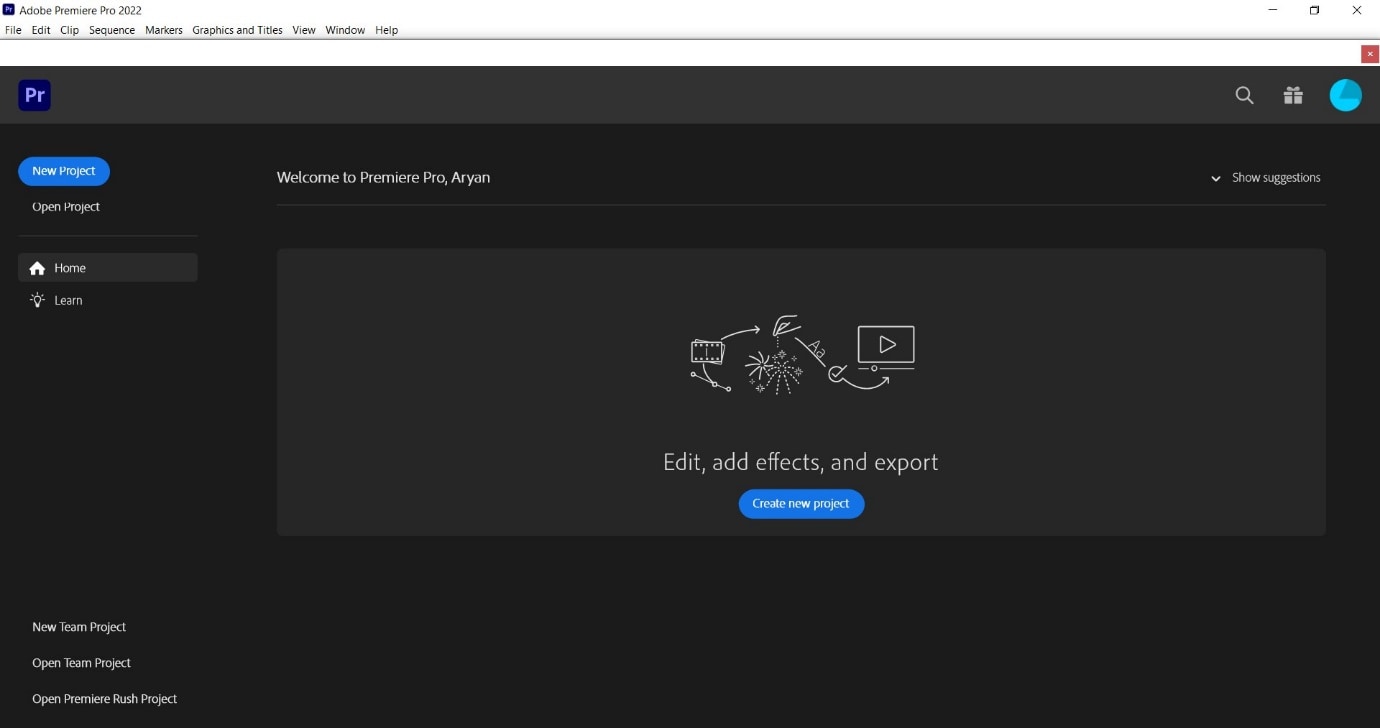
During project creation, we recommend keeping an eye on the file name set and the storage location; this can help reduce the time spent in locating the Premiere Project.
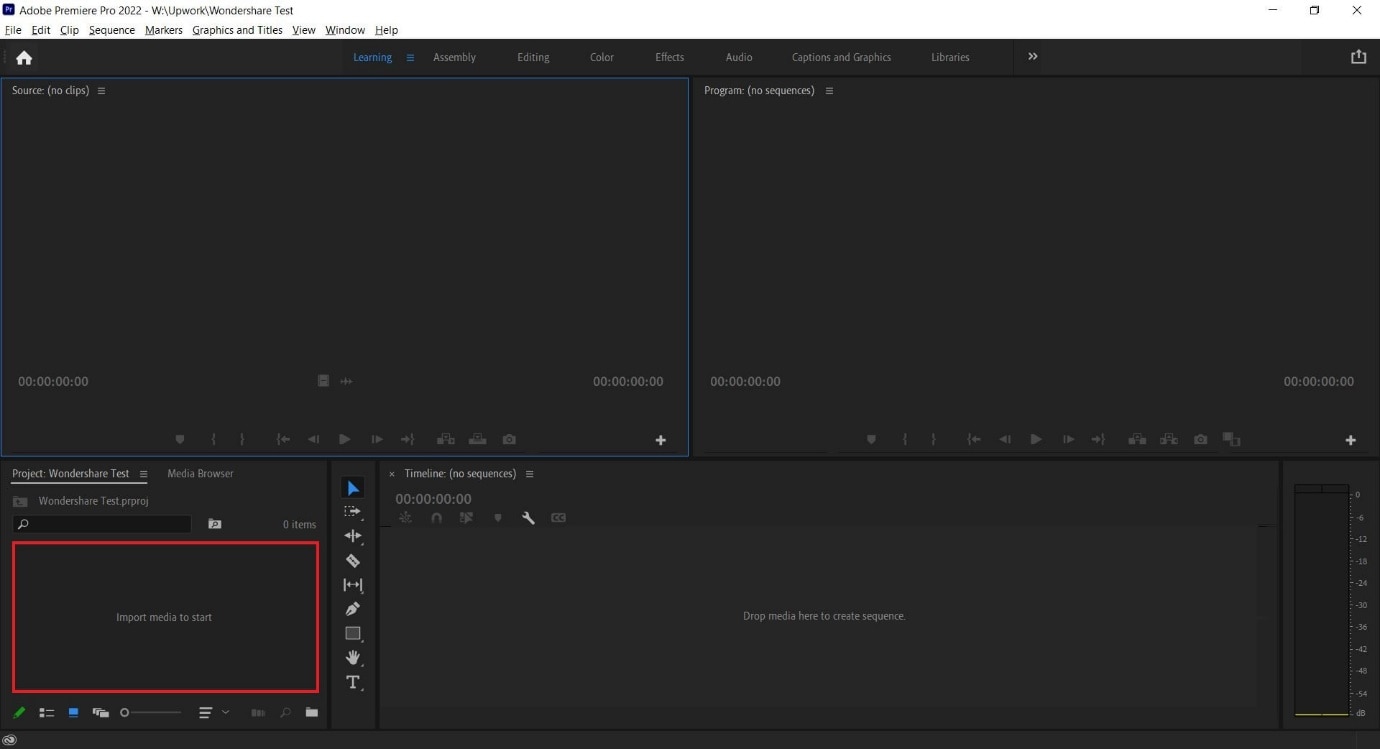
Step 2: Import a video file into Premiere Pro with a double click in the marked area and choose the file from its stored location.
Step 3: Double click on any imported media to activate it and send it to the Source Window.
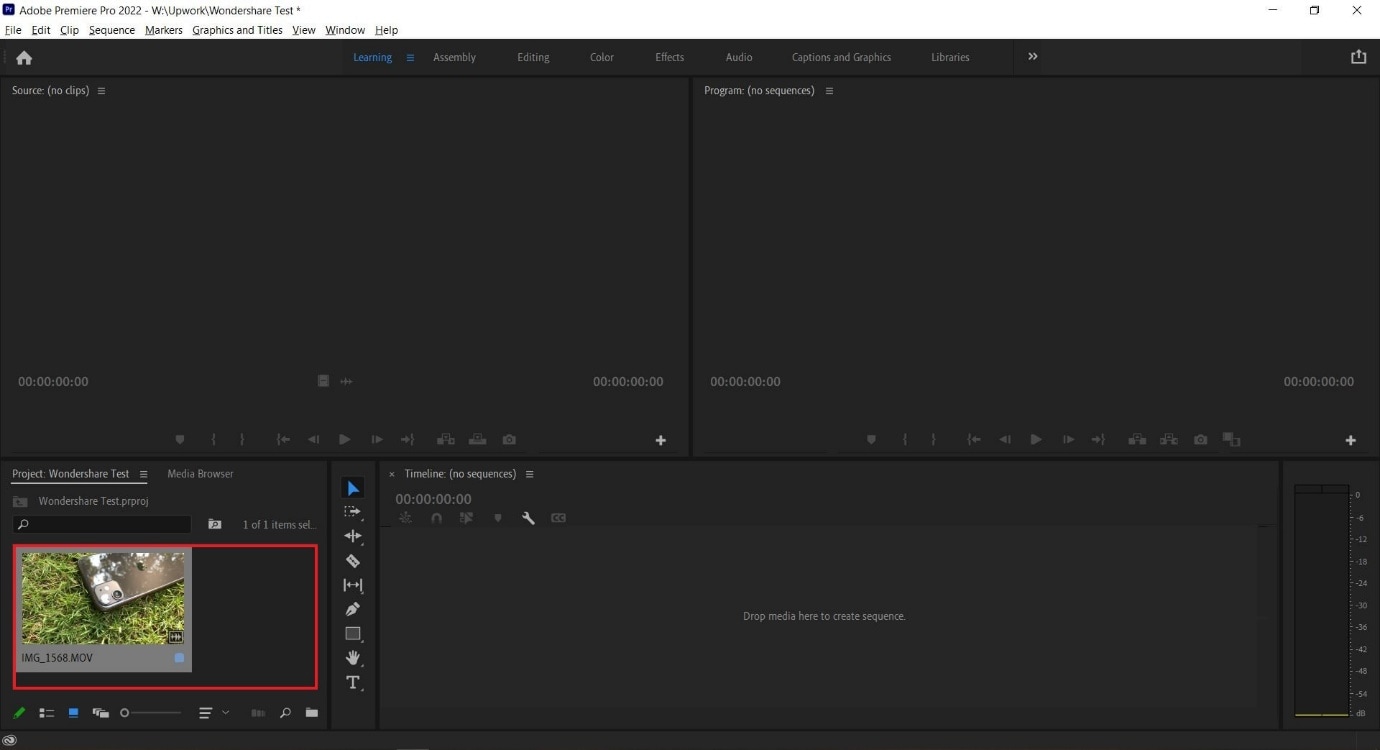
You can continue to import more media by double-clicking within the marked area. For better organization, users can also create Bins, which are folders within a Premiere Pro File that are often in use to sort out imported media.
Users can create Bins with a right-click in the red box marked area (refer to image above).
Step 4: Select either the whole clip or a part of it from the Source Window and drag it onto the Timeline.
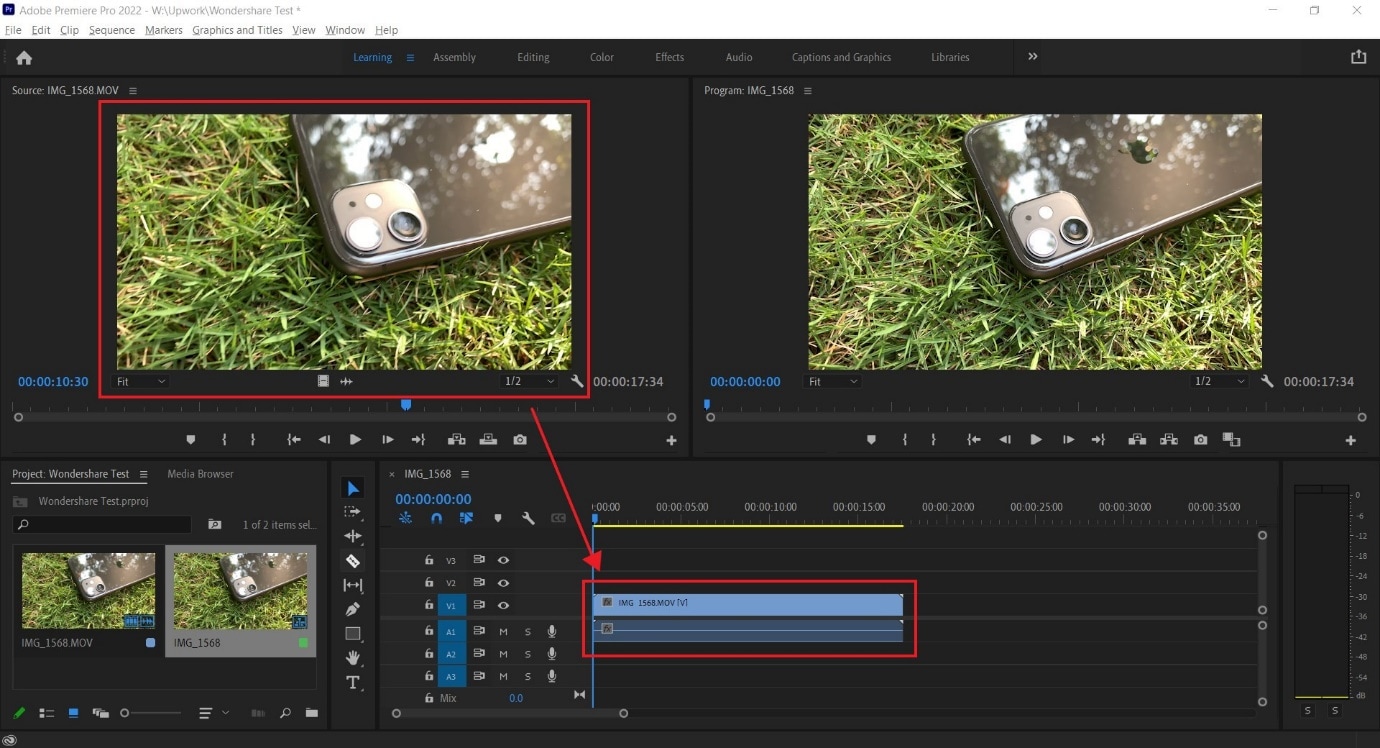
Step 5: Select the Razor Tool from the Tools Window. Now, pick the point where you want to introduce a cut and confirm with your left mouse button; this will split your video track into two parts.
Make a second cut where desired, following which you can move around the newly generated clip or delete it.
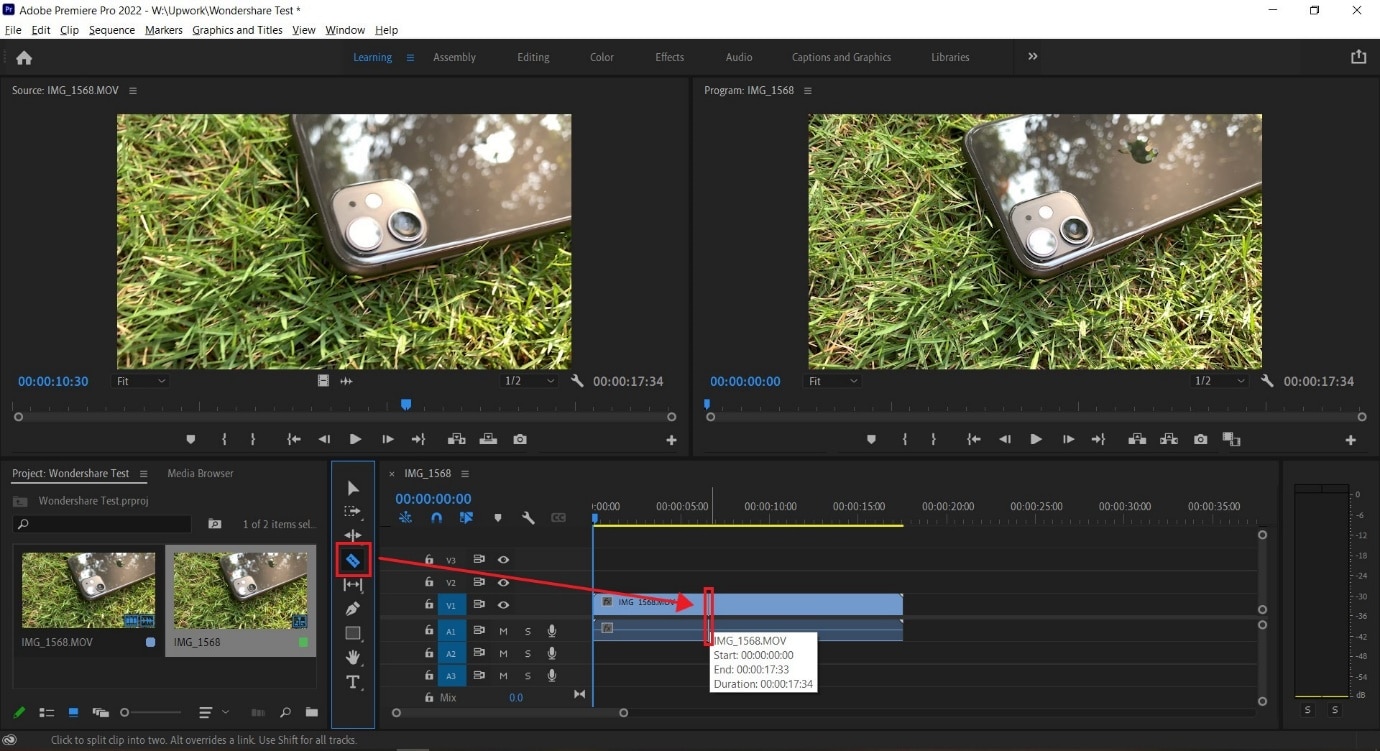
**Tip:**You can also select the Razor Tool by pressing C on the keyboard_._
We also recommend using the Snap in Timeline feature (activated with (S) on your keyboard or by choosing the magnet option), which will match your mouse pointer with the Playhead to ensure your cut will match the exact frame shown on your screen.
-—————————————————————————————————————————————-
Some more tips for Adobe Premiere Pro:
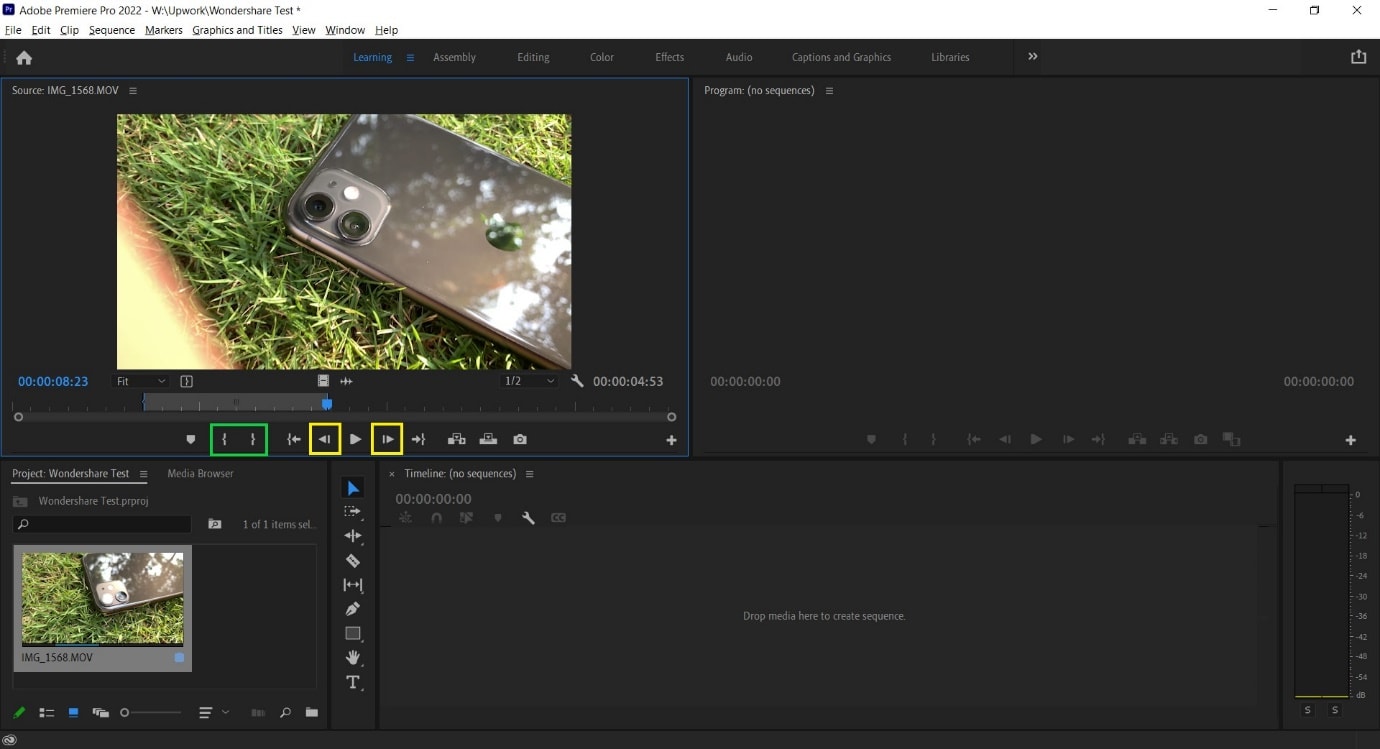
- Using the I and O keys on your keyboard while playing a video in the Source Window will allow you to set an In Pointand an Out Point. These markers will allow you to move a specific part of your video file into the Timeline, thus, reducing the amount of time spent making the right cut.
We have tagged the Mark In and Mark Out buttons with a Green Box in the image below.
- Clicking on the Step Frame Buttons [marked in Yellow] will also help increase the accuracy of your cut by allowing you to select the exact moment you desire.
- You can also mark a Point of Interest in your video file with the help of Markers in Premiere Pro. These afford you the ability to come back to the moment at a later time and see why it interested you in the first place, as editing sessions can often take hours at an end.
An alternative way to cut video with Wondershare Filmora
In Wondershare Filmora Video Editor , the steps to cut a video are simplified and don’t require as many steps as seen earlier. Opening the application throws you straight into a project, and following this, you can import a video file and begin editing. From the process you will learn below, it is easy to assume that Wondershare Filmora is more convenient for beginners and provides software features that match paid professional software.
For Win 7 or later (64-bit)
For macOS 10.14 or later
Note: If you don’t have Wondershare Filmora installed, you can get the video editor by visiting its official website . Once the setup program download completes, execute it and begin the installation process.
Once you have the editing software open, follow the steps listed below.
Step 1: Import a video file by clicking on the import window.
The default project setting for Filmora X is 1920x1080 at 25 frames per second. Users can change this to match their video file by going into Project Settings under the File tab or by accepting the automatic prompt that appears when dragging the video file onto the Timeline.

Note: If you have a PC with weak hardware, Wondershare Filmora gives you the option to create Video Proxies that will reduce the load on your computer by creating smaller clips that are lower in size, resulting in a smoother and faster experience. You can also do this in Premiere Pro, but Filmora does it for you automatically once given permission.
Step 2: Drag the video file onto the Timeline to begin previewing it in the Playback Window and commence editing operations.

Step 3: Locate where you want to cut in the video file and click on the orange scissors option to split the video file.
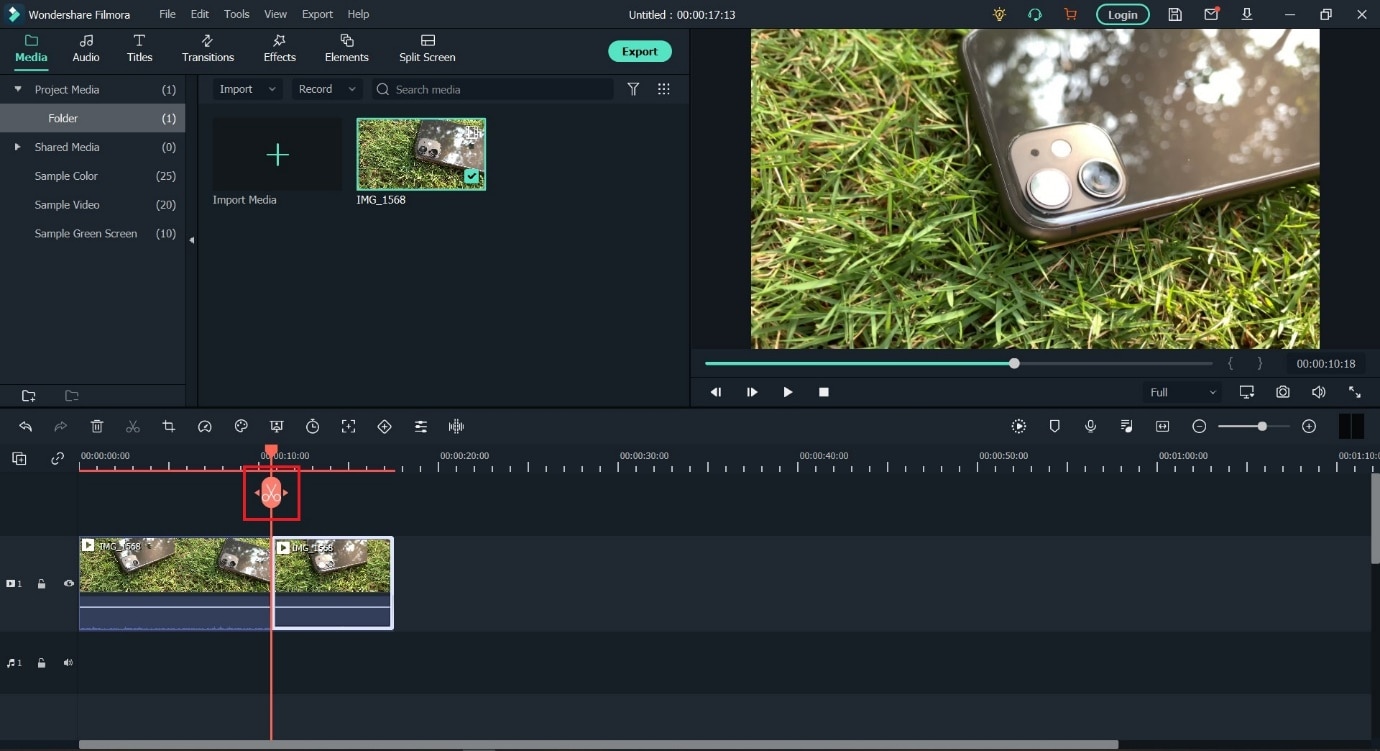
Tip: You can also use the keyboard shortcut (CTRL+B) to cut without using a mouse click, in case you make use of a trackpad while editing.
The Bottom Line
As said earlier, knowing where to cut is essential in improving the feel of your video, and we hope this guide showed you exactly how to perform the actions to create your best project. If you are a beginner, the simplistic approach of Wondershare Filmora will be more welcoming and easier to navigate. In addition, the software is also free to download, with added features that you can activate by paying a monthly, yearly, or one-time fee. Adobe Premiere Pro is an option worth considering if you plan on using third-party plugins and other applications from the Creative Cloud Suite.
During project creation, we recommend keeping an eye on the file name set and the storage location; this can help reduce the time spent in locating the Premiere Project.

Step 2: Import a video file into Premiere Pro with a double click in the marked area and choose the file from its stored location.

Step 3: Double click on any imported media to activate it and send it to the Source Window.

You can continue to import more media by double-clicking within the marked area. For better organization, users can also create Bins, which are folders within a Premiere Pro File that are often in use to sort out imported media.
Users can create Bins with a right-click in the red box marked area (refer to image above).
Step 4: Select either the whole clip or a part of it from the Source Window and drag it onto the Timeline.

Step 5: Select the Razor Tool from the Tools Window. Now, pick the point where you want to introduce a cut and confirm with your left mouse button; this will split your video track into two parts.
Make a second cut where desired, following which you can move around the newly generated clip or delete it.

**Tip:**You can also select the Razor Tool by pressing C on the keyboard_._
We also recommend using the Snap in Timeline feature (activated with (S) on your keyboard or by choosing the magnet option), which will match your mouse pointer with the Playhead to ensure your cut will match the exact frame shown on your screen.
-—————————————————————————————————————————————-
Some more tips for Adobe Premiere Pro:
- Using the I and O keys on your keyboard while playing a video in the Source Window will allow you to set an In Pointand an Out Point. These markers will allow you to move a specific part of your video file into the Timeline, thus, reducing the amount of time spent making the right cut.
We have tagged the Mark In and Mark Out buttons with a Green Box in the image below.
- Clicking on the Step Frame Buttons [marked in Yellow] will also help increase the accuracy of your cut by allowing you to select the exact moment you desire.
- You can also mark a Point of Interest in your video file with the help of Markers in Premiere Pro. These afford you the ability to come back to the moment at a later time and see why it interested you in the first place, as editing sessions can often take hours at an end.

An alternative way to cut video with Wondershare Filmora
In Wondershare Filmora Video Editor , the steps to cut a video are simplified and don’t require as many steps as seen earlier. Opening the application throws you straight into a project, and following this, you can import a video file and begin editing. From the process you will learn below, it is easy to assume that Wondershare Filmora is more convenient for beginners and provides software features that match paid professional software.
For Win 7 or later (64-bit)
For macOS 10.14 or later
Note: If you don’t have Wondershare Filmora installed, you can get the video editor by visiting its official website . Once the setup program download completes, execute it and begin the installation process.
Once you have the editing software open, follow the steps listed below.
Step 1: Import a video file by clicking on the import window.
The default project setting for Filmora X is 1920x1080 at 25 frames per second. Users can change this to match their video file by going into Project Settings under the File tab or by accepting the automatic prompt that appears when dragging the video file onto the Timeline.

Note: If you have a PC with weak hardware, Wondershare Filmora gives you the option to create Video Proxies that will reduce the load on your computer by creating smaller clips that are lower in size, resulting in a smoother and faster experience. You can also do this in Premiere Pro, but Filmora does it for you automatically once given permission.
Step 2: Drag the video file onto the Timeline to begin previewing it in the Playback Window and commence editing operations.

Step 3: Locate where you want to cut in the video file and click on the orange scissors option to split the video file.

Tip: You can also use the keyboard shortcut (CTRL+B) to cut without using a mouse click, in case you make use of a trackpad while editing.
The Bottom Line
As said earlier, knowing where to cut is essential in improving the feel of your video, and we hope this guide showed you exactly how to perform the actions to create your best project. If you are a beginner, the simplistic approach of Wondershare Filmora will be more welcoming and easier to navigate. In addition, the software is also free to download, with added features that you can activate by paying a monthly, yearly, or one-time fee. Adobe Premiere Pro is an option worth considering if you plan on using third-party plugins and other applications from the Creative Cloud Suite.
During project creation, we recommend keeping an eye on the file name set and the storage location; this can help reduce the time spent in locating the Premiere Project.

Step 2: Import a video file into Premiere Pro with a double click in the marked area and choose the file from its stored location.

Step 3: Double click on any imported media to activate it and send it to the Source Window.

You can continue to import more media by double-clicking within the marked area. For better organization, users can also create Bins, which are folders within a Premiere Pro File that are often in use to sort out imported media.
Users can create Bins with a right-click in the red box marked area (refer to image above).
Step 4: Select either the whole clip or a part of it from the Source Window and drag it onto the Timeline.

Step 5: Select the Razor Tool from the Tools Window. Now, pick the point where you want to introduce a cut and confirm with your left mouse button; this will split your video track into two parts.
Make a second cut where desired, following which you can move around the newly generated clip or delete it.

**Tip:**You can also select the Razor Tool by pressing C on the keyboard_._
We also recommend using the Snap in Timeline feature (activated with (S) on your keyboard or by choosing the magnet option), which will match your mouse pointer with the Playhead to ensure your cut will match the exact frame shown on your screen.
-—————————————————————————————————————————————-
Some more tips for Adobe Premiere Pro:
- Using the I and O keys on your keyboard while playing a video in the Source Window will allow you to set an In Pointand an Out Point. These markers will allow you to move a specific part of your video file into the Timeline, thus, reducing the amount of time spent making the right cut.
We have tagged the Mark In and Mark Out buttons with a Green Box in the image below.
- Clicking on the Step Frame Buttons [marked in Yellow] will also help increase the accuracy of your cut by allowing you to select the exact moment you desire.
- You can also mark a Point of Interest in your video file with the help of Markers in Premiere Pro. These afford you the ability to come back to the moment at a later time and see why it interested you in the first place, as editing sessions can often take hours at an end.

An alternative way to cut video with Wondershare Filmora
In Wondershare Filmora Video Editor , the steps to cut a video are simplified and don’t require as many steps as seen earlier. Opening the application throws you straight into a project, and following this, you can import a video file and begin editing. From the process you will learn below, it is easy to assume that Wondershare Filmora is more convenient for beginners and provides software features that match paid professional software.
For Win 7 or later (64-bit)
For macOS 10.14 or later
Note: If you don’t have Wondershare Filmora installed, you can get the video editor by visiting its official website . Once the setup program download completes, execute it and begin the installation process.
Once you have the editing software open, follow the steps listed below.
Step 1: Import a video file by clicking on the import window.
The default project setting for Filmora X is 1920x1080 at 25 frames per second. Users can change this to match their video file by going into Project Settings under the File tab or by accepting the automatic prompt that appears when dragging the video file onto the Timeline.

Note: If you have a PC with weak hardware, Wondershare Filmora gives you the option to create Video Proxies that will reduce the load on your computer by creating smaller clips that are lower in size, resulting in a smoother and faster experience. You can also do this in Premiere Pro, but Filmora does it for you automatically once given permission.
Step 2: Drag the video file onto the Timeline to begin previewing it in the Playback Window and commence editing operations.

Step 3: Locate where you want to cut in the video file and click on the orange scissors option to split the video file.

Tip: You can also use the keyboard shortcut (CTRL+B) to cut without using a mouse click, in case you make use of a trackpad while editing.
The Bottom Line
As said earlier, knowing where to cut is essential in improving the feel of your video, and we hope this guide showed you exactly how to perform the actions to create your best project. If you are a beginner, the simplistic approach of Wondershare Filmora will be more welcoming and easier to navigate. In addition, the software is also free to download, with added features that you can activate by paying a monthly, yearly, or one-time fee. Adobe Premiere Pro is an option worth considering if you plan on using third-party plugins and other applications from the Creative Cloud Suite.
During project creation, we recommend keeping an eye on the file name set and the storage location; this can help reduce the time spent in locating the Premiere Project.

Step 2: Import a video file into Premiere Pro with a double click in the marked area and choose the file from its stored location.

Step 3: Double click on any imported media to activate it and send it to the Source Window.

You can continue to import more media by double-clicking within the marked area. For better organization, users can also create Bins, which are folders within a Premiere Pro File that are often in use to sort out imported media.
Users can create Bins with a right-click in the red box marked area (refer to image above).
Step 4: Select either the whole clip or a part of it from the Source Window and drag it onto the Timeline.

Step 5: Select the Razor Tool from the Tools Window. Now, pick the point where you want to introduce a cut and confirm with your left mouse button; this will split your video track into two parts.
Make a second cut where desired, following which you can move around the newly generated clip or delete it.

**Tip:**You can also select the Razor Tool by pressing C on the keyboard_._
We also recommend using the Snap in Timeline feature (activated with (S) on your keyboard or by choosing the magnet option), which will match your mouse pointer with the Playhead to ensure your cut will match the exact frame shown on your screen.
-—————————————————————————————————————————————-
Some more tips for Adobe Premiere Pro:
- Using the I and O keys on your keyboard while playing a video in the Source Window will allow you to set an In Pointand an Out Point. These markers will allow you to move a specific part of your video file into the Timeline, thus, reducing the amount of time spent making the right cut.
We have tagged the Mark In and Mark Out buttons with a Green Box in the image below.
- Clicking on the Step Frame Buttons [marked in Yellow] will also help increase the accuracy of your cut by allowing you to select the exact moment you desire.
- You can also mark a Point of Interest in your video file with the help of Markers in Premiere Pro. These afford you the ability to come back to the moment at a later time and see why it interested you in the first place, as editing sessions can often take hours at an end.

An alternative way to cut video with Wondershare Filmora
In Wondershare Filmora Video Editor , the steps to cut a video are simplified and don’t require as many steps as seen earlier. Opening the application throws you straight into a project, and following this, you can import a video file and begin editing. From the process you will learn below, it is easy to assume that Wondershare Filmora is more convenient for beginners and provides software features that match paid professional software.
For Win 7 or later (64-bit)
For macOS 10.14 or later
Note: If you don’t have Wondershare Filmora installed, you can get the video editor by visiting its official website . Once the setup program download completes, execute it and begin the installation process.
Once you have the editing software open, follow the steps listed below.
Step 1: Import a video file by clicking on the import window.
The default project setting for Filmora X is 1920x1080 at 25 frames per second. Users can change this to match their video file by going into Project Settings under the File tab or by accepting the automatic prompt that appears when dragging the video file onto the Timeline.

Note: If you have a PC with weak hardware, Wondershare Filmora gives you the option to create Video Proxies that will reduce the load on your computer by creating smaller clips that are lower in size, resulting in a smoother and faster experience. You can also do this in Premiere Pro, but Filmora does it for you automatically once given permission.
Step 2: Drag the video file onto the Timeline to begin previewing it in the Playback Window and commence editing operations.

Step 3: Locate where you want to cut in the video file and click on the orange scissors option to split the video file.

Tip: You can also use the keyboard shortcut (CTRL+B) to cut without using a mouse click, in case you make use of a trackpad while editing.
The Bottom Line
As said earlier, knowing where to cut is essential in improving the feel of your video, and we hope this guide showed you exactly how to perform the actions to create your best project. If you are a beginner, the simplistic approach of Wondershare Filmora will be more welcoming and easier to navigate. In addition, the software is also free to download, with added features that you can activate by paying a monthly, yearly, or one-time fee. Adobe Premiere Pro is an option worth considering if you plan on using third-party plugins and other applications from the Creative Cloud Suite.
Hey! Are You Looking for Video Reverse Effects in Your Videos? Then, You Are at the Right Place. This Article Will Guide You in Creating a Video Reverse Effect
All great video editors use phenomenal video effects in their videos. One of the most professional effects is the reverse video effect. This unique effect is always challenging for the makers to shoot and portray on the screen flawlessly.
At the same time, it is intriguing and always draws the audience’s attention. In this article, you will learn to shoot and edit the video for reverse effects using Filmora. But first, we will learn what does video reverse effect mean. So let us get into this!
Part 1. What Is Video Reverse Effect?
It is a special video effect in which a motion of things starts in the backward direction. This unique effect is used to intrigue the audience.
For example, if a bullet is fired from a gun. With the reverse effect, you can rewind the footage, and the shot goes back into the gun. So today, you can easily rewind fast action scenes and get a wow reaction from the audience.
Famous Examples of Reverse Effect in Films
1- Demolition of a Wall (1896)
Filmmakers first used this striking effect in 1896 in a 90 seconds film, “Demolition of a wall.” Louis Lumiere was the one who made that video. Below is shown an image from the film.

2- Tenet (2020)
It is a viral film by Christopher Nolan, which was a great success. He explained the concept of reverse entropy, in which you start moving back chronologically in time instead of forward. This concept is all shown through this special video reverse effect. Unfortunately, the audience had difficulty digesting this unique concept, which generated an awful response.

Part 2. How To Shoot Video Reverse Effect?
The reverse effect is unique, so special attention should be paid while filming a video. This section will cover some of the crucial prerequisites to film a video.
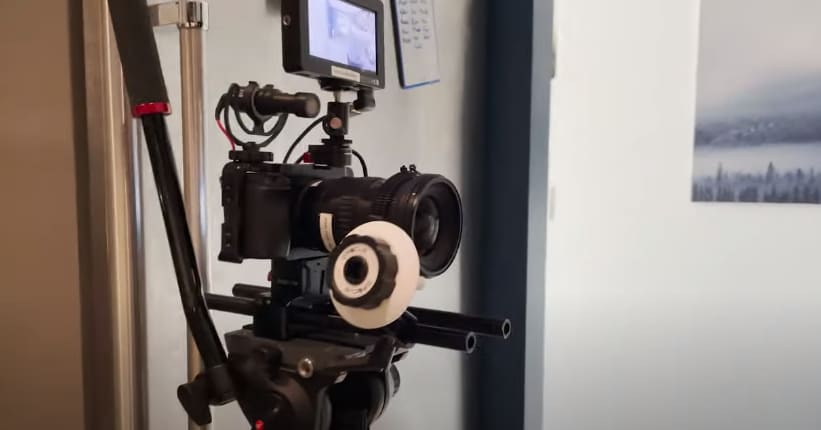
Steady Camera
It would be best to have your camera placed on a steady surface or mounted on a tripod stand to lock the focus. We will split the area and perform different tasks to make it look smooth. The audience will not get the idea that you completed the tasks separately. And it helps in the editing process as well.
A Spacious Area
You will need a spacious area in which you will perform different tasks. Make sure your camera stands still while shooting all the frames of video. In an ample space, it becomes easier to do movements freely. It also helps prevent glitches in the final product.
Splitting of Area into Portions
Now you have to split your area into portions. Each task is in its part of the frame, and actions in one frame should not pass over into another. You will do one activity per portion. It makes the editing process a lot easier. Finally, we get all three videos to merge and make it look like a single video.
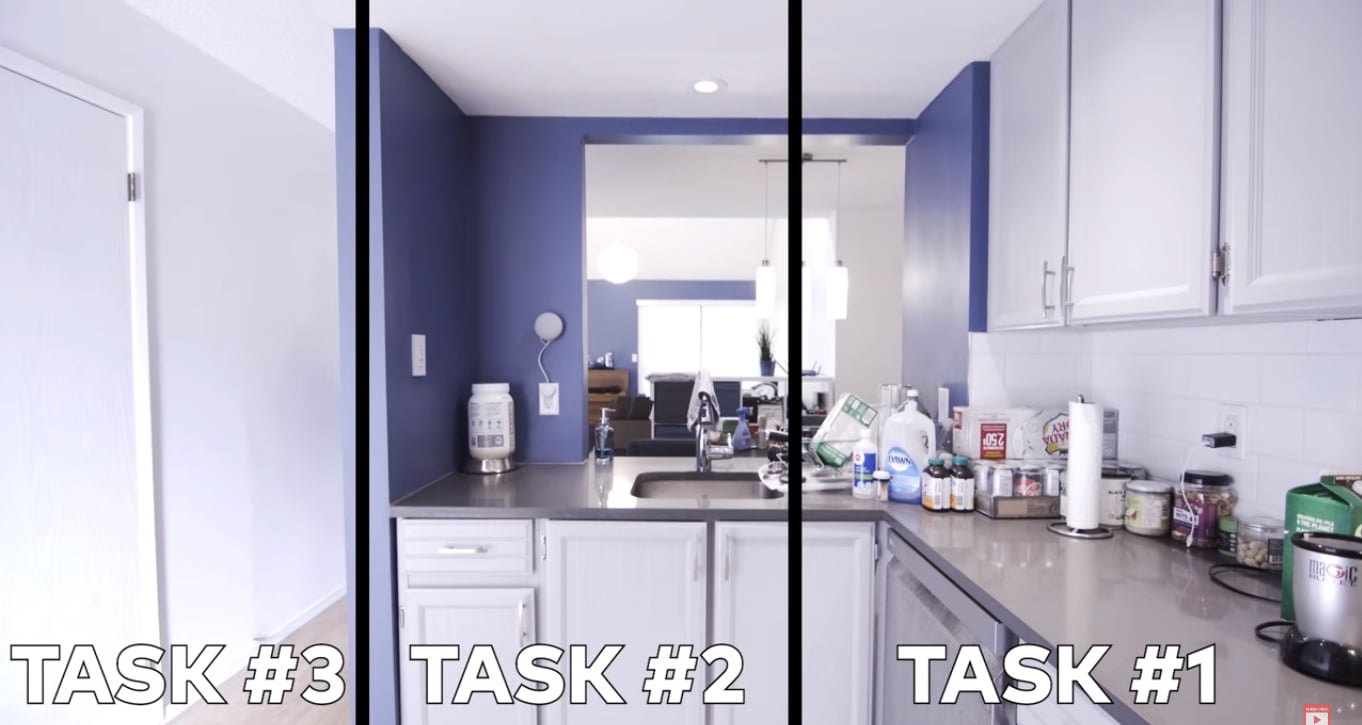
After covering the prerequisites, we will now learn the editing process of creating a video reverse effect.
Part 3. How To Edit Video Reverse Effect In Filmora? [Stepwise Guide]
Creating video reverse effects is much easier these days. Wondershare Filmora is going to help you a lot. Filmora is an exceptional platform for creating innovative and creative videos. It has advanced editing features, which help make professional videos.
Free Download For Win 7 or later(64-bit)
Free Download For macOS 10.14 or later
Applying video reverse effects to your shots here is a wise guide. Please follow the instructions given below.
Step1 Downloading Filmora and Importing Files
- After recording your shots, you will edit them in Filmora. But first, download Filmora from the website and install it.
- After opening the software, import the recording files by clicking “Import Media.”

Step2 Drag the Shots to the Timeline
- Drag the shots to the timeline and drop it. If Filmora asks for a matching resolution on the timeline, please click “Match to Media.” It will adjust your media resolution according to the timeline.
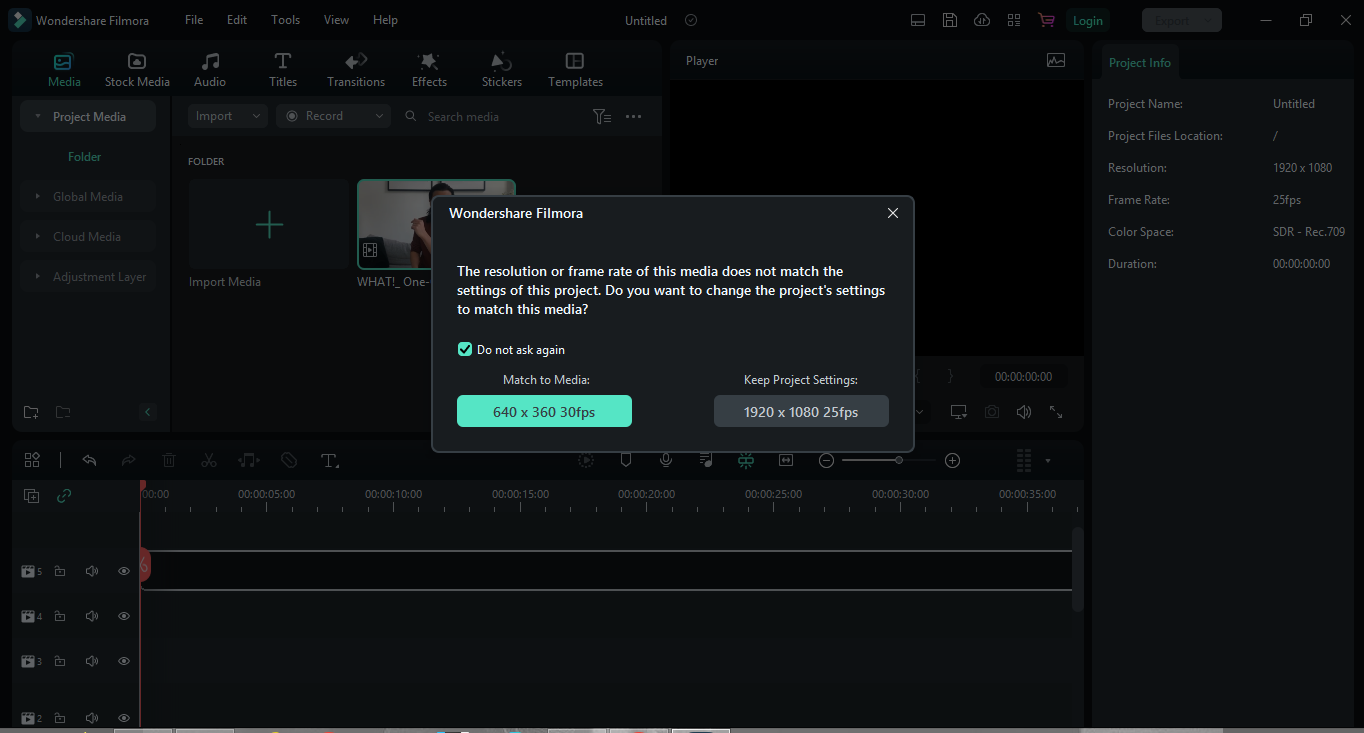
- Add videos of each action on the layers above by drag and drop.
Step3 Adding Image Mask to the Clips
- Now you will add an image mask to the clips you shot at the area’s corners.
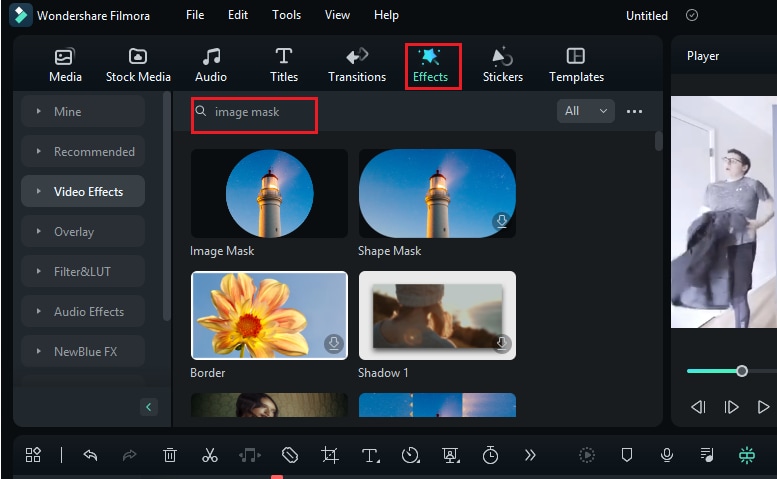
- To simultaneously show each action in the final video, go to “Effects” and click on the search tab.
- Please search “Image Mask.”
- Now drag and drop this effect to the footage shot at corners of the area.
Step4 Adjustment of the Image Mask of each Footage
- Now we will adjust the image mask of each footage so that each will show the task without any glitches.
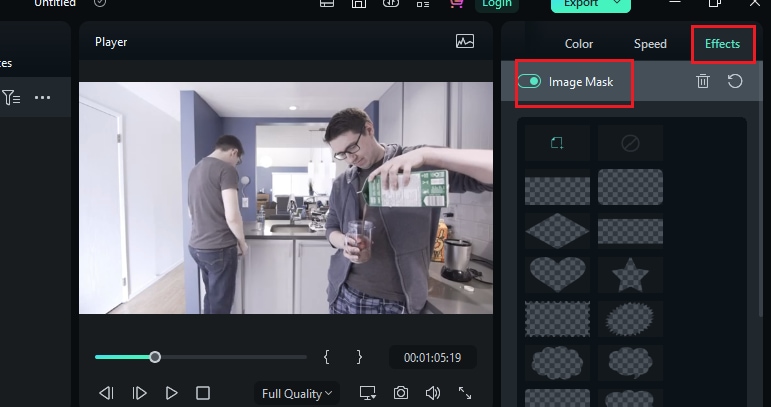
- For that purpose, double-click on the video. Next, click on “Effects” in the top right corner of the screen. Then select “Image Mask” and make the necessary adjustments so that each mask shows each footage.
Step5 Trimming the Video Clip
- You can trim the footage to create a smooth movement in each portion. In this way, all the clips gel together in a single frame.

- We have successfully gelled together three video clips in a single frame.
- But all these videos are moving forward. So let us now apply the reverse effect to a video clip.
Step6 Apply Reverse Speed to Video Clip
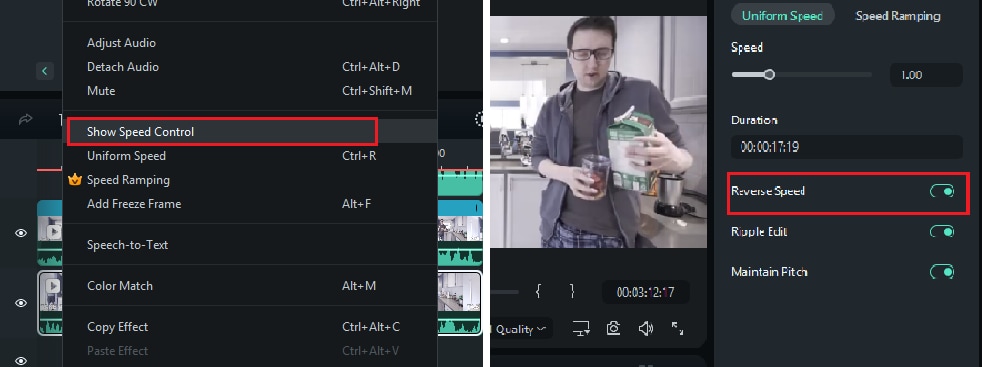
- Please right-click on the video and select “Show speed control.”
- The Control panel will open in the right corner of the screen.
- Then enable the “Reverse Speed” option. You will apply a reverse effect to that clip.
- Your video is ready now, with one clip moving in reverse and two in the forward direction.
- Take a look at the preview of your final product.
- Apply some changes to it if needed.
Step7 Export the Final Project
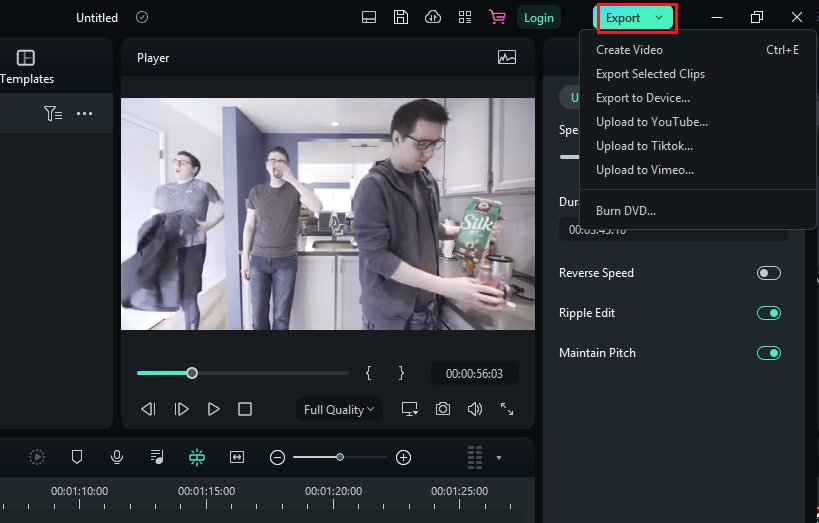
- Now it’s time to export the project to the device.
- Please select “Export” in the top right corner of the screen. And ship it to the device.
Step8 Final Video
Now have a look at the final project. How smooth and perfect it looks. That’s it!

Conclusion
The reverse video effect has a unique characteristic of its own. And it will always work when you use it in your videos. The great success of many popular films is evident by the captivating feature that this effect has got. In this article, we have discussed the prerequisites and steps of creating a reverse video effect.
If this article has helped you, please mention your experience in the comment box. Also, please share this article with your friends and colleagues. Keep creating 
Applying video reverse effects to your shots here is a wise guide. Please follow the instructions given below.
Step1 Downloading Filmora and Importing Files
- After recording your shots, you will edit them in Filmora. But first, download Filmora from the website and install it.
- After opening the software, import the recording files by clicking “Import Media.”

Step2 Drag the Shots to the Timeline
- Drag the shots to the timeline and drop it. If Filmora asks for a matching resolution on the timeline, please click “Match to Media.” It will adjust your media resolution according to the timeline.

- Add videos of each action on the layers above by drag and drop.
Step3 Adding Image Mask to the Clips
- Now you will add an image mask to the clips you shot at the area’s corners.
- To simultaneously show each action in the final video, go to “Effects” and click on the search tab.
- Please search “Image Mask.”
- Now drag and drop this effect to the footage shot at corners of the area.

Step4 Adjustment of the Image Mask of each Footage
- Now we will adjust the image mask of each footage so that each will show the task without any glitches.
- For that purpose, double-click on the video. Next, click on “Effects” in the top right corner of the screen. Then select “Image Mask” and make the necessary adjustments so that each mask shows each footage.

Step5 Trimming the Video Clip
- You can trim the footage to create a smooth movement in each portion. In this way, all the clips gel together in a single frame.

- We have successfully gelled together three video clips in a single frame.
- But all these videos are moving forward. So let us now apply the reverse effect to a video clip.
Step6 Apply Reverse Speed to Video Clip
- Please right-click on the video and select “Show speed control.”
- The Control panel will open in the right corner of the screen.
- Then enable the “Reverse Speed” option. You will apply a reverse effect to that clip.

- Your video is ready now, with one clip moving in reverse and two in the forward direction.
- Take a look at the preview of your final product.
- Apply some changes to it if needed.
Step7 Export the Final Project
- Now it’s time to export the project to the device.
- Please select “Export” in the top right corner of the screen. And ship it to the device.

Step8 Final Video
Now have a look at the final project. How smooth and perfect it looks. That’s it!

Conclusion
The reverse video effect has a unique characteristic of its own. And it will always work when you use it in your videos. The great success of many popular films is evident by the captivating feature that this effect has got. In this article, we have discussed the prerequisites and steps of creating a reverse video effect.
If this article has helped you, please mention your experience in the comment box. Also, please share this article with your friends and colleagues. Keep creating!
Also read:
- Updated 2024 Approved Learn Top Best Free LUTs For Premiere Pro
- New In 2024, How To Trim Video In Premiere Pro in Different Ways
- This Article Will Help You Understand How to Create Flying Objects Using Editing Tools Such as Wondershare Filmora for 2024
- If You Are Wondering How to Play a Slideshow in PowerPoint Automatically, This Article Is for You. Here We Will Be Looking at How to Add a Slideshow in PowerPoint and Other Relevant Headings that Would Help You Quickly Work on a PowerPoint
- Updated How to Add a Lower Third to Your Video for 2024
- New Best Animated Video Makers
- New In 2024, Quick Answer What Is a GIF File?
- In 2024, Fun & Easy Masking Tricks in Filmora
- In 2024, Recording Slow-Motion Videos Is Not More Difficult Using a Smartphone. Learn Everything From How to Record Slow-Motion Video and Edit a Video to Slow Down It
- New Step by Step to Resize Video in Davinci Resolve for 2024
- New 3 Methods to Combine 2 or 3 Videos Into 1 for 2024
- 2024 Approved Confused as to How to Add Subtitles to a Video on iPhone? No Worries as We Bring You the Best Solution to Get the Task Done
- New Are You the One Who Is Confused About What to Opt Between Camtasia vs Captivate? No More Confusion! Here We Are Going to Reveal the Answer to Camtasia vs Captivate Which Is Better? Learn More
- Updated EasyHDR Review Is This a Good Choice to Create HDR
- In 2024, A Complete Guide to the Best Brand Story Videos
- Updated Top 6 Drones for Videography
- The way to recover deleted pictures on Motorola Moto G84 5G without backup.
- How to Reset Gmail Password on Xiaomi 14 Devices
- How Can We Bypass Honor Magic 5 FRP?
- How Can I Unlock My Apple iPhone 15 Pro After Forgetting my PIN Code?
- 4 Things You Must Know About Apple iPhone 15 Plus Activation Lock
- How To Factory Unlock Your Telstra Apple iPhone 15
- In 2024, How to Remove an AirTag from Your Apple ID Account From Apple iPhone 11 Pro?
- Android Call History Recovery - recover deleted call logs from Xiaomi Redmi Note 13 Pro 5G
- Fake the Location to Get Around the MLB Blackouts on Samsung Galaxy M14 4G | Dr.fone
- In 2024, 7 Ways to Unlock a Locked Realme Narzo 60 Pro 5G Phone
- How to Exit Android Factory Mode On Honor Magic Vs 2? | Dr.fone
- Title: New 2 Actionable Ways to Extract Subtitles From MKV Videos without Quality Loss
- Author: Chloe
- Created at : 2024-06-26 06:24:35
- Updated at : 2024-06-27 06:24:35
- Link: https://ai-editing-video.techidaily.com/new-2-actionable-ways-to-extract-subtitles-from-mkv-videos-without-quality-loss/
- License: This work is licensed under CC BY-NC-SA 4.0.

