
New 2024 Approved 2 Effective Ways to Add Text Behind Objects
2 Effective Ways to Add Text Behind Objects
Adding text behind objects in your videos can be a great way to start your videos. For example, you can do so to create an attractive intro or startup a video. So, if you hope to make a video like a pro, let’s learn how to add text behind objects in your videos by Filmora.

Part 1. What Are The Benefits of Adding Text Behind Objects in Videos?
Your videos must maintain quality to create content worthy of a huge audience. You may have a YouTube channel or be starting down the road. Then you must give this a try because
Give a cool look
Adding text behind an object in a video looks cool! Now, your object could be a silhouette of a person or a huge skyscraper. You can add a text tile behind the object, creating the illusion. Due to this, the text will be flying in real-time.
Show creativity
Blasting your channel with innovative and creative content is the key to building a big audience. But, of course, you can always opt for many ways to create a video showing your creativity. One of those ways is to add text behind your object.
You can create an attractive intro by adding text behind objects that captivate the viewer. It ensures that your subscribers stay tuned to your channel and your content.
Build up a solid audience
Every day can be a real struggle if you are a daily content creator on YouTube. The audience demands good content. But your daily videos can get boring if you do not use new methods to edit your videos.
You can add text behind videos to spice up your intros and hook your daily audience even more. That will show the audience that you are genuinely putting in the effort.
Part 2. What Will You Need To Add Text Behind Videos?
Now there are a few things that you will need to add text behind videos. First, take a look at the basic priorities to perform this feature.
1. A Static Object Video
Adding text behind an object can be tricky if the object isn’t static. For example, the effect will be ruined if an object moves around a lot in a video.
Our goal is to create a smooth text behind the video effect. And this can only be achieved if the target object remains static in the video and does not move about its position.
2. A Video Editing Software - Wondershare Filmora
Once you select a video source, you aim to add it to a video editor. For this purpose, Wondershare Filmora would be your best choice. Wondershare Filmora allows you to create innovative and attractive videos.
Free Download For Win 7 or later(64-bit)
Free Download For macOS 10.14 or later
It has a very engaging system UI, allowing even beginner users to get their hands on it instantly. You will learn how to add text behind your videos with a few simple steps.

Now that you know the requirements for the video, let’s move on to the step-by-step guide to add text to your video.
Part 3. Step-by-Step Guide To Add Text Behind Videos
We look at two examples of how to add text behind videos in Wondershare Filmora.
- A static video with an object that can be easily masked out.
- A video with high contrast and a clean background.
Add Text behind a Static Video
First, we will go with adding text behind a static object. For this, scroll more to get the step-by-step process.
Step1 Download Wondershare Filmora
If you are a beginner just starting in the video editing business, Wondershare Filmora is the best choice. Follow the steps below to download the free version of Wondershare Filmora:
- First, download the Wondershare Filmora on your PC or Mac.
- Open the setup and install the Wondershare Filmora.
After downloading the Wondershare Filmora software, let’s edit the video. Scroll below to learn how to start the editing process!
Step2 Add the Video to the Timeline
We will first look at the static video example. For this, follow the below instructions:
- You have to start by importing your video in the import library.
- From the import library, you can click on the video and drag it down below to the timeline.

![]()
Note: Adding video to the timelines will allow you to create a workspace to edit your video.
Now let’s move on to how we will add the text tile to our video.
Step3 Add the Text Tile
It is time to add the text tile you will animate behind the object. To do that, follow the steps mentioned as such.:
- Go to the Titles icon on the bar above the import library.
- A drop-down option will be available on the left side.
- Scroll down to the Plain text.
- Here, you can see many text tiles to add to your video.
- You can choose anyone you like.
- The most commonly used tile is the Basic 6.
- When you add the text tile to the timeline, you must ensure that the text is of equal length to the video.
- To do that, drag the right corner of the text tile and drag it to the right to match the length of the video.

Step4 Edit the Text Tile
After you have added the text tile you desire, you need to type in the text. For this article, we will keep it simple. We will be typing a simple statement such as “Hello, World.“
- Double-click the Text tile to open the settings menu.
- After the settings menu is opened, type in the text box on the import window.
You will notice changes on the main window that your text has changed.

- After the text appears, you can make the font look as desired.
- Look above the text window, and you will see the type of text font selected.
- Click on the drop-down option and choose whatever you like.
Let’s move on to animate the text tile.
Step5 Animate the text tile
After adding text, it is time to animate it. This animation will decide how your text will appear behind the target object.
- First, you must open the text settings by double-clicking on the text tile in the timeline.
- In the settings opened in the import window, you will have to click on the animation tab in the upper left corner, aside from the Preset
- Now scroll down to where you will see the Right Roll
- Click on Right Roll and then click on the OK in the bottom right corner of the import window.

![]()
Note: You may notice now that the text appears in front of our object. Don’t worry now! We are getting there. With a few simple steps, we will see the results.
Now let us move on to the more significant part of the editing, masking the object. Again, look ahead to see how you can mask the object!
Step6 Mask the Object
To mask our object, we will need to be technical. We will begin by adding the same footage of the static object on our timeline. Follow the steps mentioned below:
- Drag and drop the static object footage above the timeline text. Make sure the text stays in the middle of the sandwich.

- We will hide the video in the first track to simplify things. In addition, this will make our editing easier.
- We will have to look in the effects library to insert the masking effect.
- You can see the Effects icon on the bar at the top.
- Click on the Effects.
- You will see the search bar at the top of the import window.
- In the search bar, type in Image mask.
- Drag the Image mask effect on the video above the text tile.
Now the masking effect has been added. But we would have to adjust so that it stays upon our object.
- Double-click on the video and the settings option will open up.
- Go into the Effects
![]()
Note: You must select your target object’s mask shape exactly as its shape.
- We have to mask out a building, so that we will need a vertical rectangle.

- After you have selected the shape of your object, we will need to convert it to the object’s size so that it only masks the building.
- To do that, scroll down below the import window to the settings.
- Here you can see the X, Y, and width settings.
- First, move the width bar so that it matches the width of the building.

- Now drag the X bar until the mask is confined to the building. You would have created the mask only limited to the building.

- Once you complete this step, click OK in the bottom right corner.
- Now un-hide the original video that you imported in the beginning.
Finally, play the video in the main play window from the beginning.

You have successfully created a text behind the object effect. Now that you know how to add text behind static objects let us move to learn how to add text to a video that has high contrast and a clean background.
Add text behind a high contrast and clean background
Besides the text can be added behind a static object, it can also be added to a clean background with high contrast. But how is it? Let’s dive into it.
Step1 Import the video into the timeline
- Import the video from the location in your PC media.
- When imported, drag and drop it onto the timeline.

Step2 Add the text tile
To add the text to your video, follow the steps mentioned below.
- Click on the titles icon on the bar above the import window.
- On the left drop-down option, scroll down to the titles.
- Select the Plain text option.
- You will notice that multiple options will pop up in the import window.
- Select the text title that suits you best.
- After you have selected the text style, drag and drop it down above your video in the timeline.

- Our next step would be to add the text.
- Double-click on the text tile. Doing so will open the settings menu in the import window.
- Type in the text that you want. For reference, we will keep it simple such as, “Hello world.”
- You can also adjust the font of your text.
- Above the type box, a drop-down option will show you the range of fonts available.
- Select the font you desire.

Now that you have added the text, it is time to animate it.
Step3 Take a snapshot
After typing in the text, you will notice in the main play window that your text still appears in front of your object. Therefore, we want to take it behind the object. To do so, first, you will need to take a snapshot.
Follow the steps mentioned to take a snapshot:
- Hide the main video. You can see the Eye icon aside from your main video in the edit column on the left side of the timeline.
- Click on the Eye icon to hide the main video.
- In the main play window, you will notice that the screen turns black, which leaves only the text on the screen.

- In the main play screen, you can notice a small camera icon.
- This camera icon is used to take snapshots of your screen.
- Click on the camera icon to take a snapshot of your screen.
- Your snapshot will now be saved in the main import window.

Now that we have taken a snapshot, we will need to import it into the timeline. Scroll below for more.
Step4 Add the snapshot
After taking it, your goal is to import it into the timeline. To perform this action, perform the following steps:
- Before adding the snapshot to the timeline, we must delete the main text tile.
- Then drag and drop the snapshot from the import library into the timeline above the video.
- Make sure that the snapshot is aligned well with the length of the video.
- If it is longer than the video, drag it from the right to match the length of the video.
- If its length is smaller than the video, drag it to the right to increase its length.

After adding the snapshot, we will have to change its blending mode.
Step5 Change the blending of the snapshot
To create the effect of your text behind the video, you must alter the main text’s blending mode. In this case, it will be the snapshot we took.
![]()
Note: Changing the blending mode of the snapshot will allow it to blend with the transparent background and will create the effect of the text behind the object in the video.
Follow the steps mentioned below to change the blending of the snapshot:
- Double-click the snapshot.
- If you select the compositing tab, the blending options will pop up.
- From default, it would be set to Normal. Click on the Normal
- It will show a drop-down option.
- Scroll down below until you can see an option labeled Then click on Overlay.

- And press OK in the bottom right corner to confirm your changes.
The text can be blended with the background.
- Click on the Eye icon to un-hide the video from the timeline.
- Now play the video from the start from the main play screen to see the final changes.

Congratulations! The above steps allow you to add text behind objects in your videos.
Conclusion
Modern media is full of creative content. And if you are a content creator that wants to make it through the world of YouTube and video creating, you need to be the best. You can only be the best at what you do if you keep pushing the boundaries of your creativity.
Adding text behind objects could be the first step in making your intros shine with creativity and innovation. It allows you to maintain and build your viewing audience. The more the audience, the more your content gets watched!
Free Download For macOS 10.14 or later
It has a very engaging system UI, allowing even beginner users to get their hands on it instantly. You will learn how to add text behind your videos with a few simple steps.
Now that you know the requirements for the video, let’s move on to the step-by-step guide to add text to your video.
Part 3. Step-by-Step Guide To Add Text Behind Videos
We look at two examples of how to add text behind videos in Wondershare Filmora.
- A static video with an object that can be easily masked out.
- A video with high contrast and a clean background.
Add Text behind a Static Video
First, we will go with adding text behind a static object. For this, scroll more to get the step-by-step process.
Step1 Download Wondershare Filmora
If you are a beginner just starting in the video editing business, Wondershare Filmora is the best choice. Follow the steps below to download the free version of Wondershare Filmora:
- First, download the Wondershare Filmora on your PC or Mac.
- Open the setup and install the Wondershare Filmora.
After downloading the Wondershare Filmora software, let’s edit the video. Scroll below to learn how to start the editing process!
Step2 Add the Video to the Timeline
We will first look at the static video example. For this, follow the below instructions:
- You have to start by importing your video in the import library.
- From the import library, you can click on the video and drag it down below to the timeline.
![]()
Note: Adding video to the timelines will allow you to create a workspace to edit your video.
Now let’s move on to how we will add the text tile to our video.
Step3 Add the Text Tile
It is time to add the text tile you will animate behind the object. To do that, follow the steps mentioned as such.:
- Go to the Titles icon on the bar above the import library.
- A drop-down option will be available on the left side.
- Scroll down to the Plain text.
- Here, you can see many text tiles to add to your video.
- You can choose anyone you like.
- The most commonly used tile is the Basic 6.
- When you add the text tile to the timeline, you must ensure that the text is of equal length to the video.
- To do that, drag the right corner of the text tile and drag it to the right to match the length of the video.
Step4 Edit the Text Tile
After you have added the text tile you desire, you need to type in the text. For this article, we will keep it simple. We will be typing a simple statement such as “Hello, World.“
- Double-click the Text tile to open the settings menu.
- After the settings menu is opened, type in the text box on the import window.
You will notice changes on the main window that your text has changed.
- After the text appears, you can make the font look as desired.
- Look above the text window, and you will see the type of text font selected.
- Click on the drop-down option and choose whatever you like.
Let’s move on to animate the text tile.
Step5 Animate the text tile
After adding text, it is time to animate it. This animation will decide how your text will appear behind the target object.
- First, you must open the text settings by double-clicking on the text tile in the timeline.
- In the settings opened in the import window, you will have to click on the animation tab in the upper left corner, aside from the Preset
- Now scroll down to where you will see the Right Roll
- Click on Right Roll and then click on the OK in the bottom right corner of the import window.
![]()
Note: You may notice now that the text appears in front of our object. Don’t worry now! We are getting there. With a few simple steps, we will see the results.
Now let us move on to the more significant part of the editing, masking the object. Again, look ahead to see how you can mask the object!
Step6 Mask the Object
To mask our object, we will need to be technical. We will begin by adding the same footage of the static object on our timeline. Follow the steps mentioned below:
- Drag and drop the static object footage above the timeline text. Make sure the text stays in the middle of the sandwich.
- We will hide the video in the first track to simplify things. In addition, this will make our editing easier.
- We will have to look in the effects library to insert the masking effect.
- You can see the Effects icon on the bar at the top.
- Click on the Effects.
- You will see the search bar at the top of the import window.
- In the search bar, type in Image mask.
- Drag the Image mask effect on the video above the text tile.
Now the masking effect has been added. But we would have to adjust so that it stays upon our object.
- Double-click on the video and the settings option will open up.
- Go into the Effects
![]()
Note: You must select your target object’s mask shape exactly as its shape.
- We have to mask out a building, so that we will need a vertical rectangle.
- After you have selected the shape of your object, we will need to convert it to the object’s size so that it only masks the building.
- To do that, scroll down below the import window to the settings.
- Here you can see the X, Y, and width settings.
- First, move the width bar so that it matches the width of the building.
- Now drag the X bar until the mask is confined to the building. You would have created the mask only limited to the building.
- Once you complete this step, click OK in the bottom right corner.
- Now un-hide the original video that you imported in the beginning.
Finally, play the video in the main play window from the beginning.
You have successfully created a text behind the object effect. Now that you know how to add text behind static objects let us move to learn how to add text to a video that has high contrast and a clean background.
Add text behind a high contrast and clean background
Besides the text can be added behind a static object, it can also be added to a clean background with high contrast. But how is it? Let’s dive into it.
Step1 Import the video into the timeline
- Import the video from the location in your PC media.
- When imported, drag and drop it onto the timeline.
Step2 Add the text tile
To add the text to your video, follow the steps mentioned below.
- Click on the titles icon on the bar above the import window.
- On the left drop-down option, scroll down to the titles.
- Select the Plain text option.
- You will notice that multiple options will pop up in the import window.
- Select the text title that suits you best.
- After you have selected the text style, drag and drop it down above your video in the timeline.
- Our next step would be to add the text.
- Double-click on the text tile. Doing so will open the settings menu in the import window.
- Type in the text that you want. For reference, we will keep it simple such as, “Hello world.”
- You can also adjust the font of your text.
- Above the type box, a drop-down option will show you the range of fonts available.
- Select the font you desire.
Now that you have added the text, it is time to animate it.
Step3 Take a snapshot
After typing in the text, you will notice in the main play window that your text still appears in front of your object. Therefore, we want to take it behind the object. To do so, first, you will need to take a snapshot.
Follow the steps mentioned to take a snapshot:
- Hide the main video. You can see the Eye icon aside from your main video in the edit column on the left side of the timeline.
- Click on the Eye icon to hide the main video.
- In the main play window, you will notice that the screen turns black, which leaves only the text on the screen.
- In the main play screen, you can notice a small camera icon.
- This camera icon is used to take snapshots of your screen.
- Click on the camera icon to take a snapshot of your screen.
- Your snapshot will now be saved in the main import window.
Now that we have taken a snapshot, we will need to import it into the timeline. Scroll below for more.
Step4 Add the snapshot
After taking it, your goal is to import it into the timeline. To perform this action, perform the following steps:
- Before adding the snapshot to the timeline, we must delete the main text tile.
- Then drag and drop the snapshot from the import library into the timeline above the video.
- Make sure that the snapshot is aligned well with the length of the video.
- If it is longer than the video, drag it from the right to match the length of the video.
- If its length is smaller than the video, drag it to the right to increase its length.
After adding the snapshot, we will have to change its blending mode.
Step5 Change the blending of the snapshot
To create the effect of your text behind the video, you must alter the main text’s blending mode. In this case, it will be the snapshot we took.
![]()
Note: Changing the blending mode of the snapshot will allow it to blend with the transparent background and will create the effect of the text behind the object in the video.
Follow the steps mentioned below to change the blending of the snapshot:
- Double-click the snapshot.
- If you select the compositing tab, the blending options will pop up.
- From default, it would be set to Normal. Click on the Normal
- It will show a drop-down option.
- Scroll down below until you can see an option labeled Then click on Overlay.
- And press OK in the bottom right corner to confirm your changes.
The text can be blended with the background.
- Click on the Eye icon to un-hide the video from the timeline.
- Now play the video from the start from the main play screen to see the final changes.
Congratulations! The above steps allow you to add text behind objects in your videos.
Conclusion
Modern media is full of creative content. And if you are a content creator that wants to make it through the world of YouTube and video creating, you need to be the best. You can only be the best at what you do if you keep pushing the boundaries of your creativity.
Adding text behind objects could be the first step in making your intros shine with creativity and innovation. It allows you to maintain and build your viewing audience. The more the audience, the more your content gets watched!
What You Should Know About Speech-to-Text Technology
Speech-to-text technology (STT) improves communication, especially in a multi-language setting. One of the ways we practice multilingualism is via speech-to-text technology: speakers input a language, and viewers read another language. Other advantages include converting oral speech into a document, real-time compatibility, and offline usage. This article explains how you can utilize speech-to-text assistance technology for optimal productivity.

Part 1: What is speech-to-text technology?
Speech-to-text technology (STT) identifies oral pronunciation and converts them into computer codes: electronic words. The computer electro-communication requires a medium of conversion: receiver and interpreter. Therefore, speech-to-text technology contains both the receiver and interpreter, which exist electronically. The medium or receiver can be software installed on a device; it must have a receiver and a screen. The computer serves a good purpose, although other devices can receive words without displaying them.
A speech-to-text technology does not necessarily have to contain displaying screen: a sound interpreter may replace the screen. Thus, speech-to-text can be oral words - electronic recognition - word encoding - display, or recitation. Oral wordings are the human’s contribution to speech-to-text technology, although all communication (especially speech) may be generated from a computer. Inter-device communication is another advancement of speech-to-text technology. For example, combining one or more devices allow you to use speech-to-text assistance technology in different languages.
Communication is the paramount importance in speech-to-text technology. Still, some advantages include easy data conversion, documentation, workflow flexibility, and easy access to data. For example, documentation is incomplete if every human cannot access the file. All humans cannot read; improvising data into oral documents reduces the percentage of people who cannot access the file. Speech-to-text increases the channel for less privileged individuals. For instance, the deaf who cannot listen to a recorded file can read the file via speech-to-text technology.
Speech-to-text technology incorporates many advantages. Learning to use the technology is the first step in familiarizing and getting yourself equipped.
Part 2: What are the stages for the technology?
STT gives so many stages and applications for a daily and smooth organization. Some include:
1. Education
Education and the love to study other languages increase with speech-to-text technology. The educative application is not limited to four corners of the room; it extends to all daily learning activities. Communication is educative if you learn new things via communication.
STT improves all processes associated with less privileged education. For example, everyone easily pours their mind into a computer screen page when they speak, especially in the language they understand using STT. Time and submission date are important factors in the educational system; STT improves time, submission, accuracy, and authentication.
2. Video Subtitles
Videography and filmmaking carry a large percentage of today’s media. Data input and integration in the video-making process weigh a lot, and the concept of STT reduces the load on the data specialist. Instead of long hours of typing, oral communication is applicable. Processing time is a factor of productivity; STTs do not only affect the time of production but also maintain accuracy.
3. Chatbots
Chatbots are available on websites. Users have different preferences: some can type while others like to communicate via speech. The chatbots attend to users’ needs; you can do more with STT if installed on the website. STT promotes freedom of communication and increases user interaction on your website. STT may be incorporated into mobile applications too. There is more to STT, and the advantage is unlimited if you add it to your chatbots.

4. Translation
Translation is the interconversion of languages. The main reason translation is important is because communication is essential; without communication, production will be static. STT is among the tool that elevates productivity via communication. For example, STT improves communication in a situation where more than one language combines as one.
Part 3: What are the best STT Technology provider
1. Amazon web services
STT is one of the services in the Amazon web services. The STT is available for all users who subscribe to one or more Amazon services. Some features include unlimited conversion, easy download, and availability in multiple formats. To get started, you need to sign up for a free AWS account and begin to enjoy the offer. Although the services are available for all users, limitations, and upgrades come a few times when you must pay for certain premium services.

2. Google docs voice typing
Google docs voice typing is available for all Google users. You can access the Google docs voice typing provided you are on a service by Google. The service is available on the Google docs application - one of the services created by Google. Google docs are free for download and available for desktop and mobile users.

3. Wondershare Filmora
Wondershare Filmora STT is quite different with other STT service providers. Other STT platforms/stages require you to use the application to convert speech-to-text, save, and export into other third-party software. However, Wondershare Filmora allows you to directly convert your speech-to-text on an ongoing production. For example, you can convert speech into subtitles during a video production on Wondershare Filmora.

4. Microsoft dictate
The Microsoft dictate shows to have the same build-up as the Microsoft Cortana Virtual Assistant. It gives free access to all users who convert speech-to-text without subscribing to any platform. The Microsoft dictate is a default option for many Microsoft devices and partners’ software. Microsoft dictates accuracy is appreciable; it is likewise easy to use.

Conclusion
How much do you know about speech to text technology now? It’s convenient indeed and do choose the service that suits you the best!
Free Download For Win 7 or later(64-bit)
Free Download For macOS 10.14 or later
Free Download For macOS 10.14 or later
How To Quickly Create A Screen Print Effect In Photoshop: Detailed Guide
Screen printing is a unique method that uses a mesh to transfer ink onto a surface and is commonly used to print designs onto t-shirts or other garments, such as hoodies, tote bags, and even sneakers.
Nowadays, digital means such as Photoshop or Illustrator are used to create the screen print effect, which is achieved by using a layer mask to cut out a portion of the image and filling it with the color or pattern of your choice. The design is then printed onto fabric using water-based CMYK (cyan, magenta, yellow, black) inks with inkjet printers.
Suppose you’ve ever wanted to create the screen print effect in Photoshop to give that artistic look to your pictures and embed them in your clothes or other accessories but don’t know where to start or are not familiar with the process. In that case, this guide can surely help you figure this out quickly!
So without any delay, let’s get on with it!
How To Use Photoshop To Create The Print Effect
Below we’ve provided a detailed guide using Adobe Photoshop to create the print effect with easy step-by-step instructions.
What Are The Requirements For Creating the Print Effect In PhotoShop?
Before we discuss the complete process of creating the print effect while using Photoshop, here are the resources you have to arrange.
- Picture of the object: We will cut out the object from the original image using the Lasso tool and unsaturate it. However, you have to ensure that the object is clear and easily detectable within the picture.
- A background image: You will need a background image to add the object to. For this, you can use a solid background, capture scenery, etc.
- Fonts: You can also add fonts to the final image to add your ideas or thoughts, making your final project more eye-catching and engaging.
- Photoshop latest version: For this tutorial, we will use the Photoshop CC 2021 version, so make sure to download and install it to your computer immediately!
What Are The Steps To Create Print Effect in PhotoShop?
Now that you know the necessary resources, the following are the steps to create the print effect in Photoshop:
Step1 Launch thePhotoshop program on your laptop/desktop and click “Create New” on the software dashboard. Next, select the page size, such as “letter,” and click “Open.”

Now, click the “File” option in the top toolbar, and from the drop-down menu, select “Open.” Next, choose the image you want to apply the screen print effect by browsing to its location on your computer.

Step2 Next, click the “Lasso” tool from the left-side menu to create the selection around the object in the image.

Press the CMD/Ctrl + C on your computer’s keyboard to copy the selection. Next, click the “Layer“ option in the top toolbar, select “New,” and click “Layer via Copy.”

Step3 Now, hide the background layer in the “Layers” panel on the right-hand side, and you will get your object without any BG. Click the “Image” option in the top toolbar and select “Adjustments.”
Click “Threshold…” from the drop-down menu, and set the “Threshold level.” Alternatively, you can click “Cmd/ctrl+Shift+U” on the keyboard to desaturate the image.

Step4 Next, select the “Magic Eraser Tool” from the left-side menu and remove the white parts to smooth down the background. Afterward, choose the “Move Tool” from the menu and drag your object to a new layer.
To add the background image, click “File” and select “Open.” Next, select the file and again click “Open.”
Step5 Select the object using the “Move Tool” and drag it to the background image layer. If the thing is too large and you want to resize it, select the object using the “CMD/Ctrl” key and click “Edit” from the top toolbar. From the drop-down menu, choose “Transform” and click “Scale.”

Next, drag the handles to adjust the size of the object on the Background image.
Step6 Click the “T” icon from the left-hand side menu and set the font style, color, and size. You can also click the “3D” option to convert your text to a three-dimensional form.

Try removing the left-out white patches on the object using the “Magic Eraser Tool” to give a polished look to the print screen effect. Once you are satisfied, click the “File” option from the top toolbar panel and select “Save As.”
Type in the file name and select the file type from the drop-down menu next to “Save As Type.” Choose the storage location, click “Save” to export your final project, and you’re done!
Conclusion
In this article, we’ve explored what the screen print effect is and how it is used in digital art. We’ve also discussed the requirements and resources you need to use and then demonstrated a step-by-step process of how to create the screen print effect in Photoshop with simple and easy-to-follow instructions.
To make things easy for you, we also added original screenshots while creating a sample project on the software.
Hopefully, this article helped resolve your queries, and you can now give a vintage or retro look to your images using the screen print effect in Photoshop.
Free Download For Win 7 or later(64-bit)
Free Download For macOS 10.14 or later
Free Download For macOS 10.14 or later
How To Split Screen On Tiktok
TikTok is probably the most popular video-sharing app in the world right now. Many TikTokers have become famous for making videos that have a significant impact and encourage creativity and new ideas. One of the most popular TikTok trends is the split-screen effect. You’ve probably seen a lot of TikTok split-screen videos with cool effects that made you wonder how the user split their screen. Becoming skilled in using TikTok effects is not as difficult as it might look. It only requires a significant amount of practice. Read on as we show you how to make a TikTok split-screen video.
Using CapCut To Split Screen
CapCut is the official free TikTok Video Maker and Video Editor with Music for TikTok that is multifunctional. Its interface is quite similar and easy to use.
CapCut includes free advanced capabilities such as keyframe animation, stabilization, and Picture-in-Picture (PIP). These are in addition to its fundamental functions, such as video editing, adding stickers, text, and music.
Steps to Split Screen Video with CapCut On Android and IOS Devices
- To use the app, you need to install it first. iPhone and Android users can download CapCut. Navigate to the appropriate app store of your choice and download CapCut.
- After installation, launch the app.
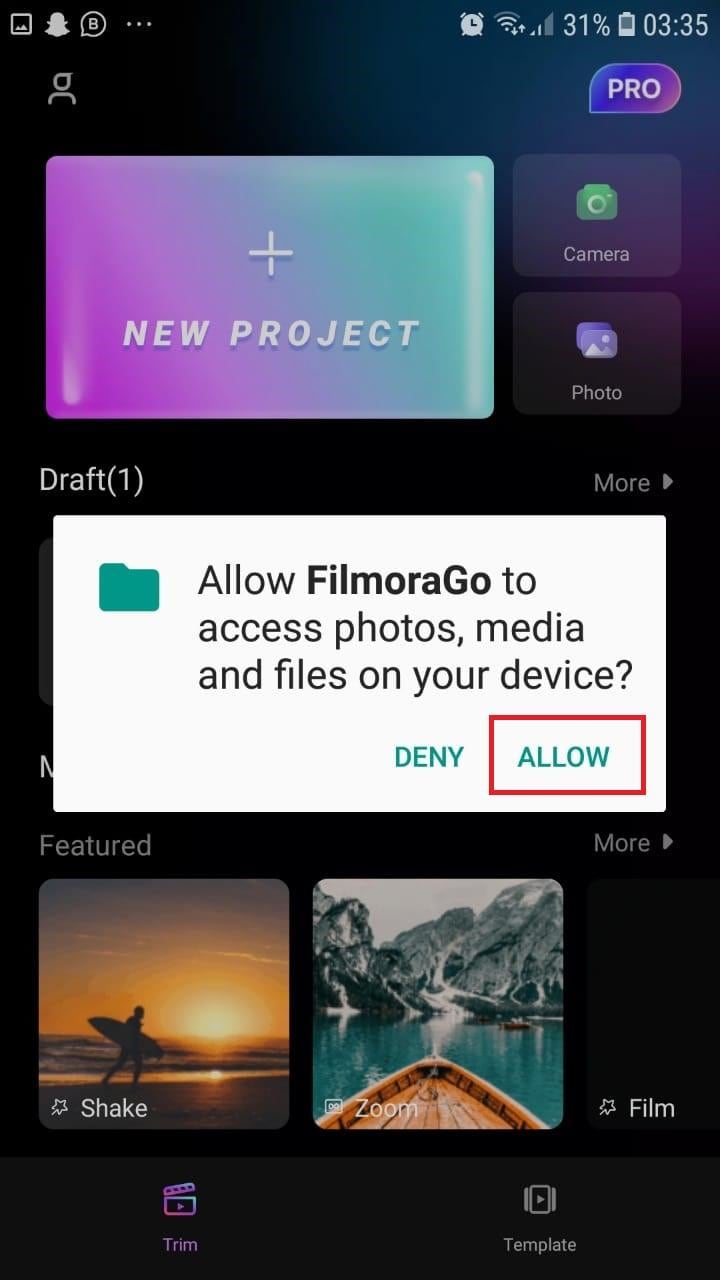
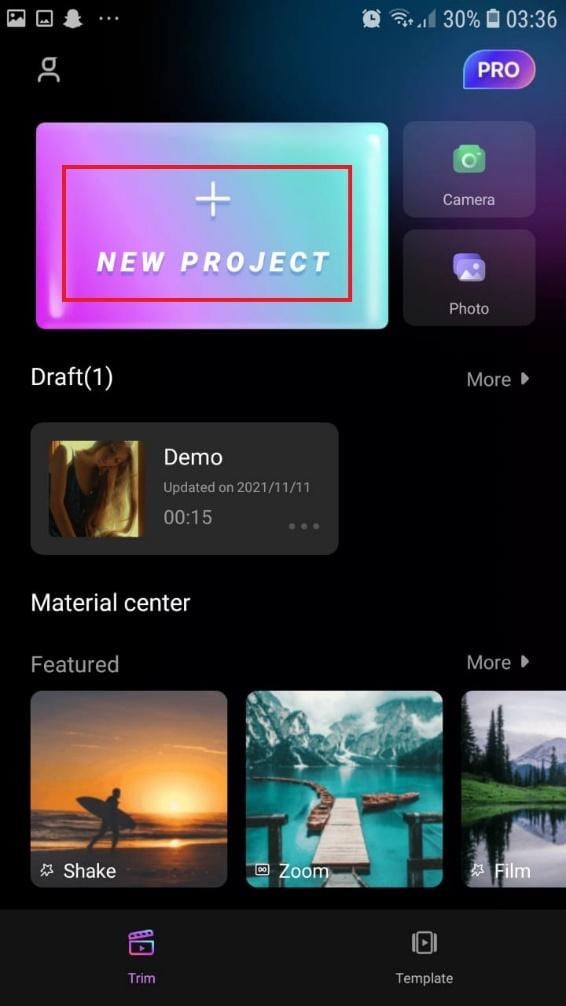
- Then go ahead and grant CapCut permission to view your camera roll. Incorporating video clips into your project has never been easier. Go to the app’s main screen and select “New Project“ from the drop-down menu.
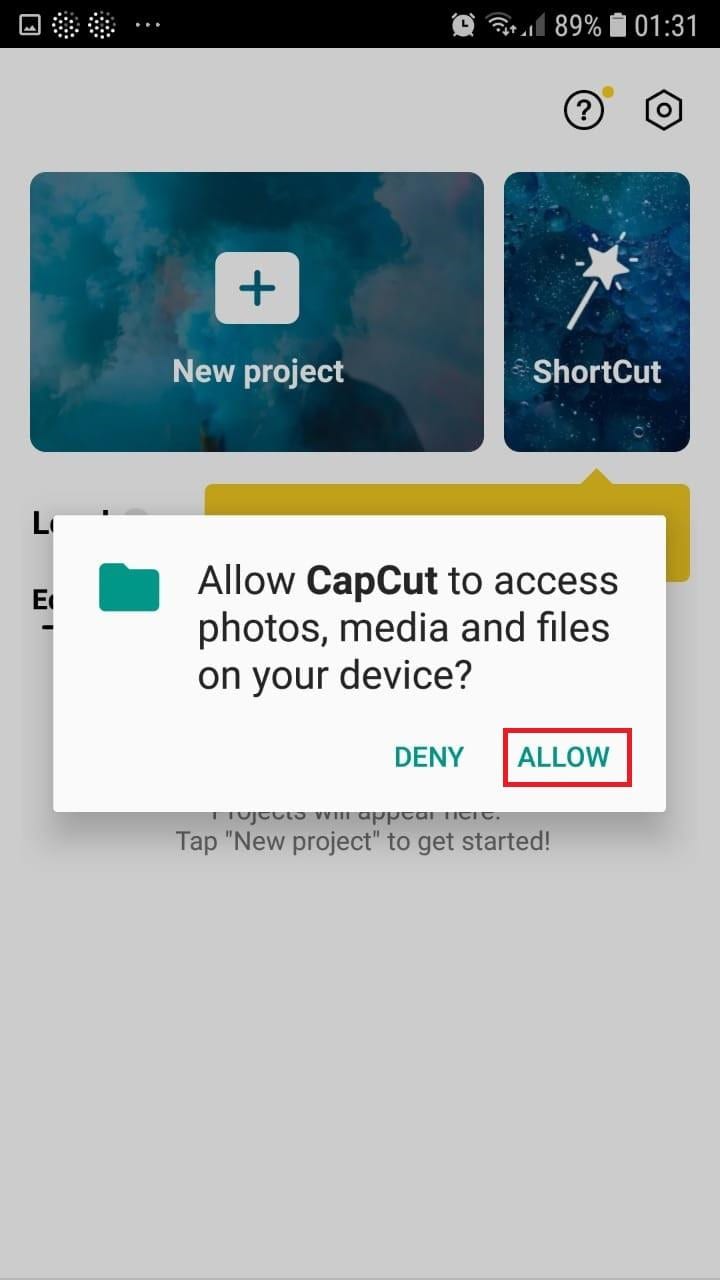
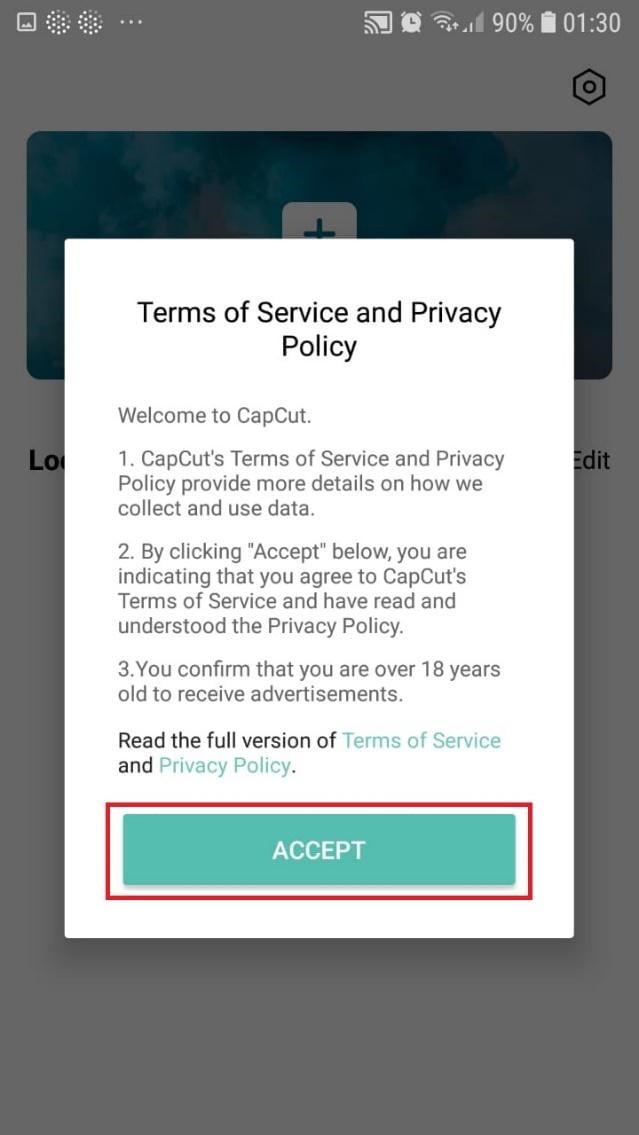
- To confirm your selection, click the green Accept This confirms that CapCut requires access to your photographs to function correctly. Tap on the button on the following pop-up window to gain access to all the photos. This is a one-time process that must be carried out the first time you launch the application.
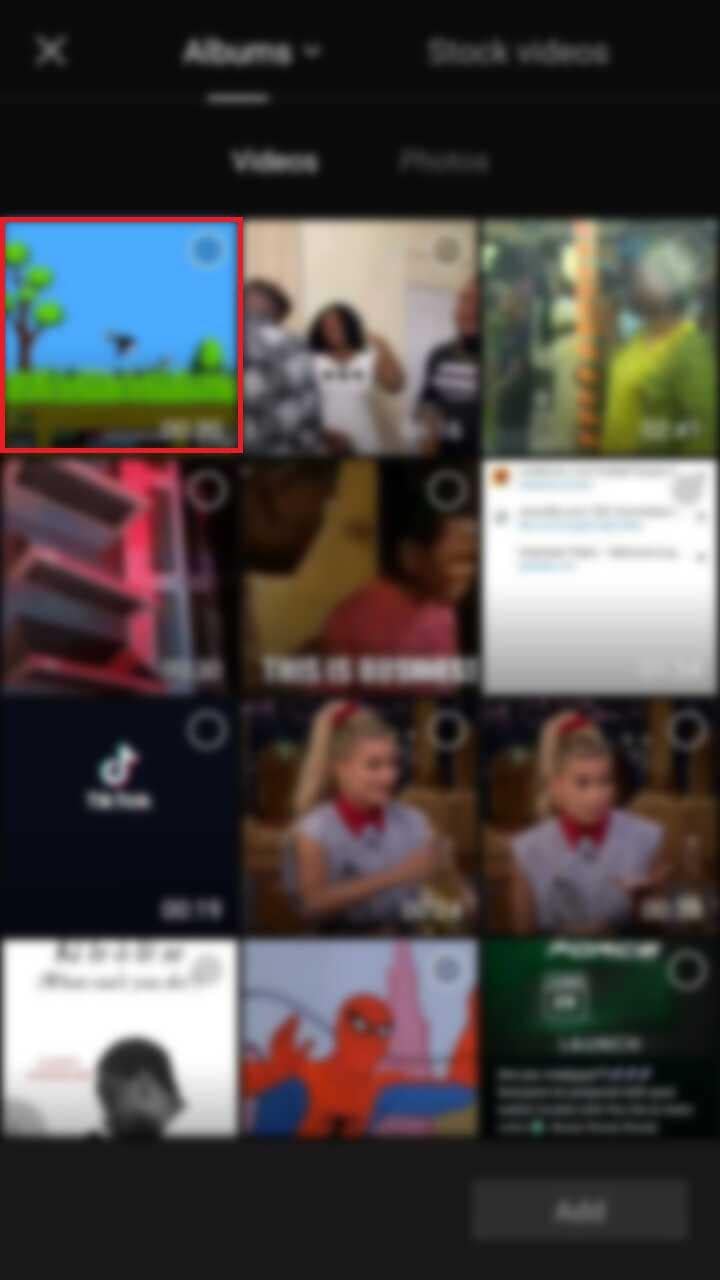
- Begin a New Project. After opening the app, press the “New Project“ icon to bring up a new screen showing your device’s videos.

- Choose a video clip. Locate the desired video clip for your project by scrolling through the pages displaying your camera roll. Tap the video’s thumbnail and then tap the “Add“ icon in the screen’s lower part.
- Get familiar with your workspace. Upon uploading your first clip, CapCut leads you to the primary workspace. This is where you will spend most of your time within the app. The preview panel, the timeline, and the toolbar are in order from top to bottom.
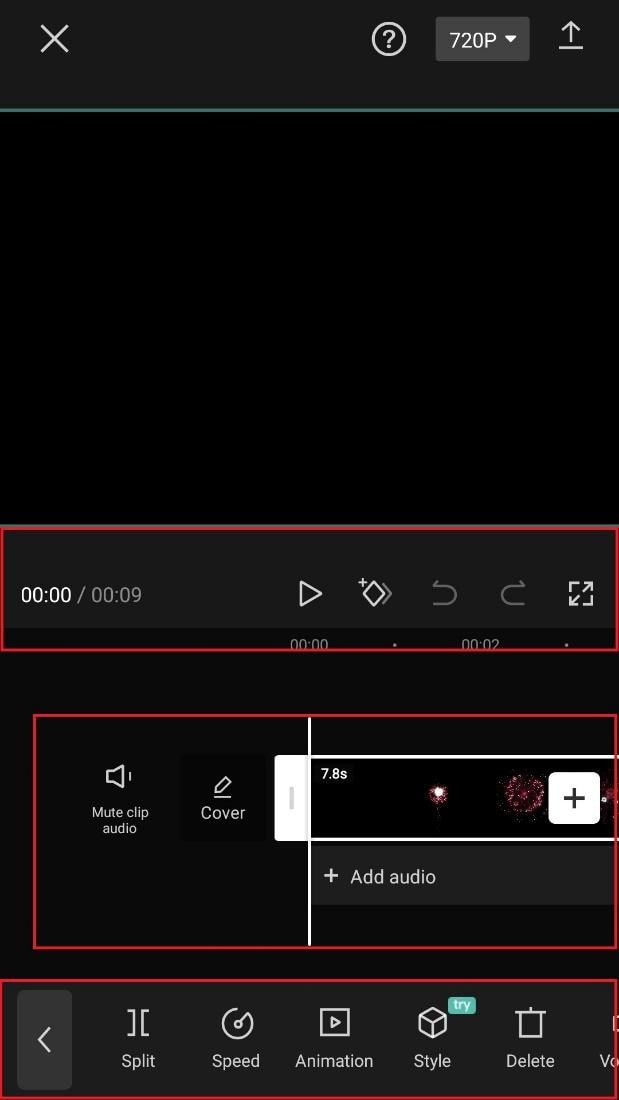
- View the toolbar and timeline. They represent your screen’s bottom half. The timeline, located below the preview panel, is where you’ll make all your adjustments. You can access all your video editing tools, including split, text, audio, effects, stickers, and more, on the toolbar at the bottom of your screen.
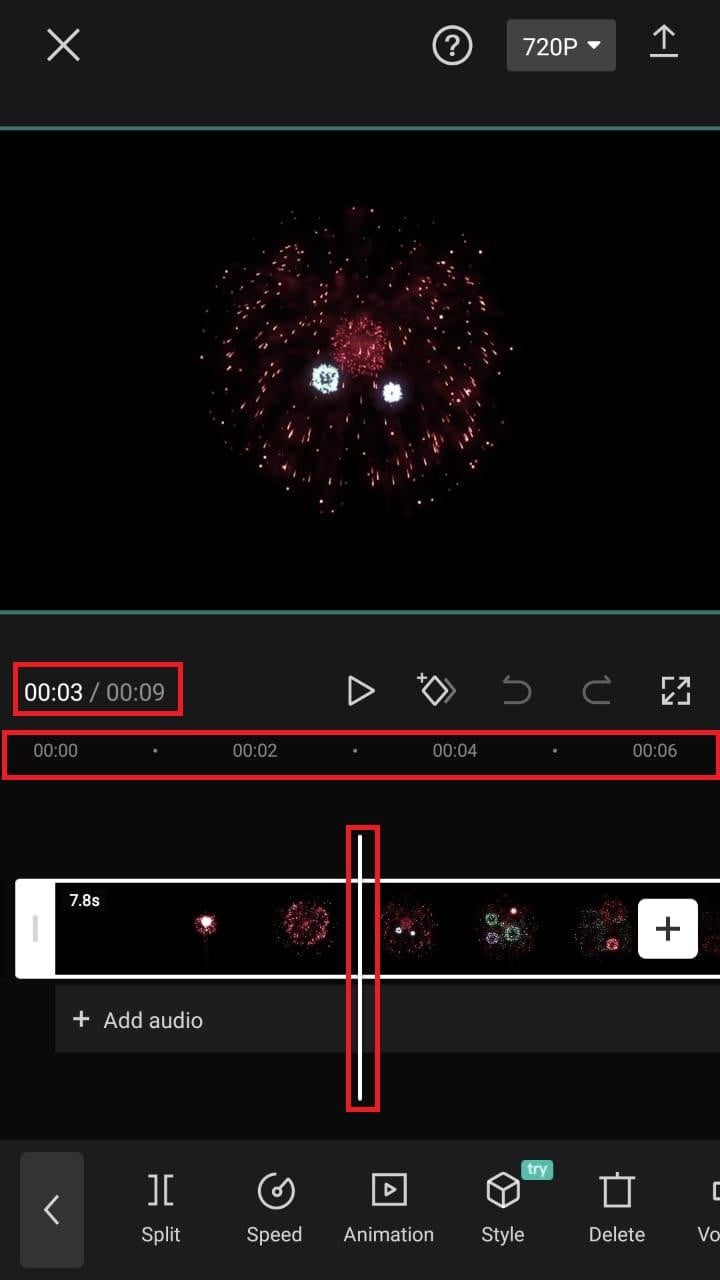
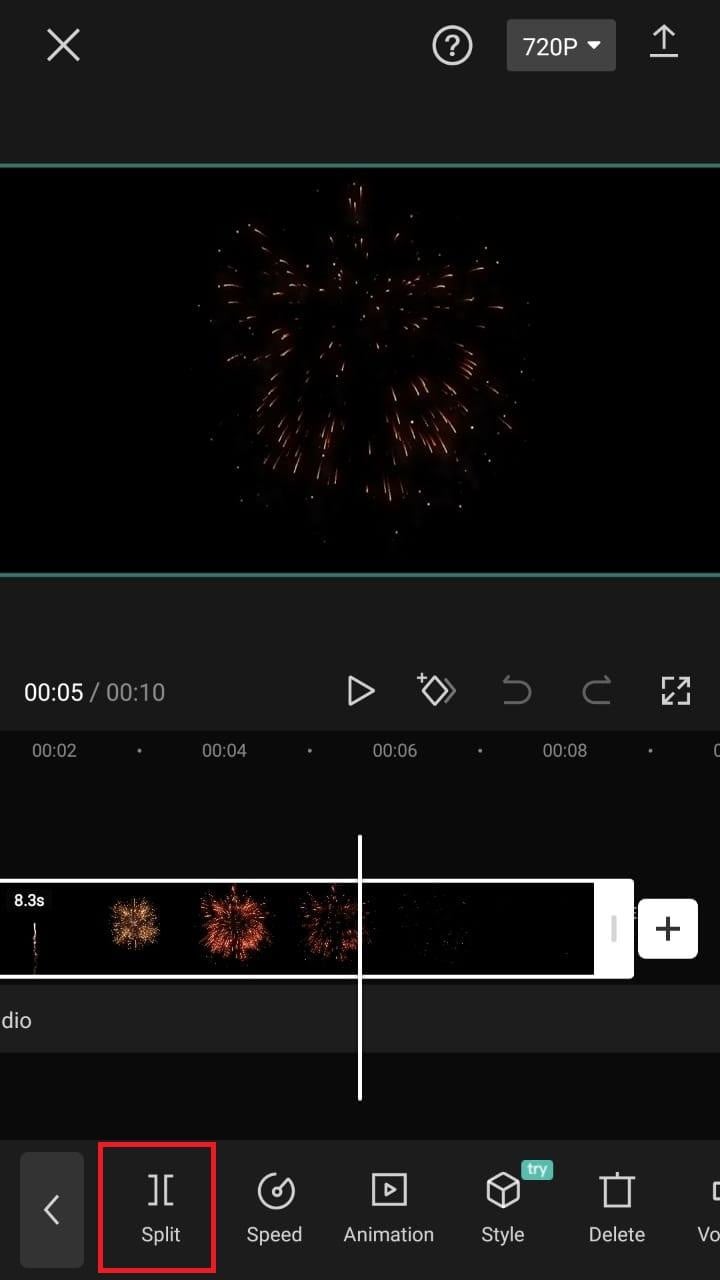
- Split video clips. To split a video clip in half, move the play head to the desired location on the timeline. Tap on your clip, then press the “Split“ toolbar icon. Your result now shows two different clips, not just one.
A Better Split-Screen Effect Video Editor
Filmora is one of the best free HD video makers and video editors with several functionalities, including text, backgrounds, filters, special effects, emoji, audio, and special effects.
Filmora is a feature-packed video editor which has a variety of tools to work with. With this video editor, producing memes, videos with images, pictures, music, stickers, and sound effects and editing videos for YouTube, Twitter, WhatsApp, Facebook, TikTok, and Instagram is simple and entertaining.
Free Download For Win 7 or later(64-bit)
Free Download For macOS 10.14 or later
Steps to Split Screen Video with Filmora
- Download Filmora from the App store
- After installation, launch it.
- Click on “Continue” to continue to use the app.

- Click on Allow to grant Filmora access to your photos and videos.
- You can now tap on “New Project” with the + Symbol.
- Select your desired video and tap on “Next” at the bottom right of your screen
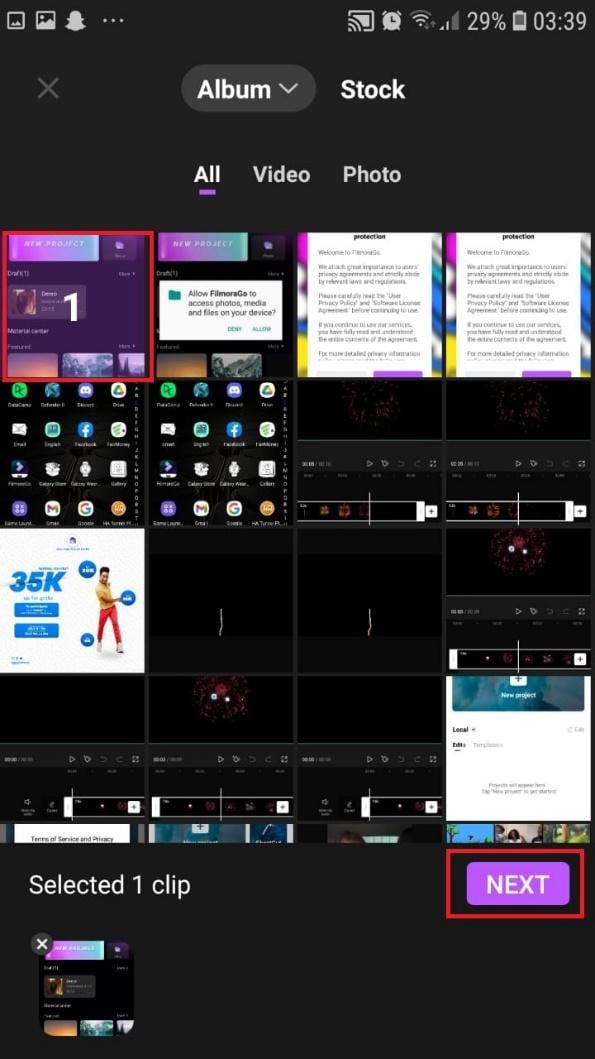
- You can select various options from the bottom of your screen to edit the selected video the way you like.

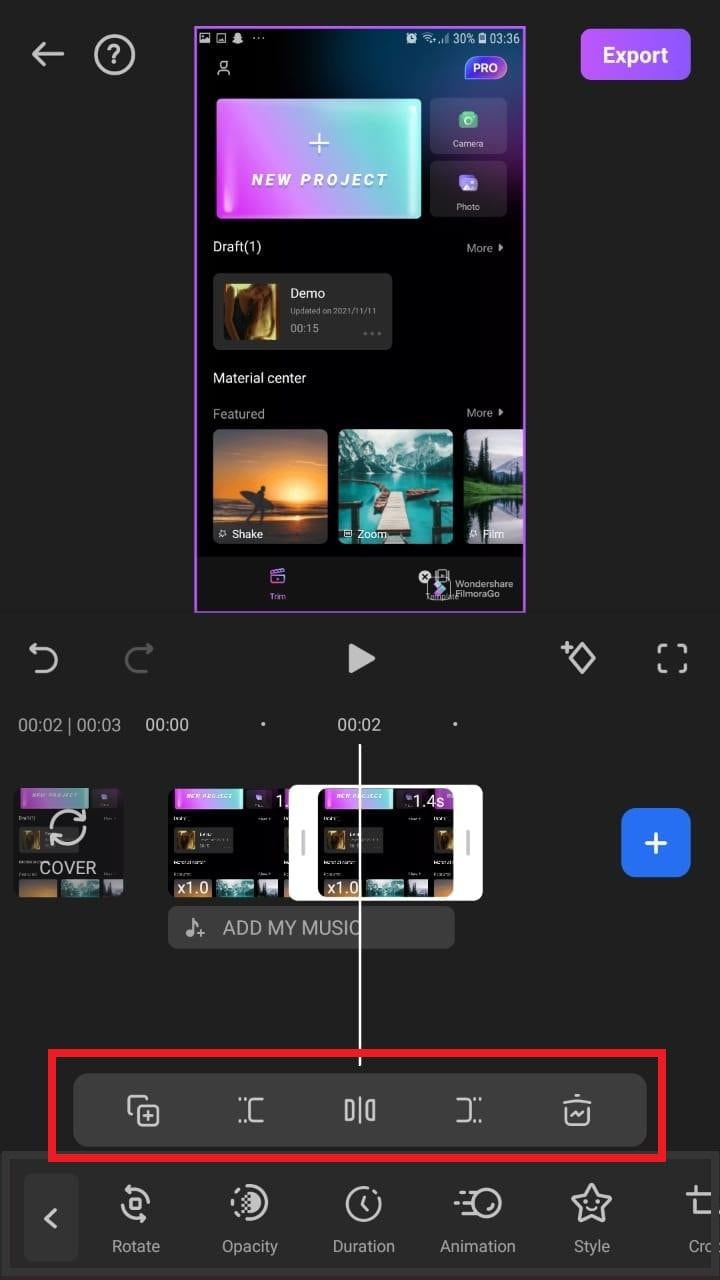
- Click on trim, and then you will see the different split-screen and collage feature options. Pick any that appeals to you.
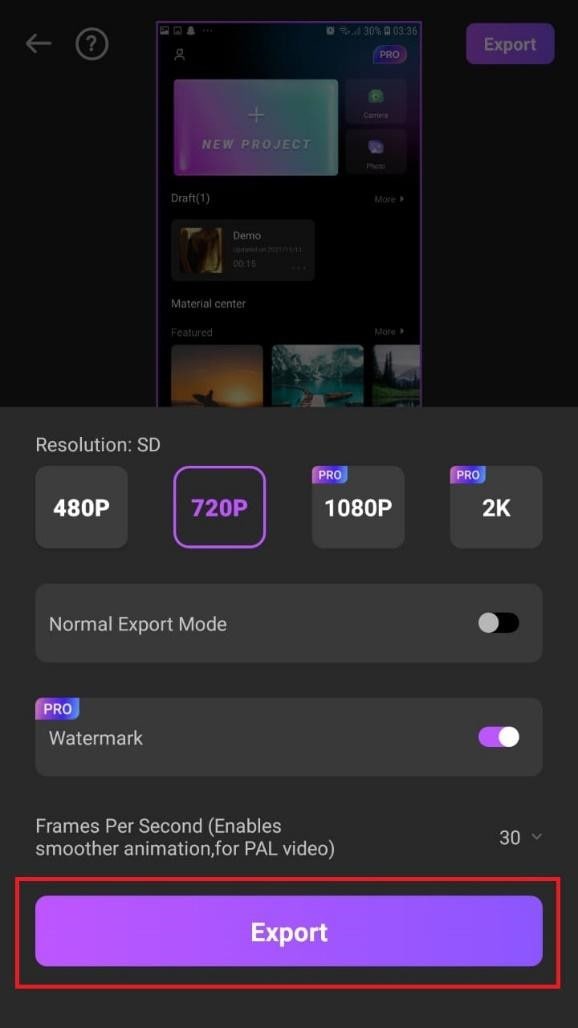
- When you are done with the editing, tap on “Export” at the top right of your screen.

- Go ahead and tap on “Export” on the next screen. Your video will be successfully exported and saved to your camera roll.
Using Filmora is very efficient in splitting your videos and making collage features for TikTok. It is a very simplified app available on both the Google Play Store and Apple Appstore.
Conclusion
TikTok is a platform that users use worldwide to create and share content. It could be pictures, videos, reels, or any other media type. Some people create videos for their audience on TikTok to educate them, while others do it to entertain them.
In any case, the goal is to build a more significant following on TikTok and garner greater attention from its users. You could even make money off the app.
One of the methods to impress your fans and explore multiple possibilities to build unique reels is to use the TikTok split-screen and collage feature effect available on TikTok. Although there are a few different ways to create a Split Screen on TikTok, the steps highlighted in this article are the most straightforward.
Free Download For macOS 10.14 or later
Steps to Split Screen Video with Filmora
- Download Filmora from the App store
- After installation, launch it.
- Click on “Continue” to continue to use the app.
- Click on Allow to grant Filmora access to your photos and videos.
- You can now tap on “New Project” with the + Symbol.
- Select your desired video and tap on “Next” at the bottom right of your screen
- You can select various options from the bottom of your screen to edit the selected video the way you like.
- Click on trim, and then you will see the different split-screen and collage feature options. Pick any that appeals to you.
- When you are done with the editing, tap on “Export” at the top right of your screen.
- Go ahead and tap on “Export” on the next screen. Your video will be successfully exported and saved to your camera roll.
Using Filmora is very efficient in splitting your videos and making collage features for TikTok. It is a very simplified app available on both the Google Play Store and Apple Appstore.
Conclusion
TikTok is a platform that users use worldwide to create and share content. It could be pictures, videos, reels, or any other media type. Some people create videos for their audience on TikTok to educate them, while others do it to entertain them.
In any case, the goal is to build a more significant following on TikTok and garner greater attention from its users. You could even make money off the app.
One of the methods to impress your fans and explore multiple possibilities to build unique reels is to use the TikTok split-screen and collage feature effect available on TikTok. Although there are a few different ways to create a Split Screen on TikTok, the steps highlighted in this article are the most straightforward.
Also read:
- [New] In 2024, Dive Into FB 360 Videos Recording and Sharing Secrets
- 1. Resolved: Troubleshooting Unplayable MKV Files on Windows Media Player
- 15 Best Strongest Pokémon To Use in Pokémon GO PvP Leagues For HTC U23 | Dr.fone
- 2024 Approved 7 Tips to Create Teaching Videos
- A Detailed VPNa Fake GPS Location Free Review On Honor X50i+ | Dr.fone
- Hassle-Free Ways to Remove FRP Lock on Poco X6 Phones with/without a PC
- In 2024, A Full Overview of Adobe Cloud Workflow & Alternative Methods
- In 2024, Dose Life360 Notify Me When Someone Checks My Location On Itel P55T? | Dr.fone
- New Create Risograph Effect In Photoshop A Beginners Guide for 2024
- New Easy Steps to Add Miniature Effect to Videos
- Remedying the Cannot Find dBghelp.dll Error: An In-Depth Fix Guide
- Splitting Audio From Video in Sony Vegas Step by Step for 2024
- Updated How to Create Your Own LOL Montage Video
- What Is HDRI? Everything You Need to Know About HDRI for 2024
- Title: New 2024 Approved 2 Effective Ways to Add Text Behind Objects
- Author: Chloe
- Created at : 2025-02-26 20:13:30
- Updated at : 2025-03-03 23:23:46
- Link: https://ai-editing-video.techidaily.com/new-2024-approved-2-effective-ways-to-add-text-behind-objects/
- License: This work is licensed under CC BY-NC-SA 4.0.