

New 2024 Approved 3 Ways To Stream And Record At The Same Time
3 Ways To Stream And Record At The Same Time
The popularity of live streaming has exploded recently. A live stream is simply a video broadcast in real-time over the internet. It’s a great way to connect with people directly, whether for a gaming session, a cooking show, or a Q&A.
Many reasons are there for which why you might want to live stream and record at the same time. For instance, keep a record of your gameplay or stream highlights for future editing or use your live stream to generate content for your YouTube channel.
Whatever your reasons, this article will show you how to do live streaming and recording at the same time using three different methods.
Way 1. Use OBS To Stream And Record Video At The Same Time
OBS, or Open Broadcaster Software, is a free and open-source tool that allows you to stream and record video at the same time, which can be useful if you want to live-stream your gameplay on Twitch or record a tutorial for YouTube.
Key Features of OBS
- Compatible with Mac OS X, Linux, and Windows operating systems.
- Requires at least 4 GB of storage space and an Intel i5 2000-series processor or higher DirectX 10 capable graphics card.
- High-performance video capturing and mixing in real-time.
- With Custom Transitions, you can set up an unlimited number of scenes you can switch between seamlessly.
- Intuitive audio mixer.
- Easy-to-use and simple configuration options.
Steps
Here’s an easy and quick guide on how to use OBS Studio to stream and record videos simultaneously:
Step1 Download OBS Studio from the official website and install it on your computer or laptop.
Step2 Launch OBS Studio and go to the Settings menu. Find the Recording section under the Output tab.
Step3 Click “Start Recording” to manually start the recording or head to the General Tab and checkmark the box before “Automatically Record When Streaming.”
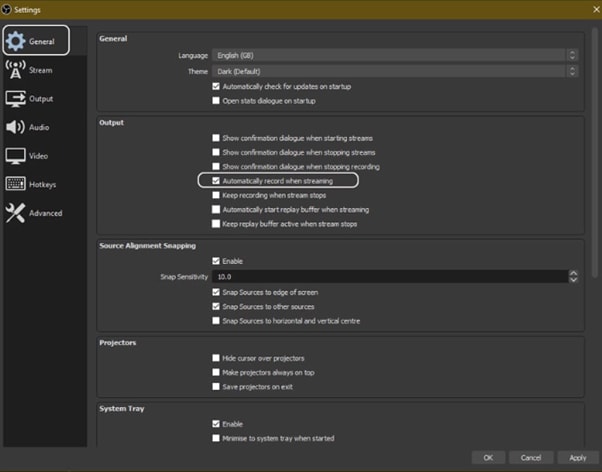
Step4 Finally, click “Apply” to save your settings. Now when you start your stream, the recording will also begin simultaneously.
Way 2. Use Twitch To Save Your Streams
Twitch is the most popular and best live streaming platform that allows gamers to broadcast their gameplay to a live audience and also gives them the ability to save their past broadcasts, or “streams.”
This feature can be useful to save your live stream for later viewing or share your stream with someone who missed it.
Features
Twitch offers a variety of features that make it a unique and powerful game streaming platform. Some of the most notable ones are:
- Live streaming: Twitch allows gamers to share their gameplay in real-time with other gamers around the world. This live aspect of the platform makes it unique and engaging.
- Social interaction: Twitch offers a variety of features that allow gamers to connect with each other, including chat rooms, forums, and user-generated content.
You can save your stream on Twitch in two ways:
- Use the “Highlights” feature, which allows you to save specific moments from your live stream.
- Download your stream’s entire VOD (video on demand) after it has ended.
Steps
Here are the quick steps to saving a stream on your PC from Twitch. But first, you need to enable Twitch VODs before starting your broadcast in the following way:
Step1 Visit Twitch and sign in to your account. Now, click the “Profile” icons and go to “Creator Dashboard.”
Step2 Head to Setting from the left-sidebar and click the “Stream” option. Scroll down and find the VOD Settings. Toggle the buttons next to “Store Past Broadcasts.”
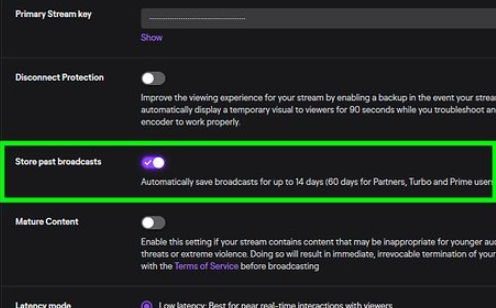
Step3 To publish your VODs instantly after broadcasting, toggle the button next to “Always Publish VODs.”
Now, to download the recordings of your broadcasts to your PC, do the following steps in sequence:
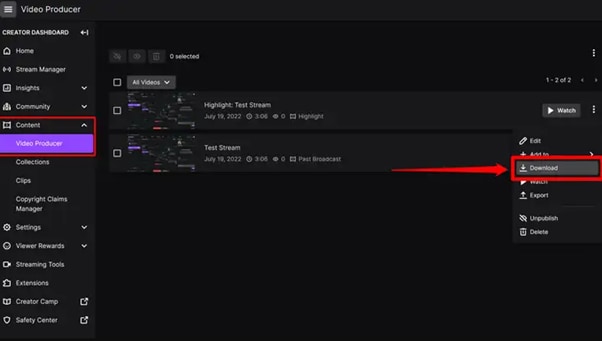
Step1 Head to the Creator Dashboard, find the “Content” section in the left sidebar, and click “Video Producer.”
Step2 Find the stream (VOD or Highlights) you want to download and on the right side, click the three dots.
Step3 Finally, click the “Download” option and let Twitch prepare your video. You will then get the stream’s recording in MP4 format.
Way 3. Use Screen Recorder To Record Your Streams
Using a screen recorder is a great way to record your live stream because it lets you capture the full screen of your PC. Although there are many different screen recorders to choose from, we recommend using Filmora.
Wondershare Filmora is a powerful editor with easy-to-use screen recording capabilities, giving you everything you need to record and stream your video at the same time. The software is free to use and has an intuitive interface.
Features of Filmora
- Support for both Mac OS X and Windows operating systems.
- Ability to record your PC screen, audio, and webcam all at once
- A variety of video editing features
- An easy-to-use interface
Steps
Here’s how to use Filmora for recording while streaming:
Step1 Head to the official Filmora website, download the software and install it on your PC.
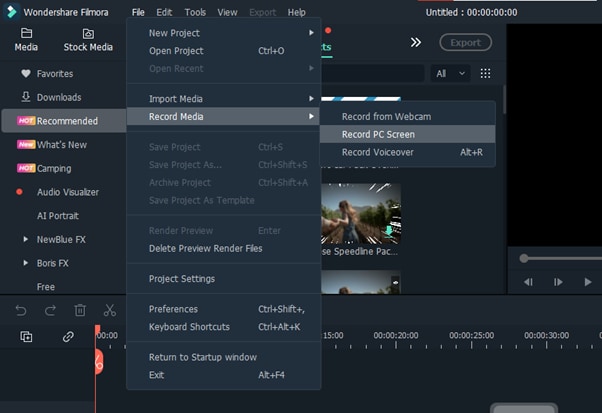
Step2 Launch Filmora 11 and click “New project” in the main interface. Click “File” from the top toolbar and scroll down to “Record media.” From the drop-down menu, select “Record PC Screen.”
Step3 A new “Wondershare Screen Recorder” window will pop up. You can set up a full screen, custom or target screen recording, speaker, and microphone settings. If you want more Settings, click the drop-down icon.
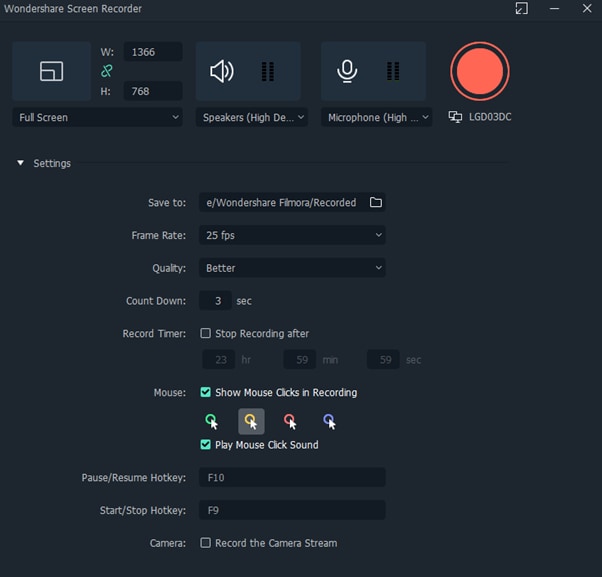
Step4 Click the Start icon to begin your recording. Afterward, click the Stop icon to stop the recording, and your stream will be saved in the selected destination.
Conclusion
In this article, we’ve discussed three step-by-step methods to help you do live streaming and recording at the same time. With these solutions at your disposal, you’ll be able to save your VODs with ease.
It is best to choose only one software to start with to avoid the time-consuming trial-and-error process. If you want to add another tool, do so later; otherwise, you will waste your precious time and resources.
Give these methods a shot, and eventually, you will find your groove—and become accustomed to just how easy it is to record and stream a video simultaneously.
Free Download For Win 7 or later(64-bit)
Free Download For macOS 10.14 or later
Free Download For macOS 10.14 or later
Do You Want to Know How to Edit a Time Lapse Video on iPhone, Interesting Ideas, and some Tips and Pointers for Shooting a Professional Time Lapse Video? Find Out Everything in This Guide
Versatile Video Editor - Wondershare Filmora
An easy and powerful editor
Numerous effects to choose from
Detailed tutorials provided by the official channel
Do you want to edit a time lapse video on an iPhone or want to know how to shoot a time-lapse video? If so, you’ve come to the right place.
Time-lapses, which show how much something changes over a period of time are some of the coolest videos you can make.
They aren’t exactly easy to make and edit at first, but we’ve put together this guide to take you through the steps. We’ll give you a few time lapse video ideas, steps to shoot them, and good practices for managing your footage after you’ve shot it.
Let’s get started.
What Is A Time Lapse Video?
In its simplest definition, a time lapse video is a cinematography technique where the frequency at which film frames are captured (the frame rate) is much lower than that used to view the sequence.
When played at normal speed, time appears to be moving faster and thus lapsing. For example, an image of a scene may be captured once every second, then played back at 30 frames per second; the result is an apparent 30 times speed increase.
Time-lapse photography can be considered to be the opposite of slow motion.
How to Shoot A Time-Lapse Video?
Subjects to shoot in a time-lapse video
Wondering what can be shot in a time-lapse video? The answer is any subject that moves, grows, decays, or changes. But what’s more important than the subject is the motion and change that it goes through.
When shooting a time-lapse video, you are composing not only the shot but also the movement of the subject. If a subject doesn’t move or change throughout your film, then it is just a regular video. So try to think of subjects that are constantly moving or changing.
Time-Lapse videos are visually appealing and easy to make. When it comes to subjects that can be chosen to shoot in a time-lapse video, the possibilities are endless. But if you’re stuck for ideas, here are 10 suggestions to get you started:
1. Sunset/Sunrise
These are quite possibly the most common subjects for timelapse videos, but there’s a reason for it! Watching the sun go up and down is always mesmerizing.
2. Clouds
Clouds move very slowly most of the time, making them perfect for time-lapse sequences. You can shoot a single cloud passing overhead, or record a passing storm front as it sweeps across the sky. Depending on the weather conditions and movement of clouds, this can look stunning or simply spectacular!
3. Starry sky
Probably one of the most fascinating time lapse videos is the ones with stars on the move. Time-lapses that capture the Milky Way or starry sky are becoming increasingly popular as camera technology improves. There are even some cameras now that have built-in settings specifically for capturing stars and other celestial bodies.
4. Flowers
Flowers blooming is another fantastic subject for time-lapse photography. The change can be incredibly subtle; however, if you shoot a timelapse over several days or weeks, you will be amazed at just how much they grow and change!
5. Season changing
The most obvious example is trees budding and shedding leaves, but all sorts of plants and animals follow seasonal cycles. You can see flowers blooming, grasses growing, and migrating birds. Even if you don’t have a chance to go somewhere exotic for your subject matter, you can find something interesting right outside your own door.
6. Cars or Pedestrians
If you want something a little more exciting then you can choose things like cars passing by or people walking on the street.
7. Cooking dinner
Got a recipe for dinner that has lots of steps? Rather than just snap photos of the process, why not make a time-lapse video instead? It’s easy and fun to do, especially if you have kids who can help you out!
8. DIY projects
Are you building something? Whether it’s a new table, shelves, or whatever else, set up your camera and take photos as you go along in a time lapse mode and you’ll get a fun time lapse video. It works well to show people how it all came together.
9. Construction work in progress
If you’re watching construction work being done on your property or nearby, consider recording its time lapse video. It’s hard to imagine the amount of resources it takes to construct an office building or skyscraper before it’s finished. Time-lapse videos have helped reveal just how much work goes into something like that.
10. A fun art project
Capturing a time lapse video of an art project can make a mesmerizing video. Whether it’s you or someone else doing the artwork, always capture its time lapse video to show to others what goes into completing an art project. All you need to do is to set your camera up on a tripod aimed at the canvas and capture one or two frames per second to get an excellent time lapse video.
Steps to shoot a time-lapse video
Time-lapse videography is something that most photographers and videographers are familiar with. But, shooting a time-lapse video needs more than setting the camera on a tripod and waiting for it to shoot for several hours.
The amazing thing about time-lapse videos is that they can be shot using your smartphone. There are apps and built-in camera settings to capture time lapse videos with just a click of the button.
If you want to create a time-lapse video that is high quality, you have to use professional cameras, and learn some important steps.
1. Decide on a subject
The movement of clouds, a sunrise or sunset, waves crashing at the beach, cars coming and going in your parking lot, people walking around your office building — all of these subjects can yield great time-lapse sequences.
2. Find a place to set up your camera on tripod
While recording a time-lapse video, it’s important to keep the camera as stable as possible. It ensures a smooth video, making it visually appealing and easy to edit post-shooting. Typically, a tripod is needed for stable recording. If you are not using a tripod, find something steady and level to set it upon.
Important tip: Shoot only with manual settings. You don’t want the camera to adjust for you; rather, you should adjust the camera settings so that it takes optimal pictures. Even if you use auto mode, make sure you take control of the camera and push it to its limits to get great shots.
3. Set the camera focus
Use either autofocus or manual focus to make sure the camera is focused on what you want to be the main subject of the video.
4. Set your exposure settings
Depending on how much the light is going to change over time, you may want to use aperture priority or shutter priority so that the camera will automatically adjust for changes in light. Or, if you know exactly how much light will be changing over time, you could set all exposure settings manually.
5. Calculate how many frames and shots are needed
For example, if you are shooting at 10 frames per second and want a total of 30 seconds of video at 24 fps (which is standard), you will need 720 frames/photos (30 seconds x 24 fps = 720 frames).
6. Import and stitch together
Once you’ve captured the images, import them into a video editing software, stitch them together, and perform necessary editing.
How to Edit The Time Lapse on iPhone?
Now that you’ve recorded a time-lapse video, you might watch it and think it’s slower or faster than you want it to be. Fortunately, you can speed up and slow down the time lapse video on iPhone using iMovie.
Let’s see how to slow down time lapse on iPhone iMovie.
1. Speed up The Time Lapse on iPhone
So you’ve taken a time lapse video on your iPhone and now you’re trying to get it to speed up in iMovie but it looks a little jumpy or there is too much footage. Here’s how to do it in iMovie for iOS.
- Launch iMovie on your iPhone and start a new project to speed up the captured time-lapse video.
- Now, tap the plus sign visible at the start of the Projects screen, then select Movie.

- From the next window, find and select the recorded time-lapse video you want to speed up.

- Tap Create Movie button at the center-bottom of the screen.

- Now move the playhead to the start of the timeline and tap to select the video. At this point, you’ll see the timeline highlighted in yellow color.
- Look at the bottom of the screen and you’ll find the Speed icon. Tap the Speed icon and a sliding bar will appear with tortoise on its left side and hare on the right side.

- To speed up the time-lapse video, move the slider to the right side and you’ll see the duration of the video reduced, indicating time-lapse video has been sped up.

- Now click the Play button to preview and then tap Done.
Once you’ve increased the speed of time-lapse video, you can share it and post it where you want.
2. Slow Down The Time Lapse on iPhone
Just like you can speed up the time-lapse video on an iPhone, iMovie lets you slow down the time-lapse video.
Here’s how you can do it:
- Launch iMovie on your iPhone and start a new project to speed up the captured time-lapse video.
- Now, tap the plus sign visible at the start of the Projects screen, then select Movie.

- From the next window, find and select your recorded time-lapse video you want to speed up.

- Tap Create Movie button at the center-bottom of the screen.

- Now move the playhead to the start of the timeline and tap to select the video. At this point, you’ll see the timeline highlighted in yellow color.
- Look at the bottom of the screen and you’ll find the Speed icon. Tap the Speed icon and a sliding bar will appear with tortoise on its left side and hare on the right side.

- To slow down the time-lapse video, move the slider to the left side and you’ll see the duration of the video increased, indicating time-lapse video has been slowed down.

- Now click the Play button to preview and then tap Done.
Advanced Software: Edit A Time Lapse Video in Wondershare Filmora
If you have professionally captured RAW images of the time-lapse video, you need to use advanced software to stitch them together. That’s where Wondershare Filmora comes into play.
Wondershare Filmore is a professional video editing software with a wide variety of basic to advanced-level editing tools. It allows for turning RAW videos into fun, engaging, and professional videos.
If you need to refine your time-lapse video, you can use it and benefit from its capabilities. Similarly, you can use it to speed up or slow down your time-lapse video.
Let’s see how you can do both with Filmora.
Speed up your time-lapse video
Why speed up a time-lapse in the first place? There are a couple of reasons you might want to speed up your time-lapse.
When shooting with a fast lens, you might want to dial down the shutter speed to achieve more motion blur, to make the scenes more interesting. However, doing so can also create motion blur on time-lapse footage when sped up.
Another reason you might want to speed up your time-lapse is when you have too many frames. When you shoot at low frame rate (e.g. 15 FPS), not everyone will experience the same viewing quality if they don’t have high frame rate monitors. Speeding up the footage is one way to reduce the number of frames without compromising the quality of your video.
Follow these steps to speed up the time-lapse video using Filmora:
- Download and install Wondershare Filmora on your computer.
- Launch Filmora and click the New project button to open the video editor or drag and drop the file directly.

- Once imported, drag the file to the timeline.

- Click the Speed icon and select the Fast option. Select 2x, 4x, 8x, etc, depending on how much you want to speed up.

- Save the file and use it the way you want.
Slow down your time-lapse video
As the speed at which your time-lapse moves increases, so does the amount of motion blur. This can make for an undesirable look, especially in shots where there is already a lot of movement.
The best way to avoid this is to slow down your time-lapse as much as possible while still maintaining an interesting level of movement within your shot.
You can slow down your time-lapse video in Filmora following the same process as you’d do for speeding-up the video (Explained above). However, there’s only one catch; instead of opting for the Fast option choose Slow when you’re at step 4.
Conclusion
Hopefully, this guide has provided a good knowledge of how to put together your own time lapse video – and how to edit it on iPhone and Wondershare Filmora. It’s easier than you may think, and the resulting videos are quite impressive.
Take your time with it, record your movies from different angles, and don’t be afraid to create something unique and experimental.
Do you want to edit a time lapse video on an iPhone or want to know how to shoot a time-lapse video? If so, you’ve come to the right place.
Time-lapses, which show how much something changes over a period of time are some of the coolest videos you can make.
They aren’t exactly easy to make and edit at first, but we’ve put together this guide to take you through the steps. We’ll give you a few time lapse video ideas, steps to shoot them, and good practices for managing your footage after you’ve shot it.
Let’s get started.
What Is A Time Lapse Video?
In its simplest definition, a time lapse video is a cinematography technique where the frequency at which film frames are captured (the frame rate) is much lower than that used to view the sequence.
When played at normal speed, time appears to be moving faster and thus lapsing. For example, an image of a scene may be captured once every second, then played back at 30 frames per second; the result is an apparent 30 times speed increase.
Time-lapse photography can be considered to be the opposite of slow motion.
How to Shoot A Time-Lapse Video?
Subjects to shoot in a time-lapse video
Wondering what can be shot in a time-lapse video? The answer is any subject that moves, grows, decays, or changes. But what’s more important than the subject is the motion and change that it goes through.
When shooting a time-lapse video, you are composing not only the shot but also the movement of the subject. If a subject doesn’t move or change throughout your film, then it is just a regular video. So try to think of subjects that are constantly moving or changing.
Time-Lapse videos are visually appealing and easy to make. When it comes to subjects that can be chosen to shoot in a time-lapse video, the possibilities are endless. But if you’re stuck for ideas, here are 10 suggestions to get you started:
1. Sunset/Sunrise
These are quite possibly the most common subjects for timelapse videos, but there’s a reason for it! Watching the sun go up and down is always mesmerizing.
2. Clouds
Clouds move very slowly most of the time, making them perfect for time-lapse sequences. You can shoot a single cloud passing overhead, or record a passing storm front as it sweeps across the sky. Depending on the weather conditions and movement of clouds, this can look stunning or simply spectacular!
3. Starry sky
Probably one of the most fascinating time lapse videos is the ones with stars on the move. Time-lapses that capture the Milky Way or starry sky are becoming increasingly popular as camera technology improves. There are even some cameras now that have built-in settings specifically for capturing stars and other celestial bodies.
4. Flowers
Flowers blooming is another fantastic subject for time-lapse photography. The change can be incredibly subtle; however, if you shoot a timelapse over several days or weeks, you will be amazed at just how much they grow and change!
5. Season changing
The most obvious example is trees budding and shedding leaves, but all sorts of plants and animals follow seasonal cycles. You can see flowers blooming, grasses growing, and migrating birds. Even if you don’t have a chance to go somewhere exotic for your subject matter, you can find something interesting right outside your own door.
6. Cars or Pedestrians
If you want something a little more exciting then you can choose things like cars passing by or people walking on the street.
7. Cooking dinner
Got a recipe for dinner that has lots of steps? Rather than just snap photos of the process, why not make a time-lapse video instead? It’s easy and fun to do, especially if you have kids who can help you out!
8. DIY projects
Are you building something? Whether it’s a new table, shelves, or whatever else, set up your camera and take photos as you go along in a time lapse mode and you’ll get a fun time lapse video. It works well to show people how it all came together.
9. Construction work in progress
If you’re watching construction work being done on your property or nearby, consider recording its time lapse video. It’s hard to imagine the amount of resources it takes to construct an office building or skyscraper before it’s finished. Time-lapse videos have helped reveal just how much work goes into something like that.
10. A fun art project
Capturing a time lapse video of an art project can make a mesmerizing video. Whether it’s you or someone else doing the artwork, always capture its time lapse video to show to others what goes into completing an art project. All you need to do is to set your camera up on a tripod aimed at the canvas and capture one or two frames per second to get an excellent time lapse video.
Steps to shoot a time-lapse video
Time-lapse videography is something that most photographers and videographers are familiar with. But, shooting a time-lapse video needs more than setting the camera on a tripod and waiting for it to shoot for several hours.
The amazing thing about time-lapse videos is that they can be shot using your smartphone. There are apps and built-in camera settings to capture time lapse videos with just a click of the button.
If you want to create a time-lapse video that is high quality, you have to use professional cameras, and learn some important steps.
1. Decide on a subject
The movement of clouds, a sunrise or sunset, waves crashing at the beach, cars coming and going in your parking lot, people walking around your office building — all of these subjects can yield great time-lapse sequences.
2. Find a place to set up your camera on tripod
While recording a time-lapse video, it’s important to keep the camera as stable as possible. It ensures a smooth video, making it visually appealing and easy to edit post-shooting. Typically, a tripod is needed for stable recording. If you are not using a tripod, find something steady and level to set it upon.
Important tip: Shoot only with manual settings. You don’t want the camera to adjust for you; rather, you should adjust the camera settings so that it takes optimal pictures. Even if you use auto mode, make sure you take control of the camera and push it to its limits to get great shots.
3. Set the camera focus
Use either autofocus or manual focus to make sure the camera is focused on what you want to be the main subject of the video.
4. Set your exposure settings
Depending on how much the light is going to change over time, you may want to use aperture priority or shutter priority so that the camera will automatically adjust for changes in light. Or, if you know exactly how much light will be changing over time, you could set all exposure settings manually.
5. Calculate how many frames and shots are needed
For example, if you are shooting at 10 frames per second and want a total of 30 seconds of video at 24 fps (which is standard), you will need 720 frames/photos (30 seconds x 24 fps = 720 frames).
6. Import and stitch together
Once you’ve captured the images, import them into a video editing software, stitch them together, and perform necessary editing.
How to Edit The Time Lapse on iPhone?
Now that you’ve recorded a time-lapse video, you might watch it and think it’s slower or faster than you want it to be. Fortunately, you can speed up and slow down the time lapse video on iPhone using iMovie.
Let’s see how to slow down time lapse on iPhone iMovie.
1. Speed up The Time Lapse on iPhone
So you’ve taken a time lapse video on your iPhone and now you’re trying to get it to speed up in iMovie but it looks a little jumpy or there is too much footage. Here’s how to do it in iMovie for iOS.
- Launch iMovie on your iPhone and start a new project to speed up the captured time-lapse video.
- Now, tap the plus sign visible at the start of the Projects screen, then select Movie.
- From the next window, find and select the recorded time-lapse video you want to speed up.
- Tap Create Movie button at the center-bottom of the screen.
- Now move the playhead to the start of the timeline and tap to select the video. At this point, you’ll see the timeline highlighted in yellow color.
- Look at the bottom of the screen and you’ll find the Speed icon. Tap the Speed icon and a sliding bar will appear with tortoise on its left side and hare on the right side.
- To speed up the time-lapse video, move the slider to the right side and you’ll see the duration of the video reduced, indicating time-lapse video has been sped up.
- Now click the Play button to preview and then tap Done.
Once you’ve increased the speed of time-lapse video, you can share it and post it where you want.
2. Slow Down The Time Lapse on iPhone
Just like you can speed up the time-lapse video on an iPhone, iMovie lets you slow down the time-lapse video.
Here’s how you can do it:
- Launch iMovie on your iPhone and start a new project to speed up the captured time-lapse video.
- Now, tap the plus sign visible at the start of the Projects screen, then select Movie.
- From the next window, find and select your recorded time-lapse video you want to speed up.
- Tap Create Movie button at the center-bottom of the screen.
- Now move the playhead to the start of the timeline and tap to select the video. At this point, you’ll see the timeline highlighted in yellow color.
- Look at the bottom of the screen and you’ll find the Speed icon. Tap the Speed icon and a sliding bar will appear with tortoise on its left side and hare on the right side.
- To slow down the time-lapse video, move the slider to the left side and you’ll see the duration of the video increased, indicating time-lapse video has been slowed down.
- Now click the Play button to preview and then tap Done.
Advanced Software: Edit A Time Lapse Video in Wondershare Filmora
If you have professionally captured RAW images of the time-lapse video, you need to use advanced software to stitch them together. That’s where Wondershare Filmora comes into play.
Wondershare Filmore is a professional video editing software with a wide variety of basic to advanced-level editing tools. It allows for turning RAW videos into fun, engaging, and professional videos.
If you need to refine your time-lapse video, you can use it and benefit from its capabilities. Similarly, you can use it to speed up or slow down your time-lapse video.
Let’s see how you can do both with Filmora.
Speed up your time-lapse video
Why speed up a time-lapse in the first place? There are a couple of reasons you might want to speed up your time-lapse.
When shooting with a fast lens, you might want to dial down the shutter speed to achieve more motion blur, to make the scenes more interesting. However, doing so can also create motion blur on time-lapse footage when sped up.
Another reason you might want to speed up your time-lapse is when you have too many frames. When you shoot at low frame rate (e.g. 15 FPS), not everyone will experience the same viewing quality if they don’t have high frame rate monitors. Speeding up the footage is one way to reduce the number of frames without compromising the quality of your video.
Follow these steps to speed up the time-lapse video using Filmora:
- Download and install Wondershare Filmora on your computer.
- Launch Filmora and click the New project button to open the video editor or drag and drop the file directly.
- Once imported, drag the file to the timeline.
- Click the Speed icon and select the Fast option. Select 2x, 4x, 8x, etc, depending on how much you want to speed up.
- Save the file and use it the way you want.
Slow down your time-lapse video
As the speed at which your time-lapse moves increases, so does the amount of motion blur. This can make for an undesirable look, especially in shots where there is already a lot of movement.
The best way to avoid this is to slow down your time-lapse as much as possible while still maintaining an interesting level of movement within your shot.
You can slow down your time-lapse video in Filmora following the same process as you’d do for speeding-up the video (Explained above). However, there’s only one catch; instead of opting for the Fast option choose Slow when you’re at step 4.
Conclusion
Hopefully, this guide has provided a good knowledge of how to put together your own time lapse video – and how to edit it on iPhone and Wondershare Filmora. It’s easier than you may think, and the resulting videos are quite impressive.
Take your time with it, record your movies from different angles, and don’t be afraid to create something unique and experimental.
Best Audio Waveform Generator
For more than a century, sound waves and broadcasts have played an important role in shaping media as we know it. Here’s how to implement them into your social media strategy. They have become popular in short video animations used to promote audio on social media, commonly referred to as audiograms.
Before learning everything there is to know about audiograms and how to make them, let’s gain a better understanding of the significance of these patterns.
Part 1. What is an audio waveform?
A sound wave is the vibration of air molecules, which is how sound travels. The waveform describes the wave using a graph of how the air molecule is displaced over time.
Amplitude is the strength of a wave’s action; the higher the amplitude, the more the air molecules are displaced. This also translates into loudness for the human ear; increasing the amplitude of the wave will increase how loud it appears to us. Sine, triangle, square, and sawtooth waveforms are the most typical periodic waveforms.
Part 2. What is audio wave animation?
A waveform animation video is a short video clip that can be uploaded to social media that combines an audio file with a static background image and a straightforward waveform animation. Audio animations, an example of audio visualization, make for fantastic video content, which is increasingly valuable on ever-noisy social media platforms.
Part 3. Why do we use audio visualization?
We all know that there is a special way of feeling called synesthesia, which is both a psychological and a linguistic phenomenon. Similar to how you automatically link this rain scene with the sound of heavy rain when you see it. People’s newly awakened senses are more about the synthesis of sensory experience with actual life experience than they are entirely about actual information. Therefore, for clean audio, enhancing it with complementary visual animation effects will improve the user’s visual experience and, to some extent, offer additional information and impact to your audio.

Part 4. Best Audio Waveform Generator
Audio visualization can be presented in a variety of ways. The simplest kind of processing involves taking low-dimensional information like frequency, loudness, and rhythm and converting them into images in the form of colors, forms, strokes, etc. However, modern artificial intelligence technology can now extract high-dimensional visual attributes including style, tone, and emotion. But, for most non-technical players, such processes are obviously out of their league, therefore your best choice is to use a basic audio waveform generator. Following, we’ll suggest 10 desktop or online generators so you may quickly finish the audio visualization project and create your audio-related videos.
Audio Visualizer on Desktop
You may add audio spectrum visualizers to videos using a variety of tools. But one of the best software we recommend is Filmora audio visualizer because you can edit all sound effects on this platform with just one button. Filmora has audio keyframing and a built-in equalizer that can create unique sound effects and make the audio recording more appealing when you hear it.
Price: US$ 49.99/Year
Pros
- Filmora Audio Visualizer provides you with 25 types of audio and concludes circle audio spectrum.
- Easy to use for the beginner and there are more other audio features that you can easily use and start editing your file.
- It’s super affordable as compared to other audio editing software.
Cons
- Pattern shape can’t be defined by yourself, also doesn’t support your custom template
VJs and all other artists who like to combine sound and images during live performances can use the Performer edition of this cross-platform music visualization software. The Studio edition offers all the functions that are necessary to create music visualizations or music videos in real-time. You can use both editions of Magic to generate 2D and 3D graphics that respond to music or mix photos, 3D files, or videos. In addition, you can easily enter full-screen mode and project your videos using LED displays or projectors. Magic Music Visuals also allows its users to combine an unlimited number of audio inputs simultaneously, meaning you can effortlessly mix two or more tracks. This music visualization software allows you to export videos in mp4 and MOV files, but the length of the rendering process depends on the length of the video and the performance of the computer you are using.

Price: Free demo available, $44.95 for a full version license
Pros
- Amazing Visual Effects
- Efficient Text Processing
- Lots of Blending modes
- Custom Color correction
Cons
- No Video Stabilization tool
- Audio waveform and hardware acceleration features are not available
Music visualization is just one of the countless video editing options offered by VDSC Video Editor Free. In addition to creating music-based videos, you can also use this video editing software product to stabilize videos recorded by action cameras, enhance colors in footage captured by a wide range of cameras and drones, create 3D graphics, or export high-quality videos. Resolution to your social media accounts directly from the software. The editor’s Audio Visualizer contains five hundred presets that you can use to create a captivating music video for your latest track. In addition to Spectrum, which displays sounds within a set color range, VDSC Video Editor also offers Audio Abstraction, which generates colorful abstract shapes based on the music you select. While visualizing audio with VDSC Audio Visualizer is a fun and simple process, video creators with no prior video editing experience may need some time to get used to the software’s interface.

Price: Free
Pros
- Every tool for video editing is available
- Amazing Visual Effects
- Efficient Text Processing
- Lots of Blending modes
- Custom Color correction
Cons
- Pro Editing Features are Missing
- No Video Stabilization tool
- Audio waveform and hardware acceleration features are not available
- Standard voiceover and masking tools
Audio Visualizer Online
- Media.io Music Visualizer Online
Want to add eye-catching visuals to your audio? Media.io Music Visualizer web app is the perfect app for you. You can add audio waveforms to any audio format, including M4A, M4R, MP3, OGG, AU, and many more. After loading the audio, this program allows you to add a captivating progression and a cover photo of your choice. Additionally, users of Media.io can trim, split, rearrange, and remove audio. You can even add subtitles, subtitles, and texts. If you’re fine with visualizing music, it lets you choose the aspect ratio before exporting to 1080P MP4. Just try it!

Price: Free
Pros
- It has consistently been upgraded and improved since its inception when it was pretty great already.
- The product is great based on how it was marketed, and it is a great tool. This is easily accomplished by use among three brands.
- An excellent experience with a great community of entrepreneurs and marketers supporting the ecosystem.
Cons
- It doesn’t have a direct publication on Instagram but offers 2 ways: via app notification (which can be annoying at times) or integration with Zapier, through a wizard.
Renderforest is a platform that enables users to design whole websites or upload visual assets for online use. However, to start visualizing your music with Renderforest, you must first register and create your account. Then just choose between visualization templates with text or photo holders, add the artist’s name and track title, then add a background photo or video. You can proceed to choose a visualization style that perfectly matches the music, chooses its color, and finally uploads the song you want to use in your video. Once done, you should simply click on the Preview icon and Renderforest will send you an email containing a video of the music visualization. Keep in mind that all videos created using the free version of the platform will be watermarked and cannot exceed the one-minute limit.

Price: Free version accessible; $9.99 is the starting price for subscriptions.
Pros
- It has got loads of beautiful templates to choose from, which could even fit perfectly into the kind of logo animation project you may have in mind.
- The effortless, natural, effective, rational, and impressive way to share your amazing ideas with the world. Just let your imagination go wild and keep going.
- A wide variety of templates and animations, with lots of customization available. And it offers amazing customer service.
Cons
- The only thing that is a downside is that there is a watermark by default, which can only be removed by paying.
- It is fairly expensive for the lack of many features.
The collection of music visualization templates that this website offers is really impressive as you can choose from a wide variety of templates during the video creation process. However, you must purchase one of the available subscription plans to customize the template you’ve selected and export it without a watermark. After selecting a music visualization template, just click the Edit button below it and start working on your project. You can either upload a song from your computer or use SoundCloud to import the song you want to visualize into your project. You can improve the quality of your video by adding a cover or using a variation of the template you originally selected. The only downside is that you won’t be able to edit the videos produced by Videobolt Music Visualizer during the free trial period.

Price: Free trial available, subscription plans start from $7.99 per month
Pros
- The quality and ease to create awesome-looking intros have been an invaluable tool in my work. Simple to use with excellent assistance available.
- This tool has helped me make an awesome-looking music video and an intro as well.
- Particularly the quality of the final product and the ability to change the templates to compliment the client’s brand guidelines.
Cons
- The overall experience is poor, and their support is terrible.
- As someone with not that much money to spend, it is a bit costly.
- Sometimes it’s hard to find exactly what you need.
Conclusion
Filmora Audio Visualizer is one of the top-rated audio editing software tools due to its incredible features and interface. If you want to create amazing sound effects on your video, we highly recommend you download this software on your computer to enjoy all the amazing editing tools. Social media content creators, musicians, and VJs can produce stunning videos with any of the music visualizers we’ve listed in this article. What’s your favorite music visualizer to use to create videos based on music? Please let us know by leaving a comment below.
Free Download For Win 7 or later(64-bit)
Free Download For macOS 10.14 or later
Price: US$ 49.99/Year
Pros
- Filmora Audio Visualizer provides you with 25 types of audio and concludes circle audio spectrum.
- Easy to use for the beginner and there are more other audio features that you can easily use and start editing your file.
- It’s super affordable as compared to other audio editing software.
Cons
- Pattern shape can’t be defined by yourself, also doesn’t support your custom template
VJs and all other artists who like to combine sound and images during live performances can use the Performer edition of this cross-platform music visualization software. The Studio edition offers all the functions that are necessary to create music visualizations or music videos in real-time. You can use both editions of Magic to generate 2D and 3D graphics that respond to music or mix photos, 3D files, or videos. In addition, you can easily enter full-screen mode and project your videos using LED displays or projectors. Magic Music Visuals also allows its users to combine an unlimited number of audio inputs simultaneously, meaning you can effortlessly mix two or more tracks. This music visualization software allows you to export videos in mp4 and MOV files, but the length of the rendering process depends on the length of the video and the performance of the computer you are using.
Price: Free demo available, $44.95 for a full version license
Pros
- Amazing Visual Effects
- Efficient Text Processing
- Lots of Blending modes
- Custom Color correction
Cons
- No Video Stabilization tool
- Audio waveform and hardware acceleration features are not available
Music visualization is just one of the countless video editing options offered by VDSC Video Editor Free. In addition to creating music-based videos, you can also use this video editing software product to stabilize videos recorded by action cameras, enhance colors in footage captured by a wide range of cameras and drones, create 3D graphics, or export high-quality videos. Resolution to your social media accounts directly from the software. The editor’s Audio Visualizer contains five hundred presets that you can use to create a captivating music video for your latest track. In addition to Spectrum, which displays sounds within a set color range, VDSC Video Editor also offers Audio Abstraction, which generates colorful abstract shapes based on the music you select. While visualizing audio with VDSC Audio Visualizer is a fun and simple process, video creators with no prior video editing experience may need some time to get used to the software’s interface.
Price: Free
Pros
- Every tool for video editing is available
- Amazing Visual Effects
- Efficient Text Processing
- Lots of Blending modes
- Custom Color correction
Cons
- Pro Editing Features are Missing
- No Video Stabilization tool
- Audio waveform and hardware acceleration features are not available
- Standard voiceover and masking tools
Audio Visualizer Online
- Media.io Music Visualizer Online
Want to add eye-catching visuals to your audio? Media.io Music Visualizer web app is the perfect app for you. You can add audio waveforms to any audio format, including M4A, M4R, MP3, OGG, AU, and many more. After loading the audio, this program allows you to add a captivating progression and a cover photo of your choice. Additionally, users of Media.io can trim, split, rearrange, and remove audio. You can even add subtitles, subtitles, and texts. If you’re fine with visualizing music, it lets you choose the aspect ratio before exporting to 1080P MP4. Just try it!
Price: Free
Pros
- It has consistently been upgraded and improved since its inception when it was pretty great already.
- The product is great based on how it was marketed, and it is a great tool. This is easily accomplished by use among three brands.
- An excellent experience with a great community of entrepreneurs and marketers supporting the ecosystem.
Cons
- It doesn’t have a direct publication on Instagram but offers 2 ways: via app notification (which can be annoying at times) or integration with Zapier, through a wizard.
Renderforest is a platform that enables users to design whole websites or upload visual assets for online use. However, to start visualizing your music with Renderforest, you must first register and create your account. Then just choose between visualization templates with text or photo holders, add the artist’s name and track title, then add a background photo or video. You can proceed to choose a visualization style that perfectly matches the music, chooses its color, and finally uploads the song you want to use in your video. Once done, you should simply click on the Preview icon and Renderforest will send you an email containing a video of the music visualization. Keep in mind that all videos created using the free version of the platform will be watermarked and cannot exceed the one-minute limit.
Price: Free version accessible; $9.99 is the starting price for subscriptions.
Pros
- It has got loads of beautiful templates to choose from, which could even fit perfectly into the kind of logo animation project you may have in mind.
- The effortless, natural, effective, rational, and impressive way to share your amazing ideas with the world. Just let your imagination go wild and keep going.
- A wide variety of templates and animations, with lots of customization available. And it offers amazing customer service.
Cons
- The only thing that is a downside is that there is a watermark by default, which can only be removed by paying.
- It is fairly expensive for the lack of many features.
The collection of music visualization templates that this website offers is really impressive as you can choose from a wide variety of templates during the video creation process. However, you must purchase one of the available subscription plans to customize the template you’ve selected and export it without a watermark. After selecting a music visualization template, just click the Edit button below it and start working on your project. You can either upload a song from your computer or use SoundCloud to import the song you want to visualize into your project. You can improve the quality of your video by adding a cover or using a variation of the template you originally selected. The only downside is that you won’t be able to edit the videos produced by Videobolt Music Visualizer during the free trial period.
Price: Free trial available, subscription plans start from $7.99 per month
Pros
- The quality and ease to create awesome-looking intros have been an invaluable tool in my work. Simple to use with excellent assistance available.
- This tool has helped me make an awesome-looking music video and an intro as well.
- Particularly the quality of the final product and the ability to change the templates to compliment the client’s brand guidelines.
Cons
- The overall experience is poor, and their support is terrible.
- As someone with not that much money to spend, it is a bit costly.
- Sometimes it’s hard to find exactly what you need.
Conclusion
Filmora Audio Visualizer is one of the top-rated audio editing software tools due to its incredible features and interface. If you want to create amazing sound effects on your video, we highly recommend you download this software on your computer to enjoy all the amazing editing tools. Social media content creators, musicians, and VJs can produce stunning videos with any of the music visualizers we’ve listed in this article. What’s your favorite music visualizer to use to create videos based on music? Please let us know by leaving a comment below.
Free Download For Win 7 or later(64-bit)
Free Download For macOS 10.14 or later
Easy Way to Inset Text in Video
Adding text to any video can serve to improve the quality of the video or emphasize a section of the video. But unlike adding text to an image, adding even simple text to a video can be quite difficult. But there are video editing tools that can significantly simplify this process.
Before we look at one of the best video editing tools that you can use to add text to your video, let’s first look at why adding text to your video may be important.
Why Insert Titles to Videos?
Adding a title or any other kind of text to your video can be important for several reasons, including the following;
1. Content Becomes Memorable
Adding text to the video can serve to make the whole content of the video or a section of the video more memorable. If there is a section of the content that you want your audience to remember, adding a colorful bit of text may make the content easier to grasp and therefore more memorable.
2. Call to Actions
Any marketer understands the value of a well-positioned call to action and the best way to add a customized call to action is to add text to the video. Calls to action can help you sell products or get your audience to sign up for a service or event.
3. Brand Awareness
Text that you add to the video can also be used to enhance brand awareness and visibility. These can be in the form of the company’s slogan and logos that can serve to remind your audience of the value of your brand and its trustworthiness.
4. Aesthetic Value
When done correctly, titles and texts in videos can turn a bland ordinary-looking video into an aesthetically pleasing art piece that your audience will only be too happy to engage with. The more appealing your video is, the greater the chance that your target audience will be willing to engage with your brand and click on your calls to action.
How to Insert Title to Video
Adding text and titles to any video can be made easier by the software you choose to use. One of the best tools to edit any aspect of any video is Wondershare Filmora . Filmora is a great choice because it makes adding text and titles that match your video’s content very easy. It is therefore an ideal tool to choose if you want to add titles that will enhance your brand’s visibility.
Free Download For Win 7 or later(64-bit)
Free Download For macOS 10.14 or later
The following guide will help you easily add text, titles, openers, and end credits to any video using Filmora .
Step1 Install Filmora on your computer and launch the program. Then open the video that you want to edit in Filmora. You can do that by simply dragging and dropping the video into the program’s main interface.
Step2 To add a title to the video, click on the “Titles” tab at the top and select a title that best suits your video project. You can use the preview function to see what it looks like before adding it to the video.

If you are happy with the title that you have selected, drag and drop it onto the timeline or right-click on it and select “Apply.”
Step3 To add an opener to the video, click on the “Openers” menu under “Titles.” Then choose the specific opener that you want to add and select “Apply” to add it to the video.
Step4 To add end credits to the video, simply select “End Credit” under “Titles” and when you find the type of end credits that you want to use, right-click on it and select “Apply.”
You can then click on the titles, end credits, and openers to edit the text by changing the color and fonts to match your brand.
How to Improve Title Effects in Video
Simply adding a title or text to the video will not do much to improve the quality of the video. You need to add effects that will not only make the videos more appealing but will also correspond with your brand colors.
Thankfully, Filmora makes adding various kinds of effects to the text very easy. The following are some of the options that you have;
Editing Title and Text Effect Duration
Typically, when you add a text effect to a video using Filmora , the duration is set at 5 seconds. You can however very easily change this duration to suit your video’s needs.
The easiest way to do that is to drag one of its edges. But you can also select the text and click on the duration icon to enter the new direction in the dialogue box that appears.
You can also change the default duration so that the new timing applies to all the text effects that you create when editing videos. To do that, go to File> Preferences > Editing < Effect Duration
Customize Text Effect
To customize the text that you added to the video, double-click on it in the timeline. This will open the text editing panel where you can change the font style including the font, size, color, and alignment as well as the animation of the text.
Apply Text Animations
Filmora offers more than 80 animation presets to choose from. You can access the “Animation” tab in the text editing panel to see a list of all available animations. Double-click on the animation you want to use and use the “Preview” window to see how it works out/

If you are happy with the animation and would like to include it in your project, click on “OK” to use it.
Advanced Title Editing
If you would like to go just a little bit further in editing your text, click on the “Advanced” button to open the Advanced Text Editing panel.

Here, you will see more options including the ability to add more elements such as adding new text boxed shapes or images.
With each of these elements, you can also change the font color, animation, opacity, border, fill and shadow.
Related FAQs about Text Video Editing
1. Can I Edit the Text in a Video?
Yes. Once you have added the title or text to the video, you can just as easily edit it in various ways. As we have seen, Filmora gives you a wealth of options to customize the title in various ways including changing the font size, color, and type all from the text editing panel. You can even completely remove the title from the video and add a new one. The preview window in Filmora allows you to see any changes that you make in real-time and adjust them accordingly to fit into your project.
2. Why Should I add Text to my Video?
Adding text and titles to any video can be very important for several reasons. For instance, you can decide to add text to emphasize a point, add a call to action and even help your audience to follow along with the content when the audio is turned off. Titles and any other text that you add to a video can also make the content more understandable, engaging, and clearer. But the effectiveness of the text will depend on how and where you place the text within the video and the video editor you choose can be very instrumental in this regard.
3. How Can I Make the Text in My Video Look Good?
First, you need to decide on the color, effects, and animations that you would like to use, and to decide these things you will need to take your brand and colors into consideration. Once you have all these details, you then need to choose a video editor that offers a wide range of fonts and colors to choose from. Thankfully, Filmora offers all the colors, fonts, and animations you could ever need, allowing you to customize the text any way you want.
4. How Do I Replace Text on my Video?
Sometimes you just need to remove the text that you already have on the video and replace it with new text. Again, how successful you are in this will depend on the tool you choose to use. Some video editors will only allow you to add new text but fall short when you need to remove the text or replace it with something else.
Filmora is one of the few tools that makes it easy to delete a title. You can just click on the title and then select the “Delete” icon in the toolbar to remove it. Then you can simply use the text editing panel to add new text again.
Free Download For macOS 10.14 or later
The following guide will help you easily add text, titles, openers, and end credits to any video using Filmora .
Step1 Install Filmora on your computer and launch the program. Then open the video that you want to edit in Filmora. You can do that by simply dragging and dropping the video into the program’s main interface.
Step2 To add a title to the video, click on the “Titles” tab at the top and select a title that best suits your video project. You can use the preview function to see what it looks like before adding it to the video.
If you are happy with the title that you have selected, drag and drop it onto the timeline or right-click on it and select “Apply.”
Step3 To add an opener to the video, click on the “Openers” menu under “Titles.” Then choose the specific opener that you want to add and select “Apply” to add it to the video.
Step4 To add end credits to the video, simply select “End Credit” under “Titles” and when you find the type of end credits that you want to use, right-click on it and select “Apply.”
You can then click on the titles, end credits, and openers to edit the text by changing the color and fonts to match your brand.
How to Improve Title Effects in Video
Simply adding a title or text to the video will not do much to improve the quality of the video. You need to add effects that will not only make the videos more appealing but will also correspond with your brand colors.
Thankfully, Filmora makes adding various kinds of effects to the text very easy. The following are some of the options that you have;
Editing Title and Text Effect Duration
Typically, when you add a text effect to a video using Filmora , the duration is set at 5 seconds. You can however very easily change this duration to suit your video’s needs.
The easiest way to do that is to drag one of its edges. But you can also select the text and click on the duration icon to enter the new direction in the dialogue box that appears.
You can also change the default duration so that the new timing applies to all the text effects that you create when editing videos. To do that, go to File> Preferences > Editing < Effect Duration
Customize Text Effect
To customize the text that you added to the video, double-click on it in the timeline. This will open the text editing panel where you can change the font style including the font, size, color, and alignment as well as the animation of the text.
Apply Text Animations
Filmora offers more than 80 animation presets to choose from. You can access the “Animation” tab in the text editing panel to see a list of all available animations. Double-click on the animation you want to use and use the “Preview” window to see how it works out/
If you are happy with the animation and would like to include it in your project, click on “OK” to use it.
Advanced Title Editing
If you would like to go just a little bit further in editing your text, click on the “Advanced” button to open the Advanced Text Editing panel.
Here, you will see more options including the ability to add more elements such as adding new text boxed shapes or images.
With each of these elements, you can also change the font color, animation, opacity, border, fill and shadow.
Related FAQs about Text Video Editing
1. Can I Edit the Text in a Video?
Yes. Once you have added the title or text to the video, you can just as easily edit it in various ways. As we have seen, Filmora gives you a wealth of options to customize the title in various ways including changing the font size, color, and type all from the text editing panel. You can even completely remove the title from the video and add a new one. The preview window in Filmora allows you to see any changes that you make in real-time and adjust them accordingly to fit into your project.
2. Why Should I add Text to my Video?
Adding text and titles to any video can be very important for several reasons. For instance, you can decide to add text to emphasize a point, add a call to action and even help your audience to follow along with the content when the audio is turned off. Titles and any other text that you add to a video can also make the content more understandable, engaging, and clearer. But the effectiveness of the text will depend on how and where you place the text within the video and the video editor you choose can be very instrumental in this regard.
3. How Can I Make the Text in My Video Look Good?
First, you need to decide on the color, effects, and animations that you would like to use, and to decide these things you will need to take your brand and colors into consideration. Once you have all these details, you then need to choose a video editor that offers a wide range of fonts and colors to choose from. Thankfully, Filmora offers all the colors, fonts, and animations you could ever need, allowing you to customize the text any way you want.
4. How Do I Replace Text on my Video?
Sometimes you just need to remove the text that you already have on the video and replace it with new text. Again, how successful you are in this will depend on the tool you choose to use. Some video editors will only allow you to add new text but fall short when you need to remove the text or replace it with something else.
Filmora is one of the few tools that makes it easy to delete a title. You can just click on the title and then select the “Delete” icon in the toolbar to remove it. Then you can simply use the text editing panel to add new text again.
Also read:
- In 2024, Guide to Make Timelapse Video with iMovie
- New 2024 Approved Best 8 AR Apps for Android and iOS | Help You See the World of AR
- Updated In 2024, Create True 3D Text Effects Using After Effects
- 2024 Approved Google Meet Green Screen
- 2024 Approved Using the Best Templates to Create Slow Motion Videos on CapCut
- In 2024, Do You Want to Be Aware of VHSs Meaning? There Is Nothing to Be Worried About because We Will Guide You in This Article
- New Practical Ways to Resize Video in Handbrake
- Updated Best LUTs for Vlog A 2024 Overview
- In 2024, 10 Creative AR Teaching Examples to Tell You What Is AR in Teaching
- Updated Color Match Game Tips for You for 2024
- New 2024 Approved How to Combine Several Xvid Files Into One Windows, Mac,Android, iPhone & Online
- New Have You Ever Tried DaVinci Resolve for Creating a Motion Blur Effect? Read This Article to Discover How to Use DaVinci Resolve Motion Blur with the Help of Detailed Instructions
- In 2024, Blender - A Video Editor for Every Professional
- New If You Want to Color Grading Your Video, Final Cut Pro Can Be One of the Best Choices. However, Its Not Easy for Everyone to Use Color Grading Feature, and in This Guide Well Show You How to Do That
- How to Windows Online Movie Maker Complete Guide
- In 2024, This Article Discusses What Is Blender Video Editor, How to Download, Install and Use It, and Its Key Features. It Further Discusses Its Alternative for Editing Your Videos and More. Check Out Now
- Updated In 2024, Adobe Premiere Pro Download and Use Guide In Depth
- Do You Want to Create a Zoom Motion Blur Effect Using Photoshop? If You Are Unaware of How to Do This, Read This Article to Learn Simple yet Authentic Instructions
- Updated Best 8 Augmented Reality Video Games for 2024
- Updated How to Use LUTs in Lumafusion & Free LUTs Resource for 2024
- Updated 2024 Approved 10 Catchy Pixel Art Wallpapers and How to Custom Your Own
- Know How to Make a Video Background Transparent? Export Transparent Background Video After Adding Effects. Steps to Remove White Background From Video for 2024
- How to Add a Slideshow in PowerPoint
- Updated 2024 Approved 10 Best Vlogging Cameras for Beginners
- Updated Easy Way to Add Effects to Art Video
- Updated 10 Best Voice Over Generators Windows, Mac, Android, iPhone, and Online
- Updated In 2024, How to Make an Aesthetic Slideshow
- Updated Are You Facing Trouble in Playing a TS File? We Got You! Read the Article Below to Learn the Most About TS Format, Pros and Cons, and More
- Updated 2024 Approved A Guide to Use Distortion Effect in Premeiere Pro
- Consider a LUT to Be a Color Preset that a Filmmaker Can Use to Start Working on a Project Quickly. Sony Engineers Have Developed LUTs to Help Filmmakers Perform Specific Tasks. All of These Are Available for Free
- Step by Step to Cut Videos in Adobe Premiere Pro for 2024
- 2024 Approved Top 7 Best GoPro Video Editors for Mac
- In 2024, Add Camera Shake to Video in Adobe After Effects
- New Quick Answer Why Did Filmora AI Portrait Attract People for 2024
- Updated A Complete Guide to the Best Brand Story Videos for 2024
- New Top 10 Transparent Image Online Tools That Give You an Advantage
- Updated 2024 Approved 12 Top Marketing Slideshow Templates
- In 2024, How to Brighten a Video in Windows 10 Easily
- New You Might Have Difficulty Rotating a Video without an Efficient Media Player or Editing Tool. Below Is a Detailed Guide on Rotating a Video on Any Axes
- New In 2024, Advancements in Game Recording Software A Comprehensive Overview
- Updated 2024 Approved Best Applications That Can Help Apply The Best VHS Camera Effect
- How to Create an Aesthetic Slideshow Presentation
- 2024 Approved How Long Does It Take To Edit Videos
- New How to Overlay Video in Premiere Pro
- How To Achieve LumaFusion Color Grading Through LUTs for 2024
- Updated Why Vimeo Slideshow Maker Become Popular for 2024
- New 2024 Approved How to Convert SRT to DOCX
- New VSCO Slow Motion for 2024
- 2024 Approved Adobe Premiere Pro Download and Use Guide
- How to remove Google FRP Lock on Tecno
- What Pokémon Evolve with A Dawn Stone For Vivo G2? | Dr.fone
- Top 10 Fixes for Phone Keep Disconnecting from Wi-Fi On Realme Narzo N55 | Dr.fone
- How to Unlock Xiaomi 14 Pro PIN Code/Pattern Lock/Password
- How to Fix Unfortunately, Contacts Has Stopped Error on Honor 90 Lite | Dr.fone
- Process of Screen Sharing OnePlus Ace 2V to PC- Detailed Steps | Dr.fone
- New In 2024, Ever-Changing Era of AI Video Translation A Reality to Be Fulfilled
- In 2024, How to Cast Poco F5 Pro 5G Screen to PC Using WiFi | Dr.fone
- How to Unlock Itel A70 Bootloader Easily
- In 2024, How To Open Your iPhone 12 Pro Without a Home Button | Dr.fone
- A Detailed VPNa Fake GPS Location Free Review On Itel P55 5G | Dr.fone
- In 2024, How Can I Use a Fake GPS Without Mock Location On Tecno Spark 20 Pro? | Dr.fone
- Title: New 2024 Approved 3 Ways To Stream And Record At The Same Time
- Author: Chloe
- Created at : 2024-06-09 16:15:25
- Updated at : 2024-06-10 16:15:25
- Link: https://ai-editing-video.techidaily.com/new-2024-approved-3-ways-to-stream-and-record-at-the-same-time/
- License: This work is licensed under CC BY-NC-SA 4.0.
