New 2024 Approved Add Text Animation to A Video Online
Add Text Animation to A Video Online
Do you want to make a creative video? Do you want your presentation or video to be easy to follow and entertaining? You can take the video to another level with the help of text animation. This article will discuss how to add text animation to online videos. You can use a good video editor from where you can select fresh styles and make the best video from there. One of the simplest ways to elevate your movie from good to excellent is with understandable text animation.
Text animation and short captions can broaden the audience for your content as more consumers view videos without sound these days. It matters what fonts you use in the videos, and they establish the mood and facilitate interaction with most viewers who rely on video captions. Add text, alter the font, add transitions, and use text effects to draw the user’s attention as they scroll. Please continue reading to discover how simple it is to make interactive video titles, words, and supers.
1. Use Kapwing animation text editor
(https://www.kapwing.com/animated-text-video-maker )
You can use the potent online editor Kapwing to add animated text to videos online, utilizing music, videos, GIFs, and images. There are no downloads required because everything is already present inside the browser. Kapwing is a capable tool for content production that is simple enough for everyone to use. The majority of video formats, GIF and image, including avi, png, jpg, gif, MOV, mp4, and more, are supported by Kapwing.
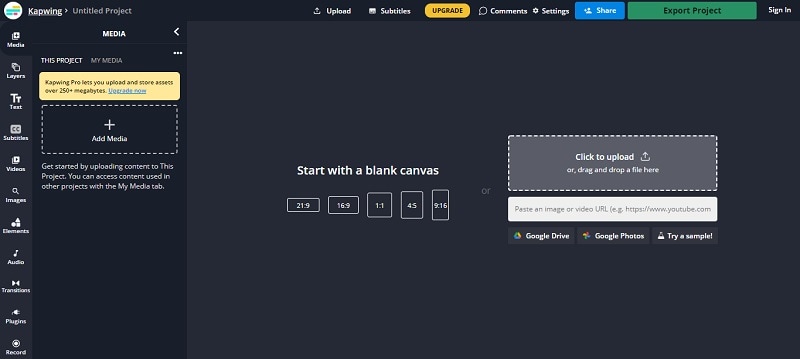
Step1 Upload the Video to Kapwing
You can open Kapwing with the device and tap on “Start Editing” to open up Kapwimg studio. After that, one can use the drag and drop option to upload the video in the studio. You can click on upload or use the link to upload.
If you have a more than 250 MB video, then you will require the Pro version.
Step2 Add the Text
When the video gets uploaded, now you can add your text. You must click the “Text” option on the left and type the text. After that, you can pick your favorite color, background, and color to add style.
You will always want that your text to get animated, but it doesn’t mean that you will have to use explosive fonts or funky or bright, which are very funky. The animation will make your text look attractive, and you can experiment with the colors and fonts to find the best combination.
Step3 Animate the Text
Now the fun part starts; choose the text box present on the right side and click on the “Animate” tab. It will allow the user to select animations like fade, flicker, hue rotates, and many more. Choose the speed according to your requirement, and if you want to change the background and color, you can do it too.
Use “Apply To” for applying this animation in the outro, intro, or both. It will help you to make the text fade out, fade in, or transition out and in with animation. Now the animation library has nine options:
- Drop: It appears on top of the text box
- Flicker: This one is like a candle’s flicker, and text flashes disappear and appear before staying.
- Fade: Opacity can be changed from 0% to 100%.
- Pop:- This grows the text more extensive than the text box and shrinks back to the place.
- Reveal:- Rolls from the left side to the right side
- Wipe:- Rolls from the left side to the right side with a colored background.
- Vibrate: The text box shakes in every direction.
- Hue rotates:- Colour of text cycles through the hue values..
You can use a timeline to adjust the animation’s termination when you set text animation. You can even drag that layer after the start time or use it on end/start time sliders to decrease or increase the time of your video. Text animation can get started when the cursor reaches the start time.
Step4 Export
The video with animated text is now ready to boom. You can click on “Export Video” present at the top and wait for the process. After that, you can download that video and use the links to share it on your social media platform.
2. Use veed.io text video editor
(https://www.veed.io/create/text-video-maker )
Veed is one of the best video editor text effects online, which allows you to add text to online videos. You can easily add style, color, text, and font in a few clicks. You can upload the video and tap the text to get started. Add title and text or select handwriting font. One can select it from templates. Change transparency, alignment, and font size of the text.
This online software is perfect for creating attractive videos on social media. This is free, which omits the usage of expensive software. It is much easier to avoid many complex video editor apps. With the help of VEED, you can create an excellent video without any experience and do it with a few clicks. Let’s see how to add animated text to photos online.
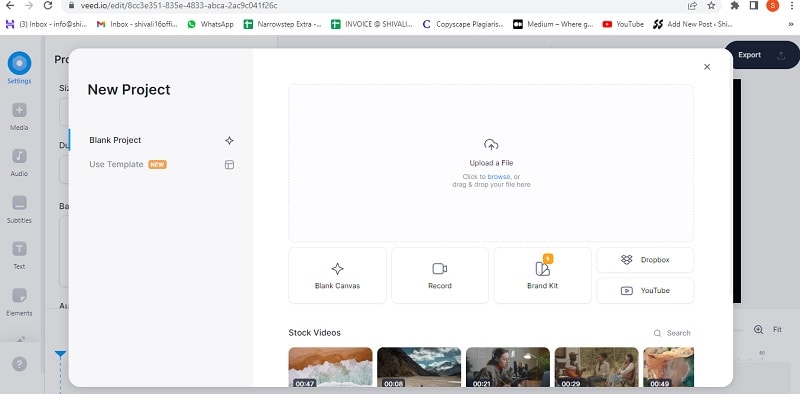
Step1 Upload the video
Tap on “Choose Video” and choose the file you want to upload on VEED. One can even use the drag and drop option from the folder to the editor.
Step2 Add text
After that, you can add the text by tapping on the “Text” option on the left menu. You can select the text style and start typing.
Step3 Export
Save the video with the text you placed by tapping on “Export.” The video gets saved in an MP4 file.
3. Use Animaker text maker
(https://www.animaker.com/text-animation-maker )
The Animaker is one of the best-animated video makers. This app offers the best collection of charts, BGs, and animated characters. With the help of Animaker, you can make the text disappear or appear off-screen in the best way. After you finish your video, you can download the format in MP4.
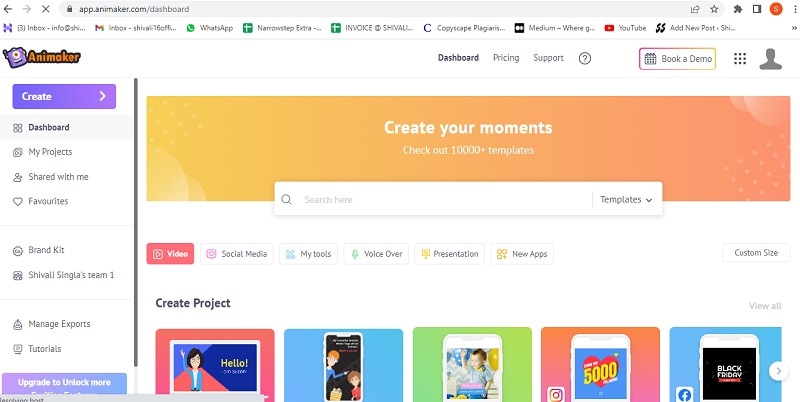
Step1 Upload the video clip
First, you can upload your video clip present on top that you wish to add text animation.
- Tap on the “Upload section” on the bottom left. You can upload your video where you wish to add the animated text.
- The video will get uploaded to “My Files.”
- Click on the uploaded video in the library to load it on the workspace.
Step2 Add text to the video
- You can add text in their text section
- In the next section, one can find two different text types. At the top, you will discover plain text options, and at the bottom, you can find pre-designed boxes seasoned at Animaker.
Let’s see how you can use pre-built text boxes.
- Tap on pre-built designs for your text animation. One can see the text appearing in the center of the workspace, and you can click it and type new text if you want to customize it.
- You can notice widespread options appearing with your text. It is known as the item menu. It will allow the user to modify their text. One can change font size, color, style, etc. Your text will come with pre-defined effects, which will help you to animate text instantly.
- You must have noticed that the purple color bar appears on the timeline, representing the duration of the text visible in the video. For example, if you want that text to get visible between 4rth to 8th seconds, then you will have to drag the edges of that purple bar to the same duration.
To see the scene, you must click on the play button on top of the timeline.
Let’s check the other ways of adding animated text to the video. In the previous one, you have seen how you can add text animation using pre-built boxes. Now you will get to know about doing it by using blank boxes.
- Start tapping the “text section”. Select the bank textbox.
- Click on them and then opt to add new text.
- Opt for clicking the cog icon that is there in the item menu.
- You will notice the settings tab that is on the screen’s right side.
- You can easily opt for the customization of the text in the way you wish. You can start by modifying the style of the font. One can change the size and color of the font as well.
- Use these options and opt for the application of enter and/or exit effects to text. Now, opt to click on the effect option to get more than 50 options. You can select the effect from there.
- Once the animation effect is applied to your timeline, you can notice the pink part in the bar i.e. purple. This completes creating text animation by using Animaker.
Step3 Download the Video
- You can visit the publish option in the right window to download the video.
- Tap on the “download video” option for downloading.
Conclusion
Now, you are aware of how to add text animation to video online and the three best video editors that will help you add animated text to your videos. At this point, you can choose the best one according to your needs and usage. These steps will help you create a unique and good video that will be easy to understand and entertaining.
Free Download For Win 7 or later(64-bit)
Free Download For macOS 10.14 or later
Free Download For macOS 10.14 or later
Clone Yourself in Videos with Filmora
With the help of video editing programs like Filmora , you can create clones of yourself. Whether you’re looking to create a funny skit or a serious video, cloning yourself can add much production value to your project.
In this article, we’ll walk you through the process of how to clone yourself in videos using Filmora.
Part 1: How to Film Clips for Cloning Effects?
To make cloning effects, you will need to take two different shots and use a tripod to place the camera, so the frame doesn’t change.
Shooting the first clip
For the first shot, stay on one side of the frame and do the first action. For example, you can pretend to yank and take off your jacket. Then, drop the jacket to the other side of the frame.

To make it more realistic, make an interaction by reacting to the “clone” while facing the other direction.

Shooting the second clip
Then, shoot for the second clip without changing the frame. You will have to go to the place where you dropped the jacket from the first shot.

Act as if you have just appeared there and give a reaction to the other side as well.
Part 2: How to Do the Clone Effect with Filmora?
After you have shot the necessary film clips, bring the clips into Filmora 11. If you haven’t installed Filmora yet, you can go to their website and download it here:
Free Download For Win 7 or later(64-bit)
Free Download For macOS 10.14 or later
Once you have opened Filmora 11, follow the steps below:
Step1 Bring the first clip to the timeline and cut the clip where you pretend to yank and take off the jacket. Select and delete the unnecessary clip.

Step2 After you have the first part of the effect ready, let’s start working on the clone part using masking.
First, place the second clip on a different window track, and the starting point is where you react to the “clone.”

Then, double-click the second clip and go to the Filmora setting window. Tap on the Mask section > Single line.

On the preview screen, adjust the position of the mask to only show “the clone.”

Set the blur strength on the setting to make a smoother edge transition.
Step3 If the timing of the two clips doesn’t match, you can fix it using the speed ramping feature on Filmora 11. To use it, double-click the second clip and select Speed > Speed Ramping > Customize.

Move the keyframe up to increase the speed. You can adjust it according to your needs.

Step4 Once you are satisfied, adjust the clip length on the timeline and make sure that both clips finish at the same time.

Extra tip: Add one more effect to make it more magical.
Step1 Open the Effects window and search for “up down 1.”

Step2 Drag and drop the effect onto the timeline where the first cut is set. Adjust the effect length to match the action.

Then, drag and drop the effect again in the transition between the first and the second clip. Adjust it to the appropriate length, then it will give a more dramatic effect.
Step3 You can playback and see how it looks on the preview screen.
Summary
Making a clone effect on video is easy using Filmora. You can use the same trick to create a fashion lookbook video or other creative content to make them more engaging. Let us know if you want to see more tutorials.
Free Download For Win 7 or later(64-bit)
Free Download For macOS 10.14 or later
Free Download For macOS 10.14 or later
Once you have opened Filmora 11, follow the steps below:
Step1 Bring the first clip to the timeline and cut the clip where you pretend to yank and take off the jacket. Select and delete the unnecessary clip.
Step2 After you have the first part of the effect ready, let’s start working on the clone part using masking.
First, place the second clip on a different window track, and the starting point is where you react to the “clone.”
Then, double-click the second clip and go to the Filmora setting window. Tap on the Mask section > Single line.
On the preview screen, adjust the position of the mask to only show “the clone.”
Set the blur strength on the setting to make a smoother edge transition.
Step3 If the timing of the two clips doesn’t match, you can fix it using the speed ramping feature on Filmora 11. To use it, double-click the second clip and select Speed > Speed Ramping > Customize.
Move the keyframe up to increase the speed. You can adjust it according to your needs.
Step4 Once you are satisfied, adjust the clip length on the timeline and make sure that both clips finish at the same time.
Extra tip: Add one more effect to make it more magical.
Step1 Open the Effects window and search for “up down 1.”
Step2 Drag and drop the effect onto the timeline where the first cut is set. Adjust the effect length to match the action.
Then, drag and drop the effect again in the transition between the first and the second clip. Adjust it to the appropriate length, then it will give a more dramatic effect.
Step3 You can playback and see how it looks on the preview screen.
Summary
Making a clone effect on video is easy using Filmora. You can use the same trick to create a fashion lookbook video or other creative content to make them more engaging. Let us know if you want to see more tutorials.
Free Download For Win 7 or later(64-bit)
Free Download For macOS 10.14 or later
Movavi Slideshow Maker Is a Powerful Video Editing Tool that Can Be Used to Add Rich Effects to Videos Easily. This Guide Will Introduce the Features and Show You How to Apply Effects to Videos with This Tool
Many video editors won’t be late in their artwork. They tend to use different effects to light up their crafts. For them, editing videos with effects applications gives more life to the story. In this composition, you will learn more about Effects, and if you are just about to do your video editing right now, these details are definitely for you.
What are Video Effects?
According to the dictionary, an effect is brought about by a cause or an agency.
In video editing, there are a few video effects you must know to apply them to your video project. Video effects can alter the speed and produce distortions, reflections, aesthetic filters, stylistic color grading, animation transitions, and more. They can also contain 3D features like CGI. When used well, these effects improve the narrative, the atmosphere, and the images’ overall impact.
Let’s dissect a few of the major effects, which will be most helpful to you.
Pans and Tilts
Your first thought upon hearing these two words may be tripod motions. Pans and tilts are a quick way to add additional movement and sensation to your video, making it more dynamic.
Change the Speed/Duration
One feature that virtually every NLE or Non-Linear Editing software gives us is the option to modify the playback speed of your video while reducing or increasing the actual duration and tempo of your segments. Slowing down your footage to match the frame rate at which the video was initially captured is one of the critical explanations for doing this.
To incorporate some frantic or chaotic moments into your production, you can use this to generate slow-motion shots and fast-forward effects. This effect can also quickly pan through footage for humorous effect. Find the “Speed/Duration” option under Effects controls to accomplish this.
Light Leaks and Flares
Nothing gives your video a more ethereal vibe than gentle, warm light emerging from the scene. A direct source visible in the photo may be the source of this light, or it may enter the frame from the edge. You’ve probably seen these flares and leaks countless times in movies, whether they were added in post-production or resulted from the cinematographer’s lens choice. You can select where the light comes from if it doesn’t distract from the task. Remember that these spills and flares must contribute to the narrative while remaining barely perceptible to the viewer.
Retro/VHS Effects
While light leaks and lens flares give your movie or film a timeless feel, nothing gives it a dated or, one would say, “scrappy” vibe. The grunge appearance of the ‘90s is in right now, and one of the most popular effects is the VHS look.
There are several ways to get this effect. Applying a preset, essentially a LUT (look-up table or filter), to your color grade will make the image appear fuzzier, desaturated, and blurrier (using the different alpha and gamma channels). This will cause “chroma errors,” which result from poor recordings and a lack of a flying erase head (a function that enables you to record over previously filmed video; imagine formatting your SD card while the video is still present on the card and you are simply recording over it), giving your images an outline of distorted blues and reds.
Color Grading and Color Correction
Besides actual editing, color grading and correction are arguably the most significant post-production steps. With the help of these tools, you may alter skin tones, highlight, and shadow levels, add vignettes, experiment with contrast, and much more. We’ll briefly go through one aspect of color grading—the ability to adjust particular colors in your image—even though this subject needs its ebook.
Adding Overlays
Although we’ve talked about adding overlays, such as VHS effects or light leaks, you may use many other editing overlays to add particular components to your shot, including weather particles!
Using Titles and Motion Graphics
Motion graphics and clean titles are essential for any video that wishes to appear professional. These could be subtitles, and the animation logo reveals post-credits, lower thirds, or even major titles. There are various free typefaces available that you may use to make your project stand out, regardless of the program you’re working in.
Once you’ve selected the appropriate font, color, and weight, it’s time to move on to motion graphics. These are crucial because they may transform a clear, ageless title or text into a lively, entertaining illustration of the product or concept your movie is attempting to market.
The abundance of tutorials nowadays makes learning the fundamentals of motion graphics a piece of cake. As I previously stated, you can access all the various effects and movements you might need, regardless of the editing program, you use.
These various methods and approaches need the practice to perfect, just like any other component of filmmaking. As you add these video editing effects to your editing toolkit, there will undoubtedly be a lot of trial and error. Still, eventually, they will become second nature to your workflow.
Importance of Applying Effects to your Video
Almost from the first motion film, cinematic storytelling and video effects have gone hand in hand. They can improve a scene, create something that doesn’t exist, hide an error, and do much more. In essence, they assist a filmmaker in telling a tale in the manner they desire.
Applying Effects using Movavi Slideshow Maker
Making picture collages is less appealing than slide show presentations. This method is ideal for presenting a gallery of images or creating a polished photo-video presentation for your brand and goods. You’ll need a creative slideshow program with loads of capabilities to create a polished slideshow that will enhance your production. The Movavi Slideshow Maker now comes into play.
In this composition, I will show you how to apply “Effects” on your video using Movavi Slideshow Maker video editing software. A professional slideshow program called Movavi slideshow creator is made for usage by both professional and amateur picture editors. It is a Mac and Windows PC freemium program with many options to give your slideshow presentation a polished and distinctive appearance.
Features of Movavi Slideshow Maker
- It offers an easy-to-use UI
- Includes a complete toolbox for altering photos
- Advanced features for improving slideshows
- Internal media tools
- Native recording capability
- Features scalable video adjustment.
Take note that this software is not just for editing pictures but also for videos.
Step1 Click the Import tab.

Step2 Click “Add Files” and locate your desired video to edit.

Step3 Drag the imported video that you want to edit onto the video track.

Applying Filter effects
A video filter is software that modifies a multimedia stream somehow. A filter graph is a series of filters that each accept input from an upstream filter, process the information, and then output the edited video to their downstream counterparts.
Step1 Click the Filter tab.

Step2 Choose your desired Filter effects depending on your preferred category.

Step3 You can see the preview of a Filter effect by clicking it before applying it to your desired video to be edited.

Step4 If you finally chose a Filter effect, drag it onto the imported video.
Step5 And now you will see the changes. The “star” symbol on the imported video means you have already applied a Filter effect on it.

Raw Footage vs With Applied Filter Effect
Raw Footage

Brush – Sketch Filter effect

Adding Transition Effect
Transitions guide your audience.
From the opening to the very end, they structure the movie. There are numerous typical forms, including the wipe, dissolve, split-cut, and many others. Film editors use transitions to transfer a scene from one video clip to another practice. Transitions don’t need to be visible.
Step1 Click the Transition tab.

Step2 Choose your desired Transition effect depending on your preferred category.

Step3 You can see the preview of a Transition effect by clicking it before applying it to your desired video to be edited.
Step4 If you finally chose a Transition effect, drag it between each imported video.

Step5 Now you will see this kind of symbol, which means you have already put a Transition effect between the imported videos.
![]()
Note: Transition effects can also be applied even if you have only one video. You can put transitions effects either at the start of the video, which could make your video introduction more appealing. Also, you can set the Transition effect at the end of the video, which could give you a pleasant closing.
Transition Effect at the start
Transition Effect at the end
Also, you can make your Transition effect longer or shorter simply by clicking this symbol then it will turn yellow. Point your cursor either on the left side of the symbol; the cursor will become a horizontal double-arrow to change the span of your Transition effect on the left video or on the right end side of the symbol to change the span of the Transition effect on the right video.
Applying Titling Motion Effect
Most video editing applications come with built-in titling choices, and many of them vary from basic letters to a collection of motion graphics that have already been pre-programmed. Enter your text into a template to insert them.
The majority of video projects have crucial titles. You can use them to build a mood, label key elements of the film, and convey information.
Step1 Click the Title tab.

Step2 Choose your desired Titling motion effect depending on your preferred category. You can also see the preview of a title effect by clicking it before applying it to your selected video to be edited.

Step3 To apply the Title Motion effect, drag the effect onto the title track, just above the video track.

Step4 You can place your Title Motion effect on your desired time where you want it to appear.

Step5 To edit your Title texts, you can double-click the applied title on the title track or right-click on it and click the “edit” option. You can also edit the text by double-clicking the title portion on the current video editing.

Step6 In this step, you can edit the Title text in the “clip editing” section, as seen in the red color box. You can change the color, text style, and font size on the yellow color box. And in the green color box, you can change the alignment of the text; you can Bold it, Italizing, and make it an Underlined text.

Step7 You can also adjust the time duration of the Titling Motion effect in two ways. First, by clicking the Title effect from the title track and placing your cursor on either side (the cursor will become a double-headed arrow), you have to shorten or lengthen the Title effect. The second step is to click the “Clip” section and adjust the duration.

These are some ways to apply effects on Movavi Slideshow Maker video editing software. You can choose your desired effects that can make an excellent contribution to your video project. You can download other effects not included in this software by simply going to their store. Click the Help tab to find “Movavi Store” or “Movavi Effects Store.”

You know many video editing software you can find on the internet, and most of them need your subscription to unlock all their features. But of course, there are also several video editing software that is free to use, which could be very helpful for you, especially when you are just a beginner in this field. Choosing the best video editing software is recommended to develop your skills gradually. You can start with a basic one before working on a professional type of video editing software.
Overall, I hope you learn more about applying effects to video editing. I hope this article helps you decide what video effects you will be using when you start editing videos. Remember that too many effects can ruin your work, so sometimes you need to keep it simple. Just be sure that you will guide the audience very well and lead them to your beautiful story.
Free Download For Win 7 or later(64-bit)
Free Download For macOS 10.14 or later
Transition Effect at the start
Transition Effect at the end
Also, you can make your Transition effect longer or shorter simply by clicking this symbol then it will turn yellow. Point your cursor either on the left side of the symbol; the cursor will become a horizontal double-arrow to change the span of your Transition effect on the left video or on the right end side of the symbol to change the span of the Transition effect on the right video.
Applying Titling Motion Effect
Most video editing applications come with built-in titling choices, and many of them vary from basic letters to a collection of motion graphics that have already been pre-programmed. Enter your text into a template to insert them.
The majority of video projects have crucial titles. You can use them to build a mood, label key elements of the film, and convey information.
Step1 Click the Title tab.
Step2 Choose your desired Titling motion effect depending on your preferred category. You can also see the preview of a title effect by clicking it before applying it to your selected video to be edited.
Step3 To apply the Title Motion effect, drag the effect onto the title track, just above the video track.
Step4 You can place your Title Motion effect on your desired time where you want it to appear.
Step5 To edit your Title texts, you can double-click the applied title on the title track or right-click on it and click the “edit” option. You can also edit the text by double-clicking the title portion on the current video editing.
Step6 In this step, you can edit the Title text in the “clip editing” section, as seen in the red color box. You can change the color, text style, and font size on the yellow color box. And in the green color box, you can change the alignment of the text; you can Bold it, Italizing, and make it an Underlined text.
Step7 You can also adjust the time duration of the Titling Motion effect in two ways. First, by clicking the Title effect from the title track and placing your cursor on either side (the cursor will become a double-headed arrow), you have to shorten or lengthen the Title effect. The second step is to click the “Clip” section and adjust the duration.
These are some ways to apply effects on Movavi Slideshow Maker video editing software. You can choose your desired effects that can make an excellent contribution to your video project. You can download other effects not included in this software by simply going to their store. Click the Help tab to find “Movavi Store” or “Movavi Effects Store.”
You know many video editing software you can find on the internet, and most of them need your subscription to unlock all their features. But of course, there are also several video editing software that is free to use, which could be very helpful for you, especially when you are just a beginner in this field. Choosing the best video editing software is recommended to develop your skills gradually. You can start with a basic one before working on a professional type of video editing software.
Overall, I hope you learn more about applying effects to video editing. I hope this article helps you decide what video effects you will be using when you start editing videos. Remember that too many effects can ruin your work, so sometimes you need to keep it simple. Just be sure that you will guide the audience very well and lead them to your beautiful story.
Free Download For Win 7 or later(64-bit)
Free Download For macOS 10.14 or later
How to Change the Speed of Video in DaVinci Resolve?
Slow-motion videos are in trend on social media platforms. You can shoot the footage in slow-motion mode or slow it down while editing the video. Similarly, if you are making a funny video, there are surely going to be parts where the video speeds up. Sped-up video clips have always been part of comic relief and entertainment for the audience. You will need a feature-rich video editor to customize the speed of your video.
DaVinci Resolve has established itself as a complete video editor. You can edit your video, correct the color, add visual effects and edit audio parts. You can undoubtedly change video speed in DaVinci Resolve. However, DaVinci Resolve’s user interface is slightly complex for beginners. We will instruct on how you can speed up a video using DaVinci Resolve. We will also suggest you an easier alternative if you are not in favor of DaVinci Resolve.
Part I. What are the Scenarios When You Need to Speed Up Video?
There are several scenarios when speeding up a video becomes a necessity. Here are the most probable ones that you can relate to.
Boring But Necessary Parts - There could be some sections in a long video that are necessary but boring to watch. You can’t bore your viewers and let them leave your video midway. Hence, you can speed up those sections to pass them away quickly.
Funny Videos - The subject’s actions in the video look very funny when you speed them up. Therefore, if you make funny videos to entertain your viewers, speeding up certain sections of your video with funny audio in the background should be a regular thing.
Short Videos - Short-duration videos are extremely popular on social media platforms.
People upload them as Stories and Statuses to entertain their followers regularly. Therefore, a sped-up video can shorten the duration, accommodate the necessary content, and fit the video duration requirements of the respective social media platforms.
Timelapse - Timelapse videos are a treat to watch. You can shoot the video in timelapse mode or speed up the video while editing. That is how you can fit hours of a video into a few minutes or seconds of video duration.
Part II. Speed Up Video using DaVinci Resolve
DaVinci Resolve is a professional video editor where you can change your video’s speed in several ways. You can instantly change your video clip’s speed by mentioning the speed in terms of percentage.
You can also use the advanced Speed Ramp option to customize the video speed unevenly. Besides, there are retime curves to adjust the video speed at your convenience. Let us go through the detailed guide on how to speed up the video in DaVinci Resolve 17.
Method 1. Change Clip Speed Option
The simplest way is through the Change Clip Speed option. You can explicitly mention the speed percentage as needed. To speed it up, mention speed percentage above 100. If you want to slow it down, the speed percentage will be below 100. Here are the steps you need to execute.
Step1 After you have placed the video clip onto the timeline, select the clip and right-click on it.

Step2 Tap “Change Clip Speed…” option.

Step3 Once the Change Clip Speed dialog box opens, modify the speed from 100% to something higher if you want to speed it up.

Step4 Click on the Change button when you are happy with the result.
Method 2. Speed Ramping Option
Speed ramping is a process where you can vary the speed of your video unevenly. It means you can speed up some portions while slowing down others. This is achieved through retime controls that let you edit the video clips in sections using speed points. Here are the steps to illustrate the process.
Step1 Right-click the video clip on your timeline. From the menu, select the Retime Controls option.

Step2 Move the play head where you want to change the speed. Click the arrow next to 100% and select the Add Speed Point option. Similarly, move the play head to another point and add a new speed point.

Step3 Click on the arrow next to 100% to change the speed between two-speed points. Go to the Change Speed option and select from the preset. Based on your preset speed selection, the video’s speed within the speed points will change.

Part III. Pros and Cons
Every video editor has its advantages as well as drawbacks. So if you think about changing video speed through DaVinci Resolve, check its pros and cons.
Pros
- Change the speed of the entire video clip instantly.
- Change the speed of certain sections of the video through speed ramping.
- Vary the speed of the video clip unevenly with Retime curves.
- Change video speed with Optical Flow for better motion representation.
Cons
- There are too many options to change video speed.
- The regular video speed-changing options produce jittery results.
- Some change video speed options are complicated to execute.
- There are reports of sudden crashes with too many video speed changes.
The cons are too grave to ignore. The learning curve is also steep too. Many look for an easier alternative to DaVinci Resolve speed ramp transition.
Part IV. A Simpler Alternative to DaVinci Resolve to Change Video Speed
Wondershare Filmora is perfectly suitable for you if you are looking for an easier alternative to DaVinci Resolve. Filmora comes with a simple user interface. You get almost the same features as you get in DaVinci Resolve as a video editor. Focusing on changing video speed, Filmora has similar options as DaVinci Resolve, but they are easier to operate.
Anyone can instantly change the speed of the entire or part of a video. There are uniform speed and simplified speed ramping options available for advanced users. You can customize the speed of a video clip as you need. There is not going to be any jittery motion when the speed is changed. In short, Filmora is tailor-made to fulfill all your demands for speeding up videos in easier steps.
Free Download For Win 7 or later(64-bit)
Free Download For macOS 10.14 or later
How Do You Change Video Speed in Filmora?
There are basically three ways to change video speed in Filmora. You can choose from presets for instant change. You can customize the video speed as well as use speed ramping for an advanced level of video speed change. We will now illustrate how to change video speed in Wondershare Filmora.
Watch this video to discover all the methods to change video speed in Filmora.
Method 1. Select From Speed Presets
You can instantly select from Speed Presets if you want to change your video speed in fewer steps. There are fast speed presets as well as slow speed presets available. Follow these steps to choose a speed preset.
Step1 Install Filmora on your computer (Windows or macOS). Open Filmora and select Create New Project.

Step2 Drag the video file from your computer to Filmora’s timeline. Choose video and tap Speed icon that you can find at the top of the timeline.

Step3 From the menu, go to the Fast or the Slow option and select a speed preset. Finally, you can export the file to save it to your computer.

Method 2. Alter Uniform Speed
If you want to customize the video speed as per your need, the Uniform Speed option is for you. You can select from 0.01X to 100X speed. The selected speed will be applicable to the entire video clip uniformly. Here are the steps to set uniform speed.
Step1 Once you have the video on the timeline, click on the Speed icon.
Step2 Choose the Uniform Speed option, which will open the Uniform Speed tab.

Step3 Adjust the speed slider to change the video speed as you need.

Step4 After setting the speed, click on the Ok button. Then you can export the video in any file format.
Method 3. Use Speed Ramping
Speed ramping provides you with a graph to customize the video speed. You can speed up and slow down different parts of your video as you think appropriate. As per the graph’s crests and troughs, the video’s speed varies. Here are the steps to execute.
Step1 Place the video file onto the timeline and go to the Speed icon.
Step2 Select the Speed Ramping option. This will open the Speed Ramping tab.

Step3 You can select any preset or select the Customize option. When you select the Customize option, you can edit the graph accordingly.

Step4 Click on the Ok button, followed by the Export button, to save the video.
Part V. Comparison Between DaVinci Resolve and Filmora
| Parameters | DaVinci Resolve | Filmora |
|---|---|---|
| Change Video Speed Options | Too Many | Appropriate |
| Video Speed Presets | Limited | Ample |
| Ease of Speed Change | Slightly Complicated | Very Easy |
| Export Options | Limited | Ample |
| Application Stability | Less stable | Highly stable |
| Average Rating | 3/5 | 4.5/5 |
| Pricing | High | Reasonable |
| Best For | Advanced video editors | Beginners and advanced video editors |
Conclusion
We have answered how you can use the speed ramp DaVinci Resolve 17 to speed up your video. We have also illustrated the steps to change speed settings in DaVinci Resolve. But many users look for an easier video editor to avoid DaVinci Resolve’s complicacy. Wondershare Filmora is that intuitive video editor where you can change video speed as you need. You can instantly choose from presets and customize the video speed throughout.
The cons are too grave to ignore. The learning curve is also steep too. Many look for an easier alternative to DaVinci Resolve speed ramp transition.
Part IV. A Simpler Alternative to DaVinci Resolve to Change Video Speed
Wondershare Filmora is perfectly suitable for you if you are looking for an easier alternative to DaVinci Resolve. Filmora comes with a simple user interface. You get almost the same features as you get in DaVinci Resolve as a video editor. Focusing on changing video speed, Filmora has similar options as DaVinci Resolve, but they are easier to operate.
Anyone can instantly change the speed of the entire or part of a video. There are uniform speed and simplified speed ramping options available for advanced users. You can customize the speed of a video clip as you need. There is not going to be any jittery motion when the speed is changed. In short, Filmora is tailor-made to fulfill all your demands for speeding up videos in easier steps.
Free Download For Win 7 or later(64-bit)
Free Download For macOS 10.14 or later
How Do You Change Video Speed in Filmora?
There are basically three ways to change video speed in Filmora. You can choose from presets for instant change. You can customize the video speed as well as use speed ramping for an advanced level of video speed change. We will now illustrate how to change video speed in Wondershare Filmora.
Watch this video to discover all the methods to change video speed in Filmora.
Method 1. Select From Speed Presets
You can instantly select from Speed Presets if you want to change your video speed in fewer steps. There are fast speed presets as well as slow speed presets available. Follow these steps to choose a speed preset.
Step1 Install Filmora on your computer (Windows or macOS). Open Filmora and select Create New Project.
Step2 Drag the video file from your computer to Filmora’s timeline. Choose video and tap Speed icon that you can find at the top of the timeline.
Step3 From the menu, go to the Fast or the Slow option and select a speed preset. Finally, you can export the file to save it to your computer.
Method 2. Alter Uniform Speed
If you want to customize the video speed as per your need, the Uniform Speed option is for you. You can select from 0.01X to 100X speed. The selected speed will be applicable to the entire video clip uniformly. Here are the steps to set uniform speed.
Step1 Once you have the video on the timeline, click on the Speed icon.
Step2 Choose the Uniform Speed option, which will open the Uniform Speed tab.
Step3 Adjust the speed slider to change the video speed as you need.
Step4 After setting the speed, click on the Ok button. Then you can export the video in any file format.
Method 3. Use Speed Ramping
Speed ramping provides you with a graph to customize the video speed. You can speed up and slow down different parts of your video as you think appropriate. As per the graph’s crests and troughs, the video’s speed varies. Here are the steps to execute.
Step1 Place the video file onto the timeline and go to the Speed icon.
Step2 Select the Speed Ramping option. This will open the Speed Ramping tab.
Step3 You can select any preset or select the Customize option. When you select the Customize option, you can edit the graph accordingly.
Step4 Click on the Ok button, followed by the Export button, to save the video.
Part V. Comparison Between DaVinci Resolve and Filmora
| Parameters | DaVinci Resolve | Filmora |
|---|---|---|
| Change Video Speed Options | Too Many | Appropriate |
| Video Speed Presets | Limited | Ample |
| Ease of Speed Change | Slightly Complicated | Very Easy |
| Export Options | Limited | Ample |
| Application Stability | Less stable | Highly stable |
| Average Rating | 3/5 | 4.5/5 |
| Pricing | High | Reasonable |
| Best For | Advanced video editors | Beginners and advanced video editors |
Conclusion
We have answered how you can use the speed ramp DaVinci Resolve 17 to speed up your video. We have also illustrated the steps to change speed settings in DaVinci Resolve. But many users look for an easier video editor to avoid DaVinci Resolve’s complicacy. Wondershare Filmora is that intuitive video editor where you can change video speed as you need. You can instantly choose from presets and customize the video speed throughout.
Also read:
- [Updated] In 2024, Navigating YouTube's Digital Canvas Studio Essentials
- [Updated] Sharing Photos & Videos Between Android & iPhone
- 2) Your Ultimate Companion: Official WinX FAQ for Seamless DVD-to-Video File Transformation
- 2024 Approved Advanced Conversational Machines (Discord)
- Best Ways to Blur Zoom Background for Free for 2024
- Complete Walkthrough: Restoring Your GoPro Hero N to Factory Settings
- Does Life360 Notify When You Log Out On Vivo G2? | Dr.fone
- How to Share Location in Messenger On Tecno Spark 20 Pro? | Dr.fone
- In 2024, Do You Want to Enable the Motion Blur Effect While Playing Dying Light 2? Read This Article to Find Out How to Use Dying Light 2 Motion Blur for a Great Gaming Experience
- In 2024, Why Your WhatsApp Location is Not Updating and How to Fix On Infinix Smart 8 Pro | Dr.fone
- IPhone Showing Only 'SOS' On Status Bar? Here Are Six Tactics to Restore Normal Functionality
- New 2024 Approved A Countdown Effect Is Widely Used in Gaming and Report Videos. So How to Create Your Own Countdown Video? This Article Will Tell You some Ideas About Contdown Video Editing
- New In 2024, How to Create Intro with Legend Intro Maker
- New In 2024, How To Export Video in Filmora
- New Top 8 Sites to Download Glitch Transition for Premiere Pro
- Streamlining Short Film Previews for Channels for 2024
- Updated A Full Guide to Funcall Voice Changer and Its Alternatives
- Updated Introduction to LUTs Their Overview and Benefits
- Updated Shoot Video with Virtual Green Screen
- Title: New 2024 Approved Add Text Animation to A Video Online
- Author: Chloe
- Created at : 2025-02-25 19:50:57
- Updated at : 2025-03-04 01:22:57
- Link: https://ai-editing-video.techidaily.com/new-2024-approved-add-text-animation-to-a-video-online/
- License: This work is licensed under CC BY-NC-SA 4.0.