
New 2024 Approved Change Background Color in After Effects
Change Background Color in After Effects
Adobe After Effects is a powerful video editor. After Effects is particularly popular for its special effects that you can add to your videos and blow the mind of your audience. In any video, the background plays a major role in enhancing the overall frame and scene. If you are planning to change background color After Effects or add special effects, you must shoot your video with a solid color background.
During the post-production phase, you can change the background uniformly to any color scheme or special effect as per the requirement of the scene. Since the learning curve for After Effects is slightly steeper, you should know the exact steps to change After Effects background color. We will explain the process in simple steps and provide you with an alternative way to change background color.
Part 1. How to change video BG color in After Effects?
After Effects is widely used for professionals to add animations and special effects to videos during video editing phase. Starting from editing social media videos and YouTube videos to short films and even movies, After Effects finds its application in every field of video editing. Changing background color in After Effects is super simple even though other video editing techniques could be slightly complex for beginners. Here are the steps on how to change background color in After Effects.
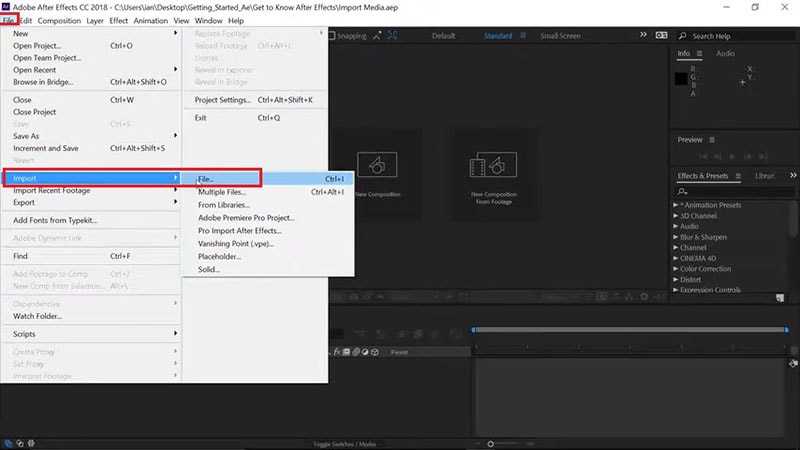
Step1 Open After Effects on your computer. Go to File> Import> File. Select the video file from your hard drive and it will appear under Project tab.
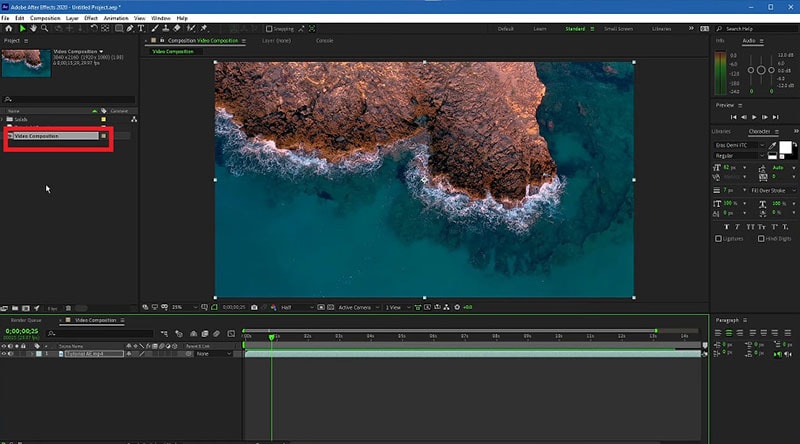
Step2 Drag and drop your video into Timeline. Select the video clip and right-click on Video Composition option located below Project tab.
Step3 From the menu, click on Composition Settings option. You can also use Ctrl + K(Windows) or Command + K(Mac) key combination to open Composition Settings directly.

Step4 On Composition Settings window, go to Background Color and set the color as per your preference. You can also use a color picker as well to select any color from the video directly.
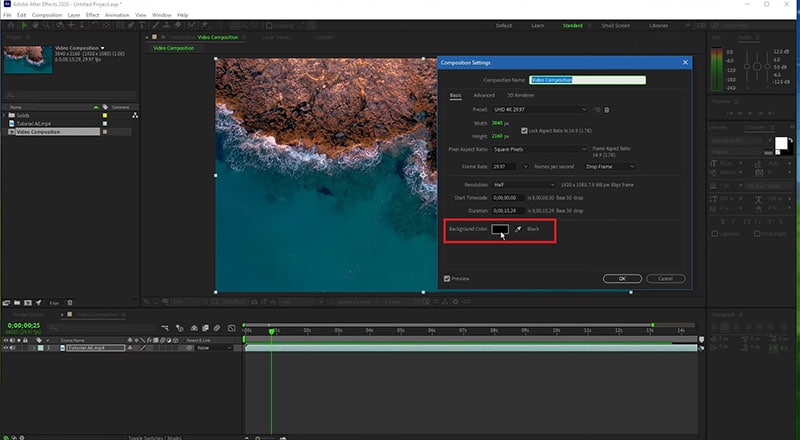
Step5 Click on Ok to set the new background color. Depending on the transparency of your video scene or the transition effect such as fade in and out, the background color will be more prominent.
Part 2. Alternative way to change background color
The best alternative to After Effects is Wondershare Filmora as Filmora has a wide range of special effects and animations. Filmora is a professional video editor where you can perform all basic as well as advanced video editing work. Most importantly, Filmora comes with an intuitive user interface so that even amateurs can use it easily.
There are several ways you can change background color in your video. For example, you can remove background color even when you do not have a solid color. If your video has a solid color, you can change background color to any color or graphical element using Chroma key. Here are the steps to change background color in Filmora .
Free Download For Win 7 or later(64-bit)
Free Download For macOS 10.14 or later
Step1 Download and install Filmora and it is available for Windows and Mac. Launch Filmora and click on New Project.

Step2 Import your video under Project Media folder and drag and drop into Timeline.
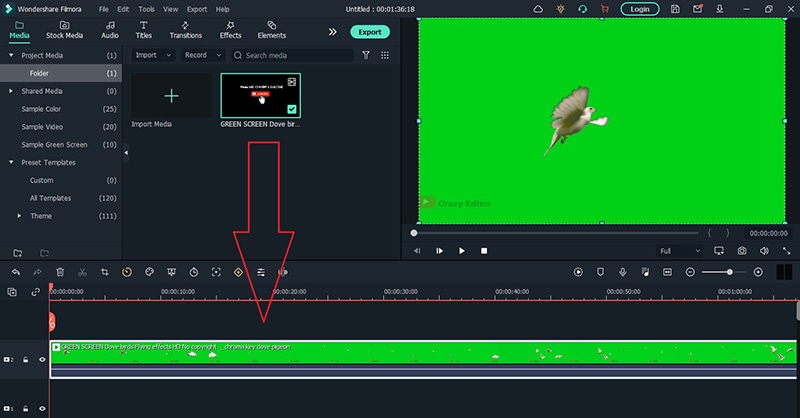
Step3 Double-click on the video clip and go to Video tab and turn on Chroma Key option. Select the solid color present in the background of the video and click on Ok button.
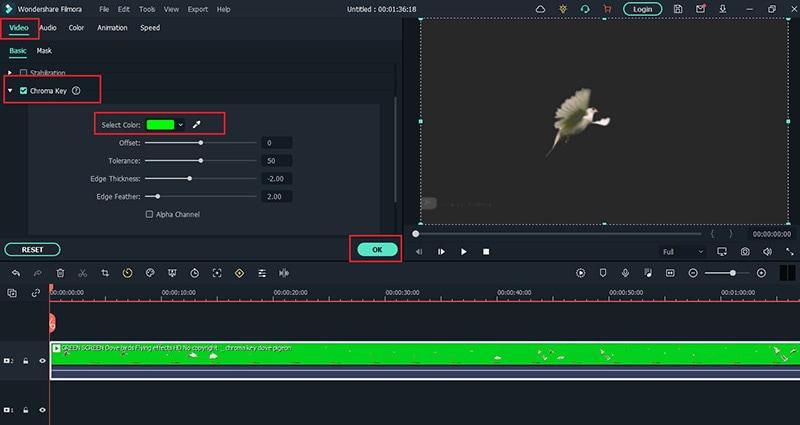
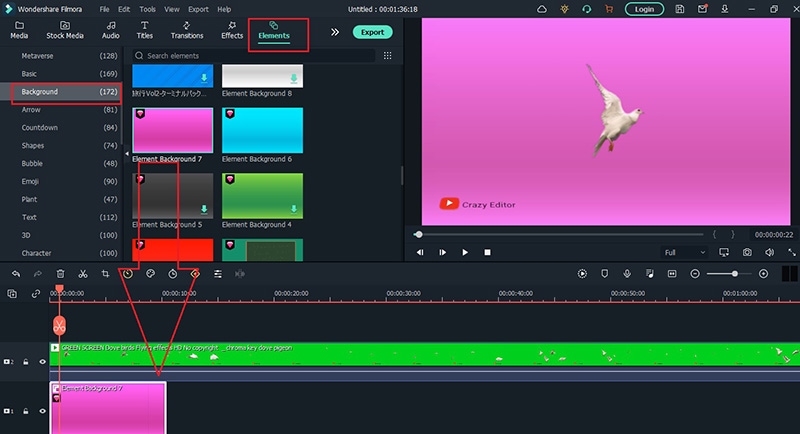
Step4 You will see the background color of the video disappear. Go to Elements> Background and drag and drop any background into Timeline. Make sure it is placed below the video clip and extend the duration of the background color as per your requirements.
Step5 Finally, play the video and click on Export button to save the video.
Part 3. FAQs about Video Background Colors
1. How do I remove background color in After Effects?
Import your video clip with a solid background color and place it on Timeline. Go to Effect menu> Keying> Keylight option. In Effects window and under Keylight, you will see Screen Colour option. Click on the eyedropper icon and select the background color you want to remove.
2. How do I change a solid background in After Effects?
The steps for After Effects how to change background color solid involve removing the background color and adding a layer of solid color to replace the transparency of the video. Go to Layer> New> Solid. Under Solid Settings window, go to Color and select the desired color from Color option and click on OK button. The new color will get reflected in the background of the video.
3. How do you add a white background in After Effects?
Go to Layer> New> Solid and add a white color solid first. However, this white color layer will not be visible unless you turn the background of your video transparent. Go to Effects & Presets and search for Luma Key and drop Luma Key on your video. Set Key type as Brighter and the threshold of the Lema key as per suitability on your video to see the white background appear.
Free Download For macOS 10.14 or later
Step1 Download and install Filmora and it is available for Windows and Mac. Launch Filmora and click on New Project.
Step2 Import your video under Project Media folder and drag and drop into Timeline.
Step3 Double-click on the video clip and go to Video tab and turn on Chroma Key option. Select the solid color present in the background of the video and click on Ok button.
Step4 You will see the background color of the video disappear. Go to Elements> Background and drag and drop any background into Timeline. Make sure it is placed below the video clip and extend the duration of the background color as per your requirements.
Step5 Finally, play the video and click on Export button to save the video.
Part 3. FAQs about Video Background Colors
1. How do I remove background color in After Effects?
Import your video clip with a solid background color and place it on Timeline. Go to Effect menu> Keying> Keylight option. In Effects window and under Keylight, you will see Screen Colour option. Click on the eyedropper icon and select the background color you want to remove.
2. How do I change a solid background in After Effects?
The steps for After Effects how to change background color solid involve removing the background color and adding a layer of solid color to replace the transparency of the video. Go to Layer> New> Solid. Under Solid Settings window, go to Color and select the desired color from Color option and click on OK button. The new color will get reflected in the background of the video.
3. How do you add a white background in After Effects?
Go to Layer> New> Solid and add a white color solid first. However, this white color layer will not be visible unless you turn the background of your video transparent. Go to Effects & Presets and search for Luma Key and drop Luma Key on your video. Set Key type as Brighter and the threshold of the Lema key as per suitability on your video to see the white background appear.
Add Neon Effects to Your Dance Videos with the Help of Wondershare Filmora After Reading This Article. It Will Give a More Thrilling and Exciting Appearance
Neon colors in videos are constantly attracting and compelling the scenes. So how it looks if dancing videos have this feature? For sure, it’ll be dreamier and more classy.
After moving toward, the following steps of processing neon effects, you will find different effects to make your video filmier. Wondershare Filmora provides all types of products on one platform. Then try it out and enjoy the rest. Scroll more to learn about the neon effect before editing your video!
Neon Dance Effects in Wondershare Filmora
You often watch viral dance videos or commercials in which a neon highlight of a person dances aside from them in the video. Yes! You can also make that just in a few minutes.
In this case, Wondershare Filmora is considered to be your partner. Filmora is a fantastic tool that you can have at your disposal to edit a range of videos. There are tons of neon effects in Filmora, including neon frames, neon swings, or even multiple neon overlays.
Free Download For Win 7 or later(64-bit)
Free Download For macOS 10.14 or later

Steps to Make a Neon Dance Effect With Filmora
The public is tired now of seeing old video graphics in dancing videos. It’s time to add neon colors to give a fascinating look. Follow the step-by-step guide mentioned below, and let’s get going!
Step1 Import Clips into the Timeline
Before we begin to edit our video, make sure you download Wondershare Filmora. First, you need to create a timeline to edit our dancing clips. For this, take a look at the below steps!
- Click on the Import icon in the main window when you open Wondershare Filmora.
- Then, import the video clips you want to edit.
- Now, drag the Video and drop it in the editing timeline below.

Step2 Add the Same Video again
We aim to create a black background for the original video we imported above. To do so, follow the steps mentioned below.
- Drag and drop the same video on the timeline.
- Make sure to drag and drop it above the original video.

Step3 Go into the Compositing Mode
After adding the same video, now convert BG into a black screen. For this, follow the given steps:
- Double-Click on the video we added later.
- A video editing panel will open up in the Import
- Scroll down till you see the compositing tab.
- Here will have to change the Blending mode.
- Click on the tab ahead that is labeled “Norma“
- A drop-down option will open up.
- In this drop-down option, scroll below to “Difference“.

- As soon as you click on the Difference option, you will notice a change in the main play window; it will all turn to a black screen.
Step4 Add the Pixelated Edges effect
Our target is to outline the individual in the video, so we can move on to create the Neon Highlight effect. To do so, follow these steps!
- First, go into the effects option that you can select from the tab above the import window.
- In the effects panel, search for the Pixelated edges
- You will notice a search bar in the top right corner. Type “Pixelated edges,“ and you will see some effects pop up in the import window.

- Select the Pixelated edges effect. Then, click and drag it below the video that we turned to black using the Difference
- The edges of the individual dancing in the video will be outlined.

Step5 Change the outline color
You may not like the default color with the Pixelated edges effect. But no worries, you can change that to whatever color you desire by following these steps:
- Double-Click on the video in which you added the effect.
- An editing panel will pop up.
- Click on the Effect option below the Video
- Here, you can see the color option.
- Click on the color and select whatever suits you the best.

Step6 Create Multiple Outlines
It would help if you created multiple outlines to achieve the Neon Dance effect. These multiple outlines will be produced by exporting them multiple times with the color you want. Follow the below points to get it instantly!
- When you have selected the color for your outline, export the video by clicking on the Export icon in the top right corner.

- When you have exported the video, move back to the timeline to edit again.
- As we had selected the Blue color for reference, now choose another color you wish.
- After changing the video, export it again.
![]()
Note: Export as many times as you want with the color of your choice. E.g., 5 colors = 5 exports.
Step7 Import the exported videos
- Now you have to import the videos that you exported.
- Before doing that, first, delete the video in track 2. (The video on which we applied the Difference)
- Now select all the exports from your library and import them onto the import window.
- Please select all of them and drag them on the timeline.
![]()
Note: You don’t want all the outlines to play simultaneously. Otherwise, the outlines will not appear to be separate.
- To do so, stack the videos on each other on different tracks.
Tip: The trick here will be to offset the video by a few seconds so that each video plays a little later than the other.

To efficiently blend the outlines with the green screen, you can change the blending mode of each of the exported videos to “Lighten.”
- Double-click on each video.
- In the editing panel, choose compositing.
- From there, select the “Lighten“ option.

Step8 Add the Glow effect
To make the outlines glow like Neon lights, we will need to add another effect from the effects library.
- Go to the effects tab and search for “Glow.”
- Click and drag the glow effect to each of the exported videos.

You can make it more fun by going one step further!
- Double-click on each of the glow effects that you added.
- In effect, the editing panel goes to the video effects.
- Here, you can change the radius of the Glow effect you added.
- Similarly, you can do it in all the other videos.
Step9 Apply the Green screen effect
We will change our green screen for the final part. Follow the last steps, and then enjoy!
- Move the green screen footage below them all to the top track.
- Double-click the video to enter the editing panel.
- Go to the chroma key (Green Screen) in the editing panel**.**
- Click on the arrow aside from the tab.
You will immediately see changes to your video in the main play window. Play the video from the start and notice the changes.

Congratulations! You have successfully created Neon Dance effects by using the user-friendly Wondershare Filmora.
Conclusion
Wondershare Filmora offers a variety of editing features that you can use to create very innovative videos. You can quickly create Neon effects in your dance videos next time by following the above steps! Add more creativity to attract more audience. Have fun and explore more effects to get unique results!
Free Download For macOS 10.14 or later
Steps to Make a Neon Dance Effect With Filmora
The public is tired now of seeing old video graphics in dancing videos. It’s time to add neon colors to give a fascinating look. Follow the step-by-step guide mentioned below, and let’s get going!
Step1 Import Clips into the Timeline
Before we begin to edit our video, make sure you download Wondershare Filmora. First, you need to create a timeline to edit our dancing clips. For this, take a look at the below steps!
- Click on the Import icon in the main window when you open Wondershare Filmora.
- Then, import the video clips you want to edit.
- Now, drag the Video and drop it in the editing timeline below.
Step2 Add the Same Video again
We aim to create a black background for the original video we imported above. To do so, follow the steps mentioned below.
- Drag and drop the same video on the timeline.
- Make sure to drag and drop it above the original video.
Step3 Go into the Compositing Mode
After adding the same video, now convert BG into a black screen. For this, follow the given steps:
- Double-Click on the video we added later.
- A video editing panel will open up in the Import
- Scroll down till you see the compositing tab.
- Here will have to change the Blending mode.
- Click on the tab ahead that is labeled “Norma“
- A drop-down option will open up.
- In this drop-down option, scroll below to “Difference“.
- As soon as you click on the Difference option, you will notice a change in the main play window; it will all turn to a black screen.
Step4 Add the Pixelated Edges effect
Our target is to outline the individual in the video, so we can move on to create the Neon Highlight effect. To do so, follow these steps!
- First, go into the effects option that you can select from the tab above the import window.
- In the effects panel, search for the Pixelated edges
- You will notice a search bar in the top right corner. Type “Pixelated edges,“ and you will see some effects pop up in the import window.
- Select the Pixelated edges effect. Then, click and drag it below the video that we turned to black using the Difference
- The edges of the individual dancing in the video will be outlined.
Step5 Change the outline color
You may not like the default color with the Pixelated edges effect. But no worries, you can change that to whatever color you desire by following these steps:
- Double-Click on the video in which you added the effect.
- An editing panel will pop up.
- Click on the Effect option below the Video
- Here, you can see the color option.
- Click on the color and select whatever suits you the best.
Step6 Create Multiple Outlines
It would help if you created multiple outlines to achieve the Neon Dance effect. These multiple outlines will be produced by exporting them multiple times with the color you want. Follow the below points to get it instantly!
- When you have selected the color for your outline, export the video by clicking on the Export icon in the top right corner.
- When you have exported the video, move back to the timeline to edit again.
- As we had selected the Blue color for reference, now choose another color you wish.
- After changing the video, export it again.
![]()
Note: Export as many times as you want with the color of your choice. E.g., 5 colors = 5 exports.
Step7 Import the exported videos
- Now you have to import the videos that you exported.
- Before doing that, first, delete the video in track 2. (The video on which we applied the Difference)
- Now select all the exports from your library and import them onto the import window.
- Please select all of them and drag them on the timeline.
![]()
Note: You don’t want all the outlines to play simultaneously. Otherwise, the outlines will not appear to be separate.
- To do so, stack the videos on each other on different tracks.
Tip: The trick here will be to offset the video by a few seconds so that each video plays a little later than the other.
To efficiently blend the outlines with the green screen, you can change the blending mode of each of the exported videos to “Lighten.”
- Double-click on each video.
- In the editing panel, choose compositing.
- From there, select the “Lighten“ option.
Step8 Add the Glow effect
To make the outlines glow like Neon lights, we will need to add another effect from the effects library.
- Go to the effects tab and search for “Glow.”
- Click and drag the glow effect to each of the exported videos.
You can make it more fun by going one step further!
- Double-click on each of the glow effects that you added.
- In effect, the editing panel goes to the video effects.
- Here, you can change the radius of the Glow effect you added.
- Similarly, you can do it in all the other videos.
Step9 Apply the Green screen effect
We will change our green screen for the final part. Follow the last steps, and then enjoy!
- Move the green screen footage below them all to the top track.
- Double-click the video to enter the editing panel.
- Go to the chroma key (Green Screen) in the editing panel**.**
- Click on the arrow aside from the tab.
You will immediately see changes to your video in the main play window. Play the video from the start and notice the changes.
Congratulations! You have successfully created Neon Dance effects by using the user-friendly Wondershare Filmora.
Conclusion
Wondershare Filmora offers a variety of editing features that you can use to create very innovative videos. You can quickly create Neon effects in your dance videos next time by following the above steps! Add more creativity to attract more audience. Have fun and explore more effects to get unique results!
Motion Blur Photo With GIMP: Step-By-Step Guide
GIMP is a cross-platform image editing software that you can use to edit photos and create graphics. The software is available for Linux, Windows, and macOS and can add a motion blur effect (A sense of movement in the photo), making your pictures look more realistic and professional.
So to help you tone your skills, we’ve written a comprehensive guide on how to apply the GIMP motion blur effect to your photos!
Part I. What Is GIMP?
GIMP software, a GNU Image Manipulation Program, is an open-source raster graphics editor used for image editing and retouching, converting between different image formats, free-form drawing, and more.
GIMP is frequently used as a Photoshop alternative. The software boasts a wide range of features, including support for layers, masks, color management, and third-party plugins.
Key Features
Here are some key features of the GIMP software:
- Quickly hide panels and menus to let you switch to a full-screen mode to preview pictures
- Fixes distorted images
- Available for Windows, Linux, Mac OS, and other operating systems
- Automatic image enhancement tool
- Lets you remove all the panels and tools from the workflow except the one you are working with.
- Released under a license called GNU General Public License v3 and later, which makes it free to use and distribute
- Add overlays and crop or resize an image
- Wide range of file formats that it can read and write, making it a versatile tool for working with images
Part II. How To Add The Motion Blur Effect To Your Photos in GIMP?
Below we’ve provided the step-by-step tutorial to add a motion blur effect to your photos in GIMP:
Step1 In the first step, launch a browser on your device, head to the GIMP website , and download the installation file according to your operating system. Now, click the downloaded installer, install the software on your system and launch it.

Step2 In the next step, click “File” on the GIMP dashboard, and select “Open” to access the Open Image window. Select your image file from your system and click “Open” to import the file.

Step3 Next, click the “Filters” option from the top toolbar, select “Blur,” and choose “Motion Blur” from the drop-down menu. A dialogue box will now open where you can preview the effect and adjust the settings, including Blur Type, Blur Center, and Blur Parameters.

Step4 Once you are satisfied with your changes, click “OK” to apply the effect to the image, and make some other edits if needed. Finally, click “File” from the top toolbar, choose “Export As,” click “File Type” to select the format, and select the “Export” option to save your file.
Bonus Tips – The Alternative To GIMP To Create Motion Blur Effect
GIMP is a popular image editor that you can use to create motion blur effects. However, some users find it difficult to use the software for this purpose.
To simplify the process, we recommend usingWondershare Filmora an all-in-one editing software that offers multiple advanced features to help you quickly enhance your project.
Free Download For Win 7 or later(64-bit)
Free Download For macOS 10.14 or later
Here’s why Filmora is the best alternative to GIMP for creating motion blur effects:
- A user-friendly interface where you can quickly create the motion blur effect without spending hours learning the process
- Advanced video editing tools, such as keyframing, speed ramping, green screen, title editing, motion tracking, screen recorder, and preset templates
- Royalty-free music library where you can access millions of music and soundtracks
- Adds the motion blur effect to your videos as well as images
- Comes with multiple parameters to adjust the effect on your clip or image
To add the radial blur effect to images using Filmora, here are the quick and easy-to-follow steps:
Step1 Download the Filmora software on your PC, launch it, and click “Create New Project” on the main panel. Use the “Click Here to Import your Media File” option to import your photo and drag and drop it into the timeline.

Step2 Now, head to the “Effects” tab from the taskbar. Use the search option to find the Blur effect. Afterward, drag & drop it in the timeline and adjust it on your selected clip.

Step3 Please note that motion blur is now a dynamic effect on the image. That means you can add multiple photos and make them into a slideshow with a blur effect transition. Or, press the “Play” icon to preview your photo and pause the clip where you think motion blur works best.
Step4 Click the effect in the timeline to open its settings. Now, play your clip to preview and adjust the parameters as you want to smooth down the motion effect.
Step5 Once satisfied with the outcome, click the “Export” option, go to the “Local” tab, select a file format to save the images, and click “Export” again to save your project.

Filmora offers many export options, such as your device, YouTube, Vimeo, and DVD, with just a few clicks.
Last Words
In this detailed tutorial, we’ve discussed what GIMP is and its key features. We’ve provided a step-by-step guide to walk you through the process of creating the motion blur effect using the GIMP software.
In addition, we’ve provided a bonus tip to recommend Filmora as the best alternative to GIMP for creating the motion blur effect.
Hopefully, you found this article helpful in resolving your queries, and you can now add a smooth motion blur effect to your images.
Free Download For macOS 10.14 or later
Here’s why Filmora is the best alternative to GIMP for creating motion blur effects:
- A user-friendly interface where you can quickly create the motion blur effect without spending hours learning the process
- Advanced video editing tools, such as keyframing, speed ramping, green screen, title editing, motion tracking, screen recorder, and preset templates
- Royalty-free music library where you can access millions of music and soundtracks
- Adds the motion blur effect to your videos as well as images
- Comes with multiple parameters to adjust the effect on your clip or image
To add the radial blur effect to images using Filmora, here are the quick and easy-to-follow steps:
Step1 Download the Filmora software on your PC, launch it, and click “Create New Project” on the main panel. Use the “Click Here to Import your Media File” option to import your photo and drag and drop it into the timeline.
Step2 Now, head to the “Effects” tab from the taskbar. Use the search option to find the Blur effect. Afterward, drag & drop it in the timeline and adjust it on your selected clip.
Step3 Please note that motion blur is now a dynamic effect on the image. That means you can add multiple photos and make them into a slideshow with a blur effect transition. Or, press the “Play” icon to preview your photo and pause the clip where you think motion blur works best.
Step4 Click the effect in the timeline to open its settings. Now, play your clip to preview and adjust the parameters as you want to smooth down the motion effect.
Step5 Once satisfied with the outcome, click the “Export” option, go to the “Local” tab, select a file format to save the images, and click “Export” again to save your project.
Filmora offers many export options, such as your device, YouTube, Vimeo, and DVD, with just a few clicks.
Last Words
In this detailed tutorial, we’ve discussed what GIMP is and its key features. We’ve provided a step-by-step guide to walk you through the process of creating the motion blur effect using the GIMP software.
In addition, we’ve provided a bonus tip to recommend Filmora as the best alternative to GIMP for creating the motion blur effect.
Hopefully, you found this article helpful in resolving your queries, and you can now add a smooth motion blur effect to your images.
Convert MP4 to 60 FPS GIF: A Step-by-Step Guide
GIFs have become a popular way to share short and engaging videos online. They are widely used on social media platforms and messaging apps, making it easy to share moments, reactions, and emotions with friends and family. But not all GIFs are created equal. Some GIFs can look choppy and low-quality, detracting from the viewing experience.
To improve the quality of your GIFs, you can convert your MP4 videos to 60 FPS (frames per second). This will give your GIFs a smooth, fluid motion that looks professional and visually appealing. In this article, we’ll go over the steps you need to follow to convert your MP4 videos to 60 FPS GIFs and create high-quality GIFs that are perfect for sharing online.

Why Convert MP4 to 60-FPS GIF?
GIFs are a great way to share short, eye-catching videos online, but not all are made the same. GIFs with low frame rates tend to look choppy, and the motion could be smoother, making the video look unprofessional and detracting from the overall viewing experience. On the other hand, GIFs with higher frame rates look smoother, and the motion is more fluid, making the video more visually appealing.
Converting your MP4 videos to GIFs has several benefits:
- Smoother Motion: By converting MP4s to GIFs, you increase the frame rate of your GIFs, giving them a smoother and more fluid motion.
- Increased Detail: Higher frame rates allow for more detail and clarity in fast-moving scenes, making the video more engaging and easier to watch.
- Reduced Ghosting: A higher frame rate reduces the “ghosting” effect in low-frame rate GIFs, making the video clearer and reducing distractions.
- High-Quality Videos: Converting MP4s to GIFs eliminates the ghosting effect and creates high-quality GIFs that are perfect for sharing online.
- Increased Engagement: High-quality GIFs will engage and entertain your audience, making them more likely to share and interact with your content.
Converting MP4s to GIFs is a great way to improve the overall quality of your GIFs and create visually appealing videos that are perfect for sharing online. Whether you’re sharing a reaction, a moment, or an emotion, a high-quality GIF will engage and entertain your audience.
Can I Get a 60 FPS GIF?
While it’s true that many people search for 60 FPS GIFs, it’s important to understand that there is no such thing as a true 60 FPS GIF.

GIFs are an image format designed to display simple animations. GIF files store delay time between frames which is defined as multiples of 1/100th of a second. Value 1 would give you 100 FPS; value 2 would already have half of 100 FPS, that is, 50 FPS; value 3 would give you 33.3 FPS GIF, etc. So there are 20 FPS GIFs, 33.3 FPS GIFs, 50 FPS GIFs, and 100 FPS GIFs.
In addition, many websites or programs (including Google Chrome) ignore value 1 (100 FPS GIFs) and default to a much slower animation speed when viewing GIF files. Therefore, 100 FPS GIFs are technically possible but are rarely used. Value 2 (50 FPS) is the most you can get.
If you want to create high-quality animations, consider using MP4s or alternative image formats better suited for high frame rates and detailed animations.
That being said, some websites may have a “60 FPS GIFs” category, but it’s important to understand that most of the content in these categories is not 60 FPS. Instead, it’s likely to be either an MP4 video or a GIF with a lower frame rate, like 50 FPS, labeled as “60 FPS” for marketing purposes.
Is There Any 60 FPS GIF Maker?
Unfortunately, there is no such thing as a 60 FPS GIF maker. As mentioned before, there is no 60 FPS GIF, so it is impossible to create a 60 FPS GIF using traditional methods. However, many excellent video-to-GIF converters in the market allow you to set the GIF frame rate.
These video-to-GIF converters allow you to convert MP4 videos to GIFs with a higher frame rate, which can give your GIFs a smoother and more fluid motion. While these GIFs may not be 60 FPS, they can still provide a significant quality improvement compared to traditional GIFs.
How To Convert Video to GIF and Set Its FPS on Desktop
Converting videos to GIFs is a simple process that can be done using various tools, including desktop software such as Wondershare Filmora . Filmora is a powerful and user-friendly video editor that makes it easy to convert videos to GIFs and set their frame rate.
Free Download For Win 7 or later(64-bit)
Free Download For macOS 10.14 or later

Not only does it allow you to easily convert your videos to GIFs, but it also allows you to customize the frame rate and other settings to get the perfect results. With its user-friendly interface and powerful features, Filmora makes it simple for anyone to create high-quality GIFs that are perfect for sharing on social media or other platforms.
Here’s how to convert MP4 to GIF using Filmora:
Step1 Open the Filmora software and create a new project

Step2 Import your video to the timeline

Step3 Export the video

Step4 In the export window, select “GIF“ and set the frame rate of the GIF.

How To Convert MP4 to GIF Online for Free
Converting MP4 videos to GIFs online is a quick and convenient way to create animations without needing specialized software. One of the best online tools for this purpose is Media.io . Its simple and user-friendly interface, Media.io, makes it easy to convert MP4 videos to GIFs in just a few clicks.
With Media.io, you can customize the frame rate, duration, and other settings to get the perfect results. Whether you’re looking to create simple animations or more complex and detailed videos, Media.io has everything you need to get started.
Best of all, Media.io is free to use, making it an excellent choice for anyone who wants to convert MP4 and other videos to GIFs without spending a dime. So if you’re looking for a fast, convenient, and reliable way to convert your videos to GIFs, look no further than Media.io.
Follow these steps to convert MP4 to GIF online using Media.io:
Step1 Upload a video from your computer or drag and drop it onto the page.

Step2 Customize the output size, frame rate, and length, and add text before creating your GIF.

Step3 Download the resulting GIF file or save it for later.

People Also Ask
Here are some of the most frequently asked questions about converting MP4 to GIF and other related topics:
Q1. Can a GIF be 30 FPS?
It is impossible to get an exact 30 FPS GIF. Frame rate refers to the number of images (frames) displayed per second in a video or animation. That frame rate is stored as an integer (n) that defines n/100ths of a second. So you can specify a frame of 1/100 second (100 FPS), 2/100 second (50 FPS), 3/100 second (33.33 FPS), 4/100 second (25 FPS), etc. but not something like 3.3333…/100 second (30 FPS).
Q2. How Do I Get the FPS of a GIF?
To determine the speed or frame rate of a GIF, you can use online tools that show the delay time between its frames in milliseconds. The frame rate of a GIF is calculated by counting how many delays fit in 1 second of animation. The delay time determines the playback speed and can be adjusted to increase or decrease the frame rate. These tools also allow you to preview the speed changes and compare the input and output GIFs.
Q3. What FPS Should a GIF Be?
GIF files store delay time between frames in whole hundredths of a second. They typically run between 10 and 100 frames per second (FPS). The common frame rate for a GIF is 10 FPS, 20 FPS, 12.5 FPS, 25 FPS, and 50 FPS. With online tools, it’s possible to determine and change the speed of a GIF.
Q4. What Is the Max FPS for a GIF?
The maximum fps for a GIF is 100 FPS, but browsers or consumer screens do not support it. The browser-engine image decoders will automatically reduce the framerate to 10 fps, playing it ten times slower. If a GIF appears slow, the browser has reset the speed to 10 fps. Some software and devices may support higher frame rates.
Conclusion
GIF is a popular format for short animations and videos. The frame rate of a GIF determines its playback speed, which is usually set at 10, 20, 12.5, 25, and 50 per second. However, the highest possible frame rate that can be represented in the GIF format is 100 FPS, but most browsers and consumer screens cannot display it accurately.
There are various tools available, both online and desktop-based, that can convert videos to GIFs and adjust their frame rate as desired. With these tools, you can create high-quality, personalized GIFs that fit your specific needs and preferences.
Free Download For macOS 10.14 or later
Not only does it allow you to easily convert your videos to GIFs, but it also allows you to customize the frame rate and other settings to get the perfect results. With its user-friendly interface and powerful features, Filmora makes it simple for anyone to create high-quality GIFs that are perfect for sharing on social media or other platforms.
Here’s how to convert MP4 to GIF using Filmora:
Step1 Open the Filmora software and create a new project
Step2 Import your video to the timeline
Step3 Export the video
Step4 In the export window, select “GIF“ and set the frame rate of the GIF.
How To Convert MP4 to GIF Online for Free
Converting MP4 videos to GIFs online is a quick and convenient way to create animations without needing specialized software. One of the best online tools for this purpose is Media.io . Its simple and user-friendly interface, Media.io, makes it easy to convert MP4 videos to GIFs in just a few clicks.
With Media.io, you can customize the frame rate, duration, and other settings to get the perfect results. Whether you’re looking to create simple animations or more complex and detailed videos, Media.io has everything you need to get started.
Best of all, Media.io is free to use, making it an excellent choice for anyone who wants to convert MP4 and other videos to GIFs without spending a dime. So if you’re looking for a fast, convenient, and reliable way to convert your videos to GIFs, look no further than Media.io.
Follow these steps to convert MP4 to GIF online using Media.io:
Step1 Upload a video from your computer or drag and drop it onto the page.
Step2 Customize the output size, frame rate, and length, and add text before creating your GIF.
Step3 Download the resulting GIF file or save it for later.
People Also Ask
Here are some of the most frequently asked questions about converting MP4 to GIF and other related topics:
Q1. Can a GIF be 30 FPS?
It is impossible to get an exact 30 FPS GIF. Frame rate refers to the number of images (frames) displayed per second in a video or animation. That frame rate is stored as an integer (n) that defines n/100ths of a second. So you can specify a frame of 1/100 second (100 FPS), 2/100 second (50 FPS), 3/100 second (33.33 FPS), 4/100 second (25 FPS), etc. but not something like 3.3333…/100 second (30 FPS).
Q2. How Do I Get the FPS of a GIF?
To determine the speed or frame rate of a GIF, you can use online tools that show the delay time between its frames in milliseconds. The frame rate of a GIF is calculated by counting how many delays fit in 1 second of animation. The delay time determines the playback speed and can be adjusted to increase or decrease the frame rate. These tools also allow you to preview the speed changes and compare the input and output GIFs.
Q3. What FPS Should a GIF Be?
GIF files store delay time between frames in whole hundredths of a second. They typically run between 10 and 100 frames per second (FPS). The common frame rate for a GIF is 10 FPS, 20 FPS, 12.5 FPS, 25 FPS, and 50 FPS. With online tools, it’s possible to determine and change the speed of a GIF.
Q4. What Is the Max FPS for a GIF?
The maximum fps for a GIF is 100 FPS, but browsers or consumer screens do not support it. The browser-engine image decoders will automatically reduce the framerate to 10 fps, playing it ten times slower. If a GIF appears slow, the browser has reset the speed to 10 fps. Some software and devices may support higher frame rates.
Conclusion
GIF is a popular format for short animations and videos. The frame rate of a GIF determines its playback speed, which is usually set at 10, 20, 12.5, 25, and 50 per second. However, the highest possible frame rate that can be represented in the GIF format is 100 FPS, but most browsers and consumer screens cannot display it accurately.
There are various tools available, both online and desktop-based, that can convert videos to GIFs and adjust their frame rate as desired. With these tools, you can create high-quality, personalized GIFs that fit your specific needs and preferences.
Also read:
- [New] Social Media to Mp3 Converter for 2024
- [Updated] From PC/Mac to the Feed How to Efficiently Upload Videos to Instagram
- 2024 Approved Learn to Use Montage with These Movies
- AMD Radeon Series - Secure Driver Downloads for Optimal Window Performance
- Building a Protected Email Environment: Safelisting on Mac OS X Mail App
- How Can I Control Speed of a Video
- How To Create Quiz Videos Detailed Guide for 2024
- How to Loop a Video with iMovie on Mac and iPhone
- How to Reset Oppo Reno 8T Without the Home Button | Dr.fone
- In 2024, Becoming a Pro at Using a Tripod for Clear, High-Quality Vlogs
- In 2024, Ensuring Perfect FB Live Recordings A Guide to 4 Ways
- In 2024, How To Fix OEM Unlock Missing on Motorola Edge 40?
- In 2024, How to Remove Forgotten PIN Of Your Motorola Edge 40
- New In 2024, How to Make a Slow Motion Video Complete Guide
- New TEXT REVEAL Animation | Easy Masking Filmora
- Step by Step to Split a Clip in VLC for 2024
- Step-by-Step Guide: Crafting Compelling Facebook Cover Videos for Maximum Impact
- Updated 3 In-Camera Transitions Tricks To Make Videos Like a Pro for 2024
- Updated Benefits of Live Streaming on YouTube
- Title: New 2024 Approved Change Background Color in After Effects
- Author: Chloe
- Created at : 2025-02-24 22:08:27
- Updated at : 2025-03-04 01:19:24
- Link: https://ai-editing-video.techidaily.com/new-2024-approved-change-background-color-in-after-effects/
- License: This work is licensed under CC BY-NC-SA 4.0.