
:max_bytes(150000):strip_icc():format(webp)/178665671_HighRes-56a532a83df78cf77286de1b.jpg)
New 2024 Approved Deleting White Background in Photoshop Is Hard?
Deleting White Background in Photoshop Is Hard?
Deleting White Background in Photoshop Is Hard? No
An easy yet powerful editor
Numerous effects to choose from
Detailed tutorials provided by the official channel
Know how Photoshop make white background transparent. Learn to create transparent background in Photoshop in simple steps. How to delete white background in image?
In this article
01 [Why Shooting with a White Background Makes Sense](#Part 1)
02 [When We Need to Delete White Background and when Not?](#Part 2)
03 [How to Delete White Background in Photoshop (5 Fast Ways)](#Part 3)
04 [Which Photoshop Selection Tool is Best for White Backdrop Removal](#Part 4)
Part 1 Why Shooting with a White Background Makes Sense

Products have gone online with E-commerce and people explore the products over internet more than they pick it from the stores. So, every business needs to showcase their products in a attractive way to get more customers. This needs an attractive photography by experts. Photography for e-commerce products requires expert product photography or commercial photography. They are very important for a business to get success in long run. To do branding the product image should be accurate and attractive.
So, if your company is going online, your products photography should be attractive enough to make buyers purchase your products. Background is essential part of any photography or video making. Whether it is product catalogue, shoot, advertising or commercial videos, white backdrop and white background are always good. With white background one can pay attention to the product. Every details of the product are highlighted when a white background is used.
When you need bright and highlighted images for any commercial videos, using a right technique for background color is must. White background creates a clean and bright commercial photo. If the same is not done correctly, the white background may turn to be off white or grey. A white background is good for isolating an object in the picture.
So, let’s know why shooting with white background make sense. Here are some reasons for it:

Removal of background becomes Easy and quick:
The most important benefit of applying white background is that it can be easily removed or replaced. In place of the blank white background, one can easily apply other background color or make it transparent. The white background has a speciality that it reflects the color of the product better which makes the product image visually good. This can be done with the help of any tool or application. Thus, using a white background gives an opportunity to apply any other background on it.
Promoting product in every occasion: An image with colorful background may not be useful to present in every event or occasion. For example a simple image with colorful background will not look good in a promotional event, while a colorful background will look happening in any festival event celebration. This, a blank background has the option to change as per the need of the occasion.
An image with white background can be changed as per the occasion. This helps a business to use a single image throughout the year without any additional cost for making a different picture. You can just change the white background of any image through various application or software.
Time saving: Removing white background is easy and streamlined as compared to any other color. The reason is that it does not require much editing and work on the edges. So, the steps in removing the white background are less and thus it saves time of the artist and the editors.
Saves location and bulk shooting expenses: When shooting with a white background is done; the same picture with some changes can be reused for number of times in several occasions. Thus, it saves the cost of shooting different in pictures in different location.
Good to celebrate every special day: A picture with white background is perfect and ready to edit for any special day. Whether it I a father’s day, mother’s day or any special day, a single picture can be edited as per the requirement. It will be a great gifting idea also after changing white background of the picture as per the special day.
Part 2 When We Need to Delete White Background and when Not?

A single picture of a person or product cannot be used for a single instance or purpose. Especially when it is a promotional campaign or commercial advertisements, a product is required to be showcased in several marketing campaign for different categories of consumers. Thus, a white background image is good for several purposes while in some circumstances, it requires changes. So, let’s see when to delete white background and when not:
When a picture requires special editing: When a picture requires some special effects like reflection, highlights and shadow effects, the picture with white background is required to be changed. When improvement in picture is requires, the white, transparent and color background can be changed accordingly.
Enhancing the visual impact of the picture: A white background picture grab the attention of the customers. So, it is good for advertising and promotion. While this needs to be removed when one desire to add some visual impact on the pictures or deliver some message to the viewers. So, it requires adding colorful and visually good background in a picture.
Adding more items to a picture: A white background need to be removed when more items are required to be included in it. Special edits and enhancing the pictures requires removing or adding a white background as per the purpose of the picture.
Part 3 How to Delete White Background in Photoshop (5 Fast Ways)

Editing a picture with white background can be done in easy steps through various applications. Deleting white background in Photoshop can be done through various tools. Some of the top 5 fast ways to clear background Photoshop are**:**
With the object selection tool:
● Start Photoshop and open the picture. Select the “object selection” from the tool bar. Hover cursor over subject till it turns blue. The subject is selected.
● Press the shift key to remove the background while selecting the objects which you want in the picture.
● To invert the selection go to Select>Inverse.
● Unlock the image based on what you want in the background. It will no longer be a background. It can be also used to create transparent background Photoshop.
● Click on Erase tool and start erasing the background.
Removing background with quick action
This is the quick method for removing a background when a user is going for own purpose. It is in-built quick action in Photoshop for removing the background. Although it is good for performing work, but the same cannot meet the perfection level that any other method does. It can be done by following the mentioned steps:
● Open the image in Photoshop, right click on background layer and click Duplicate layer. Then click on OK.
● Always try to open the properties panel by going to Window>Properties.
● Click on new layer at Layer panel. Go to Quick action and click on Remove Background.
● The background gets removed with quick action.
● At this point refinements and adjustments can be made.
Using pen tool to remove the background
● Open image in Photoshop, right click on background layer and go to Duplicate Layer. Name the layer and click OK.
● Select the Pen tool from the toolbox. Zoom the area. Start at the edge of subject. Start working on the object; add anchors which will outline the subject.
● Click-hold-drag to produce a curved line.
● Use the Direct Selection tool in the toolbox if you want to adjust an anchor point or directional lines for fine tuning
● Complete the path from where you started and save it by going to Windows>paths. Go to three bar menu, click New Path to name it and then save.
● Go to path panel and right click New Path. Choose Make selection and click OK. This will give the outline of the path.
● Go to Select> Inverse if you don’t want to delete what is inside the selection. An outline can be seen around the image.
● Press delete to delete the background. It can be also done to add Adobe Photoshop transparent background.
With Magnetic Lasso Tool
● Right click Background layer and click duplicate layer on the image opened in Photoshop. Name the layer and then click OK. From the toolbox, select Magic Lasso tool. Start drawing at the edges of subject.
● Move around the subject and complete till the start point. Marching ants can be seen around the selection.
● Go to Selection>Save selection to save and give it a name.
● Select>Inverse to delete the background. Photoshop checkered background is visible now.
With quick selection tool
● Click on Duplicate Layer by right clicking on background layer of the picture opened on the Photoshop. Name the layer and click OK.
● Go to the tool box and select quick selection tool.
● Paint the subject by using tool.
● Clean up the selection path with click by holding the Option key (macOS) or Alt key (Windows).
● Go to Selection>Save selection to save and give it a name.
● Select>Inverse to delete the background. The white background can be seen now.
Part 4 Which Photoshop Selection Tool is Best for White Backdrop Removal

There are various tools available at Photoshop to turn a background white. Each one of them has great utility based on the applications. Background Eraser tool is one of the good tools if there is need of more control over removing the background in Photoshop. It is highly effective and saves time of the user. It gives the desired outcome with perfection to an image. The visualization of image becomes better when the background is turned into white with the help of Background Eraser tool.
The other application that is very helpful in making background white to any image is Filmora.
Filmora is an excellent image and video editing software which helps the users in creating some amazing images and videos. It has wide range of image and video editing tools that can make any user a professional in image and video editing. It has features to add or remove background of an image to make it more visually good. Changing background and adding special effects to images and videos can be easily done through filmora.
Wondershare Filmora Video Editor allows transformation of pictures and videos in a better way by adding filters and graphics. Availability of support, drawing tools, editing tools, special effects and sound make it a complete application for both beginners and professionals. It can be used with various other applications also. Those who wish to know how to make a layer transparent in Photoshop can learn it from Filmora.
For Win 7 or later (64-bit)
For macOS 10.12 or later
● Ending Thoughts →
● Making white background or transparent background adobe photoshop has many benefits like it highlight the picture and make it good for various applications and occasions. It saves money and cost for the image editors and video makers.
● One should also know when to use the white background for images, catalogue and video shoot. Adding and deleting white background can only be done when required as per the demand of the occasion and the category of the user like marketing, media, customers etc.
● Various tools on Photoshop make it easy for the users to add or remove white background of images. Filmora is one of the applications that is very popular for its image editing features. It can be used to give special effects to any image or video.
Know how Photoshop make white background transparent. Learn to create transparent background in Photoshop in simple steps. How to delete white background in image?
In this article
01 [Why Shooting with a White Background Makes Sense](#Part 1)
02 [When We Need to Delete White Background and when Not?](#Part 2)
03 [How to Delete White Background in Photoshop (5 Fast Ways)](#Part 3)
04 [Which Photoshop Selection Tool is Best for White Backdrop Removal](#Part 4)
Part 1 Why Shooting with a White Background Makes Sense
Products have gone online with E-commerce and people explore the products over internet more than they pick it from the stores. So, every business needs to showcase their products in a attractive way to get more customers. This needs an attractive photography by experts. Photography for e-commerce products requires expert product photography or commercial photography. They are very important for a business to get success in long run. To do branding the product image should be accurate and attractive.
So, if your company is going online, your products photography should be attractive enough to make buyers purchase your products. Background is essential part of any photography or video making. Whether it is product catalogue, shoot, advertising or commercial videos, white backdrop and white background are always good. With white background one can pay attention to the product. Every details of the product are highlighted when a white background is used.
When you need bright and highlighted images for any commercial videos, using a right technique for background color is must. White background creates a clean and bright commercial photo. If the same is not done correctly, the white background may turn to be off white or grey. A white background is good for isolating an object in the picture.
So, let’s know why shooting with white background make sense. Here are some reasons for it:
Removal of background becomes Easy and quick:
The most important benefit of applying white background is that it can be easily removed or replaced. In place of the blank white background, one can easily apply other background color or make it transparent. The white background has a speciality that it reflects the color of the product better which makes the product image visually good. This can be done with the help of any tool or application. Thus, using a white background gives an opportunity to apply any other background on it.
Promoting product in every occasion: An image with colorful background may not be useful to present in every event or occasion. For example a simple image with colorful background will not look good in a promotional event, while a colorful background will look happening in any festival event celebration. This, a blank background has the option to change as per the need of the occasion.
An image with white background can be changed as per the occasion. This helps a business to use a single image throughout the year without any additional cost for making a different picture. You can just change the white background of any image through various application or software.
Time saving: Removing white background is easy and streamlined as compared to any other color. The reason is that it does not require much editing and work on the edges. So, the steps in removing the white background are less and thus it saves time of the artist and the editors.
Saves location and bulk shooting expenses: When shooting with a white background is done; the same picture with some changes can be reused for number of times in several occasions. Thus, it saves the cost of shooting different in pictures in different location.
Good to celebrate every special day: A picture with white background is perfect and ready to edit for any special day. Whether it I a father’s day, mother’s day or any special day, a single picture can be edited as per the requirement. It will be a great gifting idea also after changing white background of the picture as per the special day.
Part 2 When We Need to Delete White Background and when Not?
A single picture of a person or product cannot be used for a single instance or purpose. Especially when it is a promotional campaign or commercial advertisements, a product is required to be showcased in several marketing campaign for different categories of consumers. Thus, a white background image is good for several purposes while in some circumstances, it requires changes. So, let’s see when to delete white background and when not:
When a picture requires special editing: When a picture requires some special effects like reflection, highlights and shadow effects, the picture with white background is required to be changed. When improvement in picture is requires, the white, transparent and color background can be changed accordingly.
Enhancing the visual impact of the picture: A white background picture grab the attention of the customers. So, it is good for advertising and promotion. While this needs to be removed when one desire to add some visual impact on the pictures or deliver some message to the viewers. So, it requires adding colorful and visually good background in a picture.
Adding more items to a picture: A white background need to be removed when more items are required to be included in it. Special edits and enhancing the pictures requires removing or adding a white background as per the purpose of the picture.
Part 3 How to Delete White Background in Photoshop (5 Fast Ways)
Editing a picture with white background can be done in easy steps through various applications. Deleting white background in Photoshop can be done through various tools. Some of the top 5 fast ways to clear background Photoshop are**:**
With the object selection tool:
● Start Photoshop and open the picture. Select the “object selection” from the tool bar. Hover cursor over subject till it turns blue. The subject is selected.
● Press the shift key to remove the background while selecting the objects which you want in the picture.
● To invert the selection go to Select>Inverse.
● Unlock the image based on what you want in the background. It will no longer be a background. It can be also used to create transparent background Photoshop.
● Click on Erase tool and start erasing the background.
Removing background with quick action
This is the quick method for removing a background when a user is going for own purpose. It is in-built quick action in Photoshop for removing the background. Although it is good for performing work, but the same cannot meet the perfection level that any other method does. It can be done by following the mentioned steps:
● Open the image in Photoshop, right click on background layer and click Duplicate layer. Then click on OK.
● Always try to open the properties panel by going to Window>Properties.
● Click on new layer at Layer panel. Go to Quick action and click on Remove Background.
● The background gets removed with quick action.
● At this point refinements and adjustments can be made.
Using pen tool to remove the background
● Open image in Photoshop, right click on background layer and go to Duplicate Layer. Name the layer and click OK.
● Select the Pen tool from the toolbox. Zoom the area. Start at the edge of subject. Start working on the object; add anchors which will outline the subject.
● Click-hold-drag to produce a curved line.
● Use the Direct Selection tool in the toolbox if you want to adjust an anchor point or directional lines for fine tuning
● Complete the path from where you started and save it by going to Windows>paths. Go to three bar menu, click New Path to name it and then save.
● Go to path panel and right click New Path. Choose Make selection and click OK. This will give the outline of the path.
● Go to Select> Inverse if you don’t want to delete what is inside the selection. An outline can be seen around the image.
● Press delete to delete the background. It can be also done to add Adobe Photoshop transparent background.
With Magnetic Lasso Tool
● Right click Background layer and click duplicate layer on the image opened in Photoshop. Name the layer and then click OK. From the toolbox, select Magic Lasso tool. Start drawing at the edges of subject.
● Move around the subject and complete till the start point. Marching ants can be seen around the selection.
● Go to Selection>Save selection to save and give it a name.
● Select>Inverse to delete the background. Photoshop checkered background is visible now.
With quick selection tool
● Click on Duplicate Layer by right clicking on background layer of the picture opened on the Photoshop. Name the layer and click OK.
● Go to the tool box and select quick selection tool.
● Paint the subject by using tool.
● Clean up the selection path with click by holding the Option key (macOS) or Alt key (Windows).
● Go to Selection>Save selection to save and give it a name.
● Select>Inverse to delete the background. The white background can be seen now.
Part 4 Which Photoshop Selection Tool is Best for White Backdrop Removal
There are various tools available at Photoshop to turn a background white. Each one of them has great utility based on the applications. Background Eraser tool is one of the good tools if there is need of more control over removing the background in Photoshop. It is highly effective and saves time of the user. It gives the desired outcome with perfection to an image. The visualization of image becomes better when the background is turned into white with the help of Background Eraser tool.
The other application that is very helpful in making background white to any image is Filmora.
Filmora is an excellent image and video editing software which helps the users in creating some amazing images and videos. It has wide range of image and video editing tools that can make any user a professional in image and video editing. It has features to add or remove background of an image to make it more visually good. Changing background and adding special effects to images and videos can be easily done through filmora.
Wondershare Filmora Video Editor allows transformation of pictures and videos in a better way by adding filters and graphics. Availability of support, drawing tools, editing tools, special effects and sound make it a complete application for both beginners and professionals. It can be used with various other applications also. Those who wish to know how to make a layer transparent in Photoshop can learn it from Filmora.
For Win 7 or later (64-bit)
For macOS 10.12 or later
● Ending Thoughts →
● Making white background or transparent background adobe photoshop has many benefits like it highlight the picture and make it good for various applications and occasions. It saves money and cost for the image editors and video makers.
● One should also know when to use the white background for images, catalogue and video shoot. Adding and deleting white background can only be done when required as per the demand of the occasion and the category of the user like marketing, media, customers etc.
● Various tools on Photoshop make it easy for the users to add or remove white background of images. Filmora is one of the applications that is very popular for its image editing features. It can be used to give special effects to any image or video.
Top 8 AR Apps for Android and iOS | Help You See the World of AR
Top 8 AR Apps for Android and Ios Help You See the World of AR
An easy yet powerful editor
Numerous effects to choose from
Detailed tutorials provided by the official channel
Suppose you want to buy a pair of eyeglasses and don’t know which pair would suit your look. Now you might wish to look at how your face would look on different frames. Here you can use AR and see which pair of glasses would fit you using AR. AR can be used to share and receive various kinds of tacit knowledge. Augmented Reality is often synonymously used for “Computed-mediated reality” and “Mixed- Reality.”
Despite such an exceptional concept, many users raised questions about the privacy issues of this app. AR technology constantly needs to record the real environment, which involves real human beings. Recording their movement breaches their privacy which can cause legal trouble for the user. If the videos are recorded with consent, they will not harm anyone.
In this article
01 [What Is Augmented Reality?](#Part 1)
02 [The 4 Best Augmented Reality Apps for iPhone](#Part 2)
03 [The 4 Best Augmented Reality Apps for Android](#Part 3)
Part 1 What Is Augmented Reality?
Augmented Reality is a technology that uses the real-world environment where virtual objects reside. This process involves an experience where the real or physical world interweaves with virtually created objects. It interweaves so perfectly that the artificial seems a part of the natural. This is an artificial experience, and it adds to the real environment. AR gained popularity in the fields of entertainment and video games.
You might think that AR (Augmented Reality) is the same as VR (Virtual Reality). They are not the same. When someone looks through a VR, everything, including the object’s environment, is virtual or an illusion. When AR is used, the object is virtual, but the environment is real. Suppose you want to buy an item of furniture and you do not know whether it would match your home décor; here, you can use AR to see whether the furniture would fit your décor or not.
Part 2 The 4 Best Augmented Reality Apps for iPhone
Have you ever wondered how it would be to purchase furniture sitting in your bedroom? How would it be like to not worry about which color would fit the home décor o which position would be the best for the product? You can experience these exciting features using this Augmented Reality or AR powered apps. These four apps will give you the best iPhone ar video experience.
01Amikasa
Amikasa is basically a home furnishing AR app. It is exclusive to iOS users only. You can use this app to view products from different brands and websites. This app will improve your shopping experience without going to different stores to get the right product for your room. You can just walk around your house and find the best-fitted product for your house using AR models of the products. Since there are no boundaries to websites and brands, it gives you more opportunity to choose your product wisely. The most interesting part about this app is that you can make your purchases without exiting from this app.

02Wanna Kicks
Wanna Kicks is a fashion-based AR app. To be precise, this app focuses on footwear. This app is also exclusive to iOS users only. You can look into different brands and websites and choose the best footwear for yourself. You can virtually look at how a pair of shoes would look on you when you wear them. You do not browse around to find the most suitable footwear and do it sitting on your bed. These interesting features of this app have gained people’s attention from various countries. This app can push your apple ar video experience to a different level.

03Augment
Augment is a home furnishing goods-based AR app. The app needs to be purchased at $10/month for corporate uses. This app mainly targets e-commerce store owners to make their selling process smooth by creating AR pictures of their products. The seller creates 3D images or models of products that the customers can use to find the best fit for their house. The images created by this app are uploaded for common people’s Augmented Reality experience through mobile apps, websites, or some other source. It comes to great use when the products are sold in the field like event sales, pop-up shops, e-commerce markets, etc.

04Roar
Roar is another AR technology-based app that needs to be purchased at $49 by the creators or hosts. This app aims at business owners. Business owners can use this app in many ways possible, like creating an online store using AR technology using which the consumers can scan the product packages from their homes, using AR technology in advertisements, and many other ways possible.
This app can be used by car sellers to show 3D models or AR images of different cars. Roar is a very popular app used by educators to make educational videos more game-like and make the process of learning fun by including animations and models for teaching.

Part 3 The 4 Best Augmented Reality Apps for Android
Augmented Reality or AR is a very interesting technology, and anybody would want to have this feature in their phone. So here are some apps mentioned below which will help you get ar video app android experience. These four apps top the list of best AR videos for android.
01Google Lens
Google Lens is an image-recognizing application based on AR technology developed by Google, which can be used for free. This app top the list of best Augmented Reality apps. This app can be used to identify objects, texts, images, landmarks, and so much more. Instead of typing your query, you can just scan the product you want to know about.
If you want to buy a product you searched for, the app will provide you with websites selling that particular product. The object needs to be placed in front of the mobile’s camera, and the app uses its Augmented Reality technology to recognize the object and gives appropriate results. You can access Google Lenses by downloading the app or the Google Photos app itself.

02Snapchat
Snapchat is a very popular app, especially among the youngsters. Snapchat is a free app with very minimum system requirements and thus can be accessed by anyone. It has some cool features like fun image effects and exciting texting features. This app offers quirky face filters where the Augmented Reality technology comes to use.
You can transform into anything like a cat, dog, or even another person using this app’s appropriate filter. You can also send funny videos of yourself using those quirky filters through this app. This app gives you a fun and silly experience with taking pictures of yourself or taking a selfie, as popularly known.

03IKEA Place
IKEA Place is a free home décor-based Augmented Reality app. This app is a bridge between Swedish furniture retailers and shoppers. The shoppers or the consumers get the opportunity to place or put out the furniture in their house and decide whether it is suitable for the room or the house. The app considers the whole area and shows the product concerning the space of the area of the room where the product is to be kept. This “drag-and-drop” function helps the users select colors according to the place where they want to keep the product. These features make the shoppers’ experience smooth and hustle-free. This app is one of the best apps for ar video app android users.

04Houzz
Houzz is a home furnishing goods or furniture selling app that uses Augmented Reality for advertising its goods. This app can be used to do interior planning to decide on designs, positions, or layouts of the products. You can view products of different brands and buy the products without exiting the app because of its e-commerce functionality.
This app has an interesting feature: the “View in My Room,” an Augmented Reality powered feature. You can decide the product’s position by virtually placing it in your room. You might not get the most accurate result, but you can get a slight idea of the product and how it would look in your house.
For Win 7 or later (64-bit)
For macOS 10.12 or later
● Ending Thoughts →
● I hope now you know what Augmented Reality is and in which fields it is used.
● It has gained popularity in the marketing industry because it gives a multi-dimensional opportunity to buy and sell products.
● Most importantly, you know how Augmented Reality is different from Virtual Reality.
● This article also highlights the best apple ar video apps and ar video apps android. The apps mentioned in this article are very easy to use. These apps can give you a smooth AR using experience and take it to a different level.
Suppose you want to buy a pair of eyeglasses and don’t know which pair would suit your look. Now you might wish to look at how your face would look on different frames. Here you can use AR and see which pair of glasses would fit you using AR. AR can be used to share and receive various kinds of tacit knowledge. Augmented Reality is often synonymously used for “Computed-mediated reality” and “Mixed- Reality.”
Despite such an exceptional concept, many users raised questions about the privacy issues of this app. AR technology constantly needs to record the real environment, which involves real human beings. Recording their movement breaches their privacy which can cause legal trouble for the user. If the videos are recorded with consent, they will not harm anyone.
In this article
01 [What Is Augmented Reality?](#Part 1)
02 [The 4 Best Augmented Reality Apps for iPhone](#Part 2)
03 [The 4 Best Augmented Reality Apps for Android](#Part 3)
Part 1 What Is Augmented Reality?
Augmented Reality is a technology that uses the real-world environment where virtual objects reside. This process involves an experience where the real or physical world interweaves with virtually created objects. It interweaves so perfectly that the artificial seems a part of the natural. This is an artificial experience, and it adds to the real environment. AR gained popularity in the fields of entertainment and video games.
You might think that AR (Augmented Reality) is the same as VR (Virtual Reality). They are not the same. When someone looks through a VR, everything, including the object’s environment, is virtual or an illusion. When AR is used, the object is virtual, but the environment is real. Suppose you want to buy an item of furniture and you do not know whether it would match your home décor; here, you can use AR to see whether the furniture would fit your décor or not.
Part 2 The 4 Best Augmented Reality Apps for iPhone
Have you ever wondered how it would be to purchase furniture sitting in your bedroom? How would it be like to not worry about which color would fit the home décor o which position would be the best for the product? You can experience these exciting features using this Augmented Reality or AR powered apps. These four apps will give you the best iPhone ar video experience.
01Amikasa
Amikasa is basically a home furnishing AR app. It is exclusive to iOS users only. You can use this app to view products from different brands and websites. This app will improve your shopping experience without going to different stores to get the right product for your room. You can just walk around your house and find the best-fitted product for your house using AR models of the products. Since there are no boundaries to websites and brands, it gives you more opportunity to choose your product wisely. The most interesting part about this app is that you can make your purchases without exiting from this app.
02Wanna Kicks
Wanna Kicks is a fashion-based AR app. To be precise, this app focuses on footwear. This app is also exclusive to iOS users only. You can look into different brands and websites and choose the best footwear for yourself. You can virtually look at how a pair of shoes would look on you when you wear them. You do not browse around to find the most suitable footwear and do it sitting on your bed. These interesting features of this app have gained people’s attention from various countries. This app can push your apple ar video experience to a different level.
03Augment
Augment is a home furnishing goods-based AR app. The app needs to be purchased at $10/month for corporate uses. This app mainly targets e-commerce store owners to make their selling process smooth by creating AR pictures of their products. The seller creates 3D images or models of products that the customers can use to find the best fit for their house. The images created by this app are uploaded for common people’s Augmented Reality experience through mobile apps, websites, or some other source. It comes to great use when the products are sold in the field like event sales, pop-up shops, e-commerce markets, etc.
04Roar
Roar is another AR technology-based app that needs to be purchased at $49 by the creators or hosts. This app aims at business owners. Business owners can use this app in many ways possible, like creating an online store using AR technology using which the consumers can scan the product packages from their homes, using AR technology in advertisements, and many other ways possible.
This app can be used by car sellers to show 3D models or AR images of different cars. Roar is a very popular app used by educators to make educational videos more game-like and make the process of learning fun by including animations and models for teaching.
Part 3 The 4 Best Augmented Reality Apps for Android
Augmented Reality or AR is a very interesting technology, and anybody would want to have this feature in their phone. So here are some apps mentioned below which will help you get ar video app android experience. These four apps top the list of best AR videos for android.
01Google Lens
Google Lens is an image-recognizing application based on AR technology developed by Google, which can be used for free. This app top the list of best Augmented Reality apps. This app can be used to identify objects, texts, images, landmarks, and so much more. Instead of typing your query, you can just scan the product you want to know about.
If you want to buy a product you searched for, the app will provide you with websites selling that particular product. The object needs to be placed in front of the mobile’s camera, and the app uses its Augmented Reality technology to recognize the object and gives appropriate results. You can access Google Lenses by downloading the app or the Google Photos app itself.
02Snapchat
Snapchat is a very popular app, especially among the youngsters. Snapchat is a free app with very minimum system requirements and thus can be accessed by anyone. It has some cool features like fun image effects and exciting texting features. This app offers quirky face filters where the Augmented Reality technology comes to use.
You can transform into anything like a cat, dog, or even another person using this app’s appropriate filter. You can also send funny videos of yourself using those quirky filters through this app. This app gives you a fun and silly experience with taking pictures of yourself or taking a selfie, as popularly known.
03IKEA Place
IKEA Place is a free home décor-based Augmented Reality app. This app is a bridge between Swedish furniture retailers and shoppers. The shoppers or the consumers get the opportunity to place or put out the furniture in their house and decide whether it is suitable for the room or the house. The app considers the whole area and shows the product concerning the space of the area of the room where the product is to be kept. This “drag-and-drop” function helps the users select colors according to the place where they want to keep the product. These features make the shoppers’ experience smooth and hustle-free. This app is one of the best apps for ar video app android users.
04Houzz
Houzz is a home furnishing goods or furniture selling app that uses Augmented Reality for advertising its goods. This app can be used to do interior planning to decide on designs, positions, or layouts of the products. You can view products of different brands and buy the products without exiting the app because of its e-commerce functionality.
This app has an interesting feature: the “View in My Room,” an Augmented Reality powered feature. You can decide the product’s position by virtually placing it in your room. You might not get the most accurate result, but you can get a slight idea of the product and how it would look in your house.
For Win 7 or later (64-bit)
For macOS 10.12 or later
● Ending Thoughts →
● I hope now you know what Augmented Reality is and in which fields it is used.
● It has gained popularity in the marketing industry because it gives a multi-dimensional opportunity to buy and sell products.
● Most importantly, you know how Augmented Reality is different from Virtual Reality.
● This article also highlights the best apple ar video apps and ar video apps android. The apps mentioned in this article are very easy to use. These apps can give you a smooth AR using experience and take it to a different level.
Want to Make a Funny Vlog on TikTok? Trying to Find the Right Topic for It? This Article Presents some Impressive Options for Making a Funny Vlog for TikTok
TikTok has been among the few social media platforms that have gained an exponential following in a truly short time. Regardless of this stunted digital environment, the platform made its statement of becoming part of the all-time greats.
TikTok became known as a short-video platform that influenced the making of funny vlogs. If you are interested in making a funny vlog, you are at the right place.
In this article
01 Ideas for Creating A Funny Vlog for TikTok
02 5 Popular Funny Vloggers on TikTok
Part 1: Ideas for Creating A Funny Vlog for TikTok
When creating a funny vlog across TikTok, there are numerous ideas that one can think of. However, since TikTok videos are of small lengths, achieving diversity is difficult yet possible. You’ll surely get your break if you understand the following ideas for creating a funny vlog.

React to Other Videos
While it may seem the most mainstream style of creating funny content across TikTok, it is also the most effective way of making people laugh while watching your video. This will also bring recurring viewers across your channel.
Display Failure Videos
It is always great to see people trying and doing something funny across the video. Failure videos are believed to be the other way of creating content for a funny vlog on your TikTok, which shall make people laugh hard.
Use Goofy and Peculiar Voices
Unrealistic and weird voices can make your short video seem funny. If you consider talking about something in a silly voice, it will make people burst out of laughter.
Trolling Family Members
One of the best ways to make something good out of TikTok is creating candid moments. This can always be done if you troll or prank your family members out of nowhere. Just keep reminding that you have to ensure no one gets injured due to it.
Impersonations
Making impersonated videos of major celebrities is another way of showing funny content to the viewers on TikTok. If you consider some funny examples for this, it will surely bring you effective results.
Make Puns and Funny Statements
Another great way to create a funny vlog for your TikTok is to be good at making puns. This is purely hilarious content and needs someone to be highly great in it.
Physical Challenges
This can be a bit risky, but it can become quite fun to make and show to the world if executed with care. However, this can be conducted individually or in a group of people, as you find it appropriate.
Use Effects of TikTok
TikTok makes sure to provide something funny in effects to its users. The use of effects for TikTok is an excellent technique to make funny vlogs; however, it can get funny if the elements used across it have a dubious meaning.
Run Everything in Reverse
One of the most straightforward techniques to make a funny vlog is to run everything in reverse order. The simplest thing of a video becomes the funniest to watch.
Part 2: 5 Popular Funny Vloggers on TikTok
This part will provide some popular examples of TikTokers who have made a considerate performance in providing funny content to people across the platform.
Khaby Lame
This is, without a doubt, the first-choice in TikTok accounts that would always come while relating to funny content. Khaby started his journey as a TikToker with a remarkably simple motive of pointing out the simplicity in different tasks, which were displayed to be difficult. Although it sounds pretty basic, the technique taken by Khaby has been so considerate it brought him millions of followers for creating funny content.
Sarah Cooper
Want to see a great impersonation of Donald Trump? It is undoubtedly great to see every time. With Sarah Cooper, it just becomes an entirely different story. Her impersonation has been so perfect that she has been referred to as one of the best funny vloggers on TikTok. Her likes across the platform may not be that great, but she has shown some stature in presenting funny content in a great way.
Dobre Twins
This twin duo is known across many social media platforms for its funny content. As the twins started using TikTok, they started creating good funny vlogs, which gained quite the traction for them. Their unique ideas to present different things have presented the following worth 23 million likes across TikTok, which is quite commendable. However, Lucas and Marcus are only known to operate this TikTok account.

Image alt: dobre twins funny tiktoker
Brittany Broski
Quite a few TikTokers actually make funny videos with impressive comedy. Brittany Broski is a celebrity in this genre, where she has taken great use of her comedy skills to present great vlogs with different and unique topics. Her take on comedy is entirely different, which makes her funny vlog unique and better than others.

Cole LeBrant
This TikToker makes a good collection of funny vlogs across his account with his family. The variety and variability in his videos make him a different version of fun compared to other TikTokers. He has built a great reach across the account, which makes him an impressive choice.
Part 3: How to Make a Funny Vlog?
Funny vlogs are a fabulous way to interact with people of different tastes. It can be something that cherishes the moods of the viewers, regardless of their current emotions. To make this happen, you need a good platform that helps you create a video for your viewers to watch. Wondershare Filmora fulfills the needs of a video editor by providing you with the perfect options while editing the video for TikTok.
For Win 7 or later (64-bit)
For macOS 10.12 or later
If you are looking forward to understanding how to create a funny vlog for your TikTok using Filmora, you need to follow a set of simple steps. These are shown as follows:
Step 1: Launch and Import Video
To start, you need to have Wondershare Filmora installed across your device. Launch the tool and click on “New Project” to start from scratch. Once the screen opens up, you need to click on the “Arrow Head” icon across the ‘Media’ Tab to import the audio you wish to amend for TikTok.
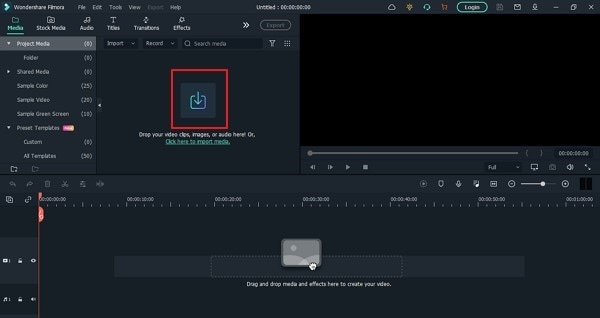
Step 2: Perform Basic Editing
Wondershare Filmora provides users with multiple options for editing their files. At first, drag the file onto the timeline. Following this, you can merge different videos or enhance the video by trimming it. Along with that, you can also consider splitting the image or changing its playback speed for different results.
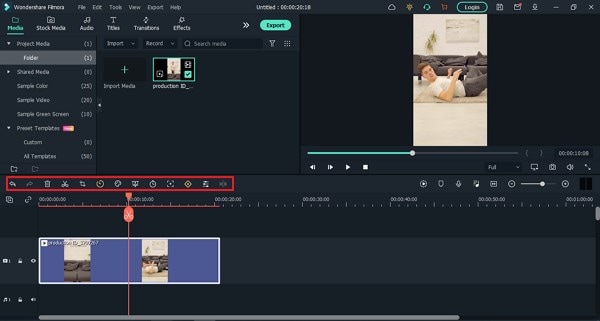
Step 3: Add Effects and Transitions
After you are done with some basic editing, you can add different effects from the “Effects” section. To make the video look exclusive, you can also include “Transitions” across it. Use the “Elements” tab to include stickers and emojis to enhance your TikTok video.
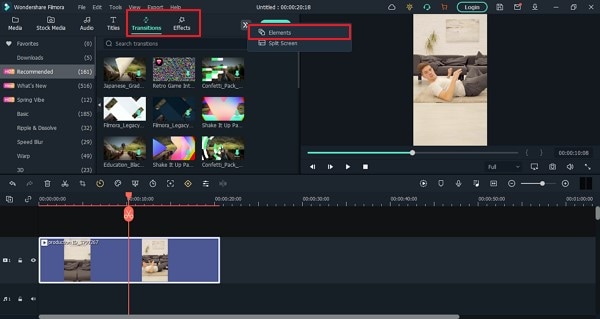
Step 4: Manage the Audio
For managing the audio of your video, you can make several changes across it. You can detach audio and change the audio with another soundtrack. Filmora also allows you to add audio from the “Audio” section, which contains royalty-free music to add. Once you are done, click on the “Export” button to set the settings of the video before exporting it back onto the device.
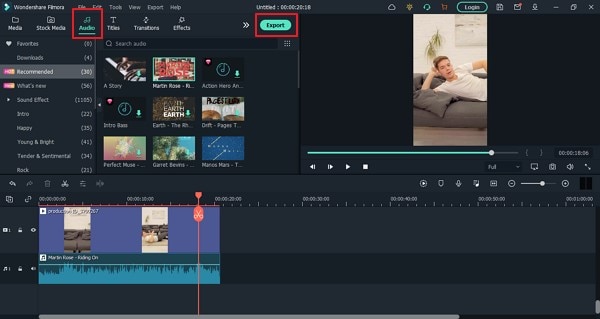
Closing Words
This article has presented some of the finest tips that can be utilized for creating funny vlogs on your TikTok. If you coherently use these tips, you can get significant results across your account in the name of the followers. Along with that, you can also use Filmora for making the best funny vlog with different editing tools.
Wondershare Filmora
Get started easily with Filmora’s powerful performance, intuitive interface, and countless effects!
Try It Free Try It Free Try It Free Learn More >

02 5 Popular Funny Vloggers on TikTok
Part 1: Ideas for Creating A Funny Vlog for TikTok
When creating a funny vlog across TikTok, there are numerous ideas that one can think of. However, since TikTok videos are of small lengths, achieving diversity is difficult yet possible. You’ll surely get your break if you understand the following ideas for creating a funny vlog.
React to Other Videos
While it may seem the most mainstream style of creating funny content across TikTok, it is also the most effective way of making people laugh while watching your video. This will also bring recurring viewers across your channel.
Display Failure Videos
It is always great to see people trying and doing something funny across the video. Failure videos are believed to be the other way of creating content for a funny vlog on your TikTok, which shall make people laugh hard.
Use Goofy and Peculiar Voices
Unrealistic and weird voices can make your short video seem funny. If you consider talking about something in a silly voice, it will make people burst out of laughter.
Trolling Family Members
One of the best ways to make something good out of TikTok is creating candid moments. This can always be done if you troll or prank your family members out of nowhere. Just keep reminding that you have to ensure no one gets injured due to it.
Impersonations
Making impersonated videos of major celebrities is another way of showing funny content to the viewers on TikTok. If you consider some funny examples for this, it will surely bring you effective results.
Make Puns and Funny Statements
Another great way to create a funny vlog for your TikTok is to be good at making puns. This is purely hilarious content and needs someone to be highly great in it.
Physical Challenges
This can be a bit risky, but it can become quite fun to make and show to the world if executed with care. However, this can be conducted individually or in a group of people, as you find it appropriate.
Use Effects of TikTok
TikTok makes sure to provide something funny in effects to its users. The use of effects for TikTok is an excellent technique to make funny vlogs; however, it can get funny if the elements used across it have a dubious meaning.
Run Everything in Reverse
One of the most straightforward techniques to make a funny vlog is to run everything in reverse order. The simplest thing of a video becomes the funniest to watch.
Part 2: 5 Popular Funny Vloggers on TikTok
This part will provide some popular examples of TikTokers who have made a considerate performance in providing funny content to people across the platform.
Khaby Lame
This is, without a doubt, the first-choice in TikTok accounts that would always come while relating to funny content. Khaby started his journey as a TikToker with a remarkably simple motive of pointing out the simplicity in different tasks, which were displayed to be difficult. Although it sounds pretty basic, the technique taken by Khaby has been so considerate it brought him millions of followers for creating funny content.
Sarah Cooper
Want to see a great impersonation of Donald Trump? It is undoubtedly great to see every time. With Sarah Cooper, it just becomes an entirely different story. Her impersonation has been so perfect that she has been referred to as one of the best funny vloggers on TikTok. Her likes across the platform may not be that great, but she has shown some stature in presenting funny content in a great way.
Dobre Twins
This twin duo is known across many social media platforms for its funny content. As the twins started using TikTok, they started creating good funny vlogs, which gained quite the traction for them. Their unique ideas to present different things have presented the following worth 23 million likes across TikTok, which is quite commendable. However, Lucas and Marcus are only known to operate this TikTok account.
Image alt: dobre twins funny tiktoker
Brittany Broski
Quite a few TikTokers actually make funny videos with impressive comedy. Brittany Broski is a celebrity in this genre, where she has taken great use of her comedy skills to present great vlogs with different and unique topics. Her take on comedy is entirely different, which makes her funny vlog unique and better than others.
Cole LeBrant
This TikToker makes a good collection of funny vlogs across his account with his family. The variety and variability in his videos make him a different version of fun compared to other TikTokers. He has built a great reach across the account, which makes him an impressive choice.
Part 3: How to Make a Funny Vlog?
Funny vlogs are a fabulous way to interact with people of different tastes. It can be something that cherishes the moods of the viewers, regardless of their current emotions. To make this happen, you need a good platform that helps you create a video for your viewers to watch. Wondershare Filmora fulfills the needs of a video editor by providing you with the perfect options while editing the video for TikTok.
For Win 7 or later (64-bit)
For macOS 10.12 or later
If you are looking forward to understanding how to create a funny vlog for your TikTok using Filmora, you need to follow a set of simple steps. These are shown as follows:
Step 1: Launch and Import Video
To start, you need to have Wondershare Filmora installed across your device. Launch the tool and click on “New Project” to start from scratch. Once the screen opens up, you need to click on the “Arrow Head” icon across the ‘Media’ Tab to import the audio you wish to amend for TikTok.
Step 2: Perform Basic Editing
Wondershare Filmora provides users with multiple options for editing their files. At first, drag the file onto the timeline. Following this, you can merge different videos or enhance the video by trimming it. Along with that, you can also consider splitting the image or changing its playback speed for different results.
Step 3: Add Effects and Transitions
After you are done with some basic editing, you can add different effects from the “Effects” section. To make the video look exclusive, you can also include “Transitions” across it. Use the “Elements” tab to include stickers and emojis to enhance your TikTok video.
Step 4: Manage the Audio
For managing the audio of your video, you can make several changes across it. You can detach audio and change the audio with another soundtrack. Filmora also allows you to add audio from the “Audio” section, which contains royalty-free music to add. Once you are done, click on the “Export” button to set the settings of the video before exporting it back onto the device.
Closing Words
This article has presented some of the finest tips that can be utilized for creating funny vlogs on your TikTok. If you coherently use these tips, you can get significant results across your account in the name of the followers. Along with that, you can also use Filmora for making the best funny vlog with different editing tools.
Wondershare Filmora
Get started easily with Filmora’s powerful performance, intuitive interface, and countless effects!
Try It Free Try It Free Try It Free Learn More >
2 Effective Ways to Easily Convert VTT to SRT
You need to convert VTT to SRT for a wide array of purposes, especially for adding subtitles to videos and making legit, informative tutorials. Sometimes, it can also help you to explain things not shown in the video, like additional information. As the task is quite baffling, we have created a comprehensive guide to help you convert a VTT file into an SRT file format.
- Batch Subtitles Converter
- SRT Converter (Subtitle Tools)
- Subtitle Edit
- How to convert the subtitle file from VTT to SRT with a Converting Software
Part 1: Why do you need to convert VTT to SRT?
Before diving into concrete how-to steps, it’ll be better to figure out when and why to convert VTT to SRT.
Sometimes, the choice isn’t the choice at all. Compatibility for different platforms can be one of the key reasons for VTT-to-SRT conversion.
Some social media platforms won’t support VTT files, though VTT is a more robust format, supporting HTML5 functionalities and styling editing, and they will work just fine with SRT.
To make subtitles from WebVTT to SRT, two crucial prerequisites are required.
1. A .vtt subtitle file
The first is to have a subtitle file in the .vtt format. Ensure you have written all details in the file, like the text, time sequence or the cues, and other styling options, if any.
2. Professional offline software or online tool for the conversion
Several options are already on the market, both free and premium, with which you can easily achieve perfection in converting the videos, but choose a proper one can be not that easy.
Once you have everything in handy, converting VTT to SRT files won’t be a hassle anymore. Now all you need to know is how to convert the files and get the desired format. In addition, you also should know the top software solutions to proceed with the conversion in a hassle-free manner.
Part 2: Convert your .vtt subtitle to .srt with software
Plenty of software platforms are available online, with which you can easily convert VTT to SRT in minutes. Acknowledging these benefits, we have reviewed the top-rated software applications you can try and proceed with the conversion.
Batch Subtitles Converter
For professional and business purposes, this subtitle converter helps you easily convert the VTT files into SRT ones. It comes with a wonderful feature named batch processing. With this, you can convert multiple subtitle files simultaneously with no file corruption or loss.

Features:
- Customized options for encoding and frame rate on the application itself
- Drag and drop feature with no need to learn tech skills
- Supports multiple file formats to give you more leverage in file conversion
Pros
- User-friendly and intuitive interface
- Free software for subtitle conversion
- Quick file conversion with no quality compromise
Cons
- Doesn’t allow many styling options
- Some features are outdated
Best for:
Converting multiple VTT files into SRT simultaneously without any corruption or quality compromise
SRT Converter (Subtitle Tools)
Many users prefer the SRT Converter by Subtitle Tools, which supports different conversion processes of subtitles. The steps for VTT to SRT conversion are simple: add multiple files into the converter, choose the final format, and begin processing.

Features:
- Supports conversion of different formats like SSA, ASS, SUB, VTT, and SMI.
- It allows webVTT to SRT conversion easily.
- Upload several files and convert them into batches.
- Compatible with different file types like moving text or karaoke text.
Pros
- Straightforward usability
- Free for all users
- Speedy conversions
Cons
- Not many premium-level or unique functions are available here
- Download all via a zip file
Best for:
Simple converter tool online for beginners or users who want quick and straightforward conversions of multiple subtitles.
Subtitle Edit
The best software application you can use for editing and converting the VTT files into SRT is the Subtitle Edit or SE. It gives you more leverage in editing the caption timing, especially when they are not in sync with the concerned video file.

Features:
- Comes with a spell checker built-in for grammar
- Merging and splitting the subtitles
- Allows you to set point synchronization of subtitles with the video
- Helps in adjusting the caption’s display time
Pros
- You can easily view the conversion history
- Themes can be customized with light and dark options
- Helps you compare the subtitles of different file formats
Cons
- Compatible with Windows and Linux only
- Can be harder for beginners
Best for:
Dynamic caption file editing on the go for better synchronization and easy upgrades
How to convert the subtitle file from VTT to SRT with a Converting Software
We are now taking Subtitle Edit software as an example to introduce you to converting the VTT subtitles to SRT.
- Upload the video file on the home page, and it will appear on the left-hand side of the video editor.
- You might have to download one of the concerned devices that do not have a compatible video player.

- Play the video till the point where you want the first subtitle.
- Type the text in the right-hand side editor. It will then appear on the video.
- You can adjust the start and end times from the right dashboard.
Part 3: Convert .vtt subtitle to .srt file with online tools
Apart from using the software applications, you can use several online tools to carry on with the VTT to SRT conversion. Since the market is brimmed with these products, we have listed the three best tools you should look into.
Rev
Rev is one of the most reliable online tools, so converting the VTT file format into SRT won’t be a hassle anymore. From offering multiple file format compatibility to securing the files, Rev has a lot to offer.

Features:
- Allows file imports from the cloud and local storage locations
- The final file can be exported through mail
- Supports automated and manual conversion methods
- Allows subtitle creation in different global languages
Pros
- Doesn’t come with any premium plan
- Easier drag and drop UI
- Automatically converts the file format
Cons
- Does not support direct uploads
- Caption file needs to be created beforehand
Best for:
Converting VTT files into SRT formats for adding subtitles to videos, additional texts, and detailed information
Happyscribe
To automatically convert VTT files to SRT, using Happyscribe is a wonderful option. It comes with a plethora of wonderful features when compared to the contenders. That’s why it gives users more leverage to achieve complete data accuracy.

Features:
- Subtitles can be edited with ease
- Automatic conversion of audio to text format
- Files can be downloaded in multiple formats
- Interactive Editor to edit and review the subtitle files
Pros
- Helps personalize the subtitles
- Provides more accuracy
- Supports over 120 languages
Cons
- Comes with premium packages
- Works best with transcribed scripts
Best for:
Professionals who want to gain more access to their video and audio files
Veed
With an innovative UI and easy-to-use features, Veed is the best VTT SRT converter. You don’t need any technical expertise to use the tool. It also helps in automated conversions of the audio files into transcripts and then to the subtitle format of your choice.

Features:
- Comes with a built-in translator
- Allows you to add emojis
- Features video editing tools also
- Maintains 100% accuracy in file conversion
Pros
- Ideal for beginners
- Offers additional features than file conversion
- Converts the VTT into SRT in minutes
Cons
- The pricing plan is billed annually
- No access to advanced features in free mode
Best for:
It is best suitable for beginners who want to master the art of subtitle creation in SRT file format with ease.
How to convert the VTT file into SRT with an Online Tool?
After getting some pieces of knowledge about VTT-to-SRT conversion tools online, let’s have a try. We take the Rev online converter as an example here to show you get an SRT file from VTT.
- Open the Rev application and upload the .vtt file that you want to convert
- Select the file format you want to change to, i.e., SRT in this case

- Click on the convert button, and the file will get converted easily
Pro Tips: The Easiest Way to Edit the Styling of Your SRT file after converting
While several file conversion apps are in the market, they aren’t very efficient. Plus, most of them lack advanced features. So, you should try using Filmora’s subtitle converter and editor tool to achieve flawlessness and perfection.
Wondershare Filmora is one of the best tools to convert VTT to SRT in a breeze. With advanced features like voiceover, speech-to-text converter, and so on, you will have more leverage in completing the conversion.
How to edit the SRT subtitle file with Filmora on both Mac & Win?
Free Download For Win 7 or later(64-bit)
Free Download For macOS 10.14 or later
Step1 Launch Filmora on your PC or Mac, and create a new project

Step2 Import the concerned SRT file from any storage location.

Step3 Right-click on the app’s timeline -> select the option for Advanced Edit

Step4 You will be given multiple editing options, from subtitle language change to time interval edit. Also, applying the styling to all is supported.

Step5 Once your customization is complete, select the SRT file present on the dashboard
Step6 Select the location where you want to store the SRT file

Final words
Whether it is for more styling options or uploading subtitles on social media platforms, you should convert VTT to SRT. Several apps can help you in converting the subtitle file with ease. Some applications even allow audio or video transcription into a transcript, followed by conversion into the required SRT file format.
- Rev
- Happyscribe
- Veed
- How to convert the VTT file into SRT with an Online Tool
- Pro Tips: The Easiest Way to Edit the Styling of Your SRT file after converting
Part 1: Why do you need to convert VTT to SRT?
Before diving into concrete how-to steps, it’ll be better to figure out when and why to convert VTT to SRT.
Sometimes, the choice isn’t the choice at all. Compatibility for different platforms can be one of the key reasons for VTT-to-SRT conversion.
Some social media platforms won’t support VTT files, though VTT is a more robust format, supporting HTML5 functionalities and styling editing, and they will work just fine with SRT.
To make subtitles from WebVTT to SRT, two crucial prerequisites are required.
1. A .vtt subtitle file
The first is to have a subtitle file in the .vtt format. Ensure you have written all details in the file, like the text, time sequence or the cues, and other styling options, if any.
2. Professional offline software or online tool for the conversion
Several options are already on the market, both free and premium, with which you can easily achieve perfection in converting the videos, but choose a proper one can be not that easy.
Once you have everything in handy, converting VTT to SRT files won’t be a hassle anymore. Now all you need to know is how to convert the files and get the desired format. In addition, you also should know the top software solutions to proceed with the conversion in a hassle-free manner.
Part 2: Convert your .vtt subtitle to .srt with software
Plenty of software platforms are available online, with which you can easily convert VTT to SRT in minutes. Acknowledging these benefits, we have reviewed the top-rated software applications you can try and proceed with the conversion.
Batch Subtitles Converter
For professional and business purposes, this subtitle converter helps you easily convert the VTT files into SRT ones. It comes with a wonderful feature named batch processing. With this, you can convert multiple subtitle files simultaneously with no file corruption or loss.
Features:
- Customized options for encoding and frame rate on the application itself
- Drag and drop feature with no need to learn tech skills
- Supports multiple file formats to give you more leverage in file conversion
Pros
- User-friendly and intuitive interface
- Free software for subtitle conversion
- Quick file conversion with no quality compromise
Cons
- Doesn’t allow many styling options
- Some features are outdated
Best for:
Converting multiple VTT files into SRT simultaneously without any corruption or quality compromise
SRT Converter (Subtitle Tools)
Many users prefer the SRT Converter by Subtitle Tools, which supports different conversion processes of subtitles. The steps for VTT to SRT conversion are simple: add multiple files into the converter, choose the final format, and begin processing.
Features:
- Supports conversion of different formats like SSA, ASS, SUB, VTT, and SMI.
- It allows webVTT to SRT conversion easily.
- Upload several files and convert them into batches.
- Compatible with different file types like moving text or karaoke text.
Pros
- Straightforward usability
- Free for all users
- Speedy conversions
Cons
- Not many premium-level or unique functions are available here
- Download all via a zip file
Best for:
Simple converter tool online for beginners or users who want quick and straightforward conversions of multiple subtitles.
Subtitle Edit
The best software application you can use for editing and converting the VTT files into SRT is the Subtitle Edit or SE. It gives you more leverage in editing the caption timing, especially when they are not in sync with the concerned video file.
Features:
- Comes with a spell checker built-in for grammar
- Merging and splitting the subtitles
- Allows you to set point synchronization of subtitles with the video
- Helps in adjusting the caption’s display time
Pros
- You can easily view the conversion history
- Themes can be customized with light and dark options
- Helps you compare the subtitles of different file formats
Cons
- Compatible with Windows and Linux only
- Can be harder for beginners
Best for:
Dynamic caption file editing on the go for better synchronization and easy upgrades
How to convert the subtitle file from VTT to SRT with a Converting Software
We are now taking Subtitle Edit software as an example to introduce you to converting the VTT subtitles to SRT.
- Upload the video file on the home page, and it will appear on the left-hand side of the video editor.
- You might have to download one of the concerned devices that do not have a compatible video player.
- Play the video till the point where you want the first subtitle.
- Type the text in the right-hand side editor. It will then appear on the video.
- You can adjust the start and end times from the right dashboard.
Part 3: Convert .vtt subtitle to .srt file with online tools
Apart from using the software applications, you can use several online tools to carry on with the VTT to SRT conversion. Since the market is brimmed with these products, we have listed the three best tools you should look into.
Rev
Rev is one of the most reliable online tools, so converting the VTT file format into SRT won’t be a hassle anymore. From offering multiple file format compatibility to securing the files, Rev has a lot to offer.
Features:
- Allows file imports from the cloud and local storage locations
- The final file can be exported through mail
- Supports automated and manual conversion methods
- Allows subtitle creation in different global languages
Pros
- Doesn’t come with any premium plan
- Easier drag and drop UI
- Automatically converts the file format
Cons
- Does not support direct uploads
- Caption file needs to be created beforehand
Best for:
Converting VTT files into SRT formats for adding subtitles to videos, additional texts, and detailed information
Happyscribe
To automatically convert VTT files to SRT, using Happyscribe is a wonderful option. It comes with a plethora of wonderful features when compared to the contenders. That’s why it gives users more leverage to achieve complete data accuracy.
Features:
- Subtitles can be edited with ease
- Automatic conversion of audio to text format
- Files can be downloaded in multiple formats
- Interactive Editor to edit and review the subtitle files
Pros
- Helps personalize the subtitles
- Provides more accuracy
- Supports over 120 languages
Cons
- Comes with premium packages
- Works best with transcribed scripts
Best for:
Professionals who want to gain more access to their video and audio files
Veed
With an innovative UI and easy-to-use features, Veed is the best VTT SRT converter. You don’t need any technical expertise to use the tool. It also helps in automated conversions of the audio files into transcripts and then to the subtitle format of your choice.
Features:
- Comes with a built-in translator
- Allows you to add emojis
- Features video editing tools also
- Maintains 100% accuracy in file conversion
Pros
- Ideal for beginners
- Offers additional features than file conversion
- Converts the VTT into SRT in minutes
Cons
- The pricing plan is billed annually
- No access to advanced features in free mode
Best for:
It is best suitable for beginners who want to master the art of subtitle creation in SRT file format with ease.
How to convert the VTT file into SRT with an Online Tool?
After getting some pieces of knowledge about VTT-to-SRT conversion tools online, let’s have a try. We take the Rev online converter as an example here to show you get an SRT file from VTT.
- Open the Rev application and upload the .vtt file that you want to convert
- Select the file format you want to change to, i.e., SRT in this case
- Click on the convert button, and the file will get converted easily
Pro Tips: The Easiest Way to Edit the Styling of Your SRT file after converting
While several file conversion apps are in the market, they aren’t very efficient. Plus, most of them lack advanced features. So, you should try using Filmora’s subtitle converter and editor tool to achieve flawlessness and perfection.
Wondershare Filmora is one of the best tools to convert VTT to SRT in a breeze. With advanced features like voiceover, speech-to-text converter, and so on, you will have more leverage in completing the conversion.
How to edit the SRT subtitle file with Filmora on both Mac & Win?
Free Download For Win 7 or later(64-bit)
Free Download For macOS 10.14 or later
Step1 Launch Filmora on your PC or Mac, and create a new project
Step2 Import the concerned SRT file from any storage location.
Step3 Right-click on the app’s timeline -> select the option for Advanced Edit
Step4 You will be given multiple editing options, from subtitle language change to time interval edit. Also, applying the styling to all is supported.
Step5 Once your customization is complete, select the SRT file present on the dashboard
Step6 Select the location where you want to store the SRT file
Final words
Whether it is for more styling options or uploading subtitles on social media platforms, you should convert VTT to SRT. Several apps can help you in converting the subtitle file with ease. Some applications even allow audio or video transcription into a transcript, followed by conversion into the required SRT file format.
Also read:
- New How Long Does It Take To Edit A Video
- In 2024, You Can Make Stylish Chroma Key Text Effects After Reading This Article. Wondershare Filmora Will Fill the Crazy Colors in Your Handwritten Note or Words
- Updated 10 Recommended Websites to Discover Awesome Premiere Pro Video Templates
- In 2024, How to Resize FLV Videos Efficiently Windows, Mac,Android, iPhone & Online
- New Top 10 Online And PC Cartoon Video Maker 2022 For Beginner
- In 2024, How To Film a Slow Motion Video
- New In 2024, How to Change Frame Rate in Premiere Pro
- Updated In 2024, Best Animated Video Makers
- Bandicut Video Editor Download and Review for 2024
- Updated In 2024, Create Your Slow Zoom TikTok in Minutes
- Updated Top 6 Drones for Videography
- Looking Into The Top Free Slow Motion Apps (Android & iOS) for 2024
- In 2024, Introduction to The Best Cinematic LUTs in The Market
- Are You Looking to Vlog Across Your Next Stop at the Café? Get Aware of the Significant Elements that Make up the Café Vlog for 2024
- 2024 Approved Discover the Essential Steps for Editing a Music Video in This Guide. Learn About Aspect Ratio and the First Cut Process to Create a Visually Captivating Video
- New 2024 Approved 12 Top Picks of Video Enhancer Software
- OpenCV Object Tracking The Complete Guide
- Updated How to Create Video in Text Intro, In 2024
- How to Create a Slideshow with Icecream Slideshow Maker for 2024
- New 4 Methods How To Make a Recap Video
- New How to Correct Lens Distortion in Videos
- 2024 Approved How to Add Green Screen in OBS
- 2024 Approved Phone Aspect Ratio Vertical Definition, Types and Tips
- New In 2024, Easy Guide to Overlay Videos in Premiere Pro
- New In 2024, How To Cut Videos For Instagram On Mac
- Updated Some Top Methods to Create AI Slow Motion Videos for 2024
- In 2024, 15 Best Strongest Pokémon To Use in Pokémon GO PvP Leagues For Xiaomi Redmi Note 12 Pro 5G | Dr.fone
- Restore Missing App Icon on Nokia C32 Step-by-Step Solutions | Dr.fone
- New In 2024, 15 Best Stop Motion Animation Kits to Fuel Creativity
- Best Android Data Recovery - Retrieve Lost Photos from Samsung Galaxy S21 FE 5G (2023).
- In 2024, 2 Ways to Transfer Text Messages from Nokia C110 to iPhone 15/14/13/12/11/X/8/ | Dr.fone
- All Must-Knows to Use Fake GPS GO Location Spoofer On Tecno Camon 30 Pro 5G | Dr.fone
- What To Do When Oppo A78 5G Has Black Screen of Death? | Dr.fone
- In 2024, What Pokémon Evolve with A Dawn Stone For Samsung Galaxy A05? | Dr.fone
- In 2024, How Do You Remove Restricted Mode on Apple iPhone 6 Plus | Dr.fone
- In 2024, Hacks to do pokemon go trainer battles For Samsung Galaxy S23 Tactical Edition | Dr.fone
- In 2024, How Do I SIM Unlock My Apple iPhone 11 Pro Max?
- In 2024, Reasons why Pokémon GPS does not Work On Realme C67 5G? | Dr.fone
- In 2024, How To Erase an Apple iPhone 6s Without Apple ID Password?
- In 2024, Why Your WhatsApp Live Location is Not Updating and How to Fix on your Realme C67 5G | Dr.fone
- How to Send and Fake Live Location on Facebook Messenger Of your OnePlus Ace 2V | Dr.fone
- Title: New 2024 Approved Deleting White Background in Photoshop Is Hard?
- Author: Chloe
- Created at : 2024-04-24 07:08:42
- Updated at : 2024-04-25 07:08:42
- Link: https://ai-editing-video.techidaily.com/new-2024-approved-deleting-white-background-in-photoshop-is-hard/
- License: This work is licensed under CC BY-NC-SA 4.0.
