
New 2024 Approved Easy Steps to Export Video in Filmora

Easy Steps to Export Video in Filmora
After you edit your video with Filmora you may wonder how to export your video in Filmora Indeed, you can export your video in Filmora in various options. This article will show you the multiple options you can get if you want to export your video in Filmora.
Steps to export your video with Filmora
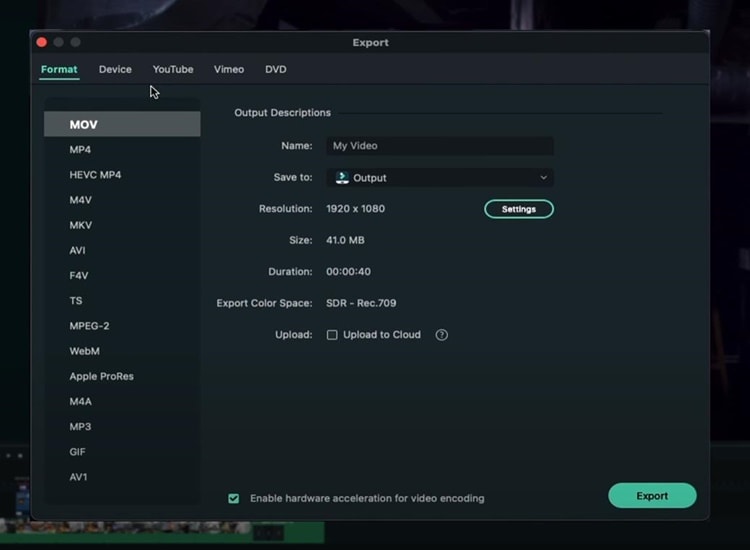
To open the export box, press “CTRL+E” on your keyboard. After that, you’ll see many export options you can do.
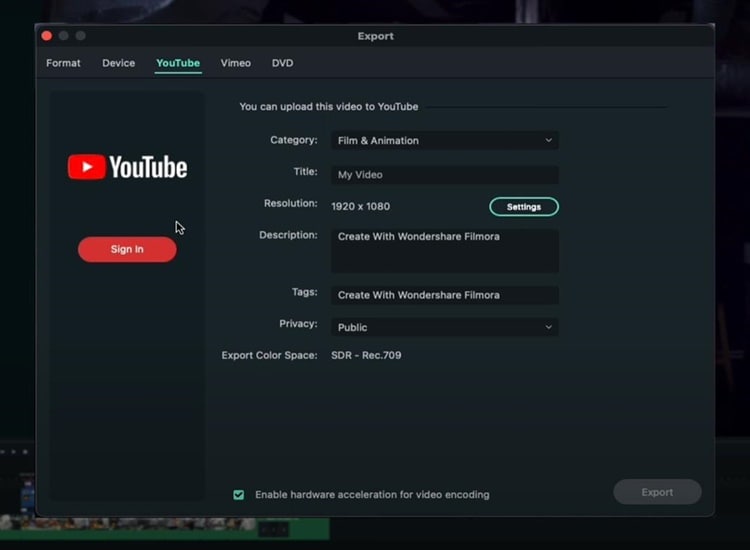
Export Video Platform
If you want your video to end up on YouTube, you can click on the “YouTube” option, sign in, and enter all the basic metadata you need for your YouTube video. Then you can click “Export”, and the video will go straight to YouTube. Also, you can have all of your privacy settings, descriptions, and everything else.
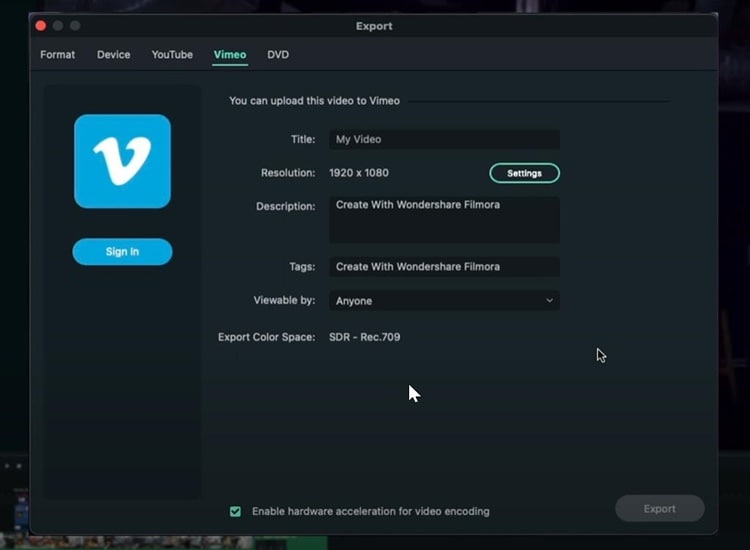
Similar to YouTube, you can do the same thing if you want to export your video on Vimeo.
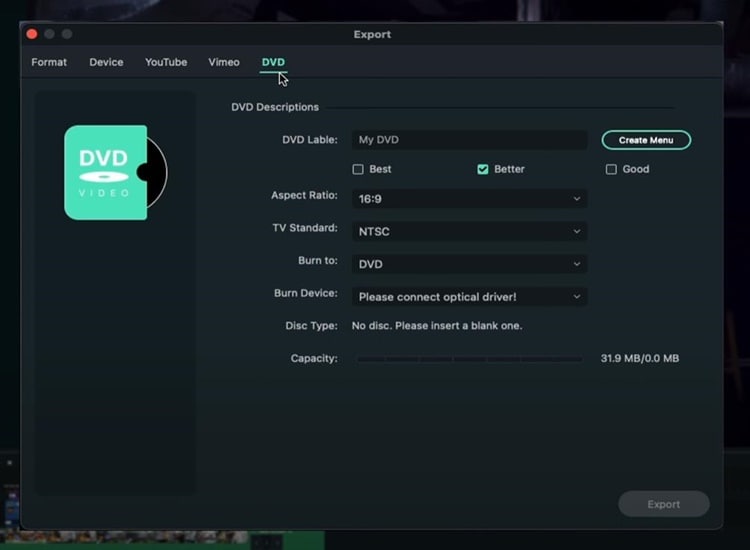
Export and Burn Video into DVD
You can also directly burn your video to a DVD. Even though video to DVD isn’t as common as it used to be, it’s still nice to be able to do it, especially if you like making DVDs.
Export Video to Other Devices
Go to the “Devices” option if you want to export your video to specific devices with everything looking good on that particular device. For instance, if you want to export your video to iPhone, you can see the size will be 41MB, and the resolution will be 1080p. All those things are going to look much better on an iPhone.
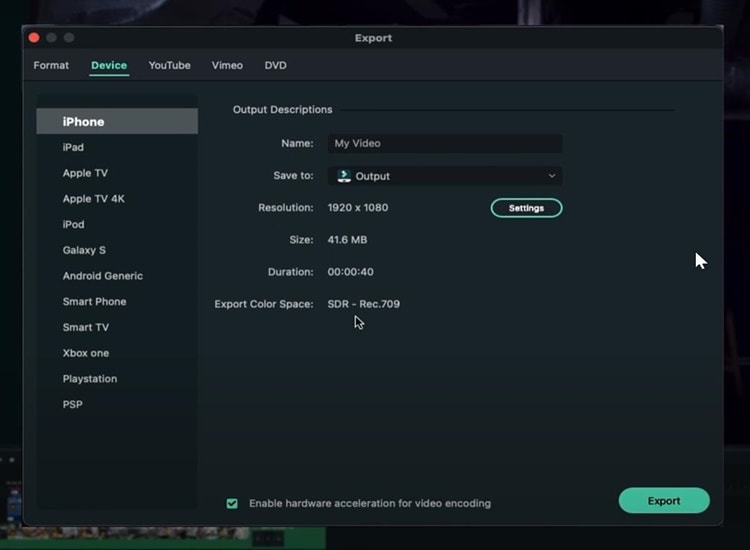
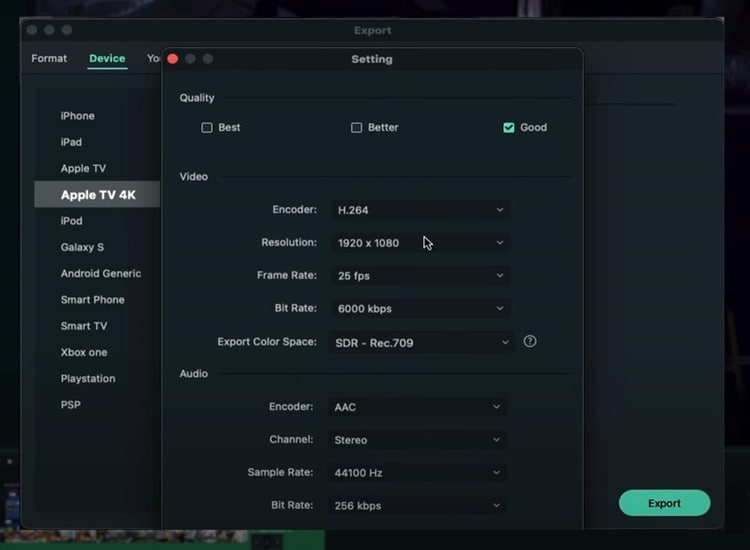
You can also adjust the quality of your video based on your needs by clicking on “Setting.”
Export Videos in High Res Quality
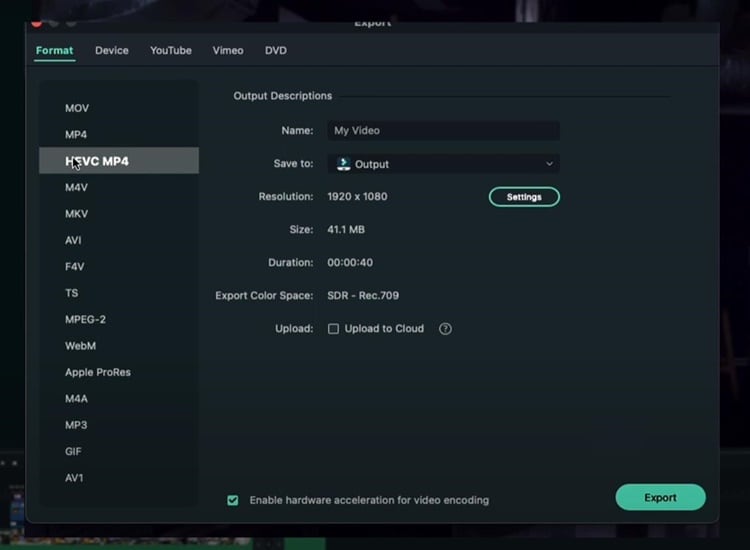
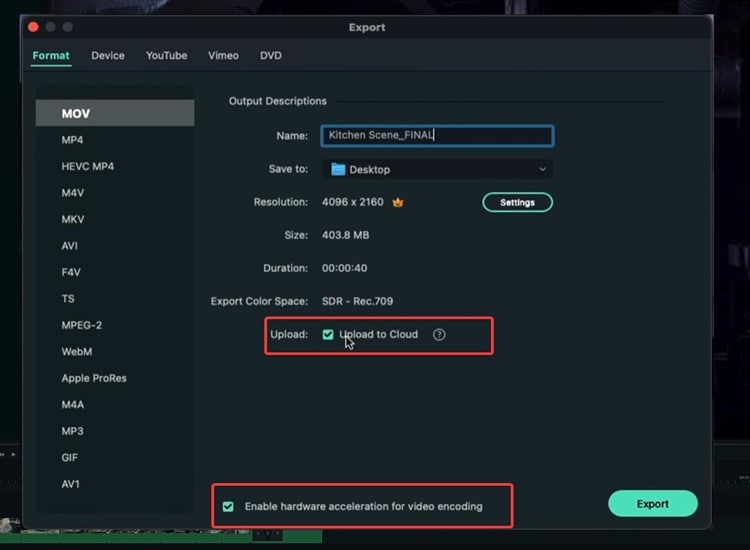
In the “Format” option you can choose the file extension, the format, or the codec. Exporting your video based on format is good if you prefer to save your video on your computer since maybe you may upload your video on YouTube, Instagram or other social media platforms.
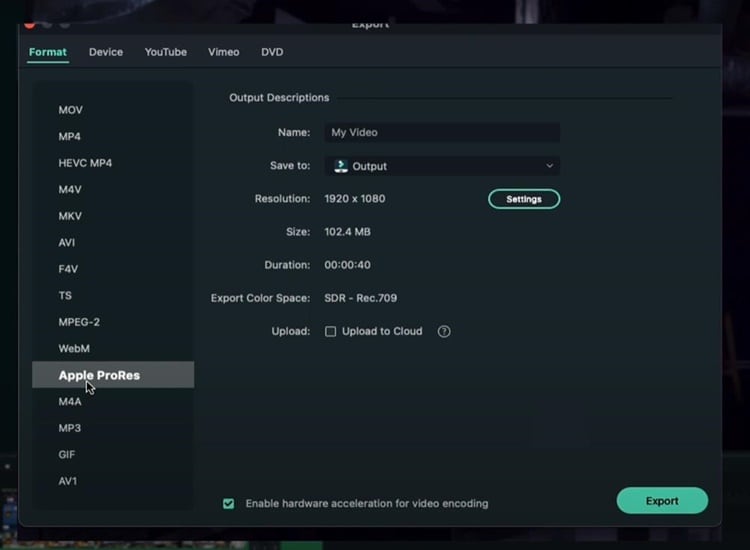
You can choose “Apple Prores” if you want the least amount of compression possible and don’t care about the file size. For example, if you want to export a video from Filmora and then import it into another video editor without losing too much quality, you should definitely choose “Apple Prores.”
Before exporting, there is the option to upload to the cloud. If you do not know what it is, Wondershare has its own Drive, which allows you to save and remotely view your video files.
In the meantime, if you have a decent PC, you can enable “Hardware acceleration for video encoding.” This option will utilize as much computer power as you have to export the video and make the process significantly faster. Once everything is finished, click “Export.”
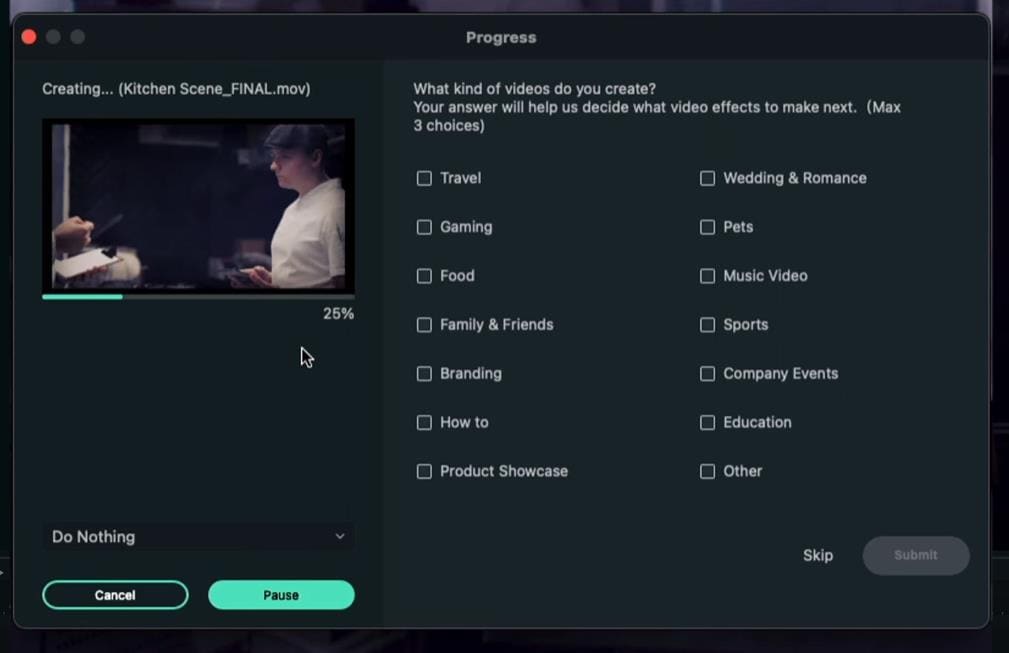
When you click Export, you can see the progress with thumbnails and everything. Lastly, your video has been exported successfully when the exporting process reaches 100%.
Summary
Indeed, there are many options to export your video using Filmora. If you wish to export your video directly to YouTube, simply select the YouTube option in the Export box. Meanwhile, if you want to export your video on your computer and upload it to various social media platforms, it’s much better to export it with a format option.
Free Download For Win 7 or later(64-bit)
Free Download For macOS 10.14 or later
Free Download For macOS 10.14 or later Free Download For macOS 10.14 or later Free Download For macOS 10.14 or later
Before & After Editing Trick - Filmora
How do travel vloggers instantly grab everyone’s attention with their magical content? The unique animation preset is the answer. Video makers use them to morph video clips into scenic views that make viewers’ jaws drop in awe. Also, these edits can cover up any flaws made during the production of the original video clip. Isn’t it cool?
You might be wondering how to add these effects to the video. Keep reading to discover some of the simplest effects that are bound to add soul to your content. Before diving into the details, let’s first understand these effects.
Part 1. What are the before/after effects?
After-effects are visual effects that are used to enhance the aesthetic appeal of videos. You might have encountered these effects several times during watching YouTube videos or movies. These transitions make the videos more appealing to the audience.
In films, for example, the dissolve effect is employed to signify a time change. It informs viewers that there is a time difference between the two shots. You can see how this effect is used to dissolve one scene into another in the video clip mentioned below.

The history of after-effects can be traced back to 1993. These effects enabled the crew to mix 3D and 2D images to produce virtual dinosaur motion visuals in the Jurassic Park film, which we all love. Now that you have a fundamental understanding of the origins of after-effects, let’s take a look at where they might be applied!
Part 2. Where can you use these before/after effects?
If you are a fan of fiction movies, then you must have noticed that some of their scenes though fake, look so realistic that they blow our minds. And now you might have an idea of how these shots are created!
Whether it be shooting a movie or a commercial, these transitions have the power to make our content irresistible. Once you are familiar with the purpose of these after-effects, it’s time to show you how you can edit your videos using these effects.
Part 3. How to edit your videos using before/after effects?
If you’re new to editing and don’t know much about video graphics, Filmora video editor is the finest platform for you. It is not only easier to use but also more entertaining than other online video editors. Filmora is a free video editor that is accessible for both Windows and macOS.
Steps for installing the Filmora video editor
To install the Filmora video editor, follow these steps
Step1 Go to the official site of Filmora.
Step2 Click on the download button.
Step3 Install the application on your PC.
Step4 Now, you can use the Filmora video editor to beautify your content.
Now, let’s explore some of the coolest transition effects that you can use in your videos for before and after comparison.
Part 4. Filmora’s top three transition effects for beginners
Wondershare Filmora can help video editors achieve their goals in the most basic and economical fashion. The best three transition effects that may completely transform your videos are shown below.
Wipe Effect
Wipe transition is used to produce an apparent transformation to videos with similar frames for the before/after comparison. Travel vloggers mostly use this effect to create a retro vibe in their videos. This transition is frequently used in movies to demonstrate the influence of time on any place.
The wipe effect’s fundamental goal is to transition from one shot into another via a sliding animation, giving the video an elegant vibe. For instance, we can use the wipe effect to convert the raw film to colored corrected footage.
Steps to apply the Wipe effect
Step1 Drag and drop the video clip ‘before color correction’ onto the timeline’s first video track.
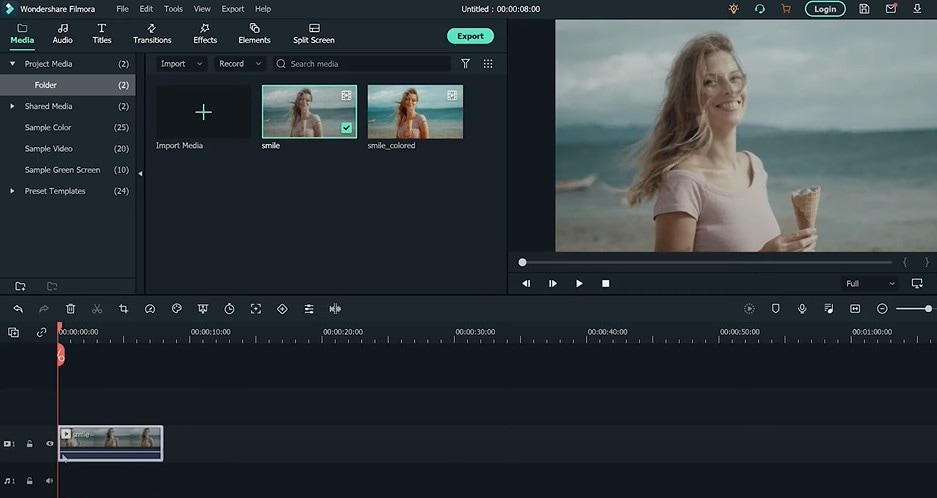
Step2 Then, drag and drop the color-corrected video clip on the second video track. Ensure that the clips are piled on top of one another so they may all be played simultaneously. It will make it easier for us to trim the footage.
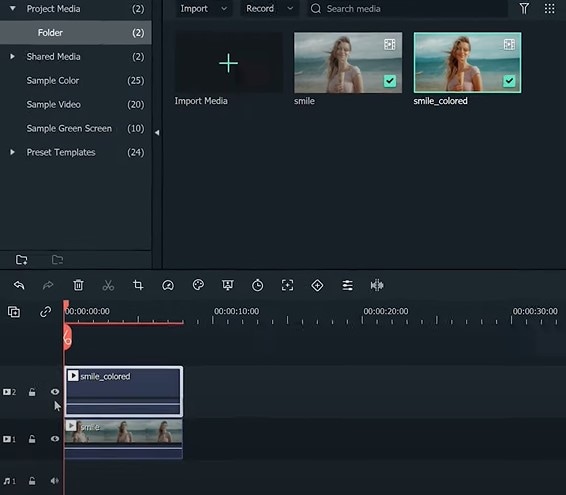
Step3 Place the play head where we want the transformation to begin. Then trim the second clip.
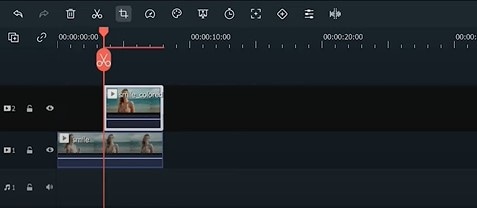
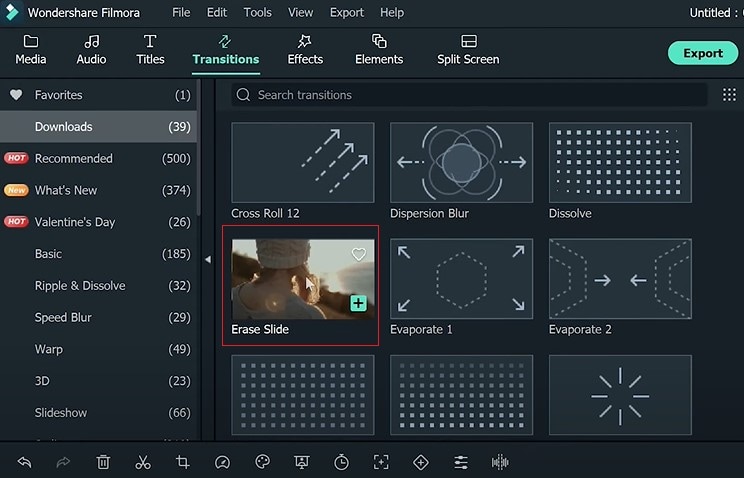
Step4 Go to the Transitions window and select “Erase slide.” Drag the transition to the start of the second video clip. Then, double-click the transition on the timeline to open the settings box.
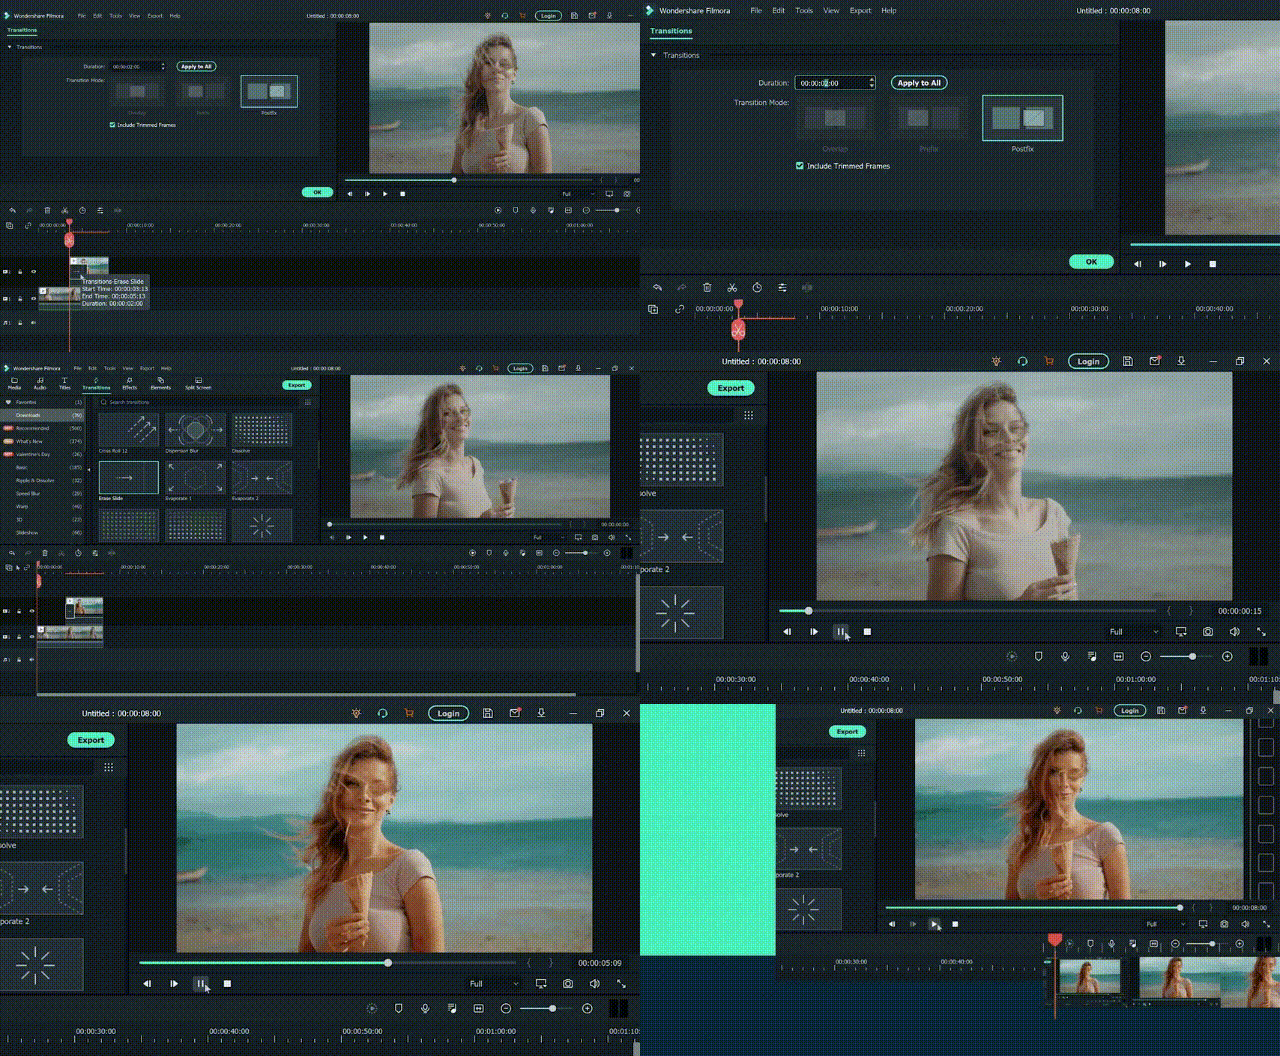
Step5 Adjust the length of the “Erase slide.” Let’s see how it turns out!
Dissolve Effect
The dissolve effect allows us to shift from one shot to another by using slow block dissolution. It gives the impression that one scene is being morphed into another. And, it is frequently used in documentaries.
We may utilize the dissolve transition to display the differences between two video segments more naturally. To explain the objective of the dissolve effect, we used two clips of the same place shot at separate times. The first film is current, but the second is from the same place but was taken a few years back.
Steps to apply the Dissolve effect
Step1 Drag and drop the first video clip onto the timeline’s first video track.
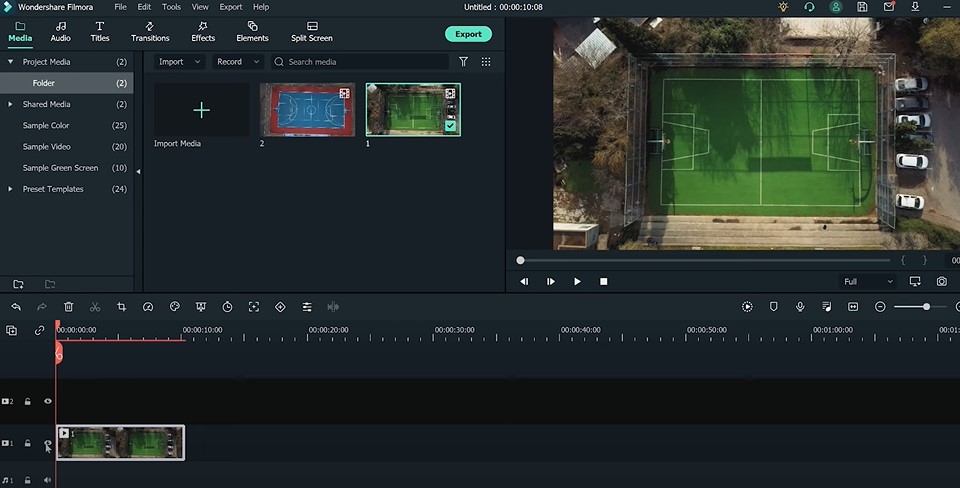
Step2 Then, on the second video track, drag and drop the second video clip. Make sure the start of the second clip is where you want the transition to begin.
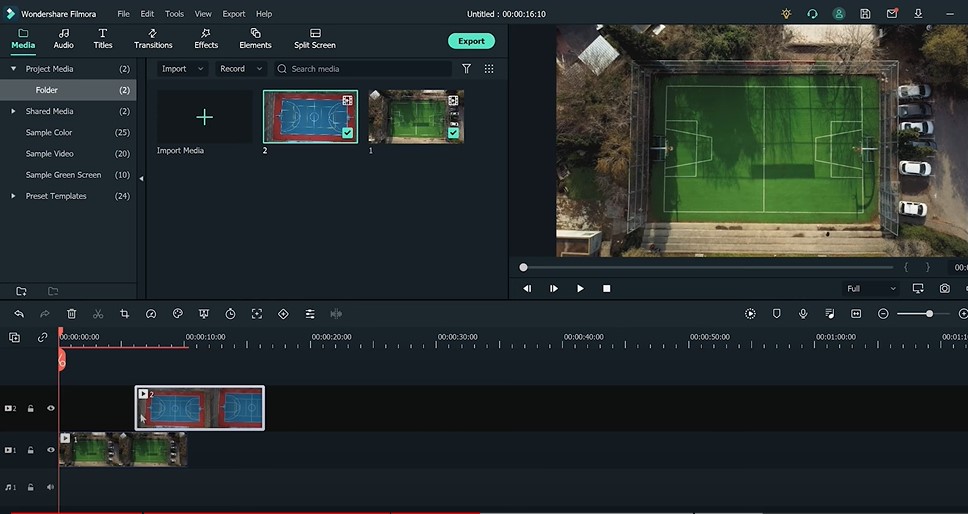
Step3 Then Go to the Transitions window and choose the “Dissolve” effect.
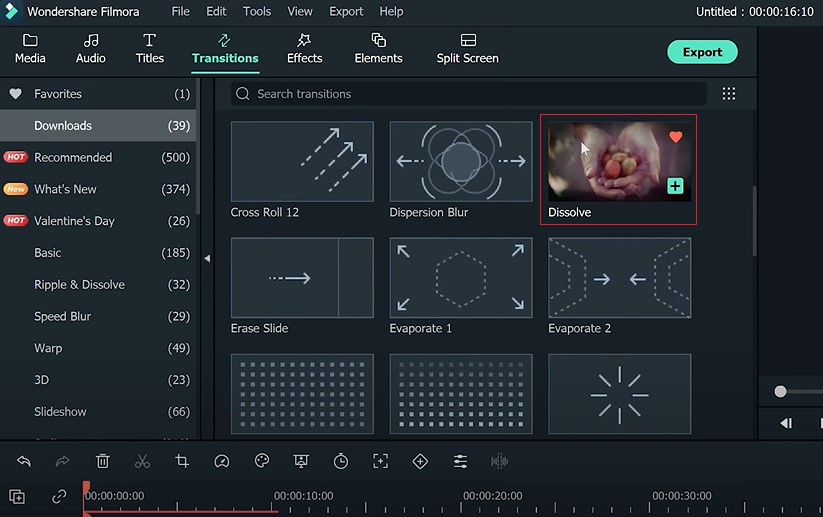
Step4 Drag the transition to the start of the second video clip.
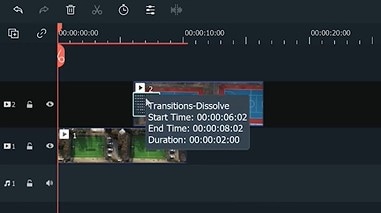
Step5 Then, on the timeline, double-click the transition to open the settings box. If necessary, adjust the duration of the “Dissolve “ effect as needed.
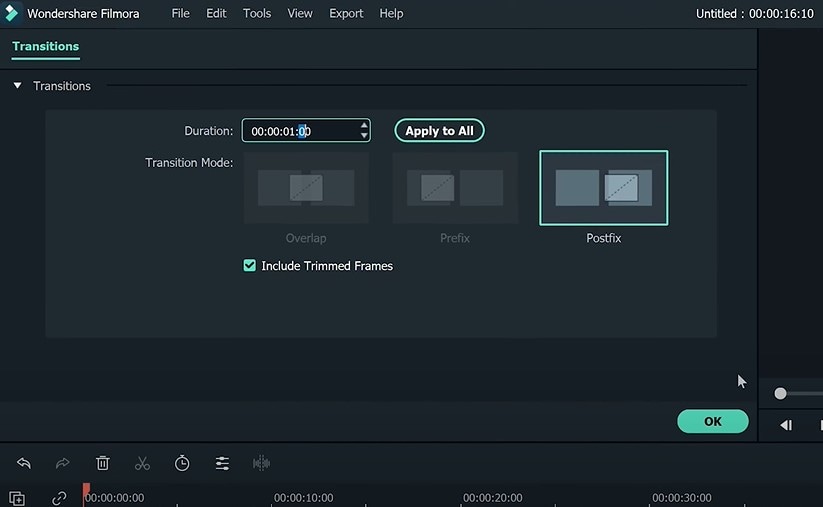
You can see how it looks in the image below. If we play the timeline, we can watch the green court convert into the old basketball court. However, the two visuals don’t truly match each other during the transformation.
Steps to adjust the frames of the clips
Step1 We may fix it by adjusting the location and scale of the clips.
Step2 Move the play head to the transition section to watch both video segments.
Step3 To open the settings window, double-click on the first video.
Step4 Find the transform section and scale it to 110%.
Step5 Then, move the first video’s frame to match the second video’s placement. We may notice a more natural transition when we replay the timeline.
Split Screen Effect
The split-screen technique first appeared in the film “The Queen of Spades,” which was released in 1949. It depicted a man suffering from a psychological illness. The split-screen effect was used to demonstrate the contrast between reality and his hallucinations. It made the viewer more aware of what was actually happening in the film.
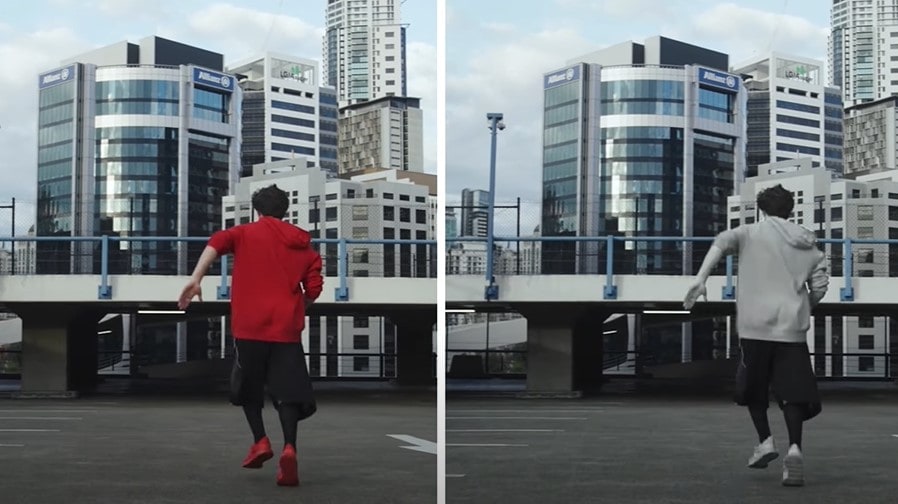
Since then, the split screen has been used as the simplest technique to demonstrate the before/after comparison. This effect is also ideal for emphasizing the changes in only one section of the video.
Because the split screen effect does not display the whole frame of the video clips, you may eliminate the top and bottom bars of the video clips using this effect.
How to apply a split screen effect?
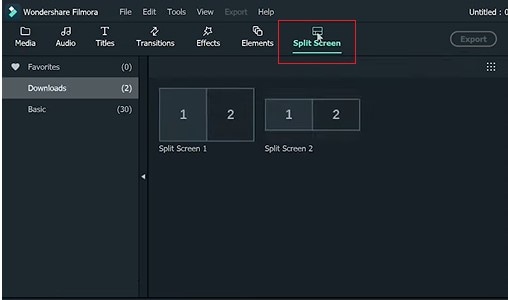
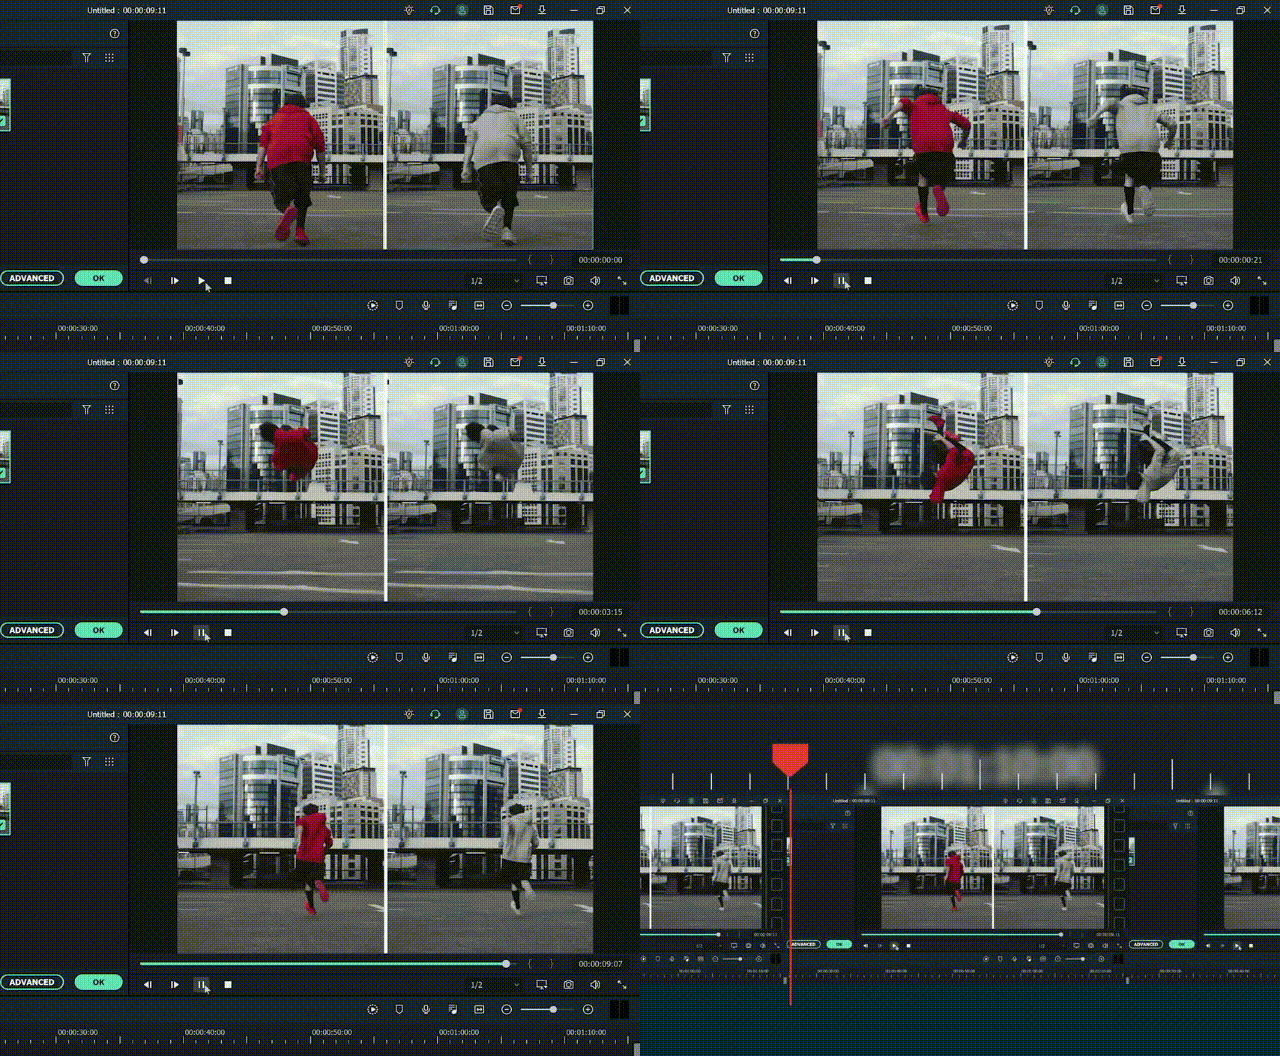
Step1 Find “Split Screen1” in the window by clicking “Split Screen.”
Step2 Drag it over to the timeline.
Step3 You’ll see the split-screen template in the preview box when you double-click it.
Step4 Drag the two video clips you wish to compare to the template’s left and right sides.
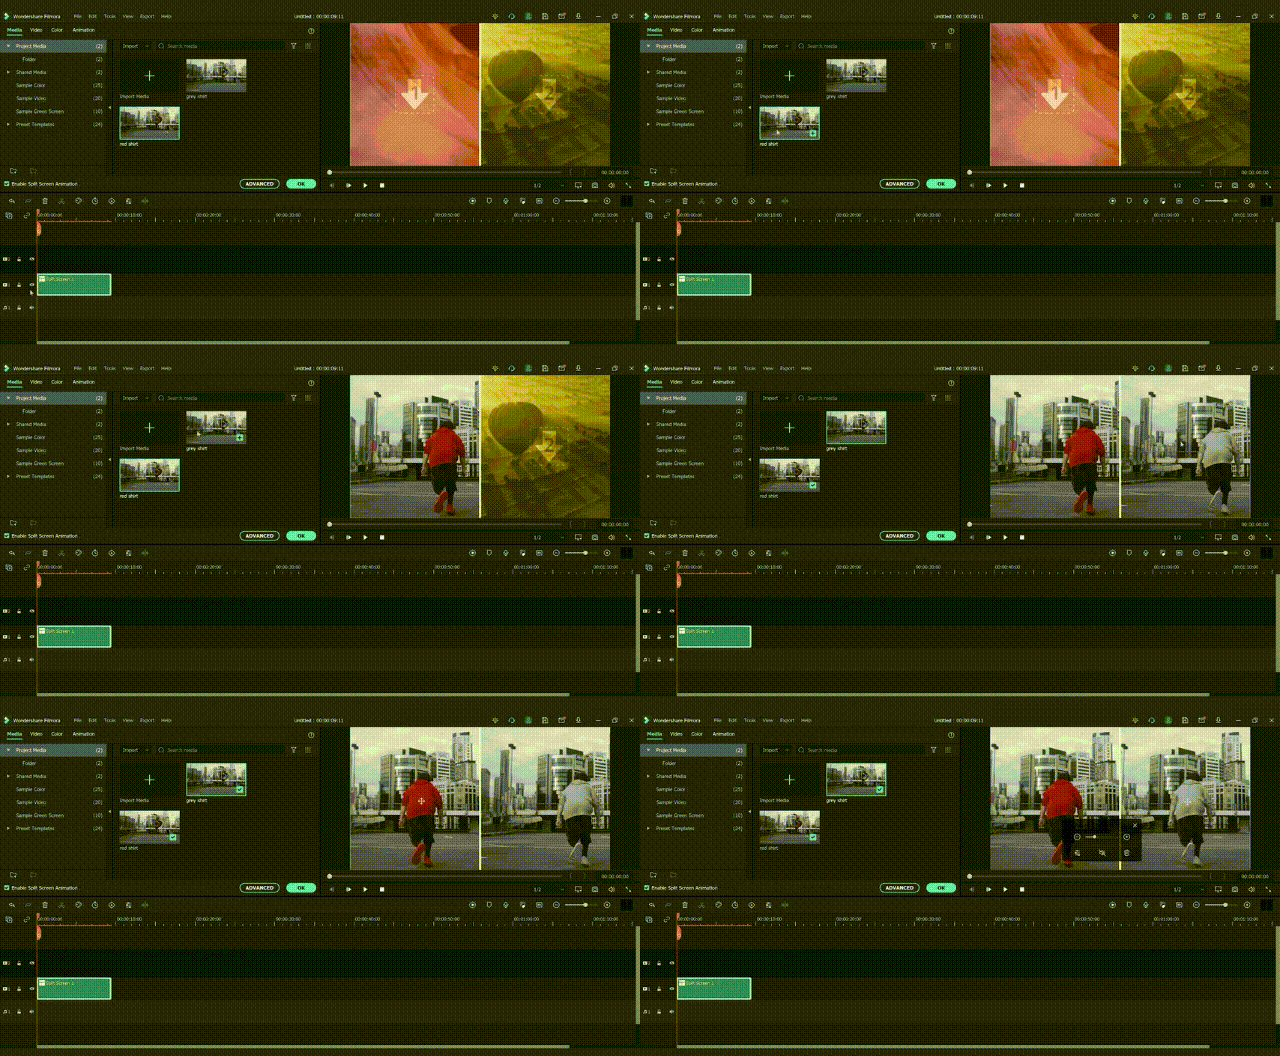
Step5 If necessary, you may also adjust the location of the videos in the preview clip.
Step6 Finally, uncheck the option labeled “allow split screen animation.”
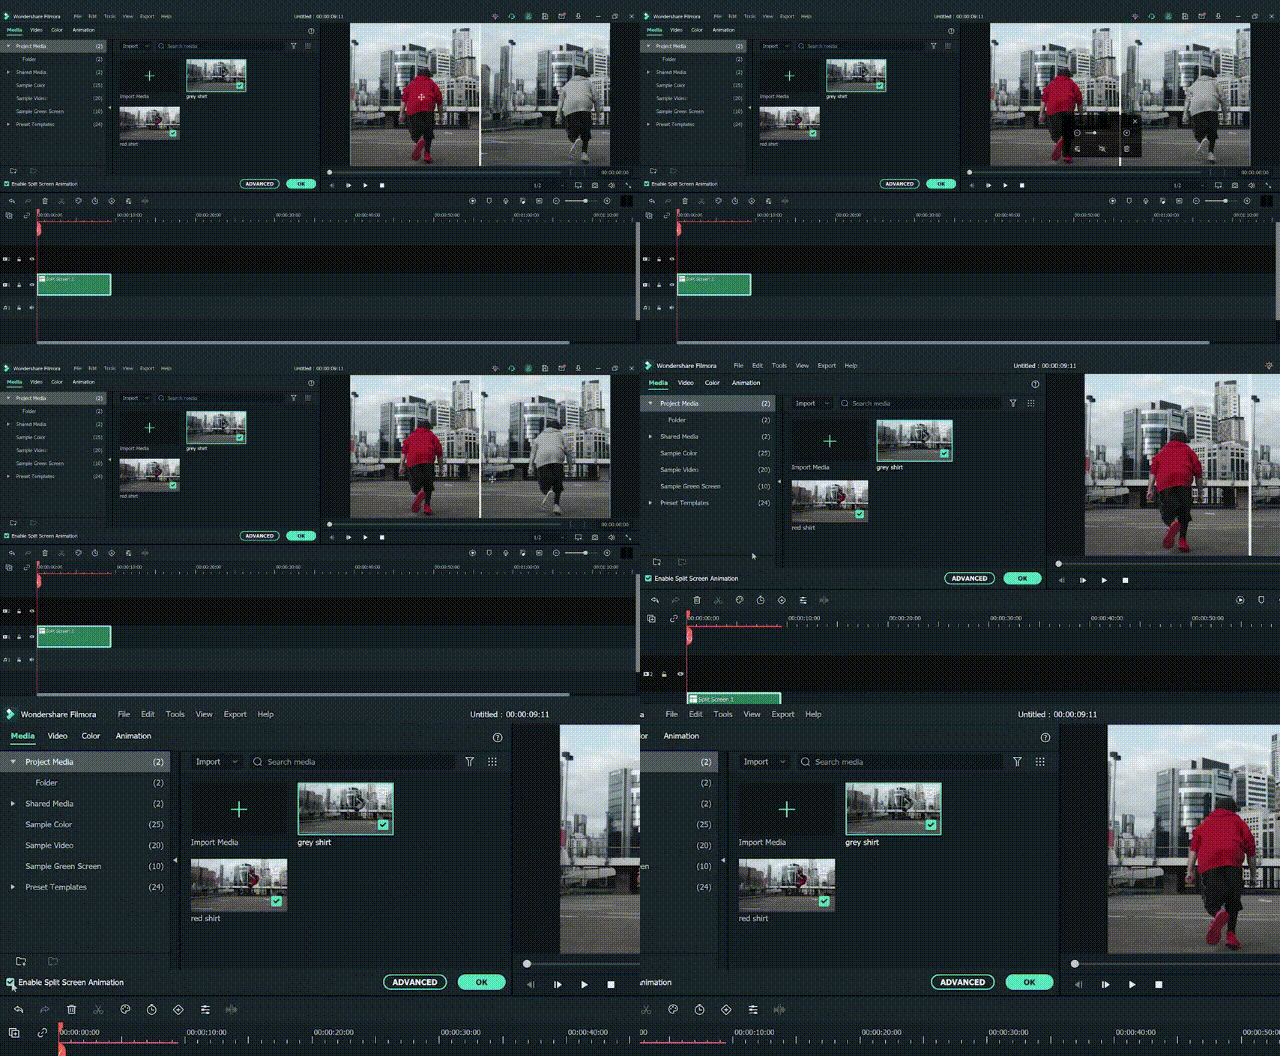
Step7 All of the steps for the before/after split screen are now complete.
Step8 Let’s wait and see how it turns out!
Final words
If you are a vlogger and you desire to add an aesthetic touch to your videos, you should try Filmora. It offers a variety of unique transitions, so you can use it to build your own trademark style that will represent your content.
By the end of this article, you must understand how to employ the wipe effect, the dissolve effect, or the split screen effect in your videos to give them an elegant and professional vibe.
Free Download For Win 7 or later(64-bit)
Free Download For macOS 10.14 or later
Free Download For macOS 10.14 or later
How to Crop a Video in Windows Media Player
In this generation, we are so much engaged in social media forms. We loved to upload and post some pictures and videos. To show the happiness that we had. But sometimes, we are not satisfied with our videos and photos. That is why we gave time to edit, put some effects , transitions and other forms of editing. It is such a big help, especially if you are running some online business. To get and gain the interest and attention of your viewers and costumers, your videos and pictures must be catchy and have some good edits. By doing some basic editing skills can help you boost your social media platform. And also by taking away some unwanted things in your videos and pictures can improved the focus of your video.
One of the basic way of editing is cropping.
Need to modify the point of interest of your video clipped? you don’t need to re-shoot your footage. The crop device can help!
Cropping is the manner of shifting or adjusting the rims of a photograph or video clip.Often used for image modifying, it’s also useful whilst modifying video. With cropping, you may take away pointless or distracting quantities of a video clip or alternate its dimensions to in shape inside a positive area.Whether you’re running with pictures from a digital digicam or display video, you’ll in all likelihood run into instances whilst you want to crop those clips.
In this article you will learn how to crop a video through windows media player and with Filmora Wondershare. Here are ways to crop your video clip.
How to crop a video in Windows Media Player
Actually, Windows Media Player can not crop a video directly. However plug-ins including the SolveigMM WMP Trimmer may be set up and used to cut or edit videos in Windows Media Player for free. Detailed steps are furnished right here to train you a way to deployation and use this unique plug-in.
As said earlier, the Windows Media Player isn’t always a video editor and can not be used immediately to trim or crop your films until with the assist of plug-ins. However, the stages underneath offer info on how to use Windows Media Player to make the edit. Please follow carefully with the steps below and use the SolveigMM WMP Trimmer to your device/Windows Media Player to make an easy edits in your video file.
Step 1: Download and install the SolveigMM WMP Trimmer plug-in. To download the plugin, click this link: https://www.solveigmm.com/en/products/wmp-trimmer-plugin/
Step 3: On Windows Media Player, click on the principle menu object and navigate to Tools Plug-ins SolveigMM WMP Trimmer Plugin.

Your plug-in will be enabled after selecting it from the menu.
Step 4: While playingthe document you need to edit, flow the blue slider to the segment of the film you need to trim/reduce and click “Start”. Manually type the time of the video you need to begin deciding on into the Start box in case you discover the usage of the slider difficult. Click the “End” button on the factor you need the trimming to end.

Step 5: Find and press the “In” button to trim the chosen component; The “Out” button to reduce the chosen component out of the authentic media document.
Note that SolveigMM WMP Trimmer Plugin supports to edit videos including cutting or trimming, however, it doesn’t offer an option to crop video.
An alternative way to crop video on Windows by Wondershare Filmora
Wondershare Filmora Video Editor is one of the great video enhancing software program with cool functions that compares to different competing video enhancing Softwares program. Many video enhancing applications claimed to provide expert results; Filmora is one in every of some consumer-stage equipment that definitely delivers.
For Win 7 or later (64-bit)
For macOS 10.14 or later
Here in Filmora, it is not just trimming but this tool can help you to adjust the focus of your video clip. Here are steps on how to crop a video using wondershare filmora.
1. Install and launch your Filmora Wondershare app.

2. Find the import media. Click it and choose your preferred video fromyour files that you want to edit. Wait a second until the video is finished importing.
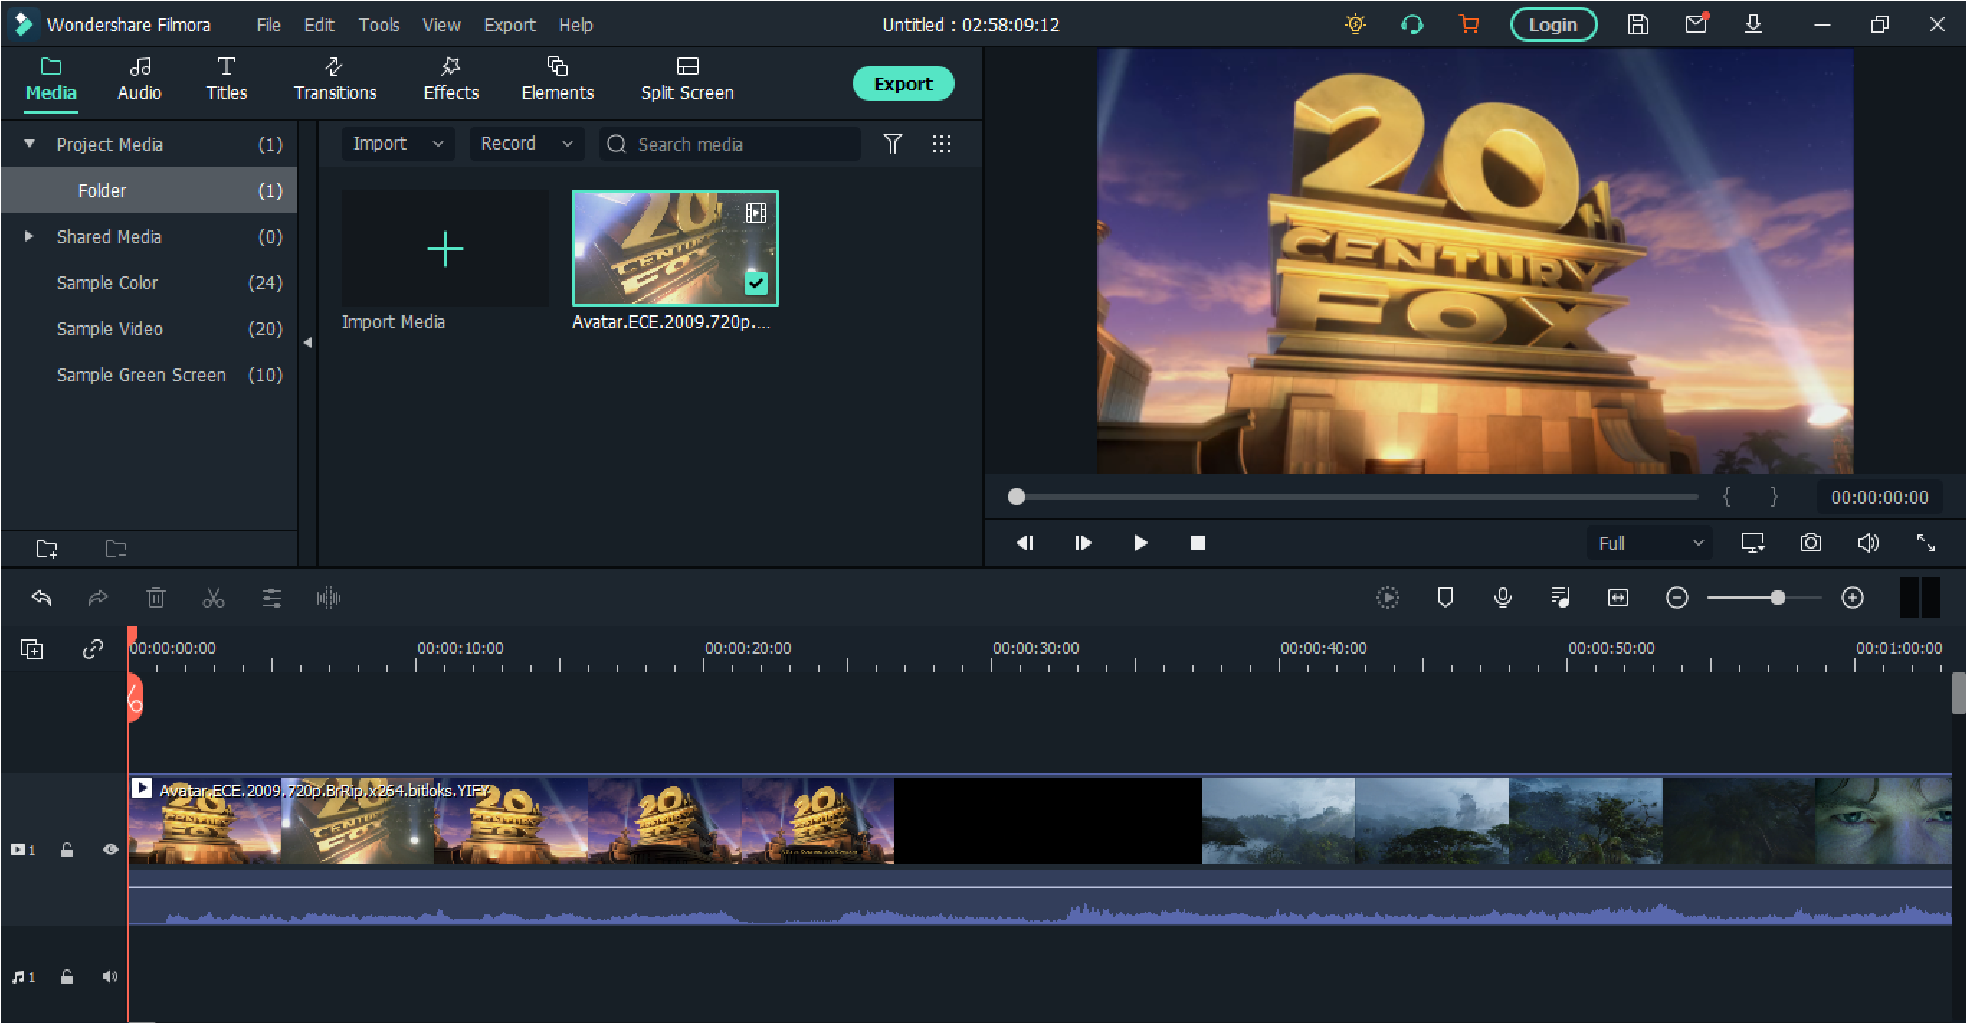
3. Drag the video to the lower left side. After dragging ,right-click yourmouse and choose video and then click “crop and zoom.”
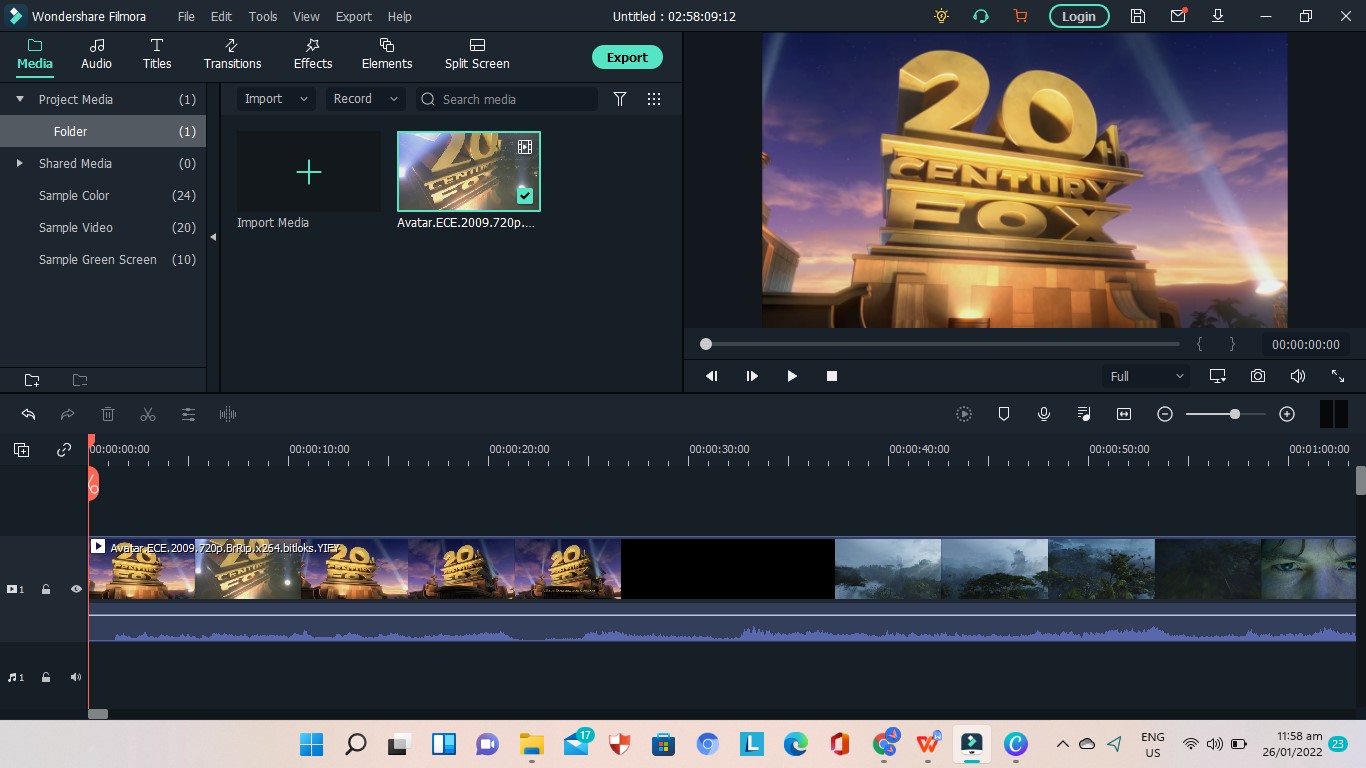
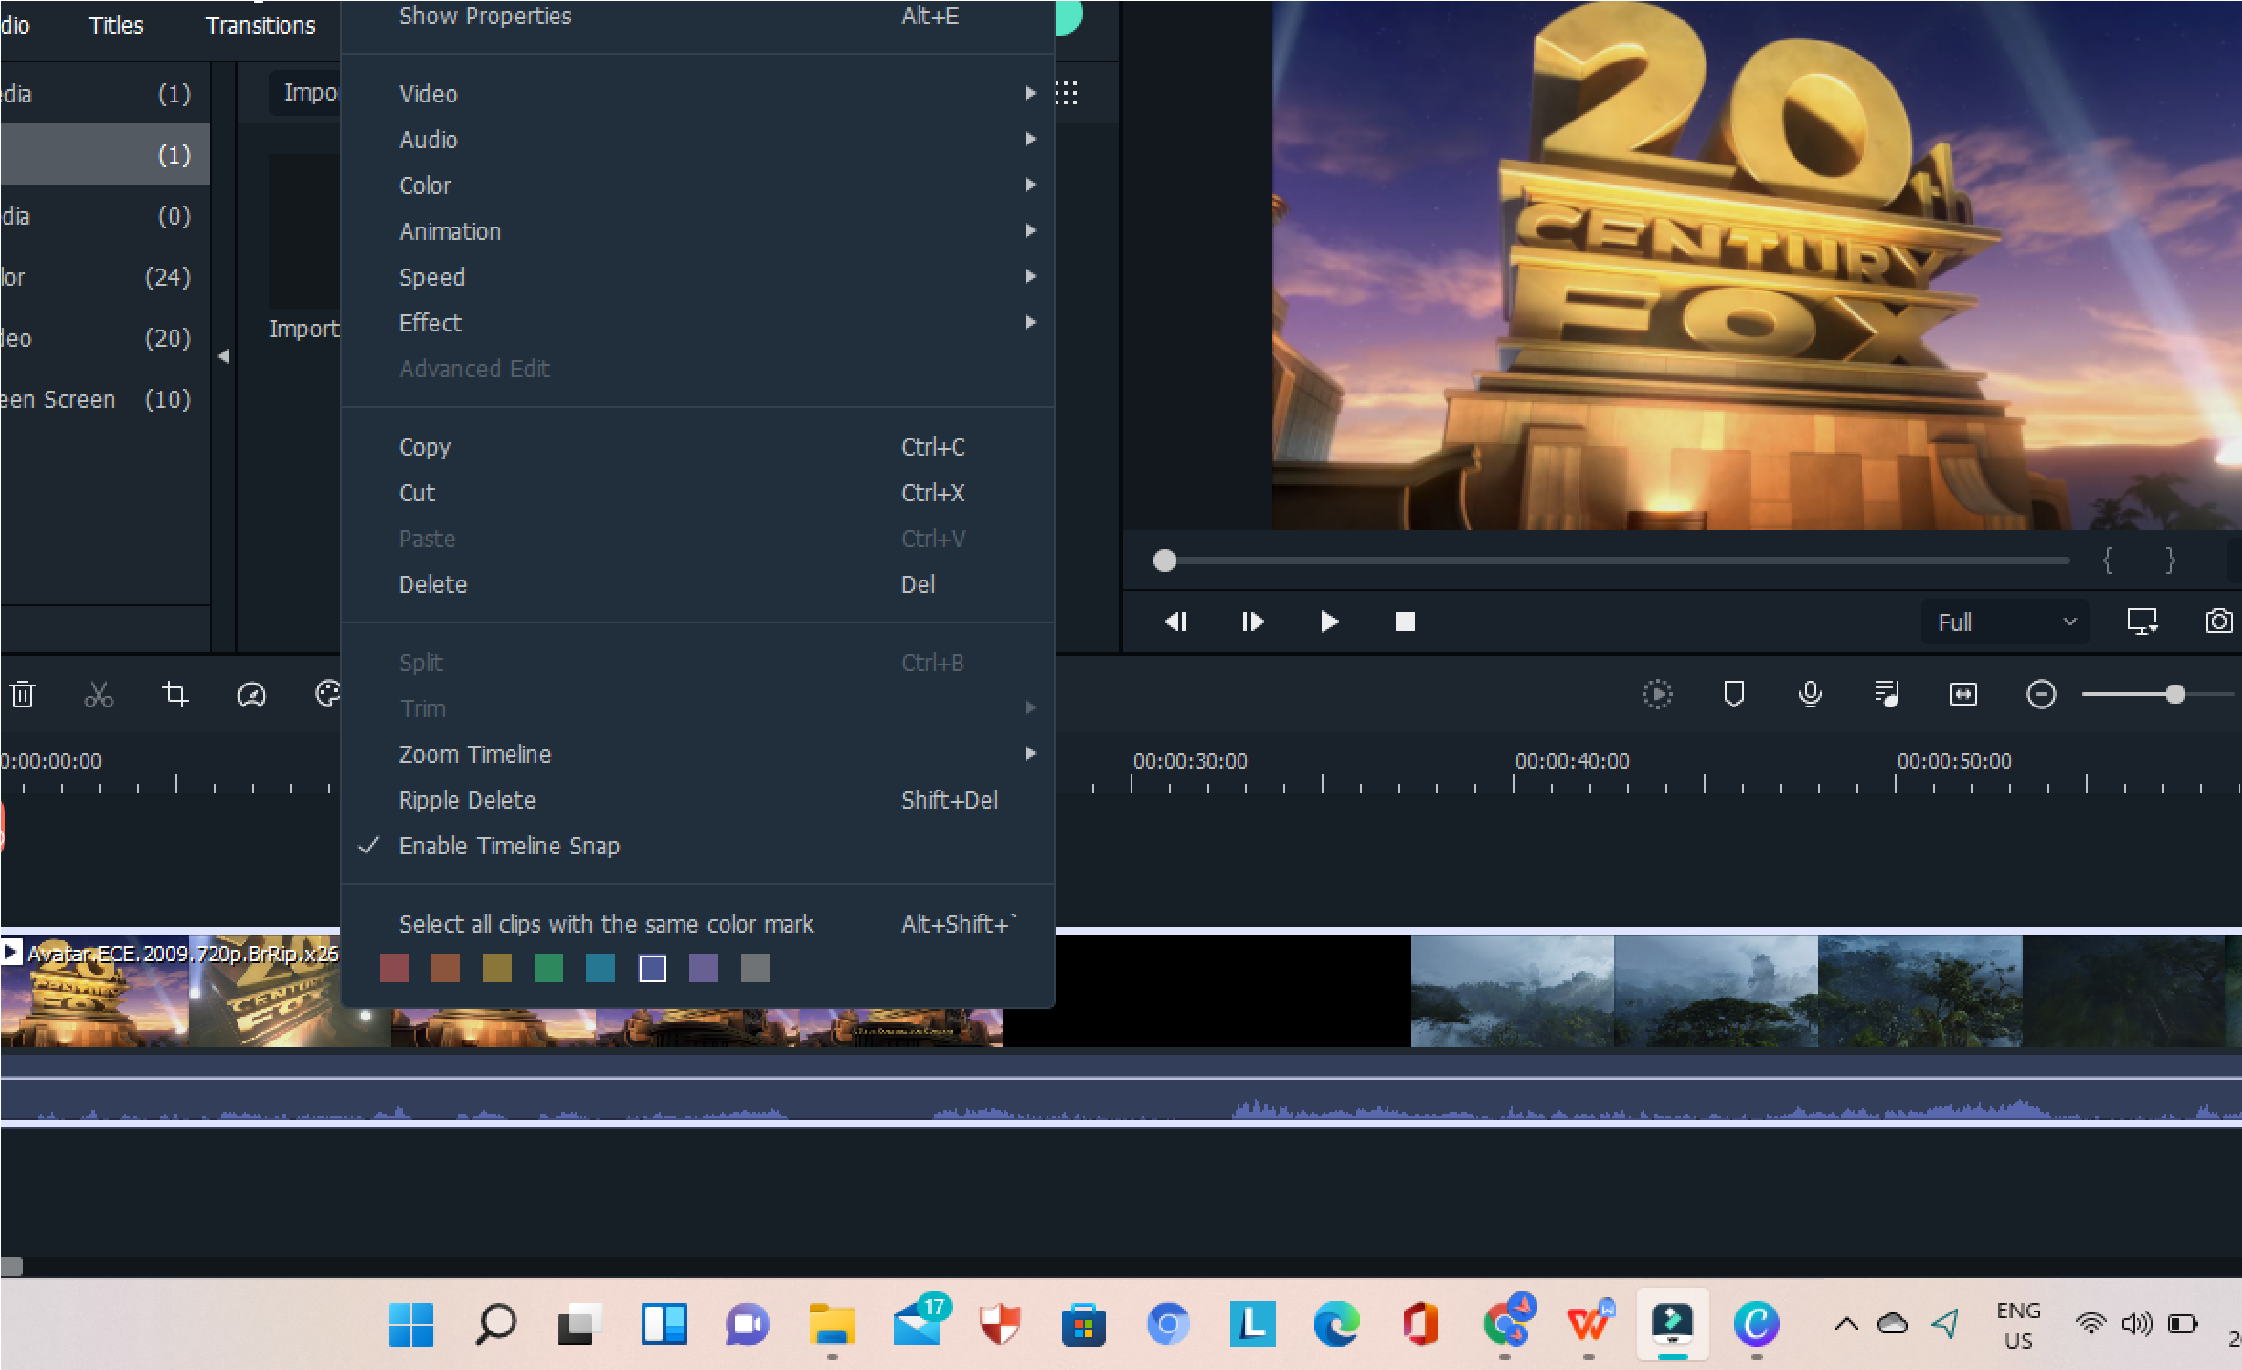
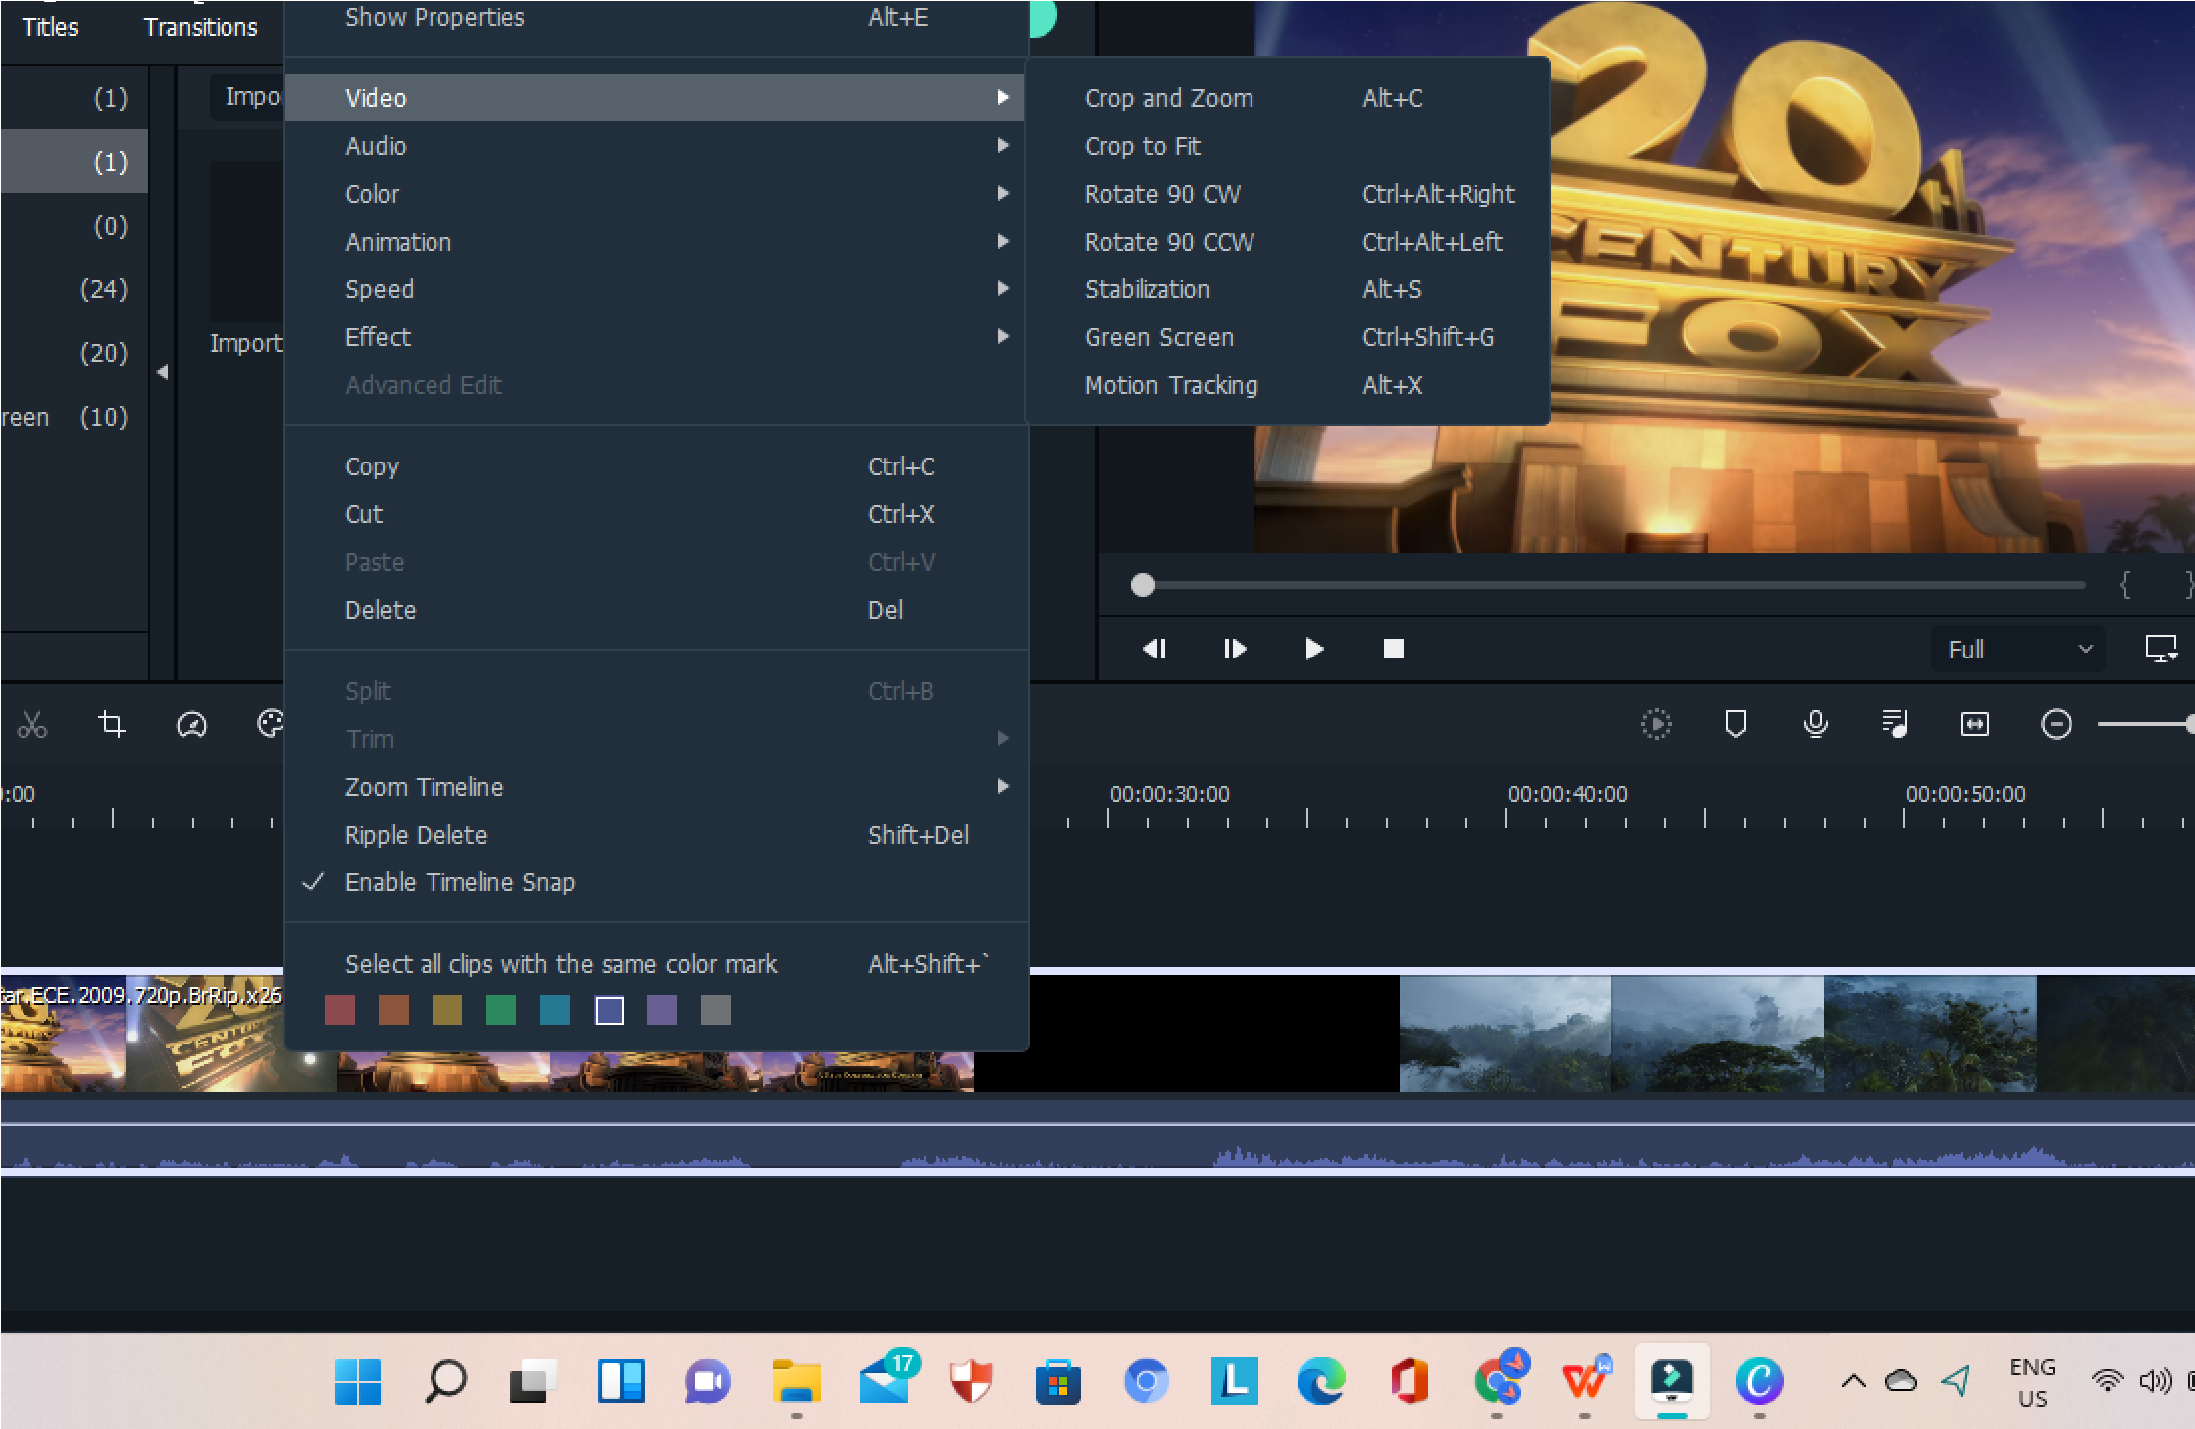
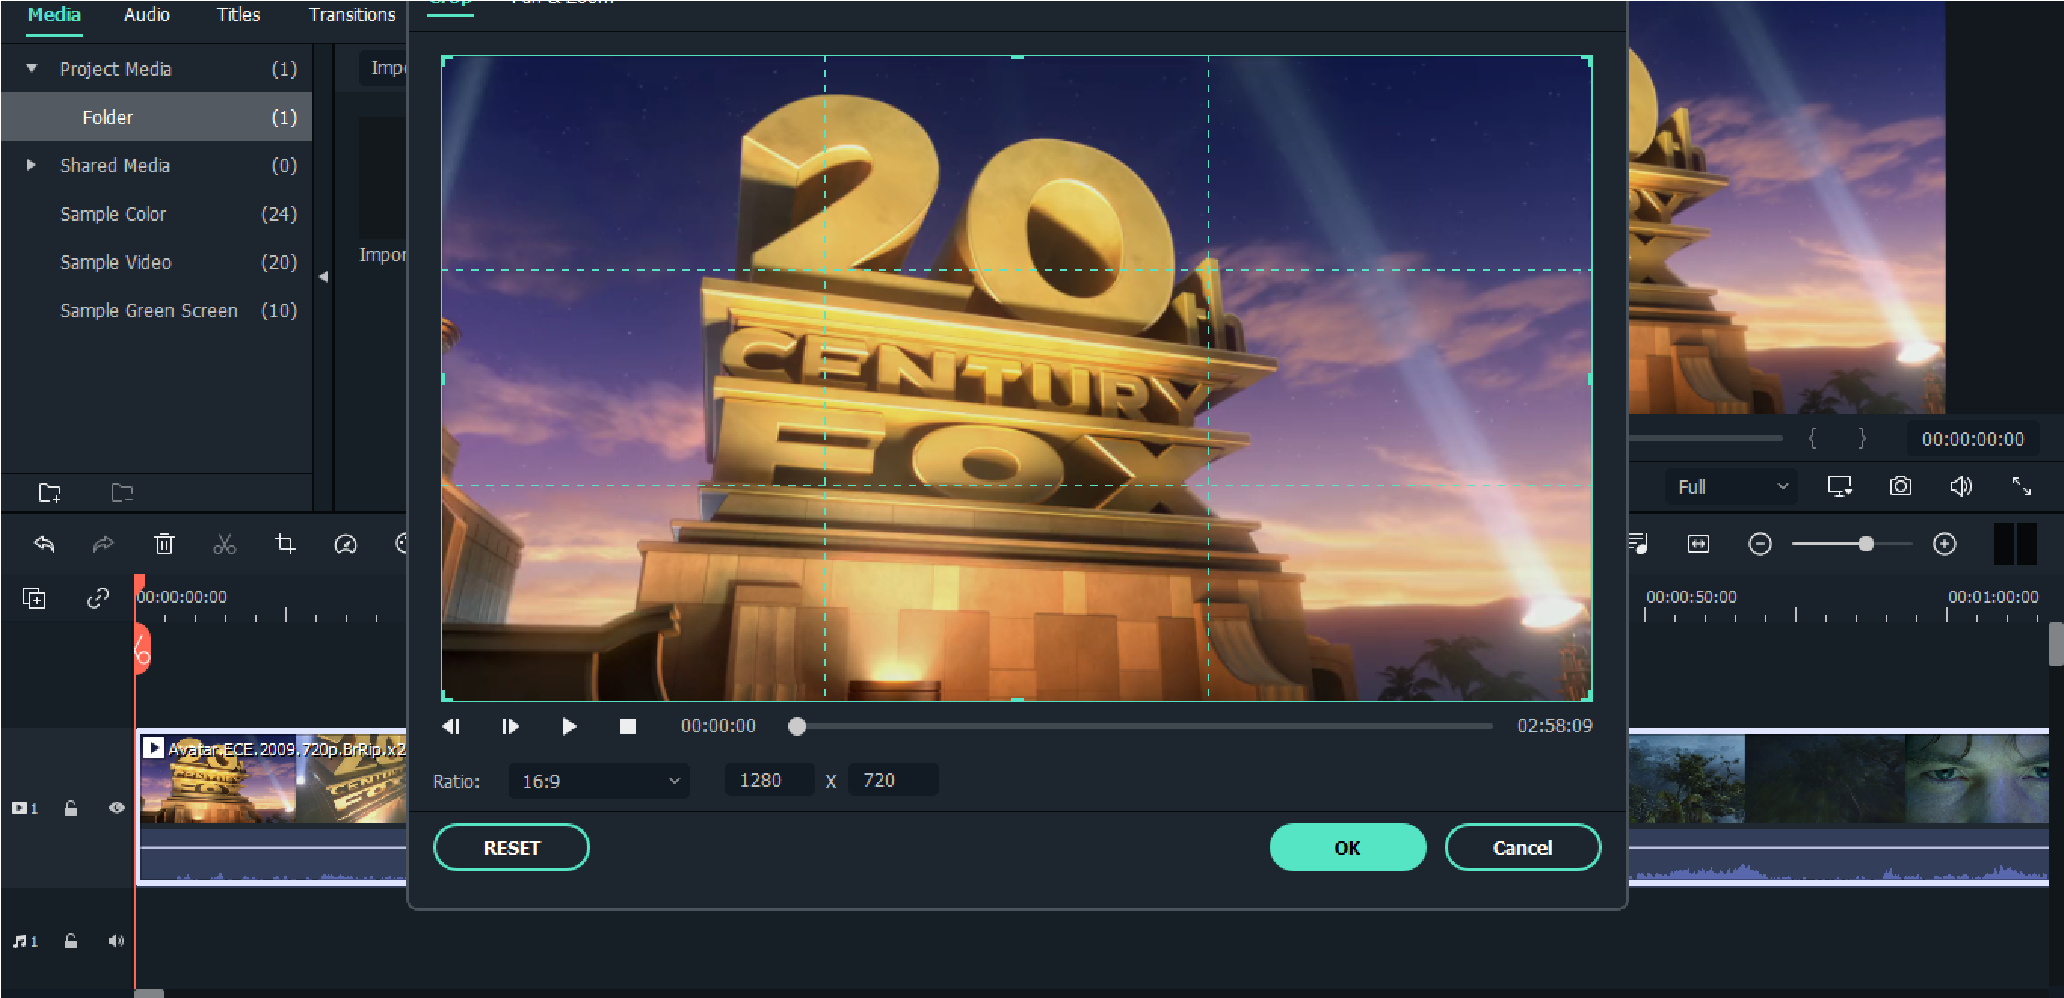
4. Now, you can adjust the focus of your video.
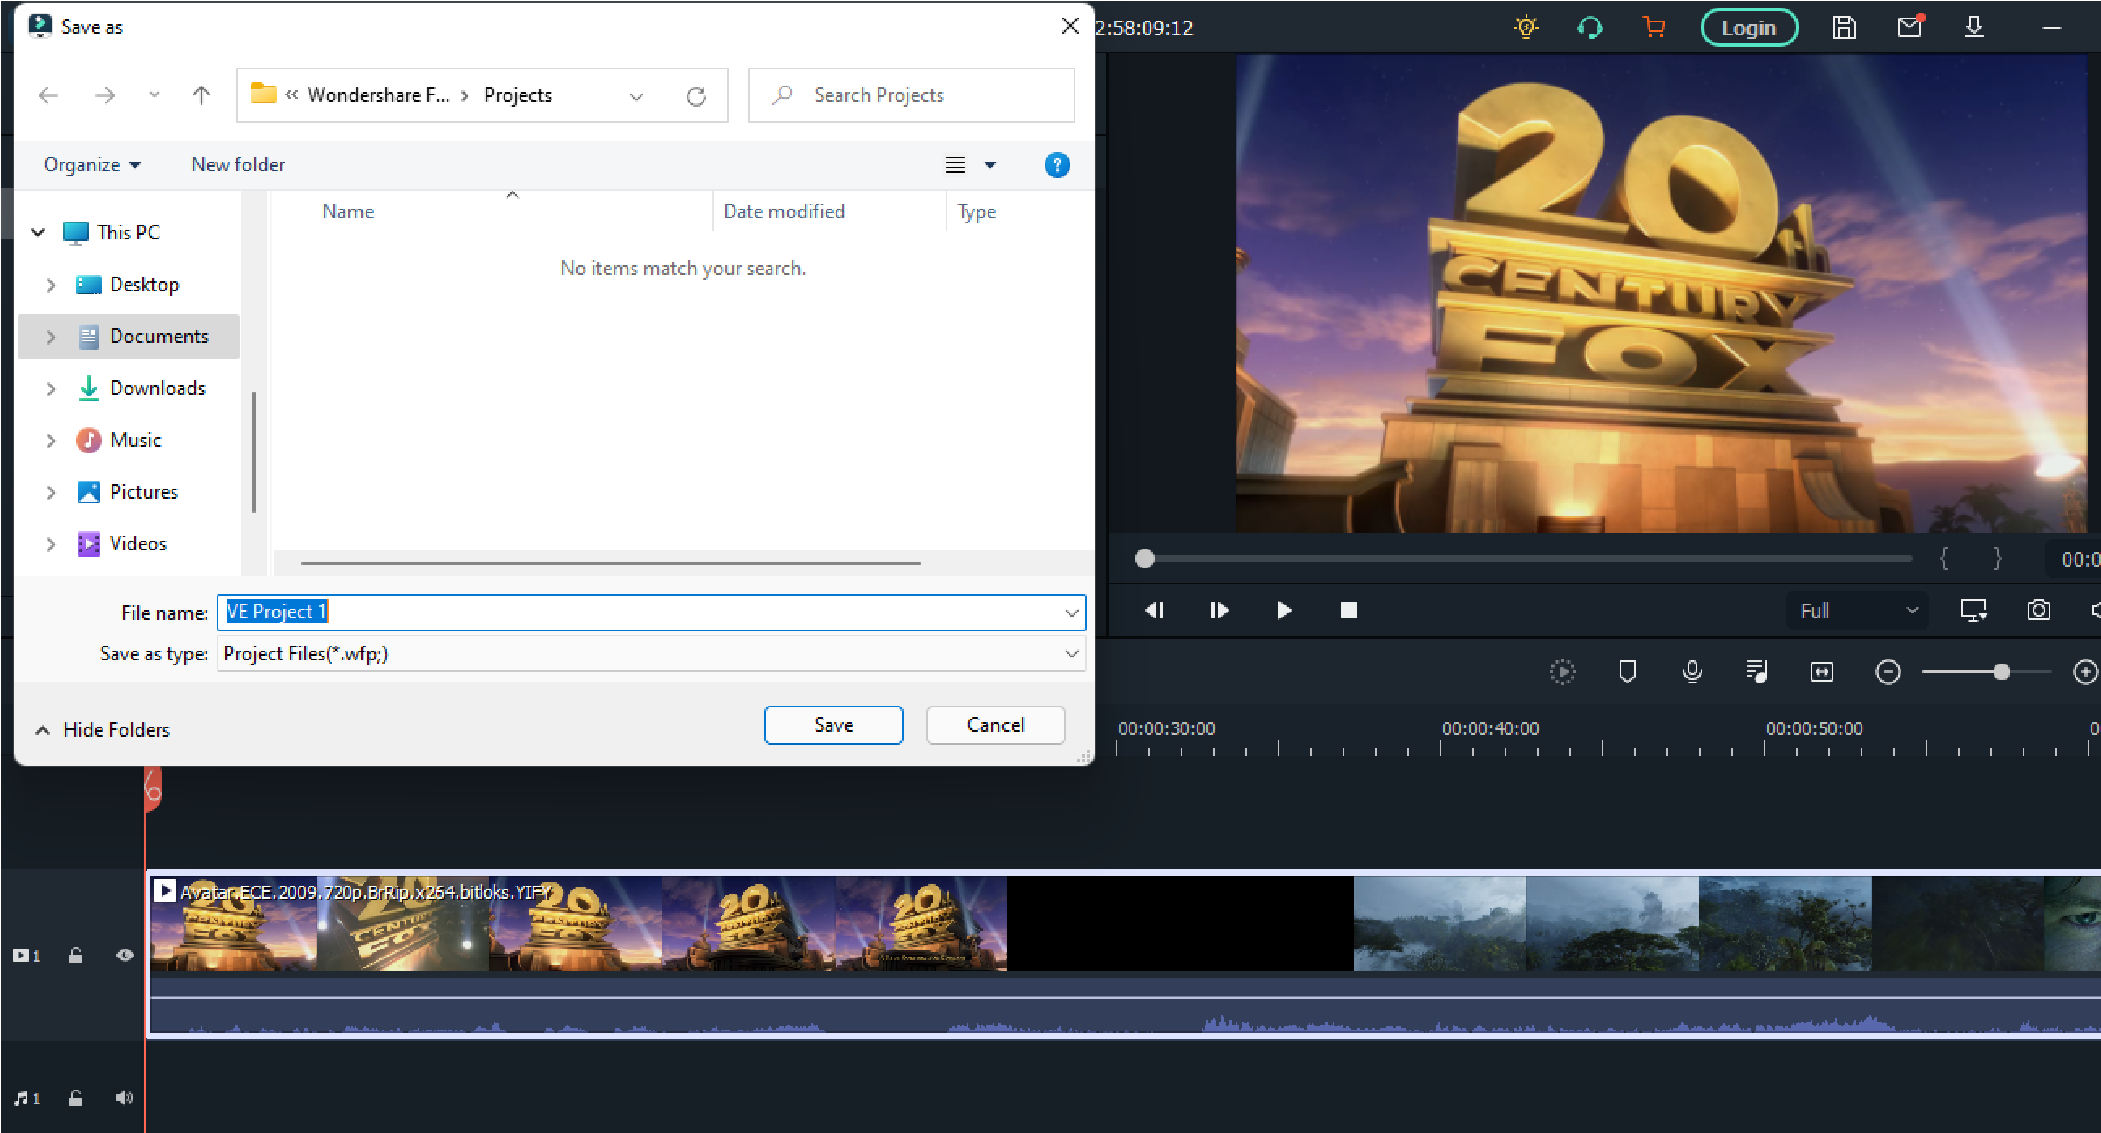
5. After cropping, if you are satisfied with your edit you can now save your project by clicking the save project icon.
Conclusion
In this guide, you have acquired some knowledge about using crop on a video clip. Though this process or step could be very difficult but using Filmora Wondershare you can easily follow the steps provided above.
Therefore, cropping video is necessary. It is one of the basic editing skill that you need to know. It is functional to your online business, work projects, school projects and other related stuffs. Cropping will help you to emphasize more about your subject.
It is easier for you to do the edit if you used some software programs. You can used Filmora Wondershare or any of the best editing software programs. While you are giving the best videos and photos of your costumer and viewers you are also improving and enhancing your editing skills.
However, you also need to be careful in doing some edits. Before you save your project you need to make sure that you are cropping the right portion of your video.
Your plug-in will be enabled after selecting it from the menu.
Step 4: While playingthe document you need to edit, flow the blue slider to the segment of the film you need to trim/reduce and click “Start”. Manually type the time of the video you need to begin deciding on into the Start box in case you discover the usage of the slider difficult. Click the “End” button on the factor you need the trimming to end.

Step 5: Find and press the “In” button to trim the chosen component; The “Out” button to reduce the chosen component out of the authentic media document.
Note that SolveigMM WMP Trimmer Plugin supports to edit videos including cutting or trimming, however, it doesn’t offer an option to crop video.
An alternative way to crop video on Windows by Wondershare Filmora
Wondershare Filmora Video Editor is one of the great video enhancing software program with cool functions that compares to different competing video enhancing Softwares program. Many video enhancing applications claimed to provide expert results; Filmora is one in every of some consumer-stage equipment that definitely delivers.
For Win 7 or later (64-bit)
For macOS 10.14 or later
Here in Filmora, it is not just trimming but this tool can help you to adjust the focus of your video clip. Here are steps on how to crop a video using wondershare filmora.
1. Install and launch your Filmora Wondershare app.

2. Find the import media. Click it and choose your preferred video fromyour files that you want to edit. Wait a second until the video is finished importing.

3. Drag the video to the lower left side. After dragging ,right-click yourmouse and choose video and then click “crop and zoom.”


4. Now, you can adjust the focus of your video.

5. After cropping, if you are satisfied with your edit you can now save your project by clicking the save project icon.

Conclusion
In this guide, you have acquired some knowledge about using crop on a video clip. Though this process or step could be very difficult but using Filmora Wondershare you can easily follow the steps provided above.
Therefore, cropping video is necessary. It is one of the basic editing skill that you need to know. It is functional to your online business, work projects, school projects and other related stuffs. Cropping will help you to emphasize more about your subject.
It is easier for you to do the edit if you used some software programs. You can used Filmora Wondershare or any of the best editing software programs. While you are giving the best videos and photos of your costumer and viewers you are also improving and enhancing your editing skills.
However, you also need to be careful in doing some edits. Before you save your project you need to make sure that you are cropping the right portion of your video.
Your plug-in will be enabled after selecting it from the menu.
Step 4: While playingthe document you need to edit, flow the blue slider to the segment of the film you need to trim/reduce and click “Start”. Manually type the time of the video you need to begin deciding on into the Start box in case you discover the usage of the slider difficult. Click the “End” button on the factor you need the trimming to end.

Step 5: Find and press the “In” button to trim the chosen component; The “Out” button to reduce the chosen component out of the authentic media document.
Note that SolveigMM WMP Trimmer Plugin supports to edit videos including cutting or trimming, however, it doesn’t offer an option to crop video.
An alternative way to crop video on Windows by Wondershare Filmora
Wondershare Filmora Video Editor is one of the great video enhancing software program with cool functions that compares to different competing video enhancing Softwares program. Many video enhancing applications claimed to provide expert results; Filmora is one in every of some consumer-stage equipment that definitely delivers.
For Win 7 or later (64-bit)
For macOS 10.14 or later
Here in Filmora, it is not just trimming but this tool can help you to adjust the focus of your video clip. Here are steps on how to crop a video using wondershare filmora.
1. Install and launch your Filmora Wondershare app.

2. Find the import media. Click it and choose your preferred video fromyour files that you want to edit. Wait a second until the video is finished importing.

3. Drag the video to the lower left side. After dragging ,right-click yourmouse and choose video and then click “crop and zoom.”


4. Now, you can adjust the focus of your video.

5. After cropping, if you are satisfied with your edit you can now save your project by clicking the save project icon.

Conclusion
In this guide, you have acquired some knowledge about using crop on a video clip. Though this process or step could be very difficult but using Filmora Wondershare you can easily follow the steps provided above.
Therefore, cropping video is necessary. It is one of the basic editing skill that you need to know. It is functional to your online business, work projects, school projects and other related stuffs. Cropping will help you to emphasize more about your subject.
It is easier for you to do the edit if you used some software programs. You can used Filmora Wondershare or any of the best editing software programs. While you are giving the best videos and photos of your costumer and viewers you are also improving and enhancing your editing skills.
However, you also need to be careful in doing some edits. Before you save your project you need to make sure that you are cropping the right portion of your video.
Your plug-in will be enabled after selecting it from the menu.
Step 4: While playingthe document you need to edit, flow the blue slider to the segment of the film you need to trim/reduce and click “Start”. Manually type the time of the video you need to begin deciding on into the Start box in case you discover the usage of the slider difficult. Click the “End” button on the factor you need the trimming to end.

Step 5: Find and press the “In” button to trim the chosen component; The “Out” button to reduce the chosen component out of the authentic media document.
Note that SolveigMM WMP Trimmer Plugin supports to edit videos including cutting or trimming, however, it doesn’t offer an option to crop video.
An alternative way to crop video on Windows by Wondershare Filmora
Wondershare Filmora Video Editor is one of the great video enhancing software program with cool functions that compares to different competing video enhancing Softwares program. Many video enhancing applications claimed to provide expert results; Filmora is one in every of some consumer-stage equipment that definitely delivers.
For Win 7 or later (64-bit)
For macOS 10.14 or later
Here in Filmora, it is not just trimming but this tool can help you to adjust the focus of your video clip. Here are steps on how to crop a video using wondershare filmora.
1. Install and launch your Filmora Wondershare app.

2. Find the import media. Click it and choose your preferred video fromyour files that you want to edit. Wait a second until the video is finished importing.

3. Drag the video to the lower left side. After dragging ,right-click yourmouse and choose video and then click “crop and zoom.”


4. Now, you can adjust the focus of your video.

5. After cropping, if you are satisfied with your edit you can now save your project by clicking the save project icon.

Conclusion
In this guide, you have acquired some knowledge about using crop on a video clip. Though this process or step could be very difficult but using Filmora Wondershare you can easily follow the steps provided above.
Therefore, cropping video is necessary. It is one of the basic editing skill that you need to know. It is functional to your online business, work projects, school projects and other related stuffs. Cropping will help you to emphasize more about your subject.
It is easier for you to do the edit if you used some software programs. You can used Filmora Wondershare or any of the best editing software programs. While you are giving the best videos and photos of your costumer and viewers you are also improving and enhancing your editing skills.
However, you also need to be careful in doing some edits. Before you save your project you need to make sure that you are cropping the right portion of your video.
How to Put a Filter on a Video in iMovie
There are times when you record a video and find out that the light and color in the video have been up to the mark. The light could be too bright or too dark while there could be some color overlays in certain portion as well as the entire frame of the video. Thanks to the video editing apps, you can correct any lighting and coloration issues with different filters available to apply to your video.
If you are using iPhone or Mac, you can use Apple’s iMovie app easily. Therefore, you should know how to add filters on iMovie to get the desired output. iMovie app is available for both iPhone and iPad users as well as Mac users. You do not need prior experience in video editing to add filter to your videos to enhance and improve them. We will illustrate the steps on how to add filters in iMovie as well as suggest a better iMovie alternative.
Part 1. How to add filters on iMovie iPhone
If you have an iPhone, you are more likely to record a video with your iPhone. This is because the camera quality of iPhones is extremely good and there are various modes available for capturing different types of videos like slow-motion and time-lapse. Once you capture a video with your iPhone, you can edit the video and add filters to enhance the video quality using iMovie app available for iPhone.
You have to install iMovie app from App Store as it does not come pre-install. If you already have it installed, make sure you update it to the latest version to get all the filters. Here are the steps how to put a filter on a video in iMovie app.
Step1 Open iMovie app on your iPhone. Tap on Create Project option and tap on Movie on the next screen.
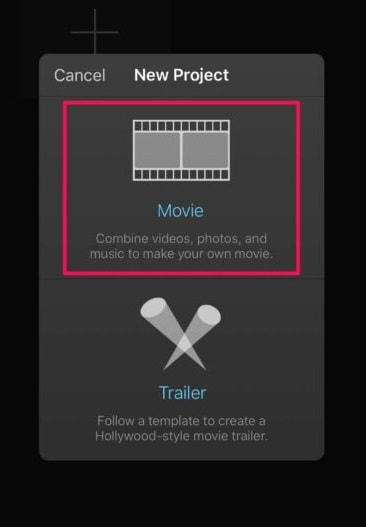
Step2 Select the video from your iPhone that you want to edit and add filters. After your selection, tap on Create Movie option located at the bottom.
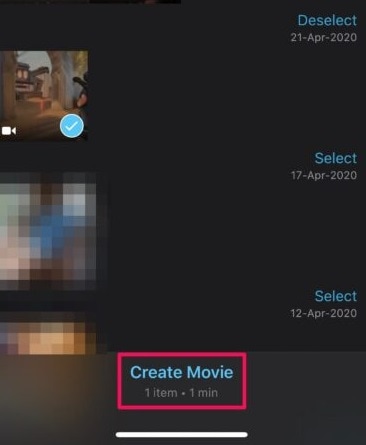
Step3 Your selected video will now be available on the Timeline where you can edit your video. Tap on Filters icon located at the bottom-right corner.
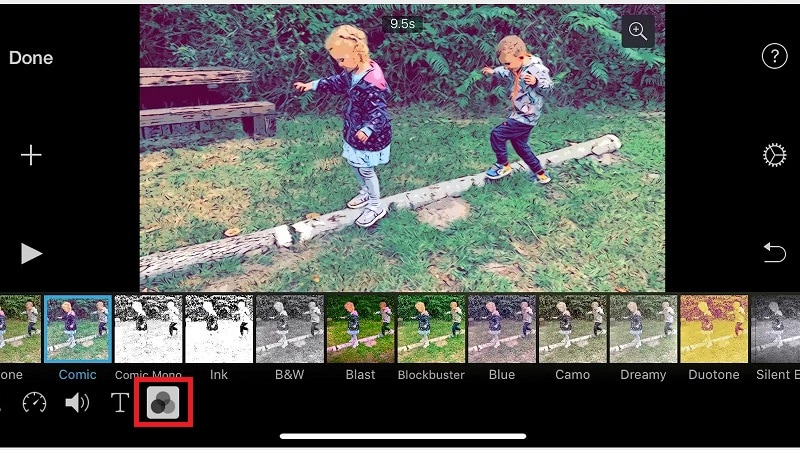
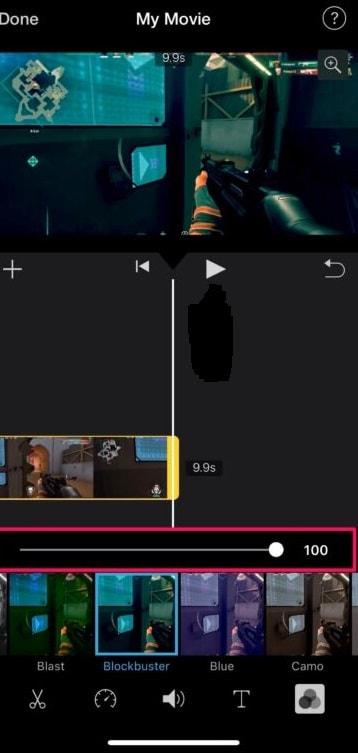
Step4 You will see all the different filters available on iMovie app. You can also find a slider above each selected filter. You can adjust the filter to increase or decrease the filter intensity.
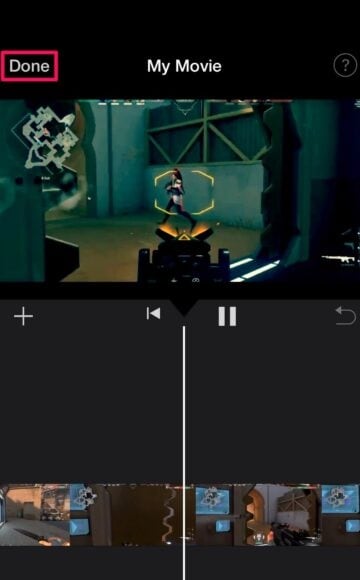
Step5 Tap on Play icon to check how the filter is looking on your video. Once you are satisfied, tap on Done option located at the top-left corner.
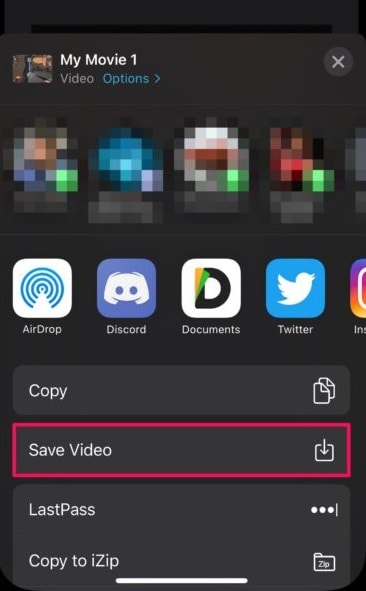
Step6 Tap on Share icon at the bottom and then tap on Save Video option to save the modified video on your iPhone.
Part 2. How to add filters on Mac iMovie
If you are someone who regularly makes videos for social media account or video streaming channel, you are more likely to record your video using a video camera and transfer the recorded video to you Mac for editing purposes. iMovie comes pre-installed on Mac, and therefore, once you have transferred the video, you can get started with editing and adding filters immediately. Here are the steps on how to add filters to iMovie on your Mac.
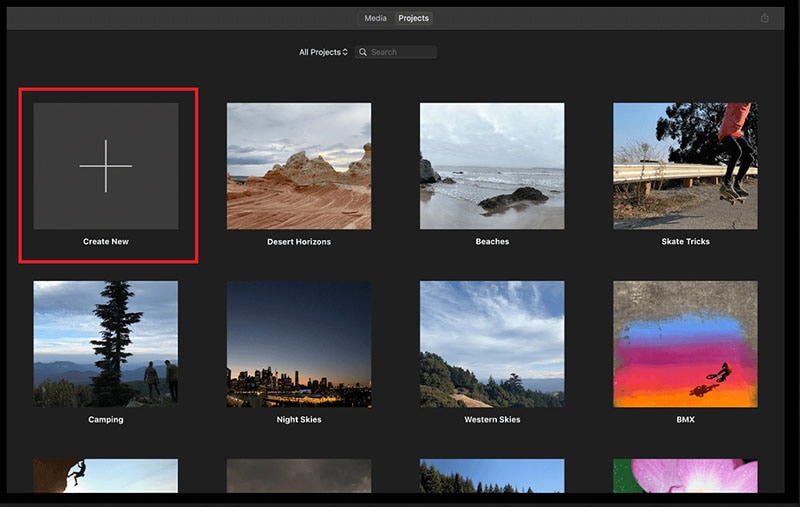
Step1 Launch iMovie from Applications folder. Click on Create New option to start a new Project.
Step2 Drag and drop the target video from Photos app to Desktop. Thereafter, drag and drop the video file from Desktop to the Timeline of iMovie project.
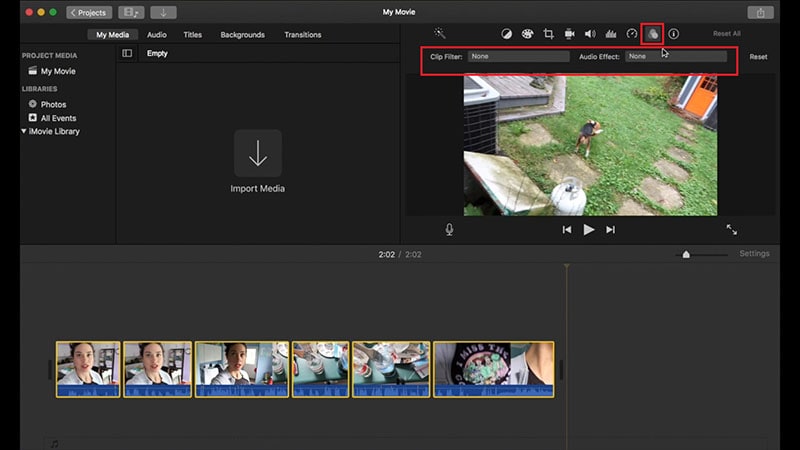
Step3 Click on the video clip on the Timeline and click on Crop Filter and Audio Effects icon above the Viewer.
Step4 Click on Clip Filter option and you will see different filters in a window to the left. Place the mouse pointer over the filters, and you will see the filter in the Viewer.
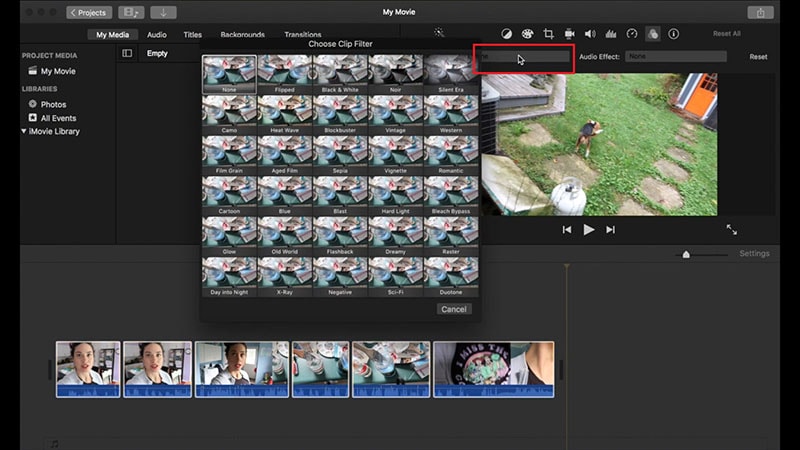
Step5 Once you are satisfied with a filter, click on that filter to apply it to the video clip.
Part 3. iMovie Alternative to add filters on Computer
There are several reasons iMovie filters may not always serve your purpose. For example, there is no way on how to add face filters on iMovie. The collection of filters is rather limited. If you are not satisfied with the filters available on iMovie, there are several iMovie alternatives available. We recommend Wondershare Filmora due to its vast collection of filters of all categories to enhance your video to the next level. Here are steps on how to add filters to your video using Filmora on your computer.
Free Download For Win 7 or later(64-bit)
Free Download For macOS 10.14 or later
Step1 Download and install Wondershare Filmora and it is available for Mac as well as Windows users. Open Filmora and click New Project.
Step2 Drag and drop video clips under Project Media folder. Thereafter, drag and drop video clips to Timeline.

Step3 Go to Effects from the top panel and click on Filters from the left panel. You will see all the different categories of filters.

Step4 Select any filter and drag and drop it on Timeline. You can stretch the duration of the filter as per your requirements.
You can also check Overlay> Utility option from the left panel to add face filters to your video in the same manner. If you want to save the modified video, click on Export button.
Conclusion
If you are an iPhone user or a Mac user, you can add filters to your video using iMovie app. You have to install iMovie app on your iPhone, but iMovie comes pre-installed on Mac. But there are limited filters available on iMovie and there is a lack of face filters which are trending in today’s viral videos. That is why we recommend Wondershare Filmora where there is a wide range of filters available to apply to your video conveniently as per your requirements.
Free Download For macOS 10.14 or later
Step1 Download and install Wondershare Filmora and it is available for Mac as well as Windows users. Open Filmora and click New Project.
Step2 Drag and drop video clips under Project Media folder. Thereafter, drag and drop video clips to Timeline.

Step3 Go to Effects from the top panel and click on Filters from the left panel. You will see all the different categories of filters.

Step4 Select any filter and drag and drop it on Timeline. You can stretch the duration of the filter as per your requirements.
You can also check Overlay> Utility option from the left panel to add face filters to your video in the same manner. If you want to save the modified video, click on Export button.
Conclusion
If you are an iPhone user or a Mac user, you can add filters to your video using iMovie app. You have to install iMovie app on your iPhone, but iMovie comes pre-installed on Mac. But there are limited filters available on iMovie and there is a lack of face filters which are trending in today’s viral videos. That is why we recommend Wondershare Filmora where there is a wide range of filters available to apply to your video conveniently as per your requirements.
Also read:
- [Updated] 2024 Approved Superior Corporate Space for Storage
- [Updated] Social Media Wiz How to Create Captivating Slideshow Stories for Facebook for 2024
- Fixing the DotA 2 VAC Ban Glitch : A Comprehensive Guide
- Full Guide to Hard Reset Your Poco M6 Pro 4G | Dr.fone
- In 2024, How to Put a Filter on a Video in iMovie
- In 2024, Ultimate guide to get the meltan box pokemon go For OnePlus 12R | Dr.fone
- In 2024, Wondering if You Can Make DIY Green Screen Video for Streaming? Learn the Easy Steps to Setup DIY Green Screen, Shoot the Video and Edit It Out to Add Green Screen Effects
- MP3 Cutter Download
- New How To Make a Timelapse in After Effects for 2024
- Rising Threats From North Korea Pose Risks to Global Memory Supply, Primarily Sourced in South Korea at Over 70% Rate
- The Ultimate Tips for Seamless Gaming on 'The Ascent': Overcoming Stutter & Skyrocketing FPS
- Updated In 2024, Convert Your Videos to 60 FPS Using These Excellent Tools
- Updated Something About Skin Care Vlog Ideas
- Title: New 2024 Approved Easy Steps to Export Video in Filmora
- Author: Chloe
- Created at : 2025-03-02 22:16:12
- Updated at : 2025-03-04 03:02:22
- Link: https://ai-editing-video.techidaily.com/new-2024-approved-easy-steps-to-export-video-in-filmora/
- License: This work is licensed under CC BY-NC-SA 4.0.