
:max_bytes(150000):strip_icc():format(webp)/Childlearningonline_WillieBThomas_Getty-3e51600a64d742a0b5db4fadacead069.jpg)
New 2024 Approved Full Guide to Funcall Voice Changer and Its Alternatives
A Full Guide to Funcall Voice Changer and Its Alternatives
Do you want to prank your friends? Everyone can agree that receiving a prank call is one of the world’s most annoying experiences. Still, you must admit that coming up with a great prank is a flex. If you want to make the next big prank film for TikTok or are just looking for something to do during a sleepover with your friends, you’ll need to have a plan before you pick up the phone. In this article, we will tell you how you can make prank calls easily with Funcall apps:
Try AI Voice Changer For Win 7 or later(64-bit)
Try AI Voice Changer For macOS 10.14 or later
Part 1: What’s Funcall App, and how to use it?
Making successful prank calls is very challenging. The Funcall - Voice Changer makes it incredibly easy to change your voice on a call and prank your family members and friends. You can call them and get their funny reactions.
You must input the target’s phone number and select whether you want the voice to be feminine, helium balloon, frightening, male, or regular sound. Funcall app also allows you to make international calls in over 150 countries on cell phones and landlines.

After installing the app, you will only have 30 seconds to play the prank. You can install other applications, view advertisements, or buy time directly through the app to get additional time. You are free to phone whatever number you like and speak in an artificial voice as long as you have the time. Additionally, you can include humorous sound effects like barking, farts, or gunfire. This voice-changing app is compatible with both Android and iPhone devices.
Follow these easy steps to use the Funcall app:
Step1Download
Go to the official website of Funcall apps and download it on your mobile device. To start the Funcall app, tap on the icon.
Step2Dial the Number
Dial the number of your friend or relative you want to prank and select the country.
Step3Select a Voice
At this point, pick the voice-altering sound you want to use. You can also add a background effect.
Step4Change Voice in Real Time
The call’s recipient will hear your customized voice rather than the original. To make the call more thrilling, you can add sound effects in addition to your altered voice.

Part 2: How to use the app for free?
Funcall is a premium software, and to use it, you must purchase one of its membership plans, which are reasonably priced. The first call on this app is free. You can earn more free minutes for prank calls by completing activities like watching advertising and downloading software.
Another option is to use Funcall MOD APK. It can be your best option if you’re seeking its free version, which allows you to enjoy an infinite number of minutes and an ad-free experience. You can use its hacked version to have free access to all of its paid features.
Part 3: Best alternatives to Funcall Voice Changer
Prank Dial
If you are looking for the best alternative to the Funcall app, you can use Prank Dial. With the help of the Prank Dial app, users can have fun while spending their free time making up to three random prank calls to friends and coworkers each day. You can press a call scenario to hear it and tap the heart to put it in your favourites so you can use it later.

The array of situations is sorted by category in the Prank Dial app, including “celebrities,” “angry,” “love,” “family prank calls,” etc. The history area displays all recent calls, including call date, caller id, scenario name, etc.
Fake Caller ID
If you want to make prank calls, make false caller ID, and have a good time, download this Fake Caller ID software. It has a very straightforward user interface that is free of any complications. You can easily prank or make fun of your friends by changing your voice pitch and caller ID.

This app gives two free calls each day and allows you to adjust your caller ID before you make the call, alter your voice while on the call, and record calls to listen to them later for fun.
MagicCall
For both Android and iOS, MagicCall is a fantastic tool to use as a voice-changing app when on the phone. It is an excellent app for making prank calls to pals and applying various effects. With multiple voice modifications and appended background effects, Magic Call is straightforward to use.

You can choose between Male, Robot, Female, Elderly Male, and Kid voices in the Voices area.
Prank Caller
With the help of the features in the Prank Caller app, you can access a massive library of prank call scripts directly from your smartphone’s screen and entertain your loved ones by using a different voice.

To try a new prank daily, you can browse the top prank call scripts and a list of all the available prank situations ranked by popularity.
FAQs
Can I use the Funcall app to make international calls?
You can use the Funcall app to make international calls in over 150 countries, including Asian, European, African, Middle Eastern regions, etc.
Can I use the Funcalls app while playing games?
No, you can’t use the Funcalls app while playing games. You can only use this app to change your voice during calls.
Can I change my voice during a call?
Yes, you can change your voice during calls. You can use Funcall apps or any alternatives to change your voice. However, we recommend you use the Funcall app because it is compatible with Android and iPhone.
What are the available voices on the Funcall app?
You can use a feminine, male, scary, helium, or a regular voice. This app also allows you to use various background sounds and effects.
Free Download For Win 7 or later(64-bit)
Free Download For macOS 10.14 or later
Try AI Voice Changer For Win 7 or later(64-bit)
Try AI Voice Changer For macOS 10.14 or later
Part 1: What’s Funcall App, and how to use it?
Making successful prank calls is very challenging. The Funcall - Voice Changer makes it incredibly easy to change your voice on a call and prank your family members and friends. You can call them and get their funny reactions.
You must input the target’s phone number and select whether you want the voice to be feminine, helium balloon, frightening, male, or regular sound. Funcall app also allows you to make international calls in over 150 countries on cell phones and landlines.
After installing the app, you will only have 30 seconds to play the prank. You can install other applications, view advertisements, or buy time directly through the app to get additional time. You are free to phone whatever number you like and speak in an artificial voice as long as you have the time. Additionally, you can include humorous sound effects like barking, farts, or gunfire. This voice-changing app is compatible with both Android and iPhone devices.
Follow these easy steps to use the Funcall app:
Step1Download
Go to the official website of Funcall apps and download it on your mobile device. To start the Funcall app, tap on the icon.
Step2Dial the Number
Dial the number of your friend or relative you want to prank and select the country.
Step3Select a Voice
At this point, pick the voice-altering sound you want to use. You can also add a background effect.
Step4Change Voice in Real Time
The call’s recipient will hear your customized voice rather than the original. To make the call more thrilling, you can add sound effects in addition to your altered voice.
Part 2: How to use the app for free?
Funcall is a premium software, and to use it, you must purchase one of its membership plans, which are reasonably priced. The first call on this app is free. You can earn more free minutes for prank calls by completing activities like watching advertising and downloading software.
Another option is to use Funcall MOD APK. It can be your best option if you’re seeking its free version, which allows you to enjoy an infinite number of minutes and an ad-free experience. You can use its hacked version to have free access to all of its paid features.
Part 3: Best alternatives to Funcall Voice Changer
Prank Dial
If you are looking for the best alternative to the Funcall app, you can use Prank Dial. With the help of the Prank Dial app, users can have fun while spending their free time making up to three random prank calls to friends and coworkers each day. You can press a call scenario to hear it and tap the heart to put it in your favourites so you can use it later.
The array of situations is sorted by category in the Prank Dial app, including “celebrities,” “angry,” “love,” “family prank calls,” etc. The history area displays all recent calls, including call date, caller id, scenario name, etc.
Fake Caller ID
If you want to make prank calls, make false caller ID, and have a good time, download this Fake Caller ID software. It has a very straightforward user interface that is free of any complications. You can easily prank or make fun of your friends by changing your voice pitch and caller ID.
This app gives two free calls each day and allows you to adjust your caller ID before you make the call, alter your voice while on the call, and record calls to listen to them later for fun.
MagicCall
For both Android and iOS, MagicCall is a fantastic tool to use as a voice-changing app when on the phone. It is an excellent app for making prank calls to pals and applying various effects. With multiple voice modifications and appended background effects, Magic Call is straightforward to use.
You can choose between Male, Robot, Female, Elderly Male, and Kid voices in the Voices area.
Prank Caller
With the help of the features in the Prank Caller app, you can access a massive library of prank call scripts directly from your smartphone’s screen and entertain your loved ones by using a different voice.
To try a new prank daily, you can browse the top prank call scripts and a list of all the available prank situations ranked by popularity.
FAQs
Can I use the Funcall app to make international calls?
You can use the Funcall app to make international calls in over 150 countries, including Asian, European, African, Middle Eastern regions, etc.
Can I use the Funcalls app while playing games?
No, you can’t use the Funcalls app while playing games. You can only use this app to change your voice during calls.
Can I change my voice during a call?
Yes, you can change your voice during calls. You can use Funcall apps or any alternatives to change your voice. However, we recommend you use the Funcall app because it is compatible with Android and iPhone.
What are the available voices on the Funcall app?
You can use a feminine, male, scary, helium, or a regular voice. This app also allows you to use various background sounds and effects.
Free Download For Win 7 or later(64-bit)
Free Download For macOS 10.14 or later
How To Fade Audio In Kinemaster
If you have been looking for video and audio editing tools then you have probably heard of Kinemaster. It is a great video editing app that allows users to edit all aspects of the video including any audio or music that may accompany the video. It has a lot of very useful features and the user interface is fairly easy to use.
One of the things that you can do with Kinemaster is to fade out audio, a useful feature that can help the ending of any video appear more authentic. In this article, we will be looking at how you can use Kinemaster to fade audio.
Kinemaster Fade Audio Steps
The following steps show you how you can easily fade audio in Kinemaster;
Step1If you don’t have Kinemaster already, start by downloading and installing the video editor on your computer.
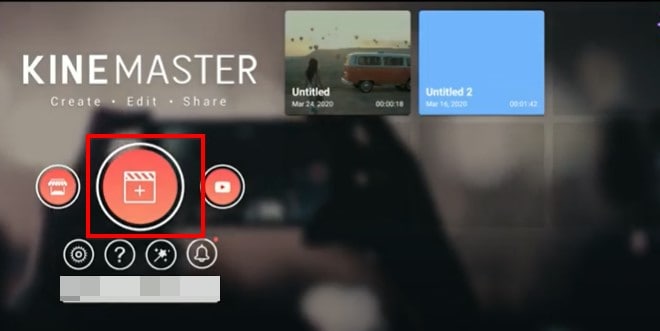
Step2Open Kinemaster on your computer and then click on the “New Project” icon to start. Select the aspect ratio that you would like to use. If you are not sure, we recommend choosing the “16:9” aspect ratio.
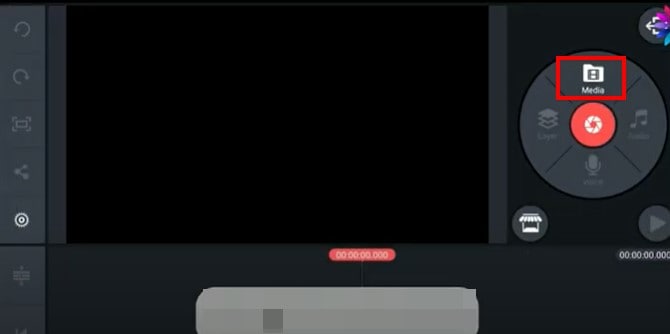
Step3In the next window, click on “Media” to select the clip you would like to add to the Kinemaster project that you have just created.
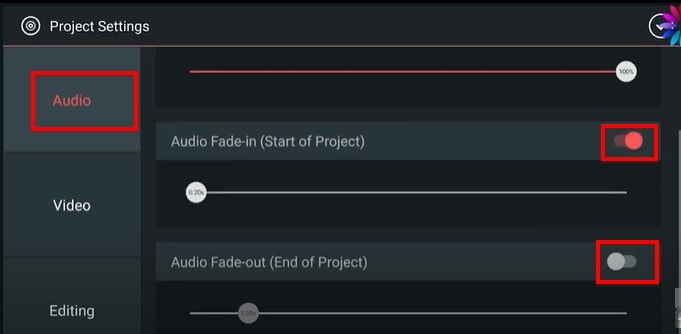
Step4To fade in and fade out the audio in the project, click on the gear icon from the options to the left of the screen.
![]()
Step5Select the “Audio” tab on the next screen and then turn on the switch next to “Audio Fade-in (Start of Project)” and “Audio Fade-out (End of Project).” This will add a fade-in and fade-out effect at the beginning of the audio and at the end of it.
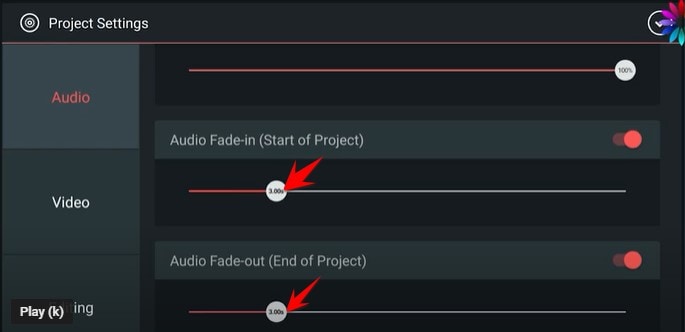
Step6You can then easily set the duration of the “Audio fade-in” and “Audio fade-out” by dragging the slider below each option. We recommend setting the duration to just a few seconds.
Don’t forget to save the project when you’re done.
Kinemaster Alternative to Edit Audio
Kinemaster is a good way to edit both audio and video on your computer, but the following options are just as good;
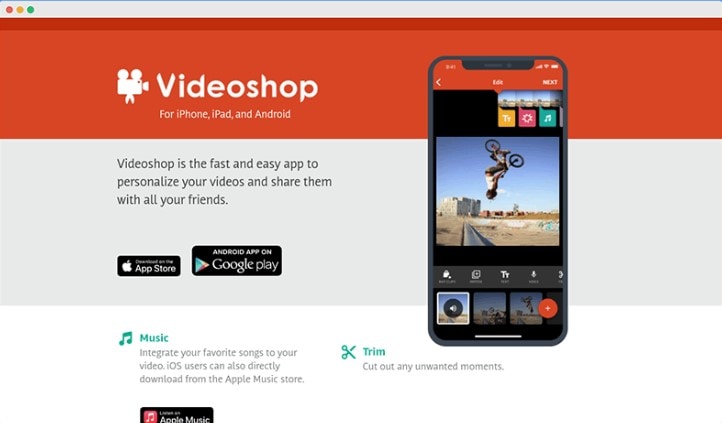
1. VideoShop
VideoShop is a simple to use and highly effective program that you can use to create and edit videos on your computer. The interface makes it easy to import any video project that you have into the program and the wealth of very useful features can help you edit the video in various ways.
For example, you can change the speed of the video, add transitions at various points in the video, add and remove text, add and remove music and so much more. Although there is a free trial version, you will only be able to access some of the more useful features when you purchase the premium version.
The Pro version of VideoShop goes for $3.99 a month, but you can get lifetime access to the program for only $39.99. One thing that VideoShop has over Kinemaster is that it is very easy to use, even beginner users find video editing a breeze with this tool.
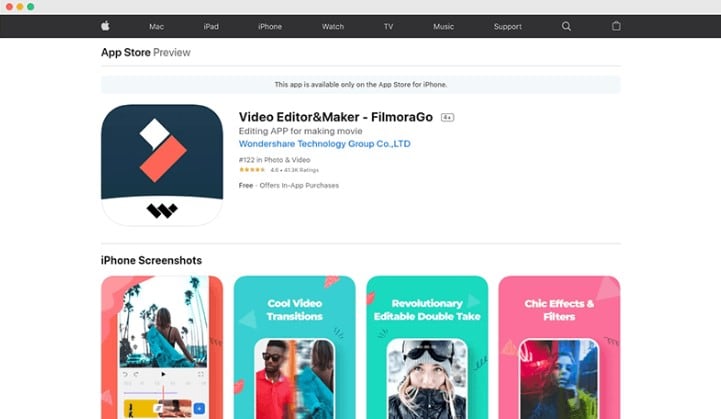
2. Filmora
If you are looking for a simple way to edit videos on Android or iOS devices, Filmora is one of the best options in the market. This mobile version of the very popular Filmora video editor is just as easy to use as its parent program. You can use it to create video projects from scratch or upload a video and make changes to it.
It offers you a lot of choices when it comes to editing features including trimming sections of the video, adding filters, adding music, adding or removing text, and even changing the canvas or the background of the video. Advanced options such as changing the speed of the video are also available.
One of the things that we love about Filmora is that you don’t even have to create an account to use it or remove the watermark added to the completed video project, watching a video ad can be enough. But this option is only available once every 24 hours, meaning that you can only remove a watermark on the free version once a day. Filmora is available for both iOS and Android and the yearly premium plan will cost you just $19.90.
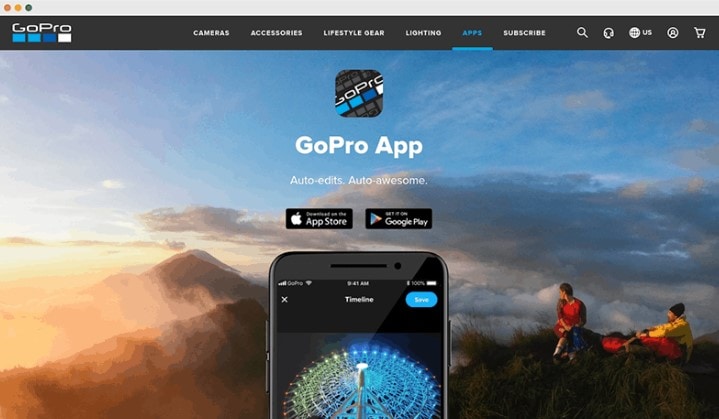
3. Quik
Quik is a video editing program created by GoPro for the purpose of editing GoPro videos, but that doesn’t mean that you will not be able to use it to edit other types of videos. You can use Quik to create a new project or edit an existing video and gives users a lot of different options when it comes to video editing.
One of the main benefits of using Quik is that you can easily add music, audio, and special effects to a video as well as change the length of the video, fade audio in and out and even change when the music starts. It is also one of the best ways to use images to create collages and slideshows very easily. There are a lot of slideshow and collage templates to choose from, and you can edit them easily by adding your music and images. Quik is completely free to use and you can upload your creation to the cloud ad share the link with others.
Conclusion
Kinemaster is one of the most popular video editing tools, especially since it simplifies the video editing process to make it very easy. All the alternative tools we have outlined here in this article are selected because they can make video editing quite simple.
Free Download For Win 7 or later(64-bit)
Free Download For macOS 10.14 or later
4 Methods for Rotating Your GoPro Videos Professionally
Video editing has secured a prominent position among other post-production works with innovation in cameras. Now, you do not need to hold the reins of your imagination tight.
With its advanced technology, Go-Pro has grabbed the attention of technology lovers. It offers video stabilization, making it the best gadget for capturing sports activities and other outdoor events.
If you have recorded your video in an odd direction? Also, you don’t want to lose that precious memory? There is no need to worry.
Rotating your video horizontally or vertically can change the entire perspective of your project.
The process of changing the orientation of the video is convenient. There are different tools for rotating your Go-Pro videos simply and easily.
In this article, you’ll find four solutions for rotating your Go-Pro Videos. The following tools will be used for this purpose.
- Wondershare Filmora
- GoPro Quik
- VLC Media Player
- Online Converter (Ezgif)
Filmora Wondershare-A companion to rotate your GoPro Videos
If you want to experience new dimensions of video editing by changing the orientation of your videos, then Filmora Video Editor is there for you. If you have made a video with your Go-pro at the wrong angle, video rotation can solve your problem.
Filmora is there to keep you out of trouble. It comes with the option of changing the direction of your videos. Apart from that, you can crop the unwanted parts or even zoom in on videos.
For Win 7 or later (64-bit)
For macOS 10.14 or later
Here is the step-by-step guide for rotating your go-pro video.
Step 1: Drag and Drop
The interface of Filmora is user-friendly and convenient. The video rotation process starts with importing the video file and then adding the drag and drop feature to the timeline.


Step 2: Video Rotation
- In the timeline, double-click on the video clip.
- The video tab will appear with several options like transformation and lens correction.

Step 3: Exploring the Transform Tab
- Expand the Transform tab.
- You will see the options like rotation, flip, scale, and position.
- You can now rotate your Go-pro video by either rotating the slider or entering a specific value for the degree of rotation.

- You can also use the scale slider to adjust the image size.

Step 4:Exporting the rotated Go-pro Video
- After changing the orientation of your video, now is the time to export your project.
- Click on the Export tab.

The Export tab shows a list of options whether you want to export the rotated video directly to your computer or share it with your friends via social media.

Exploring the Rotation of Video through GoPro Quik
GoPro Quik provides an alternative for changing the direction of videos. It comes with built-in tools specifically meant to deal with GoPro videos. Irrespective of the quality of your videos or format, it can rotate GoPro videos with ease.
You can rotate GoPro Video with GoPro Quik by following these steps
- Download and install the software and launch it afterward.
- You can connect your GoPro device to your computer or choose a folder to add media.

- Upload the media folder into the GoPro Quik program.

- Go to the video you want to rotate and double click on it.

- A new window will open. Select the circle-shaped icon.

- The video is rotated at 90 degrees with each click.

- Apart from that, on the far right side is a three-dotted button. Click on it to enter Create Mode.

- Afterward, select Open.
- Click on the Save button to save all the editing.
Pros:
- User-friendly and convenient
- It connects to the GoPro camera easily.
- Background tracks can be imported to audio libraries.
- Supports importing of background tracks to music libraries.
Cons:
- It is slow when dealing with 4K and files.
Changing the orientation of a Go-pro video using a VLC player
The majority consider VLC as only a media player. But, it also performs the functions of a video editor. The software is user-friendly and supports every existing operating system, including Windows and Linux. The cherry on top is that it supports all audio and video formats. Unlike other tools, there is no need to download add-ons.
- After downloading the VLC media player, launch the software.

- Now, you need to import the video file you want to rotate. This is done by dragging the media file to the timeline or selecting a media source from the left.

- In the VLC menu, go to Tools and then select Effects and Filters.

Tip: You can use the shortcut CTRL+E for the same purpose.
- The effects and filter tab will open a dialogue box with different options. Select the Video Effects tab.

- The video effect tab has many sub-tabs. You need to select the Geometry tab.

- Select the Transform option. A drop-down menu will appear with different options for rotating your video at different angles.

- Tick the checkbox that says Rotate to flip your video at a certain angle. Then, move the angle dialer. This will rotate your video to the angle you have specified.

- Click on the save option to complete the rotation process.

Note: The rotation settings are saved. Thus, you need to uncheck the option if you don’t want to rotate your next video.
Permanent Rotation of Video
The above steps rotated the video for only playing once. If you want to make the orientation of the video permanently to be flipped, then follow these instructions after the above steps.
Go to Media and select Convert/Save on the menu bar or use the shortcut CTRL+R.

A pop-up window will appear. Click on the Add button. Your video will be added.
Afterward, select the option Convert/Save.

A pop-up window will appear in which you have to select the settings logo, located next to Profile

- A pop-up window will appear; click on the Video codec tab.
- Select the Filters tab and click on the Video transformation filter

In the Audio Codec tab, under the encoding parameters, select MP3 in the codec option.
Select the save option.

Note: Make sure to add the destination file in the convert dialogue box.

Click on the start button to begin the transformation.
Using the Online Converter
The Online Converter is a tool that assists you in rotating the direction of your GoPro. It is an online resource and does not require downloading and installing the cumbersome trouble. It is user-friendly and compatible with different video formats like MP4, MKV,3GP, and more.
Pros:
It is free for users. Therefore, there is no need for installation.
Cons:
- If it takes longer to upload a file, you may have to re-submit it. Hence, it can be time-consuming.
- It does not support encrypted files.
Fixing the Orientation of Go-pro video by Ezgif
If you have no time to download different tools for rotating your Go-Pro videos, then the Internet has got a solution to your problem. There are various resources available on the web that facilitate the online rotation of your videos.
The Ezgif online video rotation is a handy tool. With it, you can flip your Go-pro video both horizontally and vertically. Not only that, but it also gives you the option of rotating your video at different angles. It supports various video formats like MP4, MOV, and many others.
You need to follow these simple steps to fix the orientation of your Go-Pro video.
- Upload your desired video file.
- You can also paste an URL.

- Select the rotation options and then click the Rotate video button.

Viola! Your new rotated video is there in no time.
- You will also see several options ranging from cropping the video to changing the speed of the video.

Pros:
- There would be no watermarks in the rotated version.
- The output of the created file is mostly similar to the pre-rotated video.
Cons:
- If you have poor internet connectivity, the conversion process may take a little longer than usual.
Conclusion
With the rising trend in the development of video editing tools, Go-pro Quik is not the only app for editing its videos. Whether you are a beginner or an intermediate, editing multimedia files has added spark to the creativity of the artists. You can add the desired rotation effects to yours.
Changing the rotation of your Go-Pro videos has been made easier due to the availability of user-friendly tools. These are available for all types of operating systems. Their interface is not complicated. Hence, it makes it easy for beginners to polish their video-editing skills.
By changing the orientation of your video, you can turn an ordinary video into a mesmerizing and cherishable lifelong memory. So be it an indoor or outdoor activity, enhance your video editing skills by playing with different orientations of your videos.
For macOS 10.14 or later
Here is the step-by-step guide for rotating your go-pro video.
Step 1: Drag and Drop
The interface of Filmora is user-friendly and convenient. The video rotation process starts with importing the video file and then adding the drag and drop feature to the timeline.
Step 2: Video Rotation
- In the timeline, double-click on the video clip.
- The video tab will appear with several options like transformation and lens correction.
Step 3: Exploring the Transform Tab
- Expand the Transform tab.
- You will see the options like rotation, flip, scale, and position.
- You can now rotate your Go-pro video by either rotating the slider or entering a specific value for the degree of rotation.
- You can also use the scale slider to adjust the image size.
Step 4:Exporting the rotated Go-pro Video
- After changing the orientation of your video, now is the time to export your project.
- Click on the Export tab.
The Export tab shows a list of options whether you want to export the rotated video directly to your computer or share it with your friends via social media.
Exploring the Rotation of Video through GoPro Quik
GoPro Quik provides an alternative for changing the direction of videos. It comes with built-in tools specifically meant to deal with GoPro videos. Irrespective of the quality of your videos or format, it can rotate GoPro videos with ease.
You can rotate GoPro Video with GoPro Quik by following these steps
- Download and install the software and launch it afterward.
- You can connect your GoPro device to your computer or choose a folder to add media.
- Upload the media folder into the GoPro Quik program.
- Go to the video you want to rotate and double click on it.
- A new window will open. Select the circle-shaped icon.
- The video is rotated at 90 degrees with each click.
- Apart from that, on the far right side is a three-dotted button. Click on it to enter Create Mode.
- Afterward, select Open.
- Click on the Save button to save all the editing.
Pros:
- User-friendly and convenient
- It connects to the GoPro camera easily.
- Background tracks can be imported to audio libraries.
- Supports importing of background tracks to music libraries.
Cons:
- It is slow when dealing with 4K and files.
Changing the orientation of a Go-pro video using a VLC player
The majority consider VLC as only a media player. But, it also performs the functions of a video editor. The software is user-friendly and supports every existing operating system, including Windows and Linux. The cherry on top is that it supports all audio and video formats. Unlike other tools, there is no need to download add-ons.
- After downloading the VLC media player, launch the software.
- Now, you need to import the video file you want to rotate. This is done by dragging the media file to the timeline or selecting a media source from the left.
- In the VLC menu, go to Tools and then select Effects and Filters.
Tip: You can use the shortcut CTRL+E for the same purpose.
- The effects and filter tab will open a dialogue box with different options. Select the Video Effects tab.
- The video effect tab has many sub-tabs. You need to select the Geometry tab.
- Select the Transform option. A drop-down menu will appear with different options for rotating your video at different angles.
- Tick the checkbox that says Rotate to flip your video at a certain angle. Then, move the angle dialer. This will rotate your video to the angle you have specified.
- Click on the save option to complete the rotation process.
Note: The rotation settings are saved. Thus, you need to uncheck the option if you don’t want to rotate your next video.
Permanent Rotation of Video
The above steps rotated the video for only playing once. If you want to make the orientation of the video permanently to be flipped, then follow these instructions after the above steps.
Go to Media and select Convert/Save on the menu bar or use the shortcut CTRL+R.
A pop-up window will appear. Click on the Add button. Your video will be added.
Afterward, select the option Convert/Save.
A pop-up window will appear in which you have to select the settings logo, located next to Profile
- A pop-up window will appear; click on the Video codec tab.
- Select the Filters tab and click on the Video transformation filter
In the Audio Codec tab, under the encoding parameters, select MP3 in the codec option.
Select the save option.
Note: Make sure to add the destination file in the convert dialogue box.
Click on the start button to begin the transformation.
Using the Online Converter
The Online Converter is a tool that assists you in rotating the direction of your GoPro. It is an online resource and does not require downloading and installing the cumbersome trouble. It is user-friendly and compatible with different video formats like MP4, MKV,3GP, and more.
Pros:
It is free for users. Therefore, there is no need for installation.
Cons:
- If it takes longer to upload a file, you may have to re-submit it. Hence, it can be time-consuming.
- It does not support encrypted files.
Fixing the Orientation of Go-pro video by Ezgif
If you have no time to download different tools for rotating your Go-Pro videos, then the Internet has got a solution to your problem. There are various resources available on the web that facilitate the online rotation of your videos.
The Ezgif online video rotation is a handy tool. With it, you can flip your Go-pro video both horizontally and vertically. Not only that, but it also gives you the option of rotating your video at different angles. It supports various video formats like MP4, MOV, and many others.
You need to follow these simple steps to fix the orientation of your Go-Pro video.
- Upload your desired video file.
- You can also paste an URL.
- Select the rotation options and then click the Rotate video button.
Viola! Your new rotated video is there in no time.
- You will also see several options ranging from cropping the video to changing the speed of the video.
Pros:
- There would be no watermarks in the rotated version.
- The output of the created file is mostly similar to the pre-rotated video.
Cons:
- If you have poor internet connectivity, the conversion process may take a little longer than usual.
Conclusion
With the rising trend in the development of video editing tools, Go-pro Quik is not the only app for editing its videos. Whether you are a beginner or an intermediate, editing multimedia files has added spark to the creativity of the artists. You can add the desired rotation effects to yours.
Changing the rotation of your Go-Pro videos has been made easier due to the availability of user-friendly tools. These are available for all types of operating systems. Their interface is not complicated. Hence, it makes it easy for beginners to polish their video-editing skills.
By changing the orientation of your video, you can turn an ordinary video into a mesmerizing and cherishable lifelong memory. So be it an indoor or outdoor activity, enhance your video editing skills by playing with different orientations of your videos.
How Long Does It Take To Edit Videos
If you want to put together the pieces for online videos the number one thing most of the time takes is editing.
Why does editing take so much time and what to do for that?
- Too many choices.
It completely depends upon how many choices you are giving yourself while editing a video. It takes time to make choices. For example, if your friend asks you to buy a card (any card) from the store. You go into the store and start searching cards from more than 50000 cards, it takes time. On the other hand, if your friend asks you to buy a card for his uncle’s pet dog. This time it becomes easier for you to go straight and choose from the pet cards without moving around the birthday and anniversary cards.
- Amount of footage.
It depends upon how much footage you have on your edit and what kind of content you are editing. Some of the content is really complex and takes a lot of time like V-logging but at the same time, you may have content that requires very less edit or zero edit.
The video editing will become a slit and a quick process for you compared to what it was a few years back. But there are a few key things that really speed up the editing process.
I am going to discuss from beginning to end how to edit a video.
- Outline
You should take a paper and write down what you are going to say about your video. It would make your editing easy because you have already structured your content.
- Avoid distractions
While editing you make a flow state in which the editing process becomes easier. But when you got distracted it takes a lot of time to get back to that flow state.
- My kids are my big distraction so, I usually start my editing process after they go to bed. (You can set yours).
- Keep your phone away because it is another distraction that consumes most of your time.
- Don’t keep re-watching your video all the time. Usually, people edit the first clip and before starting to edit the second clip they watch the first clip. After that, they edit the second clip and then re-watch the first and the second clip. It is also wasting a lot of your time. Do it at the end.
How to Edit Video Faster with the Best Video Editor
Filmora 11 is one of the easiest to learn and one of the most beginner-friendly apps. It is available on both Mac and windows. You can download it for free to use its features. Now let’s get started to go deep down into the steps.
- Open the Filmora 11, a window will be opened.
- The Create Project is for a new project.
- You can change the Aspect Ratio coinciding with the social media platforms. Widescreen 16:9 is for TV or YouTube.
- You can use the previously made projects.
- To start with a new project hit the New Project.

In the user interphase, there are 3 basic sections.
- Editing tabs are at the top to change the formatting of the videos.
- Media tab is to Import videos or photos.
- Preview window to watch the editing process.
- Down here is the timeline where all the editing process takes place.

- Select the video from the system storage and drag it and drop it into the timeline.
- The video then be visible in the preview window.

You can split, cut, trim, delete, animate, and add effects and music. There are hundreds of editing features inside the menu bar that provide the edit controls and you can enjoy editing in the palm of your hand.
Here is an important feature you should know.
- Select the video and hit the speed
- You can select slow, fast, normal, and the most interesting one is speed ramping.
- Speed ramping allows you to set automatically made patterns to slow down then fast again slow. It will create a cinematic effect in the video. But this feature is only for paid users.

- Here is another very interesting tool the color correction tool. To get a uniform color in the combination of different clips, you can automatically set the color correction and color match.
- You can match the reference frame with the current to match their colors.

- Hit the File option and select the Save as Project.
- Now hit the Export tab to export the video. You can set the format of the video and the platform like YouTube, Instagram, Facebook, or any of them.

It will give you the fundamental framework for editing any video using Filmora 11.
1. Photos app for Windows 10.
I am going to show you how you can edit videos in Windows 10 using the app that comes with windows 10. Yes! Windows 10 include a free video editor and I am going to tell you step-by-step how to take advantage of it. If you are using windows 7 or windows 8 don’t feel let down, you can also create windows 10 totally free.
Microsoft has added the Photos app to Windows 10 and has added a fully functional video editor. You can do all sorts of things like trimming and splitting clips and re-organizing clips.

The great news is you don’t have to go out and buy a video editor or search for the video editor to download on your system instead if you are Windows 10 you already have some awesome software to edit your videos.
2. CapCut App for Android.
CapCut is the best video editing app, whether you are making videos for youtube, TikTok, Instagram, or Facebook. It is a free and all-in-one video editing app and you can use it without watermarks and annoying ads. The good thing about this app is, that it is very easy to use. Now let’s have a quick overview of the CapCut app.
- After opening your video select the clips you want to edit and here you will get a project timeline.

Here you can add, move or replace clips and can perform even more editing in the timeline.
You can split, trim, and delete

You can also apply some filters and adjustments. Adding text, stickers, and audio and the rest of the editing is just fun doing in CapCut. You can change the animation and style of your video in just a few clicks.

It also provides us with the Effects options.
- The video effects are effects on the entire video.
- The body effects are the effects applied only on the body.

Let’s enjoy its advanced features without paying for monthly subscription.
3. Davinci Resolve for Mac.
The Davinci Resolve is the most professional video editing software on Mac. It is absolutely ridiculous that it is giving access to you for free. Along with this, it is very professional video editing software that people used to create Hollywood movies and that kind of stuff. It provides a very easy and professional interphase that anyone can use without having training.
- The controls and features in the software are amazing and can edit videos frame by frame.

- There is also a dedicated area for audio creation.

- The motion graphics and

- A specific area just for color grading and color correcting.

That’s why the Davinci Resolve has got its name as a finishing application of movies. People come in and color grade their videos. As it is a very powerful software hence if you are working with an old computer and that’s not really a powerful computer, the Davinci Resolve would not be going to work properly for you.
It completely depends upon how many choices you are giving yourself while editing a video. It takes time to make choices. For example, if your friend asks you to buy a card (any card) from the store. You go into the store and start searching cards from more than 50000 cards, it takes time. On the other hand, if your friend asks you to buy a card for his uncle’s pet dog. This time it becomes easier for you to go straight and choose from the pet cards without moving around the birthday and anniversary cards.
- Amount of footage.
It depends upon how much footage you have on your edit and what kind of content you are editing. Some of the content is really complex and takes a lot of time like V-logging but at the same time, you may have content that requires very less edit or zero edit.
The video editing will become a slit and a quick process for you compared to what it was a few years back. But there are a few key things that really speed up the editing process.
I am going to discuss from beginning to end how to edit a video.
- Outline
You should take a paper and write down what you are going to say about your video. It would make your editing easy because you have already structured your content.
- Avoid distractions
While editing you make a flow state in which the editing process becomes easier. But when you got distracted it takes a lot of time to get back to that flow state.
- My kids are my big distraction so, I usually start my editing process after they go to bed. (You can set yours).
- Keep your phone away because it is another distraction that consumes most of your time.
- Don’t keep re-watching your video all the time. Usually, people edit the first clip and before starting to edit the second clip they watch the first clip. After that, they edit the second clip and then re-watch the first and the second clip. It is also wasting a lot of your time. Do it at the end.
How to Edit Video Faster with the Best Video Editor
Filmora 11 is one of the easiest to learn and one of the most beginner-friendly apps. It is available on both Mac and windows. You can download it for free to use its features. Now let’s get started to go deep down into the steps.
- Open the Filmora 11, a window will be opened.
- The Create Project is for a new project.
- You can change the Aspect Ratio coinciding with the social media platforms. Widescreen 16:9 is for TV or YouTube.
- You can use the previously made projects.
- To start with a new project hit the New Project.
In the user interphase, there are 3 basic sections.
- Editing tabs are at the top to change the formatting of the videos.
- Media tab is to Import videos or photos.
- Preview window to watch the editing process.
- Down here is the timeline where all the editing process takes place.
- Select the video from the system storage and drag it and drop it into the timeline.
- The video then be visible in the preview window.
You can split, cut, trim, delete, animate, and add effects and music. There are hundreds of editing features inside the menu bar that provide the edit controls and you can enjoy editing in the palm of your hand.
Here is an important feature you should know.
- Select the video and hit the speed
- You can select slow, fast, normal, and the most interesting one is speed ramping.
- Speed ramping allows you to set automatically made patterns to slow down then fast again slow. It will create a cinematic effect in the video. But this feature is only for paid users.
- Here is another very interesting tool the color correction tool. To get a uniform color in the combination of different clips, you can automatically set the color correction and color match.
- You can match the reference frame with the current to match their colors.
- Hit the File option and select the Save as Project.
- Now hit the Export tab to export the video. You can set the format of the video and the platform like YouTube, Instagram, Facebook, or any of them.
It will give you the fundamental framework for editing any video using Filmora 11.
1. Photos app for Windows 10.
I am going to show you how you can edit videos in Windows 10 using the app that comes with windows 10. Yes! Windows 10 include a free video editor and I am going to tell you step-by-step how to take advantage of it. If you are using windows 7 or windows 8 don’t feel let down, you can also create windows 10 totally free.
Microsoft has added the Photos app to Windows 10 and has added a fully functional video editor. You can do all sorts of things like trimming and splitting clips and re-organizing clips.
The great news is you don’t have to go out and buy a video editor or search for the video editor to download on your system instead if you are Windows 10 you already have some awesome software to edit your videos.
2. CapCut App for Android.
CapCut is the best video editing app, whether you are making videos for youtube, TikTok, Instagram, or Facebook. It is a free and all-in-one video editing app and you can use it without watermarks and annoying ads. The good thing about this app is, that it is very easy to use. Now let’s have a quick overview of the CapCut app.
- After opening your video select the clips you want to edit and here you will get a project timeline.
Here you can add, move or replace clips and can perform even more editing in the timeline.
You can split, trim, and delete
You can also apply some filters and adjustments. Adding text, stickers, and audio and the rest of the editing is just fun doing in CapCut. You can change the animation and style of your video in just a few clicks.
It also provides us with the Effects options.
- The video effects are effects on the entire video.
- The body effects are the effects applied only on the body.
Let’s enjoy its advanced features without paying for monthly subscription.
3. Davinci Resolve for Mac.
The Davinci Resolve is the most professional video editing software on Mac. It is absolutely ridiculous that it is giving access to you for free. Along with this, it is very professional video editing software that people used to create Hollywood movies and that kind of stuff. It provides a very easy and professional interphase that anyone can use without having training.
- The controls and features in the software are amazing and can edit videos frame by frame.
- There is also a dedicated area for audio creation.
- The motion graphics and
- A specific area just for color grading and color correcting.
That’s why the Davinci Resolve has got its name as a finishing application of movies. People come in and color grade their videos. As it is a very powerful software hence if you are working with an old computer and that’s not really a powerful computer, the Davinci Resolve would not be going to work properly for you.
Also read:
- Updated Use Mobile Phones to Shoot a Video Is Very Convenient Compare with Professional Cameras. In This Article, Well List You some Tips to Help Capture a High-Quality Video on Your Phone
- In 2024, How to Use Twixtor Effect to Create Super Slow-Motion Video?
- In 2024, How to Make a Vacation Slideshow in 5 Minutes
- 2024 Approved A Normal Video Brings More Editing Opportunities than a Slow-Motion One. This Text Explores How to Convert Slow Motion Video to Normal on iPhone
- New Detailed Steps to Rotate Videos in Lightworks
- Updated 2024 Approved How to Create Vintage Film Effect 1950S
- Updated 2024 Approved How to Create Cinematic Style Videos? Easy Guide for Beginners
- New 2024 Approved Make Super Easy Coin Magic With Filmora
- Learn How to Blur the Background in Adobe Premiere Pro with Our Quick and Simple Step-by-Step Instructions to Make Your Subject More Attention-Grabbing
- Updated In 2024, 15 Camera Shake Preset for Adobe Premiere Pro
- New Create True 3D Text Effects Using After Effects
- 2024 Approved Add Emoji to Linkedin Post – 5 Tips You Need to Know
- New 2024 Approved How To Use Virtual Green Screen to Shoot Video
- New 2024 Approved How to Add Text Behind Objects in Video
- Updated 2024 Approved 12 Top Picks of Video Enhancer Software
- New Create A Freeze Frame Sequence In Your Videos for 2024
- Updated In 2024, A Complete Guide to the Best Brand Story Videos |2023|
- How To Make a Timelapse in After Effects
- Do You Want to Know About the Photo Video Maker with Song? Are You Ready to Discover It in Detail? This Article Will Give You Valuable Insights on This Topic for 2024
- Updated In 2024, Edit FLV Video Files with FLV Editor Windows, Mac,Android, iPhone
- EasyHDR Review Is This a Good Choice to Create HDR for 2024
- New In 2024, How to Add Filter to Video in Premiere Pro?
- Updated In 2024, Adding Slow Motion in DaVinci Resolve A Comprehensive Overview
- Updated 2024 Approved 15 Best Free Cinematic LUTs for Your Film
- New 2024 Approved How to Add Subtitles in Canva?
- 2024 Approved This Article Talks About Pixel Art Wallpapers. It Gives Examples of Different Pixel Art to Show You How to Customize Your Own Pixel Art Wallpapers, and How to Make a Pixel Art Gif on Filmora
- Updated In 2024, 8 Unexpected Ways to Add Emoji to Photo Online
- New Turn Your Text Into a Podcast Made Possible for 2024
- New Thousands Already Know Ezgif and So Can You for 2024
- In 2024, How to Create a Clideo Slideshow Simply
- How to Use Color Grading in Final Cut Pro
- Tiktok Aspect Ratio Is a Crucial Element to Succeeding in the Tiktok Algorithm. Here Are some Suggestions to Improve Video Quality and Land on the for You Page for 2024
- How to Use Deep Fried Meme Maker
- New Fast Method to Match Color in Photoshop
- Create a Brand Video to Make Your Business Shine
- Updated 2024 Approved How to Find Free Online Slideshow Maker with No Watermark
- New In 2024, Split Audio From Video in Adobe Premiere Pro Step by Step
- Updated In 2024, How to Put Emoji on Mac That Take Less Than 10 Mins
- All You Need to Know About Transparent Logos and How You Can Make Them. Top Transparent Logos You Can Take Inspiration From
- Updated Hitfilm Express Video Editor Review for 2024
- 2024 Approved An Ultimate Guide to Flexclip Online Trimmer
- Full Guide to Unlock Your Oppo Find X7 Ultra
- How to use Pokemon Go Joystick on Honor V Purse? | Dr.fone
- In 2024, How to Mirror Your Xiaomi Redmi 12 5G Screen to PC with Chromecast | Dr.fone
- How Do You Get Sun Stone Evolutions in Pokémon For Xiaomi Redmi Note 12 Pro 5G? | Dr.fone
- In 2024, Hacks to do pokemon go trainer battles For Nokia C22 | Dr.fone
- In 2024, How to Fix iPhone 15 Plus Passcode not Working?
- Updated 2024 Approved Top 4 Morgan Freeman Voice Generator Tools for Voice Cloning
- How to Stop Life360 from Tracking You On Realme 10T 5G? | Dr.fone
- How to Restore Deleted Honor X7b Contacts An Easy Method Explained.
- How To Free Up Apple iPhone 7 Plus Space | Dr.fone
- How to Share Location in Messenger On Realme 12 Pro+ 5G? | Dr.fone
- In 2024, How to Change Netflix Location to Get More Country Version On Apple iPhone 13 Pro | Dr.fone
- Repair broken or corrupt video files of ZTE Nubia Z60 Ultra
- In 2024, Best Motorola Moto G04 Pattern Lock Removal Tools Remove Android Pattern Lock Without Losing Data
- Sim Unlock OnePlus 11R Phones without Code 2 Ways to Remove Android Sim Lock
- How to Upgrade iPhone 6 without Losing Data? | Dr.fone
- In 2024, How Do You Get Sun Stone Evolutions in Pokémon For Nubia Red Magic 8S Pro? | Dr.fone
- How to unlock iPhone 15 Pro Max without passcode
- In 2024, Downloading SamFw FRP Tool 3.0 for Infinix Smart 8
- In 2024, Top 11 Free Apps to Check IMEI on Samsung Galaxy XCover 7 Phones
- In 2024, How to Detect and Remove Spyware on Nokia C210? | Dr.fone
- 6 Proven Ways to Unlock Itel P55T Phone When You Forget the Password
- How to Find iSpoofer Pro Activation Key On Xiaomi 14 Ultra? | Dr.fone
- Can You Unlock iPhone 15 Pro Max After Forgetting the Passcode?
- Samsung Galaxy A23 5G Not Receiving Texts? 10 Hassle-Free Solutions Here | Dr.fone
- How to Unlock iPhone 8 Plus With an Apple Watch & What to Do if It Doesnt Work | Dr.fone
- In 2024, A Complete Guide To OEM Unlocking on Vivo Y100t
- The 6 Best SIM Unlock Services That Actually Work On Your Samsung Galaxy XCover 6 Pro Tactical Edition Device
- Will iSpoofer update On Vivo V27 Pro | Dr.fone
- How to Spy on Text Messages from Computer & Xiaomi Redmi Note 13 Pro 5G | Dr.fone
- How to Transfer Photos from OnePlus 11R to Laptop Without USB | Dr.fone
- In 2024, How to Track Vivo T2 Pro 5G Location without Installing Software? | Dr.fone
- Best 3 Honor Magic 5 Lite Emulator for Mac to Run Your Wanted Android Apps | Dr.fone
- In 2024, Is Fake GPS Location Spoofer a Good Choice On Apple iPhone XS? | Dr.fone
- In 2024, How Can I Catch the Regional Pokémon without Traveling On Google Pixel Fold | Dr.fone
- How to Fake GPS on Android without Mock Location For your Infinix Note 30 VIP | Dr.fone
- How to Factory Reset OnePlus 11 5G in 5 Easy Ways | Dr.fone
- In 2024, How to Change Location On Facebook Dating for your Oppo K11 5G | Dr.fone
- Title: New 2024 Approved Full Guide to Funcall Voice Changer and Its Alternatives
- Author: Chloe
- Created at : 2024-04-24 07:08:42
- Updated at : 2024-04-25 07:08:42
- Link: https://ai-editing-video.techidaily.com/new-2024-approved-full-guide-to-funcall-voice-changer-and-its-alternatives/
- License: This work is licensed under CC BY-NC-SA 4.0.
