
New 2024 Approved Guide To Creating the Best Video Collages
Guide To Creating the Best Video Collages
By the combination of multiple videos together, you can create a studio-friendly video collage. Several types of collage videos are on the web, such as overlays, grids, split-screen, sequential, and more. If you are a startup business, you need to be aware of the effectiveness of video collages. It helps in showing more information in a limited time.
By the end of this discussion, you will know how to make a video collage with music without investing extra time and effort. Besides this, we will also guide you in making captivating video collages with Filmstock.
Part 1: What Is The Purpose of Using Video Collages?
Video collages serve various purposes according to the user’s needs. It helps create multiple creative video clips or images into a single composition. Some of the objectives of video collages are mentioned below that can be very helpful to you:
Visual Storytelling
If you want to convey your story or a message to the world, you can use video collages to present your story sequentially through video clips and images. Visual storytelling can be found in various mediums, including films, television, etc. The video collage technique helps you to create a showcase of your different moments. It includes event highlights or memories with friends or families.
Online Platforms
Video collages are one of the most popular formats of content creation on social media. It is because it allows you to share multiple moments, highlights, and scenes to engage your audience from different angles. This format is very popular with students because they can create and share their multiple moments in a single video.
Complementary Content
You can create contrasting content that conveys your message or theme using video collages. You can create a perfect comparison by using different images and videos side-by-side. Moreover, using this method, you can create amazing video content and stand out if you are a video editor.
Increasing Screen Coverage
Video collages allow you to present your content in a way that can use the maximum screen. It gets great when you have limited space and time to showcase your multiple visuals. You can optimize the available space and provide a comprehensive content view. Get this done by selecting and arranging the visual content carefully.
Video Collage Editor A powerful video editor helping you make a video collage without investing extra time and effort!
Free Download Free Download Learn More

Part 2: Filmstock: A Great Resource For Getting Video Collage Template
Have you understood the purpose of using video collages for managing memories? You will require a resource for creating the best video collages. Having a template makes things extremely easy to cover in video editing. Wondershare provides the option of using Filmstock , a dedicated resource for getting video collage templates. You can find everything in Filmstock to make a video collage, from effects to videos and audio.
The entire collection provided in Filmstock is highly sophisticated and coherent. It truly makes procession easy and convenient for users who are interested in video editing. While finding the best effects for Filmora, you can also observe great resource packs for Adobe After Effects. The entire resource is categorized into different sections, making it easy for you to navigate content.
Working with Filmstock is easy and effective when combined with Filmora. You can also immerse yourself in 3D content within this resource website. When it comes to creating collage videos, you can get help from the templates available at Filmstock.

Part 3: Wondershare Filmora: Create The Finest Video Collages Through Filmstock
By consulting Filmstock, you are now aware of how to get the best video collage templates from the platform. After finding one for your work, you can go to Wondershare Filmora to create and edit the video collage. It features a unique video editing platform for its users, giving a diversity of options to work with.
Free Download For Win 7 or later(64-bit)
Free Download For macOS 10.14 or later
From editing the video to managing its audio, you can perform all tasks on Filmora with ease. Unlike other video editors, Wondershare Filmora does not make it difficult for you to edit videos. Its structure is designed to make operations easy for all kinds of users who are in video editing. To know more about how Filmora makes things easy in creating the finest video collages, learn more about its features below:
1. Motion Tracking
If your video collage has a specific element that needs to be tracked, you can utilize the services of motion tracking . With a single click, you can track the motion of an object and make it the center of the video.
2. Adjustment Layer
Users working on specific video content require dedicated presets for their work. They can create adjustment layers for color grading, presets, and perform other operations.
3. AI Copywriting
Those who are creating specific social media content can utilize the services of AI copywriting powered by ChatGPT. All you must do is provide a prompt, after which they can create the perfect content for their video collage.
4. Speech-To-Text
If your video collage needs to be induced with subtitles, the service of Speech-to-Text works perfectly on Filmora. Users can get the best subtitles in a single click, with an accuracy of more than 95%, making it a great tool.

Part 4: Step-by-Step Guide: Creating Video Collages Through Filmstock
Filmstock is a resource library where you can access diversified templates for several things. It also helps you access the attractive video collage template. With that template, you can make optimistically impressive video collages. You can access the collages on versatile ranges and utilize them as needed.
You must be thinking that it is not easy to make video collages with Filmstock. However, it is not true, and you can see it for yourself from the below-given instructions:
Filmora Tutorial - Create a Photo Sliding Birthday Intro | Filmora Creator Academy
Free Download For Win 7 or later(64-bit)
Free Download For macOS 10.14 or later
Step 1Open Filmstock and Select Video Collage
Access Filmstock on your device and go to “Search Bar.” From here, search for Video Collages, continue to select one template, and click the “Download” button. Once the template is downloaded, launch Filmora and import your video clips.

Step 2Make a Video Collage
Next, drag the clips to the timeline and go to “Effects.” Locate the desired effect and drag it on the video in “Timeline.” Once done, select the “Transitions” icon and drag the transition in videos in “Timeline.” You can also customize the additional parameters from the adjustment section.

Step 3Preview and Export Video Collages
Make sure to click the “Play” icon to preview the results. When satisfied with the results, hit the “Export” button. Manage the export settings in the next window, and again select “Export.”

Bonus Part: Creating Slideshows Using Wondershare Filmora
Do you know that Wondershare Filmora can also be used to create slideshows? In this part, we will be discussing the details of how to create slideshows using Filmora. Look through the steps below to understand things that need to be investigated while creating slideshows:
Filmora Tutorial - Edit a Fast Slideshow Intro
Free Download For Win 7 or later(64-bit)
Free Download For macOS 10.14 or later
Step 1Launch Wondershare Filmora
On opening Wondershare Filmora on your computer, continue to select the “New Project” button. This opens a new screen where you can import the content for the slideshow on Filmora. Select the “Import” option to add the media content for the slideshow. After importing the media content, drag and drop it on the timeline.

Step 2Add Effects to Slideshow
Once the media content is imported for the slideshow, continue to add effects to your video editing canvas. You can proceed to the “Effects” tab and add your appropriate choice.

Step 3Add Transitions and Titles
Following this, you can also look to add “Transitions” to your work. This can be done by accessing the options from the top of the screen. You can add “Titles” to your slideshow to create the best content.

Step 4Export Final Slideshow from Filmora
Once you are done with this, lead to the “Export” option to save the created slideshow on Filmora. Set the parameters for the video and click “Export” on the window to execute the process.

Conclusion
This article has provided viewers with an idea of how to create the best video collages with the right platforms. Filmstock, which offers resources for video collage templates, has been discussed. Along with that, Wondershare Filmora has been displayed as the best option for making video collages of the finest quality. If you wish to create perfect video collages, work on the details to get the best results.
Free Download Free Download Learn More
Part 2: Filmstock: A Great Resource For Getting Video Collage Template
Have you understood the purpose of using video collages for managing memories? You will require a resource for creating the best video collages. Having a template makes things extremely easy to cover in video editing. Wondershare provides the option of using Filmstock , a dedicated resource for getting video collage templates. You can find everything in Filmstock to make a video collage, from effects to videos and audio.
The entire collection provided in Filmstock is highly sophisticated and coherent. It truly makes procession easy and convenient for users who are interested in video editing. While finding the best effects for Filmora, you can also observe great resource packs for Adobe After Effects. The entire resource is categorized into different sections, making it easy for you to navigate content.
Working with Filmstock is easy and effective when combined with Filmora. You can also immerse yourself in 3D content within this resource website. When it comes to creating collage videos, you can get help from the templates available at Filmstock.
Part 3: Wondershare Filmora: Create The Finest Video Collages Through Filmstock
By consulting Filmstock, you are now aware of how to get the best video collage templates from the platform. After finding one for your work, you can go to Wondershare Filmora to create and edit the video collage. It features a unique video editing platform for its users, giving a diversity of options to work with.
Free Download For Win 7 or later(64-bit)
Free Download For macOS 10.14 or later
From editing the video to managing its audio, you can perform all tasks on Filmora with ease. Unlike other video editors, Wondershare Filmora does not make it difficult for you to edit videos. Its structure is designed to make operations easy for all kinds of users who are in video editing. To know more about how Filmora makes things easy in creating the finest video collages, learn more about its features below:
1. Motion Tracking
If your video collage has a specific element that needs to be tracked, you can utilize the services of motion tracking . With a single click, you can track the motion of an object and make it the center of the video.
2. Adjustment Layer
Users working on specific video content require dedicated presets for their work. They can create adjustment layers for color grading, presets, and perform other operations.
3. AI Copywriting
Those who are creating specific social media content can utilize the services of AI copywriting powered by ChatGPT. All you must do is provide a prompt, after which they can create the perfect content for their video collage.
4. Speech-To-Text
If your video collage needs to be induced with subtitles, the service of Speech-to-Text works perfectly on Filmora. Users can get the best subtitles in a single click, with an accuracy of more than 95%, making it a great tool.
Part 4: Step-by-Step Guide: Creating Video Collages Through Filmstock
Filmstock is a resource library where you can access diversified templates for several things. It also helps you access the attractive video collage template. With that template, you can make optimistically impressive video collages. You can access the collages on versatile ranges and utilize them as needed.
You must be thinking that it is not easy to make video collages with Filmstock. However, it is not true, and you can see it for yourself from the below-given instructions:
Filmora Tutorial - Create a Photo Sliding Birthday Intro | Filmora Creator Academy
Free Download For Win 7 or later(64-bit)
Free Download For macOS 10.14 or later
Step 1Open Filmstock and Select Video Collage
Access Filmstock on your device and go to “Search Bar.” From here, search for Video Collages, continue to select one template, and click the “Download” button. Once the template is downloaded, launch Filmora and import your video clips.
Step 2Make a Video Collage
Next, drag the clips to the timeline and go to “Effects.” Locate the desired effect and drag it on the video in “Timeline.” Once done, select the “Transitions” icon and drag the transition in videos in “Timeline.” You can also customize the additional parameters from the adjustment section.
Step 3Preview and Export Video Collages
Make sure to click the “Play” icon to preview the results. When satisfied with the results, hit the “Export” button. Manage the export settings in the next window, and again select “Export.”
Bonus Part: Creating Slideshows Using Wondershare Filmora
Do you know that Wondershare Filmora can also be used to create slideshows? In this part, we will be discussing the details of how to create slideshows using Filmora. Look through the steps below to understand things that need to be investigated while creating slideshows:
Filmora Tutorial - Edit a Fast Slideshow Intro
Free Download For Win 7 or later(64-bit)
Free Download For macOS 10.14 or later
Step 1Launch Wondershare Filmora
On opening Wondershare Filmora on your computer, continue to select the “New Project” button. This opens a new screen where you can import the content for the slideshow on Filmora. Select the “Import” option to add the media content for the slideshow. After importing the media content, drag and drop it on the timeline.
Step 2Add Effects to Slideshow
Once the media content is imported for the slideshow, continue to add effects to your video editing canvas. You can proceed to the “Effects” tab and add your appropriate choice.
Step 3Add Transitions and Titles
Following this, you can also look to add “Transitions” to your work. This can be done by accessing the options from the top of the screen. You can add “Titles” to your slideshow to create the best content.
Step 4Export Final Slideshow from Filmora
Once you are done with this, lead to the “Export” option to save the created slideshow on Filmora. Set the parameters for the video and click “Export” on the window to execute the process.
Conclusion
This article has provided viewers with an idea of how to create the best video collages with the right platforms. Filmstock, which offers resources for video collage templates, has been discussed. Along with that, Wondershare Filmora has been displayed as the best option for making video collages of the finest quality. If you wish to create perfect video collages, work on the details to get the best results.
How to Uue Adobe Lightroom Color Grading
The main focus of color grading is changing the colors and tones in your photographs. Recent updates to Lightroom and Photoshop’s color grading functionality have improved its use and increased its capabilities. Color grading is ideal for giving your photograph a bit extra interest and improving the lighting.
All forms of photography benefit from and depend on color grading. The color grading tools in Lightroom and Photoshop will be especially appreciated by landscape and portrait photographers. If you’re wondering what happened to split toning, it was replaced by the Color Grading module, which is why split toning is now referred to as color grading.
1. Getting to Color Grading
Select the photo you want to modify and go to the develop module in Lightroom to access the Color Grading tool. Then, move your cursor down to the Color Grading menu on the right side of the screen. To see three separate color wheels, choose this.
The same choices are available in Photoshop’s Camera Raw Filter. Simply scroll down on the right side of the screen once you’ve opened a photo in the Camera Raw Filter until you see Color Grading. The process of color grading is identical in Photoshop and Lightroom. I’ll be using Lightroom to demonstrate the example photographs for the purposes of this blog article.
2. How to Use Color Grading
The first thing you’ll notice is that there are actually three identical color wheels. Each color wheel, though, has a distinct purpose. Midtones are controlled by the top wheel, shadows, and highlights by the left and right wheels, respectively.
Before moving on to the color grading stage, it’s crucial to notice that you should balance the temperature and tint of your image. Instead of balancing the colors to create the image, color grading is a technique for enhancing the colors in the image.
Avoid using the midtones color wheel when using the Color Grading tool for the first time. First, try modifying only the highlights and shadows wheel. Warm hues in the highlights and cold colors in the shadows appear great in the majority of photographs. However, when using these sliders to create some truly incredible photos, you may let your creativity run wild!
I’ve added some yellow (warmth) to the highlights and some blue (coolness) to the shadows in this particular example. As a result, the sunlight in my image appears to be very warm and inviting, and the shadows take on a colder, bluer appearance.
The color wheels are actually fairly easy to use. To select a color, merely click and drag it anywhere on the color wheel. The color will become stronger the further you are from the circle’s center. Each circle has a hidden slider bar underneath it. This modifies the related color wheel’s brightness value. In other words, you can brighten or darken the highlights by adjusting the bar underneath the highlights color wheel. The ability to quickly change the brightness levels in the highlights, shadows, or midtones is a convenient feature.
Blending and balancing are the other two parameters that you can modify. You can alter how well the color in the highlights, midtones, or shadows blend with one another with the blending slider. The colors will blend in more naturally by moving the blending slider higher.
The amount of the image that is judged to be in the highlights, shadows, or midtones can be changed with the balance slider. For instance, if I move the balance slider to the right, less of the highlights will show the adjustment. Only the highlights with the highest brightness will be affected by the change.
3. HSL/Color Panel
Move to the HSL/Color Panel, which stands for Hue, Saturation, and Luminance, after your image is ready to use. It is located under Tone Curve in the Develop Panel. This adjustment panel, in contrast to the ones stated before, will let you change different colors in your image independently of one another. Hue, Saturation, and Luminance are the three modifications that each color will receive.
4. Hue
Hue is measured in terms of the color wheel’s degrees. It’s possible to change the color’s real shade in this panel. For instance, you can modify the turquoise or blue to a more greenish tone if your scenario is a beach (as in our example photo). It’s advisable to begin making adjustments to your panel’s Hue before moving on to the others.
5. Saturation
The strength of the hue is known as saturation. (Remember that this HSL panel modification only affects the saturation of individual colors, not the saturation of the entire image.) In order to achieve a more subdued, muted appearance for this example, I reduced the Saturation on the aqua, blue, and green hues. To increase the intensity of your shot, you can do the exact reverse. Find the tweaks that suit your photo and the appearance you want to achieve best.
6. Luminance
Each color’s luminance measures how brightly it reflects light. Use this tool to brighten or darken specific areas of your image (it works especially well to provide contrast to black and white images). To make the water and sky behind the model darker in this example photograph, I decreased the Luminance setting on the aqua panel.
7. Adjustment Brush
Further isolate a section of your image using the Adjustment Brush so that you can change the Hue and any other parameters you like. Your Adjustment Brush is the final brush icon on the top of your editing panel. Adjust your Hue and begin painting on your image where you wish to change the color to begin color grading.(At the bottom of the Adjustment Brush Panel, you can adjust the brush’s size or feathering.)
This is perfect if you only want to edit one part of your shot. You can keep using the adjustments after you’ve painted your image to witness more changes as they happen in real time.
Here are a few tips to set you on the correct course because color grading might take some time and practice to master. Shooting in RAW will give you the most dynamic control over your colors, so be sure to do this. Try your best to start with a good photograph and to alter your default settings so that the canvas is even. Use color psychology to visually transmit the mood or feeling you wish to portray through color grading.
Utilize each panel to practice and experiment. There is no right or wrong method to color grade; it all depends on how you want your photographs to look stylistically. Press the Reset button in the right -hand corner of your panel to return to your original image.
Free Download For Win 7 or later(64-bit)
Free Download For macOS 10.14 or later
Free Download For macOS 10.14 or later
How to Add Motion Titles
Do you want to make your videos eye-catching instantly? Looking for some cool title animations to make your texts stand out? You should definitely opt for motion title templates that are widely available in popular video editors. Motion title templates come preloaded with animated texts, engaging graphic elements, and even background effects.
You can add them directly to your video and customize them as per you requirements so that your video looks exactly the way you desire. Different video editors have different motion titles, and therefore, you should check them out one by one to find out the templates you are looking for. We will illustrate title motion graphics in all the leading video editors.
Part 1. Add Motion Title with Filmora
The easiest way to add motion title to your video on your computer is through Wondershare Filmora . Filmora is a professional video editor that is available for Windows and Mac users. Filmora has the best collection of motion title templates, and the user interface is super intuitive and anyone can use without any prior experience. Here are the steps to add motion title with Filmora.
Step1Install and launch Wondershare Filmora on your computer. Click on New Project option on the welcome screen or go to File menu and click on New Project option.

Step2Go to File menu and Import Media option to import your video file. Otherwise, you can simply drop the video file into Project Media folder.
Step3Drag the video file from Project Media folder and drop it into the Timeline.

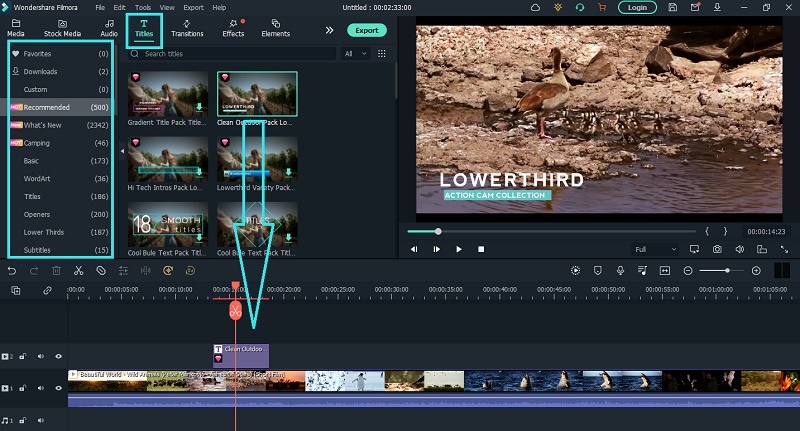
Step4Go to Titles at the top and go to the left panel. You can different categories of motion title templates. Select any desired text effect and drop into the Timeline above the video layer wherever you want.
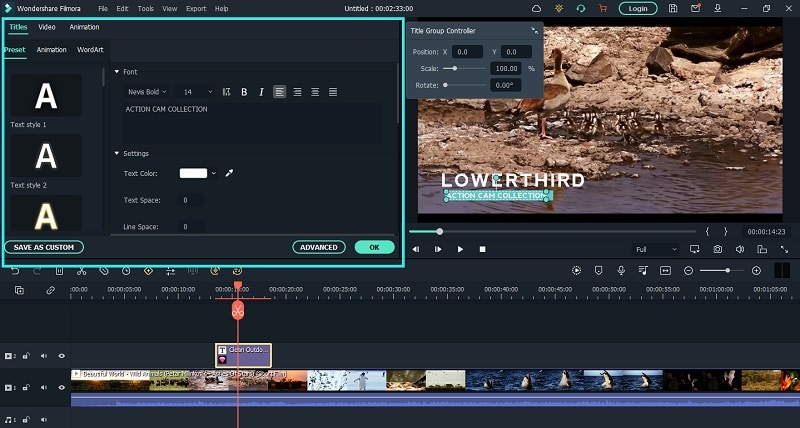
Step5Double clicking on the text layer on Timeline to edit the text and change the styles. Under Preset tab, you can change font, size, and color. Finally, click on OK button to save the edits done.
Part 2. Add Motion Title with Premiere Pro
Adobe Premiere Pro is a renowned video editor that is mostly used by professionals to edit videos and add effects and animations. Even though Premiere Pro has a steep learning curve, you can create motion title in simple steps. You can write any text on the video and select from different effects and animations to create motion title graphics. Here are the steps to add title motion graphics Premiere Pro free.
Step1Launch Premiere Pro and go to New> Project option. Import the video file and drop it into Timeline.
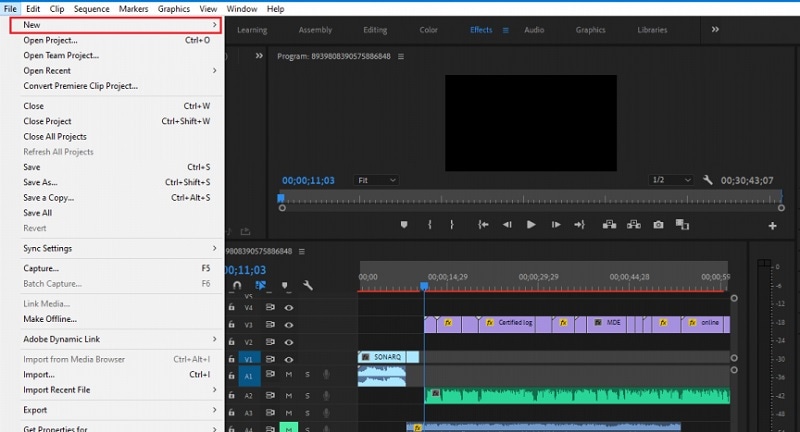
Step2Go to Title> New Title> Default Still option and follow the on-screen instructions.

Step3You will see different types of title styles and designs to choose from as you feel.

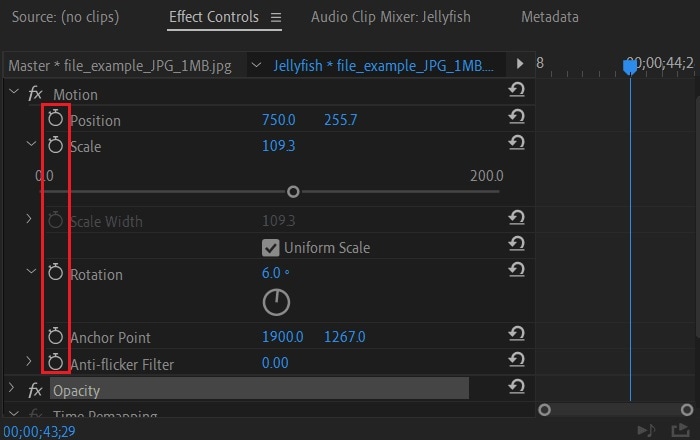
Step4Click on Type Tool option and click on the area on the video where you want the text to appear. You can customize them from the right panel from Title Styles, Title Properties, Tools and Title Actions.
Step5To add motion to the title, click on Effects Control window. Click on any desired animation and turn to Stopwatch icon to apply the effect to the text. There is a dedicated Motion option available.
Part 3. Make motion title with Studio
Studio is a popular video editing software where you can not only apply motion title presets but also create motion title presets from scratch. The reason why video editors choose Studio is because it allows users to customize everything and create different templates and animations for personalization. Here are the steps to create title motion graphics in Studio as per your requirements.
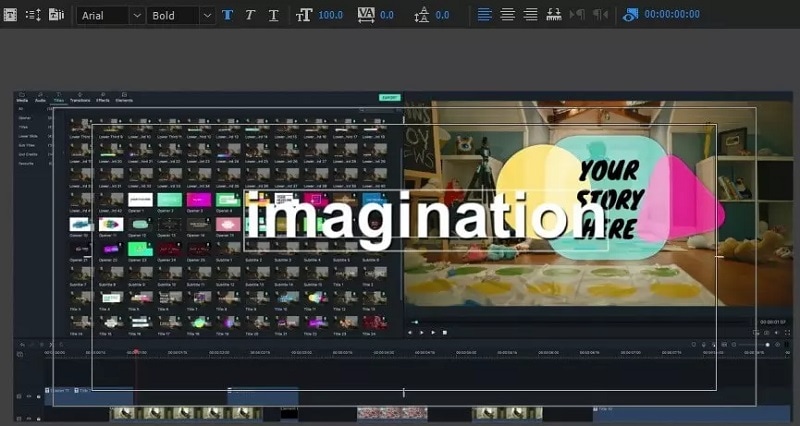
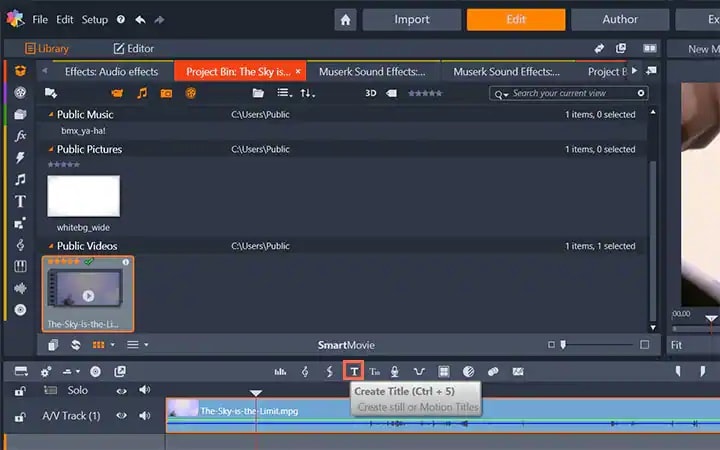
Step1Launch Studio. Import your video file, and you can import single frames such as images from a live video for stop motion titles. Once you have imported, go to the header bar above the Timeline. Click on Create Title option to open Title Editor to create title motion.
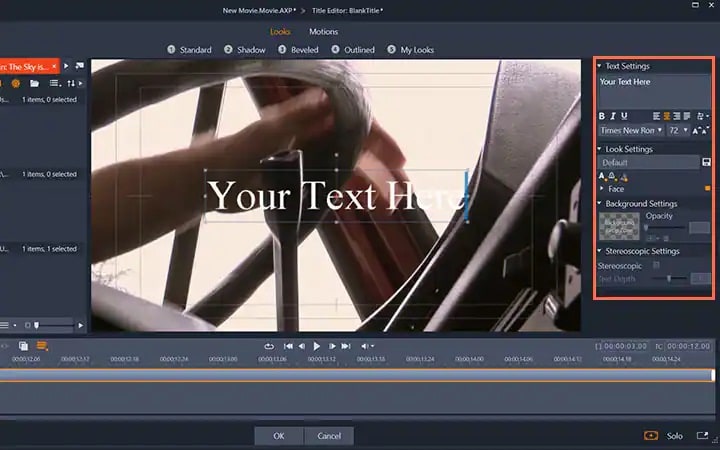
Step2Add your preferred text under Title Editor and adjust font, size, and style as you feel. Go to the right side to make changes to Look, Background, and Stereoscopic Settings to get the perfect text style from the wide range of choices available.
Step3Click on Motion option at the top to add motion to the text. Choose from the different motion title templates as per your preference.
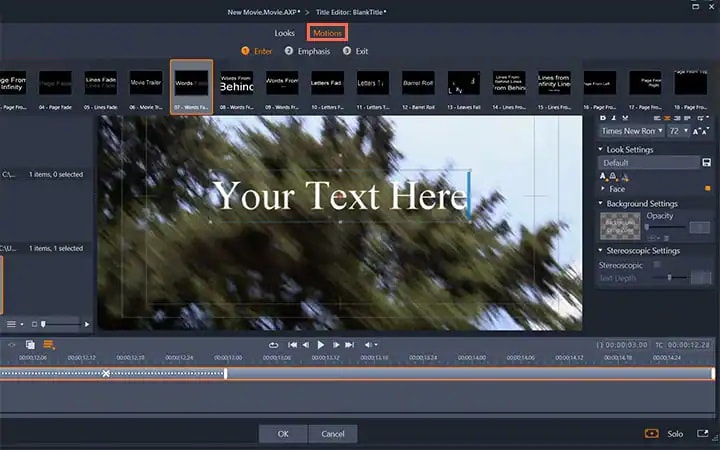
Step4You can adjust the duration of the motion effect from the right panel and click on Ok button.

Part 4. Add Motion Title with WeVideo
WeVideo is a popular online video editor that you can use to add title motion graphics Premiere Pro free. You can find many motion titles on WeVideo for free like you get in Premiere Pro and there are many exclusive motion text templates available. You need to create a free account with WeVideo to get started. You can create your video from scratch by selecting from the available video templates. You can even import your recorded video and add motion texts and animations as per your preference. Here are the steps to add motion title with WeVideo.
Step1Open your web browser and visit “wevideo.com”. Click on Try For Free button. Sign up for free and go to WeVideo video editor.

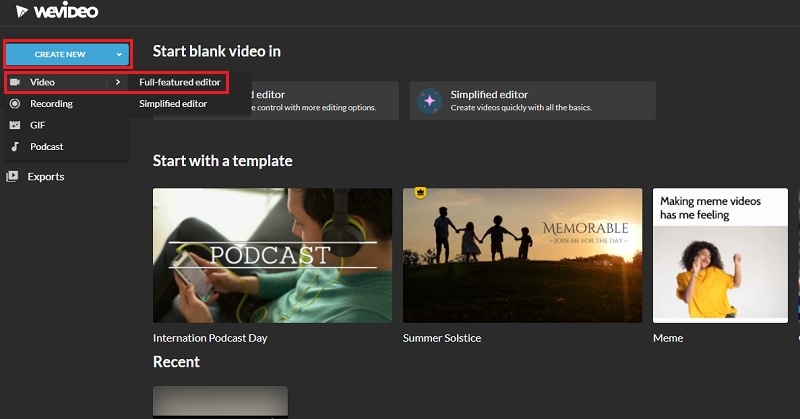
Step2Click on Create New button and select Video option. Click on Full-featured editor option.
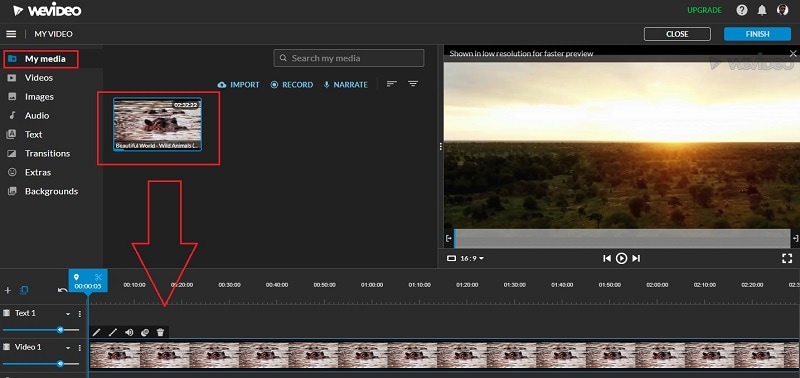
Step3Drag and drop your video file into My Media folder and bring it to Timeline.
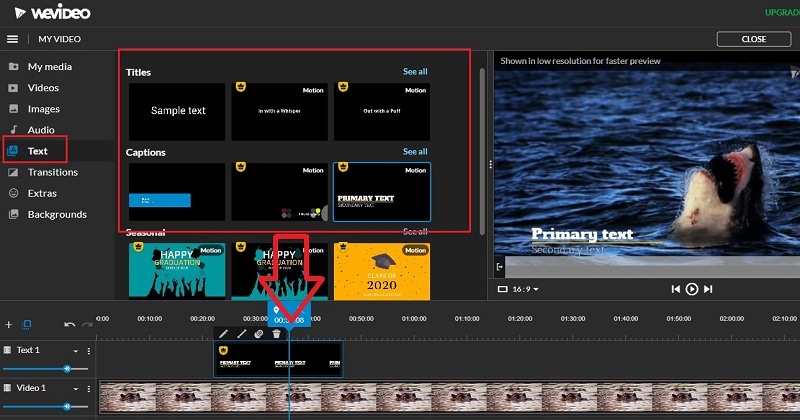
Step4Go to Text tab and you will see all the motion animated titles under Titles section. Click on them to check out their previews in Viewer. If you have selected anyone, drag and drop it into Timeline.
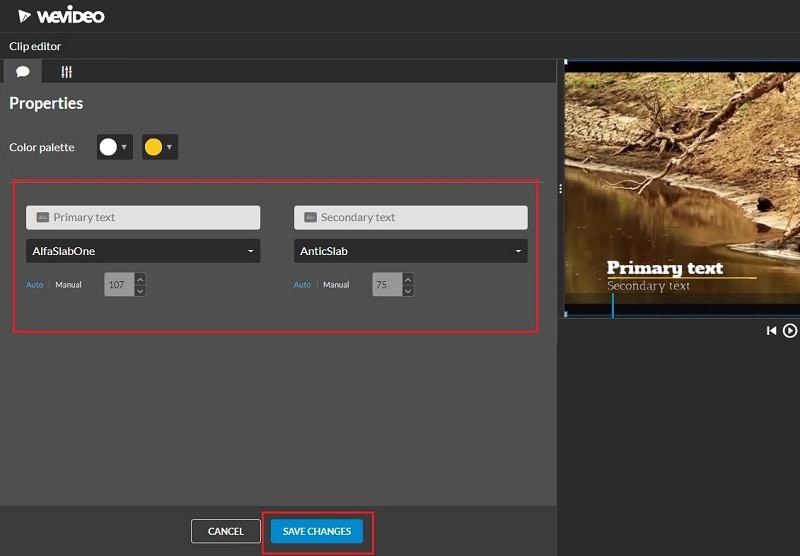
Step5Adjust the position where you want the title to appear on the video and stretch the duration as required. Double-click on the title to edit and customize it as per your preference. Finally, click on Save Changes button.
The Bottom Line
Motion titles are extremely important for any video because they bring in a variety to your video. They make the video eye-catching and help in getting the message across by grabbing the attention of the viewers. We have illustrated how to add motion titles Premiere Pro and Studio. You can also use WeVideo online video editor. We recommend Wondershare Filmora for its extensive collection of motion title templates to choose from and apply to your text.
Free Download For Win 7 or later(64-bit)
Free Download For macOS 10.14 or later
11 Ways To Radial Blur To Images (iPhone/Android/Mac/Windows)
Radial blur is an effect you can use to create a sense of movement, emphasize parts of an image, add visual interest to a scene, or make a subject stand out. There are multiple apps and software programs available to achieve this effect.
But if you don’t know where to start, we’ll show you 11 ways to create radial blur images on your iPhone, Android device, Mac, or Windows PC. With these tools, you can quickly recreate your pictures to make them unique by adding visual interest.
How To Make A Radial Blur Effect On iPhone And Android?
Below we’ve provided a list of 5 apps that can help you make a radial blur photo effect on your iPhone or Android devices.
1. Design Blur: Radial Blur
Design Blur: Radial Blur is a free app available on the Play Store for Android devices that lets you add a sense of motion and depth to your picture by applying the radial effect with just a few taps.

Download:Android
Key features:
- Mainly devoted to creating radial blur and motion blur effects.
- Includes a camera to help you instantly take pictures and apply radial effects.
- Option to revert to your original picture if you don’t like the effects.
- Easier to remove the radial blur effect from parts of your image.
- Supports changing the intensity of the effect.
Pros
- Includes a redo and undo option
- Free to use
- User-friendly UI
- Applies the effect instantly
Cons
- Includes ads
2. DSLR Camera Blur Effects
With the DSLR Camera Blur Effects app, you can instantly apply a more natural-looking radial motion blur effect to your images to give them a more professional appearance. The app offers multiple image-blurring tools and adds a DSLR-like finish to your photos.

Download: Android
Key Features
- Import photos from your phone’s gallery or take a new one using the app’s camera option.
- Options to crop your image before uploading.
- Multiple types of blur effects to choose from, such as motion blur, gaussian blur, line blur, box blur, and pixel blur.
- Can change the focus from auto to circular, linear, freestyle, point focus, or point blur.
Pros
- Simple and fast to use
- Available for free
- Draws around the subject
- A quick social sharing option is available
Cons
- Shows multiple ads
- Adds a watermark to your final image
3. Image Radial Blur
The Image Radial Blur is another user-friendly app designed to create radial blur effects for Android users and has a range of blur strengths, types, and focus options, so you can create the exact look you want.

Download:Android
Key Features
- Two Focus Move options and two blur types to choose from.
- Adjusts the strength of the radial blur on your image.
- Instantly applies the radial blur effect.
Pros
- Free and easy to use
- Applies the effect with one tap
- Comes with a quick social sharing option
- Excellent UI
Cons
- Displays ads
4. Picsart
Picsart is a powerful photo editing app that lets you create beautiful images by removing backgrounds, adding text and radial blur or other effects, and even creating collages.

Key Features
- All-in-one photo and video editor.
- Supports creating slideshows, and collages, adding subtitles to your video, and more.
- Labeled as “Editor’s Choice” on Google Play Store.
- Blur parts of an image, its background, the subject’s face, or a complete photo.
Pros
- Available for free
- AI select auto-detect blur feature
- Perfect for quick and easy edits
- Gives a professional touch to images
Cons
- The app lags sometimes
5. Affinity Photo
Affinity Photo is an award-winning photo editor available for iPads offering desktop-grade basic and advanced editing tools, including the Radial Blur effect.

Download: iOS
Key Features
- Available for a one-time purchase of $2476.20.
- Creates the radial effect in concentric circle lines, giving your images a sense of rotation.
- Brings the focus point in your pictures to life.
Pros
- Creates unique motion blur effects
- Offers other editing options
- Desktop-grade editing
Cons
- No image organization feature is available
6 Ways To Radial Blur Your Images On Windows And Mac
Here are our top 5 recommended tools to radial blur your images on Windows and Mac:
1. Wondershare Filmora
Free Download For Win 7 or later(64-bit)
Free Download For macOS 10.14 or later
Price: Starts at $7.99 per month
Support System: Windows 11 and below & macOS 10.14 - macOS 12
Wondershare Filmora is an editing software recommended by many content creators and is available for Windows and macOS. The software comes with various features such as speed ramping, screen recording, a library of royalty-free music, radial blur, keyframing, numerous filters, effects, & preset templates, motion tracking, title editing, and more.
To create a radial blur effect on your photos using the Wondershare Filmora software, do the following steps:
Step1 Visit the Filmora website and download the file, depending on your system. Install the software and launch it. Click the “Create New Project” option and drag & drop your file.

Step2 Head to the “Effects” tab, choose the Tilt-shift Circle for the radial blur effect and drop it in the timeline.

Step3 Double-click the effect in the timeline and configure the size, X-axis, Y-axis, and intensity. That’s about it. You can now export your file by clicking the “Export” option.
2. Final Cut Pro
Price: $299.99/perpetual license
Support System: macOS 11.5.1 or later

Final Cut Pro is an editing software designed for Mac systems and has everything you need to create high-finished videos. This software program offers a wide range of features, including a timeline, proxy editing, Multicam editing, and support for 4K and HDR footage.
With Final Cut Pro, you can instantly apply the radial blur effect to your images and adjust it using various parameters in the Filters Inspector section, such as Center, Angle, Crop, and Mix.
3. Adobe Photoshop
Price: US$20.99/month
Support System: macOS and Windows

As one of the most popular and advanced photo editing software in the digital market, Adobe Photoshop is packed with high-end features and is used by many professionals as well as graphic designers to create stunning radial blur effects in their projects.
To add the radial blur effect on your images using Adobe Photoshop, start with converting your background image into a Smart Object and go to the “Filters” tab. Next, select “Blur” and click “Radial Blur.” Finally, you can set the parameter in the radial blur window to adjust the effect.
4. Paint.NET
Price: Free
Support System: Microsoft .NET 6, Windows XP, Vista, 7, & 8, and needs a 64-bit Windows processor

Paint.NET is an easy-to-use software developed on the .NET framework and is only compatible with Windows PCs. The software is free and has an innovative interface for novice users to create stunning image editing projects in no time.
Paint.NET also lets you quickly create the radial blur image effect using its blur effects. You can even configure the angle, center, and quality of the effect.
5. BCC FX Editor
Price: $175 per month
Support System: macOS Mojave 10.14

Yet another powerful software is the BCC FX Editor, designed with an intuitive interface where you can quickly apply the BCC+ Radial Blur effect around a specific point in your pictures.
The software also offers various parameters to help you adjust the effect on your image. These include GPU rendering, blur type, center, radial amount, rotation amount, falloff, smooth mode, edge mode, apply mode, and more.
6. VideoPad Video Editor
Price: Free, and the premium version starts at $23.16 quarterly
Support System: Windows 10, XP, Vista, 7, 8, and 8.1

Designed for Windows systems, the VideoPad Editor is an intuitive and fast software program that can help you quickly add the radial blur effect to your file. Moreover, the software comes with numerous visual effects and transitions.
You can add custom logos, texts, & overlays and create & export your file in over 60 different video formats.
Last Words
In this article, we’ve provided a list of 5 iOS and Android apps and 6 Mac and Windows software for creating the radial blur image effect. From the above list, whichever tool you choose can help you create some stunning radial blur effects that will add depth and movement to your photos.
We’ve also provided step-by-step instructions on how you can use the Filmora 11 software to add impactful effects.
Hopefully, you’ve enjoyed reading this article and can now quickly add the radial blur effect to your images without any issues.
2. DSLR Camera Blur Effects
With the DSLR Camera Blur Effects app, you can instantly apply a more natural-looking radial motion blur effect to your images to give them a more professional appearance. The app offers multiple image-blurring tools and adds a DSLR-like finish to your photos.
Download: Android
Key Features
- Import photos from your phone’s gallery or take a new one using the app’s camera option.
- Options to crop your image before uploading.
- Multiple types of blur effects to choose from, such as motion blur, gaussian blur, line blur, box blur, and pixel blur.
- Can change the focus from auto to circular, linear, freestyle, point focus, or point blur.
Pros
- Simple and fast to use
- Available for free
- Draws around the subject
- A quick social sharing option is available
Cons
- Shows multiple ads
- Adds a watermark to your final image
3. Image Radial Blur
The Image Radial Blur is another user-friendly app designed to create radial blur effects for Android users and has a range of blur strengths, types, and focus options, so you can create the exact look you want.
Download:Android
Key Features
- Two Focus Move options and two blur types to choose from.
- Adjusts the strength of the radial blur on your image.
- Instantly applies the radial blur effect.
Pros
- Free and easy to use
- Applies the effect with one tap
- Comes with a quick social sharing option
- Excellent UI
Cons
- Displays ads
4. Picsart
Picsart is a powerful photo editing app that lets you create beautiful images by removing backgrounds, adding text and radial blur or other effects, and even creating collages.
Key Features
- All-in-one photo and video editor.
- Supports creating slideshows, and collages, adding subtitles to your video, and more.
- Labeled as “Editor’s Choice” on Google Play Store.
- Blur parts of an image, its background, the subject’s face, or a complete photo.
Pros
- Available for free
- AI select auto-detect blur feature
- Perfect for quick and easy edits
- Gives a professional touch to images
Cons
- The app lags sometimes
5. Affinity Photo
Affinity Photo is an award-winning photo editor available for iPads offering desktop-grade basic and advanced editing tools, including the Radial Blur effect.
Download: iOS
Key Features
- Available for a one-time purchase of $2476.20.
- Creates the radial effect in concentric circle lines, giving your images a sense of rotation.
- Brings the focus point in your pictures to life.
Pros
- Creates unique motion blur effects
- Offers other editing options
- Desktop-grade editing
Cons
- No image organization feature is available
6 Ways To Radial Blur Your Images On Windows And Mac
Here are our top 5 recommended tools to radial blur your images on Windows and Mac:
1. Wondershare Filmora
Free Download For Win 7 or later(64-bit)
Free Download For macOS 10.14 or later
Price: Starts at $7.99 per month
Support System: Windows 11 and below & macOS 10.14 - macOS 12
Wondershare Filmora is an editing software recommended by many content creators and is available for Windows and macOS. The software comes with various features such as speed ramping, screen recording, a library of royalty-free music, radial blur, keyframing, numerous filters, effects, & preset templates, motion tracking, title editing, and more.
To create a radial blur effect on your photos using the Wondershare Filmora software, do the following steps:
Step1 Visit the Filmora website and download the file, depending on your system. Install the software and launch it. Click the “Create New Project” option and drag & drop your file.
Step2 Head to the “Effects” tab, choose the Tilt-shift Circle for the radial blur effect and drop it in the timeline.
Step3 Double-click the effect in the timeline and configure the size, X-axis, Y-axis, and intensity. That’s about it. You can now export your file by clicking the “Export” option.
2. Final Cut Pro
Price: $299.99/perpetual license
Support System: macOS 11.5.1 or later
Final Cut Pro is an editing software designed for Mac systems and has everything you need to create high-finished videos. This software program offers a wide range of features, including a timeline, proxy editing, Multicam editing, and support for 4K and HDR footage.
With Final Cut Pro, you can instantly apply the radial blur effect to your images and adjust it using various parameters in the Filters Inspector section, such as Center, Angle, Crop, and Mix.
3. Adobe Photoshop
Price: US$20.99/month
Support System: macOS and Windows
As one of the most popular and advanced photo editing software in the digital market, Adobe Photoshop is packed with high-end features and is used by many professionals as well as graphic designers to create stunning radial blur effects in their projects.
To add the radial blur effect on your images using Adobe Photoshop, start with converting your background image into a Smart Object and go to the “Filters” tab. Next, select “Blur” and click “Radial Blur.” Finally, you can set the parameter in the radial blur window to adjust the effect.
4. Paint.NET
Price: Free
Support System: Microsoft .NET 6, Windows XP, Vista, 7, & 8, and needs a 64-bit Windows processor
Paint.NET is an easy-to-use software developed on the .NET framework and is only compatible with Windows PCs. The software is free and has an innovative interface for novice users to create stunning image editing projects in no time.
Paint.NET also lets you quickly create the radial blur image effect using its blur effects. You can even configure the angle, center, and quality of the effect.
5. BCC FX Editor
Price: $175 per month
Support System: macOS Mojave 10.14
Yet another powerful software is the BCC FX Editor, designed with an intuitive interface where you can quickly apply the BCC+ Radial Blur effect around a specific point in your pictures.
The software also offers various parameters to help you adjust the effect on your image. These include GPU rendering, blur type, center, radial amount, rotation amount, falloff, smooth mode, edge mode, apply mode, and more.
6. VideoPad Video Editor
Price: Free, and the premium version starts at $23.16 quarterly
Support System: Windows 10, XP, Vista, 7, 8, and 8.1
Designed for Windows systems, the VideoPad Editor is an intuitive and fast software program that can help you quickly add the radial blur effect to your file. Moreover, the software comes with numerous visual effects and transitions.
You can add custom logos, texts, & overlays and create & export your file in over 60 different video formats.
Last Words
In this article, we’ve provided a list of 5 iOS and Android apps and 6 Mac and Windows software for creating the radial blur image effect. From the above list, whichever tool you choose can help you create some stunning radial blur effects that will add depth and movement to your photos.
We’ve also provided step-by-step instructions on how you can use the Filmora 11 software to add impactful effects.
Hopefully, you’ve enjoyed reading this article and can now quickly add the radial blur effect to your images without any issues.
Also read:
- [New] How to Use Twitter Archive for 2024
- [Updated] From Ideation to Implementation A Comprehensive Approach for Quality Edu-Videos for 2024
- 3 Ways To Stream And Record At The Same Time
- Benefits of Live Streaming on YouTube for 2024
- Il Meglio Di Windows 11: Guida Facile E Gratuita per Clonazione Disco Senza Problemi
- In 2024, 3 Ways To Stream And Record At The Same Time
- In 2024, A Step-by-Step Guide on Using ADB and Fastboot to Remove FRP Lock on your Oppo K11 5G
- In 2024, How to Fix My Vivo V27 Location Is Wrong | Dr.fone
- In 2024, How To Make Ninja Jump Effect with Filmora
- In 2024, How To Remove or Bypass Knox Enrollment Service On Xiaomi Redmi K70 Pro
- In 2024, Key Cutting Strategies in Modern Cinema
- New 2024 Approved Different Ways to Crop TikTok Video in High-Quality
- New In 2024, Free Green Screen Software for Mobile Top Picks for Android and iOS
- New Want to Create a Stunning Intro Video on Your Smartphone? Legend Intro Maker Is a Popular Choice. Learn the Steps to Design Intro Video Legend Intro Maker
- Tackle Spammy Text Alerts: IPhone Users' Simple Tutorial for a Clean Inbox, Based on Expert Advice | ZDNET
- Updated In 2024, How to Apply Gaussian Blur Effect to Videos In Premiere Pro?
- Updated In 2024, What You Should Know About Speech-to-Text Technology
- Title: New 2024 Approved Guide To Creating the Best Video Collages
- Author: Chloe
- Created at : 2025-03-03 08:48:05
- Updated at : 2025-03-04 03:04:20
- Link: https://ai-editing-video.techidaily.com/new-2024-approved-guide-to-creating-the-best-video-collages/
- License: This work is licensed under CC BY-NC-SA 4.0.