
New 2024 Approved Guide to Make Timelapse Video with iMovie
Guide to Make Timelapse Video with iMovie
Are you in search of how to time-lapse a video on iMovie? You very well would have known that the method in which the film frames are often taken is mainly due to the timelapse. The way the time-lapse film is played is quite similar to how faster-paced videos are presented. The time-lapse aspect of a video may be created simply by speeding up the footage. It is always wonderful to see a time-lapse movie being captured.
Making time-lapse images and films may be done in a variety of methods, such as by fusing many images or utilizing pre-existing video. Time-lapse films may be made using a variety of software. When we watched a film at regular speed, it seemed like time was slipping away and moving. A fascinating perspective is created by the motion and the ability to witness hours of film condensed into a few seconds.
Part 1. How to Make Timelapse Video with iMovie iPhone
All iOS devices come with the iMovie software, which may speed up videos. iMovie makes it simple to turn a movie into a time-lapse. To transform a movie into a time-lapse, just launch iMovie. If you want a simpler solution, we advise using Slow fast Slow, a tool that speeds up playback. You must correctly configure your phone to capture time-lapse films. The camera app is aware of everything it does.
Steps to Make Timelapse Video with iMovie iPhone:
Step1 Record the Footage
In the first step, open our camera app to select the Time-lapse from the slider. You need to tap the video in the timeline and then click the icon button on the bottom-left of the corner until you find the time-lapse option. and then select it and press the record button. When you made a video and it’s done, just click on the record button again.

Step2 Launch iMovie on iPhone
Open the iMovie app on your iPhone, swipe up right then select a camera and click the “Projects” tab on top and start to “Create Project” to load the video clip whatever you want to make an iMovie lapse.

Step3 Customize the Recorded Footage
The titles, text, and even music is uploaded based on your liking or choice from the built-in royalty-free library, which offers hundreds of songs. The total length of the source video segments may vary depending on how long you want the time-lapse movie to be. The impression of increased movement or the speeding up of time is the most important component of a time-lapse.

Step4 Create Time-lapse and Save
To create the ideal iMovie time-lapse, adjust the speed and examine the movie. To save and distribute the iMovie time-lapse, click the “Done” button!

Part 2. Make Timelapse Video with iMovie on Mac
The idea behind an iMovie time-lapse is to capture anything that is moving slightly and then speed it up so you can notice the movement. A time-lapse movie only captures 1 to 2 frames per second, while video typically captures numerous. Learn how to utilize the app’s time-lapse mode and use iMovie to transform standard iPhone footage into a time-lapse movie. Here are the fundamental instructions for utilizing images and video clips in Apple iMovie:
Steps to Make a Timelapse Video with iMovie on Mac:
Step1 Download iMovie
iMovie is a free app. It comes with a new apple series computer and mobile. You can use that app to create real-time-lapse videos, with a small workaround. On your Mac, launch iMovie and import the video clip from the ‘Library’ that you want to use for your time-lapse. In the timeline, drag the video.

Step2 Select the Timelapse
Decide the clip you wish to modify the speed of. On the preview window’s upper right, tap the clock symbol. Next, you need to pick Speed > Fast, where you may set a frame rate such as “8x” or “20x.” You may watch the time-lapse video till you’re good to go.

Step3 Apply Editing
The time-lapse options in iMovie allow you to add video effects, trim, edit, and combine video clips, although doing so may degrade the quality of the final product. If you are using iMovie 9, creating a time-lapse film is a little challenging. To change the “Speed” option in the preview windows, double-click on the video clip in the timeline.

Step4 Save the Video
Due to the amount of space, it will take up on your Mac, this is the quickest method to produce time-lapses with iMovie for Mac. When you click the “Share” button straight above, you can decide whether to preserve or immediately share the iMovie time-lapse.

Part 3. iMovie Alternative to Create Timelapse video on Mac
When you record the time-lapse video, the video movements are much more noticeable and they become the focus of it. With the wide range of its features interface and wizard, the best alternative to make the iMovie time-lapse is by Filmora . It has Advanced editing features that help you create slow-motion in addition to time-lapse videos. Also, you can enhance the video too much extent.
Time-lapse is now a very popular feature for editing videos where you can speed up as you want for a clip up to X times. Filmora makes it even more compelling. As with this toolkit, all kinds of time-lapse videos can be made by Filmora’s time-lapse techniques. What’s more, the software lets you finish the video with a color grading edit. The feasibility of making a time-lapse video is at full-scale with software like Filmora.
Free Download For Win 7 or later(64-bit)
Free Download For macOS 10.14 or later
How to Make a Timelapse Video on Mac with Filmora
Step1 Install and Launch Filmora
Visit the official website to get the most recent version of Filmora on your PC as the first step. The installation procedure may then be started by launching the installer. You will then be sent to the Filmora launcher as seen below:

Step2 Add video to the Timeline
Please make sure the software has been launched and is in “Full Features Mode” before beginning. Use the “Import” option to add the desired movie or photographs to the media library. Drag it to the Timeline after that.

Step3 Divide and Edit Your Video
To produce the timelapse effect, move the slider bar to the desired location. Then, click the “Split” button to split the video into two halves. To split the video into numerous segments, repeat this step.

Step4 Make the Time-lapse
A window will appear when you double-click on the video clip you want to speed up. To speed up the movie, choose the “Speed” option and move the slider to the right. Up to 100x rapid motion and 0.01x slow motion are supported by this software.

Step5 Render and Export the Timelapse Movie
Right after the editing, render by hitting the icon in the timeline, and then you can get a stunning, high-quality movie on Filmora that is up to 4K. After completing the aforementioned parameters, click “Export” to choose an output format for exporting and storing the freshly made time-lapse movie on Mac.

Part 4: Related FAQs of Timelapse Video
1. How Do You Speed-up videos on iMovie?
The speed of the video can be changed until you get a perfect iMovie time-lapse. The speed of your time-lapse video is to use the slider to change. Drag the slider right to make it faster, or left to make it slow down. Select and click the “Done” button to save and you can share the iMovie time-lapse with the others.
2. How Do You Create a time-lapse video?
Select then tap the video in the timeline and then click the icon button on the bottom-left of the corner until you find the time-lapse option. and then select it and press the record button. When you made a video and it’s done, just click on the record button again.
3. How Long Can a Time-Lapse video on iPhone be?
There is no limit to how long time-lapse videos you can shoot. the only limitation with the iPhone. Time-lapse videos depending on the length of the original videos that you make on your iPhone can last up to 20 to 40 seconds, whether you shoot for 30 minutes or 30 hours. How long did you record the video, it won’t go over 40 seconds.
Conclusion
The iMovie time-lapse will consume very little time to create your videos and movie. When this technique is used in photography to make time-lapse videos in iMovie, time seems to be fast-moving. Time-lapse on your iPhone has never been simpler, thanks to the features of the camera app. Also, if you’re looking for easy and efficient software to create attractive time-lapses, Filmora is your best go-to software.
Free Download For macOS 10.14 or later
How to Make a Timelapse Video on Mac with Filmora
Step1 Install and Launch Filmora
Visit the official website to get the most recent version of Filmora on your PC as the first step. The installation procedure may then be started by launching the installer. You will then be sent to the Filmora launcher as seen below:
Step2 Add video to the Timeline
Please make sure the software has been launched and is in “Full Features Mode” before beginning. Use the “Import” option to add the desired movie or photographs to the media library. Drag it to the Timeline after that.
Step3 Divide and Edit Your Video
To produce the timelapse effect, move the slider bar to the desired location. Then, click the “Split” button to split the video into two halves. To split the video into numerous segments, repeat this step.
Step4 Make the Time-lapse
A window will appear when you double-click on the video clip you want to speed up. To speed up the movie, choose the “Speed” option and move the slider to the right. Up to 100x rapid motion and 0.01x slow motion are supported by this software.
Step5 Render and Export the Timelapse Movie
Right after the editing, render by hitting the icon in the timeline, and then you can get a stunning, high-quality movie on Filmora that is up to 4K. After completing the aforementioned parameters, click “Export” to choose an output format for exporting and storing the freshly made time-lapse movie on Mac.
Part 4: Related FAQs of Timelapse Video
1. How Do You Speed-up videos on iMovie?
The speed of the video can be changed until you get a perfect iMovie time-lapse. The speed of your time-lapse video is to use the slider to change. Drag the slider right to make it faster, or left to make it slow down. Select and click the “Done” button to save and you can share the iMovie time-lapse with the others.
2. How Do You Create a time-lapse video?
Select then tap the video in the timeline and then click the icon button on the bottom-left of the corner until you find the time-lapse option. and then select it and press the record button. When you made a video and it’s done, just click on the record button again.
3. How Long Can a Time-Lapse video on iPhone be?
There is no limit to how long time-lapse videos you can shoot. the only limitation with the iPhone. Time-lapse videos depending on the length of the original videos that you make on your iPhone can last up to 20 to 40 seconds, whether you shoot for 30 minutes or 30 hours. How long did you record the video, it won’t go over 40 seconds.
Conclusion
The iMovie time-lapse will consume very little time to create your videos and movie. When this technique is used in photography to make time-lapse videos in iMovie, time seems to be fast-moving. Time-lapse on your iPhone has never been simpler, thanks to the features of the camera app. Also, if you’re looking for easy and efficient software to create attractive time-lapses, Filmora is your best go-to software.
How To Fade Audio In Kinemaster
If you have been looking for video and audio editing tools then you have probably heard of Kinemaster. It is a great video editing app that allows users to edit all aspects of the video including any audio or music that may accompany the video. It has a lot of very useful features and the user interface is fairly easy to use.
One of the things that you can do with Kinemaster is to fade out audio, a useful feature that can help the ending of any video appear more authentic. In this article, we will be looking at how you can use Kinemaster to fade audio.
Kinemaster Fade Audio Steps
The following steps show you how you can easily fade audio in Kinemaster;
Step1If you don’t have Kinemaster already, start by downloading and installing the video editor on your computer.
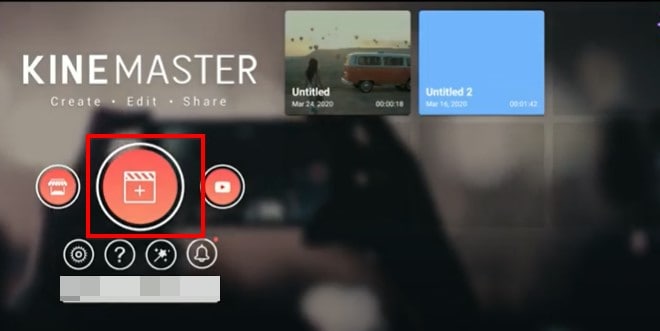
Step2Open Kinemaster on your computer and then click on the “New Project” icon to start. Select the aspect ratio that you would like to use. If you are not sure, we recommend choosing the “16:9” aspect ratio.
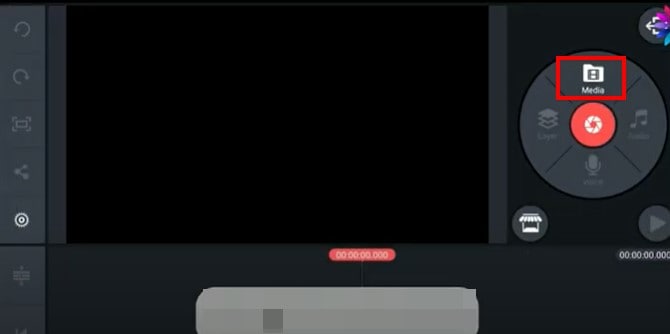
Step3In the next window, click on “Media” to select the clip you would like to add to the Kinemaster project that you have just created.
Step4To fade in and fade out the audio in the project, click on the gear icon from the options to the left of the screen.
![]()
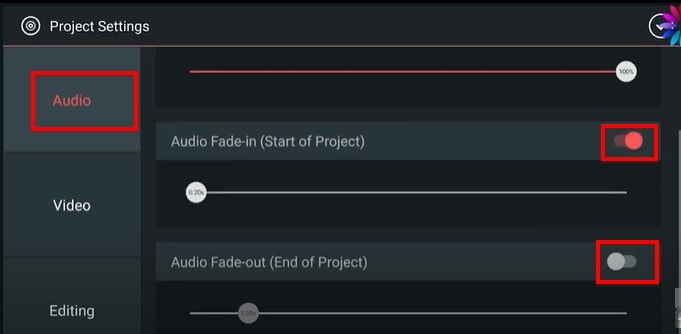
Step5Select the “Audio” tab on the next screen and then turn on the switch next to “Audio Fade-in (Start of Project)” and “Audio Fade-out (End of Project).” This will add a fade-in and fade-out effect at the beginning of the audio and at the end of it.
Step6You can then easily set the duration of the “Audio fade-in” and “Audio fade-out” by dragging the slider below each option. We recommend setting the duration to just a few seconds.
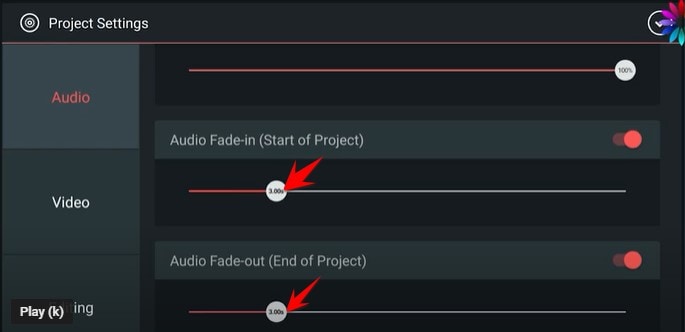
Don’t forget to save the project when you’re done.
Kinemaster Alternative to Edit Audio
Kinemaster is a good way to edit both audio and video on your computer, but the following options are just as good;
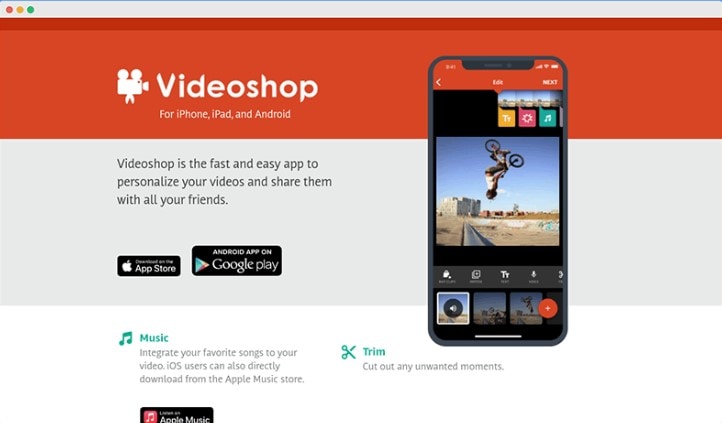
1. VideoShop
VideoShop is a simple to use and highly effective program that you can use to create and edit videos on your computer. The interface makes it easy to import any video project that you have into the program and the wealth of very useful features can help you edit the video in various ways.
For example, you can change the speed of the video, add transitions at various points in the video, add and remove text, add and remove music and so much more. Although there is a free trial version, you will only be able to access some of the more useful features when you purchase the premium version.
The Pro version of VideoShop goes for $3.99 a month, but you can get lifetime access to the program for only $39.99. One thing that VideoShop has over Kinemaster is that it is very easy to use, even beginner users find video editing a breeze with this tool.
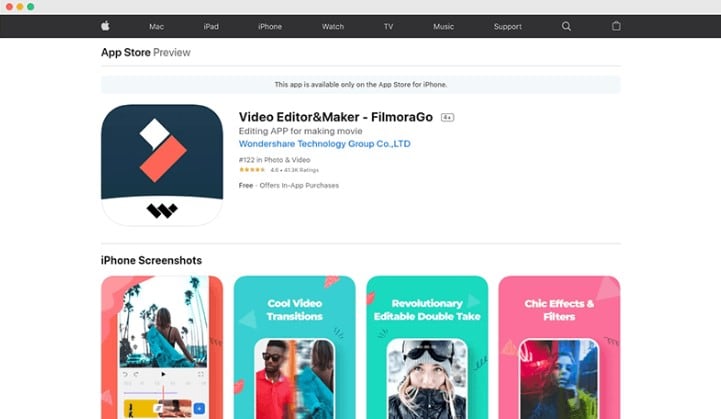
2. Filmora
If you are looking for a simple way to edit videos on Android or iOS devices, Filmora is one of the best options in the market. This mobile version of the very popular Filmora video editor is just as easy to use as its parent program. You can use it to create video projects from scratch or upload a video and make changes to it.
It offers you a lot of choices when it comes to editing features including trimming sections of the video, adding filters, adding music, adding or removing text, and even changing the canvas or the background of the video. Advanced options such as changing the speed of the video are also available.
One of the things that we love about Filmora is that you don’t even have to create an account to use it or remove the watermark added to the completed video project, watching a video ad can be enough. But this option is only available once every 24 hours, meaning that you can only remove a watermark on the free version once a day. Filmora is available for both iOS and Android and the yearly premium plan will cost you just $19.90.
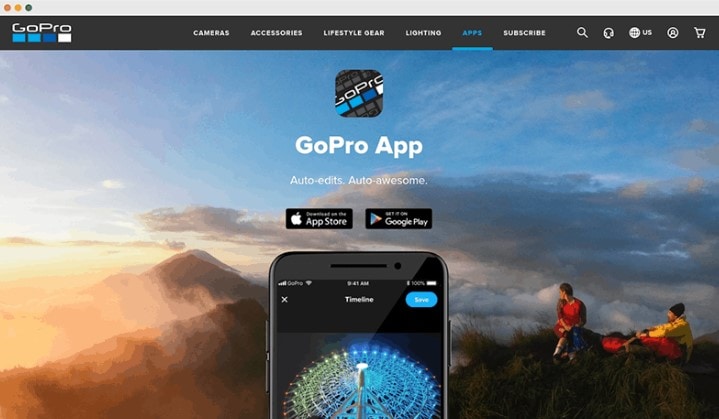
3. Quik
Quik is a video editing program created by GoPro for the purpose of editing GoPro videos, but that doesn’t mean that you will not be able to use it to edit other types of videos. You can use Quik to create a new project or edit an existing video and gives users a lot of different options when it comes to video editing.
One of the main benefits of using Quik is that you can easily add music, audio, and special effects to a video as well as change the length of the video, fade audio in and out and even change when the music starts. It is also one of the best ways to use images to create collages and slideshows very easily. There are a lot of slideshow and collage templates to choose from, and you can edit them easily by adding your music and images. Quik is completely free to use and you can upload your creation to the cloud ad share the link with others.
Conclusion
Kinemaster is one of the most popular video editing tools, especially since it simplifies the video editing process to make it very easy. All the alternative tools we have outlined here in this article are selected because they can make video editing quite simple.
Free Download For Win 7 or later(64-bit)
Free Download For macOS 10.14 or later
How to Remove Echo with Premiere Pro? Full Guide Here
Do you want to reduce echo in Premiere Pro? How often have you been in situations where you encountered conditions where there was annoying background noise on your video? There is no need to overthink, given that everyone has to deal with this problem. Your video may become intolerable if background noise, such as the sound of a fan or the wind blowing through a window, is present. Because of this, you need to take immediate action to remove echo in Premiere Pro to accomplish the task of uploading a video to YouTube or any other social media site.
Spending a lot of time on a recording, only to have the completed work have a terrible echo, is one of the most frustrating experiences. You will be relieved that there are methods by which you may take your audio clips and modify the audio on your clips to decrease the echo. The following explains how to remove echo from audio in Premiere Pro.

Part 1: How to Reduce Echo Noise with Premiere Pro
Reducing echo in Premiere Pro is straightforward with the application’s built-in tools. It requires no additional plugins from other developers.
Step1 Deverb
The first step is to look for an effect called “DeReverb” in the Effects box of the Effects workspace. Once you find it, you can easily add it to the clip in question by dragging and dropping it there. After that, it will show in the top-left corner of the effect controls inside your audio clip.

Step2 Edit
Next, choose ‘Edit’ from the drop-down menu, and then set the level of DeReverb by dragging the simple slider below your clip anywhere from 0% to 100%. As you move the slider closer to 100 percent, the echo should begin to vanish almost as soon as you do!
The processing emphasis should be around the flat line unless you know the frequencies you are working with. Additionally, ensure you activate the effect by clicking the button in the upper left corner of the effect window.
It is vital to bear in mind that less is more when it comes to this effect since it does have a somewhat negative impact on the quality of the audio you have captured.

Further Dialing in Your Settings
After you have reached a level of DeReverb that you are satisfied with, you may apply other modifications to the audio, such as compression and EQ. Still, it should already sound more distinct and more apparent at this point.
When you use the DeReverb effect to remove echo in Premiere Pro, there is one more cool thing about it. If you tick the box labeled “Auto Gain,” the volume level does not decrease as it usually would when you remove echo using this effect. Instead, the volume level maintains the same level as you go from 0 percent to 100 percent of the effect.

The conclusion is as follows: When you are out and about or in an ample space with many echoes, here is a super easy method to manage the echo levels!
The ‘Amount’ option in DeReverb allows users to specify the percentage of echo they wish to remove. However, use caution while adjusting this parameter since setting it too high can decrease the quality of your audio.
Also, applying the DeReverb effect may decrease the audio level; but if you mark the Auto Gain check box, Premiere Pro will compensate for the decrease in volume. Hence, it is advisable to keep the box checked since this is the default configuration. You also can tinker with the Processing Focus settings, which let you zero in on a specific frequency or frequency.
Part 2: How to Denoise the Free and Easy Way?
Unparalleled videos are shared in clear voices by vloggers and filmmakers. But how do they manage to make such superb, noise-free videos? Your video would still pick up some background sounds even if you had the ideal acoustic conditions, had a high-end recorder and set the recorder and everything else up perfectly. Noise reduction is a crucial step in producing a high-quality video and is required for yours. After all, good audio is essential for video. Aside from removing echo from audio in Premiere Pro, here are other free and accessible ways.
1. Use Wondershare AILab [Free and online]
Wondershare AILab is an excellent alternative to removing echo in Premiere Pro with its various free online tools. You don’t need to specify any settings since the AI will automatically identify and eliminate noise. So you can avoid an unwelcome sound in a crowd or a harsh breeze. AILab can help you create images, sounds, and clips that are simpler and more enjoyable.
Step1 To begin, use Add audio or drag it to upload.

Step2 As shown in the image below, the AI will automatically process the file and remove the static sound.

Step3 That’s it. Now, download the updated audio file at this point.
2. Use kapwing [Free and online with a watermark]
Another alternative to reduce echo in Premiere Pro is Kapwing. This noise-canceling program removes the audio in your movies by separating speech patterns, decreasing background noise, and eliminating background hums. It does this by removing background noise, reducing background noise, and removing background noise—no need to become proficient in high-powered and complicated audio editors such as Adobe Audition or iMovie. Suppose you host your podcast or live stream and utilize mics like the Blue Snowball. In that case, you can quickly and easily eliminate annoying background noise from every video you record with just one click.
Step1 Upload your video while it still has the background noise you want to remove by either uploading the video file straight from the device into your workplace or copying the URL link of the movie into your workspace.
Step2 Reach the “Edit” tab and pick the “Clean Audio” option from the drop-down menu. Kapwing will automatically clean up your video’s audio by removing any unwanted background noise. If necessary, you should make any essential extra adjustments to your video, such as adding subtitles, transitions, or sound effects.
Step3 When you have reduced the background noise from your movie, go to the “File” option and choose “Export Project.” After a few moments, the improved version of your video will be available for you to download and share.

3. Use Wondershare Filmora to denoise
The Filmora Video Editor is easy to use and delivers various features superior to those provided by other video editors. Thus, it is one of the best audio/video editors for denoising backgrounds. The process we will follow is broken down into parts for easier understanding.
Free Download For Win 7 or later(64-bit)
Free Download For macOS 10.14 or later
You can call this the best alternative to removing echo from audio in Premiere Pro.
Step1 Upload File and Preview
Start by importing your video into the interface of Wondershare Filmora. To get a video preview, trim the portions, and remove what don’t want to keep.
Step2 Start Editing
You will need to enter “Smart Denoise” into the search bar in the Effects panel. After that, choose Edit Properties from the context menu that appears after right-clicking on the video.

Here, you can alter the clip’s opacity, the threshold, and the radius.

Step3 Make Changes and Save
In this step, you can keep adjusting the Opacity slider until you get the perfect effect to satisfy your need. Afterward, reach the box beside the Smart Denoise to compare the scene before and after removing the noise and grain.
Finally, save the edited video and share it.
Part 3: FAQs
1. How can an echo be reduced in the sound of an audio recording?
For example, you might use anything that absorbs sound, like a foam pad or acoustic panels. You could alternatively record in a smaller space and use a microphone with a narrower pick-up pattern, or you could use a microphone that already has a filter built into it.
2. How can I get rid of the reverb that is on the video?
You can use either the DeReverb or the Parametric Equalizer tool to eliminate reverb or remove echo from audio in Premiere Pro.
3. Why does my recording have such a reverberant sound?
You may be in a room with hard surfaces reflecting sound waves, or your microphone is picking up an excessive amount of background noise. Try to remedy the issue by recording in a new place, using a different microphone, or modifying the settings in your recording program. All of these options are available to you.
Conclusion
This article presents how to remove echo from audio Premiere Pro and lists some of its alternatives. Have you ever wondered why so many professional content creators use Filmora? They opt to edit their content in Filmora because this tool provides complete support and reliable services.
However, all the above alternatives and Adobe will help you become better content creators by practice. So, choose the best software that is affordable and full of professional features to create flawless and eye-catching videos. Although, in my experience, Filmora is the best alternative to remove echo from audio Premiere Pro.
Free Download For macOS 10.14 or later
You can call this the best alternative to removing echo from audio in Premiere Pro.
Step1 Upload File and Preview
Start by importing your video into the interface of Wondershare Filmora. To get a video preview, trim the portions, and remove what don’t want to keep.
Step2 Start Editing
You will need to enter “Smart Denoise” into the search bar in the Effects panel. After that, choose Edit Properties from the context menu that appears after right-clicking on the video.
Here, you can alter the clip’s opacity, the threshold, and the radius.
Step3 Make Changes and Save
In this step, you can keep adjusting the Opacity slider until you get the perfect effect to satisfy your need. Afterward, reach the box beside the Smart Denoise to compare the scene before and after removing the noise and grain.
Finally, save the edited video and share it.
Part 3: FAQs
1. How can an echo be reduced in the sound of an audio recording?
For example, you might use anything that absorbs sound, like a foam pad or acoustic panels. You could alternatively record in a smaller space and use a microphone with a narrower pick-up pattern, or you could use a microphone that already has a filter built into it.
2. How can I get rid of the reverb that is on the video?
You can use either the DeReverb or the Parametric Equalizer tool to eliminate reverb or remove echo from audio in Premiere Pro.
3. Why does my recording have such a reverberant sound?
You may be in a room with hard surfaces reflecting sound waves, or your microphone is picking up an excessive amount of background noise. Try to remedy the issue by recording in a new place, using a different microphone, or modifying the settings in your recording program. All of these options are available to you.
Conclusion
This article presents how to remove echo from audio Premiere Pro and lists some of its alternatives. Have you ever wondered why so many professional content creators use Filmora? They opt to edit their content in Filmora because this tool provides complete support and reliable services.
However, all the above alternatives and Adobe will help you become better content creators by practice. So, choose the best software that is affordable and full of professional features to create flawless and eye-catching videos. Although, in my experience, Filmora is the best alternative to remove echo from audio Premiere Pro.
Split Audio From Video in Adobe Premiere Pro [Step by Step]
Adobe Premiere Pro is mainly designed and helpful for all video editors looking for options to enhance their tasks. It is beneficial for transforming any random video into an awesome video. There are different tools so you can experience your creative skills on Premiere Pro. It enables the fine-tuning of the audio, adjustments of the colourings, and supports various formats.
There is an integration of this software with other products of Adobe. So, it is pretty easy for you to transfer the task from one adobe software to another. This helps in editing and using the complete outcome according to the needs. This article is regarding the guidance about the split of the audio from the video in Premiere Pro. And also, the discussion of the Wondershare Fllmora as the replacement and how to perform a similar task in it.
How is it possible to split the audio from the video in Adobe Premiere Pro?
The Adobe Premiere Pro is quite popular for its tools and works smoothly. The whole interface also helps increase the entire work’s productivity, efficiency, and effectiveness. It is very easy to open several projects at the exact timings. It is very simple and easy to add the clips and even extract the audio from the video clips. Please take a step by step below to extract the audio from your video files, whether it is on Windows or Mac operating system.
Step 1: The first step is the creation of the project. Go to the File tab on the toolbar and select the New option.

Step 2: Import the video that you want to be mute. File à Import.

Step 3: From the project panel, drag and drop the project in the timeline panel.

Step 4: Now is the time to select the video clip from the timeline. Click on the video layer for the selection.

Step 5: Right-click on the video presentation on the timeline and select the option of “unlink” from the drop-down menu.

Step 6: Now delete the audio from the video you want to separate. For deleting the audio, either select the layer and press the “delete” key. Or you can choose the layer from audio from which you are unlinking from the video and choose the option of “Clear” from the menu.
You have received success in separating the audio from the video clip with the help of Adobe Premiere Pro. It is easy to edit the track as your own choice. Export options are also available, so you can share them wherever you want.

One easier way to separate the audio from the video clips
It is a fact that Premiere Pro is an extraordinary software, but unluckily, its features depend on the subscription monthly or yearly. It requires high storage memory from your system. While working on this software, it increases the complexity.
That’s the reason the graphic designers and video editor are always in search of feasible and straight forward editing software. Filmora Video Editor is the right solution of all the issues.
It is light to the systems and all the features are freely available without any subscription. No matter which operating system you are using Wondershare Filmora is easily available to run on it. Whether it is separating the audio or removing the background, each and everything is simple for handling.
For Win 7 or later (64-bit)
For macOS 10.14 or later
Features:
- Preview of using the tools before applying the changes
- Numerous tools are available for customizing the videos and images
- Splitting of the clips and screens as well
- Involving of the graphics and animation
- Simply drag and drop the videos in the timeline
- Mixing of the audio
- Removing the noise
Under this heading are the steps for guiding you regarding the extraction or separation of the audio from your videos.
Step :1
Simply launch the Wondershare Filmora after it installs your system. If it is already installed, then start creating the new project.
Step:2
Import the file in the timeline you want to remove or separate the audio. Go to the File menuàimport the media file or press the keys of CTRL+I on the keyboard.

Step :3
Drag and drop the video clip in the timeline to proceed with editing.

Step:4
Right-click on your video and choose the option of “Detach Audio”. Then the new track of the audio appears in the timeline.

Step:5
Select the audio you have just received above and select the option of “Delete”.

Step:6
Click on the button “Export” for exporting the video.

Step:7
Please choose the format of your choice, name the file and choose the folder where you want to save it. Even setting the resolution, decoding the video and frame rate is also possible. These options are under the settings button. Click on “Export” to begin the exporting of the video. Wondershare Filmora supports a number of video formats, as you can see in the picture below. So, it is also possible to save the video in the format of your choice. It supports 4K quality.

Every website, blog or social media page doesn’t look appealing without the videos. So, the video plays an essential role in showing your presence on the web, and for this purpose, you need the most straightforward editing software. Wondershare Filmora is the proper selection as it has all the tools no matter you are familiar with it or not.
It can completely transform your videos with amazing tools and features that bring a WOW factor to your images and videos. There is a whole library for effects; whether for transition or animation; everything is available. Start using Wondershare Filmora today and have fun.
Step 2: Import the video that you want to be mute. File à Import.
Step 3: From the project panel, drag and drop the project in the timeline panel.
Step 4: Now is the time to select the video clip from the timeline. Click on the video layer for the selection.
Step 5: Right-click on the video presentation on the timeline and select the option of “unlink” from the drop-down menu.
Step 6: Now delete the audio from the video you want to separate. For deleting the audio, either select the layer and press the “delete” key. Or you can choose the layer from audio from which you are unlinking from the video and choose the option of “Clear” from the menu.
You have received success in separating the audio from the video clip with the help of Adobe Premiere Pro. It is easy to edit the track as your own choice. Export options are also available, so you can share them wherever you want.
One easier way to separate the audio from the video clips
It is a fact that Premiere Pro is an extraordinary software, but unluckily, its features depend on the subscription monthly or yearly. It requires high storage memory from your system. While working on this software, it increases the complexity.
That’s the reason the graphic designers and video editor are always in search of feasible and straight forward editing software. Filmora Video Editor is the right solution of all the issues.
It is light to the systems and all the features are freely available without any subscription. No matter which operating system you are using Wondershare Filmora is easily available to run on it. Whether it is separating the audio or removing the background, each and everything is simple for handling.
For Win 7 or later (64-bit)
For macOS 10.14 or later
Features:
- Preview of using the tools before applying the changes
- Numerous tools are available for customizing the videos and images
- Splitting of the clips and screens as well
- Involving of the graphics and animation
- Simply drag and drop the videos in the timeline
- Mixing of the audio
- Removing the noise
Under this heading are the steps for guiding you regarding the extraction or separation of the audio from your videos.
Step :1
Simply launch the Wondershare Filmora after it installs your system. If it is already installed, then start creating the new project.
Step:2
Import the file in the timeline you want to remove or separate the audio. Go to the File menuàimport the media file or press the keys of CTRL+I on the keyboard.
Step :3
Drag and drop the video clip in the timeline to proceed with editing.
Step:4
Right-click on your video and choose the option of “Detach Audio”. Then the new track of the audio appears in the timeline.
Step:5
Select the audio you have just received above and select the option of “Delete”.
Step:6
Click on the button “Export” for exporting the video.
Step:7
Please choose the format of your choice, name the file and choose the folder where you want to save it. Even setting the resolution, decoding the video and frame rate is also possible. These options are under the settings button. Click on “Export” to begin the exporting of the video. Wondershare Filmora supports a number of video formats, as you can see in the picture below. So, it is also possible to save the video in the format of your choice. It supports 4K quality.
Every website, blog or social media page doesn’t look appealing without the videos. So, the video plays an essential role in showing your presence on the web, and for this purpose, you need the most straightforward editing software. Wondershare Filmora is the proper selection as it has all the tools no matter you are familiar with it or not.
It can completely transform your videos with amazing tools and features that bring a WOW factor to your images and videos. There is a whole library for effects; whether for transition or animation; everything is available. Start using Wondershare Filmora today and have fun.
Also read:
- [Updated] In 2024, Essential Guide to Choosing Top GoPro Cases
- 2024 Approved Secrets Unlocked 10 Online Retailers Specializing in Puzzle Boxes
- 失去Google Chrome书签的办法 - 五个简单解决方案
- New 2024 Approved 7 Tips to Create Teaching Videos
- New How to Download and Use Windows Movie Maker 10
- New Working Out All Important Details of Slowing Down Video in After Effects
- Resolving gsvcr75.dll Not Detected - Troubleshoot Steps and Solutions
- The Blueprint for a Streamlined Social Media Connection with Linktree for 2024
- Updated Renderforest Is a Great Online Editing Platform to Use for Many Video Creators. If You Want to Make an Intro Video for Your Channel or Daily Vlogs, You Can Follow This Article to Know More Details
- Title: New 2024 Approved Guide to Make Timelapse Video with iMovie
- Author: Chloe
- Created at : 2025-02-27 19:41:46
- Updated at : 2025-03-03 20:55:55
- Link: https://ai-editing-video.techidaily.com/new-2024-approved-guide-to-make-timelapse-video-with-imovie/
- License: This work is licensed under CC BY-NC-SA 4.0.