
:max_bytes(150000):strip_icc():format(webp)/ipad-pro-pencil-56a533763df78cf77286e0e0.png)
New 2024 Approved How to Add Motion Titles
How to Add Motion Titles
Do you want to make your videos eye-catching instantly? Looking for some cool title animations to make your texts stand out? You should definitely opt for motion title templates that are widely available in popular video editors. Motion title templates come preloaded with animated texts, engaging graphic elements, and even background effects.
You can add them directly to your video and customize them as per you requirements so that your video looks exactly the way you desire. Different video editors have different motion titles, and therefore, you should check them out one by one to find out the templates you are looking for. We will illustrate title motion graphics in all the leading video editors.
Part 1. Add Motion Title with Filmora
The easiest way to add motion title to your video on your computer is through Wondershare Filmora . Filmora is a professional video editor that is available for Windows and Mac users. Filmora has the best collection of motion title templates, and the user interface is super intuitive and anyone can use without any prior experience. Here are the steps to add motion title with Filmora.
Step1Install and launch Wondershare Filmora on your computer. Click on New Project option on the welcome screen or go to File menu and click on New Project option.

Step2Go to File menu and Import Media option to import your video file. Otherwise, you can simply drop the video file into Project Media folder.
Step3Drag the video file from Project Media folder and drop it into the Timeline.

Step4Go to Titles at the top and go to the left panel. You can different categories of motion title templates. Select any desired text effect and drop into the Timeline above the video layer wherever you want.
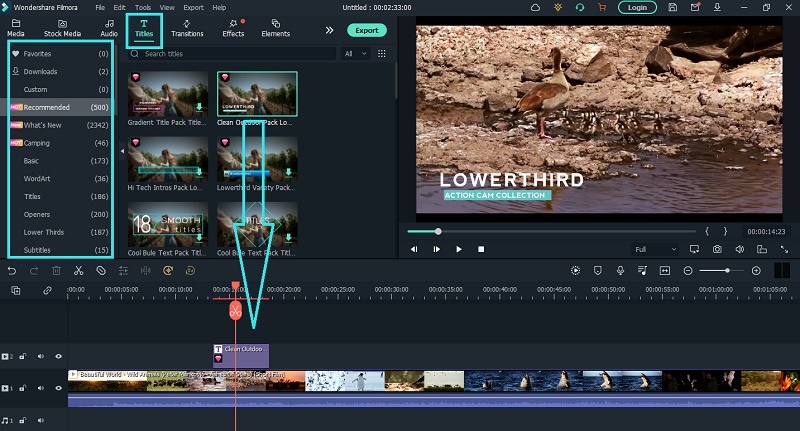
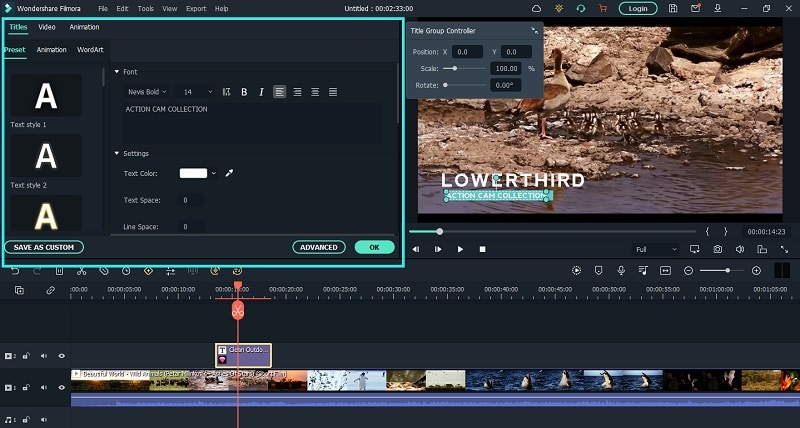
Step5Double clicking on the text layer on Timeline to edit the text and change the styles. Under Preset tab, you can change font, size, and color. Finally, click on OK button to save the edits done.
Part 2. Add Motion Title with Premiere Pro
Adobe Premiere Pro is a renowned video editor that is mostly used by professionals to edit videos and add effects and animations. Even though Premiere Pro has a steep learning curve, you can create motion title in simple steps. You can write any text on the video and select from different effects and animations to create motion title graphics. Here are the steps to add title motion graphics Premiere Pro free.
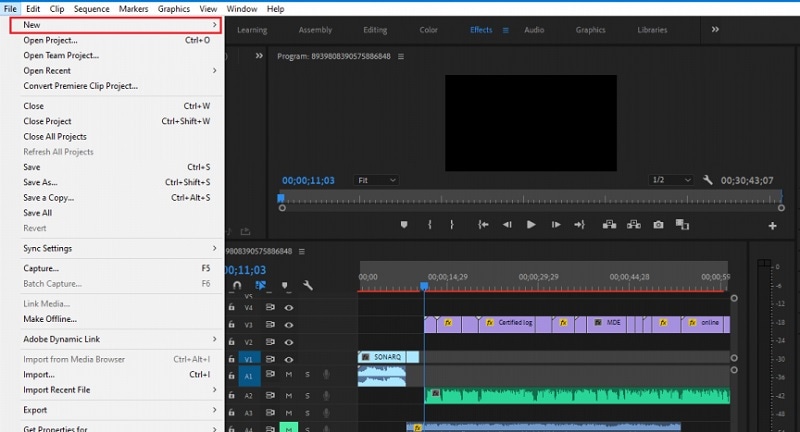
Step1Launch Premiere Pro and go to New> Project option. Import the video file and drop it into Timeline.
Step2Go to Title> New Title> Default Still option and follow the on-screen instructions.

Step3You will see different types of title styles and designs to choose from as you feel.

Step4Click on Type Tool option and click on the area on the video where you want the text to appear. You can customize them from the right panel from Title Styles, Title Properties, Tools and Title Actions.
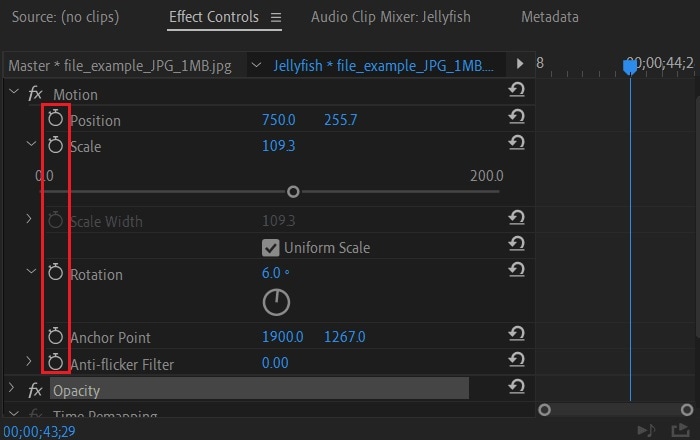
Step5To add motion to the title, click on Effects Control window. Click on any desired animation and turn to Stopwatch icon to apply the effect to the text. There is a dedicated Motion option available.
Part 3. Make motion title with Studio
Studio is a popular video editing software where you can not only apply motion title presets but also create motion title presets from scratch. The reason why video editors choose Studio is because it allows users to customize everything and create different templates and animations for personalization. Here are the steps to create title motion graphics in Studio as per your requirements.
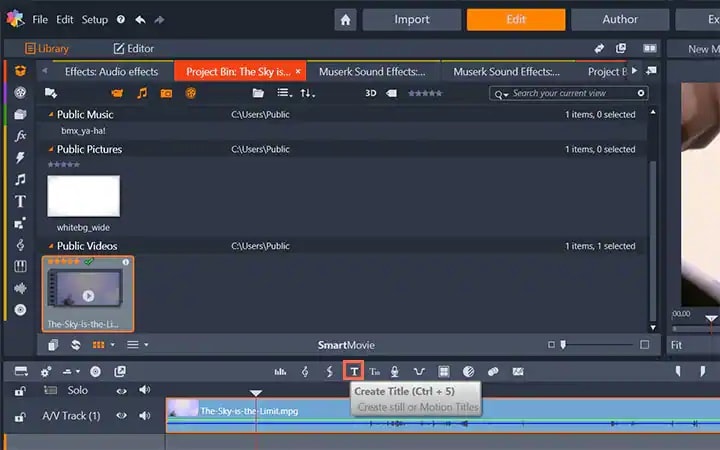
Step1Launch Studio. Import your video file, and you can import single frames such as images from a live video for stop motion titles. Once you have imported, go to the header bar above the Timeline. Click on Create Title option to open Title Editor to create title motion.
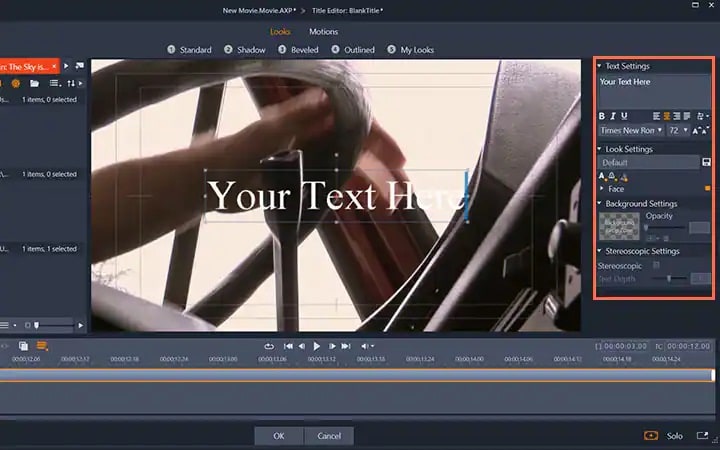
Step2Add your preferred text under Title Editor and adjust font, size, and style as you feel. Go to the right side to make changes to Look, Background, and Stereoscopic Settings to get the perfect text style from the wide range of choices available.
Step3Click on Motion option at the top to add motion to the text. Choose from the different motion title templates as per your preference.
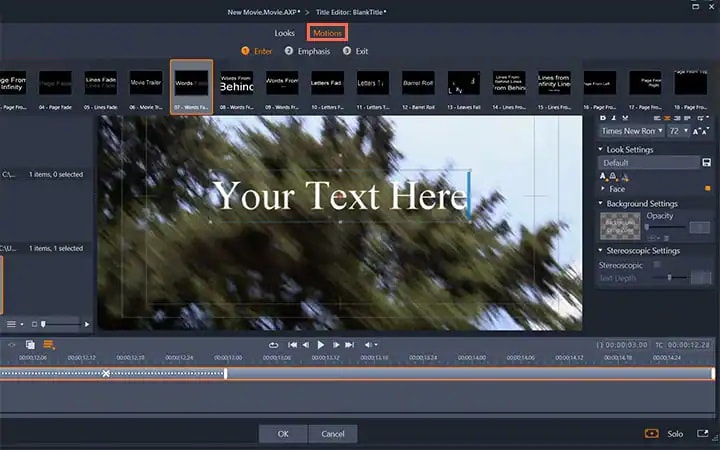
Step4You can adjust the duration of the motion effect from the right panel and click on Ok button.

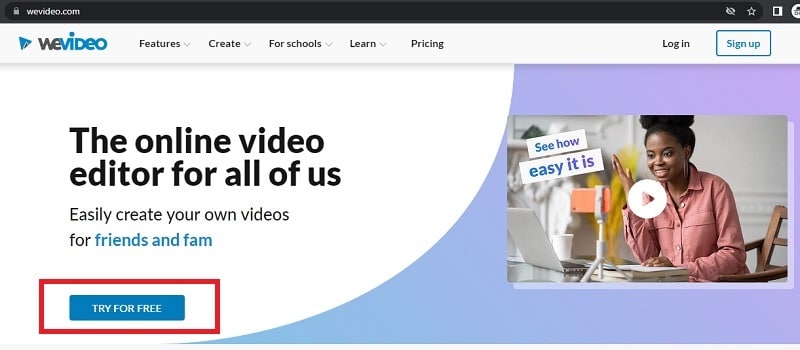
Part 4. Add Motion Title with WeVideo
WeVideo is a popular online video editor that you can use to add title motion graphics Premiere Pro free. You can find many motion titles on WeVideo for free like you get in Premiere Pro and there are many exclusive motion text templates available. You need to create a free account with WeVideo to get started. You can create your video from scratch by selecting from the available video templates. You can even import your recorded video and add motion texts and animations as per your preference. Here are the steps to add motion title with WeVideo.
Step1Open your web browser and visit “wevideo.com”. Click on Try For Free button. Sign up for free and go to WeVideo video editor.
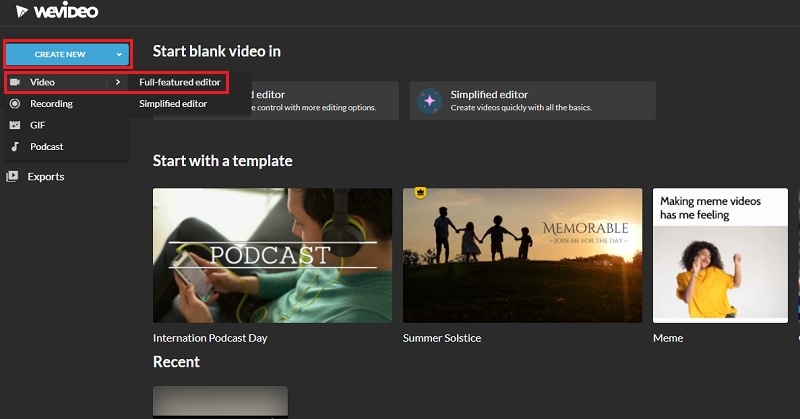
Step2Click on Create New button and select Video option. Click on Full-featured editor option.
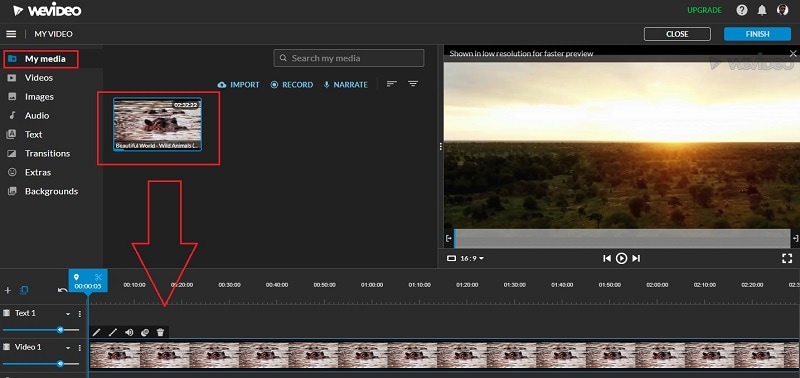
Step3Drag and drop your video file into My Media folder and bring it to Timeline.
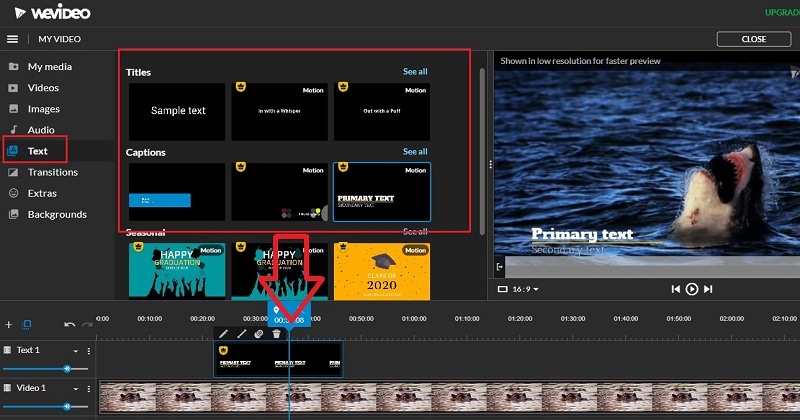
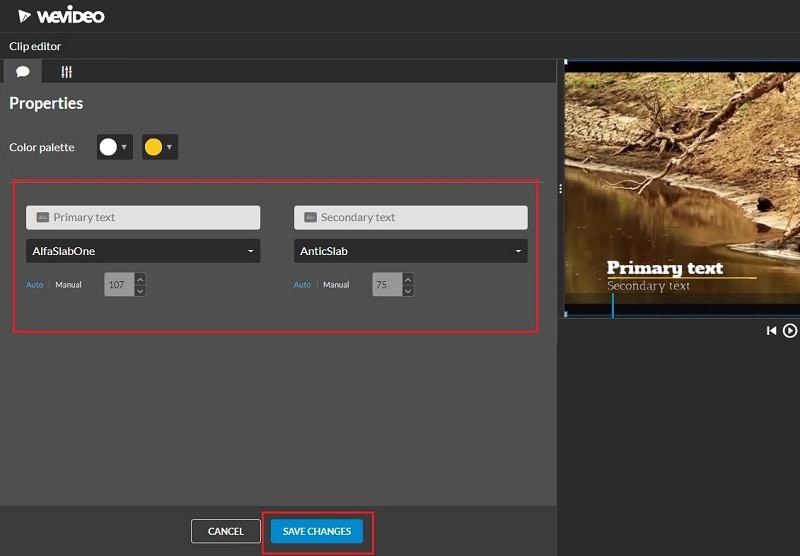
Step4Go to Text tab and you will see all the motion animated titles under Titles section. Click on them to check out their previews in Viewer. If you have selected anyone, drag and drop it into Timeline.
Step5Adjust the position where you want the title to appear on the video and stretch the duration as required. Double-click on the title to edit and customize it as per your preference. Finally, click on Save Changes button.
The Bottom Line
Motion titles are extremely important for any video because they bring in a variety to your video. They make the video eye-catching and help in getting the message across by grabbing the attention of the viewers. We have illustrated how to add motion titles Premiere Pro and Studio. You can also use WeVideo online video editor. We recommend Wondershare Filmora for its extensive collection of motion title templates to choose from and apply to your text.
Free Download For Win 7 or later(64-bit)
Free Download For macOS 10.14 or later
VSDC Free Video Editor Review
If you are a Window user and you are looking for a free video editor without a watermark, VSDC free video editor is definitely a great application. There are only a handful of free video editors available where the output video will not have a watermark, and there is no limitation on the video length. VSDC video editor belongs to the non-liner video editor group where you can combine video clips, photos, objects, and blend and overlap them as per your requirements.
For a beginner, VSDC free video editor is undoubtedly one of the best video editors. It supports different types of video and audio formats as well as codes. The system requirements are very basic, and hence, it is perfect for low-end computers? But can you rely on VSDC editor when you need slightly advanced video editing? Check out our VSDC editor review and find a better alternative.
Part 1. How to Download and Install VSDC?
VSDC editor download is only available for Windows users. It is tailor-made for those who have a low-end computer with older Windows version OS. The software is compatible with Windows 2000 to Windows 11. The minimum RAM requirement is 128MB and free disk space of 200 MB. Here are the steps to download and install VSDC editor.
Step 1: Open your web browser and visit ‘www.videosoftdev.com/free-video-editor/download” .
Step 2: Click on Download Video Editor button based on 32-bit or 64-bit version of your computer. If you have Windows XP, you have to download VDSC video editor version 6.4 instead of the latest version for compatibility.
Step 3: Give some time for the installer file to get downloaded. It is merely 100 MB and it should not take long. After downloading the installer, launch it and follow the on-screen instruction to complete the installation.
Step 4: After proper installation, launch VSDC video editor. You will get the options to create a new project and capture screen, start editing an existing video and export the finished project in a proper video format.
Part 2. Key Features of VSDC
There are two versions of VSDC video editor available – Free video editor and Pro video editor. The free version has limited features while Pro version has advanced features. Here are going to discuss the key features of VSDC Free Video Editor.
Low System Requirements – One of the reasons for the wide popularity of VSDC video editor is that it does not demand high system configurations like most other video editors. If you have a low-end computer with an outdated Windows operating system, you can use VSDC video editor without any issue.
Basic Editing – Among the basic editing tools, you can cut, trim, split and join video clips. There are options for rotating and resizing videos. You can also go for color correction and put overlays on videos as applicable. Besides, you can edit 36-degree videos with zoom and chart tools.
Effects – VSDC has a wide collection of video, audio and text effects. You can also add objects to your video and apply different ready-made filters. There are also transitions to apply in between video clips and slides. You can also use green screen effect to change your background. The special split-screen effect and picture-in-picture effects are quite eye-catching.
Capture Video – VSDC video editor is equally competent in capturing videos from your webcam as well as recording your screen video. In fact, there is a dedicated option available for creating slideshow videos from photos. You can even record your voiceover if you want to.
File Formats - VSDC supports all the popular file formats for importing and exporting video and audio files. There are different export profiles available so that you can save your edited video for different devices conveniently.
Apart from these, if you opt for the Pro version, you get motion tracking, video masking, video stabilization, and much more such advanced video editing tools.
Part 3. How to Edit Videos with VSDC
If you have the recorded video and you want to edit it with VSDC video editor, the steps are quite simple. You can even record your webcam and screen video with audio if you want to start from scratch. Coming to the editing part, you can split large video files, merge video clips, add transitions in between, add objects in the video as well as crop and rotate videos. There are different effects you can apply to uplift video content. Here are the steps to edit videos with VSDC editor.
Step 1: Open VSDC Video Editor and click on Blank Project option. Name the project and change parameters, and click on Finish.

Step 2: Click on Add Object option at the top and select Video. Import the video clips saved on your hard drive. Similarly, you can go to Add Objects> Audio to import audio files.

Step 3: All the imported media files will appear on the timeline. If you have multiple video clips, you can shift the position of clips on the timeline so that one video clip ends and the other begins.
Step 4: If you want to add transitions in between the video clips, go to Video Effects> Transitions> select the effect you want to apply. Check the on-screen parameters such as duration and click on Ok button.

Step 5: If you want to add objects, go to Add Object and select shapes, texts, animations, charts, and much more. You can also add Audio Effects as well as Text Effects from the top bar.
Step 6: Once you are happy with the preview of the edited video, go to Export Project and check all the parameters. Click on Export Project option.

Part 4. Best VSDC Alternative Video Editor
Since VSDC video editor is available completely free, there is no hard in downloading the application and trying it out. But soon, you will understand that the video editor is limited as far as tools and features are concerned. If you want to get more than just basic tools, you will have to upgrade to its Pro version. However, there are better premium video editors available. We recommend Wondershare Filmora as a better alternative to VSDC video editor.
Filmora is extremely popular in the professional video editing world as it has an intuitive interface and does not demand high-end computers. There are tons of transitions, effects, filters, and objects available to add to your edit. You can perform all standard and advanced video editing to take your video to the next level. Here are all the steps to edit videos on Filmora.
For Win 7 or later (64-bit)
For macOS 10.12 or later
Step 1: Download and install Filmora and it is available for Windows and Mac. Launch Filmora and click on New Project. Import all your media files into Project Media folder by drag and drop action.

Step 2: Arrange the video clips and audio clips on the timeline by drag and drop action. You should be placing the video and audio files on different tracks. This is where you can do all the basic editing such as trimming, cutting, splitting, and merging.

Step 3: To add transitions in between the video clips, go to Transitions from the top bar and drag and drop any transition in between the clips. Check out Titles, Effects, and Elements from the top bar and insert them on the timeline as you think appropriate.

Step 4: Play the video to see if everything is perfect and click on Export button to save your video to your hard drive.

Part 5. FAQs about VSDC
1. Is VSDC video editor really free?
Yes, VSDC video editor is completely free to use. However, there is a pro version available where more features are present. But the free version does not put watermark on the output video and has all the standard tools for video editing without any limitation.
2. Is VSDC better than Adobe Premiere Pro?
No, VSDC is not better than Adobe Premiere Pro. VSDC is a free video tor while Adobe Premiere Pro is a premium one. Naturally, Adobe Premiere Pro has more features and functionalities. However, VSDC is better for beginners and those who have low-end computers if you compare it with Adobe Premiere Pro.
3. Is VSDC safe?
Yes VSDC video editor is safe and stable to use. However, there was an incident in 2019 where VSDC video editor’s official website was hacked, but the software itself is safe to use on Windows computers.
For macOS 10.12 or later
Step 1: Download and install Filmora and it is available for Windows and Mac. Launch Filmora and click on New Project. Import all your media files into Project Media folder by drag and drop action.
Step 2: Arrange the video clips and audio clips on the timeline by drag and drop action. You should be placing the video and audio files on different tracks. This is where you can do all the basic editing such as trimming, cutting, splitting, and merging.
Step 3: To add transitions in between the video clips, go to Transitions from the top bar and drag and drop any transition in between the clips. Check out Titles, Effects, and Elements from the top bar and insert them on the timeline as you think appropriate.
Step 4: Play the video to see if everything is perfect and click on Export button to save your video to your hard drive.
Part 5. FAQs about VSDC
1. Is VSDC video editor really free?
Yes, VSDC video editor is completely free to use. However, there is a pro version available where more features are present. But the free version does not put watermark on the output video and has all the standard tools for video editing without any limitation.
2. Is VSDC better than Adobe Premiere Pro?
No, VSDC is not better than Adobe Premiere Pro. VSDC is a free video tor while Adobe Premiere Pro is a premium one. Naturally, Adobe Premiere Pro has more features and functionalities. However, VSDC is better for beginners and those who have low-end computers if you compare it with Adobe Premiere Pro.
3. Is VSDC safe?
Yes VSDC video editor is safe and stable to use. However, there was an incident in 2019 where VSDC video editor’s official website was hacked, but the software itself is safe to use on Windows computers.
Top 10 Transparent Image Online Tools That Help You A Lot
[Top 10] Transparent Image Online Tools That Give You an Advantage
An easy yet powerful editor
Numerous effects to choose from
Detailed tutorials provided by the official channel
If you are a photoholic person and you love to share your images on social media then at some point in time you might have felt the need of removing the background of the image and add something cool to the background. This process of removing the background of the image is called making your image transparent. Professional photo artists make the most use of this feature to create the best of photos. Creating transparent images and changing their background could be used in many ways like designing the logo of the brands, professional photography, or simply fun purpose.
If you have not made use of transparent images yet and you want to learn to create transparent images online and edit transparent images online then this article is for you.
In this article
01 [Best 10 Transparent Image Editors You Deserve to Own](#Part 1)
02 [Can You Find Assets of Transparent Image in the Video Editor?](#Part 2)
Part 1 Best 10 Transparent Image Editors You Deserve to Own
You might be afraid that editing a picture online and making it a transparent image would need technical knowledge in photo editing. Then you are wrong. Making transparent images online and then editing them is very easy. We, here in this article, have come up with the 10 best online transparent image makers using which you can create transparent images in a very fun way, and then you can use them for whatever purpose you want. And don’t worry, we have provided the steps on how to use online transparent image makers to make your work easy.
01Removebg
If you are looking for a free online transparent image maker then Removbg should be the first one you give a try. This online tool is powered by Al technology which enables you to remove the background of your image precisely. Removebg has “Erase” and “Restore” tools which provides for manual adjustment of the details so you can give your image a realistic touch. Apart from these features, the other highlights of this online tool are solid color backgrounds, well-designed templates, and custom templates. Using this online free tool you can also upload your image in batches. Images created by you will have a professional finishing.

02FocoClipping
The next great online transparent image maker on our list is FocoClipping. While most of the image makers and editors have a free version and paid version but all the features in the FocoClipping are free. This image editor enables you to remove background from your photos and make them transparent with only a single click. FocoClipping also uses AI tech to remove the background of your image precisely. The other features of this tool include no limit of download and upload, an easy-to-use interface, casting shadows into images, and many more.

03Image online.co
Image online.co is a trusted name in the field of transparent image makers online. This amazing website is also completely free to use. This website is powered packed by a bundle of image editing tools. To make your transparent image all you need to do is to select the background using the mouse and you are done. No technical photo editing knowledge is required to use this tool. Apart from this Image online.co offers you features like resizing the image, image color picker, merging the images, pencil sketching the photo, adding text to the image, adding a logo to the photo, etc.

04AirMore
If you are the one who needs a simple and easy-to-use tool without much sophistication to make a transparent image, then AirMore could be a good choice for you. All you need is a single click on the background to remove it. This tool provides the “Keep” and “Remove” options so in case you don’t like your editing then you can reverse the whole process. The best thing about using AirMore is that you will not have to compromise with the quality of your image and you can add any cool background to your image like a pro.

05PhotoWorks
If you find photoshop software on your pc too complicated to use then try PhotoWorks. This easy-to-use tool can help you in making transparent images online in a few seconds. PhotoWorks has a very user-friendly interface packed with many manual settings which users can adjust according to their needs. The biggest highlight of this tool is once you access it online you need no further internet connection to edit your images. It is a wonderful transparent background generator with effective results.

06Publisher
This tool comes is created by Microsoft and comes in your laptops and computers with the Microsoft office package. Publisher provides features using which you can generate transparent images in a very quick and easy manner. Other features of this tool include making designs, calendars, posters, greeting cards, and many more. However, this tool is only compatible with computers only and not smartphones. The results generated by Publisher are accurate to a high level and the interface of this software is very user-friendly.

07Online PNG Tools
Another website on our list is Online PNG Tools. This website offers you all the means to create a hassle-free transparent image online in a few seconds and that too at no cost. The algorithm of this website is powered by artificial intelligence which lets you make transparent images without any trouble. All you need to do is open the site and upload your image and click on the background you want to make transparent. The most attractive feature offered by this website is that it does not ask you to download anything. You will get very quick results while using Online PNG Tools.

08Photoshop
After reading the name Photoshop on our list, many readers might be surprised. Many people find Photoshop a bit tough to use but that is not true. This is one of the best online transparent image makers which you can use to remove the background from your images. Photoshop is a one-stop solution for the entire photo editing-related works. Here you can use features like resizing the image, image color picker, merging the images, pencil sketching the photo, adding text to the image, adding a logo to the photo, etc. Photoshop is the most reliable transparent image maker.

09LunaPic
Next on our list of online transparent image makers is LunaPic. This online platform is completely free to use and you don’t even need to sign in to use it. The best feature is can upload your image from your computer, social media, the Cloud, or any other website you want. LunaPic is power-packed with numerous tools for editing the images which will make your online transparent image-making experience a good one. It provides various Borders, Filters, Effects, etc using which you can be master in image editing. Also, you can share your photos directly to social media from the LunaPic.

10Fotor
No discussion of online transparent image maker is complete without Fotor. If you consider yourself a complete beginner, in photo editing, you should try Fotor. Creating transparent images through this tool is very easy. Along with this, you can make use of various Effects, Beauty, Frames, Stickers, etc to make the image picture-perfect. This tool’s photo background remover lets you clear the background in just a few steps. Be it about beautifying life by sharing moments or the purpose is simply the business advertisement, when you have Fotor in hand, the background removal experience is incredible and the process gets easy with its easy interface.

So, now you know the best online transparent image maker. But if you are not a professional and worried about using these online tools then we are here. Here we will guide you on making a transparent picture online, and we have usedFocoClipping for explaining, but you can use any of the above-mentioned tools and the steps are almost similar for all.
Step 1: Go to the browser of your computer and type “FocoClipping” in your search box. Click on the FocoClipping link on your screen.
Step 2: Now select the image you want to make transparent and click on “Upload”. FocoClipping user interface is auto-adjusted to remove the background from your image. As soon as you open the image in FocoClipping the background of your image will be removed.

Step 3: Now if you want to experiment more with your image then you a new background, crop, or resize the transparent image. On the right corner of your screen, you will see options “Background, Crop, and Shadow” select them according to your requirements.

Step 4: If you feel like restoring any part or whole of the real image then select the “Recover” option. Drag the recover brush over the parts you want to recover. You can make use of the “Erase” tool to delete any stuff.
Step 5: After the completion of the whole editing process click on the “Download” button”. FocoClipping will download your image without any sign-in process. The tool will ask you to choose between PNG and JPG format to save your edited image, go for your preferred format. Hit the “Download” option again and your edited image will get saved to your preferred location on your pc.
Part 2 Can You Find Assets of Transparent Image in the Video Editor?
Till now we were keeping our discussion limited to online photo editors that can create transparent images, but what is a video editing platform that provides all such features? If you find all the assets of the transparent image in a video editor then your life is going to be very easy.
Here we are talking about Wondershare Filmora Video Editor . This online video editing platform enables its users to find all the assets of transparent images. All the online video content creators find this feature of Filmora very handy in making their videos awesome and cool.
For Win 7 or later (64-bit)
For macOS 10.12 or later
Apart from this Filmora is power-packed with a big list of features some of these features are mentioned below.
● Editing features like split screen, motion tracker, screen recorder, keyframing, Auto Beat Sync, etc.
● Various kinds of effects like green screen, mask and blend, AI portraits, video effects, etc.
● Audio editing features like audio ducking and silence detection.
● Color match and color combination.
Using Filmora you can create transparent images online and along with it, this platform offers a whole bunch of editing features. If you are new to photo editing then you don’t have to worry, the UI of Filmora has been designed in such a way that anyone without any technical expertise can edit their images and videos like a pro.
● Ending Thoughts →
● So dear readers, with this article we have tried to bring you the best online transparent image maker.
● All the 10 image editors mentioned in his article are top class and you can use them to create and edit all kinds of images including transparent images.
● With the tutorial provided in the article, you can learn to create transparent images. All you need to do is to follow the steps explained in the article and you will master the art of creating transparent images online.
● If you are looking for a video editing platform through which you can access all the assets of transparent images then try Filmora.
● This platform enables you to create and video including transparent images in a very quick and easy manner.
If you are a photoholic person and you love to share your images on social media then at some point in time you might have felt the need of removing the background of the image and add something cool to the background. This process of removing the background of the image is called making your image transparent. Professional photo artists make the most use of this feature to create the best of photos. Creating transparent images and changing their background could be used in many ways like designing the logo of the brands, professional photography, or simply fun purpose.
If you have not made use of transparent images yet and you want to learn to create transparent images online and edit transparent images online then this article is for you.
In this article
01 [Best 10 Transparent Image Editors You Deserve to Own](#Part 1)
02 [Can You Find Assets of Transparent Image in the Video Editor?](#Part 2)
Part 1 Best 10 Transparent Image Editors You Deserve to Own
You might be afraid that editing a picture online and making it a transparent image would need technical knowledge in photo editing. Then you are wrong. Making transparent images online and then editing them is very easy. We, here in this article, have come up with the 10 best online transparent image makers using which you can create transparent images in a very fun way, and then you can use them for whatever purpose you want. And don’t worry, we have provided the steps on how to use online transparent image makers to make your work easy.
01Removebg
If you are looking for a free online transparent image maker then Removbg should be the first one you give a try. This online tool is powered by Al technology which enables you to remove the background of your image precisely. Removebg has “Erase” and “Restore” tools which provides for manual adjustment of the details so you can give your image a realistic touch. Apart from these features, the other highlights of this online tool are solid color backgrounds, well-designed templates, and custom templates. Using this online free tool you can also upload your image in batches. Images created by you will have a professional finishing.
02FocoClipping
The next great online transparent image maker on our list is FocoClipping. While most of the image makers and editors have a free version and paid version but all the features in the FocoClipping are free. This image editor enables you to remove background from your photos and make them transparent with only a single click. FocoClipping also uses AI tech to remove the background of your image precisely. The other features of this tool include no limit of download and upload, an easy-to-use interface, casting shadows into images, and many more.
03Image online.co
Image online.co is a trusted name in the field of transparent image makers online. This amazing website is also completely free to use. This website is powered packed by a bundle of image editing tools. To make your transparent image all you need to do is to select the background using the mouse and you are done. No technical photo editing knowledge is required to use this tool. Apart from this Image online.co offers you features like resizing the image, image color picker, merging the images, pencil sketching the photo, adding text to the image, adding a logo to the photo, etc.
04AirMore
If you are the one who needs a simple and easy-to-use tool without much sophistication to make a transparent image, then AirMore could be a good choice for you. All you need is a single click on the background to remove it. This tool provides the “Keep” and “Remove” options so in case you don’t like your editing then you can reverse the whole process. The best thing about using AirMore is that you will not have to compromise with the quality of your image and you can add any cool background to your image like a pro.
05PhotoWorks
If you find photoshop software on your pc too complicated to use then try PhotoWorks. This easy-to-use tool can help you in making transparent images online in a few seconds. PhotoWorks has a very user-friendly interface packed with many manual settings which users can adjust according to their needs. The biggest highlight of this tool is once you access it online you need no further internet connection to edit your images. It is a wonderful transparent background generator with effective results.
06Publisher
This tool comes is created by Microsoft and comes in your laptops and computers with the Microsoft office package. Publisher provides features using which you can generate transparent images in a very quick and easy manner. Other features of this tool include making designs, calendars, posters, greeting cards, and many more. However, this tool is only compatible with computers only and not smartphones. The results generated by Publisher are accurate to a high level and the interface of this software is very user-friendly.
07Online PNG Tools
Another website on our list is Online PNG Tools. This website offers you all the means to create a hassle-free transparent image online in a few seconds and that too at no cost. The algorithm of this website is powered by artificial intelligence which lets you make transparent images without any trouble. All you need to do is open the site and upload your image and click on the background you want to make transparent. The most attractive feature offered by this website is that it does not ask you to download anything. You will get very quick results while using Online PNG Tools.
08Photoshop
After reading the name Photoshop on our list, many readers might be surprised. Many people find Photoshop a bit tough to use but that is not true. This is one of the best online transparent image makers which you can use to remove the background from your images. Photoshop is a one-stop solution for the entire photo editing-related works. Here you can use features like resizing the image, image color picker, merging the images, pencil sketching the photo, adding text to the image, adding a logo to the photo, etc. Photoshop is the most reliable transparent image maker.
09LunaPic
Next on our list of online transparent image makers is LunaPic. This online platform is completely free to use and you don’t even need to sign in to use it. The best feature is can upload your image from your computer, social media, the Cloud, or any other website you want. LunaPic is power-packed with numerous tools for editing the images which will make your online transparent image-making experience a good one. It provides various Borders, Filters, Effects, etc using which you can be master in image editing. Also, you can share your photos directly to social media from the LunaPic.
10Fotor
No discussion of online transparent image maker is complete without Fotor. If you consider yourself a complete beginner, in photo editing, you should try Fotor. Creating transparent images through this tool is very easy. Along with this, you can make use of various Effects, Beauty, Frames, Stickers, etc to make the image picture-perfect. This tool’s photo background remover lets you clear the background in just a few steps. Be it about beautifying life by sharing moments or the purpose is simply the business advertisement, when you have Fotor in hand, the background removal experience is incredible and the process gets easy with its easy interface.
So, now you know the best online transparent image maker. But if you are not a professional and worried about using these online tools then we are here. Here we will guide you on making a transparent picture online, and we have usedFocoClipping for explaining, but you can use any of the above-mentioned tools and the steps are almost similar for all.
Step 1: Go to the browser of your computer and type “FocoClipping” in your search box. Click on the FocoClipping link on your screen.
Step 2: Now select the image you want to make transparent and click on “Upload”. FocoClipping user interface is auto-adjusted to remove the background from your image. As soon as you open the image in FocoClipping the background of your image will be removed.
Step 3: Now if you want to experiment more with your image then you a new background, crop, or resize the transparent image. On the right corner of your screen, you will see options “Background, Crop, and Shadow” select them according to your requirements.
Step 4: If you feel like restoring any part or whole of the real image then select the “Recover” option. Drag the recover brush over the parts you want to recover. You can make use of the “Erase” tool to delete any stuff.
Step 5: After the completion of the whole editing process click on the “Download” button”. FocoClipping will download your image without any sign-in process. The tool will ask you to choose between PNG and JPG format to save your edited image, go for your preferred format. Hit the “Download” option again and your edited image will get saved to your preferred location on your pc.
Part 2 Can You Find Assets of Transparent Image in the Video Editor?
Till now we were keeping our discussion limited to online photo editors that can create transparent images, but what is a video editing platform that provides all such features? If you find all the assets of the transparent image in a video editor then your life is going to be very easy.
Here we are talking about Wondershare Filmora Video Editor . This online video editing platform enables its users to find all the assets of transparent images. All the online video content creators find this feature of Filmora very handy in making their videos awesome and cool.
For Win 7 or later (64-bit)
For macOS 10.12 or later
Apart from this Filmora is power-packed with a big list of features some of these features are mentioned below.
● Editing features like split screen, motion tracker, screen recorder, keyframing, Auto Beat Sync, etc.
● Various kinds of effects like green screen, mask and blend, AI portraits, video effects, etc.
● Audio editing features like audio ducking and silence detection.
● Color match and color combination.
Using Filmora you can create transparent images online and along with it, this platform offers a whole bunch of editing features. If you are new to photo editing then you don’t have to worry, the UI of Filmora has been designed in such a way that anyone without any technical expertise can edit their images and videos like a pro.
● Ending Thoughts →
● So dear readers, with this article we have tried to bring you the best online transparent image maker.
● All the 10 image editors mentioned in his article are top class and you can use them to create and edit all kinds of images including transparent images.
● With the tutorial provided in the article, you can learn to create transparent images. All you need to do is to follow the steps explained in the article and you will master the art of creating transparent images online.
● If you are looking for a video editing platform through which you can access all the assets of transparent images then try Filmora.
● This platform enables you to create and video including transparent images in a very quick and easy manner.
How to Use Kahoot! On Zoom
In the educational game Kahoot! participants respond to multiple-choice questions based on trivia. Each participant uses their own controller to answer questions in the online game. There are several question kinds to pick from, allowing for complete customization of the test. Each player needs their own controller for Kahoot! The game questions will be shown in the Zoom/Google Meet window, but the answers must be entered using the controller. With the Kahoot!! app for Zoom, presenters may use play and friendly rivalry to increase participant engagement. Users may organize knowledge- and feedback-gathering pulse checks with staff members, encourage original thought with word clouds, and empower participants’ voices with surveys, open-ended questions, and other tools. Utilizing the brainstorm tool, organizations may crowdsource ideas and advance teamwork.
Engagement has emerged as a crucial component of successful learning, collaboration, and connection as the globe has increased the use of video communications in social and professional situations. Users may access, host, and play Kahoot!! games and educational information with other meeting participants using the Kahoot!! app for Zoom without ever leaving the Zoom Meeting or requiring a second device. Corporate executives may motivate their staff via speeches, meetings, and online activities. Meeting hosts will have immediate access to data and statistics from their Kahoot!! experience, allowing them to respond in real time to audience engagement with the material. Additionally, hosts may email the Kahoot!! games to all participants so they can practice and improve their scores, which will increase participant engagement and learning retention. Hosts can also distribute the Kahoot!! games as self-paced challenges with individuals who couldn’t attend in person.
Part 1: Key Features of Kahoot
What more is there to discuss, Kahoot!? Every pupil adores it. Many instructors and educators use it all around the world to make learning simple, enjoyable, and interesting. Everyone may use it since it is free and extremely simple to use. These are some of its attributes:
- Quizzes may be made in a matter of minutes.
- Develop games based on the abilities of the kids. Playing at home or in the Zoom is simple for them.
- Various templates are offered. You can choose one of them with confidence.
- Kahoot! has the ability to be organized into many folders according to topics or subjects.
- Additionally, multiple choice questions may be included by quiz makers.
- Teachers using Kahoot! may combine different questions into one format, such as quizzes, polls, riddles, and slides.
- Use Apple Schoolwork, Google Zooms, and Microsoft Teams to share student-centered tasks.
Part 2: How to Host a Kahoot! Session within a Zoom Meeting
With the Zoom app, Kahoot! may be viewed, hosted, and used. It’s amazing that Kahoot!!, one of the most well-known brands in quiz-based learning, still provides a free-to-use platform, making it very accessible to both instructors and students. It’s also a useful resource for a hybrid class that combines online and classroom instruction. Most devices will be able to use the cloud-based service using a web browser. This implies that students using computers, tablets, and cellphones in class or at home may access this. Participants in Zoom Meetings may play games and learn without having to leave the Zoom meeting or bring a second device.
Step1Sign up for Zoom ahead of time and get ready. On the other hand, launch the Kahoot! test in your web browser, then be ready to share your screen in Zoom.
Step2As the participants come, allow them in and check to see whether you and they can both hear each other. To access the Kahoot! quiz, make sure they have a device or another browser tab open.
Step3Open the Kahoot! test and share it using Zoom’s “Share Screen” feature. While your screen is shared, continue to host the Kahoot! as normal. To view participants next to your shared screen, we advise selecting Side-by-Side Mode.
Part 3: How to Participate in Kahoot! Sessions within a Zoom Meeting
With more than 40 million ready-made games available on Kahoot!!, getting started is fast and simple. When time and resources are limited, hybrid or distant learning is ideal. After linking the Kahoot! to your Zoom account, you may utilize it. Use this app and start a meeting. Go to Apps on the toolbar and choose the program you wish to use. Select Who is Hosting to locate their host or to join a Kahoot! session being hosted by a friend or another player. Players may post a question to a shared screen on the Kahoot! platform. Kahoot!! just needs an account to be made in order to use it since it is free. Most devices may be used by students to access Kahoot!! from wherever there is an internet connection. This is how:
Step1Take the time to check that Zoom, Skype, Cisco Webex, or Google Hangout are operating and that your camera, microphone, and speaker are all operational.
Step2In the right-side panel, add the Kahoot!! app to your list of apps and click Join.
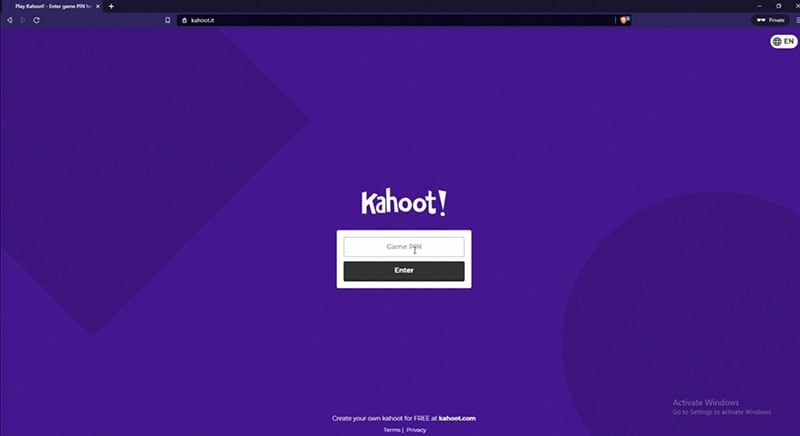
Step3The lobby will reveal your game PIN when you click the Play button, allowing the computer to show you a Kahoot! You may enter the game PIN and press Enter to join the Kahoot! session once the host shows their screen with you. To participate in a Kahoot! session, you don’t need a Kahoot! account.
Part 4: How to Record Zoom Meetings
Zoom is a conference tool that enables real-time, high-quality, low-latency communication. Filmora is an excellent video recorder for that reason, enabling users to capture on-screen activity such Zoom audio tracks and video conversations. Wondershare One of the most versatile and portable Zoom voice recorders is the Filmora. Even novices may easily utilize it due to its user-friendly UI. All you have to do is click the record button after choosing the proper audio source in the settings. The all-in-one video editing program Filmora allows you to record your screen with audio, a facecam, and a green screen effect. You can record the entire screen or just a portion of it, and you can perform a number of quick edits on your video using tools like trimming, cropping, changing the audio track’s volume, and so on.
How to Use Filmora to Record Zoom Lectures
Having said that, Filmora is a great Zoom recorder that can capture games, audio, and video conversations. This video recorder may be used to make video clip lessons in addition to recording movies, video games, and webcam footage. In addition to Zoom, it can also capture internet streaming audio. Here is information on how to record Zoom meetings using this software:
Step1Download and Install Filmora on your PC
To use this program for a number of tasks, including screen recording and recording editing, you must first download and install it on your computer. To achieve this, download the recording program by clicking the link below. Launch the program as soon as the download is finished to start the installation process, and then adhere to the on-screen directions to install and make this software available for usage.
Step2Choose the Record’s Ideal Position in the Zoom
Use it on your PC at this point. As soon as you start the program, a window interface with two choices for screen recording, editing already recorded videos, and generating videos will display. Choose the Recording option from the menu. When you click the record button, the program will direct you to the recording interface, where you can easily adjust the settings for your camera and audio. To add the microphone or Zoom sound in that particular field, use the necessary buttons as described below:
Step3Press the Record Button
It goes without saying that you must test your recording tools to ensure they are functional and capturing the highest quality audio. But once you’re ready, click the record button, which will allow you 3-5 seconds before starting to record the personalized screen of your PC as seen below:
Step4Export and Save Your Zoom Recording
You may now save the Zoom video for sharing on social media after making and modifying it. The following file types may be used to save the document: MP4, WMV, AVI, MOV, GIF, and MP3. The finest feature of Wondershare Filmora is the direct export and sharing of Zoom video recordings to YouTube; the only need is that you must be signed in to your YouTube account inside the application:
Because the MOV format is only available for online movies, you may also export your Zoom recordings to MP4 if you want to publish them to your YouTube channel. You are free to choose the format that best suits your needs. You may choose the encoder from a drop-down menu in the export options.
Conclusion
With the aid of several interesting tools and programs made accessible in this virtual environment, learning has now become enjoyable. Of them is Kahoot! In Zoom. It is an application that acts as a learning tool by providing fun games, tests, and a variety of other chances. In only a few minutes, quizzes may be made and distributed. Games and quizzes may be planned using this platform quite easily. The Kahoot! with Zoom will make it simpler than ever for corporate leaders to engage and encourage their team members with Kahoot!! engaging game-based learning experiences at a time when many organizations are staying virtual or planning for a hybrid model. Head towards recording Kahoot with Filmora to experience a smooth Kahoot! usage on Zoom. Plus, you can also share the gameplay afterwards.
In the educational game Kahoot! participants respond to multiple-choice questions based on trivia. Each participant uses their own controller to answer questions in the online game. There are several question kinds to pick from, allowing for complete customization of the test. Each player needs their own controller for Kahoot! The game questions will be shown in the Zoom/Google Meet window, but the answers must be entered using the controller. With the Kahoot!! app for Zoom, presenters may use play and friendly rivalry to increase participant engagement. Users may organize knowledge- and feedback-gathering pulse checks with staff members, encourage original thought with word clouds, and empower participants’ voices with surveys, open-ended questions, and other tools. Utilizing the brainstorm tool, organizations may crowdsource ideas and advance teamwork.
Engagement has emerged as a crucial component of successful learning, collaboration, and connection as the globe has increased the use of video communications in social and professional situations. Users may access, host, and play Kahoot!! games and educational information with other meeting participants using the Kahoot!! app for Zoom without ever leaving the Zoom Meeting or requiring a second device. Corporate executives may motivate their staff via speeches, meetings, and online activities. Meeting hosts will have immediate access to data and statistics from their Kahoot!! experience, allowing them to respond in real time to audience engagement with the material. Additionally, hosts may email the Kahoot!! games to all participants so they can practice and improve their scores, which will increase participant engagement and learning retention. Hosts can also distribute the Kahoot!! games as self-paced challenges with individuals who couldn’t attend in person.
Part 1: Key Features of Kahoot
What more is there to discuss, Kahoot!? Every pupil adores it. Many instructors and educators use it all around the world to make learning simple, enjoyable, and interesting. Everyone may use it since it is free and extremely simple to use. These are some of its attributes:
- Quizzes may be made in a matter of minutes.
- Develop games based on the abilities of the kids. Playing at home or in the Zoom is simple for them.
- Various templates are offered. You can choose one of them with confidence.
- Kahoot! has the ability to be organized into many folders according to topics or subjects.
- Additionally, multiple choice questions may be included by quiz makers.
- Teachers using Kahoot! may combine different questions into one format, such as quizzes, polls, riddles, and slides.
- Use Apple Schoolwork, Google Zooms, and Microsoft Teams to share student-centered tasks.
Part 2: How to Host a Kahoot! Session within a Zoom Meeting
With the Zoom app, Kahoot! may be viewed, hosted, and used. It’s amazing that Kahoot!!, one of the most well-known brands in quiz-based learning, still provides a free-to-use platform, making it very accessible to both instructors and students. It’s also a useful resource for a hybrid class that combines online and classroom instruction. Most devices will be able to use the cloud-based service using a web browser. This implies that students using computers, tablets, and cellphones in class or at home may access this. Participants in Zoom Meetings may play games and learn without having to leave the Zoom meeting or bring a second device.
Step1Sign up for Zoom ahead of time and get ready. On the other hand, launch the Kahoot! test in your web browser, then be ready to share your screen in Zoom.
Step2As the participants come, allow them in and check to see whether you and they can both hear each other. To access the Kahoot! quiz, make sure they have a device or another browser tab open.
Step3Open the Kahoot! test and share it using Zoom’s “Share Screen” feature. While your screen is shared, continue to host the Kahoot! as normal. To view participants next to your shared screen, we advise selecting Side-by-Side Mode.
Part 3: How to Participate in Kahoot! Sessions within a Zoom Meeting
With more than 40 million ready-made games available on Kahoot!!, getting started is fast and simple. When time and resources are limited, hybrid or distant learning is ideal. After linking the Kahoot! to your Zoom account, you may utilize it. Use this app and start a meeting. Go to Apps on the toolbar and choose the program you wish to use. Select Who is Hosting to locate their host or to join a Kahoot! session being hosted by a friend or another player. Players may post a question to a shared screen on the Kahoot! platform. Kahoot!! just needs an account to be made in order to use it since it is free. Most devices may be used by students to access Kahoot!! from wherever there is an internet connection. This is how:
Step1Take the time to check that Zoom, Skype, Cisco Webex, or Google Hangout are operating and that your camera, microphone, and speaker are all operational.
Step2In the right-side panel, add the Kahoot!! app to your list of apps and click Join.
Step3The lobby will reveal your game PIN when you click the Play button, allowing the computer to show you a Kahoot! You may enter the game PIN and press Enter to join the Kahoot! session once the host shows their screen with you. To participate in a Kahoot! session, you don’t need a Kahoot! account.
Part 4: How to Record Zoom Meetings
Zoom is a conference tool that enables real-time, high-quality, low-latency communication. Filmora is an excellent video recorder for that reason, enabling users to capture on-screen activity such Zoom audio tracks and video conversations. Wondershare One of the most versatile and portable Zoom voice recorders is the Filmora. Even novices may easily utilize it due to its user-friendly UI. All you have to do is click the record button after choosing the proper audio source in the settings. The all-in-one video editing program Filmora allows you to record your screen with audio, a facecam, and a green screen effect. You can record the entire screen or just a portion of it, and you can perform a number of quick edits on your video using tools like trimming, cropping, changing the audio track’s volume, and so on.
How to Use Filmora to Record Zoom Lectures
Having said that, Filmora is a great Zoom recorder that can capture games, audio, and video conversations. This video recorder may be used to make video clip lessons in addition to recording movies, video games, and webcam footage. In addition to Zoom, it can also capture internet streaming audio. Here is information on how to record Zoom meetings using this software:
Step1Download and Install Filmora on your PC
To use this program for a number of tasks, including screen recording and recording editing, you must first download and install it on your computer. To achieve this, download the recording program by clicking the link below. Launch the program as soon as the download is finished to start the installation process, and then adhere to the on-screen directions to install and make this software available for usage.
Step2Choose the Record’s Ideal Position in the Zoom
Use it on your PC at this point. As soon as you start the program, a window interface with two choices for screen recording, editing already recorded videos, and generating videos will display. Choose the Recording option from the menu. When you click the record button, the program will direct you to the recording interface, where you can easily adjust the settings for your camera and audio. To add the microphone or Zoom sound in that particular field, use the necessary buttons as described below:
Step3Press the Record Button
It goes without saying that you must test your recording tools to ensure they are functional and capturing the highest quality audio. But once you’re ready, click the record button, which will allow you 3-5 seconds before starting to record the personalized screen of your PC as seen below:
Step4Export and Save Your Zoom Recording
You may now save the Zoom video for sharing on social media after making and modifying it. The following file types may be used to save the document: MP4, WMV, AVI, MOV, GIF, and MP3. The finest feature of Wondershare Filmora is the direct export and sharing of Zoom video recordings to YouTube; the only need is that you must be signed in to your YouTube account inside the application:
Because the MOV format is only available for online movies, you may also export your Zoom recordings to MP4 if you want to publish them to your YouTube channel. You are free to choose the format that best suits your needs. You may choose the encoder from a drop-down menu in the export options.
Conclusion
With the aid of several interesting tools and programs made accessible in this virtual environment, learning has now become enjoyable. Of them is Kahoot! In Zoom. It is an application that acts as a learning tool by providing fun games, tests, and a variety of other chances. In only a few minutes, quizzes may be made and distributed. Games and quizzes may be planned using this platform quite easily. The Kahoot! with Zoom will make it simpler than ever for corporate leaders to engage and encourage their team members with Kahoot!! engaging game-based learning experiences at a time when many organizations are staying virtual or planning for a hybrid model. Head towards recording Kahoot with Filmora to experience a smooth Kahoot! usage on Zoom. Plus, you can also share the gameplay afterwards.
Also read:
- Updated 2024 Approved Making Slow Motion Videos in Final Cut Pro The Best Methods
- In 2024, Learn How to Blur the Background in Adobe Premiere Pro with Our Quick and Simple Step-by-Step Instructions to Make Your Subject More Attention-Grabbing
- New A Complete Guide to the Best Brand Story Videos |2023| for 2024
- New Best Guide of 8 Photo Collage Apps for PC for 2024
- 2024 Approved Add Zoom Blur Effect In Photoshop Step by Step
- New 15 Camera Shake Preset for Premiere Pro
- In 2024, Ideas to Make A Perfect Café Vlog
- Updated In 2024, How To Blur Background in Adobe Premiere Pro Detailed Guide
- In 2024, How to Create a Dynamic Text Animation in Filmora — Step-By-Step
- 2024 Approved Edit FLV Video Files with FLV Editor Windows, Mac,Android, iPhone
- Updated 6 Websites to Free Download Motivational Video Footage
- How To Be A Successful YouTuber
- In 2024, 10+ Top Unlimited FCPX Slideshow Templates
- Updated Top 8 Video Editor with Useful Masking
- New How to Convert Videos to Slow Motion?
- Things You Need to Know About Transparent PNG Remove and Convert for 2024
- Do You Want a LUT that You Can Use for Your High-Definition Content? You Can Use Rec 709 LUT Premiere Pro for Your HD Digital Media to Give the Perfect Result
- New Adobe Premiere Pro Rec 709 LUTs Finding The Best Choices for 2024
- New In 2024, How to Cut Videos on Mac without Using FFmpeg?
- 2024 Approved How To Remove Audio From Video
- New 2024 Approved Google Meet Green Screen
- A Step-by-Step Guide on Using ADB and Fastboot to Remove FRP Lock on your Xiaomi Redmi Note 12 5G
- How to share/fake gps on Uber for Poco M6 Pro 5G | Dr.fone
- How to Transfer Data After Switching From Realme 12 Pro+ 5G to Latest Samsung | Dr.fone
- In 2024, How to Bypass Google FRP Lock from Oppo F23 5G Devices
- In 2024, Can I use iTools gpx file to catch the rare Pokemon On Poco F5 Pro 5G | Dr.fone
- How to Transfer Data from Infinix Smart 8 Plus to Other Android Devices? | Dr.fone
- How To Transfer Data From Apple iPhone 6s Plus To Other iPhone devices? | Dr.fone
- Best 3 Honor Play 8T Emulator for Mac to Run Your Wanted Android Apps | Dr.fone
- Bypass Activation Lock From Apple iPhone 14 Pro - 4 Easy Ways
- How to Change GPS Location on Nokia C110 Easily & Safely | Dr.fone
- In 2024, Unlock Apple iPhone SE (2020) Without Passcode Easily | Dr.fone
- In 2024, How to Use Pokémon Emerald Master Ball Cheat On Vivo Y28 5G | Dr.fone
- How To Use Special Features - Virtual Location On Nubia Red Magic 8S Pro+? | Dr.fone
- How to Bypass iCloud Lock on Apple iPhone 13 Pro Max
- How to Recover Deleted Screenshots on iPhone XS Max? | Stellar
- In 2024, 3 Ways to Erase Apple iPhone 6 Plus When Its Locked Within Seconds
- Title: New 2024 Approved How to Add Motion Titles
- Author: Chloe
- Created at : 2024-04-24 07:08:29
- Updated at : 2024-04-25 07:08:29
- Link: https://ai-editing-video.techidaily.com/new-2024-approved-how-to-add-motion-titles/
- License: This work is licensed under CC BY-NC-SA 4.0.
