
:max_bytes(150000):strip_icc():format(webp)/relaxing-while-getting-his-studies-done-495857099-5a1ed8c5ec2f640037e369f4.jpg)
New 2024 Approved How to Add Text Animation Online
How to Add Text Animation Online
Before you can publish your recorded video to your viewers, you need to polish the video so that you can get everyone’s appreciation. This is where the magic of video editing comes into the scene. Editing your video is not just about trimming unnecessary parts and adding transitions and effects. The titles and texts you display on your video play a major role in your video content. In fact, you can create a video based on texts and titles only.
Instead of showing static texts, you should create animated texts and place them in the video wherever appropriate. You do not need to download a video editor on your computer or smartphone to add animated text to your video. You can make text animation online using an online text animation maker. We will illustrate the steps to create animated text with three different online editors.
Part 1. Use Biteable Animated Text
Biteable is a popular online platform where you can create amazing animated text video using Biteable text video maker. You can add animated text to your videos as well as photos. The user interface of Biteable is extremely easy for all users. You have to first create an account for free to get started. There are various templates available to create your animated text video from scratch. Here are the steps to use Biteable online text animation maker to create a video based on animated texts.
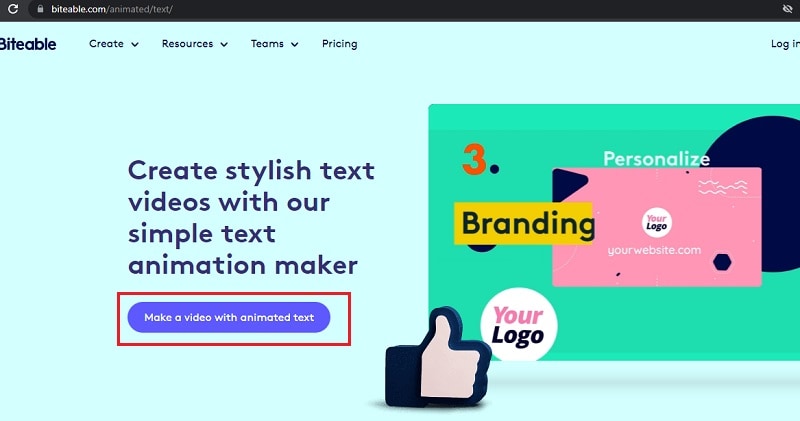
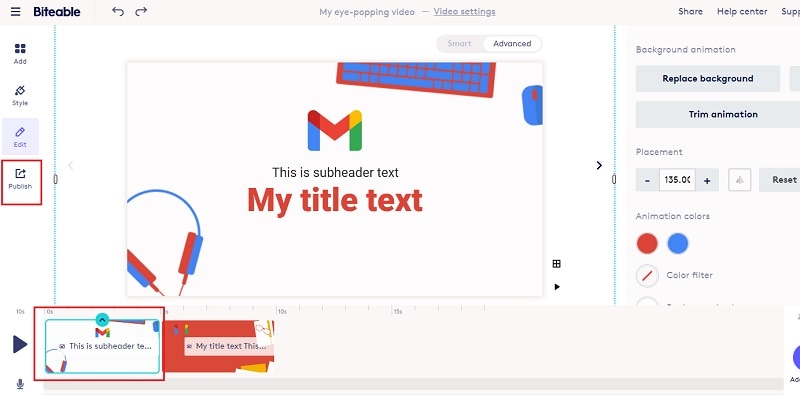
Step1Open your web browser and visit “biteable.com/animated/text”. Click on “Make a video with animated text” button.
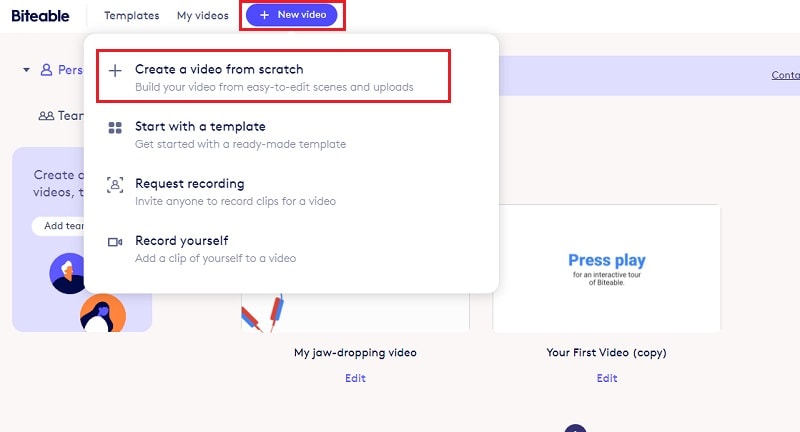
Step2Create an account by following the on-screen instructions. Click on New Video button and select “Create a video from scratch”.
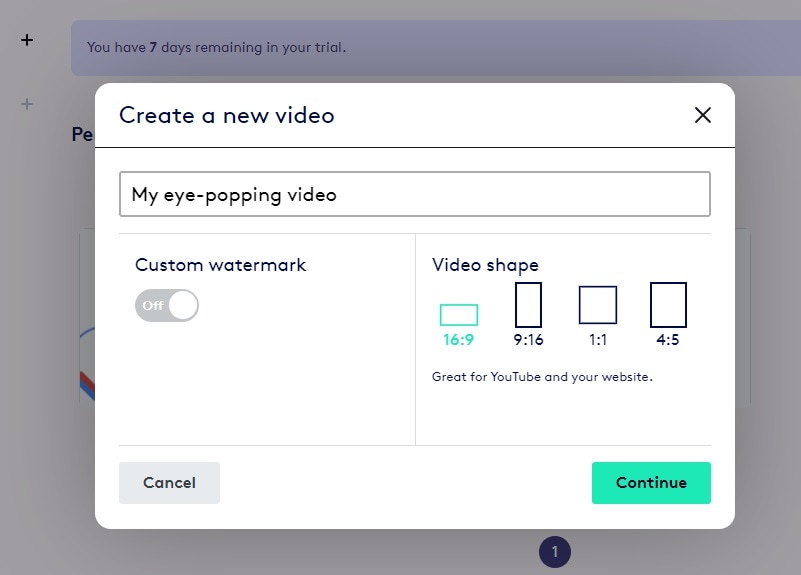
Step3Enter a name for the video and select a video shape as per your preference. Click on Continue button.
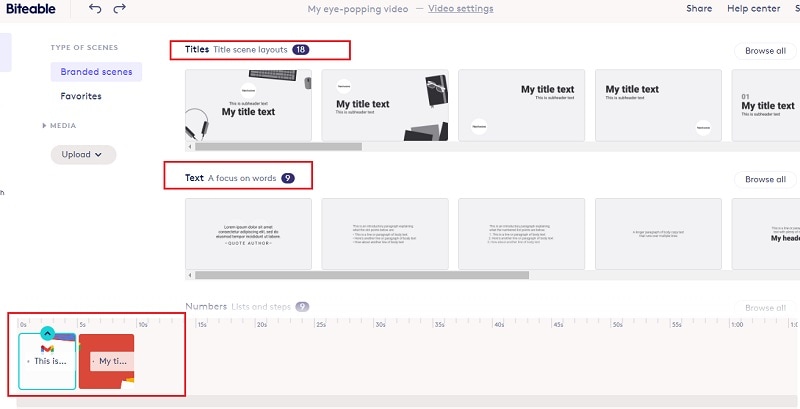
Step4Under Titles, select any template and it will be added to the Timeline. Similarly, you can add multiple titles templates, text templates, number templates and likewise. You will see them in the Timeline placed side by side. You can stretch their durations as per your requirements.
Step5Double-click on each template to edit the text in them and select the text animations as per your preference. Play the video and if you are satisfied, click on Publish button to save the video.
Part 2. Use Motionden Video Maker
Motionden is yet another powerful text animation maker where you can create free text animations instantly. There are over 1500 templates available to choose from in order to create text videos from scratch. You can choose video templates from any category as per the video theme you want. Besides, you can upload your video or photo and add texts and music as per your preference. Here are the steps to create animated text online using Motionden Video Maker.
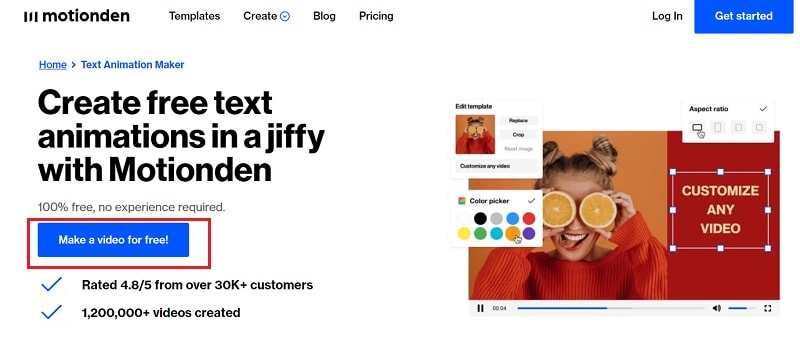
Step1Open your web browser and visit “motionden.com/video-maker/text-animation”. Click on “Make a video for free” button.
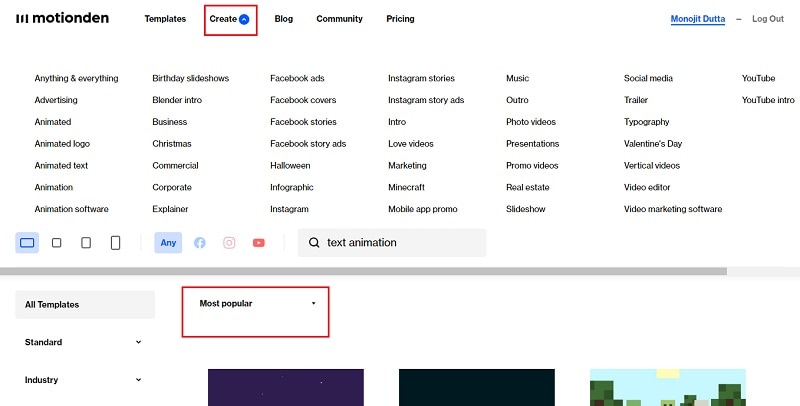
Step2Go to Create menu option and select any category of video templates. You can also check out the popular video templates and select anyone as per your preference.
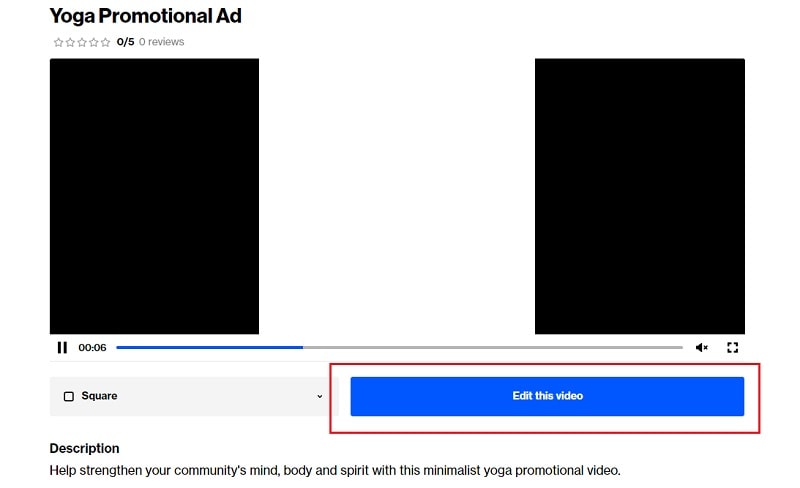
Step3For the selected category, you need to select the desired video template. Click on Edit Video and you can make changes to the template on the video editor as per your requirements. You need to sign up for free in order to continue and edit the template.
Step4Click on individual scenes and click on texts to customize them. Once the editing is done for each scene, click on Make Video button to build and save the text video.

Part 3. Use Flexclip Text Animation Tool
You can use Flexclip Text Animation Tool to create text video from scratch as well as add text to your recorded video. You should use Biteable and Motionden to create video with text effects only directly using video template while you should use Flexclip to edit your video and add text. You can add text effects to photos and videos and here are the steps to follow.
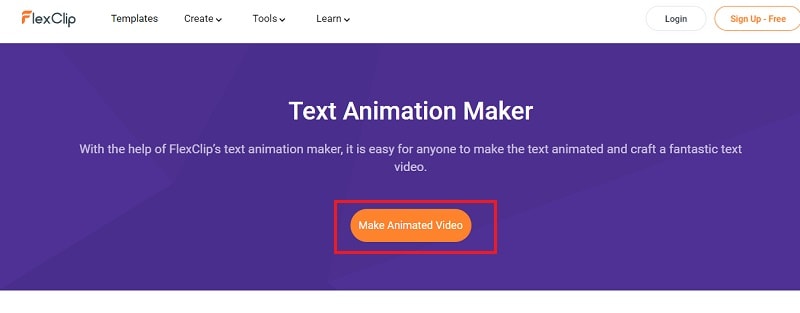
Step1Open web browser and visit “flexclip.com/features/text-animation.html”. Click on Make Animated Video button.
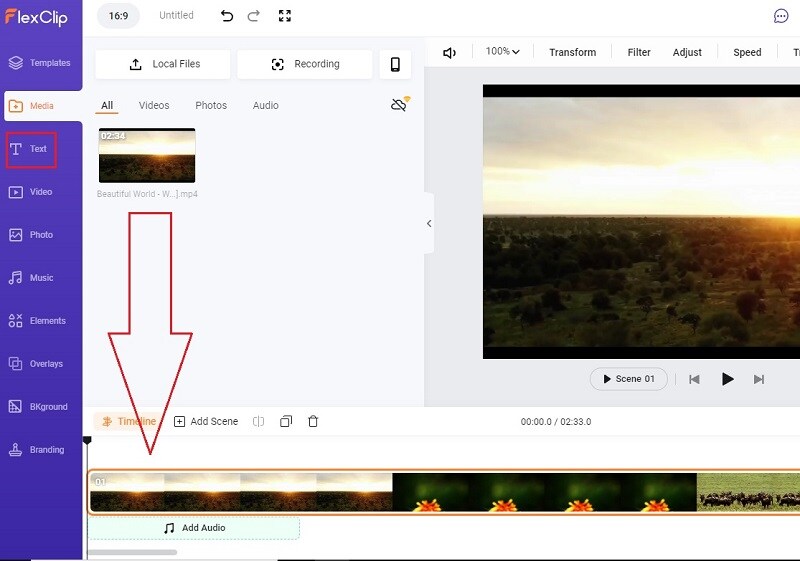
Step2You can choose from the available templates to create video with text from scratch. If you want to add text to your recorded video, go to Media tab. Click on Local Files button and upload your recorded video.

Step3Drag and drop the uploaded video into the Timeline. Thereafter, go to Text tab.
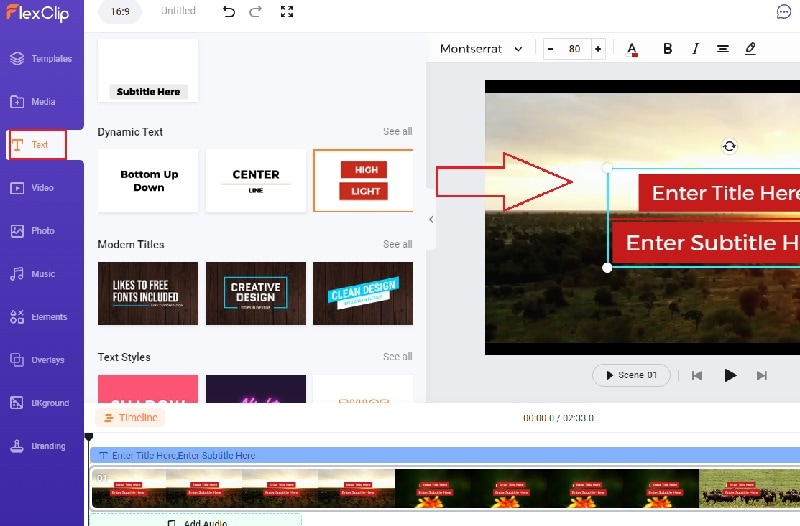
Step4You will see all the different text effects and animations. Place your mouse pointer to preview the animation. Drag and drop the select text template to the video on the Viewer. You can check the Timeline and stretch or compress the text layer as per your requirements.
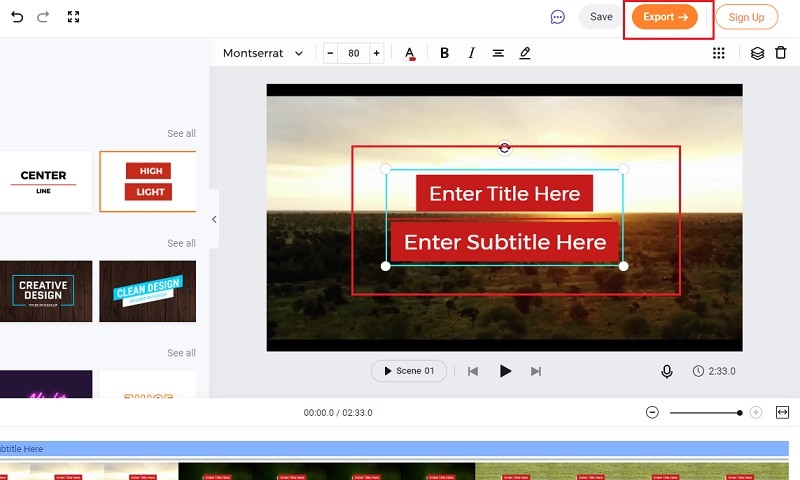
Step5Double-click on the text on Viewer window and customize the text as per your preference. Finally, click on Export button to save the edited video.
Conclusion
You can make video with animated text to make your presentation video eye-catching and attention-grabbing. We have mentioned three different online text animation makers that you can use to create animated text video from scratch by choosing different video templates. You can also edit your recorded video and add animated text wherever you want using Flexclip Text Animation Tool.
Free Download For Win 7 or later(64-bit)
Free Download For macOS 10.14 or later
How to Animate Your Designs With Canva GIF
How to Animate Your Designs With Canva GIF
An easy yet powerful editor
Numerous effects to choose from
Detailed tutorials provided by the official channel
If you are using social media daily in 2022, you must come across GIFs and maybe wonder how to make one. GIFs are the most helpful and eye-catching advertisements that can connect you with your followers through your choices. GIFs stand in the middle of images and videos. The biggest reason we use GIFs is that it represents the story or the expression in a flash. Besides, GIFs are smaller files to load and are perfect for your mobile.
In recent years, GIFs have taken the limelight in the market. The web’s most popular GIF database, GIPHY, has taken over 300 million daily active users. In 2018, Google bought the keyboard app and GIF archive to search for GIFs, Tenor. The app Tenor now has over 400 million GIF searches per day. Thus, you can realize the demand for creating GIFs is increasing now. Canva GIF is a great place to design your own GIFs.
After you create a GIF in Canva, you can use it in many fun ways in business, like promoting new sales on your products or a blog post, announcing a new webinar. In addition, you may announce your Instagram or Facebook live, share your point of view, advertise new launches, etc. In this article, we will discuss making GIFs and animating designs with GIF in Canva.
In this article
01 [How to Create a GIF in Canva](#Part 1)
02 [How to Animate Your Designs With Canva GIF](#Part 2)
Part 1 How to Create a GIF in Canva
Canva GIF has made creating your own GIFs very easy. It is one of the best GIF makers online. The plus point of using Canva to make online GIFs is that you do not require creating an account. You can straight get to work. However, if you wish to try out their premium designs and templates, you need a subscription to their premium plan. Let us now talk about making GIF in Canva and some of its tools and features to make your GIF more eye-catching.
Follow the steps below:
● Go to the web browser. Navigate to Canva. Open the GIF maker page on Canva. Select the “Make a free GIF” button to get started.

● On the left, go to the “Uploads” tab. Then, click on the “Upload media button” to add images.

● After the images are added, they will arrive under the “Images” tab. Now you have to drag and drop the images in the GIF maker.

● Next, click on the “+” button in the timeline and add the next picture. You have to repeat this step if you want to add more pictures.

● Now click on the clock icon present in the toolbar at the top. This is for defining the “duration” for how long the image will appear in the GIF. The timer can be set anywhere from 0.1 seconds to 30 seconds.

Adding Elements:
After you add the images, you need to make a GIF in Canva; you can put life into your GIF by adding multiple elements. Follow the steps to know more.
● Switch to the “Elements” tab present at the left. Now, you can explore the extensive library of Canva filled with stickers, photos, graphics, charts, etc. In addition, you can check out the “Graphics” tab for GIFs and select designs, stickers, badgers, and more of your choices.
● You have to select, drag, and drop the elements you want in your GIF. After you add them, resize, rotate, move and fit them as per your choice.

Adding Texts:
Besides graphics and stickers, you may also add text to your GIF to convey a message and make it more descriptive. Check out how.
● Click on the “Text” tab at the left. Next, select the type of texting you want, i.e., heading, sub-heading, or regular text.
● Now, you require to choose a “Text style.” Canva has more than a hundred styles and designs. Select any one of them of your choice and add it to your GIF.
● After you select the style, you can edit the text inside it. Change the font size, style, color, spacing, position, and more from the toolbar at the top. You may also animate it or add more effects to it and make it eye-catching. Use all the tools and edit accordingly.

Preview and download your GIF in Canva
After you have edited the images, preview the GIF using the “Play” button from the timeline. If you are satisfied with the GIF, it’s time to download it.
Click on the “Download button” present at the top right corner. Next, you need to go to the “File type” and select “GIF”. Select all the pages that you wish to include in your GIF. Then click on the “Download” tab. Your GIF will get successfully downloaded.

Pro Tips:
Keep it simple- The more clean and simple designs and GIFs you prepare, the more effective it looks. Also, you must focus on the message you want to convey to your audience to connect better.
Design page limit- The limit to animate design is less than ten pages. So, you need to decide and design accordingly.
Posting GIFs to Facebook- For uploading GIFs to Facebook, you have to upload them on a site like gimphy.com to hose the GIF for you.
Part 1 How to Animate Your Designs With Canva GIF
As you have already seen how to make a GIF on Canva, let’s talk about animating GIFs. You can always make your designs and GIFs look more attractive and over the top. You can use Canva to animate your designs with Canva GIFs
Follow the steps to do so:
● Select your dimension
Go to your web browser open Canva. Click on “Create a design” and select “Animated Social Media”. Then resize accordingly.
After you select the “Animated Social Media” template, a timer pops up. Here you can select for how long you need the frames to be. Using this function, you change the speed i.e., create faster or slower GIFs.
● Design your frames
Now you are about to design the first frame. When you have set everything, duplicate the first frame. In the second frame, you can move, replace or adjust graphics, which you want according to your choice.
● Change the speed of the slides
Next, you have to edit the timer and choose how long you want them to be going. It is present at the top of both of the graphics. The graphic will move faster if you shorten the time frame. You can select a slightly slower time frame to make the frameless distracting.
● Download
At the end, download the finished images and GIFs by selecting all the pages. Then, you can play it from the Downloads folder by simply pressing the space bar.
● Filmora
Apart from using Canva GIF maker, you can also use Wondershare Filmora Video Editor for making GIFs and videos. Filmora is considered one of the best video editing tools that can turn your videos into GIF images. Moreover, it has fabulous animation effects and texts. Filmora video editor has the following features:

Wondershare Filmora - Best Video Editor for Mac/Windows
5,481,435 people have downloaded it.
Build unique custom animations without breaking a sweat.
Focus on creating epic stories and leave the details to Filmora’s auto features.
Start a creative adventure with drag & drop effects and endless possibilities.
Filmora simplifies advanced features to save you time and effort.
Filmora cuts out repetition so you can move on to your next creative breakthrough.
● Add texts, titles, and animations in just a few clicks.
● Export to GIF format or other trending video formats
● More than 300 built-in outstanding visual effects are available.
Benefits of using Filmora to create GIFs and animated videos:
● Any technical and non-technical person can handle it. In addition, it is easy to use.
● You can create GIFs here on popular video formats such as .wav, .mpeg, .wmv, .mp4, .mkv, .evo, .dat, .avi, and more. There will not be any issues present while saving.
● The best part of this software tool is that you can edit .gif files with basic editing tools like color correction, splitting, rotation, cropping, combining two or more frames, speeding up the frame motion, or slowing it down requirement.
● You can edit files with interesting elements and graphics.
Filmora is a user-friendly software that is available for installation on their official website. You can turn videos into GIFs, edit them, and download them on your system.
● Key Takeaways from This Episode →
● Canva GIF is a great platform for designing your own GIFs.
● There are various features available to create eye-catching GIFs.
● Besides, Filmora software can also be used to create GIFs out of videos.
If you are using social media daily in 2022, you must come across GIFs and maybe wonder how to make one. GIFs are the most helpful and eye-catching advertisements that can connect you with your followers through your choices. GIFs stand in the middle of images and videos. The biggest reason we use GIFs is that it represents the story or the expression in a flash. Besides, GIFs are smaller files to load and are perfect for your mobile.
In recent years, GIFs have taken the limelight in the market. The web’s most popular GIF database, GIPHY, has taken over 300 million daily active users. In 2018, Google bought the keyboard app and GIF archive to search for GIFs, Tenor. The app Tenor now has over 400 million GIF searches per day. Thus, you can realize the demand for creating GIFs is increasing now. Canva GIF is a great place to design your own GIFs.
After you create a GIF in Canva, you can use it in many fun ways in business, like promoting new sales on your products or a blog post, announcing a new webinar. In addition, you may announce your Instagram or Facebook live, share your point of view, advertise new launches, etc. In this article, we will discuss making GIFs and animating designs with GIF in Canva.
In this article
01 [How to Create a GIF in Canva](#Part 1)
02 [How to Animate Your Designs With Canva GIF](#Part 2)
Part 1 How to Create a GIF in Canva
Canva GIF has made creating your own GIFs very easy. It is one of the best GIF makers online. The plus point of using Canva to make online GIFs is that you do not require creating an account. You can straight get to work. However, if you wish to try out their premium designs and templates, you need a subscription to their premium plan. Let us now talk about making GIF in Canva and some of its tools and features to make your GIF more eye-catching.
Follow the steps below:
● Go to the web browser. Navigate to Canva. Open the GIF maker page on Canva. Select the “Make a free GIF” button to get started.
● On the left, go to the “Uploads” tab. Then, click on the “Upload media button” to add images.
● After the images are added, they will arrive under the “Images” tab. Now you have to drag and drop the images in the GIF maker.
● Next, click on the “+” button in the timeline and add the next picture. You have to repeat this step if you want to add more pictures.
● Now click on the clock icon present in the toolbar at the top. This is for defining the “duration” for how long the image will appear in the GIF. The timer can be set anywhere from 0.1 seconds to 30 seconds.
Adding Elements:
After you add the images, you need to make a GIF in Canva; you can put life into your GIF by adding multiple elements. Follow the steps to know more.
● Switch to the “Elements” tab present at the left. Now, you can explore the extensive library of Canva filled with stickers, photos, graphics, charts, etc. In addition, you can check out the “Graphics” tab for GIFs and select designs, stickers, badgers, and more of your choices.
● You have to select, drag, and drop the elements you want in your GIF. After you add them, resize, rotate, move and fit them as per your choice.
Adding Texts:
Besides graphics and stickers, you may also add text to your GIF to convey a message and make it more descriptive. Check out how.
● Click on the “Text” tab at the left. Next, select the type of texting you want, i.e., heading, sub-heading, or regular text.
● Now, you require to choose a “Text style.” Canva has more than a hundred styles and designs. Select any one of them of your choice and add it to your GIF.
● After you select the style, you can edit the text inside it. Change the font size, style, color, spacing, position, and more from the toolbar at the top. You may also animate it or add more effects to it and make it eye-catching. Use all the tools and edit accordingly.
Preview and download your GIF in Canva
After you have edited the images, preview the GIF using the “Play” button from the timeline. If you are satisfied with the GIF, it’s time to download it.
Click on the “Download button” present at the top right corner. Next, you need to go to the “File type” and select “GIF”. Select all the pages that you wish to include in your GIF. Then click on the “Download” tab. Your GIF will get successfully downloaded.
Pro Tips:
Keep it simple- The more clean and simple designs and GIFs you prepare, the more effective it looks. Also, you must focus on the message you want to convey to your audience to connect better.
Design page limit- The limit to animate design is less than ten pages. So, you need to decide and design accordingly.
Posting GIFs to Facebook- For uploading GIFs to Facebook, you have to upload them on a site like gimphy.com to hose the GIF for you.
Part 1 How to Animate Your Designs With Canva GIF
As you have already seen how to make a GIF on Canva, let’s talk about animating GIFs. You can always make your designs and GIFs look more attractive and over the top. You can use Canva to animate your designs with Canva GIFs
Follow the steps to do so:
● Select your dimension
Go to your web browser open Canva. Click on “Create a design” and select “Animated Social Media”. Then resize accordingly.
After you select the “Animated Social Media” template, a timer pops up. Here you can select for how long you need the frames to be. Using this function, you change the speed i.e., create faster or slower GIFs.
● Design your frames
Now you are about to design the first frame. When you have set everything, duplicate the first frame. In the second frame, you can move, replace or adjust graphics, which you want according to your choice.
● Change the speed of the slides
Next, you have to edit the timer and choose how long you want them to be going. It is present at the top of both of the graphics. The graphic will move faster if you shorten the time frame. You can select a slightly slower time frame to make the frameless distracting.
● Download
At the end, download the finished images and GIFs by selecting all the pages. Then, you can play it from the Downloads folder by simply pressing the space bar.
● Filmora
Apart from using Canva GIF maker, you can also use Wondershare Filmora Video Editor for making GIFs and videos. Filmora is considered one of the best video editing tools that can turn your videos into GIF images. Moreover, it has fabulous animation effects and texts. Filmora video editor has the following features:
Wondershare Filmora - Best Video Editor for Mac/Windows
5,481,435 people have downloaded it.
Build unique custom animations without breaking a sweat.
Focus on creating epic stories and leave the details to Filmora’s auto features.
Start a creative adventure with drag & drop effects and endless possibilities.
Filmora simplifies advanced features to save you time and effort.
Filmora cuts out repetition so you can move on to your next creative breakthrough.
● Add texts, titles, and animations in just a few clicks.
● Export to GIF format or other trending video formats
● More than 300 built-in outstanding visual effects are available.
Benefits of using Filmora to create GIFs and animated videos:
● Any technical and non-technical person can handle it. In addition, it is easy to use.
● You can create GIFs here on popular video formats such as .wav, .mpeg, .wmv, .mp4, .mkv, .evo, .dat, .avi, and more. There will not be any issues present while saving.
● The best part of this software tool is that you can edit .gif files with basic editing tools like color correction, splitting, rotation, cropping, combining two or more frames, speeding up the frame motion, or slowing it down requirement.
● You can edit files with interesting elements and graphics.
Filmora is a user-friendly software that is available for installation on their official website. You can turn videos into GIFs, edit them, and download them on your system.
● Key Takeaways from This Episode →
● Canva GIF is a great platform for designing your own GIFs.
● There are various features available to create eye-catching GIFs.
● Besides, Filmora software can also be used to create GIFs out of videos.
Add Emoji to Linkedin Post – 5 Tips You Need to Know
Add Emoji to Linkedin Post - 5 Tips You Need to Know
An easy yet powerful editor
Numerous effects to choose from
Detailed tutorials provided by the official channel
Emojis are fun loving symbols as they represent your real emotions. Adding emojis to your LinkedIn can add personality to your posts. If you want to stand out your posts from others – use emojis.
In this article
01 [Why Emojis Matter](#Part 1)
02 [5 Tips for You to Add Emoji to Linkedin Posts](#Part 2)
03 [Add Emoji to Linkedin Post Q&A](#Part 3)
Part 1 Why Emojis Matter
Emojis are a visual portrayal of an emotion, object, sign and symbol. Emojis are very helpful in expressing our actual feelings to anyone. Sometimes you want to express anything to anyone but you cannot express them with your words. This is where emojis help you in portraying the actual meaning of the message. Emojis expresses their feelings better than words.
Emojis are becoming the common language in the 21st century. “A picture is worth a thousand words” is totally relevant in today’s time. Language is evolving day by day and emojis are a part of this evolvement as you don’t have to write long sentences, emojis convey the content in fewer words. Thus, they are now also used in the professional environment. They make the posts more engaging and also make other remember you. Emojis in some or the other way also make you popular and appear to be friendly.

Here is why they are important.
01Make your LinkedIn profile more intelligible
Using emojis in your LinkedIn bio will catch more attention from the viewers and make them to read your LinkedIn profile. However, it is essential to add the right emoji at the right place. Reading a bio which is of (2800) characters is boring and hardly any viewer is going to invest time in reading it. If you will add some emoji it will add more value to your bio and will also make your bio interesting.
Thus, it is one of the best ways to make your content much more interactive and engaging by adding emojis to it. Emojis are more advanced form of texts, which makes the reader engaged.
02Using emoji to support branding
You can use emojis to connect to your audience and it makes them feel more relatable because it is what they are using in their daily lives. You can use a perfect skin tone of emoji to expresses your brand logo.
Using an emoji as a symbol which is relevant to your brand, again and again will help the viewers to recognize the brand whenever they will see that emoji. This is how an emoji helps you to support your brand. Writing only text makes it boring and decreases the audience viewership. Adding emojis is a creative idea as they will amplify your content and make it more interesting.
03Portraying your personality
Linkedin is a professional online platform where how you represent yourself is very important. Putting anything can affect your personality as it shows who you are, what are your beliefs or your values. Use emojis which are relevant, according to your personality. It makes your personality more impactful. Adding emojis is a creative aspect of job search.
04Universality of emojis
If you are from other country and writing things which are known to your location and unknown to other person from different country, how will he/she be able to understand? A simple solution to this is, use of emojis because they are universal and known to everyone. It can be understood easily as they represent what you want to express.
Part 2 5 Tips for you to Add Emoji to Linkedin Post
● Adding an emoji helps you to express what you want to say. Sometimes texts can be monotonous, so adding an emojis which are relevant can be helpful. Texts are not enough sometimes to actually express what we are trying to say. Adding emoji to it will be a great idea but don’t stuff a lot emojis.
● Using the perfect emoji depending on the situation is a thing you should always keep in mind. There are varieties of emojis from which you can choose. Selection of perfect emoji which portrays your actual situation is actually very important.
● Using the wrong emoji that doesn’t suit the situation can offend anyone. For example, if a person is having a bad day and he/she is telling it to you and you send them a laughing emoji, it can make them feel bad and insulted.
● Placing an emoji on the right place plays an important role. Suppose if content is funny and on the other side you are putting a sad emoji then your content representation will go out of context. So the placement of an emoji on the right place is important.
● Emojis work as an upliftment of your content so placing them in wrong place will not make a match between your content and emoji. The result is it will mislead the audience. If you will use wrong emojis, viewers will stop relating to your content. So, it is important to keep in mind that you don’t have to stuff emojis anywhere, place them where you think it’s relevant to the content.
Part 3 Add Emoji to Linkedin Post Q&A
ADD EMOJI TO LINKEDIN POST Q&A
How can you add an emoji to your linkedin post?
A. You can insert an emoji to your linkedin post, emails or in a message by using a keyboard shortcut CTRL + CMD + SPACE..
Is it a good idea to use emojis on linkedin?
A. You can add emojis to your Linkedin profile as well as posts as it makes your linkedin profile more readable. If you will use emojis people will notice your posts and it will stand out from the crowd. Adding emojis to your post will give you more exposure on your profile. Emojis are helpful in adding actual emotions to your online communication.
Using emojis at work is professional or unprofessional?
A. Some people think that using emojis at work is professional because sometimes only content is not enough to explain what you wanted to convey. Adding an emoji to your work will add more value to it and will make it readable to the audience. While some people think that using emojis at work is highly unprofessional as it breaks the bar of professionalism and makes it look more casual.
What is the advantage of adding emojis to your communication?
A. Emojis express the facial expression, gestures and emotions. Having a communication online and adding emojis to it will make the communication stronger, as it represents what you want to say with what expression and emotions. It will add feelings to your communication.
What will be the best software to access latest emojis?
A. You can consider using Filmora. Filmora is editing and video creation software which was developed by Wondershare and it is the best software and it has its own built-in animated emoji library. In Wondershare Filmora Video Editor click on the elements option, as it contains various categories such as shapes, badges and emojis. Click on the emoji category and select any according to your content. Drag and drop the emoji where you want to place it then adjust the duration and size according to you.
For Win 7 or later (64-bit)
For macOS 10.12 or later
● Ending Thoughts →
● Emoji expresses your gestures, facial expressions, and your actual emotions. Adding emoji will add more value to your content and make you stand out from others.
● It can also be used professionally if you know what will be the right emoji and place to insert it. It helps you to covey your message correctly and makes your linkedin posts readable.
● You can consider using Filmora as it has its own built-in animated emoji library and variety of emojis from which you can choose and place them wherever you want.
Emojis are fun loving symbols as they represent your real emotions. Adding emojis to your LinkedIn can add personality to your posts. If you want to stand out your posts from others – use emojis.
In this article
01 [Why Emojis Matter](#Part 1)
02 [5 Tips for You to Add Emoji to Linkedin Posts](#Part 2)
03 [Add Emoji to Linkedin Post Q&A](#Part 3)
Part 1 Why Emojis Matter
Emojis are a visual portrayal of an emotion, object, sign and symbol. Emojis are very helpful in expressing our actual feelings to anyone. Sometimes you want to express anything to anyone but you cannot express them with your words. This is where emojis help you in portraying the actual meaning of the message. Emojis expresses their feelings better than words.
Emojis are becoming the common language in the 21st century. “A picture is worth a thousand words” is totally relevant in today’s time. Language is evolving day by day and emojis are a part of this evolvement as you don’t have to write long sentences, emojis convey the content in fewer words. Thus, they are now also used in the professional environment. They make the posts more engaging and also make other remember you. Emojis in some or the other way also make you popular and appear to be friendly.
Here is why they are important.
01Make your LinkedIn profile more intelligible
Using emojis in your LinkedIn bio will catch more attention from the viewers and make them to read your LinkedIn profile. However, it is essential to add the right emoji at the right place. Reading a bio which is of (2800) characters is boring and hardly any viewer is going to invest time in reading it. If you will add some emoji it will add more value to your bio and will also make your bio interesting.
Thus, it is one of the best ways to make your content much more interactive and engaging by adding emojis to it. Emojis are more advanced form of texts, which makes the reader engaged.
02Using emoji to support branding
You can use emojis to connect to your audience and it makes them feel more relatable because it is what they are using in their daily lives. You can use a perfect skin tone of emoji to expresses your brand logo.
Using an emoji as a symbol which is relevant to your brand, again and again will help the viewers to recognize the brand whenever they will see that emoji. This is how an emoji helps you to support your brand. Writing only text makes it boring and decreases the audience viewership. Adding emojis is a creative idea as they will amplify your content and make it more interesting.
03Portraying your personality
Linkedin is a professional online platform where how you represent yourself is very important. Putting anything can affect your personality as it shows who you are, what are your beliefs or your values. Use emojis which are relevant, according to your personality. It makes your personality more impactful. Adding emojis is a creative aspect of job search.
04Universality of emojis
If you are from other country and writing things which are known to your location and unknown to other person from different country, how will he/she be able to understand? A simple solution to this is, use of emojis because they are universal and known to everyone. It can be understood easily as they represent what you want to express.
Part 2 5 Tips for you to Add Emoji to Linkedin Post
● Adding an emoji helps you to express what you want to say. Sometimes texts can be monotonous, so adding an emojis which are relevant can be helpful. Texts are not enough sometimes to actually express what we are trying to say. Adding emoji to it will be a great idea but don’t stuff a lot emojis.
● Using the perfect emoji depending on the situation is a thing you should always keep in mind. There are varieties of emojis from which you can choose. Selection of perfect emoji which portrays your actual situation is actually very important.
● Using the wrong emoji that doesn’t suit the situation can offend anyone. For example, if a person is having a bad day and he/she is telling it to you and you send them a laughing emoji, it can make them feel bad and insulted.
● Placing an emoji on the right place plays an important role. Suppose if content is funny and on the other side you are putting a sad emoji then your content representation will go out of context. So the placement of an emoji on the right place is important.
● Emojis work as an upliftment of your content so placing them in wrong place will not make a match between your content and emoji. The result is it will mislead the audience. If you will use wrong emojis, viewers will stop relating to your content. So, it is important to keep in mind that you don’t have to stuff emojis anywhere, place them where you think it’s relevant to the content.
Part 3 Add Emoji to Linkedin Post Q&A
ADD EMOJI TO LINKEDIN POST Q&A
How can you add an emoji to your linkedin post?
A. You can insert an emoji to your linkedin post, emails or in a message by using a keyboard shortcut CTRL + CMD + SPACE..
Is it a good idea to use emojis on linkedin?
A. You can add emojis to your Linkedin profile as well as posts as it makes your linkedin profile more readable. If you will use emojis people will notice your posts and it will stand out from the crowd. Adding emojis to your post will give you more exposure on your profile. Emojis are helpful in adding actual emotions to your online communication.
Using emojis at work is professional or unprofessional?
A. Some people think that using emojis at work is professional because sometimes only content is not enough to explain what you wanted to convey. Adding an emoji to your work will add more value to it and will make it readable to the audience. While some people think that using emojis at work is highly unprofessional as it breaks the bar of professionalism and makes it look more casual.
What is the advantage of adding emojis to your communication?
A. Emojis express the facial expression, gestures and emotions. Having a communication online and adding emojis to it will make the communication stronger, as it represents what you want to say with what expression and emotions. It will add feelings to your communication.
What will be the best software to access latest emojis?
A. You can consider using Filmora. Filmora is editing and video creation software which was developed by Wondershare and it is the best software and it has its own built-in animated emoji library. In Wondershare Filmora Video Editor click on the elements option, as it contains various categories such as shapes, badges and emojis. Click on the emoji category and select any according to your content. Drag and drop the emoji where you want to place it then adjust the duration and size according to you.
For Win 7 or later (64-bit)
For macOS 10.12 or later
● Ending Thoughts →
● Emoji expresses your gestures, facial expressions, and your actual emotions. Adding emoji will add more value to your content and make you stand out from others.
● It can also be used professionally if you know what will be the right emoji and place to insert it. It helps you to covey your message correctly and makes your linkedin posts readable.
● You can consider using Filmora as it has its own built-in animated emoji library and variety of emojis from which you can choose and place them wherever you want.
How To Slow Down GIF: Building an Understanding
Graphic interchange format, mostly known as GIF, is extensively used to convey information. GIF is a communication tool in bitmap image format that clearly conveys your online content. When sharing GIF images, playback speed is the most important thing to count. If the playback speed of the GIF is faster than usual, viewers may skip their focus essential data.
As a solution, you must learn how to adjust slow motion GIF’s speed. This article will teach you the stepwise methods to achieve a slow-motion GIF. Before heading towards the methods, learn about some GIF video platforms. By the end, you will be able to make a matchless slow-mo GIF through a desktop solution.
Slow Motion Video Maker Slow your video’s speed with better control of your keyframes to create unique cinematic effects!
Make A Slow Motion Video Make A Slow Motion Video More Features

Part 1: Where Can I Get Impressive Slow-Motion GIFs for Myself?
Slowing down GIFs brings viewers’ attention to specific actions in video content. It exaggerates facial expressions or movements in the videos, leading to humorous results. Creators choose to slow down GIFs to convey particular moods and styles. Different contexts require different slow-mo GIF videos; below are some platforms to cater to all of them.
1. Giphy
One of the famous platforms for GIFs is Giphy, which offers an extensive collection of GIFs. If you want a GIF that can add humor to your content, pick the entertainment category from Giphy. It provides different domains of GIFs for your ease of selection. Some of its categories include sports, gaming, animals, and cartoons.

Key Features
- Using this platform, you can not only get a GIF but also upload one. Graphics designers or GIF creators can use this place to publish their work globally.
- After selecting one GIF, you can share it on any platform. It allows you to embed the GIF directly on websites or share it through links.
- Every GIF on Giphy provides in-depth details like size, frame, and source. This way, you can instantly choose one that matches your project’s requirements.
2. Tenor
Another popular platform to get high-quality GIFs is Tenor. It supports multiple languages in its interface so international users can better comprehend it. Apart from that, there are many categories in the trending searches of GIFs. It shows which domain of GIFs is ranking the most. Some trending tenors include cars, snow, happy holidays, good nights, and GIFs.

Key Features
- When you pick one GIF, you can change its format before downloading. In this regard, you can choose HD, MP4, and SD quality options.
- This platform detects your selection and suggests relevant GIFs afterward. For instance, if you pick a cat GIF, then you will find a cat GIF when scrolling down.
- Tenor provides GIF specification details under each. Besides, you can share the selected GIF image through the URL and embedded link.
Part 2: What to Do If You Want to Slow Down GIFs: The Best Tools
Knowing platforms, as mentioned above, makes it easier for you to avail the desired GIF. After grabbing one of your choices, you can make it a slow-motion GIF, if required. To do so, there are several tools in the market. Some of them are explained below, along with step-by-step instructions on how to use them.
List of Best Tools to Slow Down GIFs
1. Ezgif.com
This tool is primarily responsible for online GIF making and image editing. Besides, it can convert your video into GIF, resize, cut, crop, and optimize them. Moreover, you can add effects and text to your videos or GIFs to make them appealing. GIF animation speed changers are the real game changers among online solutions:
Step 1
Browse the official site of Ezgif.com and tap on the “Effects” section. Afterward, choose the “Adjust GIF Speed” section to proceed to further options. There, click the “Choose File” white button and look for the file you want to slow down. Optionally, paste the URL link in the given section and tap “Upload” to continue.

Step 2
Scroll down the window and insert the digits on which percentage you want to slow down the speed. Afterward, click the “Change Speed” button and find a slow-motion GIF in the output image.

2. VEED.io
VEED.io is a preferred choice by many creators for professional or high-quality videos. It offers screen recording, video editing, and subtitle translation services. Apart from that, it can fix GIF speed with the GIF speed changer feature. After changing speed, you can add transitions and animation effects in Veed.io. For now, let’s just stick to the slow-mo GIF in the following steps:
Step 1
Access the “GIF Speed Changer” in VEED.io, start by tapping “Choose GIF File” and enter the editing screen.

Step 2
From the next screen, you will get a pop-up menu first. You have to hit the “Upload a File” option and select a GIF file to import into VEED.io. Under the video preview, click on the “Speed” icon next to the “Sound” symbol. Then, choose “0.5x” and get a slow-down GIF preview in front of you.

3. Canva
Students must be aware of this platform as a presentation template provider. Canva is a tool that provides stunning templates to customize with its cloud storage system. Gradually, it’s turning more into a video editing platform. Regarding slow-motion GIFs, it can change the GIF speed online. After slowing down the GIF, you can convert it into MP4 or enhance it by adding graphics.
Step 1
Reach out to the GIF Speed Changer feature of Canva’s video editing. Then, tap the “Change GIF Speed” button to access the editing screen.

Step 2
Navigate towards the left-side panel and hit the “Upload Files.” Now, search and select your GIF to import in Canva’s editing window. Afterward, go to the “Playback” option at the top left and then direct to the left panel. Move the “Video Speed” slider to the left for a Slow-mo GIF. Click on the video for a preview, or look for any other playback adjustments.

Part 3: Make Impressive Slow Mo GIFs Using Desktop Solution
Are you getting customized speed adjustment options using any of the above tools? The answer is quite clear: no online tools do not offer personalization for slow-motion GIFs. That’s where you need Wondershare Filmora as a better alternative. It is currently the best video editor that transforms your videos into art pieces.
With more than 10 billion stock media, you don’t have to browse different sites. Filmora is an all-in-all platform that can not only edit your video but also aims to polish it to the next level. Besides, editors can use Filmora anywhere with just a password.
Free Download For Win 7 or later(64-bit)
Free Download For macOS 10.14 or later
How to Make Slow-motion GIF with Filmora
After discovering the top-notch features of Filmora, it’s time to use it. Although it’s very simple to operate, this step-by-step guide will help you process faster:
Step 1Launch Filmora and Import GIF to the Timeline
Download Wondershare Filmora from its official site. After a successful launch, you will enter its main screen. Look for the “New Project” option from the main interface. Tapping on the New Project, you will find the editing screen. Import your GIF in the media panel and drag it into the timeline section to begin the process.

Step 2Slow Down the GIF with Optical Flow
Right-click on the video and pick the “Uniform Speed” option from the list. This way, you will find an editing panel on the right side. Now, you can move the “Speed” slider towards the left. You can press the space bar and get the slow-motion GIF preview. Direct downward and choose the “Optical Flow” option from the extended menu of “AI Interpolation.”

Step 3Continue to Edit or Head to Export the Media
Finally, you will get a slow but high-quality GIF. Now, it’s up to you to continue exploring other features of Filmora or head to save the file. To save the file, go to the top right corner and press the “Export” button.

Key Features Marking Filmora’s Greatness
Filmora is proven to be the easiest software with the most powerful editing features. As proof, you can read the main features of Filmora to comprehend its functionalities better.
1. Speed Ramping
Create a unique cinematic effect in your video by adjusting keyframes. Filmora offers speed ramping features to bring a smooth transition in slow-motion or fast motions. In speed ramping, you get 6 templates, such as bullet time, montage, and jumper. Using those templates, you don’t need to manually adjust keyframes for speed ramping. Also, you can retain the original pitch of the audio after changing the speed.
2. AI Copilot Editing
To boost productivity, Filmora provides an AI Copilot editor option. It saves time that could be wasted searching for some feature or making the editing perfect. Users can ask anything to copilot in natural language. They can take help from an already existing question in the copilot editors. This feature will guide you toward practical actions through navigation buttons.
3. AI Music Generator
Who else is fed up with finding the perfect music for Vlog? Commonly, you didn’t find a video of exact length and mood. Thus, Filmora enables you to generate a soundtrack according to your mood and video length. Using it, you just have to prompt with the number of tracks, mood, and length. The AI-generated music will not require copyrights, so you can use it freely anywhere.
4. AI Image
Have you ever heard that any video editor can convert your text prompts into images? Filmora is offering this option, especially for people who are struggling to get their desired image. For this purpose, they need to describe images in simple language. Afterward, they are required to pick one style for accurate results.
5. AI Copywriting
Do you have a deadline for script submission, but it is not ready yet? Leave this headache to Filmora’s AI copywriting feature, which aims to produce engaging scripts. With ChatGPT integration, it can generate YouTube titles and descriptions. Furthermore, you can ask AI to convert your script into an appealing video.
Conclusion
To summarize, slowing down is the ultimate solution to retain the viewer’s attention. In this article, you have seen the top-notch platforms for slow-motion GIFs. They are not enough for remarkable videos because of the limited speed adjustment options. So, using Filmora remains the best option in providing easier ways to customize the speed of GIFs.
Make A Slow Motion Video Make A Slow Motion Video More Features
Part 1: Where Can I Get Impressive Slow-Motion GIFs for Myself?
Slowing down GIFs brings viewers’ attention to specific actions in video content. It exaggerates facial expressions or movements in the videos, leading to humorous results. Creators choose to slow down GIFs to convey particular moods and styles. Different contexts require different slow-mo GIF videos; below are some platforms to cater to all of them.
1. Giphy
One of the famous platforms for GIFs is Giphy, which offers an extensive collection of GIFs. If you want a GIF that can add humor to your content, pick the entertainment category from Giphy. It provides different domains of GIFs for your ease of selection. Some of its categories include sports, gaming, animals, and cartoons.
Key Features
- Using this platform, you can not only get a GIF but also upload one. Graphics designers or GIF creators can use this place to publish their work globally.
- After selecting one GIF, you can share it on any platform. It allows you to embed the GIF directly on websites or share it through links.
- Every GIF on Giphy provides in-depth details like size, frame, and source. This way, you can instantly choose one that matches your project’s requirements.
2. Tenor
Another popular platform to get high-quality GIFs is Tenor. It supports multiple languages in its interface so international users can better comprehend it. Apart from that, there are many categories in the trending searches of GIFs. It shows which domain of GIFs is ranking the most. Some trending tenors include cars, snow, happy holidays, good nights, and GIFs.
Key Features
- When you pick one GIF, you can change its format before downloading. In this regard, you can choose HD, MP4, and SD quality options.
- This platform detects your selection and suggests relevant GIFs afterward. For instance, if you pick a cat GIF, then you will find a cat GIF when scrolling down.
- Tenor provides GIF specification details under each. Besides, you can share the selected GIF image through the URL and embedded link.
Part 2: What to Do If You Want to Slow Down GIFs: The Best Tools
Knowing platforms, as mentioned above, makes it easier for you to avail the desired GIF. After grabbing one of your choices, you can make it a slow-motion GIF, if required. To do so, there are several tools in the market. Some of them are explained below, along with step-by-step instructions on how to use them.
List of Best Tools to Slow Down GIFs
1. Ezgif.com
This tool is primarily responsible for online GIF making and image editing. Besides, it can convert your video into GIF, resize, cut, crop, and optimize them. Moreover, you can add effects and text to your videos or GIFs to make them appealing. GIF animation speed changers are the real game changers among online solutions:
Step 1
Browse the official site of Ezgif.com and tap on the “Effects” section. Afterward, choose the “Adjust GIF Speed” section to proceed to further options. There, click the “Choose File” white button and look for the file you want to slow down. Optionally, paste the URL link in the given section and tap “Upload” to continue.
Step 2
Scroll down the window and insert the digits on which percentage you want to slow down the speed. Afterward, click the “Change Speed” button and find a slow-motion GIF in the output image.
2. VEED.io
VEED.io is a preferred choice by many creators for professional or high-quality videos. It offers screen recording, video editing, and subtitle translation services. Apart from that, it can fix GIF speed with the GIF speed changer feature. After changing speed, you can add transitions and animation effects in Veed.io. For now, let’s just stick to the slow-mo GIF in the following steps:
Step 1
Access the “GIF Speed Changer” in VEED.io, start by tapping “Choose GIF File” and enter the editing screen.
Step 2
From the next screen, you will get a pop-up menu first. You have to hit the “Upload a File” option and select a GIF file to import into VEED.io. Under the video preview, click on the “Speed” icon next to the “Sound” symbol. Then, choose “0.5x” and get a slow-down GIF preview in front of you.
3. Canva
Students must be aware of this platform as a presentation template provider. Canva is a tool that provides stunning templates to customize with its cloud storage system. Gradually, it’s turning more into a video editing platform. Regarding slow-motion GIFs, it can change the GIF speed online. After slowing down the GIF, you can convert it into MP4 or enhance it by adding graphics.
Step 1
Reach out to the GIF Speed Changer feature of Canva’s video editing. Then, tap the “Change GIF Speed” button to access the editing screen.
Step 2
Navigate towards the left-side panel and hit the “Upload Files.” Now, search and select your GIF to import in Canva’s editing window. Afterward, go to the “Playback” option at the top left and then direct to the left panel. Move the “Video Speed” slider to the left for a Slow-mo GIF. Click on the video for a preview, or look for any other playback adjustments.
Part 3: Make Impressive Slow Mo GIFs Using Desktop Solution
Are you getting customized speed adjustment options using any of the above tools? The answer is quite clear: no online tools do not offer personalization for slow-motion GIFs. That’s where you need Wondershare Filmora as a better alternative. It is currently the best video editor that transforms your videos into art pieces.
With more than 10 billion stock media, you don’t have to browse different sites. Filmora is an all-in-all platform that can not only edit your video but also aims to polish it to the next level. Besides, editors can use Filmora anywhere with just a password.
Free Download For Win 7 or later(64-bit)
Free Download For macOS 10.14 or later
How to Make Slow-motion GIF with Filmora
After discovering the top-notch features of Filmora, it’s time to use it. Although it’s very simple to operate, this step-by-step guide will help you process faster:
Step 1Launch Filmora and Import GIF to the Timeline
Download Wondershare Filmora from its official site. After a successful launch, you will enter its main screen. Look for the “New Project” option from the main interface. Tapping on the New Project, you will find the editing screen. Import your GIF in the media panel and drag it into the timeline section to begin the process.
Step 2Slow Down the GIF with Optical Flow
Right-click on the video and pick the “Uniform Speed” option from the list. This way, you will find an editing panel on the right side. Now, you can move the “Speed” slider towards the left. You can press the space bar and get the slow-motion GIF preview. Direct downward and choose the “Optical Flow” option from the extended menu of “AI Interpolation.”
Step 3Continue to Edit or Head to Export the Media
Finally, you will get a slow but high-quality GIF. Now, it’s up to you to continue exploring other features of Filmora or head to save the file. To save the file, go to the top right corner and press the “Export” button.
Key Features Marking Filmora’s Greatness
Filmora is proven to be the easiest software with the most powerful editing features. As proof, you can read the main features of Filmora to comprehend its functionalities better.
1. Speed Ramping
Create a unique cinematic effect in your video by adjusting keyframes. Filmora offers speed ramping features to bring a smooth transition in slow-motion or fast motions. In speed ramping, you get 6 templates, such as bullet time, montage, and jumper. Using those templates, you don’t need to manually adjust keyframes for speed ramping. Also, you can retain the original pitch of the audio after changing the speed.
2. AI Copilot Editing
To boost productivity, Filmora provides an AI Copilot editor option. It saves time that could be wasted searching for some feature or making the editing perfect. Users can ask anything to copilot in natural language. They can take help from an already existing question in the copilot editors. This feature will guide you toward practical actions through navigation buttons.
3. AI Music Generator
Who else is fed up with finding the perfect music for Vlog? Commonly, you didn’t find a video of exact length and mood. Thus, Filmora enables you to generate a soundtrack according to your mood and video length. Using it, you just have to prompt with the number of tracks, mood, and length. The AI-generated music will not require copyrights, so you can use it freely anywhere.
4. AI Image
Have you ever heard that any video editor can convert your text prompts into images? Filmora is offering this option, especially for people who are struggling to get their desired image. For this purpose, they need to describe images in simple language. Afterward, they are required to pick one style for accurate results.
5. AI Copywriting
Do you have a deadline for script submission, but it is not ready yet? Leave this headache to Filmora’s AI copywriting feature, which aims to produce engaging scripts. With ChatGPT integration, it can generate YouTube titles and descriptions. Furthermore, you can ask AI to convert your script into an appealing video.
Conclusion
To summarize, slowing down is the ultimate solution to retain the viewer’s attention. In this article, you have seen the top-notch platforms for slow-motion GIFs. They are not enough for remarkable videos because of the limited speed adjustment options. So, using Filmora remains the best option in providing easier ways to customize the speed of GIFs.
Also read:
- New In 2024, How to Stabilize Videos for Free with Google Photos App
- New In 2024, How to Create an URL for Your Video?
- Updated 2 Methods to Crop a Video in VLC
- Updated The Ultimate Guide to Slideshow Maker with Music
- New 2024 Approved Best Photo Video Maker Apps with Song PC, Mobile, Online
- Updated Are You Thinking of Learning Video Editing in the Final Cut Pro Software? In This Article, You Will Learn Different Ways of Splitting and Merging Multiple Videos at Once as a New Skill to Get Your Business to a New Level
- New In 2024, 15 Best Travel Vloggers That You Should Follow
- 2024 Approved Top 5 Best Video to PPT Converters You Should Know
- Updated Top 18 Video Editors for PC and Mac
- In 2024, How to Create a Slideshow with Movavi Slideshow Maker
- New In 2024, Doable Ways to Create Transparent Background in Procreate
- New How to Use the Logo Intro Templates for Your Next Video
- Creative Ways to Add Green Screen Effects In Photoshop
- Updated Create Amazing Slow-Motion Videos 8 Affordable Slow-Motion Cameras
- Updated Focusing On The Best Ways To Convert Slow-Motion Video to Normal for 2024
- The Definite Guide to Craig Bot Discord for 2024
- New How to Use Lumetri Color in Adobe After Effects for 2024
- New An Ultimate Guide To Edit a Music Video Aspect Ratio and First Cut for 2024
- 2024 Approved This Article Shares Valuable Insight Into the Best Brand Story Videos. Also, It Highlights the Importance of a Video Maker in Your Brand Story Video Ad-Making Process and Why Filmora Should Be Your Go-To Choice
- Updated How Long Does It Take To Edit A Video for 2024
- Everything That You Need to Know About Video Montages- Ideas, Techniqu for 2024
- How to Create Intro with Legend Intro Maker for 2024
- New How to Color Grade Your Picture in LightRoom for 2024
- Updated 2024 Approved Best 10 Tools To Make Quiz Videos
- New 2024 Approved How To Make Ninja Jump Effect
- New 10 Best Suggestions for AI Video Interviews
- 2024 Approved How to Add VHS Green Screen to Your Video
- Updated You Can Match Paint Colors From Pictures for Your Wall, as Well as for Your Videos. And to Know How to Do Both, We Have Laid Down the Following Discussion
- 2024 Approved Looking For The Best Slow Motion Effect in Premiere Pro
- New In 2024, Easy Guide to Overlay Videos in Premiere Pro
- New In 2024, Color Match Game Tips for You
- Updated In 2024, How To Add Motion Blur In Davinci Resolve?
- Learn How to Make Modern TikTok Velocity Dance Videos in Filmora Just Like the Ones You See on TikTok and Instagram Reels for 2024
- Updated In 2024, 4 Solutions to Crop a Video on Android Easily
- 2024 Approved Looking for a Way to Learn How to Merge Videos in HandBrake? Theres a Better Solution Waiting for You Inside
- New Benefits of Live Streaming on YouTube
- In 2024, Are You Looking to Freeze-Frame in FCP? If Yes, Read One, as Here Is a Guide About How to Freeze-Frame in Final Cut Pro (FCP) with Ease
- Updated Replacing the Sky in Adobe After Effects An Extensive Guide for 2024
- In 2024, Discover How to Create Professional Foggy Text Reflection Effects in the Filmora Video Editor
- In 2024, Discover the Top 5 Online Tools for Merging Videos and Audios Quickly and Easily. Streamline Your Editing Process and Create Seamless Multimedia Content
- Updated Top LUTs for Sony HLG to Download
- Updated In 2024, How to Comment on YouTube Live Chat
- In 2024, Best Tricks for Learning Photo Slideshow
- 8 Workable Fixes to the SIM not provisioned MM#2 Error on Itel P55 5G | Dr.fone
- How to Resolve Realme V30T Screen Not Working | Dr.fone
- Bypass Activation Lock From iPhone 11 - 4 Easy Ways
- How to Remove iPhone 6 Plus Face ID?
- In 2024, 5 Solutions For Vivo Y02T Unlock Without Password
- In 2024, 3 Ways for Android Pokemon Go Spoofing On Tecno Pova 5 Pro | Dr.fone
- How to Fix Android App Not Installed Error on Xiaomi 14 Quickly? | Dr.fone
- All About Apple iPhone 15 Plus Unlock Chip You Need to Know
- Simple ways to get lost files back from Infinix Note 30 VIP Racing Edition
- How to repair recovered Excel file that wont open
- In 2024, The Ultimate Guide to Get the Rare Candy on Pokemon Go Fire Red On Apple iPhone 13 mini | Dr.fone
- How to Unlock Samsung Galaxy A05 Phone Pattern Lock without Factory Reset
- Network Locked SIM Card Inserted On Your Nokia C110 Phone? Unlock It Now
- The 10 Best Tools to Bypass iCloud Activation Lock On Apple iPhone XS You Should Try Out
- Which Pokémon can Evolve with a Moon Stone For Vivo V27? | Dr.fone
- How Do I SIM Unlock My iPhone 15 Pro?
- In 2024, How to Transfer Contacts from Vivo Y100A to iPhone XS/11 | Dr.fone
- Title: New 2024 Approved How to Add Text Animation Online
- Author: Chloe
- Created at : 2024-04-24 07:08:29
- Updated at : 2024-04-25 07:08:29
- Link: https://ai-editing-video.techidaily.com/new-2024-approved-how-to-add-text-animation-online/
- License: This work is licensed under CC BY-NC-SA 4.0.
