

New 2024 Approved How to Convert Videos to Slow Motion? Complete Guide
How to Convert Videos to Slow Motion? [Complete Guide]
Slow Motion films are unique, don’t you think? Occasionally, individuals use their phones to shoot slow-motion films if they have an in-built function, and if their phone does not have an in-built feature, they may use slow-motion video creator applications to assist them.
But what happens if you have previously filmed a video at regular speed and now want the movie to be converted to slow motion?
Maybe a video of you from the pool when you’re flipping your hair, but no one remembers to take it in slow motion? Don’t be concerned! Today, we will show you how to turn any video into a slow-motion video on different operating systems.
In this article
01 How to Turn Videos Into Slow Motion on Windows for Free?
02 How to Convert Normal Video to Slow Motion for Free on Mac?
03 How to turn Normal Video to Slow Motion With VLC On Linux Computer?
04 How to Use Wondershare Filmora Video Editor to Turn Normal Videos to Slow Motion?
05 Best Slow Motion Converters to Convert Video to Slow Motion Online Free?
06 How to Convert Normal Video to Smooth Slow Motion In iPhone And Android Phones
Part 1: How to Turn Videos Into Slow Motion on Windows for Free?
If you need to conduct some simple editing and effects on your films, there is no need to invest hundreds of dollars in a video editing software application. For example, you may use the Photos App pre-installed on Windows 10 machines to apply the slow-motion effect to your photographs.
Step 1: Right click the video and choose Open with Photos. If it has been recorded by an iPhone or Android device and stored up to OneDrive, it should appear in the Microsoft Photos app without any further effort. Just click it to preview the video.
Step 2: Go to the Edit & Create option on the right corner on the top, and then select Add slo-mo option.

Step 3: Using the slider, you can determine how slowly you want it to go. Microsoft has built-in support for “Slow“ and “Super-Slow“ performance levels. Drag the slide to the right end will trigger the super slow mode.

Step 4: Specifiy the part that you want to apply slow motion in the playback bar at the bottom, and then save the video that you have just created with slow motion effects on Windows 10 .
The possibility exists that you are using an older version of Windows 10 on your computer if you do not see the option anywhere in the Photos app. You can also follow the steps above to create a slow motion video on Windows 11.
Browse Windows Update from the system menu and click on the appropriate button. When all of the updates have been installed, you will have the most recent version of the Photos app, which includes this functionality.
Part 2: How to Convert Normal Video to Slow Motion for Free on Mac?
Slow-motion videos are among the most enjoyable parts of utilizing your iPhone for videography. Video may be recorded with a frame rate of 120 or 240 fps and then played back at a considerably slower rate than usual.
However, if you don’t record video on your iPhone, making slow motion out of videos shot on other cameras or devices is more challenging. The good news is that iMovie for Mac can do this for you. We’ll show you how in this guide.
Slow-motion films are easy to make using iMovie on your Mac . Just follow the steps listed below.
Step 1: Click on the Import Media option in iMovie once launched on your Mac.
Step 2: Click on the blue Import Selected button once you’ve selected the video file in the file browser to slow it down.
Step 3: You may now open the movie in iMovie. Creating a Project is required at this stage. To do so, click on the Projects option.
Step 4: Once you’ve entered a name for your project, click the blue OK button.
Step 5: By dragging the movie onto your timeline, you may modify the video. Select the video by clicking on it and clicking on the Speed option to change its speed.
Step 6: The speed-editing interface will be shown here. Change Normal to Slow in the Speed drop-down menu.
Step 7: The duration of your movie will be increased by halves the pace at which it was initially recorded. The video may be slowed down even further by moving the speed slider.
Step 8: Go to the Menu Bar and choose File > Share. Select the file you want to share.
Step 9: Click the blue Next button once you’ve selected the properties you want for the file.
Step 10: Select a name for the file, store it, and then click the blue Save button to save it to your computer.
Part 3: How to turn Normal Video to Slow Motion With VLC On Linux Computer?
The video speed may be controlled in two ways using VLC. Using shortcut keys or hotkeys is one method, while menus and buttons are another. Both methods are OK, but the shortcut option is the quickest and most efficient.
Speed up and speed down buttons appear on the upper right of the movie when you press them. Depending on how much you tweak it, the speed is represented as 1.50x or 0.80x. This option is available for those who like to use other shortcut keys.
Step 1: From the VLC menu bar, head over to the Playback for Speed and choose a speed option: slower, slower (fine), normal, faster (fine), and faster.
Step 2: Right-clicking is also possible to access these parameters from the Playback > Speed menu.
Step 3: The video’s speed may be altered by selecting one of those options and then clicking the appropriate button.
If you are running VLC on Windows and Mac, you can check this article to find out the detailed information about how to playback video in slow motion in VLC .
Related: Best Free Video Editor for Linux .
Part 4: How to Use Wondershare Filmora Video Editor
For Win 7 or later (64-bit)
For macOS 10.12 or later
Wondershare Filmora is a video editor we’d like to show to you. Whether using a Windows or a Mac computer, you can rapidly speed up and slow down films with this easy video editor . With a user-friendly interface, Filmora video editor has many professional-grade editing features to help refine videos with ease. From motion tracking to keyframe animations, Filmora video editor offers a plethora of options.
Step 1: Launch Filmora video editor on your Windows or Mac computer (I’m running Windows 10 here). Click the New Project in the Startup window to create a new project in 16:9 aspect ratio by default.

Step 2: Import the video you want to add slow motion effect to the media library, and then drag and drop it to the timeline.

Step 3: To add slow motion effect to part of the video, you need to split the video first and then right click it to choose Speed and Duration. There will be a pop-up window. The motion effects will be sped up or slowed down based on the speed values.

Step 4: When you increase or decrease the video playing speed, the video audio speed changes. If you wish to retain the video audio’s actual playing speed, you may first Detach Audio from the video and then edit the video to achieve a perfect pitch.

Step 5: Select Export after you’ve completed setting the video speed. By selecting Format, you may save the video in any significant format.
Part 5: Best Slow Motion Converters to Convert Video to Slow Motion Online Free?
1. Online Converter
This Online Converter is one of the best on the internet. It is simple to use and supports various video formats such as MP4, AVI, FLV, MOV, 3GP, MKV, WMV, M4V, and others. This tool can also change the video speed by increasing (speeding up) or decreasing (slowing down). The audio in the video file will also become faster or slower due to using this tool.
Step 1: click on the Choose File option from the website to upload the video (max. 200MB).
Step 2: Now select the Speed of the video from the given options. Since we are going to make a video with slow motion effect, choose 0.5x or 0.8x will work perfectly.

Step 3: click on Confirm to convert the video to your preferred slo-mo video.
Part 6: How to Convert Normal Video to Smooth Slow Motion In iPhone And Android Phones
In addition to the essential editing tools of the famous social media platform, TikTok, CapCut is mobile video editing software for both Android and iOS smartphones that were mainly built to complement them. Here is how you can use CapCut to transform a regular video into a slow-mo one:
Step 1: Create A New Project on the CapCut app’s home screen. Browse and add the video you want to search for in slow-motion to the project.
Step 2: When you’re ready to turn off the sound, go ahead and hit the Mute clip audio button first, so there will be no creep sound after applying the slow-motion effect.

Step 3: In case you just want to add a slo-mo effect to part of the video, you need to split the video accordingly. Split the portion of the video that will be slowed down by clicking on the Split button in the menu. And use the Split tool again to end the slow-motion effect to get a segment of the video.
Step 4: Tap the cut section of the video and then you will see the Speed option. Open the Speed menu by selecting it from the drop-down menu.

Step 5: In CapCut, there are two methods to slow down a video, Normal and Curve, respectively. You may just choose the “Normal“ option to make things easy. It is possible to reduce the video’s frame rate by moving the speed slider to the left. You may, for example, make the pace 0.3 times slower. Apply a slow-motion effect by tapping the Check box.

Make a slow motion video at this stage to spice things up. CapCut allows you to add text, create transition effects, and more.
For more information, you can check: How to slo-mo in Capcut .
Conclusion
In this complete guide on “How to Convert Videos to Slow Motion?”, we hope you have learned all the basics. We have covered different apps that can help you do so. As the steps are straigthforward, make sure you abide by all the basics and transform your videos into catchy ones!
02 How to Convert Normal Video to Slow Motion for Free on Mac?
03 How to turn Normal Video to Slow Motion With VLC On Linux Computer?
04 How to Use Wondershare Filmora Video Editor to Turn Normal Videos to Slow Motion?
05 Best Slow Motion Converters to Convert Video to Slow Motion Online Free?
06 How to Convert Normal Video to Smooth Slow Motion In iPhone And Android Phones
Part 1: How to Turn Videos Into Slow Motion on Windows for Free?
If you need to conduct some simple editing and effects on your films, there is no need to invest hundreds of dollars in a video editing software application. For example, you may use the Photos App pre-installed on Windows 10 machines to apply the slow-motion effect to your photographs.
Step 1: Right click the video and choose Open with Photos. If it has been recorded by an iPhone or Android device and stored up to OneDrive, it should appear in the Microsoft Photos app without any further effort. Just click it to preview the video.
Step 2: Go to the Edit & Create option on the right corner on the top, and then select Add slo-mo option.
Step 3: Using the slider, you can determine how slowly you want it to go. Microsoft has built-in support for “Slow“ and “Super-Slow“ performance levels. Drag the slide to the right end will trigger the super slow mode.
Step 4: Specifiy the part that you want to apply slow motion in the playback bar at the bottom, and then save the video that you have just created with slow motion effects on Windows 10 .
The possibility exists that you are using an older version of Windows 10 on your computer if you do not see the option anywhere in the Photos app. You can also follow the steps above to create a slow motion video on Windows 11.
Browse Windows Update from the system menu and click on the appropriate button. When all of the updates have been installed, you will have the most recent version of the Photos app, which includes this functionality.
Part 2: How to Convert Normal Video to Slow Motion for Free on Mac?
Slow-motion videos are among the most enjoyable parts of utilizing your iPhone for videography. Video may be recorded with a frame rate of 120 or 240 fps and then played back at a considerably slower rate than usual.
However, if you don’t record video on your iPhone, making slow motion out of videos shot on other cameras or devices is more challenging. The good news is that iMovie for Mac can do this for you. We’ll show you how in this guide.
Slow-motion films are easy to make using iMovie on your Mac . Just follow the steps listed below.
Step 1: Click on the Import Media option in iMovie once launched on your Mac.
Step 2: Click on the blue Import Selected button once you’ve selected the video file in the file browser to slow it down.
Step 3: You may now open the movie in iMovie. Creating a Project is required at this stage. To do so, click on the Projects option.
Step 4: Once you’ve entered a name for your project, click the blue OK button.
Step 5: By dragging the movie onto your timeline, you may modify the video. Select the video by clicking on it and clicking on the Speed option to change its speed.
Step 6: The speed-editing interface will be shown here. Change Normal to Slow in the Speed drop-down menu.
Step 7: The duration of your movie will be increased by halves the pace at which it was initially recorded. The video may be slowed down even further by moving the speed slider.
Step 8: Go to the Menu Bar and choose File > Share. Select the file you want to share.
Step 9: Click the blue Next button once you’ve selected the properties you want for the file.
Step 10: Select a name for the file, store it, and then click the blue Save button to save it to your computer.
Part 3: How to turn Normal Video to Slow Motion With VLC On Linux Computer?
The video speed may be controlled in two ways using VLC. Using shortcut keys or hotkeys is one method, while menus and buttons are another. Both methods are OK, but the shortcut option is the quickest and most efficient.
Speed up and speed down buttons appear on the upper right of the movie when you press them. Depending on how much you tweak it, the speed is represented as 1.50x or 0.80x. This option is available for those who like to use other shortcut keys.
Step 1: From the VLC menu bar, head over to the Playback for Speed and choose a speed option: slower, slower (fine), normal, faster (fine), and faster.
Step 2: Right-clicking is also possible to access these parameters from the Playback > Speed menu.
Step 3: The video’s speed may be altered by selecting one of those options and then clicking the appropriate button.
If you are running VLC on Windows and Mac, you can check this article to find out the detailed information about how to playback video in slow motion in VLC .
Related: Best Free Video Editor for Linux .
Part 4: How to Use Wondershare Filmora Video Editor
For Win 7 or later (64-bit)
For macOS 10.12 or later
Wondershare Filmora is a video editor we’d like to show to you. Whether using a Windows or a Mac computer, you can rapidly speed up and slow down films with this easy video editor . With a user-friendly interface, Filmora video editor has many professional-grade editing features to help refine videos with ease. From motion tracking to keyframe animations, Filmora video editor offers a plethora of options.
Step 1: Launch Filmora video editor on your Windows or Mac computer (I’m running Windows 10 here). Click the New Project in the Startup window to create a new project in 16:9 aspect ratio by default.
Step 2: Import the video you want to add slow motion effect to the media library, and then drag and drop it to the timeline.
Step 3: To add slow motion effect to part of the video, you need to split the video first and then right click it to choose Speed and Duration. There will be a pop-up window. The motion effects will be sped up or slowed down based on the speed values.
Step 4: When you increase or decrease the video playing speed, the video audio speed changes. If you wish to retain the video audio’s actual playing speed, you may first Detach Audio from the video and then edit the video to achieve a perfect pitch.
Step 5: Select Export after you’ve completed setting the video speed. By selecting Format, you may save the video in any significant format.
Part 5: Best Slow Motion Converters to Convert Video to Slow Motion Online Free?
1. Online Converter
This Online Converter is one of the best on the internet. It is simple to use and supports various video formats such as MP4, AVI, FLV, MOV, 3GP, MKV, WMV, M4V, and others. This tool can also change the video speed by increasing (speeding up) or decreasing (slowing down). The audio in the video file will also become faster or slower due to using this tool.
Step 1: click on the Choose File option from the website to upload the video (max. 200MB).
Step 2: Now select the Speed of the video from the given options. Since we are going to make a video with slow motion effect, choose 0.5x or 0.8x will work perfectly.
Step 3: click on Confirm to convert the video to your preferred slo-mo video.
Part 6: How to Convert Normal Video to Smooth Slow Motion In iPhone And Android Phones
In addition to the essential editing tools of the famous social media platform, TikTok, CapCut is mobile video editing software for both Android and iOS smartphones that were mainly built to complement them. Here is how you can use CapCut to transform a regular video into a slow-mo one:
Step 1: Create A New Project on the CapCut app’s home screen. Browse and add the video you want to search for in slow-motion to the project.
Step 2: When you’re ready to turn off the sound, go ahead and hit the Mute clip audio button first, so there will be no creep sound after applying the slow-motion effect.
Step 3: In case you just want to add a slo-mo effect to part of the video, you need to split the video accordingly. Split the portion of the video that will be slowed down by clicking on the Split button in the menu. And use the Split tool again to end the slow-motion effect to get a segment of the video.
Step 4: Tap the cut section of the video and then you will see the Speed option. Open the Speed menu by selecting it from the drop-down menu.
Step 5: In CapCut, there are two methods to slow down a video, Normal and Curve, respectively. You may just choose the “Normal“ option to make things easy. It is possible to reduce the video’s frame rate by moving the speed slider to the left. You may, for example, make the pace 0.3 times slower. Apply a slow-motion effect by tapping the Check box.
Make a slow motion video at this stage to spice things up. CapCut allows you to add text, create transition effects, and more.
For more information, you can check: How to slo-mo in Capcut .
Conclusion
In this complete guide on “How to Convert Videos to Slow Motion?”, we hope you have learned all the basics. We have covered different apps that can help you do so. As the steps are straigthforward, make sure you abide by all the basics and transform your videos into catchy ones!
How to Zoom Webcam on PC
Making certain our digital presence is the best it can be pays dividends as more and more of what we do online; similar is the case with how to zoom out webcam windows 10. The majority of experts advise against using the built-in camera that comes with your laptop or computer and instead advocate getting a webcam or an HD camera. These, however, may be hard to come by and pricy if you locate a nice one. If the built-in camera on your laptop doesn’t perform effectively during Zoom meetings, you may want to consider about investing in a separate, better webcam. Webcams offer automatic settings that are intended to function with the largest variety of lighting situations possible. This suggests that they average out a great number of responses to the content of the frame. Because of this, we have incorporated basic PC webcam zooming settings. These answers may be found in the portions that follow.
It’s vital to know how to zoom in on a webcam before visiting there. The camera wasn’t always as vital as it is today, and only very large corporations could afford to employ it as a convenience. But today, nearly everyone, from huge organizations to little firms, acknowledges its value. Everybody needs a webcam that works properly. The camera control software you are using determines the zoom function. The resolution of your picture window and the capabilities of the application dictate how far you can zoom in on the webcam’s video image. You can zoom in and out on camera photos using tools like YouCam and Windows Live Messenger. The most critical camera capabilities for the ideal video conferencing experience are zoom in and zoom out, which at first look may appear trivial. Here, we’ll walk you through each step, in detail. Continue reading, and we’ll check your understanding of webcam zoom in and zoom out skills!
Way 1: Zoom with Windows Live Messenger
When utilizing a camera for video conferencing, you may zoom in on a user’s face to get rid of the background. Webcam settings are not accessible by default in Microsoft Windows. However, camera zoom settings may be changed in instant chat systems. Through an instant messaging tool, such as Windows Live Messenger, you may simply access these options. This application provides private offline chat, video messaging, image and video sharing, and video chatting.
Step1Start Windows Live Messenger on your PC or laptop first. Enter your login name and password by clicking the “Sign In” button.

Step2On the top menu bar, pick “Tools.” And then select the “Audio and Video Setup”. Drag the slider next to “Speaker” to modify the speaker volume. Drag the slider next to “Microphone” to modify the microphone sensitivity. Press “Next.”

Step3From the drop-down list, pick the webcam. The “Camera Control” option is situated on the top; pick “Webcam Settings” after that.
Step4Now, to alter the zoom settings, drag the “Zoom” slider. To zoom in or out, drag the slider to the left or right. Press “OK.”
Way 2: Use Windows 10 Camera App
Wondering how to zoom your camera in the Windows 10 Camera app? The Camera app enables you to zoom in or out on your webcam in both image and video modes. To accomplish so, click or push the Magnification button, and then use the slider to modify the webcam’s zoom level. To operate the zoom feature manually, pick “Manual Zoom.” In the preview window, a square appears when you pick this option. To zoom in on a specific region of the capture window, drag the square there. To expand the image that was acquired by the webcam, slide the slider bar. In simply, The Camera app enables you zoom in or out of photographs and movies shot with your webcam. To do this, click on the “Zoom” button and drag the slider to the left or right as appropriate on your Windows 10 camera. the following steps:
Step1To open the “Start Menu,” make a right-click on “Start.” Now, to access the Camera app, type “Camera App” into the start menu’s search box.

Step2Tap the Camera Control icon when you start or join a meeting. To zoom and pan the camera to the appropriate spot, utilize the icons on the Camera Control panel.
![]()
Step3To exit the Camera Control window and return to the Meeting Controls, touch outside of it.
Way 3: Zoom with YouCam
Unfortunately, the default cameras or webcams bundled with the majority of Windows laptops and desktops don’t have an automatic zoom option. In fact, the only method to adjust their crop is to switch from “Standard” to “Widescreen,” which does slightly zoom in on you but not in the manner we’d want. This makes it inescapable that the only method to manually alter a webcam’s magnification is to acquire one separately and apply its software settings. , like YouCam. YouCam provides video calling, streaming, and broadcasting. includes an integrated app. To employ Zoom with YouCam, refer to the methods given below:
Step1Launch the YouCam camera program and activate the webcam.

Step2In the camera preview window, pick Settings. Then, select “Enable Video Zoom” from the menu.
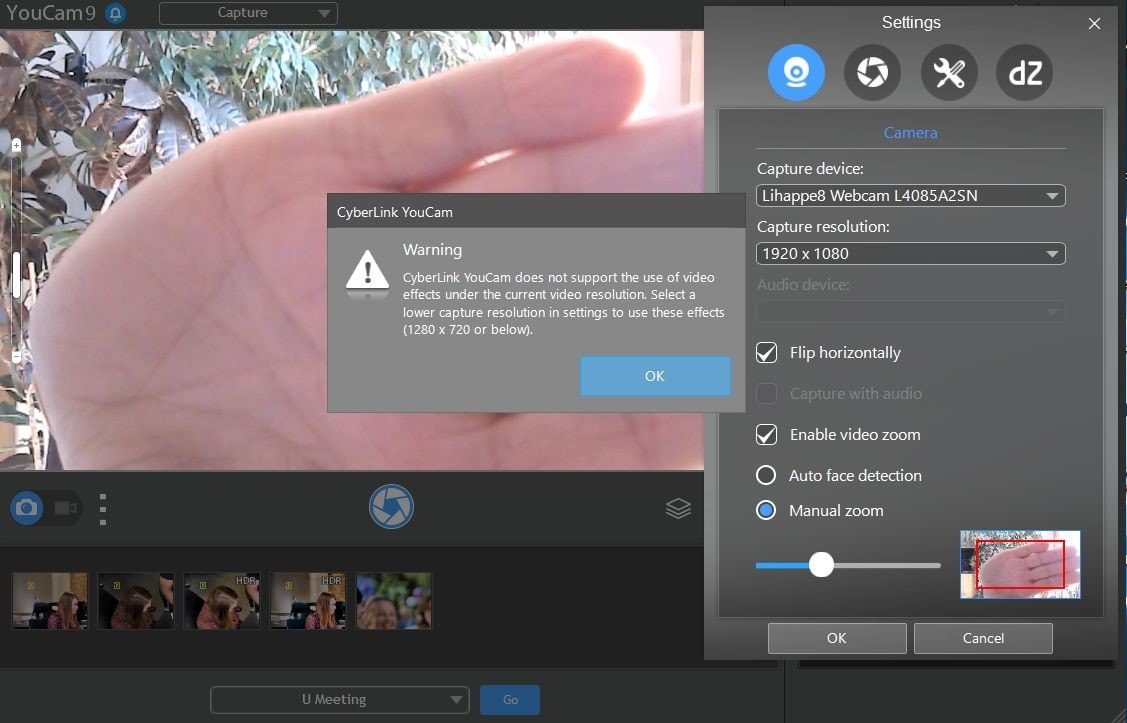
Step3Select “Automatic Face Detection” from the menu. As you wander about in the capture window, the camera watches your face and automatically zooms in on your photo as shown above.
Step4To handle the zoom feature manually, pick “Manual Zoom.” In the preview window, a square appears when you pick this option. To zoom in on a specific region of the capture window, drag the square there. To expand the image that was acquired by the webcam, slide the slider bar.

Way 4: Use iGlasses on Mac
For the perfect webcam look on a MAC, install the Chrome plugin iGlasses for video effects and style tweaks. Your videos will appear better on Zoom as a consequence. You may instantly enhance the appearance of your video interactions by utilizing the digital zoom on your iGlasses. Digital pan, tilt, and zoom are all possible with easy controls. For Macs that support it, an Apple Remote may be used to operate. iGlasses will become an option in Zoom’s video settings when it has been installed. You may improve your camera by altering the settings in iGlasses. You may experiment with a range of amusing effects, like 3-D distortions, using the virtual camera. Let’s learn how to utilize iGlasses on a Mac:
Step1Installing Ecamm’s iGlasses on a MacBook in the first step.
Step2To activate the camera, go to your video settings and pick iGlasses.
Step3Choose the Zoom window and execute the appropriate operations using the Zoom and Flip options. You may now zoom in and out using the camera on your MacBook as you like.

Conclusion
In conclusion, so many people currently take part in online conferences and virtual meetings. You want to create a lasting impression, don’t you? Not or whether you are the host of an online meeting or event, you must now maintain a professional image to prevent turning off attendees. You have discovered how to utilize the tools at your disposal to boost the zoom in and out quality of your camera in this post. However, as will be explained in the sections ahead, you may do it without the third-party plugins. With just one quick plugin, you can significantly transform how you look on a camera. Hence, try out the easy method from the above enlisted ones to get hold on your PC webcam to zoom in or out purposes.
Making certain our digital presence is the best it can be pays dividends as more and more of what we do online; similar is the case with how to zoom out webcam windows 10. The majority of experts advise against using the built-in camera that comes with your laptop or computer and instead advocate getting a webcam or an HD camera. These, however, may be hard to come by and pricy if you locate a nice one. If the built-in camera on your laptop doesn’t perform effectively during Zoom meetings, you may want to consider about investing in a separate, better webcam. Webcams offer automatic settings that are intended to function with the largest variety of lighting situations possible. This suggests that they average out a great number of responses to the content of the frame. Because of this, we have incorporated basic PC webcam zooming settings. These answers may be found in the portions that follow.
It’s vital to know how to zoom in on a webcam before visiting there. The camera wasn’t always as vital as it is today, and only very large corporations could afford to employ it as a convenience. But today, nearly everyone, from huge organizations to little firms, acknowledges its value. Everybody needs a webcam that works properly. The camera control software you are using determines the zoom function. The resolution of your picture window and the capabilities of the application dictate how far you can zoom in on the webcam’s video image. You can zoom in and out on camera photos using tools like YouCam and Windows Live Messenger. The most critical camera capabilities for the ideal video conferencing experience are zoom in and zoom out, which at first look may appear trivial. Here, we’ll walk you through each step, in detail. Continue reading, and we’ll check your understanding of webcam zoom in and zoom out skills!
Way 1: Zoom with Windows Live Messenger
When utilizing a camera for video conferencing, you may zoom in on a user’s face to get rid of the background. Webcam settings are not accessible by default in Microsoft Windows. However, camera zoom settings may be changed in instant chat systems. Through an instant messaging tool, such as Windows Live Messenger, you may simply access these options. This application provides private offline chat, video messaging, image and video sharing, and video chatting.
Step1Start Windows Live Messenger on your PC or laptop first. Enter your login name and password by clicking the “Sign In” button.
Step2On the top menu bar, pick “Tools.” And then select the “Audio and Video Setup”. Drag the slider next to “Speaker” to modify the speaker volume. Drag the slider next to “Microphone” to modify the microphone sensitivity. Press “Next.”
Step3From the drop-down list, pick the webcam. The “Camera Control” option is situated on the top; pick “Webcam Settings” after that.
Step4Now, to alter the zoom settings, drag the “Zoom” slider. To zoom in or out, drag the slider to the left or right. Press “OK.”
Way 2: Use Windows 10 Camera App
Wondering how to zoom your camera in the Windows 10 Camera app? The Camera app enables you to zoom in or out on your webcam in both image and video modes. To accomplish so, click or push the Magnification button, and then use the slider to modify the webcam’s zoom level. To operate the zoom feature manually, pick “Manual Zoom.” In the preview window, a square appears when you pick this option. To zoom in on a specific region of the capture window, drag the square there. To expand the image that was acquired by the webcam, slide the slider bar. In simply, The Camera app enables you zoom in or out of photographs and movies shot with your webcam. To do this, click on the “Zoom” button and drag the slider to the left or right as appropriate on your Windows 10 camera. the following steps:
Step1To open the “Start Menu,” make a right-click on “Start.” Now, to access the Camera app, type “Camera App” into the start menu’s search box.
Step2Tap the Camera Control icon when you start or join a meeting. To zoom and pan the camera to the appropriate spot, utilize the icons on the Camera Control panel.
![]()
Step3To exit the Camera Control window and return to the Meeting Controls, touch outside of it.
Way 3: Zoom with YouCam
Unfortunately, the default cameras or webcams bundled with the majority of Windows laptops and desktops don’t have an automatic zoom option. In fact, the only method to adjust their crop is to switch from “Standard” to “Widescreen,” which does slightly zoom in on you but not in the manner we’d want. This makes it inescapable that the only method to manually alter a webcam’s magnification is to acquire one separately and apply its software settings. , like YouCam. YouCam provides video calling, streaming, and broadcasting. includes an integrated app. To employ Zoom with YouCam, refer to the methods given below:
Step1Launch the YouCam camera program and activate the webcam.
Step2In the camera preview window, pick Settings. Then, select “Enable Video Zoom” from the menu.
Step3Select “Automatic Face Detection” from the menu. As you wander about in the capture window, the camera watches your face and automatically zooms in on your photo as shown above.
Step4To handle the zoom feature manually, pick “Manual Zoom.” In the preview window, a square appears when you pick this option. To zoom in on a specific region of the capture window, drag the square there. To expand the image that was acquired by the webcam, slide the slider bar.
Way 4: Use iGlasses on Mac
For the perfect webcam look on a MAC, install the Chrome plugin iGlasses for video effects and style tweaks. Your videos will appear better on Zoom as a consequence. You may instantly enhance the appearance of your video interactions by utilizing the digital zoom on your iGlasses. Digital pan, tilt, and zoom are all possible with easy controls. For Macs that support it, an Apple Remote may be used to operate. iGlasses will become an option in Zoom’s video settings when it has been installed. You may improve your camera by altering the settings in iGlasses. You may experiment with a range of amusing effects, like 3-D distortions, using the virtual camera. Let’s learn how to utilize iGlasses on a Mac:
Step1Installing Ecamm’s iGlasses on a MacBook in the first step.
Step2To activate the camera, go to your video settings and pick iGlasses.
Step3Choose the Zoom window and execute the appropriate operations using the Zoom and Flip options. You may now zoom in and out using the camera on your MacBook as you like.
Conclusion
In conclusion, so many people currently take part in online conferences and virtual meetings. You want to create a lasting impression, don’t you? Not or whether you are the host of an online meeting or event, you must now maintain a professional image to prevent turning off attendees. You have discovered how to utilize the tools at your disposal to boost the zoom in and out quality of your camera in this post. However, as will be explained in the sections ahead, you may do it without the third-party plugins. With just one quick plugin, you can significantly transform how you look on a camera. Hence, try out the easy method from the above enlisted ones to get hold on your PC webcam to zoom in or out purposes.
Top 5 Solutions on How to Add Emojis to iPhone
Top 5 Solutions on How to Add Emojis to iPhone
An easy yet powerful editor
Numerous effects to choose from
Detailed tutorials provided by the official channel
Have you been looking for interesting solutions on how to add emojis to iPhone? Stop you search and take a breath, you have landed at the correct spot!
In this article
01 [Want an Emoji on Your iPhone? Here’s How to Do It](#Part 1)
02 [Add Emojis to iPhone Q&A](#Part 2)
Part 1 Want an Emoji on Your iPhone? Here’s How to Do It
Emojis are known to live up to their name and introduce an emotional connect to the otherwise plain text within your social media posts and conversations. Speaking in the light of the latest and currently existing communication trends, these miniature graphic elements have managed to earn a significant amount of popularity across a diverse range of communication and information sharing platforms.
Moving ahead, the credibility of emojis to uplift the fun and emotional element in personal conversations across the popular chat service programs does not need an explanation. While the most common means of such conversations are smartphones, having a convenient access to these graphic chat elements on your mobile devices becomes quite important.
Recognizing the need to have emojis at your fingertips the next time you initiate a conversation with your friends on social media or across chat applications, let us proceed with learning about some interesting ways of sorting the concern of how to add custom emojis to iPhone in what follows next:
Solutions for Adding Emojis to Your iPhone
01Using the Emoji Keyboard of a Chat Application
The IT market has launched a variety of high end chat service programs that come with a default emoji keyboard to uplift the customary text messages. You can choose to work with any of the available iPhone compatible chat service program, while conveniently accessing their emoji keyboards on your device.
Step 1: Launch the Application
To begin with addressing the concern of how to put emojis on pictures iPhone; start with browsing through the Launchpad of your iPhone and opening a preferred chat application that supports the emoji keyboard. You can start with using the ‘Messages’ or ‘Mail’ applications.
Step 2: Access the Emoji Keyboard
Tap within the text field of the chat application, followed by clicking on either of the ‘Globe’ or ‘Emoji’ icons. The ‘Emoji Keyboard’ will now pop up on the application screen of your iPhone.
Step 3: Select an Emoji
Proceed to choose a desired emoji to add within your conversation by navigating through the diverse range of available emoji themes. You can this by tapping the ‘Gray’ emoji symbols in the bottom toolbar, or making a left-right swipe to access the available choices.
To browse through the collection of emojis that you have used most frequently, tap the ‘Clock’ icon. If you are not finding the exact emoji to depict a particular expression, navigate to the ‘Search Emoji’ box under the text field and type a relevant keyword to open a customized list of emoji options.
Step 4: Play With Different Skin Tones
If you want to alter the default skin tone of a selected emoji, you can do this by tapping on and holding the same to see a display of different skin tones appear above your selection. Click on the one you like, to apply it to the selected emoji.
Step 5: Include the Emoji
When the aforesaid customizations make you happy; click on the emoji once again to include the latter within the text field of the chat service program you are working with.

02Enabling the Emoji Keyboard of Your iPhone
If you are keen towards sorting the issue of how to add emojis to photos iPhone while working with an emoji keyboard explicitly on your iPhone, you can proceed to enable the same on your device. The process is quick and easy, with no rocket science, and allows you to add emoji to picture iPhone. Here’s what you need to do:
Step 1: Launch the Settings Application
To start with settling the query of how to add emoji keyboard to iPhone, navigate to and click on the ‘Settings’ application on the welcome screen of your iPhone, followed by hitting the ‘General’ tab from the list of categories that appears next. Entering into the ‘General Settings’ interface, pick the ‘Keyboard’ option.
Step 2: Add a New Keyboard
Within the ‘Keyboard’ category of your iPhone settings, you are required to tap on the ‘Keyboards’ subcategory, followed by hitting the ‘Add New Keyboard’ option from the window that pops up next.
As you click on the aforesaid option, a series of keyboard types gets displayed on the screen. Scroll through the list to locate the ‘Emoji’ option, followed by clicking on the same to add emoji keyboard iPhone. That’s it! You can now proceed to use the keyboard to communicate across different conversation platforms.

03Adding Emojis to the Status Bar of Your iPhone
This one is a recently included feature in iOS compatible devices to sort out the issue of working with emojis on iPhones and allied device categories to answer the question of , how to add emoji to iPhone photo. As is obvious, availing the utility requires you to launch an update of your iPhone to iOS 15 or more recent versions. Make sure you adhere to the same before proceeding with the emoji inclusion process.
Without further ado, here’s how you can add the emoji elements to the status bar of your iPhone in just a few quick and simple steps:
Step 1: Launch the Settings Application
Start with heading to and clicking on the ‘Settings’ icon frame on the Launchpad of your iPhone to be greeted by the app’s welcome interface. In the list of available categories, click on the ‘Focus’ tab.

Step 2: Navigating Through the Focus Feature
As you hit the ‘Focus’ tab in the previous step, the latter’s interface pops up with a series of utility options. Instead of entering into the options, you however need to just tap the ‘Add’ button depicted by a ‘+’ icon at the top right corner of the ‘Focus’ window.

Step 3: Select an Emoji Category
Clicking on the ‘Add’ button directs you to the ‘Emoji Selection’ interface. All you need to do here is, click on the ‘Custom’ option to open the available emoji categories within the ‘Focus’ feature. Talking of the diversity of emoji options, the feature allows you to add up to 25 emoji categories to the iPhone status bar.
Ahead of the customary variations in smiley faces, you can experiment with adding more specific icons, like; paw prints, stethoscope, fork and knife, light bulb, etc. You can work with these varieties to walk through the subject of how to add emojis to photos iPhone.

Step 4: Name Your Emoji
When you are done with adding the preferred emoji icons, proceed to assign them a specific name. The added names will however, not show up on the status bar of your iPhone, but can be seen on other conversation platform and chat service applications.
If you choose to add the emoji in a specific color to your iPhone’s status bar, you can avail the feature. The color however, won’t reflect on the device’s status bar, but can be seen on the latter’s lock screen.
04Adding Emojis to iPhone Though the Google Messages Application
When aiming to set aside the concern of how to add emoji to iPhone photo, you can seek the help of third party applications. All you need to do is install and run the app on your iPhone and start your editing spree. Browsing through the IT market, you can easily land across a never ending series of third party alternatives to work with emojis on your iPhone.
Picking one from the same, here’s a detailed explanation of using the Google Messages app to include emojis on your iPhone:
Step 1: Download and Install the Application
Start with visiting the Apple App Store to download the Google Messages application in your iPhone. In case the utility already exists in your device, proceed to update the same to the most recent version.
Step 2: Set as Default
Once you are done with the download and installation formalities, proceed to launch the app in your device, followed by setting the latter as your preferred chat application.
Step 3: And…It’s Ready!
The completion of Step 2 will guide you to the Google Messages welcome screen, where you can start conversing with your friends and peers.
Step 4: Select a Contact
To begin chatting with a contact, click on the ‘Start Chat’ option, followed by selecting the contact number or name of a desired person.
Step 5: Type a Message
As you finish Step 4, the app’s chat interface appears where you can type a message within then text field and proceed to complement the same with emojis, stickers and other graphic elements. The app comes with an extensive range of emojis to select and add from. Moving ahead of the basic smileys, you can pick emojis from categories like, Food and Beverages, Travel, Nature, and many more.
Step 6: Send!
Tap the ‘Send’ button when you are done with composing the message, to let it reach the recipient. You can also forward the message to multiple contacts at the same time.
05Adding Emojis to iPhone Through the SwiftKey Keyboard
This one is another entry in list of answers regarding the query of how to add emojis to a picture on iPhone. Essentially a third party keyboard, SwiftKey works to supplement your messages with the latest and most expressive graphic elements, including emojis. The utility comes with a smart feature that predicts the type and style of emojis you will use in future conversations, in line with your current usage pattern.
The following user guide explains the step by step process to work with the SwiftKey keyboard for adding emojis to your iPhone:
Step 1: Download, Install and Launch SwiftKey
Navigate to the Apple App Store in your iPhone and proceed to download and install the SwiftKey application to the device. When you are done, launch the app and click on ‘Get Started’.

Step 2: Sign In to SwiftKey
As you launch the SwiftKey keyboard, the latter’s ‘Sign In to SwiftKey’ window pops up, requiring you to select an account for initiating the sign process of the application by clicking on either of the ‘Continue With Google’ or ‘Continue With Facebook’ options. To move ahead, follow the instructions that appear on your device screen.

Step 3: Enable the SwiftKey Keyboard
When you have chosen the sign in account, the ‘To Enable SwiftKey’ window appears to explain to you, the process of enabling the SwiftKey keyboard.

Step 4: Accessing SwiftKey Keyboard in iPhone Settings
Launch the iPhone’s ‘Settings’ application, followed by hitting the ‘General’ tab from the list of options within the latter’s opening interface.

As the ‘General’ window pops up, proceed to choose the ‘Keyboard’ option by tapping on the same.

Within the ‘Keyboard’ setting window, navigate to and click on the ‘Keyboards’ option.

Step 5: Make SwiftKey an Additional Keyboard
To work with the SwiftKey keyboard on your iPhone, you will need to add the same to your device’s list of preset keyboards. To do this, click on the ‘Add New Keyboard’ option within the list of keyboards that pops up as you complete Step 4.

A series of third party keyboards shows up in the window that appears next. Proceed to select ‘SwiftKey’ from the available keyboard choices. In case you don’t find the aforesaid keyboard among the options, double tap the ‘Home’ button on your device to exit the ‘Settings’ application.
Re-launch the ‘Settings’ app after a few moments and follow Steps 4 and 5 to make the ‘SwiftKey’ option appear within the list.

Step 6: Grant Full Access to SwiftKey
To work with the complete feature bank of the ‘SwiftKey’ application, you will have to allow the latter to fully access your iPhone. To proceed with the process, navigate to the ‘Keyboards’ window of your iPhone settings, where you can see the ‘SwiftKey’ keyboard present in the list of active keyboards of your device. Open the application’s ‘Access’ window by clocking on the keyboard name in the list.

Within the ‘SwiftKey Access’ window that appears, toggle the slider to the right side to enable the ‘Allow Full Access’ option.

As you enable the ‘Allow Full Access’ option, the ‘App Permissions’ dialog box pops up on your iPhone screen. Click on ‘Allow’ within the same to grant the required app permissions.

Step 7: Switch to the SwiftKey Keyboard
You will now be directed to the ‘Select SwiftKey’ window to change your default keyboard. Here you need to click on the ‘Globe’ icon, followed by choosing ‘SwiftKey’ from the menu that appears next.

Step 8: SwiftKey Is Ready!
As you finish Step 7, a confirmation window pops up on the iPhone screen, displaying the ‘Installation Successful’ message. If you wish to get regular updates and tips from the SwiftKey application, click on the ‘Save’ button, otherwise, navigate to the bottom right corner of the screen and click on the ‘Not Now’ option.

You can now work towards adding emojis in your chats and conversations on the iPhone, simply by typing a message in the text field of the preferred chat service program, followed by picking a suitable emoji from the diverse range of available options within the SwiftKey keyboard. Talking of additional merits, the utility allows you to introduce customizations to the keyboard in terms of supported languages, theme centered design, access compatibility and settings.
Part 2 Add Emojis to iPhone Q&A
01Why does the emoji utility not show up on an iPhone?
In case you find difficulty in accessing emojis on your iPhone, or the latter does not appear within your communication centered utilities of the device, consider checking the settings of the iPhone to make sure that the feature has been added as well as enabled. If not so, proceed to enable the same in the ‘Settings’ interface itself.
02What is the procedure to download an additional set of emojis to an iPhone?
If you want to spark up your iPhone’s emoji library with an extra set of the latest emojis, the only method that would cater to the concern of how to add more emoji to iPhone is taking the help of third party applications. As an affordable pick, you can rely on the Messages App Store in your iPhone to avail a decent rage of third party emoji packages, both free and paid.
03How can the hidden emoji keyboard be accessed?
In your iPhone settings, open the ‘General’ category, followed by selecting the ‘ Keyboard’ option. Entering in, choose the ‘Keyboards’ subcategory and tap on ‘Add New Keyboard’. From the list of options that drops down, select ‘Japanese’, followed by ‘Kana’. As you proceed to type a message the next time, click on the ‘Globe’ icon at the bottom-left corner of the app screen to toggle between keyboard options.
04How can the hidden emojis on an iPhone be unlocked?
To unlock a hidden emoji, navigate to the ‘Apple Messages’ app in your iPhone and launch the iMessage application. Next, open a conversation thread and enter any emoji in the chat’s text field. Now, press and hold the ‘Send’ button to open a hidden emoji page that lets you choose and add these elements to your text message.
05What is the best software to look for free emojis?
If you are willing to sort out the concern of accessing the best inventory of latest emojis, you can traverse the editor library of the Wondershare Filmora Video Editor graphic designer program. Divided into a hoard of specific categories, the software is known to house the most elaborative variety of emoji elements that undergo a periodic update that can help you to sort the query of how to add emojis to pictures on iPhone.
For Win 7 or later (64-bit)
For macOS 10.12 or later
● Ending Thoughts →
● Including emojis in your social media and chat service conversations works to add an emotional connect to your otherwise normal text messages.
● When looking forward to work towards the constraint of how to add new emojis to iPhone, there are a variety of methods to move ahead with the process.
● If you are on a search of the latest collection of emojis to add to your iPhone, you can take suggestions from the editor library of the Wondershare Filmora graphic designer program.
Have you been looking for interesting solutions on how to add emojis to iPhone? Stop you search and take a breath, you have landed at the correct spot!
In this article
01 [Want an Emoji on Your iPhone? Here’s How to Do It](#Part 1)
02 [Add Emojis to iPhone Q&A](#Part 2)
Part 1 Want an Emoji on Your iPhone? Here’s How to Do It
Emojis are known to live up to their name and introduce an emotional connect to the otherwise plain text within your social media posts and conversations. Speaking in the light of the latest and currently existing communication trends, these miniature graphic elements have managed to earn a significant amount of popularity across a diverse range of communication and information sharing platforms.
Moving ahead, the credibility of emojis to uplift the fun and emotional element in personal conversations across the popular chat service programs does not need an explanation. While the most common means of such conversations are smartphones, having a convenient access to these graphic chat elements on your mobile devices becomes quite important.
Recognizing the need to have emojis at your fingertips the next time you initiate a conversation with your friends on social media or across chat applications, let us proceed with learning about some interesting ways of sorting the concern of how to add custom emojis to iPhone in what follows next:
Solutions for Adding Emojis to Your iPhone
01Using the Emoji Keyboard of a Chat Application
The IT market has launched a variety of high end chat service programs that come with a default emoji keyboard to uplift the customary text messages. You can choose to work with any of the available iPhone compatible chat service program, while conveniently accessing their emoji keyboards on your device.
Step 1: Launch the Application
To begin with addressing the concern of how to put emojis on pictures iPhone; start with browsing through the Launchpad of your iPhone and opening a preferred chat application that supports the emoji keyboard. You can start with using the ‘Messages’ or ‘Mail’ applications.
Step 2: Access the Emoji Keyboard
Tap within the text field of the chat application, followed by clicking on either of the ‘Globe’ or ‘Emoji’ icons. The ‘Emoji Keyboard’ will now pop up on the application screen of your iPhone.
Step 3: Select an Emoji
Proceed to choose a desired emoji to add within your conversation by navigating through the diverse range of available emoji themes. You can this by tapping the ‘Gray’ emoji symbols in the bottom toolbar, or making a left-right swipe to access the available choices.
To browse through the collection of emojis that you have used most frequently, tap the ‘Clock’ icon. If you are not finding the exact emoji to depict a particular expression, navigate to the ‘Search Emoji’ box under the text field and type a relevant keyword to open a customized list of emoji options.
Step 4: Play With Different Skin Tones
If you want to alter the default skin tone of a selected emoji, you can do this by tapping on and holding the same to see a display of different skin tones appear above your selection. Click on the one you like, to apply it to the selected emoji.
Step 5: Include the Emoji
When the aforesaid customizations make you happy; click on the emoji once again to include the latter within the text field of the chat service program you are working with.
02Enabling the Emoji Keyboard of Your iPhone
If you are keen towards sorting the issue of how to add emojis to photos iPhone while working with an emoji keyboard explicitly on your iPhone, you can proceed to enable the same on your device. The process is quick and easy, with no rocket science, and allows you to add emoji to picture iPhone. Here’s what you need to do:
Step 1: Launch the Settings Application
To start with settling the query of how to add emoji keyboard to iPhone, navigate to and click on the ‘Settings’ application on the welcome screen of your iPhone, followed by hitting the ‘General’ tab from the list of categories that appears next. Entering into the ‘General Settings’ interface, pick the ‘Keyboard’ option.
Step 2: Add a New Keyboard
Within the ‘Keyboard’ category of your iPhone settings, you are required to tap on the ‘Keyboards’ subcategory, followed by hitting the ‘Add New Keyboard’ option from the window that pops up next.
As you click on the aforesaid option, a series of keyboard types gets displayed on the screen. Scroll through the list to locate the ‘Emoji’ option, followed by clicking on the same to add emoji keyboard iPhone. That’s it! You can now proceed to use the keyboard to communicate across different conversation platforms.
03Adding Emojis to the Status Bar of Your iPhone
This one is a recently included feature in iOS compatible devices to sort out the issue of working with emojis on iPhones and allied device categories to answer the question of , how to add emoji to iPhone photo. As is obvious, availing the utility requires you to launch an update of your iPhone to iOS 15 or more recent versions. Make sure you adhere to the same before proceeding with the emoji inclusion process.
Without further ado, here’s how you can add the emoji elements to the status bar of your iPhone in just a few quick and simple steps:
Step 1: Launch the Settings Application
Start with heading to and clicking on the ‘Settings’ icon frame on the Launchpad of your iPhone to be greeted by the app’s welcome interface. In the list of available categories, click on the ‘Focus’ tab.
Step 2: Navigating Through the Focus Feature
As you hit the ‘Focus’ tab in the previous step, the latter’s interface pops up with a series of utility options. Instead of entering into the options, you however need to just tap the ‘Add’ button depicted by a ‘+’ icon at the top right corner of the ‘Focus’ window.
Step 3: Select an Emoji Category
Clicking on the ‘Add’ button directs you to the ‘Emoji Selection’ interface. All you need to do here is, click on the ‘Custom’ option to open the available emoji categories within the ‘Focus’ feature. Talking of the diversity of emoji options, the feature allows you to add up to 25 emoji categories to the iPhone status bar.
Ahead of the customary variations in smiley faces, you can experiment with adding more specific icons, like; paw prints, stethoscope, fork and knife, light bulb, etc. You can work with these varieties to walk through the subject of how to add emojis to photos iPhone.
Step 4: Name Your Emoji
When you are done with adding the preferred emoji icons, proceed to assign them a specific name. The added names will however, not show up on the status bar of your iPhone, but can be seen on other conversation platform and chat service applications.
If you choose to add the emoji in a specific color to your iPhone’s status bar, you can avail the feature. The color however, won’t reflect on the device’s status bar, but can be seen on the latter’s lock screen.
04Adding Emojis to iPhone Though the Google Messages Application
When aiming to set aside the concern of how to add emoji to iPhone photo, you can seek the help of third party applications. All you need to do is install and run the app on your iPhone and start your editing spree. Browsing through the IT market, you can easily land across a never ending series of third party alternatives to work with emojis on your iPhone.
Picking one from the same, here’s a detailed explanation of using the Google Messages app to include emojis on your iPhone:
Step 1: Download and Install the Application
Start with visiting the Apple App Store to download the Google Messages application in your iPhone. In case the utility already exists in your device, proceed to update the same to the most recent version.
Step 2: Set as Default
Once you are done with the download and installation formalities, proceed to launch the app in your device, followed by setting the latter as your preferred chat application.
Step 3: And…It’s Ready!
The completion of Step 2 will guide you to the Google Messages welcome screen, where you can start conversing with your friends and peers.
Step 4: Select a Contact
To begin chatting with a contact, click on the ‘Start Chat’ option, followed by selecting the contact number or name of a desired person.
Step 5: Type a Message
As you finish Step 4, the app’s chat interface appears where you can type a message within then text field and proceed to complement the same with emojis, stickers and other graphic elements. The app comes with an extensive range of emojis to select and add from. Moving ahead of the basic smileys, you can pick emojis from categories like, Food and Beverages, Travel, Nature, and many more.
Step 6: Send!
Tap the ‘Send’ button when you are done with composing the message, to let it reach the recipient. You can also forward the message to multiple contacts at the same time.
05Adding Emojis to iPhone Through the SwiftKey Keyboard
This one is another entry in list of answers regarding the query of how to add emojis to a picture on iPhone. Essentially a third party keyboard, SwiftKey works to supplement your messages with the latest and most expressive graphic elements, including emojis. The utility comes with a smart feature that predicts the type and style of emojis you will use in future conversations, in line with your current usage pattern.
The following user guide explains the step by step process to work with the SwiftKey keyboard for adding emojis to your iPhone:
Step 1: Download, Install and Launch SwiftKey
Navigate to the Apple App Store in your iPhone and proceed to download and install the SwiftKey application to the device. When you are done, launch the app and click on ‘Get Started’.
Step 2: Sign In to SwiftKey
As you launch the SwiftKey keyboard, the latter’s ‘Sign In to SwiftKey’ window pops up, requiring you to select an account for initiating the sign process of the application by clicking on either of the ‘Continue With Google’ or ‘Continue With Facebook’ options. To move ahead, follow the instructions that appear on your device screen.
Step 3: Enable the SwiftKey Keyboard
When you have chosen the sign in account, the ‘To Enable SwiftKey’ window appears to explain to you, the process of enabling the SwiftKey keyboard.
Step 4: Accessing SwiftKey Keyboard in iPhone Settings
Launch the iPhone’s ‘Settings’ application, followed by hitting the ‘General’ tab from the list of options within the latter’s opening interface.
As the ‘General’ window pops up, proceed to choose the ‘Keyboard’ option by tapping on the same.
Within the ‘Keyboard’ setting window, navigate to and click on the ‘Keyboards’ option.
Step 5: Make SwiftKey an Additional Keyboard
To work with the SwiftKey keyboard on your iPhone, you will need to add the same to your device’s list of preset keyboards. To do this, click on the ‘Add New Keyboard’ option within the list of keyboards that pops up as you complete Step 4.
A series of third party keyboards shows up in the window that appears next. Proceed to select ‘SwiftKey’ from the available keyboard choices. In case you don’t find the aforesaid keyboard among the options, double tap the ‘Home’ button on your device to exit the ‘Settings’ application.
Re-launch the ‘Settings’ app after a few moments and follow Steps 4 and 5 to make the ‘SwiftKey’ option appear within the list.
Step 6: Grant Full Access to SwiftKey
To work with the complete feature bank of the ‘SwiftKey’ application, you will have to allow the latter to fully access your iPhone. To proceed with the process, navigate to the ‘Keyboards’ window of your iPhone settings, where you can see the ‘SwiftKey’ keyboard present in the list of active keyboards of your device. Open the application’s ‘Access’ window by clocking on the keyboard name in the list.
Within the ‘SwiftKey Access’ window that appears, toggle the slider to the right side to enable the ‘Allow Full Access’ option.
As you enable the ‘Allow Full Access’ option, the ‘App Permissions’ dialog box pops up on your iPhone screen. Click on ‘Allow’ within the same to grant the required app permissions.
Step 7: Switch to the SwiftKey Keyboard
You will now be directed to the ‘Select SwiftKey’ window to change your default keyboard. Here you need to click on the ‘Globe’ icon, followed by choosing ‘SwiftKey’ from the menu that appears next.
Step 8: SwiftKey Is Ready!
As you finish Step 7, a confirmation window pops up on the iPhone screen, displaying the ‘Installation Successful’ message. If you wish to get regular updates and tips from the SwiftKey application, click on the ‘Save’ button, otherwise, navigate to the bottom right corner of the screen and click on the ‘Not Now’ option.
You can now work towards adding emojis in your chats and conversations on the iPhone, simply by typing a message in the text field of the preferred chat service program, followed by picking a suitable emoji from the diverse range of available options within the SwiftKey keyboard. Talking of additional merits, the utility allows you to introduce customizations to the keyboard in terms of supported languages, theme centered design, access compatibility and settings.
Part 2 Add Emojis to iPhone Q&A
01Why does the emoji utility not show up on an iPhone?
In case you find difficulty in accessing emojis on your iPhone, or the latter does not appear within your communication centered utilities of the device, consider checking the settings of the iPhone to make sure that the feature has been added as well as enabled. If not so, proceed to enable the same in the ‘Settings’ interface itself.
02What is the procedure to download an additional set of emojis to an iPhone?
If you want to spark up your iPhone’s emoji library with an extra set of the latest emojis, the only method that would cater to the concern of how to add more emoji to iPhone is taking the help of third party applications. As an affordable pick, you can rely on the Messages App Store in your iPhone to avail a decent rage of third party emoji packages, both free and paid.
03How can the hidden emoji keyboard be accessed?
In your iPhone settings, open the ‘General’ category, followed by selecting the ‘ Keyboard’ option. Entering in, choose the ‘Keyboards’ subcategory and tap on ‘Add New Keyboard’. From the list of options that drops down, select ‘Japanese’, followed by ‘Kana’. As you proceed to type a message the next time, click on the ‘Globe’ icon at the bottom-left corner of the app screen to toggle between keyboard options.
04How can the hidden emojis on an iPhone be unlocked?
To unlock a hidden emoji, navigate to the ‘Apple Messages’ app in your iPhone and launch the iMessage application. Next, open a conversation thread and enter any emoji in the chat’s text field. Now, press and hold the ‘Send’ button to open a hidden emoji page that lets you choose and add these elements to your text message.
05What is the best software to look for free emojis?
If you are willing to sort out the concern of accessing the best inventory of latest emojis, you can traverse the editor library of the Wondershare Filmora Video Editor graphic designer program. Divided into a hoard of specific categories, the software is known to house the most elaborative variety of emoji elements that undergo a periodic update that can help you to sort the query of how to add emojis to pictures on iPhone.
For Win 7 or later (64-bit)
For macOS 10.12 or later
● Ending Thoughts →
● Including emojis in your social media and chat service conversations works to add an emotional connect to your otherwise normal text messages.
● When looking forward to work towards the constraint of how to add new emojis to iPhone, there are a variety of methods to move ahead with the process.
● If you are on a search of the latest collection of emojis to add to your iPhone, you can take suggestions from the editor library of the Wondershare Filmora graphic designer program.
Finding The Best Filmic Pro LUTs For Video Editing
Video editing involves rearranging and upscaling video content for improved quality. Meanwhile, video editing can consume a lot of time and resources. For video editing, you need to have expertise in using the software. The ideal solution is using Filmic Tone LUTs for free download. These LUTs can extend the quality of your videos in a hassle-free environment. This article will discuss important Filmic Pro LUTs.
- Part 2: Discussing Some Practical Uses of LUTs in Video Editing
- Part 3: Best Filmic Pro LUTs To Use
- Part 4: Getting To Know Wondershare Filmora and Its Use in LUTs
Part 1: How Can LUTs Benefit Video Editors?
Video editors are professionals that are tasked to edit and customize videos. Their main objective is to enhance video quality with necessary manual upscaling. Making things more accessible, find how LUTs can benefit these professionals:
- Increased Efficiency: With LUTs, video editors can optimize their workflows with ready-made filters. So they don’t need to spend hours on video editing. By applying filters, video colors are upgraded.
- Consistent Grading: During manual editing, multiple frames are left out during color correction. With LUTs, the colors are applied in a consistent way in all frames. This way, you will experience effective color enhancement.
- Professional Quality: The quality of applied LUTs is amazing. After all, LUTs provide dedicated filter presets to optimize color saturation and brightness. With professional color grading, experience a top-quality video.
- Creative Colors: LUTs are ideal for adding premium yet stylish color schemas into videos. The color gradients are creative as well as sleek and luxurious. You will not regret using creative color presets in LUTs.
Part 2: Discussing Some Practical Uses of LUTs in Video Editing
LUTs, also known as look-up tables, are unique video editing tools. They use mathematical instructions to map input color values into output color values. This way, consistent color gradings are applied across video content. In video editing, LUTs can be used for a variety of practical uses:
1. Special Effects
By using LUTs, you can add special effects to your videos. This includes different effects, including dreamy, moody, or surreal. The videos will look more professional and enchanting with attractive looks. So you don’t need to pursue video editing in a deep way.
2. HDR Display
With LUTs, users can add a dynamic touch of HDR display to the videos. After all, they can convert SDR footage to HDR footage using special filter presets. This allows for different color contrasts within the video.
3. Color Enhancement
Enhancing color schemas is easier and more convenient using LUTs. These editing tools can adjust color contrast, balance, and saturation. Hence, your video is upscaled with an improved color display for vintage or cinematic looks.
4. Match Footages
Different cameras produce videos with diverse quality, which is unsatisfying. Through LUTs, you can match the color of your footage with a consistent appearance. The color schemes and tone contrasts are optimized in a collective way.
Part 3: Best Filmic Pro LUTs To Use
Using LUTs in video editing can save a lot of time. For video editors, LUTs can be revolutionizing because of less effort with amazing output. In general, using Filmic Pro LUTs is in great demand. Let’s discover some of them:
1. Filmic LUT Support
Bring Filmic looks to your videos using this Filmic Pro LUTs download pack. There are up to 7 different LUT preset filters that you can import. With Filmic touch, you can add unique cinematic looks to your visual content. LUT Quick Action Modal (QAM) is also introduced to switch into preview mode or apply LUT to the video.

2. Richard Lackey FREE Filmic Pro LOGv2 LUT for FilmConvert
Add a cinematic touch to your videos with this Filmic Tone LUTs free download pack. This special LUTs pack lets you add attractive film interaction to your video. The provided color schemes are exceptional because they offer unique color presentations. Meanwhile, the LUT equips solutions to correct imbalances and noise.

3. Free LUT Filmic
Make your photo or video more special with this Free LUT Filmic pack. Meanwhile, there are special effects for transforming color schemas within visual content. So, if you have film or photography, the provided LUT filters are amazing. This way, you can spark creativity like a professional editor. The video content will become more appealing.

4. Film Slog3 And Standard LUTs
Enhance your visual creativity by blending premium looks into your videos. After all, this Filmic Pro LUT download pack has fantastic color upscaling solutions. It contains a collection of 20 Film REC 709 LUTs and 20 Film Slog3 LUTs to adapt. This way, you can improve the color gradients of your social media videos and presentations.

5. FILMIC PRO SUPER-BUNDLE LUTS PACK
Enhancing video quality is now easier with this color-grading Filmic Pro pack. This is a specialized LUTs bundle that incorporates 50 cinematic filter presets. The available LUTs can generally optimize color gradients with the right contrasts. So if you have flat or log footage, using this LUT can be ideal. Meanwhile, the LUT is designed explicitly for mobile-captured videos.

6. Filmic Tone LUTs
Upgrade your preset library with this amazing Filmic Tone LUTs pack. While featuring 10 preset filters, this LUTs pack provides an aesthetic dark, moody tone. LUTs are easily applied to your videos with the right color upscaling. You will also receive a VLOG - Rec709 LUT and Sony SLOG2/3 - Rec709 LUT. The supported file format is .cube.

7. 7. Filmic LUTs Vol.2
Working with LUTs has never been this easy. So when you use Filmic LUTs Vol.2, you will get 10 creative LUT preset filters. Integrate these LUTs into your visual content to upscale their quality. Meanwhile, the LUTs can be used on different editing platforms. In most instances, you will get upscaling results within seconds. There is also an option to adjust intensity, contrast, and more.

8. 50 Cinematic Retro Film LUTs Pack
Add a retro touch to your videos with this Filmic Pro LUT download pack. After all, there are 50 retro-styled Filmic LUT presets. When you apply these LUTs to your video, special color grading is applied. Every specific LUT has a unique color schema with a styled theme. In this LUTs pack, you will also receive a PDF guide with step-by-step instructions.

9. Moody Filmic Cityscape LR Presets
Moody Filmic retouches are always special and exciting. When adding them to visual content, you can extend quality in an optimal way. After all, this Filmic Tone LUTs free download pack has 12 filter presets. This way, you can enhance color grading with the right correction standards. You can use these filter presets on both mobile and the web.

10. Movie Cinematic Film LUTs
Transform color grading within your visual content with this cinematic film LUTs pack. To sum up, there are 50 different cinematic LUTs in this pack. So, while using these LUTs, color saturation and brightness will upgrade your visual content. The good thing is the LUTs are compatible with both video and image formats.

Part 4: Getting To Know Wondershare Filmora and Its Use in LUTs
Wondershare Filmora is an industrial-standard video editing software. Meanwhile, this software is ideal for all video editors because it offers various video enhancements. There are 200+ LUTs in this editing tool which includes color grading Filmic Pro. Thus, you can upscale video colors in an optimized way in different styles.
![]()
Note: Filmora has AI tools like AI Smart Cutout, AI Audio Denoise, and Auto Reframe. Moreover, you can also enjoy the perks of AI copywriting for ready-made video scripts. With motion tracking, speed ramping, and keyframing, video editing becomes simpler. In addition, there are several options for effects, transitions, and stickers. This makes it a complete and comprehensive video editing solution for the masses.

Empower your videos with a new mood using different LUTs. Filmora now offers 100+ top-quality 3D LUTs cover a broad range of scenarios. Transform your videos with Filmora’s powerful 3D LUTs.
Apply LUT on Videos Apply LUT on Videos Learn More


Conclusion
LUTs are pre-defined color gradients that work in an instant way. Meanwhile, they make video editing simpler and smarter. This article illustrated 10 top Filmic Pro LUTs free download. By using these LUTs, you can upscale your important videos with improved color schemas. In addition, you discovered a vital editing tool, Wondershare Filmora. Within this software, you can upscale videos with multiple functionalities.
Part 1: How Can LUTs Benefit Video Editors?
Video editors are professionals that are tasked to edit and customize videos. Their main objective is to enhance video quality with necessary manual upscaling. Making things more accessible, find how LUTs can benefit these professionals:
- Increased Efficiency: With LUTs, video editors can optimize their workflows with ready-made filters. So they don’t need to spend hours on video editing. By applying filters, video colors are upgraded.
- Consistent Grading: During manual editing, multiple frames are left out during color correction. With LUTs, the colors are applied in a consistent way in all frames. This way, you will experience effective color enhancement.
- Professional Quality: The quality of applied LUTs is amazing. After all, LUTs provide dedicated filter presets to optimize color saturation and brightness. With professional color grading, experience a top-quality video.
- Creative Colors: LUTs are ideal for adding premium yet stylish color schemas into videos. The color gradients are creative as well as sleek and luxurious. You will not regret using creative color presets in LUTs.
Part 2: Discussing Some Practical Uses of LUTs in Video Editing
LUTs, also known as look-up tables, are unique video editing tools. They use mathematical instructions to map input color values into output color values. This way, consistent color gradings are applied across video content. In video editing, LUTs can be used for a variety of practical uses:
1. Special Effects
By using LUTs, you can add special effects to your videos. This includes different effects, including dreamy, moody, or surreal. The videos will look more professional and enchanting with attractive looks. So you don’t need to pursue video editing in a deep way.
2. HDR Display
With LUTs, users can add a dynamic touch of HDR display to the videos. After all, they can convert SDR footage to HDR footage using special filter presets. This allows for different color contrasts within the video.
3. Color Enhancement
Enhancing color schemas is easier and more convenient using LUTs. These editing tools can adjust color contrast, balance, and saturation. Hence, your video is upscaled with an improved color display for vintage or cinematic looks.
4. Match Footages
Different cameras produce videos with diverse quality, which is unsatisfying. Through LUTs, you can match the color of your footage with a consistent appearance. The color schemes and tone contrasts are optimized in a collective way.
Part 3: Best Filmic Pro LUTs To Use
Using LUTs in video editing can save a lot of time. For video editors, LUTs can be revolutionizing because of less effort with amazing output. In general, using Filmic Pro LUTs is in great demand. Let’s discover some of them:
1. Filmic LUT Support
Bring Filmic looks to your videos using this Filmic Pro LUTs download pack. There are up to 7 different LUT preset filters that you can import. With Filmic touch, you can add unique cinematic looks to your visual content. LUT Quick Action Modal (QAM) is also introduced to switch into preview mode or apply LUT to the video.
2. Richard Lackey FREE Filmic Pro LOGv2 LUT for FilmConvert
Add a cinematic touch to your videos with this Filmic Tone LUTs free download pack. This special LUTs pack lets you add attractive film interaction to your video. The provided color schemes are exceptional because they offer unique color presentations. Meanwhile, the LUT equips solutions to correct imbalances and noise.
3. Free LUT Filmic
Make your photo or video more special with this Free LUT Filmic pack. Meanwhile, there are special effects for transforming color schemas within visual content. So, if you have film or photography, the provided LUT filters are amazing. This way, you can spark creativity like a professional editor. The video content will become more appealing.
4. Film Slog3 And Standard LUTs
Enhance your visual creativity by blending premium looks into your videos. After all, this Filmic Pro LUT download pack has fantastic color upscaling solutions. It contains a collection of 20 Film REC 709 LUTs and 20 Film Slog3 LUTs to adapt. This way, you can improve the color gradients of your social media videos and presentations.
5. FILMIC PRO SUPER-BUNDLE LUTS PACK
Enhancing video quality is now easier with this color-grading Filmic Pro pack. This is a specialized LUTs bundle that incorporates 50 cinematic filter presets. The available LUTs can generally optimize color gradients with the right contrasts. So if you have flat or log footage, using this LUT can be ideal. Meanwhile, the LUT is designed explicitly for mobile-captured videos.
6. Filmic Tone LUTs
Upgrade your preset library with this amazing Filmic Tone LUTs pack. While featuring 10 preset filters, this LUTs pack provides an aesthetic dark, moody tone. LUTs are easily applied to your videos with the right color upscaling. You will also receive a VLOG - Rec709 LUT and Sony SLOG2/3 - Rec709 LUT. The supported file format is .cube.
7. 7. Filmic LUTs Vol.2
Working with LUTs has never been this easy. So when you use Filmic LUTs Vol.2, you will get 10 creative LUT preset filters. Integrate these LUTs into your visual content to upscale their quality. Meanwhile, the LUTs can be used on different editing platforms. In most instances, you will get upscaling results within seconds. There is also an option to adjust intensity, contrast, and more.
8. 50 Cinematic Retro Film LUTs Pack
Add a retro touch to your videos with this Filmic Pro LUT download pack. After all, there are 50 retro-styled Filmic LUT presets. When you apply these LUTs to your video, special color grading is applied. Every specific LUT has a unique color schema with a styled theme. In this LUTs pack, you will also receive a PDF guide with step-by-step instructions.
9. Moody Filmic Cityscape LR Presets
Moody Filmic retouches are always special and exciting. When adding them to visual content, you can extend quality in an optimal way. After all, this Filmic Tone LUTs free download pack has 12 filter presets. This way, you can enhance color grading with the right correction standards. You can use these filter presets on both mobile and the web.
10. Movie Cinematic Film LUTs
Transform color grading within your visual content with this cinematic film LUTs pack. To sum up, there are 50 different cinematic LUTs in this pack. So, while using these LUTs, color saturation and brightness will upgrade your visual content. The good thing is the LUTs are compatible with both video and image formats.
Part 4: Getting To Know Wondershare Filmora and Its Use in LUTs
Wondershare Filmora is an industrial-standard video editing software. Meanwhile, this software is ideal for all video editors because it offers various video enhancements. There are 200+ LUTs in this editing tool which includes color grading Filmic Pro. Thus, you can upscale video colors in an optimized way in different styles.
![]()
Note: Filmora has AI tools like AI Smart Cutout, AI Audio Denoise, and Auto Reframe. Moreover, you can also enjoy the perks of AI copywriting for ready-made video scripts. With motion tracking, speed ramping, and keyframing, video editing becomes simpler. In addition, there are several options for effects, transitions, and stickers. This makes it a complete and comprehensive video editing solution for the masses.
Empower your videos with a new mood using different LUTs. Filmora now offers 100+ top-quality 3D LUTs cover a broad range of scenarios. Transform your videos with Filmora’s powerful 3D LUTs.
Apply LUT on Videos Apply LUT on Videos Learn More
Conclusion
LUTs are pre-defined color gradients that work in an instant way. Meanwhile, they make video editing simpler and smarter. This article illustrated 10 top Filmic Pro LUTs free download. By using these LUTs, you can upscale your important videos with improved color schemas. In addition, you discovered a vital editing tool, Wondershare Filmora. Within this software, you can upscale videos with multiple functionalities.
Also read:
- In 2024, The Only Guide Youll Ever Need to Learn GIF Design
- Updated Best 5 Apps To Add Song To Video
- Updated Denoise a Video in Adobe Premiere Pro – Audio and Video Noise Removal
- In 2024, 5 Tried-And-True Ways to GIF Making
- Updated In 2024, How to Be a YouTube Vlogger
- In 2024, Have You Ever Wanted to Stop Your Video and Hold on to a Single Frame to Draw Attention to a Point or for Dramatic Flair? Good News! VEGAS Pro Makes It Easy to Do Just That. In This Tutorial, Well Look at How to Make Sony Vegas Freeze Frame
- Updated In 2024, How to Create Loop Videos Using Filmora
- In 2024, Learn How to Create Custom Titles in Filmora and Add a Unique Lower Third Animation Effect in Six Simple Steps
- Updated In 2024, A Complete Guide to Use Distortion Effect in Premiere Pro
- Updated How to Edit GoPro Videos on Mac for 2024
- Confused as to How to Add Subtitles to a Video on iPhone? No Worries as We Bring You the Best Solution to Get the Task Done for 2024
- Final Cut Pro for iPad- Is It Available for 2024
- What Is the Best MP4 Cutters for YouTubers on Mac?
- New 2024 Approved Wondershare Filmora Tutorial | Using The AI Auto Reframe Feature
- How to Zoom Desktop Screen
- Fix Cant Take Screenshot Due to Security Policy on Sony Xperia 10 V | Dr.fone
- FRP Hijacker by Hagard Download and Bypass your Xiaomi Redmi 12 FRP Locks
- How to Transfer Data from Samsung Galaxy A54 5G to Any iOS Devices | Dr.fone
- What Does Jailbreaking Apple iPhone 6s i Do? Get Answers here
- In 2024, Change Location on Yik Yak For your Oppo Reno 11F 5G to Enjoy More Fun | Dr.fone
- Why Your Vivo S18 Screen Might be Unresponsive and How to Fix It | Dr.fone
- Unlock Apple iPhone 15 Pro Max With Forgotten Passcode Different Methods You Can Try
- 3 Effective Ways to Bypass Activation Lock from iPhone 13 mini
- How to Unlock Xiaomi 13 Ultra Phone Password Without Factory Reset?
- How To Fix OEM Unlock Missing on Samsung Galaxy M14 4G?
- 7 Solutions to Fix Chrome Crashes or Wont Open on Nokia C12 | Dr.fone
- 4 Ways to Fix Android Blue Screen of Death On Motorola Edge 40 Pro | Dr.fone
- How to Fake GPS on Android without Mock Location For your Oppo A2 | Dr.fone
- In 2024, The Best Methods to Unlock the iPhone Locked to Owner for Apple iPhone SE | Dr.fone
- Title: New 2024 Approved How to Convert Videos to Slow Motion? Complete Guide
- Author: Chloe
- Created at : 2024-06-18 14:31:12
- Updated at : 2024-06-19 14:31:12
- Link: https://ai-editing-video.techidaily.com/new-2024-approved-how-to-convert-videos-to-slow-motion-complete-guide/
- License: This work is licensed under CC BY-NC-SA 4.0.
