:max_bytes(150000):strip_icc():format(webp)/title-b16094ee6f3340328084b9e5cc01426f.jpg)
New 2024 Approved How to Create a Custom Sequence Preset in Premiere Pro

How to Create a Custom Sequence Preset in Premiere Pro
You’ve probably heard of Adobe Premiere Pro – it’s a top-tier video editing software that’s widely recognized in the market. But have you delved into the nitty-gritty of sequence presets? A custom sequence preset is your best friend for maintaining consistency across projects.
It allows users to save specific settings for sequence attributes like frame rate, resolution, and audio settings. Instead of reconfiguring these settings for each new project, a custom sequence preset lets you jump right into editing. Now, how do you create one? Keep reading!
Part 1: How to Create a Custom Sequence in Premiere Pro
Creating a custom sequence is like tailoring a shirt to fit you perfectly. Here’s a step-by-step guide to help you do just that:
Step 1: Displays the New Sequence Window
Begin by launching Adobe Premiere Pro. Once opened, navigate to the top menu and select File > New > Sequence. This will open up the New Sequence window, where all the magic happens!
Step 2: Change the Editing Mode to Custom in the Settings Panel
You’ll see several tabs in the New Sequence window, but we will focus on the “Settings” tab for our purposes. Click on it.
Here, you’ll find the ‘Editing Mode’ dropdown menu. By default, it’s set to a specific format like ‘DSLR’ or ‘AVCHD.’ Change this to ‘Custom.’ This will unlock a plethora of options for you to play with.
Deep Dive into Settings:
- Frame Size: Define your video’s width and height. Remember, 1920x1080 is Full HD, and 3840x2160 is 4K. Choose based on your project needs.
- Frame Rate: 24fps is the cinematic standard, but if you’re creating content for TV or web, 30fps or 60fps might be more suitable.
- Pixel Aspect Ratio: Stick with ‘Square Pixels’ unless you have a specific reason to do otherwise.
- Fields: Choose ‘No Fields’ for progressive footage. If you’re unsure, this is a safe bet.
- Audio Settings: Here, you can configure the sample rate, among other things. 48000Hz is standard for video.
Step 3: Give the New Preset a Name and Save It
Once you’ve customized the settings to your satisfaction, it’s time to save this configuration for future use. At the bottom of the New Sequence window, you’ll see a ‘Save Preset’ button. Click on it.
A pop-up window will show up, requesting you to provide a name for your new preset. Choose something descriptive so you can easily recognize it later. Once named, click ‘OK’.
Your custom sequence preset is now saved and will appear under the ‘Custom’ folder in the ‘Sequence Presets’ tab.
Part 2: Why Custom Sequence Presets are Essential for Efficient Editing
As you delve deeper into video editing, you’ll begin to appreciate the little things that shave off minutes from your workflow, allowing you to dedicate more time to the creative process. This is precisely where the utility of custom sequence presets in Premiere Pro comes into play. But why are these presets so crucial?
- Consistency Across Projects: If you’re managing multiple projects or a series of videos, having a standard format ensures that all your content has a uniform look and feel. Consistency is a hallmark of professional-grade content. It’s not just about the visuals – maintaining a uniform audio quality and format is equally significant. With a preset, you no longer need to remember the minutiae of each setting, ensuring consistency effortlessly.
- Speed Up Your Workflow: Every minute you spend adjusting the sequence settings is a minute less you have for cutting, color correcting, audio mixing, or adding those special effects that make your videos pop. Over time, those minutes can add up to hours. By using a custom sequence preset, you can jump straight into the creative part of editing without the preliminary setup.
- Avoid Common Mistakes: Have you ever rendered an entire project only to find that the frame rate was off or the audio was set to the wrong sample rate? These kinds of errors can occur when setting up a new sequence from scratch each time. By relying on a preset, you mitigate the risks of such oversights.
- Personalized Templates for Different Platforms: Different platforms may have varying preferred settings. For instance, the ideal video format for YouTube might differ from that of Instagram or TikTok. Instead of Googling these settings each time, you can have a custom sequence preset ready for each platform, ensuring your content is optimized wherever it’s destined.
- Ease of Collaboration: If you’re working as part of a team, having standard sequence presets ensures everyone is on the same page. This is particularly handy when multiple editors are working on different segments of the same project. With custom presets, you’re not just aligning sequences but also visions.
Incorporating this practice into your editing routine might initially seem trivial, but its benefits compound with time.
Part 3: Summary
Creating a custom sequence preset in Adobe Premiere Pro isn’t just about streamlining your workflow – it’s about ensuring consistency across your projects.
By saving your most-used settings, you’re creating a base template that can be pulled up any time, granting you more time for the creative process.
Adobe Premiere Pro’s interface is designed to make tasks like these intuitive, so even if you’re a beginner, with a bit of practice, you’ll be creating custom sequence presets like a pro.
Hard to Remove Black Background in After Effects?
Hard to Remove Black Background in After Effects? Here’s the Best Way to Deal With It
An easy yet powerful editor
Numerous effects to choose from
Detailed tutorials provided by the official channel
Having to adjust with black backgrounds in After Effects is quite annoying, but not anymore. Stay tuned to get through quick and hastle free solutions!
In this article
01 [How to Remove Black Background from After Effects](#Part 1)
02 [How to Export After Effects Transparent Background](#Part 2)
Part 1 How to Remove Black Background from After Effects
Graphic and video editing are enormous domains to explore your creative skills in graphic design and animation. The software market is a pool of editing applications that are packed with extensive libraries to garnish your creations with varieties of exciting after effects. However, the additive black backgrounds are an annoying cringe to your creative artwork.
While these black backgrounds are evident on account of being inherent application properties of video and film editing software, the relaxing note is, there are effective solutions to the removal of these black screens. When browsing through affordable way to take up the removal process, you can adhere to the following procedure for making and exporting after effects transparent background videos:
Step 1: Launch After Effects
This one is an efficient motion graphics template that you can use to add a visible spunk to your graphic design artworks. Begin with launching the template in your system after an official website download of the same.
Step 2: Make Your Film Ready
Before beginning to remove the black background in After Effects template, make sure that your footage is ready to take up the action. The tool you are about to use is known to eliminate black pixels from your clip proportional to the luminous intensity variation in the scene under consideration.
Check for any areas you would like to remain untouched and mask them to retain the dark elements. To ensure effective masking, it is recommended to use the ‘Levels and Curves’ effect for a convenient tweak to the final key at the end.
Step 2: Shift Channels Effect
In the composition panel, navigate to the ‘Shift Channels’ effect and use the ‘Drag and Drop’ method to add it to the dark pixelated layer you wish to remove. You can also use this effect to work with adjustment layers.
Step 3: Luminance Adjustments
While continuing with the ‘Shift Channels’ effect, navigate to the ‘Take Alpha From’ checkbox and set ‘Luminance’ as the ‘Reset’ parameter. You are instantly fetched a footage without the black background. If this does not happen, navigate to the bottom of the composition panel and enable the ‘Transparency Grid’ option with a right side toggle.
Step 4: Color Tweaks
Use the‘Levels and Curves’ effect mentioned in Step 2 to make level adjustments until you get the perfect result. You can experiment with varieties of curve and level variations, both, before and after using the ‘Shift Channels’ effect to get the right tweaks. That’s it! You are now ready to export after effects transparent background video.
Part 2 How to Export After Effects Transparent Background
Videos with transparent backgrounds are trending examples of motion graphic designing and video editing artworks. The cue behind these backgrounds is that they exclusively permit the object of focus to have an opaque or colored pixelation, while leaving the remaining pixels as transparent or colorless. This is beneficial in adding an extra spotlight to the main elements of your creation, while rendering the less important parts behind the scene.
Having known the credibility of transparent backgrounds in video crafting, you may feel motivated to try hands on experimenting with transparent backgrounds to uplift your graphic motion artwork.
Considering the most affordable picks of video editing software to choose from, you can rely on the ‘After Effects’ motion graphic template to kick start the creation process. When using the aforesaid template to export videos with transparent backgrounds, you need to adhere to the following steps:
Step 1: Launch the After Effects Template
Start with downloading the graphic template from its official website and launching the same on your system.
Step 2: Select Your Video
On a successful launch, the template welcomes you with its composition timeline and project panel. Here, you need to select a desired video from either of the two places to export with a transparent background.
Step 3: Add to Queue
Once you have made your choice, navigate to the top toolbar in the composition panel and hit the ‘Composition’ tab. From the drop down menu that follows, choose ‘Add to Render Queue’. You can alternatively use the ‘Ctrl + M’ shortcut to carry out the above task.
“
Step 4: Output Settings
In the ‘Render Queue’ window that pops up after completion of Step 3, navigate to the left and tap ‘Output Module’ to see the ‘Output Module Settings’ window pop up. Here, click on ’Format’ and choose the standard ‘Quicktime’ format.
“
Step 5: Output Channel Selection
In the ‘Output Module’ window itself, navigate to the ‘Video Output’ tab and select ‘Channels’. In the drop down menu that follows, choose ‘RGB + Alpha’. When you are done, tap ‘OK’ at the bottom. Your video is ready for a transparent background export.
“
Exporting Transparent Background Videos in Wondershare Filmora Video Editor
Using the ‘After Effects’ motion graphic template is certainly one among the most affordable and convenient solutions for a transparent video export; however there are other feasible alternatives to adhere to the task. While searching through viable substitutes of the ‘After Effects’ template, you can surely pick Filmora as a reliable choice.
For Win 7 or later (64-bit)
For macOS 10.12 or later
Launched by Wondershare, this one is excellent video creator and editor software, capable of adhering to your requirement of a transparent background video export in the simplest way possible and that too in the quickest time span. You can further apply a plethora amazing effects to your creation from the extensive Filmora video effects library. The software comes with an advanced ‘Green Screen’ feature to create transparent video backgrounds.
It is recommended to create a Green Screen video in the software for excellent transparency. Having done that, you can take the following steps to export videos with transparent backgrounds using Filmora:
Step 1: Launch the Software
Download the free Filmora Video Editor software from its official website and install the same in any of your Windows or MacOS devices. Having done that, launch the software in your system.
Step 2: Import Your Video
In the software’s welcome interface, navigate to and hit the ‘Import’ tab. From the drop don menu that follows, choose the ‘Import Media Files’ option to import your desired background and green screen videos to Filmora’s media library.
“
Step 3: Adding Clips to Timeline
Now you need to add background footage in the timeline’s video track and repeat the process with the green screen footage to add it into a separate timeline track. You can either insert both the clips into different video tracks using the ‘Drag and Drop’ method.
“
Step 4: Chromatic Settings
In the green screen video timeline, double click on the added video to directly access the ‘Chroma Key’ settings. You can alternatively, right click the video footage and choose ‘Green Screen’ to access the ‘Chroma Key’ option.
“
Step 5: Applying Transparency Effect
Enable the Chroma Key by checking in the option boxes. Next, you need to click either the ‘Color Picker’ icon or the ‘Color Picker’ drop down menu for an automatic generation of transparent background for your footage.
“
Step 6: Preview Your Artwork
Once the transparent background is applied, the editor will redirect you to its ‘Preview’ window, where you can play the footage to see the result. You can now save and export the created video with a transparent background to any social media platform of your choice.
“
● Ending Thoughts →
● Videos with transparent backgrounds are capable of attracting much greater attention for the prime object of concern in any footage.
● You can choose from a variety of video editor tools and software, like, the After Effects template, to export videos with transparent backgrounds on various media sharing platforms. if you are looking for suitable alternatives, consider using the Filmora Video Editor software to create and export transparent background videos.
How to Zoom In and Out on Mac
Having difficulties seeing the small print on your Mac’s screen? You can easily enlarge the whole screen with just a few clicks with this guide of how-to un-zoom on mac; which is useful for anybody with poor vision in particular. Users of the macOS operating system may zoom in and out on tiny, difficult-to-read text and pictures in a variety of ways. Would you want to interact closely with anything on your Mac? Maybe you’d like to see things from a broader angle so you would require a how to zoom out on Mac tutorial.
In any case, you have our support. There are various ways to zoom in and out on a Mac, whether you want to do it for the whole screen or just a specific window. For your benefit, we went through many different methods to zoom out on a Mac today. Apple provides a wide range of customizing possibilities. We’ll provide you practical advice on how to utilize your keyboard, mouse, trackpad, or browser to zoom in MacBook. Let’s get started straight now without further ado.
Way 1: Use Keyboard Shortcuts
When using an app, holding down Command key while using the plus (+) or minus (-) keys will allow you to zoom in or out as needed. Using the keyboard on your Mac, you may zoom in and out at intervals of 10%; when you do, a pop-up menu with the option to reset (i.e., return to the default, or 100%, zoom level) will display at the top of the screen. Instead of touching or repeating the shortcut, just keep holding the plus or minus key to zoom farther. Accessibility Zoom, which was created as a tool for the blind and enables you to zoom in on a Mac to see tiny text and precisely change settings with checkboxes, must be enabled if you wish to zoom in on the whole screen rather than just an app window (such as Utilities).
Steps to Use Keyboard Shortcut to Zoom in MacBook
Step1Go to Accessibility > System Preferences > Zoom, then click Zoom in the sidebar. Check the check next to “Use keyboard shortcuts to zoom” after that. Click the command key (located on either side of the space bar).
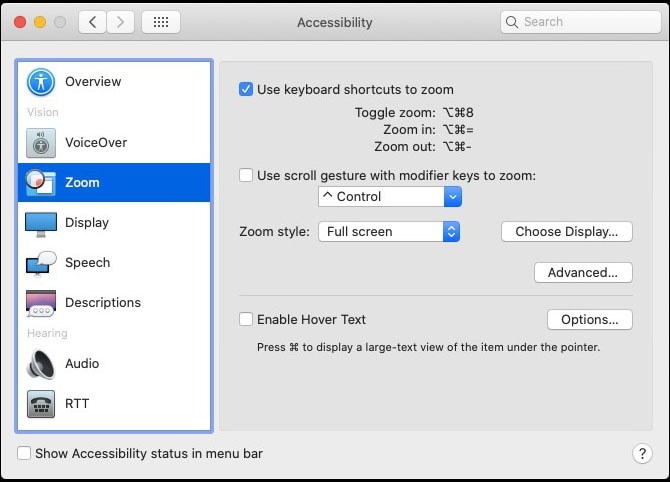
Step2Press the plus/equal sign (“+ =”) button, which is adjacent to the delete button on the top right side of the keyboard, while continuing to hold down the command button to zoom in.
Step3Press the dash/underscore button (“- _“), which is situated next to the “+ =” button on the top right side of the keyboard, while still holding down the command button, to zoom out.
Way 2: Use Trackpad Gestures
You may quickly learn how to zoom in on a Mac using trackpad movements if you prefer using a touchpad versus learning any kind of keyboard shortcuts. With a MacBook, there is another, maybe simpler way to zoom in and out in addition to the approach mentioned above. If your keyboard isn’t entirely working, it may still be helpful. However, make sure that gesture support is turned on in the settings on your Mac. Although a Mac still supports the usage of a mouse, new Mac software is designed to be used with a trackpad. Apple is abandoning the mouse. And with a little practice, you can do it too. What you must do is as follows:
Steps to Enable Trackpad Gestures
Step1Open System Preferences and choose Trackpad. Next, choose the Scroll & Zoom tab and select the “Smart zoom” checkbox. Zooming in on web sites, photos, and documents couldn’t be much simpler after gesture support was set up:
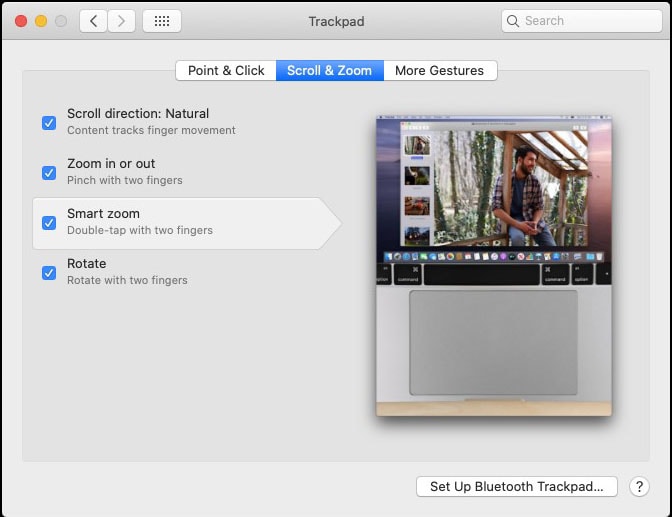
Step2You can zoom in or out on Mac by placing two fingers on the touchpad and moving one finger closer to the other or further apart (repeat for additional zooming)
Step3Another option is to simply zoom in and out by double-tapping the touchpad with two fingers.
Way 3: Use Scroll Gesture
If you’d like to use your mouse, you may utilize the screen zoom option, which enlarges everything on your screen rather than just the app window you’re now viewing. This would need holding down one of the designated modifier keys while scrolling in order to zoom in on a Mac. Just like on an iPhone or iPad, you can zoom in and out by pinching and un-pinching. The smart zoom motion, on the other hand, is executed by double-tapping with two fingers. This immediately zooms into or immediately zooms out of a web page or pdf.
Steps to Enable Scroll Gesture
Step1To make this feature active, from the Apple menu, choose System Preferences and select Accessibility. Choose Zoom from the sidebar.
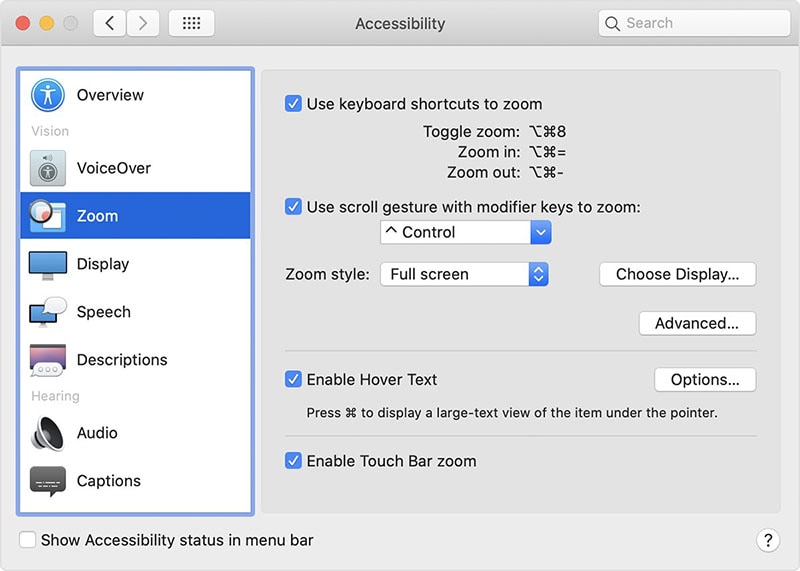
Step2Select “Use scroll motion with modifier keys to zoom” from the drop-down menu as shown above.
Step3Select the desired modifier key from the dropdown menu.
Way 4: Enable Hover Text to Zoom
Use the wonderful assistive feature called Hover Text to enlarge a single macOS user interface piece without zooming out the whole Mac screen. One of your alternatives is to enable zooming while hovering over text. The “Enable Hover Text” option is part of the Zoom menu but does not directly magnify the display. The function allows users to use the Command key to momentarily enlarge just the text below the pointer and is accessible without Zoom having to be activated. When Hover Text is enabled on your Mac, you may drag the cursor over anything on the screen, such as text, input fields, menu items, or buttons, and a high-resolution magnified version of those objects will appear in a new window. Find out here how to make Hover Text available on your Mac:
Steps to Use Hover Text to Zoom
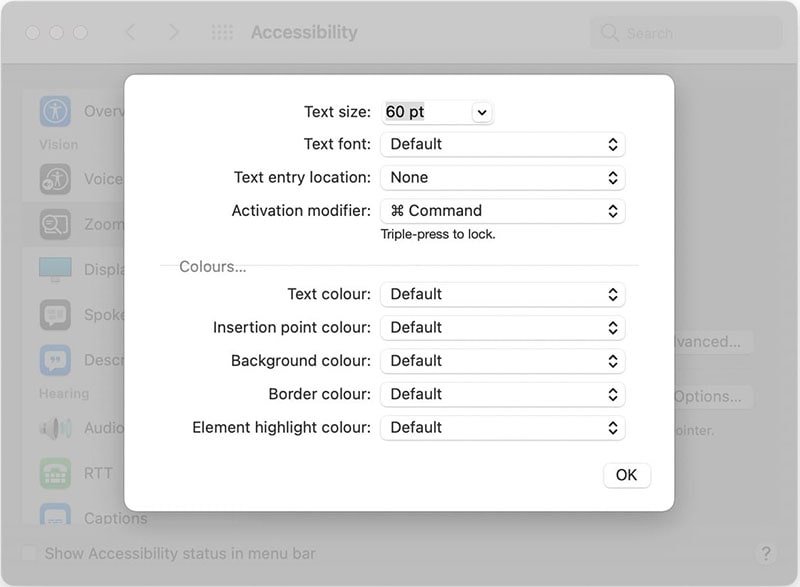
Step1When you choose this option, a larger, higher-resolution picture of the text your cursor is over will show as long as you press and hold down the “Command” key. Click “Options” to modify the text’s appearance.

Step2Additional customization options are available in the Options menu, including the ability to alter the font, the size of the zoomed-in text (which may range from 14pt to 128pt), the font’s appearance surrounding the cursor, and the modifier key that activates the function.
Way 5: Enable Touch Bar
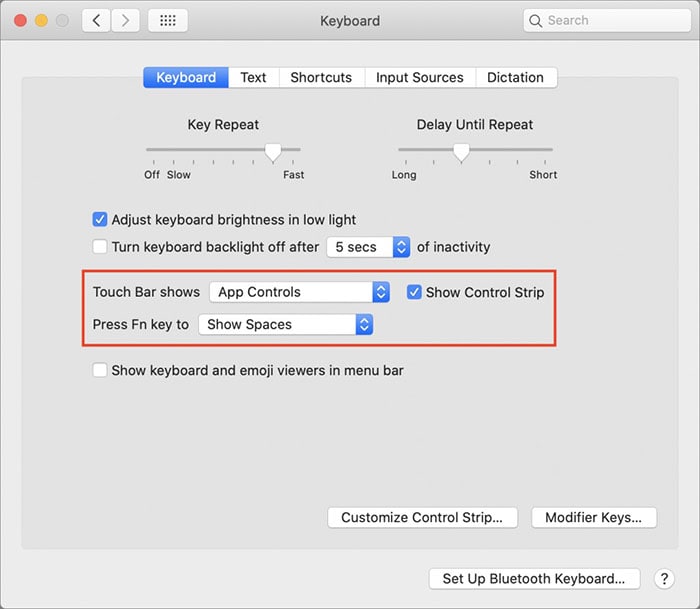
This substitute is only accessible on Macs equipped with Touch Bars. A handy feature is the Touch Bar. The Touch Bar is a feature on every current MacBook Pro model, including the 13-inch and 16-inch versions. On the Touch Bar, there is a mix of App Controls and a Control Strip. To use with your compatible MacBook Pro, the Touch Bar has additional features. Although it is helpful right out of the box, some customization may be required for your advantage. Fortunately, Apple makes modifications rather straightforward. You may change your default by following the instructions below.
Steps to Enable Touch Bar on MacBook
Step1The Touch Bar at the bottom of your display will grow and become easier to view if you choose the “Enable Touch Bar zoom” option. Now all you have to do is touch and hold the Touch Bar to test it out.
Step2Click the Apple symbol in the upper left corner of your screen and choose “System Preferences” to activate the touch bar in another method.
Step3Select “Keyboard” > “Keyboard” and then select “Touch Bar shows” under the Touch Bar settings. Then choose an option from the menu, which also includes the larger Control Strip and app buttons.
Conclusion
Even the most experienced Mac users sometimes get lost and google topics that should be obvious, like how to zoom in and out on a Mac. But it’s also not as evident as you may believe. You’ll be astonished by how many options there are for zooming on a Mac. Use the Zoom accessibility tool on your Mac’s desktop to enlarge the area of the screen you need if you’re having problems seeing certain components. We’re certain that this article will help you learn something new and use your Mac to its fullest potential. Check out the useful guide to Mac zoom above to see how these zoom tips and solutions may help you make the most of your time on a Mac.
Having difficulties seeing the small print on your Mac’s screen? You can easily enlarge the whole screen with just a few clicks with this guide of how-to un-zoom on mac; which is useful for anybody with poor vision in particular. Users of the macOS operating system may zoom in and out on tiny, difficult-to-read text and pictures in a variety of ways. Would you want to interact closely with anything on your Mac? Maybe you’d like to see things from a broader angle so you would require a how to zoom out on Mac tutorial.
In any case, you have our support. There are various ways to zoom in and out on a Mac, whether you want to do it for the whole screen or just a specific window. For your benefit, we went through many different methods to zoom out on a Mac today. Apple provides a wide range of customizing possibilities. We’ll provide you practical advice on how to utilize your keyboard, mouse, trackpad, or browser to zoom in MacBook. Let’s get started straight now without further ado.
Way 1: Use Keyboard Shortcuts
When using an app, holding down Command key while using the plus (+) or minus (-) keys will allow you to zoom in or out as needed. Using the keyboard on your Mac, you may zoom in and out at intervals of 10%; when you do, a pop-up menu with the option to reset (i.e., return to the default, or 100%, zoom level) will display at the top of the screen. Instead of touching or repeating the shortcut, just keep holding the plus or minus key to zoom farther. Accessibility Zoom, which was created as a tool for the blind and enables you to zoom in on a Mac to see tiny text and precisely change settings with checkboxes, must be enabled if you wish to zoom in on the whole screen rather than just an app window (such as Utilities).
Steps to Use Keyboard Shortcut to Zoom in MacBook
Step1Go to Accessibility > System Preferences > Zoom, then click Zoom in the sidebar. Check the check next to “Use keyboard shortcuts to zoom” after that. Click the command key (located on either side of the space bar).

Step2Press the plus/equal sign (“+ =”) button, which is adjacent to the delete button on the top right side of the keyboard, while continuing to hold down the command button to zoom in.
Step3Press the dash/underscore button (“- _“), which is situated next to the “+ =” button on the top right side of the keyboard, while still holding down the command button, to zoom out.
Way 2: Use Trackpad Gestures
You may quickly learn how to zoom in on a Mac using trackpad movements if you prefer using a touchpad versus learning any kind of keyboard shortcuts. With a MacBook, there is another, maybe simpler way to zoom in and out in addition to the approach mentioned above. If your keyboard isn’t entirely working, it may still be helpful. However, make sure that gesture support is turned on in the settings on your Mac. Although a Mac still supports the usage of a mouse, new Mac software is designed to be used with a trackpad. Apple is abandoning the mouse. And with a little practice, you can do it too. What you must do is as follows:
Steps to Enable Trackpad Gestures
Step1Open System Preferences and choose Trackpad. Next, choose the Scroll & Zoom tab and select the “Smart zoom” checkbox. Zooming in on web sites, photos, and documents couldn’t be much simpler after gesture support was set up:

Step2You can zoom in or out on Mac by placing two fingers on the touchpad and moving one finger closer to the other or further apart (repeat for additional zooming)
Step3Another option is to simply zoom in and out by double-tapping the touchpad with two fingers.
Way 3: Use Scroll Gesture
If you’d like to use your mouse, you may utilize the screen zoom option, which enlarges everything on your screen rather than just the app window you’re now viewing. This would need holding down one of the designated modifier keys while scrolling in order to zoom in on a Mac. Just like on an iPhone or iPad, you can zoom in and out by pinching and un-pinching. The smart zoom motion, on the other hand, is executed by double-tapping with two fingers. This immediately zooms into or immediately zooms out of a web page or pdf.
Steps to Enable Scroll Gesture
Step1To make this feature active, from the Apple menu, choose System Preferences and select Accessibility. Choose Zoom from the sidebar.

Step2Select “Use scroll motion with modifier keys to zoom” from the drop-down menu as shown above.
Step3Select the desired modifier key from the dropdown menu.
Way 4: Enable Hover Text to Zoom
Use the wonderful assistive feature called Hover Text to enlarge a single macOS user interface piece without zooming out the whole Mac screen. One of your alternatives is to enable zooming while hovering over text. The “Enable Hover Text” option is part of the Zoom menu but does not directly magnify the display. The function allows users to use the Command key to momentarily enlarge just the text below the pointer and is accessible without Zoom having to be activated. When Hover Text is enabled on your Mac, you may drag the cursor over anything on the screen, such as text, input fields, menu items, or buttons, and a high-resolution magnified version of those objects will appear in a new window. Find out here how to make Hover Text available on your Mac:
Steps to Use Hover Text to Zoom
Step1When you choose this option, a larger, higher-resolution picture of the text your cursor is over will show as long as you press and hold down the “Command” key. Click “Options” to modify the text’s appearance.

Step2Additional customization options are available in the Options menu, including the ability to alter the font, the size of the zoomed-in text (which may range from 14pt to 128pt), the font’s appearance surrounding the cursor, and the modifier key that activates the function.

Way 5: Enable Touch Bar
This substitute is only accessible on Macs equipped with Touch Bars. A handy feature is the Touch Bar. The Touch Bar is a feature on every current MacBook Pro model, including the 13-inch and 16-inch versions. On the Touch Bar, there is a mix of App Controls and a Control Strip. To use with your compatible MacBook Pro, the Touch Bar has additional features. Although it is helpful right out of the box, some customization may be required for your advantage. Fortunately, Apple makes modifications rather straightforward. You may change your default by following the instructions below.
Steps to Enable Touch Bar on MacBook
Step1The Touch Bar at the bottom of your display will grow and become easier to view if you choose the “Enable Touch Bar zoom” option. Now all you have to do is touch and hold the Touch Bar to test it out.
Step2Click the Apple symbol in the upper left corner of your screen and choose “System Preferences” to activate the touch bar in another method.
Step3Select “Keyboard” > “Keyboard” and then select “Touch Bar shows” under the Touch Bar settings. Then choose an option from the menu, which also includes the larger Control Strip and app buttons.

Conclusion
Even the most experienced Mac users sometimes get lost and google topics that should be obvious, like how to zoom in and out on a Mac. But it’s also not as evident as you may believe. You’ll be astonished by how many options there are for zooming on a Mac. Use the Zoom accessibility tool on your Mac’s desktop to enlarge the area of the screen you need if you’re having problems seeing certain components. We’re certain that this article will help you learn something new and use your Mac to its fullest potential. Check out the useful guide to Mac zoom above to see how these zoom tips and solutions may help you make the most of your time on a Mac.
Do You Waste Time Making Transparent Background in Paint
Do You Still Waste Time Making Transparent Background in Paint
An easy yet powerful editor
Numerous effects to choose from
Detailed tutorials provided by the official channel
Transparent background can be made easily with paint. Make background transparent paint 3d in simple steps. Learn to make background of a picture transparent with paintbrush.
In this article
01 [What’s Paint and What Advantages Does It Have for Making Transparent Background](#Part 1)
02 [How to Save a Picture with a Transparent Background?](#Part 2)
03 [How to Make Background Transparent in Paint?](#Part 3)
Part 1 What’s Paint and What Advantages Does It Have for Making Transparent Background
MS paint is one of the widest programs of Microsoft used for creating and editing pictures at the computer. It is also used to add text to the images. It’s features like ease to use and simplicity has made it so popular among the people. It’s simple drawing tool help to draw pictures on the blank space or on existing image. The various editing tools such as cropping, resizing and rotating help in manipulating images. Wide range of colors, fonts and combinations option with color make it a great choice for the users to make and edit pictures. It also comes with various built in applications that are good for various versions of Windows.
Due to its various advantages, good painters can create beautiful pictures with special effects. One can easily add or edit pictures by adding attractive picture effects as it can be done with other applications. Some of the advantages of using paint to add transparent backgrounds are:
● Paint is pre-installed at every computer and thus a user who wish to do painting or edit in the images, they need not to deal with the installation process.
● It has basic drawing and editing tools such as shapes, cropping, sizing and coloring which support maximum file types such as JPG, GIF, BMP and PNG.
● Paint is a simple program and can be learned by anyone. Thus, it is user friendly, simple and one of the most cost effective programs.
● Eraser, magnifier, pencil, paintbrush, spray, fonts, shapes and color palette are some of the tools that can even be used to add some customized features to the pictures.
● The best thing with paint is that a user can start making a picture from scratch. The files can be easily used easily from various sources such as digital camera, scanner or any other source. A user is not required to download any other software or application to add creating and editing features in a picture.
● One can change the image’s dimensions, captions, and switch color images to black and white. Transparent Background Paint is also a feature in the MS paint which can make any picture more attractive.
● Paint has support system also that can help painter to master over the brush and paints.
Part 2 How to Save a Picture with a Transparent Background?
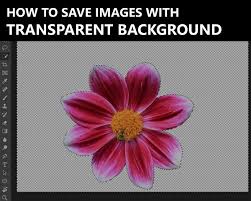
A picture made with paint splatter transparent background can be saved easily by following simple steps beginning from creating a picture with transparent background. The steps to be followed are:
● Open the image in paint which you require to add transparent background.
● Go to the image selection under select option. Click on “Transparent selection”.
● Pick the image area which is required to made transparent and press Delete.
● You will get the blank background and this need to be saved at the MS word file to make the background transparent.
● Insert the image into the word document, select ‘Format’ and click on ‘Remove background’.
● After having preview of the image, click on ‘Save changes’
● In the last step to save image, select ‘Save as Picture’. This will be the final image with a transparent background.
So, this way one can save image with transparent background paint.
Part 3 How to Make Background Transparent in Paint?

MS paint has plenty of features and tools to make a picture visually good. With high definition pictures coming into light now-a-days, 3D pictures are in trends. Giving a transparent background to a picture makes it very attractive. To paint 3d make background transparent, Ms Paint is a program that can be used by a new beginner and an experienced painter.
Let’s see how to make a picture background transparent in different styles.
01Make Background Transparent Using MS Paint
Learning to add transparent background to images? It can be done in simple steps:
● Click the Cortana, which is visual assistant and open Paint.
● Search paint in the search box and select it to open the Paint.
● To open the image in which background is to be added, move on to click on file and then open the image
● Press “Select button” and click the transparent selection option.
● Go to Select button’s menu and select the Free-form selection.
● Trace the area for background creation with the cursor and save the original picture. This can be done by holding the left mouse button.
● The rest of picture will be meant for having a transparent background.
● A rectangle will appear at the selected area. Right click on that. Then select cut that come in context menu. It will remove the selected foreground appearing the picture.
● Open a new image in Paint.
● Using Ctrl + V hotkey, you need to paste the traced foreground area from the first image.
● You can see the picture with transparent background.
● Left-click on the pasted foreground image and adjust it to a place on the background picture.
02Make Background Transparent Using Paint 3d
Transparent background can be made using Paint 3D. Let’s see how to do it:
● Search Paint 3D in Windows 10’s search box.
● It can also be done by adding the app to Windows 10
● Select to open the Paint 3D app.
● Go to Menu, select the image required and open it in Paint 3D
● Open the sidebar by pressing the Canvas button.
● Go to Transparent canvas setting.
● Through Select button drag the selection rectangle over an area of the image required to delete.
● Use Ctrl + X hotkey to cut out the area from the picture.
● You have a blank transparent area that can be filled with background layer.
● Go to Menu. Save it and select the 2D PNG option.
● Save by adding a title in the text box.
● Go to Menu and select, open the transparent image saved.
● You can find the transparent image on top of the background layer.
● The transparent area is filled by the background image layer.
● It can be resized also moving and dragging cursor.
A blank area remains in Paint leaves when picture is cut. It does not become transparent background. This blank region can be utilized for layers in the other image. This can be done through various images editing software. Thus, this way transparent background paint 3d can be made easily.
There are various applications and software to add transparent background to the images. One of the trendy applications to edit pictures and paint splash transparent background is Filmora. This application can be even used to paint brush transparent background and remove background in paint 3d. Let’s learn and know about Wondershare Filmora Video Editor .
For Win 7 or later (64-bit)
For macOS 10.12 or later
Filmora is one of the best picture and video editing software. It is trending and becoming popular due to its extraordinary features and editing tools. Colour tuning, editing support, advanced text editor, and its basic color grading features make it best for editing pictures. With filmora people can even add 3D effects on the pictures. It has Action camera tools which has camera shake, slow motion and reverse features. The professional color correction tool help in adjusting saturation, brightness and contrast. Faster editing with low resolution is also one of the features of the application. This software or application can add movement and new advance appearance to the picture that can make it more visually appealing.
This application is very useful for both the beginners as well as semi pros. They can turn their creativity into reality by using Filmora. Different versions of the application are available based on the suitability of the users. Filmora can be used to add transparent background to any images. With so many image editing and coloring tools and features, this becomes a must have application in any mobile device or Desktop.
● Ending Thoughts →
● MS paint from Microsoft is widely used program or software for creating and editing pictures. Due to its simple drawing tool and editing features, still it is first choice for the beginners and professional artists. Color, font, text and editing features in paint can be easily understood and therefore it has various advantages as compared to rest of the software or application.
● Ms Paint can be used for editing pictures and it is good when you need to add transparent background to any image. Paint 3d is one of the advanced version of the paint and it gives 3d effects to any image. It can be done by following simple steps. It can be learned easily through support provided by MS paint. The steps are simple and can be learned by anyone.
● Although there are various image editing software and applications for adding transparent background to an image. Filmora is one of the emerging application for editing pictures and videos. It is used to add some amazing effects to any picture or video. One can customize image as per their requirement through advanced settings. It can be easily installed and worked flow is good wit Filmora.
Transparent background can be made easily with paint. Make background transparent paint 3d in simple steps. Learn to make background of a picture transparent with paintbrush.
In this article
01 [What’s Paint and What Advantages Does It Have for Making Transparent Background](#Part 1)
02 [How to Save a Picture with a Transparent Background?](#Part 2)
03 [How to Make Background Transparent in Paint?](#Part 3)
Part 1 What’s Paint and What Advantages Does It Have for Making Transparent Background

MS paint is one of the widest programs of Microsoft used for creating and editing pictures at the computer. It is also used to add text to the images. It’s features like ease to use and simplicity has made it so popular among the people. It’s simple drawing tool help to draw pictures on the blank space or on existing image. The various editing tools such as cropping, resizing and rotating help in manipulating images. Wide range of colors, fonts and combinations option with color make it a great choice for the users to make and edit pictures. It also comes with various built in applications that are good for various versions of Windows.
Due to its various advantages, good painters can create beautiful pictures with special effects. One can easily add or edit pictures by adding attractive picture effects as it can be done with other applications. Some of the advantages of using paint to add transparent backgrounds are:
● Paint is pre-installed at every computer and thus a user who wish to do painting or edit in the images, they need not to deal with the installation process.
● It has basic drawing and editing tools such as shapes, cropping, sizing and coloring which support maximum file types such as JPG, GIF, BMP and PNG.
● Paint is a simple program and can be learned by anyone. Thus, it is user friendly, simple and one of the most cost effective programs.
● Eraser, magnifier, pencil, paintbrush, spray, fonts, shapes and color palette are some of the tools that can even be used to add some customized features to the pictures.
● The best thing with paint is that a user can start making a picture from scratch. The files can be easily used easily from various sources such as digital camera, scanner or any other source. A user is not required to download any other software or application to add creating and editing features in a picture.
● One can change the image’s dimensions, captions, and switch color images to black and white. Transparent Background Paint is also a feature in the MS paint which can make any picture more attractive.
● Paint has support system also that can help painter to master over the brush and paints.
Part 2 How to Save a Picture with a Transparent Background?

A picture made with paint splatter transparent background can be saved easily by following simple steps beginning from creating a picture with transparent background. The steps to be followed are:
● Open the image in paint which you require to add transparent background.
● Go to the image selection under select option. Click on “Transparent selection”.
● Pick the image area which is required to made transparent and press Delete.
● You will get the blank background and this need to be saved at the MS word file to make the background transparent.
● Insert the image into the word document, select ‘Format’ and click on ‘Remove background’.
● After having preview of the image, click on ‘Save changes’
● In the last step to save image, select ‘Save as Picture’. This will be the final image with a transparent background.
So, this way one can save image with transparent background paint.
Part 3 How to Make Background Transparent in Paint?

MS paint has plenty of features and tools to make a picture visually good. With high definition pictures coming into light now-a-days, 3D pictures are in trends. Giving a transparent background to a picture makes it very attractive. To paint 3d make background transparent, Ms Paint is a program that can be used by a new beginner and an experienced painter.
Let’s see how to make a picture background transparent in different styles.
01Make Background Transparent Using MS Paint
Learning to add transparent background to images? It can be done in simple steps:
● Click the Cortana, which is visual assistant and open Paint.
● Search paint in the search box and select it to open the Paint.
● To open the image in which background is to be added, move on to click on file and then open the image
● Press “Select button” and click the transparent selection option.
● Go to Select button’s menu and select the Free-form selection.
● Trace the area for background creation with the cursor and save the original picture. This can be done by holding the left mouse button.
● The rest of picture will be meant for having a transparent background.
● A rectangle will appear at the selected area. Right click on that. Then select cut that come in context menu. It will remove the selected foreground appearing the picture.
● Open a new image in Paint.
● Using Ctrl + V hotkey, you need to paste the traced foreground area from the first image.
● You can see the picture with transparent background.
● Left-click on the pasted foreground image and adjust it to a place on the background picture.
02Make Background Transparent Using Paint 3d
Transparent background can be made using Paint 3D. Let’s see how to do it:
● Search Paint 3D in Windows 10’s search box.
● It can also be done by adding the app to Windows 10
● Select to open the Paint 3D app.
● Go to Menu, select the image required and open it in Paint 3D
● Open the sidebar by pressing the Canvas button.
● Go to Transparent canvas setting.
● Through Select button drag the selection rectangle over an area of the image required to delete.
● Use Ctrl + X hotkey to cut out the area from the picture.
● You have a blank transparent area that can be filled with background layer.
● Go to Menu. Save it and select the 2D PNG option.
● Save by adding a title in the text box.
● Go to Menu and select, open the transparent image saved.
● You can find the transparent image on top of the background layer.
● The transparent area is filled by the background image layer.
● It can be resized also moving and dragging cursor.
A blank area remains in Paint leaves when picture is cut. It does not become transparent background. This blank region can be utilized for layers in the other image. This can be done through various images editing software. Thus, this way transparent background paint 3d can be made easily.
There are various applications and software to add transparent background to the images. One of the trendy applications to edit pictures and paint splash transparent background is Filmora. This application can be even used to paint brush transparent background and remove background in paint 3d. Let’s learn and know about Wondershare Filmora Video Editor .
For Win 7 or later (64-bit)
For macOS 10.12 or later
Filmora is one of the best picture and video editing software. It is trending and becoming popular due to its extraordinary features and editing tools. Colour tuning, editing support, advanced text editor, and its basic color grading features make it best for editing pictures. With filmora people can even add 3D effects on the pictures. It has Action camera tools which has camera shake, slow motion and reverse features. The professional color correction tool help in adjusting saturation, brightness and contrast. Faster editing with low resolution is also one of the features of the application. This software or application can add movement and new advance appearance to the picture that can make it more visually appealing.
This application is very useful for both the beginners as well as semi pros. They can turn their creativity into reality by using Filmora. Different versions of the application are available based on the suitability of the users. Filmora can be used to add transparent background to any images. With so many image editing and coloring tools and features, this becomes a must have application in any mobile device or Desktop.
● Ending Thoughts →
● MS paint from Microsoft is widely used program or software for creating and editing pictures. Due to its simple drawing tool and editing features, still it is first choice for the beginners and professional artists. Color, font, text and editing features in paint can be easily understood and therefore it has various advantages as compared to rest of the software or application.
● Ms Paint can be used for editing pictures and it is good when you need to add transparent background to any image. Paint 3d is one of the advanced version of the paint and it gives 3d effects to any image. It can be done by following simple steps. It can be learned easily through support provided by MS paint. The steps are simple and can be learned by anyone.
● Although there are various image editing software and applications for adding transparent background to an image. Filmora is one of the emerging application for editing pictures and videos. It is used to add some amazing effects to any picture or video. One can customize image as per their requirement through advanced settings. It can be easily installed and worked flow is good wit Filmora.
Transparent background can be made easily with paint. Make background transparent paint 3d in simple steps. Learn to make background of a picture transparent with paintbrush.
In this article
01 [What’s Paint and What Advantages Does It Have for Making Transparent Background](#Part 1)
02 [How to Save a Picture with a Transparent Background?](#Part 2)
03 [How to Make Background Transparent in Paint?](#Part 3)
Part 1 What’s Paint and What Advantages Does It Have for Making Transparent Background

MS paint is one of the widest programs of Microsoft used for creating and editing pictures at the computer. It is also used to add text to the images. It’s features like ease to use and simplicity has made it so popular among the people. It’s simple drawing tool help to draw pictures on the blank space or on existing image. The various editing tools such as cropping, resizing and rotating help in manipulating images. Wide range of colors, fonts and combinations option with color make it a great choice for the users to make and edit pictures. It also comes with various built in applications that are good for various versions of Windows.
Due to its various advantages, good painters can create beautiful pictures with special effects. One can easily add or edit pictures by adding attractive picture effects as it can be done with other applications. Some of the advantages of using paint to add transparent backgrounds are:
● Paint is pre-installed at every computer and thus a user who wish to do painting or edit in the images, they need not to deal with the installation process.
● It has basic drawing and editing tools such as shapes, cropping, sizing and coloring which support maximum file types such as JPG, GIF, BMP and PNG.
● Paint is a simple program and can be learned by anyone. Thus, it is user friendly, simple and one of the most cost effective programs.
● Eraser, magnifier, pencil, paintbrush, spray, fonts, shapes and color palette are some of the tools that can even be used to add some customized features to the pictures.
● The best thing with paint is that a user can start making a picture from scratch. The files can be easily used easily from various sources such as digital camera, scanner or any other source. A user is not required to download any other software or application to add creating and editing features in a picture.
● One can change the image’s dimensions, captions, and switch color images to black and white. Transparent Background Paint is also a feature in the MS paint which can make any picture more attractive.
● Paint has support system also that can help painter to master over the brush and paints.
Part 2 How to Save a Picture with a Transparent Background?

A picture made with paint splatter transparent background can be saved easily by following simple steps beginning from creating a picture with transparent background. The steps to be followed are:
● Open the image in paint which you require to add transparent background.
● Go to the image selection under select option. Click on “Transparent selection”.
● Pick the image area which is required to made transparent and press Delete.
● You will get the blank background and this need to be saved at the MS word file to make the background transparent.
● Insert the image into the word document, select ‘Format’ and click on ‘Remove background’.
● After having preview of the image, click on ‘Save changes’
● In the last step to save image, select ‘Save as Picture’. This will be the final image with a transparent background.
So, this way one can save image with transparent background paint.
Part 3 How to Make Background Transparent in Paint?

MS paint has plenty of features and tools to make a picture visually good. With high definition pictures coming into light now-a-days, 3D pictures are in trends. Giving a transparent background to a picture makes it very attractive. To paint 3d make background transparent, Ms Paint is a program that can be used by a new beginner and an experienced painter.
Let’s see how to make a picture background transparent in different styles.
01Make Background Transparent Using MS Paint
Learning to add transparent background to images? It can be done in simple steps:
● Click the Cortana, which is visual assistant and open Paint.
● Search paint in the search box and select it to open the Paint.
● To open the image in which background is to be added, move on to click on file and then open the image
● Press “Select button” and click the transparent selection option.
● Go to Select button’s menu and select the Free-form selection.
● Trace the area for background creation with the cursor and save the original picture. This can be done by holding the left mouse button.
● The rest of picture will be meant for having a transparent background.
● A rectangle will appear at the selected area. Right click on that. Then select cut that come in context menu. It will remove the selected foreground appearing the picture.
● Open a new image in Paint.
● Using Ctrl + V hotkey, you need to paste the traced foreground area from the first image.
● You can see the picture with transparent background.
● Left-click on the pasted foreground image and adjust it to a place on the background picture.
02Make Background Transparent Using Paint 3d
Transparent background can be made using Paint 3D. Let’s see how to do it:
● Search Paint 3D in Windows 10’s search box.
● It can also be done by adding the app to Windows 10
● Select to open the Paint 3D app.
● Go to Menu, select the image required and open it in Paint 3D
● Open the sidebar by pressing the Canvas button.
● Go to Transparent canvas setting.
● Through Select button drag the selection rectangle over an area of the image required to delete.
● Use Ctrl + X hotkey to cut out the area from the picture.
● You have a blank transparent area that can be filled with background layer.
● Go to Menu. Save it and select the 2D PNG option.
● Save by adding a title in the text box.
● Go to Menu and select, open the transparent image saved.
● You can find the transparent image on top of the background layer.
● The transparent area is filled by the background image layer.
● It can be resized also moving and dragging cursor.
A blank area remains in Paint leaves when picture is cut. It does not become transparent background. This blank region can be utilized for layers in the other image. This can be done through various images editing software. Thus, this way transparent background paint 3d can be made easily.
There are various applications and software to add transparent background to the images. One of the trendy applications to edit pictures and paint splash transparent background is Filmora. This application can be even used to paint brush transparent background and remove background in paint 3d. Let’s learn and know about Wondershare Filmora Video Editor .
For Win 7 or later (64-bit)
For macOS 10.12 or later
Filmora is one of the best picture and video editing software. It is trending and becoming popular due to its extraordinary features and editing tools. Colour tuning, editing support, advanced text editor, and its basic color grading features make it best for editing pictures. With filmora people can even add 3D effects on the pictures. It has Action camera tools which has camera shake, slow motion and reverse features. The professional color correction tool help in adjusting saturation, brightness and contrast. Faster editing with low resolution is also one of the features of the application. This software or application can add movement and new advance appearance to the picture that can make it more visually appealing.
This application is very useful for both the beginners as well as semi pros. They can turn their creativity into reality by using Filmora. Different versions of the application are available based on the suitability of the users. Filmora can be used to add transparent background to any images. With so many image editing and coloring tools and features, this becomes a must have application in any mobile device or Desktop.
● Ending Thoughts →
● MS paint from Microsoft is widely used program or software for creating and editing pictures. Due to its simple drawing tool and editing features, still it is first choice for the beginners and professional artists. Color, font, text and editing features in paint can be easily understood and therefore it has various advantages as compared to rest of the software or application.
● Ms Paint can be used for editing pictures and it is good when you need to add transparent background to any image. Paint 3d is one of the advanced version of the paint and it gives 3d effects to any image. It can be done by following simple steps. It can be learned easily through support provided by MS paint. The steps are simple and can be learned by anyone.
● Although there are various image editing software and applications for adding transparent background to an image. Filmora is one of the emerging application for editing pictures and videos. It is used to add some amazing effects to any picture or video. One can customize image as per their requirement through advanced settings. It can be easily installed and worked flow is good wit Filmora.
Transparent background can be made easily with paint. Make background transparent paint 3d in simple steps. Learn to make background of a picture transparent with paintbrush.
In this article
01 [What’s Paint and What Advantages Does It Have for Making Transparent Background](#Part 1)
02 [How to Save a Picture with a Transparent Background?](#Part 2)
03 [How to Make Background Transparent in Paint?](#Part 3)
Part 1 What’s Paint and What Advantages Does It Have for Making Transparent Background

MS paint is one of the widest programs of Microsoft used for creating and editing pictures at the computer. It is also used to add text to the images. It’s features like ease to use and simplicity has made it so popular among the people. It’s simple drawing tool help to draw pictures on the blank space or on existing image. The various editing tools such as cropping, resizing and rotating help in manipulating images. Wide range of colors, fonts and combinations option with color make it a great choice for the users to make and edit pictures. It also comes with various built in applications that are good for various versions of Windows.
Due to its various advantages, good painters can create beautiful pictures with special effects. One can easily add or edit pictures by adding attractive picture effects as it can be done with other applications. Some of the advantages of using paint to add transparent backgrounds are:
● Paint is pre-installed at every computer and thus a user who wish to do painting or edit in the images, they need not to deal with the installation process.
● It has basic drawing and editing tools such as shapes, cropping, sizing and coloring which support maximum file types such as JPG, GIF, BMP and PNG.
● Paint is a simple program and can be learned by anyone. Thus, it is user friendly, simple and one of the most cost effective programs.
● Eraser, magnifier, pencil, paintbrush, spray, fonts, shapes and color palette are some of the tools that can even be used to add some customized features to the pictures.
● The best thing with paint is that a user can start making a picture from scratch. The files can be easily used easily from various sources such as digital camera, scanner or any other source. A user is not required to download any other software or application to add creating and editing features in a picture.
● One can change the image’s dimensions, captions, and switch color images to black and white. Transparent Background Paint is also a feature in the MS paint which can make any picture more attractive.
● Paint has support system also that can help painter to master over the brush and paints.
Part 2 How to Save a Picture with a Transparent Background?

A picture made with paint splatter transparent background can be saved easily by following simple steps beginning from creating a picture with transparent background. The steps to be followed are:
● Open the image in paint which you require to add transparent background.
● Go to the image selection under select option. Click on “Transparent selection”.
● Pick the image area which is required to made transparent and press Delete.
● You will get the blank background and this need to be saved at the MS word file to make the background transparent.
● Insert the image into the word document, select ‘Format’ and click on ‘Remove background’.
● After having preview of the image, click on ‘Save changes’
● In the last step to save image, select ‘Save as Picture’. This will be the final image with a transparent background.
So, this way one can save image with transparent background paint.
Part 3 How to Make Background Transparent in Paint?

MS paint has plenty of features and tools to make a picture visually good. With high definition pictures coming into light now-a-days, 3D pictures are in trends. Giving a transparent background to a picture makes it very attractive. To paint 3d make background transparent, Ms Paint is a program that can be used by a new beginner and an experienced painter.
Let’s see how to make a picture background transparent in different styles.
01Make Background Transparent Using MS Paint
Learning to add transparent background to images? It can be done in simple steps:
● Click the Cortana, which is visual assistant and open Paint.
● Search paint in the search box and select it to open the Paint.
● To open the image in which background is to be added, move on to click on file and then open the image
● Press “Select button” and click the transparent selection option.
● Go to Select button’s menu and select the Free-form selection.
● Trace the area for background creation with the cursor and save the original picture. This can be done by holding the left mouse button.
● The rest of picture will be meant for having a transparent background.
● A rectangle will appear at the selected area. Right click on that. Then select cut that come in context menu. It will remove the selected foreground appearing the picture.
● Open a new image in Paint.
● Using Ctrl + V hotkey, you need to paste the traced foreground area from the first image.
● You can see the picture with transparent background.
● Left-click on the pasted foreground image and adjust it to a place on the background picture.
02Make Background Transparent Using Paint 3d
Transparent background can be made using Paint 3D. Let’s see how to do it:
● Search Paint 3D in Windows 10’s search box.
● It can also be done by adding the app to Windows 10
● Select to open the Paint 3D app.
● Go to Menu, select the image required and open it in Paint 3D
● Open the sidebar by pressing the Canvas button.
● Go to Transparent canvas setting.
● Through Select button drag the selection rectangle over an area of the image required to delete.
● Use Ctrl + X hotkey to cut out the area from the picture.
● You have a blank transparent area that can be filled with background layer.
● Go to Menu. Save it and select the 2D PNG option.
● Save by adding a title in the text box.
● Go to Menu and select, open the transparent image saved.
● You can find the transparent image on top of the background layer.
● The transparent area is filled by the background image layer.
● It can be resized also moving and dragging cursor.
A blank area remains in Paint leaves when picture is cut. It does not become transparent background. This blank region can be utilized for layers in the other image. This can be done through various images editing software. Thus, this way transparent background paint 3d can be made easily.
There are various applications and software to add transparent background to the images. One of the trendy applications to edit pictures and paint splash transparent background is Filmora. This application can be even used to paint brush transparent background and remove background in paint 3d. Let’s learn and know about Wondershare Filmora Video Editor .
For Win 7 or later (64-bit)
For macOS 10.12 or later
Filmora is one of the best picture and video editing software. It is trending and becoming popular due to its extraordinary features and editing tools. Colour tuning, editing support, advanced text editor, and its basic color grading features make it best for editing pictures. With filmora people can even add 3D effects on the pictures. It has Action camera tools which has camera shake, slow motion and reverse features. The professional color correction tool help in adjusting saturation, brightness and contrast. Faster editing with low resolution is also one of the features of the application. This software or application can add movement and new advance appearance to the picture that can make it more visually appealing.
This application is very useful for both the beginners as well as semi pros. They can turn their creativity into reality by using Filmora. Different versions of the application are available based on the suitability of the users. Filmora can be used to add transparent background to any images. With so many image editing and coloring tools and features, this becomes a must have application in any mobile device or Desktop.
● Ending Thoughts →
● MS paint from Microsoft is widely used program or software for creating and editing pictures. Due to its simple drawing tool and editing features, still it is first choice for the beginners and professional artists. Color, font, text and editing features in paint can be easily understood and therefore it has various advantages as compared to rest of the software or application.
● Ms Paint can be used for editing pictures and it is good when you need to add transparent background to any image. Paint 3d is one of the advanced version of the paint and it gives 3d effects to any image. It can be done by following simple steps. It can be learned easily through support provided by MS paint. The steps are simple and can be learned by anyone.
● Although there are various image editing software and applications for adding transparent background to an image. Filmora is one of the emerging application for editing pictures and videos. It is used to add some amazing effects to any picture or video. One can customize image as per their requirement through advanced settings. It can be easily installed and worked flow is good wit Filmora.
Also read:
- Updated 2024 Approved How to Create a Text Effect Video with Filmora
- In 2024, Top 7 Easy Ways to Convert a Video to a GIF Online
- Updated 2024 Approved Powerpoint Supported Video Format and User Tips
- Best Movie Title Maker for 2024
- Updated In 2024, Best Android Apps For Creating Slow Motion Videos
- VSDC Free Video Editor Review 2023
- 2024 Approved Easy Ways to Create Procreate GIFs
- New How to Split Videos - 33 Best Video Splitter Recommend
- In 2024, How to Loop a Video in Canva Editor
- Sometimes It May Happen to You that You Are Watching a Video that Has Very Low Graphics or, in Other Words, Low Visual Quality. You Might Wish to Change, Instead Improve the Video Quality. Here, AI Upscaling Video Comes to Use for 2024
- General Knowledge About MP4 Format and Best MP4 Video Editor for 2024
- Best 8 AR Apps for Android and iOS | Help You See the World of AR
- Updated How to Make Subtitle Videos
- Top Tricks for Learning Photo Slideshow
- In 2024, Online Calculate and Change Video Aspect Ratio
- Updated In This Article, We Introduce You Our Top 5 Picks of Video to Ppt Converter
- New In 2024, Guide To Creating the Best Video Collages
- Do You Want to Excel at Using Adobe Premiere Pro Software for Splitting Videos and Audio? Learn About Splitting a Video and Audio Using Different Tools and Add a New Skill to Your Skillset with a Step-by-Step Guide in This Article
- New 2024 Approved Best Audio Waveform Generator
- New Try These 10 Music Video Templates To Make Your Work Easy
- In This Article You Will Learn How to Crop a Video Through Windows Media Player and with Filmora Wondershare. Here Are Ways to Crop Your Video Clip for 2024
- Updated In 2024, How to Customize Your Loading Text Effect?
- New 15 Best Video Editing Courses Online with Certificate Free $ Paid for 2024
- Updated Ways to Learn Discord Game Bots – Even if Youre Just Starting Out 20
- 2024 Approved Do You Want to Make Your Photos and Videos Look Different From Others? There Are Many Lightroom LUTs Free, and They Make Your Media Content Stand Out From Others
- A Review of Efectum App Making Slow Motion Video for 2024
- New In 2024, Best Jump Cut Editing Tricks
- In 2024, How to Detect and Stop mSpy from Spying on Your Lenovo ThinkPhone | Dr.fone
- Top 6 Apps/Services to Trace Any Oppo K11x Location By Mobile Number | Dr.fone
- 3 Easy Ways to Factory Reset a Locked Apple iPhone SE Without iTunes | Dr.fone
- In 2024, How to Bypass iCloud Lock from iPhone 8
- Complete guide for recovering video files on Google Pixel 8
- How To Stream Anything From Oppo A1 5G to Apple TV | Dr.fone
- In 2024, How to Mirror Apple iPhone 11 Pro to Roku? | Dr.fone
- In 2024, How to Change Your Location on Apple iPhone SE (2022) | Dr.fone
- Does find my friends work on OnePlus Ace 2 Pro | Dr.fone
- 10 Free Location Spoofers to Fake GPS Location on your Honor Play 40C | Dr.fone
- Complete guide for recovering video files on Oppo Reno 11 Pro 5G
- How to Unlock Lava Blaze 2 5G Phone Forgot Password
- Apple iPhone XR Screen Mirroring You Must Know | Dr.fone
- Hassle-Free Ways to Remove FRP Lock on Xiaomiwith/without a PC
- How to recover deleted photos from Android Gallery without backup on OnePlus Nord CE 3 Lite 5G
- In 2024, How to Transfer Data from Motorola Moto G34 5G to Other Android Devices? | Dr.fone
- Edge 40 support - Turn Off Screen Lock.
- In 2024, What You Want To Know About Two-Factor Authentication for iCloud From your Apple iPhone XS Max
- In 2024, Top 9 Vivo V27 Pro Monitoring Apps for Parental Controls | Dr.fone
- New How to Make a FLV Photo Slideshow with Music for 2024
- In 2024, Bypassing Google Account With vnROM Bypass For Vivo T2x 5G
- Best Free iPhone 7 IMEI Checker
- Fix App Not Available in Your Country Play Store Problem on Huawei Nova Y91 | Dr.fone
- Best Free iPhone 13 IMEI Checker
- In 2024, How to Change Location on TikTok to See More Content On your Oppo Reno 9A | Dr.fone
- How to Reset a Locked Nokia C02 Phone
- Title: New 2024 Approved How to Create a Custom Sequence Preset in Premiere Pro
- Author: Chloe
- Created at : 2024-04-24 07:08:34
- Updated at : 2024-04-25 07:08:34
- Link: https://ai-editing-video.techidaily.com/new-2024-approved-how-to-create-a-custom-sequence-preset-in-premiere-pro/
- License: This work is licensed under CC BY-NC-SA 4.0.


