
:max_bytes(150000):strip_icc():format(webp)/kentuckyderby-5c7ed5d646e0fb00011bf3da.jpg)
New 2024 Approved Step by Step to Rotate Videos Using OBS
Step by Step to Rotate Videos Using OBS
Obs is video editing software that is used to create and edit videos. It is a powerful tool that can be used to do a variety of things, such as add text, music, and special effects to videos. It also allows you to cut and trim videos, and to merge them with other videos. Additionally, obs allows you to live stream your videos, which can be a great way to share them with others. Overall, obs is a powerful tool that can be used to create and edit amazing videos.
The main interface of Obs Studio is relatively simple, and it is easy to use. The top of the screen contains a number of icons that allow you to access different features of the software, such as the video editor, the live streamer, and the settings. The bottom of the screen contains a timeline, which allows you to easily edit your videos. The timeline also contains a number of tools that allow you to trim your videos, add text and music, and more. Overall, the main interface of Obs Studio is simple and easy to use.
There are many benefits to using obs, including:
- It is free to download and use.
- It is a powerful tool that can be used to create and edit amazing videos.
- It allows you to live stream your videos, which can be a great way to share them with others.
- There are many online communities where you can find help and advice from other users.
- Overall, obs is a great program that can be used to create and edit amazing videos.
There are many reasons why you might want to rotate a video. For example, if you captured a video of a person or object upside down, you would want to rotate it so that it is right-side up. Or, if you recorded a video in landscape mode but want to view it in portrait mode, you would need to rotate the video.
Luckily, there are a number of ways to rotate videos on different devices. In this article, we will show you how to rotate videos using Obs.
Step-by-step on how to rotate videos using Obs
How to rotate using the rotate tool in the video editor?
First, to use the rotate tool in the Edit tab, simply follow the steps below:
Step 1: Open the video editor and drag your video to the editor.

Step 2: Click on the Edit > Transform > Rotate 90 degrees CW tool to rotate it 90 degrees clockwise.

Step 3: Click on the Edit > Transform > Rotate 90 degrees CW tool to rotate it 90 degrees counterclockwise.

Step 4: Click on the Edit > Transform > Rotate 180 degrees tool to rotate it 180 degrees.

How to rotate using the advance controls in obs?
Second, to use the filters in obs, follow the steps below:
Step 1: Open obs and click on the Edit tab > Transform > Edit transform. You can also click Ctrl + E.

Step 2: Go to the Rotation section.

Step 3: Select the rotation degree you want to use.

Step 4: Click on enter on your keyboard to rotate it.
How to rotate using right-clicking on the video?
Third, to use right-clicking on the video, follow the following:
Step 1: Open obs and right-click on the clip that you want to rotate.
Step 2: Click on the Transform > Rotate 90 degrees CW tool to rotate it 90 degrees clockwise.

Step 3: Click on the Transform > Rotate 90 degrees CW tool to rotate it 90 degrees counterclockwise.

Step 4: Click on the Edit > Transform > Rotate 180 degrees tool to rotate it 180 degrees.

An Easy Way to Rotate Videos Using Filmora
To conclude, there are a number of ways to rotate videos on different devices. In this article, we have shown you how to rotate videos using Obs. Meanwhile, we have another suggestion which is using Filmora Video Editor to rotate videos. Filmora is a Wondershare product that helps you to rotate videos without quality loss. With its easy-to-use interface, you can rotate videos with just a few clicks. If you are interested in it, please feel free to check the guide below:
For Win 7 or later (64-bit)
For macOS 10.14 or later
Step-by-step on how to rotate videos using Filmora
How to rotate videos using Filmora?
First, to rotate videos using Filmora, follow the steps below:
Step 1: Import the video you want to rotate into Filmora.

Step 2: Click on the “Edit” button in the toolbar.

Step 3: Go to Transform > Rotate.

Step 4: Select the rotation angle you want to use.

Step 5: Click on the ‘Ok’ to rotate it.

Second, if you want to rotate a video and flip it, follow the steps below:
Click on the flip option that you want to use, either upside down or sideways, vertically or horizontally.

Click on ‘Ok’ to apply the rotation and the flip.
Third, if you want to rotate a video by a specific number of degrees, follow the steps below:
To conclude, Filmora provides a number of ways for you to rotate your videos as well as using Obs. If you are looking for an easy way to rotate your videos without quality loss, then Filmora is the best option for you.
Step 2: Click on the Edit > Transform > Rotate 90 degrees CW tool to rotate it 90 degrees clockwise.
Step 3: Click on the Edit > Transform > Rotate 90 degrees CW tool to rotate it 90 degrees counterclockwise.
Step 4: Click on the Edit > Transform > Rotate 180 degrees tool to rotate it 180 degrees.
How to rotate using the advance controls in obs?
Second, to use the filters in obs, follow the steps below:
Step 1: Open obs and click on the Edit tab > Transform > Edit transform. You can also click Ctrl + E.
Step 2: Go to the Rotation section.
Step 3: Select the rotation degree you want to use.
Step 4: Click on enter on your keyboard to rotate it.
How to rotate using right-clicking on the video?
Third, to use right-clicking on the video, follow the following:
Step 1: Open obs and right-click on the clip that you want to rotate.
Step 2: Click on the Transform > Rotate 90 degrees CW tool to rotate it 90 degrees clockwise.
Step 3: Click on the Transform > Rotate 90 degrees CW tool to rotate it 90 degrees counterclockwise.
Step 4: Click on the Edit > Transform > Rotate 180 degrees tool to rotate it 180 degrees.
An Easy Way to Rotate Videos Using Filmora
To conclude, there are a number of ways to rotate videos on different devices. In this article, we have shown you how to rotate videos using Obs. Meanwhile, we have another suggestion which is using Filmora Video Editor to rotate videos. Filmora is a Wondershare product that helps you to rotate videos without quality loss. With its easy-to-use interface, you can rotate videos with just a few clicks. If you are interested in it, please feel free to check the guide below:
For Win 7 or later (64-bit)
For macOS 10.14 or later
Step-by-step on how to rotate videos using Filmora
How to rotate videos using Filmora?
First, to rotate videos using Filmora, follow the steps below:
Step 1: Import the video you want to rotate into Filmora.
Step 2: Click on the “Edit” button in the toolbar.
Step 3: Go to Transform > Rotate.
Step 4: Select the rotation angle you want to use.
Step 5: Click on the ‘Ok’ to rotate it.
Second, if you want to rotate a video and flip it, follow the steps below:
Click on the flip option that you want to use, either upside down or sideways, vertically or horizontally.
Click on ‘Ok’ to apply the rotation and the flip.
Third, if you want to rotate a video by a specific number of degrees, follow the steps below:
To conclude, Filmora provides a number of ways for you to rotate your videos as well as using Obs. If you are looking for an easy way to rotate your videos without quality loss, then Filmora is the best option for you.
Learn How to Make Your CSGO Montage Impressive
CSGO (Counter-Strike: Global Offensive) is a popular objective-based multiplayer FPS (first-person shooter) released in 2012. The developers of this game are Hidden Path Entertainment and Valve. It’s one of the world’s most popular global eSports video games remains one of the most popular global esports, with millions of people playing it. Many people also love watching other skilled gamers play CSGO as montage videos.
With that in mind, we’ll explain how you can make CSGO montage videos and add effects to make them stand out and engaging.
How to Make Your CSGO Montage
If you are wondering: How can I create a CSGO montage video? Follow these steps:
Step1Record Your CSGO Gameplay
CSGO is compatible with Linux, PlayStation 3, Xbox 360, macOS, and Windows. You can record the CSGO demo by going to the top menu. The application will ask you to select the Capture option. Here, you can define the area you want to record and the audio settings. Specify a location where you want to save your recorded file.
You can also use a screen capture tool, such as Wondershare DemoCreator, to record your CSGO gameplay. The software saves the video clips you have captured on your PC’s hard drive.
To record your CSGO gameplay using DemoCreator, follow the steps below:
- Open the software and click “Capture.” You can set various specifications, including the audio settings for your recording and the recorded area.

Record Screen with Democreator
- Specify the location where you would like to save your recorded file.
- Press F10 or click the start capturing option to start the recording. By indicating you’re recording a game, you’ll be able to increase the frame rate.
- Click on F10 to stop the recording. The program will save the file on your PC.
Step2Choose Background Music that Fits Your CSGO Montage
The capability of music conveying emotions, authentic interactions, and a sense of realism is crucial to the viewers’ watching experience. It holds the attention of viewers and makes them want to continue watching your gaming montage.
Make sure the music you choose fits the theme of your CSGO montage video. The right music will provide a constant through-line that ties numerous CSGO gameplay clips together. What’s more? It can lend your montage a level of professionalism while giving it a polish.
Only use royalty-free music in your montage video, as this means you won’t pay any ongoing royalties when you use the music track. There are loads of royalty-free music libraries online, where you can find non-copyrighted montage music. These include StoryBlocks, FreeSound, and SoundCloud.
Once you’ve found the music you like, download it and use it in your CSGO montage video.
Step3Download Video Editing Software
You’ll need video editing software to put your series of CSGO gameplay clips together and make a montage video. While you’ll find numerous desktop-based video editing programs available, choose the best one.
A reliable video editing software should be user-friendly. The last thing you want is to get a video editing program that will make you spend months trying to learn how to edit your first montage video.
Pick a program with video editing templates; this will allow you to create CSGO montage videos swiftly because you only have to substitute the existing placeholder media with the content you are making. It should also have special effects and music.
If you’re tired of the plain and common video editing effects, check out Filmora. This video editing software has tons of cool effects that you can add to your CSGO montage videos.
Why We Need to Add Effects to Our CSGO Montage
Adding effects to your CSGO montage is crucial because of various reasons. They produce powerful entertainment for viewers. Special effects provide a creative way to spice up your gaming montage views. You can use them to captivate your audience and make them feel like your video is realistic.
Effects also help you add emotions and personality to your CSGO montage videos. You can also use them to set the tone and ensure your audience enjoys an exhilarating viewing experience.
Additionally, effects help you set the stage for your next scene, convey a mood, and move the story along. You can use them to emphasize the action occurring in the video and make viewers focus on it.
Useful Effects in Filmora that Can Make Your CSGO Video Impressive
We’ll now explore some of the effects Filmora offers on their video editing software. You can use them to make epic CSGO montage videos. Let’s dive in.
1. Split Screen Effect
Also known as video overlaying or picture-in-picture effect, Filmora’s split-screen effect allows you to display two or more video clips simultaneously in up-down style or side by side. You can use it to tell your story creatively by showing multiple viewpoints.
Filmora offers a range of animated split-screen layouts that you can use in your gaming montage video. You can also add multiple split screens.

Split Screen
2. Pan and Zoom
Also known as the Ken Burns effect, Fimora’s Pan and Zoom effect allows users to focus on specific parts of their CSGO montage video. You can use this feature to zoom in on an object or scenery to create movement or evoke emotional storytelling experiences in the video.
3. Fast Motion
Filmora’s time-lapse or fast motion effect makes your video clip play faster. The software allows you to increase the speed of your montage video by dragging the speed slider or the duration you need.
4. Transitions
Transitions improve the flow of your montage video and help you capture the viewers’ attention, as they make it look professional and cinematic. Filmora has loads of transitions that you can add between video clips to add interest and improve the flow of your montage video.
5. Overlays
Filmora has tons of overlays that you can apply to your CSGO montage videos. You can overlay a video clip on a video and an image or photo on your video. You can also size and mask the video overlay, adjust the position of the overlay, and add elements and animation to your video overlay.
6. Filters
The software allows you to add as many filters as you want to your montage video. These filters can dramatically change the feel and look of your gaming montage in a couple of clicks. You can add glitch effects, make your video shake or black and white, and much more.
Wondershare Filmora11 Express Better
Achieve More
Grow Together
Free Download Free Download Learn More

![]()
Step-By-Step Guide to Adding Effects to Your CSGO Montage Using Filmora
Applying transitions, overlays, filters, and transitions is a breeze. Just follow the steps below.
- Launch Filmora and import your video file. You can do this by pressing Ctrl+I. A window will then pop up and allow you to find your video.
- Select the video and click on the Open button to import it to Filmora’s media library.
- Drag your CSGO montage and drop it to the timeline.

Import Media
- To add transitions, head to the Transition tab. Here, you will find tons of transitions that you can use.

Add Transition
- Choose the transition you want, then drag it to the beginning or end of the gaming montage in your timeline.
- To add an overlay to your montage video, go to Effects>Overlay. You’ll find several categories here; click on one subcategory to check the available overlays. To add the effect, drag the overlay you like to your timeline. You can also take your mouse on the overlay effect, then click the plus icon to add the effect to your video.

Add Overlays
- To add a filter effect to your montage, go to Effects and select the Filters option on your left side menu. Here, you’ll find several categories of filters. Choose the one you like and drag it to the video on your timeline. Double-click on the effect if you want to make changes to the filter.

Add Filters
- To pan and zoom your video, right-click on your video in the timeline, then select the Video option and click on Crop and Zoom. Now select the Pan & Zoom option. You’ll see frames marked blue and orange over the video clip viewer. Click the Start frame, then modify the pan and zoom with the resizer and dragger to get the desired results before clicking the End frame.

Pan & Zoom
- To add the Fast Motion effect, right-click on your montage video on the timeline and select Speed. Click on the Uniform Speed option. Now, drag the speed slider to the right side to increase the speed of your video.

Fast Motion
Once you have made all the changes in your CSGO montage, click Export. This option allows you to export and save your video on your computer.
Closing Thoughts:
You can make an impressive CSGO montage video that will capture the attention of viewers and get lots of views. Use Filmora to add effects that will make your gaming montage stand out and keep viewers watching until the end of the video.
Free Download Free Download Learn More
![]()
Step-By-Step Guide to Adding Effects to Your CSGO Montage Using Filmora
Applying transitions, overlays, filters, and transitions is a breeze. Just follow the steps below.
- Launch Filmora and import your video file. You can do this by pressing Ctrl+I. A window will then pop up and allow you to find your video.
- Select the video and click on the Open button to import it to Filmora’s media library.
- Drag your CSGO montage and drop it to the timeline.
Import Media
- To add transitions, head to the Transition tab. Here, you will find tons of transitions that you can use.
Add Transition
- Choose the transition you want, then drag it to the beginning or end of the gaming montage in your timeline.
- To add an overlay to your montage video, go to Effects>Overlay. You’ll find several categories here; click on one subcategory to check the available overlays. To add the effect, drag the overlay you like to your timeline. You can also take your mouse on the overlay effect, then click the plus icon to add the effect to your video.
Add Overlays
- To add a filter effect to your montage, go to Effects and select the Filters option on your left side menu. Here, you’ll find several categories of filters. Choose the one you like and drag it to the video on your timeline. Double-click on the effect if you want to make changes to the filter.
Add Filters
- To pan and zoom your video, right-click on your video in the timeline, then select the Video option and click on Crop and Zoom. Now select the Pan & Zoom option. You’ll see frames marked blue and orange over the video clip viewer. Click the Start frame, then modify the pan and zoom with the resizer and dragger to get the desired results before clicking the End frame.
Pan & Zoom
- To add the Fast Motion effect, right-click on your montage video on the timeline and select Speed. Click on the Uniform Speed option. Now, drag the speed slider to the right side to increase the speed of your video.
Fast Motion
Once you have made all the changes in your CSGO montage, click Export. This option allows you to export and save your video on your computer.
Closing Thoughts:
You can make an impressive CSGO montage video that will capture the attention of viewers and get lots of views. Use Filmora to add effects that will make your gaming montage stand out and keep viewers watching until the end of the video.
Add Stylish Text to Videos
Create your style. Let it be unique for yourself and yet identifiable for others – Anna Wintour. Adding Stylish Text to your video helps to communicate the clarity of the story’s message, tone, and sentiment. But how much text on video is enough? This article will teach you how and when to add stylish text to your video and its importance.
What is Stylish Text
In general, Stylish text is preset animations that you can use to the text in your video with just one click, adding an efficient plan to grab your viewers’ attentiveness. From bold to essential, stylish text can help give your video a clear look while also increasing the accessibility of your videos. Text styles offer a monochrome highlight on your text and added movement to make your videos more engaging to the audience.
Most of the video editing software released offers different text style presets that you can use to accomplish the look you’re aiming. In Wondershare Filmora 11 , browsing the Title menu, there are a lot of Text categories available that you can use depending on the type of video you are working with, whether it’s all about events like Mother’s Day, Valentine’s day, or gaming text style, travel, sports, everything in one total package.

Free Download For Win 7 or later(64-bit)
Free Download For macOS 10.14 or later
How to use Stylish Text
As mentioned, Styles help you add dynamic effects that make your videos exceptional, whether you use a template or start from scratch.
For this example, we’ll walk you through using text styles on the Short video clip that I made using Wondershare Filmora 11 .
Step1 Open your Wondershare Filmora 11 Video editing software
- Launch Wondershare Filmora 11 from your system and select New Project.
- Import the selected videos and open them in the program to enhance the speed and duration of the video. The video can also be dragged and dropped to the interface.

Step2 Imported Video Clips

In using the Title or the Stylish Text, you can add your video clip on Timeline Panel, or you can first add the Title text.
Step3 Add Stylish Text
Let’s first add our selected Stylish text/title, or you can search in the Search box above for any related text you want.
- Go to Title Menu above, click the Title category that you want, and drag it to the Timeline Panel below. Once added, you can check if this will fit the story of your video.

Step4 Change Stylish Text Duration and Effects
You can also modify or change the Duration of the Title you’ve added in the Timeline panel. The default length of a text effect is 5 seconds. There are two ways to change the course of a text effect.
- Drag the text on the timeline directly and adjust the duration either on the left or right side.
- Or you can select the text in the timeline panel and click the duration icon to set a new duration. The duration setting will pop out then you can input your desired period.

Step5 Edit Text Effects
- In Editing the Added Stylish Text, you can double click on it in the timeline to open the Text editing panel. From here, you can change the style (color, font, size, alignment, transform, and compositing) and choose the Word Art type and animation of your text.
Before (Default)

After

Step6 Advanced Text Editing
To edit your text in more ways, click the Advanced button to enter the Advanced Text Edit panel.

In the Advanced Text Edit panel, you can edit and add more elements to the selected title effects, such as text boxes, shapes, or images.
You can modify your text effects in the Advanced Text Edit panel in the following ways: color, font, animation, fill, border, and many more.

You can explore each Title properties/setting to modify your text.
![]()
Note: Remove Title/Texts
There are two ways to remove Title/ Texts from your video: (In Wondershare Filmora )
Just select the text you want to remove in your Timeline Panel and hit Delete on your keyboard.
Right-click on the text in the timeline and select DELETE from the menu.
What is the importance of Adding Stylish Text?
As a Youtuber, creating thumbnails is one of the essential aspects of getting the attention of your audience. A thumbnail is a small image inserted into a video that exemplifies larger content inside the video or article. Millions of videos are produced and uploaded on the Internet every single day, so it’s essential for yours to stand out. Text on videos has several different added benefits as well. In this video, we’ll give four reasons why you should start adding text to your videos.
1. Content becomes easy to remember
Viewer Retention (sometimes referred to as “Audience Retention”) is the average percentage of a video that people watch. Videos with high Viewer Retention scores tend to sell more. Adding some Text/Title in your video is one of the critical factors to remember because the viewers get multiple cue points (example: audio and text on video) to confirm their understanding and retain the essence of the messaging.
2. Make sense even without sound
A lot of people watch videos on mute mode. A recent study indicates that 85% of Facebook videos are watched without sound. A lot of us consume videos while in transit and sometimes at work as well :).
Text is very expository for most of these videos since it’d help in building the proper context for the viewer.
3. It Helps Summarize Key Points
Some audiences are looking for a summary of the video in an instant to save more time. As Youtuber, it is very helpful if you will add Text/Titles as caption perse in a video. For example, one needs to remember 2-3 tips for driving. If the captions or text show up on the video when the driver talks about this and that, that’s better!
4. Aesthetics
Some people don’t care much about the graphics; they just go through the textual content. This is because texts are the major sources of information. Adding Styling Text/Titles can make a video engaging and attractive. The audience wants to see some color and action in the videos to grasp the storyboard easily.
Free Download For macOS 10.14 or later
How to use Stylish Text
As mentioned, Styles help you add dynamic effects that make your videos exceptional, whether you use a template or start from scratch.
For this example, we’ll walk you through using text styles on the Short video clip that I made using Wondershare Filmora 11 .
Step1 Open your Wondershare Filmora 11 Video editing software
- Launch Wondershare Filmora 11 from your system and select New Project.
- Import the selected videos and open them in the program to enhance the speed and duration of the video. The video can also be dragged and dropped to the interface.
Step2 Imported Video Clips
In using the Title or the Stylish Text, you can add your video clip on Timeline Panel, or you can first add the Title text.
Step3 Add Stylish Text
Let’s first add our selected Stylish text/title, or you can search in the Search box above for any related text you want.
- Go to Title Menu above, click the Title category that you want, and drag it to the Timeline Panel below. Once added, you can check if this will fit the story of your video.
Step4 Change Stylish Text Duration and Effects
You can also modify or change the Duration of the Title you’ve added in the Timeline panel. The default length of a text effect is 5 seconds. There are two ways to change the course of a text effect.
- Drag the text on the timeline directly and adjust the duration either on the left or right side.
- Or you can select the text in the timeline panel and click the duration icon to set a new duration. The duration setting will pop out then you can input your desired period.
Step5 Edit Text Effects
- In Editing the Added Stylish Text, you can double click on it in the timeline to open the Text editing panel. From here, you can change the style (color, font, size, alignment, transform, and compositing) and choose the Word Art type and animation of your text.
Before (Default)
After
Step6 Advanced Text Editing
To edit your text in more ways, click the Advanced button to enter the Advanced Text Edit panel.
In the Advanced Text Edit panel, you can edit and add more elements to the selected title effects, such as text boxes, shapes, or images.
You can modify your text effects in the Advanced Text Edit panel in the following ways: color, font, animation, fill, border, and many more.
You can explore each Title properties/setting to modify your text.
![]()
Note: Remove Title/Texts
There are two ways to remove Title/ Texts from your video: (In Wondershare Filmora )
Just select the text you want to remove in your Timeline Panel and hit Delete on your keyboard.
Right-click on the text in the timeline and select DELETE from the menu.
What is the importance of Adding Stylish Text?
As a Youtuber, creating thumbnails is one of the essential aspects of getting the attention of your audience. A thumbnail is a small image inserted into a video that exemplifies larger content inside the video or article. Millions of videos are produced and uploaded on the Internet every single day, so it’s essential for yours to stand out. Text on videos has several different added benefits as well. In this video, we’ll give four reasons why you should start adding text to your videos.
1. Content becomes easy to remember
Viewer Retention (sometimes referred to as “Audience Retention”) is the average percentage of a video that people watch. Videos with high Viewer Retention scores tend to sell more. Adding some Text/Title in your video is one of the critical factors to remember because the viewers get multiple cue points (example: audio and text on video) to confirm their understanding and retain the essence of the messaging.
2. Make sense even without sound
A lot of people watch videos on mute mode. A recent study indicates that 85% of Facebook videos are watched without sound. A lot of us consume videos while in transit and sometimes at work as well :).
Text is very expository for most of these videos since it’d help in building the proper context for the viewer.
3. It Helps Summarize Key Points
Some audiences are looking for a summary of the video in an instant to save more time. As Youtuber, it is very helpful if you will add Text/Titles as caption perse in a video. For example, one needs to remember 2-3 tips for driving. If the captions or text show up on the video when the driver talks about this and that, that’s better!
4. Aesthetics
Some people don’t care much about the graphics; they just go through the textual content. This is because texts are the major sources of information. Adding Styling Text/Titles can make a video engaging and attractive. The audience wants to see some color and action in the videos to grasp the storyboard easily.
How to Get Zoom on TV [Easy Solutions]
The modern workforce needs adaptable alternatives to the conventional room-to-room conferencing. The latest integrated online collaboration platform is called Zoom. What’s more, now you can get Zoom on TV. Being one of the most well-known conferencing programs, it offers reliable and efficient hosting of online meetings. In a same vein, you may set up conference rooms, do video seminars, and use instant messaging to receive real-time communications. Moreover, can you get zoom on your tv? Then the answer is Yes! The ideal technique to expand a small conference is to mirror it on TV using Zoom meetings. Additionally, sharing across all platforms and devices is possible. Sharing HD video, audio, and material from your desktop and mobile devices to conference rooms and phone systems is simple, dependable, and safe with Zoom Meetings.
Zoom is one of the top videos calling applications available, however, in terms of functionality, dependability, and stability. Special features include screen sharing for multi-user annotation and local and cloud recording with transcription. With just a single click, you may share any file with supported and encrypted settings for increased security and communicate across all platforms. Zoom has now come to represent meetings for those who do their business remotely. For almost all platforms, including Android, iOS, macOS, Windows, Smart TVs, etc., the Zoom app is officially accessible. For the query how to get zoom on portal tv? you may activate Zoom screen casting whether you’re using a Windows 10 or a Mac laptop with the Chrome browser. This section will be useful to you if you want to benefit from Zoom on a TV. You may thus do so. Continue reading the article to learn more about how to get zoom on tv.
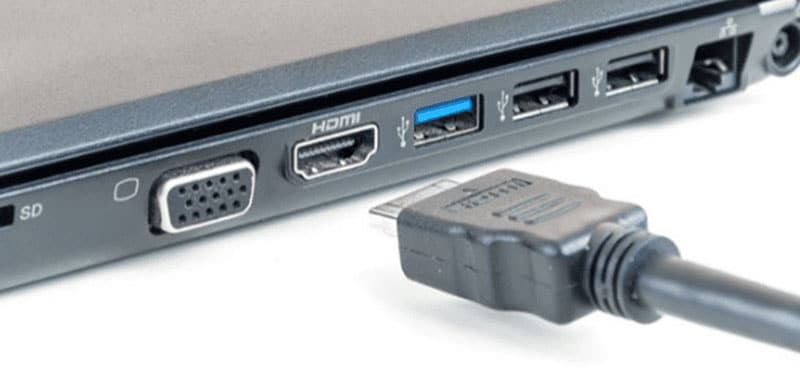
Part 1: Get Zoom on TV with HDMI Cable
Although Zoom provides companies and bigger organizations with a professional solution like Zoom Rooms, if you’re at home, you don’t need to put anything on your TV to use Zoom. You may start using Zoom right away by simply connecting your Zoom device to your TV. Connect your TV to your laptop’s HDMI port if it has one. Simple as that, however if the laptop doesn’t figure it out on its own you may need to explain what is going on with the second display. Although more reliable, connecting via cable means your source device is linked to the TV and you can’t go for a stroll. It also means you don’t have to worry about the wireless connection fading.
Steps to Get Zoom on TV with HDMI
Step1Connect the HDMI End to the TV and the Other End to Your Device
You may use this in its place if you don’t have an HDMI but do have a USB-C port. To connect to the HDMI cable coming into your TV, you’ll need a dongle, but you’ll need to make sure it’s compatible.
Step2Turn On your TV
Turn on your TV, then switch the video source to the HDMI port you just connected in your device to using the TV remote.
Step3Launch Zoom Meeting
Start or join a meeting by using the Zoom app on your smartphone (available for Android, iOS, Windows, and macOS).
Part 2: Use AirPlay to Connect Zoom to TV
Using AirPlay mirroring, MacOS or iOS devices may share content with Zoom rooms. On MacOS and iOS, Airplay is used to communicate between the Zoom client and the Zoom room. There may be a great potential for your own business requirements if you can figure out how to utilize Airplay to Zoom mirror your screen to your Apple TV. By default, AirPlay sends audio to the Apple TV. Depending on how loud your speakers are set to play and where your input device’s microphone is located, this may cause echoing and ever-louder feedback loops. Without further ado, let’s look at some of the important strategies you may use to maximize live screen streaming on your Apple TV device.
Steps to Use AirPlay to Connect Zoom to TV
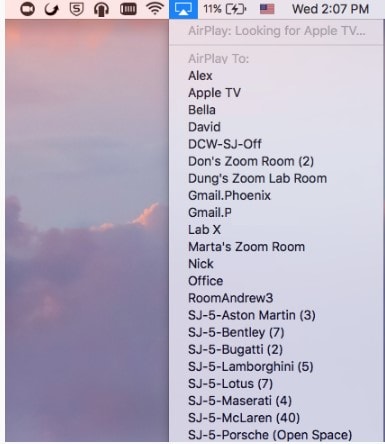
Step1Navigate to the Airplay Display in the Apple menu’s top right corner. Choose your Apple TV from the list of AirPlay Display options in the Displays preference pane. The “Show mirroring option in the menu bar when available” checkbox makes it easier to reach the AirPlay menu.

Step2Select Room Management > Zoom Rooms after logging into the Zoom online interface to manage your current Zoom Rooms. Then, modify the account settings and turn on Apple screen mirroring using the location hierarchy system.
Step3Turn on Apple Screen Mirroring by going to the Meetings tab. If this happens, you may need to activate it from the verification dialog box; otherwise, screen mirroring ought to start immediately on your device and let you see Zoom on your Apple TV. A shared password will be required of you.
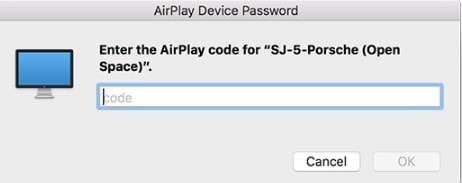
Step4Enter the passcode that is shown on the Zoom room’s screen. You may start using Airplay on your smartphone after enabling Apple screen mirroring.

Step5After that, turn off AirPlay Display by using the option in the preference pane or the system menu bar. To stop sharing, click Disconnect Airplay.
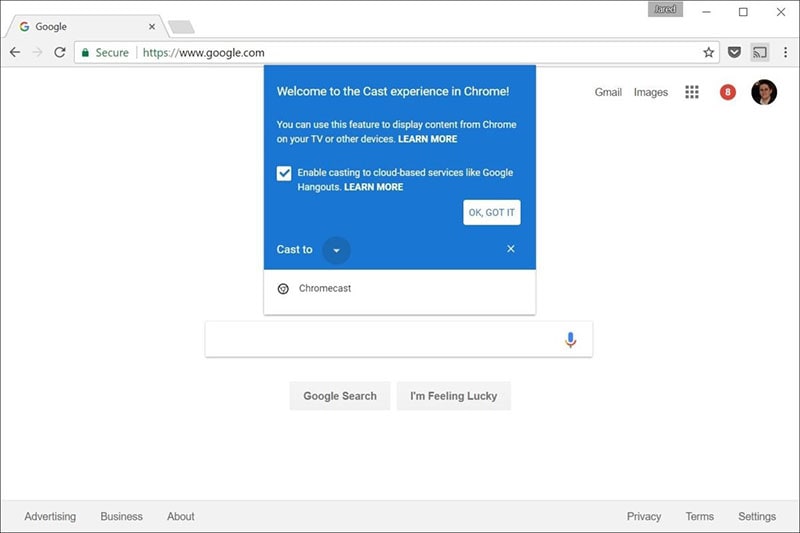
Part 3: Mirror Screen with Chromecast
The Chromecast gadgets from Google are well constructed. They should be able to cast more than just standard streaming services to your TV, logically speaking. Using a Chromecast device is one of the simplest methods to cast a Zoom conference to your TV. They are affordable, and any Google browser and the Google Home app for your Android or iOS smartphone both contain the cast capability. Between a device, such as your phone or computer, and the television, Chromecast offers the perfect connection. Chromecast makes it easy to cast Zoom meetings, particularly conferences with many of participants, since it can virtually reflect everything on your phone, tablet, or computer screen to your TV. For meetings with bigger attendance, it is advantageous to be able to cast Zoom meetings to almost any device, even a smart TV, using Chromecast.
Steps to Mirror Screen with Chromecast
Step1Install the Chromecast
Connect your Google Chromecast to the same internet source as your casting device by plugging it in.
Step2Manage Cast Settings
Locate the casting option on your device and search for recipients. Get the Zoom Cloud Meetings app for iOS or Android. You’ll also need to download the third-party software if you use an iPad or iPhone. After that, sign up for a Zoom account and log in to get started.
Step3Start Mirroring Zoom
The screen of your phone will show up on your TV when you tap your Chromecast. The best view is obtained by turning your phone into landscape after opening Zoom as usual. Once you place a call from here, the video will cast to your TV. Go to the next screen and click Start Broadcasting. You may now start casting to your Chromecast device by opening the Zoom Cloud Meeting app.
You must download the third-party app if you use an iPhone or iPad. The Chromecast Streamer software will let you cast a Zoom meeting on your Chromecast device as Zoom doesn’t provide a casting option.
Conclusion
Zoom’s popularity has skyrocketed as a result of the Pandemic. Zoom has emerged as the preferred video conferencing solution as the bulk of the global workforce shifts to a “work from home” environment. Now that more individuals than ever before work from home, video conferencing has emerged as a vital tool for marketing and corporate communication. Mirroring Zoom meetings to TV has never been this simple. In light of this, we hope that this guide has helped you come up with some of the greatest ideas and approaches for your personal zoom sharing needs. We really hope that this information has been helpful to you if you’ve been interested in learning more about screen sharing your Zoom to TV. Thanks to these methods, you can now mirror any device platform on TV.
The modern workforce needs adaptable alternatives to the conventional room-to-room conferencing. The latest integrated online collaboration platform is called Zoom. What’s more, now you can get Zoom on TV. Being one of the most well-known conferencing programs, it offers reliable and efficient hosting of online meetings. In a same vein, you may set up conference rooms, do video seminars, and use instant messaging to receive real-time communications. Moreover, can you get zoom on your tv? Then the answer is Yes! The ideal technique to expand a small conference is to mirror it on TV using Zoom meetings. Additionally, sharing across all platforms and devices is possible. Sharing HD video, audio, and material from your desktop and mobile devices to conference rooms and phone systems is simple, dependable, and safe with Zoom Meetings.
Zoom is one of the top videos calling applications available, however, in terms of functionality, dependability, and stability. Special features include screen sharing for multi-user annotation and local and cloud recording with transcription. With just a single click, you may share any file with supported and encrypted settings for increased security and communicate across all platforms. Zoom has now come to represent meetings for those who do their business remotely. For almost all platforms, including Android, iOS, macOS, Windows, Smart TVs, etc., the Zoom app is officially accessible. For the query how to get zoom on portal tv? you may activate Zoom screen casting whether you’re using a Windows 10 or a Mac laptop with the Chrome browser. This section will be useful to you if you want to benefit from Zoom on a TV. You may thus do so. Continue reading the article to learn more about how to get zoom on tv.
Part 1: Get Zoom on TV with HDMI Cable
Although Zoom provides companies and bigger organizations with a professional solution like Zoom Rooms, if you’re at home, you don’t need to put anything on your TV to use Zoom. You may start using Zoom right away by simply connecting your Zoom device to your TV. Connect your TV to your laptop’s HDMI port if it has one. Simple as that, however if the laptop doesn’t figure it out on its own you may need to explain what is going on with the second display. Although more reliable, connecting via cable means your source device is linked to the TV and you can’t go for a stroll. It also means you don’t have to worry about the wireless connection fading.
Steps to Get Zoom on TV with HDMI
Step1Connect the HDMI End to the TV and the Other End to Your Device
You may use this in its place if you don’t have an HDMI but do have a USB-C port. To connect to the HDMI cable coming into your TV, you’ll need a dongle, but you’ll need to make sure it’s compatible.
Step2Turn On your TV
Turn on your TV, then switch the video source to the HDMI port you just connected in your device to using the TV remote.
Step3Launch Zoom Meeting
Start or join a meeting by using the Zoom app on your smartphone (available for Android, iOS, Windows, and macOS).
Part 2: Use AirPlay to Connect Zoom to TV
Using AirPlay mirroring, MacOS or iOS devices may share content with Zoom rooms. On MacOS and iOS, Airplay is used to communicate between the Zoom client and the Zoom room. There may be a great potential for your own business requirements if you can figure out how to utilize Airplay to Zoom mirror your screen to your Apple TV. By default, AirPlay sends audio to the Apple TV. Depending on how loud your speakers are set to play and where your input device’s microphone is located, this may cause echoing and ever-louder feedback loops. Without further ado, let’s look at some of the important strategies you may use to maximize live screen streaming on your Apple TV device.
Steps to Use AirPlay to Connect Zoom to TV
Step1Navigate to the Airplay Display in the Apple menu’s top right corner. Choose your Apple TV from the list of AirPlay Display options in the Displays preference pane. The “Show mirroring option in the menu bar when available” checkbox makes it easier to reach the AirPlay menu.
Step2Select Room Management > Zoom Rooms after logging into the Zoom online interface to manage your current Zoom Rooms. Then, modify the account settings and turn on Apple screen mirroring using the location hierarchy system.
Step3Turn on Apple Screen Mirroring by going to the Meetings tab. If this happens, you may need to activate it from the verification dialog box; otherwise, screen mirroring ought to start immediately on your device and let you see Zoom on your Apple TV. A shared password will be required of you.
Step4Enter the passcode that is shown on the Zoom room’s screen. You may start using Airplay on your smartphone after enabling Apple screen mirroring.
Step5After that, turn off AirPlay Display by using the option in the preference pane or the system menu bar. To stop sharing, click Disconnect Airplay.
Part 3: Mirror Screen with Chromecast
The Chromecast gadgets from Google are well constructed. They should be able to cast more than just standard streaming services to your TV, logically speaking. Using a Chromecast device is one of the simplest methods to cast a Zoom conference to your TV. They are affordable, and any Google browser and the Google Home app for your Android or iOS smartphone both contain the cast capability. Between a device, such as your phone or computer, and the television, Chromecast offers the perfect connection. Chromecast makes it easy to cast Zoom meetings, particularly conferences with many of participants, since it can virtually reflect everything on your phone, tablet, or computer screen to your TV. For meetings with bigger attendance, it is advantageous to be able to cast Zoom meetings to almost any device, even a smart TV, using Chromecast.
Steps to Mirror Screen with Chromecast
Step1Install the Chromecast
Connect your Google Chromecast to the same internet source as your casting device by plugging it in.
Step2Manage Cast Settings
Locate the casting option on your device and search for recipients. Get the Zoom Cloud Meetings app for iOS or Android. You’ll also need to download the third-party software if you use an iPad or iPhone. After that, sign up for a Zoom account and log in to get started.
Step3Start Mirroring Zoom
The screen of your phone will show up on your TV when you tap your Chromecast. The best view is obtained by turning your phone into landscape after opening Zoom as usual. Once you place a call from here, the video will cast to your TV. Go to the next screen and click Start Broadcasting. You may now start casting to your Chromecast device by opening the Zoom Cloud Meeting app.
You must download the third-party app if you use an iPhone or iPad. The Chromecast Streamer software will let you cast a Zoom meeting on your Chromecast device as Zoom doesn’t provide a casting option.
Conclusion
Zoom’s popularity has skyrocketed as a result of the Pandemic. Zoom has emerged as the preferred video conferencing solution as the bulk of the global workforce shifts to a “work from home” environment. Now that more individuals than ever before work from home, video conferencing has emerged as a vital tool for marketing and corporate communication. Mirroring Zoom meetings to TV has never been this simple. In light of this, we hope that this guide has helped you come up with some of the greatest ideas and approaches for your personal zoom sharing needs. We really hope that this information has been helpful to you if you’ve been interested in learning more about screen sharing your Zoom to TV. Thanks to these methods, you can now mirror any device platform on TV.
Also read:
- Looking for the Simple Steps to Add a Filter to Your Video in Premiere Pro? Here Are the Complete Steps Along with the List of Free Premiere Filter Presets to Use
- 2024 Approved Overview of Best LUTs for Vlog
- Updated 2024 Approved A Review On 3D LUT Creator
- New How To Cut Videos For Instagram On Mac for 2024
- In 2024, Top Things People Know About Wedding Slideshow
- New 33 Best Video Splitter Recommended
- In 2024, 10+ Top Unlimited FCPX Slideshow Templates
- Updated In 2024, Achieving GoPro Slow Motion with Quality An In-Depth Overview
- Detailed Steps to Rotate Videos in Lightworks for 2024
- New If You Are Wondering How to Play a Slideshow in PowerPoint Automatically, This Article Is for You. Here We Will Be Looking at How to Add a Slideshow in PowerPoint and Other Relevant Headings that Would Help You Quickly Work on a PowerPoint
- In 2024, Confused as to How to Add Subtitles to a Video on iPhone? No Worries as We Bring You the Best Solution to Get the Task Done
- Detailed Tutorial to Crop a Video Using Openshot, In 2024
- New Complete How-To Tutorials of Kapwing Collage Maker for 2024
- 2024 Approved Step by Step to Add Border to Video Using Premiere Pro
- New In 2024, 3 Ways to Make Time-Lapse Video on MacBook
- Best 8 AI Video Denoise Software for 2024
- In 2024, Want to Learn How to Make Gaming Montage Videos? You Have Come to the Right Place. This Guide Will Teach You All You Need to Know to Create Montages of Video Games and Share Them with Other Players
- New 2024 Approved Get The Perfect Drone Footage With Free Drone LUTs
- How to Resize FLV Video EfficientlyWindows, Mac, Android, iPhone & for 2024
- Updated How I Got Free After Effects Templates Slideshow with Simple Trick
- Have You Ever Tried to Remove Motion Blur From Photos? This Article Will Address How to Remove the Motion Blur Effect Using Photoshop and Its Alternatives
- Complete guide for recovering photos files on Moto G Stylus (2023).
- How to Transfer Photos From Samsung Galaxy S23+ to Samsung Galaxy S21 Ultra | Dr.fone
- Vivo Y27 4G Not Receiving Texts? 10 Hassle-Free Solutions Here | Dr.fone
- In 2024, Ways to trade pokemon go from far away On Apple iPhone 7 Plus? | Dr.fone
- 3 Facts You Need to Know about Screen Mirroring Infinix Hot 40i | Dr.fone
- Complete Tutorial to Use GPS Joystick to Fake GPS Location On Itel A60s | Dr.fone
- Three Solutions to Hard Reset OnePlus Ace 2 Pro? | Dr.fone
- Updated 5 Recommended Websites for Text GIF Maker for 2024
- 7 Fixes for Unfortunately, Phone Has Stopped on Tecno Camon 20 | Dr.fone
- 9 Best Free Android Monitoring Apps to Monitor Phone Remotely For your Samsung Galaxy M54 5G | Dr.fone
- Title: New 2024 Approved Step by Step to Rotate Videos Using OBS
- Author: Chloe
- Created at : 2024-04-24 07:08:30
- Updated at : 2024-04-25 07:08:30
- Link: https://ai-editing-video.techidaily.com/new-2024-approved-step-by-step-to-rotate-videos-using-obs/
- License: This work is licensed under CC BY-NC-SA 4.0.
