
New 4 Ways to Loop a Video on Vimeo

4 Ways to Loop a Video on Vimeo
Vimeo is a popular video streaming platform where you can watch videos all day. Vimeo is a close competitor of YouTube. If you are a regular viewer on Vimeo, you may want to watch a video in a loop. Instead of manually playing the video again and again, you can automatically loop the video on Vimeo.
If you are embedding a Vimeo video on your website, you will want to play it on a loop. This will ensure maximum watch time from the audience. Besides, if you are a video creator, you may want to loop Vimeo videos for your video project. We will illustrate how to loop video on Vimeo for all scenarios.
Way 1. Loop A Video on Vimeo Directly
Most online users watch videos on Vimeo directly through the web browser. This is specifically applicable to computer users. If you want Vimeo loop video for any desired video, the steps are simple. You have to make some adjustments and additions to the video URL on the address bar. You should change the URL accurately for looping a video. Here are the steps on how to loop a video on Vimeo directly.
Step 1: On your device, launch the web browser. Open the official website of Vimeo Watch. Play any video of your liking.

Step 2: Now, you need to change the URL of the video you are playing. Here are the changes to make in the address bar.
- Remove everything at the beginning of “vimeo.com”. Add “.player” at the beginning of the URL.
- Add “/video/“ after “vimeo.com”.
- Add “?amp;loop=1:” at the end of the URL.
Therefore, the initial URL of the video was “https://vimeo.com/754255543 “. You have to change it to “player.vimeo.com/video/754255543?amp;loop=1”.
Step 3: After making the changes, press Enter key. The same video will play in a loop until you pause the video or close the web browser’s tab.
Way 2. Loop a Vimeo Video When Embedded on Your Site
You can embed a Vimeo video on your website so that the audience can watch it. The video will play only once when someone lands on your website. After the video ends playing, the embedding will show suggested videos. If you want the same video to play again and again, you have to put it in a loop. Here are the steps on how to loop Vimeo video when embedded on your website.
Step 1: Open the Vimeo video on your web browser. Click on Share icon present inside the player in the top-right corner.
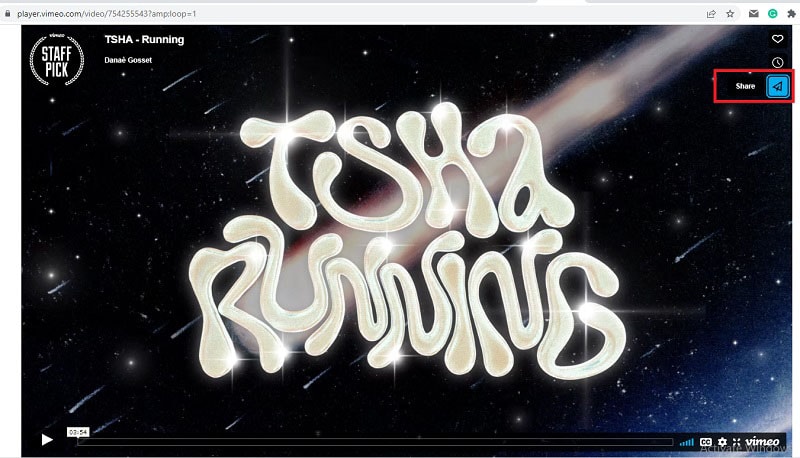
Step 2: You will get to see several options, and you need to click on “Get Embed Code” option.
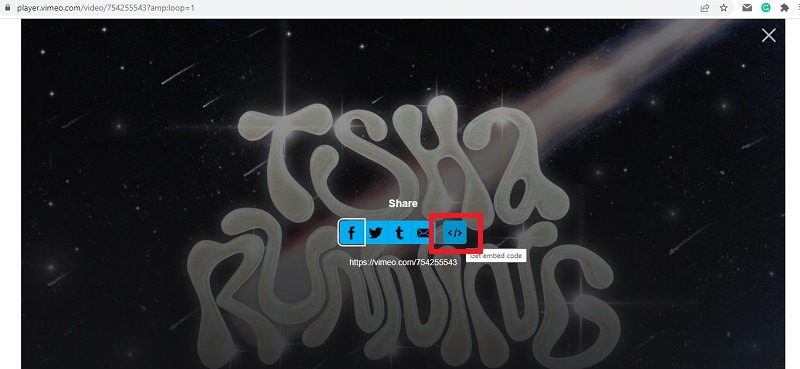
Step 3: On the next screen, you will get the embed code in a pop-up box. Click on Show options.

Step 4: From the expanded section, go to Special Stuff section. Turn on “Loop this video” option.

Step 5: Thereafter, copy the code and paste it into your website to play the video in a loop.
Way 3. How to Loop a Vimeo Video on Mobile
If you are a mobile user, you can use the Vimeo app. But you cannot loop a video on the Vimeo app, quite surprisingly. If you are using the Vimeo app, you can copy the link to the video. Thereafter, you can open the video on your web browser app. You can follow the steps we have mentioned for looping a video on Vimeo directly. Here are the steps for Vimeo loop video on mobile devices.
Step 1: Open the Vimeo app on your mobile device. Play the video that you want in the loop.
Step 2: Tap on the Share icon and tap on Copy URL option.
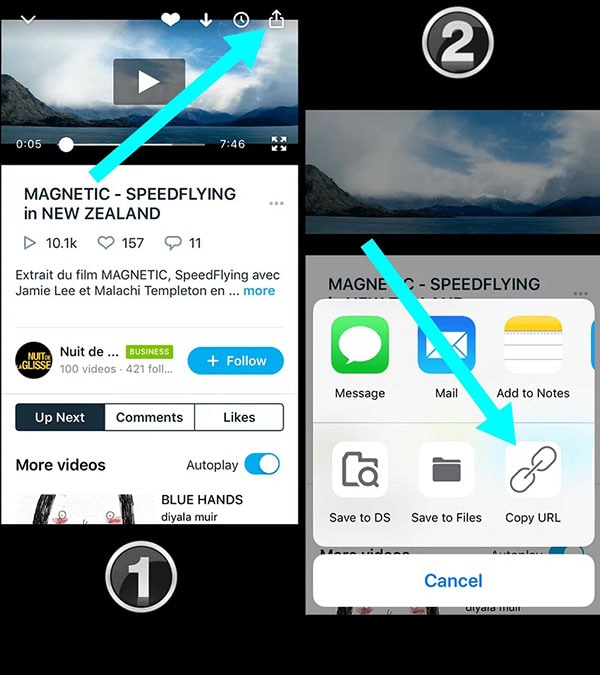
Step 3: Open your web browser and paste the copied URL.
Step 4: Modify the URL in the address bar following the steps we have mentioned in Way 1.
After the modification, the URL of the video should change from “https://vimeo.com/754255543 “ to “player.vimeo.com/video/754255543?amp;loop=1”.
Way 4. How to Loop Vimeo Videos on Computer
If you want to use Vimeo loop video in your video project on your computer, you can use Wondershare Filmora. Filmora is a professional video editor where you can loop any downloaded Vimeo video as long as you want. There are several online Vimeo downloaders available to download any designed Vimeo video.
Thereafter, you can import the downloaded video into Filmora. Then you can extend the duration by looping the video. Filmora is available for Windows and macOS. Apart from looping, you can edit your video like a professional. Here are the steps on how to loop a video on Vimeo.
Free Download For Win 7 or later(64-bit)
Free Download For macOS 10.14 or later
Step 1: Download and install Wondershare Filmora. Download the desired Vimeo video on your computer. Launch Filmora and click on New Project.

Step 2: Drag and drop the downloaded video file into the Project Media folder on Filmora. Thereafter, bring the video file from Project Media folder into the timeline.

Step 3: Drag and drop the video clip into the timeline again. Make sure that there is no gap between the clips and they are on the same channel for looping. Alternative, you can copy and paste the video clip multiple times for looping.

Step 4: You can play the video and watch it in loop. Finally, click on the Export button to save the video in the desired file format.

Wondershare Filmora Best Video Looper Software for Social Media Video Creation.
Free Download Free Download Learn More

Conclusion
There are several ways to loop a video on Vimeo. The best way out is to go for Vimeo loop video directly from the web browser. We have also illustrated how to embed a Vimeo video in a loop into your website. If you want to have a looped Vimeo video in your video project, you can use Filmora on your computer.
Free Download For macOS 10.14 or later
Step 1: Download and install Wondershare Filmora. Download the desired Vimeo video on your computer. Launch Filmora and click on New Project.

Step 2: Drag and drop the downloaded video file into the Project Media folder on Filmora. Thereafter, bring the video file from Project Media folder into the timeline.

Step 3: Drag and drop the video clip into the timeline again. Make sure that there is no gap between the clips and they are on the same channel for looping. Alternative, you can copy and paste the video clip multiple times for looping.

Step 4: You can play the video and watch it in loop. Finally, click on the Export button to save the video in the desired file format.

Wondershare Filmora Best Video Looper Software for Social Media Video Creation.
Free Download Free Download Learn More

Conclusion
There are several ways to loop a video on Vimeo. The best way out is to go for Vimeo loop video directly from the web browser. We have also illustrated how to embed a Vimeo video in a loop into your website. If you want to have a looped Vimeo video in your video project, you can use Filmora on your computer.
The Benefits Of Using Video For Social Media Marketing
When it comes to social media marketing, video is one of the most powerful tools at your disposal. Videos can be used to create engaging content that draws in new followers, and they can also be used to promote your products or services. In fact, videos are so effective that nearly 90% of businesses now use them as part of their social media marketing strategy. So, if you’re not using video yet, now is the time to start. In this post, we’ll discuss the benefits of using video for social media marketing and provide tips for getting started. Keep reading to learn more!
1. More Engaging Than Text or Images
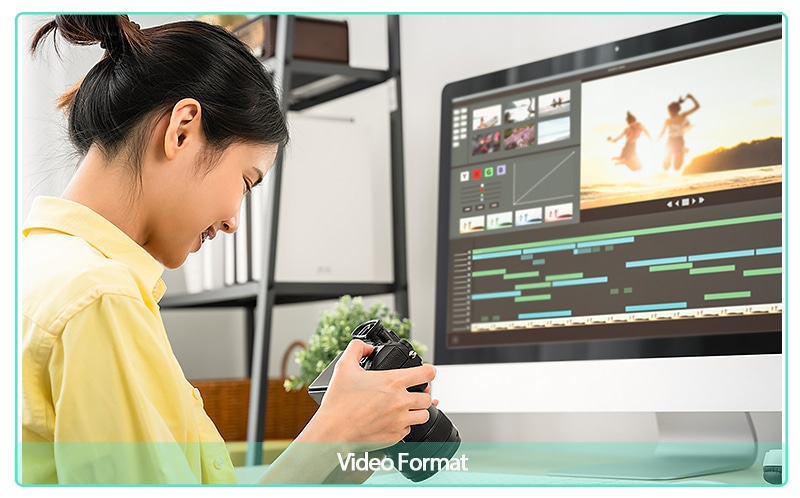
When you’re scrolling through your feed, what’s more, likely to stop you in your tracks: a picture or a video? For most people, the answer is video. In general, video is more engaging than image because it captures our attention more effectively and holds it for longer. Studies have shown that the human brain processes video 60,000 times faster than text, and that viewers retain 95% of a message when they watch it in a video, as opposed to 10% when they read it in text. Furthermore, video is more likely to evoke an emotional response than an image. We can’t help but be drawn in by the movement, sound, and facial expressions of the people in the video, which makes us more likely to feel connected to them. So next time you’re trying to capture someone’s attention, think about using video instead of a still image.
Video Format
2. Build a Relationship with Audience
Video can help you build a relationship with your audience on social media. That’s because people like to watch videos. They’re fun and interesting. You can show people what you’re doing and what’s going on in your life. And people can leave comments and talk to you on the video. The more you interact with your audience, the more they’ll like you.
Plus, video is a great way to show off your products or services. You can give people a tour of your store or office. Or show them how to use your product. If you have a new product, you can create a video to show it off. People are more likely to buy a product if they can see it in action.

Videos Help You Build a Relationship
3. Promote Your Brand or Product
Video allows you to show, rather than just tell, potential customers what your brand is all about. You can give them a behind-the-scenes look at your company, or showcase your products in action. And because people are more likely to watch a video than read an article or blog post, you’re more likely to reach a wider audience with your message.
Creating a video doesn’t have to be expensive or time-consuming. You can use your smartphone or a simple video camera to get started. And there are plenty of free or low-cost video editing software programs available if you want to get fancier with your finished product.
If you’re not sure where to start, try creating a short video that introduces your brand and tells viewers what they can expect from your products or services. Then post it on your website and social media channels and see how it goes! You might be surprised at how well it performs.

Videos Help Promote Your Brand
4. Drive Traffic to Your Website
Website traffic refers to the number of visitors who visit a website. This can be measured in a number of ways, including the number of unique visitors, the number of page views, and the amount of time spent on the site.
If you’re looking for a way to give your website a boost, you may want to consider using videos. By posting engaging videos on social media sites, you can drive traffic to your site and increase your visibility. And, with more people visiting your site, you’ll have a better chance of converting visitors into customers. Of course, creating videos can be time-consuming and requires some level of creative talent. But it’s worth the effort if you’re looking for a way to improve your web traffic.
So, if you’re ready to take your social media marketing to the next level, why not give video a try?

Videos Help Drive Traffic
5. Increase Your Social Media Reach
Social media reach is the number of people who see your content. It’s the potential audience for your message. The more people who see it, the more likely it is that someone will engage with it. The size of your reach depends on the platform you’re using and how many followers you have. Some platforms, like Facebook, make it easy to reach a large audience.
The best way to increase your reach is to create compelling video content that people want to share. Videos are highly shareable, and if they are well-made and engaging, they can quickly attract a large audience. In addition, videos are a great way to build brand awareness and show potential customers what your business is all about. By including videos in your social media marketing strategy, you can reach a wider audience and create more opportunities for customer engagement.

Videos Help Drive Traffic
6. Boost your SEO
SEO is an acronym that stands for “search engine optimization.” It is a process of improving the visibility and ranking of a website or web page in search engine results pages (SERPs). The higher a website or web page appears in the SERPs, the more likely it is to be clicked by users.
If you’re like most people, you probably spend a good chunk of your day scrolling through social media sites like Facebook, Twitter, and Instagram. And when you’re not scrolling through your feed, you’re probably watching videos. Whether it’s a funny cat video or a cooking tutorial, chances are you’ve watched a video online in the past 24 hours. What you may not realize is that videos can also be used to boost your SEO.
That’s right - by creating and posting engaging videos, you can attract more visitors to your website and improve your search engine ranking. Here’s how it works: when people watch your videos and share them with their friends, they are effectively giving your website a “vote” of approval. This helps to improve your visibility on search engines and attracts more visitors to your site. In addition, videos help to keep people on your website for longer periods of time, which is also a positive signal to search engines. So if you’re looking for a new way to improve your SEO, consider adding videos to your website. You might just be surprised at the results.

Videos Help Boost Your SEO
Wrap Up
- Now that you know the importance of using video for your social media marketing, it’s time to start planning your next campaign.
- Keep in mind the different ways you can use video to engage with your audience and think about what kind of content will resonate best with them.
- Don’t be afraid to try something new – after all, that’s how we learn and grow. What are some ideas you have for using video in your social media marketing? We want to hear from you! Comment down below and let us know.

Videos Conclusion
When it comes to social media marketing, video is one of the most powerful tools at your disposal. Videos can be used to create engaging content that draws in new followers, and they can also be used to promote your products or services. In fact, videos are so effective that nearly 90% of businesses now use them as part of their social media marketing strategy. So, if you’re not using video yet, now is the time to start. In this post, we’ll discuss the benefits of using video for social media marketing and provide tips for getting started. Keep reading to learn more!
1. More Engaging Than Text or Images
When you’re scrolling through your feed, what’s more, likely to stop you in your tracks: a picture or a video? For most people, the answer is video. In general, video is more engaging than image because it captures our attention more effectively and holds it for longer. Studies have shown that the human brain processes video 60,000 times faster than text, and that viewers retain 95% of a message when they watch it in a video, as opposed to 10% when they read it in text. Furthermore, video is more likely to evoke an emotional response than an image. We can’t help but be drawn in by the movement, sound, and facial expressions of the people in the video, which makes us more likely to feel connected to them. So next time you’re trying to capture someone’s attention, think about using video instead of a still image.

Video Format
2. Build a Relationship with Audience
Video can help you build a relationship with your audience on social media. That’s because people like to watch videos. They’re fun and interesting. You can show people what you’re doing and what’s going on in your life. And people can leave comments and talk to you on the video. The more you interact with your audience, the more they’ll like you.
Plus, video is a great way to show off your products or services. You can give people a tour of your store or office. Or show them how to use your product. If you have a new product, you can create a video to show it off. People are more likely to buy a product if they can see it in action.

Videos Help You Build a Relationship
3. Promote Your Brand or Product
Video allows you to show, rather than just tell, potential customers what your brand is all about. You can give them a behind-the-scenes look at your company, or showcase your products in action. And because people are more likely to watch a video than read an article or blog post, you’re more likely to reach a wider audience with your message.
Creating a video doesn’t have to be expensive or time-consuming. You can use your smartphone or a simple video camera to get started. And there are plenty of free or low-cost video editing software programs available if you want to get fancier with your finished product.
If you’re not sure where to start, try creating a short video that introduces your brand and tells viewers what they can expect from your products or services. Then post it on your website and social media channels and see how it goes! You might be surprised at how well it performs.

Videos Help Promote Your Brand
4. Drive Traffic to Your Website
Website traffic refers to the number of visitors who visit a website. This can be measured in a number of ways, including the number of unique visitors, the number of page views, and the amount of time spent on the site.
If you’re looking for a way to give your website a boost, you may want to consider using videos. By posting engaging videos on social media sites, you can drive traffic to your site and increase your visibility. And, with more people visiting your site, you’ll have a better chance of converting visitors into customers. Of course, creating videos can be time-consuming and requires some level of creative talent. But it’s worth the effort if you’re looking for a way to improve your web traffic.
So, if you’re ready to take your social media marketing to the next level, why not give video a try?

Videos Help Drive Traffic
5. Increase Your Social Media Reach
Social media reach is the number of people who see your content. It’s the potential audience for your message. The more people who see it, the more likely it is that someone will engage with it. The size of your reach depends on the platform you’re using and how many followers you have. Some platforms, like Facebook, make it easy to reach a large audience.
The best way to increase your reach is to create compelling video content that people want to share. Videos are highly shareable, and if they are well-made and engaging, they can quickly attract a large audience. In addition, videos are a great way to build brand awareness and show potential customers what your business is all about. By including videos in your social media marketing strategy, you can reach a wider audience and create more opportunities for customer engagement.

Videos Help Drive Traffic
6. Boost your SEO
SEO is an acronym that stands for “search engine optimization.” It is a process of improving the visibility and ranking of a website or web page in search engine results pages (SERPs). The higher a website or web page appears in the SERPs, the more likely it is to be clicked by users.
If you’re like most people, you probably spend a good chunk of your day scrolling through social media sites like Facebook, Twitter, and Instagram. And when you’re not scrolling through your feed, you’re probably watching videos. Whether it’s a funny cat video or a cooking tutorial, chances are you’ve watched a video online in the past 24 hours. What you may not realize is that videos can also be used to boost your SEO.
That’s right - by creating and posting engaging videos, you can attract more visitors to your website and improve your search engine ranking. Here’s how it works: when people watch your videos and share them with their friends, they are effectively giving your website a “vote” of approval. This helps to improve your visibility on search engines and attracts more visitors to your site. In addition, videos help to keep people on your website for longer periods of time, which is also a positive signal to search engines. So if you’re looking for a new way to improve your SEO, consider adding videos to your website. You might just be surprised at the results.

Videos Help Boost Your SEO
Wrap Up
- Now that you know the importance of using video for your social media marketing, it’s time to start planning your next campaign.
- Keep in mind the different ways you can use video to engage with your audience and think about what kind of content will resonate best with them.
- Don’t be afraid to try something new – after all, that’s how we learn and grow. What are some ideas you have for using video in your social media marketing? We want to hear from you! Comment down below and let us know.

Videos Conclusion
Recording Video in Slow Motion: Some Considerable Points
Slow motion helps filmmakers to achieve several goals in their projects. Slo-mo can dramatize emotions, set the right mood for watching action films, and so on. Recording slow-motion videos with high-end cameras was a matter of the past. In this tech-based era, capturing moments in slow motion is a built-in feature in your smartphone.
Amplify your message in slow-motion videos by understanding how to record slow-motion video. You will learn how to record a slow-motion video using any model of Android and iPhones. Besides, there are some aspects that you should know before start recording scenes. As a plus point, here you can find a top-notch editing app with a guide on how to record slow-motion video.
Slow Motion Video Maker Slow your video’s speed with better control of your keyframes to create unique cinematic effects

Part 1: Some Important Deliverables to Ensure While Recording Videos in Slow Motion
Capture fleeting moments in the slow-motion mode of the camera to emphasize details. It’s the only way to highlight important aspects of sports and action scenes. Recording in slow motion is not difficult when you will learn how to record slow-motion video. Before learning, let’s understand important aspects you should look at while recording.
- Frame Rate: For slow-motion video, choosing the right frame rate is crucial. A higher framerate, such as 120fps and 240fps, allows smoother playback. So, before recording, ensure that your camera supports a good framerate.
- Resolution: Maintaining high-resolution videos is important to get good quality. Usually, slow-motion footage uses 4K and HD (High Definition) resolution. Having a high video resolution means providing clarity in details in videos.
- Shutter Speed: It refers to the speed at which the camera closes and controls exposure. Adjust the shutter speed to faster mode to capture every crisp in slow motion. It will prevent motion blur and help in freezing fast-moving objects.
- Audio Consideration: You should know that recording slow motion will affect the original audio. Meanwhile, some cameras preserve the original sound. So, be prepared and test your camera’s audio speed to ease the editing process.
- Focus and Stability: Minimize your camera shake and enable a stabilizer or tripod. Stable footage is essential to enhance the video quality. Moreover, try to keep your main subject in camera focus. In this regard, you can use manual focus control if necessary.
- Editing Software Compatibility: Another thing that you must consider is tool compatibility. It’s better to check it before recording so you will not regret it later. Check your editing tools are supporting the file format of the recorded slow-motion video.
- Storage Space: The “No More Storage” sign is a nightmare when you have recorded a perfect shot. Slow-motion videos consume large storage because of high resolution and frame rate. Thus, consider this aspect before recording to avoid inconvenience and arrange storage media.
Part 2: How to Record a Slow-Motion Video on Android/iPhone?
No matter your smartphone, recording slow-mo is just one click away. Luckily, you don’t need any separate app and technical equipment for this task. If you want to record slow motion now, keep reading this section for detailed steps. Here, you will find how to record a slow-motion video using an iPhone and Android.
Record Slow Motion Using an iPhone
Apple has offered a slow-motion feature since 2013 with the release of the iPhone 5s. Subsequent iPhone models also support this feature. Following are the steps that you can follow to record a slow-motion video on an iPhone:
Step 1
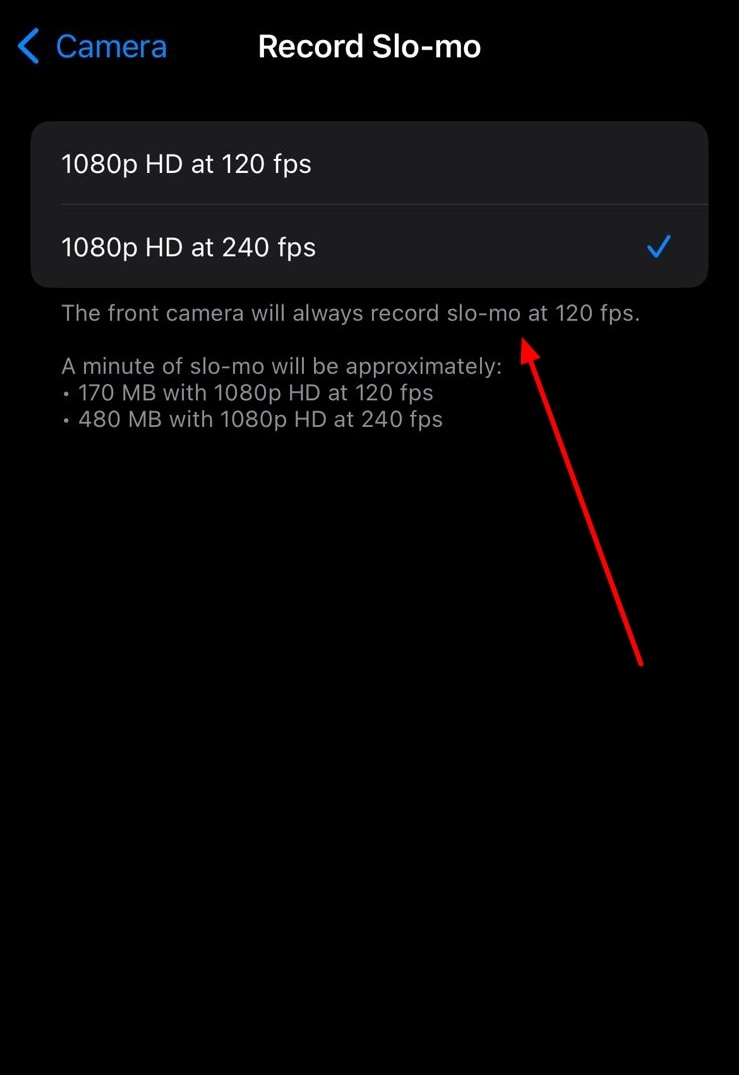
Before recording, set frame rate and resolution. To do so, go to “Settings” and scroll until you find “Camera.” After choosing the camera, touch the “Record Slo-mo.” From the given two choices, select one frame rate and resolution option.
Step 2
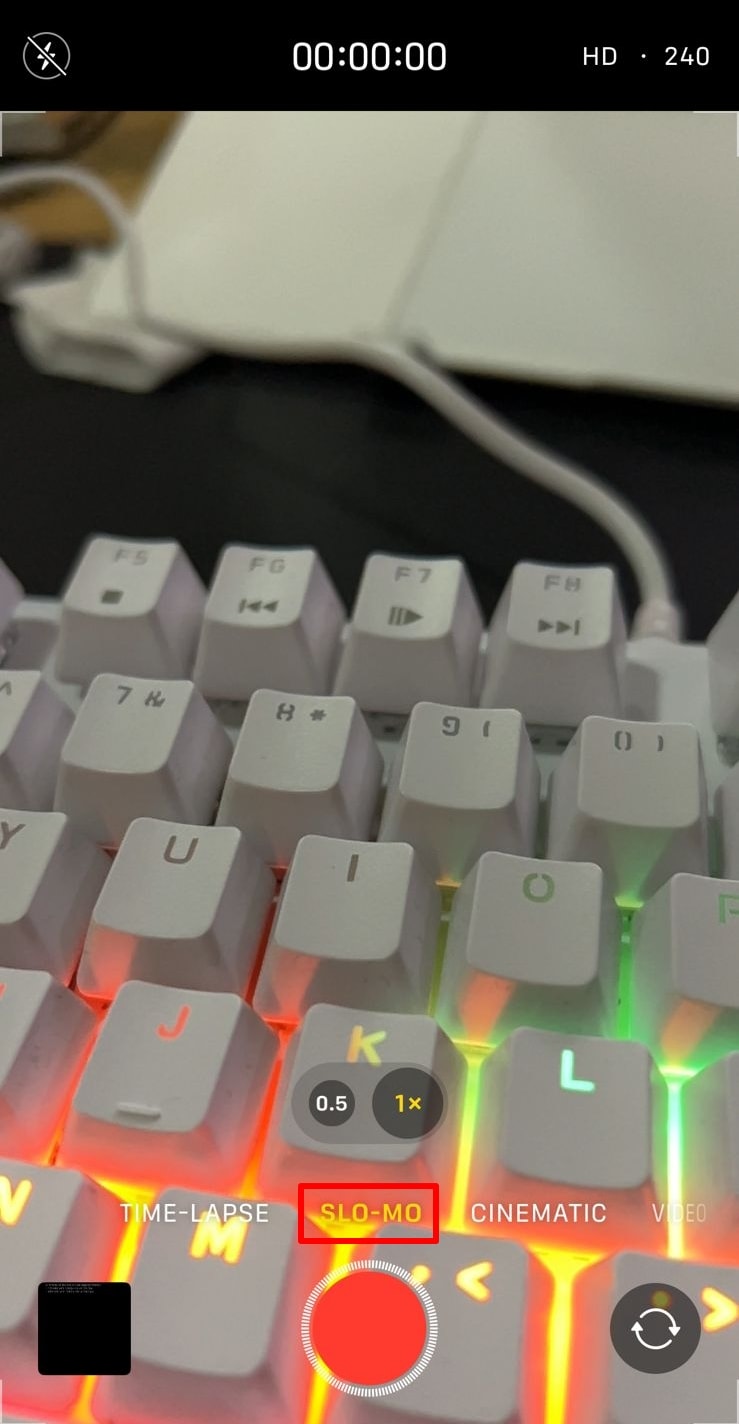
Now, tap on the “Camera” app on the home screen of your iPhone. Click on the “Slo-Mo” option next to the “Video.” Then, touch the red “Record” button and capture moments till you want. Finally, stop recording by hitting the same red button. Your footage will automatically be saved in your gallery.
Record Slow Motion Using Android
Who needs a third-party app when Android also supports a slow-motion recording feature? Currently, almost all Android phones are offering slow-motion. The location and access to slow-motion options might differ per Android phone model. To start recording, look at the given steps:
Step 1
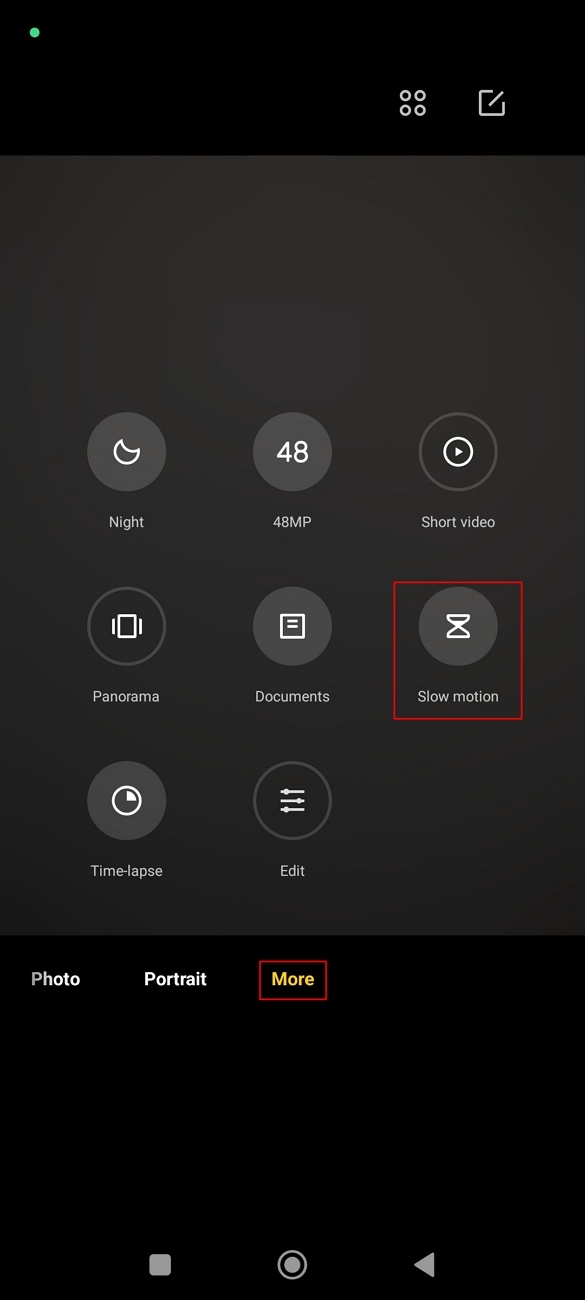
Unlock your phone and click on the “Camera” from the main screen. Click on the “More” option next to the “Portrait.” From the next menu, look for the “Slow Motion” circle icon.
Step 2
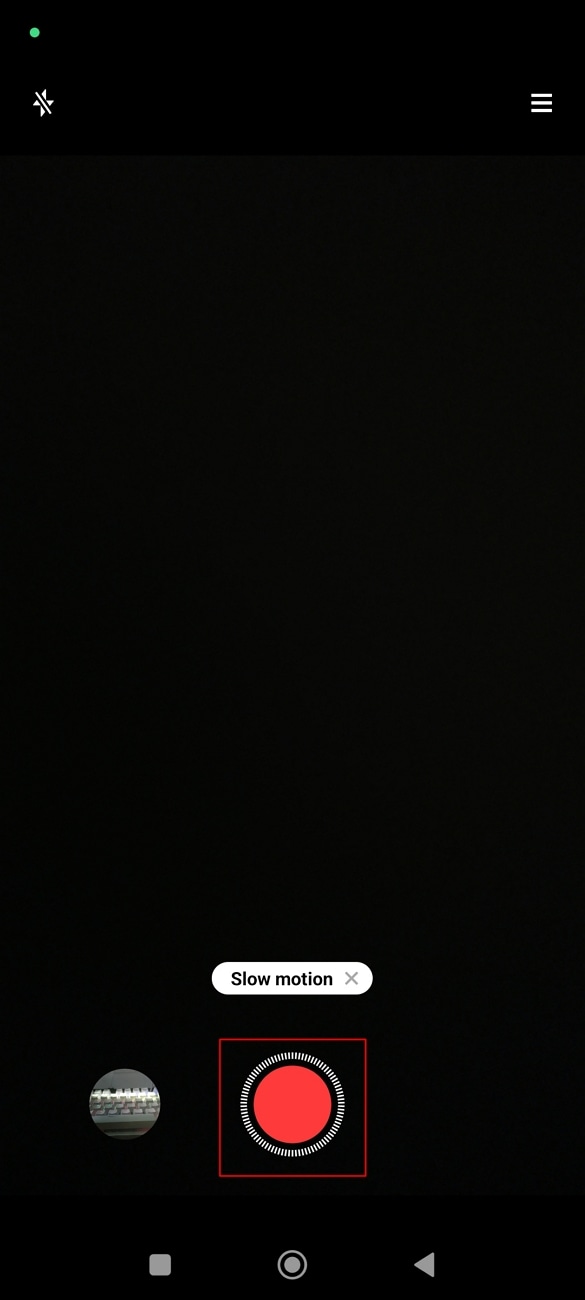
After selecting slow motion, adjust the focus manually. Head to the top-right corner and click on the small menu icon. Choose a frame rate and resolution from the displayed options. To start recording, touch the red “Record” button. When you capture the desired shots, press the red button again and get the video on your phone.
Part 3: Making Recorded Video in Slow Motion Using the Right Tools
Now, you are pretty much familiar with how to record slow-motion video using smartphones. A phenomenon that arises here is, can we slow down the normally recorded video? The simple answer is yes. There are many editing apps designed for this purpose. Adobe Premiere Pro is one such editing app to slow down the pre-recorded videos.
Step 1
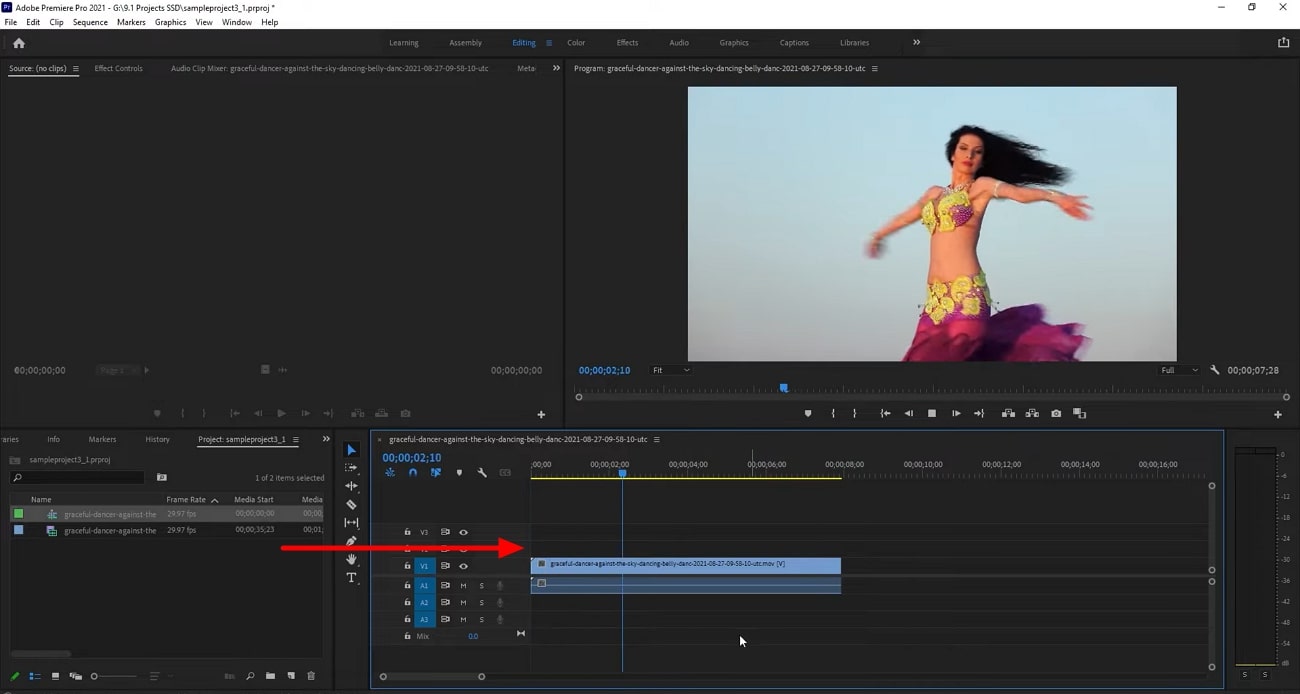
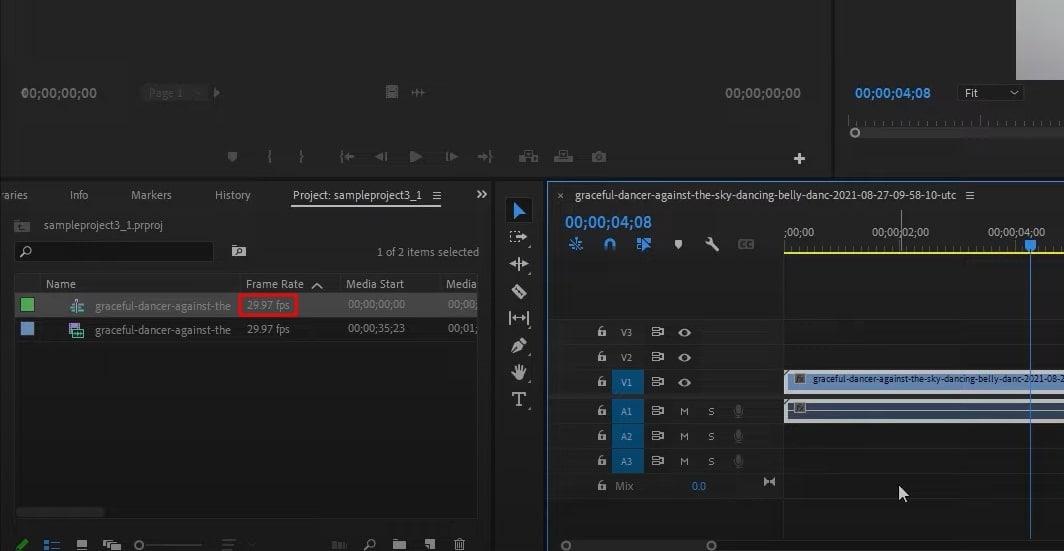
Access your Adobe Premiere Pro application and import a video in the timeline. Identify the frame rate of your video clip for a non-choppy playback.
Step 2
The frame rate will tell you how much you need to slow down the video. To do so, use this “(Timeline Frame Rate ÷ Footage Frame Rate) x 100” formula. Before moving, analyze the slow motion you can add in your clip as per their frame rate.
Step 3
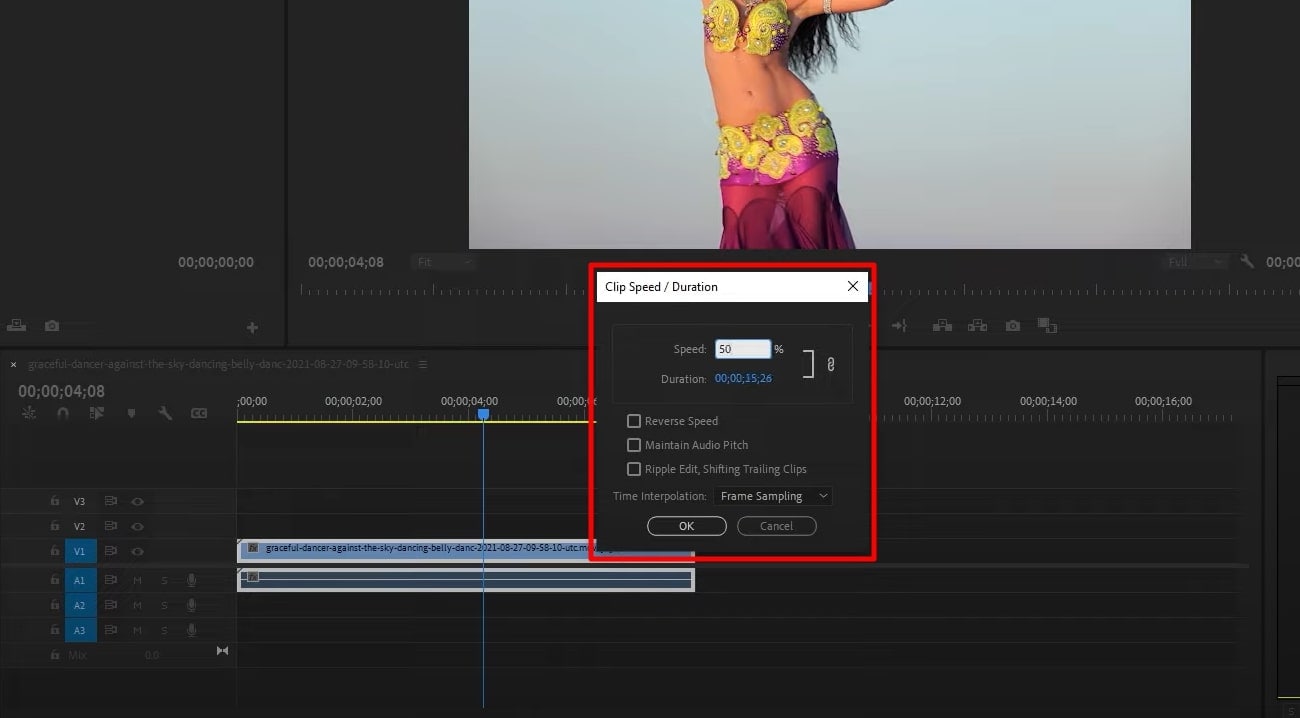
After making calculations, right-click on your footage in the timeline. Select the “Speed/Duration” option from the list and get a small pop-up screen. There, type any number; suppose you type 40% in the box given next to the “Speed.” Finally, click on the “OK” and press the Space bar to get a preview.
Bonus Part: Making Video Editing Simpler! Use Wondershare Filmora to Slow Down Your Video
Apart from Adobe Premiere Pro, there are many other software to do the same task. From multiple options, it’s quite difficult to pick the best option. Let us ease your selection by introducing Wondershare Filmora . It’s a video editing app that is much easier to operate than any other option. With AI integration, many time-consuming editing tasks are now a matter of seconds.
Free Download For Win 7 or later(64-bit)
Free Download For macOS 10.14 or later
How to Turn a Video into Slow-Motion with Optical Flow
As discussed earlier, Filmora can slow down your videos with customization options. Users can set their video to optical flow to automatically get slow speed with high quality.
Step 1Import a Project in Timeline after Launching Filmora
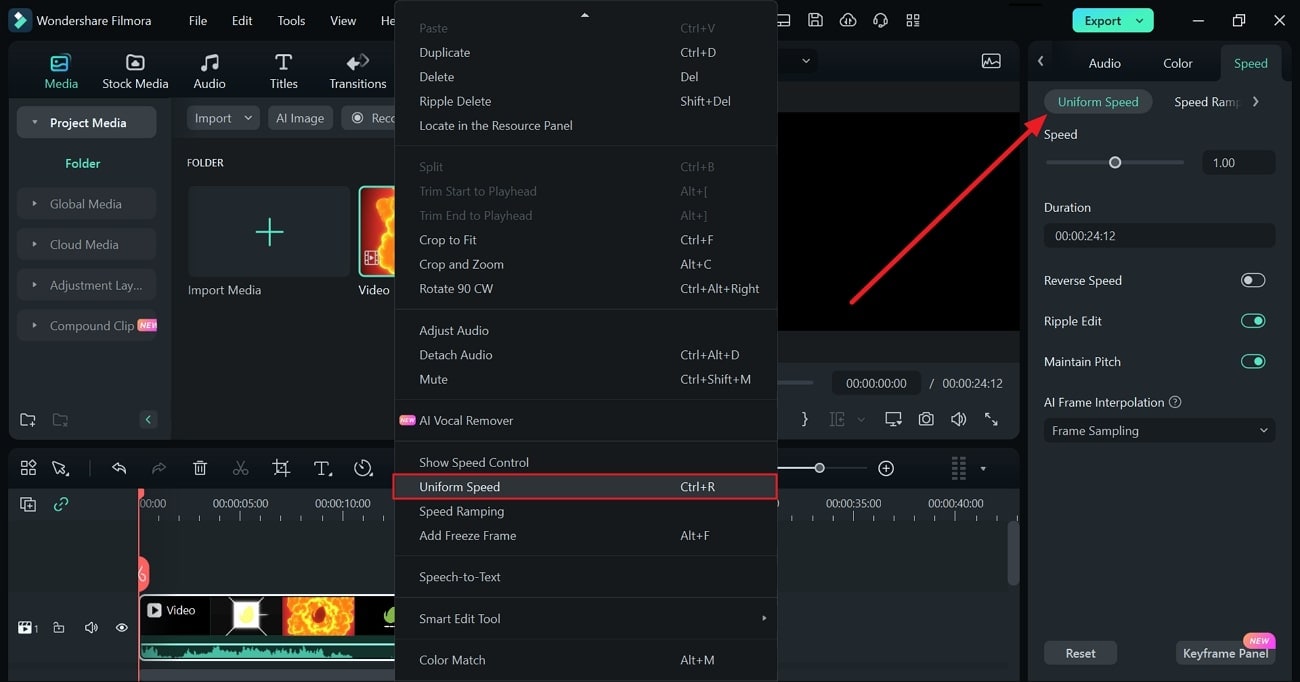
Launch the latest version of Filmora on your device. Access the main interface and choose the “New Project” option to start editing. From the editing screen, look for the “Import” option and bring your media to the timeline. Now, right-click on your video in the timeline to get an extended list. Select the “Uniform Speed” option to get a panel on the right side.
Step 2Explore the Uniform Speed option to Slow Down Videos
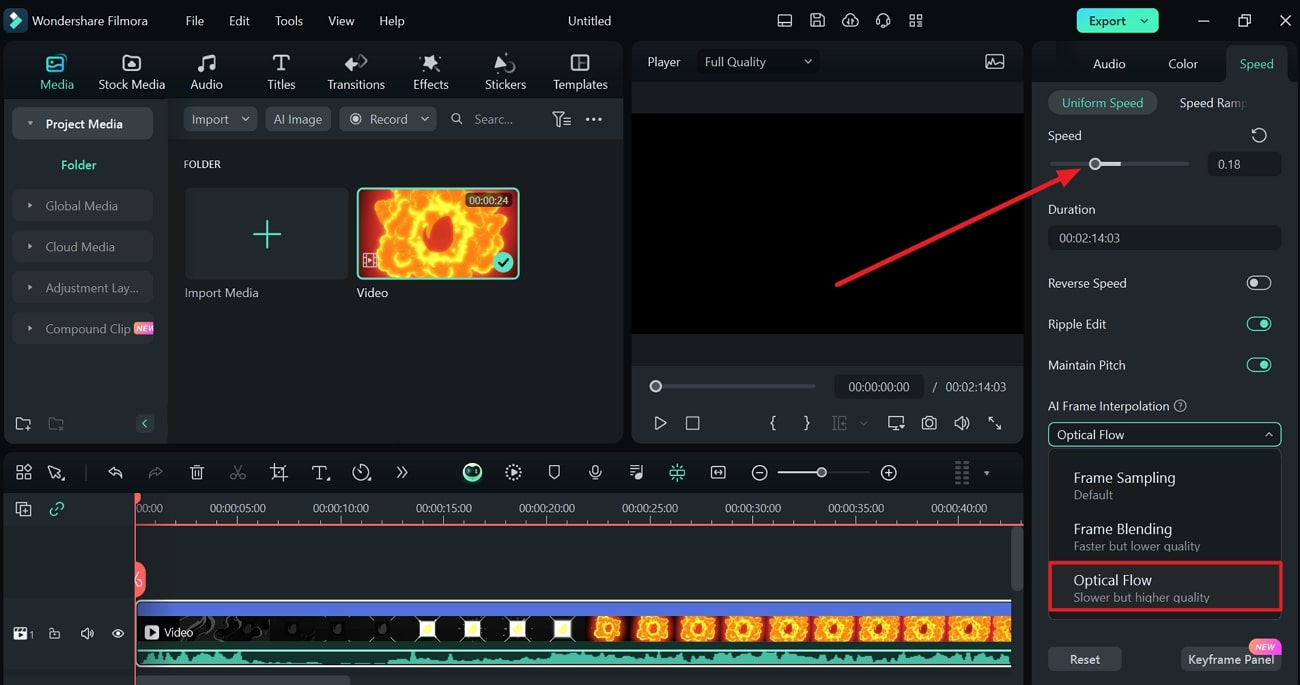
Move to that panel, hold, and drag the “Speed” slider towards the left. Drop the slider at your desired speed for slow-motion video. Go downward and click on the downward icon of “AI Interpolation.” From the extended menu, pick the “Optical Flow” option.
Step 3Head to Export Button Once You Finish Editing
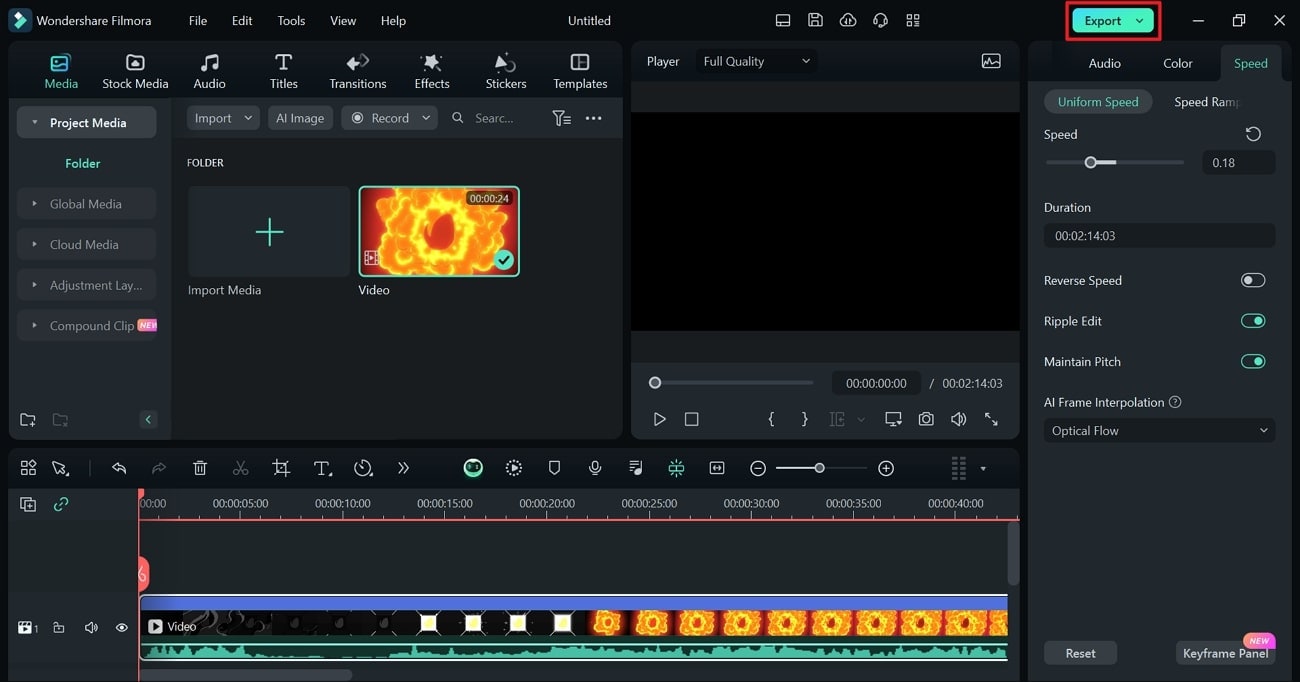
Get a preview of the slow-motion video and decide whether to continue editing or quit. If you are done with editing, move to the top right corner and click on the “Export” button. Assign parameters of your choice and again press the “Export” option to get the file on your PC.
In slow-motion video editing, you can slow down videos to the extent you want. In addition, users can try the AI features of Filmora to explore its powerful functionalities. Keep reading to know some of the key features that Filmora offers to ensure your workflow.
1. AI Copilot Editing
Have you ever imagined AI as your assistant in video editing? Filmora offers an AI copilot editor to assist you in complex editing tasks. To optimize your workflow, it provides valuable insights and guidance with navigations. It ensures that your projects maintain high quality, so it detects conflicting parameters. Afterward, it sends error messages to prevent any issues.
2. AI Text-Based Editing
Getting editable text out of videos is no more challenging with this feature of Filmora. It offers transformative leap technology that converts audio into video and text. After getting transcribed text from the video, users can edit it as per their preferences. You can save work hours because AI can add subtitles to your movies. Also, it allows you to export, translate, and rewrite the subtitles.
3. AI Image
If you are searching for an image that matches your content needs, look no forward. You can generate your own image after giving instructions to AI. This creative concept of Filmora aims to bring your imagination into visual content. In this regard, you just have to describe your image in simple words. Later, users can pick one resolution and image style from endless options.
4. AI Thumbnail Creator
As a content creator, you might know that thumbnail creates a first impression on viewers. A stunning and informative thumbnail attracts viewers to watch the video. For this purpose, Filmora automatically detects the best shots out of your video as a thumbnail. Despite that, you can choose any thumbnail from the professional thumbnail templates library.
5. AI Music Generator
Finding a musical video according to the video content is a hectic job. What if AI generates a soundtrack tailored to your needs? Filmora can generate a musical video by assigning musical choices and sound duration. In addition, you can prompt the number of musical tracks you want. The generated music will be royalty-free and further editable.
Conclusion
Overall, slow-motion videos are becoming a necessity for digital media. That’s why smartphones are offering built-in slow-motion recording features. In this guide, you have learned how to record a slow-motion video and edit it using Premiere Pro. Still, there lies a need to get a better and easier option. For this, you can rely on Filmora, which offers powerful AI features to boost productivity.
Make A Slow Motion Video Make A Slow Motion Video More Features

Part 1: Some Important Deliverables to Ensure While Recording Videos in Slow Motion
Capture fleeting moments in the slow-motion mode of the camera to emphasize details. It’s the only way to highlight important aspects of sports and action scenes. Recording in slow motion is not difficult when you will learn how to record slow-motion video. Before learning, let’s understand important aspects you should look at while recording.
- Frame Rate: For slow-motion video, choosing the right frame rate is crucial. A higher framerate, such as 120fps and 240fps, allows smoother playback. So, before recording, ensure that your camera supports a good framerate.
- Resolution: Maintaining high-resolution videos is important to get good quality. Usually, slow-motion footage uses 4K and HD (High Definition) resolution. Having a high video resolution means providing clarity in details in videos.
- Shutter Speed: It refers to the speed at which the camera closes and controls exposure. Adjust the shutter speed to faster mode to capture every crisp in slow motion. It will prevent motion blur and help in freezing fast-moving objects.
- Audio Consideration: You should know that recording slow motion will affect the original audio. Meanwhile, some cameras preserve the original sound. So, be prepared and test your camera’s audio speed to ease the editing process.
- Focus and Stability: Minimize your camera shake and enable a stabilizer or tripod. Stable footage is essential to enhance the video quality. Moreover, try to keep your main subject in camera focus. In this regard, you can use manual focus control if necessary.
- Editing Software Compatibility: Another thing that you must consider is tool compatibility. It’s better to check it before recording so you will not regret it later. Check your editing tools are supporting the file format of the recorded slow-motion video.
- Storage Space: The “No More Storage” sign is a nightmare when you have recorded a perfect shot. Slow-motion videos consume large storage because of high resolution and frame rate. Thus, consider this aspect before recording to avoid inconvenience and arrange storage media.
Part 2: How to Record a Slow-Motion Video on Android/iPhone?
No matter your smartphone, recording slow-mo is just one click away. Luckily, you don’t need any separate app and technical equipment for this task. If you want to record slow motion now, keep reading this section for detailed steps. Here, you will find how to record a slow-motion video using an iPhone and Android.
Record Slow Motion Using an iPhone
Apple has offered a slow-motion feature since 2013 with the release of the iPhone 5s. Subsequent iPhone models also support this feature. Following are the steps that you can follow to record a slow-motion video on an iPhone:
Step 1
Before recording, set frame rate and resolution. To do so, go to “Settings” and scroll until you find “Camera.” After choosing the camera, touch the “Record Slo-mo.” From the given two choices, select one frame rate and resolution option.

Step 2
Now, tap on the “Camera” app on the home screen of your iPhone. Click on the “Slo-Mo” option next to the “Video.” Then, touch the red “Record” button and capture moments till you want. Finally, stop recording by hitting the same red button. Your footage will automatically be saved in your gallery.

Record Slow Motion Using Android
Who needs a third-party app when Android also supports a slow-motion recording feature? Currently, almost all Android phones are offering slow-motion. The location and access to slow-motion options might differ per Android phone model. To start recording, look at the given steps:
Step 1
Unlock your phone and click on the “Camera” from the main screen. Click on the “More” option next to the “Portrait.” From the next menu, look for the “Slow Motion” circle icon.

Step 2
After selecting slow motion, adjust the focus manually. Head to the top-right corner and click on the small menu icon. Choose a frame rate and resolution from the displayed options. To start recording, touch the red “Record” button. When you capture the desired shots, press the red button again and get the video on your phone.

Part 3: Making Recorded Video in Slow Motion Using the Right Tools
Now, you are pretty much familiar with how to record slow-motion video using smartphones. A phenomenon that arises here is, can we slow down the normally recorded video? The simple answer is yes. There are many editing apps designed for this purpose. Adobe Premiere Pro is one such editing app to slow down the pre-recorded videos.
Step 1
Access your Adobe Premiere Pro application and import a video in the timeline. Identify the frame rate of your video clip for a non-choppy playback.

Step 2
The frame rate will tell you how much you need to slow down the video. To do so, use this “(Timeline Frame Rate ÷ Footage Frame Rate) x 100” formula. Before moving, analyze the slow motion you can add in your clip as per their frame rate.

Step 3
After making calculations, right-click on your footage in the timeline. Select the “Speed/Duration” option from the list and get a small pop-up screen. There, type any number; suppose you type 40% in the box given next to the “Speed.” Finally, click on the “OK” and press the Space bar to get a preview.

Bonus Part: Making Video Editing Simpler! Use Wondershare Filmora to Slow Down Your Video
Apart from Adobe Premiere Pro, there are many other software to do the same task. From multiple options, it’s quite difficult to pick the best option. Let us ease your selection by introducing Wondershare Filmora . It’s a video editing app that is much easier to operate than any other option. With AI integration, many time-consuming editing tasks are now a matter of seconds.
Free Download For Win 7 or later(64-bit)
Free Download For macOS 10.14 or later
How to Turn a Video into Slow-Motion with Optical Flow
As discussed earlier, Filmora can slow down your videos with customization options. Users can set their video to optical flow to automatically get slow speed with high quality.
Step 1Import a Project in Timeline after Launching Filmora
Launch the latest version of Filmora on your device. Access the main interface and choose the “New Project” option to start editing. From the editing screen, look for the “Import” option and bring your media to the timeline. Now, right-click on your video in the timeline to get an extended list. Select the “Uniform Speed” option to get a panel on the right side.

Step 2Explore the Uniform Speed option to Slow Down Videos
Move to that panel, hold, and drag the “Speed” slider towards the left. Drop the slider at your desired speed for slow-motion video. Go downward and click on the downward icon of “AI Interpolation.” From the extended menu, pick the “Optical Flow” option.

Step 3Head to Export Button Once You Finish Editing
Get a preview of the slow-motion video and decide whether to continue editing or quit. If you are done with editing, move to the top right corner and click on the “Export” button. Assign parameters of your choice and again press the “Export” option to get the file on your PC.

In slow-motion video editing, you can slow down videos to the extent you want. In addition, users can try the AI features of Filmora to explore its powerful functionalities. Keep reading to know some of the key features that Filmora offers to ensure your workflow.
1. AI Copilot Editing
Have you ever imagined AI as your assistant in video editing? Filmora offers an AI copilot editor to assist you in complex editing tasks. To optimize your workflow, it provides valuable insights and guidance with navigations. It ensures that your projects maintain high quality, so it detects conflicting parameters. Afterward, it sends error messages to prevent any issues.
2. AI Text-Based Editing
Getting editable text out of videos is no more challenging with this feature of Filmora. It offers transformative leap technology that converts audio into video and text. After getting transcribed text from the video, users can edit it as per their preferences. You can save work hours because AI can add subtitles to your movies. Also, it allows you to export, translate, and rewrite the subtitles.
3. AI Image
If you are searching for an image that matches your content needs, look no forward. You can generate your own image after giving instructions to AI. This creative concept of Filmora aims to bring your imagination into visual content. In this regard, you just have to describe your image in simple words. Later, users can pick one resolution and image style from endless options.
4. AI Thumbnail Creator
As a content creator, you might know that thumbnail creates a first impression on viewers. A stunning and informative thumbnail attracts viewers to watch the video. For this purpose, Filmora automatically detects the best shots out of your video as a thumbnail. Despite that, you can choose any thumbnail from the professional thumbnail templates library.
5. AI Music Generator
Finding a musical video according to the video content is a hectic job. What if AI generates a soundtrack tailored to your needs? Filmora can generate a musical video by assigning musical choices and sound duration. In addition, you can prompt the number of musical tracks you want. The generated music will be royalty-free and further editable.
Conclusion
Overall, slow-motion videos are becoming a necessity for digital media. That’s why smartphones are offering built-in slow-motion recording features. In this guide, you have learned how to record a slow-motion video and edit it using Premiere Pro. Still, there lies a need to get a better and easier option. For this, you can rely on Filmora, which offers powerful AI features to boost productivity.
Do You Want to Remove the Video Background in Premier Pro Using the Ultra Key but Don’t Know About the Whole Process? Please Read Our Complete Step-by-Step Tutorial and Learn From Scratch as a Beginner
Adobe Premiere Pro is one of the leading video editing software. You can use to create or remove a video’s background. Advanced Chroma Key features such as Color Key and Ultra Key make it possible to produce background-free content quickly.
Although both Keys work similarly, many users prefer to use the Ultra key for a better result in the video. This article will explain how to remove video background in Premiere Pro if you are a newbie.
Let’s get right to it and start the tutorial!
How to Use Premiere Pro to Remove Video Background?
Adobe Premiere Pro can remove video backgrounds quickly using the Ultra Key feature with the following steps:
Step1 In the first step, launch a browser, and download the appropriate Adobe Premiere Pro version for your Windows PC or Mac . Next, install the software on your system and launch it from your Desktop or Dock.
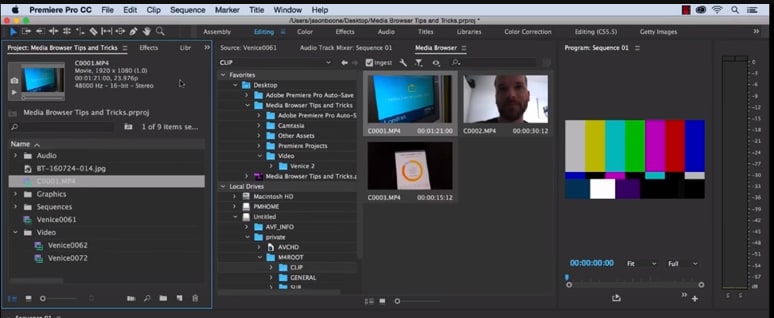
Step2 Now, use the Media Browser panel in the software to browse the video clips you want to import into the software. Next, right-click on your selected video file in which you want to remove the background and choose the “Import” option.
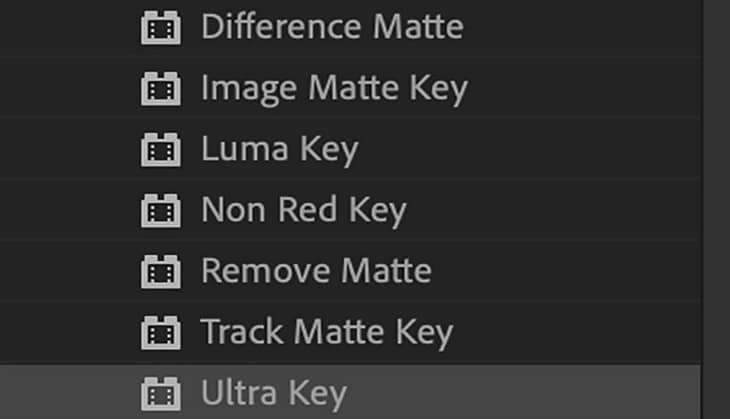
Step3 Click the “Effects” tab in the software panel and select Video Effects. Here, you will see the “Keying” option; select the Ultra Key, press and hold it to grab the key, and place it on your video clip.
![]()
Note: You can also search for the Ultra Key in the Adobe Premiere Pro search bar. Drag it to the video clip containing a background you want to remove.
Step4 As soon as you drop the Ultra Key to your footage, an Effects Control panel will pop up. Next, use the eyedropper tool in the Effects Control panel. Finally, select the background color on your video that you want to remove.
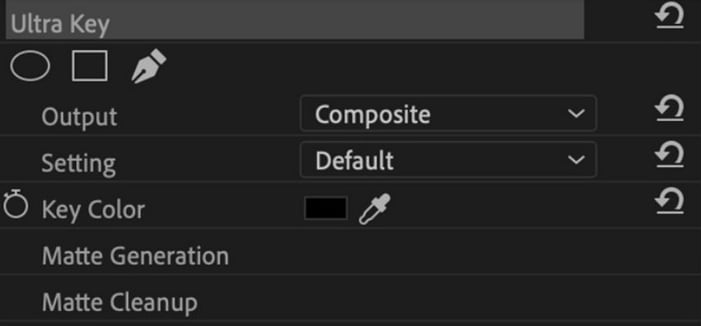
Step5 In the next step, click the drop-down menu next to the “Output” option, and select “Alpha Channel” from the list. This will reveal the details of your video and the edits. Also, click the “Setting” drop-down menu and select the Relaxed, Aggressive, or Custom option for the video effect.

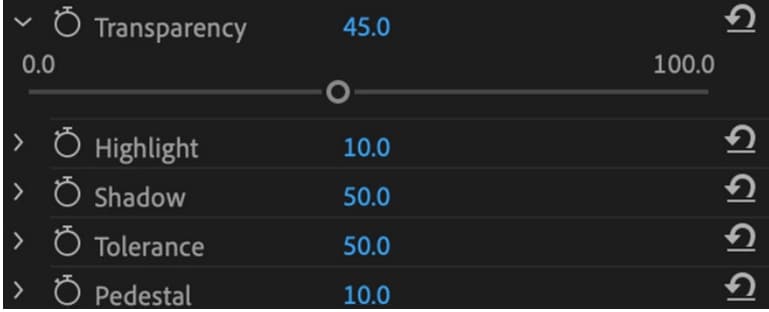
Step6 Select the “Matte Generation“ below Key Color. Try different levels for Highlight, Shadow, Tolerance, Transparency, Pedestal, and other settings to further clean the matte for a premium effect.
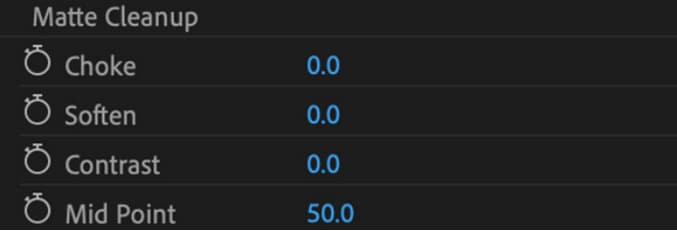
Step7 In this step,choose the “Matte Cleanup” option to expand its settings and clean up the edges of your clip. You will see various options here, but the most important one is “Choke.” It will shrink the object’s borders and “Soften” to add fuzz.
If you see a background color spill on your video after playing with the above settings, click “Spill Suppression” beneath Matte Cleanup to expand its options and choose the desired settings to resolve this issue.
That’s about it! You have successfully removed the video background in Premiere Pro.
Step8 In the last step, you need to save, render, and export your video with the removed background. To do this, click the “File” option on the Premiere Pro Media Browser, and choose “Export” to explore the “Media” menu.
Choose the format in the Export Settings, as it is compatible with most devices. Next, choose a valid Preset and resolution, and click “Export” to begin the rendering process. Finally, save your edited background video again, and export the video to the desired destination.
Is There Any Best Alternative to Remove Video’s Background?
Although Adobe Premiere Pro is an excellent choice, the software can be a little overzealous for beginners. But don’t fret; there is an alternative for newbie to remove the video background.
Many video content creators recommended Wondershare Filmora as a user-friendly video editing software. This software loads with customization options and compact feature, including the Human Segmentation effect. With it, you can isolate objects from the background of a video without a green screen.
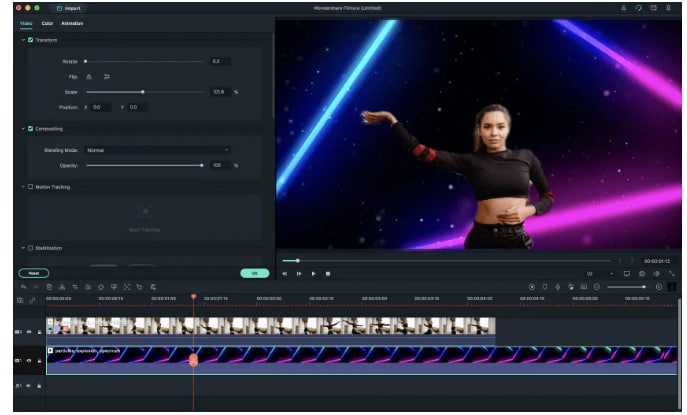
Let’s take a quick look at Filmora video editing marvel features:
- Comes with a free trial and is priced to meet most video designers’ production needs.
- Remove the video background with four quick steps.
- View the foreground of your video in real-time after background removal.
- Numerous customization options to add a different background or an image to the original content.
- Add the removed background as an overlay on top of another clip.
- Drag and drop a video clip to another track in the timeline for cutting, trimming, and elimination purposes.
- Using the “Human Segregation effect” in the AI Portrait on any imported video is simple.
- See objects isolated from the background in the Preview mode, which allows you to adjust the edges, feathers, and thickness accordingly.
- Easy export options supporting various compatible formats.
Additionally, we have provided you with a video tutorial about How to Remove and Change Video Background Without Green Screen with Filmora:
Free Download For Win 7 or later(64-bit)
Free Download For macOS 10.14 or later
Conclusion
This comprehensive guide explains how to remove the video background in Premier Pro using the Ultra key instead of the Color Key.
We have also discussed an excellent alternative to Premier Pro that can eliminate any background in your video content within minutes.
This article helped solve your queries. As a result, you can now create quality video content for your audience without paying thousands of dollars to professional video editors to do the background removal for you.
Step4 As soon as you drop the Ultra Key to your footage, an Effects Control panel will pop up. Next, use the eyedropper tool in the Effects Control panel. Finally, select the background color on your video that you want to remove.

Step5 In the next step, click the drop-down menu next to the “Output” option, and select “Alpha Channel” from the list. This will reveal the details of your video and the edits. Also, click the “Setting” drop-down menu and select the Relaxed, Aggressive, or Custom option for the video effect.

Step6 Select the “Matte Generation“ below Key Color. Try different levels for Highlight, Shadow, Tolerance, Transparency, Pedestal, and other settings to further clean the matte for a premium effect.

Step7 In this step,choose the “Matte Cleanup” option to expand its settings and clean up the edges of your clip. You will see various options here, but the most important one is “Choke.” It will shrink the object’s borders and “Soften” to add fuzz.

If you see a background color spill on your video after playing with the above settings, click “Spill Suppression” beneath Matte Cleanup to expand its options and choose the desired settings to resolve this issue.
That’s about it! You have successfully removed the video background in Premiere Pro.
Step8 In the last step, you need to save, render, and export your video with the removed background. To do this, click the “File” option on the Premiere Pro Media Browser, and choose “Export” to explore the “Media” menu.
Choose the format in the Export Settings, as it is compatible with most devices. Next, choose a valid Preset and resolution, and click “Export” to begin the rendering process. Finally, save your edited background video again, and export the video to the desired destination.
Is There Any Best Alternative to Remove Video’s Background?
Although Adobe Premiere Pro is an excellent choice, the software can be a little overzealous for beginners. But don’t fret; there is an alternative for newbie to remove the video background.
Many video content creators recommended Wondershare Filmora as a user-friendly video editing software. This software loads with customization options and compact feature, including the Human Segmentation effect. With it, you can isolate objects from the background of a video without a green screen.

Let’s take a quick look at Filmora video editing marvel features:
- Comes with a free trial and is priced to meet most video designers’ production needs.
- Remove the video background with four quick steps.
- View the foreground of your video in real-time after background removal.
- Numerous customization options to add a different background or an image to the original content.
- Add the removed background as an overlay on top of another clip.
- Drag and drop a video clip to another track in the timeline for cutting, trimming, and elimination purposes.
- Using the “Human Segregation effect” in the AI Portrait on any imported video is simple.
- See objects isolated from the background in the Preview mode, which allows you to adjust the edges, feathers, and thickness accordingly.
- Easy export options supporting various compatible formats.
Additionally, we have provided you with a video tutorial about How to Remove and Change Video Background Without Green Screen with Filmora:
Free Download For Win 7 or later(64-bit)
Free Download For macOS 10.14 or later
Conclusion
This comprehensive guide explains how to remove the video background in Premier Pro using the Ultra key instead of the Color Key.
We have also discussed an excellent alternative to Premier Pro that can eliminate any background in your video content within minutes.
This article helped solve your queries. As a result, you can now create quality video content for your audience without paying thousands of dollars to professional video editors to do the background removal for you.
Also read:
- Updated 18 Video Editors Weve Tested Heres What We Learned for 2024
- In 2024, Looking for the Steps to Add Transitions Effects in Premiere Pro? Here Are the Steps to Add and Edit Transitions in Premiere Pro and an Alternative Way to Video Transitions
- 2024 Approved Are You Looking for the Best Premiere Pro Slideshow Template Online for Free? If Yes, You Can Find a Few Exciting Slideshow Templates Here. They Are Worth Using
- 2024 Approved How to Make a Slideshow with Icecream Slideshow Maker
- Updated 2024 Approved Vintage Film Effect 1920S - How to Make
- Ways to Merge Videos in HandBrake? Expectation Vs. Reality
- 2024 Approved Have You Recently Experienced Motion Blur in Games? Do You Wish to Learn More About It? This Article Provides an Overview and the Need for Motion Blur Gaming
- Updated In 2024, How To Add Motion Blur In Davinci Resolve?
- Learn How to Blur the Background in Adobe Premiere Pro with Our Quick and Simple Step-by-Step Instructions to Make Your Subject More Attention-Grabbing
- 2024 Approved 11 Tools To Create Radial Blur Photo Mobile And Desktop
- New Any Video May Be Enhanced Using Adobe Premiere Transitions. If You Are Looking to Learn How to Add Fade to Black in Premiere Pro? Then, Check Out This Fade to Black Transition Premiere Pro Guide to Learn the Trick
- How Do You Use the Splice App on Android and Which Useful Video Splice Apps Are Best Suited? This Article Expands More on It for 2024
- Updated How to Loop a Video in PowerPoint
- 7 Best GoPro Video Editors for Mac
- This Article Will Show You How to Clone Yourslef in Videos with Filmora
- Updated Guide Add LUTs in Premiere Pro with Ease for 2024
- Updated 10 Best Mp3 Visualizers Windows, Mac, Android, iPhone & Online
- 2024 Approved Can You Make an Fcpx Slideshow? Undoubtedly Yes, with the Unlimited Best Fcpx Slideshow Templates Available. To Know How to, Follow the Discussion Below
- 2024 Approved How Much Information Do You Have About MP4 Digital File Storage? Let Us Tell You More About the MP4 File Format; Get Ready to Increase Your Knowledge
- In 2024, AVI Editor for Windows 11/10/8.1/8/7 Easily Edit AVI Files on PC
- In 2024, What Is the Top Filmora Slideshow Templates? Experts Choice
- Updated Are You Excited to Learn About a Video Maker with a Song? Do You Want to Create a Video Embedded with Audio Tracks to Entertain the Viewers? Then, This Guide Assists You to Build Interesting Videos Along with Songs Precisely
- 2024 Approved Are You Looking for Ideas for Funny YouTube Videos? Your Search Is Over. Read the Article Below and Get the Most Information Regarding Funny Videos. You Will Also Get to Know About the Best Funny Video Background Music
- New Something That You Should Know About MP4 Video Format
- Updated Take Your Video Editing to the Next Level with Video Scopes for 2024
- In 2024, Learn How to Make a Gaming Montage - Guide & Tips
- How to Make Stunning Glitch Effect in Photoshop, In 2024
- Updated In 2024, The Way to Make Dynamic Video Collages?
- New Best 10 Crazy-Cool Examples of AR Video for 2024
- In 2024, Downloading SamFw FRP Tool 3.0 for Samsung Galaxy A15 5G
- New In 2024, Best Celebrity Voice Generator Tools to Transform Your Voice
- Updated 5 Smart Tips About YouTube Shorts to Grow Your Business
- How to Bypass Apple iPhone 14 Pro Max Passcode Easily Video Inside
- Undelete lost data from Samsung Galaxy Z Fold 5
- A Detailed VPNa Fake GPS Location Free Review On Xiaomi Redmi K70 | Dr.fone
- How to Stop Google Chrome from Tracking Your Location On Apple iPhone 13 mini? | Dr.fone
- In 2024, How to Remove and Reset Face ID on iPhone 13
- How to Reset Oppo A1x 5G without Losing Data | Dr.fone
- Forgot Your Apple ID Password and Email From iPhone XS Max? Heres the Best Fixes
- Ultimate Guide from Xiaomi 13 Ultra FRP Bypass
- Tips and Tricks for Setting Up your Realme 12 5G Phone Pattern Lock
- How to Fix My Xiaomi Civi 3 Disney 100th Anniversary Edition Location Is Wrong | Dr.fone
- In 2024, A Step-by-Step Guide on Using ADB and Fastboot to Remove FRP Lock on your Xiaomi
- Solutions to Spy on Samsung Galaxy S23 Ultra with and without jailbreak | Dr.fone
- Unlock iPhone 6 lock with iTunes
- 10 Easy-to-Use FRP Bypass Tools for Unlocking Google Accounts On Oppo A2
- Apple ID is Greyed Out From Apple iPhone 8 How to Bypass?
- Sony can't play MP4 video files
- Unlock Your Nubia Z50S Pro Phone with Ease The 3 Best Lock Screen Removal Tools
- In 2024, 15 Best Strongest Pokémon To Use in Pokémon GO PvP Leagues For Oppo Find X6 | Dr.fone
- In 2024, How to Erase an Apple iPhone 12 Pro Max without Apple ID?
- In 2024, How to Track Vivo Y56 5G Location without Installing Software? | Dr.fone
- In 2024, How to Mirror PC Screen to Realme Narzo N53 Phones? | Dr.fone
- In 2024, How to Unlock iPhone 11 Pro with a Mask On
- In 2024, How To Unlink Apple ID From iPhone XS Max
- In 2024, How to Turn Off Find My iPhone 6 when Phone is Broken? | Dr.fone
- In 2024, How to Transfer Apps from Asus ROG Phone 8 to Another | Dr.fone
- How to Change GPS Location on Apple iPhone X Easily & Safely | Dr.fone
- Title: New 4 Ways to Loop a Video on Vimeo
- Author: Chloe
- Created at : 2024-06-18 14:30:49
- Updated at : 2024-06-19 14:30:49
- Link: https://ai-editing-video.techidaily.com/new-4-ways-to-loop-a-video-on-vimeo/
- License: This work is licensed under CC BY-NC-SA 4.0.

