
:max_bytes(150000):strip_icc():format(webp)/YoungAsianmanusinglaptopandreadingnewspaperonplane-59960904685fbe00103478bd.jpg)
New 4 Ways to Loop a Video on Vimeo for 2024
4 Ways to Loop a Video on Vimeo
Vimeo is a popular video streaming platform where you can watch videos all day. Vimeo is a close competitor of YouTube. If you are a regular viewer on Vimeo, you may want to watch a video in a loop. Instead of manually playing the video again and again, you can automatically loop the video on Vimeo.
If you are embedding a Vimeo video on your website, you will want to play it on a loop. This will ensure maximum watch time from the audience. Besides, if you are a video creator, you may want to loop Vimeo videos for your video project. We will illustrate how to loop video on Vimeo for all scenarios.
Way 1. Loop A Video on Vimeo Directly
Most online users watch videos on Vimeo directly through the web browser. This is specifically applicable to computer users. If you want Vimeo loop video for any desired video, the steps are simple. You have to make some adjustments and additions to the video URL on the address bar. You should change the URL accurately for looping a video. Here are the steps on how to loop a video on Vimeo directly.
Step 1: On your device, launch the web browser. Open the official website of Vimeo Watch. Play any video of your liking.

Step 2: Now, you need to change the URL of the video you are playing. Here are the changes to make in the address bar.
- Remove everything at the beginning of “vimeo.com”. Add “.player” at the beginning of the URL.
- Add “/video/“ after “vimeo.com”.
- Add “?amp;loop=1:” at the end of the URL.
Therefore, the initial URL of the video was “https://vimeo.com/754255543 “. You have to change it to “player.vimeo.com/video/754255543?amp;loop=1”.
Step 3: After making the changes, press Enter key. The same video will play in a loop until you pause the video or close the web browser’s tab.
Way 2. Loop a Vimeo Video When Embedded on Your Site
You can embed a Vimeo video on your website so that the audience can watch it. The video will play only once when someone lands on your website. After the video ends playing, the embedding will show suggested videos. If you want the same video to play again and again, you have to put it in a loop. Here are the steps on how to loop Vimeo video when embedded on your website.
Step 1: Open the Vimeo video on your web browser. Click on Share icon present inside the player in the top-right corner.

Step 2: You will get to see several options, and you need to click on “Get Embed Code” option.

Step 3: On the next screen, you will get the embed code in a pop-up box. Click on Show options.

Step 4: From the expanded section, go to Special Stuff section. Turn on “Loop this video” option.

Step 5: Thereafter, copy the code and paste it into your website to play the video in a loop.
Way 3. How to Loop a Vimeo Video on Mobile
If you are a mobile user, you can use the Vimeo app. But you cannot loop a video on the Vimeo app, quite surprisingly. If you are using the Vimeo app, you can copy the link to the video. Thereafter, you can open the video on your web browser app. You can follow the steps we have mentioned for looping a video on Vimeo directly. Here are the steps for Vimeo loop video on mobile devices.
Step 1: Open the Vimeo app on your mobile device. Play the video that you want in the loop.
Step 2: Tap on the Share icon and tap on Copy URL option.

Step 3: Open your web browser and paste the copied URL.
Step 4: Modify the URL in the address bar following the steps we have mentioned in Way 1.
After the modification, the URL of the video should change from “https://vimeo.com/754255543 “ to “player.vimeo.com/video/754255543?amp;loop=1”.
Way 4. How to Loop Vimeo Videos on Computer
If you want to use Vimeo loop video in your video project on your computer, you can use Wondershare Filmora. Filmora is a professional video editor where you can loop any downloaded Vimeo video as long as you want. There are several online Vimeo downloaders available to download any designed Vimeo video.
Thereafter, you can import the downloaded video into Filmora. Then you can extend the duration by looping the video. Filmora is available for Windows and macOS. Apart from looping, you can edit your video like a professional. Here are the steps on how to loop a video on Vimeo.
Free Download For Win 7 or later(64-bit)
Free Download For macOS 10.14 or later
Step 1: Download and install Wondershare Filmora. Download the desired Vimeo video on your computer. Launch Filmora and click on New Project.

Step 2: Drag and drop the downloaded video file into the Project Media folder on Filmora. Thereafter, bring the video file from Project Media folder into the timeline.

Step 3: Drag and drop the video clip into the timeline again. Make sure that there is no gap between the clips and they are on the same channel for looping. Alternative, you can copy and paste the video clip multiple times for looping.

Step 4: You can play the video and watch it in loop. Finally, click on the Export button to save the video in the desired file format.

Wondershare Filmora Best Video Looper Software for Social Media Video Creation.
Free Download Free Download Learn More

![]()
Conclusion
There are several ways to loop a video on Vimeo. The best way out is to go for Vimeo loop video directly from the web browser. We have also illustrated how to embed a Vimeo video in a loop into your website. If you want to have a looped Vimeo video in your video project, you can use Filmora on your computer.
Free Download For macOS 10.14 or later
Step 1: Download and install Wondershare Filmora. Download the desired Vimeo video on your computer. Launch Filmora and click on New Project.
Step 2: Drag and drop the downloaded video file into the Project Media folder on Filmora. Thereafter, bring the video file from Project Media folder into the timeline.
Step 3: Drag and drop the video clip into the timeline again. Make sure that there is no gap between the clips and they are on the same channel for looping. Alternative, you can copy and paste the video clip multiple times for looping.
Step 4: You can play the video and watch it in loop. Finally, click on the Export button to save the video in the desired file format.
Wondershare Filmora Best Video Looper Software for Social Media Video Creation.
Free Download Free Download Learn More
![]()
Conclusion
There are several ways to loop a video on Vimeo. The best way out is to go for Vimeo loop video directly from the web browser. We have also illustrated how to embed a Vimeo video in a loop into your website. If you want to have a looped Vimeo video in your video project, you can use Filmora on your computer.
Change Background Color in After Effects
Adobe After Effects is a powerful video editor. After Effects is particularly popular for its special effects that you can add to your videos and blow the mind of your audience. In any video, the background plays a major role in enhancing the overall frame and scene. If you are planning to change background color After Effects or add special effects, you must shoot your video with a solid color background.
During the post-production phase, you can change the background uniformly to any color scheme or special effect as per the requirement of the scene. Since the learning curve for After Effects is slightly steeper, you should know the exact steps to change After Effects background color. We will explain the process in simple steps and provide you with an alternative way to change background color.
Part 1. How to change video BG color in After Effects?
After Effects is widely used for professionals to add animations and special effects to videos during video editing phase. Starting from editing social media videos and YouTube videos to short films and even movies, After Effects finds its application in every field of video editing. Changing background color in After Effects is super simple even though other video editing techniques could be slightly complex for beginners. Here are the steps on how to change background color in After Effects.
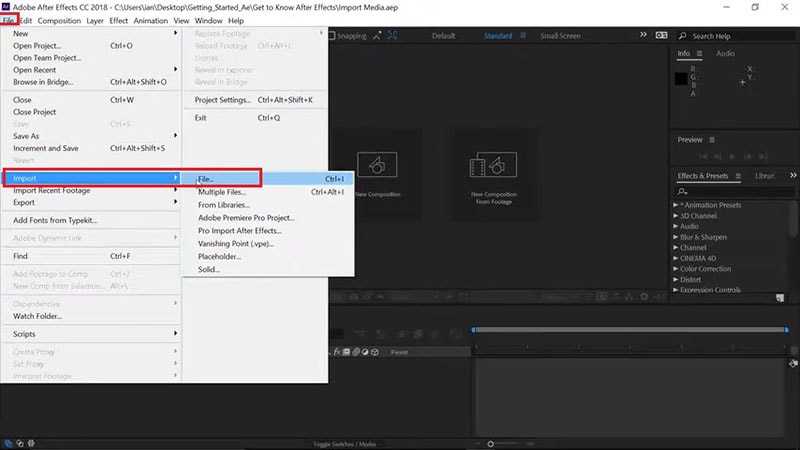
Step1 Open After Effects on your computer. Go to File> Import> File. Select the video file from your hard drive and it will appear under Project tab.
Step2 Drag and drop your video into Timeline. Select the video clip and right-click on Video Composition option located below Project tab.
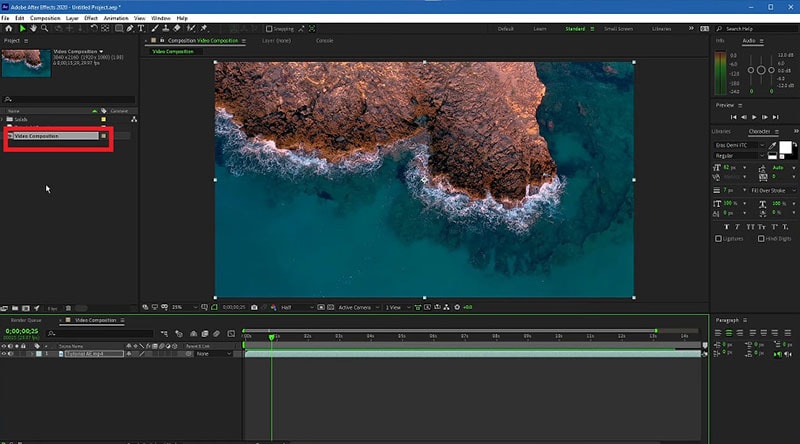
Step3 From the menu, click on Composition Settings option. You can also use Ctrl + K(Windows) or Command + K(Mac) key combination to open Composition Settings directly.

Step4 On Composition Settings window, go to Background Color and set the color as per your preference. You can also use a color picker as well to select any color from the video directly.
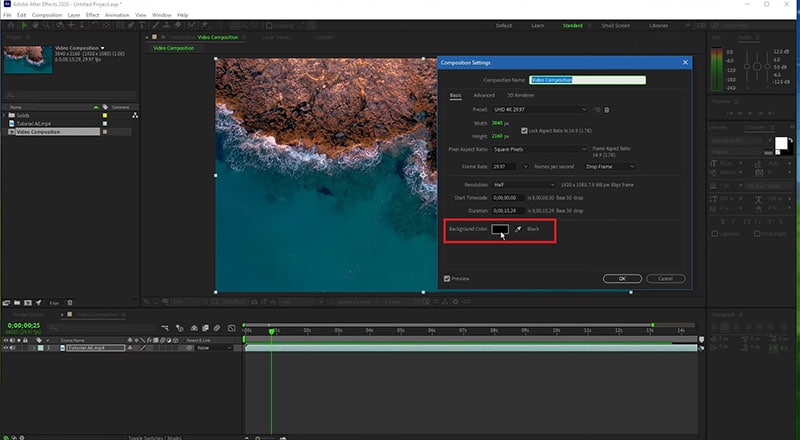
Step5 Click on Ok to set the new background color. Depending on the transparency of your video scene or the transition effect such as fade in and out, the background color will be more prominent.
Part 2. Alternative way to change background color
The best alternative to After Effects is Wondershare Filmora as Filmora has a wide range of special effects and animations. Filmora is a professional video editor where you can perform all basic as well as advanced video editing work. Most importantly, Filmora comes with an intuitive user interface so that even amateurs can use it easily.
There are several ways you can change background color in your video. For example, you can remove background color even when you do not have a solid color. If your video has a solid color, you can change background color to any color or graphical element using Chroma key. Here are the steps to change background color in Filmora .
Free Download For Win 7 or later(64-bit)
Free Download For macOS 10.14 or later
Step1 Download and install Filmora and it is available for Windows and Mac. Launch Filmora and click on New Project.

Step2 Import your video under Project Media folder and drag and drop into Timeline.
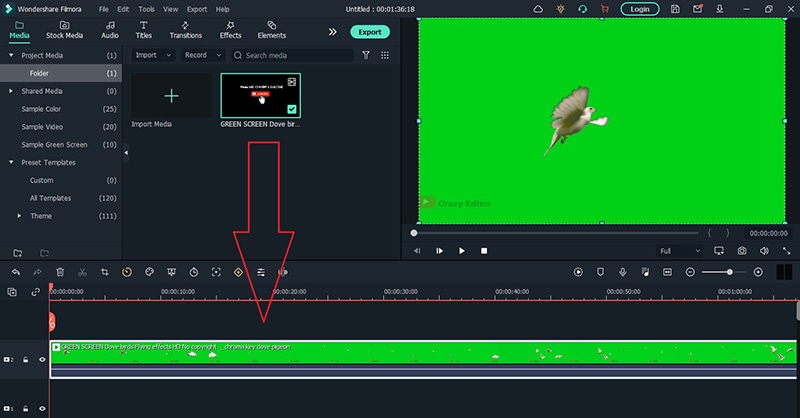
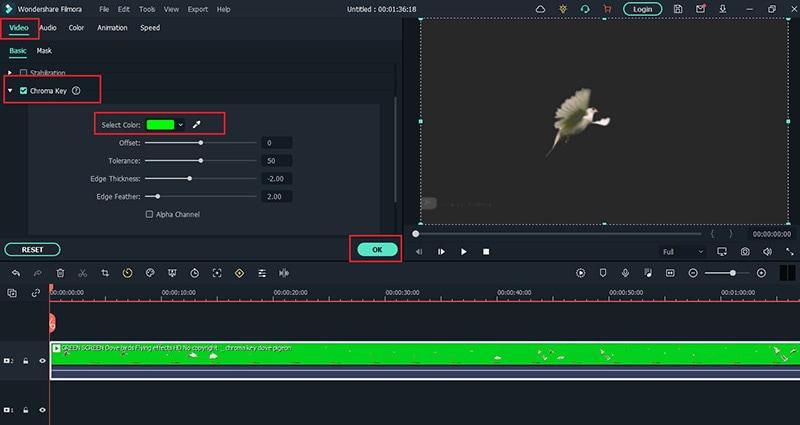
Step3 Double-click on the video clip and go to Video tab and turn on Chroma Key option. Select the solid color present in the background of the video and click on Ok button.
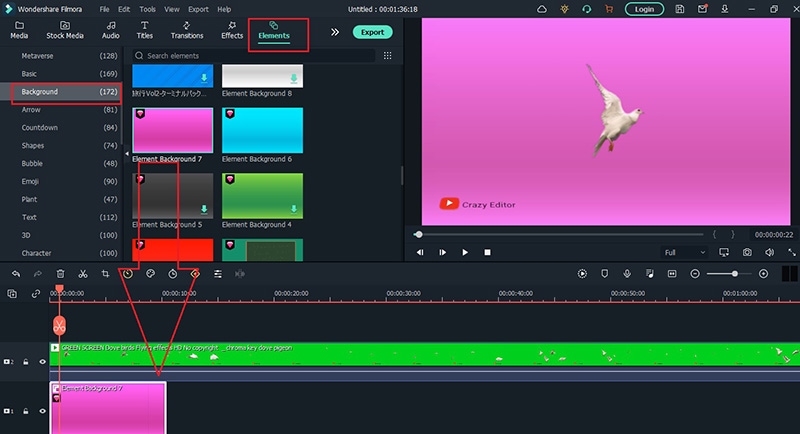
Step4 You will see the background color of the video disappear. Go to Elements> Background and drag and drop any background into Timeline. Make sure it is placed below the video clip and extend the duration of the background color as per your requirements.
Step5 Finally, play the video and click on Export button to save the video.
Part 3. FAQs about Video Background Colors
1. How do I remove background color in After Effects?
Import your video clip with a solid background color and place it on Timeline. Go to Effect menu> Keying> Keylight option. In Effects window and under Keylight, you will see Screen Colour option. Click on the eyedropper icon and select the background color you want to remove.
2. How do I change a solid background in After Effects?
The steps for After Effects how to change background color solid involve removing the background color and adding a layer of solid color to replace the transparency of the video. Go to Layer> New> Solid. Under Solid Settings window, go to Color and select the desired color from Color option and click on OK button. The new color will get reflected in the background of the video.
3. How do you add a white background in After Effects?
Go to Layer> New> Solid and add a white color solid first. However, this white color layer will not be visible unless you turn the background of your video transparent. Go to Effects & Presets and search for Luma Key and drop Luma Key on your video. Set Key type as Brighter and the threshold of the Lema key as per suitability on your video to see the white background appear.
Free Download For macOS 10.14 or later
Step1 Download and install Filmora and it is available for Windows and Mac. Launch Filmora and click on New Project.
Step2 Import your video under Project Media folder and drag and drop into Timeline.
Step3 Double-click on the video clip and go to Video tab and turn on Chroma Key option. Select the solid color present in the background of the video and click on Ok button.
Step4 You will see the background color of the video disappear. Go to Elements> Background and drag and drop any background into Timeline. Make sure it is placed below the video clip and extend the duration of the background color as per your requirements.
Step5 Finally, play the video and click on Export button to save the video.
Part 3. FAQs about Video Background Colors
1. How do I remove background color in After Effects?
Import your video clip with a solid background color and place it on Timeline. Go to Effect menu> Keying> Keylight option. In Effects window and under Keylight, you will see Screen Colour option. Click on the eyedropper icon and select the background color you want to remove.
2. How do I change a solid background in After Effects?
The steps for After Effects how to change background color solid involve removing the background color and adding a layer of solid color to replace the transparency of the video. Go to Layer> New> Solid. Under Solid Settings window, go to Color and select the desired color from Color option and click on OK button. The new color will get reflected in the background of the video.
3. How do you add a white background in After Effects?
Go to Layer> New> Solid and add a white color solid first. However, this white color layer will not be visible unless you turn the background of your video transparent. Go to Effects & Presets and search for Luma Key and drop Luma Key on your video. Set Key type as Brighter and the threshold of the Lema key as per suitability on your video to see the white background appear.
How to Add Subtitles to MKV Videos on All Platforms
Many people use MKV files as it’s an open-source format and does not require licenses. This file format functions as a multimedia file container that can help you in storing audio and video tracks. However, there are some key disadvantages of using MKV files, as this format is not supported by various platforms or devices. So, the most suitable video file formats that you can use are FLV and MP4. These two formats offer high-quality results and are supported by multiple platforms.
If you still want to use MKV files and want to add subtitles, this article can assist you. By reading this article, you can learn how to add subtitles to MKV with different methods.
Part 1: How to Add Subtitles to MKV on Windows?
Are you a Windows user and want to add subtitles to MKV? Read this section to find out compatible tools that can add subtitles to your MKV videos efficiently.
1. Wondershare Filmora
Free Download For Win 7 or later(64-bit)
Free Download For macOS 10.14 or later
Wondershare Filmora is a popular tool that provides you with multiple options to edit video files. If you are interested in adding subtitles to your MKV files, you can navigate to its “Speech-to-Text” feature. This feature automatically transcribes the voice used in the video into subtitles. It supports 16 different languages for creating subtitles through this feature.
This feature can also enhance your editing efficiency as you don’t have to write the subtitles on your own. Moreover, the STT feature utilizes advanced algorithms that help the tool create subtitles with high precision. Furthermore, you can also manually add the subtitles to your MKV file using this MKV subtitle editor.
Key Features
- Filmora offers various effects, such as a green screen that can help you to change your background dramatically.
- If you want to resize your videos efficiently, this tool provides the Auto Reframe feature.
- Filmora also offers various preset templates that can help you to craft captivating videos easily.
Step-by-Step Guide to Add Subtitles Using Filmora
Step1 Create a New Filmora Project
Download and install Filmora on your PC and click “Create Project.” Afterward, import the MKV video from your PC to this tool by clicking on the “Arrow” icon.

Step2 Go to Titles Tab
After importing the video, drag it to the timeline. Once done, click on the “Titles” section given on top. Afterward, click on “Subtitles” from the left section. Now you will be able to see different types of subtitles on your screen. Select your favorite style of subtitles and tap on its “Download” icon.

Step3 Choose the Preferred Subtitle Style
After that, tap on the “Plus” icon to add your selected subtitle style to the timeline. Double-click on the added subtitles, which will open the settings. You can manually add the subtitles on the “Input Text” box easily. Moreover, you can easily change the text font, color, opacity, and alignment.

Step4 Export and Save Video
Once you have created subtitles for your imported video, click the “Export” button on top. Using this option, you can save the video file to your device or share it on other platforms.

2. Cisdem Video Converter
Cisdem is an efficient tool that can be used by content creators for various purposes. Along with editing the videos, this tool can help you add subtitles to your video files in any format. It supports various formats for adding subtitles, such as MKV, MP4, AVI, etc. This tool also offers a built-in editor to modify the MKV videos flawlessly. Hence, it’s a basic tool that generates quality results instantly.
Key Features
- Cisdem can function as a video converter that supports more than 300 file formats. You can convert to and from MKV files using this platform easily.
- Through this software, you can professionally add watermarks to your MKV files. It provides various options to add a customized watermark to your desired video files.
- It offers a built-in media player that allows you to play and watch MKV files without interruption.
Steps to Add Subtitles to MKV Using Cisdem Video Converter
Step1 Launch the Cisdem tool on your system and navigate to its “Converter”. Afterward, import the MKV file instantly. Now tap on the “Pencil” icon given on top to open the editing window.

Step2 From the editing window, go to “Subtitle and Audio” and click on “No subtitles.” From the drop-down box, click on “Load Subtitles” to upload your SRT or ASS subtitle file from your system.

Step3 Now press the “Save” button to proceed. As the default output format in this tool is MP4, navigate to the “General Video” section to change it. From this option, select “MKV Video” as the output format. Afterward, hit the “Convert” button to embed the added subtitles easily.

3. VLC Media Player
The VLC Media Player is a commonly used platform that offers various functions. It can be easily accessed and shows compatibility with tons of platforms. It has a simple interface that allows you to operate it easily. Through this tool, you can also add subtitles to MKV proficiently. This MKV subtitle editor supports various caption formats such as VobSub, SubRip, SubViewer, etc.
Key Features
- While watching a video on the VLC media player, you can take instant snapshots of your favorite moments in high resolution.
- This tool offers a screen recorder through which you can capture your activities on a desktop. You can also choose the frame rate and output format for your screen recording.
- You can enhance your video files by adding effects from this tool. Along with applying attractive video effects, you can also change the brightness and hue of your video.
Step-by-Step Guide to Add Subtitles Using VLC
Step1 Open your VLC media player and click on the “Media” tab given on top. From there, tap on the “Convert/Save” option.

Step2 A new dialogue box will open regarding “Open Media.” Now you can instantly upload your MKV file on this tool. By staying on the same window, check the box saying, “Use a subtitle file.” Afterward, browse the SRT file from your computer.

Step3 Now tap on the “Convert/Save” arrowhead and choose the “Convert” option from the drop-down menu. A new window will open from where you have to tap on the “Wretch” icon. On the “Encapsulation” section, select “MKV.”

Step4 By going to the “Audio codec” and “Video codec” sections, check the box “keep original video or audio track.” Now go to the “Subtitle” section and enable the option of “Overlay subtitles on the video.” Once done, hit the “Create” button.

Part 2: How to Add Subtitles to MKV on Mac?
Are you looking for MKV subtitle editors that are compatible with Mac? In this section, you can learn how to add subtitles to MKV on your Mac devices easily.
1. HD Video Converter Deluxe
This tool is highly compatible with Mac users and provides tons of advanced features. Besides being a great video editor, this tool can help you add subtitles to your MKV video files. It supports popular subtitle formats such as ASS, SSA, and SRT. If you want to embed hardcode subtitles into your MKV files, this is the most compatible tool.
Key Features
- If you want to decrease the video file size without harming its high quality, you can use this platform. This tool offers a video compressor through which you can reduce file sizes effectively.
- To combine your various video chunks or clips, this software offers a reliable video merger.
- If you are facing audio problems in your video, this tool can permanently adjust the volume according to your preference.
Step-by-Step Guide to Add Subtitles Using HD Video Converter Deluxe
Step1 Start by launching HD Video Converter Deluxe on your MacBook. Afterward, tap on the “+Video” button to import your MKV file.

Step2 On the Output Profile window, choose “MKV” as your output format. Click on the “OK” button to proceed. Now navigate to the “Edit” tab and select “Subtitle.” From there, check “Enable Subtitle.” Also, check “Extra” and then click on the “Add” button. Now you can import the subtitle file to this tool.

Step3 Click the “Done” button and then hit the “RUN” button to embed the subtitles.

2. Wondershare UniConverter
UniConverter is one of the famous tools that many people prefer due to its high reliability. Among its various advanced features, you can use its “Subtitle Editor” to add subtitles to MKV videos. You can create subtitles manually in your preferred font. Moreover, it provides an auto generator to create subtitles by extracting audio from the video file. This feature supports more than 100 languages to offer more diversity.
Key Features
- The MKV subtitle editor of UniConverter is also capable of converting text into subtitle lines through its TXT to SRT feature.
- You can remove backgrounds from your video and add a new one with a few clicks. This can make your video more captivating.
- It offers a vocal remover that can separate instrumental sounds and vocals from an audio or video file easily.
Step-by-Step Guide to Use the Subtitle Editor of UniConverter
Step1 Run UniConverter on your PC and click on “Subtitle Editor” from its homepage. A new window will open in which you have to import the MKV video file.

Step2 You can click on the “Manual Subtitles” button to add your subtitles with respect to the time duration. Or, you can tap on ‘Import Subtitles’ to upload the subtitles file from your MacBook. Other options are also available such as Text to Subtitles and Auto Subtitles.

Step3 You can edit the added subtitles by going to the “Styles” section. Here, you can change the font, color, and style of your subtitles. Once done, click on the “Save” button.

Part 3: How to Add Subtitles to MKV Online?
If you want to use online platforms to merge subtitles with MKV, here are the top two online tools.
1. Veed
Veed is an easy-to-use online tool that allows you to edit your video clips with high accuracy. Through this online tool, you can add subtitles to your MKV files in 3 different ways. You can upload subtitle files in formats like VVT, TXT, SSA, SRT, and ASS. Otherwise, you can enter the subtitles manually by selecting their color, font, size, and time duration. Moreover, you can use its voice recognition software to auto-create subtitles instantly.
Key Features
- To make your video clips funny and engaging, this tool enables you to add various emojis and stickers to your video files.
- You can explain the content in your video by adding annotations such as text boxes using this tool.
- To remove unwanted objects from your video, you can use the crop feature of Veed.
Step-by-Step Guide to Add Subtitles Using Veed
Step1 Access the official website of Veed and click on “Add Subtitles To video” from its tools. Afterward, click the “Choose Files” button and import your MKV file.

Step2 Once done with uploading, click on “Upload Subtitle File.” You can upload any of its supported subtitle files. Also, choose the language from the given box.

Step3 After importing the subtitles, you can modify them by altering their text color, color effect, style, and alignment. Once done, hit the “Export” button.

2. Flixier
Do you want an interesting tool to create subtitles? Flixier is an efficient online tool that can edit your video and audio files. Without making a user account, you can use this tool to add subtitles to MKV video files. You can upload MKV files from different platforms, such as your device, Google Drive, Zoom, Dropbox, etc. This tool also provides different ways to flawlessly create subtitles for your video files.
Key Features
- The subtitle editor of this tool offers more than 1000 fonts. Thus, you can make your subtitles look stylish by choosing a preferred font.
- To edit your videos, this tool allows you to collaborate with your friends in real-time.
- It offers more than 50 transitions that you can apply to your videos easily.
Step-by-Step Guide to Add Subtitles Using Flixier
Step1 Visit the website of Flixier and click on “Add subtitles to your videos” from its tools. Afterward, tap on “Get Started” to proceed. The tool will ask you to upload your video file.

Step2 Once you have uploaded the MKV video, click on “Text” given on the left side. Afterward, tap “Add Subtitle” to create subtitles for your video. You can add text to the given space to create subtitles. You can also tap on the “Import Subtitle” button to upload the subtitle file. To change the properties of your subtitles, you can edit them from the provided options on your screen.

Step3 Once done with creating and adjusting subtitles, click on the “Export” button.

Conclusion
Subtitles are shown at the bottom of a video and help make the video content comprehensive. If you are dealing with MKV files and want to add subtitles in an instant way, this article has provided all the details. By reading this guide, you can learn how to add subtitles to MKV files on different platforms.
To attain the best results and utilize advanced features, we will highly recommend you use Wondershare Filmora. This tool creates a comfortable environment and gives an intuitive interface to create subtitles.
Part 1: How to Add Subtitles to MKV on Windows?
Are you a Windows user and want to add subtitles to MKV? Read this section to find out compatible tools that can add subtitles to your MKV videos efficiently.
1. Wondershare Filmora
Free Download For Win 7 or later(64-bit)
Free Download For macOS 10.14 or later
Wondershare Filmora is a popular tool that provides you with multiple options to edit video files. If you are interested in adding subtitles to your MKV files, you can navigate to its “Speech-to-Text” feature. This feature automatically transcribes the voice used in the video into subtitles. It supports 16 different languages for creating subtitles through this feature.
This feature can also enhance your editing efficiency as you don’t have to write the subtitles on your own. Moreover, the STT feature utilizes advanced algorithms that help the tool create subtitles with high precision. Furthermore, you can also manually add the subtitles to your MKV file using this MKV subtitle editor.
Key Features
- Filmora offers various effects, such as a green screen that can help you to change your background dramatically.
- If you want to resize your videos efficiently, this tool provides the Auto Reframe feature.
- Filmora also offers various preset templates that can help you to craft captivating videos easily.
Step-by-Step Guide to Add Subtitles Using Filmora
Step1 Create a New Filmora Project
Download and install Filmora on your PC and click “Create Project.” Afterward, import the MKV video from your PC to this tool by clicking on the “Arrow” icon.
Step2 Go to Titles Tab
After importing the video, drag it to the timeline. Once done, click on the “Titles” section given on top. Afterward, click on “Subtitles” from the left section. Now you will be able to see different types of subtitles on your screen. Select your favorite style of subtitles and tap on its “Download” icon.
Step3 Choose the Preferred Subtitle Style
After that, tap on the “Plus” icon to add your selected subtitle style to the timeline. Double-click on the added subtitles, which will open the settings. You can manually add the subtitles on the “Input Text” box easily. Moreover, you can easily change the text font, color, opacity, and alignment.
Step4 Export and Save Video
Once you have created subtitles for your imported video, click the “Export” button on top. Using this option, you can save the video file to your device or share it on other platforms.
2. Cisdem Video Converter
Cisdem is an efficient tool that can be used by content creators for various purposes. Along with editing the videos, this tool can help you add subtitles to your video files in any format. It supports various formats for adding subtitles, such as MKV, MP4, AVI, etc. This tool also offers a built-in editor to modify the MKV videos flawlessly. Hence, it’s a basic tool that generates quality results instantly.
Key Features
- Cisdem can function as a video converter that supports more than 300 file formats. You can convert to and from MKV files using this platform easily.
- Through this software, you can professionally add watermarks to your MKV files. It provides various options to add a customized watermark to your desired video files.
- It offers a built-in media player that allows you to play and watch MKV files without interruption.
Steps to Add Subtitles to MKV Using Cisdem Video Converter
Step1 Launch the Cisdem tool on your system and navigate to its “Converter”. Afterward, import the MKV file instantly. Now tap on the “Pencil” icon given on top to open the editing window.
Step2 From the editing window, go to “Subtitle and Audio” and click on “No subtitles.” From the drop-down box, click on “Load Subtitles” to upload your SRT or ASS subtitle file from your system.
Step3 Now press the “Save” button to proceed. As the default output format in this tool is MP4, navigate to the “General Video” section to change it. From this option, select “MKV Video” as the output format. Afterward, hit the “Convert” button to embed the added subtitles easily.
3. VLC Media Player
The VLC Media Player is a commonly used platform that offers various functions. It can be easily accessed and shows compatibility with tons of platforms. It has a simple interface that allows you to operate it easily. Through this tool, you can also add subtitles to MKV proficiently. This MKV subtitle editor supports various caption formats such as VobSub, SubRip, SubViewer, etc.
Key Features
- While watching a video on the VLC media player, you can take instant snapshots of your favorite moments in high resolution.
- This tool offers a screen recorder through which you can capture your activities on a desktop. You can also choose the frame rate and output format for your screen recording.
- You can enhance your video files by adding effects from this tool. Along with applying attractive video effects, you can also change the brightness and hue of your video.
Step-by-Step Guide to Add Subtitles Using VLC
Step1 Open your VLC media player and click on the “Media” tab given on top. From there, tap on the “Convert/Save” option.
Step2 A new dialogue box will open regarding “Open Media.” Now you can instantly upload your MKV file on this tool. By staying on the same window, check the box saying, “Use a subtitle file.” Afterward, browse the SRT file from your computer.
Step3 Now tap on the “Convert/Save” arrowhead and choose the “Convert” option from the drop-down menu. A new window will open from where you have to tap on the “Wretch” icon. On the “Encapsulation” section, select “MKV.”
Step4 By going to the “Audio codec” and “Video codec” sections, check the box “keep original video or audio track.” Now go to the “Subtitle” section and enable the option of “Overlay subtitles on the video.” Once done, hit the “Create” button.
Part 2: How to Add Subtitles to MKV on Mac?
Are you looking for MKV subtitle editors that are compatible with Mac? In this section, you can learn how to add subtitles to MKV on your Mac devices easily.
1. HD Video Converter Deluxe
This tool is highly compatible with Mac users and provides tons of advanced features. Besides being a great video editor, this tool can help you add subtitles to your MKV video files. It supports popular subtitle formats such as ASS, SSA, and SRT. If you want to embed hardcode subtitles into your MKV files, this is the most compatible tool.
Key Features
- If you want to decrease the video file size without harming its high quality, you can use this platform. This tool offers a video compressor through which you can reduce file sizes effectively.
- To combine your various video chunks or clips, this software offers a reliable video merger.
- If you are facing audio problems in your video, this tool can permanently adjust the volume according to your preference.
Step-by-Step Guide to Add Subtitles Using HD Video Converter Deluxe
Step1 Start by launching HD Video Converter Deluxe on your MacBook. Afterward, tap on the “+Video” button to import your MKV file.
Step2 On the Output Profile window, choose “MKV” as your output format. Click on the “OK” button to proceed. Now navigate to the “Edit” tab and select “Subtitle.” From there, check “Enable Subtitle.” Also, check “Extra” and then click on the “Add” button. Now you can import the subtitle file to this tool.
Step3 Click the “Done” button and then hit the “RUN” button to embed the subtitles.
2. Wondershare UniConverter
UniConverter is one of the famous tools that many people prefer due to its high reliability. Among its various advanced features, you can use its “Subtitle Editor” to add subtitles to MKV videos. You can create subtitles manually in your preferred font. Moreover, it provides an auto generator to create subtitles by extracting audio from the video file. This feature supports more than 100 languages to offer more diversity.
Key Features
- The MKV subtitle editor of UniConverter is also capable of converting text into subtitle lines through its TXT to SRT feature.
- You can remove backgrounds from your video and add a new one with a few clicks. This can make your video more captivating.
- It offers a vocal remover that can separate instrumental sounds and vocals from an audio or video file easily.
Step-by-Step Guide to Use the Subtitle Editor of UniConverter
Step1 Run UniConverter on your PC and click on “Subtitle Editor” from its homepage. A new window will open in which you have to import the MKV video file.
Step2 You can click on the “Manual Subtitles” button to add your subtitles with respect to the time duration. Or, you can tap on ‘Import Subtitles’ to upload the subtitles file from your MacBook. Other options are also available such as Text to Subtitles and Auto Subtitles.
Step3 You can edit the added subtitles by going to the “Styles” section. Here, you can change the font, color, and style of your subtitles. Once done, click on the “Save” button.
Part 3: How to Add Subtitles to MKV Online?
If you want to use online platforms to merge subtitles with MKV, here are the top two online tools.
1. Veed
Veed is an easy-to-use online tool that allows you to edit your video clips with high accuracy. Through this online tool, you can add subtitles to your MKV files in 3 different ways. You can upload subtitle files in formats like VVT, TXT, SSA, SRT, and ASS. Otherwise, you can enter the subtitles manually by selecting their color, font, size, and time duration. Moreover, you can use its voice recognition software to auto-create subtitles instantly.
Key Features
- To make your video clips funny and engaging, this tool enables you to add various emojis and stickers to your video files.
- You can explain the content in your video by adding annotations such as text boxes using this tool.
- To remove unwanted objects from your video, you can use the crop feature of Veed.
Step-by-Step Guide to Add Subtitles Using Veed
Step1 Access the official website of Veed and click on “Add Subtitles To video” from its tools. Afterward, click the “Choose Files” button and import your MKV file.
Step2 Once done with uploading, click on “Upload Subtitle File.” You can upload any of its supported subtitle files. Also, choose the language from the given box.
Step3 After importing the subtitles, you can modify them by altering their text color, color effect, style, and alignment. Once done, hit the “Export” button.
2. Flixier
Do you want an interesting tool to create subtitles? Flixier is an efficient online tool that can edit your video and audio files. Without making a user account, you can use this tool to add subtitles to MKV video files. You can upload MKV files from different platforms, such as your device, Google Drive, Zoom, Dropbox, etc. This tool also provides different ways to flawlessly create subtitles for your video files.
Key Features
- The subtitle editor of this tool offers more than 1000 fonts. Thus, you can make your subtitles look stylish by choosing a preferred font.
- To edit your videos, this tool allows you to collaborate with your friends in real-time.
- It offers more than 50 transitions that you can apply to your videos easily.
Step-by-Step Guide to Add Subtitles Using Flixier
Step1 Visit the website of Flixier and click on “Add subtitles to your videos” from its tools. Afterward, tap on “Get Started” to proceed. The tool will ask you to upload your video file.
Step2 Once you have uploaded the MKV video, click on “Text” given on the left side. Afterward, tap “Add Subtitle” to create subtitles for your video. You can add text to the given space to create subtitles. You can also tap on the “Import Subtitle” button to upload the subtitle file. To change the properties of your subtitles, you can edit them from the provided options on your screen.
Step3 Once done with creating and adjusting subtitles, click on the “Export” button.
Conclusion
Subtitles are shown at the bottom of a video and help make the video content comprehensive. If you are dealing with MKV files and want to add subtitles in an instant way, this article has provided all the details. By reading this guide, you can learn how to add subtitles to MKV files on different platforms.
To attain the best results and utilize advanced features, we will highly recommend you use Wondershare Filmora. This tool creates a comfortable environment and gives an intuitive interface to create subtitles.
Do You Want to Use a Video Editor for Your iOS Device? This Article Introduces LumaFusion, a Perfect Multi-Track Video Editor Designed to Cater to Your Needs
LumaFusion makes itself known as a multi-track video editor available for iOS users. While it presents other compatible versions, it provides some of the most professional video editing and enhancement features that make editing proficient on mobile devices. Its easy-to-use interface, combined with advanced functions of editing videos, adding audio, and adjusting speed, gives a perfect non-linear editing experience.
Pros
- Manageable and Proficient user interface
- Image stabilization is available to enhance performance
- Can add third-party plugins for video enhancement
- Trim unused media before exporting the video
- Videos can be exported directly to Final Cut Pro
Cons
- The user has to pay for the app to download
- Audio synchronization issues in large videos
- You can only add up to 6 audio/video tracks to the timeline
Part 1: What is LumaFusion?
LumaFusion is a multi-track video editing mobile application providing a professional video editing experience on portable devices. It gives uses a platform to create the perfect storyline and environments for bringing out the perfect features of the story that is held by the video. So, while you get a platform with interactive features and tools to work with, video editing simultaneously gets extensive and simple.
People who are not having the time to bring in a professional video editor to work on a task can look forward to this progressive tool designed for portable video editing. While you do not confuse it with a basic video editor, you can find tools that can help you adjust parameters such as the aspect ratio.

Download LumaFusion: Android | iOS
You can download this proficient video editor for your iPhone and iPad. It can also be enjoyed on Mac devices, which are now available on Android devices. LumaFusion has scaled its support and compatibility of devices over time.
Pricing Plan
If you intend to use the LumaFusion app to inject creativity into your videos, you must have to pay a single-time price of $19.99 to get access to the application. Apart from that, there are several in-app purchases that you can look forward to for increasing the hold on different tools and features, as per the requirement.
System Requirements of LumaFusion iOS
| iPhone | Requires iOS 15.4 or later. |
|---|---|
| iPad | Requires iPadOS 15.4 or later. |
| iPod Touch | Requires iOS 15.4 or later. |
| Mac | Requires macOS 12.3 or later and a Mac with Apple M1 chip or later. |
| Size | 192.9 MB |
Part 2: Key Features of LumaFusion Video Editor
We will now highlight some essential features that can be considered about the LumaFusion video editor. These features will give a better understanding of the tool and provide a guideline on how to utilize the best functions with ease:
1. Interface
When understanding the interface of the LumaFusion app on iOS, many would think the application won’t provide extensive tools to work with. This video editor does not come with a bland user interface but provides some great functions and features on an interface that allows you to create professional-level videos.
With the option of adding titles, transitions, color grading, and effects, LumaFusion is a complete video editor that provides features that are not commonly observed in many desktop-based video editors. Regardless, it presents an efficient workspace that has managed all the functions properly in rows and different sections.

2. Video’s Layers
Creating proper movies on your iOS device is not difficult with LumaFusion. With the option of including six layers of video in the timeline, a lot can be done with them for improvising different sequences and multiple effects. Its picture-in-picture presets, layered transitions, graphic equalizer, and the use of additional plugins allow you to create complete videos with proper control.
Talking about some renowned iOS video editors in the market, you will find LumaFusion a much better option. iMovie, the dedicated video editor for iOS devices, can only embed two layers of videos in the timeline. This clearly explains why LumaFusion is a much better option with its video layers.

3. Powerful Keyframe
The keyframes function on LumaFusion is not challenging to work with on the video editor. You can ecstatically create animating effects with the help of the keyframe sounds within the application. These effects, once created, can be saved and used on other videos within the platform. To improve your effects on the mobile video editor, you can use the powerful keyframe feature of LumaFusion to create the best results.
With a small price to pay for the video editor, you can gain access to a diversity of keyframes that can help you design the perfect effects for your video.

4. Export to Final Cut Pro
Another impressive and touching feature this video editor provides to its users is its integration with Final Cut Pro - a proficient desktop video editor offered on macOS. You can easily export your created video to Final Cut Pro as an FCPXML.zip file directly after paying a one-time price. Users who are having a rough time editing the file on LumaFusion can easily shift to Final Cut Pro.
This process has disadvantages, regardless of the extensive control and accessibility provided between the applications. If you seek to use Final Cut Pro after editing a video on the LumaFusion app, you will have to add all the assets on FCP when you shift the file onto the platform.
Also, you might have to include many effects such as LUTs, Chroma key, and other relevant features. With this effort, you can easily put your video from LumaFusion to Final Cut Pro.
Part 3: Advantages and Disadvantages of LumaFusion Video Editor
Suppose you are considering using the LumaFusion video editor on your iOS device. In that case, there are a few advantages and disadvantages you must look into to understand more about the tool and get to an absolute decision:
Pros
- You can add third-party plugins to your video editor to enhance the video editing features. This allows you to put better effects, transitions, and enhancement elements in your video.
- It can create smooth slow-motion videos with 120fps and 240fps results.
- Multi-layer titles can be created within the platform and used in further actions.
- The display of the edited video can be previewed across an external monitor.
- It provides stability in video editing by using color tags within frame rates up to 18fps.
Cons
- For large video files, you might face lagging issues and audio synchronization within videos.
- To access the complete library of music and clips, you will have to subscribe to their additional plans.
- The tool is already available at a price tag, which is associated with more subscription plans, making it a devalued option.
Part 4: What’s New in LumaFusion 3.2 Version
The latest iteration of the LumaFusion app brings new and exciting features to the market. To learn more about these features, you will know better how the video editor is improving its operations:
1. 35+ New Transitions
LumaFusion 3.2 comes with a new set of transitions, with almost 35 in number. With different blur transitions, there are some new introductions in the transition section that offers multiple motions.

2. iCloud Backups
If you are confused about how to sustain the storage space on your iOS device, LumaFusion now provides iCloud Drive support and allows the user to back up their data. The data from the iCloud Drive can also be restored directly from the platform.

3. Rename Linked Folders
In the previous versions of LumaFusion, you could not rename the linked folders, or the platform incorrectly named them. With this update, you can now easily rename the linked folders by selecting and holding them within the interface.

4. Localizations for 2 New Versions
Traditional Chinese and Brazilian Portuguese are now among the added localizations in the video editor. The wide range of language support is helping this application set up a new precedent in the market for other mobile video editors.
Part 5: Best Alternative to LumaFusion Video Editor for iOS
LumaFusion video editor is a great option, but its drawbacks restrict it to some extent. To answer this, Wondershare Filmora provides a better option for video editing, offering compatibility on Windows and all other platforms supported by the LumaFusion video editing application. To know more about how good Filmora is, look ahead.
Wondershare Filmora is a complete, easy-to-use video editor providing many features and creativity options. For example, you can find the perfect set of effects and transitions on the platform by supporting a diversity of filters and text overlays. With other options, such as PIP mode and video beautification, Wondershare Filmora supports many file formats for video editing.
Free Download For Win 7 or later(64-bit)
Free Download For macOS 10.14 or later

Conclusion
This article has provided a prominent overview of the LumaFusion review, a video editor that has made video editing operations easier on smartphones. While it is a great iOS video editor, you can find other prominent functions with extensive layered support, intuitive keyframes, and consolidated connectivity to other platforms. As a better option, this article has offered Wondershare Filmora as a more potent tool with better compatibility and inexpensive features.
People Also Want to Know
1. How to download LumaFusion on Windows?
LumaFusion is unavailable on the Windows platform, where you can only find it on Mac, iOS, and Android. As an alternative to this video editor, you can try using Wondershare Filmora.
2. Can LumaFusion edit 4K?
You can easily edit, manage, and export 4K videos within the platform. LumaFusion provides extensive support for managing a broad range of video resolutions.
Part 1: What is LumaFusion?
LumaFusion is a multi-track video editing mobile application providing a professional video editing experience on portable devices. It gives uses a platform to create the perfect storyline and environments for bringing out the perfect features of the story that is held by the video. So, while you get a platform with interactive features and tools to work with, video editing simultaneously gets extensive and simple.
People who are not having the time to bring in a professional video editor to work on a task can look forward to this progressive tool designed for portable video editing. While you do not confuse it with a basic video editor, you can find tools that can help you adjust parameters such as the aspect ratio.
Download LumaFusion: Android | iOS
You can download this proficient video editor for your iPhone and iPad. It can also be enjoyed on Mac devices, which are now available on Android devices. LumaFusion has scaled its support and compatibility of devices over time.
Pricing Plan
If you intend to use the LumaFusion app to inject creativity into your videos, you must have to pay a single-time price of $19.99 to get access to the application. Apart from that, there are several in-app purchases that you can look forward to for increasing the hold on different tools and features, as per the requirement.
System Requirements of LumaFusion iOS
| iPhone | Requires iOS 15.4 or later. |
|---|---|
| iPad | Requires iPadOS 15.4 or later. |
| iPod Touch | Requires iOS 15.4 or later. |
| Mac | Requires macOS 12.3 or later and a Mac with Apple M1 chip or later. |
| Size | 192.9 MB |
Part 2: Key Features of LumaFusion Video Editor
We will now highlight some essential features that can be considered about the LumaFusion video editor. These features will give a better understanding of the tool and provide a guideline on how to utilize the best functions with ease:
1. Interface
When understanding the interface of the LumaFusion app on iOS, many would think the application won’t provide extensive tools to work with. This video editor does not come with a bland user interface but provides some great functions and features on an interface that allows you to create professional-level videos.
With the option of adding titles, transitions, color grading, and effects, LumaFusion is a complete video editor that provides features that are not commonly observed in many desktop-based video editors. Regardless, it presents an efficient workspace that has managed all the functions properly in rows and different sections.
2. Video’s Layers
Creating proper movies on your iOS device is not difficult with LumaFusion. With the option of including six layers of video in the timeline, a lot can be done with them for improvising different sequences and multiple effects. Its picture-in-picture presets, layered transitions, graphic equalizer, and the use of additional plugins allow you to create complete videos with proper control.
Talking about some renowned iOS video editors in the market, you will find LumaFusion a much better option. iMovie, the dedicated video editor for iOS devices, can only embed two layers of videos in the timeline. This clearly explains why LumaFusion is a much better option with its video layers.
3. Powerful Keyframe
The keyframes function on LumaFusion is not challenging to work with on the video editor. You can ecstatically create animating effects with the help of the keyframe sounds within the application. These effects, once created, can be saved and used on other videos within the platform. To improve your effects on the mobile video editor, you can use the powerful keyframe feature of LumaFusion to create the best results.
With a small price to pay for the video editor, you can gain access to a diversity of keyframes that can help you design the perfect effects for your video.
4. Export to Final Cut Pro
Another impressive and touching feature this video editor provides to its users is its integration with Final Cut Pro - a proficient desktop video editor offered on macOS. You can easily export your created video to Final Cut Pro as an FCPXML.zip file directly after paying a one-time price. Users who are having a rough time editing the file on LumaFusion can easily shift to Final Cut Pro.
This process has disadvantages, regardless of the extensive control and accessibility provided between the applications. If you seek to use Final Cut Pro after editing a video on the LumaFusion app, you will have to add all the assets on FCP when you shift the file onto the platform.
Also, you might have to include many effects such as LUTs, Chroma key, and other relevant features. With this effort, you can easily put your video from LumaFusion to Final Cut Pro.
Part 3: Advantages and Disadvantages of LumaFusion Video Editor
Suppose you are considering using the LumaFusion video editor on your iOS device. In that case, there are a few advantages and disadvantages you must look into to understand more about the tool and get to an absolute decision:
Pros
- You can add third-party plugins to your video editor to enhance the video editing features. This allows you to put better effects, transitions, and enhancement elements in your video.
- It can create smooth slow-motion videos with 120fps and 240fps results.
- Multi-layer titles can be created within the platform and used in further actions.
- The display of the edited video can be previewed across an external monitor.
- It provides stability in video editing by using color tags within frame rates up to 18fps.
Cons
- For large video files, you might face lagging issues and audio synchronization within videos.
- To access the complete library of music and clips, you will have to subscribe to their additional plans.
- The tool is already available at a price tag, which is associated with more subscription plans, making it a devalued option.
Part 4: What’s New in LumaFusion 3.2 Version
The latest iteration of the LumaFusion app brings new and exciting features to the market. To learn more about these features, you will know better how the video editor is improving its operations:
1. 35+ New Transitions
LumaFusion 3.2 comes with a new set of transitions, with almost 35 in number. With different blur transitions, there are some new introductions in the transition section that offers multiple motions.
2. iCloud Backups
If you are confused about how to sustain the storage space on your iOS device, LumaFusion now provides iCloud Drive support and allows the user to back up their data. The data from the iCloud Drive can also be restored directly from the platform.
3. Rename Linked Folders
In the previous versions of LumaFusion, you could not rename the linked folders, or the platform incorrectly named them. With this update, you can now easily rename the linked folders by selecting and holding them within the interface.
4. Localizations for 2 New Versions
Traditional Chinese and Brazilian Portuguese are now among the added localizations in the video editor. The wide range of language support is helping this application set up a new precedent in the market for other mobile video editors.
Part 5: Best Alternative to LumaFusion Video Editor for iOS
LumaFusion video editor is a great option, but its drawbacks restrict it to some extent. To answer this, Wondershare Filmora provides a better option for video editing, offering compatibility on Windows and all other platforms supported by the LumaFusion video editing application. To know more about how good Filmora is, look ahead.
Wondershare Filmora is a complete, easy-to-use video editor providing many features and creativity options. For example, you can find the perfect set of effects and transitions on the platform by supporting a diversity of filters and text overlays. With other options, such as PIP mode and video beautification, Wondershare Filmora supports many file formats for video editing.
Free Download For Win 7 or later(64-bit)
Free Download For macOS 10.14 or later
Conclusion
This article has provided a prominent overview of the LumaFusion review, a video editor that has made video editing operations easier on smartphones. While it is a great iOS video editor, you can find other prominent functions with extensive layered support, intuitive keyframes, and consolidated connectivity to other platforms. As a better option, this article has offered Wondershare Filmora as a more potent tool with better compatibility and inexpensive features.
People Also Want to Know
1. How to download LumaFusion on Windows?
LumaFusion is unavailable on the Windows platform, where you can only find it on Mac, iOS, and Android. As an alternative to this video editor, you can try using Wondershare Filmora.
2. Can LumaFusion edit 4K?
You can easily edit, manage, and export 4K videos within the platform. LumaFusion provides extensive support for managing a broad range of video resolutions.
Also read:
- Updated 2024 Approved How to Create Discord Emoji GIF
- New How to Make Double Exposure Effect in Filmora
- 2024 Approved The Ultimate Guide for the 10 Leading Slow-Motion Cameras
- Updated In 2024, How to Color-Correct an S-Log Footage
- New 10 Best Meme Text to Speech Tools Windows, Mac, Android, iPhone&Online
- How to Add Effects in Premiere Pro for 2024
- Updated 2024 Approved How to Put Emoji on Mac That Take Less Than 10 Mins
- Updated How to Crop a Video in Davinci Resolve Step by Step for 2024
- 2024 Approved How to Create Intro Video with KineMaster
- New How to Add Zoom Blur Effect In Photoshop
- How to Set Up Twitch Green Screen
- Updated How To Track and Blur Faces in Premiere Pro
- In 2024, How to Create Freeze Frame Clone Effect
- 2024 Approved 2 Practical Ways to Combine Videos on TikTok
- What Are the Best 15 Slideshow Presentation Examples Your Audience Will Love for 2024
- Do You Want to Remove the Unnecessary Scene From Your TikTok Video? This Article Will Help You to Adjust the Length of TikTok Clip by Providing Easy Methods
- Updated Here We Will Investigate AI-Based Video Interview, How It Is Being Used, and How to Master an Artificial Intelligence Video Interview Act
- Updated Mix and Match The Ultimate List of 8 Video and Photo Merging Tools
- 2024 Approved How to Rotate Video in iMovie with Alternative
- Updated 2024 Approved Best Photo Video Maker Apps with Song PC, Mobile, Online
- Updated 2024 Approved An Ultimate Guide To Edit a Music Video Aspect Ratio and First Cut
- 2024 Approved Top 10 Online And PC Cartoon Video Maker 2022 For Beginner
- 2024 Approved Troubleshoot Snapchat Camera Zoomed in Issue 4 Tips
- New 2024 Approved HOW to Add Fade to Black on Premiere Pro
- 2024 Approved How to Brighten a Video in Windows 10 | Step-By-Step Guide
- New 2024 Approved Clone Yourself in Videos with Filmora
- Top 10 TEXT TO SPEECH VIDEO MAKERS for 2024
- Updated In 2024, How to Create a Video Slideshow in iMovie
- 2024 Approved Step-by-Step Guide to Storyboard
- Updated In 2024, How to Do Motion Graphics in Filmora
- In 2024, 15 Best Vloggers That You Should Follow for Travel
- New In 2024, Best Audio Plug-Ins For Video Editors
- New The Power of Music in Videos for 2024
- 2024 Approved This Article Will Reveal the Secrets of Choosing a Location to Shoot Your Viral Music Video. As Well as Tips to Make an Energetic Schedule for Shooting Days
- 2024 Approved If You Want to Make an Intro Video, Then Adobe After Effects Will Be a Great Choice. This Article Will Show the Steps to Create an Intro Video with After Effects by Your Own
- Try These 10 Music Video Templates To Make Your Work Easy
- Review Video Is a Common Type Video and the First Impression Review Is Also Included. This Article Will Show You What Is First Impression Review Video and How to Create One by Yourself
- New Clearly, the Efectum App Download without a Watermark Option Is on Android Phones. Thus, Read This Review on the Efectum App and Find Replacements for Good
- New 2024 Approved VSDC Free Video Editor Review
- 2024 Approved Guide to Create a Timelapse Video in After Effects
- Updated 5 Tips for Aquasoft Slideshow for 2024
- In 2024, How to Make Hand Shake Effect with Final Cut Pro
- In 2024, 9 Best Sparkle Effects Photo and Video Editors You Should Know
- How to retrieve erased messages from Infinix Note 30 5G
- In 2024, The Ultimate Guide How to Bypass Swipe Screen to Unlock on Vivo Y55s 5G (2023) Device
- How to Change Location on TikTok to See More Content On your Apple iPhone 11 | Dr.fone
- How to Use Pokémon Emerald Master Ball Cheat On Apple iPhone 12 Pro Max | Dr.fone
- Easy steps to recover deleted call history from K11x
- In 2024, Complete Tutorial to Use GPS Joystick to Fake GPS Location On OnePlus Nord CE 3 5G | Dr.fone
- How To Restore a Bricked Vivo X Fold 2 Back to Operation | Dr.fone
- In 2024, Forgot Locked Apple iPhone 8 Plus Password? Learn the Best Methods To Unlock
- In 2024, How To Use Allshare Cast To Turn On Screen Mirroring On Tecno Pop 8 | Dr.fone
- How To Transfer Data From Apple iPhone 15 To Others ios devices? | Dr.fone
- Possible solutions to restore deleted messages from Vivo Y27 4G
- Is Your Apple iPhone SE (2020) in Security Lockout? Proper Ways To Unlock
- How to Mirror Your Xiaomi Redmi K70E Screen to PC with Chromecast | Dr.fone
- How To Transfer WhatsApp From Apple iPhone 14 Pro Max to other iPhone 14 Pro Max devices? | Dr.fone
- Bypassing Google Account With vnROM Bypass For Honor 80 Pro Straight Screen Edition
- How PGSharp Save You from Ban While Spoofing Pokemon Go On Motorola Moto G24? | Dr.fone
- In 2024, The Most Useful Tips for Pokemon Go Ultra League On Apple iPhone 11 | Dr.fone
- In 2024, How to Fix when Apple Account Locked On iPhone XR?
- How to Unlock locked iPhone 15 by restoring it to factory settings
- 3 Facts You Need to Know about Screen Mirroring Nokia 130 Music | Dr.fone
- In 2024, 5 Ways to Track Samsung Galaxy Z Fold 5 without App | Dr.fone
- How To Unlock Apple iPhone XR Official Method to Unlock Your Apple iPhone XR
- 2024 Approved Top 5 AI-Powered Script to Video Makers
- How to Transfer Videos from Nokia G22 to iPad | Dr.fone
- Two Ways to Track My Boyfriends Lenovo ThinkPhone without Him Knowing | Dr.fone
- All About Apple iPhone XS Unlock Chip You Need to Know
- In 2024, 5 Quick Methods to Bypass Google Pixel 8 Pro FRP
- In 2024, Everything You Need To Know About Unlocked iPhone 15 Plus
- How to Fix Life360 Shows Wrong Location On Realme 11 Pro? | Dr.fone
- Why does the pokemon go battle league not available On Apple iPhone XR | Dr.fone
- In 2024, Did Your Apple iPhone SE (2020) Passcode Change Itself? Unlock It Now
- Does Apple iPhone 13 Pro Max Have Find My Friends? | Dr.fone
- In 2024, 3 Things You Must Know about Fake Snapchat Location On Honor X9b | Dr.fone
- How to Fix Error 495 While Download/Updating Android Apps On Honor Play 7T | Dr.fone
- In 2024, iPhone 15 Plus Asking for Passcode after iOS 17/14 Update, What to Do?
- Reliable User Guide to Fix Poco C55 Running Slow and Freezing | Dr.fone
- In 2024, Ultimate Guide to Catch the Regional-Located Pokemon For Samsung Galaxy S21 FE 5G (2023) | Dr.fone
- Title: New 4 Ways to Loop a Video on Vimeo for 2024
- Author: Chloe
- Created at : 2024-04-24 07:08:27
- Updated at : 2024-04-25 07:08:27
- Link: https://ai-editing-video.techidaily.com/new-4-ways-to-loop-a-video-on-vimeo-for-2024/
- License: This work is licensed under CC BY-NC-SA 4.0.
