
New A Comprehensive Guide on Converting Slo-Mo Videos to Normal Speed Videos On iPhone for 2024
A Comprehensive Guide on Converting Slo-Mo Videos to Normal Speed Videos On iPhone
Thanks to the eccentric and offbeat elements, slow-motion videos have become the super-fun, state-of-the-art trend. Whether you’re in the bar trying to click the aesthetic, cinematic video or capture cool, unique, and enticing birthday moments, you can always rely on the slow-mo feature.

But do you ever feel like converting the slow-motion video in your iOS device to a normal video? Perhaps you thought the slow-mo video would be more attractive, but it’s not, or maybe you want to determine how to remove slow-motion from a video iPhone.
No matter the reason, there are numerous ways to remove slow motion from iPhone video. In this article, you’ll learn the various methods to convert slow-motion video into a regular video on your iPhone or iPad. Also, learn the steps involved in achieving it.
So, let’s start.
How To Convert Slow Motion Video to Normal on iPhone and iPad
Due to the slow-motion and Time-lapse modes that are built into the iPhone, people may quickly record slo-mo and time-lapse clips using their iOS smartphone cameras.
Access the iPhone camera, select Slo-mo, press the Record icon once to begin filming, and then press it once more to stop. This will create a slo-mo video.
Do you ever wish to get your video’s slow motion removed? How to convert slow-motion video to normal on an iPhone? Well, here’s your answer.
Method 1. Using the Photos App
The Photos app is an in-built app for iPhone and iPad that features editing capabilities like rotation, resizing, and auto-enhancement, in addition to helping you manage videos and images.

You may quickly and effortlessly turn a slow-mo video into a regular-speed one with the Photos app’s tucked-away slow-motion converter feature. Additionally, there won’t be any quality loss in your video.
And here are the steps on how to remove slow-mo from iPhone video using the Photos app on an iPad or iPhone to turn it to normal speed.
Step1: Take your iPad or iPhone, navigate to the Photos app, open it, and then go to the bottom to hit the Albums tab.
Step2: Choose the Slo-mo option, and subsequently select the video you wish to turn into a regular speed video. Go to the top right corner of the screen and hit the Edit button.

Step3: If you look under the timeline, you’ll find vertical lines. Here, the area with apart spaces signifies slow motion.

Step4: To learn how to remove slow mo from iPhone video is to learn how to turn it into regular speed. To do so, select the slow-motion bar and drag it towards the other one to position the lines at a close distance.
Step5: When finished, hit the Done button and save this video. However, if you think this change was unnecessary or incorrect, you can discard it by clicking on Edit → Revert → Revert To Original.

Editing Tip
- The Photos app on iPhone doesn’t allow you to convert any video shot at 24fps or 30fps to slow motion.
- You cannot reduce or decrease the overall size of the video after conversion.
Pros & Cons
Pros
- It is a built-in app on every iOS device.
- Saves the hassle of downloading any third-party app.
- No charges are applicable for using this app.
- Excellent slow-mo video convertor.
Cons
- Limited speed adjustment for the conversion of slow-mo videos into regular videos.
Method 2: Using Other Converter Apps
You may think that converting slow-mo video to a regular speed video on your iPad or iPhone is convenient, but there’s a drawback too. The method mentioned above can only help you with minimalistic speed changes, which may not give you the desired result.
However, other converter apps also help you change slow-mo video to regular iPhone video. These apps work seamlessly on your PC or Mac to turn your slow-mo videos on the iPhone or Mac to normal-speed video using customized and high-resolution settings.
Overview of The Apps
| Particulars | iMovie | Slow-Fast Motion Video Editor |
|---|---|---|
| Type (versatile or specialized) | Versatile | Specialized |
| Supported OS | iOS, Mac | iOS, Mac |
| Average Rating | 3.9/5 | 4.7/5 |
| Price | Free | Free |
| Best for | Video editing with cinematic effects | Slo-mo video conversion |
1) iMovie

iMovie is an excellent option if you’re looking for an application to modify a video with additional tools and convert the slow-mo to a regular pace. Among the top video converters for the iPhone is iMovie.
It offers a wide range of tools and capabilities that allow you to change the video transition, audio, and speed, add music, animated text, video overlay effects, normal video effects, and more. Additionally, it aids users in producing stunning films and commercials in a Cinematic manner.
iMovie could convert slow-mo footage to normal speed, in case you didn’t know. Did you ever attempt to change slow mot to regular speed in iMovie? With the use of iMovie, how can slow-motion video be made normally on an iPhone?
Here are the instructions.
Step1: Open the iMovie app, click on the ‘Create Project’ option, → tap on ‘Movie → Media → Video.

Step2: Tap on the slow-mo option, select the slow-motion video you want to convert and hit the ‘Create Movie’ option.

Step3: Get to know the editing options by clicking on the timeline. Then, click on the clock (speed) icon. At the beginning of the lines, you’ll find a turtle. It demonstrates slow motion. Plus, the number right behind the rabbit at the end signifies the speed.

Step4: To turn this slow-motion video into a regular speed video, drag and slide the speed control slider until the number turns 1x.
Step5: To save the changes, tap on the Done option. Subsequently, edit the video as per your preference.
2) Slow-Fast Motion Video Editor

This slow-mo video converter app helps you slow down or speed up any slow-motion video without any watermark and charges. This free app supports both landscape or portrait operation, unlimited video length, and corrected audio pitch.
The application is convenient to use and seamless to speed up or slow down any parts or clips of your videos. Without charging a penny, this app meets the users’ expectations. If you’re wondering how to use this converter app, here’s a step-by-step guide:
Method 3. Using Third-Party Online Tools
The smartphone sector’s most cutting-edge functionalities can be found on iPhones. Users may capture slow-motion videos, for instance. However, you may consider accelerating the slo-mo movie to regular video speed once it has been recorded.
Using your smartphone, how would you go about doing that? Well, we have seen that using the built-in Photos app and converter apps like iMovie can help, but can they really provide the level of customization and outcomes you need?
When things get professional and the expectations are too high, it’s best to use third-party online tools. So, here are a few practical choices:
Overview of the Online Tools
| Particulars | KAPWING | Clideo | EZGIF |
|---|---|---|---|
| Supported File Format | .AVI, .FLV, 3GP, and other edge file types. | MP4, MOV, WMV, AVI, WEBM, FLV, MKV, MPG, MPEG, MTS. | MNG files |
| Watermark | Not Available | Only in Free version | Not Available |
| Available Speed Option | As fast as 4x for an accelerated video | 0.25 times to 2 times | 0.25 times to 2 times |
| Time Consuming | No | Moderate | No |
1) KAPWING

Kapwing is a tool for group film editing that enables people to collaborate to produce original videos. For individuals to create the ideal video, Kapwing offers a collection of pre-built themes, stock footage, and materials.
Kapwing acts as a digital office solution that enables individuals to organize all of their resources in one location and work together on projects utilizing sharing features. Amid its vast range of features, its slow-mo converter is the most famous and widely used one.
- Rating: 4.1/5
- Price: Plan starts at $20 per month
Step-By-Step Guide To Convert Slow-Mo on Iphone Using Kapwing App
Step1: First, download and install the Kapwing app from the App Store.
Step2: Upload the slow-mo video that you want to speed up.
![]()
Note: Kapwing also lets you speed up any slow-mo video present on TikTok, Twitter, or YouTube.

Step3: Perform the video clip speed adjustment by utilizing the Kapwing sidebar. You can accelerate the video clip speed up to four times the original speed. If not, you can play in every level in between.

Step4: Finally, click on the Export option, and the final video clip with all speed adjustments will be generated within a few seconds.

2) Clideo

Among the finest free tools for rapid photo or video editing is Clideo. You can start upgrading your material by uploading files in a wide range of formats to their site.
Limitless customization is possible with the paid version for just $9 a month. The capabilities, though, aren’t as varied as those offered by rivals, and there aren’t any mobile apps for people who want to generate material while on the go.
- Ratings: 4.3/5
- Price: Starts at $9 per month
Step-By-Step Guide To Convert Slow-Mo on Iphone Using Clideo App:
Step1: From your computer (Mac) or mobile device (iPhone), upload a video. You can also add from a Dropbox or Google Drive account.

Step2: Select to speed up the video after it has been recorded. Then, if required, muffle its sound and alter the file type.


Step3: The video can be seen directly in your browser. Click “Download” after you are finished and delighted with your creation.

3) EZGIF

EZGIF is a free online editing tool that enables individuals to change the playback speed of any video. Not only does it effectively convert your slow-mo video on an iOS device to a normal speed video, but it also comes with many other features (later on that). The website has a simple, outdated interface, but except for that, it’s a fine app for beginners.
Step-By-Step Guide To Convert Slow-Mo on Iphone Using Clideo App:
Step1: Upload the video clip and choose a speed multiplier to start using this program.

Step2: A number less than one will slow down playback; a number greater than one will quicken it.
Step3: Thus, input 0.5 to run the program at 1/2 its normal speed, and so forth.

Step4: You can preserve the audio track’s original tempo, vary the speed along with the video, or silence the audio entirely.
Convert Your Slo-Mo Videos Into Regular Ones In a Few Simple Steps With Filmora
Filmora is a leading online video editing software that has become the preferred choice of all professionals and amateurs. From everyday needs to something formal, it helps you edit videos for every occasion.
You can change pace swiftly or consistently in Filmora and vary the pace of the audio or video recordings. Use the Speed Ramping tool in Filmora. If you want to remove slow-mo or add it, you can use Filmora’s speed ramping feature anytime.
Free Download For Win 7 or later(64-bit)
Free Download For macOS 10.14 or later
We will share some details on how to use this feature here, but for a comprehensive, detailed guide, read to the end.
Step-By-Step Guide to Speed Changing
Step1Launch the Video
Activate Wondershare Filmora on your computer. To increase the speed and runtime of the movie, explore the desired video and enter it into the software. You can drag and drop the movie onto the interface as well.
Step2Speed Adjustment

Press the left mouse button as soon as the video shows on the screen. And click the speed tab in the toolbar. There is then a contextual menu displayed. To double the rate, select 2x from the “Fast” menu. The participant may use any fundamental that has more than one.
Step3Save & Export
When finished, select “Save Project” from the list of available options in the “File” panel. Press “Save” after renaming the project.
Using Filmora’s “Export” feature, selecting “Export,” and then modifying the file name is the alternative way to export the video. A device, a system, or even YouTube can receive the exported video. Next, click “Export.”
Bonus Tips. 2 More Methods to Normalize Your Video Speed
Filmora offers you 2 more advanced methods to increase or decrease the speed of the video, one is uniform speed and the other, is speed ramping . Want to learn more about changing speed in Filmora, watch this video tutorial to get a quick start on using them.
Conclusion
That’s basically it! So that’s how you turn any slow-motion video into a regular one.
This article covers all major techniques to convert videos to slow motion on iOS and Mac. You can pick one of them to convert video to slow motion or to slow down slow motion.
So, are you now prepared to convert slow-motion videos on your iPad or iPhone device to ordinary speed? Try the Filmora video editor if you’re looking for something really professional.
It makes it much easier to convert slow-motion videos from your smartphone or tablet to regular speed. It has powerful video editing features and is more comfortable to use. So, get started today!
Method 2: Using Other Converter Apps
You may think that converting slow-mo video to a regular speed video on your iPad or iPhone is convenient, but there’s a drawback too. The method mentioned above can only help you with minimalistic speed changes, which may not give you the desired result.
However, other converter apps also help you change slow-mo video to regular iPhone video. These apps work seamlessly on your PC or Mac to turn your slow-mo videos on the iPhone or Mac to normal-speed video using customized and high-resolution settings.
Overview of The Apps
| Particulars | iMovie | Slow-Fast Motion Video Editor |
|---|---|---|
| Type (versatile or specialized) | Versatile | Specialized |
| Supported OS | iOS, Mac | iOS, Mac |
| Average Rating | 3.9/5 | 4.7/5 |
| Price | Free | Free |
| Best for | Video editing with cinematic effects | Slo-mo video conversion |
1) iMovie
iMovie is an excellent option if you’re looking for an application to modify a video with additional tools and convert the slow-mo to a regular pace. Among the top video converters for the iPhone is iMovie.
It offers a wide range of tools and capabilities that allow you to change the video transition, audio, and speed, add music, animated text, video overlay effects, normal video effects, and more. Additionally, it aids users in producing stunning films and commercials in a Cinematic manner.
iMovie could convert slow-mo footage to normal speed, in case you didn’t know. Did you ever attempt to change slow mot to regular speed in iMovie? With the use of iMovie, how can slow-motion video be made normally on an iPhone?
Here are the instructions.
Step1: Open the iMovie app, click on the ‘Create Project’ option, → tap on ‘Movie → Media → Video.
Step2: Tap on the slow-mo option, select the slow-motion video you want to convert and hit the ‘Create Movie’ option.
Step3: Get to know the editing options by clicking on the timeline. Then, click on the clock (speed) icon. At the beginning of the lines, you’ll find a turtle. It demonstrates slow motion. Plus, the number right behind the rabbit at the end signifies the speed.
Step4: To turn this slow-motion video into a regular speed video, drag and slide the speed control slider until the number turns 1x.
Step5: To save the changes, tap on the Done option. Subsequently, edit the video as per your preference.
2) Slow-Fast Motion Video Editor
This slow-mo video converter app helps you slow down or speed up any slow-motion video without any watermark and charges. This free app supports both landscape or portrait operation, unlimited video length, and corrected audio pitch.
The application is convenient to use and seamless to speed up or slow down any parts or clips of your videos. Without charging a penny, this app meets the users’ expectations. If you’re wondering how to use this converter app, here’s a step-by-step guide:
Method 3. Using Third-Party Online Tools
The smartphone sector’s most cutting-edge functionalities can be found on iPhones. Users may capture slow-motion videos, for instance. However, you may consider accelerating the slo-mo movie to regular video speed once it has been recorded.
Using your smartphone, how would you go about doing that? Well, we have seen that using the built-in Photos app and converter apps like iMovie can help, but can they really provide the level of customization and outcomes you need?
When things get professional and the expectations are too high, it’s best to use third-party online tools. So, here are a few practical choices:
Overview of the Online Tools
| Particulars | KAPWING | Clideo | EZGIF |
|---|---|---|---|
| Supported File Format | .AVI, .FLV, 3GP, and other edge file types. | MP4, MOV, WMV, AVI, WEBM, FLV, MKV, MPG, MPEG, MTS. | MNG files |
| Watermark | Not Available | Only in Free version | Not Available |
| Available Speed Option | As fast as 4x for an accelerated video | 0.25 times to 2 times | 0.25 times to 2 times |
| Time Consuming | No | Moderate | No |
1) KAPWING
Kapwing is a tool for group film editing that enables people to collaborate to produce original videos. For individuals to create the ideal video, Kapwing offers a collection of pre-built themes, stock footage, and materials.
Kapwing acts as a digital office solution that enables individuals to organize all of their resources in one location and work together on projects utilizing sharing features. Amid its vast range of features, its slow-mo converter is the most famous and widely used one.
- Rating: 4.1/5
- Price: Plan starts at $20 per month
Step-By-Step Guide To Convert Slow-Mo on Iphone Using Kapwing App
Step1: First, download and install the Kapwing app from the App Store.
Step2: Upload the slow-mo video that you want to speed up.
![]()
Note: Kapwing also lets you speed up any slow-mo video present on TikTok, Twitter, or YouTube.
Step3: Perform the video clip speed adjustment by utilizing the Kapwing sidebar. You can accelerate the video clip speed up to four times the original speed. If not, you can play in every level in between.
Step4: Finally, click on the Export option, and the final video clip with all speed adjustments will be generated within a few seconds.
2) Clideo
Among the finest free tools for rapid photo or video editing is Clideo. You can start upgrading your material by uploading files in a wide range of formats to their site.
Limitless customization is possible with the paid version for just $9 a month. The capabilities, though, aren’t as varied as those offered by rivals, and there aren’t any mobile apps for people who want to generate material while on the go.
- Ratings: 4.3/5
- Price: Starts at $9 per month
Step-By-Step Guide To Convert Slow-Mo on Iphone Using Clideo App:
Step1: From your computer (Mac) or mobile device (iPhone), upload a video. You can also add from a Dropbox or Google Drive account.
Step2: Select to speed up the video after it has been recorded. Then, if required, muffle its sound and alter the file type.
Step3: The video can be seen directly in your browser. Click “Download” after you are finished and delighted with your creation.
3) EZGIF
EZGIF is a free online editing tool that enables individuals to change the playback speed of any video. Not only does it effectively convert your slow-mo video on an iOS device to a normal speed video, but it also comes with many other features (later on that). The website has a simple, outdated interface, but except for that, it’s a fine app for beginners.
Step-By-Step Guide To Convert Slow-Mo on Iphone Using Clideo App:
Step1: Upload the video clip and choose a speed multiplier to start using this program.
Step2: A number less than one will slow down playback; a number greater than one will quicken it.
Step3: Thus, input 0.5 to run the program at 1/2 its normal speed, and so forth.
Step4: You can preserve the audio track’s original tempo, vary the speed along with the video, or silence the audio entirely.
Convert Your Slo-Mo Videos Into Regular Ones In a Few Simple Steps With Filmora
Filmora is a leading online video editing software that has become the preferred choice of all professionals and amateurs. From everyday needs to something formal, it helps you edit videos for every occasion.
You can change pace swiftly or consistently in Filmora and vary the pace of the audio or video recordings. Use the Speed Ramping tool in Filmora. If you want to remove slow-mo or add it, you can use Filmora’s speed ramping feature anytime.
Free Download For Win 7 or later(64-bit)
Free Download For macOS 10.14 or later
We will share some details on how to use this feature here, but for a comprehensive, detailed guide, read to the end.
Step-By-Step Guide to Speed Changing
Step1Launch the Video
Activate Wondershare Filmora on your computer. To increase the speed and runtime of the movie, explore the desired video and enter it into the software. You can drag and drop the movie onto the interface as well.
Step2Speed Adjustment
Press the left mouse button as soon as the video shows on the screen. And click the speed tab in the toolbar. There is then a contextual menu displayed. To double the rate, select 2x from the “Fast” menu. The participant may use any fundamental that has more than one.
Step3Save & Export
When finished, select “Save Project” from the list of available options in the “File” panel. Press “Save” after renaming the project.
Using Filmora’s “Export” feature, selecting “Export,” and then modifying the file name is the alternative way to export the video. A device, a system, or even YouTube can receive the exported video. Next, click “Export.”
Bonus Tips. 2 More Methods to Normalize Your Video Speed
Filmora offers you 2 more advanced methods to increase or decrease the speed of the video, one is uniform speed and the other, is speed ramping . Want to learn more about changing speed in Filmora, watch this video tutorial to get a quick start on using them.
Conclusion
That’s basically it! So that’s how you turn any slow-motion video into a regular one.
This article covers all major techniques to convert videos to slow motion on iOS and Mac. You can pick one of them to convert video to slow motion or to slow down slow motion.
So, are you now prepared to convert slow-motion videos on your iPad or iPhone device to ordinary speed? Try the Filmora video editor if you’re looking for something really professional.
It makes it much easier to convert slow-motion videos from your smartphone or tablet to regular speed. It has powerful video editing features and is more comfortable to use. So, get started today!
How to Add the Popular Video Text Effects to Your Video?
If your video needs to have texts and titles, instead of static text effects, you should opt for video text effects. Basically, you will be showing eye-catching animated texts instead of unappealing still texts. You can get the attention of the audience towards your texts instantly and get the messages across swiftly. There are literally unlimited types of video editing text effects available but a handful of them are widely used by video creators.
If you want to add those popular text effects to your video, you will need a professional video editor. Wondershare Filmora is the best video editor to add all the popular and amazing video text effects. Filmora is equally popular among professionals and amateurs due to its wide range of text effects and intuitive user interface. We will list down the popular text effects in Filmora and illustrate how to add them to your video using Filmora.
Part 1. Popular text effects in Filmora
There are unlimited text effects available in Filmora but some of them are extremely popular that video creators regularly use in their videos. Here is the list of the popular Filmora video editor text effects that you should be aware of.
1. Text Swipe Effect
Text swipe effects are the most commonly used in today’s videos on social media and video streaming platforms. In this effect, the text slides into the video frame from a particular direction. The entire text can swipe in if it is a one-liner and it can even swipe in word by word or sentence by sentence.
If you want to show short texts and you do not want to experiment with text animations, the text swipe effect is the safest option. For example, if you want to display your social media handles, your location, a coupon code, or a correction phrase that you have uttered wrongly, text swipe effects should be on your video.
2. Type Text Effect
The type text effect in Filmora is referred to as the typewriter text effect in Premiere Pro and After Effects. The effect displays the text as if it is being typed in real-time as it is done in a typewriter. The characters will appear on the screen with a cursor on the screen and therefore, it takes more duration than most other text effects.
The type text effect is particularly useful when you are displaying a large size of text on the screen. It is also widely used when showing a paragraph of text instead of a simple line. This helps in drawing the attention of the audience to the paragraph and retaining the attention for a longer duration of time.
3. WordArt Effect
WordArt is synonymous with MS Word where large words have 3D effects and highlighted background. Apart from 3D effect, text can have a thick stroke or outline as well as a gradient color style when WordArt effect is applied. In Filmora, you will find a plethora of WordArt effects and some are them are modern while others have a retro feel to them.
The WordArt effect is particularly popular while displaying titles and funny texts on the entire screen or covering a large part of the video. These are mostly used in the opening or ending scenes of the video. Besides, some video creators use them while making transitions from one scene to another.
4. Keyframe
If you want to create text animations as per your requirements, you have to use keyframes in any video editor. You can always apply the ready-made video editing text effects but if you want to customize and personalize, you can add keyframes in between two timestamps. Thereafter, you need to change text styles and parameters for each frame so that it looks like an animation.
If you want to add uniqueness to text animations so that you can make the audience wonder and appreciate, keyframes are the way. Adding keyframes in the text layer on Filmora is super easy and you can get effects like texts slowly scaling up, dancing randomly, changing fonts, and much more.
5. Color Text Effect
The color text effect is becoming extremely popular and it is widely used for opening and ending credits. Flashing different colors through your texts and titles against a darker background can act as a feast for the human eyes. There are different types of color text effects available that can make your text stand out.
When you are using color text effect, you need to maintain a large font size for your text so that it is widely visible. Even if your background is not dark, you can use a darker box in the background of the text or a darker frame around the text to amplify the effect.
6. Bounce to Zoom Effect
The bounce to zoom effect is widely used during a transition from one scene to another. It is regarded as a funny text effect where the text can swipe in and bounce and enlarge in size. Alternatively, the characters can bounce individually and zoom in and out with the motion as if they are dancing.
Apart from transitions, you can use the bounce to zoom effect to showcase a few important texts at the bottom of the video so that the viewers notice your text. Generally, the effect lasts for a few seconds before the text disappears. When you are using it for a larger text, you can use it for promotions and advertisements as well.
Part 2. How to Add Text Effects with Filmora
When it comes to adding text effects and animations, there is no better alternative to Filmora . Thanks to its super intuitive user interface, adding and customizing text effects in videos is as simple as text effect video online. Apart from the popular text effects we have discussed, there are so many categories of text effect and animation templates available on Filmora. Here are the steps on how to create text effect video in Filmora.
Free Download For Win 7 or later(64-bit)
Free Download For macOS 10.14 or later
Step1 Download and install Wondershare Filmora as per your operating system. Filmora is available for Windows and Mac users. Launch Filmora and click on New Project on the welcome screen.

Step2 Import your video clips under Project Media folder and drop them onto the timeline. Go to Titles menu option and you will see different categories and templates of text effects and templates from the left panel.

Step3 Search for a popular text effect from the search box. Select a text effect template and drop it on the timeline. Adjust its place on the timeline depending on where you want the text to appear. Double-click on the text layer and edit the text as per your requirements.

You can edit the style from fonts and settings section. You can also go to Advanced section available for more minute editing and get the desired text effect.
Conclusion
If texts are an essential part of your video, you should apply amazing video editing text effects to the texts and titles present in your video. You can use the common and the popular video text effects as well as use unique text effects to make your video stand out easily. There is no better video editor to add text effects to your video other than Wondershare Filmora for its unlimited text effect and animation templates.
Part 1. Popular text effects in Filmora
There are unlimited text effects available in Filmora but some of them are extremely popular that video creators regularly use in their videos. Here is the list of the popular Filmora video editor text effects that you should be aware of.
1. Text Swipe Effect
Text swipe effects are the most commonly used in today’s videos on social media and video streaming platforms. In this effect, the text slides into the video frame from a particular direction. The entire text can swipe in if it is a one-liner and it can even swipe in word by word or sentence by sentence.
If you want to show short texts and you do not want to experiment with text animations, the text swipe effect is the safest option. For example, if you want to display your social media handles, your location, a coupon code, or a correction phrase that you have uttered wrongly, text swipe effects should be on your video.
2. Type Text Effect
The type text effect in Filmora is referred to as the typewriter text effect in Premiere Pro and After Effects. The effect displays the text as if it is being typed in real-time as it is done in a typewriter. The characters will appear on the screen with a cursor on the screen and therefore, it takes more duration than most other text effects.
The type text effect is particularly useful when you are displaying a large size of text on the screen. It is also widely used when showing a paragraph of text instead of a simple line. This helps in drawing the attention of the audience to the paragraph and retaining the attention for a longer duration of time.
3. WordArt Effect
WordArt is synonymous with MS Word where large words have 3D effects and highlighted background. Apart from 3D effect, text can have a thick stroke or outline as well as a gradient color style when WordArt effect is applied. In Filmora, you will find a plethora of WordArt effects and some are them are modern while others have a retro feel to them.
The WordArt effect is particularly popular while displaying titles and funny texts on the entire screen or covering a large part of the video. These are mostly used in the opening or ending scenes of the video. Besides, some video creators use them while making transitions from one scene to another.
4. Keyframe
If you want to create text animations as per your requirements, you have to use keyframes in any video editor. You can always apply the ready-made video editing text effects but if you want to customize and personalize, you can add keyframes in between two timestamps. Thereafter, you need to change text styles and parameters for each frame so that it looks like an animation.
If you want to add uniqueness to text animations so that you can make the audience wonder and appreciate, keyframes are the way. Adding keyframes in the text layer on Filmora is super easy and you can get effects like texts slowly scaling up, dancing randomly, changing fonts, and much more.
5. Color Text Effect
The color text effect is becoming extremely popular and it is widely used for opening and ending credits. Flashing different colors through your texts and titles against a darker background can act as a feast for the human eyes. There are different types of color text effects available that can make your text stand out.
When you are using color text effect, you need to maintain a large font size for your text so that it is widely visible. Even if your background is not dark, you can use a darker box in the background of the text or a darker frame around the text to amplify the effect.
6. Bounce to Zoom Effect
The bounce to zoom effect is widely used during a transition from one scene to another. It is regarded as a funny text effect where the text can swipe in and bounce and enlarge in size. Alternatively, the characters can bounce individually and zoom in and out with the motion as if they are dancing.
Apart from transitions, you can use the bounce to zoom effect to showcase a few important texts at the bottom of the video so that the viewers notice your text. Generally, the effect lasts for a few seconds before the text disappears. When you are using it for a larger text, you can use it for promotions and advertisements as well.
Part 2. How to Add Text Effects with Filmora
When it comes to adding text effects and animations, there is no better alternative to Filmora . Thanks to its super intuitive user interface, adding and customizing text effects in videos is as simple as text effect video online. Apart from the popular text effects we have discussed, there are so many categories of text effect and animation templates available on Filmora. Here are the steps on how to create text effect video in Filmora.
Free Download For Win 7 or later(64-bit)
Free Download For macOS 10.14 or later
Step1 Download and install Wondershare Filmora as per your operating system. Filmora is available for Windows and Mac users. Launch Filmora and click on New Project on the welcome screen.
Step2 Import your video clips under Project Media folder and drop them onto the timeline. Go to Titles menu option and you will see different categories and templates of text effects and templates from the left panel.
Step3 Search for a popular text effect from the search box. Select a text effect template and drop it on the timeline. Adjust its place on the timeline depending on where you want the text to appear. Double-click on the text layer and edit the text as per your requirements.
You can edit the style from fonts and settings section. You can also go to Advanced section available for more minute editing and get the desired text effect.
Conclusion
If texts are an essential part of your video, you should apply amazing video editing text effects to the texts and titles present in your video. You can use the common and the popular video text effects as well as use unique text effects to make your video stand out easily. There is no better video editor to add text effects to your video other than Wondershare Filmora for its unlimited text effect and animation templates.
How to Zoom Webcam on PC
Making certain our digital presence is the best it can be pays dividends as more and more of what we do online; similar is the case with how to zoom out webcam windows 10. The majority of experts advise against using the built-in camera that comes with your laptop or computer and instead advocate getting a webcam or an HD camera. These, however, may be hard to come by and pricy if you locate a nice one. If the built-in camera on your laptop doesn’t perform effectively during Zoom meetings, you may want to consider about investing in a separate, better webcam. Webcams offer automatic settings that are intended to function with the largest variety of lighting situations possible. This suggests that they average out a great number of responses to the content of the frame. Because of this, we have incorporated basic PC webcam zooming settings. These answers may be found in the portions that follow.
It’s vital to know how to zoom in on a webcam before visiting there. The camera wasn’t always as vital as it is today, and only very large corporations could afford to employ it as a convenience. But today, nearly everyone, from huge organizations to little firms, acknowledges its value. Everybody needs a webcam that works properly. The camera control software you are using determines the zoom function. The resolution of your picture window and the capabilities of the application dictate how far you can zoom in on the webcam’s video image. You can zoom in and out on camera photos using tools like YouCam and Windows Live Messenger. The most critical camera capabilities for the ideal video conferencing experience are zoom in and zoom out, which at first look may appear trivial. Here, we’ll walk you through each step, in detail. Continue reading, and we’ll check your understanding of webcam zoom in and zoom out skills!
Way 1: Zoom with Windows Live Messenger
When utilizing a camera for video conferencing, you may zoom in on a user’s face to get rid of the background. Webcam settings are not accessible by default in Microsoft Windows. However, camera zoom settings may be changed in instant chat systems. Through an instant messaging tool, such as Windows Live Messenger, you may simply access these options. This application provides private offline chat, video messaging, image and video sharing, and video chatting.
Step1Start Windows Live Messenger on your PC or laptop first. Enter your login name and password by clicking the “Sign In” button.

Step2On the top menu bar, pick “Tools.” And then select the “Audio and Video Setup”. Drag the slider next to “Speaker” to modify the speaker volume. Drag the slider next to “Microphone” to modify the microphone sensitivity. Press “Next.”

Step3From the drop-down list, pick the webcam. The “Camera Control” option is situated on the top; pick “Webcam Settings” after that.
Step4Now, to alter the zoom settings, drag the “Zoom” slider. To zoom in or out, drag the slider to the left or right. Press “OK.”
Way 2: Use Windows 10 Camera App
Wondering how to zoom your camera in the Windows 10 Camera app? The Camera app enables you to zoom in or out on your webcam in both image and video modes. To accomplish so, click or push the Magnification button, and then use the slider to modify the webcam’s zoom level. To operate the zoom feature manually, pick “Manual Zoom.” In the preview window, a square appears when you pick this option. To zoom in on a specific region of the capture window, drag the square there. To expand the image that was acquired by the webcam, slide the slider bar. In simply, The Camera app enables you zoom in or out of photographs and movies shot with your webcam. To do this, click on the “Zoom” button and drag the slider to the left or right as appropriate on your Windows 10 camera. the following steps:
Step1To open the “Start Menu,” make a right-click on “Start.” Now, to access the Camera app, type “Camera App” into the start menu’s search box.

Step2Tap the Camera Control icon when you start or join a meeting. To zoom and pan the camera to the appropriate spot, utilize the icons on the Camera Control panel.
![]()
Step3To exit the Camera Control window and return to the Meeting Controls, touch outside of it.
Way 3: Zoom with YouCam
Unfortunately, the default cameras or webcams bundled with the majority of Windows laptops and desktops don’t have an automatic zoom option. In fact, the only method to adjust their crop is to switch from “Standard” to “Widescreen,” which does slightly zoom in on you but not in the manner we’d want. This makes it inescapable that the only method to manually alter a webcam’s magnification is to acquire one separately and apply its software settings. , like YouCam. YouCam provides video calling, streaming, and broadcasting. includes an integrated app. To employ Zoom with YouCam, refer to the methods given below:
Step1Launch the YouCam camera program and activate the webcam.

Step2In the camera preview window, pick Settings. Then, select “Enable Video Zoom” from the menu.
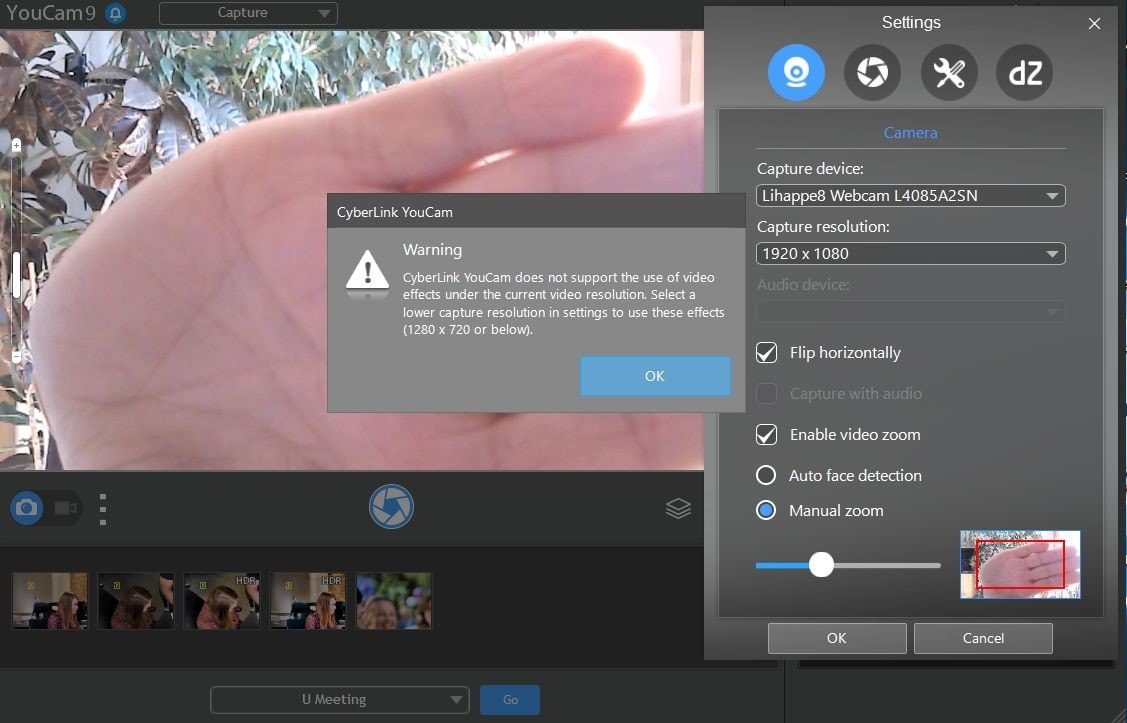
Step3Select “Automatic Face Detection” from the menu. As you wander about in the capture window, the camera watches your face and automatically zooms in on your photo as shown above.
Step4To handle the zoom feature manually, pick “Manual Zoom.” In the preview window, a square appears when you pick this option. To zoom in on a specific region of the capture window, drag the square there. To expand the image that was acquired by the webcam, slide the slider bar.

Way 4: Use iGlasses on Mac
For the perfect webcam look on a MAC, install the Chrome plugin iGlasses for video effects and style tweaks. Your videos will appear better on Zoom as a consequence. You may instantly enhance the appearance of your video interactions by utilizing the digital zoom on your iGlasses. Digital pan, tilt, and zoom are all possible with easy controls. For Macs that support it, an Apple Remote may be used to operate. iGlasses will become an option in Zoom’s video settings when it has been installed. You may improve your camera by altering the settings in iGlasses. You may experiment with a range of amusing effects, like 3-D distortions, using the virtual camera. Let’s learn how to utilize iGlasses on a Mac:
Step1Installing Ecamm’s iGlasses on a MacBook in the first step.
Step2To activate the camera, go to your video settings and pick iGlasses.
Step3Choose the Zoom window and execute the appropriate operations using the Zoom and Flip options. You may now zoom in and out using the camera on your MacBook as you like.

Conclusion
In conclusion, so many people currently take part in online conferences and virtual meetings. You want to create a lasting impression, don’t you? Not or whether you are the host of an online meeting or event, you must now maintain a professional image to prevent turning off attendees. You have discovered how to utilize the tools at your disposal to boost the zoom in and out quality of your camera in this post. However, as will be explained in the sections ahead, you may do it without the third-party plugins. With just one quick plugin, you can significantly transform how you look on a camera. Hence, try out the easy method from the above enlisted ones to get hold on your PC webcam to zoom in or out purposes.
Making certain our digital presence is the best it can be pays dividends as more and more of what we do online; similar is the case with how to zoom out webcam windows 10. The majority of experts advise against using the built-in camera that comes with your laptop or computer and instead advocate getting a webcam or an HD camera. These, however, may be hard to come by and pricy if you locate a nice one. If the built-in camera on your laptop doesn’t perform effectively during Zoom meetings, you may want to consider about investing in a separate, better webcam. Webcams offer automatic settings that are intended to function with the largest variety of lighting situations possible. This suggests that they average out a great number of responses to the content of the frame. Because of this, we have incorporated basic PC webcam zooming settings. These answers may be found in the portions that follow.
It’s vital to know how to zoom in on a webcam before visiting there. The camera wasn’t always as vital as it is today, and only very large corporations could afford to employ it as a convenience. But today, nearly everyone, from huge organizations to little firms, acknowledges its value. Everybody needs a webcam that works properly. The camera control software you are using determines the zoom function. The resolution of your picture window and the capabilities of the application dictate how far you can zoom in on the webcam’s video image. You can zoom in and out on camera photos using tools like YouCam and Windows Live Messenger. The most critical camera capabilities for the ideal video conferencing experience are zoom in and zoom out, which at first look may appear trivial. Here, we’ll walk you through each step, in detail. Continue reading, and we’ll check your understanding of webcam zoom in and zoom out skills!
Way 1: Zoom with Windows Live Messenger
When utilizing a camera for video conferencing, you may zoom in on a user’s face to get rid of the background. Webcam settings are not accessible by default in Microsoft Windows. However, camera zoom settings may be changed in instant chat systems. Through an instant messaging tool, such as Windows Live Messenger, you may simply access these options. This application provides private offline chat, video messaging, image and video sharing, and video chatting.
Step1Start Windows Live Messenger on your PC or laptop first. Enter your login name and password by clicking the “Sign In” button.
Step2On the top menu bar, pick “Tools.” And then select the “Audio and Video Setup”. Drag the slider next to “Speaker” to modify the speaker volume. Drag the slider next to “Microphone” to modify the microphone sensitivity. Press “Next.”
Step3From the drop-down list, pick the webcam. The “Camera Control” option is situated on the top; pick “Webcam Settings” after that.
Step4Now, to alter the zoom settings, drag the “Zoom” slider. To zoom in or out, drag the slider to the left or right. Press “OK.”
Way 2: Use Windows 10 Camera App
Wondering how to zoom your camera in the Windows 10 Camera app? The Camera app enables you to zoom in or out on your webcam in both image and video modes. To accomplish so, click or push the Magnification button, and then use the slider to modify the webcam’s zoom level. To operate the zoom feature manually, pick “Manual Zoom.” In the preview window, a square appears when you pick this option. To zoom in on a specific region of the capture window, drag the square there. To expand the image that was acquired by the webcam, slide the slider bar. In simply, The Camera app enables you zoom in or out of photographs and movies shot with your webcam. To do this, click on the “Zoom” button and drag the slider to the left or right as appropriate on your Windows 10 camera. the following steps:
Step1To open the “Start Menu,” make a right-click on “Start.” Now, to access the Camera app, type “Camera App” into the start menu’s search box.
Step2Tap the Camera Control icon when you start or join a meeting. To zoom and pan the camera to the appropriate spot, utilize the icons on the Camera Control panel.
![]()
Step3To exit the Camera Control window and return to the Meeting Controls, touch outside of it.
Way 3: Zoom with YouCam
Unfortunately, the default cameras or webcams bundled with the majority of Windows laptops and desktops don’t have an automatic zoom option. In fact, the only method to adjust their crop is to switch from “Standard” to “Widescreen,” which does slightly zoom in on you but not in the manner we’d want. This makes it inescapable that the only method to manually alter a webcam’s magnification is to acquire one separately and apply its software settings. , like YouCam. YouCam provides video calling, streaming, and broadcasting. includes an integrated app. To employ Zoom with YouCam, refer to the methods given below:
Step1Launch the YouCam camera program and activate the webcam.
Step2In the camera preview window, pick Settings. Then, select “Enable Video Zoom” from the menu.
Step3Select “Automatic Face Detection” from the menu. As you wander about in the capture window, the camera watches your face and automatically zooms in on your photo as shown above.
Step4To handle the zoom feature manually, pick “Manual Zoom.” In the preview window, a square appears when you pick this option. To zoom in on a specific region of the capture window, drag the square there. To expand the image that was acquired by the webcam, slide the slider bar.
Way 4: Use iGlasses on Mac
For the perfect webcam look on a MAC, install the Chrome plugin iGlasses for video effects and style tweaks. Your videos will appear better on Zoom as a consequence. You may instantly enhance the appearance of your video interactions by utilizing the digital zoom on your iGlasses. Digital pan, tilt, and zoom are all possible with easy controls. For Macs that support it, an Apple Remote may be used to operate. iGlasses will become an option in Zoom’s video settings when it has been installed. You may improve your camera by altering the settings in iGlasses. You may experiment with a range of amusing effects, like 3-D distortions, using the virtual camera. Let’s learn how to utilize iGlasses on a Mac:
Step1Installing Ecamm’s iGlasses on a MacBook in the first step.
Step2To activate the camera, go to your video settings and pick iGlasses.
Step3Choose the Zoom window and execute the appropriate operations using the Zoom and Flip options. You may now zoom in and out using the camera on your MacBook as you like.
Conclusion
In conclusion, so many people currently take part in online conferences and virtual meetings. You want to create a lasting impression, don’t you? Not or whether you are the host of an online meeting or event, you must now maintain a professional image to prevent turning off attendees. You have discovered how to utilize the tools at your disposal to boost the zoom in and out quality of your camera in this post. However, as will be explained in the sections ahead, you may do it without the third-party plugins. With just one quick plugin, you can significantly transform how you look on a camera. Hence, try out the easy method from the above enlisted ones to get hold on your PC webcam to zoom in or out purposes.
Video Maker with Song
Versatile Video Editor - Wondershare Filmora
An easy yet powerful editor
Numerous effects to choose from
Detailed tutorials provided by the official channel
>
Had you ever thought about creating a video along with the music tracks? Is it exciting to make a video using the captured images and favorite soundtracks? Create engaging videos using the video maker with a song to post them on social media. Play them on special occasions like birthday and anniversary parties to entertain the crowd wisely. There are numerous options to use the videos precisely to have fun with your family and friends. In this article, you will learn about the reliable video maker that assists you to create the best videos for your needs. It has a wide range of customization options to make the content realistic. Connect with this article and explore the functionalities of the video maker tool and edit your videos professionally to acquire desired effects.

In this article
01 [Video Maker with Song – Filmora Video Editor ](#Part 1)
02 [Tip: Additional video edits using the Filmora video editor ](#Part 2)
Part 1 Video Maker with Song – Filmora Video Editor
Here is an impressive video maker with a song that helps your video content to sound energetical and entertain the viewers to a greater extent. The Filmora video editor offers the users to create videos from the scratch or use the in-built templates to make your video creation work complete at a faster rate. Another capturing feature of the Filmora app is that you can insert any in-built options merely by drag and drop action or right-click on the relevant items and select the Apply message from the pop-up. This application has a simple interface and creates wonders for your video content. If you are a newbie user, no worries, the Filmora video editor will be your perfect partner to create inspiring videos with music for your needs.

Wondershare Filmora - Best Video Editor for Mac/Windows
5,481,435 people have downloaded it.
Build unique custom animations without breaking a sweat.
Focus on creating epic stories and leave the details to Filmora’s auto features.
Start a creative adventure with drag & drop effects and endless possibilities.
Filmora simplifies advanced features to save you time and effort.
Filmora cuts out repetition so you can move on to your next creative breakthrough.
The Filmora video editor, there is a large source of music files are available for quick access. You can also import it from external files to enhance the video content. There are impressive options to make your video realistic and it entertains the viewers optimally. Choose the perfect feature and edit it according to your needs in no time. The controls are highly visible and you can reach for them quickly. It is enough of you to tap the perfect controls to implement the desired changes on the imported media files. The in-built library contains templates, sound effects, filters, and special effects to customize the video content precisely. In the below content you will learn how to use Filmora the video maker with song efficiently to edit the uploaded media file. It is enough if you drag and drop the desired effects on the timeline to apply the changes to it.
The stunning features of Filmora Video Editor
● The simple interface helps the newbie users to use this program efficiently without any special skills.
● Insert the desired filter effects and transitions to enhance the interaction of the video content.
● Add your favorite sound effects and merge them with your video file effortlessly.
● Easily import and export the media files to any storage space without any data loss.
● There are options to adjust the audio settings like audio ducking, detach audio, fade- and fade-out options to customize the videos efficiently.
The above features help you to make the best out of your video content. You can post them on any social media platform and store them on any storage space for quick access. After performing all the edits, you can have a preview of it before exporting it to the storage space. During the export process, there are options to modify the file format, and resolution settings to improve the video clarity.
The stepwise guide to editing the media file using the Video Maker with a song like the Filmora application.
Step1 Download the Filmora Video Editor
Go to the official webpage of Filmora and download the appropriate version of this program based on your system OS. You can either choose Windows or Mac and download according to your needs. Then, install the app by following the instruction wizard. Launch the program and insert the media file into the working space by tapping the Import Media files option. You must drag and drop the uploaded media file into the timeline to make further edits.

Step2 Add song to the uploaded video
Now, click the Audio in the Menu option and choose Sound effects from the left panel of the screen. From the displayed items at the right panel, choose the desired ones and make a right-click on them. Then, select Apply option from the pop-up screen. You can also drag and drop it to the timeline to merge this audio track with the video file.

Step3 Preview and export
After adding the desired audio tracks with the uploaded video content, preview the video by playing them on this video editor screen. When you are convinced with the edit operations, then export it by tapping the Export button. In the Export screen, you can change the display settings like resolution, and file format to overcome the file compatibility issues. You can store it on any external or internal storage space based on your needs.

Use the above instructions to edit the media files using the Filmora app the video maker with song and enhance the quality of the video content professionally.
Tip: Additional video edits using the Filmora video editor
Wondershare Filmora
Get started easily with Filmora’s powerful performance, intuitive interface, and countless effects!
Try It Free Try It Free Try It Free Learn More about Filmora>
In the Filmora app, you can find audio adjustment options to customize the audio signal manually by fading them in and out precisely. You can enable the audio ducking option to increase the audio quality by personalizing the specific segment of the audio file. This feature helps to make the audio file sound better. Based on your needs, you can detach the audio tracks from the video file and insert the voice-over sounds by recoding them using this program. This option helps the editors to convert the video file to interactive and fun-filled.

Apart from working on the audio tracks, you can also make changes in the video settings. Add the filters and transitions to enhance the video quality and you can also split the screens to narrate a better story using the video content. Another interesting factor with the Filmora application is that you can upload any file format files to make necessary edits because it supports all formats without compromising on any factors.
In Filmora, you can edit the audios with loads of in-built settings like Audio Equalizer and Audio speed options. In the Equalizer screen, you can make variations by manually adjusting the fade-in/fade-out options, volume adjustment and pitch to improvise the audio quality. You can also make changes with the audio speed by making it fast forward, slow motion effect and reverse the speed as per your requirements. On the Audio edit window, you can set the Denoise option to remove the background noise. Check in the Remove Background Noise option and scroll on the settings liner to assign the value between weak, mid, and strong.

These are the available audio settings with the Filmora video editor. Make the right settings to enhance the overall audio attributes with utmost quality factors.
Conclusion
This article had taught you how to create an efficient video using the video maker with a song like Filmora video editor. It is an incredible app that assists you to perform a wide range of video edit options. This app is compatible with professionals as well as newbie users. You can work on this program and build a creative video for your needs. Connect with this article to get some valuable insights on the best video edits using an efficient video editor. Choose Filmora to unleash your imaginations and make desired edits limitlessly. Stay tuned to make wise edits on your videos and create stunning content to entertain the audience precisely.
Had you ever thought about creating a video along with the music tracks? Is it exciting to make a video using the captured images and favorite soundtracks? Create engaging videos using the video maker with a song to post them on social media. Play them on special occasions like birthday and anniversary parties to entertain the crowd wisely. There are numerous options to use the videos precisely to have fun with your family and friends. In this article, you will learn about the reliable video maker that assists you to create the best videos for your needs. It has a wide range of customization options to make the content realistic. Connect with this article and explore the functionalities of the video maker tool and edit your videos professionally to acquire desired effects.
In this article
01 [Video Maker with Song – Filmora Video Editor ](#Part 1)
02 [Tip: Additional video edits using the Filmora video editor ](#Part 2)
Part 1 Video Maker with Song – Filmora Video Editor
Here is an impressive video maker with a song that helps your video content to sound energetical and entertain the viewers to a greater extent. The Filmora video editor offers the users to create videos from the scratch or use the in-built templates to make your video creation work complete at a faster rate. Another capturing feature of the Filmora app is that you can insert any in-built options merely by drag and drop action or right-click on the relevant items and select the Apply message from the pop-up. This application has a simple interface and creates wonders for your video content. If you are a newbie user, no worries, the Filmora video editor will be your perfect partner to create inspiring videos with music for your needs.
Wondershare Filmora - Best Video Editor for Mac/Windows
5,481,435 people have downloaded it.
Build unique custom animations without breaking a sweat.
Focus on creating epic stories and leave the details to Filmora’s auto features.
Start a creative adventure with drag & drop effects and endless possibilities.
Filmora simplifies advanced features to save you time and effort.
Filmora cuts out repetition so you can move on to your next creative breakthrough.
The Filmora video editor, there is a large source of music files are available for quick access. You can also import it from external files to enhance the video content. There are impressive options to make your video realistic and it entertains the viewers optimally. Choose the perfect feature and edit it according to your needs in no time. The controls are highly visible and you can reach for them quickly. It is enough of you to tap the perfect controls to implement the desired changes on the imported media files. The in-built library contains templates, sound effects, filters, and special effects to customize the video content precisely. In the below content you will learn how to use Filmora the video maker with song efficiently to edit the uploaded media file. It is enough if you drag and drop the desired effects on the timeline to apply the changes to it.
The stunning features of Filmora Video Editor
● The simple interface helps the newbie users to use this program efficiently without any special skills.
● Insert the desired filter effects and transitions to enhance the interaction of the video content.
● Add your favorite sound effects and merge them with your video file effortlessly.
● Easily import and export the media files to any storage space without any data loss.
● There are options to adjust the audio settings like audio ducking, detach audio, fade- and fade-out options to customize the videos efficiently.
The above features help you to make the best out of your video content. You can post them on any social media platform and store them on any storage space for quick access. After performing all the edits, you can have a preview of it before exporting it to the storage space. During the export process, there are options to modify the file format, and resolution settings to improve the video clarity.
The stepwise guide to editing the media file using the Video Maker with a song like the Filmora application.
Step1 Download the Filmora Video Editor
Go to the official webpage of Filmora and download the appropriate version of this program based on your system OS. You can either choose Windows or Mac and download according to your needs. Then, install the app by following the instruction wizard. Launch the program and insert the media file into the working space by tapping the Import Media files option. You must drag and drop the uploaded media file into the timeline to make further edits.
Step2 Add song to the uploaded video
Now, click the Audio in the Menu option and choose Sound effects from the left panel of the screen. From the displayed items at the right panel, choose the desired ones and make a right-click on them. Then, select Apply option from the pop-up screen. You can also drag and drop it to the timeline to merge this audio track with the video file.
Step3 Preview and export
After adding the desired audio tracks with the uploaded video content, preview the video by playing them on this video editor screen. When you are convinced with the edit operations, then export it by tapping the Export button. In the Export screen, you can change the display settings like resolution, and file format to overcome the file compatibility issues. You can store it on any external or internal storage space based on your needs.
Use the above instructions to edit the media files using the Filmora app the video maker with song and enhance the quality of the video content professionally.
Tip: Additional video edits using the Filmora video editor
Wondershare Filmora
Get started easily with Filmora’s powerful performance, intuitive interface, and countless effects!
Try It Free Try It Free Try It Free Learn More about Filmora>
In the Filmora app, you can find audio adjustment options to customize the audio signal manually by fading them in and out precisely. You can enable the audio ducking option to increase the audio quality by personalizing the specific segment of the audio file. This feature helps to make the audio file sound better. Based on your needs, you can detach the audio tracks from the video file and insert the voice-over sounds by recoding them using this program. This option helps the editors to convert the video file to interactive and fun-filled.
Apart from working on the audio tracks, you can also make changes in the video settings. Add the filters and transitions to enhance the video quality and you can also split the screens to narrate a better story using the video content. Another interesting factor with the Filmora application is that you can upload any file format files to make necessary edits because it supports all formats without compromising on any factors.
In Filmora, you can edit the audios with loads of in-built settings like Audio Equalizer and Audio speed options. In the Equalizer screen, you can make variations by manually adjusting the fade-in/fade-out options, volume adjustment and pitch to improvise the audio quality. You can also make changes with the audio speed by making it fast forward, slow motion effect and reverse the speed as per your requirements. On the Audio edit window, you can set the Denoise option to remove the background noise. Check in the Remove Background Noise option and scroll on the settings liner to assign the value between weak, mid, and strong.
These are the available audio settings with the Filmora video editor. Make the right settings to enhance the overall audio attributes with utmost quality factors.
Conclusion
This article had taught you how to create an efficient video using the video maker with a song like Filmora video editor. It is an incredible app that assists you to perform a wide range of video edit options. This app is compatible with professionals as well as newbie users. You can work on this program and build a creative video for your needs. Connect with this article to get some valuable insights on the best video edits using an efficient video editor. Choose Filmora to unleash your imaginations and make desired edits limitlessly. Stay tuned to make wise edits on your videos and create stunning content to entertain the audience precisely.
Also read:
- New 2024 Approved Best 6 WebM to GIF Converters
- 2024 Approved Do You Want to Know About the Photo Video Maker with Song? Are You Ready to Discover It in Detail? This Article Will Give You Valuable Insights on This Topic
- New Competitive Guide To Use Slow Motion in After Effects
- Updated 2024 Approved 18 Video Editors Weve Tested Heres What We Learned
- In 2024, How to Find Free Online Slideshow Maker with No Watermark
- New Detailed Guide to the Best Convertors for Turning GIF Into PDF Files. Know Their Features, Pros, Cons, and More
- In 2024, Offering The Best Understanding of Performing iMovie Slow Motion Video
- New In 2024, Guide To Creating the Best Video Collages
- Updated In 2024, How to Brighten a Video in Windows 10 Easily
- New 8 Tips to Apply Cinematic Color Grading to Your Videos
- 2024 Approved Change Background Color in After Effects
- Updated YouTube Zoom to Fill Is a Great Feature for Viewing Things in Depth. This Article Answers All Questions About Fixing YouTube Zoom to Fill Not Working on Your Device
- New 2024 Approved How To Create A YouTube Intro
- 2024 Approved How to Speed Up Pictures on TikTok Slideshow
- 2024 Approved Complete How-To Tutorials of Kapwing Collage Maker
- In This Article, We Will Introduce You Our Top 5 Picks of Websites and Software Converter Online to Convert Powerpoint to Mp4
- Are You in Search for a Step-by-Step Guide to How to Add Effects in TikTok? Here It Is. To Add some Flavor to Your TikTok Videos. Use These How to Add Effect to TikTok Recommendations
- Updated In 2024, Guide to Making Cinematography for Music Video
- Best GIF to Video Converters for 2024
- Customize PowerPoint Slideshow Icon in 8 Simple Ways for 2024
- Replacing Sky in Your Pictures Using Online and Offline Tools for 2024
- New Best 10 Options Slow Down Video Online with Perfection for 2024
- 2024 Approved Wondering About Vimeo Slideshow Maker? Know Everything About the Platform Which Is Gaining Much Popularity. Also, Browse some Tips to Create Appealing Video Slideshows
- New Best 8 AI Video Denoise Software for 2024
- Updated Do You Need More Time to Explain a Particular Screen or Moment in Your Recording Using an Extended Freeze-Frame? Learn How to Use Camtasia Freeze-Frame to Extend Parts of a Video Effectively
- How to Zoom Picture in Picture Easy Solution
- In 2024, How to Easily Create a Free Eye-Catching Intro Videos with Invideo
- Updated In 2024, 10 Best Vloggers on YouTube
- AVI Video Format How to Open, Play, Edit AVI File for 2024
- What Is Color Finale
- New In Todays Article, We Are Going to Show You How Adding a Simple Lower Third to Your Video Can Add a Degree of Professionalism and Polish to Your Videos While Giving It a Higher Perceived Value
- Updated 2024 Approved 10 Mind-Blowing Video Collage Maker for PC
- New Best 5 AI Music Video Examples and Makers to Make Them for 2024
- Updated Replacing the Sky in Adobe After Effects An Extensive Guide for 2024
- Updated Top Tips on How to Design Travel Slideshow
- Try These 10 Music Video Templates To Make Your Work Easy
- Updated 2024 Approved What Are the Best Video Background Changers Online?
- Timeline Template Is a Visual Representation Showing the Passage of Time. It Includes Text, Diagrams, Images and Icons. They Are Perfect for Telling Stories, Events Etc for 2024
- New In 2024, Hard to Remove Black Background in After Effects?
- New 2024 Approved Finding The Best Filmic Pro LUTs For Video Editing
- How To Add Scrolling Text Effect for 2024
- New Would You Like to Know How to Change the Ratio of the Video or Which Is the Correct Aspect Ratio for Uploading to the Online Platform? Then, Go Through the Article to Get Complete Details About the Video Aspect Ratio
- New Little Tricks to Create Canva Slideshow No One Is Telling You for 2024
- New In 2024, Effective 10 Ways to Convert YouTube to MOV at Ease PC & Online
- In 2024, Fixing Foneazy MockGo Not Working On Vivo S17t | Dr.fone
- How to Track a Lost Oppo Find N3 for Free? | Dr.fone
- Easy Steps on How To Create a New Apple ID Account On iPhone 11 Pro Max | Dr.fone
- Unlock Your Disabled Apple iPhone 12 Without iTunes in 5 Ways | Dr.fone
- In 2024, How to Send and Fake Live Location on Facebook Messenger Of your Honor X7b | Dr.fone
- In 2024, How Do I Stop Someone From Tracking My Xiaomi Redmi Note 12 5G? | Dr.fone
- Best Ways on How to Unlock/Bypass/Swipe/Remove Oppo Reno 11 5G Fingerprint Lock
- In 2024, 3 Effective Methods to Fake GPS location on Android For your Realme C33 2023 | Dr.fone
- Updated In 2024, Everything You Want To Know About Kapwing Video Translation
- In 2024, Forgot iPhone Passcode Again? Unlock Apple iPhone SE Without Passcode Now
- Top 10 Nokia G22 Android SIM Unlock APK
- Most Popular Tips on Learning Animate Rigging for 2024
- Will the iPogo Get You Banned and How to Solve It On Nokia C32 | Dr.fone
- Trouble with Apple iPhone 14 Pro Max Swipe-Up? Try These 11 Solutions
- Top ways to unlock iPhone SE (2022) screen lock
- What is Geo-Blocking and How to Bypass it On OnePlus Nord 3 5G? | Dr.fone
- 3 Ways to Erase Apple iPhone 13 Pro When Its Locked Within Seconds
- Hacks to do pokemon go trainer battles For Apple iPhone 6 Plus | Dr.fone
- Fixing Persistent Pandora Crashes on Xiaomi Redmi Note 12 Pro 5G | Dr.fone
- How to Change Google Play Location On Samsung Galaxy S23 Tactical Edition | Dr.fone
- Authentication Error Occurred on Vivo X Fold 2? Here Are 10 Proven Fixes | Dr.fone
- In 2024, iPhone Is Disabled? Here Is The Way To Unlock Disabled iPhone 12 Pro
- Ways to trade pokemon go from far away On Apple iPhone 7 Plus? | Dr.fone
- In 2024, How to Transfer Contacts from Itel A60s to Other Android Devices Devices? | Dr.fone
- How to Use Phone Clone to Migrate Your Oppo K11x Data? | Dr.fone
- In 2024, How to Detect and Remove Spyware on Xiaomi Redmi Note 12 Pro+ 5G? | Dr.fone
- In 2024, How to Track a Lost Samsung Galaxy S23 Ultra for Free? | Dr.fone
- In 2024, Here Are Some Reliable Ways to Get Pokemon Go Friend Codes For Tecno Pop 7 Pro | Dr.fone
- In 2024, 8 Best Apps for Screen Mirroring Honor 100 PC | Dr.fone
- 10 Easy-to-Use FRP Bypass Tools for Unlocking Google Accounts On Nokia C210
- Updated 2024 Approved Boost Sales with Live Shopping Learn Winning Strategies From Top Brands
- How Do You Unlock your iPhone 6s Plus? Learn All 4 Methods | Dr.fone
- Best Anti Tracker Software For ZTE Axon 40 Lite | Dr.fone
- How to Fix Pokemon Go Route Not Working On Oppo F25 Pro 5G? | Dr.fone
- In 2024, 5 Ways to Transfer Music from Realme C67 4G to Other Android Devices Easily | Dr.fone
- What Legendaries Are In Pokemon Platinum On Google Pixel 8 Pro? | Dr.fone
- How To Unbrick a Dead Infinix Smart 7 | Dr.fone
- 8 Solutions to Solve YouTube App Crashing on Nokia C22 | Dr.fone
- Title: New A Comprehensive Guide on Converting Slo-Mo Videos to Normal Speed Videos On iPhone for 2024
- Author: Chloe
- Created at : 2024-04-24 07:08:28
- Updated at : 2024-04-25 07:08:28
- Link: https://ai-editing-video.techidaily.com/new-a-comprehensive-guide-on-converting-slo-mo-videos-to-normal-speed-videos-on-iphone-for-2024/
- License: This work is licensed under CC BY-NC-SA 4.0.
