:max_bytes(150000):strip_icc():format(webp)/GettyImages-1065028028-8e770c58918e4cf8b0852e81cff60ed6.jpg)
New A Detailed Guid to Remove Background From a Video in Premier Pro for 2024

A Detailed Guid to Remove Background From a Video in Premier Pro
Adobe Premiere Pro is one of the leading video editing software. You can use to create or remove a video’s background. Advanced Chroma Key features such as Color Key and Ultra Key make it possible to produce background-free content quickly.
Although both Keys work similarly, many users prefer to use the Ultra key for a better result in the video. This article will explain how to remove video background in Premiere Pro if you are a newbie.
Let’s get right to it and start the tutorial!
How to Use Premiere Pro to Remove Video Background?
Adobe Premiere Pro can remove video backgrounds quickly using the Ultra Key feature with the following steps:
Step1 In the first step, launch a browser, and download the appropriate Adobe Premiere Pro version for your Windows PC or Mac . Next, install the software on your system and launch it from your Desktop or Dock.
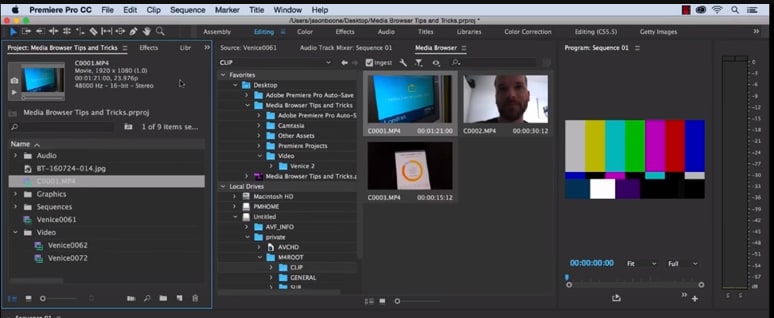
Step2 Now, use the Media Browser panel in the software to browse the video clips you want to import into the software. Next, right-click on your selected video file in which you want to remove the background and choose the “Import” option.
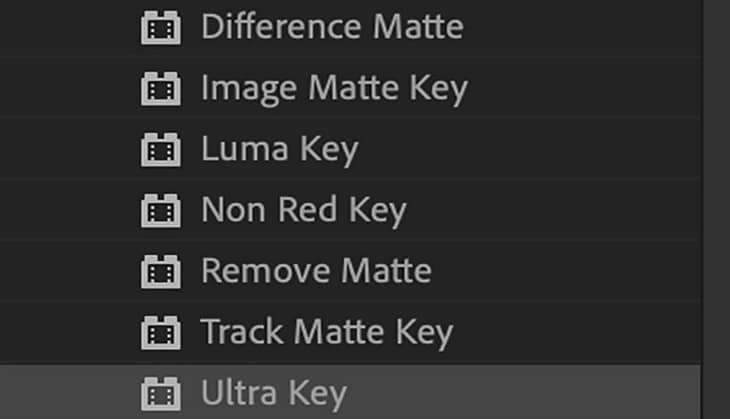
Step3 Click the “Effects” tab in the software panel and select Video Effects. Here, you will see the “Keying” option; select the Ultra Key, press and hold it to grab the key, and place it on your video clip.
![]()
Note: You can also search for the Ultra Key in the Adobe Premiere Pro search bar. Drag it to the video clip containing a background you want to remove.
Step4 As soon as you drop the Ultra Key to your footage, an Effects Control panel will pop up. Next, use the eyedropper tool in the Effects Control panel. Finally, select the background color on your video that you want to remove.
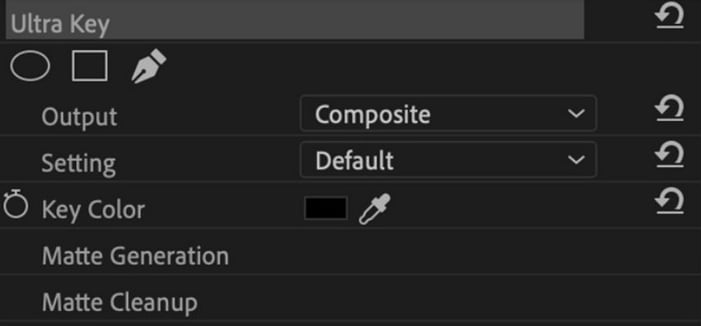
Step5 In the next step, click the drop-down menu next to the “Output” option, and select “Alpha Channel” from the list. This will reveal the details of your video and the edits. Also, click the “Setting” drop-down menu and select the Relaxed, Aggressive, or Custom option for the video effect.

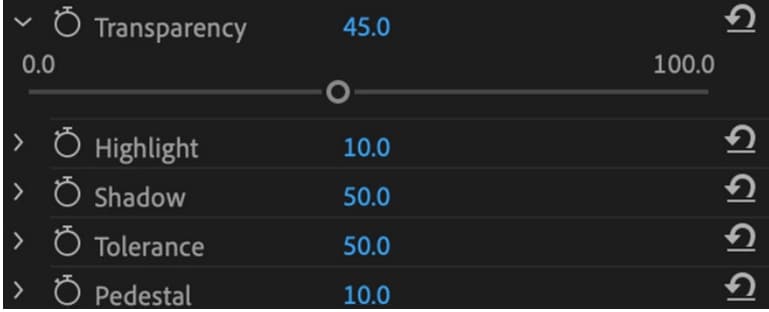
Step6 Select the “Matte Generation“ below Key Color. Try different levels for Highlight, Shadow, Tolerance, Transparency, Pedestal, and other settings to further clean the matte for a premium effect.
Step7 In this step,choose the “Matte Cleanup” option to expand its settings and clean up the edges of your clip. You will see various options here, but the most important one is “Choke.” It will shrink the object’s borders and “Soften” to add fuzz.
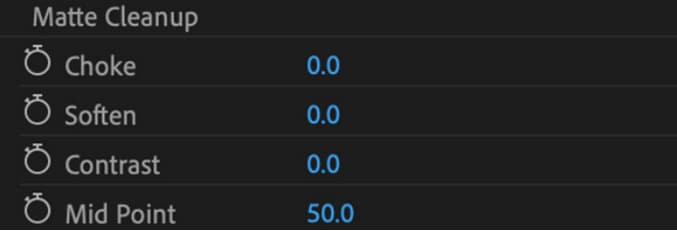
If you see a background color spill on your video after playing with the above settings, click “Spill Suppression” beneath Matte Cleanup to expand its options and choose the desired settings to resolve this issue.
That’s about it! You have successfully removed the video background in Premiere Pro.
Step8 In the last step, you need to save, render, and export your video with the removed background. To do this, click the “File” option on the Premiere Pro Media Browser, and choose “Export” to explore the “Media” menu.
Choose the format in the Export Settings, as it is compatible with most devices. Next, choose a valid Preset and resolution, and click “Export” to begin the rendering process. Finally, save your edited background video again, and export the video to the desired destination.
Is There Any Best Alternative to Remove Video’s Background?
Although Adobe Premiere Pro is an excellent choice, the software can be a little overzealous for beginners. But don’t fret; there is an alternative for newbie to remove the video background.
Many video content creators recommended Wondershare Filmora as a user-friendly video editing software. This software loads with customization options and compact feature, including the Human Segmentation effect. With it, you can isolate objects from the background of a video without a green screen.
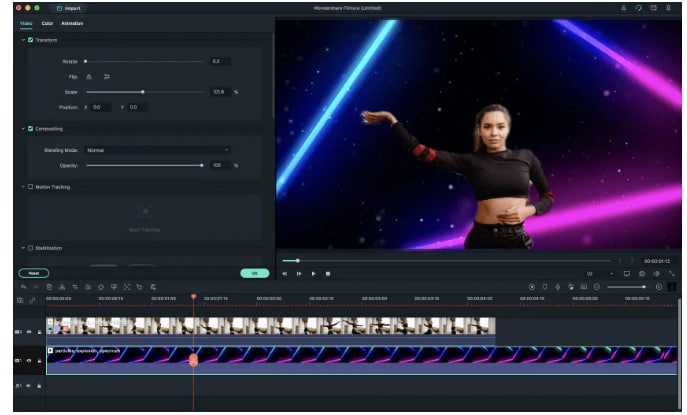
Let’s take a quick look at Filmora video editing marvel features:
- Comes with a free trial and is priced to meet most video designers’ production needs.
- Remove the video background with four quick steps.
- View the foreground of your video in real-time after background removal.
- Numerous customization options to add a different background or an image to the original content.
- Add the removed background as an overlay on top of another clip.
- Drag and drop a video clip to another track in the timeline for cutting, trimming, and elimination purposes.
- Using the “Human Segregation effect” in the AI Portrait on any imported video is simple.
- See objects isolated from the background in the Preview mode, which allows you to adjust the edges, feathers, and thickness accordingly.
- Easy export options supporting various compatible formats.
Additionally, we have provided you with a video tutorial about How to Remove and Change Video Background Without Green Screen with Filmora:
Free Download For Win 7 or later(64-bit)
Free Download For macOS 10.14 or later
Conclusion
This comprehensive guide explains how to remove the video background in Premier Pro using the Ultra key instead of the Color Key.
We have also discussed an excellent alternative to Premier Pro that can eliminate any background in your video content within minutes.
This article helped solve your queries. As a result, you can now create quality video content for your audience without paying thousands of dollars to professional video editors to do the background removal for you.
Step4 As soon as you drop the Ultra Key to your footage, an Effects Control panel will pop up. Next, use the eyedropper tool in the Effects Control panel. Finally, select the background color on your video that you want to remove.

Step5 In the next step, click the drop-down menu next to the “Output” option, and select “Alpha Channel” from the list. This will reveal the details of your video and the edits. Also, click the “Setting” drop-down menu and select the Relaxed, Aggressive, or Custom option for the video effect.

Step6 Select the “Matte Generation“ below Key Color. Try different levels for Highlight, Shadow, Tolerance, Transparency, Pedestal, and other settings to further clean the matte for a premium effect.

Step7 In this step,choose the “Matte Cleanup” option to expand its settings and clean up the edges of your clip. You will see various options here, but the most important one is “Choke.” It will shrink the object’s borders and “Soften” to add fuzz.

If you see a background color spill on your video after playing with the above settings, click “Spill Suppression” beneath Matte Cleanup to expand its options and choose the desired settings to resolve this issue.
That’s about it! You have successfully removed the video background in Premiere Pro.
Step8 In the last step, you need to save, render, and export your video with the removed background. To do this, click the “File” option on the Premiere Pro Media Browser, and choose “Export” to explore the “Media” menu.
Choose the format in the Export Settings, as it is compatible with most devices. Next, choose a valid Preset and resolution, and click “Export” to begin the rendering process. Finally, save your edited background video again, and export the video to the desired destination.
Is There Any Best Alternative to Remove Video’s Background?
Although Adobe Premiere Pro is an excellent choice, the software can be a little overzealous for beginners. But don’t fret; there is an alternative for newbie to remove the video background.
Many video content creators recommended Wondershare Filmora as a user-friendly video editing software. This software loads with customization options and compact feature, including the Human Segmentation effect. With it, you can isolate objects from the background of a video without a green screen.

Let’s take a quick look at Filmora video editing marvel features:
- Comes with a free trial and is priced to meet most video designers’ production needs.
- Remove the video background with four quick steps.
- View the foreground of your video in real-time after background removal.
- Numerous customization options to add a different background or an image to the original content.
- Add the removed background as an overlay on top of another clip.
- Drag and drop a video clip to another track in the timeline for cutting, trimming, and elimination purposes.
- Using the “Human Segregation effect” in the AI Portrait on any imported video is simple.
- See objects isolated from the background in the Preview mode, which allows you to adjust the edges, feathers, and thickness accordingly.
- Easy export options supporting various compatible formats.
Additionally, we have provided you with a video tutorial about How to Remove and Change Video Background Without Green Screen with Filmora:
Free Download For Win 7 or later(64-bit)
Free Download For macOS 10.14 or later
Conclusion
This comprehensive guide explains how to remove the video background in Premier Pro using the Ultra key instead of the Color Key.
We have also discussed an excellent alternative to Premier Pro that can eliminate any background in your video content within minutes.
This article helped solve your queries. As a result, you can now create quality video content for your audience without paying thousands of dollars to professional video editors to do the background removal for you.
This Is the Method Employed During Every Evening Weather Broadcast: The Newscaster Is Standing in Front of a Blank Screen, but the Viewers at Home See a Weather Map
Chroma key with gimp green screen is the method by which photographers (and videographers) use a monochromatic backdrop, then replace the blue or green “screen” with a virtual background. This is the method employed during every evening weather broadcast: the newscaster is standing in front of a blank screen, but the viewers at home see a weather map.
Green screen Chroma key can also be used with photography. Subjects can be photographed in front of a monochromatic screen, and a virtual background can be put behind the subject once the screen is removed. For example, a duck can be photographed in front of a green or blue tarp, which is then replaced by a photograph of a river.
Filmora Audio Recorder
Record computer system audio
Capture microphone audio
Customize recording volume
Record screen and webcam as well
How to use green screen in gimp
If you take a picture with a solid colored background (blue or green works best), then you can have a computer program pull out the blue or green pixels and replace them with another color or a transparent layer. This process is called “chroma key” and is used in weather forecasts and other special effects. The terms “green screen” and “blue screen” also refer to the chroma key process.
These directions outlined below describe how to use GIMP to add a transparent layer and remove blue or green pixels from an image. This allows you to layer images on different backgrounds or use pictures as Sprites in Scratch or Greenfoot.
Brief outline of process:
- Start GIMP
- Open the picture file.
- Create an “Alpha Channel” (Transparent Pixels)
- Select “Like Colored Pixels” (Click on the Green or Blue background)
- Control->K to delete the pixels and reveal the Transparent background.
- Save the picture as a .gif file. (Not .jpg!)
Detailed Directions:
- Start GIMP: (The “Gnu Image Manipulation Program”)
- Click the “K” menu
- Select “Graphics”
- Select “GIMP Image Editor”
Note about the GIMP:
Most computer applications run in one window. GIMP will run different windows for each function or object you are working with. (Separate windows for paintbrush menus, images, backgrounds, etc . . .)
- Select “File-> Open”
- Navigate to your File Area and select a chroma key picture
- Once your picture opens, add the “Alpha Channel”
a. Select “Layer” from the picture menu bar
b. Select “Transparency”
c. Select “Add Alpha Channel” - Click the “Select Region by Color” icon.
- Click once on the green or blue color in the background.
- Press “Control -> K” on the keyboard to delete the colors. The background will appear as a gray checkerboard pattern.
- Repeat the click and “Control-K” process to remove the background colors.
- Once the background colors are removed, save the picture:
a. Select “File-Save As” from the menu bar.
b. Type “LastnamePicture.gif” as the filename. - Select “Convert to Indexed” - Click Export
- Click “OK”
- the picture should save.
- You can now use this picture in Scratch for a sprite, or in other graphics projects to combine with backgrounds.
Best GIMP alternative to edit images
Krita
Krita is an application for image creation and image manipulation. We focus on painting, illustration, concept art and other creative work. This is a short an incomplete list of the most important features Krita provides.
Krita provides an OpenGL based canvas in addition to an unaccelerated canvas. Krita’s filters, histogram computation and image recomposion are multi-threaded and make use of multiple cores if available. The effect of filters is previewed on-canvas.
Key Features
- File Formats
Krita has support for a variety of file formats. Not all file formats are supported equally well, and for some there is only import, not export. Krita supports metadata for kra, ora, tiff, jpeg and png file formats.
- Color models
Krita does not support indexed color models. In general, Krita does not support color models without an alpha channel. Krita supports different channel depths, from 8 bits integer to 32 bits floating point per channel.
- Layer types
Krita supports the both layers and masks. Masks are associated with a single layer, while layers are grouped in a hierarchy.
- Tools
There are several types of tools: vector tools, raster tools, guidance tools, canvas tools and selection tools. Note some types of content are not implement as tools but as “shapes” that can be inserted, for instance richt text, text-on-a-path or geometric shapes.
- Brush engines
Krita is different from other applications in that it supports brush engine plugins. These brush engines are used in the pixel tools to stroke your painting.
- Filters
Krita provides filters that can be used directly, i.e. destructively on the pixels of a layer, when painting, or dynamically as a filter layer or filter mask.
Paint.Net
Paint.net is a free and very capable image editing software for Windows. Great alternative to Photoshop for people that do not need all the stuff PS offers.
In order to handle multiple images easily, Paint.NET uses a tabbed document interface. The tabs display a live thumbnail of the image instead of a text description. This makes navigation very simple and fast. Extensive work has gone into making Paint.NET the fastest image editor available. Whether you have a netbook with a power-conscious Atom CPU, or a Dual Intel Xeon workstation with 16+ blazingly fast processing cores, you can expect Paint.NET to start up quickly and be responsive to every mouse click.
Key Features
- **Performance
Extensive work has gone into making Paint.NET the fastest image editor available. Whether you have a netbook with a power-conscious Atom CPU, or a Dual Intel Xeon workstation with 16+ blazingly fast processing cores, you can expect Paint.NET to start up quickly and be responsive to every mouse click.
- **Layers
Usually only found on expensive or complicated professional software, layers form the basis for a rich image composition experience. You may think of them as a stack of transparency slides that, when viewed together at the same time, form one image.
- **Automatically Updated
Updates are free, and contain new features, performance improvements, and bug fixes. Upgrading to the latest version is very simple, requiring only two clicks of the mouse.
- **Special Effects
Many special effects are included for enhancing and perfecting your images. Everything from blurring, sharpening, red-eye removal, distortion, noise, and embossing are included. Also included is our unique 3D Rotate/Zoom effect that makes it very easy to add perspective and tilting. Adjustments are also included which help you tweak an image’s brightness, contrast, hue, saturation, curves, and levels. You can also convert an image to black and white, or sepia-toned.
- **Powerful Tools
Paint.NET includes simple tools for drawing shapes, including an easy-to-use curve tool for drawing splines or Bezier curves. The Gradient tool, new for 3.0, has been cited as an innovative improvement over similar tools provided by other software. The facilities for creating and working with selections is powerful, yet still simple enough to be picked up quickly. Other powerful tools include the Magic Wand for selecting regions of similar color, and the Clone Stamp for copying or erasing portions of an image. There is also a simple text editor, a tool for zooming, and a Recolor tool.
- **Unlimited History
Everybody makes mistakes, and everybody changes their mind. To accommodate this, _every action you perform on an image is recorded in the History window and may be undone. Once you’ve undone an action, you can also redo it. The length of the history is only limited by available disk space.
Adobe Photoshop
Adobe Photoshop is the commercial image editor that set the standard in creative illustration and design work with a sophisticated, layer-based workflow and robust, professional feature set.
Over the years, Photoshop developed from a small photo editing tool to an Industry-leading software that dictates the global graphic designing and multimedia industries. With every new version, Adobe introduces in the Photoshop; the graphic designing communities wait to check out the next big leap where Photoshop can take them.
Key Features of Adobe Photoshop
- Layers
With Layers palette, you can draw or design various elements of your document independently in layers and stack them up as per the order of display. With this advantage, control over every single object is catered at the click of a mouse. Mistakes happen, but the effects of the mistake are limited to the part of the canvas; you can choose to work on the particular part and leave the rest of the canvas as it is. This benefit is lacking in the traditional painting method. Artists are not allowed to relax at any part of the drawing or painting once their concentration is diverted and a stroke of painting goes wrong! They are bound to change the whole canvas.
- Selection Tools
Photoshop’s selection tools are so handy to use that designers worldwide are addicted to the set of selection tools Photoshop offers. However, there are a bunch of competitive software and open-source software designed to give tough competition for Photoshop. Users are still stuck with Adobe’s torch bearer software due to the ease its tools provide.
- Pen Tool
Today, Photoshop cannot be imagined without a Pen tool. Though the pen tool, by nature, works for drawing paths along with the anchor points, the creative scope it provides is limitless. The tool is designed so flexibly that the designer can draw any shape or edit the existing shapes as good as he is using his bare hand. The amount of control we have through placing the anchor points in the right places is taken further with the three types of Anchor points that can allow you to draw and edit paths precisely.
- Shapes
The outlook of the shape layers in Photoshop may be limited, but the capabilities of the feature go a step further than what we assume about it. In the traditional marquee selection tools, the selection is limited to the raster process, and in many cases, the output will result in the sharp pixilated edges, which are never good looking. But the shape layers can act as an individual object within the document with its attribute to maintain the finest quality.
- Vector Mask
The layer masks create a masking portion of an object by using the grayscale color combination (Shades of Gray). Once the masking part is done, the area of the object under the layer mask disappears.
- Retouching Tools
Retouching tools are an accumulation of various tools such as Stamp tool, Pattern Stamp tool, Spot Healing tool, Healing tool, Patch tool, Redeye tool and much more. Though the numbers are more, every tool has its importance. The development of retouching tools did not happen overnight. Adobe was working hard identifying the problems of the photographers and finding the solutions for the problems from time to time.
Affinity Photo
Affinity Photo is a professional, full-featured raster graphics editor. Working in Affinity Photo is always live and you can pan and zoom at 60fps, with live previews and non-destructive application.
Whatever your genre of choice, be it landscapes, portraits, macro or anything else, Affinity not only has an unbeatable set of tools to help you, but it’s also laid out in an intuitive way that is ideal for newcomers and those switching from other software alike. There are a series of modules, called Personas, that bring you dedicated interfaces, such as Tone Mapping, RAW Developing and even a powerful liquify interface that makes complex reshaping a breeze! Even better, you can take the full functionality of the desktop app on the road, thanks to the iPad version, which is the most powerful mobile editing solution available. With so much on offer for so little, it’s time that you incorporated Affinity Photo into your workflow and moved your photography to the next step. To get you started, we’re going to give you some great tips to get the most from this brilliant software and get you well on the way to creating your own Masterpieces.
- **Develop RAW Files Like A Pro
The first milestone in any photographer’s journey is unquestionably learning to shoot RAW. This image format captures even more data than JPEG and can be tweaked to create the perfect image or a solid base for further editing. To take advantage, all you need to do is open up your RAW file of choice into Affinity Photo and the Develop Persona will load up automatically. From here you can apply exposure adjustments, recover highlights and shadows and even craft a split toning effect. There’s a Curves adjustment for precision tweaks, a savvy noise reduction component and a lens correction module to combat distortion. It has everything you need for that all-important first step to brilliance.
- **Professional Skin Retouching At The Click Of A Button
If you shoot portraits, you’ll doubtless know about the power of frequency separation. This technique is favored by many pros to get that glossy high-end look that screams professional. While it may sound complicated, in Affinity Photo it’s as simple as going to the Photo Persona and clicking on Filters>Frequency Separation. Once you’ve done this, you can set your Gaussian Blur amount in real-time, click Apply and the software will split your shot into two layers, one with the color and one with the detail. From here, you can remove blemishes, add your own dodge and burn and tidy up colors – a game changer!
- **Ramp Up Your Dynamic Range With Tone Mapping
Amazingly, Affinity Photo has its very own Tone Mapping Persona with a full suite of tools to get your well on the way to high dynamic range images, whether you have a series of bracketed shots – identical photos taken at different exposures – or a single shot as we’ve used. Opening this Persona brings up a toolbar on the right-hand side with the usual exposure and enhancement tools, though also gives you access to Tone Compression, Local Contrast and detail sliders. There’s even a series of presets to get you started. Like most of Affinity, the effects can be seen in real-time and are completely reversible, meaning there’s no such thing as a permanent mistake. What we love most about the Tone Mapping Persona is the subtlety compared to others on offer, meaning you’re able to keep your shots looking natural while still getting the most from your work!
- **Adjustments Are Plentiful And Powerful
Adjustments refer to a series of functional layers that apply specific effects to your shots. These can be as simple as Exposure, Vibrance or Brightness and Contrast, which do what they say on the tin, all the way up to more powerful options like Gradient Maps, Channel Mixers and Color Balance for creative effects and color corrections. Because they’re layers, they can be altered at any time in your editing process and moved around as you see fit. They affect any layers below them in the Layer palette but can be set to cast an effect on only a single-pixel layer by using the brilliant Mask to Below feature. You can also stack as many Adjustments as you wish, giving you a huge amount of flexibility to fine-tune your work in any way possible.
- **Layers Offer You The Ultimate Creative Freedom
An editing software that doesn’t allow Layers will really set back your creative choices. Happily, Affinity Photo gives you full control over its layer system. This means that you can bring in additional elements into your scene. You can then take advantage of Affinity’s hugely powerful selection engine to select the parts you wish to cut out or scroll through the full list of Blending Modes for a more refined and creative look. To add the birds to our shot, we took one landscape and added in a shot of birds taken against a white sky. From here, it’s as easy as setting the Blending Mode to Multiply and voila, the white sky has gone. Of course, there’s no need to stop there, and you can find yourself creating in-depth composites that are truly only limited by your imagination - set yourself free!
Pixlr
Pixlr makes it easy to transform everyday images into stunning works of art. Whether you’re applying a quick fix to your photos or adding your personal touch with effects, overlays, or borders, Pixlr has everything you need to make your moments beautiful.
For now, Pixlr is free for all users: individuals to the enterprise. There is no news yet if and when the platform is set to charge people from using it. For content creators and artists on the go, Pixlr is a great app to use. It is free and available on the web. Regardless of your device, you only need an internet connection to get access to a free app but with serious functionalities. You just open your files from your device through the app like you would any popular image editing software and you are good to go. Furthermore, images edited on Pixlr are set to private. This makes your interaction with the app, over the net, is secure. Also, Pixlr does not store any copy of your images in their systems.
Key Features
- **Free and Safe
Pixlr, for now, is free. There is also no indication that the company will charge users soon. It is a legitimate site that does not engage in fraudulent activities or perpetuate any hidden charges. The images that you edit or make on Pixlr are also free for commercial use. For freelance artists and small businesses, this is the perfect starter app. For enterprises with content creators in the field, it is good to let employees know about Pixlr’s no-cost offer.
- **Versatile and Lightweight
Any browser can access Pixlr. Users can access the image editing suite regardless of device type and operating system. If you are on Mac, Windows, or Linux using Safari, Edge, Firefox, or Chrome, Pixlr is available at your disposal. All you need to have is a Flash plug-in.
If you are on mobile using iOS or Android, you can download the native apps. They do not take much of space and memory. It is a true lightweight app that packs a punch when it comes to functionality.
- **Quick Fix
Pixlr is known for being the lightweight app that packs so many editing tools and functionalities at no cost. But, maybe, more importantly, it also includes many tools for quick fixes. This is something essential for people on the go or those that just need minor adjustments. Just open your browser on any device and apply touch-ups. You do not have to open your laptop or go to your desktop for simple needs.
- **Spot heal
Super useful, the spot heal tool can help remove scratches or blemishes by simply clicking on the area. Additional options: Besides size of brush, you have a choice of Pixlr choosing to blend the area with nearby area values or generate a pattern. Generally, you will only want to choose a pattern if you’re blending an area that has a pattern (e.g., a chain-link fence).
- **Dodge
Use the dodge tool to lighten specific areas. Note that this is a tool that deals with contrast (light vs. dark) and not color, although color may sometimes appear to change based on your lightening. Additional options: You can change brush size and exposure settings. You can also choose to focus your lightening on shadows, midtones, or highlights.
- **Sponge
The sponge tool enhances or sops up color, depending on your settings. It’s a great tool for saturating or desaturating specific areas of an image. Additional options: You can change the brush size and brush strength, but the most important setting is whether you want to saturate (increase) or desaturate (decrease) coloring.
Conclusion
When choosing an object for use in chroma key, it is important to verify the background “screen” color does not exist on the object. For example, choosing a blue background for a blue butterfly would be a poor choice: portions of the butterfly would be deleted along with the background.In addition, it would be a good idea to become familiar with basic GIMP functions before attempting this tutorial: a basic knowledge of the Layers dialog and toolbox items is necessary prior to attempting this photo editing technique.
| Change Speed of a Video on iPhone
Versatile Video Editor - Wondershare Filmora
An easy and powerful editor
Numerous effects to choose from
Detailed tutorials provided by the official channel
Do you want to know how to slow down a video on iPhone? Or maybe you want to know how to speed a video up on iPhone.
There might be times you need to speed up or slow down a video that you shoot on iPhone. There are apps and built-in option that allows you to adjust the video’s speed.
This guide will help you out of this problem with step by step process to speed up and slow down iPhone videos.
Let’s get started.
Best Free App for Changing Video Speed on iPhone
Want to know how to slow a video down on iPhone or speed it up? There are numerous apps that let you do this, but not all of them are free and intuitive. However, there’s one such option that stands out from the crowd for its free access and variety of other video editing tools.
Wondershare Filmora is an iOS app available on Apple App Store. You can download the app and install it on your iPhone.
It is essentially a video editing app with an intuitive interface. It can help you speed up videos, slow down videos, or record slowmo iPhone videos that can be shared on social media platforms.
In addition to changing video speed, you can do some basic video editing as well. It includes text effects, stickers effects, music, PIP, and more.
How to Slow Down A Video on iPhone?
Looking for how to slow down a video on iPhone? Keep reading and you’ll find out shortly exactly how to do it.
Have you ever seen a movie trailer and thought that the slow-motion effect looked really cool? Well, you can get the same effect on any of your videos. You can even reverse the effect and speed up your video to create some interesting video effects.
Whatever your reason for slowing down a video, it’s easy to change the speed of your clip using iMovie on iPhone.
Here’s how you can do it:
- You need to have iMovie app installed on your iPhone. If it’s already installed, launch iMovie on your iPhone and start a new project.
- Now, tap the plus sign that’s at the start of the Projects screen.

- Now, a pop-up window will appear where you need to select Movie.

- Now, find and select the video you want to slow down and tap Create Movie button at the center bottom of the screen.

- Now move the playhead to the start of the timeline and tap to select the video. At this point, you’ll see the timeline highlighted in yellow color.
- Look at the bottom of the screen and you’ll find the Speed button with the speedometer icon. Tap the Speed icon and a sliding bar will appear.

- To slow down the video, move the sliding bar to the left side, which’s towards the tortoise. It indicates that the speed of the video will decrease.

- Now click the Play button to preview and then tap Done.
How to Speed Up Videos on iPhone?
Do you want to know how to speed up a video on iPhone? Keep reading to find out.
There are plenty of reasons why you might want to speed up a video. Maybe it’s an educational video that is really slow and boring or it has been recorded in slo-mo. It might be the reason that the video is long and slow, and your audience will get bored midway.
Whatever the reason, speeding up a video is easy to do on iPhone.
Let’s look into two different methods to speed up video on iPhone.
The first method works for videos originally recorded in slo-mo mode on iPhone.
Speed up slo-mo videos using the Photos app
The easiest way to speed up slo-mo videos is using the Photos app that comes pre-installed on iPhone.
Just follow these steps to speed up slo-mo videos:
- Open the Photos app on your iPhone.
- Tap Albums.
- Now, scroll down and tap Slo-mo.
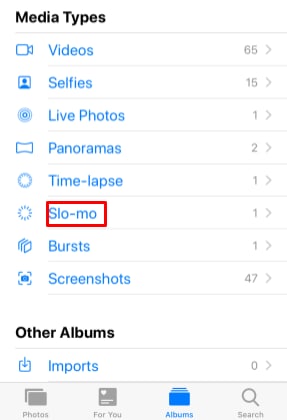
- Tap the slo-mo video you want to speed up.
- Once the video is open, tap Edit.
- You’ll see a set of vertical lines on the bottom of the screen. The vertical lines indicate the video’s speed at that point. Closer lines mean normal speed and a wider distance between lines indicates that the section is in slow motion.
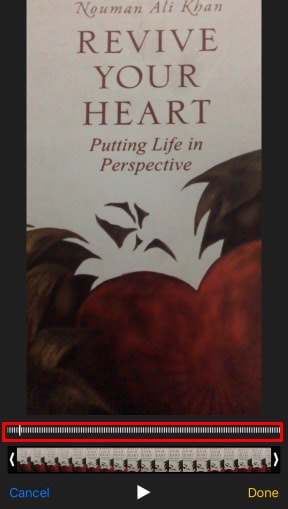
- You can hold and drag a bar and bring it closer to the other one to speed up the slo-mo section of the video. Bringing the lines closer indicates the video is at normal speed.
- Once you have changed the speed, tap Done.

Speed up iPhone videos using iMovie app
Here’s how you can speed up a video on iPhone with iMovie app:
- Launch iMovie on your iPhone and start a new project.
- Now, tap the plus sign visible at the start of the Projects screen.
- A pop-up screen will appear where you need to select Movie.
- Now, you can find and select the video you’re looking to speed up on iPhone. Once sleected, tap Create Movie button at the center bottom of the screen.
- Now move the playhead to the start of the timeline and tap to select the video. At this point, you’ll see the timeline highlighted in yellow color.
- Look at the bottom of the screen and you’ll find the Speed icon. Tap the Speed icon and a sliding bar will appear with a tortoise on its left side and a hare on the right side.
- To speed up the time-lapse video, move the slider to the right side.
- Now click the Play button to preview and then tap Done.
After increasing the speed of the video on iPhone, you can save it or share on your social media accounts or with your friends via messaging apps.
Bonus Tip: How to Change up the speed of a video in Wondershare Filmora
In case you have a video stored on your computer and you need to adjust its speed, you can use Wondershare Filmora.
With Wondershare Filmora, you have the ability to adjust a video’s speed. Flipping through your editing options will reveal your options for doing so. You can increase or decrease the speed of the video with just a few simple clicks.
There are plenty of options around how much you can speed up/down. In fact, you can set a custom speed.
Let’s see how you can slow down and speed up a video using Wondershare Filmora.
How to speed a video up with Filmora
Follow these steps to increase the speed of the video using Wondershare Filmora:
- Download and install Wondershare Filmora on your computer.
- Launch Filmora and click the on new project, or you can just drag and drop the file that you want to edit.

- Click the Import button to load your file or drag and drop the file directly.
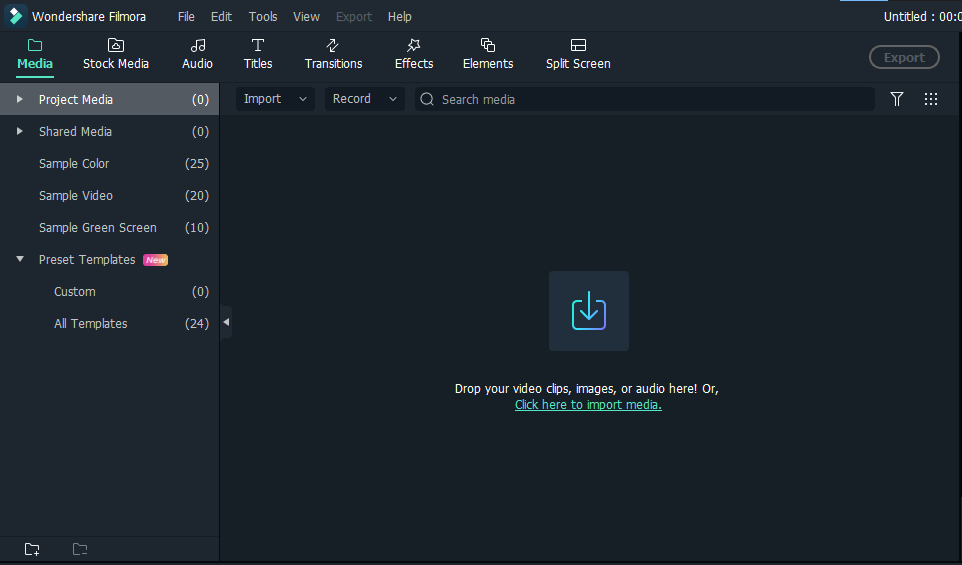
- Once imported, you need to drag the file to the timeline.

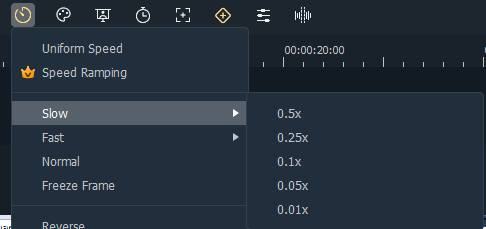
- Now that the video is on timeline, you need to click the Speed icon and select the Fast option. You can increase the speed by 2x, 4x, 8x, and so on. You can also set a custom speed using Custom Speed option.
- Save the file and use it the way you want.
How to slow down a video using Filmora
To slow down a video using Filmora, you need to follow the below steps:
- Make sure you have Wondershare Filmora installed on your computer.
- Launch Filmora and click the Import button. The browse file window will appear where you need to select the file you want to slow down. You can also drag and drop the file directly.
- Once imported to the media library, drag the file to the timeline.
- Now that the video is on the timeline, click the Speed icon. Since you want to slow down the video, select the Slow option. Filmora lets you slow down a video by 0.5x, 0.25x, 0.1x, 0.05x, and 0.01x. You can also set a custom speed.
- Now, click the Render button to apply the settings.
- Save the file and use it the way you want.
Conclusion
That’s really it! Changing video playback speed on your iPhone couldn’t be simpler, and it will help you save time by leaving you with shorter videos to edit.
We explained the step-by-step process to let you know how to slow down a video on iPhone or speed it up. With the help of a built-in method to speed up slo-mo video and using apps like iMovie and Filmora, you can easily speed up or slow down videos on your iPhone.
When it comes to changing the video’s speed on your computer, Wondershare Filmora is an excellent choice.
We hope this guide helps you to change the speed of videos on your iPhone – without scratching your head.
Do you want to know how to slow down a video on iPhone? Or maybe you want to know how to speed a video up on iPhone.
There might be times you need to speed up or slow down a video that you shoot on iPhone. There are apps and built-in option that allows you to adjust the video’s speed.
This guide will help you out of this problem with step by step process to speed up and slow down iPhone videos.
Let’s get started.
Best Free App for Changing Video Speed on iPhone
Want to know how to slow a video down on iPhone or speed it up? There are numerous apps that let you do this, but not all of them are free and intuitive. However, there’s one such option that stands out from the crowd for its free access and variety of other video editing tools.
Wondershare Filmora is an iOS app available on Apple App Store. You can download the app and install it on your iPhone.
It is essentially a video editing app with an intuitive interface. It can help you speed up videos, slow down videos, or record slowmo iPhone videos that can be shared on social media platforms.
In addition to changing video speed, you can do some basic video editing as well. It includes text effects, stickers effects, music, PIP, and more.
How to Slow Down A Video on iPhone?
Looking for how to slow down a video on iPhone? Keep reading and you’ll find out shortly exactly how to do it.
Have you ever seen a movie trailer and thought that the slow-motion effect looked really cool? Well, you can get the same effect on any of your videos. You can even reverse the effect and speed up your video to create some interesting video effects.
Whatever your reason for slowing down a video, it’s easy to change the speed of your clip using iMovie on iPhone.
Here’s how you can do it:
- You need to have iMovie app installed on your iPhone. If it’s already installed, launch iMovie on your iPhone and start a new project.
- Now, tap the plus sign that’s at the start of the Projects screen.

- Now, a pop-up window will appear where you need to select Movie.

- Now, find and select the video you want to slow down and tap Create Movie button at the center bottom of the screen.

- Now move the playhead to the start of the timeline and tap to select the video. At this point, you’ll see the timeline highlighted in yellow color.
- Look at the bottom of the screen and you’ll find the Speed button with the speedometer icon. Tap the Speed icon and a sliding bar will appear.

- To slow down the video, move the sliding bar to the left side, which’s towards the tortoise. It indicates that the speed of the video will decrease.

- Now click the Play button to preview and then tap Done.
How to Speed Up Videos on iPhone?
Do you want to know how to speed up a video on iPhone? Keep reading to find out.
There are plenty of reasons why you might want to speed up a video. Maybe it’s an educational video that is really slow and boring or it has been recorded in slo-mo. It might be the reason that the video is long and slow, and your audience will get bored midway.
Whatever the reason, speeding up a video is easy to do on iPhone.
Let’s look into two different methods to speed up video on iPhone.
The first method works for videos originally recorded in slo-mo mode on iPhone.
Speed up slo-mo videos using the Photos app
The easiest way to speed up slo-mo videos is using the Photos app that comes pre-installed on iPhone.
Just follow these steps to speed up slo-mo videos:
- Open the Photos app on your iPhone.
- Tap Albums.
- Now, scroll down and tap Slo-mo.

- Tap the slo-mo video you want to speed up.
- Once the video is open, tap Edit.
- You’ll see a set of vertical lines on the bottom of the screen. The vertical lines indicate the video’s speed at that point. Closer lines mean normal speed and a wider distance between lines indicates that the section is in slow motion.

- You can hold and drag a bar and bring it closer to the other one to speed up the slo-mo section of the video. Bringing the lines closer indicates the video is at normal speed.
- Once you have changed the speed, tap Done.

Speed up iPhone videos using iMovie app
Here’s how you can speed up a video on iPhone with iMovie app:
- Launch iMovie on your iPhone and start a new project.
- Now, tap the plus sign visible at the start of the Projects screen.
- A pop-up screen will appear where you need to select Movie.
- Now, you can find and select the video you’re looking to speed up on iPhone. Once sleected, tap Create Movie button at the center bottom of the screen.
- Now move the playhead to the start of the timeline and tap to select the video. At this point, you’ll see the timeline highlighted in yellow color.
- Look at the bottom of the screen and you’ll find the Speed icon. Tap the Speed icon and a sliding bar will appear with a tortoise on its left side and a hare on the right side.
- To speed up the time-lapse video, move the slider to the right side.
- Now click the Play button to preview and then tap Done.
After increasing the speed of the video on iPhone, you can save it or share on your social media accounts or with your friends via messaging apps.
Bonus Tip: How to Change up the speed of a video in Wondershare Filmora
In case you have a video stored on your computer and you need to adjust its speed, you can use Wondershare Filmora.
With Wondershare Filmora, you have the ability to adjust a video’s speed. Flipping through your editing options will reveal your options for doing so. You can increase or decrease the speed of the video with just a few simple clicks.
There are plenty of options around how much you can speed up/down. In fact, you can set a custom speed.
Let’s see how you can slow down and speed up a video using Wondershare Filmora.
How to speed a video up with Filmora
Follow these steps to increase the speed of the video using Wondershare Filmora:
- Download and install Wondershare Filmora on your computer.
- Launch Filmora and click the on new project, or you can just drag and drop the file that you want to edit.

- Click the Import button to load your file or drag and drop the file directly.

- Once imported, you need to drag the file to the timeline.

- Now that the video is on timeline, you need to click the Speed icon and select the Fast option. You can increase the speed by 2x, 4x, 8x, and so on. You can also set a custom speed using Custom Speed option.

- Save the file and use it the way you want.
How to slow down a video using Filmora
To slow down a video using Filmora, you need to follow the below steps:
- Make sure you have Wondershare Filmora installed on your computer.
- Launch Filmora and click the Import button. The browse file window will appear where you need to select the file you want to slow down. You can also drag and drop the file directly.
- Once imported to the media library, drag the file to the timeline.
- Now that the video is on the timeline, click the Speed icon. Since you want to slow down the video, select the Slow option. Filmora lets you slow down a video by 0.5x, 0.25x, 0.1x, 0.05x, and 0.01x. You can also set a custom speed.
- Now, click the Render button to apply the settings.
- Save the file and use it the way you want.
Conclusion
That’s really it! Changing video playback speed on your iPhone couldn’t be simpler, and it will help you save time by leaving you with shorter videos to edit.
We explained the step-by-step process to let you know how to slow down a video on iPhone or speed it up. With the help of a built-in method to speed up slo-mo video and using apps like iMovie and Filmora, you can easily speed up or slow down videos on your iPhone.
When it comes to changing the video’s speed on your computer, Wondershare Filmora is an excellent choice.
We hope this guide helps you to change the speed of videos on your iPhone – without scratching your head.
Do you want to know how to slow down a video on iPhone? Or maybe you want to know how to speed a video up on iPhone.
There might be times you need to speed up or slow down a video that you shoot on iPhone. There are apps and built-in option that allows you to adjust the video’s speed.
This guide will help you out of this problem with step by step process to speed up and slow down iPhone videos.
Let’s get started.
Best Free App for Changing Video Speed on iPhone
Want to know how to slow a video down on iPhone or speed it up? There are numerous apps that let you do this, but not all of them are free and intuitive. However, there’s one such option that stands out from the crowd for its free access and variety of other video editing tools.
Wondershare Filmora is an iOS app available on Apple App Store. You can download the app and install it on your iPhone.
It is essentially a video editing app with an intuitive interface. It can help you speed up videos, slow down videos, or record slowmo iPhone videos that can be shared on social media platforms.
In addition to changing video speed, you can do some basic video editing as well. It includes text effects, stickers effects, music, PIP, and more.
How to Slow Down A Video on iPhone?
Looking for how to slow down a video on iPhone? Keep reading and you’ll find out shortly exactly how to do it.
Have you ever seen a movie trailer and thought that the slow-motion effect looked really cool? Well, you can get the same effect on any of your videos. You can even reverse the effect and speed up your video to create some interesting video effects.
Whatever your reason for slowing down a video, it’s easy to change the speed of your clip using iMovie on iPhone.
Here’s how you can do it:
- You need to have iMovie app installed on your iPhone. If it’s already installed, launch iMovie on your iPhone and start a new project.
- Now, tap the plus sign that’s at the start of the Projects screen.

- Now, a pop-up window will appear where you need to select Movie.

- Now, find and select the video you want to slow down and tap Create Movie button at the center bottom of the screen.

- Now move the playhead to the start of the timeline and tap to select the video. At this point, you’ll see the timeline highlighted in yellow color.
- Look at the bottom of the screen and you’ll find the Speed button with the speedometer icon. Tap the Speed icon and a sliding bar will appear.

- To slow down the video, move the sliding bar to the left side, which’s towards the tortoise. It indicates that the speed of the video will decrease.

- Now click the Play button to preview and then tap Done.
How to Speed Up Videos on iPhone?
Do you want to know how to speed up a video on iPhone? Keep reading to find out.
There are plenty of reasons why you might want to speed up a video. Maybe it’s an educational video that is really slow and boring or it has been recorded in slo-mo. It might be the reason that the video is long and slow, and your audience will get bored midway.
Whatever the reason, speeding up a video is easy to do on iPhone.
Let’s look into two different methods to speed up video on iPhone.
The first method works for videos originally recorded in slo-mo mode on iPhone.
Speed up slo-mo videos using the Photos app
The easiest way to speed up slo-mo videos is using the Photos app that comes pre-installed on iPhone.
Just follow these steps to speed up slo-mo videos:
- Open the Photos app on your iPhone.
- Tap Albums.
- Now, scroll down and tap Slo-mo.

- Tap the slo-mo video you want to speed up.
- Once the video is open, tap Edit.
- You’ll see a set of vertical lines on the bottom of the screen. The vertical lines indicate the video’s speed at that point. Closer lines mean normal speed and a wider distance between lines indicates that the section is in slow motion.

- You can hold and drag a bar and bring it closer to the other one to speed up the slo-mo section of the video. Bringing the lines closer indicates the video is at normal speed.
- Once you have changed the speed, tap Done.

Speed up iPhone videos using iMovie app
Here’s how you can speed up a video on iPhone with iMovie app:
- Launch iMovie on your iPhone and start a new project.
- Now, tap the plus sign visible at the start of the Projects screen.
- A pop-up screen will appear where you need to select Movie.
- Now, you can find and select the video you’re looking to speed up on iPhone. Once sleected, tap Create Movie button at the center bottom of the screen.
- Now move the playhead to the start of the timeline and tap to select the video. At this point, you’ll see the timeline highlighted in yellow color.
- Look at the bottom of the screen and you’ll find the Speed icon. Tap the Speed icon and a sliding bar will appear with a tortoise on its left side and a hare on the right side.
- To speed up the time-lapse video, move the slider to the right side.
- Now click the Play button to preview and then tap Done.
After increasing the speed of the video on iPhone, you can save it or share on your social media accounts or with your friends via messaging apps.
Bonus Tip: How to Change up the speed of a video in Wondershare Filmora
In case you have a video stored on your computer and you need to adjust its speed, you can use Wondershare Filmora.
With Wondershare Filmora, you have the ability to adjust a video’s speed. Flipping through your editing options will reveal your options for doing so. You can increase or decrease the speed of the video with just a few simple clicks.
There are plenty of options around how much you can speed up/down. In fact, you can set a custom speed.
Let’s see how you can slow down and speed up a video using Wondershare Filmora.
How to speed a video up with Filmora
Follow these steps to increase the speed of the video using Wondershare Filmora:
- Download and install Wondershare Filmora on your computer.
- Launch Filmora and click the on new project, or you can just drag and drop the file that you want to edit.

- Click the Import button to load your file or drag and drop the file directly.

- Once imported, you need to drag the file to the timeline.

- Now that the video is on timeline, you need to click the Speed icon and select the Fast option. You can increase the speed by 2x, 4x, 8x, and so on. You can also set a custom speed using Custom Speed option.

- Save the file and use it the way you want.
How to slow down a video using Filmora
To slow down a video using Filmora, you need to follow the below steps:
- Make sure you have Wondershare Filmora installed on your computer.
- Launch Filmora and click the Import button. The browse file window will appear where you need to select the file you want to slow down. You can also drag and drop the file directly.
- Once imported to the media library, drag the file to the timeline.
- Now that the video is on the timeline, click the Speed icon. Since you want to slow down the video, select the Slow option. Filmora lets you slow down a video by 0.5x, 0.25x, 0.1x, 0.05x, and 0.01x. You can also set a custom speed.
- Now, click the Render button to apply the settings.
- Save the file and use it the way you want.
Conclusion
That’s really it! Changing video playback speed on your iPhone couldn’t be simpler, and it will help you save time by leaving you with shorter videos to edit.
We explained the step-by-step process to let you know how to slow down a video on iPhone or speed it up. With the help of a built-in method to speed up slo-mo video and using apps like iMovie and Filmora, you can easily speed up or slow down videos on your iPhone.
When it comes to changing the video’s speed on your computer, Wondershare Filmora is an excellent choice.
We hope this guide helps you to change the speed of videos on your iPhone – without scratching your head.
Do you want to know how to slow down a video on iPhone? Or maybe you want to know how to speed a video up on iPhone.
There might be times you need to speed up or slow down a video that you shoot on iPhone. There are apps and built-in option that allows you to adjust the video’s speed.
This guide will help you out of this problem with step by step process to speed up and slow down iPhone videos.
Let’s get started.
Best Free App for Changing Video Speed on iPhone
Want to know how to slow a video down on iPhone or speed it up? There are numerous apps that let you do this, but not all of them are free and intuitive. However, there’s one such option that stands out from the crowd for its free access and variety of other video editing tools.
Wondershare Filmora is an iOS app available on Apple App Store. You can download the app and install it on your iPhone.
It is essentially a video editing app with an intuitive interface. It can help you speed up videos, slow down videos, or record slowmo iPhone videos that can be shared on social media platforms.
In addition to changing video speed, you can do some basic video editing as well. It includes text effects, stickers effects, music, PIP, and more.
How to Slow Down A Video on iPhone?
Looking for how to slow down a video on iPhone? Keep reading and you’ll find out shortly exactly how to do it.
Have you ever seen a movie trailer and thought that the slow-motion effect looked really cool? Well, you can get the same effect on any of your videos. You can even reverse the effect and speed up your video to create some interesting video effects.
Whatever your reason for slowing down a video, it’s easy to change the speed of your clip using iMovie on iPhone.
Here’s how you can do it:
- You need to have iMovie app installed on your iPhone. If it’s already installed, launch iMovie on your iPhone and start a new project.
- Now, tap the plus sign that’s at the start of the Projects screen.

- Now, a pop-up window will appear where you need to select Movie.

- Now, find and select the video you want to slow down and tap Create Movie button at the center bottom of the screen.

- Now move the playhead to the start of the timeline and tap to select the video. At this point, you’ll see the timeline highlighted in yellow color.
- Look at the bottom of the screen and you’ll find the Speed button with the speedometer icon. Tap the Speed icon and a sliding bar will appear.

- To slow down the video, move the sliding bar to the left side, which’s towards the tortoise. It indicates that the speed of the video will decrease.

- Now click the Play button to preview and then tap Done.
How to Speed Up Videos on iPhone?
Do you want to know how to speed up a video on iPhone? Keep reading to find out.
There are plenty of reasons why you might want to speed up a video. Maybe it’s an educational video that is really slow and boring or it has been recorded in slo-mo. It might be the reason that the video is long and slow, and your audience will get bored midway.
Whatever the reason, speeding up a video is easy to do on iPhone.
Let’s look into two different methods to speed up video on iPhone.
The first method works for videos originally recorded in slo-mo mode on iPhone.
Speed up slo-mo videos using the Photos app
The easiest way to speed up slo-mo videos is using the Photos app that comes pre-installed on iPhone.
Just follow these steps to speed up slo-mo videos:
- Open the Photos app on your iPhone.
- Tap Albums.
- Now, scroll down and tap Slo-mo.

- Tap the slo-mo video you want to speed up.
- Once the video is open, tap Edit.
- You’ll see a set of vertical lines on the bottom of the screen. The vertical lines indicate the video’s speed at that point. Closer lines mean normal speed and a wider distance between lines indicates that the section is in slow motion.

- You can hold and drag a bar and bring it closer to the other one to speed up the slo-mo section of the video. Bringing the lines closer indicates the video is at normal speed.
- Once you have changed the speed, tap Done.

Speed up iPhone videos using iMovie app
Here’s how you can speed up a video on iPhone with iMovie app:
- Launch iMovie on your iPhone and start a new project.
- Now, tap the plus sign visible at the start of the Projects screen.
- A pop-up screen will appear where you need to select Movie.
- Now, you can find and select the video you’re looking to speed up on iPhone. Once sleected, tap Create Movie button at the center bottom of the screen.
- Now move the playhead to the start of the timeline and tap to select the video. At this point, you’ll see the timeline highlighted in yellow color.
- Look at the bottom of the screen and you’ll find the Speed icon. Tap the Speed icon and a sliding bar will appear with a tortoise on its left side and a hare on the right side.
- To speed up the time-lapse video, move the slider to the right side.
- Now click the Play button to preview and then tap Done.
After increasing the speed of the video on iPhone, you can save it or share on your social media accounts or with your friends via messaging apps.
Bonus Tip: How to Change up the speed of a video in Wondershare Filmora
In case you have a video stored on your computer and you need to adjust its speed, you can use Wondershare Filmora.
With Wondershare Filmora, you have the ability to adjust a video’s speed. Flipping through your editing options will reveal your options for doing so. You can increase or decrease the speed of the video with just a few simple clicks.
There are plenty of options around how much you can speed up/down. In fact, you can set a custom speed.
Let’s see how you can slow down and speed up a video using Wondershare Filmora.
How to speed a video up with Filmora
Follow these steps to increase the speed of the video using Wondershare Filmora:
- Download and install Wondershare Filmora on your computer.
- Launch Filmora and click the on new project, or you can just drag and drop the file that you want to edit.

- Click the Import button to load your file or drag and drop the file directly.

- Once imported, you need to drag the file to the timeline.

- Now that the video is on timeline, you need to click the Speed icon and select the Fast option. You can increase the speed by 2x, 4x, 8x, and so on. You can also set a custom speed using Custom Speed option.

- Save the file and use it the way you want.
How to slow down a video using Filmora
To slow down a video using Filmora, you need to follow the below steps:
- Make sure you have Wondershare Filmora installed on your computer.
- Launch Filmora and click the Import button. The browse file window will appear where you need to select the file you want to slow down. You can also drag and drop the file directly.
- Once imported to the media library, drag the file to the timeline.
- Now that the video is on the timeline, click the Speed icon. Since you want to slow down the video, select the Slow option. Filmora lets you slow down a video by 0.5x, 0.25x, 0.1x, 0.05x, and 0.01x. You can also set a custom speed.
- Now, click the Render button to apply the settings.
- Save the file and use it the way you want.
Conclusion
That’s really it! Changing video playback speed on your iPhone couldn’t be simpler, and it will help you save time by leaving you with shorter videos to edit.
We explained the step-by-step process to let you know how to slow down a video on iPhone or speed it up. With the help of a built-in method to speed up slo-mo video and using apps like iMovie and Filmora, you can easily speed up or slow down videos on your iPhone.
When it comes to changing the video’s speed on your computer, Wondershare Filmora is an excellent choice.
We hope this guide helps you to change the speed of videos on your iPhone – without scratching your head.
Do You Still Waste Time Making Transparent Background in Paint
Do You Still Waste Time Making Transparent Background in Paint
An easy yet powerful editor
Numerous effects to choose from
Detailed tutorials provided by the official channel
Transparent background can be made easily with paint. Make background transparent paint 3d in simple steps. Learn to make background of a picture transparent with paintbrush.
In this article
01 [What’s Paint and What Advantages Does It Have for Making Transparent Background](#Part 1)
02 [How to Save a Picture with a Transparent Background?](#Part 2)
03 [How to Make Background Transparent in Paint?](#Part 3)
Part 1 What’s Paint and What Advantages Does It Have for Making Transparent Background
MS paint is one of the widest programs of Microsoft used for creating and editing pictures at the computer. It is also used to add text to the images. It’s features like ease to use and simplicity has made it so popular among the people. It’s simple drawing tool help to draw pictures on the blank space or on existing image. The various editing tools such as cropping, resizing and rotating help in manipulating images. Wide range of colors, fonts and combinations option with color make it a great choice for the users to make and edit pictures. It also comes with various built in applications that are good for various versions of Windows.
Due to its various advantages, good painters can create beautiful pictures with special effects. One can easily add or edit pictures by adding attractive picture effects as it can be done with other applications. Some of the advantages of using paint to add transparent backgrounds are:
● Paint is pre-installed at every computer and thus a user who wish to do painting or edit in the images, they need not to deal with the installation process.
● It has basic drawing and editing tools such as shapes, cropping, sizing and coloring which support maximum file types such as JPG, GIF, BMP and PNG.
● Paint is a simple program and can be learned by anyone. Thus, it is user friendly, simple and one of the most cost effective programs.
● Eraser, magnifier, pencil, paintbrush, spray, fonts, shapes and color palette are some of the tools that can even be used to add some customized features to the pictures.
● The best thing with paint is that a user can start making a picture from scratch. The files can be easily used easily from various sources such as digital camera, scanner or any other source. A user is not required to download any other software or application to add creating and editing features in a picture.
● One can change the image’s dimensions, captions, and switch color images to black and white. Transparent Background Paint is also a feature in the MS paint which can make any picture more attractive.
● Paint has support system also that can help painter to master over the brush and paints.
Part 2 How to Save a Picture with a Transparent Background?
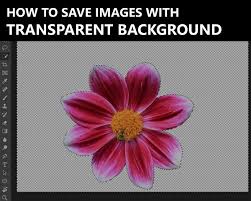
A picture made with paint splatter transparent background can be saved easily by following simple steps beginning from creating a picture with transparent background. The steps to be followed are:
● Open the image in paint which you require to add transparent background.
● Go to the image selection under select option. Click on “Transparent selection”.
● Pick the image area which is required to made transparent and press Delete.
● You will get the blank background and this need to be saved at the MS word file to make the background transparent.
● Insert the image into the word document, select ‘Format’ and click on ‘Remove background’.
● After having preview of the image, click on ‘Save changes’
● In the last step to save image, select ‘Save as Picture’. This will be the final image with a transparent background.
So, this way one can save image with transparent background paint.
Part 3 How to Make Background Transparent in Paint?
MS paint has plenty of features and tools to make a picture visually good. With high definition pictures coming into light now-a-days, 3D pictures are in trends. Giving a transparent background to a picture makes it very attractive. To paint 3d make background transparent, Ms Paint is a program that can be used by a new beginner and an experienced painter.
Let’s see how to make a picture background transparent in different styles.
01Make Background Transparent Using MS Paint
Learning to add transparent background to images? It can be done in simple steps:
● Click the Cortana, which is visual assistant and open Paint.
● Search paint in the search box and select it to open the Paint.
● To open the image in which background is to be added, move on to click on file and then open the image
● Press “Select button” and click the transparent selection option.
● Go to Select button’s menu and select the Free-form selection.
● Trace the area for background creation with the cursor and save the original picture. This can be done by holding the left mouse button.
● The rest of picture will be meant for having a transparent background.
● A rectangle will appear at the selected area. Right click on that. Then select cut that come in context menu. It will remove the selected foreground appearing the picture.
● Open a new image in Paint.
● Using Ctrl + V hotkey, you need to paste the traced foreground area from the first image.
● You can see the picture with transparent background.
● Left-click on the pasted foreground image and adjust it to a place on the background picture.
02Make Background Transparent Using Paint 3d
Transparent background can be made using Paint 3D. Let’s see how to do it:
● Search Paint 3D in Windows 10’s search box.
● It can also be done by adding the app to Windows 10
● Select to open the Paint 3D app.
● Go to Menu, select the image required and open it in Paint 3D
● Open the sidebar by pressing the Canvas button.
● Go to Transparent canvas setting.
● Through Select button drag the selection rectangle over an area of the image required to delete.
● Use Ctrl + X hotkey to cut out the area from the picture.
● You have a blank transparent area that can be filled with background layer.
● Go to Menu. Save it and select the 2D PNG option.
● Save by adding a title in the text box.
● Go to Menu and select, open the transparent image saved.
● You can find the transparent image on top of the background layer.
● The transparent area is filled by the background image layer.
● It can be resized also moving and dragging cursor.
A blank area remains in Paint leaves when picture is cut. It does not become transparent background. This blank region can be utilized for layers in the other image. This can be done through various images editing software. Thus, this way transparent background paint 3d can be made easily.
There are various applications and software to add transparent background to the images. One of the trendy applications to edit pictures and paint splash transparent background is Filmora. This application can be even used to paint brush transparent background and remove background in paint 3d. Let’s learn and know about Wondershare Filmora Video Editor .
For Win 7 or later (64-bit)
For macOS 10.12 or later
Filmora is one of the best picture and video editing software. It is trending and becoming popular due to its extraordinary features and editing tools. Colour tuning, editing support, advanced text editor, and its basic color grading features make it best for editing pictures. With filmora people can even add 3D effects on the pictures. It has Action camera tools which has camera shake, slow motion and reverse features. The professional color correction tool help in adjusting saturation, brightness and contrast. Faster editing with low resolution is also one of the features of the application. This software or application can add movement and new advance appearance to the picture that can make it more visually appealing.
This application is very useful for both the beginners as well as semi pros. They can turn their creativity into reality by using Filmora. Different versions of the application are available based on the suitability of the users. Filmora can be used to add transparent background to any images. With so many image editing and coloring tools and features, this becomes a must have application in any mobile device or Desktop.
● Ending Thoughts →
● MS paint from Microsoft is widely used program or software for creating and editing pictures. Due to its simple drawing tool and editing features, still it is first choice for the beginners and professional artists. Color, font, text and editing features in paint can be easily understood and therefore it has various advantages as compared to rest of the software or application.
● Ms Paint can be used for editing pictures and it is good when you need to add transparent background to any image. Paint 3d is one of the advanced version of the paint and it gives 3d effects to any image. It can be done by following simple steps. It can be learned easily through support provided by MS paint. The steps are simple and can be learned by anyone.
● Although there are various image editing software and applications for adding transparent background to an image. Filmora is one of the emerging application for editing pictures and videos. It is used to add some amazing effects to any picture or video. One can customize image as per their requirement through advanced settings. It can be easily installed and worked flow is good wit Filmora.
Transparent background can be made easily with paint. Make background transparent paint 3d in simple steps. Learn to make background of a picture transparent with paintbrush.
In this article
01 [What’s Paint and What Advantages Does It Have for Making Transparent Background](#Part 1)
02 [How to Save a Picture with a Transparent Background?](#Part 2)
03 [How to Make Background Transparent in Paint?](#Part 3)
Part 1 What’s Paint and What Advantages Does It Have for Making Transparent Background

MS paint is one of the widest programs of Microsoft used for creating and editing pictures at the computer. It is also used to add text to the images. It’s features like ease to use and simplicity has made it so popular among the people. It’s simple drawing tool help to draw pictures on the blank space or on existing image. The various editing tools such as cropping, resizing and rotating help in manipulating images. Wide range of colors, fonts and combinations option with color make it a great choice for the users to make and edit pictures. It also comes with various built in applications that are good for various versions of Windows.
Due to its various advantages, good painters can create beautiful pictures with special effects. One can easily add or edit pictures by adding attractive picture effects as it can be done with other applications. Some of the advantages of using paint to add transparent backgrounds are:
● Paint is pre-installed at every computer and thus a user who wish to do painting or edit in the images, they need not to deal with the installation process.
● It has basic drawing and editing tools such as shapes, cropping, sizing and coloring which support maximum file types such as JPG, GIF, BMP and PNG.
● Paint is a simple program and can be learned by anyone. Thus, it is user friendly, simple and one of the most cost effective programs.
● Eraser, magnifier, pencil, paintbrush, spray, fonts, shapes and color palette are some of the tools that can even be used to add some customized features to the pictures.
● The best thing with paint is that a user can start making a picture from scratch. The files can be easily used easily from various sources such as digital camera, scanner or any other source. A user is not required to download any other software or application to add creating and editing features in a picture.
● One can change the image’s dimensions, captions, and switch color images to black and white. Transparent Background Paint is also a feature in the MS paint which can make any picture more attractive.
● Paint has support system also that can help painter to master over the brush and paints.
Part 2 How to Save a Picture with a Transparent Background?

A picture made with paint splatter transparent background can be saved easily by following simple steps beginning from creating a picture with transparent background. The steps to be followed are:
● Open the image in paint which you require to add transparent background.
● Go to the image selection under select option. Click on “Transparent selection”.
● Pick the image area which is required to made transparent and press Delete.
● You will get the blank background and this need to be saved at the MS word file to make the background transparent.
● Insert the image into the word document, select ‘Format’ and click on ‘Remove background’.
● After having preview of the image, click on ‘Save changes’
● In the last step to save image, select ‘Save as Picture’. This will be the final image with a transparent background.
So, this way one can save image with transparent background paint.
Part 3 How to Make Background Transparent in Paint?

MS paint has plenty of features and tools to make a picture visually good. With high definition pictures coming into light now-a-days, 3D pictures are in trends. Giving a transparent background to a picture makes it very attractive. To paint 3d make background transparent, Ms Paint is a program that can be used by a new beginner and an experienced painter.
Let’s see how to make a picture background transparent in different styles.
01Make Background Transparent Using MS Paint
Learning to add transparent background to images? It can be done in simple steps:
● Click the Cortana, which is visual assistant and open Paint.
● Search paint in the search box and select it to open the Paint.
● To open the image in which background is to be added, move on to click on file and then open the image
● Press “Select button” and click the transparent selection option.
● Go to Select button’s menu and select the Free-form selection.
● Trace the area for background creation with the cursor and save the original picture. This can be done by holding the left mouse button.
● The rest of picture will be meant for having a transparent background.
● A rectangle will appear at the selected area. Right click on that. Then select cut that come in context menu. It will remove the selected foreground appearing the picture.
● Open a new image in Paint.
● Using Ctrl + V hotkey, you need to paste the traced foreground area from the first image.
● You can see the picture with transparent background.
● Left-click on the pasted foreground image and adjust it to a place on the background picture.
02Make Background Transparent Using Paint 3d
Transparent background can be made using Paint 3D. Let’s see how to do it:
● Search Paint 3D in Windows 10’s search box.
● It can also be done by adding the app to Windows 10
● Select to open the Paint 3D app.
● Go to Menu, select the image required and open it in Paint 3D
● Open the sidebar by pressing the Canvas button.
● Go to Transparent canvas setting.
● Through Select button drag the selection rectangle over an area of the image required to delete.
● Use Ctrl + X hotkey to cut out the area from the picture.
● You have a blank transparent area that can be filled with background layer.
● Go to Menu. Save it and select the 2D PNG option.
● Save by adding a title in the text box.
● Go to Menu and select, open the transparent image saved.
● You can find the transparent image on top of the background layer.
● The transparent area is filled by the background image layer.
● It can be resized also moving and dragging cursor.
A blank area remains in Paint leaves when picture is cut. It does not become transparent background. This blank region can be utilized for layers in the other image. This can be done through various images editing software. Thus, this way transparent background paint 3d can be made easily.
There are various applications and software to add transparent background to the images. One of the trendy applications to edit pictures and paint splash transparent background is Filmora. This application can be even used to paint brush transparent background and remove background in paint 3d. Let’s learn and know about Wondershare Filmora Video Editor .
For Win 7 or later (64-bit)
For macOS 10.12 or later
Filmora is one of the best picture and video editing software. It is trending and becoming popular due to its extraordinary features and editing tools. Colour tuning, editing support, advanced text editor, and its basic color grading features make it best for editing pictures. With filmora people can even add 3D effects on the pictures. It has Action camera tools which has camera shake, slow motion and reverse features. The professional color correction tool help in adjusting saturation, brightness and contrast. Faster editing with low resolution is also one of the features of the application. This software or application can add movement and new advance appearance to the picture that can make it more visually appealing.
This application is very useful for both the beginners as well as semi pros. They can turn their creativity into reality by using Filmora. Different versions of the application are available based on the suitability of the users. Filmora can be used to add transparent background to any images. With so many image editing and coloring tools and features, this becomes a must have application in any mobile device or Desktop.
● Ending Thoughts →
● MS paint from Microsoft is widely used program or software for creating and editing pictures. Due to its simple drawing tool and editing features, still it is first choice for the beginners and professional artists. Color, font, text and editing features in paint can be easily understood and therefore it has various advantages as compared to rest of the software or application.
● Ms Paint can be used for editing pictures and it is good when you need to add transparent background to any image. Paint 3d is one of the advanced version of the paint and it gives 3d effects to any image. It can be done by following simple steps. It can be learned easily through support provided by MS paint. The steps are simple and can be learned by anyone.
● Although there are various image editing software and applications for adding transparent background to an image. Filmora is one of the emerging application for editing pictures and videos. It is used to add some amazing effects to any picture or video. One can customize image as per their requirement through advanced settings. It can be easily installed and worked flow is good wit Filmora.
Transparent background can be made easily with paint. Make background transparent paint 3d in simple steps. Learn to make background of a picture transparent with paintbrush.
In this article
01 [What’s Paint and What Advantages Does It Have for Making Transparent Background](#Part 1)
02 [How to Save a Picture with a Transparent Background?](#Part 2)
03 [How to Make Background Transparent in Paint?](#Part 3)
Part 1 What’s Paint and What Advantages Does It Have for Making Transparent Background

MS paint is one of the widest programs of Microsoft used for creating and editing pictures at the computer. It is also used to add text to the images. It’s features like ease to use and simplicity has made it so popular among the people. It’s simple drawing tool help to draw pictures on the blank space or on existing image. The various editing tools such as cropping, resizing and rotating help in manipulating images. Wide range of colors, fonts and combinations option with color make it a great choice for the users to make and edit pictures. It also comes with various built in applications that are good for various versions of Windows.
Due to its various advantages, good painters can create beautiful pictures with special effects. One can easily add or edit pictures by adding attractive picture effects as it can be done with other applications. Some of the advantages of using paint to add transparent backgrounds are:
● Paint is pre-installed at every computer and thus a user who wish to do painting or edit in the images, they need not to deal with the installation process.
● It has basic drawing and editing tools such as shapes, cropping, sizing and coloring which support maximum file types such as JPG, GIF, BMP and PNG.
● Paint is a simple program and can be learned by anyone. Thus, it is user friendly, simple and one of the most cost effective programs.
● Eraser, magnifier, pencil, paintbrush, spray, fonts, shapes and color palette are some of the tools that can even be used to add some customized features to the pictures.
● The best thing with paint is that a user can start making a picture from scratch. The files can be easily used easily from various sources such as digital camera, scanner or any other source. A user is not required to download any other software or application to add creating and editing features in a picture.
● One can change the image’s dimensions, captions, and switch color images to black and white. Transparent Background Paint is also a feature in the MS paint which can make any picture more attractive.
● Paint has support system also that can help painter to master over the brush and paints.
Part 2 How to Save a Picture with a Transparent Background?

A picture made with paint splatter transparent background can be saved easily by following simple steps beginning from creating a picture with transparent background. The steps to be followed are:
● Open the image in paint which you require to add transparent background.
● Go to the image selection under select option. Click on “Transparent selection”.
● Pick the image area which is required to made transparent and press Delete.
● You will get the blank background and this need to be saved at the MS word file to make the background transparent.
● Insert the image into the word document, select ‘Format’ and click on ‘Remove background’.
● After having preview of the image, click on ‘Save changes’
● In the last step to save image, select ‘Save as Picture’. This will be the final image with a transparent background.
So, this way one can save image with transparent background paint.
Part 3 How to Make Background Transparent in Paint?

MS paint has plenty of features and tools to make a picture visually good. With high definition pictures coming into light now-a-days, 3D pictures are in trends. Giving a transparent background to a picture makes it very attractive. To paint 3d make background transparent, Ms Paint is a program that can be used by a new beginner and an experienced painter.
Let’s see how to make a picture background transparent in different styles.
01Make Background Transparent Using MS Paint
Learning to add transparent background to images? It can be done in simple steps:
● Click the Cortana, which is visual assistant and open Paint.
● Search paint in the search box and select it to open the Paint.
● To open the image in which background is to be added, move on to click on file and then open the image
● Press “Select button” and click the transparent selection option.
● Go to Select button’s menu and select the Free-form selection.
● Trace the area for background creation with the cursor and save the original picture. This can be done by holding the left mouse button.
● The rest of picture will be meant for having a transparent background.
● A rectangle will appear at the selected area. Right click on that. Then select cut that come in context menu. It will remove the selected foreground appearing the picture.
● Open a new image in Paint.
● Using Ctrl + V hotkey, you need to paste the traced foreground area from the first image.
● You can see the picture with transparent background.
● Left-click on the pasted foreground image and adjust it to a place on the background picture.
02Make Background Transparent Using Paint 3d
Transparent background can be made using Paint 3D. Let’s see how to do it:
● Search Paint 3D in Windows 10’s search box.
● It can also be done by adding the app to Windows 10
● Select to open the Paint 3D app.
● Go to Menu, select the image required and open it in Paint 3D
● Open the sidebar by pressing the Canvas button.
● Go to Transparent canvas setting.
● Through Select button drag the selection rectangle over an area of the image required to delete.
● Use Ctrl + X hotkey to cut out the area from the picture.
● You have a blank transparent area that can be filled with background layer.
● Go to Menu. Save it and select the 2D PNG option.
● Save by adding a title in the text box.
● Go to Menu and select, open the transparent image saved.
● You can find the transparent image on top of the background layer.
● The transparent area is filled by the background image layer.
● It can be resized also moving and dragging cursor.
A blank area remains in Paint leaves when picture is cut. It does not become transparent background. This blank region can be utilized for layers in the other image. This can be done through various images editing software. Thus, this way transparent background paint 3d can be made easily.
There are various applications and software to add transparent background to the images. One of the trendy applications to edit pictures and paint splash transparent background is Filmora. This application can be even used to paint brush transparent background and remove background in paint 3d. Let’s learn and know about Wondershare Filmora Video Editor .
For Win 7 or later (64-bit)
For macOS 10.12 or later
Filmora is one of the best picture and video editing software. It is trending and becoming popular due to its extraordinary features and editing tools. Colour tuning, editing support, advanced text editor, and its basic color grading features make it best for editing pictures. With filmora people can even add 3D effects on the pictures. It has Action camera tools which has camera shake, slow motion and reverse features. The professional color correction tool help in adjusting saturation, brightness and contrast. Faster editing with low resolution is also one of the features of the application. This software or application can add movement and new advance appearance to the picture that can make it more visually appealing.
This application is very useful for both the beginners as well as semi pros. They can turn their creativity into reality by using Filmora. Different versions of the application are available based on the suitability of the users. Filmora can be used to add transparent background to any images. With so many image editing and coloring tools and features, this becomes a must have application in any mobile device or Desktop.
● Ending Thoughts →
● MS paint from Microsoft is widely used program or software for creating and editing pictures. Due to its simple drawing tool and editing features, still it is first choice for the beginners and professional artists. Color, font, text and editing features in paint can be easily understood and therefore it has various advantages as compared to rest of the software or application.
● Ms Paint can be used for editing pictures and it is good when you need to add transparent background to any image. Paint 3d is one of the advanced version of the paint and it gives 3d effects to any image. It can be done by following simple steps. It can be learned easily through support provided by MS paint. The steps are simple and can be learned by anyone.
● Although there are various image editing software and applications for adding transparent background to an image. Filmora is one of the emerging application for editing pictures and videos. It is used to add some amazing effects to any picture or video. One can customize image as per their requirement through advanced settings. It can be easily installed and worked flow is good wit Filmora.
Transparent background can be made easily with paint. Make background transparent paint 3d in simple steps. Learn to make background of a picture transparent with paintbrush.
In this article
01 [What’s Paint and What Advantages Does It Have for Making Transparent Background](#Part 1)
02 [How to Save a Picture with a Transparent Background?](#Part 2)
03 [How to Make Background Transparent in Paint?](#Part 3)
Part 1 What’s Paint and What Advantages Does It Have for Making Transparent Background

MS paint is one of the widest programs of Microsoft used for creating and editing pictures at the computer. It is also used to add text to the images. It’s features like ease to use and simplicity has made it so popular among the people. It’s simple drawing tool help to draw pictures on the blank space or on existing image. The various editing tools such as cropping, resizing and rotating help in manipulating images. Wide range of colors, fonts and combinations option with color make it a great choice for the users to make and edit pictures. It also comes with various built in applications that are good for various versions of Windows.
Due to its various advantages, good painters can create beautiful pictures with special effects. One can easily add or edit pictures by adding attractive picture effects as it can be done with other applications. Some of the advantages of using paint to add transparent backgrounds are:
● Paint is pre-installed at every computer and thus a user who wish to do painting or edit in the images, they need not to deal with the installation process.
● It has basic drawing and editing tools such as shapes, cropping, sizing and coloring which support maximum file types such as JPG, GIF, BMP and PNG.
● Paint is a simple program and can be learned by anyone. Thus, it is user friendly, simple and one of the most cost effective programs.
● Eraser, magnifier, pencil, paintbrush, spray, fonts, shapes and color palette are some of the tools that can even be used to add some customized features to the pictures.
● The best thing with paint is that a user can start making a picture from scratch. The files can be easily used easily from various sources such as digital camera, scanner or any other source. A user is not required to download any other software or application to add creating and editing features in a picture.
● One can change the image’s dimensions, captions, and switch color images to black and white. Transparent Background Paint is also a feature in the MS paint which can make any picture more attractive.
● Paint has support system also that can help painter to master over the brush and paints.
Part 2 How to Save a Picture with a Transparent Background?

A picture made with paint splatter transparent background can be saved easily by following simple steps beginning from creating a picture with transparent background. The steps to be followed are:
● Open the image in paint which you require to add transparent background.
● Go to the image selection under select option. Click on “Transparent selection”.
● Pick the image area which is required to made transparent and press Delete.
● You will get the blank background and this need to be saved at the MS word file to make the background transparent.
● Insert the image into the word document, select ‘Format’ and click on ‘Remove background’.
● After having preview of the image, click on ‘Save changes’
● In the last step to save image, select ‘Save as Picture’. This will be the final image with a transparent background.
So, this way one can save image with transparent background paint.
Part 3 How to Make Background Transparent in Paint?

MS paint has plenty of features and tools to make a picture visually good. With high definition pictures coming into light now-a-days, 3D pictures are in trends. Giving a transparent background to a picture makes it very attractive. To paint 3d make background transparent, Ms Paint is a program that can be used by a new beginner and an experienced painter.
Let’s see how to make a picture background transparent in different styles.
01Make Background Transparent Using MS Paint
Learning to add transparent background to images? It can be done in simple steps:
● Click the Cortana, which is visual assistant and open Paint.
● Search paint in the search box and select it to open the Paint.
● To open the image in which background is to be added, move on to click on file and then open the image
● Press “Select button” and click the transparent selection option.
● Go to Select button’s menu and select the Free-form selection.
● Trace the area for background creation with the cursor and save the original picture. This can be done by holding the left mouse button.
● The rest of picture will be meant for having a transparent background.
● A rectangle will appear at the selected area. Right click on that. Then select cut that come in context menu. It will remove the selected foreground appearing the picture.
● Open a new image in Paint.
● Using Ctrl + V hotkey, you need to paste the traced foreground area from the first image.
● You can see the picture with transparent background.
● Left-click on the pasted foreground image and adjust it to a place on the background picture.
02Make Background Transparent Using Paint 3d
Transparent background can be made using Paint 3D. Let’s see how to do it:
● Search Paint 3D in Windows 10’s search box.
● It can also be done by adding the app to Windows 10
● Select to open the Paint 3D app.
● Go to Menu, select the image required and open it in Paint 3D
● Open the sidebar by pressing the Canvas button.
● Go to Transparent canvas setting.
● Through Select button drag the selection rectangle over an area of the image required to delete.
● Use Ctrl + X hotkey to cut out the area from the picture.
● You have a blank transparent area that can be filled with background layer.
● Go to Menu. Save it and select the 2D PNG option.
● Save by adding a title in the text box.
● Go to Menu and select, open the transparent image saved.
● You can find the transparent image on top of the background layer.
● The transparent area is filled by the background image layer.
● It can be resized also moving and dragging cursor.
A blank area remains in Paint leaves when picture is cut. It does not become transparent background. This blank region can be utilized for layers in the other image. This can be done through various images editing software. Thus, this way transparent background paint 3d can be made easily.
There are various applications and software to add transparent background to the images. One of the trendy applications to edit pictures and paint splash transparent background is Filmora. This application can be even used to paint brush transparent background and remove background in paint 3d. Let’s learn and know about Wondershare Filmora Video Editor .
For Win 7 or later (64-bit)
For macOS 10.12 or later
Filmora is one of the best picture and video editing software. It is trending and becoming popular due to its extraordinary features and editing tools. Colour tuning, editing support, advanced text editor, and its basic color grading features make it best for editing pictures. With filmora people can even add 3D effects on the pictures. It has Action camera tools which has camera shake, slow motion and reverse features. The professional color correction tool help in adjusting saturation, brightness and contrast. Faster editing with low resolution is also one of the features of the application. This software or application can add movement and new advance appearance to the picture that can make it more visually appealing.
This application is very useful for both the beginners as well as semi pros. They can turn their creativity into reality by using Filmora. Different versions of the application are available based on the suitability of the users. Filmora can be used to add transparent background to any images. With so many image editing and coloring tools and features, this becomes a must have application in any mobile device or Desktop.
● Ending Thoughts →
● MS paint from Microsoft is widely used program or software for creating and editing pictures. Due to its simple drawing tool and editing features, still it is first choice for the beginners and professional artists. Color, font, text and editing features in paint can be easily understood and therefore it has various advantages as compared to rest of the software or application.
● Ms Paint can be used for editing pictures and it is good when you need to add transparent background to any image. Paint 3d is one of the advanced version of the paint and it gives 3d effects to any image. It can be done by following simple steps. It can be learned easily through support provided by MS paint. The steps are simple and can be learned by anyone.
● Although there are various image editing software and applications for adding transparent background to an image. Filmora is one of the emerging application for editing pictures and videos. It is used to add some amazing effects to any picture or video. One can customize image as per their requirement through advanced settings. It can be easily installed and worked flow is good wit Filmora.
Also read:
- Updated 2024 Approved Deep Learning of AI Video Recognition
- Updated In 2024, Easy Steps to Add Miniature Effect to Videos
- In 2024, How to Make a Gaming Montage - Guide & Tips
- This Article Can Help You Know How to Crop Video in After Effects and on the Alternative by Using Wondershare Filmora. I Know that It May Seem Confusing to Compare These Two at First. But, Ill Provide an Explanation to Get the Cropped Video that You Want
- In 2024, Learn How to Make Interactive and Fun Video Collages Using Kapwing Collage Maker, an Easy-to-Use Tool for All Your Collage-Making Needs
- Updated Have You Ever Used Premiere Pro to Create Slow-Motion Effects? This Article Will Provide a Guide on Producing Slow-Motion Effects by Using Adobe Premiere Pro
- Want to Create an Impressive Video Collage but Clueless About the Best Tools? No Worries as We Are Here and Will Help You to Learn About the Best Video Collage Maker PC Tools
- In 2024, Color Match Game Tips for You
- Updated Are You in Search for a Step-by-Step Guide to How to Add Effects in TikTok? Here It Is. To Add some Flavor to Your TikTok Videos. Use These How to Add Effect to TikTok Recommendations
- New 2024 Approved 8 Free Photo Collage with Music Video Maker
- LumaFusion – One of the Best Video Editors for iOS for 2024
- How to Remove Audio From Video Without Watermark?
- Updated In 2024, Camtasia Video Editor Review
- New In 2024, Guide To Using Luts Perfectly in Final Cut Pro
- New Here We Will Discuss About Both the Methods Which You Can Choose One to Get Rid of Unwanted Portions From Your Videos or Photos
- Get 15 Absolutely-Free LUTs From This Article as Well as Get an Insight on How Cinematic LUTs Affect Your Film
- 2024 Approved A Review of Efectum App Making Slow Motion Video
- New In 2024, Funny Content Ideas for YouTube Videos
- New Merging Videos Like a Pro A Step-by-Step Guide to Use FFmpeg
- 2024 Approved The Complete Guide to Make a Text Collage
- Easy Way to Apply Green Screen to YouTube Videos
- Updated In 2024, How to Set Up Twitch Green Screen
- Updated 2024 Approved 5 Excellent Tools To Convert Video to 60 FPS
- 2024 Approved Speed up Video on Splice
- Updated Guiding Principles of Track Matte and Tracking in Adobe After Effects
- 2024 Approved Are You Looking to Vlog Across Your Next Stop at the Café? Get Aware of the Significant Elements that Make up the Café Vlog
- In 2024, Unlocking Apple iPhone 11 Passcode without a Computer | Dr.fone
- How To Update or Downgrade iPhone XR Without Losing Anything? | Dr.fone
- Best Ways on How to Unlock/Bypass/Swipe/Remove Samsung Galaxy S24 Fingerprint Lock
- In 2024, How To Open Your Apple iPhone 8 Plus Without a Home Button | Dr.fone
- Complete guide for recovering music files on Realme C67 5G
- About Vivo X90S FRP Bypass
- How to Unlock Vivo Y78t Phone without Google Account?
- New 2024 Approved What Is AI Pixel Art Generator?
- In 2024, How to Unlock AT&T Apple iPhone 11 with 3 Methods
- Full Guide to Fix iToolab AnyGO Not Working On Oppo A38 | Dr.fone
- In 2024, 10 Free Location Spoofers to Fake GPS Location on your Realme GT 5 | Dr.fone
- 3 Ways to Erase iPhone XR When Its Locked Within Seconds
- CatchEmAll Celebrate National Pokémon Day with Virtual Location On Motorola Moto E13 | Dr.fone
- In 2024, How to Transfer Contacts from Honor Magic5 Ultimate to iPhone XS/11 | Dr.fone
- In 2024, The Magnificent Art of Pokemon Go Streaming On Samsung Galaxy F34 5G? | Dr.fone
- In 2024, How to Screen Share on Apple iPhone SE (2020)? | Dr.fone
- How To Unlock Vivo X90S Phone Without Password?
- How to Bypass Google FRP Lock from Oppo Reno 10 Pro+ 5G Devices
- Updated In 2024, The Secret Sauce for Making GIF Instagram Story More Aesthetic
- Fix the Error of Unfortunately the Process.com.android.phone Has Stopped on Vivo V30 Lite 5G | Dr.fone
- In 2024, How to Unlock Itel P55T Phone Pattern Lock without Factory Reset
- In 2024, Latest Guide How To Bypass Honor Magic5 Ultimate FRP Without Computer
- Edit and Send Fake Location on Telegram For your Vivo Y27 4G in 3 Ways | Dr.fone
- In 2024, How to Successfully Bypass iCloud Activation Lock on iPhone 14 Pro Max
- In 2024, Easy Ways to Manage Your Honor Magic 6 Location Settings | Dr.fone
- Title: New A Detailed Guid to Remove Background From a Video in Premier Pro for 2024
- Author: Chloe
- Created at : 2024-04-24 07:08:28
- Updated at : 2024-04-25 07:08:28
- Link: https://ai-editing-video.techidaily.com/new-a-detailed-guid-to-remove-background-from-a-video-in-premier-pro-for-2024/
- License: This work is licensed under CC BY-NC-SA 4.0.

