:max_bytes(150000):strip_icc():format(webp)/GettyImages-664800650-4349941504c24712b81975694798236b.jpg)
New A Full Review of Leeming LUT Pro

A Full Review of Leeming LUT Pro
Create High-Quality Video - Wondershare Filmora
An easy and powerful YouTube video editor
Numerous video and audio effects to choose from
Detailed tutorials are provided by the official channel
Color grading can be a tedious process, especially if you don’t have the technical skills required to achieve the desired result. That’s where a LUT can come in handy. So, what is a LUT?
LUT stands for “look up table.” Simply put, a LUT is a color preset that you can apply to your video footage to speed up the color grading process. While LUTs are commonly used to speed up the color grading process, they can also be used for other tasks, such as color transfer between software, monitor calibration, and more.
In this article, we’ll explore a particular LUT – Leeming LUT Pro™ and how you can use it in various video editors.

In this article
02 Supported Cameras of Leeming LUT Pro™
03 How to Import and Use Leeming LUT Pro™ in Different Video Editors
What is Leeming LUT Pro™?
Leeming LUT Pro™ is the world’s first unified, corrective Look Up Table (LUT) system for supported cameras. It’s designed to maximize dynamic range, fix skin tones, remove unwanted color casts and provide an accurate Rec709 starting point for further creative color grading.
The Pro LUTs are designed for perfect Rec709 colorimetry and have a linear luma curve, with an average measured dE(2000) of less than 1. As a result, they are visually indistinguishable from reality to the human eye.
Athena LUTs are a brighter version of Pro. They are designed around how the eye sees while retaining the same perfect colorimetry as Pro.
Supported Cameras of Leeming LUT Pro™
- Panasonic G Series: All G series cameras with Cine-D, V-LogL, and HLG for Rec709
- Panasonic S Series: All S series cameras with V-Log, V-Log BRAW, V-Log ProRes RAW, Cine-D, Cine-D2, and HLG for Rec709
- Fujifilm X Series: All X Series cameras with F-Log, Eterna Cinema, Pro Neg Std, and HLG for Rec709
- Canon R Series: All R series cameras with the Faithful Picture Style, C-Log, C-Log3, and CanonRAW
- Canon C Series: All C series cameras with BT.709, C-Log2, C-Log3, HDR-PQ for Rec709, and HLG for Rec709
- Blackmagic Pocket 4K/6K/6K Pro: All cameras with Gen 4 or Gen5 Film
- Blackmagic Pocket/Micro: Older cameras with Gen1 Film
- Nikon Z Series: All cameras with N-Log, Flat
- Sony A Series: All cameras with Picture profile menus, like the A7, with Cine2, S-Log2, S-Log3, HLG/3 for Rec709, and S-Cinetone
- JVC: GY-LS300 with J-Log1
- RunCam: 5 Orange Normal, Flat
- GoPro: 6,7 8, 9 & 10 ProTune, 4 & 5 ProTune, Session ProTune
- DJI: Mavic3, Phantom 4 Pro, Air 2S, Mavic 2 Pro, Mavic Air 2, Mini Series, Mavic Air, Mavic Pro, Pocket 2, Osmo Pocket, Osmo Action, X5 Series
How to Import and Use Leeming LUT Pro™ in Different Video Editors
Leeming LUT Pro™ is supported by various video editors, coloring software, and motion graphics programs, such as:
- Final Cut Pro X
- Avid Media Composer
- DaVinci Resolve
- Adobe Premiere Pro
- Adobe After Effects
- Magix Vegas
- Grass Valley Edius
- Lightworks
- Cyberlink PowerDirector
- LumaFusion
Next, we’ll explore how you can use Leeming LUT in some popular video editors.
1. How to Use Leeming LUT in FCPX
Follow these steps to use Leeming LUT in Final Cut Pro:
Step 1. Import Footage
Launch Final Cut Pro and import your footage. To import your footage, navigate to the top left corner and click on the import icon (the arrow pointing downwards).
In the window that opens, your camera or device name should appear in the left column under devices.
Click on your camera or device to display the media you want to import. Then select the media you want to import and click on the import selected button in the bottom right corner to import your footage.

Step 2. Highlight the Footage
Highlight all the footage by clicking and dragging your pointer over the footage or press Command + A to select all the footage.

Step 3. Open the Inspector
After highlighting all the footage, open the Inspector menu and click the little i icon. Then go down to the bottom of the Inspector and switch from Basic to General.
Step 4. Select the Camera LUT Option
Select Camera LUT from the options under General and click on the Add Custom Camera LUT option.
Step 5. Import Leeming LUTs into FCPX
Find the folder where your Leeming LUTs are stored and import them into Final Cut Pro by clicking on Open.
Step 6. Select the LUT
Once imported, go back to the Camera LUT option under General and click on it. Then scroll down the available options and select your Leeming LUT under the Custom Camera options.
Finally, click the profile you used to apply it to your footage.
2. How to Use Leeming LUT in PowerDirector
Follow these steps to use a LUT in PowerDirector:
Step 1. Launch PowerDirector
Open PowerDirector and select Full Mode.
Step 2. Import Media
Click the import button and then select Import Media Folder to import the video footage you want to apply the Leeming LUT to.
Step 3. Add Footage to Timeline
Drag and drop the imported video footage into your project’s timeline.
Step 4. Select the Fix/Enhance Option
Click on the video clip on the timeline and choose the Fix/Enhance option.
Step 5. Select the Color Presets & CLUTs Option
In the top left window that opens above the timeline, select the Color Presets & CLUTs option under Enhance.
Step 6. Apply the Leeming LUT to the Footage
Click on the import button in the panel to import the Leeming LUT file. Once imported, apply it to give your video a more vibrant look.
Part 5: Bonus! Use Filmora – Easy to Use Video Editor for Color LUTs
Besides Final Cut Pro and PowerDirector, Filmora is another excellent video editing software that you can use to apply LUTs to your video.
Designed for beginners and intermediate users, Filmora is an intuitive yet powerful video editing software.
For instance, you can apply 3D LUTs to your video using Filmora. Unlike 1D LUTs, which can only control one value setting, 3D LUTs can allow you to control various value settings. As a result, 3D LUTs can give you more control over specific color values in your video.
Here’s how you can apply LUTs using Filmora:
Step 1. Import the Footage
Launch Filmora and choose New Project. In the New Project window that opens, import the video you want to apply the LUT to by clicking on Import and selecting one of the drop-down options.
Step 2. Add the Video to the Timeline
Drag and drop the video into your project’s timeline.
Step 3. Open the Color Tab
Double click the video on the timeline to select it. Once it’s selected, go to the top left panel and click on the color tab.

Step 4. Apply a LUT to the Video
Under the color tab, navigate to the 3D LUT option and select one of the available options in the 3D LUT drop-down menu to apply a LUT.
Many LUTs are named after popular TV shows and series whose visual styles they mimic, such as Batman, House of Cards, Game of Thrones, Mission Impossible, Harry Potter, Star Wars, and more.
Once you apply a LUT, you can see your changes in the Preview Window. Besides using the preset LUTs, Filmora also allows you to use custom LUTs. Instead of choosing one of the presets, click on the Load New LUT option to import your custom LUT into Filmora.
Step 5. Make Fine Adjustments
Once you apply a LUT, Filmora can allow you to make further modifications to the video. Click on the Advanced button at the bottom of the color tab to view advanced color correction options.
In the new window that opens, you can adjust several things, such as color, light, HSL, and more. You can also choose from a variety of other available presets.

Step 6. Save the Changes
Once you’re satisfied with the changes you’ve applied, click on the OK button in the lower right corner to save the changes.
For Win 7 or later (64-bit)
For macOS 10.12 or later
Conclusion
LUTs are a fast way to color grade your footage after color correction. However, to ensure your LUTs work effectively, here are some important guidelines you should observe when using LUTs:
- Ensure your footage matches from shot to shot, especially if you’re applying LUTs to multiple clips.
- Ensure your exposure is correct before using LUTs. You can use a histogram to help you set the exposure.
- Ensure you apply LUTs to a video that’s been properly color corrected.
- Make small adjustments to things, such as brightness, saturation, contrast, exposure, color temperature, and tint for best results.
- Test out various LUTs before settling for one because shooting conditions can drastically affect how different LUTs look.
Ultimately, LUTs are an excellent way to make your video more cinematic. If you don’t have advanced video editing skills or prior experience working with LUTs, don’t worry. Filmora is a user-friendly video editing software that allows you to quickly apply LUTs with no video editing experience. Just download Filmora for free to get started.
Color grading can be a tedious process, especially if you don’t have the technical skills required to achieve the desired result. That’s where a LUT can come in handy. So, what is a LUT?
LUT stands for “look up table.” Simply put, a LUT is a color preset that you can apply to your video footage to speed up the color grading process. While LUTs are commonly used to speed up the color grading process, they can also be used for other tasks, such as color transfer between software, monitor calibration, and more.
In this article, we’ll explore a particular LUT – Leeming LUT Pro™ and how you can use it in various video editors.

In this article
02 Supported Cameras of Leeming LUT Pro™
03 How to Import and Use Leeming LUT Pro™ in Different Video Editors
What is Leeming LUT Pro™?
Leeming LUT Pro™ is the world’s first unified, corrective Look Up Table (LUT) system for supported cameras. It’s designed to maximize dynamic range, fix skin tones, remove unwanted color casts and provide an accurate Rec709 starting point for further creative color grading.
The Pro LUTs are designed for perfect Rec709 colorimetry and have a linear luma curve, with an average measured dE(2000) of less than 1. As a result, they are visually indistinguishable from reality to the human eye.
Athena LUTs are a brighter version of Pro. They are designed around how the eye sees while retaining the same perfect colorimetry as Pro.
Supported Cameras of Leeming LUT Pro™
- Panasonic G Series: All G series cameras with Cine-D, V-LogL, and HLG for Rec709
- Panasonic S Series: All S series cameras with V-Log, V-Log BRAW, V-Log ProRes RAW, Cine-D, Cine-D2, and HLG for Rec709
- Fujifilm X Series: All X Series cameras with F-Log, Eterna Cinema, Pro Neg Std, and HLG for Rec709
- Canon R Series: All R series cameras with the Faithful Picture Style, C-Log, C-Log3, and CanonRAW
- Canon C Series: All C series cameras with BT.709, C-Log2, C-Log3, HDR-PQ for Rec709, and HLG for Rec709
- Blackmagic Pocket 4K/6K/6K Pro: All cameras with Gen 4 or Gen5 Film
- Blackmagic Pocket/Micro: Older cameras with Gen1 Film
- Nikon Z Series: All cameras with N-Log, Flat
- Sony A Series: All cameras with Picture profile menus, like the A7, with Cine2, S-Log2, S-Log3, HLG/3 for Rec709, and S-Cinetone
- JVC: GY-LS300 with J-Log1
- RunCam: 5 Orange Normal, Flat
- GoPro: 6,7 8, 9 & 10 ProTune, 4 & 5 ProTune, Session ProTune
- DJI: Mavic3, Phantom 4 Pro, Air 2S, Mavic 2 Pro, Mavic Air 2, Mini Series, Mavic Air, Mavic Pro, Pocket 2, Osmo Pocket, Osmo Action, X5 Series
How to Import and Use Leeming LUT Pro™ in Different Video Editors
Leeming LUT Pro™ is supported by various video editors, coloring software, and motion graphics programs, such as:
- Final Cut Pro X
- Avid Media Composer
- DaVinci Resolve
- Adobe Premiere Pro
- Adobe After Effects
- Magix Vegas
- Grass Valley Edius
- Lightworks
- Cyberlink PowerDirector
- LumaFusion
Next, we’ll explore how you can use Leeming LUT in some popular video editors.
1. How to Use Leeming LUT in FCPX
Follow these steps to use Leeming LUT in Final Cut Pro:
Step 1. Import Footage
Launch Final Cut Pro and import your footage. To import your footage, navigate to the top left corner and click on the import icon (the arrow pointing downwards).
In the window that opens, your camera or device name should appear in the left column under devices.
Click on your camera or device to display the media you want to import. Then select the media you want to import and click on the import selected button in the bottom right corner to import your footage.

Step 2. Highlight the Footage
Highlight all the footage by clicking and dragging your pointer over the footage or press Command + A to select all the footage.

Step 3. Open the Inspector
After highlighting all the footage, open the Inspector menu and click the little i icon. Then go down to the bottom of the Inspector and switch from Basic to General.
Step 4. Select the Camera LUT Option
Select Camera LUT from the options under General and click on the Add Custom Camera LUT option.
Step 5. Import Leeming LUTs into FCPX
Find the folder where your Leeming LUTs are stored and import them into Final Cut Pro by clicking on Open.
Step 6. Select the LUT
Once imported, go back to the Camera LUT option under General and click on it. Then scroll down the available options and select your Leeming LUT under the Custom Camera options.
Finally, click the profile you used to apply it to your footage.
2. How to Use Leeming LUT in PowerDirector
Follow these steps to use a LUT in PowerDirector:
Step 1. Launch PowerDirector
Open PowerDirector and select Full Mode.
Step 2. Import Media
Click the import button and then select Import Media Folder to import the video footage you want to apply the Leeming LUT to.
Step 3. Add Footage to Timeline
Drag and drop the imported video footage into your project’s timeline.
Step 4. Select the Fix/Enhance Option
Click on the video clip on the timeline and choose the Fix/Enhance option.
Step 5. Select the Color Presets & CLUTs Option
In the top left window that opens above the timeline, select the Color Presets & CLUTs option under Enhance.
Step 6. Apply the Leeming LUT to the Footage
Click on the import button in the panel to import the Leeming LUT file. Once imported, apply it to give your video a more vibrant look.
Part 5: Bonus! Use Filmora – Easy to Use Video Editor for Color LUTs
Besides Final Cut Pro and PowerDirector, Filmora is another excellent video editing software that you can use to apply LUTs to your video.
Designed for beginners and intermediate users, Filmora is an intuitive yet powerful video editing software.
For instance, you can apply 3D LUTs to your video using Filmora. Unlike 1D LUTs, which can only control one value setting, 3D LUTs can allow you to control various value settings. As a result, 3D LUTs can give you more control over specific color values in your video.
Here’s how you can apply LUTs using Filmora:
Step 1. Import the Footage
Launch Filmora and choose New Project. In the New Project window that opens, import the video you want to apply the LUT to by clicking on Import and selecting one of the drop-down options.
Step 2. Add the Video to the Timeline
Drag and drop the video into your project’s timeline.
Step 3. Open the Color Tab
Double click the video on the timeline to select it. Once it’s selected, go to the top left panel and click on the color tab.

Step 4. Apply a LUT to the Video
Under the color tab, navigate to the 3D LUT option and select one of the available options in the 3D LUT drop-down menu to apply a LUT.
Many LUTs are named after popular TV shows and series whose visual styles they mimic, such as Batman, House of Cards, Game of Thrones, Mission Impossible, Harry Potter, Star Wars, and more.
Once you apply a LUT, you can see your changes in the Preview Window. Besides using the preset LUTs, Filmora also allows you to use custom LUTs. Instead of choosing one of the presets, click on the Load New LUT option to import your custom LUT into Filmora.
Step 5. Make Fine Adjustments
Once you apply a LUT, Filmora can allow you to make further modifications to the video. Click on the Advanced button at the bottom of the color tab to view advanced color correction options.
In the new window that opens, you can adjust several things, such as color, light, HSL, and more. You can also choose from a variety of other available presets.

Step 6. Save the Changes
Once you’re satisfied with the changes you’ve applied, click on the OK button in the lower right corner to save the changes.
For Win 7 or later (64-bit)
For macOS 10.12 or later
Conclusion
LUTs are a fast way to color grade your footage after color correction. However, to ensure your LUTs work effectively, here are some important guidelines you should observe when using LUTs:
- Ensure your footage matches from shot to shot, especially if you’re applying LUTs to multiple clips.
- Ensure your exposure is correct before using LUTs. You can use a histogram to help you set the exposure.
- Ensure you apply LUTs to a video that’s been properly color corrected.
- Make small adjustments to things, such as brightness, saturation, contrast, exposure, color temperature, and tint for best results.
- Test out various LUTs before settling for one because shooting conditions can drastically affect how different LUTs look.
Ultimately, LUTs are an excellent way to make your video more cinematic. If you don’t have advanced video editing skills or prior experience working with LUTs, don’t worry. Filmora is a user-friendly video editing software that allows you to quickly apply LUTs with no video editing experience. Just download Filmora for free to get started.
Color grading can be a tedious process, especially if you don’t have the technical skills required to achieve the desired result. That’s where a LUT can come in handy. So, what is a LUT?
LUT stands for “look up table.” Simply put, a LUT is a color preset that you can apply to your video footage to speed up the color grading process. While LUTs are commonly used to speed up the color grading process, they can also be used for other tasks, such as color transfer between software, monitor calibration, and more.
In this article, we’ll explore a particular LUT – Leeming LUT Pro™ and how you can use it in various video editors.

In this article
02 Supported Cameras of Leeming LUT Pro™
03 How to Import and Use Leeming LUT Pro™ in Different Video Editors
What is Leeming LUT Pro™?
Leeming LUT Pro™ is the world’s first unified, corrective Look Up Table (LUT) system for supported cameras. It’s designed to maximize dynamic range, fix skin tones, remove unwanted color casts and provide an accurate Rec709 starting point for further creative color grading.
The Pro LUTs are designed for perfect Rec709 colorimetry and have a linear luma curve, with an average measured dE(2000) of less than 1. As a result, they are visually indistinguishable from reality to the human eye.
Athena LUTs are a brighter version of Pro. They are designed around how the eye sees while retaining the same perfect colorimetry as Pro.
Supported Cameras of Leeming LUT Pro™
- Panasonic G Series: All G series cameras with Cine-D, V-LogL, and HLG for Rec709
- Panasonic S Series: All S series cameras with V-Log, V-Log BRAW, V-Log ProRes RAW, Cine-D, Cine-D2, and HLG for Rec709
- Fujifilm X Series: All X Series cameras with F-Log, Eterna Cinema, Pro Neg Std, and HLG for Rec709
- Canon R Series: All R series cameras with the Faithful Picture Style, C-Log, C-Log3, and CanonRAW
- Canon C Series: All C series cameras with BT.709, C-Log2, C-Log3, HDR-PQ for Rec709, and HLG for Rec709
- Blackmagic Pocket 4K/6K/6K Pro: All cameras with Gen 4 or Gen5 Film
- Blackmagic Pocket/Micro: Older cameras with Gen1 Film
- Nikon Z Series: All cameras with N-Log, Flat
- Sony A Series: All cameras with Picture profile menus, like the A7, with Cine2, S-Log2, S-Log3, HLG/3 for Rec709, and S-Cinetone
- JVC: GY-LS300 with J-Log1
- RunCam: 5 Orange Normal, Flat
- GoPro: 6,7 8, 9 & 10 ProTune, 4 & 5 ProTune, Session ProTune
- DJI: Mavic3, Phantom 4 Pro, Air 2S, Mavic 2 Pro, Mavic Air 2, Mini Series, Mavic Air, Mavic Pro, Pocket 2, Osmo Pocket, Osmo Action, X5 Series
How to Import and Use Leeming LUT Pro™ in Different Video Editors
Leeming LUT Pro™ is supported by various video editors, coloring software, and motion graphics programs, such as:
- Final Cut Pro X
- Avid Media Composer
- DaVinci Resolve
- Adobe Premiere Pro
- Adobe After Effects
- Magix Vegas
- Grass Valley Edius
- Lightworks
- Cyberlink PowerDirector
- LumaFusion
Next, we’ll explore how you can use Leeming LUT in some popular video editors.
1. How to Use Leeming LUT in FCPX
Follow these steps to use Leeming LUT in Final Cut Pro:
Step 1. Import Footage
Launch Final Cut Pro and import your footage. To import your footage, navigate to the top left corner and click on the import icon (the arrow pointing downwards).
In the window that opens, your camera or device name should appear in the left column under devices.
Click on your camera or device to display the media you want to import. Then select the media you want to import and click on the import selected button in the bottom right corner to import your footage.

Step 2. Highlight the Footage
Highlight all the footage by clicking and dragging your pointer over the footage or press Command + A to select all the footage.

Step 3. Open the Inspector
After highlighting all the footage, open the Inspector menu and click the little i icon. Then go down to the bottom of the Inspector and switch from Basic to General.
Step 4. Select the Camera LUT Option
Select Camera LUT from the options under General and click on the Add Custom Camera LUT option.
Step 5. Import Leeming LUTs into FCPX
Find the folder where your Leeming LUTs are stored and import them into Final Cut Pro by clicking on Open.
Step 6. Select the LUT
Once imported, go back to the Camera LUT option under General and click on it. Then scroll down the available options and select your Leeming LUT under the Custom Camera options.
Finally, click the profile you used to apply it to your footage.
2. How to Use Leeming LUT in PowerDirector
Follow these steps to use a LUT in PowerDirector:
Step 1. Launch PowerDirector
Open PowerDirector and select Full Mode.
Step 2. Import Media
Click the import button and then select Import Media Folder to import the video footage you want to apply the Leeming LUT to.
Step 3. Add Footage to Timeline
Drag and drop the imported video footage into your project’s timeline.
Step 4. Select the Fix/Enhance Option
Click on the video clip on the timeline and choose the Fix/Enhance option.
Step 5. Select the Color Presets & CLUTs Option
In the top left window that opens above the timeline, select the Color Presets & CLUTs option under Enhance.
Step 6. Apply the Leeming LUT to the Footage
Click on the import button in the panel to import the Leeming LUT file. Once imported, apply it to give your video a more vibrant look.
Part 5: Bonus! Use Filmora – Easy to Use Video Editor for Color LUTs
Besides Final Cut Pro and PowerDirector, Filmora is another excellent video editing software that you can use to apply LUTs to your video.
Designed for beginners and intermediate users, Filmora is an intuitive yet powerful video editing software.
For instance, you can apply 3D LUTs to your video using Filmora. Unlike 1D LUTs, which can only control one value setting, 3D LUTs can allow you to control various value settings. As a result, 3D LUTs can give you more control over specific color values in your video.
Here’s how you can apply LUTs using Filmora:
Step 1. Import the Footage
Launch Filmora and choose New Project. In the New Project window that opens, import the video you want to apply the LUT to by clicking on Import and selecting one of the drop-down options.
Step 2. Add the Video to the Timeline
Drag and drop the video into your project’s timeline.
Step 3. Open the Color Tab
Double click the video on the timeline to select it. Once it’s selected, go to the top left panel and click on the color tab.

Step 4. Apply a LUT to the Video
Under the color tab, navigate to the 3D LUT option and select one of the available options in the 3D LUT drop-down menu to apply a LUT.
Many LUTs are named after popular TV shows and series whose visual styles they mimic, such as Batman, House of Cards, Game of Thrones, Mission Impossible, Harry Potter, Star Wars, and more.
Once you apply a LUT, you can see your changes in the Preview Window. Besides using the preset LUTs, Filmora also allows you to use custom LUTs. Instead of choosing one of the presets, click on the Load New LUT option to import your custom LUT into Filmora.
Step 5. Make Fine Adjustments
Once you apply a LUT, Filmora can allow you to make further modifications to the video. Click on the Advanced button at the bottom of the color tab to view advanced color correction options.
In the new window that opens, you can adjust several things, such as color, light, HSL, and more. You can also choose from a variety of other available presets.

Step 6. Save the Changes
Once you’re satisfied with the changes you’ve applied, click on the OK button in the lower right corner to save the changes.
For Win 7 or later (64-bit)
For macOS 10.12 or later
Conclusion
LUTs are a fast way to color grade your footage after color correction. However, to ensure your LUTs work effectively, here are some important guidelines you should observe when using LUTs:
- Ensure your footage matches from shot to shot, especially if you’re applying LUTs to multiple clips.
- Ensure your exposure is correct before using LUTs. You can use a histogram to help you set the exposure.
- Ensure you apply LUTs to a video that’s been properly color corrected.
- Make small adjustments to things, such as brightness, saturation, contrast, exposure, color temperature, and tint for best results.
- Test out various LUTs before settling for one because shooting conditions can drastically affect how different LUTs look.
Ultimately, LUTs are an excellent way to make your video more cinematic. If you don’t have advanced video editing skills or prior experience working with LUTs, don’t worry. Filmora is a user-friendly video editing software that allows you to quickly apply LUTs with no video editing experience. Just download Filmora for free to get started.
Color grading can be a tedious process, especially if you don’t have the technical skills required to achieve the desired result. That’s where a LUT can come in handy. So, what is a LUT?
LUT stands for “look up table.” Simply put, a LUT is a color preset that you can apply to your video footage to speed up the color grading process. While LUTs are commonly used to speed up the color grading process, they can also be used for other tasks, such as color transfer between software, monitor calibration, and more.
In this article, we’ll explore a particular LUT – Leeming LUT Pro™ and how you can use it in various video editors.

In this article
02 Supported Cameras of Leeming LUT Pro™
03 How to Import and Use Leeming LUT Pro™ in Different Video Editors
What is Leeming LUT Pro™?
Leeming LUT Pro™ is the world’s first unified, corrective Look Up Table (LUT) system for supported cameras. It’s designed to maximize dynamic range, fix skin tones, remove unwanted color casts and provide an accurate Rec709 starting point for further creative color grading.
The Pro LUTs are designed for perfect Rec709 colorimetry and have a linear luma curve, with an average measured dE(2000) of less than 1. As a result, they are visually indistinguishable from reality to the human eye.
Athena LUTs are a brighter version of Pro. They are designed around how the eye sees while retaining the same perfect colorimetry as Pro.
Supported Cameras of Leeming LUT Pro™
- Panasonic G Series: All G series cameras with Cine-D, V-LogL, and HLG for Rec709
- Panasonic S Series: All S series cameras with V-Log, V-Log BRAW, V-Log ProRes RAW, Cine-D, Cine-D2, and HLG for Rec709
- Fujifilm X Series: All X Series cameras with F-Log, Eterna Cinema, Pro Neg Std, and HLG for Rec709
- Canon R Series: All R series cameras with the Faithful Picture Style, C-Log, C-Log3, and CanonRAW
- Canon C Series: All C series cameras with BT.709, C-Log2, C-Log3, HDR-PQ for Rec709, and HLG for Rec709
- Blackmagic Pocket 4K/6K/6K Pro: All cameras with Gen 4 or Gen5 Film
- Blackmagic Pocket/Micro: Older cameras with Gen1 Film
- Nikon Z Series: All cameras with N-Log, Flat
- Sony A Series: All cameras with Picture profile menus, like the A7, with Cine2, S-Log2, S-Log3, HLG/3 for Rec709, and S-Cinetone
- JVC: GY-LS300 with J-Log1
- RunCam: 5 Orange Normal, Flat
- GoPro: 6,7 8, 9 & 10 ProTune, 4 & 5 ProTune, Session ProTune
- DJI: Mavic3, Phantom 4 Pro, Air 2S, Mavic 2 Pro, Mavic Air 2, Mini Series, Mavic Air, Mavic Pro, Pocket 2, Osmo Pocket, Osmo Action, X5 Series
How to Import and Use Leeming LUT Pro™ in Different Video Editors
Leeming LUT Pro™ is supported by various video editors, coloring software, and motion graphics programs, such as:
- Final Cut Pro X
- Avid Media Composer
- DaVinci Resolve
- Adobe Premiere Pro
- Adobe After Effects
- Magix Vegas
- Grass Valley Edius
- Lightworks
- Cyberlink PowerDirector
- LumaFusion
Next, we’ll explore how you can use Leeming LUT in some popular video editors.
1. How to Use Leeming LUT in FCPX
Follow these steps to use Leeming LUT in Final Cut Pro:
Step 1. Import Footage
Launch Final Cut Pro and import your footage. To import your footage, navigate to the top left corner and click on the import icon (the arrow pointing downwards).
In the window that opens, your camera or device name should appear in the left column under devices.
Click on your camera or device to display the media you want to import. Then select the media you want to import and click on the import selected button in the bottom right corner to import your footage.

Step 2. Highlight the Footage
Highlight all the footage by clicking and dragging your pointer over the footage or press Command + A to select all the footage.

Step 3. Open the Inspector
After highlighting all the footage, open the Inspector menu and click the little i icon. Then go down to the bottom of the Inspector and switch from Basic to General.
Step 4. Select the Camera LUT Option
Select Camera LUT from the options under General and click on the Add Custom Camera LUT option.
Step 5. Import Leeming LUTs into FCPX
Find the folder where your Leeming LUTs are stored and import them into Final Cut Pro by clicking on Open.
Step 6. Select the LUT
Once imported, go back to the Camera LUT option under General and click on it. Then scroll down the available options and select your Leeming LUT under the Custom Camera options.
Finally, click the profile you used to apply it to your footage.
2. How to Use Leeming LUT in PowerDirector
Follow these steps to use a LUT in PowerDirector:
Step 1. Launch PowerDirector
Open PowerDirector and select Full Mode.
Step 2. Import Media
Click the import button and then select Import Media Folder to import the video footage you want to apply the Leeming LUT to.
Step 3. Add Footage to Timeline
Drag and drop the imported video footage into your project’s timeline.
Step 4. Select the Fix/Enhance Option
Click on the video clip on the timeline and choose the Fix/Enhance option.
Step 5. Select the Color Presets & CLUTs Option
In the top left window that opens above the timeline, select the Color Presets & CLUTs option under Enhance.
Step 6. Apply the Leeming LUT to the Footage
Click on the import button in the panel to import the Leeming LUT file. Once imported, apply it to give your video a more vibrant look.
Part 5: Bonus! Use Filmora – Easy to Use Video Editor for Color LUTs
Besides Final Cut Pro and PowerDirector, Filmora is another excellent video editing software that you can use to apply LUTs to your video.
Designed for beginners and intermediate users, Filmora is an intuitive yet powerful video editing software.
For instance, you can apply 3D LUTs to your video using Filmora. Unlike 1D LUTs, which can only control one value setting, 3D LUTs can allow you to control various value settings. As a result, 3D LUTs can give you more control over specific color values in your video.
Here’s how you can apply LUTs using Filmora:
Step 1. Import the Footage
Launch Filmora and choose New Project. In the New Project window that opens, import the video you want to apply the LUT to by clicking on Import and selecting one of the drop-down options.
Step 2. Add the Video to the Timeline
Drag and drop the video into your project’s timeline.
Step 3. Open the Color Tab
Double click the video on the timeline to select it. Once it’s selected, go to the top left panel and click on the color tab.

Step 4. Apply a LUT to the Video
Under the color tab, navigate to the 3D LUT option and select one of the available options in the 3D LUT drop-down menu to apply a LUT.
Many LUTs are named after popular TV shows and series whose visual styles they mimic, such as Batman, House of Cards, Game of Thrones, Mission Impossible, Harry Potter, Star Wars, and more.
Once you apply a LUT, you can see your changes in the Preview Window. Besides using the preset LUTs, Filmora also allows you to use custom LUTs. Instead of choosing one of the presets, click on the Load New LUT option to import your custom LUT into Filmora.
Step 5. Make Fine Adjustments
Once you apply a LUT, Filmora can allow you to make further modifications to the video. Click on the Advanced button at the bottom of the color tab to view advanced color correction options.
In the new window that opens, you can adjust several things, such as color, light, HSL, and more. You can also choose from a variety of other available presets.

Step 6. Save the Changes
Once you’re satisfied with the changes you’ve applied, click on the OK button in the lower right corner to save the changes.
For Win 7 or later (64-bit)
For macOS 10.12 or later
Conclusion
LUTs are a fast way to color grade your footage after color correction. However, to ensure your LUTs work effectively, here are some important guidelines you should observe when using LUTs:
- Ensure your footage matches from shot to shot, especially if you’re applying LUTs to multiple clips.
- Ensure your exposure is correct before using LUTs. You can use a histogram to help you set the exposure.
- Ensure you apply LUTs to a video that’s been properly color corrected.
- Make small adjustments to things, such as brightness, saturation, contrast, exposure, color temperature, and tint for best results.
- Test out various LUTs before settling for one because shooting conditions can drastically affect how different LUTs look.
Ultimately, LUTs are an excellent way to make your video more cinematic. If you don’t have advanced video editing skills or prior experience working with LUTs, don’t worry. Filmora is a user-friendly video editing software that allows you to quickly apply LUTs with no video editing experience. Just download Filmora for free to get started.
An Ultimate Guide To Edit a Music Video: Aspect Ratio and First Cut
Are you planning to edit your music video? Do you need on out how to edit your first music video draft? Editing a music video is a creative task but can be challenging.
One of the key elements of this process is selecting the aspect ratio and making the first cut. In this blog, we will explore these steps in detail, providing important tips and tricks. Whether you’re a beginner or an experienced editor, get ready to take your music video to the next level. Let’s get started.
Which software will you need?
As we have a lot of software in the market, we must select the right software for high-quality editing. Wondershare Filmora is an amazing video editing software. It offers a ton of video editing tools. You can add special effects, transitions, and more to make your music video captivating.
Free Download For Win 7 or later(64-bit)
Free Download For macOS 10.14 or later
![]()
Note: Before you start editing your project, make sure that you have a backup. You can copy the project to an external USB or hard drive for a backup.
Adjust the aspect ratio
The aspect ratio is known as the size of the video frame. For example, the most common aspect ratios are 16:9 and 4:3. The first number represents the width, and the second represents the height.
You should always ask your cinematographer about the aspect ratio. There are chances when cameras won’t shoot at the intended aspect ratio they were framed for. In that case, you’ll need to crop or letterbox them when editing.

How to find the width/height of the frame?
Most of the frames that are being shot on the camera are 3424 pixels wide, which is a little under 4k. If you have a measurement of one side of the frame, you can find the other by using some math. Let’s suppose your frame is 3424 pixels wide. You can use this formula to find the height.
Formula: 3424 pixels wide x 1 high / 2.35 wide (or whatever your aspect ratio)

Now you can cancel out the width from the multiplier and the denominator.
= 3424 pixels wide x 1 high / 2.35 wide

Now you are left with the equation:
= 3424 pixels high / 2.35
After solving this equation, you will get the answer which is: 1457 pixels high. Let’s adjust it on the music video as well, follow the steps given below:
Free Download For Win 7 or later(64-bit)
Free Download For macOS 10.14 or later
Step1Open the aspect ratio setting tab
Open your music video project in Filmora and click on the screen icon, as shown in the picture.
![]()
Then select the Change Project Aspect Ratio.

Step2Add values
Now set the project Width to 3424 pixels and its Height to 1457 pixels. You can also adjust the frame rate by selecting the one in which you shot the video. Then click OK.

Assembly
The next step is assembly. You will arrange the shots, clips, and elements in this process and get everything in order. It can be daunting and inspiring for you, as it’s a blank canvas you are going to start with. Before editing, you can also get some guidance from your art director.
If your music video has shots of the band performing, drop them off first and sync them with the audio. On the contrary, if you are doing a narrative style, you can arrange the shots according to the story you want to portray.

Step1Drop the media
You can start by dragging and dropping the music onto the audio timeline. Then you can add the shots of your music video.

Step2Arrange the shots
Arrange the shots according to the storyboard you created and sync them with the audio.

Step3Add the title
Once you arrange all shots in order, you can add the title of your music video. Click on the Titles, then choose your desired style and add the name of your music video in the title box. You can also change the text’s size, font, and color.

Step4Flip the clip
One last thing is, if you shot any scene in mirror-image format, you can flip it. Click on the clip you want to flip and select the flip icon in the video properties.

Send your first draft
The first draft is the video in which you added audio and re-ordered the shots. You decided on the pace and flow of the video to create a basic structure. You made changes to make it interesting and captivating.
Before you put too much effort into editing your video, send it to your director, producer, or client for review. It will help ensure that any big changes can be made before you invest too much time in the edit.
For first drafts, you don’t need anything fancy. A lower-resolution and more compressed file can make sending it to a director or client much easier. You can also add a timer on the music video, so the person reviewing it can give you accurate timing on where he wants any revision.
How to add the timer in the music video?
- Click on Effects and search for Timecode in the search bar.
- Choose the timer style you like and drop it onto the new timeline.
- Extend the timer to the end of the video.
- Adjust the position and add the duration of your music video.

Now you are all set to export the first draft of your music video. You can also adjust the video format on the export option, but MP4 is recommended.
Conclusion
We hope this blog has helped you edit the initials of your music video. By adjusting the aspect ratio to fit the desired screen size and properly planning the first cut, you can lay a solid foundation for the rest of the editing process.
These two steps can greatly impact the overall look and feel of the final product. Remember to communicate with your director, producer, or client throughout the process to ensure that the final product meets their expectations.
Free Download For macOS 10.14 or later
![]()
Note: Before you start editing your project, make sure that you have a backup. You can copy the project to an external USB or hard drive for a backup.
Adjust the aspect ratio
The aspect ratio is known as the size of the video frame. For example, the most common aspect ratios are 16:9 and 4:3. The first number represents the width, and the second represents the height.
You should always ask your cinematographer about the aspect ratio. There are chances when cameras won’t shoot at the intended aspect ratio they were framed for. In that case, you’ll need to crop or letterbox them when editing.

How to find the width/height of the frame?
Most of the frames that are being shot on the camera are 3424 pixels wide, which is a little under 4k. If you have a measurement of one side of the frame, you can find the other by using some math. Let’s suppose your frame is 3424 pixels wide. You can use this formula to find the height.
Formula: 3424 pixels wide x 1 high / 2.35 wide (or whatever your aspect ratio)

Now you can cancel out the width from the multiplier and the denominator.
= 3424 pixels wide x 1 high / 2.35 wide

Now you are left with the equation:
= 3424 pixels high / 2.35
After solving this equation, you will get the answer which is: 1457 pixels high. Let’s adjust it on the music video as well, follow the steps given below:
Free Download For Win 7 or later(64-bit)
Free Download For macOS 10.14 or later
Step1Open the aspect ratio setting tab
Open your music video project in Filmora and click on the screen icon, as shown in the picture.
![]()
Then select the Change Project Aspect Ratio.

Step2Add values
Now set the project Width to 3424 pixels and its Height to 1457 pixels. You can also adjust the frame rate by selecting the one in which you shot the video. Then click OK.

Assembly
The next step is assembly. You will arrange the shots, clips, and elements in this process and get everything in order. It can be daunting and inspiring for you, as it’s a blank canvas you are going to start with. Before editing, you can also get some guidance from your art director.
If your music video has shots of the band performing, drop them off first and sync them with the audio. On the contrary, if you are doing a narrative style, you can arrange the shots according to the story you want to portray.

Step1Drop the media
You can start by dragging and dropping the music onto the audio timeline. Then you can add the shots of your music video.

Step2Arrange the shots
Arrange the shots according to the storyboard you created and sync them with the audio.

Step3Add the title
Once you arrange all shots in order, you can add the title of your music video. Click on the Titles, then choose your desired style and add the name of your music video in the title box. You can also change the text’s size, font, and color.

Step4Flip the clip
One last thing is, if you shot any scene in mirror-image format, you can flip it. Click on the clip you want to flip and select the flip icon in the video properties.

Send your first draft
The first draft is the video in which you added audio and re-ordered the shots. You decided on the pace and flow of the video to create a basic structure. You made changes to make it interesting and captivating.
Before you put too much effort into editing your video, send it to your director, producer, or client for review. It will help ensure that any big changes can be made before you invest too much time in the edit.
For first drafts, you don’t need anything fancy. A lower-resolution and more compressed file can make sending it to a director or client much easier. You can also add a timer on the music video, so the person reviewing it can give you accurate timing on where he wants any revision.
How to add the timer in the music video?
- Click on Effects and search for Timecode in the search bar.
- Choose the timer style you like and drop it onto the new timeline.
- Extend the timer to the end of the video.
- Adjust the position and add the duration of your music video.

Now you are all set to export the first draft of your music video. You can also adjust the video format on the export option, but MP4 is recommended.
Conclusion
We hope this blog has helped you edit the initials of your music video. By adjusting the aspect ratio to fit the desired screen size and properly planning the first cut, you can lay a solid foundation for the rest of the editing process.
These two steps can greatly impact the overall look and feel of the final product. Remember to communicate with your director, producer, or client throughout the process to ensure that the final product meets their expectations.
Are You Tired of Spending Too Much Time on Video Editing? Learn the Most Effective Ways to Manage Your Timeline and Streamline Your Video Editing Process
Do you still have a lot of editing to do after spending hours creating a video for your client? Though you already have a lot on your plate, you can’t continue to devote all of your working hours to only video editing. What if we told you there is a way to make this video editing process much quicker and easier? Keep reading this article to learn how to make the video editing process simpler and more effective.
Part 1: Best Way to Manage your Timeline
We all know that keeping good habits while editing could be helpful, whether you are a professional or a newbie. It could make editing so much more efficient. Today, we will show you some easy tips to organize your media browser and timeline while editing videos. But before we begin, download Filmora from their official website so you can follow all the steps easily.
Free Download For Win 7 or later(64-bit)
Free Download For macOS 10.14 or later
1. Create folders in Filmora
If you have footage from multiple cameras, it is best to create some folders first.
Step1 Create a Folder for Camera 1
If you have video footage from three cameras, you can create one folder for each camera.
Go to the default folder on the top left and rename it Cam_A.
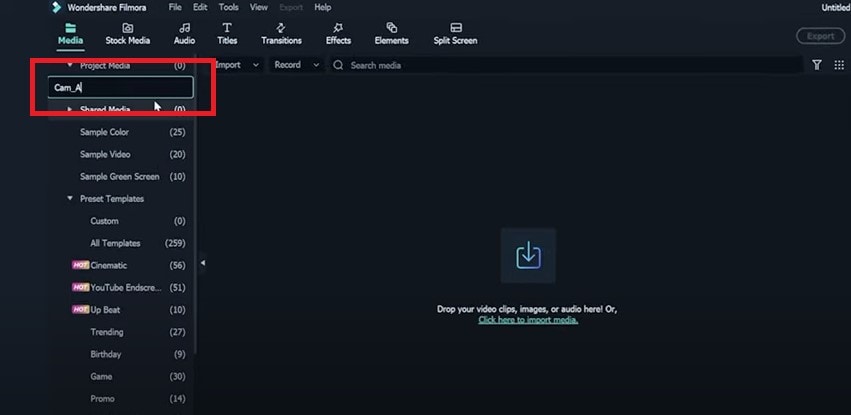
Step2 Create a Folder for Camera 2
Then go to the bottom left of the media browser and click on this icon to add a new folder. Rename it to Cam_B.
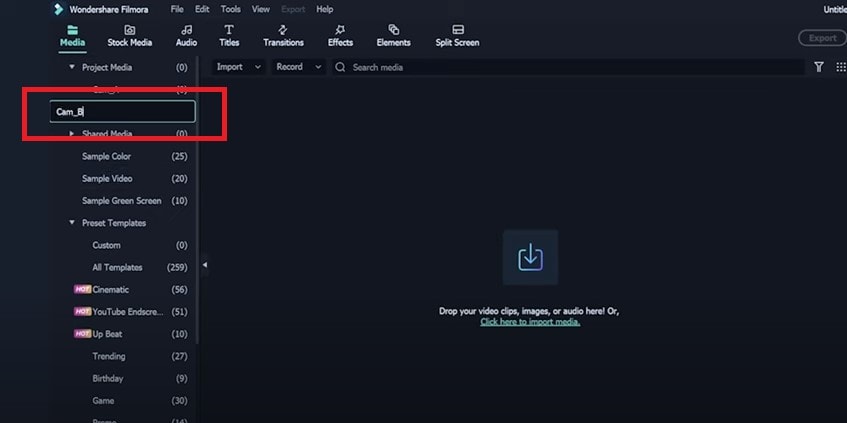
Step3 Create a Folder for Camera 3
Repeat the steps to create another folder called Cam_C. Now you can import footage from your different cameras into each folder.

Step4 Create a Folder for Production Sound
After that, add three new folders and rename them to Production Sound, SFX, and Music. Production sound is usually the sound that is recorded on set. If you have recorded all dialects from the subjects on the location, you can put them into this folder.
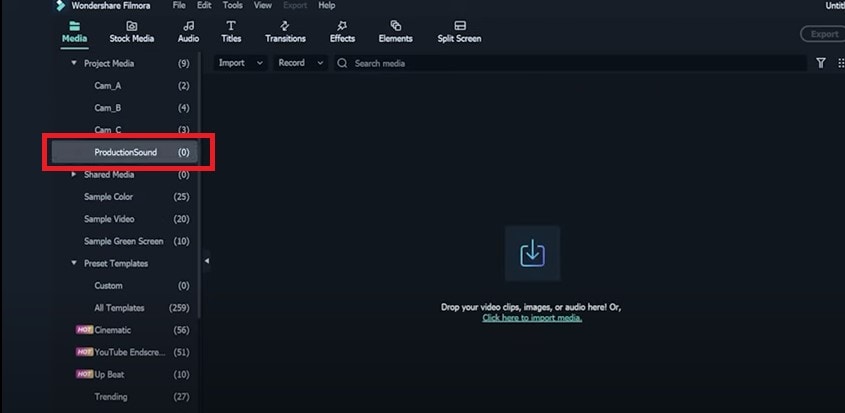
Step5 Create a Folder for SFX
SFX stands for sound effects. You can add push clapping, laughing and other Folly sounds into this folder.
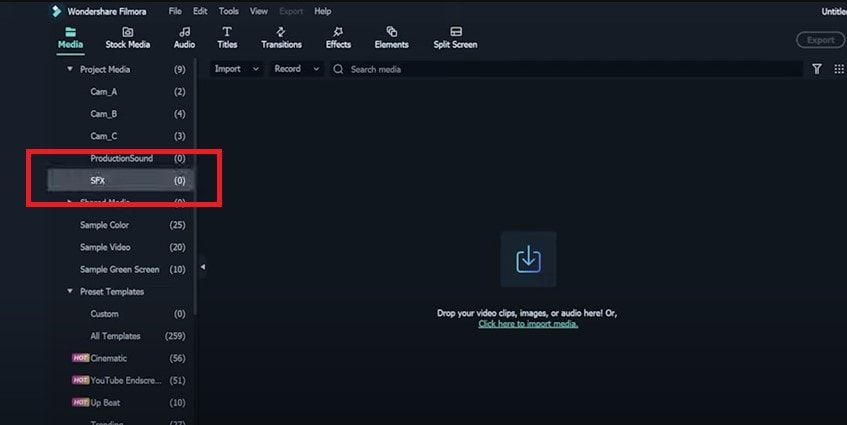
Step6 Create a Folder for Music
Next, import all music files into the music folder. You can create folders for your graphics, B-roll, and stock footage if needed.

2. Organize your Timeline and Video Tracks
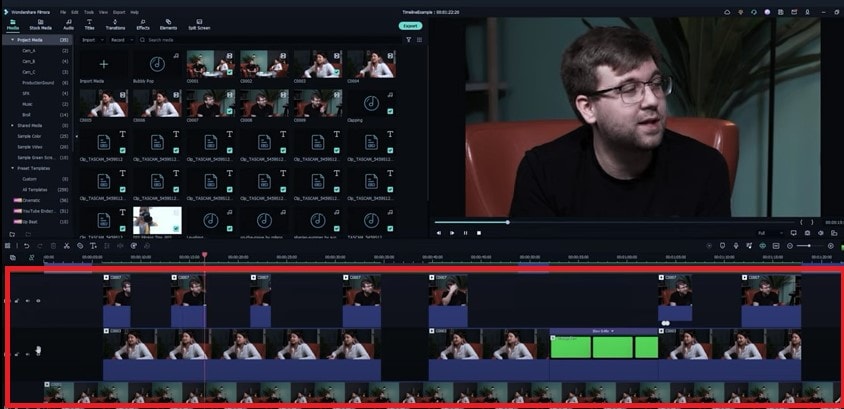
Step1 Create Tracks for Picture Editing
Keep the first three tracks for picture editing. These tracks are usually for picture editing that includes footage with no effects or some simple effects—for example resizing, keyframing, transitions, or Green Screen.
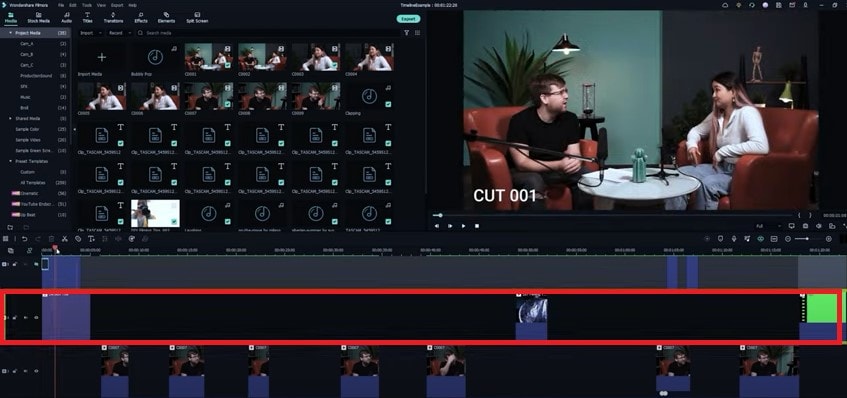
Step2 Create Tracks for Temporary Footage
Set up the fourth track for the temporary footage or placeholders so you can quickly switch the temporary footage without spending extra time looking for them.
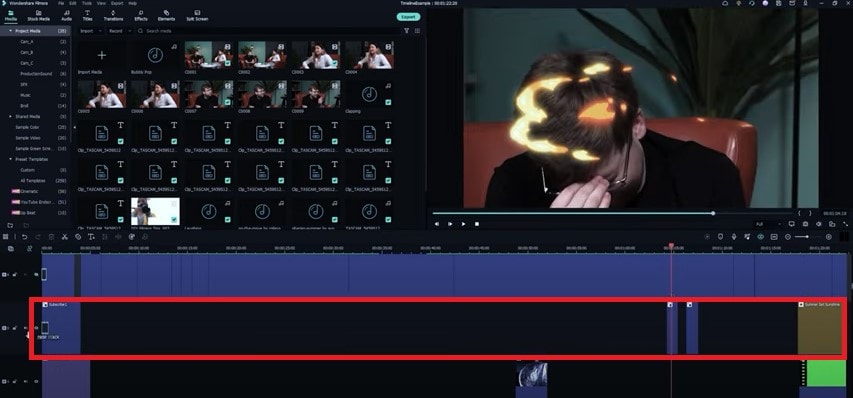
Step3 Create Tracks for Effects
Set the fifth video track as the effect track. It will include all effects from firmware that do not apply to the footage directly.
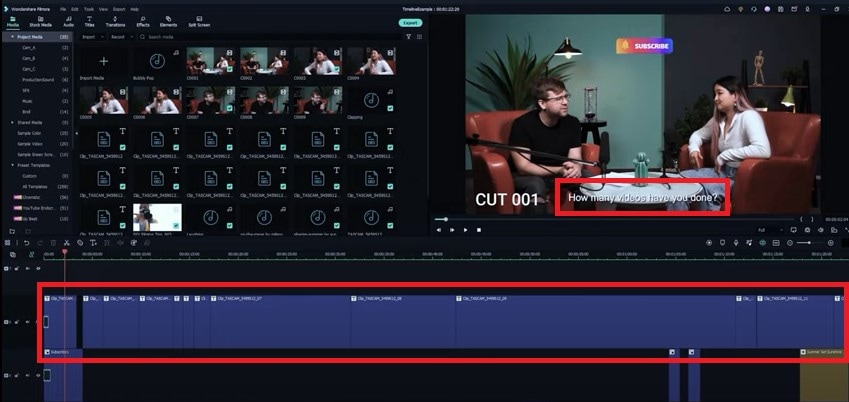
Step4 Create Tracks for On and Off Content
Next, on the sixth video track, you can add the content that you would want to turn on and off from time to time. In this example, you can put the subtitles here.
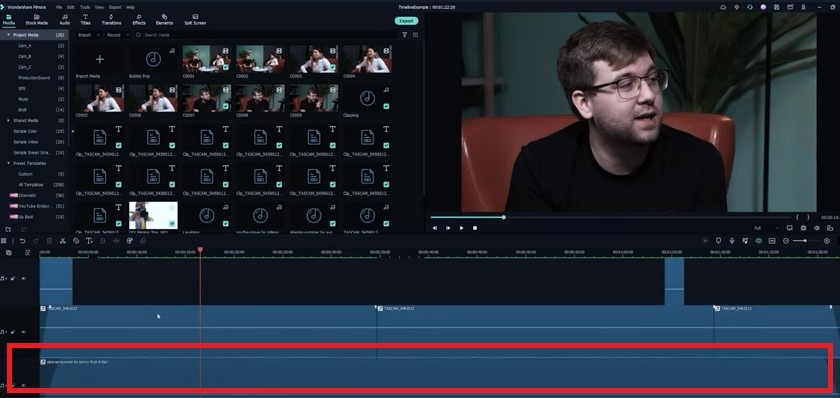
3. Organize your Audio Tracks
Step1 Create Tracks for Dialects
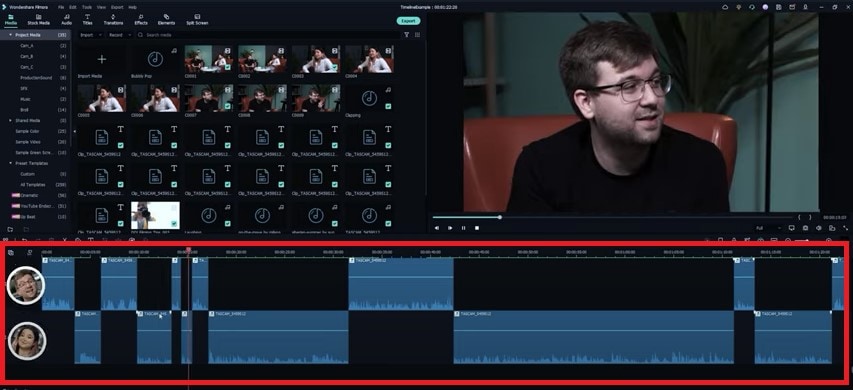
The first two tracks are usually for dialects. You can include all the dialects of characters in these tracks. Keep one track for each character. If you have more characters, feel free to assign more tracks to them.
Step2 Create Tracks for Additional Audio
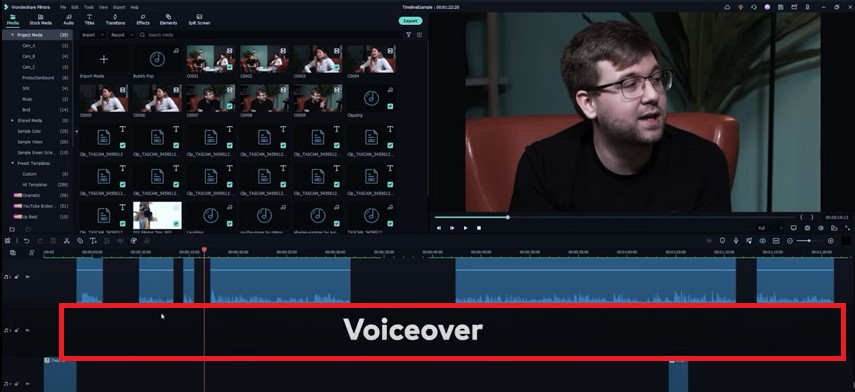
The third audio track could be for any additional audio, such as voiceover. If you don’t have a voiceover in your video, you can leave it empty.
Step3 Create Tracks for Sound Effects
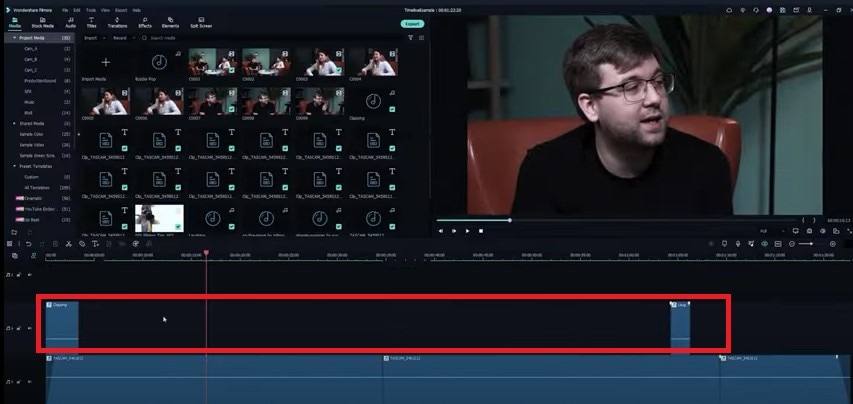
The fourth track could usually be the sound effects track. You can add all the clapping sounds, laughing, and all kinds of other foley sound here.
Step4 Create Tracks for Ambient Sound
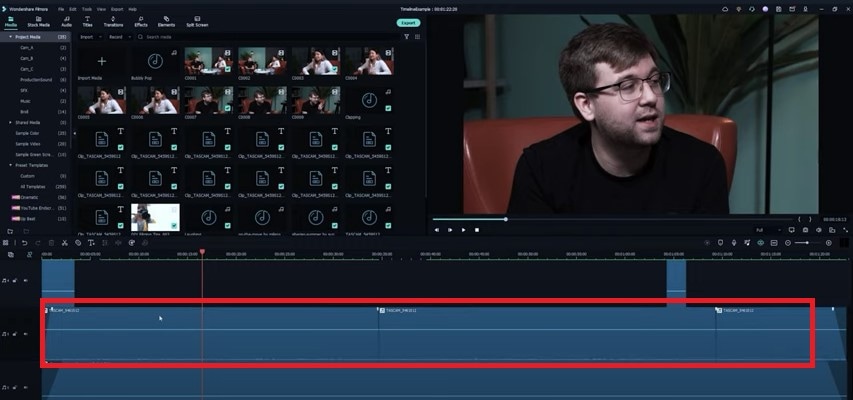
Keep the fifth track for Ambient sound and room tone. You can use it to keep a very subtle environment sound in specific scenes. For example, you can use the room tone recorded on sets.
Step5 Create Tracks for Background Music
Finally, the sixth track is usually for background music. But, of course, you could also keep it empty if your project has no background music.
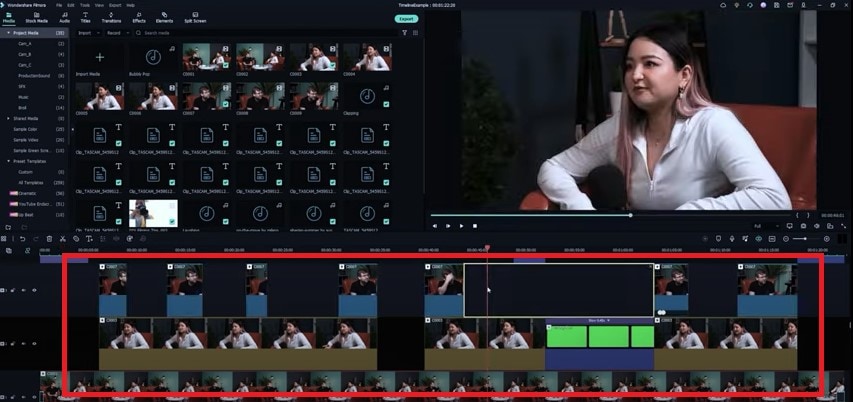
4. Color Code Your Clips
Suppose you want to make the timeline even easier to view. In that case, you can select all clips from a camera or a subject and color code them into a specific color. For example, you can color code the footage from camera A in red, camera B in yellow, and Camera C in blue. Now, when you look at the Timeline, you can quickly distinguish footage from different cameras.
Part 2: Pro Tips about Improving Video Editing Efficiency
1. Rename Individual Clips
It would be much simpler to organize the timeline if you could quickly rename individual clips. Cut a clip into smaller segments and give each clip a different name. Make sure these clips have a name other than the source video to avoid confusion.
2. Remove Empty Timeline
For quick video editing, timeline organization is essential. Organize your materials and footage at all times to prevent delays. Put everything in the correct folders with the proper labels. To keep your timeline organized, select “Delete Empty Tracks” from the context menu when right-clicking on the track window on the left.
3. Use Keyboard Shortcuts
Knowing keyboard shortcuts allows you to carry out the editing process quickly and precisely.
4. Select Good Music
Don’t only concentrate on the images; the music also affects how well your video comes out. For example, suppose you’re making a drama movie. In that case, you should pick the right music track to evoke particular emotions in your viewers.
5. Add Text and Graphics
Depending on the style of the video, adding text, graphics, or stock video to your project could be helpful. You should provide more text than just the title for some videos.
Summary
You don’t need to be an expert in video editing to produce high-quality videos. In reality, you can complete the task without any expensive, high-end professional training. So how? Well, with the proper video editing tools like Wondershare Filmora, anything is possible. Follow the above guide, organize your timeline and keep the tracks consistent while video editing on Filmora so it’s easier to come back and edit a project or share with other editors.
Free Download For macOS 10.14 or later
1. Create folders in Filmora
If you have footage from multiple cameras, it is best to create some folders first.
Step1 Create a Folder for Camera 1
If you have video footage from three cameras, you can create one folder for each camera.
Go to the default folder on the top left and rename it Cam_A.

Step2 Create a Folder for Camera 2
Then go to the bottom left of the media browser and click on this icon to add a new folder. Rename it to Cam_B.

Step3 Create a Folder for Camera 3
Repeat the steps to create another folder called Cam_C. Now you can import footage from your different cameras into each folder.

Step4 Create a Folder for Production Sound
After that, add three new folders and rename them to Production Sound, SFX, and Music. Production sound is usually the sound that is recorded on set. If you have recorded all dialects from the subjects on the location, you can put them into this folder.

Step5 Create a Folder for SFX
SFX stands for sound effects. You can add push clapping, laughing and other Folly sounds into this folder.

Step6 Create a Folder for Music
Next, import all music files into the music folder. You can create folders for your graphics, B-roll, and stock footage if needed.

2. Organize your Timeline and Video Tracks
Step1 Create Tracks for Picture Editing
Keep the first three tracks for picture editing. These tracks are usually for picture editing that includes footage with no effects or some simple effects—for example resizing, keyframing, transitions, or Green Screen.

Step2 Create Tracks for Temporary Footage
Set up the fourth track for the temporary footage or placeholders so you can quickly switch the temporary footage without spending extra time looking for them.

Step3 Create Tracks for Effects
Set the fifth video track as the effect track. It will include all effects from firmware that do not apply to the footage directly.

Step4 Create Tracks for On and Off Content
Next, on the sixth video track, you can add the content that you would want to turn on and off from time to time. In this example, you can put the subtitles here.

3. Organize your Audio Tracks
Step1 Create Tracks for Dialects
The first two tracks are usually for dialects. You can include all the dialects of characters in these tracks. Keep one track for each character. If you have more characters, feel free to assign more tracks to them.

Step2 Create Tracks for Additional Audio
The third audio track could be for any additional audio, such as voiceover. If you don’t have a voiceover in your video, you can leave it empty.

Step3 Create Tracks for Sound Effects
The fourth track could usually be the sound effects track. You can add all the clapping sounds, laughing, and all kinds of other foley sound here.

Step4 Create Tracks for Ambient Sound
Keep the fifth track for Ambient sound and room tone. You can use it to keep a very subtle environment sound in specific scenes. For example, you can use the room tone recorded on sets.

Step5 Create Tracks for Background Music
Finally, the sixth track is usually for background music. But, of course, you could also keep it empty if your project has no background music.

4. Color Code Your Clips
Suppose you want to make the timeline even easier to view. In that case, you can select all clips from a camera or a subject and color code them into a specific color. For example, you can color code the footage from camera A in red, camera B in yellow, and Camera C in blue. Now, when you look at the Timeline, you can quickly distinguish footage from different cameras.

Part 2: Pro Tips about Improving Video Editing Efficiency
1. Rename Individual Clips
It would be much simpler to organize the timeline if you could quickly rename individual clips. Cut a clip into smaller segments and give each clip a different name. Make sure these clips have a name other than the source video to avoid confusion.
2. Remove Empty Timeline
For quick video editing, timeline organization is essential. Organize your materials and footage at all times to prevent delays. Put everything in the correct folders with the proper labels. To keep your timeline organized, select “Delete Empty Tracks” from the context menu when right-clicking on the track window on the left.
3. Use Keyboard Shortcuts
Knowing keyboard shortcuts allows you to carry out the editing process quickly and precisely.
4. Select Good Music
Don’t only concentrate on the images; the music also affects how well your video comes out. For example, suppose you’re making a drama movie. In that case, you should pick the right music track to evoke particular emotions in your viewers.
5. Add Text and Graphics
Depending on the style of the video, adding text, graphics, or stock video to your project could be helpful. You should provide more text than just the title for some videos.
Summary
You don’t need to be an expert in video editing to produce high-quality videos. In reality, you can complete the task without any expensive, high-end professional training. So how? Well, with the proper video editing tools like Wondershare Filmora, anything is possible. Follow the above guide, organize your timeline and keep the tracks consistent while video editing on Filmora so it’s easier to come back and edit a project or share with other editors.
How to Create Datamoshing Effect to Your Footage in After Effects?
Experimenting with new effects and filters has become part and parcel of life, especially for creative professionals. Datamoshing is a similar effect that displays errors and flaws in the video clips to leave an impression on the audience. In most terms, the datamoshing effect shares similarities with the glitch effect.
Henceforth, the write-up shall focus on the introduction of this effect along with its workability. The procedure to create datamosh After Effects would also be covered. So, let us begin!
In this article
01 What is the Datamoshing Effect?
02 How Does Datamoshing Effect Work?
03 Step by Step to Create Datamoshing Effect in After Effects (Without Plugin)
04 How to Do Datamoshing Effect with Datamosh Plugin in After Effects
Part 1: What is the Datamoshing Effect?
Before going into the depths of workability and operation of the datamoshing effect in After Effects, let us understand the effect in detail. The datamoshing effect plays with the video compression to corrupt the pixels of the footage.
In this effect, the pixels glitch and appear to melt, duplicate, and create a projection organically. Also known as databending, it is a complicated technique in which movement of one layer is introduced to another layer of the video clip.
Lossy compression and removed frames help develop a psychedelic result effortlessly. Presently, datamosh After Effects has gained popularity as it helps bring change to the video and engages the audience.
Part 2: How Does Datamoshing Effect Work?
The sub-section informs the content creators and creative professionals regarding the workability of the datamoshing effect in video clips. Hence, let us commence this.
Datamoshing eliminates the new picture frame and keeps those frames that control the movement of the pixels. It leads to the picture pixels going into different directions instead of the usual one, thus, creating a glitch effect. These glitch effects are used in unique mediums to create a classy yet ancient vibe.
The datamoshing effect can be noticed between the cuts and motion. It is the process of corrupting the imagery in which the I-frames are replaced and P-frames are applied in the wrong picture. Let us dive right into two types of datamoshing.
The first type of datamoshing is created when the I-frame of the video is removed. In this scenario, the pixels from the previous scene are projected into the next scene smoothly. It gives the impression that the pixels have been tracked into the next shot.
The second kind of datamoshing, known to humankind, is when the d-frame of the video is duplicated. It leads the footage to show images and colors being bloomed together as the pixels are equivalent, coming through the same motion path.
Part 3: Step by Step to Create Datamoshing Effect in After Effects (Without Plugin)
Understanding the datamosh After Effects is one thing, and incorporating it in your footage is another. The section shall walk you through the step-by-step guide to create the After Effects’ datamoshing effect without a plugin. So, let’s go, shall we?
Step 1: Preliminary Process
The first step is easy. Open After Effects from your system. Import the targeted video that needs the datamosh effect. After that, head to the “Content-Aware Fill” to begin the process.

Step 2: Creating the Reference Frame
Use the playhead where you wish to create the effect, and then click on “Create Reference Frame.” The picture frame opens in Photoshop, and the user is expected to save it. Now, go back to the After Effects.

Step 3: Smearing Process
Now, hide the top layer so that the smearing can occur. Turn the Masks to “None” so that you can perform the masking. Split the second layer to duplicate the layer as we make changes to it. Set the “Masks” to “Subtract and then add a refine soft matte.

Step 4: Pre-composing the Clip
It is important to pre-compose the clip, so right-click on the timeline and hit “Pre-compose” to the menu list that appears. Tick mark “Move all attributes into the new composition” and rename the clip afterward. Hit “OK.”

Step 5: Rendering Queue
Double-click on the timeline, hold shift and drag it until the clip snaps. Press “B” on your keyboard and “N” on the other side to snap the work area. Navigate to “File” and “Export” and then click on “Render Queue.”

Step 6: Generating Fill Layer
Import the file when it is done rendering and drag it to the timeline. Trim the work area again using B and N buttons from the keyboard. Ensure that the fill method is “Surface,” and the range is “Work Area.” Click on “Generate Fill Layer” to start the analyzing process.

Step 7: Creating the Transition
The user is expected to create a transition between the two shots. Use the track matte to make solid and fractal noise. In the “Noise and Grain” section, click on “Fractal noise” and then switch the fractal type to “Basic.” Now, keyframe the “Brightness” and simultaneously turn its level to black and white to create a transition.

Step 8: Achieving a Glitchy Effect
To give the glitchy effect, head to the “Effects and Presets” and hit “Posterize,” and reduce its level to a couple of integers. Pull the transition down to the fill layer and set it to “Luma Matte.” It will showcase the halo sign that we masked around the image.

Step 9: Have a Finer Imprint
To eliminate it, use the “Set Matte” channel and alter its layer to the one we pre-composed. Now, invert the matte. Moving on, navigate to the “Simple Choker” and reduce it to one pixel. For perfection, duplicate it and get a finer imprint.

Step 10: Final Process
Duplicate the grey solid and then extend the second clip to our fill. In the last step, change the layer of the second clip to “Luma Matte” and save the video. You are done with the process.

Part 4: How to Do Datamoshing Effect with Datamosh Plugin in After Effects
With its plugin, this sub-section revolves around creating the datamosh effect in After Effects. So, let us begin!
Step 1: Rendering the Work Area
Open After Effects and click on the (+) sign to set the in and out points. Click on the “Datamosh” to render the work area. The timeline will showcase the clip. Click on “Remove Frames” from the left panel and add a new mosh marker by pressing the (+) button beside “Remove Frames.”

Step 2: I-Frame Removal
The new remove frame marker will be on the timeline. Drag it to the new scene and then hit “Datamosh.” The I-frame removal effect can be shown on the screen. Again, click on (+) to add a new mosh module. Press “Multiply” and then “Average” from the menus that appear. Hit “Average previous 3” afterward.

Step 3: Using the Hold Frames Function
Set the in and out points of this mosh marker and again hit “Datamosh.” The work area will be rendered. Now, open the mosh module and toggle on the “Hold Frames” feature. Also, toggle on the previous render. Press the “Datamosh” again.

Step 4: Injecting the Frames
Toggle the “Inject Frames” on and press use previous render. Hit “Datamosh” afterward. In this way, the clip will hold the frames and inject them into the transition. Enhance the intensity of the moshing algorithm and eliminate “Remove Frames” and “Inject Frames.” Use the previous render and again hit “Datamosh.”

Step 5: Playing with the Acceleration
Increase the acceleration and bring the intensity back to what it was. Again, use the previous render and click “Datamosh.” Now, improve the intensity and set the acceleration back to 0. Alter the “Blend” as much you need to mix the original and present motion of the transition. Press the “Datamosh.”

Step 6: Changing the Threshold
Moving on to the threshold feature, this function is a gatekeeper and decides if a pixel will be moshed. Inverse the intensity of the clip, change the blend to be 0, and set the threshold to be a small integer to find out the impact first. It can be enhanced later on. Uncheck the previous render if you are using the new clip for threshold. Hit “Datamosh” again. Now, export the video, and you are done with the datamoshing.

Conclusion
YouTubers and content creators use the Datamoshing effect to offer magic to the workplace. The article offered an extensive guide to effortlessly adding this effect in After Effects. The foundation and workability of the datamosh effect were also the cruces of the article. It is recommended that the user properly know the software before getting into the process.
02 How Does Datamoshing Effect Work?
03 Step by Step to Create Datamoshing Effect in After Effects (Without Plugin)
04 How to Do Datamoshing Effect with Datamosh Plugin in After Effects
Part 1: What is the Datamoshing Effect?
Before going into the depths of workability and operation of the datamoshing effect in After Effects, let us understand the effect in detail. The datamoshing effect plays with the video compression to corrupt the pixels of the footage.
In this effect, the pixels glitch and appear to melt, duplicate, and create a projection organically. Also known as databending, it is a complicated technique in which movement of one layer is introduced to another layer of the video clip.
Lossy compression and removed frames help develop a psychedelic result effortlessly. Presently, datamosh After Effects has gained popularity as it helps bring change to the video and engages the audience.
Part 2: How Does Datamoshing Effect Work?
The sub-section informs the content creators and creative professionals regarding the workability of the datamoshing effect in video clips. Hence, let us commence this.
Datamoshing eliminates the new picture frame and keeps those frames that control the movement of the pixels. It leads to the picture pixels going into different directions instead of the usual one, thus, creating a glitch effect. These glitch effects are used in unique mediums to create a classy yet ancient vibe.
The datamoshing effect can be noticed between the cuts and motion. It is the process of corrupting the imagery in which the I-frames are replaced and P-frames are applied in the wrong picture. Let us dive right into two types of datamoshing.
The first type of datamoshing is created when the I-frame of the video is removed. In this scenario, the pixels from the previous scene are projected into the next scene smoothly. It gives the impression that the pixels have been tracked into the next shot.
The second kind of datamoshing, known to humankind, is when the d-frame of the video is duplicated. It leads the footage to show images and colors being bloomed together as the pixels are equivalent, coming through the same motion path.
Part 3: Step by Step to Create Datamoshing Effect in After Effects (Without Plugin)
Understanding the datamosh After Effects is one thing, and incorporating it in your footage is another. The section shall walk you through the step-by-step guide to create the After Effects’ datamoshing effect without a plugin. So, let’s go, shall we?
Step 1: Preliminary Process
The first step is easy. Open After Effects from your system. Import the targeted video that needs the datamosh effect. After that, head to the “Content-Aware Fill” to begin the process.

Step 2: Creating the Reference Frame
Use the playhead where you wish to create the effect, and then click on “Create Reference Frame.” The picture frame opens in Photoshop, and the user is expected to save it. Now, go back to the After Effects.

Step 3: Smearing Process
Now, hide the top layer so that the smearing can occur. Turn the Masks to “None” so that you can perform the masking. Split the second layer to duplicate the layer as we make changes to it. Set the “Masks” to “Subtract and then add a refine soft matte.

Step 4: Pre-composing the Clip
It is important to pre-compose the clip, so right-click on the timeline and hit “Pre-compose” to the menu list that appears. Tick mark “Move all attributes into the new composition” and rename the clip afterward. Hit “OK.”

Step 5: Rendering Queue
Double-click on the timeline, hold shift and drag it until the clip snaps. Press “B” on your keyboard and “N” on the other side to snap the work area. Navigate to “File” and “Export” and then click on “Render Queue.”

Step 6: Generating Fill Layer
Import the file when it is done rendering and drag it to the timeline. Trim the work area again using B and N buttons from the keyboard. Ensure that the fill method is “Surface,” and the range is “Work Area.” Click on “Generate Fill Layer” to start the analyzing process.

Step 7: Creating the Transition
The user is expected to create a transition between the two shots. Use the track matte to make solid and fractal noise. In the “Noise and Grain” section, click on “Fractal noise” and then switch the fractal type to “Basic.” Now, keyframe the “Brightness” and simultaneously turn its level to black and white to create a transition.

Step 8: Achieving a Glitchy Effect
To give the glitchy effect, head to the “Effects and Presets” and hit “Posterize,” and reduce its level to a couple of integers. Pull the transition down to the fill layer and set it to “Luma Matte.” It will showcase the halo sign that we masked around the image.

Step 9: Have a Finer Imprint
To eliminate it, use the “Set Matte” channel and alter its layer to the one we pre-composed. Now, invert the matte. Moving on, navigate to the “Simple Choker” and reduce it to one pixel. For perfection, duplicate it and get a finer imprint.

Step 10: Final Process
Duplicate the grey solid and then extend the second clip to our fill. In the last step, change the layer of the second clip to “Luma Matte” and save the video. You are done with the process.

Part 4: How to Do Datamoshing Effect with Datamosh Plugin in After Effects
With its plugin, this sub-section revolves around creating the datamosh effect in After Effects. So, let us begin!
Step 1: Rendering the Work Area
Open After Effects and click on the (+) sign to set the in and out points. Click on the “Datamosh” to render the work area. The timeline will showcase the clip. Click on “Remove Frames” from the left panel and add a new mosh marker by pressing the (+) button beside “Remove Frames.”

Step 2: I-Frame Removal
The new remove frame marker will be on the timeline. Drag it to the new scene and then hit “Datamosh.” The I-frame removal effect can be shown on the screen. Again, click on (+) to add a new mosh module. Press “Multiply” and then “Average” from the menus that appear. Hit “Average previous 3” afterward.

Step 3: Using the Hold Frames Function
Set the in and out points of this mosh marker and again hit “Datamosh.” The work area will be rendered. Now, open the mosh module and toggle on the “Hold Frames” feature. Also, toggle on the previous render. Press the “Datamosh” again.

Step 4: Injecting the Frames
Toggle the “Inject Frames” on and press use previous render. Hit “Datamosh” afterward. In this way, the clip will hold the frames and inject them into the transition. Enhance the intensity of the moshing algorithm and eliminate “Remove Frames” and “Inject Frames.” Use the previous render and again hit “Datamosh.”

Step 5: Playing with the Acceleration
Increase the acceleration and bring the intensity back to what it was. Again, use the previous render and click “Datamosh.” Now, improve the intensity and set the acceleration back to 0. Alter the “Blend” as much you need to mix the original and present motion of the transition. Press the “Datamosh.”

Step 6: Changing the Threshold
Moving on to the threshold feature, this function is a gatekeeper and decides if a pixel will be moshed. Inverse the intensity of the clip, change the blend to be 0, and set the threshold to be a small integer to find out the impact first. It can be enhanced later on. Uncheck the previous render if you are using the new clip for threshold. Hit “Datamosh” again. Now, export the video, and you are done with the datamoshing.

Conclusion
YouTubers and content creators use the Datamoshing effect to offer magic to the workplace. The article offered an extensive guide to effortlessly adding this effect in After Effects. The foundation and workability of the datamosh effect were also the cruces of the article. It is recommended that the user properly know the software before getting into the process.
02 How Does Datamoshing Effect Work?
03 Step by Step to Create Datamoshing Effect in After Effects (Without Plugin)
04 How to Do Datamoshing Effect with Datamosh Plugin in After Effects
Part 1: What is the Datamoshing Effect?
Before going into the depths of workability and operation of the datamoshing effect in After Effects, let us understand the effect in detail. The datamoshing effect plays with the video compression to corrupt the pixels of the footage.
In this effect, the pixels glitch and appear to melt, duplicate, and create a projection organically. Also known as databending, it is a complicated technique in which movement of one layer is introduced to another layer of the video clip.
Lossy compression and removed frames help develop a psychedelic result effortlessly. Presently, datamosh After Effects has gained popularity as it helps bring change to the video and engages the audience.
Part 2: How Does Datamoshing Effect Work?
The sub-section informs the content creators and creative professionals regarding the workability of the datamoshing effect in video clips. Hence, let us commence this.
Datamoshing eliminates the new picture frame and keeps those frames that control the movement of the pixels. It leads to the picture pixels going into different directions instead of the usual one, thus, creating a glitch effect. These glitch effects are used in unique mediums to create a classy yet ancient vibe.
The datamoshing effect can be noticed between the cuts and motion. It is the process of corrupting the imagery in which the I-frames are replaced and P-frames are applied in the wrong picture. Let us dive right into two types of datamoshing.
The first type of datamoshing is created when the I-frame of the video is removed. In this scenario, the pixels from the previous scene are projected into the next scene smoothly. It gives the impression that the pixels have been tracked into the next shot.
The second kind of datamoshing, known to humankind, is when the d-frame of the video is duplicated. It leads the footage to show images and colors being bloomed together as the pixels are equivalent, coming through the same motion path.
Part 3: Step by Step to Create Datamoshing Effect in After Effects (Without Plugin)
Understanding the datamosh After Effects is one thing, and incorporating it in your footage is another. The section shall walk you through the step-by-step guide to create the After Effects’ datamoshing effect without a plugin. So, let’s go, shall we?
Step 1: Preliminary Process
The first step is easy. Open After Effects from your system. Import the targeted video that needs the datamosh effect. After that, head to the “Content-Aware Fill” to begin the process.

Step 2: Creating the Reference Frame
Use the playhead where you wish to create the effect, and then click on “Create Reference Frame.” The picture frame opens in Photoshop, and the user is expected to save it. Now, go back to the After Effects.

Step 3: Smearing Process
Now, hide the top layer so that the smearing can occur. Turn the Masks to “None” so that you can perform the masking. Split the second layer to duplicate the layer as we make changes to it. Set the “Masks” to “Subtract and then add a refine soft matte.

Step 4: Pre-composing the Clip
It is important to pre-compose the clip, so right-click on the timeline and hit “Pre-compose” to the menu list that appears. Tick mark “Move all attributes into the new composition” and rename the clip afterward. Hit “OK.”

Step 5: Rendering Queue
Double-click on the timeline, hold shift and drag it until the clip snaps. Press “B” on your keyboard and “N” on the other side to snap the work area. Navigate to “File” and “Export” and then click on “Render Queue.”

Step 6: Generating Fill Layer
Import the file when it is done rendering and drag it to the timeline. Trim the work area again using B and N buttons from the keyboard. Ensure that the fill method is “Surface,” and the range is “Work Area.” Click on “Generate Fill Layer” to start the analyzing process.

Step 7: Creating the Transition
The user is expected to create a transition between the two shots. Use the track matte to make solid and fractal noise. In the “Noise and Grain” section, click on “Fractal noise” and then switch the fractal type to “Basic.” Now, keyframe the “Brightness” and simultaneously turn its level to black and white to create a transition.

Step 8: Achieving a Glitchy Effect
To give the glitchy effect, head to the “Effects and Presets” and hit “Posterize,” and reduce its level to a couple of integers. Pull the transition down to the fill layer and set it to “Luma Matte.” It will showcase the halo sign that we masked around the image.

Step 9: Have a Finer Imprint
To eliminate it, use the “Set Matte” channel and alter its layer to the one we pre-composed. Now, invert the matte. Moving on, navigate to the “Simple Choker” and reduce it to one pixel. For perfection, duplicate it and get a finer imprint.

Step 10: Final Process
Duplicate the grey solid and then extend the second clip to our fill. In the last step, change the layer of the second clip to “Luma Matte” and save the video. You are done with the process.

Part 4: How to Do Datamoshing Effect with Datamosh Plugin in After Effects
With its plugin, this sub-section revolves around creating the datamosh effect in After Effects. So, let us begin!
Step 1: Rendering the Work Area
Open After Effects and click on the (+) sign to set the in and out points. Click on the “Datamosh” to render the work area. The timeline will showcase the clip. Click on “Remove Frames” from the left panel and add a new mosh marker by pressing the (+) button beside “Remove Frames.”

Step 2: I-Frame Removal
The new remove frame marker will be on the timeline. Drag it to the new scene and then hit “Datamosh.” The I-frame removal effect can be shown on the screen. Again, click on (+) to add a new mosh module. Press “Multiply” and then “Average” from the menus that appear. Hit “Average previous 3” afterward.

Step 3: Using the Hold Frames Function
Set the in and out points of this mosh marker and again hit “Datamosh.” The work area will be rendered. Now, open the mosh module and toggle on the “Hold Frames” feature. Also, toggle on the previous render. Press the “Datamosh” again.

Step 4: Injecting the Frames
Toggle the “Inject Frames” on and press use previous render. Hit “Datamosh” afterward. In this way, the clip will hold the frames and inject them into the transition. Enhance the intensity of the moshing algorithm and eliminate “Remove Frames” and “Inject Frames.” Use the previous render and again hit “Datamosh.”

Step 5: Playing with the Acceleration
Increase the acceleration and bring the intensity back to what it was. Again, use the previous render and click “Datamosh.” Now, improve the intensity and set the acceleration back to 0. Alter the “Blend” as much you need to mix the original and present motion of the transition. Press the “Datamosh.”

Step 6: Changing the Threshold
Moving on to the threshold feature, this function is a gatekeeper and decides if a pixel will be moshed. Inverse the intensity of the clip, change the blend to be 0, and set the threshold to be a small integer to find out the impact first. It can be enhanced later on. Uncheck the previous render if you are using the new clip for threshold. Hit “Datamosh” again. Now, export the video, and you are done with the datamoshing.

Conclusion
YouTubers and content creators use the Datamoshing effect to offer magic to the workplace. The article offered an extensive guide to effortlessly adding this effect in After Effects. The foundation and workability of the datamosh effect were also the cruces of the article. It is recommended that the user properly know the software before getting into the process.
02 How Does Datamoshing Effect Work?
03 Step by Step to Create Datamoshing Effect in After Effects (Without Plugin)
04 How to Do Datamoshing Effect with Datamosh Plugin in After Effects
Part 1: What is the Datamoshing Effect?
Before going into the depths of workability and operation of the datamoshing effect in After Effects, let us understand the effect in detail. The datamoshing effect plays with the video compression to corrupt the pixels of the footage.
In this effect, the pixels glitch and appear to melt, duplicate, and create a projection organically. Also known as databending, it is a complicated technique in which movement of one layer is introduced to another layer of the video clip.
Lossy compression and removed frames help develop a psychedelic result effortlessly. Presently, datamosh After Effects has gained popularity as it helps bring change to the video and engages the audience.
Part 2: How Does Datamoshing Effect Work?
The sub-section informs the content creators and creative professionals regarding the workability of the datamoshing effect in video clips. Hence, let us commence this.
Datamoshing eliminates the new picture frame and keeps those frames that control the movement of the pixels. It leads to the picture pixels going into different directions instead of the usual one, thus, creating a glitch effect. These glitch effects are used in unique mediums to create a classy yet ancient vibe.
The datamoshing effect can be noticed between the cuts and motion. It is the process of corrupting the imagery in which the I-frames are replaced and P-frames are applied in the wrong picture. Let us dive right into two types of datamoshing.
The first type of datamoshing is created when the I-frame of the video is removed. In this scenario, the pixels from the previous scene are projected into the next scene smoothly. It gives the impression that the pixels have been tracked into the next shot.
The second kind of datamoshing, known to humankind, is when the d-frame of the video is duplicated. It leads the footage to show images and colors being bloomed together as the pixels are equivalent, coming through the same motion path.
Part 3: Step by Step to Create Datamoshing Effect in After Effects (Without Plugin)
Understanding the datamosh After Effects is one thing, and incorporating it in your footage is another. The section shall walk you through the step-by-step guide to create the After Effects’ datamoshing effect without a plugin. So, let’s go, shall we?
Step 1: Preliminary Process
The first step is easy. Open After Effects from your system. Import the targeted video that needs the datamosh effect. After that, head to the “Content-Aware Fill” to begin the process.

Step 2: Creating the Reference Frame
Use the playhead where you wish to create the effect, and then click on “Create Reference Frame.” The picture frame opens in Photoshop, and the user is expected to save it. Now, go back to the After Effects.

Step 3: Smearing Process
Now, hide the top layer so that the smearing can occur. Turn the Masks to “None” so that you can perform the masking. Split the second layer to duplicate the layer as we make changes to it. Set the “Masks” to “Subtract and then add a refine soft matte.

Step 4: Pre-composing the Clip
It is important to pre-compose the clip, so right-click on the timeline and hit “Pre-compose” to the menu list that appears. Tick mark “Move all attributes into the new composition” and rename the clip afterward. Hit “OK.”

Step 5: Rendering Queue
Double-click on the timeline, hold shift and drag it until the clip snaps. Press “B” on your keyboard and “N” on the other side to snap the work area. Navigate to “File” and “Export” and then click on “Render Queue.”

Step 6: Generating Fill Layer
Import the file when it is done rendering and drag it to the timeline. Trim the work area again using B and N buttons from the keyboard. Ensure that the fill method is “Surface,” and the range is “Work Area.” Click on “Generate Fill Layer” to start the analyzing process.

Step 7: Creating the Transition
The user is expected to create a transition between the two shots. Use the track matte to make solid and fractal noise. In the “Noise and Grain” section, click on “Fractal noise” and then switch the fractal type to “Basic.” Now, keyframe the “Brightness” and simultaneously turn its level to black and white to create a transition.

Step 8: Achieving a Glitchy Effect
To give the glitchy effect, head to the “Effects and Presets” and hit “Posterize,” and reduce its level to a couple of integers. Pull the transition down to the fill layer and set it to “Luma Matte.” It will showcase the halo sign that we masked around the image.

Step 9: Have a Finer Imprint
To eliminate it, use the “Set Matte” channel and alter its layer to the one we pre-composed. Now, invert the matte. Moving on, navigate to the “Simple Choker” and reduce it to one pixel. For perfection, duplicate it and get a finer imprint.

Step 10: Final Process
Duplicate the grey solid and then extend the second clip to our fill. In the last step, change the layer of the second clip to “Luma Matte” and save the video. You are done with the process.

Part 4: How to Do Datamoshing Effect with Datamosh Plugin in After Effects
With its plugin, this sub-section revolves around creating the datamosh effect in After Effects. So, let us begin!
Step 1: Rendering the Work Area
Open After Effects and click on the (+) sign to set the in and out points. Click on the “Datamosh” to render the work area. The timeline will showcase the clip. Click on “Remove Frames” from the left panel and add a new mosh marker by pressing the (+) button beside “Remove Frames.”

Step 2: I-Frame Removal
The new remove frame marker will be on the timeline. Drag it to the new scene and then hit “Datamosh.” The I-frame removal effect can be shown on the screen. Again, click on (+) to add a new mosh module. Press “Multiply” and then “Average” from the menus that appear. Hit “Average previous 3” afterward.

Step 3: Using the Hold Frames Function
Set the in and out points of this mosh marker and again hit “Datamosh.” The work area will be rendered. Now, open the mosh module and toggle on the “Hold Frames” feature. Also, toggle on the previous render. Press the “Datamosh” again.

Step 4: Injecting the Frames
Toggle the “Inject Frames” on and press use previous render. Hit “Datamosh” afterward. In this way, the clip will hold the frames and inject them into the transition. Enhance the intensity of the moshing algorithm and eliminate “Remove Frames” and “Inject Frames.” Use the previous render and again hit “Datamosh.”

Step 5: Playing with the Acceleration
Increase the acceleration and bring the intensity back to what it was. Again, use the previous render and click “Datamosh.” Now, improve the intensity and set the acceleration back to 0. Alter the “Blend” as much you need to mix the original and present motion of the transition. Press the “Datamosh.”

Step 6: Changing the Threshold
Moving on to the threshold feature, this function is a gatekeeper and decides if a pixel will be moshed. Inverse the intensity of the clip, change the blend to be 0, and set the threshold to be a small integer to find out the impact first. It can be enhanced later on. Uncheck the previous render if you are using the new clip for threshold. Hit “Datamosh” again. Now, export the video, and you are done with the datamoshing.

Conclusion
YouTubers and content creators use the Datamoshing effect to offer magic to the workplace. The article offered an extensive guide to effortlessly adding this effect in After Effects. The foundation and workability of the datamosh effect were also the cruces of the article. It is recommended that the user properly know the software before getting into the process.
Also read:
- In 2024, How to Use Rules of Thirds
- 2024 Approved Create True 3D Text Effects Using After Effects
- New How to Make Flying Objects in Wondershare Filmora for 2024
- Updated Top 7 Color Match Paint Apps
- Efficient Ways to Change Slow Motion Video to Normal on iPhone for 2024
- Updated In 2024, Camtasia Vs. Final Cut Pro
- In 2024, How to Create a Video Slideshow in iMovie
- New This Article Discusses What Is Hitfilm Express, How to Download, Install and Use It, and Its Key Features. It Further Discusses Its Alternative for Editing Your Videos and More. Check Out Now
- Updated 2024 Approved What Is TS Format and How To Play TS Files?
- Updated 2024 Approved How to Create An Eye-Catching Intro Videos with InVideo
- Updated In 2024, How To Make Transparent Background On Picsart
- Updated 2024 Approved Splitting Video in VSDC Step by Step
- Updated Customize PowerPoint Slideshow Icon in 8 Simple Ways for 2024
- Updated Why Vimeo Slideshow Maker Become Popular for 2024
- New Best Guide for Setting TikTok Countdown Timer
- Updated How to Make an Instant Slideshow on Mac
- 2024 Approved 15 Camera Shake Preset for Premiere Pro to Add Camera Shake with Simple Keyframes. Each Preset Is Editable with Easy Steps. Make Your Video Shocking and Impressive with These Camera Shake Effects
- 2024 Approved Top 7 Best GoPro Video Editors for Mac
- New 2 Methods to Cut Video in VLC on Windows
- In 2024, Adobe Photoshop Is the Best Photo Editor to Add Green Screen Effect to Your Photo While Wondershare Filmora Is the Best Video Editor to Add Green Screen Effect to Your Video
- The Power of Music in Videos (+Filmora Editing Tricks)
- Updated In 2024, Mix and Match The Ultimate List of 8 Video and Photo Merging Tools
- New Are You Looking to Turn on the Motion Blur Effect in Minecraft? Learn How You Can Turn the Effect on or Off with the Help of the Best Methods
- In 2024, How to Make a Gaming Montage - Guide & Tips
- 2024 Approved Are You the One Who Is Confused About What to Opt Between Camtasia vs Captivate? No More Confusion! Here We Are Going to Reveal the Answer to Camtasia vs Captivate Which Is Better? Learn More
- Updated In 2024, Add Flesh to Your Video Content Before Posting Them for Your Audience to See Using Meme Texts. Use the Tutorial Guide Shared in This Post
- Updated Is Augmented Reality Conferencing the Future of Workplace Collaboratio
- How to Create a Custom Sequence Preset in Premiere Pro
- How To Quickly Create A Screen Print Effect In Photoshop Detailed Guide for 2024
- Updated In 2024, Tactics to Make Transparent Image in Minimal Steps
- Updated In 2024, Cropping Videos in VLC Step by Step
- New In 2024, Splitting Audio From Video in Sony Vegas Step by Step
- Updated How to Create a Makeup Video for 2024
- New In 2024, 6 Ways to Mimic Professional Filming Gears
- Updated Learn How to Create Quiz Videos for YouTube that Are Interactive and Can Get Your Audience Engaged with Your Content
- 2024 Approved Best Free Video Editing Software for Reddit
- Color Lut in Video -How to Color Grade Your Video
- In This Article, You Will Learn How to Make an Engaging and Creative YouTube Intro to Give a Hook and Recap Information to the Audience by Using Wondershare Filmora
- Free 3D Intro Makers
- New Create A Freeze Frame Sequence In Your Videos for 2024
- Here We Will Discuss About Both the Methods Which You Can Choose One to Get Rid of Unwanted Portions From Your Videos or Photos
- Whether Youre a Professional Animator or a Beginner Into This. If You Want to Use the OBS Studio Chroma Key, Weve Presented some Efficient Ways to Proceed. Learn More Here
- In 2024, Here We Are Going to Show You the Best Effects to Appear on Camera Made with Filmora
- New Simple Tricks Make 3D GIF Production of Inspiration Pop up Constantly
- Keyframes Interval Everything You Need To Know
- Updated In 2024, | Change Speed of a Video on iPhone
- Updated 2024 Approved Adobe Animate Text Effects Skills You Need to Know
- Proven Ways to Fix There Was A Problem Parsing the Package on Poco X5 Pro | Dr.fone
- How to use Pokemon Go Joystick on Realme C67 5G? | Dr.fone
- In 2024, 3 Facts You Need to Know about Screen Mirroring Samsung Galaxy A14 4G | Dr.fone
- How to Easily Hard reset my Oppo Reno 9A | Dr.fone
- Full Guide on Mirroring Your Realme Narzo 60x 5G to Your PC/Mac | Dr.fone
- How to Use Life360 on Windows PC For Oppo A59 5G? | Dr.fone
- In 2024, Best Infinix Note 30i Pattern Lock Removal Tools Remove Android Pattern Lock Without Losing Data
- In 2024, How to Unlock Samsung Galaxy M14 4G Phone Password Without Factory Reset?
- What To Do if Your Samsung Galaxy F15 5G Auto Does Not Work | Dr.fone
- Title: New A Full Review of Leeming LUT Pro
- Author: Chloe
- Created at : 2024-05-20 03:37:45
- Updated at : 2024-05-21 03:37:45
- Link: https://ai-editing-video.techidaily.com/new-a-full-review-of-leeming-lut-pro/
- License: This work is licensed under CC BY-NC-SA 4.0.

