
:max_bytes(150000):strip_icc():format(webp)/TheWolfAmongUsBigby-793544cded2749488ae1d20113d8d73a.jpg)
New Add Green Screen Video on TikTok for 2024
Add Green Screen Video on TikTok
TikTok is the most popular platform for making short videos. You can create creative short videos and upload to TikTok so that they can entertain your followers and make your videos go viral. To add variety to your video content, the use of green screen in short videos is a great idea. You can replace the green screen with any background in your TikTok video. You need to know how to add green screen video on TikTok.
Adding green screen on TikTok videos has become a trend now as there are several green screen TikTok videos that have gone viral. In fact, creative green screen videos are extremely popular on social media platforms. Instead of replacing the green screen in your video with a single photo, you can replace it with multiple pictures on TikTok. We will illustrate how to add multiple pictures on TikTok green screen.
Part 1. How to Add Green Screen on TikTok?
To add green screen on TikTok video, you need to have a background of uniform color. It does not necessarily have to be a green screen. For example, if you are shooting a video of your legs and the floor tiles have uniform color, you can use green screen on TikTok to replace the tiles with any picture. Instead of using one picture on TikTok short video, you can use multiple pictures in the background to create stunning TikTok videos. Here are the steps on how to add multiple pictures to TikTok green screen.
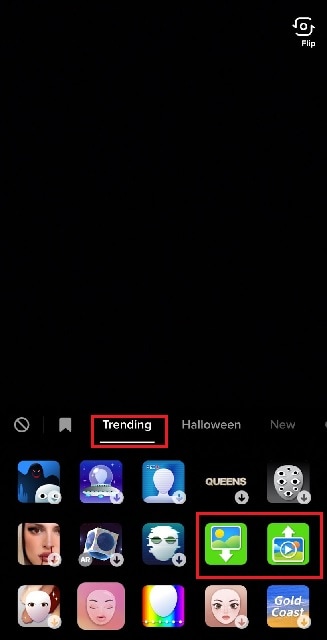
Step1 Open TikTok app on your phone. Tap on Plus icon located at the bottom of the app screen to make a new video.
Step2 Choose the duration of the video as per your preference. Thereafter, tap on Effects option located at the bottom-left corner to see the different effects available on TikTok.
![]()
Step3 Go to Trending tab and you will see Green Screen and Green Screen Video icons. If you want your video to have green screen photo, tap on Green Screen icon. If you want your video to have green screen video, tap on Green Screen Video icon.
Step4 You will get a generic background and you can choose any preset background or select photo or video from your phone gallery by tapping on Plus icon. Once you are done, tap on Record button.
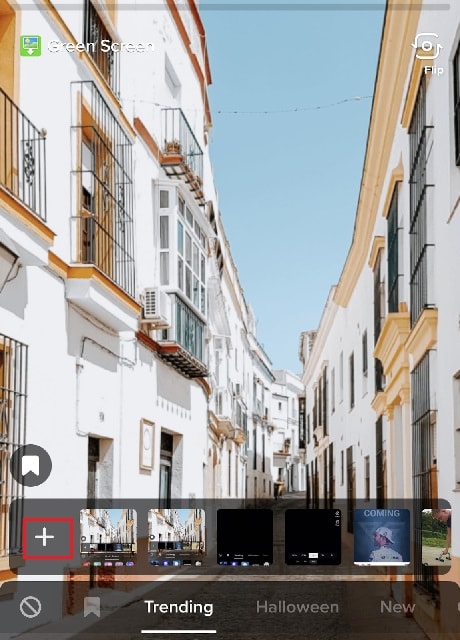
Step5 In order to use multiple pictures, you should stop recording in between and change your green screen image to anything you desire. Then tap on Record button again. TikTok will string your clips and it would appear that you have been changing multiple pictures of your background for your video.
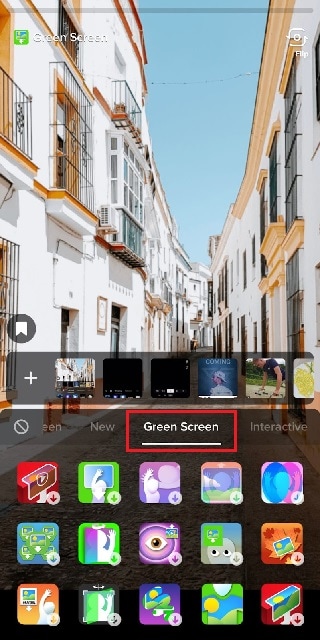
If you want to experiment with green scree effects, you can scroll down after tapping on Green Screen icon under Effects. You will see different types of green screen videos possible on TikTok to choose from.
Part 2. Creative Ideas to Make TikTok Green Screen Video
Now that you know how to add a video on TikTok green screen, you have to make the most out of it. If you are wondering how you can use green screen in your TikTok videos, here are some creative ideas for you.
Walking Out Videos – You can use green screen effect to show that you are walking out of plane, walking vertically on the wall like inception, walking on the roof of a building. In fact, you can show that you are walking out of popular monuments and palaces and trick your viewers into thinking that you were actually there.
Photoshoot Location – Create a TikTok video showing your favorite locations across the world where you dream of doing photoshoot. You can pose differently and place the location in your background through green screen effect.
How-To Video – If your TikTok channel is about tutorial and learning videos, you can explain things better by putting screenshots and multiple relevant pictures in the background so that viewers can get a pictorial representation of what you are speaking to them.
Mystery Story – You can a create short video describing unknowing facts and mysteries around certain places in the world. You can put photos or video clips of those mysterious places in your background to keep your viewers hooked and related to your narration.
Rate Them Video – You can use green screen effect to showcase your old Instagram photos or videos and rate them. This is an extremely popular trend in TikTok where people show their old photos, display work from the past, and rate them today.
Reveal Your Creation – Share your secrets or interesting stories behind some of the photos or videos you took in the past. You can talk about how creatively you took certain photos and put those photos in the background while discussing them.
Part 3. How to Make Green Screen Video on Computer?
If you have a computer and a webcam, you can record a green screen video on your computer. You can place the green screen in the background perfectly and place the webcam so that the background stays within the green screen. You will need a video recorder and a video editor to make green screen video as well as replace the green screen with any photo or video. We recommend Wondershare Filmora where you can record as well as edit green screen video.
Filmora is a professional video editor where you can record your computer screen as well as your webcam video with green screen background in Picture-in-Picture mode. After recording the video, you can replace the green screen with any video clip or photo instantly in a few steps. You can also fine-tune green screen effect for perfection. Therefore, you can save the video in any resolution and file format as per your preference.

Free Download For Win 7 or later(64-bit)
Free Download For macOS 10.14 or later
Conclusion
Adding green screen effect on TikTok videos can make your videos stand out. We have illustrated how to add multiple green screen videos on TikTok and your videos will have a better chance of getting viral. Keep the green screen ideas in mind while making TikTok green screen videos. If you want to make and edit green screen videos on computer, Wondershare Filmora is the best application available for Windows and Mac users.
How to Combine Multiple Videos Into One on Instagram
Instagram is your favorite social media platform, and even if you use it frequently, there are still some features you’d like to master. You’d like to post a series of films on the stories, but you’re unsure how to put them together.
Suppose things are exactly like this, and you’re wondering how to combine numerous videos in Instagram stories. In that case, you’ll be happy to know that I’ll show you how to do it using the native capability built into the Instagram app for smartphones. I’ll also give you some pointers on accomplishing similar tasks utilizing well-known third-party software.
Combine many clips into a single video and share it on Instagram.

Here are a few simple methods for combining two or more videos into one and posting them on Instagram (IG).
Using the Instagram official app
There is no simple way to combine many videos into one on Instagram. You can, however, utilize the Story technique.
Create an Instagram Story with two or more videos. You can add stickers, text, and other elements if you like.
Tap the three dots icon on your Instagram Tale > Save > Save story. Your current Instagram Stories films and photos will be saved to the Photos app as a single video file.
Upload the resulting Video to Instagram!
Tools To Use to Combine videos for Instagram.
- Wondershare Filmora is an easy-to-use video merger.
Before I detail online video joiners, I’d like to mention Wondershare Filmora, which can automatically merge video files without or with transitions. It merges video files with the same or various file extensions in 1:1 quality (.mp4, .mov, .mkv, .avi, etc). Continue reading to learn more about this simple video merging and how to merge videos.
Part 2: Using Filmora to combine, merge, and join clips
To join videos, first, import them.

You can drag the files from Windows File Explorer to the User’s Album or click the “Import” button on the window and choose files from your computer. All imported files will appear in thumbnail format in the User’s Album. To preview a file in the right-hand preview window, double-click it.
- To merge video files, drag & drop them.

Move videos from the User’s Album to the video track on the Timeline after that. All video files will be combined into a single video with no transition. However, you can use the following method to add transitions between video clips.
- Add transitions in the third step (optional)

Add transitions between clips for a smooth transition from one to the next to make the linked videos look like a complete movie. Go to the Transition tab and drag the desired change to the intersection of two clips. You can also right-click any transition to bring up a menu with choices such as “Apply to All” and “Random to All” for your convenience.
Step 4: Combine video files into a single file.

Now that you’ve seen the merged Movie click the “Export” option to save the several video segments to a single file. Select any format from the list under the Format tab. All of the most common video formats are supported. Choose “Device” and choose the thumbnail of your device to play the combined video file on iPod, iPhone, or iPad. You may also publish the combined Video on YouTube or burn it to DVDs to watch on television.
Other Online Video Mergers
- Androvid

Androvid is a video joiner and video editor in one. Multiple files can be easily combined into a single video. This tool also allows you to divide videos, apply effects, convert videos, and do a lot more. Use this program to effortlessly merge video files in MPEG, 3GP, MP4, AVI, and more formats.
- Video Toolbox

Users can merge and unite videos up to 600MB in size using this fantastic video editing tool. This platform is popular among professionals due to its comprehensive cutting, cropping, combining, and effects editing services. More significantly, joining videos is completely free.
- Inshot

This is a free video editing app that allows you to merge multiple videos into a single file. This is how:
Install and run Inshot.
Select Video.
Tap the check button after selecting multiple videos.
Optional: Here is where you can edit the videos. Select the 16:9 comprehensive video layout or another option by tapping Canvas.
- With iMovie

Apple’s iMovie app is available for free on iPhones, iPad, and Mac. Here’s how to combine two or more videos for an Instagram post:
Get iMovie and open it on your iPhone.
Select Movie from the Create Project menu.
Choose your movies. To see only the clips, go to the top left and tap Media, then Video. Choose a video and press the check button.
Tap Create Movie after selecting two or more video clips.
Swipe horizontally to the point where one video clip ends and another begins if desired. You can edit or remove the transition effect between videos by tapping the two triangle icon.
Optional: You can also experiment with other iMovie features such as adding music, text, and video speed changes. You can tap a video clip, tap the tiny plus icon, and zoom in and out with two fingers.
When you’re done, tap Done in the top left corner.
From the bottom, tap the share button and select Save Video.
Your iPhone’s Photos app now contains the merged clip. Open Instagram and make an individual post with the final combined Video.
This is how you can combine multiple clips into one Instagram video. I hope you found this quick tutorial helpful. Of course, you can merge two or more clips into one single video file using any other video editing app besides the ones listed above.
Here are a few simple methods for combining two or more videos into one and posting them on Instagram (IG).
Using the Instagram official app
There is no simple way to combine many videos into one on Instagram. You can, however, utilize the Story technique.
Create an Instagram Story with two or more videos. You can add stickers, text, and other elements if you like.
Tap the three dots icon on your Instagram Tale > Save > Save story. Your current Instagram Stories films and photos will be saved to the Photos app as a single video file.
Upload the resulting Video to Instagram!
Tools To Use to Combine videos for Instagram.
- Wondershare Filmora is an easy-to-use video merger.
Before I detail online video joiners, I’d like to mention Wondershare Filmora, which can automatically merge video files without or with transitions. It merges video files with the same or various file extensions in 1:1 quality (.mp4, .mov, .mkv, .avi, etc). Continue reading to learn more about this simple video merging and how to merge videos.
Part 2: Using Filmora to combine, merge, and join clips
To join videos, first, import them.
You can drag the files from Windows File Explorer to the User’s Album or click the “Import” button on the window and choose files from your computer. All imported files will appear in thumbnail format in the User’s Album. To preview a file in the right-hand preview window, double-click it.
- To merge video files, drag & drop them.
Move videos from the User’s Album to the video track on the Timeline after that. All video files will be combined into a single video with no transition. However, you can use the following method to add transitions between video clips.
- Add transitions in the third step (optional)
Add transitions between clips for a smooth transition from one to the next to make the linked videos look like a complete movie. Go to the Transition tab and drag the desired change to the intersection of two clips. You can also right-click any transition to bring up a menu with choices such as “Apply to All” and “Random to All” for your convenience.
Step 4: Combine video files into a single file.
Now that you’ve seen the merged Movie click the “Export” option to save the several video segments to a single file. Select any format from the list under the Format tab. All of the most common video formats are supported. Choose “Device” and choose the thumbnail of your device to play the combined video file on iPod, iPhone, or iPad. You may also publish the combined Video on YouTube or burn it to DVDs to watch on television.
Other Online Video Mergers
- Androvid
Androvid is a video joiner and video editor in one. Multiple files can be easily combined into a single video. This tool also allows you to divide videos, apply effects, convert videos, and do a lot more. Use this program to effortlessly merge video files in MPEG, 3GP, MP4, AVI, and more formats.
- Video Toolbox
Users can merge and unite videos up to 600MB in size using this fantastic video editing tool. This platform is popular among professionals due to its comprehensive cutting, cropping, combining, and effects editing services. More significantly, joining videos is completely free.
- Inshot
This is a free video editing app that allows you to merge multiple videos into a single file. This is how:
Install and run Inshot.
Select Video.
Tap the check button after selecting multiple videos.
Optional: Here is where you can edit the videos. Select the 16:9 comprehensive video layout or another option by tapping Canvas.
- With iMovie
Apple’s iMovie app is available for free on iPhones, iPad, and Mac. Here’s how to combine two or more videos for an Instagram post:
Get iMovie and open it on your iPhone.
Select Movie from the Create Project menu.
Choose your movies. To see only the clips, go to the top left and tap Media, then Video. Choose a video and press the check button.
Tap Create Movie after selecting two or more video clips.
Swipe horizontally to the point where one video clip ends and another begins if desired. You can edit or remove the transition effect between videos by tapping the two triangle icon.
Optional: You can also experiment with other iMovie features such as adding music, text, and video speed changes. You can tap a video clip, tap the tiny plus icon, and zoom in and out with two fingers.
When you’re done, tap Done in the top left corner.
From the bottom, tap the share button and select Save Video.
Your iPhone’s Photos app now contains the merged clip. Open Instagram and make an individual post with the final combined Video.
This is how you can combine multiple clips into one Instagram video. I hope you found this quick tutorial helpful. Of course, you can merge two or more clips into one single video file using any other video editing app besides the ones listed above.
Easy Ways to Change Aspect Ratio in iMovie?
How to Change Aspect Ratio in iMovie

Liza Brown
Nov 07, 2023• Proven solutions
The ratio between the height and width of the screen or an image is called the aspect ratio. Different video posting platforms require different aspect ratios. For example, for YouTube, the commonly used aspect ratio is 16:9, which is a standard for almost all videos. However, for TikTok, the required aspect ratio is 9:16.
The video’s original aspect ratio is based on the default settings of the recording device. Some phones and tablets provide the option of changing your video’s aspect ratio before you start recording. But it can also be changed afterward with the help of editing software.
Social media apps and websites require you post images and videos of a specific size. And if you post your content in its original dimensions it most probably be will get cropped in the wrong places and will diminish the quality of your video or image.
To post that perfect video, it is better to resize it before posting it online. Several online editing tools are available on the market that you can use to change the dimensions of your content. iMovie has to be one of the most popular editing software used worldwide. So, if you use iMovie for editing videos, and you want to know how you can change the aspect ratio of your content, read on to find it out.
In this article
01 How to Change Aspect Ratio in iMovie on Mac?
02 How to Easily Change Aspect Ratio on Mac with Wondershare Filmora? [Recommend: Auto Resize]
03 How to Change Aspect Ratio in iMovie on iPhone?
04 How to Change Aspect Ratio in iMovie on iPad?
05 FAQs About Changing Aspect Ratio in iMovie
For Win 7 or later (64-bit)
For macOS 10.12 or later
 Secure Download
How to Change Aspect Ratio in iMovie on Mac?
Learn to change the aspect ratio of videos in iMovie on Mac by following these simple steps:
Step 1. Open a pre-existing project in iMovie or create a new one. It is better to adjust the video size before starting any other editing procedures. Changing the dimensions of videos afterward may affect the editing procedures and effects applied to the video.
Step 2. To resize the video, click on “File” and then click on “Project Properties” on the drop-down list, a pop-up window will appear.
Step 3. On the popping-up dialog, you will see several options regarding aspect ratio.
Step 4. Choose the settings that are suitable for your video, and you’re done. Your video will now appear in your chosen dimensions.
How to Easily Change Aspect Ratio on Mac with Wondershare Filmora?
Wondershare Filmora is one of the best alternatives to iMovie. You can use Filmora to change the aspect ratio of your videos with a few simple steps:
For Win 7 or later (64-bit)
For macOS 10.12 or later
Secure Download
Step 1. Open the Wondershare Filmora application on Mac.
Step 2. Open the video you want to edit in the app by clicking on “Import” on the menu bar. You can also drag and drop the video on your timeline, and your file will open in the Filmora app.
Step 3. To adjust the aspect ratio of your video, click on the “Crop and Zoom” option and a pop-up will appear on your screen. Now, you have two options to consider, you can either choose presets having aspects ratios of 16:9, 4:3, 1:1, and 9:16, or you can choose custom settings. For custom dimensions, click on Custom and type in your desired ratio.
Step 4. When you are satisfied with the settings, click OK and the aspect ratio of your video will be changed.

How to Change Aspect Ratio in iMovie on iPhone?
Here’s how you can aspect ratio of your videos in iPhone using iMovie:
Step 1. Open the video you want to edit in iMovie. You can either choose a pre-existing project or create a whole new one.
Step 2. To change the aspect ratio, tap on the “Zoom” option that you will see in the top right corner of your iPhone screen.
Step 3. You can also use your fingers to resize the video by zooming in or out as required.
Step 4. Tap “Done” and the aspect ratio of your video will be changed.
How to Change Aspect Ratio in iMovie on iPad?
The procedure of changing the aspect ratio on the iPad is quite similar to that of the iPhone. The following steps will help you change the aspect ratio of your videos on iPad using iMovie:
Step 1. Open the iMovie app on your iPad. Import a pre-existing project on your timeline or start a new one.
Step 2. Resize your video by tapping on the “zoom” option.
Step 3. Readjust the video size using your two fingers.
Step 4. Tap “Done” when you are happy with the selected size.

Filmora Video Editor
Wondershare Filmora - Auto Resize Video
• Auto reframe video in 16:9, 1:1, 9:16, 4:3 or 21:9
• Offers cool video effects and filters to make your video become professional
• Cross-platform supported - (Windows, Mac, iOS, Android)
Try It Free Try It Free Try It Free Learn More >
FAQs About Changing Aspect Ratio in iMovie
1. What is the standard aspect ratio for YouTube Videos?
On a computer, the standard aspect ratio for videos on YouTube is 16:9. If your video has a different aspect ratio, YouTube will change it automatically to a size that is suitable for the website. But, it may ruin the quality of the video, or black bars might appear on the sides of the aspect ratio that is too small.
2. What resolution does iMovie support?
The resolution of the first film or video clip that you add to your timeline will define the resolution of your entire iMovie project. The latest versions of iMovie can support 4K and videos with frame rates higher than 30 frames per second.
3. Can I crop a video in iMovie?
Of course, you can crop a video in iMovie. To do so, open a project in iMovie and click on the “Crop to Fill” button. The video will appear in an adjustable frame. Now you can drag the frame and set it to the size you want.
4. How do I change movie dimensions in iMovie 10?
You can only change the size of your movie/video when you share/export your project. Go to the “size” option after clicking on “File” to change the dimensions of your movie.
5. How do I compress videos in iMovie?
Click on the “share” option after clicking on “File”. The video can be compressed for Facebook, Email, Vimeo, and more. Select the option for which you want to compress the file. You may have to make small changes for large videos.
Final Word
Aspect ratio is simply defined as the relationship between the width and height of an image, video, or screen. Various video posting platforms have a standard aspect ratio for videos. So. Before posting your video creation, you have to make sure that the aspect ratio of your video aligns with the website standards.
To tweak the aspect ratio of your videos, you can use iMovie, which is a powerful video editor for Mac and iOS devices. You can also use Wondershare Filmora which is the best alternative to iMovie and is highly compatible with both Mac and Windows devices.
For Win 7 or later (64-bit)
For macOS 10.12 or later
Secure Download
Liza Brown
Liza Brown is a writer and a lover of all things video.
Follow @Liza Brown
Liza Brown
Nov 07, 2023• Proven solutions
The ratio between the height and width of the screen or an image is called the aspect ratio. Different video posting platforms require different aspect ratios. For example, for YouTube, the commonly used aspect ratio is 16:9, which is a standard for almost all videos. However, for TikTok, the required aspect ratio is 9:16.
The video’s original aspect ratio is based on the default settings of the recording device. Some phones and tablets provide the option of changing your video’s aspect ratio before you start recording. But it can also be changed afterward with the help of editing software.
Social media apps and websites require you post images and videos of a specific size. And if you post your content in its original dimensions it most probably be will get cropped in the wrong places and will diminish the quality of your video or image.
To post that perfect video, it is better to resize it before posting it online. Several online editing tools are available on the market that you can use to change the dimensions of your content. iMovie has to be one of the most popular editing software used worldwide. So, if you use iMovie for editing videos, and you want to know how you can change the aspect ratio of your content, read on to find it out.
In this article
01 How to Change Aspect Ratio in iMovie on Mac?
02 How to Easily Change Aspect Ratio on Mac with Wondershare Filmora? [Recommend: Auto Resize]
03 How to Change Aspect Ratio in iMovie on iPhone?
04 How to Change Aspect Ratio in iMovie on iPad?
05 FAQs About Changing Aspect Ratio in iMovie
For Win 7 or later (64-bit)
For macOS 10.12 or later
Secure Download
How to Change Aspect Ratio in iMovie on Mac?
Learn to change the aspect ratio of videos in iMovie on Mac by following these simple steps:
Step 1. Open a pre-existing project in iMovie or create a new one. It is better to adjust the video size before starting any other editing procedures. Changing the dimensions of videos afterward may affect the editing procedures and effects applied to the video.
Step 2. To resize the video, click on “File” and then click on “Project Properties” on the drop-down list, a pop-up window will appear.
Step 3. On the popping-up dialog, you will see several options regarding aspect ratio.
Step 4. Choose the settings that are suitable for your video, and you’re done. Your video will now appear in your chosen dimensions.
How to Easily Change Aspect Ratio on Mac with Wondershare Filmora?
Wondershare Filmora is one of the best alternatives to iMovie. You can use Filmora to change the aspect ratio of your videos with a few simple steps:
For Win 7 or later (64-bit)
For macOS 10.12 or later
Secure Download
Step 1. Open the Wondershare Filmora application on Mac.
Step 2. Open the video you want to edit in the app by clicking on “Import” on the menu bar. You can also drag and drop the video on your timeline, and your file will open in the Filmora app.
Step 3. To adjust the aspect ratio of your video, click on the “Crop and Zoom” option and a pop-up will appear on your screen. Now, you have two options to consider, you can either choose presets having aspects ratios of 16:9, 4:3, 1:1, and 9:16, or you can choose custom settings. For custom dimensions, click on Custom and type in your desired ratio.
Step 4. When you are satisfied with the settings, click OK and the aspect ratio of your video will be changed.
How to Change Aspect Ratio in iMovie on iPhone?
Here’s how you can aspect ratio of your videos in iPhone using iMovie:
Step 1. Open the video you want to edit in iMovie. You can either choose a pre-existing project or create a whole new one.
Step 2. To change the aspect ratio, tap on the “Zoom” option that you will see in the top right corner of your iPhone screen.
Step 3. You can also use your fingers to resize the video by zooming in or out as required.
Step 4. Tap “Done” and the aspect ratio of your video will be changed.
How to Change Aspect Ratio in iMovie on iPad?
The procedure of changing the aspect ratio on the iPad is quite similar to that of the iPhone. The following steps will help you change the aspect ratio of your videos on iPad using iMovie:
Step 1. Open the iMovie app on your iPad. Import a pre-existing project on your timeline or start a new one.
Step 2. Resize your video by tapping on the “zoom” option.
Step 3. Readjust the video size using your two fingers.
Step 4. Tap “Done” when you are happy with the selected size.
Filmora Video Editor
Wondershare Filmora - Auto Resize Video
• Auto reframe video in 16:9, 1:1, 9:16, 4:3 or 21:9
• Offers cool video effects and filters to make your video become professional
• Cross-platform supported - (Windows, Mac, iOS, Android)
Try It Free Try It Free Try It Free Learn More >
FAQs About Changing Aspect Ratio in iMovie
1. What is the standard aspect ratio for YouTube Videos?
On a computer, the standard aspect ratio for videos on YouTube is 16:9. If your video has a different aspect ratio, YouTube will change it automatically to a size that is suitable for the website. But, it may ruin the quality of the video, or black bars might appear on the sides of the aspect ratio that is too small.
2. What resolution does iMovie support?
The resolution of the first film or video clip that you add to your timeline will define the resolution of your entire iMovie project. The latest versions of iMovie can support 4K and videos with frame rates higher than 30 frames per second.
3. Can I crop a video in iMovie?
Of course, you can crop a video in iMovie. To do so, open a project in iMovie and click on the “Crop to Fill” button. The video will appear in an adjustable frame. Now you can drag the frame and set it to the size you want.
4. How do I change movie dimensions in iMovie 10?
You can only change the size of your movie/video when you share/export your project. Go to the “size” option after clicking on “File” to change the dimensions of your movie.
5. How do I compress videos in iMovie?
Click on the “share” option after clicking on “File”. The video can be compressed for Facebook, Email, Vimeo, and more. Select the option for which you want to compress the file. You may have to make small changes for large videos.
Final Word
Aspect ratio is simply defined as the relationship between the width and height of an image, video, or screen. Various video posting platforms have a standard aspect ratio for videos. So. Before posting your video creation, you have to make sure that the aspect ratio of your video aligns with the website standards.
To tweak the aspect ratio of your videos, you can use iMovie, which is a powerful video editor for Mac and iOS devices. You can also use Wondershare Filmora which is the best alternative to iMovie and is highly compatible with both Mac and Windows devices.
For Win 7 or later (64-bit)
For macOS 10.12 or later
Secure Download
Liza Brown
Liza Brown is a writer and a lover of all things video.
Follow @Liza Brown
How to Merge Videos in HandBrake? Expectation Vs. Reality
So you have captured some mind-blowing clips and want to join them together to make an excellent movie? But, sadly, you are still stuck because you are not sure what video editors would be suitable to complete this task fast.
If such miseries are haunting you, take a deep breath because many like you are searching for the right video merging tools. However, some people recommend using HandBrake for merging clips. So let’s dig some ground to know if the software can really combine clips. And if there’s a “Yes”? Then how to merge videos in HandBrake?
In this article
02 Using HandBrake to Merge Videos – Possible or Not?
03 Combining Videos with Filmora Wondershare
Part 1: What is HandBrake?
Before you gear up for HandBrake to merge videos, it would be wise to know a few essential details about this software.
HandBrake is a free tool for Windows, Linux, and MAC operating systems. The basic purpose of this software is to convert videos from any format in MKV, WebM, and MP4. It is an open-source program that allows users to convert their videos to play them on multiple devices, such as TV media players, computers, tablets, mobile phones, etc.
Moreover, this platform gives you the power to turn your low-quality videos into high-quality screen time. That is why most professional videographers use this tool to polish videos captured with old cameras.
A few more interesting features of HandBrake are:
- Combing artifacts removal due to interlacing
- Convert videos without negatively affecting the audio quality
- Volume and range adjustment
- Addition, removal, and preservation of soft subtitles
However, one vital thing to understand is that although HandBrake takes a tiny little space of your hard drive, the interface is complicated for beginners.

Part 2: Using HandBrake to Merge Videos – Possible or Not?
There is a great misconception about HandBrake among the newbies that HandBrake is primarily a video merger software. But, in reality, that is not true at all. Or, at least, the latest HandBrake version 1.5.1 lacks such features.
Even the official website states that HandBrake cannot combine two or more clips to make them whole.
So feel yourself lucky to read this article if you haven’t downloaded HandBrake yet. Congratulations! You are saved from another heartbreak.
But wait! If the software is not meant to merge clips, it doesn’t mean that you can’t use it to prepare your videos for the real deal. HandBrake can still be a helpful tool, permitting you to convert videos in a similar format before you start merging them on any other video editor.
For example, suppose you have two video clips in different formats. In that case, you can use HandBrake to convert all of them in a similar format so that they can be easily be merged when imported on any video merger tool.
But, again, the question is, if not HandBrake, then what?
Frankly, you will find hundreds of video editing tools with a combining clips feature, but not all of them deserve your attention and time. While software like DaVinci Resolve includes characteristics to merge two or more clips in a single shot, beginners and mid-level users may still find them a bit difficult at the start.
That is why professionals and experts prefer Filmora by Wondershare to merge videos without banging their heads on the screen.
So, how to merge videos in Filmora with simple clicks? Focus on the next part of the article to learn the step-by-step method within a few minutes.
Part 3: Combining Videos with Filmora Wondershare
Filmora Video Editor is a remarkable video editing tool for all types of users. The software works on all major operating systems (MAC and Windows) and includes a gigantic library of effects, presets, overlays, and so much more than you can imagine.
You can download Filmora for free if watermarks don’t annoy you. On the other hand, you can purchase a suitable plan to get rid of watermarks, so your videos look 100% professional.
For Win 7 or later (64-bit)
For macOS 10.14 or later
Now, without any more delay, let’s start learning how to combine videos in Filmora through the following steps.
Step 1: Install Filmora on Your Computer
Just visit Filmora’s website to download the latest version of the software for your Windows or MAC.

After downloading the software on your computer, install it. Once the software is ready, double-click the “Wondershare Filmora” icon (it should be on your desktop screen) to open the program.
As you can see, the interface is simple with user-friendly options.

Step 2: Import Multiple Videos in Filmora
Click on the blue icon with a “+” sign to import videos.

Or, click on the “File” button on the top menu to import files and drag and drop both clips to the same timeline.
As you can see, there are two clips on the timeline. The first clip is called “Cherry Blossom,” and the second clip’s name is “Plating Food.”

Step 3: Keep Video Clips on the Same Timeline
There shouldn’t be any gap or spaces between the two clips.

It is because gaps will create a dark blank space between the clips when you export the clips, like this:

Therefore, slide the second video right next to the first video without leaving any gaps with your mouse.

And guess what? You have already merged the two clips.
Step 4: Save Video on Your PC
Now, hit the “Export” button and save the merged video on your computer.

HandBrake is an outstanding tool for video conversion, but there’s no benefit of learning how to merge videos in HandBrake, as the software does not include such features. Nevertheless, when it is about combining multiple videos in high quality, you can rely on Filmora to merge clips in no time.
FAQs
Q1. Can you increase the video quality in HandBrake?
Yes. You can use HandBrake to convert videos and adjust the video quality settings as per your requirements before starting the conversion process.
Q2. Can you crop and resize the video in HandBrake?
HandBrake makes it easy to crop and resize all types of videos without disturbing the audio quality.
Q3. Can you use HandBrake clips on other video editors for video mergers?
After converting videos in HandBrake, you can use the clips in video editors, like Filmora, to merge clips.
02 Using HandBrake to Merge Videos – Possible or Not?
03 Combining Videos with Filmora Wondershare
Part 1: What is HandBrake?
Before you gear up for HandBrake to merge videos, it would be wise to know a few essential details about this software.
HandBrake is a free tool for Windows, Linux, and MAC operating systems. The basic purpose of this software is to convert videos from any format in MKV, WebM, and MP4. It is an open-source program that allows users to convert their videos to play them on multiple devices, such as TV media players, computers, tablets, mobile phones, etc.
Moreover, this platform gives you the power to turn your low-quality videos into high-quality screen time. That is why most professional videographers use this tool to polish videos captured with old cameras.
A few more interesting features of HandBrake are:
- Combing artifacts removal due to interlacing
- Convert videos without negatively affecting the audio quality
- Volume and range adjustment
- Addition, removal, and preservation of soft subtitles
However, one vital thing to understand is that although HandBrake takes a tiny little space of your hard drive, the interface is complicated for beginners.
Part 2: Using HandBrake to Merge Videos – Possible or Not?
There is a great misconception about HandBrake among the newbies that HandBrake is primarily a video merger software. But, in reality, that is not true at all. Or, at least, the latest HandBrake version 1.5.1 lacks such features.
Even the official website states that HandBrake cannot combine two or more clips to make them whole.
So feel yourself lucky to read this article if you haven’t downloaded HandBrake yet. Congratulations! You are saved from another heartbreak.
But wait! If the software is not meant to merge clips, it doesn’t mean that you can’t use it to prepare your videos for the real deal. HandBrake can still be a helpful tool, permitting you to convert videos in a similar format before you start merging them on any other video editor.
For example, suppose you have two video clips in different formats. In that case, you can use HandBrake to convert all of them in a similar format so that they can be easily be merged when imported on any video merger tool.
But, again, the question is, if not HandBrake, then what?
Frankly, you will find hundreds of video editing tools with a combining clips feature, but not all of them deserve your attention and time. While software like DaVinci Resolve includes characteristics to merge two or more clips in a single shot, beginners and mid-level users may still find them a bit difficult at the start.
That is why professionals and experts prefer Filmora by Wondershare to merge videos without banging their heads on the screen.
So, how to merge videos in Filmora with simple clicks? Focus on the next part of the article to learn the step-by-step method within a few minutes.
Part 3: Combining Videos with Filmora Wondershare
Filmora Video Editor is a remarkable video editing tool for all types of users. The software works on all major operating systems (MAC and Windows) and includes a gigantic library of effects, presets, overlays, and so much more than you can imagine.
You can download Filmora for free if watermarks don’t annoy you. On the other hand, you can purchase a suitable plan to get rid of watermarks, so your videos look 100% professional.
For Win 7 or later (64-bit)
For macOS 10.14 or later
Now, without any more delay, let’s start learning how to combine videos in Filmora through the following steps.
Step 1: Install Filmora on Your Computer
Just visit Filmora’s website to download the latest version of the software for your Windows or MAC.
After downloading the software on your computer, install it. Once the software is ready, double-click the “Wondershare Filmora” icon (it should be on your desktop screen) to open the program.
As you can see, the interface is simple with user-friendly options.
Step 2: Import Multiple Videos in Filmora
Click on the blue icon with a “+” sign to import videos.
Or, click on the “File” button on the top menu to import files and drag and drop both clips to the same timeline.
As you can see, there are two clips on the timeline. The first clip is called “Cherry Blossom,” and the second clip’s name is “Plating Food.”
Step 3: Keep Video Clips on the Same Timeline
There shouldn’t be any gap or spaces between the two clips.
It is because gaps will create a dark blank space between the clips when you export the clips, like this:
Therefore, slide the second video right next to the first video without leaving any gaps with your mouse.
And guess what? You have already merged the two clips.
Step 4: Save Video on Your PC
Now, hit the “Export” button and save the merged video on your computer.
HandBrake is an outstanding tool for video conversion, but there’s no benefit of learning how to merge videos in HandBrake, as the software does not include such features. Nevertheless, when it is about combining multiple videos in high quality, you can rely on Filmora to merge clips in no time.
FAQs
Q1. Can you increase the video quality in HandBrake?
Yes. You can use HandBrake to convert videos and adjust the video quality settings as per your requirements before starting the conversion process.
Q2. Can you crop and resize the video in HandBrake?
HandBrake makes it easy to crop and resize all types of videos without disturbing the audio quality.
Q3. Can you use HandBrake clips on other video editors for video mergers?
After converting videos in HandBrake, you can use the clips in video editors, like Filmora, to merge clips.
Also read:
- Updated 2024 Approved Working Through the Details of iMovie Slow Motion Video Making 100 Effective
- Updated Tactics to Create Transparent Image in Minimal Steps
- Updated 2024 Approved How to Make an Aesthetic Slideshow
- 2024 Approved End Screen Makers
- Updated In 2024, Efficient Ways to Change Slow Motion Video to Normal on iPhone
- New Detailed Tutorial to Crop a Video Using Openshot for 2024
- Transforming a Slow-Motion Video to Normal Mastering the Skill
- Updated 12 Best GIF Editors to Use
- New Top Tricks for Learning Photo Slideshow for 2024
- New A Comprehensive Guide on Converting Slo-Mo Videos to Normal Speed Videos On iPhone
- Are You Also Facing a Problem with the Snapchat Camera Zoomed In? Find Out the Easiest Methods to Fix This Error without Installing a Third-Party Tool
- Top 10 Picks for Flawless Slow Motion Video Generation for 2024
- Updated Transparent Logo and Images Look Cool when You Are Planning to Create a Brand Identity. An Image with Unique Features Catches the Attention of Viewers and Leaves Impression
- New IMovie Review – Is It The Best Video Editor for Mac Users?
- Updated In 2024, How to Create a PowerPoint Looping Slideshow
- 2024 Approved 4 Ways for Rotating Your GoPro Videos Professionally
- The Most Useful Tips for Pokemon Go Ultra League On Oppo A58 4G | Dr.fone
- How To Simulate GPS Movement With Location Spoofer On Motorola Razr 40 Ultra? | Dr.fone
- In 2024, How to Track a Lost Motorola Razr 40 Ultra for Free? | Dr.fone
- 8 Quick Fixes Unfortunately, Snapchat has Stopped on Sony Xperia 5 V | Dr.fone
- In 2024, Top 7 Skype Hacker to Hack Any Skype Account On your Vivo T2 5G | Dr.fone
- Fixing Foneazy MockGo Not Working On Honor X9a | Dr.fone
- How do i add my signature to Excel 2010 files
- How to Change your Realme 12 Pro+ 5G Location on Twitter | Dr.fone
- In 2024, Top 11 Free Apps to Check IMEI on Vivo Y02T Phones
- Mastering Android Device Manager The Ultimate Guide to Unlocking Your Realme 12 5G Device
- In 2024, How To Bypass iCloud By Checkra1n Even On iPhone 13 Pro If Youve Tried Everything
- Title: New Add Green Screen Video on TikTok for 2024
- Author: Chloe
- Created at : 2024-04-24 07:08:29
- Updated at : 2024-04-25 07:08:29
- Link: https://ai-editing-video.techidaily.com/new-add-green-screen-video-on-tiktok-for-2024/
- License: This work is licensed under CC BY-NC-SA 4.0.
