
:max_bytes(150000):strip_icc():format(webp)/the-best-halloween-live-wallpaper-for-2019-4691483-019a40e91504436ca9fc9f1944d89c15.jpg)
New Adobe After Effects Review for 2024
Adobe After Effects Review
Make cinematic films, movies, intros, and transitions. Delete people from clips. Start fires or create a foggy weather. With Adobe After Effects, the industry-standard motion graphics and visual effects software, you are able to take any idea and make it come to life. Animate titles, credits, and lower thirds. Begin editing from scratch or with presets available. Combine photos and video footage to create anything you can think of.
Choose amazing effects from hundreds of options, remove unwanted parts from the frame, people or objects, and make VR videos to push your audience into the action. This software lets professionals configure keyframes, allow them to create compositing operations. Features of Adobe After Effects include a content library, digital asset management, video rendering, data import/export, and much more. In this article we will give you a brief overview of what After Effects is, what it’s used for and by who and the overall experience!
With that said, let’s get started!
1. Speed and Stability
When talking about speed and stability, After Effects has the latest release packed with improvements. All the developers have focused themselves on speed and also performance. The team at Adobe have worked very hard to make this application more responsive and when we go along in this article, that can be seen in many ways
The main improvement which is immediately clear to all users, is the renewed preview playback optimization. What we noticed is that After Effects is creating the ram preview for your projects a lot faster. However, while working with the software for this article, we did find the user interface to be more responsive, the playback is way smoother, so is it a lot more stable overall.
While using shape layers, there was a significant improvement. A few expressions are a lot faster. This alone is worth upgrading to the latest version of After Effects.

2. User Interface
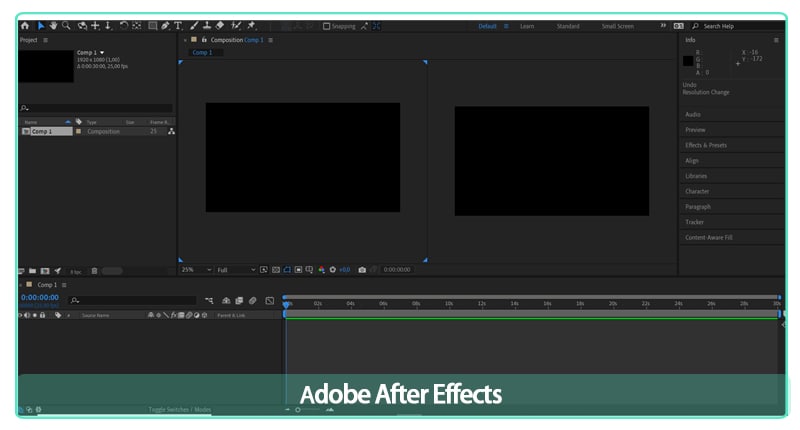
The After Effects interface is constructed up of four main parts. The Timeline panel, the Project panel, the Composition panel and the Effects panel.
The Timeline Panel
In the Timeline panel, you edit all the footage and clips to create your rough cut. You can find the Timeline panel on the bottom of the workspace.
The Project Panel
It’s pretty straightforward that in the Project panel you import your footage and create your project. This is located on the top left of the standard After Effects workspace.
The Composition Panel
The Composition panel is where you will see the final product. This is located in the middle of your workspace.
The Effects Panel
In order to make creative changes to your video, use the preview, audio, effects, and Preset Panels. These panels are located on the upper right area of your workspace, each one also has its dropdown.
3. Learning Curve
The learning curve for After Effects depends on your background, the best way to find out if you like it is starting a free trial. Go through some tutorials online or paid courses. You’ll also want to spend time with the User Guide. The Search Help field in the top right corner provides you an easier search for answers to most questions that you have. Speaking of YouTube and online learning, most of the video tutorials you will find have been created by people that are experienced in After Effects and know their way around it.
4. VFX
There’s a time-period when video editors require strengthening their skills, calling it imperative software for improving editing skills is nowhere near an exaggeration. it really helps prospective professionals improve their learning experience through visual effects, camera tracking, text animation, motion tracking, color grading, etc. All of these methodologies do help in improving the VFX learning process in the long run.
Video editing happens to be a crucial part of film production. Making videos in a fantastic process can indulge in building professional videos via motion graphics animation. This is where Adobe After Effects become an excellent learning tool.
5. Motion Graphics
Motion graphics can sound quite scary. It’s a new term for a specific genre of animation. Motion graphics is the intersection between animation and graphic design. These are purpose-driven visual aspects with the goal of showing information to the viewer through the use of animated graphics or text. Sometimes they include voice-overs narrating what the text or graphics are showing. Where it gets a little complex is that the more popular the term motion graphics becomes, the more people are misaligning animations to it. They need to represent information and illustrate the idea to the viewer clearly, so they do that using animation and motion graphics.
6. Titles and Outros
Adobe released a new combination of features for you. For Adobe Stock: Graphics templates. Those pre-made templates give you a super smooth way to discover new motion graphics within Premiere Pro, without needing to spend time creating titles, overlays, or animations from scratch. The world has digitalized, and videos often need visual aspects such as titles, lower thirds, to present information. The templates not only assist video editors increase the quality of the content by showing certain information, but they also give a strong visual touch to keep the viewer engaged throughout the video. The audience nowadays is a lot more sophisticated, meaning that motion graphics are a necessity in a driven media world.
Motion Graphics templates are valuable for video editors of all levels. For the beginning content creators, the templates offer great quality, ready-made footage to help their creative goal. They can explore and work on their skills. Motion graphics that are pre-made are an excellent way to express the vision and express inspiration to new opportunities.
So now that you are aware of what After Effects templates are, we can move on to the actual workflow, why it is important, and how to use it as efficient as possible.
7. Workflow
Whether you are using Adobe After Effects to create motion graphics, or composite realistic visuals, you usually follow the same workflow, you may repeat the process of adjusting layer properties, editing, and compositing until everything looks good. You can change any property of any element, such as position, opacity and size. Make use of motion tracking to stabilize footage so that it follows the motion from another clip, and so much more!
8. Rendering Speed
When it comes to exporting your project in After Effects, you don’t need to buy an expensive workstation. You can speed up your rendering process from your own laptop without investing too much and by using the following tips we have for you below!
Tip #1: Enable Multiprocessing
What exactly is multiprocessing? That is when After Effects uses multiple cores from your CPU to export multiple frames at once. If your processor has one or more cores, you can enable this feature to reduce your rendering time. We want to mention that you need to check whether or not this option is turned on. Once enabled, you’ll see a great decrease in export time.
To enable Multiprocessing, navigate to Preferences > Memory & Multiprocessing. Then you click the check box next to ‘Render Multiple Frames Simultaneously’ and remember also to adjust the settings that you need.
Tip #2: Optimize Your RAM Usage
The RAM memory inside your workstation can be used to write and read data at a lot higher speeds than regular hard drives and portable drives. Configuring your RAM in a system is one of the easiest upgrades for better performance. Giving you affordable solutions for both desktop and laptop systems, the RAM memory upgrade does not require a lot of knowledge. The more RAM you allow applications to use, the higher the performance you will get out of it.
It also shows a noticeable increase in rendering speed. When the export time in your work is longer than needed, look at your RAM memory and see if you can make the necessary changes or upgrades.
Tip #3: Use the Media Encoder
Let’s talk about the Media Encoder. It’s the software that comes up with Adobe Creative Cloud products such as After Effects and Premiere Pro to simplify the export process. You can easily render your project from After Effects to Adobe Media Encoder and begin the project render process from that point on. The Media Encoder will increase your rendering performance and will significantly decrease rendering time.
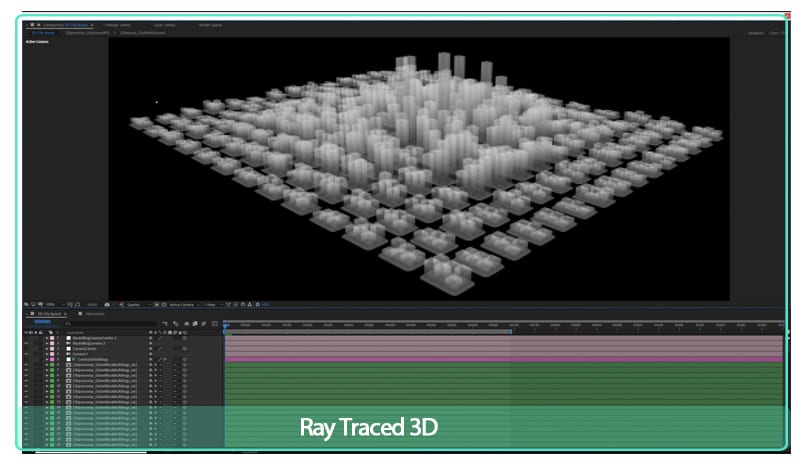
Tip #4: Disable Ray-Traced 3D
The included After Effects Ray-Traced 3D feature enables you to produce 3D models within After Effects without any struggle. Calculating all the motions and visual graphics is such a heavy process for your workstation. When you disable raytracing, you will get a faster export time. By looking that ‘Classic 3D’ is checked instead of ‘Ray-Traced 3D’ from your composition preferences, you can speed your rendering speed up to 50%. Isn’t that incredible?
Tip #5: Activate GPU Exporting with Cuda Acceleration
Exporting your videos with GPU rather than CPU will increase the efficiency of your render process. The export length will decrease a whole lot when you activate Mercury GPU Acceleration, also known as ‘CUDA’ from the ‘Project Settings’.
After Effects doesn’t really require CUDA features from a special kind of Nvidia GPU. Only the GPU accelerated 3D renderer, that is based on the raytracing algorithm, requires that. The other GPU features are running on any GPU that meets the basic minimums, including Intel and AMD GPUs.
9. System Requirements for Windows
These are the minimum specifications needed to use After Effects on PC:
OS: Windows 10 (64-bit) versions 1909 and later, or Windows 11
CPU: Intel or AMD Quad-Core Processor (Intel i5 and i7 will do the job)
RAM: 16 GB
Monitor resolution: 1280 x 1080
An internet connection
Free storage: 15 GB
GPU: Minimum 2 GB of VRAM
10. System Requirements for macOS
OS: macOS 10.13 or later
RAM: 16 GB
CPU: Intel and Apple Silicon (Rosetta2 Supported) Quad-Core Processor
GPU: 2GB of VRAM
Monitor resolution: 1440×900
Free storage: 15 GB
An internet connection
11. Keyboard Shortcuts
You can work visually when you configure your keyboard shortcuts with the visual keyboard shortcut editor within After Effects. You can use the keyboard user interface to show the keys that have been assigned to shortcuts, the available keys for assignment, and edit assigned shortcuts to make your workflow even easier.
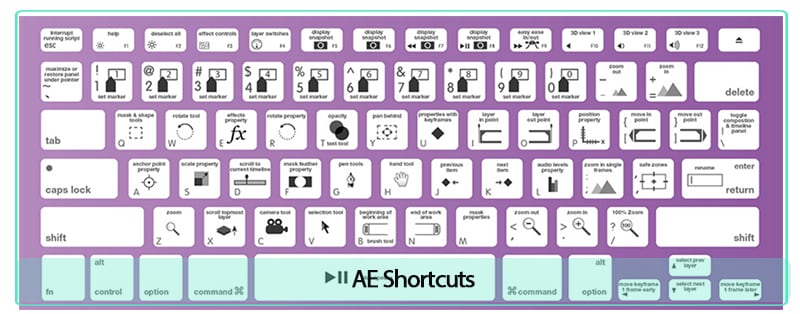
The keyboard layout:
This is a representation of your physical keyboard where you can see which keys have been assigned a shortcut, and which are available.
Command list:
The list displays all the commands that can be assigned shortcuts.
Key modifier list:
This list shows you all the modifier combinations and assigned shortcuts associated with the key you select on your physical keyboard.
After Effects does not allow you to reassign the following keys:
- A
- AA
- E
- EE
- F
- FF
- L
- LL
- M
- MM
- P
- PP
- R
- RR
- S
- SS
- T
- TT
- U
- UU
12. Should You Buy It?
Well first, you cannot buy After Effects, Premiere Pro or other software from Adobe. You have to rent them by paying monthly. After Effects is primarily a compositing and graphics software. Premiere is primarily a video editing program. In the case of After Effects and Premiere Pro, it’s not really an either/or. They’re both software with different purposes. After Effects is a lot more powerful and essentially showcases most of Premiere’s functionality, but according to our experience, the Premiere Pro interface and workflow is way more superior for video editing.
Premiere Pro is essentially built around its timeline, the region where you cut your video clips and drag and place them into your appropriate sequence. Hollywood filmmakers and professional YouTube content creators are using Premiere Pro to edit high-performing content and award-winning films. The software is very intuitive and easy for beginners to start with.
Are going to work with After Effects to create an income? Or are just going to use it for a hobby? It’s crucial to mention that question because Adobe After Effects is not something that is cheaply available. You will be investing much money on the program, and if you are working to use the software, paying a good amount, and earning nothing in return, then you might want to shift to another alternative which would cost you less. For instance, let’s assume you are using the application to earn an income, and have a few low-paying clients. In such a situation, you will have to rethink your options of software and analyze whether what you are paying in comparison to what you are getting is enough for you or not. We all are different individuals and have different preferences. Once we can see what is more important to us, or what is our need at this moment, then we will be able to judge the worth of purchasing Adobe After Effects better.
Are you going to use After Effects to earn an income? Or are just using it as a hobby? It is very important to address this question because Adobe After Effects is not something cheaply accessible. You will be investing a lot of money into this software, if you are using the software while paying a good amount and earning nothing in return yet, then you could shift to a different alternative which will cost you a lot less. Let’s say you are using After Effects to earn an income and have some low-paying work. In that case, you will have to reconsider your options of video editing software and look at whether what you are paying in comparison to what you are getting is possible for you. When we can see what is more important to us, we will be able to see the worth of buying After Effects.
Did you previously use After Effects or are you new to the program? The return that you will get using Adobe After Effects, depends on how good you know how to work with the options, functions and features in the software.
The Bottom Line
So summing it all together, Adobe After Effects takes care of all your assets and creates a final product, considering that After Effects is usually an asset-generation tool. Most video editors complete their projects in After Effects non-stop. It’s excellent for making visual videos come to life.
AE version 22.3 is very impressive. Giving you a wealth of new features created to make VFX editing a lot faster and easier. Offering new features on a regular basis, improving their subscription model making it more attractive. Especially if you’re a professional editor and designer.
Once you get comfortable with Adobe After Effects, you learn how to dynamically combine After Effects compositions to your Premiere projects. You are able to access both assets at the same time if needed!
Free Download For Win 7 or later(64-bit)
Free Download For macOS 10.14 or later
[Spooky Halloween] Best 15+ Halloween Countdown Video Clips
Halloween is fast approaching, and as a content creator, you’re looking to take advantage of the season and give your viewers unique Halloween vibes in your videos, but you don’t know how to go about it. Don’t panic, we got just the right idea for you. Some might ask; What idea? Well, it’s none other than a Halloween countdown video clip.
Adding a Halloween countdown clip to your video is a great way to spice it up. However, it can be quite difficult to find a perfect clip that will suit the theme of your video. To help you out, we’ve curated a list of the best 15 Halloween countdown video clips that you can use in your videos to make them fancier.
- Fog Stones Halloween Dead
- Scary Sadako ghost
- Transferring Halloween Cupcakes From The Tray To The Table Moments
- Skeleton breaking screen
- Dark Monster Halloween Horror
- Face Portrait Halloween Clown
- A Family Wearing Handmade Halloween Mask At Home
- Halloween Buckets Stacked Together
- Carving Of Pumpkin For Halloween
- Dough Halloween Cookies Bakery Products
- Woman Decorating for Halloween [TikTok]
- Girl Blonde Portrait Halloween
- An Outdoor Table With Halloween Theme Settings
- A Kid In A Mummy Costume Holding A Halloween Bucket
- Stop Motion Of Halloween Candy
Halloween Countdown Clips Editor The best editor helps you add a Halloween countdown clip to your video.
Free Download Free Download Learn More

Part 1: Top 10 Halloween-Themed Footage for Halloween Countdown Clock Video
Here we provide footage exclusively for horizontal videos, so that you can use them for your videos for YouTube, Vimeo, Twitch, etc. If you just want some clips for TikTok, Ins story, or anything else, go ahead Halloween footage for vertical videos.
1. Fog Stones Halloween Dead
Spooky graveyard with scary tombstones is another good way to go about it when you are looking for vacation countdown clock videos. The mixture of the turbulent and serene environment is enough to set the Halloween mood and even scare some folks.
Remember the scene from the movie “The Fog” and its famous dialogues: When the fog rolls in the terror begin! If you do not, take a look at a scene and judge for yourself if scary enough or not.

2. Scary Sadako ghost
What’s better than the Sadako ghost 7-day video call threat on Halloween? Well, nothing! So, why not create a prank video for your friends and family, especially those afraid of Sadako? Plus, Sadako creates a perfect backdrop for the countdown. Look at this Philippines creator who went to great lengths to scare his friends via a Sadako video call.
But you do not have to go through all that costume and scenery setup. Instead, you can use the video footage on any premium video and apply Sadako ghost via Green Screen.

3. Transferring Halloween Cupcakes From The Tray To The Table Moments
Halloween is adored for its trick-or-treat, but what about the party? What will you serve? Cupcakes sound like a good idea. But how will you entice your guest with your Halloween cupcakes? Well, you can include the cupcakes in the invitation video. While you can find many Halloween creative and savory cupcake recipes on YouTube, you can use stock footage to have them in the video.

4. Skeleton breaking screen
The broken screen is the classic prank suitable for any event and day. But simply using apps or replacing the wallpaper on your friend’s or spouse’s mobile doesn’t cut in this age and day. With new technology coming in, you have to get creative. Plus, it’s for Halloween, meaning dead skulls are a must.

5. Dark Monster Halloween Horror
Halloween house horror is another great backdrop for scaring your friends after a vacation countdown clock. You will find tons of videos on Halloween Horror houses on the internet. Look at how Jackie from Super Enthused (YouTube channel) gets scared while touring the 10 Halloween horror houses at the theme park. That was really scary, and this Halloween countdown effect can also help you do the same to your viewers.

6. Face Portrait Halloween Clown
Scary clowns against a kid’s window have been the long norm of scaring the small ones. No doubt, such pranks can scare anyone, not just kids. If you do not believe me, look at the reaction video from Infinite featuring scaring clowns’ pranks.
But how about dropping such a scary face bomb in a vacation countdown clock video? You can easily get your hands on creepy clowns’ portraits for videos via premium stock libraries like Filmora’s Filmstock.

7. A Family Wearing Handmade Halloween Mask At Home
Another not-so-fancy, subtle, and understated appeal for the Halloween vacation countdown clock video is a family together with Halloween masks. Given everyone will be in their costumes, you can also consider distributing self-made masks for everyone. You can take ideas from any of the numerous videos about Halloween mask design ideas.

8. Halloween Buckets Stacked Together
What’s the simplest and most fitting footage for the Halloween vacation countdown clock? Well, it is the scary pumpkins. Carving out Jack-o’-lantern has long been the Halloween “tradition,” and featuring it in your countdown timer at the party is the most classic way to go about it. The vibe from simple Halloween buckets stacked together is on the next level; if you do not believe me, look at Angie Bellemare’s Halloween Bucket ideas and creativity:

9. Carving Of Pumpkin For Halloween
Another Jack-o’-lantern idea for the vacation countdown clock video is the DIY Pumpin projects in the video. It doesn’t sound like much, but it really is enough to give the best feeling about Halloween without really indulging in the scary stuff. Take a look at how Jenn designs her Pumpkin Stack Fall Planter:

10. Dough Halloween Cookies Bakery Products
If Halloween is more about spending time with friends and family, a bunch of laughter, fun, and creating memories, then it cannot get better than focusing on the sweet stuff, like the dough used to cook the Halloween cookies. When you imagine the scenario of dough mixing for the Halloween countdown timer video, it does not sound like much! But they are cool-looking and set the perfect backdrop for a countdown timer video:
You can use such clips individually or mix them with other stock video footage mentioned here to create a perfect Halloween vacation countdown clock video clip.

Halloween Footage for Vertical Videos [TikTok/Instagram Story]:
The above list discusses the panoramic footage suitable for big screens. If your screen is rather a vertical one, then you might be looking for vertical stock footage for the Halloween vacation countdown clock clip. Here are some vertical footage ideas and links to stock footage to create the perfect vertical vacation countdown clock video for Halloween:
1. Woman Decorating for Halloween [TikTok]
Another simple backdrop for the Halloween countdown timer video is the decorations process to transform your indoors or outdoors for Halloween. And while you can use your own footage of decorating the house, chances are you may have missed filming yourself while decorating the house, given not everyone films themselves decorating the house and use it for their TikTok video. Here’s a video from Spooky Bones featuring the indoor decoration process for Halloween.

2. Girl Blonde Portrait Halloween
Another simple idea for a vertical countdown timer for Halloween is a scary face. In fact, if you are looking for the users to focus on the timer instead of footage is to use a slo-mo video, like this one from Tay. Tay tells a story about a real haunted house in her neighborhood while wearing scary Halloween makeup.
Of course, you can replace the story; and instead, use a clock with a girl wearing Halloween makeup.

3. An Outdoor Table With Halloween Theme Settings
If you are looking to feature the vacation countdown clock outdoors in a vertical setup, then a table with a Halloween theme might create the perfect setting. After all, Halloween is all about setting the perfect theme, and featuring a non-relevant indoor or scary video outdoors spoils the theme. Take a look at how Stephanie Cunningham on TikTok showcases her outdoor table decoration setup for Halloween.

4. A Kid In A Mummy Costume Holding A Halloween Bucket
If you are going for the classic mummy theme on Halloween, then how can you include any other footage than an actual mummy in the vertical countdown timer video? There are many ways to go about when looking to feature a mummy in the countdown clock; one idea is to show you made the mummy costumes, like Vina’s getup video on TikTok.

5. Stop Motion Of Halloween Candy
Hosting a Halloween party for kids and in search of the perfect vertical footage for a Halloween vacation countdown clock video? It cannot get better than simply featuring a bunch of candy to lure the kids toward the countdown clock. When you look at this video and imagine using a clock for the countdown clock.

Part 2: How to Apply a Halloween Countdown Clock to Your Video?
To make a unique Halloween Countdown Clock that ticks boxes around, you need software like Wondershare Filmora to implement the right element seamlessly.
Filmora library is filled with numerous such videos that will create the perfect backdrop for Halloween vacation countdown clock clips.
Coming to using the footage in your videos and making the Halloween countdown clock; well, you can do that easily using the Filmora Video editor (the video editor includes the Filmstock plug-in for easy navigation).
- Aside from Halloween-themed video footage, Filmora’s Filmstock also includes numerous audio, image, and other such elements.
- Filmora, primarily, is a video editor. You can combine all the elements like the stock footage videos discussed above and scary soundtracks and create a clock-down timer video easily.
- From trimming to splitting, to cool effects, there are several editing tools in Filmora.
- Transitions**, filters, text animations, and other editing features** are all supported.
Here’s how to use Filmora to Create a Halloween Countdown Clock Video
Free Download For Win 7 or later(64-bit)
Free Download For macOS 10.14 or later
Step1 Download and install Filmora on your Mac or PC.
Step2 Start the installed software and click Import from the main interface to upload the Halloween countdown clip. Alternatively, you can just drag-n-drop the video.

Step3 Drag-n-drop the uploaded video to the timeline.

Step4 Next, click on Stock Media and select the countdown effect that you want to use in the Halloween video. Then, drag-n-drop it to the timeline.

Step5 double click on the countdown effect and adjust it according to your requirement. You can adjust the time length too.

After that, play the video to preview it.
Step6 If you’re satisfied with the editing, scroll to the top of the screen and click Export, then, select ‘Burn DVD’.

Step7 Enter a name for your file in the Label box of the pop-up that appears on your screen, then in the Folder Path, choose the location where you want the file to be saved. Click the ‘Export’ button to finish.

Conclusion
There you have it - the top 15 Halloween countdown videos that can be used to spice up videos. Not to mention, you can find the stock footage on this page via Filmstock’s vast library containing tons of such videos. Also, is better to use subtle and not-so-horrifying clips if you want everything to be serene in the Halloween vacation countdown clock video.
Free Download For Win 7 or later(64-bit)
Free Download For macOS 10.14 or later
Halloween Countdown Clips Editor The best editor helps you add a Halloween countdown clip to your video.
Free Download Free Download Learn More
Part 1: Top 10 Halloween-Themed Footage for Halloween Countdown Clock Video
Here we provide footage exclusively for horizontal videos, so that you can use them for your videos for YouTube, Vimeo, Twitch, etc. If you just want some clips for TikTok, Ins story, or anything else, go ahead Halloween footage for vertical videos.
1. Fog Stones Halloween Dead
Spooky graveyard with scary tombstones is another good way to go about it when you are looking for vacation countdown clock videos. The mixture of the turbulent and serene environment is enough to set the Halloween mood and even scare some folks.
Remember the scene from the movie “The Fog” and its famous dialogues: When the fog rolls in the terror begin! If you do not, take a look at a scene and judge for yourself if scary enough or not.
2. Scary Sadako ghost
What’s better than the Sadako ghost 7-day video call threat on Halloween? Well, nothing! So, why not create a prank video for your friends and family, especially those afraid of Sadako? Plus, Sadako creates a perfect backdrop for the countdown. Look at this Philippines creator who went to great lengths to scare his friends via a Sadako video call.
But you do not have to go through all that costume and scenery setup. Instead, you can use the video footage on any premium video and apply Sadako ghost via Green Screen.
3. Transferring Halloween Cupcakes From The Tray To The Table Moments
Halloween is adored for its trick-or-treat, but what about the party? What will you serve? Cupcakes sound like a good idea. But how will you entice your guest with your Halloween cupcakes? Well, you can include the cupcakes in the invitation video. While you can find many Halloween creative and savory cupcake recipes on YouTube, you can use stock footage to have them in the video.
4. Skeleton breaking screen
The broken screen is the classic prank suitable for any event and day. But simply using apps or replacing the wallpaper on your friend’s or spouse’s mobile doesn’t cut in this age and day. With new technology coming in, you have to get creative. Plus, it’s for Halloween, meaning dead skulls are a must.
5. Dark Monster Halloween Horror
Halloween house horror is another great backdrop for scaring your friends after a vacation countdown clock. You will find tons of videos on Halloween Horror houses on the internet. Look at how Jackie from Super Enthused (YouTube channel) gets scared while touring the 10 Halloween horror houses at the theme park. That was really scary, and this Halloween countdown effect can also help you do the same to your viewers.
6. Face Portrait Halloween Clown
Scary clowns against a kid’s window have been the long norm of scaring the small ones. No doubt, such pranks can scare anyone, not just kids. If you do not believe me, look at the reaction video from Infinite featuring scaring clowns’ pranks.
But how about dropping such a scary face bomb in a vacation countdown clock video? You can easily get your hands on creepy clowns’ portraits for videos via premium stock libraries like Filmora’s Filmstock.
7. A Family Wearing Handmade Halloween Mask At Home
Another not-so-fancy, subtle, and understated appeal for the Halloween vacation countdown clock video is a family together with Halloween masks. Given everyone will be in their costumes, you can also consider distributing self-made masks for everyone. You can take ideas from any of the numerous videos about Halloween mask design ideas.
8. Halloween Buckets Stacked Together
What’s the simplest and most fitting footage for the Halloween vacation countdown clock? Well, it is the scary pumpkins. Carving out Jack-o’-lantern has long been the Halloween “tradition,” and featuring it in your countdown timer at the party is the most classic way to go about it. The vibe from simple Halloween buckets stacked together is on the next level; if you do not believe me, look at Angie Bellemare’s Halloween Bucket ideas and creativity:
9. Carving Of Pumpkin For Halloween
Another Jack-o’-lantern idea for the vacation countdown clock video is the DIY Pumpin projects in the video. It doesn’t sound like much, but it really is enough to give the best feeling about Halloween without really indulging in the scary stuff. Take a look at how Jenn designs her Pumpkin Stack Fall Planter:
10. Dough Halloween Cookies Bakery Products
If Halloween is more about spending time with friends and family, a bunch of laughter, fun, and creating memories, then it cannot get better than focusing on the sweet stuff, like the dough used to cook the Halloween cookies. When you imagine the scenario of dough mixing for the Halloween countdown timer video, it does not sound like much! But they are cool-looking and set the perfect backdrop for a countdown timer video:
You can use such clips individually or mix them with other stock video footage mentioned here to create a perfect Halloween vacation countdown clock video clip.
Halloween Footage for Vertical Videos [TikTok/Instagram Story]:
The above list discusses the panoramic footage suitable for big screens. If your screen is rather a vertical one, then you might be looking for vertical stock footage for the Halloween vacation countdown clock clip. Here are some vertical footage ideas and links to stock footage to create the perfect vertical vacation countdown clock video for Halloween:
1. Woman Decorating for Halloween [TikTok]
Another simple backdrop for the Halloween countdown timer video is the decorations process to transform your indoors or outdoors for Halloween. And while you can use your own footage of decorating the house, chances are you may have missed filming yourself while decorating the house, given not everyone films themselves decorating the house and use it for their TikTok video. Here’s a video from Spooky Bones featuring the indoor decoration process for Halloween.
2. Girl Blonde Portrait Halloween
Another simple idea for a vertical countdown timer for Halloween is a scary face. In fact, if you are looking for the users to focus on the timer instead of footage is to use a slo-mo video, like this one from Tay. Tay tells a story about a real haunted house in her neighborhood while wearing scary Halloween makeup.
Of course, you can replace the story; and instead, use a clock with a girl wearing Halloween makeup.
3. An Outdoor Table With Halloween Theme Settings
If you are looking to feature the vacation countdown clock outdoors in a vertical setup, then a table with a Halloween theme might create the perfect setting. After all, Halloween is all about setting the perfect theme, and featuring a non-relevant indoor or scary video outdoors spoils the theme. Take a look at how Stephanie Cunningham on TikTok showcases her outdoor table decoration setup for Halloween.
4. A Kid In A Mummy Costume Holding A Halloween Bucket
If you are going for the classic mummy theme on Halloween, then how can you include any other footage than an actual mummy in the vertical countdown timer video? There are many ways to go about when looking to feature a mummy in the countdown clock; one idea is to show you made the mummy costumes, like Vina’s getup video on TikTok.
5. Stop Motion Of Halloween Candy
Hosting a Halloween party for kids and in search of the perfect vertical footage for a Halloween vacation countdown clock video? It cannot get better than simply featuring a bunch of candy to lure the kids toward the countdown clock. When you look at this video and imagine using a clock for the countdown clock.
Part 2: How to Apply a Halloween Countdown Clock to Your Video?
To make a unique Halloween Countdown Clock that ticks boxes around, you need software like Wondershare Filmora to implement the right element seamlessly.
Filmora library is filled with numerous such videos that will create the perfect backdrop for Halloween vacation countdown clock clips.
Coming to using the footage in your videos and making the Halloween countdown clock; well, you can do that easily using the Filmora Video editor (the video editor includes the Filmstock plug-in for easy navigation).
- Aside from Halloween-themed video footage, Filmora’s Filmstock also includes numerous audio, image, and other such elements.
- Filmora, primarily, is a video editor. You can combine all the elements like the stock footage videos discussed above and scary soundtracks and create a clock-down timer video easily.
- From trimming to splitting, to cool effects, there are several editing tools in Filmora.
- Transitions**, filters, text animations, and other editing features** are all supported.
Here’s how to use Filmora to Create a Halloween Countdown Clock Video
Free Download For Win 7 or later(64-bit)
Free Download For macOS 10.14 or later
Step1 Download and install Filmora on your Mac or PC.
Step2 Start the installed software and click Import from the main interface to upload the Halloween countdown clip. Alternatively, you can just drag-n-drop the video.
Step3 Drag-n-drop the uploaded video to the timeline.
Step4 Next, click on Stock Media and select the countdown effect that you want to use in the Halloween video. Then, drag-n-drop it to the timeline.
Step5 double click on the countdown effect and adjust it according to your requirement. You can adjust the time length too.
After that, play the video to preview it.
Step6 If you’re satisfied with the editing, scroll to the top of the screen and click Export, then, select ‘Burn DVD’.
Step7 Enter a name for your file in the Label box of the pop-up that appears on your screen, then in the Folder Path, choose the location where you want the file to be saved. Click the ‘Export’ button to finish.
Conclusion
There you have it - the top 15 Halloween countdown videos that can be used to spice up videos. Not to mention, you can find the stock footage on this page via Filmstock’s vast library containing tons of such videos. Also, is better to use subtle and not-so-horrifying clips if you want everything to be serene in the Halloween vacation countdown clock video.
Free Download For Win 7 or later(64-bit)
Free Download For macOS 10.14 or later
Top 5 Solutions on How to Add Emojis to iPhone
Top 5 Solutions on How to Add Emojis to iPhone
An easy yet powerful editor
Numerous effects to choose from
Detailed tutorials provided by the official channel
Have you been looking for interesting solutions on how to add emojis to iPhone? Stop you search and take a breath, you have landed at the correct spot!
In this article
01 [Want an Emoji on Your iPhone? Here’s How to Do It](#Part 1)
02 [Add Emojis to iPhone Q&A](#Part 2)
Part 1 Want an Emoji on Your iPhone? Here’s How to Do It
Emojis are known to live up to their name and introduce an emotional connect to the otherwise plain text within your social media posts and conversations. Speaking in the light of the latest and currently existing communication trends, these miniature graphic elements have managed to earn a significant amount of popularity across a diverse range of communication and information sharing platforms.
Moving ahead, the credibility of emojis to uplift the fun and emotional element in personal conversations across the popular chat service programs does not need an explanation. While the most common means of such conversations are smartphones, having a convenient access to these graphic chat elements on your mobile devices becomes quite important.
Recognizing the need to have emojis at your fingertips the next time you initiate a conversation with your friends on social media or across chat applications, let us proceed with learning about some interesting ways of sorting the concern of how to add custom emojis to iPhone in what follows next:
Solutions for Adding Emojis to Your iPhone
01Using the Emoji Keyboard of a Chat Application
The IT market has launched a variety of high end chat service programs that come with a default emoji keyboard to uplift the customary text messages. You can choose to work with any of the available iPhone compatible chat service program, while conveniently accessing their emoji keyboards on your device.
Step 1: Launch the Application
To begin with addressing the concern of how to put emojis on pictures iPhone; start with browsing through the Launchpad of your iPhone and opening a preferred chat application that supports the emoji keyboard. You can start with using the ‘Messages’ or ‘Mail’ applications.
Step 2: Access the Emoji Keyboard
Tap within the text field of the chat application, followed by clicking on either of the ‘Globe’ or ‘Emoji’ icons. The ‘Emoji Keyboard’ will now pop up on the application screen of your iPhone.
Step 3: Select an Emoji
Proceed to choose a desired emoji to add within your conversation by navigating through the diverse range of available emoji themes. You can this by tapping the ‘Gray’ emoji symbols in the bottom toolbar, or making a left-right swipe to access the available choices.
To browse through the collection of emojis that you have used most frequently, tap the ‘Clock’ icon. If you are not finding the exact emoji to depict a particular expression, navigate to the ‘Search Emoji’ box under the text field and type a relevant keyword to open a customized list of emoji options.
Step 4: Play With Different Skin Tones
If you want to alter the default skin tone of a selected emoji, you can do this by tapping on and holding the same to see a display of different skin tones appear above your selection. Click on the one you like, to apply it to the selected emoji.
Step 5: Include the Emoji
When the aforesaid customizations make you happy; click on the emoji once again to include the latter within the text field of the chat service program you are working with.

02Enabling the Emoji Keyboard of Your iPhone
If you are keen towards sorting the issue of how to add emojis to photos iPhone while working with an emoji keyboard explicitly on your iPhone, you can proceed to enable the same on your device. The process is quick and easy, with no rocket science, and allows you to add emoji to picture iPhone. Here’s what you need to do:
Step 1: Launch the Settings Application
To start with settling the query of how to add emoji keyboard to iPhone, navigate to and click on the ‘Settings’ application on the welcome screen of your iPhone, followed by hitting the ‘General’ tab from the list of categories that appears next. Entering into the ‘General Settings’ interface, pick the ‘Keyboard’ option.
Step 2: Add a New Keyboard
Within the ‘Keyboard’ category of your iPhone settings, you are required to tap on the ‘Keyboards’ subcategory, followed by hitting the ‘Add New Keyboard’ option from the window that pops up next.
As you click on the aforesaid option, a series of keyboard types gets displayed on the screen. Scroll through the list to locate the ‘Emoji’ option, followed by clicking on the same to add emoji keyboard iPhone. That’s it! You can now proceed to use the keyboard to communicate across different conversation platforms.

03Adding Emojis to the Status Bar of Your iPhone
This one is a recently included feature in iOS compatible devices to sort out the issue of working with emojis on iPhones and allied device categories to answer the question of , how to add emoji to iPhone photo. As is obvious, availing the utility requires you to launch an update of your iPhone to iOS 15 or more recent versions. Make sure you adhere to the same before proceeding with the emoji inclusion process.
Without further ado, here’s how you can add the emoji elements to the status bar of your iPhone in just a few quick and simple steps:
Step 1: Launch the Settings Application
Start with heading to and clicking on the ‘Settings’ icon frame on the Launchpad of your iPhone to be greeted by the app’s welcome interface. In the list of available categories, click on the ‘Focus’ tab.

Step 2: Navigating Through the Focus Feature
As you hit the ‘Focus’ tab in the previous step, the latter’s interface pops up with a series of utility options. Instead of entering into the options, you however need to just tap the ‘Add’ button depicted by a ‘+’ icon at the top right corner of the ‘Focus’ window.

Step 3: Select an Emoji Category
Clicking on the ‘Add’ button directs you to the ‘Emoji Selection’ interface. All you need to do here is, click on the ‘Custom’ option to open the available emoji categories within the ‘Focus’ feature. Talking of the diversity of emoji options, the feature allows you to add up to 25 emoji categories to the iPhone status bar.
Ahead of the customary variations in smiley faces, you can experiment with adding more specific icons, like; paw prints, stethoscope, fork and knife, light bulb, etc. You can work with these varieties to walk through the subject of how to add emojis to photos iPhone.

Step 4: Name Your Emoji
When you are done with adding the preferred emoji icons, proceed to assign them a specific name. The added names will however, not show up on the status bar of your iPhone, but can be seen on other conversation platform and chat service applications.
If you choose to add the emoji in a specific color to your iPhone’s status bar, you can avail the feature. The color however, won’t reflect on the device’s status bar, but can be seen on the latter’s lock screen.
04Adding Emojis to iPhone Though the Google Messages Application
When aiming to set aside the concern of how to add emoji to iPhone photo, you can seek the help of third party applications. All you need to do is install and run the app on your iPhone and start your editing spree. Browsing through the IT market, you can easily land across a never ending series of third party alternatives to work with emojis on your iPhone.
Picking one from the same, here’s a detailed explanation of using the Google Messages app to include emojis on your iPhone:
Step 1: Download and Install the Application
Start with visiting the Apple App Store to download the Google Messages application in your iPhone. In case the utility already exists in your device, proceed to update the same to the most recent version.
Step 2: Set as Default
Once you are done with the download and installation formalities, proceed to launch the app in your device, followed by setting the latter as your preferred chat application.
Step 3: And…It’s Ready!
The completion of Step 2 will guide you to the Google Messages welcome screen, where you can start conversing with your friends and peers.
Step 4: Select a Contact
To begin chatting with a contact, click on the ‘Start Chat’ option, followed by selecting the contact number or name of a desired person.
Step 5: Type a Message
As you finish Step 4, the app’s chat interface appears where you can type a message within then text field and proceed to complement the same with emojis, stickers and other graphic elements. The app comes with an extensive range of emojis to select and add from. Moving ahead of the basic smileys, you can pick emojis from categories like, Food and Beverages, Travel, Nature, and many more.
Step 6: Send!
Tap the ‘Send’ button when you are done with composing the message, to let it reach the recipient. You can also forward the message to multiple contacts at the same time.
05Adding Emojis to iPhone Through the SwiftKey Keyboard
This one is another entry in list of answers regarding the query of how to add emojis to a picture on iPhone. Essentially a third party keyboard, SwiftKey works to supplement your messages with the latest and most expressive graphic elements, including emojis. The utility comes with a smart feature that predicts the type and style of emojis you will use in future conversations, in line with your current usage pattern.
The following user guide explains the step by step process to work with the SwiftKey keyboard for adding emojis to your iPhone:
Step 1: Download, Install and Launch SwiftKey
Navigate to the Apple App Store in your iPhone and proceed to download and install the SwiftKey application to the device. When you are done, launch the app and click on ‘Get Started’.

Step 2: Sign In to SwiftKey
As you launch the SwiftKey keyboard, the latter’s ‘Sign In to SwiftKey’ window pops up, requiring you to select an account for initiating the sign process of the application by clicking on either of the ‘Continue With Google’ or ‘Continue With Facebook’ options. To move ahead, follow the instructions that appear on your device screen.

Step 3: Enable the SwiftKey Keyboard
When you have chosen the sign in account, the ‘To Enable SwiftKey’ window appears to explain to you, the process of enabling the SwiftKey keyboard.

Step 4: Accessing SwiftKey Keyboard in iPhone Settings
Launch the iPhone’s ‘Settings’ application, followed by hitting the ‘General’ tab from the list of options within the latter’s opening interface.

As the ‘General’ window pops up, proceed to choose the ‘Keyboard’ option by tapping on the same.

Within the ‘Keyboard’ setting window, navigate to and click on the ‘Keyboards’ option.

Step 5: Make SwiftKey an Additional Keyboard
To work with the SwiftKey keyboard on your iPhone, you will need to add the same to your device’s list of preset keyboards. To do this, click on the ‘Add New Keyboard’ option within the list of keyboards that pops up as you complete Step 4.

A series of third party keyboards shows up in the window that appears next. Proceed to select ‘SwiftKey’ from the available keyboard choices. In case you don’t find the aforesaid keyboard among the options, double tap the ‘Home’ button on your device to exit the ‘Settings’ application.
Re-launch the ‘Settings’ app after a few moments and follow Steps 4 and 5 to make the ‘SwiftKey’ option appear within the list.

Step 6: Grant Full Access to SwiftKey
To work with the complete feature bank of the ‘SwiftKey’ application, you will have to allow the latter to fully access your iPhone. To proceed with the process, navigate to the ‘Keyboards’ window of your iPhone settings, where you can see the ‘SwiftKey’ keyboard present in the list of active keyboards of your device. Open the application’s ‘Access’ window by clocking on the keyboard name in the list.

Within the ‘SwiftKey Access’ window that appears, toggle the slider to the right side to enable the ‘Allow Full Access’ option.

As you enable the ‘Allow Full Access’ option, the ‘App Permissions’ dialog box pops up on your iPhone screen. Click on ‘Allow’ within the same to grant the required app permissions.

Step 7: Switch to the SwiftKey Keyboard
You will now be directed to the ‘Select SwiftKey’ window to change your default keyboard. Here you need to click on the ‘Globe’ icon, followed by choosing ‘SwiftKey’ from the menu that appears next.

Step 8: SwiftKey Is Ready!
As you finish Step 7, a confirmation window pops up on the iPhone screen, displaying the ‘Installation Successful’ message. If you wish to get regular updates and tips from the SwiftKey application, click on the ‘Save’ button, otherwise, navigate to the bottom right corner of the screen and click on the ‘Not Now’ option.

You can now work towards adding emojis in your chats and conversations on the iPhone, simply by typing a message in the text field of the preferred chat service program, followed by picking a suitable emoji from the diverse range of available options within the SwiftKey keyboard. Talking of additional merits, the utility allows you to introduce customizations to the keyboard in terms of supported languages, theme centered design, access compatibility and settings.
Part 2 Add Emojis to iPhone Q&A
01Why does the emoji utility not show up on an iPhone?
In case you find difficulty in accessing emojis on your iPhone, or the latter does not appear within your communication centered utilities of the device, consider checking the settings of the iPhone to make sure that the feature has been added as well as enabled. If not so, proceed to enable the same in the ‘Settings’ interface itself.
02What is the procedure to download an additional set of emojis to an iPhone?
If you want to spark up your iPhone’s emoji library with an extra set of the latest emojis, the only method that would cater to the concern of how to add more emoji to iPhone is taking the help of third party applications. As an affordable pick, you can rely on the Messages App Store in your iPhone to avail a decent rage of third party emoji packages, both free and paid.
03How can the hidden emoji keyboard be accessed?
In your iPhone settings, open the ‘General’ category, followed by selecting the ‘ Keyboard’ option. Entering in, choose the ‘Keyboards’ subcategory and tap on ‘Add New Keyboard’. From the list of options that drops down, select ‘Japanese’, followed by ‘Kana’. As you proceed to type a message the next time, click on the ‘Globe’ icon at the bottom-left corner of the app screen to toggle between keyboard options.
04How can the hidden emojis on an iPhone be unlocked?
To unlock a hidden emoji, navigate to the ‘Apple Messages’ app in your iPhone and launch the iMessage application. Next, open a conversation thread and enter any emoji in the chat’s text field. Now, press and hold the ‘Send’ button to open a hidden emoji page that lets you choose and add these elements to your text message.
05What is the best software to look for free emojis?
If you are willing to sort out the concern of accessing the best inventory of latest emojis, you can traverse the editor library of the Wondershare Filmora Video Editor graphic designer program. Divided into a hoard of specific categories, the software is known to house the most elaborative variety of emoji elements that undergo a periodic update that can help you to sort the query of how to add emojis to pictures on iPhone.
For Win 7 or later (64-bit)
For macOS 10.12 or later
● Ending Thoughts →
● Including emojis in your social media and chat service conversations works to add an emotional connect to your otherwise normal text messages.
● When looking forward to work towards the constraint of how to add new emojis to iPhone, there are a variety of methods to move ahead with the process.
● If you are on a search of the latest collection of emojis to add to your iPhone, you can take suggestions from the editor library of the Wondershare Filmora graphic designer program.
Have you been looking for interesting solutions on how to add emojis to iPhone? Stop you search and take a breath, you have landed at the correct spot!
In this article
01 [Want an Emoji on Your iPhone? Here’s How to Do It](#Part 1)
02 [Add Emojis to iPhone Q&A](#Part 2)
Part 1 Want an Emoji on Your iPhone? Here’s How to Do It
Emojis are known to live up to their name and introduce an emotional connect to the otherwise plain text within your social media posts and conversations. Speaking in the light of the latest and currently existing communication trends, these miniature graphic elements have managed to earn a significant amount of popularity across a diverse range of communication and information sharing platforms.
Moving ahead, the credibility of emojis to uplift the fun and emotional element in personal conversations across the popular chat service programs does not need an explanation. While the most common means of such conversations are smartphones, having a convenient access to these graphic chat elements on your mobile devices becomes quite important.
Recognizing the need to have emojis at your fingertips the next time you initiate a conversation with your friends on social media or across chat applications, let us proceed with learning about some interesting ways of sorting the concern of how to add custom emojis to iPhone in what follows next:
Solutions for Adding Emojis to Your iPhone
01Using the Emoji Keyboard of a Chat Application
The IT market has launched a variety of high end chat service programs that come with a default emoji keyboard to uplift the customary text messages. You can choose to work with any of the available iPhone compatible chat service program, while conveniently accessing their emoji keyboards on your device.
Step 1: Launch the Application
To begin with addressing the concern of how to put emojis on pictures iPhone; start with browsing through the Launchpad of your iPhone and opening a preferred chat application that supports the emoji keyboard. You can start with using the ‘Messages’ or ‘Mail’ applications.
Step 2: Access the Emoji Keyboard
Tap within the text field of the chat application, followed by clicking on either of the ‘Globe’ or ‘Emoji’ icons. The ‘Emoji Keyboard’ will now pop up on the application screen of your iPhone.
Step 3: Select an Emoji
Proceed to choose a desired emoji to add within your conversation by navigating through the diverse range of available emoji themes. You can this by tapping the ‘Gray’ emoji symbols in the bottom toolbar, or making a left-right swipe to access the available choices.
To browse through the collection of emojis that you have used most frequently, tap the ‘Clock’ icon. If you are not finding the exact emoji to depict a particular expression, navigate to the ‘Search Emoji’ box under the text field and type a relevant keyword to open a customized list of emoji options.
Step 4: Play With Different Skin Tones
If you want to alter the default skin tone of a selected emoji, you can do this by tapping on and holding the same to see a display of different skin tones appear above your selection. Click on the one you like, to apply it to the selected emoji.
Step 5: Include the Emoji
When the aforesaid customizations make you happy; click on the emoji once again to include the latter within the text field of the chat service program you are working with.
02Enabling the Emoji Keyboard of Your iPhone
If you are keen towards sorting the issue of how to add emojis to photos iPhone while working with an emoji keyboard explicitly on your iPhone, you can proceed to enable the same on your device. The process is quick and easy, with no rocket science, and allows you to add emoji to picture iPhone. Here’s what you need to do:
Step 1: Launch the Settings Application
To start with settling the query of how to add emoji keyboard to iPhone, navigate to and click on the ‘Settings’ application on the welcome screen of your iPhone, followed by hitting the ‘General’ tab from the list of categories that appears next. Entering into the ‘General Settings’ interface, pick the ‘Keyboard’ option.
Step 2: Add a New Keyboard
Within the ‘Keyboard’ category of your iPhone settings, you are required to tap on the ‘Keyboards’ subcategory, followed by hitting the ‘Add New Keyboard’ option from the window that pops up next.
As you click on the aforesaid option, a series of keyboard types gets displayed on the screen. Scroll through the list to locate the ‘Emoji’ option, followed by clicking on the same to add emoji keyboard iPhone. That’s it! You can now proceed to use the keyboard to communicate across different conversation platforms.
03Adding Emojis to the Status Bar of Your iPhone
This one is a recently included feature in iOS compatible devices to sort out the issue of working with emojis on iPhones and allied device categories to answer the question of , how to add emoji to iPhone photo. As is obvious, availing the utility requires you to launch an update of your iPhone to iOS 15 or more recent versions. Make sure you adhere to the same before proceeding with the emoji inclusion process.
Without further ado, here’s how you can add the emoji elements to the status bar of your iPhone in just a few quick and simple steps:
Step 1: Launch the Settings Application
Start with heading to and clicking on the ‘Settings’ icon frame on the Launchpad of your iPhone to be greeted by the app’s welcome interface. In the list of available categories, click on the ‘Focus’ tab.
Step 2: Navigating Through the Focus Feature
As you hit the ‘Focus’ tab in the previous step, the latter’s interface pops up with a series of utility options. Instead of entering into the options, you however need to just tap the ‘Add’ button depicted by a ‘+’ icon at the top right corner of the ‘Focus’ window.
Step 3: Select an Emoji Category
Clicking on the ‘Add’ button directs you to the ‘Emoji Selection’ interface. All you need to do here is, click on the ‘Custom’ option to open the available emoji categories within the ‘Focus’ feature. Talking of the diversity of emoji options, the feature allows you to add up to 25 emoji categories to the iPhone status bar.
Ahead of the customary variations in smiley faces, you can experiment with adding more specific icons, like; paw prints, stethoscope, fork and knife, light bulb, etc. You can work with these varieties to walk through the subject of how to add emojis to photos iPhone.
Step 4: Name Your Emoji
When you are done with adding the preferred emoji icons, proceed to assign them a specific name. The added names will however, not show up on the status bar of your iPhone, but can be seen on other conversation platform and chat service applications.
If you choose to add the emoji in a specific color to your iPhone’s status bar, you can avail the feature. The color however, won’t reflect on the device’s status bar, but can be seen on the latter’s lock screen.
04Adding Emojis to iPhone Though the Google Messages Application
When aiming to set aside the concern of how to add emoji to iPhone photo, you can seek the help of third party applications. All you need to do is install and run the app on your iPhone and start your editing spree. Browsing through the IT market, you can easily land across a never ending series of third party alternatives to work with emojis on your iPhone.
Picking one from the same, here’s a detailed explanation of using the Google Messages app to include emojis on your iPhone:
Step 1: Download and Install the Application
Start with visiting the Apple App Store to download the Google Messages application in your iPhone. In case the utility already exists in your device, proceed to update the same to the most recent version.
Step 2: Set as Default
Once you are done with the download and installation formalities, proceed to launch the app in your device, followed by setting the latter as your preferred chat application.
Step 3: And…It’s Ready!
The completion of Step 2 will guide you to the Google Messages welcome screen, where you can start conversing with your friends and peers.
Step 4: Select a Contact
To begin chatting with a contact, click on the ‘Start Chat’ option, followed by selecting the contact number or name of a desired person.
Step 5: Type a Message
As you finish Step 4, the app’s chat interface appears where you can type a message within then text field and proceed to complement the same with emojis, stickers and other graphic elements. The app comes with an extensive range of emojis to select and add from. Moving ahead of the basic smileys, you can pick emojis from categories like, Food and Beverages, Travel, Nature, and many more.
Step 6: Send!
Tap the ‘Send’ button when you are done with composing the message, to let it reach the recipient. You can also forward the message to multiple contacts at the same time.
05Adding Emojis to iPhone Through the SwiftKey Keyboard
This one is another entry in list of answers regarding the query of how to add emojis to a picture on iPhone. Essentially a third party keyboard, SwiftKey works to supplement your messages with the latest and most expressive graphic elements, including emojis. The utility comes with a smart feature that predicts the type and style of emojis you will use in future conversations, in line with your current usage pattern.
The following user guide explains the step by step process to work with the SwiftKey keyboard for adding emojis to your iPhone:
Step 1: Download, Install and Launch SwiftKey
Navigate to the Apple App Store in your iPhone and proceed to download and install the SwiftKey application to the device. When you are done, launch the app and click on ‘Get Started’.
Step 2: Sign In to SwiftKey
As you launch the SwiftKey keyboard, the latter’s ‘Sign In to SwiftKey’ window pops up, requiring you to select an account for initiating the sign process of the application by clicking on either of the ‘Continue With Google’ or ‘Continue With Facebook’ options. To move ahead, follow the instructions that appear on your device screen.
Step 3: Enable the SwiftKey Keyboard
When you have chosen the sign in account, the ‘To Enable SwiftKey’ window appears to explain to you, the process of enabling the SwiftKey keyboard.
Step 4: Accessing SwiftKey Keyboard in iPhone Settings
Launch the iPhone’s ‘Settings’ application, followed by hitting the ‘General’ tab from the list of options within the latter’s opening interface.
As the ‘General’ window pops up, proceed to choose the ‘Keyboard’ option by tapping on the same.
Within the ‘Keyboard’ setting window, navigate to and click on the ‘Keyboards’ option.
Step 5: Make SwiftKey an Additional Keyboard
To work with the SwiftKey keyboard on your iPhone, you will need to add the same to your device’s list of preset keyboards. To do this, click on the ‘Add New Keyboard’ option within the list of keyboards that pops up as you complete Step 4.
A series of third party keyboards shows up in the window that appears next. Proceed to select ‘SwiftKey’ from the available keyboard choices. In case you don’t find the aforesaid keyboard among the options, double tap the ‘Home’ button on your device to exit the ‘Settings’ application.
Re-launch the ‘Settings’ app after a few moments and follow Steps 4 and 5 to make the ‘SwiftKey’ option appear within the list.
Step 6: Grant Full Access to SwiftKey
To work with the complete feature bank of the ‘SwiftKey’ application, you will have to allow the latter to fully access your iPhone. To proceed with the process, navigate to the ‘Keyboards’ window of your iPhone settings, where you can see the ‘SwiftKey’ keyboard present in the list of active keyboards of your device. Open the application’s ‘Access’ window by clocking on the keyboard name in the list.
Within the ‘SwiftKey Access’ window that appears, toggle the slider to the right side to enable the ‘Allow Full Access’ option.
As you enable the ‘Allow Full Access’ option, the ‘App Permissions’ dialog box pops up on your iPhone screen. Click on ‘Allow’ within the same to grant the required app permissions.
Step 7: Switch to the SwiftKey Keyboard
You will now be directed to the ‘Select SwiftKey’ window to change your default keyboard. Here you need to click on the ‘Globe’ icon, followed by choosing ‘SwiftKey’ from the menu that appears next.
Step 8: SwiftKey Is Ready!
As you finish Step 7, a confirmation window pops up on the iPhone screen, displaying the ‘Installation Successful’ message. If you wish to get regular updates and tips from the SwiftKey application, click on the ‘Save’ button, otherwise, navigate to the bottom right corner of the screen and click on the ‘Not Now’ option.
You can now work towards adding emojis in your chats and conversations on the iPhone, simply by typing a message in the text field of the preferred chat service program, followed by picking a suitable emoji from the diverse range of available options within the SwiftKey keyboard. Talking of additional merits, the utility allows you to introduce customizations to the keyboard in terms of supported languages, theme centered design, access compatibility and settings.
Part 2 Add Emojis to iPhone Q&A
01Why does the emoji utility not show up on an iPhone?
In case you find difficulty in accessing emojis on your iPhone, or the latter does not appear within your communication centered utilities of the device, consider checking the settings of the iPhone to make sure that the feature has been added as well as enabled. If not so, proceed to enable the same in the ‘Settings’ interface itself.
02What is the procedure to download an additional set of emojis to an iPhone?
If you want to spark up your iPhone’s emoji library with an extra set of the latest emojis, the only method that would cater to the concern of how to add more emoji to iPhone is taking the help of third party applications. As an affordable pick, you can rely on the Messages App Store in your iPhone to avail a decent rage of third party emoji packages, both free and paid.
03How can the hidden emoji keyboard be accessed?
In your iPhone settings, open the ‘General’ category, followed by selecting the ‘ Keyboard’ option. Entering in, choose the ‘Keyboards’ subcategory and tap on ‘Add New Keyboard’. From the list of options that drops down, select ‘Japanese’, followed by ‘Kana’. As you proceed to type a message the next time, click on the ‘Globe’ icon at the bottom-left corner of the app screen to toggle between keyboard options.
04How can the hidden emojis on an iPhone be unlocked?
To unlock a hidden emoji, navigate to the ‘Apple Messages’ app in your iPhone and launch the iMessage application. Next, open a conversation thread and enter any emoji in the chat’s text field. Now, press and hold the ‘Send’ button to open a hidden emoji page that lets you choose and add these elements to your text message.
05What is the best software to look for free emojis?
If you are willing to sort out the concern of accessing the best inventory of latest emojis, you can traverse the editor library of the Wondershare Filmora Video Editor graphic designer program. Divided into a hoard of specific categories, the software is known to house the most elaborative variety of emoji elements that undergo a periodic update that can help you to sort the query of how to add emojis to pictures on iPhone.
For Win 7 or later (64-bit)
For macOS 10.12 or later
● Ending Thoughts →
● Including emojis in your social media and chat service conversations works to add an emotional connect to your otherwise normal text messages.
● When looking forward to work towards the constraint of how to add new emojis to iPhone, there are a variety of methods to move ahead with the process.
● If you are on a search of the latest collection of emojis to add to your iPhone, you can take suggestions from the editor library of the Wondershare Filmora graphic designer program.
Add Motion Blur in After Effects
Everyone has seen those transition or animation video cuts when something doesn’t quite seem right; the movement appears forced or the playback is choppy. Typically, this occurs because a motion blur effect was not used while editing. Learning the ins, outs, rights, and wrongs of Motion Blur in After Effects is one of the most thrilling early steps in the motion graphics adventure. Learning how and when to utilize it successfully is a true “level up” moment for most designers.
Making everything you add to a motion graphic or animation project appear like it belongs there organically and hasn’t been “artificially” inserted is a crucial component. Adding motion blur After Effects Is a fantastic tool for making items mix more naturally in your compositions. Let’s quickly examine Motion Blur with all of this in mind. To help you better grasp motion blur and how to add motion blur to flawlessly merge objects in your video projects or even create styled effects, we’ve put up a detailed guide here.
Part 1. What is Motion Blur Effects
Let’s start with a little introduction before learning how to apply motion blur. The visual result of an item moving while being photographed in conjunction with the shutter speed of the camera is called motion blur. When we swiftly move our heads from side to side, this effect also naturally occurs with our eyes, but we aren’t aware of it since our brains “edit” it for us. It may be startling and awkward to watch when items are moving on the screen, particularly rapid motion, without any kind of blurring effect.
Motion blur was introduced into animation to aid in the blending of frames and replicate the blurring that was seen in earlier cameras as a result of fast-moving objects. When a moving item keeps moving while light is still reaching our eyes, motion blur results. The goal of Motion Blur in After Effects is to replicate this phenomenon. After Effects will duplicate your layer several times when it changes in size or location. Then, it will offset it in various ways. This is closely related to the direction and pace of your layer’s animation.
These days, we have cameras with fast shutter speeds, which allows us to almost completely remove motion blur. Without motion blurring, each frame of your animation is like a flawless still image, making the action seem a little disorienting. Each picture captures the exact moment in time, despite the fluid motion. However, the absence of motion blur is what viewers do notice. Because of this, visual effects creators often use artificial motion blur in their effects to replicate what the viewer would experience if the element were really there in the picture.
Part 2. How to Add Motion Blur in After Effects
In videos, slow-motion may be used in a variety of ways, such as to convey the emotional context of a story or make beautiful slideshow backdrops. It doesn’t matter why you want to make a slow-motion sequence; After Effects’ slow-motion effect will work well. Click the Motion Blur layer switch to turn Motion Blur on or off. Make sure you can render out Motion Blur by turning on the Enable Motion Blur composition option at the top of the Timeline panel.
Using the motion blur option in your layer settings is the first and easiest approach to apply motion blur in After Effects. You’ll see many choices on the left and right sides of the screen after choosing a certain video. There are several techniques to motion blur a video, which we wish to accomplish. But because this guide is for novices, we will choose the simpler option. Follow the steps below to learn how to add motion blur to a video in AE:
Steps to Add Motion Blur to After Effects:
So, it goes without saying that After Effects makes it simple to access Motion Blur’s magic. You should shoot the movie at a frame rate that is faster than the average if you want the greatest slow-motion effects. How many photos are being captured each second is indicated by the frame rate.
Step1 Download and install Adobe After Effects if it isn’t already on your PC. Since Adobe After Effects is a commercial program, it is not available for free. Open the program after installation. After installation, launch it and choose “New Project” to begin editing a brand-new file. Look through the video you wish to alter.

Step2 You have a variety of settings in Adobe After Effects on the right side. Then, choose “Effects & Presets.” A search bar will appear as a result. Enter “CC Force Motion Blur” in the search field if you wish to add motion blur to the video. You may apply this effect to whatever layer you choose since your movie is made up of layers.

Step3 Next, drag the “CC Force Motion Blur” to the layers that represent your imported video at the bottom left of the screen. On the left side of the screen, under “CC Force Motion Blur,” you will find settings for motion blur. Here, you may change the motion blur to suit your needs. You may type in the values and watch the video as appropriate. There are several choices available for you to modify.

![]()
Note: Before applying any speed effects, first trim your film to the proper length. Once the speed effects have been included, you need also make sure that your composition is lengthy enough for your clip. Once you’re satisfied with the footage you want to slow down, choose one of the ways—Time warp or Time Stretch.
Step4 Customize “Shutter Angle” and “Motion Blur Samples.” Always be careful to preview the video after any modifications. Adjust to your needs and specifications. Additionally, if you wish, you may add any additional effect to the video. When finished, save the video by selecting “File” in the upper left corner.

Step5 Finally, hit the OK button and afterwards, export the project with the Motion Blur embedded inside the main video. Adobe AE also gives you flexibility to export to the desired format with the preset project settings.
Part 3. Other Video Editor to Add Effects to Videos
Due to its cost and adaptability, Adobe After Effects is quite expensive; especially for the beginners. So, we’ve a handy option, Filmora by Wondershare, that is a fantastic option since most high-end video editors are, to put it mildly, expensive. It may seem natural to just add motion blur to everything before rendering while working on a conventional 2D project in After Effects, but there are occasions when having no motion blur at all is preferable. When used properly, After Effects’ slow-motion features are extensive and reliable.
Wondershare: A video-making and editing program has its flagship product called Filmora . You may use the tools to create a wide variety of styles and appearances. Less complicated and user-friendly for beginners, the program. With the help of this program, you may edit your video at home like an expert. With this user-friendly tool and stylish effects, making excellent films doesn’t have to be difficult. When you open the app and choose Editor mode as it will walk you through each stage of the procedure.
Free Download For Win 7 or later(64-bit)
Free Download For macOS 10.14 or later
Import Files
Media files may be easily added to the timeline in Filmora from the device’s library. .mpg,.mpeg, and many more file types are supported for this video file format’s input.

Utilize Filmstock
On Wondershare Filmora , there is a full-service shop called Filmstock that offers a ton of exciting media and after-effects for download. You may get free sound effects and short video clips to add to your videos on this website.
Edit Effect
Download films from the effect store or import them from your device and add them to your timeline in Filmora to modify your videos. Utilize the software’s drag-and-drop feature to modify the video.

Apply filters
Overlays and video filters are effects used to enhance the appeal of the video. Open the effects tab and select your desired filter to apply overlays and filters. To apply it, drag and drop it into the timeline’s video. Additionally, filters may be adjusted to change the time scale and transparency.
Export
Exporting a video to a variety of platforms comes after editing it. Filmora allows users to export video in a number of different file types, including mp4, Wmv, Mkv, ts, 3gp, f4v, Mkv, MOV, mpg, 3gp, GIF 4K, and mp3.
Conclusion
Motion blur is crucial when animating characters to move. Your videos require some blur to seem realistic when there is motion, particularly when there is quick movement. You have learnt how to include motion blur into your animation project from this guide. To add motion blur effects to your movie or animation, After Effects offers a wide variety of options. To inform you about this wonderful gesture, we utilized Filmora and Adobe After Effects and recommend Filmora for easiness and handy outputs.
Let’s start with a little introduction before learning how to apply motion blur. The visual result of an item moving while being photographed in conjunction with the shutter speed of the camera is called motion blur. When we swiftly move our heads from side to side, this effect also naturally occurs with our eyes, but we aren’t aware of it since our brains “edit” it for us. It may be startling and awkward to watch when items are moving on the screen, particularly rapid motion, without any kind of blurring effect.Motion blur was introduced into animation to aid in the blending of frames and replicate the blurring that was seen in earlier cameras as a result of fast-moving objects. When a moving item keeps moving while light is still reaching our eyes, motion blur results. The goal of Motion Blur in After Effects is to replicate this phenomenon. After Effects will duplicate your layer several times when it changes in size or location. Then, it will offset it in various ways. This is closely related to the direction and pace of your layer’s animation.
These days, we have cameras with fast shutter speeds, which allows us to almost completely remove motion blur. Without motion blurring, each frame of your animation is like a flawless still image, making the action seem a little disorienting. Each picture captures the exact moment in time, despite the fluid motion. However, the absence of motion blur is what viewers do notice. Because of this, visual effects creators often use artificial motion blur in their effects to replicate what the viewer would experience if the element were really there in the picture.
Part 2. How to Add Motion Blur in After Effects
In videos, slow-motion may be used in a variety of ways, such as to convey the emotional context of a story or make beautiful slideshow backdrops. It doesn’t matter why you want to make a slow-motion sequence; After Effects’ slow-motion effect will work well. Click the Motion Blur layer switch to turn Motion Blur on or off. Make sure you can render out Motion Blur by turning on the Enable Motion Blur composition option at the top of the Timeline panel.
Using the motion blur option in your layer settings is the first and easiest approach to apply motion blur in After Effects. You’ll see many choices on the left and right sides of the screen after choosing a certain video. There are several techniques to motion blur a video, which we wish to accomplish. But because this guide is for novices, we will choose the simpler option. Follow the steps below to learn how to add motion blur to a video in AE:
Steps to Add Motion Blur to After Effects:
So, it goes without saying that After Effects makes it simple to access Motion Blur’s magic. You should shoot the movie at a frame rate that is faster than the average if you want the greatest slow-motion effects. How many photos are being captured each second is indicated by the frame rate.
Step1 Download and install Adobe After Effects if it isn’t already on your PC. Since Adobe After Effects is a commercial program, it is not available for free. Open the program after installation. After installation, launch it and choose “New Project” to begin editing a brand-new file. Look through the video you wish to alter.
Step2 You have a variety of settings in Adobe After Effects on the right side. Then, choose “Effects & Presets.” A search bar will appear as a result. Enter “CC Force Motion Blur” in the search field if you wish to add motion blur to the video. You may apply this effect to whatever layer you choose since your movie is made up of layers.
Step3 Next, drag the “CC Force Motion Blur” to the layers that represent your imported video at the bottom left of the screen. On the left side of the screen, under “CC Force Motion Blur,” you will find settings for motion blur. Here, you may change the motion blur to suit your needs. You may type in the values and watch the video as appropriate. There are several choices available for you to modify.
![]()
Note: Before applying any speed effects, first trim your film to the proper length. Once the speed effects have been included, you need also make sure that your composition is lengthy enough for your clip. Once you’re satisfied with the footage you want to slow down, choose one of the ways—Time warp or Time Stretch.
Step4 Customize “Shutter Angle” and “Motion Blur Samples.” Always be careful to preview the video after any modifications. Adjust to your needs and specifications. Additionally, if you wish, you may add any additional effect to the video. When finished, save the video by selecting “File” in the upper left corner.
Step5 Finally, hit the OK button and afterwards, export the project with the Motion Blur embedded inside the main video. Adobe AE also gives you flexibility to export to the desired format with the preset project settings.
Part 3. Other Video Editor to Add Effects to Videos
Due to its cost and adaptability, Adobe After Effects is quite expensive; especially for the beginners. So, we’ve a handy option, Filmora by Wondershare, that is a fantastic option since most high-end video editors are, to put it mildly, expensive. It may seem natural to just add motion blur to everything before rendering while working on a conventional 2D project in After Effects, but there are occasions when having no motion blur at all is preferable. When used properly, After Effects’ slow-motion features are extensive and reliable.
Wondershare: A video-making and editing program has its flagship product called Filmora . You may use the tools to create a wide variety of styles and appearances. Less complicated and user-friendly for beginners, the program. With the help of this program, you may edit your video at home like an expert. With this user-friendly tool and stylish effects, making excellent films doesn’t have to be difficult. When you open the app and choose Editor mode as it will walk you through each stage of the procedure.
Free Download For Win 7 or later(64-bit)
Free Download For macOS 10.14 or later
Import Files
Media files may be easily added to the timeline in Filmora from the device’s library. .mpg,.mpeg, and many more file types are supported for this video file format’s input.
Utilize Filmstock
On Wondershare Filmora , there is a full-service shop called Filmstock that offers a ton of exciting media and after-effects for download. You may get free sound effects and short video clips to add to your videos on this website.
Edit Effect
Download films from the effect store or import them from your device and add them to your timeline in Filmora to modify your videos. Utilize the software’s drag-and-drop feature to modify the video.
Apply filters
Overlays and video filters are effects used to enhance the appeal of the video. Open the effects tab and select your desired filter to apply overlays and filters. To apply it, drag and drop it into the timeline’s video. Additionally, filters may be adjusted to change the time scale and transparency.
Export
Exporting a video to a variety of platforms comes after editing it. Filmora allows users to export video in a number of different file types, including mp4, Wmv, Mkv, ts, 3gp, f4v, Mkv, MOV, mpg, 3gp, GIF 4K, and mp3.
Conclusion
Motion blur is crucial when animating characters to move. Your videos require some blur to seem realistic when there is motion, particularly when there is quick movement. You have learnt how to include motion blur into your animation project from this guide. To add motion blur effects to your movie or animation, After Effects offers a wide variety of options. To inform you about this wonderful gesture, we utilized Filmora and Adobe After Effects and recommend Filmora for easiness and handy outputs.
Also read:
- 2024 Approved 15 Free Cinematic LUTs for Your Film
- In 2024, Top 31 Video Trimmers That Will Save You Time in Ediitng
- Updated Lets Learn How to Convert a Normal Video Into a Film Shot in the 1920S with Wondershare Filmora
- Updated A Complete Guide to Use Distortion Effect in Premiere Pro for 2024
- REVIEW Whats Top 10 Software to Make AI Upscaling Video
- How to Create A Freeze Frame Sequence in Video
- New 2024 Approved Everything That You Need to Know About Video Montages- Ideas, Techniqu
- Updated In 2024, Best 12 Best Freeze Frame Video Editing Examples
- 2024 Approved There Are Several Video Players that You Can Use to Watch Videos on Your PC. To Have a Better Experience Viewing Videos and Enhancing Them Across a Similar Platform, You Can Try Out VLC Media Player for PC
- HDR Photography How to Use HDR Mode on Your Android Devices for 2024
- Making Creative and Engaging Youtube Videos Is Now Easy with Several Tools. Now, YouTube Also Offers You Its Own Built-In Video Editor Through Which You Can Edit and Enhance the Video Quality for 2024
- 2024 Approved Steps to Remove Background Noise From Video Sony Vegas
- VSDC Free Video Editor Review 2023
- Updated Are You Eager to Discover All About Dynamic Videos? You Are in the Right Place because This Article Provides Insight Into Dynamic Video Collages
- Updated 2024 Approved Basic Introduction of LumaFusion Color Grading
- New You Are Planning to Convert an AVI to GIF Online but You Are Not Sure How? If You Are Looking for an Idea on How to Do It, You Have Come to the Right Place
- Updated How to Make After Effects Gifs
- In 2024, How to Change Video Thumbnail in Google Drive
- Updated In This Article, We Talk About How to Add Old Film Overlays and Other Effects to Turn the Videos or Photos More Vintage and with an Older Aspect. We Take a Look at Filmora in This Guide and Give Tips on How to Create Great Retro Videos
- Updated In 2024, Hitfilm Express Video Editor Review
- New In 2024, All Things About Adding Effects In Kinemaster
- 2024 Approved Frame Rates, Speed, and Wondershare Filmora An Overview
- New Different Ways to Crop TikTok Video in High-Quality
- In 2024, How to Download and Use Windows Movie Maker 10
- New 6 Free Tools To Radial Blur Photos Online for 2024
- Updated Renderforest Is a Great Online Editing Platform to Use for Many Video Creators. If You Want to Make an Intro Video for Your Channel or Daily Vlogs, You Can Follow This Article to Know More Details
- New In 2024, Vegas Pro - How to Download, Install and Use It?
- New In 2024, Detailed Tutorial to Rotate Videos in Cyberlink PowerDirector
- Updated How to Shoot Cinematic Footage From a Smartphone
- New Fast and Easy Method to Match Color in Photoshop
- Updated Read and Learn How to Convert a Slow-Motion Video to Normal in This Guide. Besides, Find the Best Desktop Solution to Adjust Video Speed Quickly and Easily
- New Doable Ways to Make Transparent Background in Procreate
- Updated Easiest Fix Included! Top 5 Ways to Convert HDR to SDR Videos for 2024
- Updated In 2024, Top 10 Old Film Overlays to Make Your Videos Look Vintage
- New In 2024, 3 Best Effects to Appear on Camera Made with Filmora
- New How to Perform Mask Tracking Discovering the Best Methods
- New How to Create Discord GIF Avatar in Depth Guide
- In 2024, Want to Add the Amazing Video Text Effects that You Generally See on Video Streaming Platforms? Use Filmora to Add Popular Video Text Effects Instantly
- In 2024, Guide on How To Change Your Apple ID Email Address On iPhone 7
- How to Transfer Photos from Infinix Smart 7 HD to Laptop Without USB | Dr.fone
- Prevent Cross-Site Tracking on Poco X6 Pro and Browser | Dr.fone
- In 2024, Different Methods To Unlock Your Apple iPhone SE (2022) | Dr.fone
- How To Bypass Vivo V30 FRP In 3 Different Ways
- In 2024, How to Transfer Data After Switching From Realme C53 to Latest Samsung | Dr.fone
- Full Guide How To Fix Connection Is Not Private on Motorola Moto G23 | Dr.fone
- How To Bypass iCloud Activation Lock On iPod and Apple iPhone 14 Plus The Right Way
- How to Change Netflix Location to Get More Country Version On Tecno Phantom V Flip | Dr.fone
- How to restore wiped music on Gionee F3 Pro
- In 2024, Set Your Preferred Job Location on LinkedIn App of your Xiaomi Redmi K70 | Dr.fone
- In 2024, About Lava Yuva 3 Pro FRP Bypass
- In 2024, Easy Ways to Manage Your Samsung Galaxy S24 Ultra Location Settings | Dr.fone
- In 2024, 5 Ways to Transfer Music from Tecno Spark 20 Pro to Other Android Devices Easily | Dr.fone
- Does find my friends work on Xiaomi Redmi Note 13 Pro 5G | Dr.fone
- In 2024, Full Guide to Catch 100 IV Pokémon Using a Map On Apple iPhone 12 Pro | Dr.fone
- 6 Methods to Protect Yourself from Location Tracking on Apple iPhone 12 Pro Max | Dr.fone
- Full Guide to Fix iToolab AnyGO Not Working On Nokia C12 Pro | Dr.fone
- How does the stardust trade cost In pokemon go On OnePlus Ace 2V? | Dr.fone
- How To Pause Life360 Location Sharing For OnePlus Nord N30 5G | Dr.fone
- In 2024, How To Remove Screen Lock PIN On Vivo S17 Pro Like A Pro 5 Easy Ways
- How to Screen Mirroring Poco M6 Pro 4G? | Dr.fone
- Undelete lost contacts from 150 (2023).
- In 2024, Latest way to get Shiny Meltan Box in Pokémon Go Mystery Box On Motorola Edge 40 Pro | Dr.fone
- Best Samsung Galaxy M54 5G Pattern Lock Removal Tools Remove Android Pattern Lock Without Losing Data
- 5 Solutions For Poco M6 Pro 5G Unlock Without Password
- In 2024, Various Methods to Transfer Pictures from Apple iPhone 12 to PC | Dr.fone
- A Detailed Guide to Making Your Pictures Speak
- In 2024, iPhone 13 mini Backup Password Never Set But Still Asking? Heres the Fix | Dr.fone
- Complete Tutorial to Use GPS Joystick to Fake GPS Location On Vivo T2 5G | Dr.fone
- In 2024, How To Unlock SIM Cards Of OnePlus 12R Without PUK Codes
- Title: New Adobe After Effects Review for 2024
- Author: Chloe
- Created at : 2024-04-24 07:08:30
- Updated at : 2024-04-25 07:08:30
- Link: https://ai-editing-video.techidaily.com/new-adobe-after-effects-review-for-2024/
- License: This work is licensed under CC BY-NC-SA 4.0.
