
New Adobe Premiere Pro Rec 709 LUTs Finding The Best Choices
Adobe Premiere Pro Rec 709 LUTs: Finding The Best Choices
Different styles of LUTs exist because each style serves a specific purpose in color correction and grading. LUTs are designed to replicate various cinematic styles and to change lighting conditions. By using different styles of LUTs, you can effortlessly achieve the desired color grading for your media. There are many types of LUTs to download, each with unique color composition.
However, Rec 709 LUT is a type of LUT commonly used in video editing software like Premiere Pro. Additionally, this LUT ensures that your video appears accurate and consistent on various HD screens. Moreover, it helps maintain the right balance of colors, contrast, and brightness. Furthermore, Rec 709 LUT Premiere Pro is suitable for broadcast, web streaming, or other HD content platforms.
Part 1: What are the Benefits of Using Premiere Pro Rec 709 LUTs in Video Editing?
Do you know the advantages of using Rec 709 Premiere Pro LUTs? Using Rec 709 LUTs in video editing with software like Adobe Premiere Pro can offer several benefits:
Color Accuracy
Rec 709 is the color space standard used for broadcast and video production. Furthermore, applying Rec 709 LUTs ensures accurate color representation of your media. Additionally, it maintains consistency and accuracy across different devices and platforms. It helps to achieve a standardized color look that conforms to industry standards.
Efficient Color Correction
Rec 709 LUTs streamline your color correction process. They provide a starting point for adjusting your videos’ color balance, contrast, and saturation. Moreover, if you apply this LUT at the start of your project, you can bring your video within the acceptable color range. Eventually, it will save you time and effort in the editing process.
Previewing Final Look
When you apply these LUTs, you can preview how your footage will look after color grading. Similarly, it helps you visualize your content to make changes for further adjustments. In addition, it also allows you to assess the tone and mood of the video in real-time.
Consistency and Compatibility
Such LUTs promote consistency across different cameras, lighting conditions, and sources. When working with multiple sources, you can apply this LUT for a consistent look. Furthermore, these LUTs also ensure compatibility with various display devices and platforms. It makes this tool compatible with different platforms and software.
Creative Control
Furthermore, these LUTs also serve as a starting point for further creative grading. You can layer additional adjustments on top of the LUT. In this way, you can achieve a specific artistic style to create a unique look for your project. Additionally, Rec 709 LUT creates a foundation for you to color-grade your content creatively.
Speeding Up Workflow
By using Rec 709 LUTs as a starting point, you can speed up your editing workflow. Using these LUTs, you don’t need to adjust each clip individually manually. In addition, you can apply a LUT to multiple clips simultaneously to color-correct your media files. Moreover, it saves you time when working on larger video projects.
Empower your videos with a new mood using different LUTs. Filmora now offers 100+ top-quality 3D LUTs cover a broad range of scenarios. Transform your videos with Filmora’s powerful 3D LUTs.
Apply LUT on Videos Apply LUT on Videos Learn More


Part 2: How to Use LUTs in Premiere Pro: A Guide
You can apply your Rec 709 LUT for Premiere Pro without needing any prior experience. All you have to do is to follow these simple steps to apply your favorite LUT.
Step 1: To apply a LUT using Adobe Premiere Pro, import your video by clicking the “File” button and selecting the “Import” option. You can also click on “Import media to start” in the Project Tab. Once your file is imported, drag the clip onto the timeline and move into the “Color” workspace.

Step 2: In continuation, click the “Adjustment Layer” button in the Project tab. Select your adjustment layer and drop it on top of your video clip in the timeline. Click on the layer and go to the “Video Effects” in the Effects option in the Project window. Then, navigate to “Color Correction” and select “Lumetri Color.”

Step 3: In the new window that appears, find the “Input LUT” option under the Basic Correction tab. Browse the LUT you want to apply to your video. Additionally, you can explore more creative LUTs by going to the “Creative” tab in the Lumetri Color window. In the “Look” section, browse for different creative LUTs for your video. You can adjust the intensity of the selected LUT using the slider.

Part 3: The Top Notch Premiere Pro LUTs Rec 709
There are many Premiere Pro Rec 709 LUTs available that you can download and purchase. In the list below are some of the best Rec 709 LUTs you can use.
1. LOOK Creative LUT Pack
The LOOK Creative LUT Pack is a collection of 10 creative LUTs. It includes a range of LUTs, including some popular ones like teal and orange and old noir. These LUTs provide a quick and easy way to add a specific color tone or mood to your footage. In addition to the basic LUTs, it also offers unique and creative options. For example, you’ll find LUTs like Subtle Sci-Fi, Grunge Green, and others.

2. Cinematic LUTs V2
Cinematic LUTs V2 is a pack of modern cinematic-style LUTs. This incredible LUTs pack is designed to give your videos a cinematic touch. With this pack, you get access to 10 different cinematic LUTs to color grade your videos. Furthermore, you can use these LUTs for your LOG footage as well. Additionally, with these LUTs, you can add richness and depth to your videos.

3. NATURAL Rec709
The NATURAL Rec709 LUT pack offers 17 different styles of LUTs. It includes ones inspired by Tobacco, Crunchy Gold, and Black & White filters. These LUTs can enhance the colors and tones in your videos, providing a natural look. Furthermore, you can customize the intensity of the LUTs. Moreover, each LUT in this pack offers a unique color scheme for your videos.

4. 35 Free LUTs for Color Grading Videos
It is an amazing LUT pack that offers you a variety of 35 different styles of LUTs. With these LUTs, you can achieve a vintage look or a cinematic vibe for your videos. These LUTs can work perfectly with Rec 709 footage with accurate and vibrant colors. Furthermore, this pack is compatible with different software, including Premiere Pro.

5. S-Log 3 to Rec.709 LUT
The S-Log3 to Rec.709 LUT pack is designed to enhance your footage by adding vibrance. Applying this LUT boosts saturation, giving your video a more natural and realistic look. Additionally, you can bring out the full potential of your videos captured in S-Log3 gamma. Moreover, this LUT amplifies the colors and is compatible with the Rec.709 color space.

6. DJI OSMO POCKET Creative LUTs Pack
The DJI Osmo Pocket Creative LUTs Pack offers a collection of various creative LUTs. You can choose from different styles and color overlays for your media files. Moreover, you can use this LUT pack for both pictures and videos. In addition to this, it is also compatible with popular editing software. Furthermore, this tool pack supports both .3dl and .cube formats.

7. Blockbuster HLG And Standard LUTs
Another amazing pack of LUTs that you can use is Blockbuster HLG and Standard LUTs. This pack includes 21 Rec 709 LUTs with unique color toning and style. Furthermore, applying these LUTs will make your color grading more professional. Additionally, you can get rich and deep tones for your digital medial files. Similarly, you can change the feel of your content in a more professional style.

Conclusion
In conclusion, LUTs are perfect tools to enhance your media by altering its colors and tones. Different styles of LUTs cater to various creative needs. Furthermore, LUTs allow you to achieve specific looks and moods for your digital content. Moreover, the Rec 709 LUT Premiere Pro ensures your video appears accurate and consistent on HD displays. Additionally, you can achieve professional-grade results as well.
To add more LUTs on video, you can try Wondershare Filmora !
Add LUTs on Video For Win 7 or later(64-bit)
Add LUTs on Video For macOS 10.14 or later
Apply LUT on Videos Apply LUT on Videos Learn More
Part 2: How to Use LUTs in Premiere Pro: A Guide
You can apply your Rec 709 LUT for Premiere Pro without needing any prior experience. All you have to do is to follow these simple steps to apply your favorite LUT.
Step 1: To apply a LUT using Adobe Premiere Pro, import your video by clicking the “File” button and selecting the “Import” option. You can also click on “Import media to start” in the Project Tab. Once your file is imported, drag the clip onto the timeline and move into the “Color” workspace.
Step 2: In continuation, click the “Adjustment Layer” button in the Project tab. Select your adjustment layer and drop it on top of your video clip in the timeline. Click on the layer and go to the “Video Effects” in the Effects option in the Project window. Then, navigate to “Color Correction” and select “Lumetri Color.”
Step 3: In the new window that appears, find the “Input LUT” option under the Basic Correction tab. Browse the LUT you want to apply to your video. Additionally, you can explore more creative LUTs by going to the “Creative” tab in the Lumetri Color window. In the “Look” section, browse for different creative LUTs for your video. You can adjust the intensity of the selected LUT using the slider.
Part 3: The Top Notch Premiere Pro LUTs Rec 709
There are many Premiere Pro Rec 709 LUTs available that you can download and purchase. In the list below are some of the best Rec 709 LUTs you can use.
1. LOOK Creative LUT Pack
The LOOK Creative LUT Pack is a collection of 10 creative LUTs. It includes a range of LUTs, including some popular ones like teal and orange and old noir. These LUTs provide a quick and easy way to add a specific color tone or mood to your footage. In addition to the basic LUTs, it also offers unique and creative options. For example, you’ll find LUTs like Subtle Sci-Fi, Grunge Green, and others.
2. Cinematic LUTs V2
Cinematic LUTs V2 is a pack of modern cinematic-style LUTs. This incredible LUTs pack is designed to give your videos a cinematic touch. With this pack, you get access to 10 different cinematic LUTs to color grade your videos. Furthermore, you can use these LUTs for your LOG footage as well. Additionally, with these LUTs, you can add richness and depth to your videos.
3. NATURAL Rec709
The NATURAL Rec709 LUT pack offers 17 different styles of LUTs. It includes ones inspired by Tobacco, Crunchy Gold, and Black & White filters. These LUTs can enhance the colors and tones in your videos, providing a natural look. Furthermore, you can customize the intensity of the LUTs. Moreover, each LUT in this pack offers a unique color scheme for your videos.
4. 35 Free LUTs for Color Grading Videos
It is an amazing LUT pack that offers you a variety of 35 different styles of LUTs. With these LUTs, you can achieve a vintage look or a cinematic vibe for your videos. These LUTs can work perfectly with Rec 709 footage with accurate and vibrant colors. Furthermore, this pack is compatible with different software, including Premiere Pro.
5. S-Log 3 to Rec.709 LUT
The S-Log3 to Rec.709 LUT pack is designed to enhance your footage by adding vibrance. Applying this LUT boosts saturation, giving your video a more natural and realistic look. Additionally, you can bring out the full potential of your videos captured in S-Log3 gamma. Moreover, this LUT amplifies the colors and is compatible with the Rec.709 color space.
6. DJI OSMO POCKET Creative LUTs Pack
The DJI Osmo Pocket Creative LUTs Pack offers a collection of various creative LUTs. You can choose from different styles and color overlays for your media files. Moreover, you can use this LUT pack for both pictures and videos. In addition to this, it is also compatible with popular editing software. Furthermore, this tool pack supports both .3dl and .cube formats.
7. Blockbuster HLG And Standard LUTs
Another amazing pack of LUTs that you can use is Blockbuster HLG and Standard LUTs. This pack includes 21 Rec 709 LUTs with unique color toning and style. Furthermore, applying these LUTs will make your color grading more professional. Additionally, you can get rich and deep tones for your digital medial files. Similarly, you can change the feel of your content in a more professional style.
Conclusion
In conclusion, LUTs are perfect tools to enhance your media by altering its colors and tones. Different styles of LUTs cater to various creative needs. Furthermore, LUTs allow you to achieve specific looks and moods for your digital content. Moreover, the Rec 709 LUT Premiere Pro ensures your video appears accurate and consistent on HD displays. Additionally, you can achieve professional-grade results as well.
To add more LUTs on video, you can try Wondershare Filmora !
Add LUTs on Video For Win 7 or later(64-bit)
Add LUTs on Video For macOS 10.14 or later
How to Zoom Picture in Picture [Easy Solution]
Zoom is one of the greatest options on the market for video conferencing. It doesn’t matter whether you use it at home or in an office environment; it will quickly link the team members. One of the most popular video conferencing programs is Zoom. When in-person meetings aren’t feasible, it enables you to communicate electronically with employees, and it’s been a major popularity for social occasions as well. In case you’re not acquainted, picture-in-picture mode enables you to watch videos from one app while using your PC normally. The movie will keep playing in a tiny thumbnail window so that two applications may work simultaneously on your smartphone.
You may create virtual audio and video conferences, webinars, live chats, screen sharing, and other collaboration tools with Zoom, a cloud-based video communications solution. Zoom’s most recent iPhone apps let you dismiss a Zoom Meeting while keeping the Zoom video call open in a picture-in-picture mode. To join a Zoom conference, you don’t need an account, and because the software works with Mac, Windows, Linux, iOS, and Android devices, nearly anybody can use it. Since using Zoom’s picture-in-picture mode is the same as using it with other applications, you shouldn’t have any trouble if you often use PiP mode. Here are the top 4 methods you can refer to picture in picture in Zoom.
Method 1: Swap Shared Screen with Video
You may move the Zoom Meeting PiP window across the screen, change the thumbnail’s size, and utilize other applications while it remains open, just like any other picture-in-picture window. Before leaving the meeting if you’re not giving a presentation or speaking, you should definitely mute Zoom on your iPhone to prevent noises from your typing or other activities from entering the conversation. Additionally, keep in mind to switch off the camera if you’re engaged in something distracting, at least for the duration of your activity. To reopen the Zoom Meeting and go back to the Zoom app, touch the Picture-in-Picture mode pane. Here are some actions to keep in mind:
Steps to Swap Shared Screen for Zoom Picture in Picture
Step1Launch or enter a Zoom meeting. Keep the video on your main screen at all times, closing the chat and participant list as necessary.
Step2Tap the Home button or swipe up from the bottom of the screen.
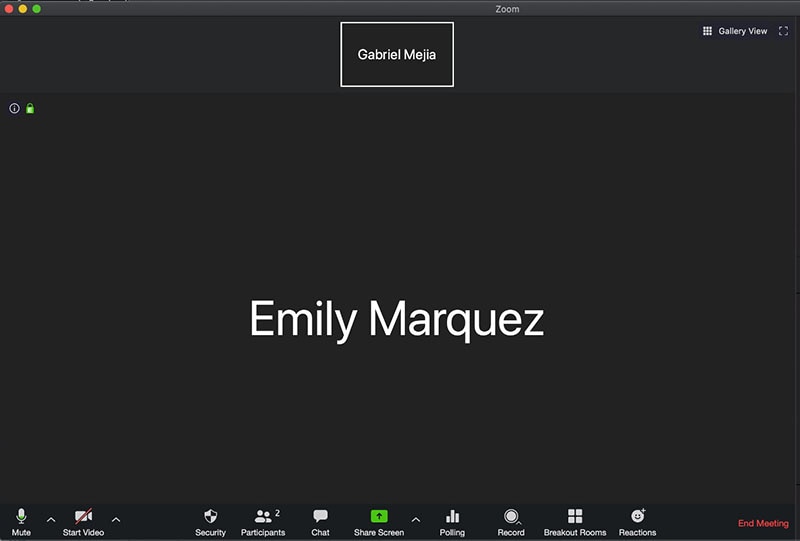
Step3Picture-in-picture mode should be activated automatically throughout the meeting.
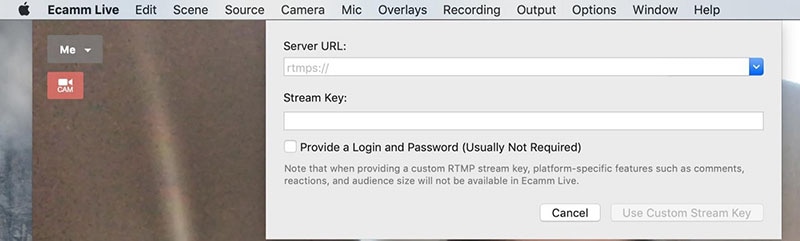
Method 2: Use Ecamm Live
Live streaming is a fantastic way to provide original content and stand out from the crowd. To prevent any operational difficulties, a more sophisticated virtual camera is absolutely necessary. You now have magical abilities thanks to Ecamm virtual cam, including the ability to add text, animations, observe a live stream, post viewer comments, play music, share your screen, use sound effects, and many more. It offers the Ecamm live virtual camera zoom function for video conferences so you may improve your Zoom discussions by sending output to other PC programs. You could see a quality difference between what you view in Ecamm Live and what your Zoom visitors see while utilizing virtual camera with Zoom. The quality of a Zoom video stream cannot be improved using Ecamm Live. Simply broadcast the Zoom app using Ecamm Live’s Screen Share mode to utilize Ecamm Live for picture-in-picture virtual presentations on Zoom.
Steps to Use Ecamm Live for Zoom Picture in Picture
Step1Download the Ecamm Application
Install Ecamm Live on your computer, then choose the center button in the source switcher at the top of the main window to enter Screen Share mode.
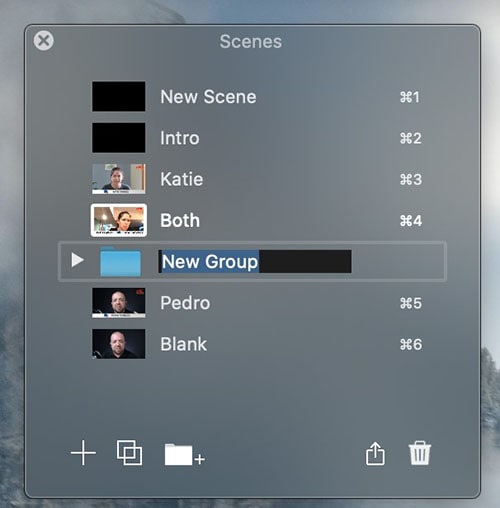
Step2Create Scenes
With the use of Ecamm Live’s Virtual Camera and Virtual Mic capabilities, you may transfer Ecamm Live’s output to almost any other Mac software, including Zoom. After setting, create the scenes in the program to quickly switch between various cameras.
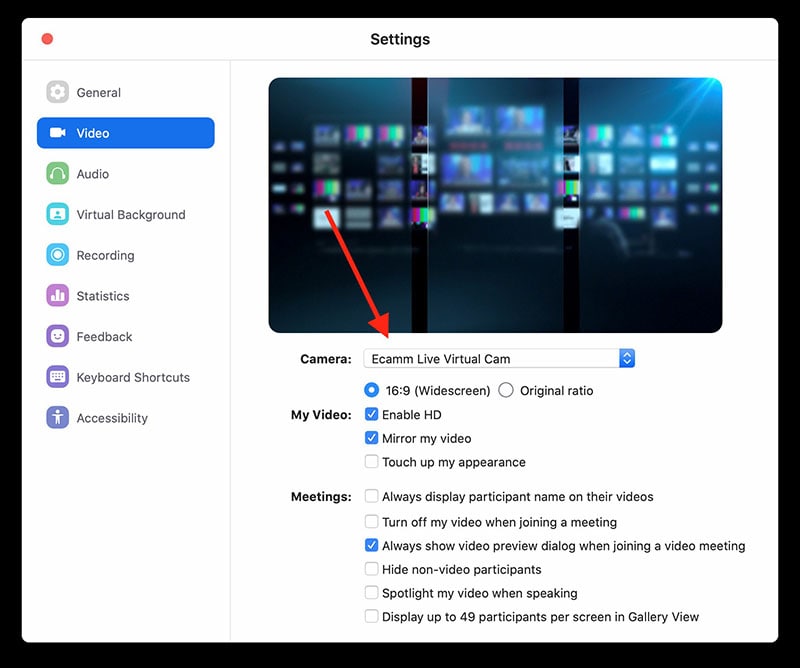
Step3Select Ecamm on Zoom
You may also utilize Ecamm Live’s Sharing Window capability to feed Ecamm Live output into Zoom. Simply activate the virtual camera, and then, as seen below, choose Ecamm Live Virtual Camera in Zoom’s video settings:
Step4Begin Your Presentation
Finally, click the PC share option to show your Zoom app to your audience. To conceal a picture-in-picture window that displays your camera image while live streaming, click the PIP button.
Method 3: Use Filmora as A Switcher
Zoom has solutions that will make your meetings simple and secure. It gives your remote staff a secure setting to interact and share crucial information. Ideal control over your film and configuration options to make them aesthetically pleasing is something Zoom lacks. To overcome the drawbacks and improve the quality of your online meetings, you may take use of the capabilities of Zoom in conjunction with Filmora. Filmora was developed with the intention of easing user burden and supporting applications. Though complicated, the program is simple to use. The perhaps most popular web information that may be saved on your computer can be easily captured by just angling your screen. For more information on how to record and save your Zoom for picture in picture, see the guide here.
To broadcast a variety of situations in a grid style, you may also combine inputs from your camera, microphone, computer screen, and web conferencing software. Wondershare -the finest desktop application for recording a Zoom Picture in Picture meeting- is Filmora. With the majority of cameras, this app’s screen recording capability is both user-friendly and feature-rich. Here, users may either choose a particular region to record or record their zoom meetings in Fullscreen mode. Additionally, you may choose the camera and input microphone that will be used while recording a video overlay. The addition of relevant comments like phrases, lines, drawings, symbols, etc. is also possible by users. The detailed procedure for recording a Zoom Picture-in-Picture meeting using a Filmora recorder is given below:
Free Download For Win 7 or later(64-bit)
Free Download For macOS 10.14 or later
Step1Download and Install Filmora Zoom Recorder
You may find both types, i.e., the most recent Windows and Mac versions, by first visiting the usual website and then using this Zoom. Install the program on your computer once you download it to get started.

Step2Initiate Filmora Recorder
After finishing the installation process for this Reside Zoom recorder, launch it from the main menus and choose “New Task” when prompted. It will take you to Filmora’s streamlined user interface where you can immediately start filming. Then, as seen in the picture below, you may adjust the screen recording using your preferred camera, microphone, and system settings:

Step3Begin/End the Recording
When you are through configuring this Zoom picture in picture recorder, click the Record button, and it will immediately begin recording your customized screen. Similar to that, after you’re done recording, click Stop, which will take you inside the video editor where you may edit your recorded information.

Step4Share Recordings
When you have everything ready, export your recording right away. After you’re done with the editing part, you do have a lot of options to choose from when displaying your screen capture and webcam stories. To do so, click the Export button in the item user interface’s top-right corner as shown below:
You may easily choose your preferred way to share from there if you choose to upload your work of zoom picture in picture recordings straight to the YouTube or other reputable websites right now. Simply refer to the Sharing plug-ins in the Export window to find out more.
Method 4: Use Hardware Switcher ATEM Mini Pro
Particularly on Zoom, the ATEM Mini is excellent for video conferences. The Blackmagic ATEM Mini is a USB video interface and HDMI switcher. Four HDMI inputs, or four cameras that can produce an HDMI video stream, may be switched between live. This device integrates Zoom meetings fast and makes it incredibly simple to set up your audio, a sometimes-forgotten aspect of video broadcasting. This sophisticated video switcher promises to offer broadcast-quality multi-camera footage with ease and is targeted at gamers, streamers, and online reviewers. It connects to a computer via a USB-C to USB-A connection. The video feed may then be sent to distant colleagues via a number of well-liked videos streaming services, including Zoom.
Step1The ATEM Mini Pro is a basic control switcher with pro-broadcast performance. Your ATEM Mini Pro is really simple to set up. You can connect a full setup with several cameras and microphones in around 30 minutes.
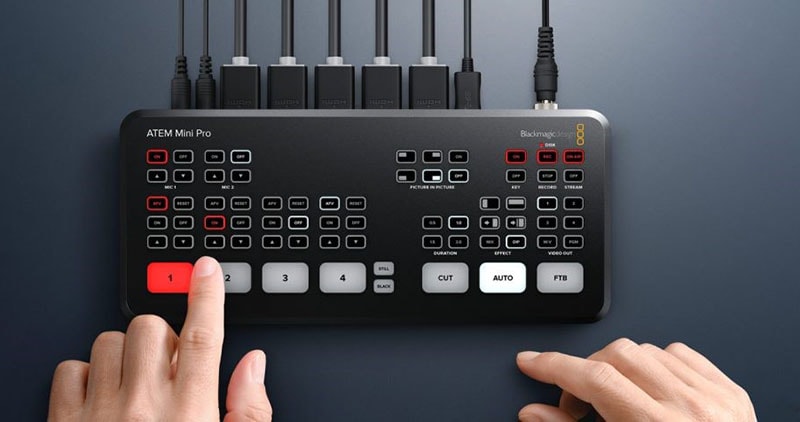
Step2You may connect several camera sources to the inputs of the ATEM Mini Pro. The 4 HDMI inputs each have a separate standards converter built in. As a result, the ATEM Mini can automatically convert inputs that are 1080p, 1080i, or 720p to the switcher’s video standard. You may make quick changes between inputs with no latency or disruption to your video output by using the ergonomic buttons.
Step3As a third option, Zoom offers ATEM Mini, which enables you to switch between several inputs, add custom visuals, and adjust audio levels all from a single interface. To improve the quality of your production, you may even use smooth transitions like wipes or fades. You can even test any input stream before making it live.
Conclusion
When you are doing a Zoom Meeting and share your screen, only to discover that what the other attendees see is a split screen with your material and the other Attendee cams, it is highly annoying. You may move the Zoom Meeting PiP window across the screen, change the thumbnail’s size, and utilize other applications while it remains open, just like any other picture-in-picture window. Someone must be sharing information in the Zoom conference for the Picture in Picture, or “Split Screen” option, to be active. We’ve listed the top techniques for doing it effectively above. To do this work without difficulty, use them as your guide.
Free Download For macOS 10.14 or later
Step1Download and Install Filmora Zoom Recorder
You may find both types, i.e., the most recent Windows and Mac versions, by first visiting the usual website and then using this Zoom. Install the program on your computer once you download it to get started.
Step2Initiate Filmora Recorder
After finishing the installation process for this Reside Zoom recorder, launch it from the main menus and choose “New Task” when prompted. It will take you to Filmora’s streamlined user interface where you can immediately start filming. Then, as seen in the picture below, you may adjust the screen recording using your preferred camera, microphone, and system settings:
Step3Begin/End the Recording
When you are through configuring this Zoom picture in picture recorder, click the Record button, and it will immediately begin recording your customized screen. Similar to that, after you’re done recording, click Stop, which will take you inside the video editor where you may edit your recorded information.
Step4Share Recordings
When you have everything ready, export your recording right away. After you’re done with the editing part, you do have a lot of options to choose from when displaying your screen capture and webcam stories. To do so, click the Export button in the item user interface’s top-right corner as shown below:
You may easily choose your preferred way to share from there if you choose to upload your work of zoom picture in picture recordings straight to the YouTube or other reputable websites right now. Simply refer to the Sharing plug-ins in the Export window to find out more.
Method 4: Use Hardware Switcher ATEM Mini Pro
Particularly on Zoom, the ATEM Mini is excellent for video conferences. The Blackmagic ATEM Mini is a USB video interface and HDMI switcher. Four HDMI inputs, or four cameras that can produce an HDMI video stream, may be switched between live. This device integrates Zoom meetings fast and makes it incredibly simple to set up your audio, a sometimes-forgotten aspect of video broadcasting. This sophisticated video switcher promises to offer broadcast-quality multi-camera footage with ease and is targeted at gamers, streamers, and online reviewers. It connects to a computer via a USB-C to USB-A connection. The video feed may then be sent to distant colleagues via a number of well-liked videos streaming services, including Zoom.
Step1The ATEM Mini Pro is a basic control switcher with pro-broadcast performance. Your ATEM Mini Pro is really simple to set up. You can connect a full setup with several cameras and microphones in around 30 minutes.
Step2You may connect several camera sources to the inputs of the ATEM Mini Pro. The 4 HDMI inputs each have a separate standards converter built in. As a result, the ATEM Mini can automatically convert inputs that are 1080p, 1080i, or 720p to the switcher’s video standard. You may make quick changes between inputs with no latency or disruption to your video output by using the ergonomic buttons.
Step3As a third option, Zoom offers ATEM Mini, which enables you to switch between several inputs, add custom visuals, and adjust audio levels all from a single interface. To improve the quality of your production, you may even use smooth transitions like wipes or fades. You can even test any input stream before making it live.
Conclusion
When you are doing a Zoom Meeting and share your screen, only to discover that what the other attendees see is a split screen with your material and the other Attendee cams, it is highly annoying. You may move the Zoom Meeting PiP window across the screen, change the thumbnail’s size, and utilize other applications while it remains open, just like any other picture-in-picture window. Someone must be sharing information in the Zoom conference for the Picture in Picture, or “Split Screen” option, to be active. We’ve listed the top techniques for doing it effectively above. To do this work without difficulty, use them as your guide.
Top 5 Free Online Video Filter Editors
In the era of digital storytelling, everyone desires to make their content stand out. Applying video filters is a surefire way to enhance your videos’ mood, style, and overall appeal.
With many video filter editors available online, choosing the right one can be daunting. Worry not, for we’ve scoured the internet to bring you the top 5 free online video filter editors to jazz up your content. Let’s dive in!
Part 1: Top 5 Free Online Video Filter Editors
Veed.io

Veed.io is more than just an online video editor. This platform is designed with the user in mind, ensuring a hassle-free experience as they navigate its diverse video editing tools. One of the standout features is, undoubtedly, its video filter capabilities.
Is the product free?
Veed.io offers a robust free version, letting creators jump in without any initial investment. However, for those seeking more advanced features and capabilities, Veed.io has premium plans available, starting at a competitive price of $12/month.
Free trial for video filter function?
One of the commendable aspects of Veed.io is its commitment to transparency. Users can fully experience the video filter function without spending a dime, ensuring they know exactly what they’re getting before opting for paid plans.
Advantages: Even those new to video editing can quickly find their way around. The platform’s design is clean and straightforward and prioritizes user experience. Videos are processed promptly, ensuring you get your polished content out quickly.
Disadvantages: The free version watermarks the videos.
Clideo

Clideo is a multifaceted online video editing solution that caters to a broad spectrum of editing needs.
Whether you’re looking to merge clips, resize videos for various platforms, or infuse creativity with video filters, Clideo offers a comprehensive toolkit.
Is the product free?
It has a free version with basic functionalities. Paid plans start at $9/month.
Free trial for video filter function?
Yes, the filter function can be tested without any charges.
Advantages : Simple to use, no software installation required.
Disadvantages : Limited filters in the free version.
Flixier

Flixier emerges as a dynamic online video editing platform, aiming to bridge the gap between advanced editing tools and user accessibility.
Catering to novice editors and seasoned professionals, it offers tools that effortlessly combine efficiency with creativity.
Is the product free?
Flixier provides a free tier. For advanced features, paid plans start at $10/month.
Free trial for video filter function?
The video filter function is available in the free tier.
Advantages: Collaborative editing features quick export times.
Disadvantages: Slightly steeper learning curve for beginners.
Flexclip

Flexclip positions itself as a holistic online video editor designed with both beginners and advanced users in mind.
Whether you’re crafting a short promotional clip, a personal vlog, or an extensive documentary, Flexclip provides the tools and templates to make the process seamless.
Is the product free?
There’s a free version available. Upgraded plans are priced from $4.99/month.
Free trial for video filter function?
Absolutely, users can enjoy filter functions for free.
Advantages: Rich video templates and intuitive design.
Disadvantages: Limited advanced editing options in the free version.
Kapwing

KAPWING has swiftly carved its niche in the world of online video editing, offering a unique blend of simplicity and versatility. Beyond just a video editor, KAPWING is a creative toolkit that empowers users to bring their video visions to life with ease.
Is the product free?
Kapwing provides a basic free version. For premium features, plans start at $20/month.
Free trial for video filter function?
The video filter function is accessible in the free version.
Advantages: No watermarks, user-friendly, wide array of tools.
Disadvantages: Some advanced filters are limited to premium users.
Part 2: Best Alternatives
When it comes to alternative video filter editors, Filmora undoubtedly stands out. Although it’s not exclusively an online tool, Filmora has firmly established its reputation in the digital video editing community, and here’s why:
- Extensive Library of Video Filters : One of Filmora’s shining points is its rich, extensive library of video filters. From adding a touch of nostalgia with sepia tones to creating blockbuster cinematic vibes with dramatic contrasts, Filmora ensures every creative vision can be realized.
Video Filter Editor
Create AI Filter For Win 7 or later(64-bit)
Create AI Filter For macOS 10.14 or later
- User-friendly Interface : While its feature set is extensive, beginners need not be intimidated. Filmora offers an intuitive drag-and-drop interface, making the application of filters a seamless process. This ease of use ensures that even the most novice of editors can achieve professional-looking results in no time.
- Customizable Filters : Filmora allows users to tweak and customize effects to their liking beyond the preset filters. This feature gives creators the flexibility to craft unique visuals that align with their brand or story’s essence.
- Regular Updates : Filmora continuously updates its software, adding new filters and features. This means users can always stay ahead of the curve and incorporate the latest trends into their videos.
- Pricing and Value : While Filmora isn’t free, the value it offers makes the investment worthwhile. The tool offers various pricing plans designed for both individuals and businesses. Given the quality and diversity of its video filters, many content creators view it as a justifiable expense.
- Community and Tutorials : Filmora boasts a vibrant community of users. Their official website and channels regularly release tutorials, guiding users on the various functionalities, ensuring you make the most out of the software.
Part 3: Summary
The digital space is flooded with content, making it crucial for creators to ensure their videos capture attention and engage viewers. Utilizing video filters can significantly boost the visual appeal of your content.
With platforms like Veed.io, Clideo, Flixier, Flexclip, and KAPWING, filtering videos is now more accessible than ever.
And for those willing to invest a little, Filmora stands as a robust alternative. So, explore these platforms, harness the power of video filters, and watch your content shine like never before!
Part 1: Top 5 Free Online Video Filter Editors
Veed.io
Veed.io is more than just an online video editor. This platform is designed with the user in mind, ensuring a hassle-free experience as they navigate its diverse video editing tools. One of the standout features is, undoubtedly, its video filter capabilities.
Is the product free?
Veed.io offers a robust free version, letting creators jump in without any initial investment. However, for those seeking more advanced features and capabilities, Veed.io has premium plans available, starting at a competitive price of $12/month.
Free trial for video filter function?
One of the commendable aspects of Veed.io is its commitment to transparency. Users can fully experience the video filter function without spending a dime, ensuring they know exactly what they’re getting before opting for paid plans.
Advantages: Even those new to video editing can quickly find their way around. The platform’s design is clean and straightforward and prioritizes user experience. Videos are processed promptly, ensuring you get your polished content out quickly.
Disadvantages: The free version watermarks the videos.
Clideo
Clideo is a multifaceted online video editing solution that caters to a broad spectrum of editing needs.
Whether you’re looking to merge clips, resize videos for various platforms, or infuse creativity with video filters, Clideo offers a comprehensive toolkit.
Is the product free?
It has a free version with basic functionalities. Paid plans start at $9/month.
Free trial for video filter function?
Yes, the filter function can be tested without any charges.
Advantages : Simple to use, no software installation required.
Disadvantages : Limited filters in the free version.
Flixier
Flixier emerges as a dynamic online video editing platform, aiming to bridge the gap between advanced editing tools and user accessibility.
Catering to novice editors and seasoned professionals, it offers tools that effortlessly combine efficiency with creativity.
Is the product free?
Flixier provides a free tier. For advanced features, paid plans start at $10/month.
Free trial for video filter function?
The video filter function is available in the free tier.
Advantages: Collaborative editing features quick export times.
Disadvantages: Slightly steeper learning curve for beginners.
Flexclip
Flexclip positions itself as a holistic online video editor designed with both beginners and advanced users in mind.
Whether you’re crafting a short promotional clip, a personal vlog, or an extensive documentary, Flexclip provides the tools and templates to make the process seamless.
Is the product free?
There’s a free version available. Upgraded plans are priced from $4.99/month.
Free trial for video filter function?
Absolutely, users can enjoy filter functions for free.
Advantages: Rich video templates and intuitive design.
Disadvantages: Limited advanced editing options in the free version.
Kapwing
KAPWING has swiftly carved its niche in the world of online video editing, offering a unique blend of simplicity and versatility. Beyond just a video editor, KAPWING is a creative toolkit that empowers users to bring their video visions to life with ease.
Is the product free?
Kapwing provides a basic free version. For premium features, plans start at $20/month.
Free trial for video filter function?
The video filter function is accessible in the free version.
Advantages: No watermarks, user-friendly, wide array of tools.
Disadvantages: Some advanced filters are limited to premium users.
Part 2: Best Alternatives
When it comes to alternative video filter editors, Filmora undoubtedly stands out. Although it’s not exclusively an online tool, Filmora has firmly established its reputation in the digital video editing community, and here’s why:
- Extensive Library of Video Filters : One of Filmora’s shining points is its rich, extensive library of video filters. From adding a touch of nostalgia with sepia tones to creating blockbuster cinematic vibes with dramatic contrasts, Filmora ensures every creative vision can be realized.
Video Filter Editor
Create AI Filter For Win 7 or later(64-bit)
Create AI Filter For macOS 10.14 or later
- User-friendly Interface : While its feature set is extensive, beginners need not be intimidated. Filmora offers an intuitive drag-and-drop interface, making the application of filters a seamless process. This ease of use ensures that even the most novice of editors can achieve professional-looking results in no time.
- Customizable Filters : Filmora allows users to tweak and customize effects to their liking beyond the preset filters. This feature gives creators the flexibility to craft unique visuals that align with their brand or story’s essence.
- Regular Updates : Filmora continuously updates its software, adding new filters and features. This means users can always stay ahead of the curve and incorporate the latest trends into their videos.
- Pricing and Value : While Filmora isn’t free, the value it offers makes the investment worthwhile. The tool offers various pricing plans designed for both individuals and businesses. Given the quality and diversity of its video filters, many content creators view it as a justifiable expense.
- Community and Tutorials : Filmora boasts a vibrant community of users. Their official website and channels regularly release tutorials, guiding users on the various functionalities, ensuring you make the most out of the software.
Part 3: Summary
The digital space is flooded with content, making it crucial for creators to ensure their videos capture attention and engage viewers. Utilizing video filters can significantly boost the visual appeal of your content.
With platforms like Veed.io, Clideo, Flixier, Flexclip, and KAPWING, filtering videos is now more accessible than ever.
And for those willing to invest a little, Filmora stands as a robust alternative. So, explore these platforms, harness the power of video filters, and watch your content shine like never before!
How to Save As MP4 File on Windows Movie Maker?
If you are a Windows user and you are looking for a free video editor, Windows Movie Maker is a great application. Windows Movie Maker comes pre-installed in older Windows versions though it has been discontinued in the latest Windows versions. However, if you are using the latest Windows versions, you can install MiniTool Movie Maker instead. If you are editing your video in Windows Movie Maker, you should know how to save your video in MP4 format.
MP4 file format is the most used video file format, and hence, you should know how to save Windows movie maker mp4 file. Otherwise, you won’t be able to play your video on regular video players on different devices. This is because not all video players support the native Windows Movie Maker file format, but they support MP4 format as it is very common. In this article, we will illustrate the steps for Windows Movie Maker how to save as MP4 file.
Part 1. Steps to Save Windows Movie Maker Video as MP4
There are two scenarios you may come across while dealing with Windows Movie Maker MP4 situation. First, you might be editing your video on Windows Movie Maker, and you want to save it in MP4 format. Second, you might have received a video file saved in the native Windows Movie Maker file format and you want to convert it to MP4 file format. In the second scenario, you must opt for a Windows Movie Maker to MP4 converter such as VideoConverterFactory.
For the first scenario where you are editing your video on Windows Movie Maker, the solution is simple. This is because the default file format to save a video file on Windows Movie Maker is MP4. There are other options available such as WMV, but if you opt for the recommended settings, you can easily save your video file in MP4. Here are the steps for Windows Movie Maker to mp4 file format.
Step1Launch Windows Movie Maker on your PC. Create a new project and import your video clips. Split, trim, join, add transitions, effects, and titles as per your requirements.
Step2When you are done editing your video, go to Home tab> Save Movie button available on Share section.

Step3Instead of clicking on Save Movie button, click on the small triangle icon on Save Movie button. Click on Recommended for this project option. You can hold your mouse pointer on the option for a few seconds before clicking to check out the different parameters of your video file that you are going to save.

Step4The Save Movie dialog box will open on the screen. Go to the Save as type section and make sure it is selected for “MPEG-4/ Vide File”. MP4 is the abbreviation of MPEG-4. Finally, click on Save button and your video file will be saved in MP4 file format as per the destination you have chosen.

Part 2. Windows Movie Maker Alternative to Save as MP4
We have already stated that Windows Movie Maker from Microsoft has been discontinued in Window 10 and Windows 11. Instead, there is a basic video editor available under Photos app. Therefore, if you are looking for a Windows Live Movie Maker MP4 alternative, we recommend Wondershare Filmora.
Wondershare Filmora is a professional video editor where you can edit your videos like a pro and save your edited video as MP4 file format. You get more features on Filmora in comparison to Windows Movie Maker as it is a premium video editor. In fact, Filmora is easy to operate thanks to its super intuitive user interface. Here are the steps to export a video as MP4 format.
Free Download For Win 7 or later(64-bit)
Free Download For macOS 10.14 or later
Step1Download and install Wondershare Filmora. Click on New Project option on the welcome screen. Drag and drop your video clips into Project Media folder. Thereafter, bring them onto the timeline.

Step2Edit the video clips, add effects and animations as well as titles. Once your editing is done, click on Export button.

Step3Select MP4 file format on the left corner and specify the file name. Select the destination folder from Save To and other parameters as required. Finally, click on Export button.

Related FAQs of Movie Maker
The default file format of Windows Movie Maker is MP4. There is also an option to save video file as WMV format.
If you want to convert a movie maker file to MP4 file format, you can open the file in Windows Movie Maker and save the file as MP4. You can also use a video converter such as VideoConverterFactory to convert a movie maker file to MP4.
By default, Windows Movie Maker saves video files under My Documents or Documents folder as per Windows operating system you have on your PC. If it is not available there, you can check My Videos or My Pictures folder on your hard drive under User folder hierarchy.
If you are using Windows Movie Maker on your PC, we have stated how you can save your video file as MP4 format. We have also stated how to convert Windows Movie Maker file to MP4 format easily. We have also recommended the best Windows Movie Maker alternative as Wondershare Filmora where you get more video editing features as well as wide range of video file formats.
Free Download For macOS 10.14 or later
Step1Download and install Wondershare Filmora. Click on New Project option on the welcome screen. Drag and drop your video clips into Project Media folder. Thereafter, bring them onto the timeline.
Step2Edit the video clips, add effects and animations as well as titles. Once your editing is done, click on Export button.
Step3Select MP4 file format on the left corner and specify the file name. Select the destination folder from Save To and other parameters as required. Finally, click on Export button.
Related FAQs of Movie Maker
The default file format of Windows Movie Maker is MP4. There is also an option to save video file as WMV format.
If you want to convert a movie maker file to MP4 file format, you can open the file in Windows Movie Maker and save the file as MP4. You can also use a video converter such as VideoConverterFactory to convert a movie maker file to MP4.
By default, Windows Movie Maker saves video files under My Documents or Documents folder as per Windows operating system you have on your PC. If it is not available there, you can check My Videos or My Pictures folder on your hard drive under User folder hierarchy.
If you are using Windows Movie Maker on your PC, we have stated how you can save your video file as MP4 format. We have also stated how to convert Windows Movie Maker file to MP4 format easily. We have also recommended the best Windows Movie Maker alternative as Wondershare Filmora where you get more video editing features as well as wide range of video file formats.
Also read:
- [New] 2024 Approved Narratives in Motion Transforming Thoughts Into Words
- [Updated] In 2024, Foremost Spots for YouTube Video Promotion
- 2024 Approved 15 Best Travel Vloggers That You Should Follow
- Classificações E Testemunhos De Especialistas Sobre O Software Movavi
- In 2024, 3 Ways to Fake GPS Without Root On Vivo S17e | Dr.fone
- In 2024, How to Use Google Assistant on Your Lock Screen Of Xiaomi Civi 3 Disney 100th Anniversary Edition Phone
- New 2024 Approved 2 Effective Ways to Add Text Behind Objects
- New 2024 Approved How to Remove Background From a Video in Premier Pro
- The Complete Tutorial for Repairing 'officialsetup.dll Not Found' Issues
- Top 11 Free Apps to Check IMEI on Itel P55 Phones
- Update Your Samsung Laptop's Drivers with These Step-by-Step Instructions for Windows Users
- What Is the Best Frame Rate for 4K Videos, In 2024
- Title: New Adobe Premiere Pro Rec 709 LUTs Finding The Best Choices
- Author: Chloe
- Created at : 2024-12-08 11:21:22
- Updated at : 2024-12-12 07:54:08
- Link: https://ai-editing-video.techidaily.com/new-adobe-premiere-pro-rec-709-luts-finding-the-best-choices/
- License: This work is licensed under CC BY-NC-SA 4.0.