:max_bytes(150000):strip_icc():format(webp)/the_room-56cc7f225f9b5879cc590941.png)
New Backup and Organize Your Footage in Minutes

Backup and Organize Your Footage in Minutes
Backing up your data is deemed significantly necessary among video editing communities. Files get corrupted easily. Having a backup drive can save your day and countless hours. You can back up your data any way you deem fit. However, it will do you right if you follow the advice of professionals.
The article is written explicitly after due consideration and suggestions from the professional video editor. You can follow the steps in it to make backup files. Let us start with very straightforward steps to help you understand the professional way of backing up and organizing your footage.
Part 1. Back Up Your Files
Backing up your files gives you peace of mind. If one file is lost, the whole project becomes vulnerable to failure. Therefore, every effort must be made to ensure the protection of files. The best way to protect the files from any misfortune is to back them up.
Remember, there is no specific way to back up your files. Depending on the project’s requirements, you can do that differently. The following steps will light up how you can back up your files.
Step1Back up your files in two different places
It is crucial to do that. If one backup drive corrupts, you have the second option. It gives you an opportunity to back up files.
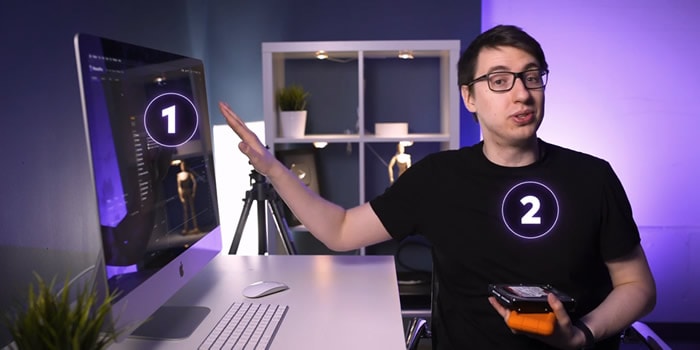
- You can make two different external backup hard drives.
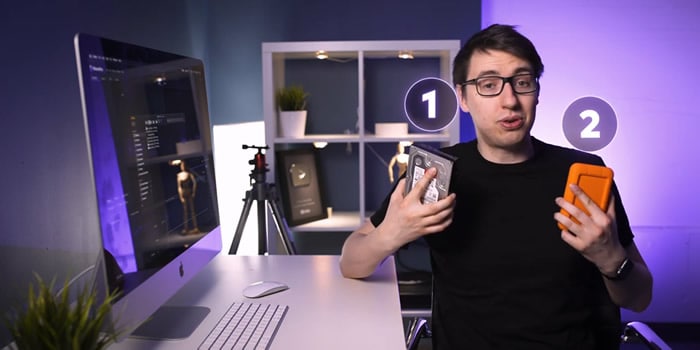
- You can also use your internal and external devices as two backup options.
Step2Make specific folders for each purpose of the video
The next step is how you back up your files properly and safely. Make separate folders for the different formats you are importing in your drive. Always use the primary source to make a copy of your files.
Follow the steps below to understand how to back up your files in two drives.
- Create a folder in your drive.
- Name it. You can name it according to the given format. The choice is yours.
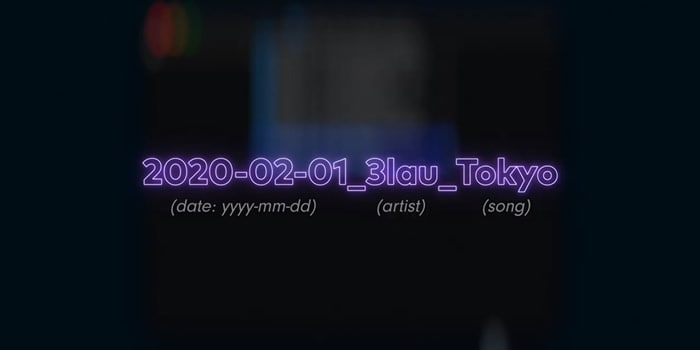
- Your backup folder is created.
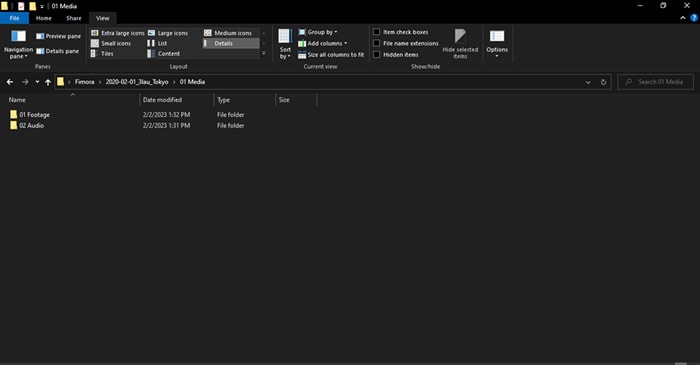
- Make new folders based on the files that are imported into the file. We are making two folders for the project, 01 Footage, and 02 Audio.
- 01 Footage is for the original footage.
- 02 Audio is for audio files provided by the music artist.
Step3Repeat the same process in your second backup drive
- Make the same folders and sub-folders in your secondary backup drive.
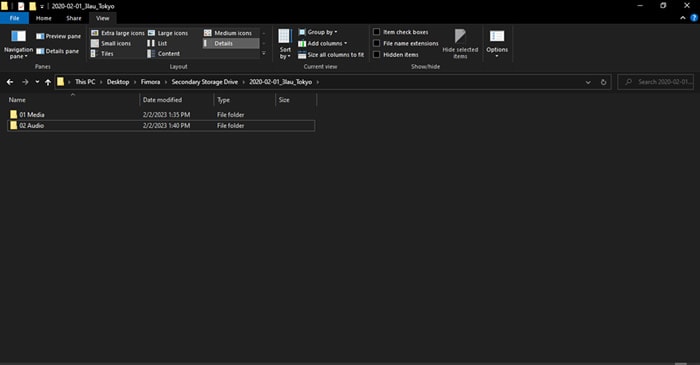
Step4Transfer files to your primary and secondary folders
- Transfer files to folders and sub-folders in your first backup drive.
- Transfer files to folders and sub-folders in your secondary backup drive.
![]()
Note: Most people make the mistake of making a backup drive and then using the same drive to make the second backup. The approach needs to be corrected.
We are done with backing up our files. It is time to organize the files in your drive.
Part 2. Organize Your Files in Filmora
Organizing your files is vital for any operation in video and editing. It makes everything streamlined. The risk of losing your data become negligible. Let us enlighten you on how you can organize your files.
Free Download For Win 7 or later(64-bit)
Free Download For macOS 10.14 or later
Step1Create new folders to lay the foundation for your video editing project
You can imitate the format we have chosen. However, you can choose any way you deem fit.
- Create 02 Project Files and 03 Exports.
- 02 Project contains the files that we will edit in Filmora .
- 03 Exports will have files that will be exported out of Filmora.
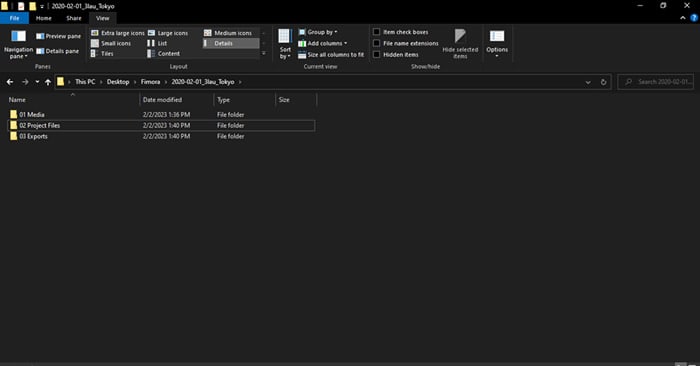
- In the 01 Media folder, create a new folder, 03 Graphics. It will contain graphics the artist will provide, such as a logo. You can also add your graphics to the folder if you want.
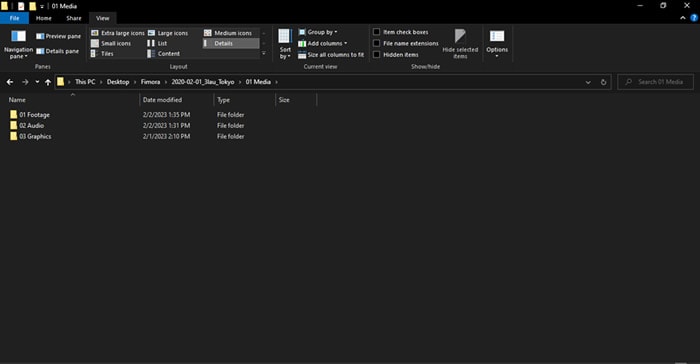
The format will help you if you move files from one device to the next case. In that case, you will only have to move one folder with the artist’s name.
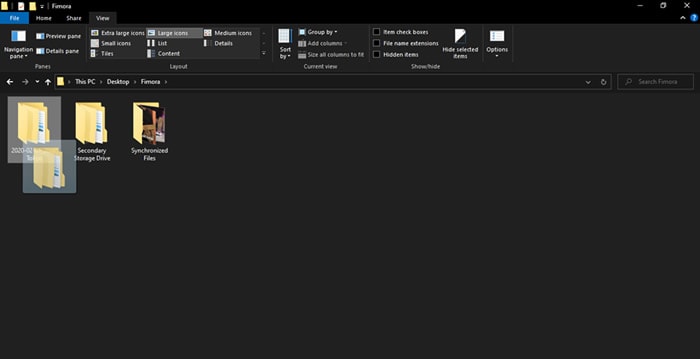
Step2Create a new project
In this step, we will organize our files in Filmora. It will help us to keep discipline and order in file organization. It makes work easy and fun.
- Create a new project when you open Filmora on your PC or Mac.
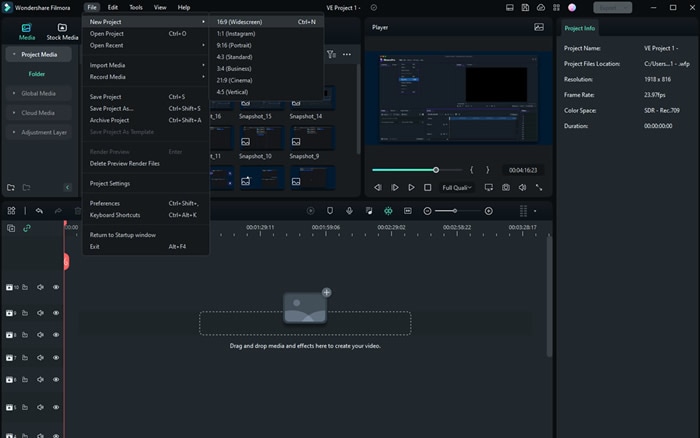
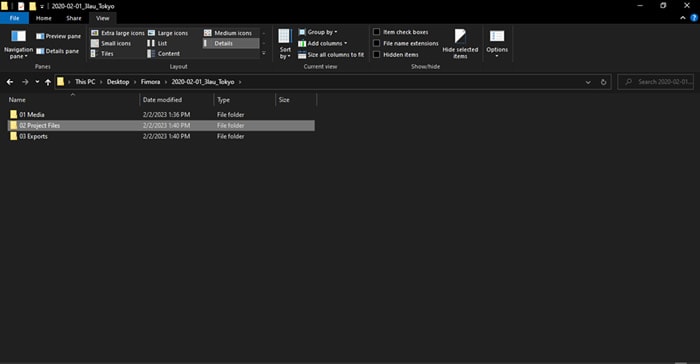
- Save the project in any name you want. We have saved the project in the format explained above.
- Save the file in 02 Project Files.
Step3Edit your workspace if you want
Users can edit the workspace in Filmora. You can customize it to your liking. Also, it is entirely optional.
- Go to layout mode. Change the layout if you want.
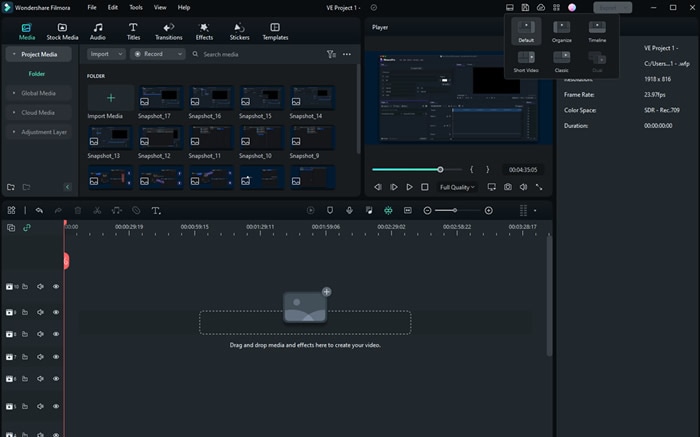
- You can manually change the panels by simply dragging them across the screen.
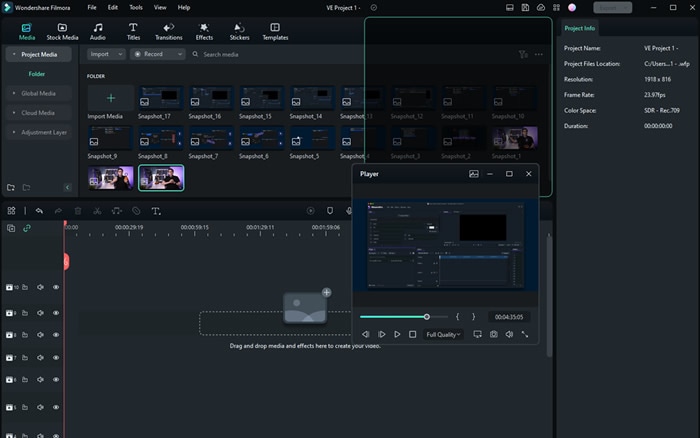
The workspace settings will be saved automatically. The next time you start Filmora, you will not need to readjust the panels.
- Save the file
Step4Recreate the file structure in your 02 project files
Now, you create folders in your project. For that, you can follow our structure, or you can follow your instincts.
- Create the folders in Filmora, as you have created them in your drive. The folders will be created in your 02 Project Files.
These new folders are the exact copies of your media files that you have got from the producer and music artist.
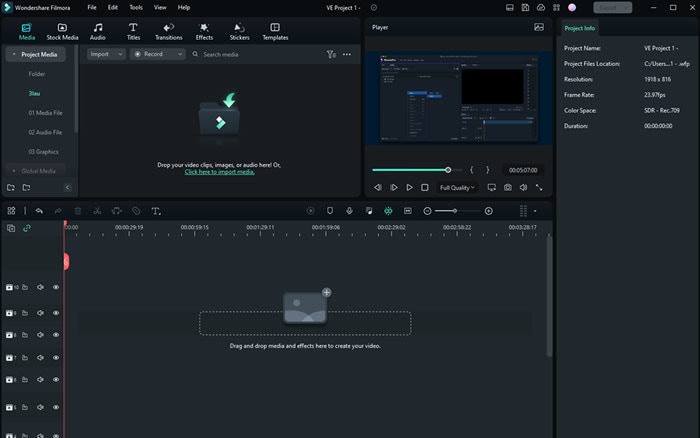
- Import the files into respective folders. Footage should include all the original videos given to your producers.
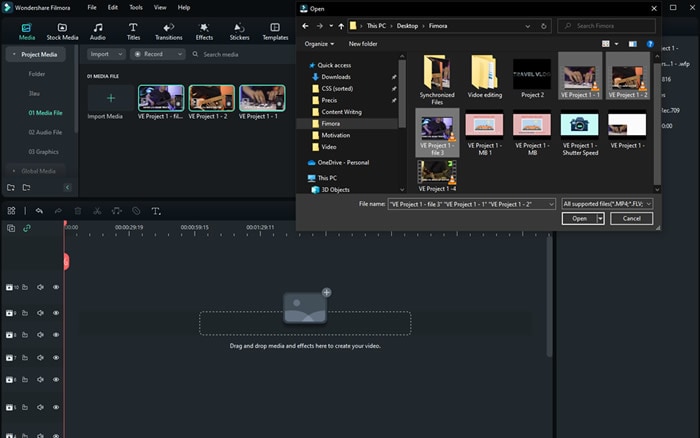
Step5Save the project
You can save the file using the button on Filmora, as shown below.
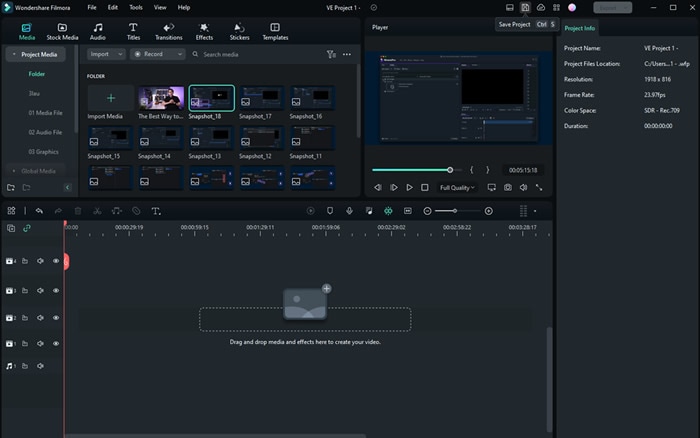
- You can save the files using short keys.

Conclusion
Making a backup file for your project is crucial. For a video editor, it is quite painful to learn that the final product has a missing file. Therefore, one must ensure that all the files are backed up before beginning the editing phase.
Apart from that, one must also keep updating the files in Filmora . You performed some editing. Make sure to save the file then and there. Any minor mistake can cause great worry for the professional editor. Thus, it is better to take proactive actions.
Free Download For Win 7 or later(64-bit)
Free Download For macOS 10.14 or later
We are done with backing up our files. It is time to organize the files in your drive.
Part 2. Organize Your Files in Filmora
Organizing your files is vital for any operation in video and editing. It makes everything streamlined. The risk of losing your data become negligible. Let us enlighten you on how you can organize your files.
Free Download For Win 7 or later(64-bit)
Free Download For macOS 10.14 or later
Step1Create new folders to lay the foundation for your video editing project
You can imitate the format we have chosen. However, you can choose any way you deem fit.
- Create 02 Project Files and 03 Exports.
- 02 Project contains the files that we will edit in Filmora .
- 03 Exports will have files that will be exported out of Filmora.

- In the 01 Media folder, create a new folder, 03 Graphics. It will contain graphics the artist will provide, such as a logo. You can also add your graphics to the folder if you want.

The format will help you if you move files from one device to the next case. In that case, you will only have to move one folder with the artist’s name.

Step2Create a new project
In this step, we will organize our files in Filmora. It will help us to keep discipline and order in file organization. It makes work easy and fun.
- Create a new project when you open Filmora on your PC or Mac.

- Save the project in any name you want. We have saved the project in the format explained above.
- Save the file in 02 Project Files.

Step3Edit your workspace if you want
Users can edit the workspace in Filmora. You can customize it to your liking. Also, it is entirely optional.
- Go to layout mode. Change the layout if you want.

- You can manually change the panels by simply dragging them across the screen.

The workspace settings will be saved automatically. The next time you start Filmora, you will not need to readjust the panels.
- Save the file
Step4Recreate the file structure in your 02 project files
Now, you create folders in your project. For that, you can follow our structure, or you can follow your instincts.
- Create the folders in Filmora, as you have created them in your drive. The folders will be created in your 02 Project Files.
These new folders are the exact copies of your media files that you have got from the producer and music artist.

- Import the files into respective folders. Footage should include all the original videos given to your producers.

Step5Save the project
You can save the file using the button on Filmora, as shown below.

- You can save the files using short keys.

Conclusion
Making a backup file for your project is crucial. For a video editor, it is quite painful to learn that the final product has a missing file. Therefore, one must ensure that all the files are backed up before beginning the editing phase.
Apart from that, one must also keep updating the files in Filmora . You performed some editing. Make sure to save the file then and there. Any minor mistake can cause great worry for the professional editor. Thus, it is better to take proactive actions.
Free Download For Win 7 or later(64-bit)
Free Download For macOS 10.14 or later
Useful Guide to Speed Up/Down Videos in VLC
You can add fun by modifying the video speed when you play a video. To perform the detailed effects on the content, you need sophisticated programs that are reliable and user-friendly. Do you know about the VLC playback speed? Are there any options in the VLC app to edit the playback speed as per your needs?
Here, you will be learning about the precise video edits you can perform effortlessly on your captured content using VLC and its alternative application. Stay connected and scroll down for enlightening facts on it.

In this article
01 What is VLC?
02 How to speed up/down videos in VLC
03 Alternative for changing speed for videos
Part 1: What is VLC?
VLC is an open-source program, and it supports media files to play on its interface efficiently. This app supports different file formats and is available in many versions. You can use VLC players on Windows, Mac, and Linux platforms. There are options to play a part of a file using this program when trying to download any video file into your system.

Here, you can find video edit features like you can add subtitles and modifying the playback speed precisely. It is a flexible player with a simple user interface. You do not require any prior knowledge to play the desired content on this interface. All the essential controls are explicit and you can reach for them quickly.
Part 2: How to speed up/down videos in VLC
It is high time to learn about the VLC playback speed that you can implement on your video effortlessly. You must carefully follow up the below instructions and perform the right clicks to edit the video speed.
The stepwise guidelines to modify the video speed using the VLC application.
Step 1
Install VLC from its official webpage according to your system OS type and then upload the desired video into its working space.

Step 2
Now, tap the Playback option from the menu and choose the required speed duration of the content from the expanded items. Select faster, slower, normal speed in pace with your needs and modify the video speed accordingly.

Save the changes you had performed on the video and play the track to view the changes done on this media space.
The Filmora video editor is the reliable and performable tool that edits the video beyond limitations. The above instructions will guide you to edit the video speed using the VLC player. If you search for an alternative tool to perform further edits on your captures, then quickly scroll down for more enlightening facts.
Part 3: Alternative for changing speed for videos
The Filmora video editor provides you with in-built templates, filter effects, transitions to make the content attractive. If you take closer looks at the filters, you will find mesmerizing special effects available as ready to use the element to edit your uploaded content on the timeline. Few clicks are enough to bring the best in your video in no time. It is easy to use and you can embed efficient elements to the video precisely. There are options to insert desired elements from integrated libraries like Filmstock, Giphy to add flavors to your video content.
The Key Features of Filmora Video Editor program.
- This app supports all file types effortlessly, and you can import any media file quickly despite its size.
- Simple clicks are sufficient to include desired effects on the video content.
- Filters, transitions, and special elements to insert into the uploaded file.
- Use audio customization features like Audio ducking, audio equalizers, and detach audio to personalize the content.
- Tap the preview option to view the edited file before finalizing the export option.
Connect with the integrated libraries and download the desired elements to customize the uploaded content. During the export action, you can change its file type, resolution, and size to add compatibility for end streaming devices. Drag and drop the elements into the working timeline to insert the changes to the captured media.
The detailed guide on how to change the video speed using the Filmora video editor tool.
Step 1: Install the program
Download the application from its official website and install it by following the instruction wizard. Then, launch the app and import the media file into the working space. To make further edits, drag and drop the file into the timeline.

Step 2: Customize the video speed
Next, make a right-click on the imported media file and select the Speed and Duration option from the expanded list. Adjust the speed slider from the pop-up window to change the video duration while playing. Finally, save the changes by tapping the OK button.

Now, play the edited content to witness the changes in the video speed. The video plays according to the customized value, and you can have a preview before exporting it to the necessary storage space.
Conclusion
Wondershare Filmora
Get started easily with Filmora’s powerful performance, intuitive interface, and countless effects!
Try It Free Try It Free Try It Free Learn More about Filmora>

Thus, in detail, you had an enlightening discussion on the VLC playback speed. You would have understood the tips and tricks associated with these video edits. Use the Filmora video editor application to create stunning videos for your needs. It is a reliable program, and you can go for it without any hesitation. You can customize the content by modifying every detail of the content precisely. Choose Filmora and enjoy the video edits beyond boundaries. Create content as per your requirements without sacrificing any parameters. Stay tuned for many more facts on video edits using the Filmora video editor application.
02 How to speed up/down videos in VLC
03 Alternative for changing speed for videos
Part 1: What is VLC?
VLC is an open-source program, and it supports media files to play on its interface efficiently. This app supports different file formats and is available in many versions. You can use VLC players on Windows, Mac, and Linux platforms. There are options to play a part of a file using this program when trying to download any video file into your system.

Here, you can find video edit features like you can add subtitles and modifying the playback speed precisely. It is a flexible player with a simple user interface. You do not require any prior knowledge to play the desired content on this interface. All the essential controls are explicit and you can reach for them quickly.
Part 2: How to speed up/down videos in VLC
It is high time to learn about the VLC playback speed that you can implement on your video effortlessly. You must carefully follow up the below instructions and perform the right clicks to edit the video speed.
The stepwise guidelines to modify the video speed using the VLC application.
Step 1
Install VLC from its official webpage according to your system OS type and then upload the desired video into its working space.

Step 2
Now, tap the Playback option from the menu and choose the required speed duration of the content from the expanded items. Select faster, slower, normal speed in pace with your needs and modify the video speed accordingly.

Save the changes you had performed on the video and play the track to view the changes done on this media space.
The Filmora video editor is the reliable and performable tool that edits the video beyond limitations. The above instructions will guide you to edit the video speed using the VLC player. If you search for an alternative tool to perform further edits on your captures, then quickly scroll down for more enlightening facts.
Part 3: Alternative for changing speed for videos
The Filmora video editor provides you with in-built templates, filter effects, transitions to make the content attractive. If you take closer looks at the filters, you will find mesmerizing special effects available as ready to use the element to edit your uploaded content on the timeline. Few clicks are enough to bring the best in your video in no time. It is easy to use and you can embed efficient elements to the video precisely. There are options to insert desired elements from integrated libraries like Filmstock, Giphy to add flavors to your video content.
The Key Features of Filmora Video Editor program.
- This app supports all file types effortlessly, and you can import any media file quickly despite its size.
- Simple clicks are sufficient to include desired effects on the video content.
- Filters, transitions, and special elements to insert into the uploaded file.
- Use audio customization features like Audio ducking, audio equalizers, and detach audio to personalize the content.
- Tap the preview option to view the edited file before finalizing the export option.
Connect with the integrated libraries and download the desired elements to customize the uploaded content. During the export action, you can change its file type, resolution, and size to add compatibility for end streaming devices. Drag and drop the elements into the working timeline to insert the changes to the captured media.
The detailed guide on how to change the video speed using the Filmora video editor tool.
Step 1: Install the program
Download the application from its official website and install it by following the instruction wizard. Then, launch the app and import the media file into the working space. To make further edits, drag and drop the file into the timeline.

Step 2: Customize the video speed
Next, make a right-click on the imported media file and select the Speed and Duration option from the expanded list. Adjust the speed slider from the pop-up window to change the video duration while playing. Finally, save the changes by tapping the OK button.

Now, play the edited content to witness the changes in the video speed. The video plays according to the customized value, and you can have a preview before exporting it to the necessary storage space.
Conclusion
Wondershare Filmora
Get started easily with Filmora’s powerful performance, intuitive interface, and countless effects!
Try It Free Try It Free Try It Free Learn More about Filmora>

Thus, in detail, you had an enlightening discussion on the VLC playback speed. You would have understood the tips and tricks associated with these video edits. Use the Filmora video editor application to create stunning videos for your needs. It is a reliable program, and you can go for it without any hesitation. You can customize the content by modifying every detail of the content precisely. Choose Filmora and enjoy the video edits beyond boundaries. Create content as per your requirements without sacrificing any parameters. Stay tuned for many more facts on video edits using the Filmora video editor application.
02 How to speed up/down videos in VLC
03 Alternative for changing speed for videos
Part 1: What is VLC?
VLC is an open-source program, and it supports media files to play on its interface efficiently. This app supports different file formats and is available in many versions. You can use VLC players on Windows, Mac, and Linux platforms. There are options to play a part of a file using this program when trying to download any video file into your system.

Here, you can find video edit features like you can add subtitles and modifying the playback speed precisely. It is a flexible player with a simple user interface. You do not require any prior knowledge to play the desired content on this interface. All the essential controls are explicit and you can reach for them quickly.
Part 2: How to speed up/down videos in VLC
It is high time to learn about the VLC playback speed that you can implement on your video effortlessly. You must carefully follow up the below instructions and perform the right clicks to edit the video speed.
The stepwise guidelines to modify the video speed using the VLC application.
Step 1
Install VLC from its official webpage according to your system OS type and then upload the desired video into its working space.

Step 2
Now, tap the Playback option from the menu and choose the required speed duration of the content from the expanded items. Select faster, slower, normal speed in pace with your needs and modify the video speed accordingly.

Save the changes you had performed on the video and play the track to view the changes done on this media space.
The Filmora video editor is the reliable and performable tool that edits the video beyond limitations. The above instructions will guide you to edit the video speed using the VLC player. If you search for an alternative tool to perform further edits on your captures, then quickly scroll down for more enlightening facts.
Part 3: Alternative for changing speed for videos
The Filmora video editor provides you with in-built templates, filter effects, transitions to make the content attractive. If you take closer looks at the filters, you will find mesmerizing special effects available as ready to use the element to edit your uploaded content on the timeline. Few clicks are enough to bring the best in your video in no time. It is easy to use and you can embed efficient elements to the video precisely. There are options to insert desired elements from integrated libraries like Filmstock, Giphy to add flavors to your video content.
The Key Features of Filmora Video Editor program.
- This app supports all file types effortlessly, and you can import any media file quickly despite its size.
- Simple clicks are sufficient to include desired effects on the video content.
- Filters, transitions, and special elements to insert into the uploaded file.
- Use audio customization features like Audio ducking, audio equalizers, and detach audio to personalize the content.
- Tap the preview option to view the edited file before finalizing the export option.
Connect with the integrated libraries and download the desired elements to customize the uploaded content. During the export action, you can change its file type, resolution, and size to add compatibility for end streaming devices. Drag and drop the elements into the working timeline to insert the changes to the captured media.
The detailed guide on how to change the video speed using the Filmora video editor tool.
Step 1: Install the program
Download the application from its official website and install it by following the instruction wizard. Then, launch the app and import the media file into the working space. To make further edits, drag and drop the file into the timeline.

Step 2: Customize the video speed
Next, make a right-click on the imported media file and select the Speed and Duration option from the expanded list. Adjust the speed slider from the pop-up window to change the video duration while playing. Finally, save the changes by tapping the OK button.

Now, play the edited content to witness the changes in the video speed. The video plays according to the customized value, and you can have a preview before exporting it to the necessary storage space.
Conclusion
Wondershare Filmora
Get started easily with Filmora’s powerful performance, intuitive interface, and countless effects!
Try It Free Try It Free Try It Free Learn More about Filmora>

Thus, in detail, you had an enlightening discussion on the VLC playback speed. You would have understood the tips and tricks associated with these video edits. Use the Filmora video editor application to create stunning videos for your needs. It is a reliable program, and you can go for it without any hesitation. You can customize the content by modifying every detail of the content precisely. Choose Filmora and enjoy the video edits beyond boundaries. Create content as per your requirements without sacrificing any parameters. Stay tuned for many more facts on video edits using the Filmora video editor application.
02 How to speed up/down videos in VLC
03 Alternative for changing speed for videos
Part 1: What is VLC?
VLC is an open-source program, and it supports media files to play on its interface efficiently. This app supports different file formats and is available in many versions. You can use VLC players on Windows, Mac, and Linux platforms. There are options to play a part of a file using this program when trying to download any video file into your system.

Here, you can find video edit features like you can add subtitles and modifying the playback speed precisely. It is a flexible player with a simple user interface. You do not require any prior knowledge to play the desired content on this interface. All the essential controls are explicit and you can reach for them quickly.
Part 2: How to speed up/down videos in VLC
It is high time to learn about the VLC playback speed that you can implement on your video effortlessly. You must carefully follow up the below instructions and perform the right clicks to edit the video speed.
The stepwise guidelines to modify the video speed using the VLC application.
Step 1
Install VLC from its official webpage according to your system OS type and then upload the desired video into its working space.

Step 2
Now, tap the Playback option from the menu and choose the required speed duration of the content from the expanded items. Select faster, slower, normal speed in pace with your needs and modify the video speed accordingly.

Save the changes you had performed on the video and play the track to view the changes done on this media space.
The Filmora video editor is the reliable and performable tool that edits the video beyond limitations. The above instructions will guide you to edit the video speed using the VLC player. If you search for an alternative tool to perform further edits on your captures, then quickly scroll down for more enlightening facts.
Part 3: Alternative for changing speed for videos
The Filmora video editor provides you with in-built templates, filter effects, transitions to make the content attractive. If you take closer looks at the filters, you will find mesmerizing special effects available as ready to use the element to edit your uploaded content on the timeline. Few clicks are enough to bring the best in your video in no time. It is easy to use and you can embed efficient elements to the video precisely. There are options to insert desired elements from integrated libraries like Filmstock, Giphy to add flavors to your video content.
The Key Features of Filmora Video Editor program.
- This app supports all file types effortlessly, and you can import any media file quickly despite its size.
- Simple clicks are sufficient to include desired effects on the video content.
- Filters, transitions, and special elements to insert into the uploaded file.
- Use audio customization features like Audio ducking, audio equalizers, and detach audio to personalize the content.
- Tap the preview option to view the edited file before finalizing the export option.
Connect with the integrated libraries and download the desired elements to customize the uploaded content. During the export action, you can change its file type, resolution, and size to add compatibility for end streaming devices. Drag and drop the elements into the working timeline to insert the changes to the captured media.
The detailed guide on how to change the video speed using the Filmora video editor tool.
Step 1: Install the program
Download the application from its official website and install it by following the instruction wizard. Then, launch the app and import the media file into the working space. To make further edits, drag and drop the file into the timeline.

Step 2: Customize the video speed
Next, make a right-click on the imported media file and select the Speed and Duration option from the expanded list. Adjust the speed slider from the pop-up window to change the video duration while playing. Finally, save the changes by tapping the OK button.

Now, play the edited content to witness the changes in the video speed. The video plays according to the customized value, and you can have a preview before exporting it to the necessary storage space.
Conclusion
Wondershare Filmora
Get started easily with Filmora’s powerful performance, intuitive interface, and countless effects!
Try It Free Try It Free Try It Free Learn More about Filmora>

Thus, in detail, you had an enlightening discussion on the VLC playback speed. You would have understood the tips and tricks associated with these video edits. Use the Filmora video editor application to create stunning videos for your needs. It is a reliable program, and you can go for it without any hesitation. You can customize the content by modifying every detail of the content precisely. Choose Filmora and enjoy the video edits beyond boundaries. Create content as per your requirements without sacrificing any parameters. Stay tuned for many more facts on video edits using the Filmora video editor application.
Create Your Face Zoom TikTok Now
Abundant Video Effects - Wondershare Filmora
Provide abundant video effects - A creative video editor
Powerful color correction and grading
Detailed tutorials are provided by the official channel
TikTok videos are very popular across the youth of the world. With millions of users in support of the platform, there are many content creators that gained popularity through making small videos on TikTok. These videos are, however, incomplete without the existence of a proper effect on them. To emphasize something across a video, the zoom effect is always preferred in the market.
This article discusses the face zoom effect of TikTok and provides users with the appropriate methods that can be adapted to utilize this function to perfection. With this feature, you can make your perfect videos with an emphasis on the important elements to view on the screen.
In this article
Part 1: What is TikTok Face Zoom?
Part 2: Create A Face Zoom TikTok Video in Minutes
Part 3: Bonus | Create Face Zoom Video in Wondershare Filmora
Part 1: What is TikTok Face Zoom?
The face zoom TikTok effect is referred to the zooming effect that is covered by putting the focus on the facial presence within the video. The use of the face zoom effect on TikTok has a significant utility in highlighting the importance of the person within the video and creating an illusion that would make people watch the video all along.
Many TikTokers like using this effect in scenes where they wish to highlight something new about their face, e.g., new makeup.
Part 2: Create A Face Zoom TikTok Video in Minutes
There are some direct approaches to zooming the face across a TikTok video. To understand these methods, you should go through the provided details and understand the face zoom effect on TikTok.
Method 1: Create A Face Zoom TikTok Video in Minutes
Step 1: Before coming onto adding effects across your TikTok video, you need to record it across the social platform or have it recorded before on your smartphone under the requirements of TikTok.
Step 2: For uploading a video on TikTok, you need to continue by clicking the “+” icon and locating the “Upload” button for adding a pre-recorded video across TikTok.

Step 3: Once you have added the video for editing, navigate into the “Effects” section and find yourselves in the “Visuals” section. Let the cursor of the video be at the point where the facial features are prominent, and you wish to face zoom the video from there. With the cursor across the required place, find the “Zoom” effect in the list and hold the button until you’ve successfully added the effect across the required length of the video.

Step 4: After editing the video and adding the face zoom effect successfully, you need to click on “Save” to preview the video before you click “Next” to share it across the necessary platforms. TikTok provides you with the ability to share your videos across Instagram, Facebook, or WhatsApp.

Method 2: Do Face Zoom Easily by Finding a Face Zoom Video
Step 1: To use the TikTok face zoom effect on your video, you need to launch the platform and click on “Discover” present on the bottom of the screen. In the search bar, you need to type “Face Zoom” to locate the effect across TikTok.

Step 2: Once you have found the effect, open it on another screen. Locate the “Try this effect” button to use a similar effect across your video.

Step 3: Record the video on TikTok by clicking on the red recording button. Make changes to the recorded video and save the video on your device or share it across the social media platforms as desired.

Part 3: Bonus | Create Face Zoom Video in Wondershare Filmora
TikTok produces impressive content that can be commended for many reasons. This, however, does not make the professional video that you might be looking for. What to do if you cannot create such a professional video that would help you get the right reach you are looking for? Wondershare Filmora includes an exceptional experience of using the TikTok face zoom effect across its easy-to-use platform with the right set of tools.
To understand how you can successfully execute the procedure without putting yourselves in any difficulty, go through the steps as shown below:
Step 1: Download and Install Wondershare Filmora
For starters, you need to have Wondershare Filmora installed on your computer. Proceed to launch it and click on the “New Project” button to start a new project.

Step 2: Upload Media
As a new window opens up on the front, you need to click on the arrowhead icon against the “Media” tab to import the video that is to be edited across Wondershare Filmora. On adding it, drag it across the timeline successfully.

Step 3: Track the Face using Motion Tracking
To track the facial features across the video, you need to double-click the video on the timeline and proceed to open the “Motion Tracking” menu that you can find across the pane. Enable the option if necessary and set the position of the box across the “Preview” window that would track the face. Click on “Start Tracking” to successfully motion track the face.

Step 4: Add Magnify Effect to the Face
Proceed into the “Effects” tab and write “Magnify” in the search bar. Select the effect and place it across the video in the timeline. To align the effect with the face, you need to double-click the video and move into the “Motion Tracking” section again. Select the specific magnify effect in the drop-down menu and select “Start Tracking.”

Step 5: Preview and Export the Face Zoom Video
Once you are done editing the video, preview it across the window to check if any edits are required. Once confirmed, click on the “Export” button to save the video across the computer.

Conclusion
The TikTok face zoom effect can be quite impressive if used perfectly. However, since the intent is to highlight the facial parts in the video, the appropriate use of the effect can give an exceptional result. For this, the article has discussed the best methods that can be applied to understanding how to use face zoom in TikTok with ease.
TikTok videos are very popular across the youth of the world. With millions of users in support of the platform, there are many content creators that gained popularity through making small videos on TikTok. These videos are, however, incomplete without the existence of a proper effect on them. To emphasize something across a video, the zoom effect is always preferred in the market.
This article discusses the face zoom effect of TikTok and provides users with the appropriate methods that can be adapted to utilize this function to perfection. With this feature, you can make your perfect videos with an emphasis on the important elements to view on the screen.
In this article
Part 1: What is TikTok Face Zoom?
Part 2: Create A Face Zoom TikTok Video in Minutes
Part 3: Bonus | Create Face Zoom Video in Wondershare Filmora
Part 1: What is TikTok Face Zoom?
The face zoom TikTok effect is referred to the zooming effect that is covered by putting the focus on the facial presence within the video. The use of the face zoom effect on TikTok has a significant utility in highlighting the importance of the person within the video and creating an illusion that would make people watch the video all along.
Many TikTokers like using this effect in scenes where they wish to highlight something new about their face, e.g., new makeup.
Part 2: Create A Face Zoom TikTok Video in Minutes
There are some direct approaches to zooming the face across a TikTok video. To understand these methods, you should go through the provided details and understand the face zoom effect on TikTok.
Method 1: Create A Face Zoom TikTok Video in Minutes
Step 1: Before coming onto adding effects across your TikTok video, you need to record it across the social platform or have it recorded before on your smartphone under the requirements of TikTok.
Step 2: For uploading a video on TikTok, you need to continue by clicking the “+” icon and locating the “Upload” button for adding a pre-recorded video across TikTok.

Step 3: Once you have added the video for editing, navigate into the “Effects” section and find yourselves in the “Visuals” section. Let the cursor of the video be at the point where the facial features are prominent, and you wish to face zoom the video from there. With the cursor across the required place, find the “Zoom” effect in the list and hold the button until you’ve successfully added the effect across the required length of the video.

Step 4: After editing the video and adding the face zoom effect successfully, you need to click on “Save” to preview the video before you click “Next” to share it across the necessary platforms. TikTok provides you with the ability to share your videos across Instagram, Facebook, or WhatsApp.

Method 2: Do Face Zoom Easily by Finding a Face Zoom Video
Step 1: To use the TikTok face zoom effect on your video, you need to launch the platform and click on “Discover” present on the bottom of the screen. In the search bar, you need to type “Face Zoom” to locate the effect across TikTok.

Step 2: Once you have found the effect, open it on another screen. Locate the “Try this effect” button to use a similar effect across your video.

Step 3: Record the video on TikTok by clicking on the red recording button. Make changes to the recorded video and save the video on your device or share it across the social media platforms as desired.

Part 3: Bonus | Create Face Zoom Video in Wondershare Filmora
TikTok produces impressive content that can be commended for many reasons. This, however, does not make the professional video that you might be looking for. What to do if you cannot create such a professional video that would help you get the right reach you are looking for? Wondershare Filmora includes an exceptional experience of using the TikTok face zoom effect across its easy-to-use platform with the right set of tools.
To understand how you can successfully execute the procedure without putting yourselves in any difficulty, go through the steps as shown below:
Step 1: Download and Install Wondershare Filmora
For starters, you need to have Wondershare Filmora installed on your computer. Proceed to launch it and click on the “New Project” button to start a new project.

Step 2: Upload Media
As a new window opens up on the front, you need to click on the arrowhead icon against the “Media” tab to import the video that is to be edited across Wondershare Filmora. On adding it, drag it across the timeline successfully.

Step 3: Track the Face using Motion Tracking
To track the facial features across the video, you need to double-click the video on the timeline and proceed to open the “Motion Tracking” menu that you can find across the pane. Enable the option if necessary and set the position of the box across the “Preview” window that would track the face. Click on “Start Tracking” to successfully motion track the face.

Step 4: Add Magnify Effect to the Face
Proceed into the “Effects” tab and write “Magnify” in the search bar. Select the effect and place it across the video in the timeline. To align the effect with the face, you need to double-click the video and move into the “Motion Tracking” section again. Select the specific magnify effect in the drop-down menu and select “Start Tracking.”

Step 5: Preview and Export the Face Zoom Video
Once you are done editing the video, preview it across the window to check if any edits are required. Once confirmed, click on the “Export” button to save the video across the computer.

Conclusion
The TikTok face zoom effect can be quite impressive if used perfectly. However, since the intent is to highlight the facial parts in the video, the appropriate use of the effect can give an exceptional result. For this, the article has discussed the best methods that can be applied to understanding how to use face zoom in TikTok with ease.
TikTok videos are very popular across the youth of the world. With millions of users in support of the platform, there are many content creators that gained popularity through making small videos on TikTok. These videos are, however, incomplete without the existence of a proper effect on them. To emphasize something across a video, the zoom effect is always preferred in the market.
This article discusses the face zoom effect of TikTok and provides users with the appropriate methods that can be adapted to utilize this function to perfection. With this feature, you can make your perfect videos with an emphasis on the important elements to view on the screen.
In this article
Part 1: What is TikTok Face Zoom?
Part 2: Create A Face Zoom TikTok Video in Minutes
Part 3: Bonus | Create Face Zoom Video in Wondershare Filmora
Part 1: What is TikTok Face Zoom?
The face zoom TikTok effect is referred to the zooming effect that is covered by putting the focus on the facial presence within the video. The use of the face zoom effect on TikTok has a significant utility in highlighting the importance of the person within the video and creating an illusion that would make people watch the video all along.
Many TikTokers like using this effect in scenes where they wish to highlight something new about their face, e.g., new makeup.
Part 2: Create A Face Zoom TikTok Video in Minutes
There are some direct approaches to zooming the face across a TikTok video. To understand these methods, you should go through the provided details and understand the face zoom effect on TikTok.
Method 1: Create A Face Zoom TikTok Video in Minutes
Step 1: Before coming onto adding effects across your TikTok video, you need to record it across the social platform or have it recorded before on your smartphone under the requirements of TikTok.
Step 2: For uploading a video on TikTok, you need to continue by clicking the “+” icon and locating the “Upload” button for adding a pre-recorded video across TikTok.

Step 3: Once you have added the video for editing, navigate into the “Effects” section and find yourselves in the “Visuals” section. Let the cursor of the video be at the point where the facial features are prominent, and you wish to face zoom the video from there. With the cursor across the required place, find the “Zoom” effect in the list and hold the button until you’ve successfully added the effect across the required length of the video.

Step 4: After editing the video and adding the face zoom effect successfully, you need to click on “Save” to preview the video before you click “Next” to share it across the necessary platforms. TikTok provides you with the ability to share your videos across Instagram, Facebook, or WhatsApp.

Method 2: Do Face Zoom Easily by Finding a Face Zoom Video
Step 1: To use the TikTok face zoom effect on your video, you need to launch the platform and click on “Discover” present on the bottom of the screen. In the search bar, you need to type “Face Zoom” to locate the effect across TikTok.

Step 2: Once you have found the effect, open it on another screen. Locate the “Try this effect” button to use a similar effect across your video.

Step 3: Record the video on TikTok by clicking on the red recording button. Make changes to the recorded video and save the video on your device or share it across the social media platforms as desired.

Part 3: Bonus | Create Face Zoom Video in Wondershare Filmora
TikTok produces impressive content that can be commended for many reasons. This, however, does not make the professional video that you might be looking for. What to do if you cannot create such a professional video that would help you get the right reach you are looking for? Wondershare Filmora includes an exceptional experience of using the TikTok face zoom effect across its easy-to-use platform with the right set of tools.
To understand how you can successfully execute the procedure without putting yourselves in any difficulty, go through the steps as shown below:
Step 1: Download and Install Wondershare Filmora
For starters, you need to have Wondershare Filmora installed on your computer. Proceed to launch it and click on the “New Project” button to start a new project.

Step 2: Upload Media
As a new window opens up on the front, you need to click on the arrowhead icon against the “Media” tab to import the video that is to be edited across Wondershare Filmora. On adding it, drag it across the timeline successfully.

Step 3: Track the Face using Motion Tracking
To track the facial features across the video, you need to double-click the video on the timeline and proceed to open the “Motion Tracking” menu that you can find across the pane. Enable the option if necessary and set the position of the box across the “Preview” window that would track the face. Click on “Start Tracking” to successfully motion track the face.

Step 4: Add Magnify Effect to the Face
Proceed into the “Effects” tab and write “Magnify” in the search bar. Select the effect and place it across the video in the timeline. To align the effect with the face, you need to double-click the video and move into the “Motion Tracking” section again. Select the specific magnify effect in the drop-down menu and select “Start Tracking.”

Step 5: Preview and Export the Face Zoom Video
Once you are done editing the video, preview it across the window to check if any edits are required. Once confirmed, click on the “Export” button to save the video across the computer.

Conclusion
The TikTok face zoom effect can be quite impressive if used perfectly. However, since the intent is to highlight the facial parts in the video, the appropriate use of the effect can give an exceptional result. For this, the article has discussed the best methods that can be applied to understanding how to use face zoom in TikTok with ease.
TikTok videos are very popular across the youth of the world. With millions of users in support of the platform, there are many content creators that gained popularity through making small videos on TikTok. These videos are, however, incomplete without the existence of a proper effect on them. To emphasize something across a video, the zoom effect is always preferred in the market.
This article discusses the face zoom effect of TikTok and provides users with the appropriate methods that can be adapted to utilize this function to perfection. With this feature, you can make your perfect videos with an emphasis on the important elements to view on the screen.
In this article
Part 1: What is TikTok Face Zoom?
Part 2: Create A Face Zoom TikTok Video in Minutes
Part 3: Bonus | Create Face Zoom Video in Wondershare Filmora
Part 1: What is TikTok Face Zoom?
The face zoom TikTok effect is referred to the zooming effect that is covered by putting the focus on the facial presence within the video. The use of the face zoom effect on TikTok has a significant utility in highlighting the importance of the person within the video and creating an illusion that would make people watch the video all along.
Many TikTokers like using this effect in scenes where they wish to highlight something new about their face, e.g., new makeup.
Part 2: Create A Face Zoom TikTok Video in Minutes
There are some direct approaches to zooming the face across a TikTok video. To understand these methods, you should go through the provided details and understand the face zoom effect on TikTok.
Method 1: Create A Face Zoom TikTok Video in Minutes
Step 1: Before coming onto adding effects across your TikTok video, you need to record it across the social platform or have it recorded before on your smartphone under the requirements of TikTok.
Step 2: For uploading a video on TikTok, you need to continue by clicking the “+” icon and locating the “Upload” button for adding a pre-recorded video across TikTok.

Step 3: Once you have added the video for editing, navigate into the “Effects” section and find yourselves in the “Visuals” section. Let the cursor of the video be at the point where the facial features are prominent, and you wish to face zoom the video from there. With the cursor across the required place, find the “Zoom” effect in the list and hold the button until you’ve successfully added the effect across the required length of the video.

Step 4: After editing the video and adding the face zoom effect successfully, you need to click on “Save” to preview the video before you click “Next” to share it across the necessary platforms. TikTok provides you with the ability to share your videos across Instagram, Facebook, or WhatsApp.

Method 2: Do Face Zoom Easily by Finding a Face Zoom Video
Step 1: To use the TikTok face zoom effect on your video, you need to launch the platform and click on “Discover” present on the bottom of the screen. In the search bar, you need to type “Face Zoom” to locate the effect across TikTok.

Step 2: Once you have found the effect, open it on another screen. Locate the “Try this effect” button to use a similar effect across your video.

Step 3: Record the video on TikTok by clicking on the red recording button. Make changes to the recorded video and save the video on your device or share it across the social media platforms as desired.

Part 3: Bonus | Create Face Zoom Video in Wondershare Filmora
TikTok produces impressive content that can be commended for many reasons. This, however, does not make the professional video that you might be looking for. What to do if you cannot create such a professional video that would help you get the right reach you are looking for? Wondershare Filmora includes an exceptional experience of using the TikTok face zoom effect across its easy-to-use platform with the right set of tools.
To understand how you can successfully execute the procedure without putting yourselves in any difficulty, go through the steps as shown below:
Step 1: Download and Install Wondershare Filmora
For starters, you need to have Wondershare Filmora installed on your computer. Proceed to launch it and click on the “New Project” button to start a new project.

Step 2: Upload Media
As a new window opens up on the front, you need to click on the arrowhead icon against the “Media” tab to import the video that is to be edited across Wondershare Filmora. On adding it, drag it across the timeline successfully.

Step 3: Track the Face using Motion Tracking
To track the facial features across the video, you need to double-click the video on the timeline and proceed to open the “Motion Tracking” menu that you can find across the pane. Enable the option if necessary and set the position of the box across the “Preview” window that would track the face. Click on “Start Tracking” to successfully motion track the face.

Step 4: Add Magnify Effect to the Face
Proceed into the “Effects” tab and write “Magnify” in the search bar. Select the effect and place it across the video in the timeline. To align the effect with the face, you need to double-click the video and move into the “Motion Tracking” section again. Select the specific magnify effect in the drop-down menu and select “Start Tracking.”

Step 5: Preview and Export the Face Zoom Video
Once you are done editing the video, preview it across the window to check if any edits are required. Once confirmed, click on the “Export” button to save the video across the computer.

Conclusion
The TikTok face zoom effect can be quite impressive if used perfectly. However, since the intent is to highlight the facial parts in the video, the appropriate use of the effect can give an exceptional result. For this, the article has discussed the best methods that can be applied to understanding how to use face zoom in TikTok with ease.
How to Create the Stranger Things Upside Down Effect
With stranger things season 4 ending, it seems like great timing to make a stranger things style transition to the Upside Down. In the Netflix series Stranger Things, there is an opposite version of our world called the Upside Down. The Upside Down is dark, creepy, and possibly filled with aliens, monsters, creatures, and other things.
Now, you can also apply the Stranger Things Upside Down Effect to your video! This effect combines camera tricks and video editing within Filmora to transition from the normal world into the Upside Down.
How-to Guide
1) Preparation
To make this effect, you will need two footage shots: one with the camera moving down and one with the camera coming back up.
When shooting for the footage, follow the steps below:
First shot
- Find any item close enough to the ground that we can block our frame with.

- Once you have your talent lined up, rotate your camera while lowering it below the foreground item at a constant speed and leaving the camera there. The key is making sure when you go behind the object, the frame is nothing but black.

For the next scene, have your actor change positions, or you can change the set around to look like the Upside Down. For instance, adding fake plants and flickering lights.
Second shot
Start bringing your camera back up at the same speed and rotate it again in the direction it was moving.

2) Steps
After you have all the footage, you can start editing it on Filmora. If you haven’t installed it yet, you can download Filmora at their official website at https://filmora.wondershare.com .
Free Download For Win 7 or later(64-bit)
Free Download For macOS 10.14 or later
Now, launch Filmora on your PC and follow the steps below:
Step1 Take your first clip in the “normal” world and drag it down to a video track on the timeline. Trim the edge of the clip, so it ends on pure black and in a downward motion.

Step2 Drag the second clip (in the Upside Down) onto the video track on the timeline after the first clip. Trim this video, so it begins in pure black and an upward motion.

Cut the clips to get the timing right since it should be a very fast transition. You can cut in the black frames so they won’t be too apparent.
If you don’t have a perfectly smooth transition, you can add a dissolve by going to Transitions > Basic > Dissolve.

Color Grading and Effects
After the transition, you can make the clip look a lot more like the Upside Down from the show with a color grade and Filmora effects. Follow the steps below:
Step1 Double-click on your second clip, then go to Color > Advanced. For a quick edit, you can try one of the presets available, such as “cool film.” It will give you the colder blue tones that Stranger Things used for the Upside Down.

Step2 You can further edit the color grading in the white balance menu. Drag the slider to the left to get a blue, cold vibe for the Upside Down.
The “cool” or “warm” color grading technically talks about color temperature. A “warmer” look will be more orange, and a “colder” look will be bluer. You can also use the tint slider to fine-tune the look.

Step3 Next, move down to the color, lower the brightness and increase contrast. It makes the scene darker and more sinister than the normal world.

Step4 Finally, go down to the vignette and drag the amount slider a tiny bit to give a Vinnette around your clip.

3) Pro Tips
You can still make your clip look even more like Upside Down with some Filmora elements.
Go to Elements > Smoke > Smokescreen 2. Drag this element on top of your Upside Down clip and trim it, so it starts at the same time the clip leaves the black frame.

You can adjust the opacity by double-clicking the smoke effect to open the setting.
Finally, go to the Transition > Basic > Dissolve to the start of the smoke and adjust it when the smoke gradually appears.

Resources from Filmostock
You can also use filmstock effects to bring our video to the next level. Go to Elements > Fire > Large Scale 12 and drag it down on top of your clip and the smoke.

Double-click the clip and change the scale of the effect to your needs. Then, go to compositing to change the blending mode to the screen to help the effect blend in more.

Now, go to color and open the white balance menu. Drag the two sliders to change the color of the particles to match your clip.

Summary
That is all you need to make a Stranger Things Upside Down effects to your video. Let us know if there are any other effects from tv shows you want to learn how to make.
Free Download For macOS 10.14 or later
Now, launch Filmora on your PC and follow the steps below:
Step1 Take your first clip in the “normal” world and drag it down to a video track on the timeline. Trim the edge of the clip, so it ends on pure black and in a downward motion.

Step2 Drag the second clip (in the Upside Down) onto the video track on the timeline after the first clip. Trim this video, so it begins in pure black and an upward motion.

Cut the clips to get the timing right since it should be a very fast transition. You can cut in the black frames so they won’t be too apparent.
If you don’t have a perfectly smooth transition, you can add a dissolve by going to Transitions > Basic > Dissolve.

Color Grading and Effects
After the transition, you can make the clip look a lot more like the Upside Down from the show with a color grade and Filmora effects. Follow the steps below:
Step1 Double-click on your second clip, then go to Color > Advanced. For a quick edit, you can try one of the presets available, such as “cool film.” It will give you the colder blue tones that Stranger Things used for the Upside Down.

Step2 You can further edit the color grading in the white balance menu. Drag the slider to the left to get a blue, cold vibe for the Upside Down.
The “cool” or “warm” color grading technically talks about color temperature. A “warmer” look will be more orange, and a “colder” look will be bluer. You can also use the tint slider to fine-tune the look.

Step3 Next, move down to the color, lower the brightness and increase contrast. It makes the scene darker and more sinister than the normal world.

Step4 Finally, go down to the vignette and drag the amount slider a tiny bit to give a Vinnette around your clip.

3) Pro Tips
You can still make your clip look even more like Upside Down with some Filmora elements.
Go to Elements > Smoke > Smokescreen 2. Drag this element on top of your Upside Down clip and trim it, so it starts at the same time the clip leaves the black frame.

You can adjust the opacity by double-clicking the smoke effect to open the setting.
Finally, go to the Transition > Basic > Dissolve to the start of the smoke and adjust it when the smoke gradually appears.

Resources from Filmostock
You can also use filmstock effects to bring our video to the next level. Go to Elements > Fire > Large Scale 12 and drag it down on top of your clip and the smoke.

Double-click the clip and change the scale of the effect to your needs. Then, go to compositing to change the blending mode to the screen to help the effect blend in more.

Now, go to color and open the white balance menu. Drag the two sliders to change the color of the particles to match your clip.

Summary
That is all you need to make a Stranger Things Upside Down effects to your video. Let us know if there are any other effects from tv shows you want to learn how to make.
Also read:
- 2024 Approved Best Video Grabbers for Chrome
- In 2024, Wondering How to Edit a Video to Slow Motion on iPhone and Android Devices? Find Out How to Use Wondershare Filmora to Create and Edit Slo Mo Videos in a Few Clicks
- Get Creative with These 10 Video Editing App With Templates
- New Quick Answer Why Did Filmora AI Portrait Attract People for 2024
- 2024 Approved TXT to SRT 3 Effective Ways to Convert TXT to SRT
- Learning Some Perfect Ways to Convert a Slow-Motion Video to Normal
- 2024 Approved How to Speed Up Video on Instagram Reels?
- Updated Best Slow Motion Camera Apps for Best Content Creation
- New How to Find a High-Quality Video Marketing Agency, In 2024
- 2024 Approved Premiere Pro Is a Powerful Video Editing Software. In This Article, You Will Learn About How to Use, Save and Export LUTs in Adobe Premiere Pro
- 2024 Approved What Is Animated GIF
- In 2024, Do You Need More Time to Explain a Particular Screen or Moment in Your Recording Using an Extended Freeze-Frame? Learn How to Use Camtasia Freeze-Frame to Extend Parts of a Video Effectively
- New 2024 Approved Featuring The Use of Camera Shake in Creating the Best Videos
- New 2024 Approved 6 Best MP4 Mergers to Join Videos Easily
- Sometimes, when It Comes to Editing a Video, We Dont Even Know Where to Start, because There Are Too Many Options –Online Platforms Which Instantly Help Us Edit Our Clips, without Lengthy Process of Downloading and Installing Computer Programs
- Updated 11 Ways To Speed Up A Video On iPhone
- New Color Lut in Video - Color Grade Your Video for 2024
- Updated In 2024, Best 8 Srt File Creators
- Updated This Article Discusses What Is Adobe Premiere Pro, How to Download, Install and Use It, and Its Key Features. It Further Discusses Its Alternative for Editing Your Videos and More. Check Out Now
- In 2024, Looking for the Simple Steps to Add a Filter to Your Video in Premiere Pro? Here Are the Complete Steps Along with the List of Free Premiere Filter Presets to Use
- New How to Cut Videos on Mac without Using FFmpeg, In 2024
- 2024 Approved Top 20 Best Text To Speech Software Windows, Mac, Android, iPhone & Online
- New Let Us Talk About the Famous Photoshop and Most Commonly Used Glitch Effect. The Article Understudy Will Discuss in Detail About Photo Glitch Effect
- In 2024, Filmora Is a Great Video Editor that Many Users Are Making Intro Video with It. This Article Will Guide You How to Create an Intro Video with Filmora
- Updated Learn How to Add Fun and Personalized AR Emoji Stickers to Your Videos. Discover Tips and Tricks for Using These Stickers Like a Pro and Making Your Videos Stand Out
- New Best Photo Video Maker Apps with Song PC, Mobile, Online for 2024
- This Article Talks in Detail About How to Convert Time-Lapse to Normal Video Using Certain Methods on iPhone, Online Tools, and so On. It Further Discusses Converting Time-Lapse Video to Normal on the Computer. Check Out
- New How to Use Blender Green Screen for 2024
- Best Video Format Converter for PC and Online for 2024
- New Ways to Make Canva Collages
- Updated Easily Cut Large Videos Faster on Mac 7 Solutions Included for 2024
- Step by Step to Crop a Video Using Lightworks
- New 2024 Approved 4 Ways to Loop a Video on Vimeo
- New Learn About Open Broadcaster Software and How to Perform Obs Color Correction. Also, Explore the Various Aspects of Color Correction Like Contrast, Brightness, Saturation, Among Others
- New 100+ Best TikTok Captions Enhance Your Content
- How to Loop a Video in Canva Editor for 2024
- Fixing The Slow Playback Issues in DaVinci Resolve
- New Detailed Tutorial to Crop Video in KineMaster
- Ideas to Make A Perfect Café Vlog for 2024
- 2024 Approved How to Use OBS Chroma Key With/Without Green Screen
- In 2024, How To Achieve LumaFusion Color Grading Through LUTs
- Updated How To Fade Audio With Movavi Editor
- New Top 10 Anime Movies of All Time
- Updated In 2024, How to Change Video Resolution in Filmora
- Updated End This Problem! Make Transparent Background Video Today for 2024
- How to Fix My Vivo V29 Pro Location Is Wrong | Dr.fone
- Edit and Send Fake Location on Telegram For your Samsung Galaxy S23 in 3 Ways | Dr.fone
- How To Bypass iCloud By Checkra1n Even On Apple iPhone 15 Plus If Youve Tried Everything
- Complete Guide on Unlocking iPhone 13 mini with a Broken Screen?
- How to Fix Error 495 While Download/Updating Android Apps On Realme C55 | Dr.fone
- The Best 8 VPN Hardware Devices Reviewed On Samsung Galaxy F34 5G | Dr.fone
- In 2024, Ultimate Guide on ZTE Blade A73 5G FRP Bypass
- In 2024, Top 15 Apps To Hack WiFi Password On Poco X6
- In 2024, Will Pokémon Go Ban the Account if You Use PGSharp On Vivo T2 5G | Dr.fone
- New Translate Audio/Video Content From Spanish to English and Vice Versa
- How to Reset a Locked Xiaomi Redmi Note 12 Pro 4G Phone
- Is GSM Flasher ADB Legit? Full Review To Bypass Your Nokia C22FRP Lock
- 4 solution to get rid of pokemon fail to detect location On Realme Narzo 60 5G | Dr.fone
- How To Fake GPS On HTC U23 Pro For Mobile Legends? | Dr.fone
- Wondering the Best Alternative to Hola On Infinix Hot 40 Pro? Here Is the Answer | Dr.fone
- How to Sign Out of Apple ID On Apple iPhone 8 Plus without Password?
- Full Guide How To Fix Connection Is Not Private on Nokia C12 Pro | Dr.fone
- In 2024, Does Airplane Mode Turn off GPS Location On Itel A60s? | Dr.fone
- In 2024, How to Change Your Poco X5 Pro Location on life360 Without Anyone Knowing? | Dr.fone
- How to Unlock Oppo F25 Pro 5G Bootloader Easily
- Reasons for Motorola Moto G23 Stuck on Boot Screen and Ways To Fix Them | Dr.fone
- In 2024, Best Pokemons for PVP Matches in Pokemon Go For Honor Magic 5 Lite | Dr.fone
- Title: New Backup and Organize Your Footage in Minutes
- Author: Chloe
- Created at : 2024-05-20 03:38:24
- Updated at : 2024-05-21 03:38:24
- Link: https://ai-editing-video.techidaily.com/new-backup-and-organize-your-footage-in-minutes/
- License: This work is licensed under CC BY-NC-SA 4.0.

