
:max_bytes(150000):strip_icc():format(webp)/GettyImages-944229620-9cff560054804b72a431e9492c7445b4.jpg)
New Best 8 Online GIF to APNG Converters for 2024
Best 8 Online GIF to APNG Converters
Great Video Converter - Wondershare Filmora
Provide abundant video effects - A creative video editor
Powerful color correction and grading
Detailed tutorials provided by the official channel
The GIF image format is a bitmap image format that supports up to 8 bits per pixel. APNG (Animated Portable Network Graphics) is a format for animated images that supports 24 bits per pixel and 8 bits of transparency, which is not available in GIFs. Backward compatibility with non-animated PNG files is also maintained.
Because the initial frame of an APNG file saves as a regular PNG stream, it can display by most conventional PNG decoders. Extra chunks can hold frame speed data and different animation frames (as provided by the original PNG specification).
Is APNG superior to GIF? APNG files are smaller and have more outstanding quality than GIF files. However, GIF is more compatible than APNG. Firefox, Safari, Google Chrome, and Opera support APNG, while practically all online browsers support GIF.
Let’s look at the top 8 best GIFs to APNG converters now.
In this article
Part 1: Best 8 GIF to APNG Converters
Part 2: How to Convert a GIF to APNG
Part 3: FAQs
Part 1. Best 8 GIF to APNG Converters
Here are the top 8 GIFs to APNG converters to look out for
1. EZgif

Ezgif.com is a free, easy-to-use toolset for making and modifying animated GIFs. Besides some basic video editing, we also offer editing and conversions for various other picture formats, like animated WebP, PNG, MNG, and FLIF. GIF maker, video to GIF converter, and photo resizer are three of our most popular online utilities.
In addition, EZgif lets you edit GIFs before converting them to APNG.
Features:
- ImageMagick - conducts most picture editing tasks such as resizing, optimization, cropping, etc.
- Making, optimizing, trimming, and resizing animated GIFs with gifsicle and lossygif.
- For video conversions and editing, use FFmpeg (the genuine one).
- This video to GIF converter online has a low conversion rate.
- This free online GIF banner maker can assist you in creating GIF banners.
- This online GIF creator has an extremely user-friendly UI.
- This web program’s impressive capabilities are completely free to use.
- This GIF converter online maintains high-quality GIF conversion.
- You can make GIFs from videos in seconds.
Pros
The program at ezgif.com is entirely secure to use.
Users do not have to install any other programs for the software to work.
The application is simple and allows users to create GIFs online without exerting any effort.
Cons
Because there is a problem in the program, the result of this online GIF maker from photographs degrades. Hence it is not advised for high professional use.
2. FreeConvert

FreeConvert is a GIF to APNG converter that can convert photos, videos, audio files, documents, eBooks, and units, among other formats. It can upload GIFs from your device, Google Drive, Dropbox, or a URL, and it can batch convert many GIFs to animated PNG files without sacrificing quality. FreeConvert is a safe program because it automatically deletes converted files after two hours.
Features:
- You can convert numerous files at once without sacrificing quality.
- It provides a variety of output file types.
- You can choose from your device (computer, smartphone, etc.) or a Dropbox or Google Drive account to select your files.
Pros
It’s as simple as uploading your GIF files and clicking convert.
Convert a GIF to APNG(animated PNG) while keeping the original GIF’s animation quality.
It is entirely free and works with any web browser.
All files are encrypted using 256-bit SSL and erased after two hours.
Cons
Limited services for free users
3. Aconvert

Aconvert is another free online GIF to APNG converter. It not only converts GIFs to APNG but also compresses, resizes, merges, crops, and rotates GIFs. GIFs can be stored on your device or online storage services after being uploaded from local, online storage services or a URL.
The uploaded image file can be up to 200 MB in size.
My favorite software is AVS Image Converter, which can convert GIF to APNG and APNG to GIF. Furthermore, its ability to support a wide range of image formats and editing capabilities such as Watermarks, Filters, Image Corrections, and others is fantastic.
Features:
- It supports large file conversion of up to 200MB
- It can also resize and rotate GIF file
- It supports a wide range of image formats
- Edits watermark
Pros
Simple user interface
File compression settings get support across platforms
Multiplatform
Free and can be used on a web browser
Cons
Limited services for free users.
4. AVS Image Converter

AVS Image Converter for Windows is a free GIF to APNG converter. You can use it to convert animated GIF files into animated PNG files. This software can convert GIFs to APNGs and APNGs to animated GIFs. Aside from APNG and GIF, this shareware accepts various additional image and project formats as input, including BMP, JPEG, TIFF, TGA, PCX, PSD, PDD, and more. Unlike input types, only JPEG, PDF, GIF, PNG (APNG), TIFF, BMP, TGA, and RAS are the output formats. You can convert several photos from one format to another using our GIF to APNG converter’s batch conversion.
Features:
- It supports a variety of formats.
- It converts in batches.
- Convert animated GIFs into animated PNG files
Pros
Processes large groups of images
It’s possible to utilize it from the command line.
Presets for various dimensions
Multiple input formats are supported.
Allows you to convert photos to PDF.
Multiple effects are applied.
Cons
There are no individual presets.
Displays advertisements
5. Real World Paint
RealWorld Paint - portable image editor (rw-designer.com)

Another free GIF to APNG converter for Windows is RealWorld Paint. It can also convert an APNG file back to a GIF. Additionally, format conversions between PNG, JPEG, GIF, WEBP, animated WEBP, and other formats are possible. The prime benefit of this software is that it can work with projects created by various famous photo editors, including Photoshop, Paint.Net, GIMP, and others.
You can also add, edit, and improve frames in GIF files and simple conversion. When you open a GIF file in it, an editor area appears, right below which you can see all of the GIF file’s frames.
Features:
- Supports a wide range of file types
- Easy to use interface
- Doesn’t consume a lot of hardware resources
- Can convert in a few minutes
Pros
Transformation of a particular area
Multi-platform
Folder selection is simple.
Set the conversion quality quickly.
Cons
For novices, it’s a bit difficult.
Only the premium version is available.
6. Convertio

Convertio is a competitor to Browserling in terms of simplicity. Convertio, on the other hand, outnumbers the former in terms of picture formats supported. Convertio can also convert GIFs to TGA, PSD, JPG, TIFF, ICO, etc. Unfortunately, it lacks image editing capabilities.
Features:
- The file size is unrestricted.
- There is no restriction to how many conversions you can do at once.
- Priority number one.
- Every day, you have an unlimited number of conversion minutes.
- The maximum conversion time per file is unlimited.
- Pages with no advertisements.
Pros
Allows you to convert files by dragging and dropping them.
The ETA is less than 2 minutes, and the conversion is quick.
There are 3 membership options.
Cons
After 24 hours/manually, files saved on the server/cloud gets removed.
7. Onlineconvertfree

Onlineconvertfree is a lovely PNG converter that works with all standard image formats. You can create a PNG file from various formats, including GIF, JPG, HTML, TIFF, RAW, and more. Users may crop, clip, rotate, flip, and perform many other editing actions on their files.
Features:
- It has offline access for quick connectivity and document access.
- Even when an internet connection is unavailable, this helps speed up the entire document management process.
- The software comes with a free version that includes all of the basic capabilities
- Individuals and small enterprises will find it very affordable due to this.
- It supports a Variety of Formats
Pros
Converted files are simple to upload and download.
You can convert almost any file to your preferred format.
There is no need to give personal information such as an email address.
It offers three subscription tiers, all of which are ad-free.
Cons
This is a free service with a limit of two files per conversion.
8. Zamzar

Zamzar is the easiest online GIF to APNG converter on this list. It has numbered steps that make it extremely simple to use. You may convert GIF to PNG, TIFF, TGA, JPG, BMP, and other image formats on Zamzar.
Features:
- Uploading files by dragging and dropping them and speedier file conversions.
- All Zamzar subscribers get high-speed downloads.
- Email files to be converted.
- You can stream the converted videos and audio to your iPhone, iPad, and iPod.
Pros
Allows you to convert files from URLs. Batch conversion is supported.
Presets a three-step method that is quite easy to follow.
Over 1200 file formats are supported.
Multiplatform
File compression settings are now supported.
Developers will appreciate the API.
Cons
File size restricted to 50 MB on free accounts for uploads.
Like other online tools, it lacks OCR.
Part 2. How to Convert a GIF to APNG
Follow the 3 simple steps to convert GIF to animated PNG
Step 1: Choose Files
Select several files on your computer using the “Choose Files” button or the dropdown menu to select an online file from a URL, Google Drive, or Dropbox. The file size of an image can be up to 200 megabytes. You can use a file analyzer to gain detailed information about a source image, including its size, resolution, quality, and transparent color.

Step 2: Choose Image Format
Determine the image format, quality, and size you want to use. You choose to use the original image size or select “Change width and height” and enter a custom image size. 1920x1080 is an example of a [width]x[height] format. Only a few image formats support the picture quality choice, such as JPG, WEBP, or AVIF. The value ranges from 1 (lowest picture quality and highest compression) to 100 (highest image quality and lowest compression) (best quality but least effective compression). If this field is left blank, the converter will use the estimated quality of your input image if found; otherwise, 92 by default. JPG, PNG, TIFF, GIF, HEIC, BMP, PS, PSD, WEBP, TGA, DDS, EXR, J2K, PNM, or SVG are examples of target image formats.

Step 3: Click on Convert Now
Click the “Convert Now” option to begin the batch conversion. If one server fails, it will automatically attempt another; please be patient while converting. The resultant files will be in the “Conversion Results” section. Click the icon to display the QR code for the file or save it to an online storage like Google Drive or Dropbox.

Part 3. FAQ
1. What Is APNG (Animated Portable Network Graphics )
The .apng (Animated Portable Network Graphics) extension is an unofficial extension to the Portable Network Graphics format (PNG ). It is a series of frames (a PNG image) that represent an animation sequence, producing a visual effect comparable to a GIF. APNG files support 24-bit pictures with 8-bit transparency. You can convert non-animated GIF files to APNG format. APNG files have the same.png extension as PNG files and can be opened by software like Mozilla Firefox, Chrome with APNG compatibility, and iOS 10’s iMessage apps.
2. How to Create APNG File?
Step 1: Select Image
Click File > Open to bring up the photo you wish to convert to PNG.

Step 2: Click Open
Click “Open” when you’ve navigated to your picture.

Step 3: Go to Save As
After you’ve opened the file, go to File > Save As.

Step 4: Save
Make sure PNG is selected from the drop-down list of formats in the following box, then click “Save.”

Step 5: Compress
The compression rate is set to “Best” by default, but the Save Options box contains a few extras to check if you want a bit more control over the compression of your file. The file size will be determined by changing the compression rate; the higher the value, the less compression will be utilized when saving your image.

3. How Do I Save Something as APNG?
Here are the steps to take when saving an image as APNG
Step 1: Open Paint
Open an image-editing program on your computer, such as Paint for Windows or Paintbrush for Mac. Simply double-click the software’s icon on your desktop, or choose it from your applications list.
Step 2: Go to saved Images
Open the image you already saved. Navigate to the window where you saved the image. Click-hold it, drag it, and drop it onto the editor to display the image.
Step 3: Resize Image
Make changes to the image. You can resize or rescale the image before saving it as a PNG file, and you can even add text using your software’s Text tool. This is, however, wholly optional.
Step 4: Choose Save as
PNG is the top format for saving images. Choose “Save as” from the “File” menu in the editor’s upper left corner.
In the File Name window, provide the name you want for the file.
Under the File Name field, click the “Save as type” drop-down option to see all of the image’s possible formats.
Click “Save” after selecting “PNG.” The file will be saved as a PNG file in the same directory as the original.
Conclusion
After getting to know the eight best GIF to APNG converters, you can utilize them efficiently when converting files. Also, we provided answers to frequently asked questions to help increase your knowledge of what an APNG is and how to save and create an APNG file.
Now explore these and convert GIF to animated PNG.
The GIF image format is a bitmap image format that supports up to 8 bits per pixel. APNG (Animated Portable Network Graphics) is a format for animated images that supports 24 bits per pixel and 8 bits of transparency, which is not available in GIFs. Backward compatibility with non-animated PNG files is also maintained.
Because the initial frame of an APNG file saves as a regular PNG stream, it can display by most conventional PNG decoders. Extra chunks can hold frame speed data and different animation frames (as provided by the original PNG specification).
Is APNG superior to GIF? APNG files are smaller and have more outstanding quality than GIF files. However, GIF is more compatible than APNG. Firefox, Safari, Google Chrome, and Opera support APNG, while practically all online browsers support GIF.
Let’s look at the top 8 best GIFs to APNG converters now.
In this article
Part 1: Best 8 GIF to APNG Converters
Part 2: How to Convert a GIF to APNG
Part 3: FAQs
Part 1. Best 8 GIF to APNG Converters
Here are the top 8 GIFs to APNG converters to look out for
1. EZgif
Ezgif.com is a free, easy-to-use toolset for making and modifying animated GIFs. Besides some basic video editing, we also offer editing and conversions for various other picture formats, like animated WebP, PNG, MNG, and FLIF. GIF maker, video to GIF converter, and photo resizer are three of our most popular online utilities.
In addition, EZgif lets you edit GIFs before converting them to APNG.
Features:
- ImageMagick - conducts most picture editing tasks such as resizing, optimization, cropping, etc.
- Making, optimizing, trimming, and resizing animated GIFs with gifsicle and lossygif.
- For video conversions and editing, use FFmpeg (the genuine one).
- This video to GIF converter online has a low conversion rate.
- This free online GIF banner maker can assist you in creating GIF banners.
- This online GIF creator has an extremely user-friendly UI.
- This web program’s impressive capabilities are completely free to use.
- This GIF converter online maintains high-quality GIF conversion.
- You can make GIFs from videos in seconds.
Pros
The program at ezgif.com is entirely secure to use.
Users do not have to install any other programs for the software to work.
The application is simple and allows users to create GIFs online without exerting any effort.
Cons
Because there is a problem in the program, the result of this online GIF maker from photographs degrades. Hence it is not advised for high professional use.
2. FreeConvert
FreeConvert is a GIF to APNG converter that can convert photos, videos, audio files, documents, eBooks, and units, among other formats. It can upload GIFs from your device, Google Drive, Dropbox, or a URL, and it can batch convert many GIFs to animated PNG files without sacrificing quality. FreeConvert is a safe program because it automatically deletes converted files after two hours.
Features:
- You can convert numerous files at once without sacrificing quality.
- It provides a variety of output file types.
- You can choose from your device (computer, smartphone, etc.) or a Dropbox or Google Drive account to select your files.
Pros
It’s as simple as uploading your GIF files and clicking convert.
Convert a GIF to APNG(animated PNG) while keeping the original GIF’s animation quality.
It is entirely free and works with any web browser.
All files are encrypted using 256-bit SSL and erased after two hours.
Cons
Limited services for free users
3. Aconvert
Aconvert is another free online GIF to APNG converter. It not only converts GIFs to APNG but also compresses, resizes, merges, crops, and rotates GIFs. GIFs can be stored on your device or online storage services after being uploaded from local, online storage services or a URL.
The uploaded image file can be up to 200 MB in size.
My favorite software is AVS Image Converter, which can convert GIF to APNG and APNG to GIF. Furthermore, its ability to support a wide range of image formats and editing capabilities such as Watermarks, Filters, Image Corrections, and others is fantastic.
Features:
- It supports large file conversion of up to 200MB
- It can also resize and rotate GIF file
- It supports a wide range of image formats
- Edits watermark
Pros
Simple user interface
File compression settings get support across platforms
Multiplatform
Free and can be used on a web browser
Cons
Limited services for free users.
4. AVS Image Converter
AVS Image Converter for Windows is a free GIF to APNG converter. You can use it to convert animated GIF files into animated PNG files. This software can convert GIFs to APNGs and APNGs to animated GIFs. Aside from APNG and GIF, this shareware accepts various additional image and project formats as input, including BMP, JPEG, TIFF, TGA, PCX, PSD, PDD, and more. Unlike input types, only JPEG, PDF, GIF, PNG (APNG), TIFF, BMP, TGA, and RAS are the output formats. You can convert several photos from one format to another using our GIF to APNG converter’s batch conversion.
Features:
- It supports a variety of formats.
- It converts in batches.
- Convert animated GIFs into animated PNG files
Pros
Processes large groups of images
It’s possible to utilize it from the command line.
Presets for various dimensions
Multiple input formats are supported.
Allows you to convert photos to PDF.
Multiple effects are applied.
Cons
There are no individual presets.
Displays advertisements
5. Real World Paint
RealWorld Paint - portable image editor (rw-designer.com)
Another free GIF to APNG converter for Windows is RealWorld Paint. It can also convert an APNG file back to a GIF. Additionally, format conversions between PNG, JPEG, GIF, WEBP, animated WEBP, and other formats are possible. The prime benefit of this software is that it can work with projects created by various famous photo editors, including Photoshop, Paint.Net, GIMP, and others.
You can also add, edit, and improve frames in GIF files and simple conversion. When you open a GIF file in it, an editor area appears, right below which you can see all of the GIF file’s frames.
Features:
- Supports a wide range of file types
- Easy to use interface
- Doesn’t consume a lot of hardware resources
- Can convert in a few minutes
Pros
Transformation of a particular area
Multi-platform
Folder selection is simple.
Set the conversion quality quickly.
Cons
For novices, it’s a bit difficult.
Only the premium version is available.
6. Convertio
Convertio is a competitor to Browserling in terms of simplicity. Convertio, on the other hand, outnumbers the former in terms of picture formats supported. Convertio can also convert GIFs to TGA, PSD, JPG, TIFF, ICO, etc. Unfortunately, it lacks image editing capabilities.
Features:
- The file size is unrestricted.
- There is no restriction to how many conversions you can do at once.
- Priority number one.
- Every day, you have an unlimited number of conversion minutes.
- The maximum conversion time per file is unlimited.
- Pages with no advertisements.
Pros
Allows you to convert files by dragging and dropping them.
The ETA is less than 2 minutes, and the conversion is quick.
There are 3 membership options.
Cons
After 24 hours/manually, files saved on the server/cloud gets removed.
7. Onlineconvertfree
Onlineconvertfree is a lovely PNG converter that works with all standard image formats. You can create a PNG file from various formats, including GIF, JPG, HTML, TIFF, RAW, and more. Users may crop, clip, rotate, flip, and perform many other editing actions on their files.
Features:
- It has offline access for quick connectivity and document access.
- Even when an internet connection is unavailable, this helps speed up the entire document management process.
- The software comes with a free version that includes all of the basic capabilities
- Individuals and small enterprises will find it very affordable due to this.
- It supports a Variety of Formats
Pros
Converted files are simple to upload and download.
You can convert almost any file to your preferred format.
There is no need to give personal information such as an email address.
It offers three subscription tiers, all of which are ad-free.
Cons
This is a free service with a limit of two files per conversion.
8. Zamzar
Zamzar is the easiest online GIF to APNG converter on this list. It has numbered steps that make it extremely simple to use. You may convert GIF to PNG, TIFF, TGA, JPG, BMP, and other image formats on Zamzar.
Features:
- Uploading files by dragging and dropping them and speedier file conversions.
- All Zamzar subscribers get high-speed downloads.
- Email files to be converted.
- You can stream the converted videos and audio to your iPhone, iPad, and iPod.
Pros
Allows you to convert files from URLs. Batch conversion is supported.
Presets a three-step method that is quite easy to follow.
Over 1200 file formats are supported.
Multiplatform
File compression settings are now supported.
Developers will appreciate the API.
Cons
File size restricted to 50 MB on free accounts for uploads.
Like other online tools, it lacks OCR.
Part 2. How to Convert a GIF to APNG
Follow the 3 simple steps to convert GIF to animated PNG
Step 1: Choose Files
Select several files on your computer using the “Choose Files” button or the dropdown menu to select an online file from a URL, Google Drive, or Dropbox. The file size of an image can be up to 200 megabytes. You can use a file analyzer to gain detailed information about a source image, including its size, resolution, quality, and transparent color.
Step 2: Choose Image Format
Determine the image format, quality, and size you want to use. You choose to use the original image size or select “Change width and height” and enter a custom image size. 1920x1080 is an example of a [width]x[height] format. Only a few image formats support the picture quality choice, such as JPG, WEBP, or AVIF. The value ranges from 1 (lowest picture quality and highest compression) to 100 (highest image quality and lowest compression) (best quality but least effective compression). If this field is left blank, the converter will use the estimated quality of your input image if found; otherwise, 92 by default. JPG, PNG, TIFF, GIF, HEIC, BMP, PS, PSD, WEBP, TGA, DDS, EXR, J2K, PNM, or SVG are examples of target image formats.
Step 3: Click on Convert Now
Click the “Convert Now” option to begin the batch conversion. If one server fails, it will automatically attempt another; please be patient while converting. The resultant files will be in the “Conversion Results” section. Click the icon to display the QR code for the file or save it to an online storage like Google Drive or Dropbox.
Part 3. FAQ
1. What Is APNG (Animated Portable Network Graphics )
The .apng (Animated Portable Network Graphics) extension is an unofficial extension to the Portable Network Graphics format (PNG ). It is a series of frames (a PNG image) that represent an animation sequence, producing a visual effect comparable to a GIF. APNG files support 24-bit pictures with 8-bit transparency. You can convert non-animated GIF files to APNG format. APNG files have the same.png extension as PNG files and can be opened by software like Mozilla Firefox, Chrome with APNG compatibility, and iOS 10’s iMessage apps.
2. How to Create APNG File?
Step 1: Select Image
Click File > Open to bring up the photo you wish to convert to PNG.
Step 2: Click Open
Click “Open” when you’ve navigated to your picture.
Step 3: Go to Save As
After you’ve opened the file, go to File > Save As.
Step 4: Save
Make sure PNG is selected from the drop-down list of formats in the following box, then click “Save.”
Step 5: Compress
The compression rate is set to “Best” by default, but the Save Options box contains a few extras to check if you want a bit more control over the compression of your file. The file size will be determined by changing the compression rate; the higher the value, the less compression will be utilized when saving your image.
3. How Do I Save Something as APNG?
Here are the steps to take when saving an image as APNG
Step 1: Open Paint
Open an image-editing program on your computer, such as Paint for Windows or Paintbrush for Mac. Simply double-click the software’s icon on your desktop, or choose it from your applications list.
Step 2: Go to saved Images
Open the image you already saved. Navigate to the window where you saved the image. Click-hold it, drag it, and drop it onto the editor to display the image.
Step 3: Resize Image
Make changes to the image. You can resize or rescale the image before saving it as a PNG file, and you can even add text using your software’s Text tool. This is, however, wholly optional.
Step 4: Choose Save as
PNG is the top format for saving images. Choose “Save as” from the “File” menu in the editor’s upper left corner.
In the File Name window, provide the name you want for the file.
Under the File Name field, click the “Save as type” drop-down option to see all of the image’s possible formats.
Click “Save” after selecting “PNG.” The file will be saved as a PNG file in the same directory as the original.
Conclusion
After getting to know the eight best GIF to APNG converters, you can utilize them efficiently when converting files. Also, we provided answers to frequently asked questions to help increase your knowledge of what an APNG is and how to save and create an APNG file.
Now explore these and convert GIF to animated PNG.
Free Drone LUTs For Perfect Drone Footage
Drone footage is an aerial recording of an event, occasion, or entire town. The quality of these drone recordings may not be good enough. This is why users need to pursue video editing to enhance video quality. Meanwhile, editing videos from scratch can be time-consuming. Utilizing free drone LUTs is ideal for upscaling video quality to optimized standards. In this article, you will find top recommendations for using drone LUTs.
- Part 2: How Can LUTs be Used in Drone Footage Editing?
- Part 3: Best Drone LUTs To Discover In 2024
- Bonus Part: Learn More About Video Editing Through LUTs with Wondershare Filmora
Part 1: What Do You Know About LUTs?
LUTS, or Lookup Tables, do exist in small files. These files have sources to enhance color grading and optimize color correction within videos and images. The sources are special color presets that transform color schemas. The use cases of LUTs typically fall within the video and film industries. Individuals can also use these video-enhancing tools to better visualize their content.
Within LUTs, you will find a range of preset filters that can be applied. Meanwhile, the color grading is executed with more consistency. This way, the colors are accurately applied to all frames of visual content. The colors are mapped into the original footage using pre-determined color options. So, you don’t need to adjust or manually customize individual colors.
Part 2: How Can LUTs be Used in Drone Footage Editing?
Drone technology is a new revolution in this modern world. After all, it allows us to capture aerial photos and videos with greater proximity. While the quality of this footage may not be good, LUTs can help. Here is how you can use LUTs in drone footage editing and make your work easier:
- Color Grading: You can use LUTs for creative color grading solutions. After all, there are different filter presets with unique color styling. This provides new and interesting looks to your visual media.
- Match Colors: If you use different cameras to record drone footage, colors may differ. That’s where LUTs can be useful. They can match colors in all frames with dedicated filter presets.
- Color Correction: Drone footage often faces lighting issues that damage color gradients. When using drone LUTs pack-free, you can correct color schemas with consistency. The color imbalances will rectify.
- Saves Resources: With LUTs, you can save time and money. So, you don’t need to waste long hours on video editing. You don’t even have to spend money on good editing software. Color grading becomes more straightforward with LUTs.
Part 3: Best Drone LUTs To Discover In 2024
Aerial technology in this modern world is evolving, which includes drone usage. In contrast, you may need to upscale video colors using special drone LUTs. Here you’ll find the list of the best drone LUTs to make video upscaling smarter:
1.Moody DJI Drone LUTs
Provide moody styles to your recorded drone footage with this DJI drone LUTs pack free download. There are 15 LUTs preset filters that you can use to upscale video colors. All filters are unique, with different color gradients, contrast, and compositions. You have to import these filters to use them, and they require no extra plugin. The drone LUTs pack is compatible with both Windows and Mac.

2.DJI Drone LUTs Color Preset
Transfrom your aerial video shoot in wildlife, sports, or traveling with this LUTs pack. After all, this DJI Mavic 2 Pro LUTs works with drones, including the DJI Mavic Pro line. There are, in total, 120 color presets that are available in different gradients. The quality for these LUTs is 8K, and they work with LOG and Rec .709.

3.DB - Cinematic Drone LUTs
Enhance aerial videography using color grading using this cinematic drone LUTs-free pack. In this LUTs pack, you’ll find 10 premium LUTs to get started. Each LUTs possesses a special color preset to provide new looks within aerial videos. Meanwhile, this DJI drone LUTs pack free download is ideal for DJI drones. The LUTs work well on types of camera footage.

4. CINEMATIC DRONE LUTS
Apply professional color gradients to your all-important drone visual content. You can transform videos’ visual quality by using these free LUTs for drone footage. In total, you receive 25 color presets in different color schemas and textures. This way, you can blend cinematic touch into your aerial shoot. You can even set a reference point or increase the speed of color grading.

5. JHL Drone LUTs
Aerial videography can be upscaled in a simpler way using JHL drone LUTs. After all, this LUTs pack contains 18 distinctive LUTs preset filters. In general, you can use these LUTs on all software editing platforms. Meanwhile, the LUTs have been tested for DJI drone clips, so expect outstanding results. The LUTs are special because they provide solutions in all weather and light ranges.

6. Drone LUTs
Make your aerial project more enchanting with this drone LUTs pack free. You will get 20 diverse drone LUTs preset filters. In contrast, these filters suit all lighting, weather, and environment. The color gradients of your visual content are optimized with stunning color grading. These LUTs work with any resolution. You need to drag and drop these elements into your content.

7. B&W
Black and white color schemes are always special. Adding them to your aerial videos or photos can enlighten your content’s visualization. By using these B&W LUTs for drones, turn aerial shoots into appealing black-and-white contrasts. This will make your visual content more aesthetic with improved engagement. Using this LUTs pack is very convenient and straightforward.

Bonus Part: Learn More About Video Editing Through LUTs with Wondershare Filmora
Video editing is a way to optimize the quality of videos with perfection. Meanwhile, using LUTs can convincingly simplify video editing. For using cinematic drone LUTs free, you need a good and reliable tool. Wondershare Filmora is the trusted solution in this regard. This is a video editing software that allows video upscaling from broader perspectives.
There are more than 200 LUTs that you can use, and every LUTs is unique. The availability of titles, stickers, transitions, effects, and audio makes this tool special. Meanwhile, Filmora comes with a user-friendly interface to get started.

Key Features of Wondershare Filmora
Regarding video editing, Wondershare Filmora takes the lead over its competitors. There are several functions and various tools to learn about, which can be seen in the critical features of Filmora described below:
1. Instant Mode
Filmora’s instant mode allows you to create videos without requiring editing skills. You have to add your respective media items, and Filmora transforms them into videos. There are more than 115 templates that you can use. The AI algorithm works fast and efficiently.
2. Batch Text Editing
Using batch text editing, you can add subtitles to your video. There are three ways to batch edit the text. First, select all texts in the timeline to edit them at the same time. Second, multiple text styles in the Filmora player. Third, changing fonts in bulk quantity within advanced editing.
3. Screen Recorder
Record your screenplay using the Filmora screen recording facility. So, you can record videos from different areas of a webcam or PC screen. You can also customize the ratio and screen sizes of your videos. Meanwhile, audio is recorded by microphone and system.
4. Adjustment layer
Filmora can also help add general effects to your videos at once. Through the adjustment layer, the same effects could be applied across timeline videos. This improves video editing efficiency as a whole. In addition, the adjustment layer can hold unlimited effects.
Add LUTs on Video For Win 7 or later(64-bit)
Add LUTs on Video For macOS 10.14 or later


Conclusion
Drone technology is evolving modern videography and photography with aerial views. Meanwhile, using a camera may affect the quality of recorded videos. This is why using DJI mini 2 LUTs free is essential. This article discussed 7 drone LUTs pack free help get started with color upscaling. Moreover, you also learned about Wondershare Filmora, which is a best-in-class video editing software.
- Part 3: Best Drone LUTs To Discover In 2024
- Bonus Part: Learn More About Video Editing Through LUTs with Wondershare Filmora
Part 1: What Do You Know About LUTs?
LUTS, or Lookup Tables, do exist in small files. These files have sources to enhance color grading and optimize color correction within videos and images. The sources are special color presets that transform color schemas. The use cases of LUTs typically fall within the video and film industries. Individuals can also use these video-enhancing tools to better visualize their content.
Within LUTs, you will find a range of preset filters that can be applied. Meanwhile, the color grading is executed with more consistency. This way, the colors are accurately applied to all frames of visual content. The colors are mapped into the original footage using pre-determined color options. So, you don’t need to adjust or manually customize individual colors.
Part 2: How Can LUTs be Used in Drone Footage Editing?
Drone technology is a new revolution in this modern world. After all, it allows us to capture aerial photos and videos with greater proximity. While the quality of this footage may not be good, LUTs can help. Here is how you can use LUTs in drone footage editing and make your work easier:
- Color Grading: You can use LUTs for creative color grading solutions. After all, there are different filter presets with unique color styling. This provides new and interesting looks to your visual media.
- Match Colors: If you use different cameras to record drone footage, colors may differ. That’s where LUTs can be useful. They can match colors in all frames with dedicated filter presets.
- Color Correction: Drone footage often faces lighting issues that damage color gradients. When using drone LUTs pack-free, you can correct color schemas with consistency. The color imbalances will rectify.
- Saves Resources: With LUTs, you can save time and money. So, you don’t need to waste long hours on video editing. You don’t even have to spend money on good editing software. Color grading becomes more straightforward with LUTs.
Part 3: Best Drone LUTs To Discover In 2024
Aerial technology in this modern world is evolving, which includes drone usage. In contrast, you may need to upscale video colors using special drone LUTs. Here you’ll find the list of the best drone LUTs to make video upscaling smarter:
1.Moody DJI Drone LUTs
Provide moody styles to your recorded drone footage with this DJI drone LUTs pack free download. There are 15 LUTs preset filters that you can use to upscale video colors. All filters are unique, with different color gradients, contrast, and compositions. You have to import these filters to use them, and they require no extra plugin. The drone LUTs pack is compatible with both Windows and Mac.
2.DJI Drone LUTs Color Preset
Transfrom your aerial video shoot in wildlife, sports, or traveling with this LUTs pack. After all, this DJI Mavic 2 Pro LUTs works with drones, including the DJI Mavic Pro line. There are, in total, 120 color presets that are available in different gradients. The quality for these LUTs is 8K, and they work with LOG and Rec .709.
3.DB - Cinematic Drone LUTs
Enhance aerial videography using color grading using this cinematic drone LUTs-free pack. In this LUTs pack, you’ll find 10 premium LUTs to get started. Each LUTs possesses a special color preset to provide new looks within aerial videos. Meanwhile, this DJI drone LUTs pack free download is ideal for DJI drones. The LUTs work well on types of camera footage.
4. CINEMATIC DRONE LUTS
Apply professional color gradients to your all-important drone visual content. You can transform videos’ visual quality by using these free LUTs for drone footage. In total, you receive 25 color presets in different color schemas and textures. This way, you can blend cinematic touch into your aerial shoot. You can even set a reference point or increase the speed of color grading.
5. JHL Drone LUTs
Aerial videography can be upscaled in a simpler way using JHL drone LUTs. After all, this LUTs pack contains 18 distinctive LUTs preset filters. In general, you can use these LUTs on all software editing platforms. Meanwhile, the LUTs have been tested for DJI drone clips, so expect outstanding results. The LUTs are special because they provide solutions in all weather and light ranges.
6. Drone LUTs
Make your aerial project more enchanting with this drone LUTs pack free. You will get 20 diverse drone LUTs preset filters. In contrast, these filters suit all lighting, weather, and environment. The color gradients of your visual content are optimized with stunning color grading. These LUTs work with any resolution. You need to drag and drop these elements into your content.
7. B&W
Black and white color schemes are always special. Adding them to your aerial videos or photos can enlighten your content’s visualization. By using these B&W LUTs for drones, turn aerial shoots into appealing black-and-white contrasts. This will make your visual content more aesthetic with improved engagement. Using this LUTs pack is very convenient and straightforward.
Bonus Part: Learn More About Video Editing Through LUTs with Wondershare Filmora
Video editing is a way to optimize the quality of videos with perfection. Meanwhile, using LUTs can convincingly simplify video editing. For using cinematic drone LUTs free, you need a good and reliable tool. Wondershare Filmora is the trusted solution in this regard. This is a video editing software that allows video upscaling from broader perspectives.
There are more than 200 LUTs that you can use, and every LUTs is unique. The availability of titles, stickers, transitions, effects, and audio makes this tool special. Meanwhile, Filmora comes with a user-friendly interface to get started.
Key Features of Wondershare Filmora
Regarding video editing, Wondershare Filmora takes the lead over its competitors. There are several functions and various tools to learn about, which can be seen in the critical features of Filmora described below:
1. Instant Mode
Filmora’s instant mode allows you to create videos without requiring editing skills. You have to add your respective media items, and Filmora transforms them into videos. There are more than 115 templates that you can use. The AI algorithm works fast and efficiently.
2. Batch Text Editing
Using batch text editing, you can add subtitles to your video. There are three ways to batch edit the text. First, select all texts in the timeline to edit them at the same time. Second, multiple text styles in the Filmora player. Third, changing fonts in bulk quantity within advanced editing.
3. Screen Recorder
Record your screenplay using the Filmora screen recording facility. So, you can record videos from different areas of a webcam or PC screen. You can also customize the ratio and screen sizes of your videos. Meanwhile, audio is recorded by microphone and system.
4. Adjustment layer
Filmora can also help add general effects to your videos at once. Through the adjustment layer, the same effects could be applied across timeline videos. This improves video editing efficiency as a whole. In addition, the adjustment layer can hold unlimited effects.
Add LUTs on Video For Win 7 or later(64-bit)
Add LUTs on Video For macOS 10.14 or later
Conclusion
Drone technology is evolving modern videography and photography with aerial views. Meanwhile, using a camera may affect the quality of recorded videos. This is why using DJI mini 2 LUTs free is essential. This article discussed 7 drone LUTs pack free help get started with color upscaling. Moreover, you also learned about Wondershare Filmora, which is a best-in-class video editing software.
33 Best Video Splitter Recommended
A video splitter is necessary when you need to extract a crucial or particular portion of a video file. Many users trim or reduce video segments by deleting superfluous or undesired elements. While splitting a video into smaller clips is a challenging task in and of itself, don’t overlook the importance of keeping the quality of the video clip you plan to obtain. While there are various online video splitter software available today, most of them do not achieve what they claim. We’ve put together a compelling list of the best video splitters in this post, including full-featured software and lightweight editing solutions. Continue reading to learn more about them and choose the one that most appeals to you.
- Filmora
- Boilsoft Video Splitter
- Solveigmm Video Splitter
- BandiCut
- Free Video Cutter
- Easy Video Splitter
- Avidemux
- Ultra Video Splitter
- VideoPad Video Editor
- Windows Movie Maker
- Windows Photos
- VLC
- iMovie
- Format Factory
- 7 Best Free Video Splitter Online
- 10 Best Video Splitter for Mobile Phone
- Filmora
- AndroVid Video Editor
- Easy Video Cutter
- Video Editor
- VideoShow – Video Editor
- Trim Video
- Video Splitter
- Crop video
- Video Crop
- Video Trim & Cut
Part 1: Backup Your Original Video
Making several backups is perhaps the most critical thing you can do for your project. Whether your computer dies suddenly or your editing application crashes, you’ll have a point to fall back on if you have a backup. Making this a habit will save you a lot of time and work in the long term. How many copies of your data should you make? You should create at least three project duplicates in the best-case scenario. Also, make sure they’re preserved in various formats and places—one on an SD card, another on a hard drive, or a USB drive.
14 Best Video Splitter for Windows/Mac
1. Filmora
Wondershare Filmora Video Editor is a superb video editor for those seeking software that can split videos and has a lot of functions. It was originally only accessible for Windows, but thanks to the developers, Mac users may now use this high-quality video splitter. Using this program to split and join videos is pretty basic and straightforward. It’s an intriguing tool since it allows users to produce high-quality films using filters, effects, and other features in an easier method than employing professional editors. This program also lets you export video at a breakneck speed, up to 4k quality.
![]()
Platform: Windows/Mac
Price: Free Trial
Features
- Editing is intuitive and quick.
- Export video in 4k quality.
- There are several graphic effects and transitions.
- Footage from the internet.
- Regularly upgraded features.
Pros
- Large films can be easily cut, trimmed, and combined without compromising quality.
- On the exported video, there is no watermark.
- Both Windows and Mac computers are supported.
- Splitting a video is such a breeze.
- For novices, it has a lot of handy options that will help you create a stunning film.
Cons
- Large-scale content editing might be slow at times.
2. Boilsoft Video Splitter
Boilsoft Video Splitter can divide, edit, or trim a big AVI, MPEG, RM, ASF, WMV, 3GP, MKV, FLV, or MP4 video file without re-encoding smaller video segments. It has a built-in player that allows you to effortlessly split/cut video files according to time or selection.
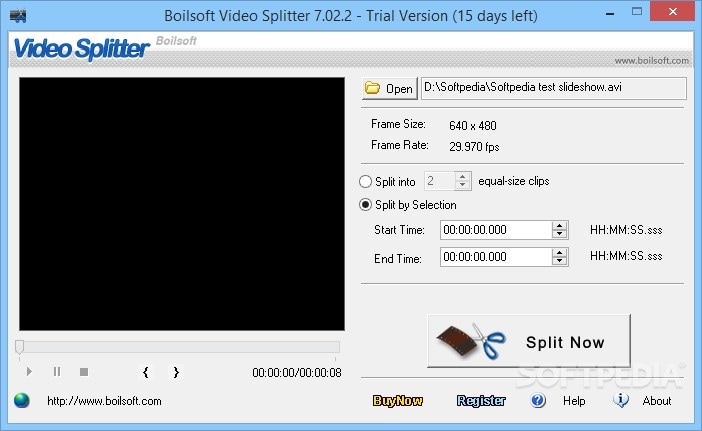
Platform: Windows/Mac
Price:$34.95 one-time payment
Features
- Split Video
- Cut video
- Built-in player
Pros
- It supports lots of video format.
- User-friendly software.
Cons
- Because you can’t adjust the program window, using the slider for selection becomes increasingly difficult as your video becomes longer.
3. Solveigmm Video Splitter
SolveigMM Video Splitter is suitable for simple editing processes such as removing an extra section from a video, removing an advertisement from a movie, muting the sound on a selected video fragment, saving only a video or audio track from a file, cutting a video into parts, saving segments into separate files, and so on. The editing procedure takes just a few seconds.
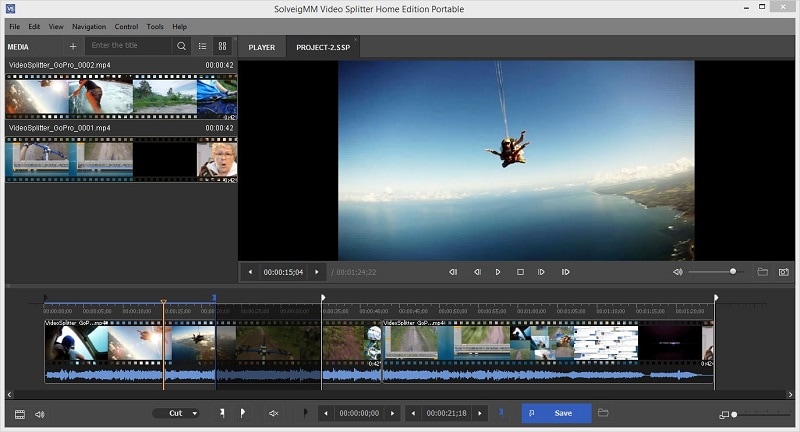
Platform: Windows/Mac
Price:$7.99 per month
Features
- Video cutter
- Video editor
- Video Joiner
Pros
- No previous training or knowledge is necessary to understand how to use the software.
- All major file formats are supported.
- The output file quality is unaffected.
Cons
- It sometimes crashes depending on the file size.
4. BandiCut
Bandicut is a video splitting and joining program for Windows systems only. It has a straightforward UI and simple settings. It may also be used as a video converter, allowing you to modify the format of the output clips. The tool is useful for both newcomers and seasoned users.
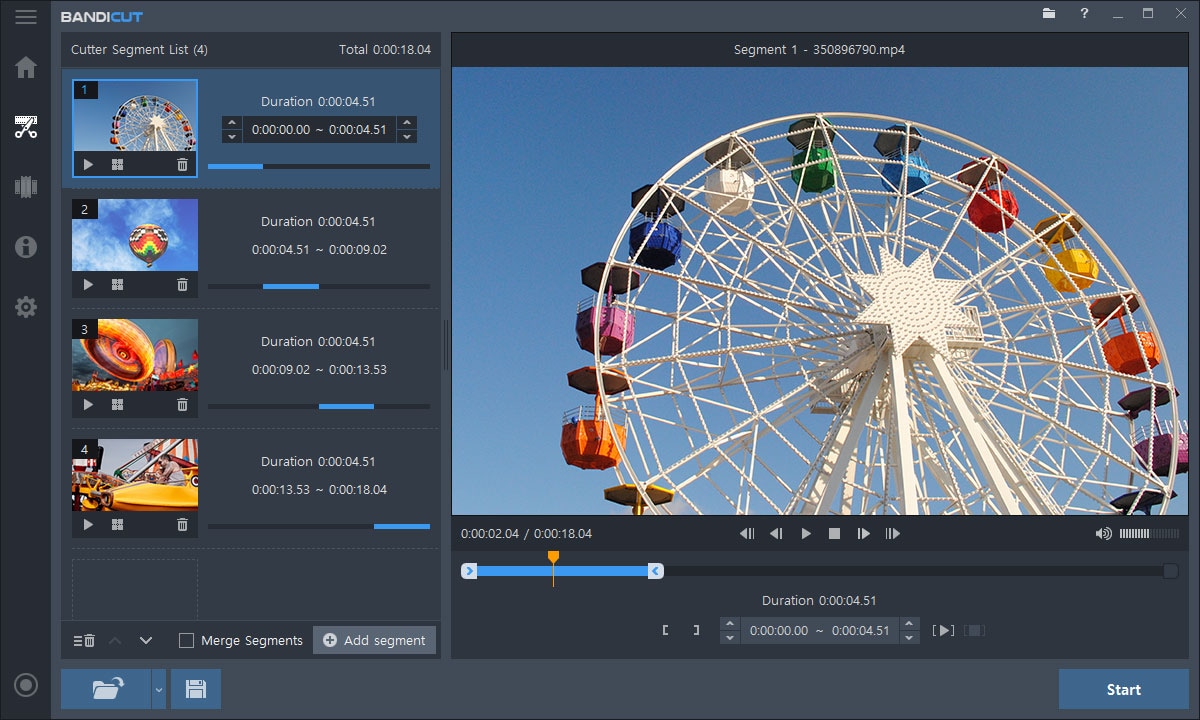
Platform: Windows
Price:$29.95 per user per month
Features
- Easy and fast video cutter
- Video splitter
Pros
- The interface is pleasing to the eye, and the functions are simple.
- High-capacity mode
Cons
- There isn’t a fully working free version available.
5. Free Video Cutter
This is a basic tool for reducing the size of large video files. It allows you to cut a clip from a movie or video in various formats and save it in four other formats. The hand-drawn interface, by the way, is incredibly charming.
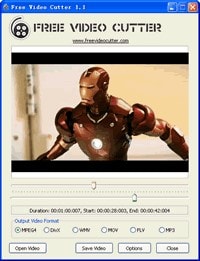
Platform: Windows
**Price:**a free version and premium version ($17.99 per month)
Features
- An irregularly shaped hand-drawn art style interface.
- Videos in a variety of formats are accepted.
- The control panel is small, with just three major buttons.
Pros
- Save as new videos in a variety of formats without compromising quality.
- It may be used to trim lengthy movies, mobile videos, and camera recordings, among other things.
Cons
- For huge files, there are a lot of crashes.
- For Mac users, this tool is not accessible.
6. Easy Video Splitter
Easy Video Splitter is a simple video editing application that allows you to divide your video into many segments. It can play AVI, MPEG, WMV, and ASF files. The scroll bats may be used to cut the movie precisely where you want it to be cut or to divide the film at certain intervals.
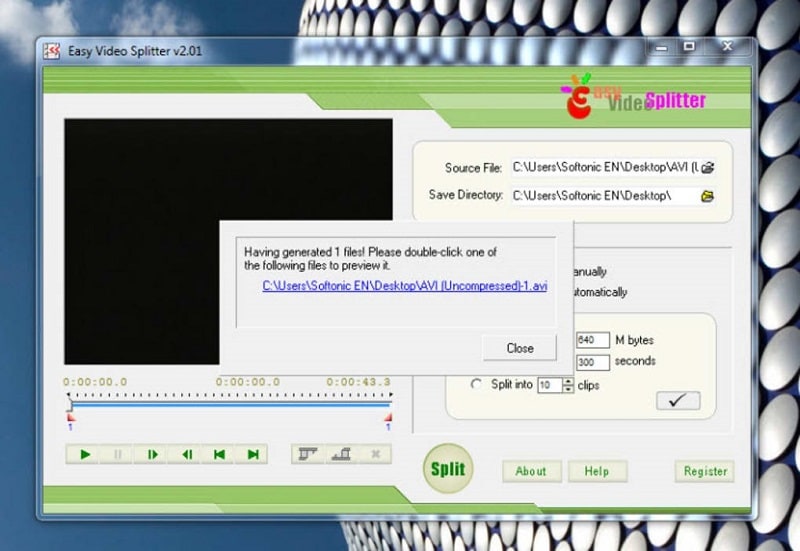
**Platform:**Windows/Mac
**Price:**free with ads
Features
- Has a batch processor
- Multiple file support
- Easy to use
Pros
- Batch processing is supported.
Cons
- Only one frame at a time may be fine-tuned.
7. Avidemux
Avidemux is perfect if you have a video to encode or arrange for a certain speaker system. It’s also an ideal choice if you just require a basic video editor, although there are many more extensive applications available that may be better appropriate.
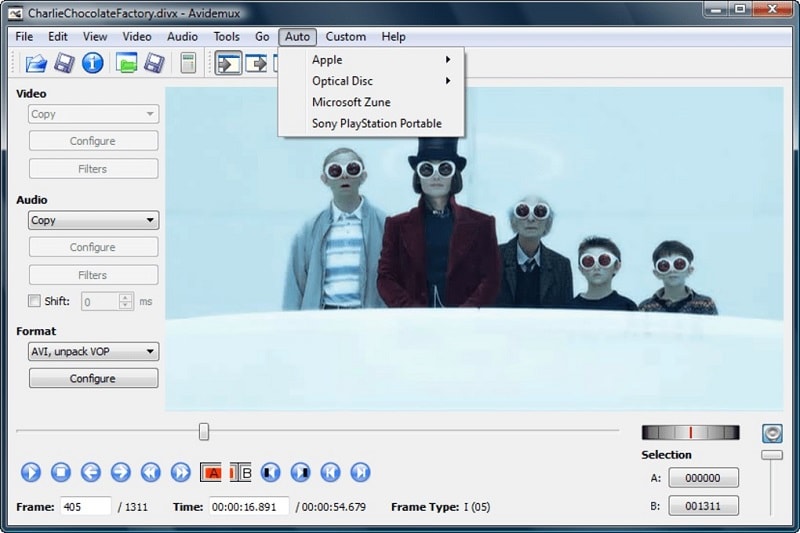
**Platform:**Windows/Mac
**Price:**free
Features
- This program can handle a variety of subtitle formats, including SUB and SRT.
- They also provide a variety of filtering options.
- You may export videos in various formats, including MKV, MPEG, and MP4.
Pros
- A user-friendly interface
- Excellent alternatives for encoding
- Filters for sharpening and de-noising
Cons
- There is no timeline.
- There are no innovative transitions or effects.
8. Ultra Video Splitter
Ultra Video Splitter is an excellent solution for people who just need to complete this one operation and hence do not need the usage of sophisticated video editing software. The tool enables you to choose from a variety of parameters for the final file or files, such as file size, final format, and bitrate.
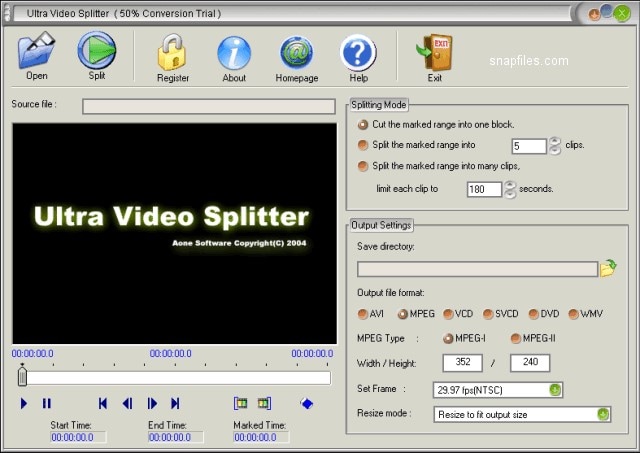
**Platform:**Windows/Mac
Price:$25.00 one-time payment
Features
- Supports videos in WMV, XviD, MPEG, ASF, AVI, RM, MOV, 3GP, Divx, and MP4 format.
- Can export the final video in VCD, SVCD, DVD, AVI, DivX, MPEG, or WMV format.
Pros
- Video trimming and exporting are both quick.
- Multiple video formats are supported.
Cons
- Has just a few video editing options.
9. VideoPad Video Editor
On Mac and Windows, the VideoPad video editor allows you to edit clips and produce professional-quality films. Its divide and merge functions are also straightforward to utilize. VideoPad editing software can be used to create visually appealing videos. As a result, the video splitter software for Mac can rapidly and efficiently manipulate video streams.
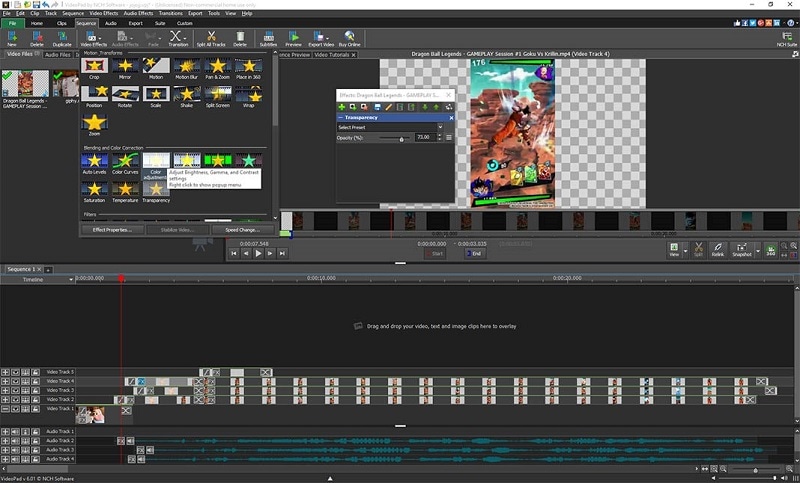
**Platform:**Windows/Mac
Price:$60.00 one-time payment
Features
- It supports a variety of file formats, offering users additional choices for how to utilize the tool with different file kinds.
Pros
- The cost of a professional business video is surprisingly low.
- Importing video is as simple as dragging and dropping.
Cons
- The free edition offers a restricted number of functions.
10. Windows Movie Maker
This video editing software comes with Windows OS and is focused on simplicity: There’s no easier method to split videos and save into lossless codecs with titles, transitions, background music, and effects than this. Earlier versions of the application were so basic that they couldn’t accomplish what most people required. Still, over time, features like voiceover recording and even anti-shake have crept into what is today a highly useful free video splitter.
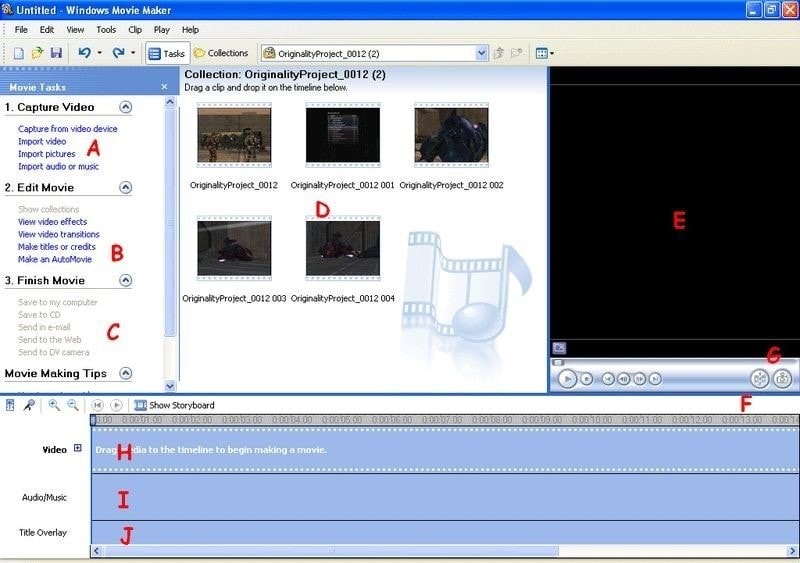
**Platform:**Windows
**Price:**free
Features
- Cool transitions
- Effects on video
- Voiceovers are some of the audio features
Pros
- Effects are automatically previewed.
- Audio features such as voiceovers and other audio enhancements.
- Excellent choices for sharing.
- Simple to use
- Stabilization.
Cons
- There are no modifications to the contrast or saturation.
- The effects aren’t flexible.
11. Windows Photos
Many users will never require more than Windows 10’s built-in picture and video editor . It is an automatic video splitter with sophisticated effects like 3D overlays and animated titles are among the extras.
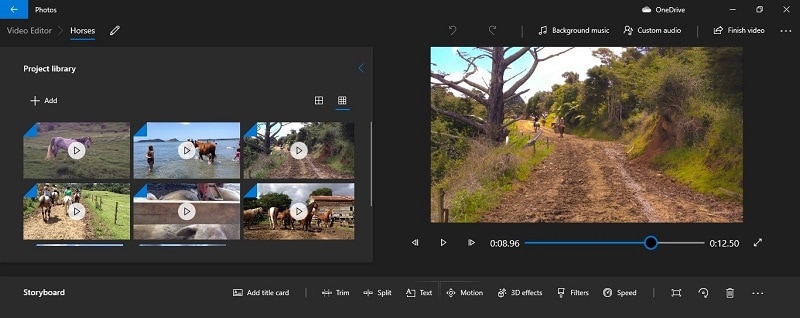
**Platform:**Windows
**Price:**free
Features
- Face recognition
- Video cutter
- 3D overlays
Pros
- A simple interface.
- Detecting faces and objects.
- Album creation is done automatically.
- It works with OneDrive.
- Soundtracks, text, and transitions are all used in video editing.
Cons
- There isn’t a before-and-after comparison.
- Panorama stitching and selective focus are not supported.
- There is no geometry correction or chromatic aberration correction.
12. VLC
VLC Media Player , for good reasons, is a hugely popular video splitter. It is completely free, supports almost everything without the need to download additional codecs, supports streaming, can enhance video and audio playback for your chosen device, and can be extended almost infinitely with plugins downloadable from the internet.
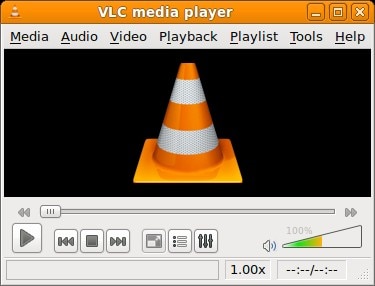
**Platform:**Windows/Mac
**Price:**free
Features
- Allows streaming of MPEG and DivX files
- Excellent video and audio playback modifying tools
Pros
- It can play all kinds of music and video formats, even compressed ones.
Cons
- It is GPU-dependent and may crash at random moments.
13. iMovie
If you’re using a Mac,iMovie video editing program can help you split videos. Mac users will find this to be one of the finest video splitters available. It contains a wide range of capabilities that may improve the quality of your video in a variety of ways. The video may be trimmed and enhanced with many features, such as text, special effects, and audio. Video quality may be improved with this software’s special effects and video upgrades. In addition, the interface is so user-friendly that even novices may generate stunning results. On the other hand, iMovie is capable of storing 4K films.
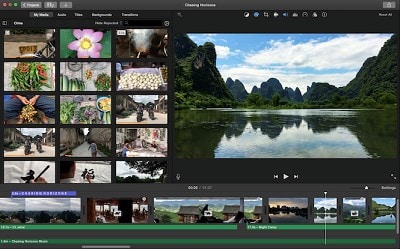
**Platform:**Mac
**Price:**free
Features
- An easy-to-use video splitter that is already built-in
- It’s simple to use
Pros
- An easy-to-use video splitter that is already built-in
- It’s simple to use
Cons
- Uploading and exporting videos takes a long time.
14. Format Factory
Multifunctional document and multimedia processing software -Format Factory - is only available for Windows. It’s meticulously designed to keep you from getting lost in the weeds when working on any project. It is designed to be a stand-alone file management application, and judging by the wealth of options available, it has done an excellent job.

**Platform:**Windows
**Price:**free
Features
- Video joining and muxing are available.
- It has a screen recorder built right in.
- A built-in video player and downloader are included.
- Allows for hardware acceleration.
- Disk ripping options are provided.
- Processing may be done in a batch.
Pros
- Removes watermarks and logos.
- File formats supported include video, audio, images, and documents.
Cons
- Unnecessary software is installed when installing the program.
7 Best Free Video Splitter Online
2. VEED.IO
Veed.io is a free online video editing tool that allows anybody to make powerful movies and expand their audiences. It has several useful features, such as cutting and filtering films based on their appearance. Users may cut, add text, and draw on the videos. Veed may also be used to generate videos on social media channels.

**Price:**free
Features
- Video splitter and joiner
Pros
- Simple and quick.
- A preview of the cutting result is available.
Cons
- The maximum file size is 50 MB.
3. Flixier
Flixier is a web-based video editor that offers 1-minute exports to any device, easy collaboration, and lots of cloud storage. Flixier enables customers to export whatever video they want, independent of their technology. It keeps all stakeholders in the loop by allowing each team member and contributor to remain in sync across all platforms. Teams may interact in real time without fear of losing track of the project. Cloud storage, version history, feedback comments, sophisticated exports, and email alerts are all available. The tool supports Windows, Mac, Linux, and Chromebooks.
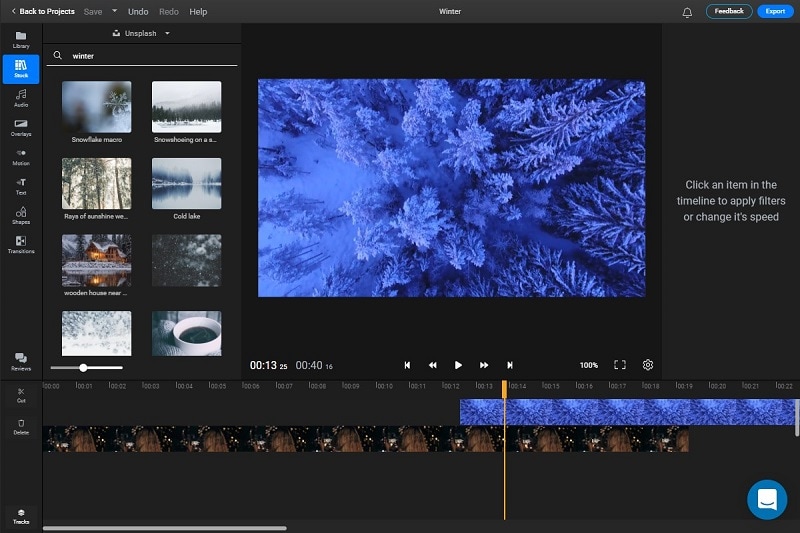
**Price:**free
Features
- Video splitter and joiner
Pros
- iPhone version is available.
- Automatic sound amplification.
Cons
- May seem too overloaded with functions.
4. Split Video
Split Video program may also be used to edit and split huge videos into smaller segments. It’s quite simple to work with. All you have to do now is choose the video to divide. Tell the app how you’d want the video to be divided. Choose how many parts you want in your video. You may watch the app-split clips before sharing them.
**Price:**free
Features
- Video splitter and joiner
Pros
- Interface that is easy to use.
Cons
- The maximum file size is 200 MB.
5. Kapwing
This application primarily advertises itself as a video trimmer. It lets you edit films by removing unwanted bits and trimming them to the appropriate length. It also has some basic settings, such as utilizing it as a free online MP4 splitter. The user interface is simple, and uploading a movie takes just a few moments. The primary drawback is that your film may only be 300 MB in size and must be under 30 minutes in length.
**Price:**free
Features
- Video splitter and joiner
Pros
- Interface that is simple to use.
Cons
- A little watermark appears in the corner of your video with the free version.
- Only supports films up to 300 MB in size and up to half an hour in length.
6. Typito
Typito is a video collaboration tool that allows you and your team to work together to make better films for your business. Typito allows you to make and utilize professionally created graphic overlays for free, as well as generate full-length HR movies in both square and portrait formats. It enables you to produce movies consistent with your brand, allowing you to change and customize elements like font, color, and logo with a few mouse clicks. You may save time for your organization by producing videos quicker and working with your team to publish professional-looking films while previewing them on the move. Inviting team members to the project and assigning responsibilities for editing and reviewing videos are just a few collaboration tools.
**Price:**free
Features
- Video splitter and joiner
Pros
- Simple features to use
Cons
- Few transition templates.
7. Clideo
Clideo is a one-of-a-kind platform that allows you to easily produce and modify any video, GIFS, and picture files in one spot. Merging, compressing, resizing, slideshow, cropping, rotation, and other video editing tools are included in the program. Users may add music or text to videos to help them stand out and draw in the right audience. The video editing platform supports various video formats such as MP4, AVI, MPG, VOB, WMV, MOV, and others. There is no need to download or install any applications since everything may be done entirely online. The premium security encryption that comes with it ensures that all video files are always well-protected.
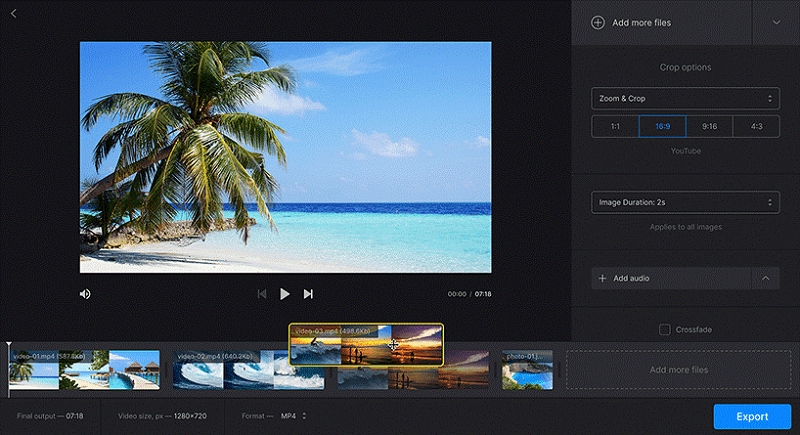
**Price:**free
Features
- Video splitter and joiner
Pros
- Much easier to use than other video editing software.
- Projects are stored on the cloud, so they don’t take up any computer resources.
- There is no need to download any program.
Cons
- The feature set is limited in comparison to other video editing suites.
- Visual artistry is required.
- Some undertakings need a significant amount of time to complete.
10 Best Video Splitter for Mobile Phone
1. Filmora
A good video editor is required to split a video qualitatively.Filmora Video Editor & Maker might be the answer. It works with high-definition videos. It comes with all of the necessary editing tools. As a result, you will not be sorry for installing this software. Not only will you be able to edit and divide films effortlessly, but you’ll also be able to add fun filters.
The sticker library in Filmora Video Editor & Maker is extensive. The number is in the thousands. You’ll be able to apply both realistic and humorous animated stickers. Use video transitions such as Flash, Page Cut, Cross Zoom, Blurry Roll, and Cube. You have complete control over the speed of your edited video.
**Price:**free
Features
- Video splitter and joiner
- Video editor
Pros
- Files may be readily exported and imported.
Cons
- Compatibility of exported videos is limited.
2. AndroVid Video Editor
AndroVid is a video-splitting program with all the tools you’ll ever need. This program is jam-packed with editing tools, allowing you to create a polished video quickly. The program is also quite user-friendly, so even if this is your first time splitting a video, you will be able to handle it.
**Platform:**Android
**Price:**free
Features
- Video splitter and joiner
- Video editor
Pros
- Simple video cutting tool; can extract single-frame pictures from videos.
Cons
- There are no sophisticated editing choices, and the audio options are quite restricted.
- There is no tool for full-screen graphics, and the user interface is a little complicated.
- The ad-free version is nearly as expensive as KineMaster Pro, which is more sophisticated.
3. Easy Video Cutter
Becausethis program is only devoted to video editing, it can handle a wide range of tasks. The program, for example, may clip videos, combine them, rotate them, and so on. You may also adjust the pace of the videos as needed. It should be noted that trimming the video in this program is quite simple — just pick the range with the slider instrument, and that’s it. Because this program is only devoted to video editing, it can handle a wide range of tasks. The program, for example, may clip videos, combine them, rotate them, and so on. You may also adjust the pace of the videos as needed. It should be noted that trimming the video in this program is quite simple — just pick the range with the slider instrument and that’s it.

**Platform:**Android
**Price:**free
Features
- Video splitter and joiner
- Video editor
Pros
- It’s quite simple to use.
- It’s ideal for simple video cutting tasks.
Cons
- There are no additional editing options available.
4. Video Editor
Video Editor is a fantastic app for Android users who want to edit and enhance their videos. It can break a video into segments, combine several films, crop videos, and adjust the video’s size. You may also add audio to the video of your choosing.
**Platform:**Android
**Price:**free
Features
- Video splitter and joiner
- Video editor
Pros
- You may rearrange your clips in any order you choose.
- Many older file types are supported by the program.
Cons
- The video scroll bar might be a little tricky to use.
- It’s quite basic.
5. VideoShow – Video Editor
On the Google Play market,VideoShow is one of the most popular video editing applications. There are several themes, filters, music, and audio to choose from while creating great videos. It’s a fantastic video trimming software.
**Platform:**Android/iPhone
**Price:**free
Features
- Video splitter and joiner
- Video editor
Pros
- It has the ability to both connect and cut clips.
- It’ll run on almost any android phone.
Cons
- Video Scissors has taken the place of the iPhone version.
- Cutting is fast, but re-encoding might take a long time.
6. Trim Video
Trim Video is the greatest app for iPhone video editing and cutting of huge videos. From the huge file, you may easily crop a video clip. Although the program is highly useful and entertaining for video makers, it is not free and costs $0.99.
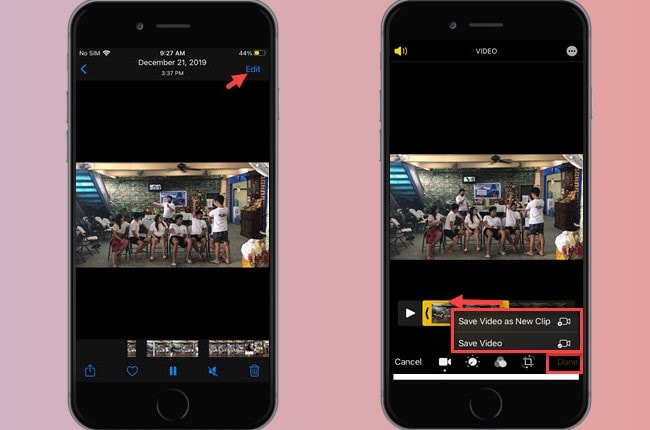
**Platform:**iPhone
Price:$0.99 per month
Features
- Video splitter
Pros
- All major video and audio formats are supported.
- When you’re finished, there’s no need to re-render the video.
- There are no watermarks.
Cons
- This software does not include video joining; it must be downloaded separately.
- This app’s main purpose is to cut.
7. Video Splitter
Video Splitter is an iPhone software that allows you to edit and divide videos into segments. It’s a free program that combines all of your editing tools into one application. The tool successfully splits a huge video into little chunks, which can be quickly texted or uploaded to social media.
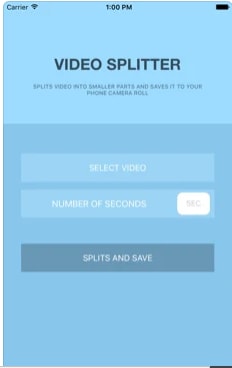
**Platform:**iPhone
**Price:**free
Features
- Video splitter and joiner
- Video editor
Pros
- A broad number of formats, including audio, are supported.
- It’s a breeze to use.
Cons
- There are no choices for video converting.
- It’s been a long time since it’s been updated.
8. Crop video
Crop Video is another handy iPhone app if you wish to cut your movie to a lesser size. It is one of the most popular tools for cutting videos and altering them for a better impact. It contains several features that boost the app’s versatility. It’ll set you back $2.99.
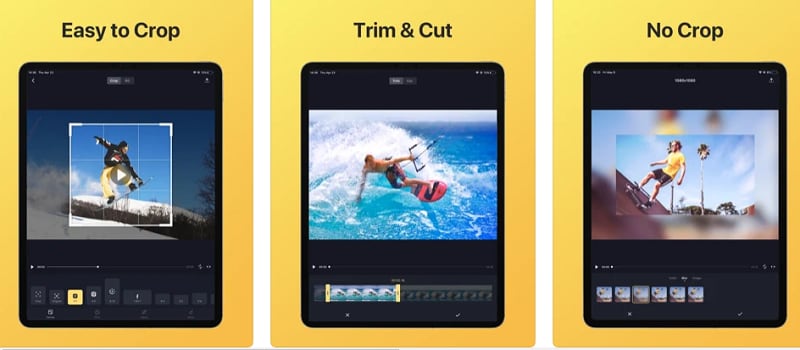
**Platform:**iPhone
Price:$2.99 per month
Features
- Video splitter and joiner
- Video editor
Pros
- The video cutter is helpful for novices.
- It works with every iPhone version.
Cons
- The free version has a lot of limitations.
- The videos of free users are watermarked.
9. Video Crop
Video Crop is a free iPhone software that allows you to crop videos. There are many more options in the software that may be used to modify and improve a video. This program has a lot of flexibility when it comes to video editing and other video settings. This program may also be used to split videos.
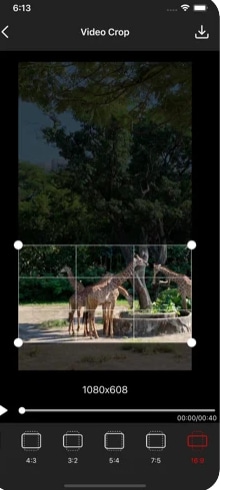
**Platform:**iPhone
**Price:**free
Features
- Video splitter and joiner
- Video editor
Pros
- Splitting and joining MP4 files is simple and effective.
Cons
- It’s only compatible with MP4 files.
- The UI is really sluggish.
10. Video Trim & Cut
Video Trim & Cut is an iPhone software that allows you to divide or trim videos. Adding effects, cropping, altering color, and changing themes are just a few things you can do with the app.
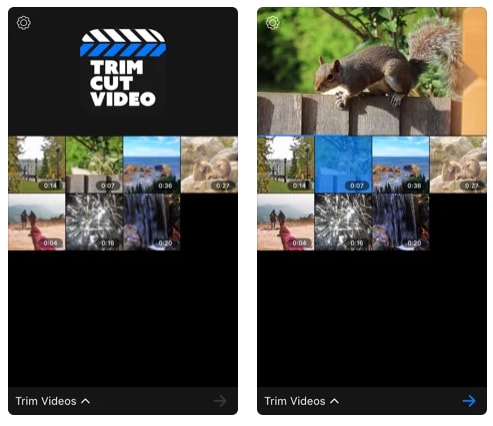
**Platform:**iPhone
**Price:**free
Features
- Video splitter and joiner
- Video editor
Pros
- Excellent templates.
- It has the appearance and functionality of a more costly app.
Cons
- It’s only available on iPhone.
- It might take a long time for a video to render.
Part 5: How to Split Video with Filmora
Step1Import your videos to Filmora Video Cutter
Launch the video cutter once it has been installed and click New Project to access the video editing interface. Now you must import the video, which must be divided into numerous portions.
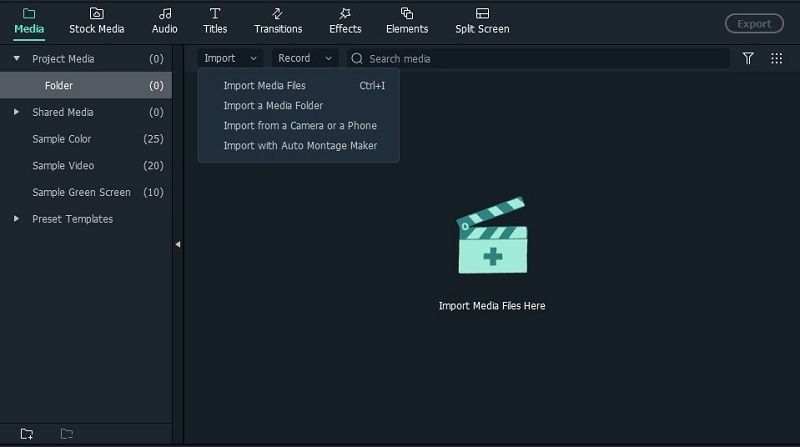
Upload files
You can either drag and drop files to the media library before adding them to the timeline for editing, or you can click “Import” on the main interface and choose files from your computer.
VOB, 3GP, 3G2, MP4, FLV, AVI, MOV, F4V, M4V, TRP, M2TS, MTS, TP, DAT, WMV, MPG, MPEG, TS, MKV, ASF, DV, EVO, MOD, NSV, and TOD files are all supported by Filmora video cutter.
If your video contains a lot of distinct sequences, Filmora can help you discover the clip you want to trim. The “Scene Detection” tool will assist you in rapidly locating the part you wish to clip. To open the Scene Detection window, choose the video in the media library (not the timeline), right-click it, and select “Scene Detection.”

Detect video
When you click Detect, Filmora will automatically split your films into multiple segments depending on scene changes.
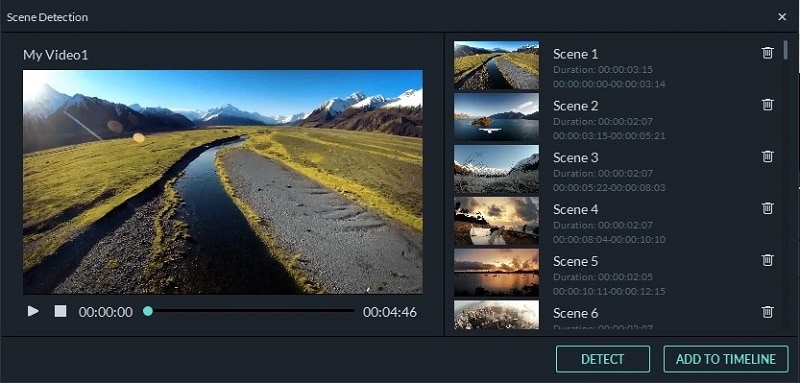
Scenes detected automatically
By clicking the Delete symbol next to the clip, you may delete the undesired sequences and quickly get to the section you want. When you click the Add to Timeline button, all of the segmented video sections will be instantly imported into the timeline, which you can then modify.
Step2Manually trim/split/cut/delete videos
To trim video files, drag clips from the media library to the video track on the timeline and follow these steps. You may use the trim option to chop off the beginning or conclusion of a video swiftly.
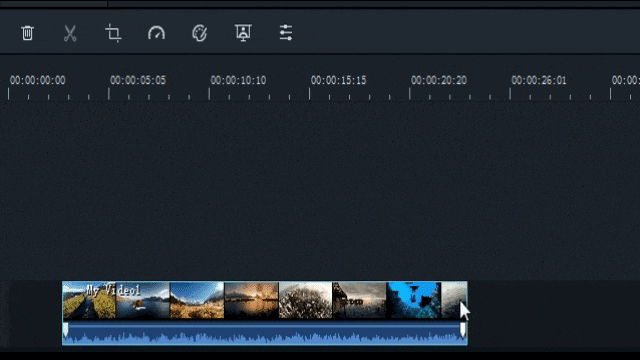
Trim video using filmora
- i.Zoom in on the frames you wish to remove from the timeline. Drag the trim symbol to the right to remove the video’s beginning segments from the timeline or to the left to remove the video’s undesired ending segments. You may use the trim tool to cut the beginning and end parts of a sentence with a single drag.
- ii.You may edit a movie into portions, eliminate unnecessary aspects, and combine them into a new film, in addition to chopping off segments at the beginning or conclusion.
- iii.Move the play head to the beginning of the video part you want to cut, then click the Split icon (scissor icon) on the toolbar or the Split button on the play head to split the video. You will get the starting frame, then move the play head to the ending frame and click the Split button again to get the ending part.
- iv.To cut a video into many sections, repeat the procedure. You will get multiple clipped portions, which you may either remove or re-order and alter further.
- v.You may edit out an undesirable cut video by hitting the Delete symbol on the toolbar.
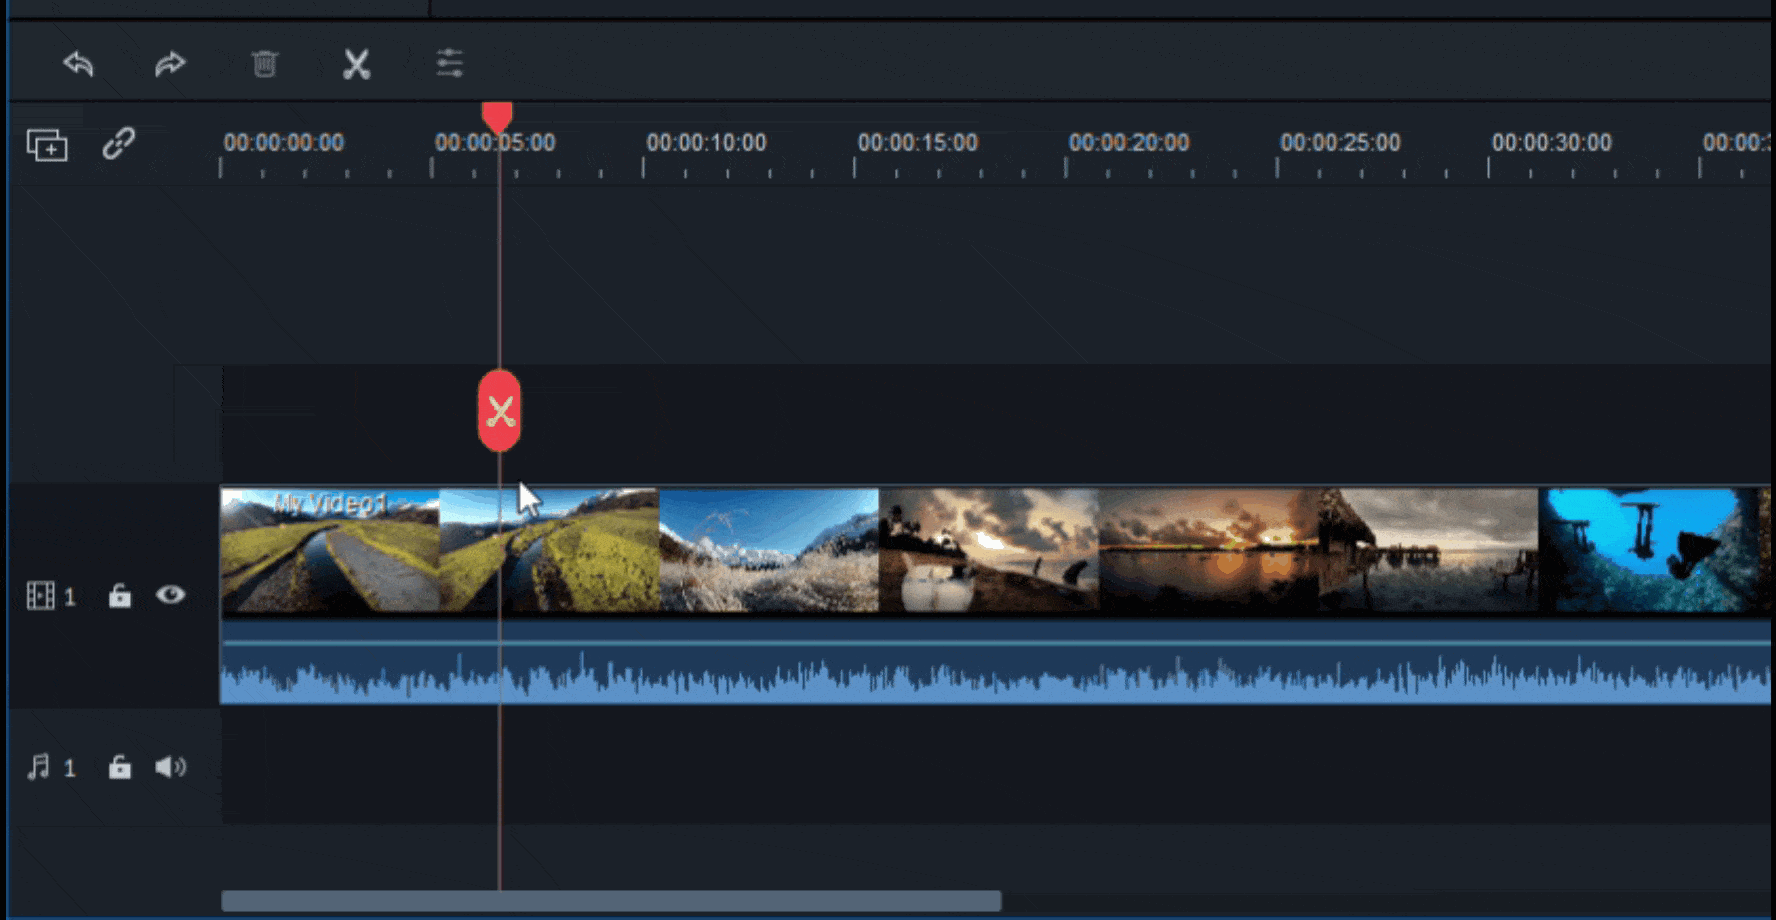
Add trim start and end
Step3Export your video
Click the Export button on the screen after you’ve completed cutting and basic editing. By choosing “Format” and specifying the essential options such as frame rate and resolution, you may save the video in different formats on your local computer.
If you wish to see your video production on your iPod, iPhone, or iPad, go to “Device” and choose your device’s thumbnail. You may also instantly post your films on YouTube or Vimeo, or burn them to DVDs for long-term storage.
Export video after splitting
Bottom Line
Video splitting can be a daunting task when you don’t have the right tools to help you. If you are a Windows or a Mac user then Wondershare Filmora will help you split videos in just few clicks. The software is completely free with an option to go pro for a cheaper price compared to other premium apps. If you prefer splitting your video online then still Filmora online editor will help you in this. Moreover, some good news for android and iPhone users as Filmora comes with all features to split and join videos. With all these tools you can take your video creation process to the next level.
- Filmora
- AndroVid Video Editor
- Easy Video Cutter
- Video Editor
- VideoShow – Video Editor
- Trim Video
- Video Splitter
- Crop video
- Video Crop
- Video Trim & Cut
Part 1: Backup Your Original Video
Making several backups is perhaps the most critical thing you can do for your project. Whether your computer dies suddenly or your editing application crashes, you’ll have a point to fall back on if you have a backup. Making this a habit will save you a lot of time and work in the long term. How many copies of your data should you make? You should create at least three project duplicates in the best-case scenario. Also, make sure they’re preserved in various formats and places—one on an SD card, another on a hard drive, or a USB drive.
14 Best Video Splitter for Windows/Mac
1. Filmora
Wondershare Filmora Video Editor is a superb video editor for those seeking software that can split videos and has a lot of functions. It was originally only accessible for Windows, but thanks to the developers, Mac users may now use this high-quality video splitter. Using this program to split and join videos is pretty basic and straightforward. It’s an intriguing tool since it allows users to produce high-quality films using filters, effects, and other features in an easier method than employing professional editors. This program also lets you export video at a breakneck speed, up to 4k quality.
![]()
Platform: Windows/Mac
Price: Free Trial
Features
- Editing is intuitive and quick.
- Export video in 4k quality.
- There are several graphic effects and transitions.
- Footage from the internet.
- Regularly upgraded features.
Pros
- Large films can be easily cut, trimmed, and combined without compromising quality.
- On the exported video, there is no watermark.
- Both Windows and Mac computers are supported.
- Splitting a video is such a breeze.
- For novices, it has a lot of handy options that will help you create a stunning film.
Cons
- Large-scale content editing might be slow at times.
2. Boilsoft Video Splitter
Boilsoft Video Splitter can divide, edit, or trim a big AVI, MPEG, RM, ASF, WMV, 3GP, MKV, FLV, or MP4 video file without re-encoding smaller video segments. It has a built-in player that allows you to effortlessly split/cut video files according to time or selection.
Platform: Windows/Mac
Price:$34.95 one-time payment
Features
- Split Video
- Cut video
- Built-in player
Pros
- It supports lots of video format.
- User-friendly software.
Cons
- Because you can’t adjust the program window, using the slider for selection becomes increasingly difficult as your video becomes longer.
3. Solveigmm Video Splitter
SolveigMM Video Splitter is suitable for simple editing processes such as removing an extra section from a video, removing an advertisement from a movie, muting the sound on a selected video fragment, saving only a video or audio track from a file, cutting a video into parts, saving segments into separate files, and so on. The editing procedure takes just a few seconds.
Platform: Windows/Mac
Price:$7.99 per month
Features
- Video cutter
- Video editor
- Video Joiner
Pros
- No previous training or knowledge is necessary to understand how to use the software.
- All major file formats are supported.
- The output file quality is unaffected.
Cons
- It sometimes crashes depending on the file size.
4. BandiCut
Bandicut is a video splitting and joining program for Windows systems only. It has a straightforward UI and simple settings. It may also be used as a video converter, allowing you to modify the format of the output clips. The tool is useful for both newcomers and seasoned users.
Platform: Windows
Price:$29.95 per user per month
Features
- Easy and fast video cutter
- Video splitter
Pros
- The interface is pleasing to the eye, and the functions are simple.
- High-capacity mode
Cons
- There isn’t a fully working free version available.
5. Free Video Cutter
This is a basic tool for reducing the size of large video files. It allows you to cut a clip from a movie or video in various formats and save it in four other formats. The hand-drawn interface, by the way, is incredibly charming.
Platform: Windows
**Price:**a free version and premium version ($17.99 per month)
Features
- An irregularly shaped hand-drawn art style interface.
- Videos in a variety of formats are accepted.
- The control panel is small, with just three major buttons.
Pros
- Save as new videos in a variety of formats without compromising quality.
- It may be used to trim lengthy movies, mobile videos, and camera recordings, among other things.
Cons
- For huge files, there are a lot of crashes.
- For Mac users, this tool is not accessible.
6. Easy Video Splitter
Easy Video Splitter is a simple video editing application that allows you to divide your video into many segments. It can play AVI, MPEG, WMV, and ASF files. The scroll bats may be used to cut the movie precisely where you want it to be cut or to divide the film at certain intervals.
**Platform:**Windows/Mac
**Price:**free with ads
Features
- Has a batch processor
- Multiple file support
- Easy to use
Pros
- Batch processing is supported.
Cons
- Only one frame at a time may be fine-tuned.
7. Avidemux
Avidemux is perfect if you have a video to encode or arrange for a certain speaker system. It’s also an ideal choice if you just require a basic video editor, although there are many more extensive applications available that may be better appropriate.
**Platform:**Windows/Mac
**Price:**free
Features
- This program can handle a variety of subtitle formats, including SUB and SRT.
- They also provide a variety of filtering options.
- You may export videos in various formats, including MKV, MPEG, and MP4.
Pros
- A user-friendly interface
- Excellent alternatives for encoding
- Filters for sharpening and de-noising
Cons
- There is no timeline.
- There are no innovative transitions or effects.
8. Ultra Video Splitter
Ultra Video Splitter is an excellent solution for people who just need to complete this one operation and hence do not need the usage of sophisticated video editing software. The tool enables you to choose from a variety of parameters for the final file or files, such as file size, final format, and bitrate.
**Platform:**Windows/Mac
Price:$25.00 one-time payment
Features
- Supports videos in WMV, XviD, MPEG, ASF, AVI, RM, MOV, 3GP, Divx, and MP4 format.
- Can export the final video in VCD, SVCD, DVD, AVI, DivX, MPEG, or WMV format.
Pros
- Video trimming and exporting are both quick.
- Multiple video formats are supported.
Cons
- Has just a few video editing options.
9. VideoPad Video Editor
On Mac and Windows, the VideoPad video editor allows you to edit clips and produce professional-quality films. Its divide and merge functions are also straightforward to utilize. VideoPad editing software can be used to create visually appealing videos. As a result, the video splitter software for Mac can rapidly and efficiently manipulate video streams.
**Platform:**Windows/Mac
Price:$60.00 one-time payment
Features
- It supports a variety of file formats, offering users additional choices for how to utilize the tool with different file kinds.
Pros
- The cost of a professional business video is surprisingly low.
- Importing video is as simple as dragging and dropping.
Cons
- The free edition offers a restricted number of functions.
10. Windows Movie Maker
This video editing software comes with Windows OS and is focused on simplicity: There’s no easier method to split videos and save into lossless codecs with titles, transitions, background music, and effects than this. Earlier versions of the application were so basic that they couldn’t accomplish what most people required. Still, over time, features like voiceover recording and even anti-shake have crept into what is today a highly useful free video splitter.
**Platform:**Windows
**Price:**free
Features
- Cool transitions
- Effects on video
- Voiceovers are some of the audio features
Pros
- Effects are automatically previewed.
- Audio features such as voiceovers and other audio enhancements.
- Excellent choices for sharing.
- Simple to use
- Stabilization.
Cons
- There are no modifications to the contrast or saturation.
- The effects aren’t flexible.
11. Windows Photos
Many users will never require more than Windows 10’s built-in picture and video editor . It is an automatic video splitter with sophisticated effects like 3D overlays and animated titles are among the extras.
**Platform:**Windows
**Price:**free
Features
- Face recognition
- Video cutter
- 3D overlays
Pros
- A simple interface.
- Detecting faces and objects.
- Album creation is done automatically.
- It works with OneDrive.
- Soundtracks, text, and transitions are all used in video editing.
Cons
- There isn’t a before-and-after comparison.
- Panorama stitching and selective focus are not supported.
- There is no geometry correction or chromatic aberration correction.
12. VLC
VLC Media Player , for good reasons, is a hugely popular video splitter. It is completely free, supports almost everything without the need to download additional codecs, supports streaming, can enhance video and audio playback for your chosen device, and can be extended almost infinitely with plugins downloadable from the internet.
**Platform:**Windows/Mac
**Price:**free
Features
- Allows streaming of MPEG and DivX files
- Excellent video and audio playback modifying tools
Pros
- It can play all kinds of music and video formats, even compressed ones.
Cons
- It is GPU-dependent and may crash at random moments.
13. iMovie
If you’re using a Mac,iMovie video editing program can help you split videos. Mac users will find this to be one of the finest video splitters available. It contains a wide range of capabilities that may improve the quality of your video in a variety of ways. The video may be trimmed and enhanced with many features, such as text, special effects, and audio. Video quality may be improved with this software’s special effects and video upgrades. In addition, the interface is so user-friendly that even novices may generate stunning results. On the other hand, iMovie is capable of storing 4K films.
**Platform:**Mac
**Price:**free
Features
- An easy-to-use video splitter that is already built-in
- It’s simple to use
Pros
- An easy-to-use video splitter that is already built-in
- It’s simple to use
Cons
- Uploading and exporting videos takes a long time.
14. Format Factory
Multifunctional document and multimedia processing software -Format Factory - is only available for Windows. It’s meticulously designed to keep you from getting lost in the weeds when working on any project. It is designed to be a stand-alone file management application, and judging by the wealth of options available, it has done an excellent job.
**Platform:**Windows
**Price:**free
Features
- Video joining and muxing are available.
- It has a screen recorder built right in.
- A built-in video player and downloader are included.
- Allows for hardware acceleration.
- Disk ripping options are provided.
- Processing may be done in a batch.
Pros
- Removes watermarks and logos.
- File formats supported include video, audio, images, and documents.
Cons
- Unnecessary software is installed when installing the program.
7 Best Free Video Splitter Online
2. VEED.IO
Veed.io is a free online video editing tool that allows anybody to make powerful movies and expand their audiences. It has several useful features, such as cutting and filtering films based on their appearance. Users may cut, add text, and draw on the videos. Veed may also be used to generate videos on social media channels.
**Price:**free
Features
- Video splitter and joiner
Pros
- Simple and quick.
- A preview of the cutting result is available.
Cons
- The maximum file size is 50 MB.
3. Flixier
Flixier is a web-based video editor that offers 1-minute exports to any device, easy collaboration, and lots of cloud storage. Flixier enables customers to export whatever video they want, independent of their technology. It keeps all stakeholders in the loop by allowing each team member and contributor to remain in sync across all platforms. Teams may interact in real time without fear of losing track of the project. Cloud storage, version history, feedback comments, sophisticated exports, and email alerts are all available. The tool supports Windows, Mac, Linux, and Chromebooks.
**Price:**free
Features
- Video splitter and joiner
Pros
- iPhone version is available.
- Automatic sound amplification.
Cons
- May seem too overloaded with functions.
4. Split Video
Split Video program may also be used to edit and split huge videos into smaller segments. It’s quite simple to work with. All you have to do now is choose the video to divide. Tell the app how you’d want the video to be divided. Choose how many parts you want in your video. You may watch the app-split clips before sharing them.
**Price:**free
Features
- Video splitter and joiner
Pros
- Interface that is easy to use.
Cons
- The maximum file size is 200 MB.
5. Kapwing
This application primarily advertises itself as a video trimmer. It lets you edit films by removing unwanted bits and trimming them to the appropriate length. It also has some basic settings, such as utilizing it as a free online MP4 splitter. The user interface is simple, and uploading a movie takes just a few moments. The primary drawback is that your film may only be 300 MB in size and must be under 30 minutes in length.
**Price:**free
Features
- Video splitter and joiner
Pros
- Interface that is simple to use.
Cons
- A little watermark appears in the corner of your video with the free version.
- Only supports films up to 300 MB in size and up to half an hour in length.
6. Typito
Typito is a video collaboration tool that allows you and your team to work together to make better films for your business. Typito allows you to make and utilize professionally created graphic overlays for free, as well as generate full-length HR movies in both square and portrait formats. It enables you to produce movies consistent with your brand, allowing you to change and customize elements like font, color, and logo with a few mouse clicks. You may save time for your organization by producing videos quicker and working with your team to publish professional-looking films while previewing them on the move. Inviting team members to the project and assigning responsibilities for editing and reviewing videos are just a few collaboration tools.
**Price:**free
Features
- Video splitter and joiner
Pros
- Simple features to use
Cons
- Few transition templates.
7. Clideo
Clideo is a one-of-a-kind platform that allows you to easily produce and modify any video, GIFS, and picture files in one spot. Merging, compressing, resizing, slideshow, cropping, rotation, and other video editing tools are included in the program. Users may add music or text to videos to help them stand out and draw in the right audience. The video editing platform supports various video formats such as MP4, AVI, MPG, VOB, WMV, MOV, and others. There is no need to download or install any applications since everything may be done entirely online. The premium security encryption that comes with it ensures that all video files are always well-protected.
**Price:**free
Features
- Video splitter and joiner
Pros
- Much easier to use than other video editing software.
- Projects are stored on the cloud, so they don’t take up any computer resources.
- There is no need to download any program.
Cons
- The feature set is limited in comparison to other video editing suites.
- Visual artistry is required.
- Some undertakings need a significant amount of time to complete.
10 Best Video Splitter for Mobile Phone
1. Filmora
A good video editor is required to split a video qualitatively.Filmora Video Editor & Maker might be the answer. It works with high-definition videos. It comes with all of the necessary editing tools. As a result, you will not be sorry for installing this software. Not only will you be able to edit and divide films effortlessly, but you’ll also be able to add fun filters.
The sticker library in Filmora Video Editor & Maker is extensive. The number is in the thousands. You’ll be able to apply both realistic and humorous animated stickers. Use video transitions such as Flash, Page Cut, Cross Zoom, Blurry Roll, and Cube. You have complete control over the speed of your edited video.
**Price:**free
Features
- Video splitter and joiner
- Video editor
Pros
- Files may be readily exported and imported.
Cons
- Compatibility of exported videos is limited.
2. AndroVid Video Editor
AndroVid is a video-splitting program with all the tools you’ll ever need. This program is jam-packed with editing tools, allowing you to create a polished video quickly. The program is also quite user-friendly, so even if this is your first time splitting a video, you will be able to handle it.
**Platform:**Android
**Price:**free
Features
- Video splitter and joiner
- Video editor
Pros
- Simple video cutting tool; can extract single-frame pictures from videos.
Cons
- There are no sophisticated editing choices, and the audio options are quite restricted.
- There is no tool for full-screen graphics, and the user interface is a little complicated.
- The ad-free version is nearly as expensive as KineMaster Pro, which is more sophisticated.
3. Easy Video Cutter
Becausethis program is only devoted to video editing, it can handle a wide range of tasks. The program, for example, may clip videos, combine them, rotate them, and so on. You may also adjust the pace of the videos as needed. It should be noted that trimming the video in this program is quite simple — just pick the range with the slider instrument, and that’s it. Because this program is only devoted to video editing, it can handle a wide range of tasks. The program, for example, may clip videos, combine them, rotate them, and so on. You may also adjust the pace of the videos as needed. It should be noted that trimming the video in this program is quite simple — just pick the range with the slider instrument and that’s it.
**Platform:**Android
**Price:**free
Features
- Video splitter and joiner
- Video editor
Pros
- It’s quite simple to use.
- It’s ideal for simple video cutting tasks.
Cons
- There are no additional editing options available.
4. Video Editor
Video Editor is a fantastic app for Android users who want to edit and enhance their videos. It can break a video into segments, combine several films, crop videos, and adjust the video’s size. You may also add audio to the video of your choosing.
**Platform:**Android
**Price:**free
Features
- Video splitter and joiner
- Video editor
Pros
- You may rearrange your clips in any order you choose.
- Many older file types are supported by the program.
Cons
- The video scroll bar might be a little tricky to use.
- It’s quite basic.
5. VideoShow – Video Editor
On the Google Play market,VideoShow is one of the most popular video editing applications. There are several themes, filters, music, and audio to choose from while creating great videos. It’s a fantastic video trimming software.
**Platform:**Android/iPhone
**Price:**free
Features
- Video splitter and joiner
- Video editor
Pros
- It has the ability to both connect and cut clips.
- It’ll run on almost any android phone.
Cons
- Video Scissors has taken the place of the iPhone version.
- Cutting is fast, but re-encoding might take a long time.
6. Trim Video
Trim Video is the greatest app for iPhone video editing and cutting of huge videos. From the huge file, you may easily crop a video clip. Although the program is highly useful and entertaining for video makers, it is not free and costs $0.99.
**Platform:**iPhone
Price:$0.99 per month
Features
- Video splitter
Pros
- All major video and audio formats are supported.
- When you’re finished, there’s no need to re-render the video.
- There are no watermarks.
Cons
- This software does not include video joining; it must be downloaded separately.
- This app’s main purpose is to cut.
7. Video Splitter
Video Splitter is an iPhone software that allows you to edit and divide videos into segments. It’s a free program that combines all of your editing tools into one application. The tool successfully splits a huge video into little chunks, which can be quickly texted or uploaded to social media.
**Platform:**iPhone
**Price:**free
Features
- Video splitter and joiner
- Video editor
Pros
- A broad number of formats, including audio, are supported.
- It’s a breeze to use.
Cons
- There are no choices for video converting.
- It’s been a long time since it’s been updated.
8. Crop video
Crop Video is another handy iPhone app if you wish to cut your movie to a lesser size. It is one of the most popular tools for cutting videos and altering them for a better impact. It contains several features that boost the app’s versatility. It’ll set you back $2.99.
**Platform:**iPhone
Price:$2.99 per month
Features
- Video splitter and joiner
- Video editor
Pros
- The video cutter is helpful for novices.
- It works with every iPhone version.
Cons
- The free version has a lot of limitations.
- The videos of free users are watermarked.
9. Video Crop
Video Crop is a free iPhone software that allows you to crop videos. There are many more options in the software that may be used to modify and improve a video. This program has a lot of flexibility when it comes to video editing and other video settings. This program may also be used to split videos.
**Platform:**iPhone
**Price:**free
Features
- Video splitter and joiner
- Video editor
Pros
- Splitting and joining MP4 files is simple and effective.
Cons
- It’s only compatible with MP4 files.
- The UI is really sluggish.
10. Video Trim & Cut
Video Trim & Cut is an iPhone software that allows you to divide or trim videos. Adding effects, cropping, altering color, and changing themes are just a few things you can do with the app.
**Platform:**iPhone
**Price:**free
Features
- Video splitter and joiner
- Video editor
Pros
- Excellent templates.
- It has the appearance and functionality of a more costly app.
Cons
- It’s only available on iPhone.
- It might take a long time for a video to render.
Part 5: How to Split Video with Filmora
Step1Import your videos to Filmora Video Cutter
Launch the video cutter once it has been installed and click New Project to access the video editing interface. Now you must import the video, which must be divided into numerous portions.
Upload files
You can either drag and drop files to the media library before adding them to the timeline for editing, or you can click “Import” on the main interface and choose files from your computer.
VOB, 3GP, 3G2, MP4, FLV, AVI, MOV, F4V, M4V, TRP, M2TS, MTS, TP, DAT, WMV, MPG, MPEG, TS, MKV, ASF, DV, EVO, MOD, NSV, and TOD files are all supported by Filmora video cutter.
If your video contains a lot of distinct sequences, Filmora can help you discover the clip you want to trim. The “Scene Detection” tool will assist you in rapidly locating the part you wish to clip. To open the Scene Detection window, choose the video in the media library (not the timeline), right-click it, and select “Scene Detection.”
Detect video
When you click Detect, Filmora will automatically split your films into multiple segments depending on scene changes.
Scenes detected automatically
By clicking the Delete symbol next to the clip, you may delete the undesired sequences and quickly get to the section you want. When you click the Add to Timeline button, all of the segmented video sections will be instantly imported into the timeline, which you can then modify.
Step2Manually trim/split/cut/delete videos
To trim video files, drag clips from the media library to the video track on the timeline and follow these steps. You may use the trim option to chop off the beginning or conclusion of a video swiftly.
Trim video using filmora
- i.Zoom in on the frames you wish to remove from the timeline. Drag the trim symbol to the right to remove the video’s beginning segments from the timeline or to the left to remove the video’s undesired ending segments. You may use the trim tool to cut the beginning and end parts of a sentence with a single drag.
- ii.You may edit a movie into portions, eliminate unnecessary aspects, and combine them into a new film, in addition to chopping off segments at the beginning or conclusion.
- iii.Move the play head to the beginning of the video part you want to cut, then click the Split icon (scissor icon) on the toolbar or the Split button on the play head to split the video. You will get the starting frame, then move the play head to the ending frame and click the Split button again to get the ending part.
- iv.To cut a video into many sections, repeat the procedure. You will get multiple clipped portions, which you may either remove or re-order and alter further.
- v.You may edit out an undesirable cut video by hitting the Delete symbol on the toolbar.
Add trim start and end
Step3Export your video
Click the Export button on the screen after you’ve completed cutting and basic editing. By choosing “Format” and specifying the essential options such as frame rate and resolution, you may save the video in different formats on your local computer.
If you wish to see your video production on your iPod, iPhone, or iPad, go to “Device” and choose your device’s thumbnail. You may also instantly post your films on YouTube or Vimeo, or burn them to DVDs for long-term storage.
Export video after splitting
Bottom Line
Video splitting can be a daunting task when you don’t have the right tools to help you. If you are a Windows or a Mac user then Wondershare Filmora will help you split videos in just few clicks. The software is completely free with an option to go pro for a cheaper price compared to other premium apps. If you prefer splitting your video online then still Filmora online editor will help you in this. Moreover, some good news for android and iPhone users as Filmora comes with all features to split and join videos. With all these tools you can take your video creation process to the next level.
Rules of Three or Thirds Is a Classic Trick in Photography, and the Result of Video and Photo Is Really Great. This Article Will Show You How to Use Rule of Thirds to Make a Better Video
So you have your work flow sorted out and you’re well on your way with Filmora but you’re not quite happy with your results or something just seems off when you watch your videos back. You may be missing an important element of all visual media and that’s composition. This is where the building blocks of every frame come together to make a visually pleasing piece for the viewer and helps the eyes concentrate on the content rather than trying to figure out what they are looking at.
I’m sure you may have heard of the rule of thirds for art or photography and you may not know or understand what it is. You may even be wondering how the rule of thirds can help you with your video creation. Well, that is what I’m going to show and explain to you today.
What is the rule of thirds
At its core the rule of thirds is a guide to follow whenever you create something visual.
You break an image into thirds both horizontally and vertically, in doing this you are left with nine boxes and four gridlines, the rule states that by placing key elements in line with gridlines you will have an overall better composition.
To gain a better understanding of this here is a visual example of the gridlines and nine boxes.

This may seem simple but is often overlooked due to time restraints and eagerness to get that video out there. By following these guidelines your overall composition will gain interesting and pleasing results that can help with viewer engagement. This is only one piece of the puzzle but as any photography professional or artist will tell you, It’s the small things that add up.
How to use the rule of thirds
To show how to use the rule of thirds I will be showing an image with and without the use of the guidelines. In doing this you will be able to see how impactful this system is and how it can help with your own creations within Filmora .
This will be our scene example, you can see buildings, boats, water and skyline. This may be typical of a backdrop or an insert for a holiday picture amongst many other things.
I will now show this picture with no compositional thought and without the use of the thirds system.

Notice how all the elements are in the scene but it just looks interesting and something just seems off when you look at it. You may find yourself searching for understanding of the image rather than taking the image in and concentrating on what the creator intended. This is seen commonly due to the need to fit every element in the scene but sometimes it is best to sacrifice something you may see as important for the sake of the whole picture.
We will now look at the example image with the rule of thirds in place and see if overall this makes a more interesting scene.

We have aligned the skyline with the first horizontal grid line and aligned the boats with the vertical grid lines. We have sacrificed the crane in the scene but overall I’m sure you can agree that this is more pleasing and makes more sense when you’re viewing this. The whole middle section of the scene now has information within it and the contrast between the middle and the rest of the scene directs your eyes to what was intended to be viewed, This is called effect use of empty space. In doing this you save yourself time from adding more information to direct the viewer.
Placing key elements directly in the center of your scene can seem static and boring but by placing elements to one side or using the first and second horizontal grid lines you create something called Dynamism , where the viewer sees an element along the grid and takes a journey through the rest of the image.
Studies have shown that this is the humans natural way of viewing imagery, we first find something interesting to look at and then journey around that. So by using this rule you are creating a more natural process for your viewer.
Tips when starting using the rule of thirds
The first tip I would say is to view other videos, YouTube is a good starting point. Watch interviews and notice where the chairs are aligned. Watch reviewers and notice where they position themselves in the scene. Lastly watch movies and pause on an interesting scene and try to deconstruct where everything is placed and why they chose that composition.
The idea with the rule is to have it become something you do naturally, by always considering the form you save yourself time in the editing process. The key things you have in your mind whenever you make a scene should be.
1. What is the key element in my scene or what am I trying to make the viewer focus on.
2. where do I intend to place these in my scene?
3. Have I created a balanced scene with enough negative space to direct the eye.
If you consider this with every video you make then in time this will become as natural as drinking water on a hot day. As a practice you could open some old projects and apply this rule to your video to see the results and you may find yourself impressed with the change.
When is it best to not use the rule of thirds?
The rule is very useful when you’re aiming to grab the attention towards a certain element but that being said, when you have a symmetrical scene you can get away with not using the rule as your eyes can make sense of symmetry very well.
Even when working with a symmetrical scene you can incorporate the rule within for elements such as people or key figures but in this situation it is down to the creator to figure what they feel is best in any given shot.
How to Use Rule of Thirds in Filmora
The tools provided within Filmora are generous and one great feature is the crop and size tool.
When inserting an image or movie file you can right click on the timeline and select crop and size bringing up a handy screen with the gridlines already there for you. It’s just a matter of aligning your shot for the best composition.
For reference I will show you what this looks like.
First right click the timeline on the image you want to reposition. Alternatively you can select the desired insert and press Alt+C this will also bring up the same editing box.

Now click on the crop and zoom option and this editor will appear.

As you can see you are able to align the shot and change the aspect ratio to align with your project. For a better look at the built in grid lines see image below.

Conclusion
To conclude, the rule of thirds is very important within visual media and is tough within the fundamentals of art and photography from beginner level right up to the highest point of education, Practice thinking about your placement of key elements within your videos and how this affects your overall composition. The goal is to have this as an automatic thought when shooting your videos or still images. This is a small change you can make but has a big impact on how a viewer engages your content and in return leaves a positive opinion towards your creativity and eye for detail.
Free Download For Win 7 or later(64-bit)
Free Download For macOS 10.14 or later
Free Download For macOS 10.14 or later
Also read:
- 2024 Approved Best Ways to Add Meme Text to Videos
- New In 2024, Guaranteed 10 Storyboard Creators To Make Animation Easier For You
- New Easy Ways to Remove Motion Blur In Photoshop for 2024
- Updated Learn About some of the Best Apps for Photo Collage for PC
- New Reviewing Efectum App and The Best Alternatives for Smartphone Users for 2024
- Updated 2024 Approved 6 Top Online MP4 Croppers
- Updated Find a Video Background Change Online that Works for You. This Article Contains Tools that Can Edit Video Backgrounds Online with Little Effort
- New How to Add Subtitles in VLC Media Play for 2024
- 5 Simple Tools to Merge Video and Audio Online
- Updated 2024 Approved 8 Tips to Apply Cinematic Color Grading to Your Video
- Looking for the Steps to Add Transitions Effects in Premiere Pro? Here Are the Steps to Add and Edit Transitions in Premiere Pro and an Alternative Way to Video Transitions
- Updated Deleting White Background in Photoshop Is Hard, In 2024
- Updated In 2024, Final Cut Pro for iPad- Is It Available?
- In 2024, How to Split Videos in Final Cut Pro
- New 10 Best Websites to Discover Free Premiere Pro Video Templates for 2024
- Best 20 Slideshow Makers for Win/Mac/Online Review for 2024
- 2024 Approved Making Slow Motion Videos in Premiere Pro A Review on The Best Methods
- New Have You Ever Heard Bokeh Effects for Videos? Do You Know that You Can Make Your Own Bokeh Video Easily with some Software. This Article Will Introduce You How to Make a Bokeh Effect Video with Steps
- Updated How to Change Video Thumbnail on Google Drive
- Updated How Can Filmora Create an Audio Visualizer Project for a Song? All Steps, From Launching the App to Editing the Text, Are Detailed Here
- FRP Hijacker by Hagard Download and Bypass your Infinix Note 30 FRP Locks
- In 2024, Which Pokémon can Evolve with a Moon Stone For Apple iPhone 11 Pro Max? | Dr.fone
- In 2024, How to use Snapchat Location Spoofer to Protect Your Privacy On Samsung Galaxy XCover 6 Pro Tactical Edition? | Dr.fone
- Best Free iPhone 12 Pro Max IMEI Checker
- Pokemon Go Error 12 Failed to Detect Location On Poco F5 Pro 5G? | Dr.fone
- How to Easily Hard reset my Xiaomi Redmi K70 Pro | Dr.fone
- In 2024, Here Are Some Reliable Ways to Get Pokemon Go Friend Codes For Nokia C110 | Dr.fone
- 4 solution to get rid of pokemon fail to detect location On Samsung Galaxy Z Flip 5 | Dr.fone
- 10 Stunning Stop Motion Movies That You Should Not Miss
- How To Bypass Motorola Moto G04 FRP In 3 Different Ways
- New 2024 Approved The Recommended Natural AI Hindi Voice Generator
- In 2024, The Magnificent Art of Pokemon Go Streaming On Tecno Spark 10 4G? | Dr.fone
- How to retrieve erased call logs from Samsung Galaxy A05s?
- In 2024, Is Fake GPS Location Spoofer a Good Choice On Infinix Note 30i? | Dr.fone
- 8 Solutions to Solve YouTube App Crashing on Xiaomi Civi 3 | Dr.fone
- Remove Hot 40i unlock screen
- Title: New Best 8 Online GIF to APNG Converters for 2024
- Author: Chloe
- Created at : 2024-04-24 07:08:30
- Updated at : 2024-04-25 07:08:30
- Link: https://ai-editing-video.techidaily.com/new-best-8-online-gif-to-apng-converters-for-2024/
- License: This work is licensed under CC BY-NC-SA 4.0.
