
:max_bytes(150000):strip_icc():format(webp)/asian-woman-talking-into-microphone-722208887-5b2a989730371300373a0447.jpg)
New Best Method to Split Video Into Parts Online
Best Method to Split Video Into Parts Online
Apart from offline editing software, online video splitters are also available with the evolution of technology nowadays. VEED is one of them. It helps you in splitting the video into different parts. The splitter tool is available for deleting a specific part of the video. Even you can save these parts separately. The whole video editor is extremely user-friendly.
Along with the split and trimming of the videos, VEED also offers several tools for editing and adding effects to the images. It is suitable for training video makers and social media managers to demonstrate the products, business presentations, and HR videos. There are camera filters present, including sepia, night vision, fish eye, and many others. This article is actually the guide regarding editing the videos through VEED. As a substitute, Wondershare Filmora is also under discussion that is also available for the same purpose.
How can you split the video clips online from VEED?
VEED also supports different formats such as WMV, AVI, MPEG and others. While editing the videos in VEED, it converts into MP4, which is compatible with most media players. This is the most suitable format for sharing videos on social networking sites. This splitter tool also helps create a GIF file with animation. Even there is also a possibility of creating GIFs from various software. No matter the duration is of the video, VEED can split the video. It is freely available, and you can use it easily from your browser. You don’t need purchasing of premium software for splitting the videos.
Step 1: Select the video and upload it on the VEED. Simply drag and drop your video file in the editor when you click on “Choose video”. After the selection, split or trim on the timeline and drag towards the left side corner to make the clips shorter.

Step 2: Click on where you are looking to split the video or keep moving the slider on the timeline. Now, you need to press the “S” key on the keyboard or click on the button “Split”. It is easy to delete the clips you don’t need anymore.
Step 3: Click on the option of “Export”, and this is the time for saving the new file as the MP4 video file. Simply export them as a single video file. It is the simplest option to use, and you can do all the steps in a few clicks.

An easier way to split the video into parts
An online tool is available for instant tasks and increases efficiency. But unfortunately, it becomes time-consuming whenever the size of your file is a large or unstable internet connection. Here emerges the usage of Filmora Video Editor . It is an incredible tool for creating and editing your images and videos. This also helps maintain the quality of the videos without any concern about their size. All the options of splitting, rotating, resizing, and trimming the videos are also available offline.
For Win 7 or later (64-bit)
For macOS 10.14 or later
Features:
- Cloning of the effects
- Magical effects
- Motion graphics and addition of animation as well
- Splitting of the screen and video clips
- Matching of the colour
- Controls available for adjusting the audios and videos
There is a number of options available for a variety of users. There is Wondershare Filmora Pro for the experts and solutions for the business owners. The whole business plan of Wondershare Filmora is for showcasing your brand. Support centres are available for helping you whenever you face any hurdle. All the new features are updated in the latest version of it. User guides are also available on its official site. For splitting the videos and extracting your favourite scenes, below steps are how to split the videos in Wondershare Filmora:
Step 1. To split the videos in Wondershare Filmora, the feature of scene detection is very helpful for this purpose. It automatically makes the parts of the videos depending on the changes of the scene. To enable this feature, right-click on your video clip in your library folder and choose the “scene detection” option for its window.

Step 2. Click on “Detect”, and Wondershare Filmora starts dividing the videos into the number of clips depending on changing of the scenes. Click on every small clip for it is easy for you to preview the outcome for its addition on the timeline.

Step 3. For deleting the specific part of the video, its selection is essential and click on the trash icon. Click on “Add on the timeline” for separating the clips and edit them later. The clips you have split can be imported on the timeline, just like in the picture below.

Step 4. After splitting the video files, there are many options to apply to them like rotation, merger, cropping and recording the voice-over. Join the number of segments and add the background music to make the new video.
Wondershare Filmora is on the top ranking in the list of video editing software. Without facing any issues, you can simply create videos as well as edit them as well. You can get quickly a video editor of a professional level in just a smaller number of days of using it. All the tools are just on your timeline, and the simple interface makes it more enjoyable to use.
It is possible for the user to apply every feature in many ways, so Wondershare Filmora is very simple in handling all the functionalities. The whole software is full of fun. It guarantees to deliver highly professional results. Whether online or offline, Wondershare Filmora is also available to bring your imagination into reality. Even you can join the certification program of Wondershare Filmora. Start using it now as you will feel the difference in using it apart from other video editing software.
Step 2: Click on where you are looking to split the video or keep moving the slider on the timeline. Now, you need to press the “S” key on the keyboard or click on the button “Split”. It is easy to delete the clips you don’t need anymore.
Step 3: Click on the option of “Export”, and this is the time for saving the new file as the MP4 video file. Simply export them as a single video file. It is the simplest option to use, and you can do all the steps in a few clicks.
An easier way to split the video into parts
An online tool is available for instant tasks and increases efficiency. But unfortunately, it becomes time-consuming whenever the size of your file is a large or unstable internet connection. Here emerges the usage of Filmora Video Editor . It is an incredible tool for creating and editing your images and videos. This also helps maintain the quality of the videos without any concern about their size. All the options of splitting, rotating, resizing, and trimming the videos are also available offline.
For Win 7 or later (64-bit)
For macOS 10.14 or later
Features:
- Cloning of the effects
- Magical effects
- Motion graphics and addition of animation as well
- Splitting of the screen and video clips
- Matching of the colour
- Controls available for adjusting the audios and videos
There is a number of options available for a variety of users. There is Wondershare Filmora Pro for the experts and solutions for the business owners. The whole business plan of Wondershare Filmora is for showcasing your brand. Support centres are available for helping you whenever you face any hurdle. All the new features are updated in the latest version of it. User guides are also available on its official site. For splitting the videos and extracting your favourite scenes, below steps are how to split the videos in Wondershare Filmora:
Step 1. To split the videos in Wondershare Filmora, the feature of scene detection is very helpful for this purpose. It automatically makes the parts of the videos depending on the changes of the scene. To enable this feature, right-click on your video clip in your library folder and choose the “scene detection” option for its window.
Step 2. Click on “Detect”, and Wondershare Filmora starts dividing the videos into the number of clips depending on changing of the scenes. Click on every small clip for it is easy for you to preview the outcome for its addition on the timeline.
Step 3. For deleting the specific part of the video, its selection is essential and click on the trash icon. Click on “Add on the timeline” for separating the clips and edit them later. The clips you have split can be imported on the timeline, just like in the picture below.
Step 4. After splitting the video files, there are many options to apply to them like rotation, merger, cropping and recording the voice-over. Join the number of segments and add the background music to make the new video.
Wondershare Filmora is on the top ranking in the list of video editing software. Without facing any issues, you can simply create videos as well as edit them as well. You can get quickly a video editor of a professional level in just a smaller number of days of using it. All the tools are just on your timeline, and the simple interface makes it more enjoyable to use.
It is possible for the user to apply every feature in many ways, so Wondershare Filmora is very simple in handling all the functionalities. The whole software is full of fun. It guarantees to deliver highly professional results. Whether online or offline, Wondershare Filmora is also available to bring your imagination into reality. Even you can join the certification program of Wondershare Filmora. Start using it now as you will feel the difference in using it apart from other video editing software.
Best 8 AI Video Denoise Software
Best 8 AI Video Denoise Software
An easy yet powerful editor
Numerous effects to choose from
Detailed tutorials provided by the official channel
Several times the two same videos captured from the same phone or a camera may appear different. One video may appear to be perfectly clean and sharp while the other one looks a little blurred or grainy? Do you wonder why? This is because of the noise in the video which makes it look grainy.
So, if you too have videos with disturbing noise, there is AI-based software available that can help correct the issue. The following parts of the topic will help you learn about such tools.
In this article
01 [What’s AI Video Denoise?](#Part 1)
02 [Top AI Video Denoise Software](#Part 2)
03 [Other Effective Denoise software](#Part 3)
Part 1 What’s AI Video Denoise?
An AI video denoise tool is an AI-based software that helps to correct and remove the noise in the videos. Many times, when you shoot a video using your DSLR or a phone, a lot of noise is present and this mainly happens when there are low light conditions, higher ISO settings, and similar other situations.
The common noise type in your videos can be internal noise or interference noise which can be further divided into different types like fixed-pattern noise, salt & pepper noise, anisotropic noise, and more.
Whatever may be the noise type of a situation you would need a good noise reduction tool to enhance the video watching experience. Several AI-based and non -AI denoise software are
available and depending on what are your requirements, you can choose the best one.
Part 2 Top AI Video Denoise Software
AI Video Denoise software are the tools that use AI technology to detect and remove the noise from your videos. These programs automatically remove the noise for improving the video quality.
Below listed are the top tools in the category.
01DVDFab Video Enhancer
This is one of the widely used AI Denoise software that uses the latest artificial intelligence technology and algorithms for identifying and removing the noise from your videos. All types of noise can be automatically removed using the software. Other key features include the capability to upscale the low-resolution videos up to high 4K quality, comes with neural networks infilled, allows removing the blurs and noise along with color corrections, facilitates improvement and upscaling, improves video brightness, saturation, and other quality parameters.

02AVCLabs Video Enhancer AI
This Windows and Mac-based tool use AI technology for enhancing and improving the overall look of your video and this also includes denoise the footage along with other functions. Using the software, you can deblur your video frame by frame and also upscale the files from 480p to 1080p, 4K, and 8K quality. The low-resolution videos can be upscaled without compromising on the quality and you can even retouch the faces in your videos. The powerful features of the software are easy and quick to use.

03Pixop Denoiser
This is an excellent software for reducing and removing the digital noise which will make the videos crystal clear and sharp. The software is capable of removing the Gaussian noise, aliasing artifacts, jittering, and others for enhancing overall video quality. The program can denoise the files up to UHD 4K and everything is done automatically thanks to the AI technology. No manual tweaks or settings are required.

Part 3 Other Effective Denoise software
In addition to AI tools, several other denoise software are available as well. Check out the list as below.
01****Wondershare Filmora Video Editor **
Wondershare Filmora is an excellent video editing tool that supports multiple functions that also included denoising. Its video denoise feature will let you remove all the unwanted noise from a video that too while maintaining the video quality. Further the program support advanced features like automatic audio sync, audio compression, audio transitions, adding filters, motion tracking, adding animations, masking, and much more. The software can be quickly downloaded on your Windows and Mac systems and help you process the files in a user-friendly manner.
For Win 7 or later (64-bit)
For macOS 10.12 or later
02Adobe After Effects
When it comes to video editing, Adobe After Effects is the most widely used tool as it comes packed in with all needed features. Using the software’s Remove Grain feature, the variables of the video can be changed for fixing the noise and the grain. Though the software smooths out the noise artifacts, the downside is that it also leads to blurring of the footage along with reduced sharpness. Using the right variables may help to maintain the details and the quality of the footage.

03Final Cut Pro X
If you are editing your videos on a Mac system, Final Cut Pro X is the best tool. The program supports multiple professional functions including video denoising. The Noise Reduction filter is added from the 10.4.4 version of the program and the process of getting the task done is also simple and quick. The tool gives you the option to select the amount of noise that you want to remove from the footage.

04DaVinci Resolve Studio
Another editing tool that can be used for removing the noise and for other tasks is DaVinci Resolve Studio. The paid version of the program supports the feature where you can control the Temporal NR and Spatial NR which will help reduce the noise.

05Neat Video Plugin
Neat Video is available as a plugin for popular tools like Final Cut Pro(X), Adobe Premiere, After Effects, and more. This special filter helps in removing the grains and the noise from the video footage that are captured using the TV Tuners, VHS, DSLRs as well as digital video cameras.

● Ending Thoughts →
● When light conditions are not appropriate, one of the common issues that you may encounter is grainy and noisy footage.
● To help you correct and resolve this, several AI and other denoising software and programs are available.
● The AI-based denoising software works automatically to remove the noise while with the others you need to tweak and make the adjustments to remove the grains and the noise.
Several times the two same videos captured from the same phone or a camera may appear different. One video may appear to be perfectly clean and sharp while the other one looks a little blurred or grainy? Do you wonder why? This is because of the noise in the video which makes it look grainy.
So, if you too have videos with disturbing noise, there is AI-based software available that can help correct the issue. The following parts of the topic will help you learn about such tools.
In this article
01 [What’s AI Video Denoise?](#Part 1)
02 [Top AI Video Denoise Software](#Part 2)
03 [Other Effective Denoise software](#Part 3)
Part 1 What’s AI Video Denoise?
An AI video denoise tool is an AI-based software that helps to correct and remove the noise in the videos. Many times, when you shoot a video using your DSLR or a phone, a lot of noise is present and this mainly happens when there are low light conditions, higher ISO settings, and similar other situations.
The common noise type in your videos can be internal noise or interference noise which can be further divided into different types like fixed-pattern noise, salt & pepper noise, anisotropic noise, and more.
Whatever may be the noise type of a situation you would need a good noise reduction tool to enhance the video watching experience. Several AI-based and non -AI denoise software are
available and depending on what are your requirements, you can choose the best one.
Part 2 Top AI Video Denoise Software
AI Video Denoise software are the tools that use AI technology to detect and remove the noise from your videos. These programs automatically remove the noise for improving the video quality.
Below listed are the top tools in the category.
01DVDFab Video Enhancer
This is one of the widely used AI Denoise software that uses the latest artificial intelligence technology and algorithms for identifying and removing the noise from your videos. All types of noise can be automatically removed using the software. Other key features include the capability to upscale the low-resolution videos up to high 4K quality, comes with neural networks infilled, allows removing the blurs and noise along with color corrections, facilitates improvement and upscaling, improves video brightness, saturation, and other quality parameters.
02AVCLabs Video Enhancer AI
This Windows and Mac-based tool use AI technology for enhancing and improving the overall look of your video and this also includes denoise the footage along with other functions. Using the software, you can deblur your video frame by frame and also upscale the files from 480p to 1080p, 4K, and 8K quality. The low-resolution videos can be upscaled without compromising on the quality and you can even retouch the faces in your videos. The powerful features of the software are easy and quick to use.
03Pixop Denoiser
This is an excellent software for reducing and removing the digital noise which will make the videos crystal clear and sharp. The software is capable of removing the Gaussian noise, aliasing artifacts, jittering, and others for enhancing overall video quality. The program can denoise the files up to UHD 4K and everything is done automatically thanks to the AI technology. No manual tweaks or settings are required.
Part 3 Other Effective Denoise software
In addition to AI tools, several other denoise software are available as well. Check out the list as below.
01****Wondershare Filmora Video Editor **
Wondershare Filmora is an excellent video editing tool that supports multiple functions that also included denoising. Its video denoise feature will let you remove all the unwanted noise from a video that too while maintaining the video quality. Further the program support advanced features like automatic audio sync, audio compression, audio transitions, adding filters, motion tracking, adding animations, masking, and much more. The software can be quickly downloaded on your Windows and Mac systems and help you process the files in a user-friendly manner.
For Win 7 or later (64-bit)
For macOS 10.12 or later
02Adobe After Effects
When it comes to video editing, Adobe After Effects is the most widely used tool as it comes packed in with all needed features. Using the software’s Remove Grain feature, the variables of the video can be changed for fixing the noise and the grain. Though the software smooths out the noise artifacts, the downside is that it also leads to blurring of the footage along with reduced sharpness. Using the right variables may help to maintain the details and the quality of the footage.
03Final Cut Pro X
If you are editing your videos on a Mac system, Final Cut Pro X is the best tool. The program supports multiple professional functions including video denoising. The Noise Reduction filter is added from the 10.4.4 version of the program and the process of getting the task done is also simple and quick. The tool gives you the option to select the amount of noise that you want to remove from the footage.
04DaVinci Resolve Studio
Another editing tool that can be used for removing the noise and for other tasks is DaVinci Resolve Studio. The paid version of the program supports the feature where you can control the Temporal NR and Spatial NR which will help reduce the noise.
05Neat Video Plugin
Neat Video is available as a plugin for popular tools like Final Cut Pro(X), Adobe Premiere, After Effects, and more. This special filter helps in removing the grains and the noise from the video footage that are captured using the TV Tuners, VHS, DSLRs as well as digital video cameras.
● Ending Thoughts →
● When light conditions are not appropriate, one of the common issues that you may encounter is grainy and noisy footage.
● To help you correct and resolve this, several AI and other denoising software and programs are available.
● The AI-based denoising software works automatically to remove the noise while with the others you need to tweak and make the adjustments to remove the grains and the noise.
Five Thoughts on Discord Create Account’s How-To Questions
Five Thoughts on Discord Create Account
An easy yet powerful editor
Numerous effects to choose from
Detailed tutorials provided by the official channel
Discord was a great alternative to voice chat systems such as TeamSpeak, Mumble, and Ventrilo for online gamers. Gamers make discord accounts for these services to play together rather than the voice communication facilities integrated into games, which are frequently of poor quality and lack functionality.
Founded in 2015, discord allowed individuals to talk while playing PC games seamlessly. Users may utilize the service to establish servers that can include many text and audio channels. A typical discord account server may feature chat rooms dedicated to specific themes (such as “gaming” and “anime x manga”), as well as voice channels devoted to specific games or activities. The service’s high-quality, low-latency audio chat is a popular tool for Twitch broadcasters and podcasters. It has also expanded to accommodate massive video conversations to compete with Zoom.
In this article
01 [How Does Discord Work and What is it Used for?](#Part 1)
02 [How to Make a Discord Signup in the Browser?](#Part 2)
03 [How to Make a Discord Signup with Desktop?](#Part 3)
04 [How to Make a Signup Discord with App?](#Part 4)
05 [Discord Create Account FAQs](#Part 5)
Part 1 How Does Discord Work and What is it Used for?
Discord account allows friends to communicate with one another one-on-one or in groups via a server. You may use it to send direct messages to pals, as well as video calls, audio chat, and screen sharing. Once on a server, you can join a voice chat channel to communicate with other gamers who are playing certain games.
You can share many things on discord, including media files like images, gifs, audio, and videos. Speaking of videos, video editing doesn’t get any better than Filmora. Wondershare Filmora Video Editor is a sophisticated editing application for Windows and Mac users. It was initially known as Wondershare Video Editor, but following its fifth release, it got renamed Filmora. The video editor’s primary features include animation, overlays, audio control, on-screen recording, and multi-editing modes. The video editor is well-known for its feature-rich but the simple interface, making it suited for both novice and experienced users.
For Win 7 or later (64-bit)
For macOS 10.12 or later
Filmora’s standout features
● Editing Audio Equalizer 4K Resolution Support
● Support for GIFs
● Screen Dividers
● Controls For Video And Audio
● Multiple Video Clips Can Be Layered
● Stabilization of Video
● Presets for Color Grading
● Text Editing Expertise
● Tilt-Shift
● The mosaic (Blurring)
● Noise Elimination
● Importance in Social Life
● Preview of Each Frame
● Controlling the Speed
● Audio-Mixer
● Backgrounds in Chroma Key
● Screen Capture
● Separation of audio
● Scene Recognition
You can make your discord account and use it on almost any platform, including discord desktop software for Windows and Mac and iOS and Android apps for talking and calling on the move. If you prefer not to download anything, it also works in a web browser. You can link your discord account app to various popular services, such as Twitch and Spotify, so your friends can see your actions. While there is no discord Xbox app, you may link your discord and Xbox accounts so that others can see what you’re up to on your Xbox Series X or Xbox Series S.
Part 2 How to Make a Discord Signup in the Browser
Don’t have the discord account?
You can quickly sign up using your preferred web browser, i.e., Chrome, Microsoft Edge, Firefox, or Safari.
Follow the steps below to make a discord account using your web browser:
Step 1: Go to <www.discord.com> and click the “Login” button in the upper right corner.
Step 2: To establish a new discord account, click “Register” underneath the login page.
Step 3:
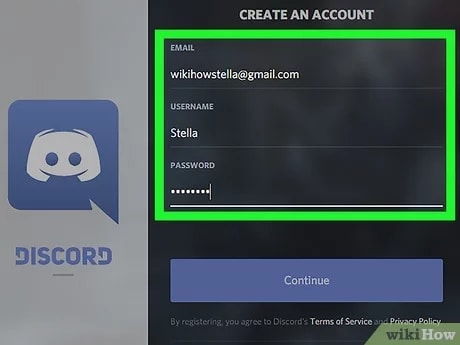
● Enter your email, a username, and a strong password.
● Date of birth.
● Accept the terms of service.
After entering the above, click the “Continue” button.
Step 4: Check the box besides “I am human” to enable the captcha.
Step 5: You will receive an email asking you to confirm your information. Select the “Verify email” option.
Once you’ve signed up for discord, you may access it via the Discord website or the mobile app. The program is free to download for Windows, Linux, Mac, Android, and iOS.
Follow the steps above to sign up on discord account successfully. Easy right? Let’s proceed!
Part 3 How to Make a Discord Signup with Desktop?
The discord creating account on your desktop is pretty much the same as using your browser.
Follow the steps below to make a discord account using your desktop.
Step 1: Click “Login” on the Discord website (top right).
Step 2: Underneath the sign-in box, click “Register.”
Step 3: Enter the email address, username, password, and birth date.
Step 4: Agree to the terms of service and then click “Continue.”
Step 5: Use the captcha to prove that you are not a robot.
Step 6: You will get an email to confirm your data; click on the link in the email to confirm.
See that? No big deal, right?
Part 4 How to Make a Signup Discord with App
Signing up for a discord account through the app is relatively easy, like the procedures above, you will not break a sweat.
Follow the easy steps below for discord create account on your smartphone device:

Step 1: Install and launch the Discord app on your smartphone
Step 2: Select the Register option.
Step 3: Choose whether to register by cellphone number or email address and input either one.
Step 4: You will get a message with a confirmation code or an email with a link.
Step 5: Enter the code or navigate to the URL.
Step 6: Enter your username and password here.
Step 7: Enter your birth date.
Step 8: Accept the terms of the agreement.
Step 9: Click “Next” to finish the Discord registration.
What Happens When You Disable your Discord Account?
When you deactivate your account, it goes to suspension mode. You may reactivate it by signing in and following the on-screen instructions. Keep in mind that discord accounts dormant for two years are removed, so if you want to keep yours, you must reactivate it (but you can disable it after this if you like).
After you deactivate an account, users will no longer get discord alerts. Users may, however, still receive friend requests, and any friend requests users get while their account is blocked will be ready for when they reactivate it. However, when a user decides to delete their account, the said account will get permanently deleted.
Tip: If you want to stay away from your discord account for a while with a plan to return to it later, it is advisable to log out or deactivate rather than delete it.
Part 5 Discord Create Account FAQs
Q. Is discord free, or do I have to pay?
A. Yes and no. The premium edition of discord is not free. If you don’t want to utilize the premium features, you may still download and make a discord account for free.
Q. Is there anything I cannot do on discord?
A. Do not organize, promote, or participate in any unlawful or possibly dangerous activities, such as sexual solicitation, human trafficking, or selling or enabling the sale of forbidden or potentially harmful products (firearms, ammunition, drugs, and controlled substances).
Q. Do messages disappear on discord?
A. Your messages are only destroyed: 1. if they are deleted individually (by you or a user with proper rights), 2. if you get banned, and the person banning you decides to delete all of your messages at once.
Q. Does discord account keep a record of interactions?
A. Yes, discord will track every discussion you have on discord acount, record everything you say on discord, and examine all photographs you transmit over discord.
Q. How will I know when someone blocks me on discord?
A. When you block someone, their online status on discord account changes to “offline” until unblocked and vice versa. They will also show offline in mutual servers or your chat history.
Q. How do I permanently delete my discord account?
A. To delete your discord created account for good, head to user settings, then tap on ‘my account.’ From there, tap on ‘Account Removal’ then tap on ‘Delete Account.’
If you are a server owner, you will have to delete the server or pass ownership of the server.
Q. How do I find servers to join on discord?
A. If you have a buddy who has a discord server you’d want to join, request an invite. If you’re a member of a discord community, ask for an invite or check on the community website.
By tapping the magnifying glass in the left window of the discord account app, you may also search for public servers that anybody can join.
● Ending Thoughts →
● Discord is a web program that works in most browsers. A desktop version is available for Windows, macOS, Linux, iOS, and Android. Discord’s desktop and browser versions are functionally and visually identical in practically every regard if you want to make a discord account. So, re-read the article and the FAQs on discord create account, and start your journey.
● Finally, for the creatives, boost your discord create account and usage experience by using Filmora to edit videos and make cool animations.
Discord was a great alternative to voice chat systems such as TeamSpeak, Mumble, and Ventrilo for online gamers. Gamers make discord accounts for these services to play together rather than the voice communication facilities integrated into games, which are frequently of poor quality and lack functionality.
Founded in 2015, discord allowed individuals to talk while playing PC games seamlessly. Users may utilize the service to establish servers that can include many text and audio channels. A typical discord account server may feature chat rooms dedicated to specific themes (such as “gaming” and “anime x manga”), as well as voice channels devoted to specific games or activities. The service’s high-quality, low-latency audio chat is a popular tool for Twitch broadcasters and podcasters. It has also expanded to accommodate massive video conversations to compete with Zoom.
In this article
01 [How Does Discord Work and What is it Used for?](#Part 1)
02 [How to Make a Discord Signup in the Browser?](#Part 2)
03 [How to Make a Discord Signup with Desktop?](#Part 3)
04 [How to Make a Signup Discord with App?](#Part 4)
05 [Discord Create Account FAQs](#Part 5)
Part 1 How Does Discord Work and What is it Used for?
Discord account allows friends to communicate with one another one-on-one or in groups via a server. You may use it to send direct messages to pals, as well as video calls, audio chat, and screen sharing. Once on a server, you can join a voice chat channel to communicate with other gamers who are playing certain games.
You can share many things on discord, including media files like images, gifs, audio, and videos. Speaking of videos, video editing doesn’t get any better than Filmora. Wondershare Filmora Video Editor is a sophisticated editing application for Windows and Mac users. It was initially known as Wondershare Video Editor, but following its fifth release, it got renamed Filmora. The video editor’s primary features include animation, overlays, audio control, on-screen recording, and multi-editing modes. The video editor is well-known for its feature-rich but the simple interface, making it suited for both novice and experienced users.
For Win 7 or later (64-bit)
For macOS 10.12 or later
Filmora’s standout features
● Editing Audio Equalizer 4K Resolution Support
● Support for GIFs
● Screen Dividers
● Controls For Video And Audio
● Multiple Video Clips Can Be Layered
● Stabilization of Video
● Presets for Color Grading
● Text Editing Expertise
● Tilt-Shift
● The mosaic (Blurring)
● Noise Elimination
● Importance in Social Life
● Preview of Each Frame
● Controlling the Speed
● Audio-Mixer
● Backgrounds in Chroma Key
● Screen Capture
● Separation of audio
● Scene Recognition
You can make your discord account and use it on almost any platform, including discord desktop software for Windows and Mac and iOS and Android apps for talking and calling on the move. If you prefer not to download anything, it also works in a web browser. You can link your discord account app to various popular services, such as Twitch and Spotify, so your friends can see your actions. While there is no discord Xbox app, you may link your discord and Xbox accounts so that others can see what you’re up to on your Xbox Series X or Xbox Series S.
Part 2 How to Make a Discord Signup in the Browser
Don’t have the discord account?
You can quickly sign up using your preferred web browser, i.e., Chrome, Microsoft Edge, Firefox, or Safari.
Follow the steps below to make a discord account using your web browser:
Step 1: Go to <www.discord.com> and click the “Login” button in the upper right corner.
Step 2: To establish a new discord account, click “Register” underneath the login page.
Step 3:
● Enter your email, a username, and a strong password.
● Date of birth.
● Accept the terms of service.
After entering the above, click the “Continue” button.
Step 4: Check the box besides “I am human” to enable the captcha.
Step 5: You will receive an email asking you to confirm your information. Select the “Verify email” option.
Once you’ve signed up for discord, you may access it via the Discord website or the mobile app. The program is free to download for Windows, Linux, Mac, Android, and iOS.
Follow the steps above to sign up on discord account successfully. Easy right? Let’s proceed!
Part 3 How to Make a Discord Signup with Desktop?
The discord creating account on your desktop is pretty much the same as using your browser.
Follow the steps below to make a discord account using your desktop.
Step 1: Click “Login” on the Discord website (top right).
Step 2: Underneath the sign-in box, click “Register.”
Step 3: Enter the email address, username, password, and birth date.
Step 4: Agree to the terms of service and then click “Continue.”
Step 5: Use the captcha to prove that you are not a robot.
Step 6: You will get an email to confirm your data; click on the link in the email to confirm.
See that? No big deal, right?
Part 4 How to Make a Signup Discord with App
Signing up for a discord account through the app is relatively easy, like the procedures above, you will not break a sweat.
Follow the easy steps below for discord create account on your smartphone device:
Step 1: Install and launch the Discord app on your smartphone
Step 2: Select the Register option.
Step 3: Choose whether to register by cellphone number or email address and input either one.
Step 4: You will get a message with a confirmation code or an email with a link.
Step 5: Enter the code or navigate to the URL.
Step 6: Enter your username and password here.
Step 7: Enter your birth date.
Step 8: Accept the terms of the agreement.
Step 9: Click “Next” to finish the Discord registration.
What Happens When You Disable your Discord Account?
When you deactivate your account, it goes to suspension mode. You may reactivate it by signing in and following the on-screen instructions. Keep in mind that discord accounts dormant for two years are removed, so if you want to keep yours, you must reactivate it (but you can disable it after this if you like).
After you deactivate an account, users will no longer get discord alerts. Users may, however, still receive friend requests, and any friend requests users get while their account is blocked will be ready for when they reactivate it. However, when a user decides to delete their account, the said account will get permanently deleted.
Tip: If you want to stay away from your discord account for a while with a plan to return to it later, it is advisable to log out or deactivate rather than delete it.
Part 5 Discord Create Account FAQs
Q. Is discord free, or do I have to pay?
A. Yes and no. The premium edition of discord is not free. If you don’t want to utilize the premium features, you may still download and make a discord account for free.
Q. Is there anything I cannot do on discord?
A. Do not organize, promote, or participate in any unlawful or possibly dangerous activities, such as sexual solicitation, human trafficking, or selling or enabling the sale of forbidden or potentially harmful products (firearms, ammunition, drugs, and controlled substances).
Q. Do messages disappear on discord?
A. Your messages are only destroyed: 1. if they are deleted individually (by you or a user with proper rights), 2. if you get banned, and the person banning you decides to delete all of your messages at once.
Q. Does discord account keep a record of interactions?
A. Yes, discord will track every discussion you have on discord acount, record everything you say on discord, and examine all photographs you transmit over discord.
Q. How will I know when someone blocks me on discord?
A. When you block someone, their online status on discord account changes to “offline” until unblocked and vice versa. They will also show offline in mutual servers or your chat history.
Q. How do I permanently delete my discord account?
A. To delete your discord created account for good, head to user settings, then tap on ‘my account.’ From there, tap on ‘Account Removal’ then tap on ‘Delete Account.’
If you are a server owner, you will have to delete the server or pass ownership of the server.
Q. How do I find servers to join on discord?
A. If you have a buddy who has a discord server you’d want to join, request an invite. If you’re a member of a discord community, ask for an invite or check on the community website.
By tapping the magnifying glass in the left window of the discord account app, you may also search for public servers that anybody can join.
● Ending Thoughts →
● Discord is a web program that works in most browsers. A desktop version is available for Windows, macOS, Linux, iOS, and Android. Discord’s desktop and browser versions are functionally and visually identical in practically every regard if you want to make a discord account. So, re-read the article and the FAQs on discord create account, and start your journey.
● Finally, for the creatives, boost your discord create account and usage experience by using Filmora to edit videos and make cool animations.
How to Loop Videos with iMovie
If you are a video creator, there are times when you have to loop a video. This is to extend the duration of the original video. For instance, you have a stock video of a short duration. You want it to be the background in your video throughout. You have to extend the duration of the stock video by playing it in a loop.
If you are a macOS user, you can use iMovie to loop your video. iMovie comes pre-install on macOS devices. iMovie happens to be one of the most preferred video editors among beginners. In fact, iMovie comes pre-installed on iPhones and iPads. You can easily loop your video on your mobile devices as well. We will illustrate how to loop a video on iMovie on iPhone as well as on Mac.
Part 1. How to loop a video on iMovie iPhone
iMovie by Apple comes pre-installed on iPhone and iPad. Naturally, it is one of the most widely used video editors by iPhone users. iMovie app has options for basic and even advanced levels of video editing. Looping a video on iMovie involves a few simple steps that everyone can perform easily. Here are the steps on how to loop a video in the iMovie app on your iPhone.
Step1 Launch the iMovie app on your iPhone. If you have uninstalled or disabled the app, you can always go to App Store to install it again.

Step2 If you are opening the app for the first time, you will get a welcome screen. Follow the on-screen instructions to land on the home screen of the app.
Step3 Tap on New Project “+” icon and select the Movie option to get started. This will take you to the phone media gallery to select a media file to get started.

Step4 You should tap on the Video option and select the video that you want to put into a loop. After selecting a video, tap on Create Movie option.

Step5 Tap on the video on the timeline to select the video and tap on the Duplicate option. You will see that the duration of the video has doubled. You can tap on Duplicate as many times as you want to increase the video duration.

Step6 Once you are done with the iMovie loop, tap on the Done option located in the top-left corner. Thereafter, tap on the Share icon at the bottom.

Step7 You will get a pop-up where you have to tap on the Save Video option. The edited video will be saved on your iPhone. You can open the new video from the Photos app.

Part 2. Loop Videos on Mac with iMovie
Editing a video on a Mac is always more comfortable than on an iPhone because of the larger screen. iMovie from Apple comes pre-installed on Mac as well, and hence, you can get started right away. It is completely free to use, and hence, you do not need to install any third-party video editor. Here are the steps on how to loop an iMovie video in simple steps.
Step1 Open the iMovie app from the Applications folder.
Step2 Click on Create New option and then click on the Movie option.

Step3 Bring in the required video under Movie Library by dragging the file from Finder on your Mac. You can also go to File> Import Media option and select the required video. You can also select the required media file from Events or Photos under the Libraries section.

Step4 Drag and drop the video on your timeline. When you want to loop the video, drag and drop the video clip again on the timeline. Make sure there is no gap between the first clip and the second clip on the timeline. You can drag and drop the video clip multiple times on the timeline to increase its duration.

Step5 Once you are done, go to File> Share> File option. Choose the destination to save the edited video.

Part 3. iMovie Alternative to Loop Videos on Mac
If you are looking for an iMovie alternative to perform iMovie loop video action easily, we recommend Wondershare Filmora . Filmora is available for both Mac and Windows. Filmora is a better video editor than iMovie. It is a premium video editor and it has more features and functionalities.
You can loop any video as many times as you want instantly. Besides, you can edit your video clip as per your requirements before looping the edited video. The user interface is highly intuitive for everyone. Hence, it has huge popularity among Mac users. You can also save the looped video in different file formats. Here are the steps to loop a video on Filmora.
Free Download For Win 7 or later(64-bit)
Free Download For macOS 10.14 or later
Step1 Download and install Wondershare Filmora. Launch Filmora and click on New Project on the welcome screen.

Step2 Drag and drop the video file from Finder on Mac to the Project Media folder on Filmora. Thereafter, drop the video file into the timeline.

Step3 Drag and drop the video clip into the timeline again. Make sure that there is no gap between the clips. Besides, make sure that they are on the same channel for looping. You can drag and drop the video into the timeline multiple times.

Step4 You can zoom out the timeline for better viewing. Play the video to check its output on Viewer. Finally, click on the Export button and save the video in the desired file format on your Mac.
The Bottom Line
If you want to loop a video on your Mac, iMovie is the most preferred option. The same is applicable to iPhone users as well. iMovie comes pre-installed, and it is completely free to use. That is why you can loop any video instantly. Wondershare Filmora is the best alternative to iMovie to edit and loop your video.
Free Download For macOS 10.14 or later
Step1 Download and install Wondershare Filmora. Launch Filmora and click on New Project on the welcome screen.
Step2 Drag and drop the video file from Finder on Mac to the Project Media folder on Filmora. Thereafter, drop the video file into the timeline.
Step3 Drag and drop the video clip into the timeline again. Make sure that there is no gap between the clips. Besides, make sure that they are on the same channel for looping. You can drag and drop the video into the timeline multiple times.
Step4 You can zoom out the timeline for better viewing. Play the video to check its output on Viewer. Finally, click on the Export button and save the video in the desired file format on your Mac.
The Bottom Line
If you want to loop a video on your Mac, iMovie is the most preferred option. The same is applicable to iPhone users as well. iMovie comes pre-installed, and it is completely free to use. That is why you can loop any video instantly. Wondershare Filmora is the best alternative to iMovie to edit and loop your video.
Also read:
- Updated In 2024, Time Bending Brilliance The Ultimate Slow Motion Video Makers
- 2024 Approved Top 5 Best Video Denoisers
- New Top 10 Best Free Video Compressors
- New Do You Want to Replace the Sky in Your Media? Read the Article to Learn How to Change the Sky App on Your Mobile Phone
- In 2024, Create a Movie with Windows Movie Maker
- 2024 Approved Best Free Video Editing Software to Boost Your Content Creation
- 2024 Approved If You Are Trying to Create a Countdown Effect, but Youre Not Sure Where to Start, Then This Post Is Going to Show You some Ways to Create a Countdown Animation for Your Videos
- Updated Do You Want a LUT that You Can Use for Your High-Definition Content? You Can Use Rec 709 LUT Premiere Pro for Your HD Digital Media to Give the Perfect Result
- Updated This Article Aims to Show You How to Improve Your Lighting in the Sun
- How to Use LUTs in VN Editor – Complete Guide and Best LUTs Download
- New In 2024, Top List 20 Best LUTs for Music Videos
- New In 2024, 6 Tips for Your First Facebook Ads
- New 11 Ways To Radial Blur To Images (iPhone/Android/Mac/Windows) for 2024
- New How to Crop a Video in Windows Media Player for 2024
- Looking for a Video Editor Where You Can Edit Your Tutorial and Training Videos? Camtasia Is a Great Choice. But Is It the Best Video Editor Available? Find Out From Our Camtasia Review
- In 2024, Split Audio From a Video in Adobe Premiere Pro Step by Step
- In 2024, How to Use Visual Effect for Zoom
- In 2024, How to Split a Video Into Parts on All Platforms
- New In 2024, Color Match Game Tips for You
- Updated Want to Take Your Editing Creativity to the Next Level by Designing Top-Class, Professional-Quality Slideshows in Aquasoft? Rest Assured, You Have Landed at the Right Place
- Updated In 2024, How to Make Discord GIF PFP? Solved
- New 2024 Approved How to Stabilize Videos for Free with Google Photos App
- Finding The Best Ways To Replace Sky in Lightroom
- New The Way to Make Dynamic Video Collages for 2024
- New Whatever the Reason You Want to Convert an Mp4 to GIF Online, There Are a Number of Ways to Do It. Use This Guide to Learn the Best Methods. Read More Here
- New Top 22 Free Video Editing Software
- Updated How To Brighten Video In Premiere Pro | Step By Step Guide for 2024
- In 2024, How To Be A Successful YouTuber
- Ideas to Make A Perfect Café Vlog
- Updated When the Talk Is About an Effective Slideshow Design, People Also Ask of Creating a Quick Windows 10 Slideshow. Keep Reading to Know About the Quickest Ways of Setting the Issue Straight
- Updated In 2024, Best 10 iPad Slideshow Apps to Create a Slideshow
- Updated The Top 10 AI Video Analytics Companies at a Glance
- Updated Easy Guide to Apply Slow Zoom Effects to Videos
- New A Complete Guide to the Best Brand Story Videos for 2024
- This Article Covers a Lot of Information About the Freeze-Frame Effect. It Includes Its Power, Its Usage in Films, and How to Create It in Your Videos Using Filmora. It Will Get You a Super Exciting Cinematic Effect
- In 2024, Create Eye-Catching Slow-Motion Videos to Set Your Own Trend. For This Purpose, Read This Article to Find and Learn to Use CapCuts New Slow-Motion Templates
- Updated Want to Create an Impressive Video Collage but Clueless About the Best Tools? No Worries as We Are Here and Will Help You to Learn About the Best Video Collage Maker PC Tools
- Updated Easy Step by Step Tutorial on Creating a Lightroom Collage for 2024
- Want to Add a Motion Blur Effect to Your Photos? This Step-by-Step Tutorial Will Show You How to Use GIMP Software to Get the Effect You Want
- Updated 2024 Approved Free LUTs for OBS How to Use Them?
- In 2024, Land Into the Thrill of Creating Stunning GIFs with Ezgif
- Do You Want to Record Videos with a Phantom High-Speed Camera? In This Guide, You Can Get a Detailed Note on the Phantom Camera for 2024
- What Is MOV Format and How to Edit MOV Video Better?
- Updated The Most Efficient Ways to Manage Your Timeline for 2024
- New Top 15 Slow Motion CapCut Templates to Work With
- 3D LUT Mobile App Review - A Composite Application for Editing Media
- Updated 2024 Approved Create an Awesome Logo Reveal with Logo Intro Templates
- 2024 Approved The After-Effects Match Colour Feature Bestows Numerous Benefits. Thus, in the Following Discussion, We Will Discuss This Feature and an Equally Proficient Efficient Alternative Tool for Colour Matching
- How to Factory Reset Samsung Galaxy A23 5G in 5 Easy Ways | Dr.fone
- In 2024, The Most Useful Tips for Pokemon Go Ultra League On Honor 90 Lite | Dr.fone
- In 2024, 3 Facts You Need to Know about Screen Mirroring Realme C55 | Dr.fone
- In 2024, Full Tutorial to Bypass Your Vivo V29 Pro Face Lock?
- In 2024, 3 Ways to Track Oppo A78 5G without Them Knowing | Dr.fone
- Can Life360 Track You When Your Samsung Galaxy A15 4G is off? | Dr.fone
- In 2024, Can I Bypass a Forgotten Phone Password Of ZTE?
- In 2024, 5 Solutions For Vivo Y78t Unlock Without Password
- The way to recover deleted pictures on Motorola G24 Power without backup.
- In 2024, 5 Ways to Track Lava Yuva 2 without App | Dr.fone
- In 2024, How to Mirror Your Xiaomi 13 Ultra Screen to PC with Chromecast | Dr.fone
- The way to convert MTS for Xiaomi Redmi K70
- Possible ways to recover deleted files from Xiaomi Redmi Note 13 5G
- 11 Best Pokemon Go Spoofers for GPS Spoofing on Apple iPhone 14 Plus | Dr.fone
- In 2024, How to Mirror PC Screen to Vivo V29 Pro Phones? | Dr.fone
- In 2024, Is GSM Flasher ADB Legit? Full Review To Bypass Your Infinix Zero 5G 2023 TurboFRP Lock
- Remove the lock of C51
- The Magnificent Art of Pokemon Go Streaming On Samsung Galaxy A05s? | Dr.fone
- In 2024, Is GSM Flasher ADB Legit? Full Review To Bypass Your Oppo Find X7 Ultra Phone FRP Lock
- In 2024, How to Use Google Assistant on Your Lock Screen Of Vivo S17e Phone
- Title: New Best Method to Split Video Into Parts Online
- Author: Chloe
- Created at : 2024-05-20 03:38:26
- Updated at : 2024-05-21 03:38:26
- Link: https://ai-editing-video.techidaily.com/new-best-method-to-split-video-into-parts-online/
- License: This work is licensed under CC BY-NC-SA 4.0.
