New Best Practical Tips to Improve Your Lighting in the Sun for 2024

Best Practical Tips to Improve Your Lighting in the Sun
Shooting outdoors is a challenge in most situations. We have to deal with the sun being overexposed or the background is too dark.
In this article, we’ll show you how to light with the sun the easiest way. These simple and effective tips can help you block the harsh sun and make it to your advantage!
1) Preparation
You may need those things to film under the harsh sun:
- An ND filter for your lens
- A flag to block the sun. It can be anything like a black poster.
- A white poster to bounce the sunlight.
- Artificial light equipment.
Now let’s see when and how to use them against the strong sunlight!
2) Direct to the Sun
If we want a specific background for our shot but our talent has to face the sun, here are some tips you can do to undermine the unflattering light or the blindness.
1. Pick up an ND filter on your lens

We use it outside so we can open our aperture to get nice blurry backgrounds without overexposing our footage.
2. Use a “flag” to block or shape the sunlight
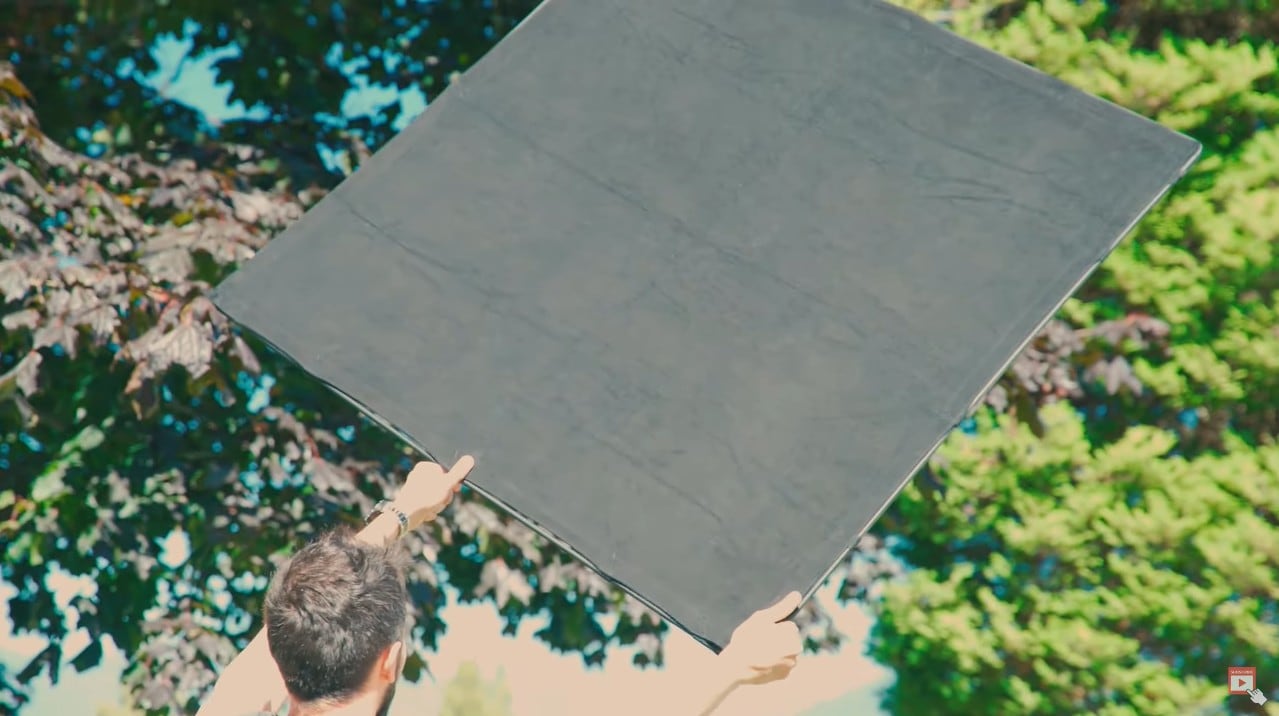
Using a black piece of poster board works perfectly fine, hold it up to the sun. Also, remember to angle your “flag” to create harsh lines or fully shade your talent.
3. Adjust your camera to fit the environment
For example, you can change the exposure of your camera to match the talent’s face giving a more silhouette look.
3) Back to the Sun
Have you ever been filming outside only to see your talent dark in the frame with the background blown out with light? To fix the problem, the simplest way is to use a “bounce”.
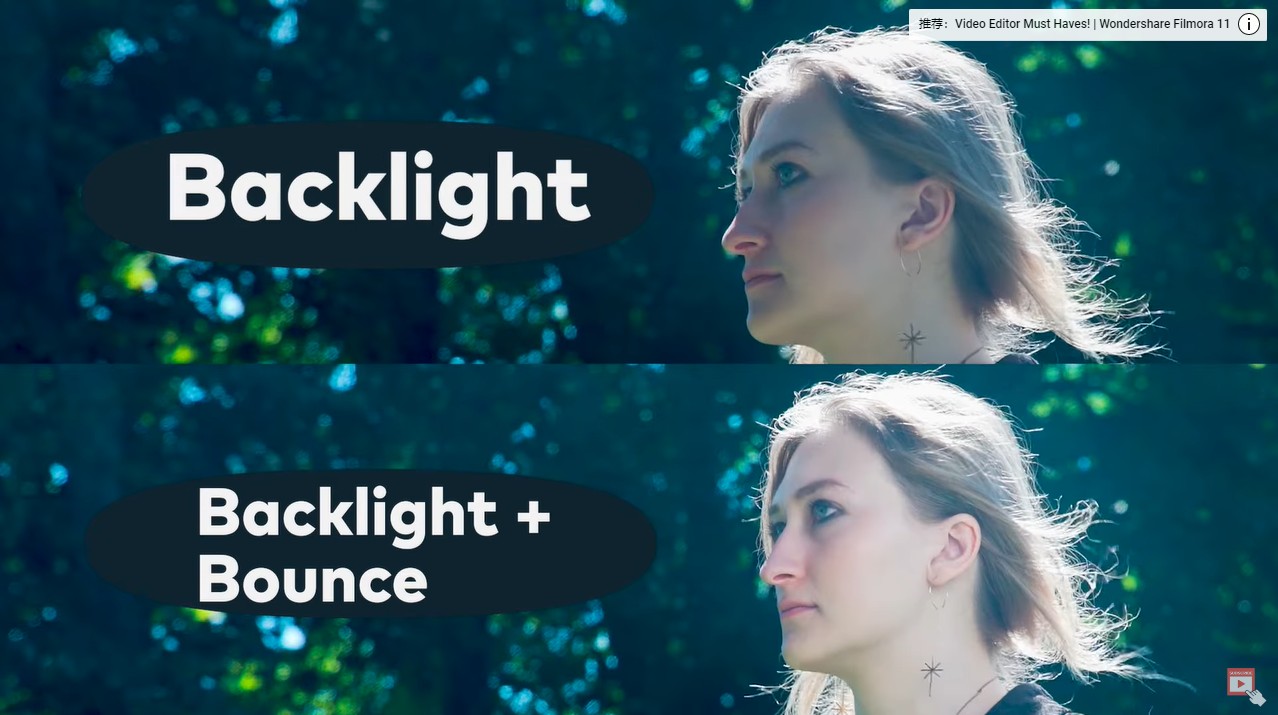
By using a “bounce”, we can reflect the light from the sun to our talent. Make sure to lift the bounce and move it around to get the right amount of light on your talent.
This should give us a nice look with the sun backlighting our subject and the bounce filling in the shadows and giving us soft light on our talent’s face!
4) Artificial lighting
If we want to control our lighting better, we will want to use artificial lights in combination with the sun.
For example, weather changes. As you shot, the sun will move and make lighting challenging to keep consistent.
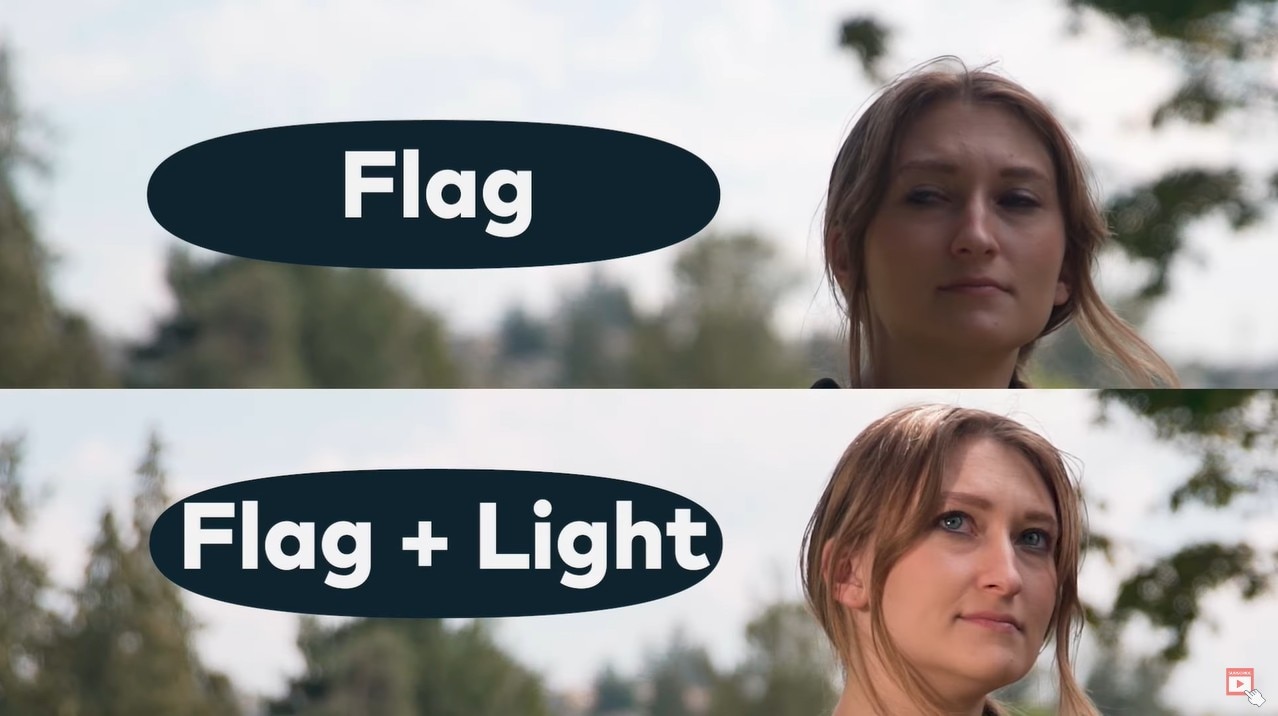
In that case, we can use the flag technique that we used before to block the harsh sunlight and then use our lights on our talent’s face, this keeps our lighting more consistent than if we relied on just the natural light.
Now, take a look at the comparison with all the lighting conditions we create:
- Flag VS Flag & Light
- Backlight VS Backlight & Bounce
Summary
If you shoot or film outdoors, you must learn how to cope with the unsteady natural light. Hope this article helps you with that and kindly leave your thoughts below.
Free Download For Win 7 or later(64-bit)
Free Download For macOS 10.14 or later
Free Download For macOS 10.14 or later
How to Make Strobe Light Text Effect?
In video editing, professionals put in different types of effects to create a unique feel to the visuals. In fact, there are different styles available that you can use in videos to create a specific feel in the viewers—case in point, strobe lights.
This technique involves a series of intense short flashes of light in sections of the clip that create a suspenseful or thrilling ambiance, amping up the horror feel in viewers and more. You might have seen many examples of this in horror movies, thrillers, suspense or action-filled movies, sci-fi films, etc. Similarly, adding the effect to the titles gives a cinematic feel to them.
As a film or video editor, are you interested in adding this effect to your own project as well? Luckily, you do not need significant technical know-how or invest in different types of high-grade equipment to manage it - Wondershare Filmora allows users to add the effect easily in the titles. Want to know how? Read ahead.
Launch the software first
Of course, before you can begin adding the effect to your video, you must have the software. The downloading process for Wondershare Filmora 11 is very straightforward as long as you have a Mac or Windows PC.
Free Download For Win 7 or later(64-bit)
Free Download For macOS 10.14 or later
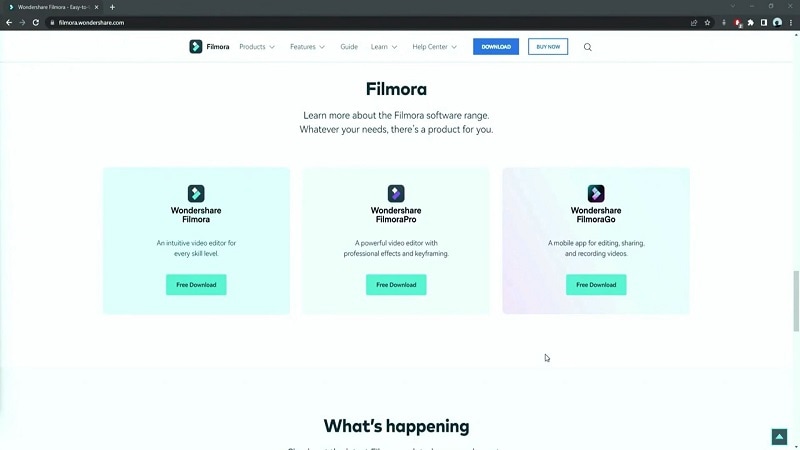
First, visit the official website to download the software. The Download button at the top of the screen or the description box is available to click on. That will instantly allow the Filmora installer to download into your device.
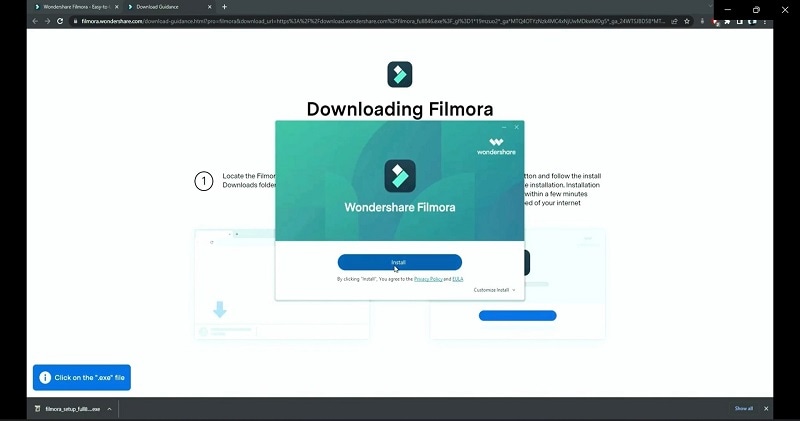
Double-click on the installer from your notifications or browser downloads section, then click Install. Allow the prompt for permission approval when it comes up, and the installation process will begin. This would take a little bit of time, and you can tap on the Start Now button at the last window that opens.
Add the title
The editor will open automatically next. You have to tap on the Create New Project button to access the editing screen, tap on the Titles tab, and choose the Default Title. If you prefer another version, browse through the different title presets available as options and download the one you prefer.
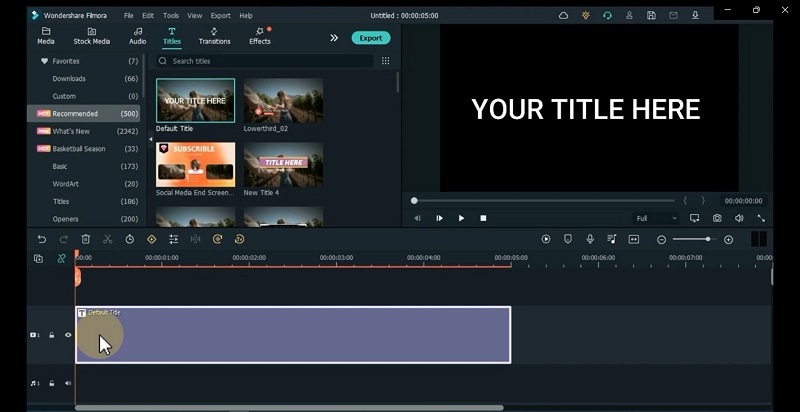
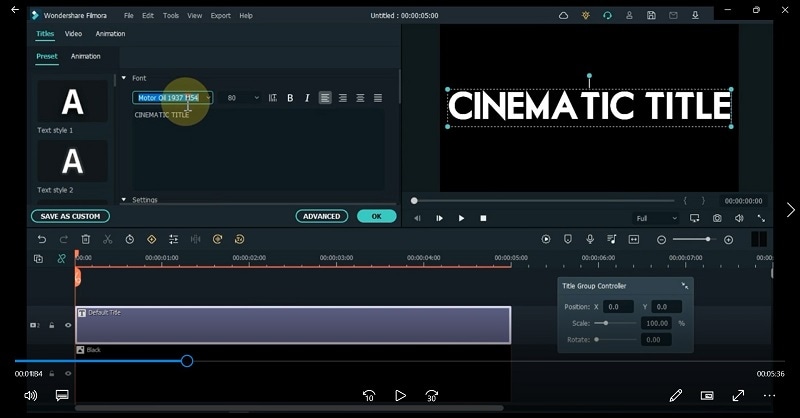
Then, drag the title from this section and drop it into the editing timeline. Double-click on the title in the timeline to open the title editing window. Insert the text you want to add as the title in the text field and adjust the size, font, and other font modifications here.
Edit the title and click snapshots
Then, you should drag the title clip you added to the timeline to an upper section and click on the Media tab following that. Then, choose the Sample Color option from the listed menu and tap on the Black color choice. After doing so, drag it down to the timeline onto the track under the Default Title clip you added and moved up.
Consequently, click on the Snapshot icon at the right side of the toolbar just above the timeline. This will take a screenshot of the black color picture you added second.
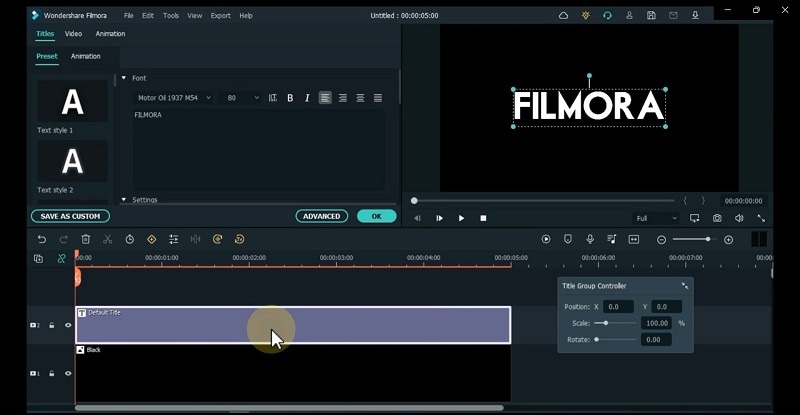
Then you should double-click on the original Default Title you added and start editing your title text once more. This time, add the term you want to appear under your original title here. Adjust the font for it as something other than the original one. For example, if you put Motor Oil 1937 M54 as the first title font, set the second as Montserrat SemBold. Make more adjustments, if necessary, to the font. Then, retake a snapshot of it.
Insert the snapshots
Remove the two title clips you added to the timeline. You have to work with the Snapshots you took now.
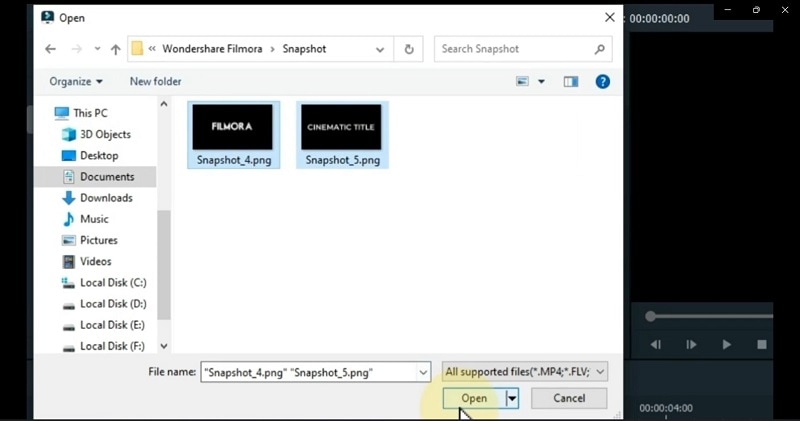
It is possible that you will not see the Snapshots saved in your media folder. In this case, tap on the “Click here to insert media” section and go to the device library. It will open in the Wondershare Filmora folder; if not, search for it and access it.
In the folder, double-click on the Snapshot folder. Choose both of the Snapshots you saved right now from here and tap on Open to import them into Filmora.
Import additional music and background visuals
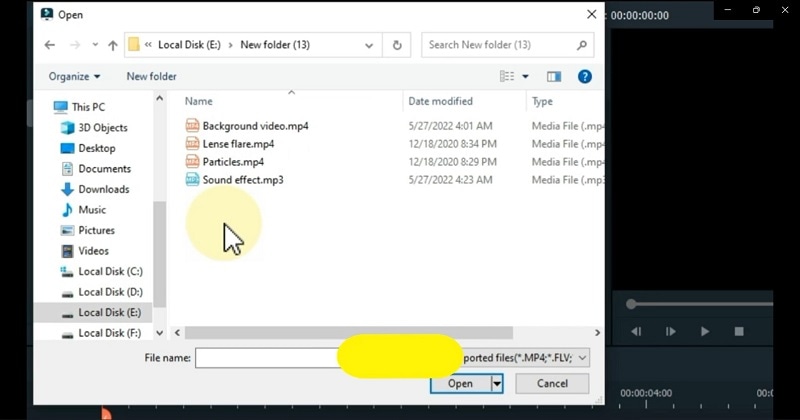
After you have imported the snapshots to Filmora, you have to tap on the Import File option again. Go to the folder where you saved specific files like Lens flare, background video, particles, and sound effect clips. If you have these previously saved in other folders, make sure to keep them all in one folder ahead of time and open that one here.
Choose all files and click on Open to add them to the Filmora software. Now starts the process of merging them all into one cohesive effect.
Drag the files into the timeline
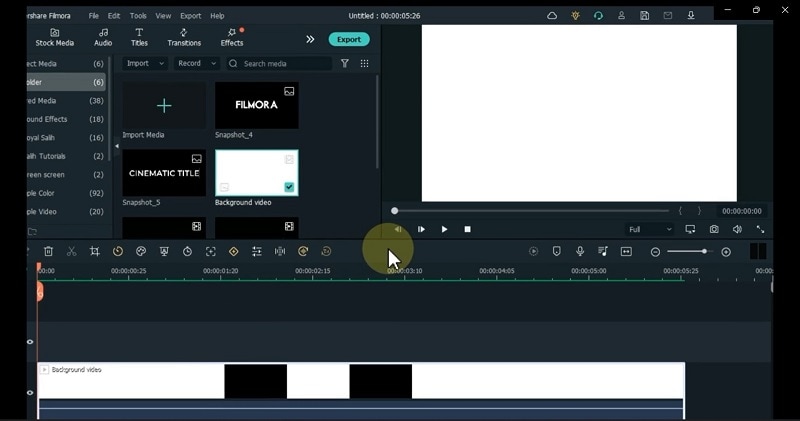
The background video is the first file you will drag and drop to the timeline. For the best effect, choose a flashing light background video. Next, drag the first title you edited into Track 2, right above the first one. Make sure to adjust the length of the clip to match the background video length. Repeat the same for the second snapshot, adding it above the first snapshot in the timeline.
Edit the snapshots via Chroma Key and Composting
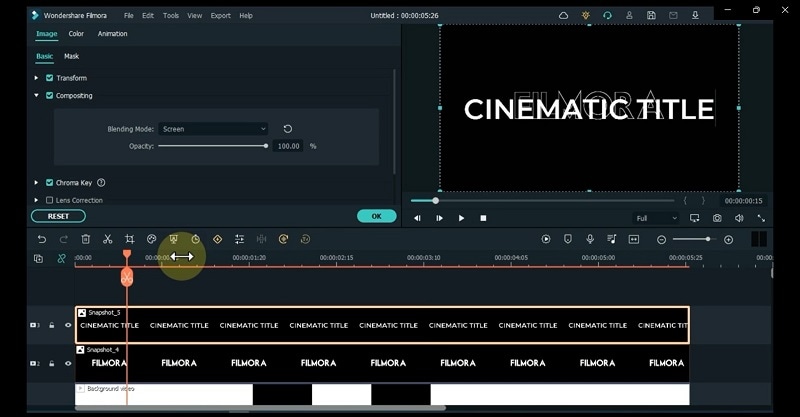
You must hide the second snapshot you added, i.e., the one in the 3rd Track on the timeline. After that, click on snapshot 1 and tap on the Chroma Key icon in the toolbar right above the timeline.
When the Chroma Key window opens, tap on the Select Color option and go to the “More…” option. Tap on the basic white color and click on OK.
Following it, move the slider for Edge Thickness to extend it and see the preview to know if you are satisfied with the amount. Then, click on the unhide icon for the second snapshot. Right-click on it and tap on the Composting option. Under the Blending Mode parameter, change the option to Screen. The title background will remove automatically.
Press OK.
Add the sound effect
Again, you must hide the second snapshot in the timeline with the same step as before. Then, drag the sound effect to the audio track timeline next. Tap on the Play button under the Preview to see how the effect looks with the sound. Cut out the extra second of the sound effect clip to align it with the ending section of all of the other clips.
Add the initial keyframes
Choose the first snapshot in the timeline, below the second snapshot, and above the background video clip. Then, double-click on it to open the editor window and choose the Animation tab this time instead of Image.
Add the keyframe here and change the value of the Scale parameter to 400 or something high like that. In the preview, you will see that most of the font in this title is out of frame. After this, click on Rotate and turn the font to 45 degrees.
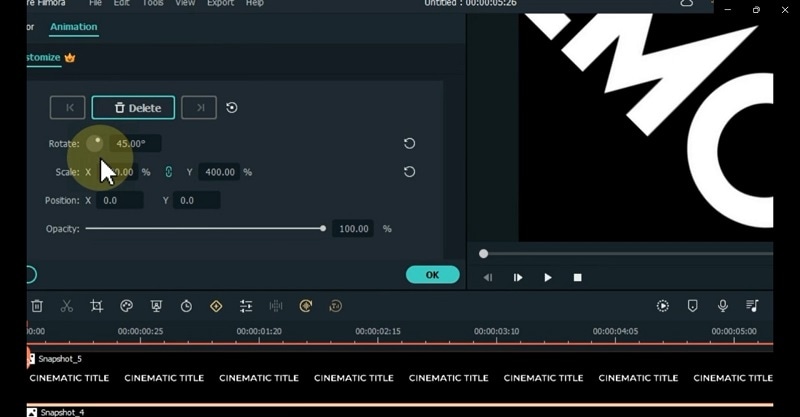
Move your playhead on this snapshot clip in the timeline by at least 1 second. Then, add another keyframe in this location by tapping the Add button. Here, reset the Scale and Rotate parameters and press the OK button to end.
Add the lens flare and particle video
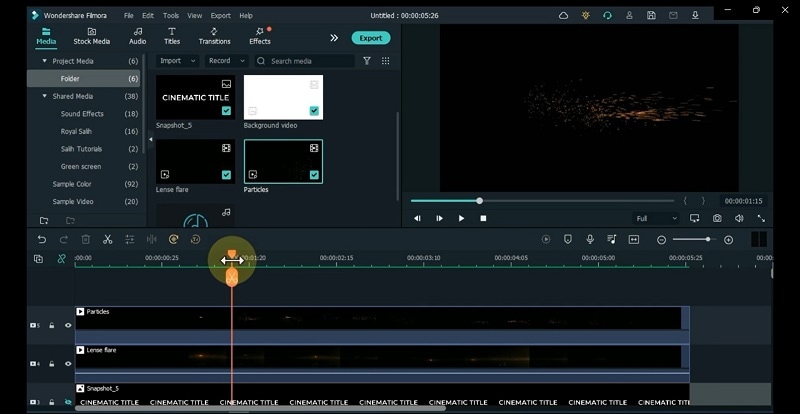
Next, go back to the media section where all the files you added are present and drag your lens flare clip to the timeline, right on the track above the last one you added. Drop it here and adjust the length of it to match others if it does not show that automatically.
Above it, drag and drop the Particles video from the media files you added previously onto the track above the lens flare one. Do the same to delete the spare part by moving the play head to that point, clicking on the scissor icon, and removing the extra part.
Then, double-click on this Particles video clip on the timeline and go to the Compositing section. Tap on the Blending Mode drop-down choice and choose the Screen option. Press OK. Next, repeat the same for the lens flare video and tap the OK button.
Now, play the preview again.
Adjust the second title, again
Remember how you clicked on the hide button for the second snapshot for title 2? Now, you have to click on the unhide icon beside it.
Move the play head to the 3-second mark from the beginning. If you need clarification on this, check if the lens flare effect is beginning to start below the first title at this point. Move your playhead to that point for the second snapshot.
Here, tap on the Split icon and remove the clip’s first half. Then, double-click on the second half and go to Animation. Press the Add button to insert a keyframe here and change the scale and position of the title at this point. Move it to the placement you want, right above the lens flare. Also, drag the slider for the Opacity parameter to zero at this point.
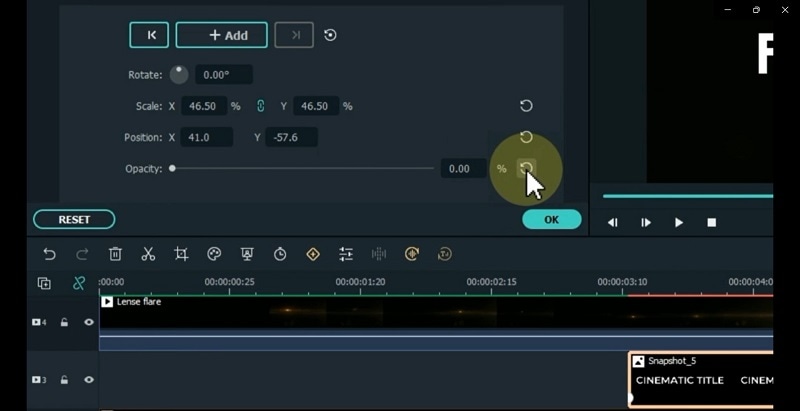
Subsequently, move the play head to the point when the lens flare effect stop, which is around 2 seconds more. At this point, you have to add another keyframe and change the Opacity to 100.
Play the preview of the whole thing to see how the effect looks in completion.
Conclusion
Indeed, the strobe light effect in the title of movies or videos of different lengths can effectively create a heart-stopping moment on the screen. Moreover, it can work to incite a feeling of anticipation in viewers, especially with the right music beat in the backdrop.
Using Filmora will allow you to add the cinematic effect quickly and efficiently with simple, quick steps. Follow the phases mentioned in this post while trying out different variations before settling on your final shot choice.
Free Download For macOS 10.14 or later
First, visit the official website to download the software. The Download button at the top of the screen or the description box is available to click on. That will instantly allow the Filmora installer to download into your device.

Double-click on the installer from your notifications or browser downloads section, then click Install. Allow the prompt for permission approval when it comes up, and the installation process will begin. This would take a little bit of time, and you can tap on the Start Now button at the last window that opens.

Add the title
The editor will open automatically next. You have to tap on the Create New Project button to access the editing screen, tap on the Titles tab, and choose the Default Title. If you prefer another version, browse through the different title presets available as options and download the one you prefer.

Then, drag the title from this section and drop it into the editing timeline. Double-click on the title in the timeline to open the title editing window. Insert the text you want to add as the title in the text field and adjust the size, font, and other font modifications here.
Edit the title and click snapshots
Then, you should drag the title clip you added to the timeline to an upper section and click on the Media tab following that. Then, choose the Sample Color option from the listed menu and tap on the Black color choice. After doing so, drag it down to the timeline onto the track under the Default Title clip you added and moved up.
Consequently, click on the Snapshot icon at the right side of the toolbar just above the timeline. This will take a screenshot of the black color picture you added second.

Then you should double-click on the original Default Title you added and start editing your title text once more. This time, add the term you want to appear under your original title here. Adjust the font for it as something other than the original one. For example, if you put Motor Oil 1937 M54 as the first title font, set the second as Montserrat SemBold. Make more adjustments, if necessary, to the font. Then, retake a snapshot of it.

Insert the snapshots
Remove the two title clips you added to the timeline. You have to work with the Snapshots you took now.
It is possible that you will not see the Snapshots saved in your media folder. In this case, tap on the “Click here to insert media” section and go to the device library. It will open in the Wondershare Filmora folder; if not, search for it and access it.
In the folder, double-click on the Snapshot folder. Choose both of the Snapshots you saved right now from here and tap on Open to import them into Filmora.

Import additional music and background visuals
After you have imported the snapshots to Filmora, you have to tap on the Import File option again. Go to the folder where you saved specific files like Lens flare, background video, particles, and sound effect clips. If you have these previously saved in other folders, make sure to keep them all in one folder ahead of time and open that one here.
Choose all files and click on Open to add them to the Filmora software. Now starts the process of merging them all into one cohesive effect.

Drag the files into the timeline
The background video is the first file you will drag and drop to the timeline. For the best effect, choose a flashing light background video. Next, drag the first title you edited into Track 2, right above the first one. Make sure to adjust the length of the clip to match the background video length. Repeat the same for the second snapshot, adding it above the first snapshot in the timeline.

Edit the snapshots via Chroma Key and Composting
You must hide the second snapshot you added, i.e., the one in the 3rd Track on the timeline. After that, click on snapshot 1 and tap on the Chroma Key icon in the toolbar right above the timeline.
When the Chroma Key window opens, tap on the Select Color option and go to the “More…” option. Tap on the basic white color and click on OK.
Following it, move the slider for Edge Thickness to extend it and see the preview to know if you are satisfied with the amount. Then, click on the unhide icon for the second snapshot. Right-click on it and tap on the Composting option. Under the Blending Mode parameter, change the option to Screen. The title background will remove automatically.
Press OK.

Add the sound effect
Again, you must hide the second snapshot in the timeline with the same step as before. Then, drag the sound effect to the audio track timeline next. Tap on the Play button under the Preview to see how the effect looks with the sound. Cut out the extra second of the sound effect clip to align it with the ending section of all of the other clips.
Add the initial keyframes
Choose the first snapshot in the timeline, below the second snapshot, and above the background video clip. Then, double-click on it to open the editor window and choose the Animation tab this time instead of Image.
Add the keyframe here and change the value of the Scale parameter to 400 or something high like that. In the preview, you will see that most of the font in this title is out of frame. After this, click on Rotate and turn the font to 45 degrees.

Move your playhead on this snapshot clip in the timeline by at least 1 second. Then, add another keyframe in this location by tapping the Add button. Here, reset the Scale and Rotate parameters and press the OK button to end.
Add the lens flare and particle video
Next, go back to the media section where all the files you added are present and drag your lens flare clip to the timeline, right on the track above the last one you added. Drop it here and adjust the length of it to match others if it does not show that automatically.
Above it, drag and drop the Particles video from the media files you added previously onto the track above the lens flare one. Do the same to delete the spare part by moving the play head to that point, clicking on the scissor icon, and removing the extra part.
Then, double-click on this Particles video clip on the timeline and go to the Compositing section. Tap on the Blending Mode drop-down choice and choose the Screen option. Press OK. Next, repeat the same for the lens flare video and tap the OK button.
Now, play the preview again.

Adjust the second title, again
Remember how you clicked on the hide button for the second snapshot for title 2? Now, you have to click on the unhide icon beside it.
Move the play head to the 3-second mark from the beginning. If you need clarification on this, check if the lens flare effect is beginning to start below the first title at this point. Move your playhead to that point for the second snapshot.
Here, tap on the Split icon and remove the clip’s first half. Then, double-click on the second half and go to Animation. Press the Add button to insert a keyframe here and change the scale and position of the title at this point. Move it to the placement you want, right above the lens flare. Also, drag the slider for the Opacity parameter to zero at this point.

Subsequently, move the play head to the point when the lens flare effect stop, which is around 2 seconds more. At this point, you have to add another keyframe and change the Opacity to 100.
Play the preview of the whole thing to see how the effect looks in completion.
Conclusion
Indeed, the strobe light effect in the title of movies or videos of different lengths can effectively create a heart-stopping moment on the screen. Moreover, it can work to incite a feeling of anticipation in viewers, especially with the right music beat in the backdrop.
Using Filmora will allow you to add the cinematic effect quickly and efficiently with simple, quick steps. Follow the phases mentioned in this post while trying out different variations before settling on your final shot choice.
Separating Audio From Video in DaVinci Resolve [Step by Step]
The DaVinci Resolve is an excellent software for editing videos; that’s why it attracts users. They also enjoy using it due to its simplicity and availability of features. One of them is separating the audio from the video that most people are looking for. It is easy to extract from this software. But, to avail of this feature, you need to follow proper steps, and this article is all about it. There are also details regarding the Wondershare Filmora as the most appropriate alternative and simpler solution provider.
How can you separate audio from the video clips in DaVinci resolve?
The DaVinci resolve is the complete package to solve your different issues. It is a solution provider regarding the editing of the videos, extraction of audio from videos, matching, correction of the colours and many more. It also includes modification of the lens that helps analyse and correct the distortion. Even the lens analysis is also available to deliver high-quality results.
Step 1: Launch the DaVinci Resolve in your system after its installation. Import the media file from the library in your timeline from which you have to separate the audio.

Step 2: Select the Edit tab in the timeline of your project if it isn’t selected by default. You need to choose the video clip by pointing the cursor or dragging the mouse towards it.

Step 3: After its selection, untick all the clips, and this step is for separating the audio from the video just from one file. Click the video file for deselection.

Step 4: Now it is easy to select the video and click on it. Select the audio and video clips separately. Simply edit, delete or move your audio whenever you want it to.
An easier way to separate the audio from the video
However, the DaVinci Resolve is the software of advanced level and the best choice for professionals. But its pricing that is $299, is quite disturbing for most of the users. So, they are always searching for a suitable approach and reasonable as well. And that is the first and foremost Filmora Video Editor . You can split the audio and listen to your favourite track on any media player.
All the tools are readily available, and they are used without facing any issue. After editing and applying all the effects, it is easy to upload on social network platforms. it is very simple to create fast or slow-motion videos with speed controls. This software is highly supportive of editing videos of any kind. There is no need to look for the reasons to choose Wondershare Filmora; instead, it is not to choose it for editing tasks.
For Win 7 or later (64-bit)
For macOS 10.14 or later
Features:
- Extracting the audio from videos
- Controls available for videos and audios
- Number of ways to split the clips and screens
- All the functions are performed by just drag and drop
- Sharing of the videos unlimitedly on Vimeo, YouTube and others
- mixing the audio and removing the noise
To extract the audio from the video clip in Wondershare Filmora, go through the following easy steps and get your task done.
Step 1: After completing the installation of Wondershare Filmora, selection of the ratio is required whether it is 4:3 or 16:9. It is your choice and dependent on the requirements of your project. Import the video from the folder of your computer when you will click “Import”. As the default, all the files are all together in one place with no gap.

Step 2: This step separates the audio from the video in a single click. You need to right-click on the video from which you have to split the audio and select “Detach Audio”. Instantly, an audio file will appear on the screen on the audio track. Yes, you have received the original audio final from the source file.
Successfully the audio is separate from the video. Wondershare Filmora also offers to replace the audio file you want to add to the video. It can provide a few instructions, some narrations or personal, funny tunes for sharing with family and friends.
Step 3: After step2, it is simple to delete the audio clips or video that isn’t needed anymore and add your own choice. Click on “Export” to save the audio file into the new MP3 file and select “iPod” presenting to play. Even, you can save it as your project file on your system. After the completion of exporting the audio track, load the project file again with the video frame and export it as the new file of your video.

Wondershare Filmora is the most user-friendly editing software for all. Whether you want to make complex or straightforward videos, all is done in just a few steps. The best part of this software is that all the features are easily accessible to all types of users. It is very simple to start and show your creative skills and share easily if you are unfamiliar with video editing.
There is a massive range of tools in Wondershare Filmora that you are looking for in any video editor. 800+ video effects are built-in, such as effects for the text, transitions, filters, stickers, motion graphics, and overlays.
In Wondershare Filmora, there are templates for the spilt screens as well. It is best for you to handle your YouTube channels or your Instagram account. It doesn’t record screen only but as well voice-over. Even capturing the videos from frame to frame is also possible. So, what are you waiting for? Download Wondershare Filmora today and start your editing done in just a few clicks.
Step 2: Select the Edit tab in the timeline of your project if it isn’t selected by default. You need to choose the video clip by pointing the cursor or dragging the mouse towards it.

Step 3: After its selection, untick all the clips, and this step is for separating the audio from the video just from one file. Click the video file for deselection.

Step 4: Now it is easy to select the video and click on it. Select the audio and video clips separately. Simply edit, delete or move your audio whenever you want it to.
An easier way to separate the audio from the video
However, the DaVinci Resolve is the software of advanced level and the best choice for professionals. But its pricing that is $299, is quite disturbing for most of the users. So, they are always searching for a suitable approach and reasonable as well. And that is the first and foremost Filmora Video Editor . You can split the audio and listen to your favourite track on any media player.
All the tools are readily available, and they are used without facing any issue. After editing and applying all the effects, it is easy to upload on social network platforms. it is very simple to create fast or slow-motion videos with speed controls. This software is highly supportive of editing videos of any kind. There is no need to look for the reasons to choose Wondershare Filmora; instead, it is not to choose it for editing tasks.
For Win 7 or later (64-bit)
For macOS 10.14 or later
Features:
- Extracting the audio from videos
- Controls available for videos and audios
- Number of ways to split the clips and screens
- All the functions are performed by just drag and drop
- Sharing of the videos unlimitedly on Vimeo, YouTube and others
- mixing the audio and removing the noise
To extract the audio from the video clip in Wondershare Filmora, go through the following easy steps and get your task done.
Step 1: After completing the installation of Wondershare Filmora, selection of the ratio is required whether it is 4:3 or 16:9. It is your choice and dependent on the requirements of your project. Import the video from the folder of your computer when you will click “Import”. As the default, all the files are all together in one place with no gap.

Step 2: This step separates the audio from the video in a single click. You need to right-click on the video from which you have to split the audio and select “Detach Audio”. Instantly, an audio file will appear on the screen on the audio track. Yes, you have received the original audio final from the source file.
Successfully the audio is separate from the video. Wondershare Filmora also offers to replace the audio file you want to add to the video. It can provide a few instructions, some narrations or personal, funny tunes for sharing with family and friends.
Step 3: After step2, it is simple to delete the audio clips or video that isn’t needed anymore and add your own choice. Click on “Export” to save the audio file into the new MP3 file and select “iPod” presenting to play. Even, you can save it as your project file on your system. After the completion of exporting the audio track, load the project file again with the video frame and export it as the new file of your video.

Wondershare Filmora is the most user-friendly editing software for all. Whether you want to make complex or straightforward videos, all is done in just a few steps. The best part of this software is that all the features are easily accessible to all types of users. It is very simple to start and show your creative skills and share easily if you are unfamiliar with video editing.
There is a massive range of tools in Wondershare Filmora that you are looking for in any video editor. 800+ video effects are built-in, such as effects for the text, transitions, filters, stickers, motion graphics, and overlays.
In Wondershare Filmora, there are templates for the spilt screens as well. It is best for you to handle your YouTube channels or your Instagram account. It doesn’t record screen only but as well voice-over. Even capturing the videos from frame to frame is also possible. So, what are you waiting for? Download Wondershare Filmora today and start your editing done in just a few clicks.
Step 2: Select the Edit tab in the timeline of your project if it isn’t selected by default. You need to choose the video clip by pointing the cursor or dragging the mouse towards it.

Step 3: After its selection, untick all the clips, and this step is for separating the audio from the video just from one file. Click the video file for deselection.

Step 4: Now it is easy to select the video and click on it. Select the audio and video clips separately. Simply edit, delete or move your audio whenever you want it to.
An easier way to separate the audio from the video
However, the DaVinci Resolve is the software of advanced level and the best choice for professionals. But its pricing that is $299, is quite disturbing for most of the users. So, they are always searching for a suitable approach and reasonable as well. And that is the first and foremost Filmora Video Editor . You can split the audio and listen to your favourite track on any media player.
All the tools are readily available, and they are used without facing any issue. After editing and applying all the effects, it is easy to upload on social network platforms. it is very simple to create fast or slow-motion videos with speed controls. This software is highly supportive of editing videos of any kind. There is no need to look for the reasons to choose Wondershare Filmora; instead, it is not to choose it for editing tasks.
For Win 7 or later (64-bit)
For macOS 10.14 or later
Features:
- Extracting the audio from videos
- Controls available for videos and audios
- Number of ways to split the clips and screens
- All the functions are performed by just drag and drop
- Sharing of the videos unlimitedly on Vimeo, YouTube and others
- mixing the audio and removing the noise
To extract the audio from the video clip in Wondershare Filmora, go through the following easy steps and get your task done.
Step 1: After completing the installation of Wondershare Filmora, selection of the ratio is required whether it is 4:3 or 16:9. It is your choice and dependent on the requirements of your project. Import the video from the folder of your computer when you will click “Import”. As the default, all the files are all together in one place with no gap.

Step 2: This step separates the audio from the video in a single click. You need to right-click on the video from which you have to split the audio and select “Detach Audio”. Instantly, an audio file will appear on the screen on the audio track. Yes, you have received the original audio final from the source file.
Successfully the audio is separate from the video. Wondershare Filmora also offers to replace the audio file you want to add to the video. It can provide a few instructions, some narrations or personal, funny tunes for sharing with family and friends.
Step 3: After step2, it is simple to delete the audio clips or video that isn’t needed anymore and add your own choice. Click on “Export” to save the audio file into the new MP3 file and select “iPod” presenting to play. Even, you can save it as your project file on your system. After the completion of exporting the audio track, load the project file again with the video frame and export it as the new file of your video.

Wondershare Filmora is the most user-friendly editing software for all. Whether you want to make complex or straightforward videos, all is done in just a few steps. The best part of this software is that all the features are easily accessible to all types of users. It is very simple to start and show your creative skills and share easily if you are unfamiliar with video editing.
There is a massive range of tools in Wondershare Filmora that you are looking for in any video editor. 800+ video effects are built-in, such as effects for the text, transitions, filters, stickers, motion graphics, and overlays.
In Wondershare Filmora, there are templates for the spilt screens as well. It is best for you to handle your YouTube channels or your Instagram account. It doesn’t record screen only but as well voice-over. Even capturing the videos from frame to frame is also possible. So, what are you waiting for? Download Wondershare Filmora today and start your editing done in just a few clicks.
Step 2: Select the Edit tab in the timeline of your project if it isn’t selected by default. You need to choose the video clip by pointing the cursor or dragging the mouse towards it.

Step 3: After its selection, untick all the clips, and this step is for separating the audio from the video just from one file. Click the video file for deselection.

Step 4: Now it is easy to select the video and click on it. Select the audio and video clips separately. Simply edit, delete or move your audio whenever you want it to.
An easier way to separate the audio from the video
However, the DaVinci Resolve is the software of advanced level and the best choice for professionals. But its pricing that is $299, is quite disturbing for most of the users. So, they are always searching for a suitable approach and reasonable as well. And that is the first and foremost Filmora Video Editor . You can split the audio and listen to your favourite track on any media player.
All the tools are readily available, and they are used without facing any issue. After editing and applying all the effects, it is easy to upload on social network platforms. it is very simple to create fast or slow-motion videos with speed controls. This software is highly supportive of editing videos of any kind. There is no need to look for the reasons to choose Wondershare Filmora; instead, it is not to choose it for editing tasks.
For Win 7 or later (64-bit)
For macOS 10.14 or later
Features:
- Extracting the audio from videos
- Controls available for videos and audios
- Number of ways to split the clips and screens
- All the functions are performed by just drag and drop
- Sharing of the videos unlimitedly on Vimeo, YouTube and others
- mixing the audio and removing the noise
To extract the audio from the video clip in Wondershare Filmora, go through the following easy steps and get your task done.
Step 1: After completing the installation of Wondershare Filmora, selection of the ratio is required whether it is 4:3 or 16:9. It is your choice and dependent on the requirements of your project. Import the video from the folder of your computer when you will click “Import”. As the default, all the files are all together in one place with no gap.

Step 2: This step separates the audio from the video in a single click. You need to right-click on the video from which you have to split the audio and select “Detach Audio”. Instantly, an audio file will appear on the screen on the audio track. Yes, you have received the original audio final from the source file.
Successfully the audio is separate from the video. Wondershare Filmora also offers to replace the audio file you want to add to the video. It can provide a few instructions, some narrations or personal, funny tunes for sharing with family and friends.
Step 3: After step2, it is simple to delete the audio clips or video that isn’t needed anymore and add your own choice. Click on “Export” to save the audio file into the new MP3 file and select “iPod” presenting to play. Even, you can save it as your project file on your system. After the completion of exporting the audio track, load the project file again with the video frame and export it as the new file of your video.

Wondershare Filmora is the most user-friendly editing software for all. Whether you want to make complex or straightforward videos, all is done in just a few steps. The best part of this software is that all the features are easily accessible to all types of users. It is very simple to start and show your creative skills and share easily if you are unfamiliar with video editing.
There is a massive range of tools in Wondershare Filmora that you are looking for in any video editor. 800+ video effects are built-in, such as effects for the text, transitions, filters, stickers, motion graphics, and overlays.
In Wondershare Filmora, there are templates for the spilt screens as well. It is best for you to handle your YouTube channels or your Instagram account. It doesn’t record screen only but as well voice-over. Even capturing the videos from frame to frame is also possible. So, what are you waiting for? Download Wondershare Filmora today and start your editing done in just a few clicks.
10 Recommended Websites to Discover Awesome Premiere Pro Video Templates
The Premiere Pro templates are a great help to start working on the video right away. You don’t need to create your video from scratch thus, saving time. Moreover, there are fully adaptable features that make your video eye-catching. The article provides knowledge about 10 free Premiere Pro templates. So, let us commence this! Are you with us?
Part 1: 10 Popular Websites to Find Premiere Pro Templates
There is an extensive range of websites to access the free Adobe Premiere templates. It is important to know the workability of such websites and what they bring to the house. Therefore, the sub-section of this write-up would shed light on 10 of such websites where you can download Adobe Premiere templates and find them compatible with the software.
So, what are we waiting for? Let us begin the process!
1. Envato Elements
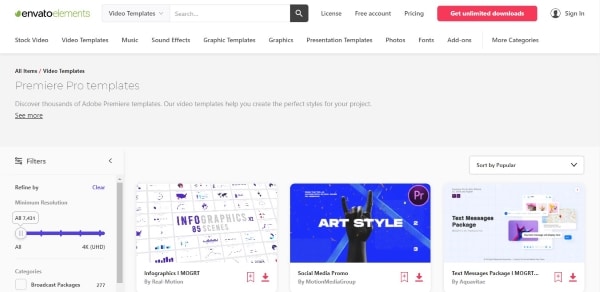
The first website offering Adobe Premiere templates is known as Envato Elements. One can count on this webpage to access millions of creative assets. Envato Elements comes up with Adobe Premiere Pro templates free, stock videos, graphic templates, photos, and website templates.
Moreover, if you are into print and website design, you will find Envato Elements beside you. The search bar makes the search effective as you can choose between categories or applications. The search filter has made life easy for designers and creators.
2. Storyblocks
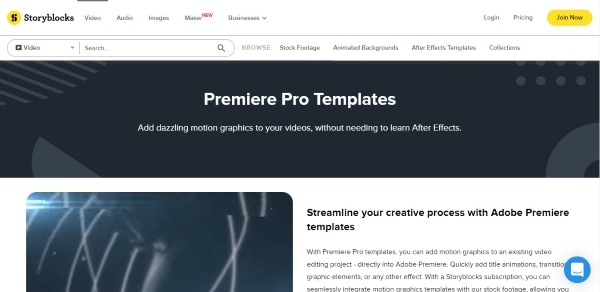
Storyblocks are the next big thing if you need to download Premiere templates without much effort. This website presents an awful load of green screen footage, music and sound effects, animated backgrounds, royalty stock footage, and templates for Premiere Pro. It also has a Maker, enabling the user to make the professional video in seconds.
The filtering option of Storyblocks is to die for. Style or software can filter the templates and effects to have what we need without wasting much time.
3. MotionElements
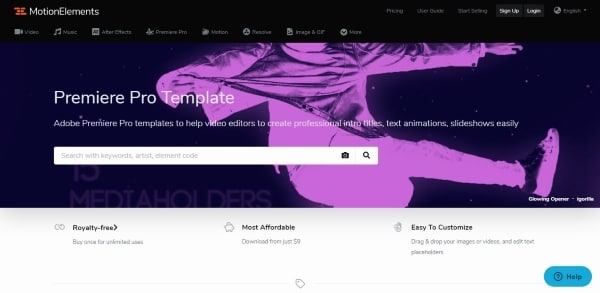
The third royalty-free marketplace making a brand name for itself is MotionElements. The website offers more than 3 million assets for its users in different industry sectors. You can access Premiere Pro templates free download with other stock videos and audio files.
From images, music, templates, effects to transitions, logos, and animations, MotionElements has covered its basis. The search filter gives multiple categories, including software, category, and style.
4. Motion Array
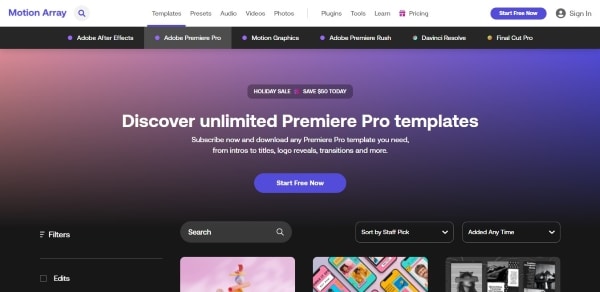
Claiming to be an all-in-one video and filmmaker’s platform, Motion Array takes complete responsibility for making your projects successful. The website takes the raw concept of your project and turns it into completion. Adobe Premiere Pro templates can be downloaded via Motion Array with other effects.
You can have Adobe Premiere Pro, Final Cut, DaVinci, and After Effects templates. The stock motion graphics, sound effects, videos, and photos are some of the strengths of Motion Array. The unlimited downloads save you from emptying your wallet.
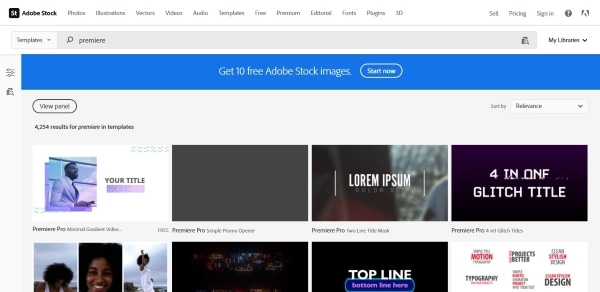
5. Adobe Stock
While we are on the subject of template Adobe Premiere free, how can we forget about Adobe Stock? Adobe Stock is a serious archive for templates, especially for Adobe Creative Suite applications. Moreover, getting hands-on an impeccable library of stock photos, audio, and videos, is one of the strongest traits of Adobe Stock.
The search filter has different options to make the search easier, for instance, application, categories, transitions, and whatnot. If you type free in the search bar, you will find Premiere Pro video templates so that downloading them wouldn’t cost a penny.
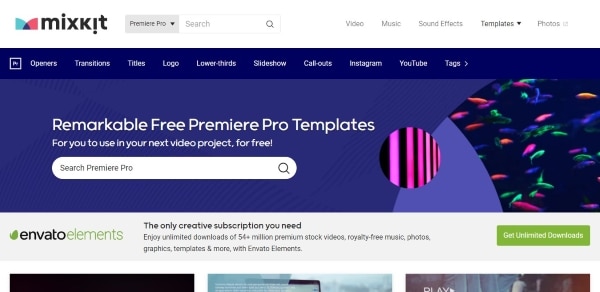
6. Mixkit
Mixkit is the top choice for getting Premiere Pro split-screen template among other royalty-free assets. Mixkit offers free Premiere Pro templates with After Effects, Final Cut Pro, DaVinci Resolve, and much more.
Moreover, Mixkit can be used for stock videos, music, sound effects, and music tracks. The quality is always high, so you don’t need to worry about that.
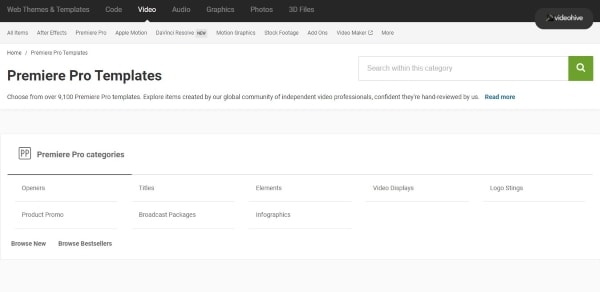
7. VideoHive
VideoHive offers the best quality and fast researched Premiere Pro templates. With more than 9,100 free Adobe Premiere templates, VideoHive helps add motion graphics and effects to your videos. Most filmmakers prefer the usage of motion graphics as it improves time and cost-effectiveness and enhances ease in adding animations to the projects.
If you are interested in making a slideshow, animated title, transition, or logo stings, you will find VideoHive there for you.
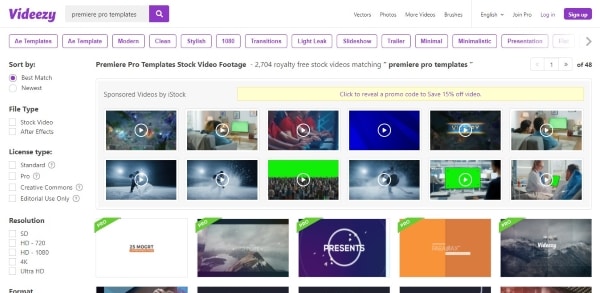
8. Videezy
Videezy is a fair choice if you need to access Premiere templates free in the most effortless fashion. The search bar of Videezy stock marketplace has interactive filter options. The user is free to navigate by sorting the results based on their presence on the website. Moreover, you can choose between the file type and bring productivity to the media industry.
The resolution can also be decided as Videezy offers SD, HD 720, HD 1080, 4K, and Ultra HD. Doesn’t it feel like a dream come true?
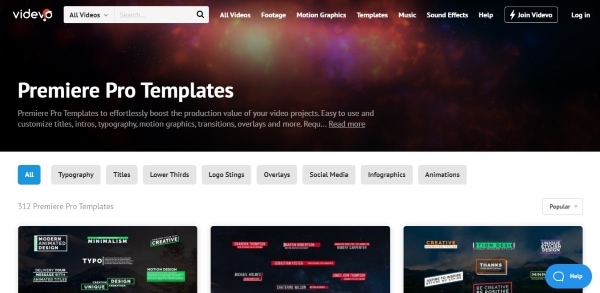
9. Videvo
Videvo is the right shop for you if you prefer the ease-of-use over-complicated workability. Offering an interactive interface and progressive search results, Videvo boosts the production value of your projects multifold. Furthermore, this free Premiere Pro templates provider is an allrounder from the video footage, motion graphics, templates, music, and sound effects.
The user is free to customize titles, intros, typographs, overlays, and transitions. Launch the website, download the template, and get into the process.
10. Monsterone
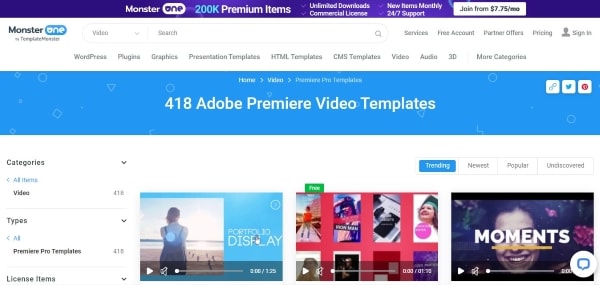
Offering Trending, Newest, Popular, and Undiscovered filtering options and choosing the right tags, Monsterone has made it to the bucket list of professionals in the field. More than 400 Premiere Pro templates can be downloaded to start working on the deadline right away.
The templates can be effortlessly previewed and launched before accessing them. It helps the user make a conscious choice. The resolution can also be set as the user deems necessary.
The Bottom Line
We are surrounded by videos 24/7. It is true for most creative professionals in the industry who are expected to edit the video to make it more captivating and attractive. One needs to have access to free Premiere Pro templates to obtain a sense of originality as we save money and time on making videos from scratch.
For this very reason, the article discussed 10 compatible and popular websites where Premiere templates free are found. We expect the user to make the right choice based on their niche in the industry. The video editing process can be accelerated by using a phenomenal tool which is Wondershare Filmora.
Filmora has the right toolbox set to make video editing easier and flawless. From cropping to flipping and motion tracking to adding keyframes, Filmora knows it all. One can also count on this tool to add backgrounds in Hollywood effect to gain innovation at all costs.
Wondershare Filmstock is your one-stop shop for royalty-free effects, video footage, clips, video effects, and audio tracks. Do not forget to review Filmora and Filmstock about their workability in the flesh.
Click here to find 10 Free After Effects Logo Templates .
Wondershare Filmora
Get started easily with Filmora’s powerful performance, intuitive interface, and countless effects!
Try It Free Try It Free Try It Free Learn More >


Also read:
- [Updated] 4K Resolution Unveiled in Chroma-Focused Lenses for 2024
- 2024 Approved Achieving Seamless Video Communication Between Xbox & Zoom
- 2024 Approved Top 6 Drones for Videography
- In 2024, Do You Want to Be Aware of VHSs Meaning? There Is Nothing to Be Worried About because We Will Guide You in This Article
- In 2024, How to Screen Mirroring Nokia G310 to PC? | Dr.fone
- Microsoft Windows Bluetooth Drivers: Latest Downloads and Updates for Versions 11, 8, and 7
- MSI Raider GE78 Gaming Throne - Desktop King
- New 2024 Approved How to Add Subtitles to Videos With Kapwing
- New 2024 Approved How To Film a Slow Motion Video
- New VSDC Free Video Editor Review for 2024
- Overcoming iPhone App Download Hurdles: A Comprehensive List of 10 Reliable Remedies
- Speedy Solution: Obtain Your Brother HL-3170CDW Drivers Today
- Tailor Your Text to Voice Top 5 Cloud Services for Chrome OS Sound Transformation
- The Holy Grail | Free Book
- Updated for 2024
- Updated In 2024, 3 Best Effects to Appear on Camera
- Updated Top 8 Sites to Download Glitch Transition for Premiere Pro
- Title: New Best Practical Tips to Improve Your Lighting in the Sun for 2024
- Author: Chloe
- Created at : 2025-02-26 06:04:50
- Updated at : 2025-03-04 04:18:30
- Link: https://ai-editing-video.techidaily.com/new-best-practical-tips-to-improve-your-lighting-in-the-sun-for-2024/
- License: This work is licensed under CC BY-NC-SA 4.0.