
:max_bytes(150000):strip_icc():format(webp)/how-to-change-your-tiktok-username-and-profile-picture-048cd3c3b4854846ab46f920e862332f.jpg)
New Best Way to Freeze-Frame in Final Cut Pro for 2024
Best Way to Freeze-Frame in Final Cut Pro
Best Way to Freeze Frame in Final Cut Pro
An easy yet powerful editor
Numerous effects to choose from
Detailed tutorials provided by the official channel
The primary purpose of freezing frames is to hold a particular frame in clips in one place, temporarily to stop the action onscreen. You can create the Freeze-Frame clip from any video clip in the browser or the timeline. If a Freeze-Frame clip is created from the browser, it gets affixed to the major storyline at the Playhead location as a connecting clip.

Now, Final Cut Pro is a fantastic video editor available for macOS. It is an entire video editing tool perfect for basic video editing. In addition, it can be valuable to Freeze-Frames in a video. This article will explain why to Freeze-Frame in FCP and its alternatives. We will also introduce how to add a Freeze-Frame Final Cut Pro video editor that can make your videos more appealing.
In this article
01 [Why Do You Need to Freeze-Frame](#Part 1)
02 [How to Freeze-Frames in Final Cut Pro?](#Part 2)
03 [3 Alternative to Freeze-Frames and Why](#Part 3)
Part 1 Why Do You Need to Freeze-Frame
Freeze-Frames is an effective and quick way to begin a drama session when you want to edit a movie. Besides, users of any age, ranging from children to adults, can easily handle it. Participants can use it to create an image using their bodies with no movement, and Freeze-Frames can also be made by individuals, a whole group, or a small group.
Another perfect way to describe a Freeze-Frame is a “still image.” It is a way of pressing the pause button on the remote control and making a statue or taking a photo. The image creation can be quick without discussion, planned, or rehearsed.
Here are some reasons you need a Freeze-Frame app:
● They are beneficial as a quick way of communicating ideas or telling a story.
● In addition, Freeze-Frame can represent objects or people and even abstract concepts like atmosphere or emotions.
● Freeze-Frames can help shyer performers to gain confidence, as there are no lines to learn.

Part 2 How to Freeze-Frames in Final Cut Pro?
FCPX Freeze-Frame clips can temporarily hold a particular frame in place and stop the action onscreen. The Freeze-Frame, as its phrase, freezes or contains the specific frame you want to feature or focus on in a video.
You have to pick or select the frame you want to freeze and follow the steps in the article to freeze the frame of your choice.
In addition, if you do not want to create a separate freeze-frame clip, make a hold segment to stop the action for part of a clip temporarily. This action offers more precise control, especially when a variable speed effect is created.
You can Freeze-Frame on the fly by navigating to a specific frame in a clip or during playback. Thus, A Freeze-Frame clip will preserve any attributes applied to the source clip, such as settings and effects.
Here is how to Freeze-Frame in Final Cut Pro effectively.
Step 1: In the browser or in the timeline in Final Cut Pro, do any one of the following:
● Begin playback of the clip and pause
● Move the Skimmer or Playhead to the portion you wish to freeze.

Step 2: Choose Edit > Add Freeze-Frame (or press Option-F).
Note: How Freeze-Frame gets added to the project depends on whether it got created from the browser or the timeline:
● If the Freeze-Frame was from a browser clip, a new freeze-frame clip gets attached as a connected clip at the Playhead site in the timeline.
● Alternatively, if the freeze-frame was from the timeline, a new freeze-frame clip gets inserted at the Playhead location or the Skimmer in the timeline.

Part 3 Alternative to Freeze-Frames and Why
There are a lot of alternatives to Freeze-Frame in Final-Cut Pro all over the Internet. However, you must be careful while choosing when you want to add customization to your videos.
Additionally, if you are looking for the best editor to add a Freeze-Frame effect to your video, we recommend trying Filmora. Wondershare Filmora Video Editor for Mac and Windows devices comes with tons of Freeze-Frame impacts that you can use to spice-up your video.
For Win 7 or later (64-bit)
For macOS 10.12 or later
Some of the alternatives to adding a Freeze-Frame on Final Cut Pro include:
01AZ Screen Recorder
This is a free android APK alternative to Freeze-Frames in FCP. It is a great application available for anyone who needs to have the ability to record what is happening on their Android device’s screen. One great benefit of using this application is that your Android device does need to be rooted to experience the best the app has to offer.
A blinking red dot will be noticed in the screen’s right bottom corner when users begin to record with this application. This is an indicator that the recording is in progress. In addition, users can pause the recording as per their requirements by just tapping the screen. If you are not comfortable with the location of the blinking red dot, hold and move it to anywhere on the screen that can better suit your needs. Thus, this is an excellent alternative to Final Cut Pro X Freeze-Frame with the exceptional video quality.
Features
● Simple, clean, and easy to use interface
● The application settings options allow users to adjust things like the video output quality and how the clip recording interacts with the screen while the application is running.
● The four icons located in the middle of the application’s home screen clearly outline their options when the application is first open. The four options include adjusting the application’s settings, accessing previously recorded video files, starting recording, and the option to exit.
Pros:
● It has options to increase video quality.
● No watermark
● No time limits
● No frame loss
Cons:
● No option to live stream.

02AndroVid
This Android application allows the creation of new videos by cutting and combining two or more video effects on your phone. Additionally, this application is typically different from the others that let you watch videos or share them with other sites. Bits and pieces can be cut from two or more videos and combined to make a new video. In addition, it is fun to use if you want to create a new music video that features the same song but different steps made when various people are being used.
Users can easily cut and paste with simple instructions, and the application also lets you work with any video stored on your phone.
Features
● Add subtitles to the videos that you create
● Create titles in any color or font that is available with the application
● making the videos from the clips a little more personal and customized before sharing.
Pros
● Allows multiple videos editing
● Allows the addition of a subtitle
● Users can reverse video content
Cons
● You cannot save a lot of work automatically
● It takes time to get the video adjusted

03Action Director
This Android editor also serves as an alternative to Final Cut Pro X Freeze-Frame. This video editing tool allows users to create quality compositions in no time at all. Additionally, you can change the image’s color, cut video clips, add a soundtrack, or insert text with this Video Editor using effortless control. With just a few finger taps on the screen, you can customize any video. This excellent video editing tool lets you create and share your videos quickly and easily.
Features
● Record videos with this Android app.
● Edit video and apply effects from its exclusive list.
● Get more than 12 transitions for your videos
● The useful movie editing guide helps you create videos with action effects and edits.
● Share your videos with your friends.
Pros
● It is fast and easy to use
● It is elementary to control
● Has video sharing option to share videos on another website
Cons
● Requires premium version to export video in high quality
● Ending Thoughts →
● About Final Cut Pro X Freeze-Frame and explained to the user how to use Freeze-Frame in FCP.
● Additionally, the article listed and presented three alternatives to Freeze-Frame and
● Recommended Filmora as the best editing software to use Freeze-Frame effects due to its many editing options.
The primary purpose of freezing frames is to hold a particular frame in clips in one place, temporarily to stop the action onscreen. You can create the Freeze-Frame clip from any video clip in the browser or the timeline. If a Freeze-Frame clip is created from the browser, it gets affixed to the major storyline at the Playhead location as a connecting clip.
Now, Final Cut Pro is a fantastic video editor available for macOS. It is an entire video editing tool perfect for basic video editing. In addition, it can be valuable to Freeze-Frames in a video. This article will explain why to Freeze-Frame in FCP and its alternatives. We will also introduce how to add a Freeze-Frame Final Cut Pro video editor that can make your videos more appealing.
In this article
01 [Why Do You Need to Freeze-Frame](#Part 1)
02 [How to Freeze-Frames in Final Cut Pro?](#Part 2)
03 [3 Alternative to Freeze-Frames and Why](#Part 3)
Part 1 Why Do You Need to Freeze-Frame
Freeze-Frames is an effective and quick way to begin a drama session when you want to edit a movie. Besides, users of any age, ranging from children to adults, can easily handle it. Participants can use it to create an image using their bodies with no movement, and Freeze-Frames can also be made by individuals, a whole group, or a small group.
Another perfect way to describe a Freeze-Frame is a “still image.” It is a way of pressing the pause button on the remote control and making a statue or taking a photo. The image creation can be quick without discussion, planned, or rehearsed.
Here are some reasons you need a Freeze-Frame app:
● They are beneficial as a quick way of communicating ideas or telling a story.
● In addition, Freeze-Frame can represent objects or people and even abstract concepts like atmosphere or emotions.
● Freeze-Frames can help shyer performers to gain confidence, as there are no lines to learn.
Part 2 How to Freeze-Frames in Final Cut Pro?
FCPX Freeze-Frame clips can temporarily hold a particular frame in place and stop the action onscreen. The Freeze-Frame, as its phrase, freezes or contains the specific frame you want to feature or focus on in a video.
You have to pick or select the frame you want to freeze and follow the steps in the article to freeze the frame of your choice.
In addition, if you do not want to create a separate freeze-frame clip, make a hold segment to stop the action for part of a clip temporarily. This action offers more precise control, especially when a variable speed effect is created.
You can Freeze-Frame on the fly by navigating to a specific frame in a clip or during playback. Thus, A Freeze-Frame clip will preserve any attributes applied to the source clip, such as settings and effects.
Here is how to Freeze-Frame in Final Cut Pro effectively.
Step 1: In the browser or in the timeline in Final Cut Pro, do any one of the following:
● Begin playback of the clip and pause
● Move the Skimmer or Playhead to the portion you wish to freeze.
Step 2: Choose Edit > Add Freeze-Frame (or press Option-F).
Note: How Freeze-Frame gets added to the project depends on whether it got created from the browser or the timeline:
● If the Freeze-Frame was from a browser clip, a new freeze-frame clip gets attached as a connected clip at the Playhead site in the timeline.
● Alternatively, if the freeze-frame was from the timeline, a new freeze-frame clip gets inserted at the Playhead location or the Skimmer in the timeline.
Part 3 Alternative to Freeze-Frames and Why
There are a lot of alternatives to Freeze-Frame in Final-Cut Pro all over the Internet. However, you must be careful while choosing when you want to add customization to your videos.
Additionally, if you are looking for the best editor to add a Freeze-Frame effect to your video, we recommend trying Filmora. Wondershare Filmora Video Editor for Mac and Windows devices comes with tons of Freeze-Frame impacts that you can use to spice-up your video.
For Win 7 or later (64-bit)
For macOS 10.12 or later
Some of the alternatives to adding a Freeze-Frame on Final Cut Pro include:
01AZ Screen Recorder
This is a free android APK alternative to Freeze-Frames in FCP. It is a great application available for anyone who needs to have the ability to record what is happening on their Android device’s screen. One great benefit of using this application is that your Android device does need to be rooted to experience the best the app has to offer.
A blinking red dot will be noticed in the screen’s right bottom corner when users begin to record with this application. This is an indicator that the recording is in progress. In addition, users can pause the recording as per their requirements by just tapping the screen. If you are not comfortable with the location of the blinking red dot, hold and move it to anywhere on the screen that can better suit your needs. Thus, this is an excellent alternative to Final Cut Pro X Freeze-Frame with the exceptional video quality.
Features
● Simple, clean, and easy to use interface
● The application settings options allow users to adjust things like the video output quality and how the clip recording interacts with the screen while the application is running.
● The four icons located in the middle of the application’s home screen clearly outline their options when the application is first open. The four options include adjusting the application’s settings, accessing previously recorded video files, starting recording, and the option to exit.
Pros:
● It has options to increase video quality.
● No watermark
● No time limits
● No frame loss
Cons:
● No option to live stream.
02AndroVid
This Android application allows the creation of new videos by cutting and combining two or more video effects on your phone. Additionally, this application is typically different from the others that let you watch videos or share them with other sites. Bits and pieces can be cut from two or more videos and combined to make a new video. In addition, it is fun to use if you want to create a new music video that features the same song but different steps made when various people are being used.
Users can easily cut and paste with simple instructions, and the application also lets you work with any video stored on your phone.
Features
● Add subtitles to the videos that you create
● Create titles in any color or font that is available with the application
● making the videos from the clips a little more personal and customized before sharing.
Pros
● Allows multiple videos editing
● Allows the addition of a subtitle
● Users can reverse video content
Cons
● You cannot save a lot of work automatically
● It takes time to get the video adjusted
03Action Director
This Android editor also serves as an alternative to Final Cut Pro X Freeze-Frame. This video editing tool allows users to create quality compositions in no time at all. Additionally, you can change the image’s color, cut video clips, add a soundtrack, or insert text with this Video Editor using effortless control. With just a few finger taps on the screen, you can customize any video. This excellent video editing tool lets you create and share your videos quickly and easily.
Features
● Record videos with this Android app.
● Edit video and apply effects from its exclusive list.
● Get more than 12 transitions for your videos
● The useful movie editing guide helps you create videos with action effects and edits.
● Share your videos with your friends.
Pros
● It is fast and easy to use
● It is elementary to control
● Has video sharing option to share videos on another website
Cons
● Requires premium version to export video in high quality
● Ending Thoughts →
● About Final Cut Pro X Freeze-Frame and explained to the user how to use Freeze-Frame in FCP.
● Additionally, the article listed and presented three alternatives to Freeze-Frame and
● Recommended Filmora as the best editing software to use Freeze-Frame effects due to its many editing options.
Are You Looking to Remove Echo in Premiere Pro? Please Look at Our Guide for Advice and Suggestions on Getting the Best Possible Outcomes
Do you want to reduce echo in Premiere Pro? How often have you been in situations where you encountered conditions where there was annoying background noise on your video? There is no need to overthink, given that everyone has to deal with this problem. Your video may become intolerable if background noise, such as the sound of a fan or the wind blowing through a window, is present. Because of this, you need to take immediate action to remove echo in Premiere Pro to accomplish the task of uploading a video to YouTube or any other social media site.
Spending a lot of time on a recording, only to have the completed work have a terrible echo, is one of the most frustrating experiences. You will be relieved that there are methods by which you may take your audio clips and modify the audio on your clips to decrease the echo. The following explains how to remove echo from audio in Premiere Pro.

Part 1: How to Reduce Echo Noise with Premiere Pro
Reducing echo in Premiere Pro is straightforward with the application’s built-in tools. It requires no additional plugins from other developers.
Step1 Deverb
The first step is to look for an effect called “DeReverb” in the Effects box of the Effects workspace. Once you find it, you can easily add it to the clip in question by dragging and dropping it there. After that, it will show in the top-left corner of the effect controls inside your audio clip.

Step2 Edit
Next, choose ‘Edit’ from the drop-down menu, and then set the level of DeReverb by dragging the simple slider below your clip anywhere from 0% to 100%. As you move the slider closer to 100 percent, the echo should begin to vanish almost as soon as you do!
The processing emphasis should be around the flat line unless you know the frequencies you are working with. Additionally, ensure you activate the effect by clicking the button in the upper left corner of the effect window.
It is vital to bear in mind that less is more when it comes to this effect since it does have a somewhat negative impact on the quality of the audio you have captured.

Further Dialing in Your Settings
After you have reached a level of DeReverb that you are satisfied with, you may apply other modifications to the audio, such as compression and EQ. Still, it should already sound more distinct and more apparent at this point.
When you use the DeReverb effect to remove echo in Premiere Pro, there is one more cool thing about it. If you tick the box labeled “Auto Gain,” the volume level does not decrease as it usually would when you remove echo using this effect. Instead, the volume level maintains the same level as you go from 0 percent to 100 percent of the effect.

The conclusion is as follows: When you are out and about or in an ample space with many echoes, here is a super easy method to manage the echo levels!
The ‘Amount’ option in DeReverb allows users to specify the percentage of echo they wish to remove. However, use caution while adjusting this parameter since setting it too high can decrease the quality of your audio.
Also, applying the DeReverb effect may decrease the audio level; but if you mark the Auto Gain check box, Premiere Pro will compensate for the decrease in volume. Hence, it is advisable to keep the box checked since this is the default configuration. You also can tinker with the Processing Focus settings, which let you zero in on a specific frequency or frequency.
Part 2: How to Denoise the Free and Easy Way?
Unparalleled videos are shared in clear voices by vloggers and filmmakers. But how do they manage to make such superb, noise-free videos? Your video would still pick up some background sounds even if you had the ideal acoustic conditions, had a high-end recorder and set the recorder and everything else up perfectly. Noise reduction is a crucial step in producing a high-quality video and is required for yours. After all, good audio is essential for video. Aside from removing echo from audio in Premiere Pro, here are other free and accessible ways.
1. Use Wondershare AILab [Free and online]
Wondershare AILab is an excellent alternative to removing echo in Premiere Pro with its various free online tools. You don’t need to specify any settings since the AI will automatically identify and eliminate noise. So you can avoid an unwelcome sound in a crowd or a harsh breeze. AILab can help you create images, sounds, and clips that are simpler and more enjoyable.
Step1 To begin, use Add audio or drag it to upload.

Step2 As shown in the image below, the AI will automatically process the file and remove the static sound.

Step3 That’s it. Now, download the updated audio file at this point.
2. Use kapwing [Free and online with a watermark]
Another alternative to reduce echo in Premiere Pro is Kapwing. This noise-canceling program removes the audio in your movies by separating speech patterns, decreasing background noise, and eliminating background hums. It does this by removing background noise, reducing background noise, and removing background noise—no need to become proficient in high-powered and complicated audio editors such as Adobe Audition or iMovie. Suppose you host your podcast or live stream and utilize mics like the Blue Snowball. In that case, you can quickly and easily eliminate annoying background noise from every video you record with just one click.
Step1 Upload your video while it still has the background noise you want to remove by either uploading the video file straight from the device into your workplace or copying the URL link of the movie into your workspace.
Step2 Reach the “Edit” tab and pick the “Clean Audio” option from the drop-down menu. Kapwing will automatically clean up your video’s audio by removing any unwanted background noise. If necessary, you should make any essential extra adjustments to your video, such as adding subtitles, transitions, or sound effects.
Step3 When you have reduced the background noise from your movie, go to the “File” option and choose “Export Project.” After a few moments, the improved version of your video will be available for you to download and share.

3. Use Wondershare Filmora to denoise
The Filmora Video Editor is easy to use and delivers various features superior to those provided by other video editors. Thus, it is one of the best audio/video editors for denoising backgrounds. The process we will follow is broken down into parts for easier understanding.
Free Download For Win 7 or later(64-bit)
Free Download For macOS 10.14 or later
You can call this the best alternative to removing echo from audio in Premiere Pro.
Step1 Upload File and Preview
Start by importing your video into the interface of Wondershare Filmora. To get a video preview, trim the portions, and remove what don’t want to keep.
Step2 Start Editing
You will need to enter “Smart Denoise” into the search bar in the Effects panel. After that, choose Edit Properties from the context menu that appears after right-clicking on the video.

Here, you can alter the clip’s opacity, the threshold, and the radius.

Step3 Make Changes and Save
In this step, you can keep adjusting the Opacity slider until you get the perfect effect to satisfy your need. Afterward, reach the box beside the Smart Denoise to compare the scene before and after removing the noise and grain.
Finally, save the edited video and share it.
Part 3: FAQs
1. How can an echo be reduced in the sound of an audio recording?
For example, you might use anything that absorbs sound, like a foam pad or acoustic panels. You could alternatively record in a smaller space and use a microphone with a narrower pick-up pattern, or you could use a microphone that already has a filter built into it.
2. How can I get rid of the reverb that is on the video?
You can use either the DeReverb or the Parametric Equalizer tool to eliminate reverb or remove echo from audio in Premiere Pro.
3. Why does my recording have such a reverberant sound?
You may be in a room with hard surfaces reflecting sound waves, or your microphone is picking up an excessive amount of background noise. Try to remedy the issue by recording in a new place, using a different microphone, or modifying the settings in your recording program. All of these options are available to you.
Conclusion
This article presents how to remove echo from audio Premiere Pro and lists some of its alternatives. Have you ever wondered why so many professional content creators use Filmora? They opt to edit their content in Filmora because this tool provides complete support and reliable services.
However, all the above alternatives and Adobe will help you become better content creators by practice. So, choose the best software that is affordable and full of professional features to create flawless and eye-catching videos. Although, in my experience, Filmora is the best alternative to remove echo from audio Premiere Pro.
Free Download For macOS 10.14 or later
You can call this the best alternative to removing echo from audio in Premiere Pro.
Step1 Upload File and Preview
Start by importing your video into the interface of Wondershare Filmora. To get a video preview, trim the portions, and remove what don’t want to keep.
Step2 Start Editing
You will need to enter “Smart Denoise” into the search bar in the Effects panel. After that, choose Edit Properties from the context menu that appears after right-clicking on the video.
Here, you can alter the clip’s opacity, the threshold, and the radius.
Step3 Make Changes and Save
In this step, you can keep adjusting the Opacity slider until you get the perfect effect to satisfy your need. Afterward, reach the box beside the Smart Denoise to compare the scene before and after removing the noise and grain.
Finally, save the edited video and share it.
Part 3: FAQs
1. How can an echo be reduced in the sound of an audio recording?
For example, you might use anything that absorbs sound, like a foam pad or acoustic panels. You could alternatively record in a smaller space and use a microphone with a narrower pick-up pattern, or you could use a microphone that already has a filter built into it.
2. How can I get rid of the reverb that is on the video?
You can use either the DeReverb or the Parametric Equalizer tool to eliminate reverb or remove echo from audio in Premiere Pro.
3. Why does my recording have such a reverberant sound?
You may be in a room with hard surfaces reflecting sound waves, or your microphone is picking up an excessive amount of background noise. Try to remedy the issue by recording in a new place, using a different microphone, or modifying the settings in your recording program. All of these options are available to you.
Conclusion
This article presents how to remove echo from audio Premiere Pro and lists some of its alternatives. Have you ever wondered why so many professional content creators use Filmora? They opt to edit their content in Filmora because this tool provides complete support and reliable services.
However, all the above alternatives and Adobe will help you become better content creators by practice. So, choose the best software that is affordable and full of professional features to create flawless and eye-catching videos. Although, in my experience, Filmora is the best alternative to remove echo from audio Premiere Pro.
Cropping Video in VLC [Step by Step]
Want to crop your videos but don’t know how to start?
A video editor needs to know how he can crop his videos. There is a way to do this using the VLC that is installed in your computer. This guide will teach you a simple way to get what you want. This might appear as complicated at first sight but it will be shown to you in a digestible way. An alternative way would be to use Wondershare Filmora. You will also be guided on how to use this software to crop your videos. Don’t worry and just take it one step at a time.
How to Crop a Video using VLC
Have you ever heard of the VLC media player? If not, you can browse through it online and install it on your computer. Aside from watching content, you can also crop videos with it. Cropping is a way to remove spaces that you would not want to be included on your video.
Find the software on your computer and don’t be overwhelmed by the interface.

Then click the Media and select Open File to choose the video that you want to crop. You should prepare the videos that you want to be cropped and rename them to avoid confusion.

Click the Tools on the menu and select the Effects and Filters.

After that, click on the Video Effects and under that select Crop. Doing this, will open the cropping editor.

You need to enter specific pixels on the left, right, top and bottom. This will depend on your preferences. If it is your first time and you don’t know the exact pixels then just input what you think would be enough.

After entering your preferred pixels, you can preview it. If you would like to adjust then just simply repeat entering the specific pixels.

You decided to save the cropped video. Find the Tools menu and select Preferences.

Find the Show settings and click All. In the search bar type Croppadd then save your previous preferred pixel settings. Lastly, click Save.

In the Media menu select the Convert/Save. You can drag and drop the cropped video to the File box.

You can select your file format and codecs by clicking Convert/Save.

Find the Edit Selected Profile and click the Video Codec. Then under the Filters tab, select the Video cropping filter. Finally, click Save.

In the Destination file select where you want it to be saved.

Then click Start.

Congratulations on getting here! You finally cropped your video using the VLC media player.
Although there are disadvantages to using this as your cropping tool. Like for example you want the real-time preview of what you’ve changed in your video. This would be a turn off for some that want their outputs to be shown to them immediately. Aside from this, there is a chance that you will forget one step to make and thus, the whole process would need to start over from scratch. Lastly, is the freedom to batch crop multiple videos. This is especially important for those that need to have many clips in one video. A user might lose the continuity of the story within his video.
While one of its strong suits is the affordability of the software. It is completely free and has no additional charges that may surprise you in the future. Finally, your output won’t have watermarks that could destroy the aesthetics of your video.
What are your experiences with using it as a cropping tool? What would you recommend to improve it? It is up to you the user if you want to continue using this as your partner in removing the excess in your videos.
An Easier Way to Crop a Video using Wondershare Filmora
Have you heard of an editing tool called Wondershare Filmora Video Editor ? What are your first impressions of this software? You can download this for free by going to the official site.
Wondershare Filmora is a useful editor that can help you produce the content that you want. It is packed with beneficial tools that you can learn to apply. If it is already installed on your computer then proceed to opening it.
For Win 7 or later (64-bit)
For macOS 10.14 or later

Prepare your videos that you need to crop. You can drag and drop your video or click the Import.

Select the video clip that you want to crop. Then, click the Crop tool and choose if you want the Crop or Pan & Zoom.

You can also right click the video clip .Under the Video tab you can select the Crop and Zoom or Crop to Fit then adjust to your preferred ratio.

One of the advantages of Filmora is you can preview what you have cropped immediately. This will greatly help you if you’re not sure what kind of crop that you want. If you’ve thought that you made a mistake then a simple Undo button could fix it. In short, you’re not going through the gruesome process of starting all over again. You can also do the batch cropping of multiple videos helping you ensure the smoothness of flow in the final output.
Although the Filmora is not free, there is a trial that you can use to test it to check if this video editor would meet your needs. It has tools that a beginner to expert video editor could use to produce high quality videos that would make the audience think that it was life from the movies.
The Bottom Line
The journey of exploring different options would help you make the decision. Both VLC media player and Wondershare Filmora have their great features which would aid the user to crop his videos in an efficient way. What are your thoughts on each of them? As an individual you have varied needs that a video tool should meet.
After reading this, you’ve had a clearer view of what these video softwares offers. Did this guide help you decide which would fit your needs as a video editor? What are your suggestions for improvement?
You could share with us the tips and tricks you know on cropping videos using these applications.
A video editor needs to know how he can crop his videos. There is a way to do this using the VLC that is installed in your computer. This guide will teach you a simple way to get what you want. This might appear as complicated at first sight but it will be shown to you in a digestible way. An alternative way would be to use Wondershare Filmora. You will also be guided on how to use this software to crop your videos. Don’t worry and just take it one step at a time.
How to Crop a Video using VLC
Have you ever heard of the VLC media player? If not, you can browse through it online and install it on your computer. Aside from watching content, you can also crop videos with it. Cropping is a way to remove spaces that you would not want to be included on your video.
Find the software on your computer and don’t be overwhelmed by the interface.
Then click the Media and select Open File to choose the video that you want to crop. You should prepare the videos that you want to be cropped and rename them to avoid confusion.
Click the Tools on the menu and select the Effects and Filters.
After that, click on the Video Effects and under that select Crop. Doing this, will open the cropping editor.
You need to enter specific pixels on the left, right, top and bottom. This will depend on your preferences. If it is your first time and you don’t know the exact pixels then just input what you think would be enough.
After entering your preferred pixels, you can preview it. If you would like to adjust then just simply repeat entering the specific pixels.
You decided to save the cropped video. Find the Tools menu and select Preferences.
Find the Show settings and click All. In the search bar type Croppadd then save your previous preferred pixel settings. Lastly, click Save.
In the Media menu select the Convert/Save. You can drag and drop the cropped video to the File box.
You can select your file format and codecs by clicking Convert/Save.
Find the Edit Selected Profile and click the Video Codec. Then under the Filters tab, select the Video cropping filter. Finally, click Save.
In the Destination file select where you want it to be saved.
Then click Start.
Congratulations on getting here! You finally cropped your video using the VLC media player.
Although there are disadvantages to using this as your cropping tool. Like for example you want the real-time preview of what you’ve changed in your video. This would be a turn off for some that want their outputs to be shown to them immediately. Aside from this, there is a chance that you will forget one step to make and thus, the whole process would need to start over from scratch. Lastly, is the freedom to batch crop multiple videos. This is especially important for those that need to have many clips in one video. A user might lose the continuity of the story within his video.
While one of its strong suits is the affordability of the software. It is completely free and has no additional charges that may surprise you in the future. Finally, your output won’t have watermarks that could destroy the aesthetics of your video.
What are your experiences with using it as a cropping tool? What would you recommend to improve it? It is up to you the user if you want to continue using this as your partner in removing the excess in your videos.
An Easier Way to Crop a Video using Wondershare Filmora
Have you heard of an editing tool called Wondershare Filmora Video Editor ? What are your first impressions of this software? You can download this for free by going to the official site.
Wondershare Filmora is a useful editor that can help you produce the content that you want. It is packed with beneficial tools that you can learn to apply. If it is already installed on your computer then proceed to opening it.
For Win 7 or later (64-bit)
For macOS 10.14 or later
Prepare your videos that you need to crop. You can drag and drop your video or click the Import.
Select the video clip that you want to crop. Then, click the Crop tool and choose if you want the Crop or Pan & Zoom.
You can also right click the video clip .Under the Video tab you can select the Crop and Zoom or Crop to Fit then adjust to your preferred ratio.
One of the advantages of Filmora is you can preview what you have cropped immediately. This will greatly help you if you’re not sure what kind of crop that you want. If you’ve thought that you made a mistake then a simple Undo button could fix it. In short, you’re not going through the gruesome process of starting all over again. You can also do the batch cropping of multiple videos helping you ensure the smoothness of flow in the final output.
Although the Filmora is not free, there is a trial that you can use to test it to check if this video editor would meet your needs. It has tools that a beginner to expert video editor could use to produce high quality videos that would make the audience think that it was life from the movies.
The Bottom Line
The journey of exploring different options would help you make the decision. Both VLC media player and Wondershare Filmora have their great features which would aid the user to crop his videos in an efficient way. What are your thoughts on each of them? As an individual you have varied needs that a video tool should meet.
After reading this, you’ve had a clearer view of what these video softwares offers. Did this guide help you decide which would fit your needs as a video editor? What are your suggestions for improvement?
You could share with us the tips and tricks you know on cropping videos using these applications.
What Are the Best 10 GIF Creator?
What are the 10 Best GIF Creator?
An easy yet powerful editor
Numerous effects to choose from
Detailed tutorials provided by the official channel
Stay tuned to find the most affordable GIF creator solutions.
In this article
01 [Why Gifs Are Essential for Every Marketer?](#Part 1)
02 [How to Make Your Own GIF?](#Part 2)
03 [What Are 10 Best GIF Creator to Find Brilliant Pre-made Gifs?](#Part 3)
Part 1 Why Gifs Are Essential for Every Marketer?
Everyone around you today is accustomed with the fact that GIFs are an interesting and impactful means of content sharing. These 3-5 second snippets are highly preferred and convenient ways to deliver information that is precise, clear and to the point. When it comes to time frames, short and quick GIFs are obvious choices over lengthy videos. Additionally, GIFs are eye-catchy and keep you captivated to see though the entire content within seconds, contradictory to those monotonous and often dull videos that sound more like a long, boring lecture.
These are an effective media tool that is not limited to sharing information that is chiefly entertainment based or fun centered. You can use them to deliver important content that addresses a specific purpose or audience. Owing to this, GIFs have become an essential marketing utility, here’s why:
● Improve Product Branding:
GIFs can serve as impressive branding tools for your products in the market. Markets today are considerably impacted by the ‘What You See is What You Buy’ concept, which puts forward the need to lay added stress on effective branding.
GIFs are ready to sort this out with their exciting range of features. From video editing choices to sound and color customization, GIFs are loaded with everything you need to improvise your product branding. All you have to do is explore your creativity to make the most of the GIF branding choices.
● Explain it Better
On a preference poll, most of us would shift to ‘watch’ over ‘read’ for a comprehensive understanding. An attractive motion visual is an even better treat. GIFs are pivotal in making viewers relate to the concept and message behind your product in a more enhanced manner.
Additionally, these are a continent means to introduce emotional mobility among your target audience with depictive emojis. You can use GIFs to develop effective content approaches to make the audience connect with your product viability, both practically band emotionally.
● Increase Visitor Attraction
Today’s changing times have brought about a rapid outlook towards everything. All of us are bounded by time constraints and when browsing the web, the prime need is to look for quick and accurate solutions to everything concerned.
Short and exact information delivery of GIFs is something that would keep visitors glued to your site because they will be assured of getting exactly what they search for and that too in an interesting and entertaining way.
Part 2 How to Make Your Own GIF?
Now that you are familiar with the creative marketing credibility of GIFs, you might naturally feel motivated towards creating a GIF of your own. In case you are, see through the following section of this article to find out interesting ways of creating interesting and catchy GIFs, either for impressive product marketing or just to make your social media posts leave your community peers in awe!
Looking for the best GIF creator solutions on the web, you can rely on GIPHY, one of the most preferred and convenient databases to create GIFs quickly. This is a smartphone compatible tool and works well with almost any device. Follow the steps given below to make GIFs with this tool:
Step 1:
Download and install the GIPHY app in your device.
Step 2:
Click on ‘Create’ in the app’s welcome screen. This will change (+) icon at the top-right corner to the ‘Camera’ symbol. You can also navigate to the ‘Profile’ at the bottom-right and tap the (+) or ‘Camera’ icon in the app’s account page.
Step 3:
Click on ‘Allow Camera Access’. You will receive two successive prompt messages from the app. Click on ‘Allow’ to grant access permissions to your device media. When you are done, click on ‘I Agree’.
Step 4:
GIFHY uses your device’s front camera for GIF creation. However, if you need to go for a camera switch, click on the ‘Camera’ sign at the bottom-right.
Step 5:
Choose a desired filter and effect for your GIF with a left or right swipe on the live feed toolbar. The app has 11 amazing and realistic effects, including VHS Static, 3D Glasses, etc.
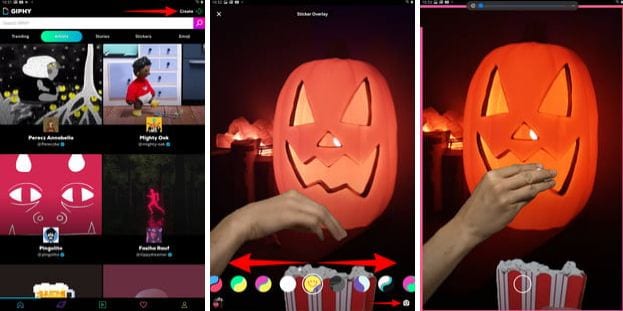
Step 6:
You can take up either of the following:
Press either of the ‘Filter’ or ‘Effect’ buttons to take static shots to create GIF from images, or press and hold the same to create animated GIF. For simply using effects, tap the white button.
In case you choose to create a motion GIF, the app forms a ‘visual timer’ around the editor screen. The motion recording stops once the line is in sync with the screen edges.
Step 7:
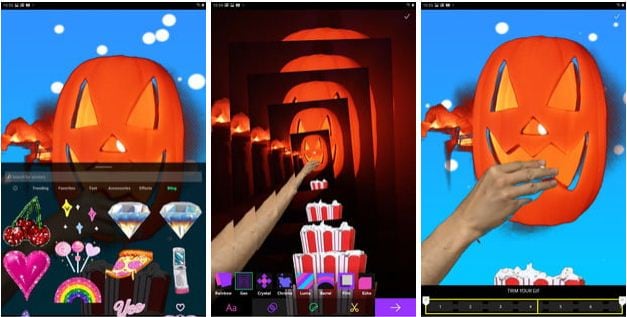
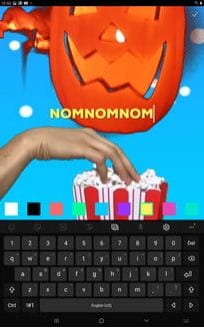
Having captured your perfect shot, you have the liberty to merge it with an image or video. However, do consider the following options to add some more elements to your capture: You can add relatable text in 9 color choices.
● Enhance your graphic presentation with 8 amazing effects like, ‘rainbow overlays’, BW film grains, etc.
● Choose from a never ending list of suitable stickers to add the feel through connect to your GIFs.
● Trim your animated GIFs to the ‘just perfect’ portion by adjusting the editing markers.
Relax; that’s no rocket science. Just tap on the respective buttons and there you go!
Step 8:
Set your GIF in a desired size frame by choosing the ‘Crop’ tool from the top-right corner of the editing screen. You are given a size flexibility of 1:1, 3:2, 16:9, 4:5 and 9:16.

Step 9:
Once you are satisfied with your creation, tap the ‘Right Arrow’ icon. In the interface that follows, add suitable share tags to the GIF.
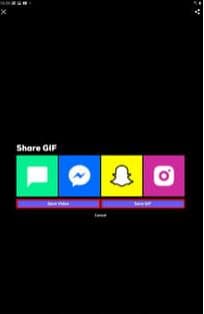
Step 10:
Tap ‘Share GIF’ to post your creation on social media platforms or share it through popular IM apps. To save your initially captured clip, click on ‘Save Video’ or tap ‘Save GIF’ to save your creation in your smartphone’s memory.
Part 1 What Are 10 Best GIF Creator to Find Brilliant Pre-made Gifs?
Having talked about GIF creation on the go, let’s take a dive into the best GIF creator solutions that are a storehouse of exciting pre-made GIFs. When browsing the web for an affordable GIF maker tool, you land across a pool of choices. Read through the further sections of this article to find out what’s best for you.
Described below are 10 best alternatives to get amazing pre-made GIFs:
● Wondershare Filmora Video Editor
This one is a popular, preferred and top rated application where you get to choose from an exciting range of pre-made GIFs under a variety of specific categories. All you need to do is, visit the app’s official site, browse to your favorite GIF category and select a desired GIF. Follow a few app instructions to save your selection and that’s it! Your selected GIF reaches your device memory within seconds.

Wondershare Filmora - Best Video Editor for Mac/Windows
5,481,435 people have downloaded it.
Build unique custom animations without breaking a sweat.
Focus on creating epic stories and leave the details to Filmora’s auto features.
Start a creative adventure with drag & drop effects and endless possibilities.
Filmora simplifies advanced features to save you time and effort.
Filmora cuts out repetition so you can move on to your next creative breakthrough.
Key Features
● This app is available to you absolutely free of cost.
● Has an intelligent and user cohesive interface.
● Loaded with tons of brilliant GIFs to choose from.
● The app supports GIF customization.
● GIFHY
Launched in 2013, this one is probably the best GIF maker and downloader tool available on the web today. It is a free tool, packed with enormous varieties of GIFs to choose from. What’s more interesting about the app is that you are free to play with your editing creativity to enhance your downloaded GIFs in the GIPHY editor.
Key Features
● It comes with an easy to use, convenient interface.
● You can edit downloaded GIFs with hundreds of effects and filters.
● The app provides you a direct sharing platform, allowing you to post GIFs to various social media platforms and also go for sharing via Instant Messaging applications.
● This is a fast processing tool that allows you to escape the notch of annoying and delayed download processes.
● Tenor
You can conveniently regard this one as the closest competitor to the GIPHY GIF creator and downloader tool. Needless to say, both are quite similar to each other in interface and usage respects. However, focusing on search results for a common keyword, you find diverse variations to your obvious surprise.
Key Features
● This is a free to use, interactive interface tool.
● It introduces a GIF Keyboard that allows you to search the most specific and relatable GIFs.
● It ensures a speedy and high quality GIF download.
● You can explore your editing skills to your heart’s content to improvise the downloaded GIFs with this tool.
● This tool gives you the liberty to directly share GIFs across different platforms.
If you like to spend ample time on choosing what’s perfect for you, refer this online tool for your GIF download solutions. It caters to your love of diversity with the most deep rooted and broad GIF range. However, this one comes with a little messy interface, demanding some patience from you to get to the right thing.
Key Features
● This tool provides you with almost all possible choices for a GIF category.
● It is available to you free of cost
● The tool site is loaded with rich and quality GIF content.
● This one is a direct save and export tool for your downloaded GIFs.
● Gfycat
You can prefer this one as a GIF hosting tool. Developed with a view to launch a common medium for GIF and HTML contents, this app ensures in-time and hassle free downloads and delivery. Though lacking a refined search bar, this tool promises you of excellence in content quality.
Key Features
● This comes to you as one of the most reliable GIF hosting tools.
● It is a free and quick content delivery tool.
● You are allowed to select the most suitable one from a variety of playback choices.
● This tool also gives you the flexibility of direct media sharing.
● GIFbin
If you are hung-over decade old nostalgia and the fever doesn’t seem to go away, you can check this site for some really satisfying retro and other similar content. This would definitely make you take a toll back to the times when MSN and Limewire were unparalleled market leaders in content sharing.
Key Features
● GIFbin is a storehouse of the best animated GIFs, that is on a continuous update to facilitate fresh and quality based content, every time you visit the site.
● It has an advanced, API enabled search mechanism.
● It boasts of having the handiest and convenient user interface.
● If you prefer GIFs of the comic genre, this tool is heaven for you.
● Imgflip
This is another GIF download site, commonly preferred for comedy and fun oriented content. Using this site, you can download and create a variety of GIF based memes that have the potential to flood your social media posts with likes and comments. This one is a complete GIF basket, suited to vast content varieties and user preferences. You will find the site’s official watermark on all its contents.
Key Features
● The site stands among the most preferred GIF-meme creation and sharing platforms.
● The tool is packed with loads of quality content under specific categories
● You can improvise the dimensions of your editing skills to modify downloaded GIFs.
● This site has a default media export feature that you can use to share your GIFs on social media.
● Imgur
Launched in 2009, this is among the most visited GIF sites, originally created for sharing meme based contents on social media. Its extensive search filters are dedicated to fetch the exact GIFs and memes you are looking for. If you are tired of browsing sites for particular content requirements, your search spree will definitely end here.
Key Features
● The site is known for its extensive and diversified content quality.
● It is a free, convenient and dependable GIF download tool.
● Imgur is highly preferred for content export across various media platforms.
● It is equipped with an advanced and updated search filter that assures you of getting fresh and top quality GIFs on almost every possible keyword.
● Tumblr
Claiming a launch date of 13 years back, this is quite a good GIF download option. You can find excellent quality GIF content on the site, particularly in the comic genre. Though not as popular as its online counterparts today, the site definitely enjoyed commendable visitor preferences at the time of its launch. You can certainly visit this site for a filling entertainment dose.
Key Features
● Tumblr is a free download site with a user friendly interface.
● The site is loaded with notable content varieties.
● You can go for direct media sharing through this site.
● Its comic GIFs are quite hilarious.
● Know Your Meme
This site uses the Wiki software to stock an inventory of classic GIFs and memes. Using this database for GIF downloads means that you don’t need to compromise on content and image quality. The site contents are periodically updated to ensure that visitors are not exposed to stale and outdated content.
Key Features
● The site offers fresh content having catchy and latest GIFs.
● This is a complete storehouse of GIFs and memes that can definitely keep you rolling.
● The site comes as a free tool and gas a user cohesive interface
● It hast the most efficient search filters that are regularly improvised to ensure quality content delivery.
● Key Takeaways from This Episode →
● GIFs are an effective and captivating means of quality content sharing and message delivery. Take them as a hilarious entertainment source or use them to enhance your marketing policies, GIFs can do it all.
● Influenced by the user credibility of GIFs, there are loads of GIF creator and download tools available online; among which Filmora by Wondershare is the current market leader. You can use this app to explore your GIF editing skills or download and share latest GIFs across media sharing platforms.
Stay tuned to find the most affordable GIF creator solutions.
In this article
01 [Why Gifs Are Essential for Every Marketer?](#Part 1)
02 [How to Make Your Own GIF?](#Part 2)
03 [What Are 10 Best GIF Creator to Find Brilliant Pre-made Gifs?](#Part 3)
Part 1 Why Gifs Are Essential for Every Marketer?
Everyone around you today is accustomed with the fact that GIFs are an interesting and impactful means of content sharing. These 3-5 second snippets are highly preferred and convenient ways to deliver information that is precise, clear and to the point. When it comes to time frames, short and quick GIFs are obvious choices over lengthy videos. Additionally, GIFs are eye-catchy and keep you captivated to see though the entire content within seconds, contradictory to those monotonous and often dull videos that sound more like a long, boring lecture.
These are an effective media tool that is not limited to sharing information that is chiefly entertainment based or fun centered. You can use them to deliver important content that addresses a specific purpose or audience. Owing to this, GIFs have become an essential marketing utility, here’s why:
● Improve Product Branding:
GIFs can serve as impressive branding tools for your products in the market. Markets today are considerably impacted by the ‘What You See is What You Buy’ concept, which puts forward the need to lay added stress on effective branding.
GIFs are ready to sort this out with their exciting range of features. From video editing choices to sound and color customization, GIFs are loaded with everything you need to improvise your product branding. All you have to do is explore your creativity to make the most of the GIF branding choices.
● Explain it Better
On a preference poll, most of us would shift to ‘watch’ over ‘read’ for a comprehensive understanding. An attractive motion visual is an even better treat. GIFs are pivotal in making viewers relate to the concept and message behind your product in a more enhanced manner.
Additionally, these are a continent means to introduce emotional mobility among your target audience with depictive emojis. You can use GIFs to develop effective content approaches to make the audience connect with your product viability, both practically band emotionally.
● Increase Visitor Attraction
Today’s changing times have brought about a rapid outlook towards everything. All of us are bounded by time constraints and when browsing the web, the prime need is to look for quick and accurate solutions to everything concerned.
Short and exact information delivery of GIFs is something that would keep visitors glued to your site because they will be assured of getting exactly what they search for and that too in an interesting and entertaining way.
Part 2 How to Make Your Own GIF?
Now that you are familiar with the creative marketing credibility of GIFs, you might naturally feel motivated towards creating a GIF of your own. In case you are, see through the following section of this article to find out interesting ways of creating interesting and catchy GIFs, either for impressive product marketing or just to make your social media posts leave your community peers in awe!
Looking for the best GIF creator solutions on the web, you can rely on GIPHY, one of the most preferred and convenient databases to create GIFs quickly. This is a smartphone compatible tool and works well with almost any device. Follow the steps given below to make GIFs with this tool:
Step 1:
Download and install the GIPHY app in your device.
Step 2:
Click on ‘Create’ in the app’s welcome screen. This will change (+) icon at the top-right corner to the ‘Camera’ symbol. You can also navigate to the ‘Profile’ at the bottom-right and tap the (+) or ‘Camera’ icon in the app’s account page.
Step 3:
Click on ‘Allow Camera Access’. You will receive two successive prompt messages from the app. Click on ‘Allow’ to grant access permissions to your device media. When you are done, click on ‘I Agree’.
Step 4:
GIFHY uses your device’s front camera for GIF creation. However, if you need to go for a camera switch, click on the ‘Camera’ sign at the bottom-right.
Step 5:
Choose a desired filter and effect for your GIF with a left or right swipe on the live feed toolbar. The app has 11 amazing and realistic effects, including VHS Static, 3D Glasses, etc.
Step 6:
You can take up either of the following:
Press either of the ‘Filter’ or ‘Effect’ buttons to take static shots to create GIF from images, or press and hold the same to create animated GIF. For simply using effects, tap the white button.
In case you choose to create a motion GIF, the app forms a ‘visual timer’ around the editor screen. The motion recording stops once the line is in sync with the screen edges.
Step 7:
Having captured your perfect shot, you have the liberty to merge it with an image or video. However, do consider the following options to add some more elements to your capture: You can add relatable text in 9 color choices.
● Enhance your graphic presentation with 8 amazing effects like, ‘rainbow overlays’, BW film grains, etc.
● Choose from a never ending list of suitable stickers to add the feel through connect to your GIFs.
● Trim your animated GIFs to the ‘just perfect’ portion by adjusting the editing markers.
Relax; that’s no rocket science. Just tap on the respective buttons and there you go!
Step 8:
Set your GIF in a desired size frame by choosing the ‘Crop’ tool from the top-right corner of the editing screen. You are given a size flexibility of 1:1, 3:2, 16:9, 4:5 and 9:16.
Step 9:
Once you are satisfied with your creation, tap the ‘Right Arrow’ icon. In the interface that follows, add suitable share tags to the GIF.
Step 10:
Tap ‘Share GIF’ to post your creation on social media platforms or share it through popular IM apps. To save your initially captured clip, click on ‘Save Video’ or tap ‘Save GIF’ to save your creation in your smartphone’s memory.
Part 1 What Are 10 Best GIF Creator to Find Brilliant Pre-made Gifs?
Having talked about GIF creation on the go, let’s take a dive into the best GIF creator solutions that are a storehouse of exciting pre-made GIFs. When browsing the web for an affordable GIF maker tool, you land across a pool of choices. Read through the further sections of this article to find out what’s best for you.
Described below are 10 best alternatives to get amazing pre-made GIFs:
● Wondershare Filmora Video Editor
This one is a popular, preferred and top rated application where you get to choose from an exciting range of pre-made GIFs under a variety of specific categories. All you need to do is, visit the app’s official site, browse to your favorite GIF category and select a desired GIF. Follow a few app instructions to save your selection and that’s it! Your selected GIF reaches your device memory within seconds.
Wondershare Filmora - Best Video Editor for Mac/Windows
5,481,435 people have downloaded it.
Build unique custom animations without breaking a sweat.
Focus on creating epic stories and leave the details to Filmora’s auto features.
Start a creative adventure with drag & drop effects and endless possibilities.
Filmora simplifies advanced features to save you time and effort.
Filmora cuts out repetition so you can move on to your next creative breakthrough.
Key Features
● This app is available to you absolutely free of cost.
● Has an intelligent and user cohesive interface.
● Loaded with tons of brilliant GIFs to choose from.
● The app supports GIF customization.
● GIFHY
Launched in 2013, this one is probably the best GIF maker and downloader tool available on the web today. It is a free tool, packed with enormous varieties of GIFs to choose from. What’s more interesting about the app is that you are free to play with your editing creativity to enhance your downloaded GIFs in the GIPHY editor.
Key Features
● It comes with an easy to use, convenient interface.
● You can edit downloaded GIFs with hundreds of effects and filters.
● The app provides you a direct sharing platform, allowing you to post GIFs to various social media platforms and also go for sharing via Instant Messaging applications.
● This is a fast processing tool that allows you to escape the notch of annoying and delayed download processes.
● Tenor
You can conveniently regard this one as the closest competitor to the GIPHY GIF creator and downloader tool. Needless to say, both are quite similar to each other in interface and usage respects. However, focusing on search results for a common keyword, you find diverse variations to your obvious surprise.
Key Features
● This is a free to use, interactive interface tool.
● It introduces a GIF Keyboard that allows you to search the most specific and relatable GIFs.
● It ensures a speedy and high quality GIF download.
● You can explore your editing skills to your heart’s content to improvise the downloaded GIFs with this tool.
● This tool gives you the liberty to directly share GIFs across different platforms.
If you like to spend ample time on choosing what’s perfect for you, refer this online tool for your GIF download solutions. It caters to your love of diversity with the most deep rooted and broad GIF range. However, this one comes with a little messy interface, demanding some patience from you to get to the right thing.
Key Features
● This tool provides you with almost all possible choices for a GIF category.
● It is available to you free of cost
● The tool site is loaded with rich and quality GIF content.
● This one is a direct save and export tool for your downloaded GIFs.
● Gfycat
You can prefer this one as a GIF hosting tool. Developed with a view to launch a common medium for GIF and HTML contents, this app ensures in-time and hassle free downloads and delivery. Though lacking a refined search bar, this tool promises you of excellence in content quality.
Key Features
● This comes to you as one of the most reliable GIF hosting tools.
● It is a free and quick content delivery tool.
● You are allowed to select the most suitable one from a variety of playback choices.
● This tool also gives you the flexibility of direct media sharing.
● GIFbin
If you are hung-over decade old nostalgia and the fever doesn’t seem to go away, you can check this site for some really satisfying retro and other similar content. This would definitely make you take a toll back to the times when MSN and Limewire were unparalleled market leaders in content sharing.
Key Features
● GIFbin is a storehouse of the best animated GIFs, that is on a continuous update to facilitate fresh and quality based content, every time you visit the site.
● It has an advanced, API enabled search mechanism.
● It boasts of having the handiest and convenient user interface.
● If you prefer GIFs of the comic genre, this tool is heaven for you.
● Imgflip
This is another GIF download site, commonly preferred for comedy and fun oriented content. Using this site, you can download and create a variety of GIF based memes that have the potential to flood your social media posts with likes and comments. This one is a complete GIF basket, suited to vast content varieties and user preferences. You will find the site’s official watermark on all its contents.
Key Features
● The site stands among the most preferred GIF-meme creation and sharing platforms.
● The tool is packed with loads of quality content under specific categories
● You can improvise the dimensions of your editing skills to modify downloaded GIFs.
● This site has a default media export feature that you can use to share your GIFs on social media.
● Imgur
Launched in 2009, this is among the most visited GIF sites, originally created for sharing meme based contents on social media. Its extensive search filters are dedicated to fetch the exact GIFs and memes you are looking for. If you are tired of browsing sites for particular content requirements, your search spree will definitely end here.
Key Features
● The site is known for its extensive and diversified content quality.
● It is a free, convenient and dependable GIF download tool.
● Imgur is highly preferred for content export across various media platforms.
● It is equipped with an advanced and updated search filter that assures you of getting fresh and top quality GIFs on almost every possible keyword.
● Tumblr
Claiming a launch date of 13 years back, this is quite a good GIF download option. You can find excellent quality GIF content on the site, particularly in the comic genre. Though not as popular as its online counterparts today, the site definitely enjoyed commendable visitor preferences at the time of its launch. You can certainly visit this site for a filling entertainment dose.
Key Features
● Tumblr is a free download site with a user friendly interface.
● The site is loaded with notable content varieties.
● You can go for direct media sharing through this site.
● Its comic GIFs are quite hilarious.
● Know Your Meme
This site uses the Wiki software to stock an inventory of classic GIFs and memes. Using this database for GIF downloads means that you don’t need to compromise on content and image quality. The site contents are periodically updated to ensure that visitors are not exposed to stale and outdated content.
Key Features
● The site offers fresh content having catchy and latest GIFs.
● This is a complete storehouse of GIFs and memes that can definitely keep you rolling.
● The site comes as a free tool and gas a user cohesive interface
● It hast the most efficient search filters that are regularly improvised to ensure quality content delivery.
● Key Takeaways from This Episode →
● GIFs are an effective and captivating means of quality content sharing and message delivery. Take them as a hilarious entertainment source or use them to enhance your marketing policies, GIFs can do it all.
● Influenced by the user credibility of GIFs, there are loads of GIF creator and download tools available online; among which Filmora by Wondershare is the current market leader. You can use this app to explore your GIF editing skills or download and share latest GIFs across media sharing platforms.
Also read:
- Updated In 2024, Best 10 Tools To Make Quiz Videos
- Updated Steps to Create Gold Text Effects After Effects for 2024
- New In 2024, Elevate Your Designs with Feather Shapes in After Effects
- In 2024, Recommended Video Background Changers
- New 2024 Approved The Ultimate Guide to Slideshow Maker with Music
- This Article Discusses What Is Hitfilm Express, How to Download, Install and Use It, and Its Key Features. It Further Discusses Its Alternative for Editing Your Videos and More. Check Out Now for 2024
- We Will Give You the Best-Suggested List of Color Match Generators to Help You Choose From an Efficient Collection Rather than Finding It Aimlessly
- New Detailed Tutorial to Rotate a Video in Cyberlink PowerDirector
- Updated There Are 10 Slideshow Makers Coming with Beautiful Music for Creating a Stunning Slideshow
- 2024 Approved This Article Talks in Detail About How to Export iMovie Video From iPhone, Mac, Etc. It Also Covers the Process of Using iMovie Alternative to Edit Videos on Mac. Check Out Now
- In 2024, Bored of Extraneous Software Downloads and Program Installations to Edit Your Videos? The Best Video Editing Online Utilities Are Here at Your Rescue
- 2024 Approved You Can Match Paint Colors From Pictures for Your Wall, as Well as for Your Videos. And to Know How to Do Both, We Have Laid Down the Following Discussion
- Mask Tracking with Adobe Premiere Pro A Detailed Guide
- How to Crop Videos in Windows Media Player
- In 2024, Top 5 Video Filter Software Improve Your Videos with Filters
- Updated How to Create Datamoshing Effect to Your Footage in After Effects?
- Updated In 2024, Convert Slow Motion Videos to Regular Videos in Your iOS Device |A How
- New Some Facts About GIF Background You Didnt Know
- New Discover 30+ Amazing Templates for VN Video Editor to Elevate Your Videos. Create Professional-Looking Videos with Ease
- Updated Take Your Video Editing to the Next Level with Video Scopes for 2024
- Updated In 2024, Ideas That Will Help You Out in Converting AVI to GIF
- New 3 Actionable Ways to Create Countdown Animation for Videos
- New Easy Steps to Loop YouTube Videos on iPhone for 2024
- Updated Converting VTT to SRT, or in Other Words, Converting a Document File Format Web to Subtitles File with the SRT Format Can Be a Cumbersome Process for Many. It Becomes Difficult when You Are New to This and Dont Have Prior Guidance
- Updated Wondershare Filmora Has Introduced a New Feature - AI Portrait Effect that You Can Use to Remove Background From Various Videos and Images. Explore the Uses, Benefits, and Real-Life Scenarios of This Feature in a Comprehensive Guide
- New Art of Time Manipulation A Guide to After Effects Slow Motion Mastery
- Updated 15 Best CapCut Templates for Slow Motion Editing
- New Things You Need to Know About Color Grading in Photography
- Updated In 2024, How to Record Super Slow Motion Videos on Your Phone?
- 2024 Approved Make Time-Lapse Video on MacBook Complete Guide
- Updated 2024 Approved Best AR Video Apps
- Updated In This Article, We Will Discuss How to Rotate Videos in the Lightworks Application. Below Is a Way to Rotate Videos in Lightworks Manually, Here, We Will Use the Z-Axis Rotation
- Updated Little Tricks to Create Canva Slideshow No One Is Telling You
- In 2024, Detailed guide of ispoofer for pogo installation On Samsung Galaxy M34 | Dr.fone
- In 2024, Top IMEI Unlokers for Your Vivo V29 Pro Phone
- In 2024, How and Where to Find a Shiny Stone Pokémon For Realme Narzo 60 Pro 5G? | Dr.fone
- Updated A Detailed Review of Murf.ai AI Text-to-Speech Tool for 2024
- What Is a SIM Network Unlock PIN? Get Your Oppo A78 Phone Network-Ready
- In 2024, For People Wanting to Mock GPS on Realme C67 4G Devices | Dr.fone
- A Detailed VPNa Fake GPS Location Free Review On Samsung Galaxy A14 4G | Dr.fone
- How to get the dragon scale and evolution-enabled pokemon On Google Pixel 8 Pro? | Dr.fone
- In 2024, How to Unlock Nubia Z50 Ultra Pattern Lock if Forgotten? 6 Ways
- A Detailed VPNa Fake GPS Location Free Review On Nubia Red Magic 9 Pro | Dr.fone
- Easily Unlock Your Realme C53 Device SIM
- In 2024, Best Ways on How to Unlock/Bypass/Swipe/Remove Samsung Galaxy M34 Fingerprint Lock
- Full Guide on Mirroring Your Samsung Galaxy F15 5G to Your PC/Mac | Dr.fone
- How To Unlock Stolen Apple iPhone 12 Pro In Different Conditionsin
- Updated What Is AI Background Generator? | Wondershare Virbo Glossary for 2024
- Stuck at Android System Recovery Of Poco C65 ? Fix It Easily | Dr.fone
- In 2024, The Best iSpoofer Alternative to Try On Poco M6 Pro 5G | Dr.fone
- 4 solution to get rid of pokemon fail to detect location On Infinix Smart 7 | Dr.fone
- iSpoofer is not working On Lava Blaze Pro 5G? Fixed | Dr.fone
- In 2024, Lock Your Nokia C22 Phone in Style The Top 5 Gesture Lock Screen Apps
- In 2024, The Updated Method to Bypass Tecno Spark 10 4G FRP
- Process of Screen Sharing Infinix Smart 8 to PC- Detailed Steps | Dr.fone
- New Best Claymation Shows That Make Your Memories Unforgettable
- Will the iPogo Get You Banned and How to Solve It On Infinix Smart 8 Plus | Dr.fone
- In 2024, iPhone Is Disabled? Here Is The Way To Unlock Disabled Apple iPhone XS
- In 2024, Which Pokémon can Evolve with a Moon Stone For Honor Magic 5 Pro? | Dr.fone
- Title: New Best Way to Freeze-Frame in Final Cut Pro for 2024
- Author: Chloe
- Created at : 2024-04-24 07:08:32
- Updated at : 2024-04-25 07:08:32
- Link: https://ai-editing-video.techidaily.com/new-best-way-to-freeze-frame-in-final-cut-pro-for-2024/
- License: This work is licensed under CC BY-NC-SA 4.0.
