
:max_bytes(150000):strip_icc():format(webp)/0010_21-best-teen-movies-on-netflix-5104880-b0e9832746854cabb4f33cafef96214b.jpg)
New Create Glitch Text Effect
Create Glitch Text Effect
Glitch text effect is a trending video effect whereby the texts get distorted for a few seconds. The effect is comparable to the glitch you face when your screen starts to malfunction, and the screen appears to be wavy and disoriented. A glitch text effect is better than a regular animated text effect as it helps to get the attention of the viewers immediately and get the message across clearly.
The glitch effect can be applied to the entire video as well as the text as per your preference. There are several video editors available where the glitch text effect comes pre-loaded. All you need to do is to apply it to the text and get it done in a few steps. We will illustrate how to add glitch text effect Premiere Pro. But we recommend Filmora for the best glitter text effect that you can add to your video instantly.
Part 1. Create Glitch Text in Video with Filmora
We have already stated that Wondershare Filmora is the best video editor for the best glitch text effect download and apply to your video in simple steps. Filmora is a premium video editor that is widely used by amateur and professional video editors. You can get all glitch text effect After Effects and add them to your video conveniently in comparison to After Effects.
As a matter of fact, there are literally unlimited video and text effects available, and you can find different types of glitch text effects to apply to your titles and texts. Filmora is available for both Windows and mac users. Here are the steps to create glitch text in video with Filmora.
Free Download For Win 7 or later(64-bit)
Free Download For macOS 10.14 or later
Step1 Download and install Filmora on your computer. Go to File> New Project from the menu bar to start video editing project.

Step2 Go to File> Import Media > Import Media Files to import the video clips where you want to add glitch text effect. Drop the clip into the Timeline to get started.

Step3 Go to Titles tab located at the top. From the left panel, click on Titles option. Search “glitch” in the search field and you will see all the glitch text effects that you can apply to the text in your video.
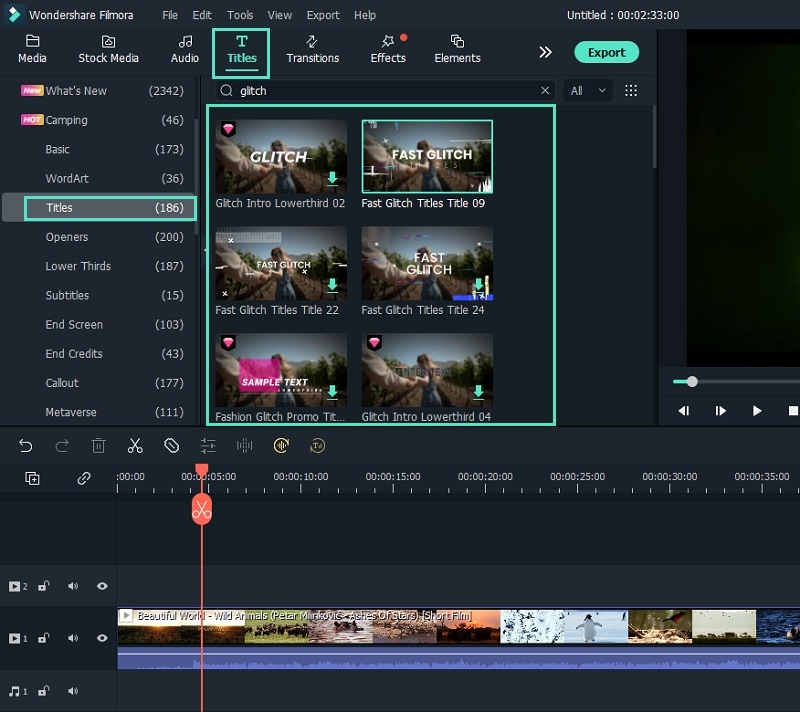
Step4 Select any glitch text effect and drop it into the Timeline above the video clip exactly where you want the text and the effect to appear.
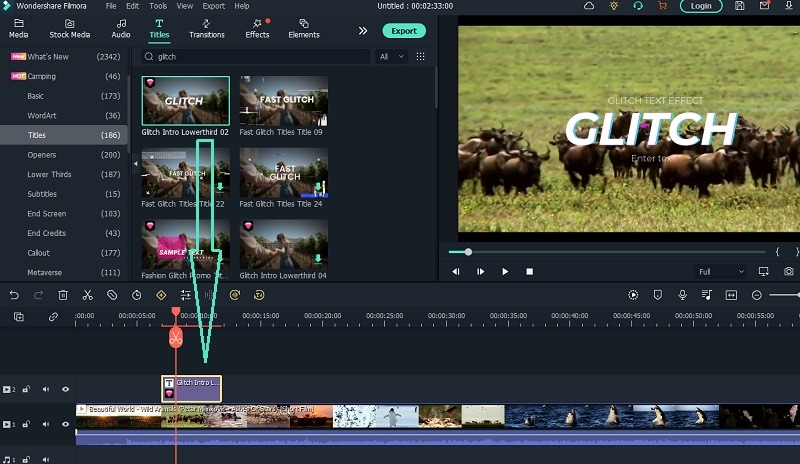
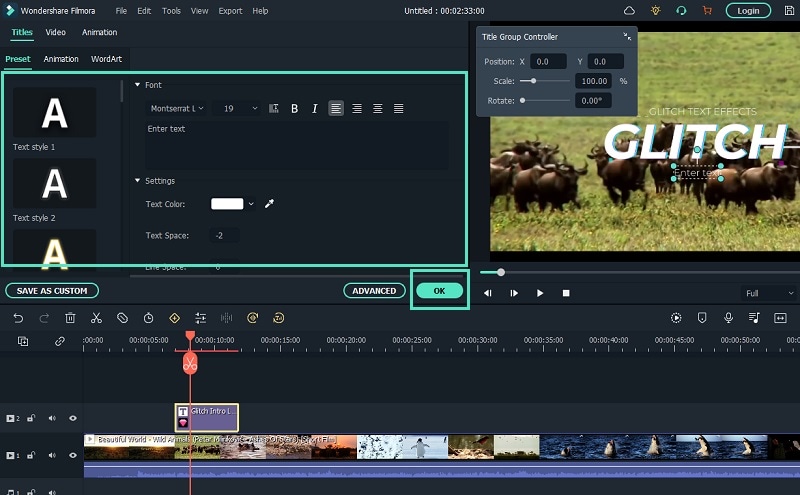
Step5 Double-click on the glitch text effect located on Timeline and edit the text, style, and other parameters as per your preference. Click on Ok and play the video to see your edited video with the glitch text effect.
Part 2. How to Make Glitch Text Effect with Premiere Pro
Adobe Premiere Pro is another renowned video editor where you can add glitch text effect to your video. Premiere Pro is strictly for professional video editors as the user interface is not as intuitive as Filmora . The learning curve is steep, and therefore, you need to go through the steps to add glitch text effect Premiere Pro. There are several glitch text effect presets available that you can apply to any text on your video to make them engaging. Here are the steps to make glitch text effect with Premiere Pro.
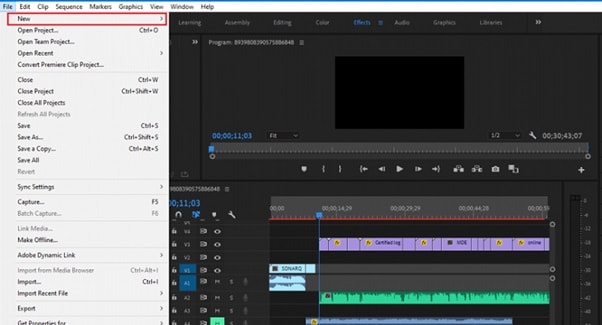
Step1 Launch Adobe Premiere Pro and go to New> Project to get started. Import your video and drop it into Timeline.
Step2 Use the Type tool to write any text on your video to add glitch text effect. You should have a text layer on Timeline.
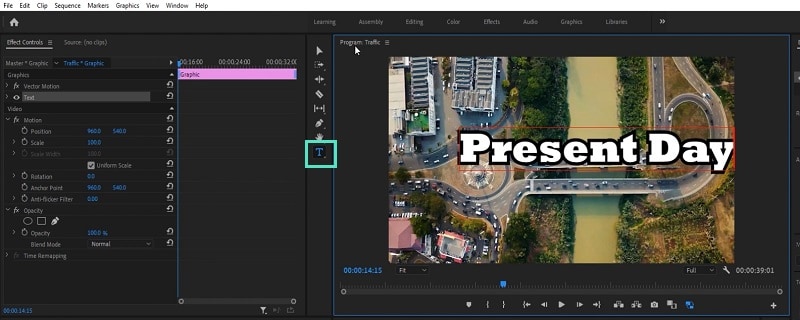
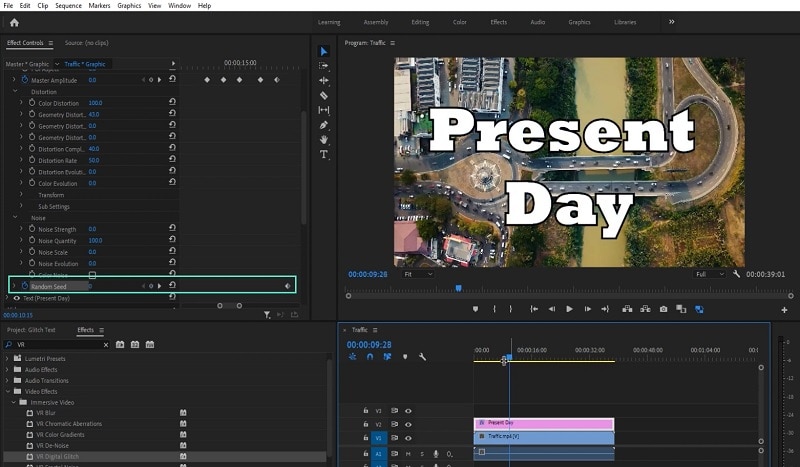
Step3 Go to Effects> Immersive Video> VR Digital Glitch option. Drag and drop the effect to text layer.
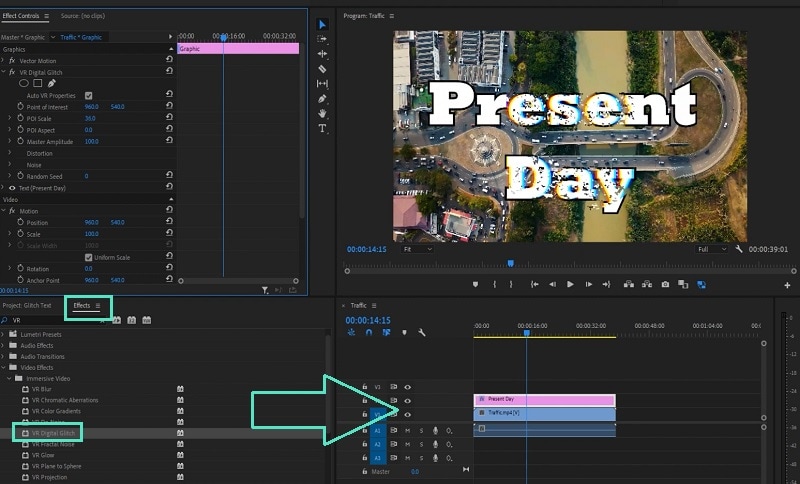
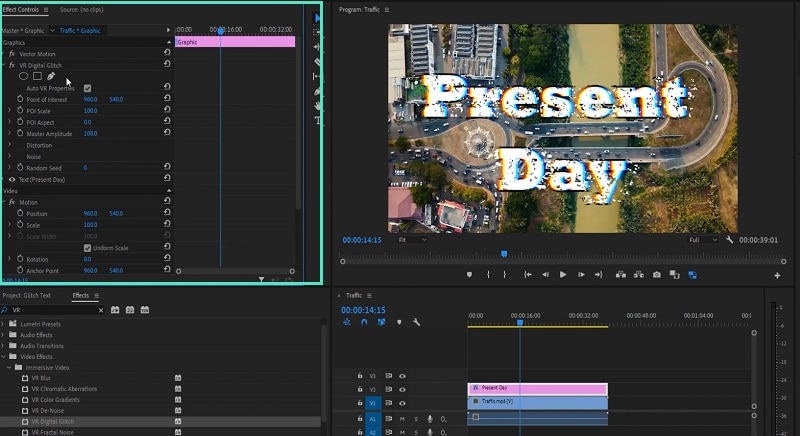
Step4 Under Effect Controls tab, you will find all the different parameters that you can adjust to get the glitch text effect perfectly.
Step5 Turn on Master Amplitude and add multiple keyframes as different points in the Timeline and change the distortion value to make the effect prominent.
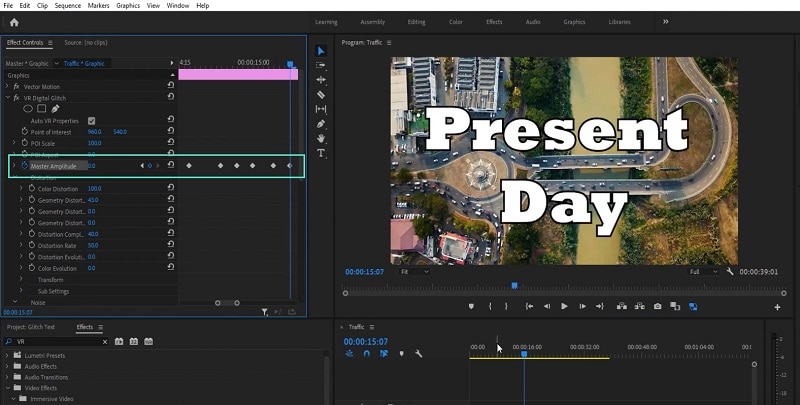
Step6 Go to the first keyframe and turn on Random Seed effect. Go to the last keyframe and turn on Random Seed effect and change the value to 75. Play the video to check the entire video with glitch text effect.
Part 3. Use VSDC Video Editor to Create Glitch Text
If you do not have any premium video editor on your computer and you do not want to purchase any premium video editor, you can still get glitter text effect free. You need to download and install VSDC free video editor on your computer. But the steps to create glitch text on VSDC video editor are slightly complicated as the user interface is not as intuitive as Filmora . Here are the steps to add free glitch text effect on your video.
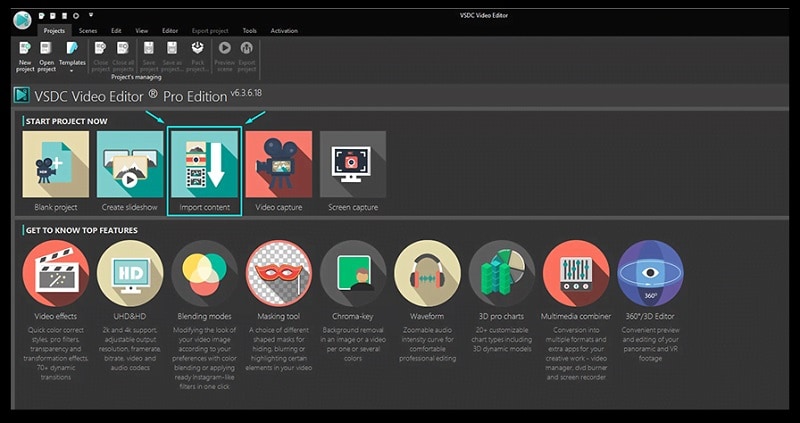
Step1 Download and install VSDC video editor. Launch the editor and click on New Project to get started. Import your video to your project where you want to add glitch text effect.
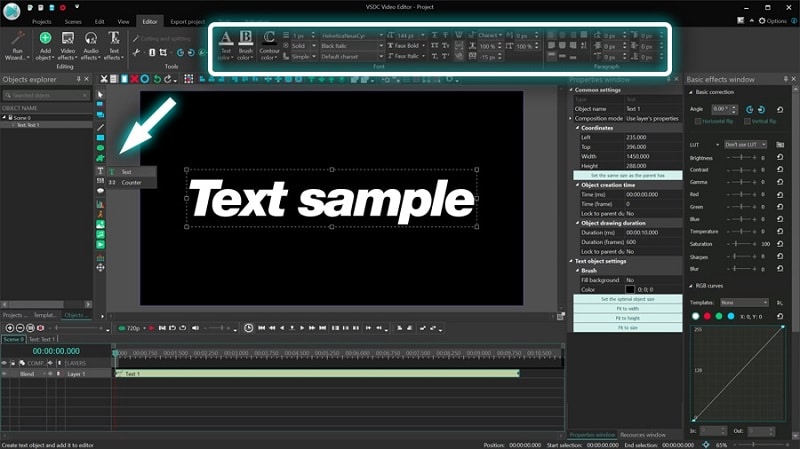
Step2 Use Type tool to write a text on the video. You can press Shift+T shortcut as well. After typing the text, adjust the text style as per your preference.
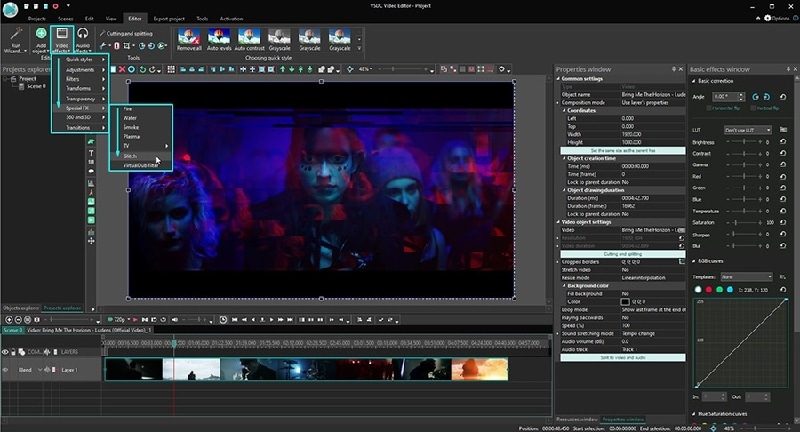
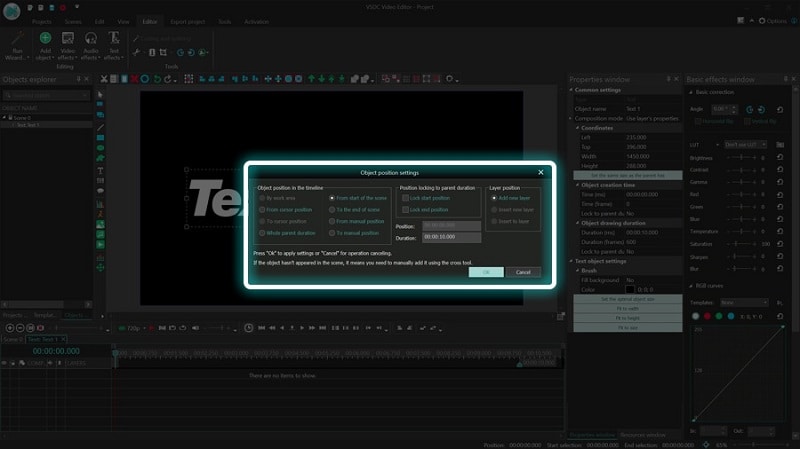
Step3 Double-click on the text layer on Timeline and go to Video Effects> Special FX and click on Glitch option.
Step4 A window will appear where you can set the starting point, duration, and different parameters. Click on Ok button.
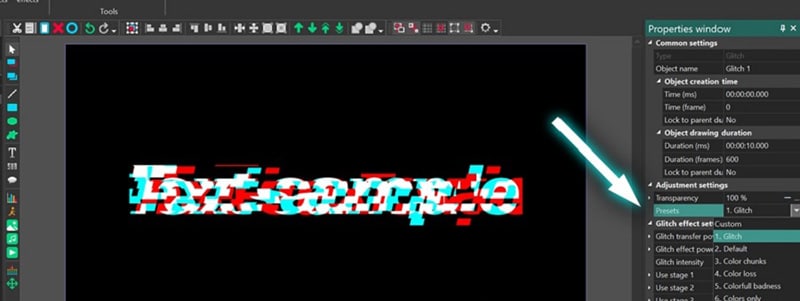
Step5 Go to Properties Windows and click on Presets to select different types of glitch text effects. You can also adjust the intensity of the text effects and other parameters as you feel.
Part 4. Related FAQs about Glitch Text
1. How do you animate glitch text?
If you want to animate glitch text for free, VSDC video editor is ideal as you can customize the effect on any text in simple steps. If you want to use a premium video editor, we recommend Filmora as there are various glitch text effects available to apply to any text on your video instantly.
2. How do you glitch text on video?
First, you have to import your video in your video editor. Type the desired text and set the style. Thereafter, go to glitch text effect presets available on the video editor and apply it to the text instantly. You can customize the glitch text effect as per your preference to make the animation more prominent.
3. How do you glitch text on Android?
You should first install Glitch Video Effect: Glitch FX app from Play Store. Edit your video on the app to add any text, and thereafter, add glitch text effect instantly. In fact, the glitch text effect is available in almost all popular video editor apps on Android due to the effect being trendy and viral.
Free Download For macOS 10.14 or later
Step1 Download and install Filmora on your computer. Go to File> New Project from the menu bar to start video editing project.
Step2 Go to File> Import Media > Import Media Files to import the video clips where you want to add glitch text effect. Drop the clip into the Timeline to get started.
Step3 Go to Titles tab located at the top. From the left panel, click on Titles option. Search “glitch” in the search field and you will see all the glitch text effects that you can apply to the text in your video.
Step4 Select any glitch text effect and drop it into the Timeline above the video clip exactly where you want the text and the effect to appear.
Step5 Double-click on the glitch text effect located on Timeline and edit the text, style, and other parameters as per your preference. Click on Ok and play the video to see your edited video with the glitch text effect.
Part 2. How to Make Glitch Text Effect with Premiere Pro
Adobe Premiere Pro is another renowned video editor where you can add glitch text effect to your video. Premiere Pro is strictly for professional video editors as the user interface is not as intuitive as Filmora . The learning curve is steep, and therefore, you need to go through the steps to add glitch text effect Premiere Pro. There are several glitch text effect presets available that you can apply to any text on your video to make them engaging. Here are the steps to make glitch text effect with Premiere Pro.
Step1 Launch Adobe Premiere Pro and go to New> Project to get started. Import your video and drop it into Timeline.
Step2 Use the Type tool to write any text on your video to add glitch text effect. You should have a text layer on Timeline.
Step3 Go to Effects> Immersive Video> VR Digital Glitch option. Drag and drop the effect to text layer.
Step4 Under Effect Controls tab, you will find all the different parameters that you can adjust to get the glitch text effect perfectly.
Step5 Turn on Master Amplitude and add multiple keyframes as different points in the Timeline and change the distortion value to make the effect prominent.
Step6 Go to the first keyframe and turn on Random Seed effect. Go to the last keyframe and turn on Random Seed effect and change the value to 75. Play the video to check the entire video with glitch text effect.
Part 3. Use VSDC Video Editor to Create Glitch Text
If you do not have any premium video editor on your computer and you do not want to purchase any premium video editor, you can still get glitter text effect free. You need to download and install VSDC free video editor on your computer. But the steps to create glitch text on VSDC video editor are slightly complicated as the user interface is not as intuitive as Filmora . Here are the steps to add free glitch text effect on your video.
Step1 Download and install VSDC video editor. Launch the editor and click on New Project to get started. Import your video to your project where you want to add glitch text effect.
Step2 Use Type tool to write a text on the video. You can press Shift+T shortcut as well. After typing the text, adjust the text style as per your preference.
Step3 Double-click on the text layer on Timeline and go to Video Effects> Special FX and click on Glitch option.
Step4 A window will appear where you can set the starting point, duration, and different parameters. Click on Ok button.
Step5 Go to Properties Windows and click on Presets to select different types of glitch text effects. You can also adjust the intensity of the text effects and other parameters as you feel.
Part 4. Related FAQs about Glitch Text
1. How do you animate glitch text?
If you want to animate glitch text for free, VSDC video editor is ideal as you can customize the effect on any text in simple steps. If you want to use a premium video editor, we recommend Filmora as there are various glitch text effects available to apply to any text on your video instantly.
2. How do you glitch text on video?
First, you have to import your video in your video editor. Type the desired text and set the style. Thereafter, go to glitch text effect presets available on the video editor and apply it to the text instantly. You can customize the glitch text effect as per your preference to make the animation more prominent.
3. How do you glitch text on Android?
You should first install Glitch Video Effect: Glitch FX app from Play Store. Edit your video on the app to add any text, and thereafter, add glitch text effect instantly. In fact, the glitch text effect is available in almost all popular video editor apps on Android due to the effect being trendy and viral.
Best Voice Changers for WhatsApp [Free Included]
Ever thought of the best way to prank your friends via WhatsApp voice calls? WhatsApp voice changing app is what you need. Not any voice changer, but one that offers quality services to end-users. Many software programs claim to render such services. However, not all are the perfect fit since the majority are substandard.
Are you looking for an efficient WhatsApp voice changer with a comprehensive user interface that you can use on your Windows, Mac, or mobile devices? You are at the right spot. Our team has browsed the internet and handpicked the best 7 WhatsApp voice-changing apps available in the global market today. We will share them with you here.
Try AI Voice Changer For Win 7 or later(64-bit)
Try AI Voice Changer For macOS 10.14 or later
Part 1. 7 Best Voice Changers for WhatsApp
Here are the seven (7) most powerful software or apps that offer quality voice-changing services on WhatsApp:
1. Magic Call[iOS] [Free with Limited Features]
Magic Call [iOS] is one of the best voice-changing apps available on the internet. The app lets you switch your voice into a fun and lovely one with complete ease. It’s a simple app available for download to Android and iOS devices.
Users of this WhatsApp voice changer find it simple to operate because of the comprehensive user interface and rich features it holds. Magic Call [iOS] is a freemium app and highly secured. The app provides you with several voice-changing options that you can choose from to prank your callers. Some of them are male, female, and robotic sounds. Additionally, it supports sounds like clap, laughter, gasp, and several others.

How to Use Magic Call [iOS] with WhatsApp
Open Google PlayStore or App Store on your Android device, and search Magic Call. Click on the corresponding key to download and install the app on your device, then follow the procedure below to change your WhatsApp voice:
Step1 Launch Magic Call [iOS], and grant it access to the necessary features such as contact, audio recording, etc.
Step2 Next, choose a contact from the list appearing on your display screen to speak to
Step3 Tap on the contact’s name, and then click on the Female Voice filter from the options that pop up.
Step4 Apply the WhatsApp voice-changer to spice up your conversation with friends and relatives on your contact.
2. Voicemod
Here is another fun-oriented software that permits you to change your voice during WhatsApp calls easily and quickly. Voicemod is a highly efficient WhatsApp voice changer popular among gamers, content creators, and more.
The app is well-customized with epic sound effects that you can select from to pimp your voice during calls. You can choose to sound like a robot, woman, man, or demon. Voicemod integrates with apps like TikTok, Elgato Stream, Audacity, Discord, Skype, and many more.
Also, Voicemod comes with voice filters. The app allows you to switch between scary, loud, or funny voices. Additionally, you have the chance to customize your vice via the Voicelab feature tucked into it. It’s a simple tool compatible with Windows, Mac, and Chromebook.

How to Use Voicemod with WhatsApp
Step1 Open your desired web browser on your PC, and navigate to the official website for Voicemod. A page as below will appear on your screen:
Click on the corresponding button to download and install a suitable version. Wait until the download is complete, and follow the on-screen instructions to configure the app. Ensure you grant permission to the necessary devices such as Microphone, etc.
Step2 Next, confirm the Voice Changer toggle at the bottom of the Window page is activated. Once that’s set, scroll through the library of voice filters, and sound effects to select your desired prank voice.
Step3 Now connect the selected Microphone to WhatsApp, host a call, and start enjoying the lovely prank voices from Voicemod.
3. Call Voice Changer [iOS]
Call Voice Changer is a simple yet powerful voice-changing app built with countless sound effects that you can use to fool your contacts during calls. The app helps you spice up your conversation with friends and families. It lets you select between funny, creepy, and loud voices.
Also, Call Voice Changer supports sound effects like birthday songs, cartoon characters, and lots more. All end-users of this app find it simple to operate. The reason is because of the clean user interface. Call Voice Changer provides you with real-time voice-changing effects- this means you have the privilege to change your voice at any time during calls.

How to Use Call Voice Changer- IntCall
Step1 On your iOS device, open the App Store, and click on the Search tab at the extreme lower right corner of your screen. Enter Call Voice Changer in the empty field provided and tap on the Enter key on your keypad.
Step2 A new screen showing the Call Voice Changer app will pop up. Here is what the app looks like:

Click on the GET button next to the app name. Validate your action when required. Launch the app after the successful download, accept the necessary conditions, and grant access if prompted.
Step3 When Call Voice Changer opens, add your cellphone number, and grant access to Microphone.
Next, select your preferred voice pitch on the next interface that pops up.

Step4 Choose your preferred sound effect from the available options, and make calls via WhatsApp.
4. Funcalls- Voice Changer & Call Recording
With over 100 voice effects, Funcalls is another wonderful WhatsApp voice-changer you can use to alter your voice during audio or video calls. The app makes it to our top list because of the quality features it holds. Funcalls is well-designed with a clean interface that lets you navigate around easily and quickly without involving a third party.
Besides voice changing, Funcalls lets you record your conversations during calls. This WhatsApp voice-changer works perfectly with mobile operating systems like Android and iOS devices. It’s a highly flexible app that permits you to change your voice using different pitches and speeds.
How to Use Funcalls- Voice Changer & Call Recorder
Step1 Depending on the mobile operating system you are using, launch the App Store, or Google PlayStore, click on the Search button and enter Funcalls in the appropriate field.
Tap on the appropriate button to install the app on your device.
Step2 Wait patiently for the installation to complete, and follow the on-screen prompts to set up the app with your Android or iOS device. Once the configuration is complete, click on the Dialer button at the bottom of the app screen. Enter a cellphone number by selecting the appropriate keys. Ensure you input the country code while dialing the number.
Step3 Now select your preferred voice effect from the options appearing on your screen.

Host the call, and download the audio recording. After the call, share the recording with friends and families for fun.
5. Prank Dial
Designed for novices and experts in the tech space, Prank Dial is another voice changer that integrates with WhatsApp. This lightweight app lets you change your voice during calls to spice up conversations with families and friends.
It’s a fun app customized with several background sound effects. From funny sounds to annoying, celebrations, scams, money, politics, and lots more. Prank Dial WhatsApp voice-changer offers quality services in free and paid subscription packages. Like the Funcalls-Voice Changer & Call Recording, Prank Dial also supports call recording.

How to Use Prank Dial with WhatsApp
Step1 Click the appropriate button on your Android or iOS device to open Google PlayStore or App Store. Enter Prank Dial in the field given to search the WhatsApp voice-changer.
Tap the corresponding button to download and install the app on your device. After the installation is over, open the app for operation.
Step2 Next, kindly grant Prank Dial access to calls, contact, and local storage. Pick a sound effect to prank your friend, and head to connect with a friend via WhatsApp.
Step3 Once the step above is complete, settle down and prank your friends. Export and share audio recordings with people on your contact list for fun.
6. Voice Changer with Effects
Here is another good WhatsApp voice-changer with top-notch sound effects that you can select from to prank your contacts. It is a high utility voice-changing app well-known for delivering all it promises. End-users have the freedom to switch a boring phone call into an interesting one by selecting a background effect.
How to Use Voice Changer with Effects with WhatsApp
Step1 Download and install Voice Changer with Effects on your smartphone. Launch the app, and grant necessary permission as required.
Step2 Next, locate the Microphone icon, and click on it. Speak to the mic, and add your desired background voice effect.
Step3 Once the step above is complete, edit the recording, and hit the Share button to send it to your contact.

You can share it via WhatsApp. To do that, select the WhatsApp icon

7. Narrator’s Voice
Lastly, Narrator’s voice is a top-rated WhatsApp voice-changing app designed with extraordinary background sound effects you can use to create a wonderful phone call experience. The app supports the text-to-speech feature. Thus, you can type, and Narrator’s Voice will convert into speech.

How to Use Narrator’s Voice with WhatsApp
Step1 Run Narrator’s Voice by clicking on the appropriate icon on your Android device.
Step2 Grant the app access to all the necessary apps and features, including the microphone. Speak to the microphone to proceed.
Step3 Edit your speech with sound effects, and click on Apply. When the editing is complete, click on Share to send to friends.
Part 2: FAQs
Q1. Can I change my voice during calls?
Yes, of course, you can!
However, you need a voice-changing app that supports real-time voice changing. You can select one from the list shared above. We mentioned seven (7) quality voice-changing apps that you can use to prank your contact during calls.
Q2. How to edit voice recordings before sharing them with friends?
Editing voice recording before sharing it with friends is straightforward if you have a voice editing tool like Wondershare Filmora. Wondershare Filmora is a world-leading video editing software with robust features that you need to edit your media files. It supports audio editing without distorting the file format.
Filmora allows you to detach audio from videos, delete, and adjust audio speeds with quality. Additionally, you can use the software to edit your videos, add transitions, effects, and more. This software works with popular computer systems like Windows and Mac. The software is simple to operate and offers quality results at a remarkably high speed. When compared with other video editing tools, Filmora stands out.

Conclusion
Now we’ve successfully explored the best 7 WhatsApp voice changers. Which do you wish to invest your funds in? While making a selection, we advise that you consider the subscription price, ease of use, and compatibility. If you want to edit your voice recordings before sharing them with friends and relatives, Filmora is the perfect tool to apply.
Free Download For Win 7 or later(64-bit)
Free Download For macOS 10.14 or later
Try AI Voice Changer For Win 7 or later(64-bit)
Try AI Voice Changer For macOS 10.14 or later
Part 1. 7 Best Voice Changers for WhatsApp
Here are the seven (7) most powerful software or apps that offer quality voice-changing services on WhatsApp:
1. Magic Call[iOS] [Free with Limited Features]
Magic Call [iOS] is one of the best voice-changing apps available on the internet. The app lets you switch your voice into a fun and lovely one with complete ease. It’s a simple app available for download to Android and iOS devices.
Users of this WhatsApp voice changer find it simple to operate because of the comprehensive user interface and rich features it holds. Magic Call [iOS] is a freemium app and highly secured. The app provides you with several voice-changing options that you can choose from to prank your callers. Some of them are male, female, and robotic sounds. Additionally, it supports sounds like clap, laughter, gasp, and several others.
How to Use Magic Call [iOS] with WhatsApp
Open Google PlayStore or App Store on your Android device, and search Magic Call. Click on the corresponding key to download and install the app on your device, then follow the procedure below to change your WhatsApp voice:
Step1 Launch Magic Call [iOS], and grant it access to the necessary features such as contact, audio recording, etc.
Step2 Next, choose a contact from the list appearing on your display screen to speak to
Step3 Tap on the contact’s name, and then click on the Female Voice filter from the options that pop up.
Step4 Apply the WhatsApp voice-changer to spice up your conversation with friends and relatives on your contact.
2. Voicemod
Here is another fun-oriented software that permits you to change your voice during WhatsApp calls easily and quickly. Voicemod is a highly efficient WhatsApp voice changer popular among gamers, content creators, and more.
The app is well-customized with epic sound effects that you can select from to pimp your voice during calls. You can choose to sound like a robot, woman, man, or demon. Voicemod integrates with apps like TikTok, Elgato Stream, Audacity, Discord, Skype, and many more.
Also, Voicemod comes with voice filters. The app allows you to switch between scary, loud, or funny voices. Additionally, you have the chance to customize your vice via the Voicelab feature tucked into it. It’s a simple tool compatible with Windows, Mac, and Chromebook.
How to Use Voicemod with WhatsApp
Step1 Open your desired web browser on your PC, and navigate to the official website for Voicemod. A page as below will appear on your screen:
Click on the corresponding button to download and install a suitable version. Wait until the download is complete, and follow the on-screen instructions to configure the app. Ensure you grant permission to the necessary devices such as Microphone, etc.
Step2 Next, confirm the Voice Changer toggle at the bottom of the Window page is activated. Once that’s set, scroll through the library of voice filters, and sound effects to select your desired prank voice.
Step3 Now connect the selected Microphone to WhatsApp, host a call, and start enjoying the lovely prank voices from Voicemod.
3. Call Voice Changer [iOS]
Call Voice Changer is a simple yet powerful voice-changing app built with countless sound effects that you can use to fool your contacts during calls. The app helps you spice up your conversation with friends and families. It lets you select between funny, creepy, and loud voices.
Also, Call Voice Changer supports sound effects like birthday songs, cartoon characters, and lots more. All end-users of this app find it simple to operate. The reason is because of the clean user interface. Call Voice Changer provides you with real-time voice-changing effects- this means you have the privilege to change your voice at any time during calls.
How to Use Call Voice Changer- IntCall
Step1 On your iOS device, open the App Store, and click on the Search tab at the extreme lower right corner of your screen. Enter Call Voice Changer in the empty field provided and tap on the Enter key on your keypad.
Step2 A new screen showing the Call Voice Changer app will pop up. Here is what the app looks like:
Click on the GET button next to the app name. Validate your action when required. Launch the app after the successful download, accept the necessary conditions, and grant access if prompted.
Step3 When Call Voice Changer opens, add your cellphone number, and grant access to Microphone.
Next, select your preferred voice pitch on the next interface that pops up.
Step4 Choose your preferred sound effect from the available options, and make calls via WhatsApp.
4. Funcalls- Voice Changer & Call Recording
With over 100 voice effects, Funcalls is another wonderful WhatsApp voice-changer you can use to alter your voice during audio or video calls. The app makes it to our top list because of the quality features it holds. Funcalls is well-designed with a clean interface that lets you navigate around easily and quickly without involving a third party.
Besides voice changing, Funcalls lets you record your conversations during calls. This WhatsApp voice-changer works perfectly with mobile operating systems like Android and iOS devices. It’s a highly flexible app that permits you to change your voice using different pitches and speeds.
How to Use Funcalls- Voice Changer & Call Recorder
Step1 Depending on the mobile operating system you are using, launch the App Store, or Google PlayStore, click on the Search button and enter Funcalls in the appropriate field.
Tap on the appropriate button to install the app on your device.
Step2 Wait patiently for the installation to complete, and follow the on-screen prompts to set up the app with your Android or iOS device. Once the configuration is complete, click on the Dialer button at the bottom of the app screen. Enter a cellphone number by selecting the appropriate keys. Ensure you input the country code while dialing the number.
Step3 Now select your preferred voice effect from the options appearing on your screen.
Host the call, and download the audio recording. After the call, share the recording with friends and families for fun.
5. Prank Dial
Designed for novices and experts in the tech space, Prank Dial is another voice changer that integrates with WhatsApp. This lightweight app lets you change your voice during calls to spice up conversations with families and friends.
It’s a fun app customized with several background sound effects. From funny sounds to annoying, celebrations, scams, money, politics, and lots more. Prank Dial WhatsApp voice-changer offers quality services in free and paid subscription packages. Like the Funcalls-Voice Changer & Call Recording, Prank Dial also supports call recording.
How to Use Prank Dial with WhatsApp
Step1 Click the appropriate button on your Android or iOS device to open Google PlayStore or App Store. Enter Prank Dial in the field given to search the WhatsApp voice-changer.
Tap the corresponding button to download and install the app on your device. After the installation is over, open the app for operation.
Step2 Next, kindly grant Prank Dial access to calls, contact, and local storage. Pick a sound effect to prank your friend, and head to connect with a friend via WhatsApp.
Step3 Once the step above is complete, settle down and prank your friends. Export and share audio recordings with people on your contact list for fun.
6. Voice Changer with Effects
Here is another good WhatsApp voice-changer with top-notch sound effects that you can select from to prank your contacts. It is a high utility voice-changing app well-known for delivering all it promises. End-users have the freedom to switch a boring phone call into an interesting one by selecting a background effect.
How to Use Voice Changer with Effects with WhatsApp
Step1 Download and install Voice Changer with Effects on your smartphone. Launch the app, and grant necessary permission as required.
Step2 Next, locate the Microphone icon, and click on it. Speak to the mic, and add your desired background voice effect.
Step3 Once the step above is complete, edit the recording, and hit the Share button to send it to your contact.
You can share it via WhatsApp. To do that, select the WhatsApp icon
7. Narrator’s Voice
Lastly, Narrator’s voice is a top-rated WhatsApp voice-changing app designed with extraordinary background sound effects you can use to create a wonderful phone call experience. The app supports the text-to-speech feature. Thus, you can type, and Narrator’s Voice will convert into speech.
How to Use Narrator’s Voice with WhatsApp
Step1 Run Narrator’s Voice by clicking on the appropriate icon on your Android device.
Step2 Grant the app access to all the necessary apps and features, including the microphone. Speak to the microphone to proceed.
Step3 Edit your speech with sound effects, and click on Apply. When the editing is complete, click on Share to send to friends.
Part 2: FAQs
Q1. Can I change my voice during calls?
Yes, of course, you can!
However, you need a voice-changing app that supports real-time voice changing. You can select one from the list shared above. We mentioned seven (7) quality voice-changing apps that you can use to prank your contact during calls.
Q2. How to edit voice recordings before sharing them with friends?
Editing voice recording before sharing it with friends is straightforward if you have a voice editing tool like Wondershare Filmora. Wondershare Filmora is a world-leading video editing software with robust features that you need to edit your media files. It supports audio editing without distorting the file format.
Filmora allows you to detach audio from videos, delete, and adjust audio speeds with quality. Additionally, you can use the software to edit your videos, add transitions, effects, and more. This software works with popular computer systems like Windows and Mac. The software is simple to operate and offers quality results at a remarkably high speed. When compared with other video editing tools, Filmora stands out.
Conclusion
Now we’ve successfully explored the best 7 WhatsApp voice changers. Which do you wish to invest your funds in? While making a selection, we advise that you consider the subscription price, ease of use, and compatibility. If you want to edit your voice recordings before sharing them with friends and relatives, Filmora is the perfect tool to apply.
Free Download For Win 7 or later(64-bit)
Free Download For macOS 10.14 or later
Time Lapse Videos Play an Important Part in Videography. If You Want to Start Video Shooting, Then You Shouldn’t Miss Time Lapse Video. This Article Will Show You some Ideas over This
Are you thinking of stepping out of the familiar world of still photography to make a time-lapse video?
As you all know I am a fan of travel videos and time-lapse video because why not? There is no denying that time-lapse techniques are a perfect medium for travel videos.
In this article will give you some ideas to get started in time-lapse video or photography and let’s define what a time-lapse video and what makes them great.
What is Time Lapse
Time-lapse is a creative filming and video editing technique that manipulates how the frame rate is captured. Frame rate is the number of images or frames appearing in a second of video. In most videos, the frame rate and playback speed are the same. In a time-lapse video, the frame rate is stretched out far more: when played back at average speed, time appears to be sped up.
Time-lapse can also refer to a camera’s shutter speed (How long the camera’s shutter remains open to let light in). A similar effect to time-lapse is found in stop-motion videos. The subject doesn’t move but seems to be in motion because it’s manually or repeatedly moved and then photographed. The images are then strung together to create video-like motion.

How Time-lapse Works
Time-lapse photography is a technique that records a scene or objects that change at a slow speed and turns it into a video that plays back at high speed.
Most time-lapse videos are projected at a speed of 30 frames per second. The frame rate of your time-lapse video can be determined in the editing process, but you will need to account for how quickly the action is taking place in the camera or your video will be a collection if stills. Consider what FPS you want to use in your video. You need to capture that many frames per second to create a time-lapse effect. If you’re shooting a 10 second video at 30fps, you should end up with 300 images.
What equipment needed for time-lapse video?
Time-lapse photography requires only a few special pieces of equipment.
1. Camera / Smartphones
Technically any point and shoot camera or smartphone can be used for time-lapse video, the easiest ones to work are DSLR or mirrorless cameras, some even have an in camera intervalometer (often called a time-lapse feature or time-lapse mode), which means you’ll need less equipment to take great time-lapse video.
2. High-capacity Memory Card
For the best results, shoot in RAW format which takes image in the highest resolution with actual image dimensions. You’ll need to prepare for very large RAW file sizes, so bring multiple high capacity memory cards.
3.Tripod
A tripod is essential to time-lapse video or photography, because the camera needs to stay perfectly still in order to emphasize the steady movement of your subject and to avoid overlay blurry videos or photos.
How to Capture Times-lapse Video
A technique that was once found only in video editing software is now on nearly every mobile device. So what’s the best way to make an amazing time-lapse video that stands apart from the rest? That depends on how you plan to capture the footage.
Smartphones:
Most phones have a time-lapse feature in their camera app. Be advised: you will need to record for an extended period, as 30 minutes equates to about 10 seconds of footage. Like a video camera, you will need a tripod to steady your shots. On an iPhone, you can either film a time-lapse or stitch one together from your photo collection, all without a video editor.
DSLR Camera
For DSLR camera you’ll need a tripod and a device called intervalometer. The first is essential to make sure your camera is stationary and is taking photos if the exact same location without moving anywhere.
An intervalometer, or a remote control, is a device that allows you to set your camera to hit the shutter button at an interval of your choice. In other words, an intervalometer is there to let you rest aside without having a manually click the shutter button yourself.
Here are some video ideas for your time-lapse
- Ice melting
- Flower and plants
- Clouds moving
- Sunrise/sunset
- Star movement
- Traffic movement
Ice melting
Time-lapse is an ideal way to capture the mesmerizing transition between water and ice. Even something as simple as watching ice melt can be appealing.
Flower and plants
Flowers and plants can be beautiful to behold, but their transformation from seed to adult plant is often absolutely breathtaking. If you have an indoor plant that you are about to start growing you can set up a camera on a mount of a tripod at the angle with which you want to capture. As you water, groom or fertilize on a regular schedule, you can incorporate taking a photograph at the same time.
Clouds moving
The clouds can provide a whole host of phenomena that will both enlighten the observer to the complexities of the atmosphere or cosmos but will also provide a beautiful spectacle in the daytime, the movement of clouds can be quite spell binding and the rolling in of rain or a thunderstorm can be particularly interesting.
Sunrise/Sunset
Shooting a sunset is more difficult. The light changes during the selected time period.
To overcome this, use remote control camera software. This can be compensated by increasing the ISO or decreasing the shutter speed as the light dims.

Star movement
At night, if the sky is clear and you are in an area dark enough, the stars in the sky can provide a beautiful time-lapse as the stars move in relation to the observer due to earths rotations.
Traffic movement
The interconnectedness of vehicles moving along busy roads, trailing light patterns, and the general hustle and bustle of city life can be brought to you in a dynamic way via time-lapse videos.
It is the smooth impression of motion which time-lapse is able to produce that can emphasize and help to invigorate something as ordinary and everyday as the coming and going of traffic.

Edit your video with Wondershare Filmora
Wondershare Filmora has the action camera tool that allows you to fasten up your video without re-encoding. This means the quality of the video remains intact without any change after exporting. Here is how to convert a standard video to a time-lapse:
Step1 Download Wondershare Filmora from the official website
Free Download For Win 7 or later(64-bit)
Free Download For macOS 10.14 or later
Step2 Open Filmora, then click action camera tool
Step3 Click import action cam video to import your file

Step4 click on the speed icon add marker button. Then drag the marker all the way over the target video.

Step5 Next drag the slider under the speed tool to speed up the video according to your desire.

Step6 Lastly when done, export and save the final video.

Conclusion
Hope this article can give you an idea on how to make a good time-lapse video. It’s so fun doing it you will see how the things change that fast. Time-lapse content is typically just that, shorter, more visually interesting content, unlike most conventional video, time-lapse video can tell a story within just a few second. Start creating nice and creative time-lapse video now and make it as one content on your you tube channel.
Free Download For macOS 10.14 or later
Step2 Open Filmora, then click action camera tool
Step3 Click import action cam video to import your file
Step4 click on the speed icon add marker button. Then drag the marker all the way over the target video.
Step5 Next drag the slider under the speed tool to speed up the video according to your desire.
Step6 Lastly when done, export and save the final video.
Conclusion
Hope this article can give you an idea on how to make a good time-lapse video. It’s so fun doing it you will see how the things change that fast. Time-lapse content is typically just that, shorter, more visually interesting content, unlike most conventional video, time-lapse video can tell a story within just a few second. Start creating nice and creative time-lapse video now and make it as one content on your you tube channel.
Create Perfect Slow Motion Videos With The Best CapCut Templates
Editing from scratch is a time-consuming process, especially when you’re a beginner. Even skilled editors opt for different ways to maintain productivity. One of the means to save time is the use of templates for creating or editing videos. Slow-motion videos require the manipulation of speed or framerate to produce results. Slow-motion CapCut templates prove to be a valuable source.
In this article, readers will learn about slow-mo CapCut templates for crafting slow-motion videos. For those unfamiliar with CapCut, a brief overview of its functions will be provided. In addition, we’ll introduce some remarkable slow-mo CapCut templates. Moreover, you can learn about an extraordinary alternative for fashioning amazing slow-motion videos.
Slow Motion Video Maker Slow your video’s speed with better control of your keyframes to create unique cinematic effects!
Make A Slow Motion Video Make A Slow Motion Video More Features

Part 1. CapCut Video Editor for Smartphone: Reading Out the Detailed Review
CapCut is a content editing platform that acts as a smartphone application and computing software. The application serves in various video editing tasks while giving professional outcomes. Most of CapCut’s features are free to use; however, there is an affordable subscription plan.
It has AI and manual functioning features to help you edit how you like. In its “Explore” section, you can find various effects, text styles, stickers, and audio tracks. Moreover, you can also introduce subtitles and captions with its “Caption” tool. Plus, it offers camera recording where you can adjust record time, effects, multi-clip options, and more. Here are some of CapCut’s limitless editing features:

- Templates: CapCut enables you to access its pre-built templates for distinct purposes. You can access it all from there, be it fast-motion, cinematic effect, or CapCut slow-mo template. Moreover, when you add the keyword for search, it can show you trending templates and hashtags.
- Remove Background: If you couldn’t decide on a good background while recording, CapCut has got you covered. This feature not only removes the background but also offers a setting for bringing precision. You can adjust the edge setting or intensity of these settings accordingly.
- Smart User-Interface: This application has an intuitive, clean, and smart smartphone interface. The themes and the positioning of features are done minimally, where nothing looks stuffed. In addition, you can expand or collapse the display menu accordingly.
- Image Enhancement: As discussed before, CapCut is a content editing app that offers image enhancements as well. The feature automatically compresses your content quality to 1080p. Moreover, you can resize the image post-enhancement and add an AI background to it.
- Cloud Storage and Collaboration: You can edit without any prior account information in CapCut. However, signing up comes with various benefits, such as accessing pre-edited projects. In addition, you can connect with other editors on CapCut and take your editing up a notch.
Part 2. Some Top-Rated CapCut Templates to Try for Creating Perfect Slow-Motion Videos
With a wide range of features and effects, CapCut also has the power to turn videos into slow-mos. You can craft a slow-motion video via manual speed change or be smart with its templates. CapCut slow-motion templates are easily accessible in its Template section. While there are hundreds of slow-mo templates CapCut, take a look at these that we’ve compiled for you:
1. Slowmo
This template is reachable via the CapCut slow-mo edit template gallery and is open for access. The template possesses an aspect ratio of 9:16 and is a suitable fit for your Instagram reels and YouTube shorts. It only requires a video of 16 seconds to get started with this trending template. The template slows down your video at specific durations, giving it a majestic resonance.

2. Slowmotion Smooth
With a catchy song and visually striking filter, this is perfect for aesthetic dress-up videos. This CapCut video slow motion template applies to a single clip of 14 seconds duration. With its 9:16 aspect ratio, it is well-fitted for a majority of social platforms. The template has over 316.3K uses, and you can replace its background song using CapCut.

3. Trend Slowmo
Use this trending slow-motion song CapCut template with over 1.1 million uses to make viral slo-mos. It doesn’t offer a basic Slomo effect but has a trendy background song. In addition, the template is a collaboration between slow motion and blur effect. Users only require a video to employ this effect, offering a 9:16 aspect ratio.

4. Slowmo Aesthetic
Make your modeling and dress-up video look aesthetic with this slow-mo CapCut template. It is a beautiful blend of slow-motion effects on specific scenes with an aesthetic filter. The video will start with a black-and-white look with a smooth transition toward colors and slo-mo. With its 9:16 aspect ratio and 6-second duration, it is perfect for showcasing dresses and fashion.

5. Healing Slowmo
Craft aesthetic travel videos and capture landscapes using this CapCut slow-mo template. It appears as a combination of slow motion and blur effect at multiple periods. You only require a portrait clip to use this template in an efficient way. You can fashion captivating Instagram, Facebook, and Pinterest reels with its 9:16 ratio.

Part 3. How to Create Proper Slow-Motion Videos on CapCut Video Editor?
CapCut slow-mo edit not only slows down video but also helps in post-editing. The user interface is self-explanatory, and you can find the features with ease. However, this section will provide you with a detailed guide on using the template CapCut slow-mo. Here is a step-by-step guide to creating a slo-mo in CapCut via its templates collection:
Step 1. After downloading CapCut on your smartphone, launch it to access its main menu. From there, navigate towards the downward bar and click the “Templates” option.

Step 2. In the templates collection, go to the search bar and type slow motion. Multiple options will appear on the screen in the Trending section. From there, select a template to employ it. Once you have selected the template, observe if it is right for your video. Afterward, click the “Use template” button to start editing with it.

Step 3. Once you have selected a video, click the “Preview” button. Notice that you can only select the number of videos the template offers.

Step 4. Afterward, click on the “Text” option and add text if you want. After all the editing is done, click on the “Export” button to download the video.

Part 4. Smartphone Alternative: Creating Slow Motion Videos with Wondershare Filmora App
Wondershare Filmora is a versatile platform for creating or editing slow motions with smartphone services. You can access the application from the Play Store or App Store and start editing instantly. The Filmora app displays a clearly laid out interface with easy access to features. Here, you can use advanced and basic speed editing to create a slow motion:

Method 1. Using the Normal Speed Option
The normal method in this CapCut slow-mo edit alternative uses playback speed. It involves a simple slider positioning and some enhancement options. Here is how to create a slow motion in the Filmora app using the standard approach:
Step 1. After downloading the Filmora application, navigate towards the top tools. From there, select the “Speed” option and choose a clip for import.

Step 2. Select the “Normal” section and drag the playback towards the left. This will slow down the video, and you can set the speed up to 0.2x for slo-mo. After speed settings, click the “ü” icon, and if you want, do other settings.

Step 3. Once you are done with post-slow motion settings, click the “Export” button.

Method 2. Using the Speed Curve Option
This method involves slightly advanced speed settings for slow-motion creation. This method features many templates alternative to CapCut slow-mo templates. Further, you can use the custom setting template to edit as per your taste. Here is how to create a slow motion using Filmora’s speed curve:
Step 1. Repeat the same process of importing the video and go to the “Curve” section. Select a pre-designed speed template if it fits your video. If not, go for the “Customize” template, and a panel will display.

Step 2. In this panel, adjust the slider position in the downward direction. This will slow down your video at specific durations. You can also enable the “+ Add beat” option for audio adjustments.

Step 3. Click the “ü” icon a couple of times in the respective panels to finalize settings. Afterward, export the video by opting for the “Export” button.

Bonus Part. Make Your Video Editing Perfect with Wondershare Filmora
For beginners, smartphone editing might be satisfactory. However, for a skilled professional with a passion for editing, it’s not enough. For more precise editing and smooth slow motions, we recommend a desktop solution. This CapCut slow-motion edit alternative is Wondershare Filmora’s computing software.
It is an adaptable editing software offering basic as well as advanced video editing features. The features rest on its intuitive interface and are reachable to all. It has a resource library that is filled with transition templates, effects, presets, and more. It has both visual and audio editing options along with AI abilities for production purposes. All in all, the software is an amazing pick for those who prefer high-quality results.
Free Download For Win 7 or later(64-bit)
Free Download For macOS 10.14 or later
AI-Backed Professional Video Editing Features of Filmora
If you are looking to create high-grade slow motions using speed templates, Filmora is for you. There are multiple settings to enhance visuals, audio tracks, and texts. You can do amazing color corrections or add mesmerizing effects to videos. Here are some of its video editing features to consider during editing:
1. AI Copilot Editing
For instance, you are using Filmora for slow motion and don’t know where to start. Employ its copilot assistant and ask it about slo-mo creation. It will direct you towards the speed options with insights on editing. Moreover, the copilot provides one-click access buttons for you to access the feature.
2. AI Text-to-Video
If you are a big fan of AI applications, then Filmora is the right stop for you. Its text-to-video AI allows you to generate videos via prompts or scripts. The function automatically adds graphics and AI voice to videos.
3. Remove Background
The video background remover of Filmora uses high-end AI technology to do the work. It analyzes and cuts out the background with accuracy while providing replacements. You employ three background options: solid color, gradients, and graphics. Users can also add a custom image or video in the timeline to use a background.
4. Instant Mode
If you are not familiar with video and need to start editing videos, this feature is for you. It is an automated video editor for you that uses AI algorithms to edit videos. It color-corrects or enhances any flaws and adds templates and beats to the video. Moreover, it has 115+ multi-contextual templates for diverse video editing.
Conclusion
Slow-motion CapCut templates serve as a powerful resource for creating slo-mos. The con is that with automated templates, there is no room for customizations. However, Wondershare Filmora is a powerful software application with no such limit. It offers visual, audio, and more custom options after some creation. Hence, if you are looking for an editor to broaden your editing game, use Filmora.
Make A Slow Motion Video Make A Slow Motion Video More Features
Part 1. CapCut Video Editor for Smartphone: Reading Out the Detailed Review
CapCut is a content editing platform that acts as a smartphone application and computing software. The application serves in various video editing tasks while giving professional outcomes. Most of CapCut’s features are free to use; however, there is an affordable subscription plan.
It has AI and manual functioning features to help you edit how you like. In its “Explore” section, you can find various effects, text styles, stickers, and audio tracks. Moreover, you can also introduce subtitles and captions with its “Caption” tool. Plus, it offers camera recording where you can adjust record time, effects, multi-clip options, and more. Here are some of CapCut’s limitless editing features:
- Templates: CapCut enables you to access its pre-built templates for distinct purposes. You can access it all from there, be it fast-motion, cinematic effect, or CapCut slow-mo template. Moreover, when you add the keyword for search, it can show you trending templates and hashtags.
- Remove Background: If you couldn’t decide on a good background while recording, CapCut has got you covered. This feature not only removes the background but also offers a setting for bringing precision. You can adjust the edge setting or intensity of these settings accordingly.
- Smart User-Interface: This application has an intuitive, clean, and smart smartphone interface. The themes and the positioning of features are done minimally, where nothing looks stuffed. In addition, you can expand or collapse the display menu accordingly.
- Image Enhancement: As discussed before, CapCut is a content editing app that offers image enhancements as well. The feature automatically compresses your content quality to 1080p. Moreover, you can resize the image post-enhancement and add an AI background to it.
- Cloud Storage and Collaboration: You can edit without any prior account information in CapCut. However, signing up comes with various benefits, such as accessing pre-edited projects. In addition, you can connect with other editors on CapCut and take your editing up a notch.
Part 2. Some Top-Rated CapCut Templates to Try for Creating Perfect Slow-Motion Videos
With a wide range of features and effects, CapCut also has the power to turn videos into slow-mos. You can craft a slow-motion video via manual speed change or be smart with its templates. CapCut slow-motion templates are easily accessible in its Template section. While there are hundreds of slow-mo templates CapCut, take a look at these that we’ve compiled for you:
1. Slowmo
This template is reachable via the CapCut slow-mo edit template gallery and is open for access. The template possesses an aspect ratio of 9:16 and is a suitable fit for your Instagram reels and YouTube shorts. It only requires a video of 16 seconds to get started with this trending template. The template slows down your video at specific durations, giving it a majestic resonance.
2. Slowmotion Smooth
With a catchy song and visually striking filter, this is perfect for aesthetic dress-up videos. This CapCut video slow motion template applies to a single clip of 14 seconds duration. With its 9:16 aspect ratio, it is well-fitted for a majority of social platforms. The template has over 316.3K uses, and you can replace its background song using CapCut.
3. Trend Slowmo
Use this trending slow-motion song CapCut template with over 1.1 million uses to make viral slo-mos. It doesn’t offer a basic Slomo effect but has a trendy background song. In addition, the template is a collaboration between slow motion and blur effect. Users only require a video to employ this effect, offering a 9:16 aspect ratio.
4. Slowmo Aesthetic
Make your modeling and dress-up video look aesthetic with this slow-mo CapCut template. It is a beautiful blend of slow-motion effects on specific scenes with an aesthetic filter. The video will start with a black-and-white look with a smooth transition toward colors and slo-mo. With its 9:16 aspect ratio and 6-second duration, it is perfect for showcasing dresses and fashion.
5. Healing Slowmo
Craft aesthetic travel videos and capture landscapes using this CapCut slow-mo template. It appears as a combination of slow motion and blur effect at multiple periods. You only require a portrait clip to use this template in an efficient way. You can fashion captivating Instagram, Facebook, and Pinterest reels with its 9:16 ratio.
Part 3. How to Create Proper Slow-Motion Videos on CapCut Video Editor?
CapCut slow-mo edit not only slows down video but also helps in post-editing. The user interface is self-explanatory, and you can find the features with ease. However, this section will provide you with a detailed guide on using the template CapCut slow-mo. Here is a step-by-step guide to creating a slo-mo in CapCut via its templates collection:
Step 1. After downloading CapCut on your smartphone, launch it to access its main menu. From there, navigate towards the downward bar and click the “Templates” option.
Step 2. In the templates collection, go to the search bar and type slow motion. Multiple options will appear on the screen in the Trending section. From there, select a template to employ it. Once you have selected the template, observe if it is right for your video. Afterward, click the “Use template” button to start editing with it.
Step 3. Once you have selected a video, click the “Preview” button. Notice that you can only select the number of videos the template offers.
Step 4. Afterward, click on the “Text” option and add text if you want. After all the editing is done, click on the “Export” button to download the video.
Part 4. Smartphone Alternative: Creating Slow Motion Videos with Wondershare Filmora App
Wondershare Filmora is a versatile platform for creating or editing slow motions with smartphone services. You can access the application from the Play Store or App Store and start editing instantly. The Filmora app displays a clearly laid out interface with easy access to features. Here, you can use advanced and basic speed editing to create a slow motion:
Method 1. Using the Normal Speed Option
The normal method in this CapCut slow-mo edit alternative uses playback speed. It involves a simple slider positioning and some enhancement options. Here is how to create a slow motion in the Filmora app using the standard approach:
Step 1. After downloading the Filmora application, navigate towards the top tools. From there, select the “Speed” option and choose a clip for import.
Step 2. Select the “Normal” section and drag the playback towards the left. This will slow down the video, and you can set the speed up to 0.2x for slo-mo. After speed settings, click the “ü” icon, and if you want, do other settings.
Step 3. Once you are done with post-slow motion settings, click the “Export” button.
Method 2. Using the Speed Curve Option
This method involves slightly advanced speed settings for slow-motion creation. This method features many templates alternative to CapCut slow-mo templates. Further, you can use the custom setting template to edit as per your taste. Here is how to create a slow motion using Filmora’s speed curve:
Step 1. Repeat the same process of importing the video and go to the “Curve” section. Select a pre-designed speed template if it fits your video. If not, go for the “Customize” template, and a panel will display.
Step 2. In this panel, adjust the slider position in the downward direction. This will slow down your video at specific durations. You can also enable the “+ Add beat” option for audio adjustments.
Step 3. Click the “ü” icon a couple of times in the respective panels to finalize settings. Afterward, export the video by opting for the “Export” button.
Bonus Part. Make Your Video Editing Perfect with Wondershare Filmora
For beginners, smartphone editing might be satisfactory. However, for a skilled professional with a passion for editing, it’s not enough. For more precise editing and smooth slow motions, we recommend a desktop solution. This CapCut slow-motion edit alternative is Wondershare Filmora’s computing software.
It is an adaptable editing software offering basic as well as advanced video editing features. The features rest on its intuitive interface and are reachable to all. It has a resource library that is filled with transition templates, effects, presets, and more. It has both visual and audio editing options along with AI abilities for production purposes. All in all, the software is an amazing pick for those who prefer high-quality results.
Free Download For Win 7 or later(64-bit)
Free Download For macOS 10.14 or later
AI-Backed Professional Video Editing Features of Filmora
If you are looking to create high-grade slow motions using speed templates, Filmora is for you. There are multiple settings to enhance visuals, audio tracks, and texts. You can do amazing color corrections or add mesmerizing effects to videos. Here are some of its video editing features to consider during editing:
1. AI Copilot Editing
For instance, you are using Filmora for slow motion and don’t know where to start. Employ its copilot assistant and ask it about slo-mo creation. It will direct you towards the speed options with insights on editing. Moreover, the copilot provides one-click access buttons for you to access the feature.
2. AI Text-to-Video
If you are a big fan of AI applications, then Filmora is the right stop for you. Its text-to-video AI allows you to generate videos via prompts or scripts. The function automatically adds graphics and AI voice to videos.
3. Remove Background
The video background remover of Filmora uses high-end AI technology to do the work. It analyzes and cuts out the background with accuracy while providing replacements. You employ three background options: solid color, gradients, and graphics. Users can also add a custom image or video in the timeline to use a background.
4. Instant Mode
If you are not familiar with video and need to start editing videos, this feature is for you. It is an automated video editor for you that uses AI algorithms to edit videos. It color-corrects or enhances any flaws and adds templates and beats to the video. Moreover, it has 115+ multi-contextual templates for diverse video editing.
Conclusion
Slow-motion CapCut templates serve as a powerful resource for creating slo-mos. The con is that with automated templates, there is no room for customizations. However, Wondershare Filmora is a powerful software application with no such limit. It offers visual, audio, and more custom options after some creation. Hence, if you are looking for an editor to broaden your editing game, use Filmora.
Also read:
- 2024 Approved Things About Transparent PNG Remove and Convert
- Updated 3GP Video Format What Is 3GP Format And How To Open It for 2024
- How to Edit Text in Premiere Pro for 2024
- Making Slow Motion Videos in Premiere Pro A Review on The Best Method for 2024
- New In 2024, AI Features of Wondershare Filmora - Silence Detection in Videos
- Updated In 2024, 8 Best Free Photo Collage with Music Video Maker
- Updated Guide Add LUTs in Premiere Pro with Ease for 2024
- New Boost the Pace of Your Instagram Reels Videos with These Simple Tricks for 2024
- Want to Add the Radial Blur Image Effect to Your Photos to Make Them Stand Out? Read on to Find the 11 Best Tools for Creating Stunning Image Editing Projects
- The Right Ways to Slow Down a Video on iPhone for 2024
- 2024 Approved Creating Flawless Slow-Motion Videos Is Every Content Creators Dream. Learn About DaVinci Resolve Slow-Motion Video Creation, Amongst Other Tools
- Updated How to Zoom Desktop Screen
- In 2024, Turn Your Text Into a Podcast Made Possible (+ EASY Editing Tips)
- New Do You Want to Know About the Best Filmic Pro LUTs for Video Editing? This Article Provides Details on the Best Recommendations
- Updated In 2024, IMovie Review – Is It The Best Video Editor for Mac Users?
- A Guide to Color Grade Your Picture in LightRoom for 2024
- Updated How to Create a Slideshow on iPhone
- The Complete Guide to GIF for Discord Profile
- Updated Learn How to Create Custom Titles in Filmora and Add a Unique Lower Third Animation Effect in Six Simple Steps
- Are You an Apple User Interested in Adding a Slow-Mo to Their Videos? This Article Features an Exceptional Procedure for Creating Slow-Mo in iMovie for 2024
- 2024 Approved Lets Introduce the Top 5 Applications to Add a Song to a Video for Free with some Amazing Sound and Visual Effects
- Why Vimeo Slideshow Maker Become More and More Popular for 2024
- New How D AI Video Games Act More Human Than Human, In 2024
- 2024 Approved Do You Want to Learn How to Use Premiere Pro Distortion Effects in Your Videos? We Have Provided a List of Distortion Premiere Pro Effects and How to Use Them
- In 2024, Top 5 Video Filter Software Enhance Your Videos
- 2024 Approved Easy Steps to Slow Down a Video on iPhone and Android
- How to Make Discord GIF Avatar in Depth Guide for 2024
- New Finding The Best LUTs for Wondershare Filmora
- Updated This Article Discusses What Is Vegas Pro, How to Download, Install and Use It, and Its Key Features. It Further Discusses Its Alternative for Editing Your Videos and More. Check Out Now
- New Fixes | What If YouTube Zoom to Fill Not Working, In 2024
- New 2024 Approved 7 Tips to Create Teaching Videos
- In 2024, New Multiple Ways How To Remove iCloud Activation Lock On your iPhone 12 Pro Max
- Complete Tutorial for Oppo Reno 10 Pro 5G Hard Reset | Dr.fone
- Top 10 Fingerprint Lock Apps to Lock Your Vivo S18 Pro Phone
- Guide How To Unbrick a Bricked Oppo A38 Phone | Dr.fone
- In 2024, For People Wanting to Mock GPS on Poco X5 Pro Devices | Dr.fone
- How to Fake GPS on Android without Mock Location For your Vivo S17e | Dr.fone
- Complete Fixes To Solve Apple iPhone 7 Randomly Asking for Apple ID Password
- Unlock Apple iPhone 12 Without Passcode Easily
- Your Complete Guide To Reset Samsung Galaxy A24 | Dr.fone
- In 2024, Top 10 Samsung Galaxy A23 5G Android SIM Unlock APK
- 2024 Approved How to Stream on Twitch The Ultimate Guide
- How To Bypass Activation Lock On Apple Watch Or Apple iPhone 7?
- Oppo A56s 5G Not Receiving Texts? 10 Hassle-Free Solutions Here | Dr.fone
- All Things You Need to Know about Wipe Data/Factory Reset For Vivo Y78 5G | Dr.fone
- OnePlus Nord N30 5G Camera Not Working Unexpected Error? Fix It Now | Dr.fone
- Hard Resetting an Oppo K11x Device Made Easy | Dr.fone
- Top 10 AirPlay Apps in Lava Yuva 3 for Streaming | Dr.fone
- Title: New Create Glitch Text Effect
- Author: Chloe
- Created at : 2024-05-20 03:37:54
- Updated at : 2024-05-21 03:37:54
- Link: https://ai-editing-video.techidaily.com/new-create-glitch-text-effect/
- License: This work is licensed under CC BY-NC-SA 4.0.
