
New Create Glitch Text Effect for 2024
Create Glitch Text Effect
Glitch text effect is a trending video effect whereby the texts get distorted for a few seconds. The effect is comparable to the glitch you face when your screen starts to malfunction, and the screen appears to be wavy and disoriented. A glitch text effect is better than a regular animated text effect as it helps to get the attention of the viewers immediately and get the message across clearly.
The glitch effect can be applied to the entire video as well as the text as per your preference. There are several video editors available where the glitch text effect comes pre-loaded. All you need to do is to apply it to the text and get it done in a few steps. We will illustrate how to add glitch text effect Premiere Pro. But we recommend Filmora for the best glitter text effect that you can add to your video instantly.
Part 1. Create Glitch Text in Video with Filmora
We have already stated that Wondershare Filmora is the best video editor for the best glitch text effect download and apply to your video in simple steps. Filmora is a premium video editor that is widely used by amateur and professional video editors. You can get all glitch text effect After Effects and add them to your video conveniently in comparison to After Effects.
As a matter of fact, there are literally unlimited video and text effects available, and you can find different types of glitch text effects to apply to your titles and texts. Filmora is available for both Windows and mac users. Here are the steps to create glitch text in video with Filmora.
Free Download For Win 7 or later(64-bit)
Free Download For macOS 10.14 or later
Step1 Download and install Filmora on your computer. Go to File> New Project from the menu bar to start video editing project.

Step2 Go to File> Import Media > Import Media Files to import the video clips where you want to add glitch text effect. Drop the clip into the Timeline to get started.

Step3 Go to Titles tab located at the top. From the left panel, click on Titles option. Search “glitch” in the search field and you will see all the glitch text effects that you can apply to the text in your video.
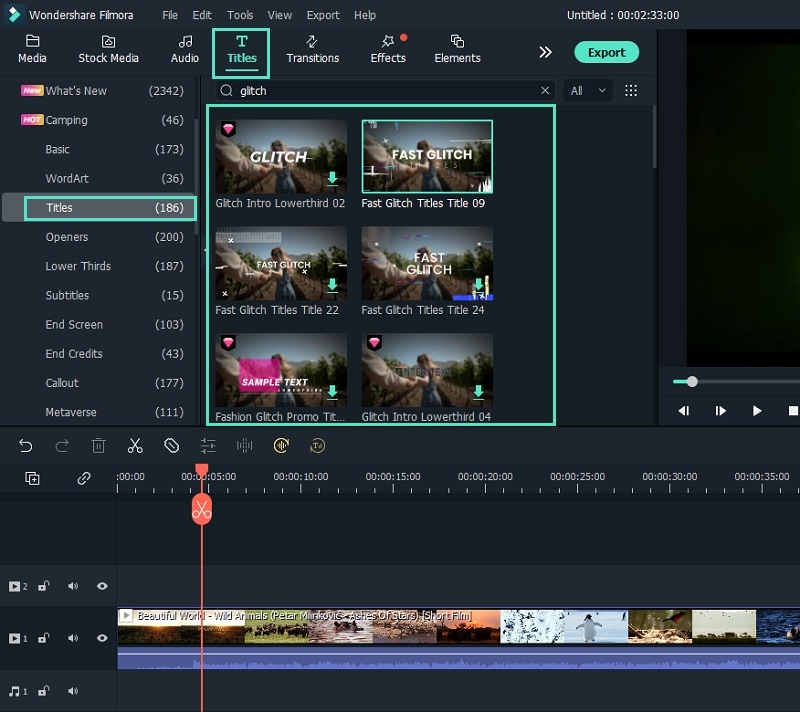
Step4 Select any glitch text effect and drop it into the Timeline above the video clip exactly where you want the text and the effect to appear.
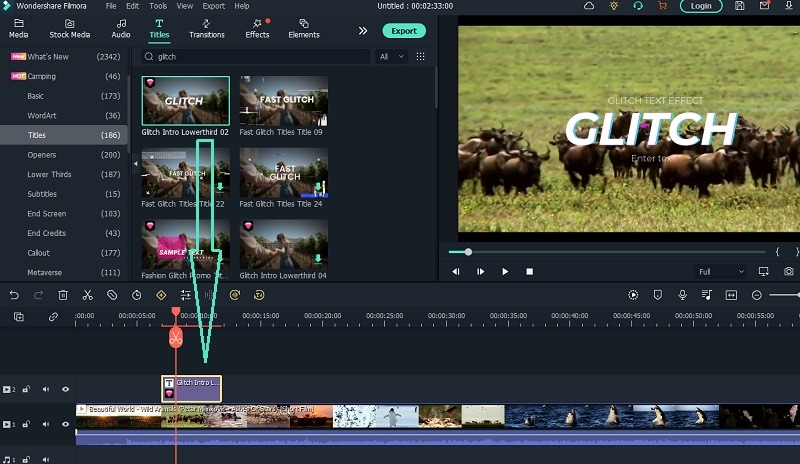
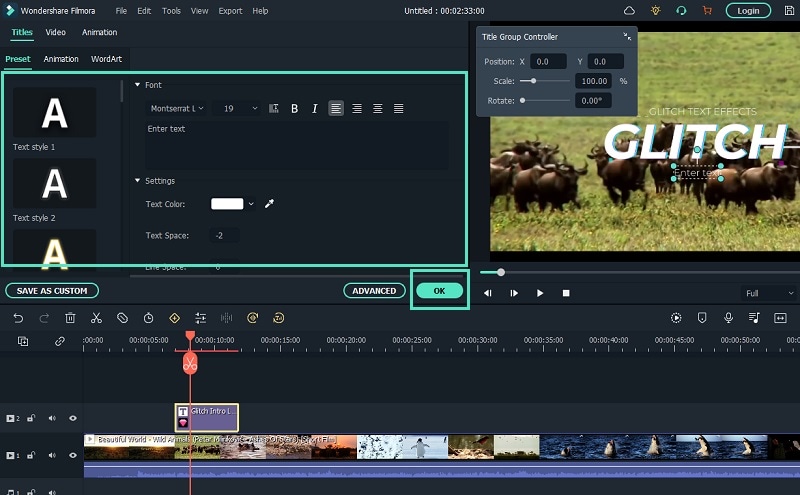
Step5 Double-click on the glitch text effect located on Timeline and edit the text, style, and other parameters as per your preference. Click on Ok and play the video to see your edited video with the glitch text effect.
Part 2. How to Make Glitch Text Effect with Premiere Pro
Adobe Premiere Pro is another renowned video editor where you can add glitch text effect to your video. Premiere Pro is strictly for professional video editors as the user interface is not as intuitive as Filmora . The learning curve is steep, and therefore, you need to go through the steps to add glitch text effect Premiere Pro. There are several glitch text effect presets available that you can apply to any text on your video to make them engaging. Here are the steps to make glitch text effect with Premiere Pro.
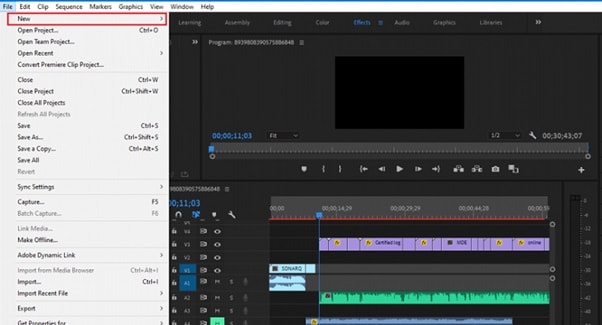
Step1 Launch Adobe Premiere Pro and go to New> Project to get started. Import your video and drop it into Timeline.
Step2 Use the Type tool to write any text on your video to add glitch text effect. You should have a text layer on Timeline.
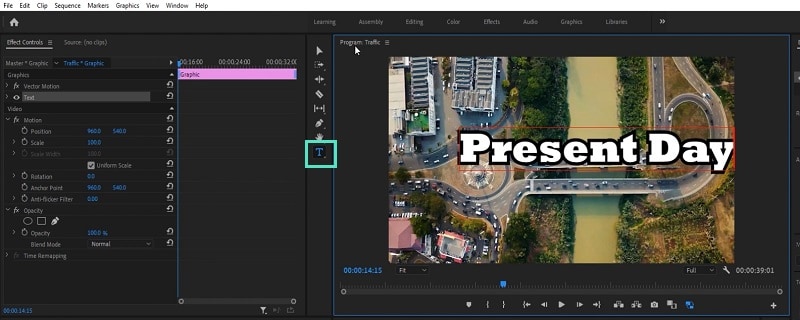
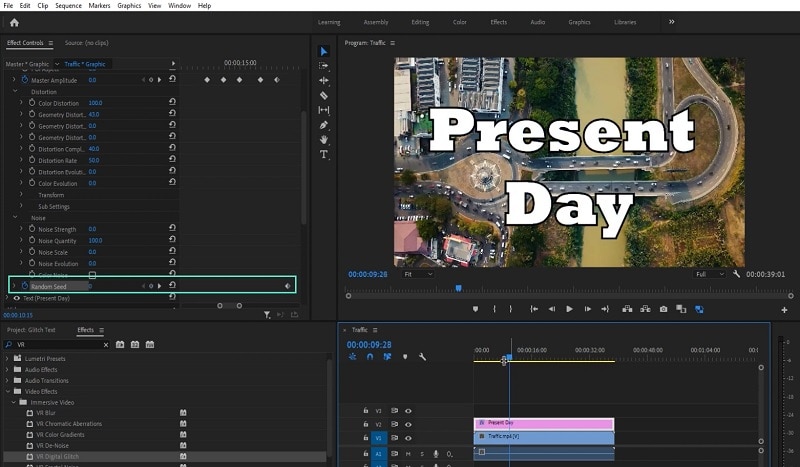
Step3 Go to Effects> Immersive Video> VR Digital Glitch option. Drag and drop the effect to text layer.
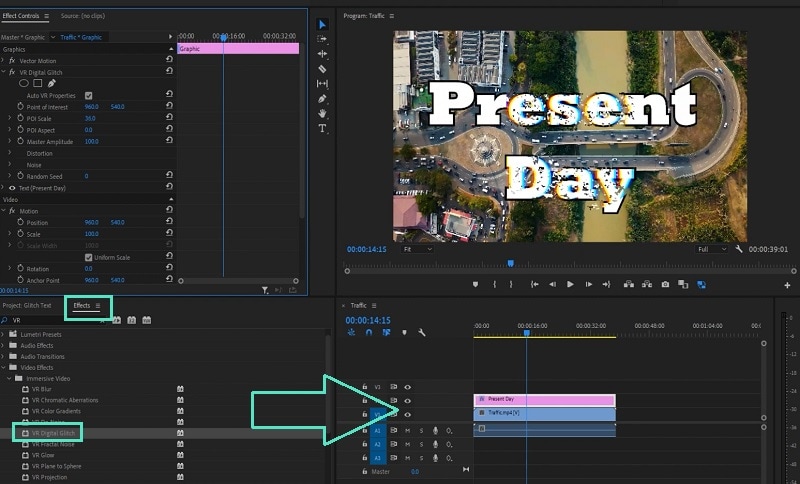
Step4 Under Effect Controls tab, you will find all the different parameters that you can adjust to get the glitch text effect perfectly.
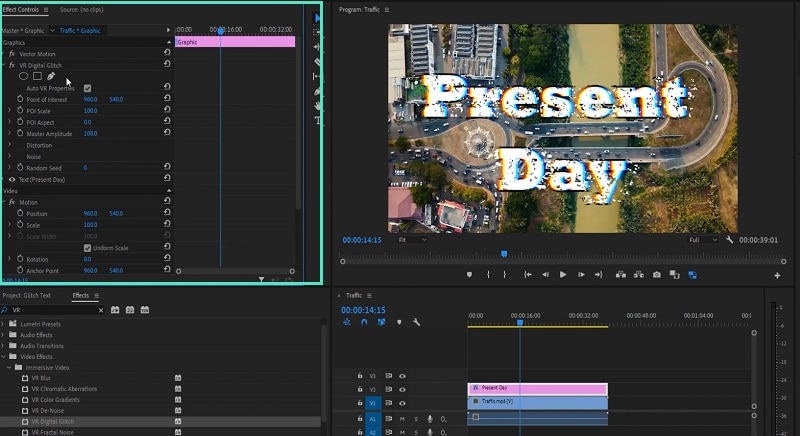
Step5 Turn on Master Amplitude and add multiple keyframes as different points in the Timeline and change the distortion value to make the effect prominent.
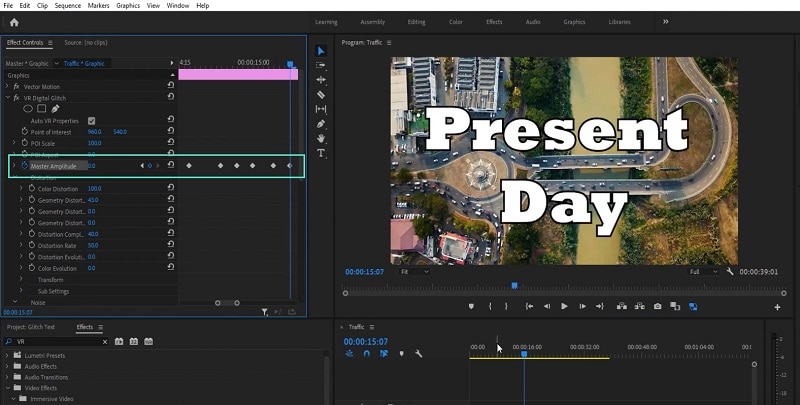
Step6 Go to the first keyframe and turn on Random Seed effect. Go to the last keyframe and turn on Random Seed effect and change the value to 75. Play the video to check the entire video with glitch text effect.
Part 3. Use VSDC Video Editor to Create Glitch Text
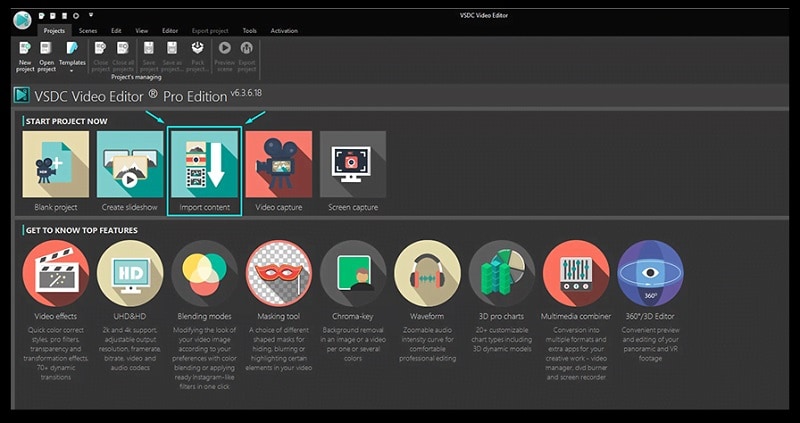
If you do not have any premium video editor on your computer and you do not want to purchase any premium video editor, you can still get glitter text effect free. You need to download and install VSDC free video editor on your computer. But the steps to create glitch text on VSDC video editor are slightly complicated as the user interface is not as intuitive as Filmora . Here are the steps to add free glitch text effect on your video.
Step1 Download and install VSDC video editor. Launch the editor and click on New Project to get started. Import your video to your project where you want to add glitch text effect.
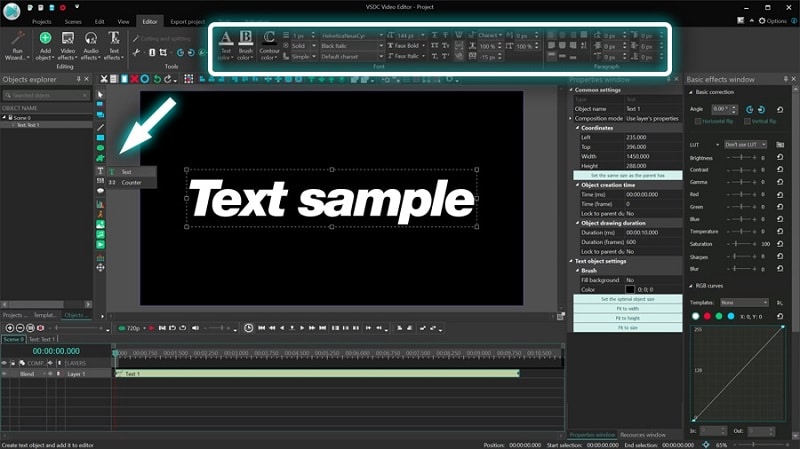
Step2 Use Type tool to write a text on the video. You can press Shift+T shortcut as well. After typing the text, adjust the text style as per your preference.
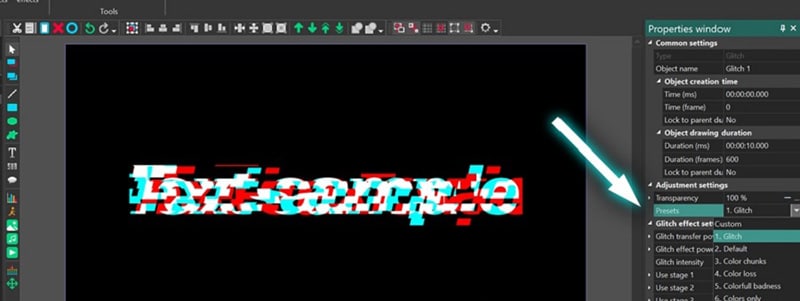
Step3 Double-click on the text layer on Timeline and go to Video Effects> Special FX and click on Glitch option.
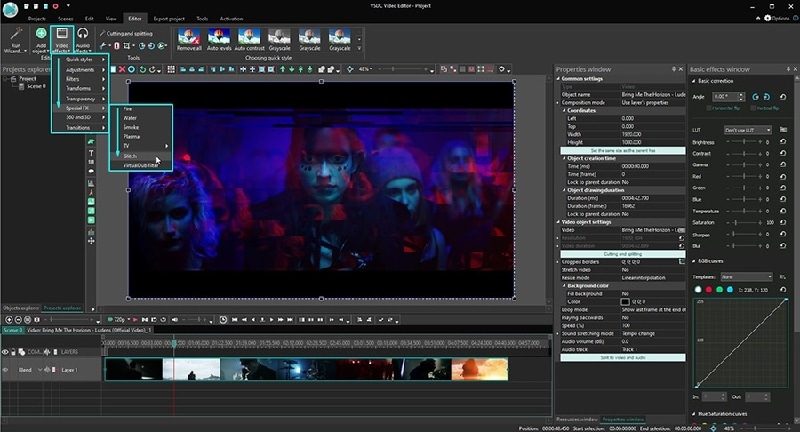
Step4 A window will appear where you can set the starting point, duration, and different parameters. Click on Ok button.
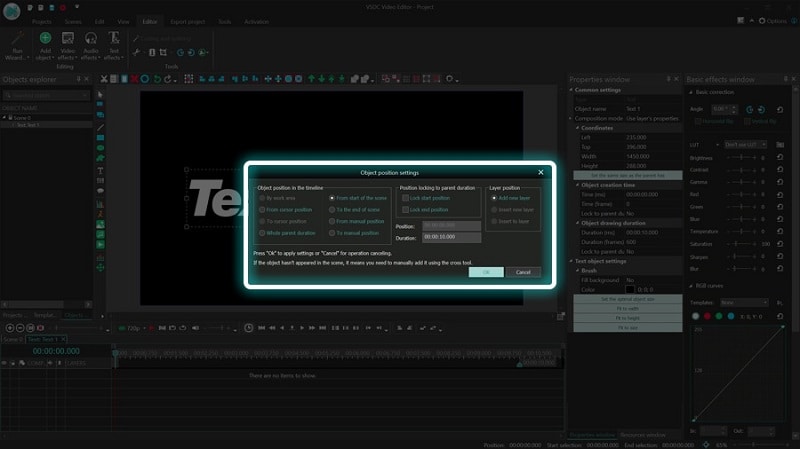
Step5 Go to Properties Windows and click on Presets to select different types of glitch text effects. You can also adjust the intensity of the text effects and other parameters as you feel.
Part 4. Related FAQs about Glitch Text
1. How do you animate glitch text?
If you want to animate glitch text for free, VSDC video editor is ideal as you can customize the effect on any text in simple steps. If you want to use a premium video editor, we recommend Filmora as there are various glitch text effects available to apply to any text on your video instantly.
2. How do you glitch text on video?
First, you have to import your video in your video editor. Type the desired text and set the style. Thereafter, go to glitch text effect presets available on the video editor and apply it to the text instantly. You can customize the glitch text effect as per your preference to make the animation more prominent.
3. How do you glitch text on Android?
You should first install Glitch Video Effect: Glitch FX app from Play Store. Edit your video on the app to add any text, and thereafter, add glitch text effect instantly. In fact, the glitch text effect is available in almost all popular video editor apps on Android due to the effect being trendy and viral.
Free Download For macOS 10.14 or later
Step1 Download and install Filmora on your computer. Go to File> New Project from the menu bar to start video editing project.
Step2 Go to File> Import Media > Import Media Files to import the video clips where you want to add glitch text effect. Drop the clip into the Timeline to get started.
Step3 Go to Titles tab located at the top. From the left panel, click on Titles option. Search “glitch” in the search field and you will see all the glitch text effects that you can apply to the text in your video.
Step4 Select any glitch text effect and drop it into the Timeline above the video clip exactly where you want the text and the effect to appear.
Step5 Double-click on the glitch text effect located on Timeline and edit the text, style, and other parameters as per your preference. Click on Ok and play the video to see your edited video with the glitch text effect.
Part 2. How to Make Glitch Text Effect with Premiere Pro
Adobe Premiere Pro is another renowned video editor where you can add glitch text effect to your video. Premiere Pro is strictly for professional video editors as the user interface is not as intuitive as Filmora . The learning curve is steep, and therefore, you need to go through the steps to add glitch text effect Premiere Pro. There are several glitch text effect presets available that you can apply to any text on your video to make them engaging. Here are the steps to make glitch text effect with Premiere Pro.
Step1 Launch Adobe Premiere Pro and go to New> Project to get started. Import your video and drop it into Timeline.
Step2 Use the Type tool to write any text on your video to add glitch text effect. You should have a text layer on Timeline.
Step3 Go to Effects> Immersive Video> VR Digital Glitch option. Drag and drop the effect to text layer.
Step4 Under Effect Controls tab, you will find all the different parameters that you can adjust to get the glitch text effect perfectly.
Step5 Turn on Master Amplitude and add multiple keyframes as different points in the Timeline and change the distortion value to make the effect prominent.
Step6 Go to the first keyframe and turn on Random Seed effect. Go to the last keyframe and turn on Random Seed effect and change the value to 75. Play the video to check the entire video with glitch text effect.
Part 3. Use VSDC Video Editor to Create Glitch Text
If you do not have any premium video editor on your computer and you do not want to purchase any premium video editor, you can still get glitter text effect free. You need to download and install VSDC free video editor on your computer. But the steps to create glitch text on VSDC video editor are slightly complicated as the user interface is not as intuitive as Filmora . Here are the steps to add free glitch text effect on your video.
Step1 Download and install VSDC video editor. Launch the editor and click on New Project to get started. Import your video to your project where you want to add glitch text effect.
Step2 Use Type tool to write a text on the video. You can press Shift+T shortcut as well. After typing the text, adjust the text style as per your preference.
Step3 Double-click on the text layer on Timeline and go to Video Effects> Special FX and click on Glitch option.
Step4 A window will appear where you can set the starting point, duration, and different parameters. Click on Ok button.
Step5 Go to Properties Windows and click on Presets to select different types of glitch text effects. You can also adjust the intensity of the text effects and other parameters as you feel.
Part 4. Related FAQs about Glitch Text
1. How do you animate glitch text?
If you want to animate glitch text for free, VSDC video editor is ideal as you can customize the effect on any text in simple steps. If you want to use a premium video editor, we recommend Filmora as there are various glitch text effects available to apply to any text on your video instantly.
2. How do you glitch text on video?
First, you have to import your video in your video editor. Type the desired text and set the style. Thereafter, go to glitch text effect presets available on the video editor and apply it to the text instantly. You can customize the glitch text effect as per your preference to make the animation more prominent.
3. How do you glitch text on Android?
You should first install Glitch Video Effect: Glitch FX app from Play Store. Edit your video on the app to add any text, and thereafter, add glitch text effect instantly. In fact, the glitch text effect is available in almost all popular video editor apps on Android due to the effect being trendy and viral.
Google Meet Green Screen Is the Latest Addition to the Virtual Meeting App. It Is a Crucial Feature as It Allows Users to Maintain a Semblance of Privacy Through Virtual Backgrounds
Google meet green screen is the latest addition to the virtual meeting app. It is a crucial feature as it allows users to maintain a semblance of privacy through virtual backgrounds. This video communication app has been a popular choice for classrooms and workplaces since the COVID 19 pandemic of 2019. Since then, Google meet has seen an increase of 3 million users per day since 2020.
The green screen for Google meet has come in handy for its millions of active users across the globe. It is an important feature that safeguards the privacy of its user in the cyber world. Google meet green screen allows you to alter the meeting’s background in real-time, similar to how movies employ the famous green curtain behind the performers during filming. You can use this feature to immediately insert a backdrop image of your choice by activating the green screen provided in the browser extension Visual Effects for Google Meet.
Uses of Google Meet Green Screen
The Google Meet Green Screen feature keeps things interesting in corporate meetings. It also allows users to hide their backgrounds which can often be a source of discomfort or vulnerability. The green screen for Google Meet is a handy feature as you can now attend meetings without worrying about the background.
Virtual Green Screens, Blur, Pixelate, Inverse, Contrast and More! This extension allows you to apply effects like Blur, Pixelate and Inverse to your camera live during Google Meets. And you can use the Virtual Green Screen feature to mask whatever you would not fancy appearing in your videos’ background.
Green screen from Google helps you limit distractions or make video calls more fun, you can now blur or replace your background or replace it with an image, an immersive background, or a video. You can also apply styles to customize your video with various light, color filters and stylized backgrounds.
How to Use Green Screen on Google Meet
With Google Meet Green Screen, you can create a virtual background by either uploading photographs from their PC or using the extension’s stock photos. You can utilize an office background as a backdrop for business meetings. Teachers can add a classroom background to their online classes. Parties and vacation backgrounds from other nations might be used for informal encounters with friends.
For a get-together with friends, users might choose a Hawaii theme or an office wall for business chats. You can create and save as many background photos as you want with Google Meet Green Screen. In addition to all of this, it offers a picture-in-picture (floating window) function that users can enable if desired.
How to use green screen for Google Meet: A guide
You can select a virtual background before beginning a meeting or during an ongoing video conversation. However, this feature is only available on the desktop currently. You can follow the steps given below to use the Green Screen for Google Meet.
Prior to a video call
- Go to Google Meet and select a meeting.
- Change the background of your self-view by clicking Change Background in the bottom right corner.
- Click Blur your background to totally blur your background.
- Click Somewhat blur your background to blur your background slightly.
- Click background to select a previously downloaded backdrop.
- Click Add to add your own image as a background.
- Click on Join Now.
During a video conference
- Click More at the bottom of the page.
- Select Change Background from the drop-down menu.
- Click Blur your background to totally blur your background.
- Click Somewhat blur your background to blur your background slightly.
- Click a background to select a previously downloaded backdrop.
- Click Add to add your own image as a background.
Extra Tips
How to Add Green Screen to Meeting Video
Prior to a video call
- Go to Google Meet and select a meeting.
- Change the background of your self-view by clicking Change Background in the bottom right corner. Click Blur your background to totally blur your background. …
- Click Add to add your own image as a background.
- Click on Join Now.
Filmora
If you’re just starting out with video editing, or just want a simple program that works, Wondershare Filmora might be what you’re looking for. It has the essential tools, and anyone can learn to use it easily.
Wondershare Filmora is the one of best video editing software with cool features that compares to other competing video editing Softwares. Many video editing programs claim to offer professional results; Filmora is one of a few consumer-level tools that actually delivers.
For Win 7 or later (64-bit)
For macOS 10.12 or later
Installation Steps
- Click the icon in the center of the Media Library to add files directly.
- Go File > Import Media > Import Media Files.
- Drag and drop to the Media Library directly.
While importing a media file, Wondershar Filmora may ask you if you wish to create a proxy file to accelerate the editing process. Select “Yes” to have a fast video editing experience.
You can also import video clips using your Touch Bar controls if your computer has Touch Bar.
Record a media file
Apart from the videos shot by your digital devices, you can also directly import media files by recording video from your webcam, capturing the computer screen, or recording a voice-over.
Record computer screen:
Click the “Record” option, and choose “Record PC Screen” to get the built-in Wondershare Screen Recorder. Hit the red button to get started. If you want to stop the recording, you can hit F9.
Record videos from webcam:
Also, click the “Record” option, and choose “Record from Webcam”. In the pop-up Video Recording window, click the red button to start recording and click it again to stop recording. Then click OK to save the recorded video file.
Record voice-over:
Choose “Record a voiceover” under the Record menu. It would be better to connect a microphone to your Mac for a better result. Hit the Record button, and it leaves you 3 seconds to get ready.
All the recorded media files will be saved into Media Library automatically and you can drag them to the Timeline for editing.
Conclusion
The zoom meeting green screen for Google background feature essentially allows users to display an image or a video in place of the actual background during video calls. The feature is especially helpful when you are video conferencing in a messy room. The feature is starting to gain popularity among users and is also available on WebEx for iOS. While Google Meet does not come with a built-in feature to blur or obscure the existing background while on camera, there are still ways you can do it. Luckily, there are a bunch of third-party tools that can build a virtual background for you without a green screen. One of the popular tools you can use is ChromaCam and can be configured in just a few minutes.
3D Ray Traced Settings In After Effects
3D Ray Traced is a hot topic in the world of graphic design and video editing that allows you to create three-dimensional images from scratch or add realistic effects to existing 2D footage.
In After Effects, it is a lightning technique for generating a photorealistic image by tracing the light’s path through a scene in three dimensions. Raytracing lets you have proper reflections, internal refraction, and transparency.
In this comprehensive guide, we’ll explore the basics of Ray Tracing and everything you need to know about 3D Ray Traced in After Effects.
Part 1. What Is Ray Tracing?
Ray Tracing is a powerful rendering technique that can create incredibly realistic lighting and shadows. By tracing the path of light, algorithms can simulate the way that light interacts with virtual objects in a computer-generated world.
This results in more lifelike shadows, reflections, and translucence. Ray Tracing has been responsible for the dramatic increase in realism we’ve seen in video games over the years, and its benefits are only becoming more apparent as technology improves.
In simple words, Ray Tracing is a computer graphics technique for generating realistic images and works by tracing the light’s path from the camera through the scene. This allows for accurate simulations of light interactions, such as reflection, refraction, and shadows.

Part 2. Overview Of Ray Tracing
In this part, we will explain what Ray Tracing is from the following sides and for your better understanding.
History
Albrecht Dürer first gave the idea of Ray Tracing in the 16th century through his invention, the Dürer’s door. However, it was not until 1968 that Arthur Appel used a computer for the first time to create a shaded picture through Ray Tracing.
First conceptualized in 1969, Ray Tracing is a common technique used to create computer-generated graphics for movies and TV shows today. This is because studios can use the processing power of multiple computers to get the job done quickly and efficiently. However, even with this extra processing power, Ray Tracing can be a long and difficult process.
Despite the challenges, Ray Tracing is becoming increasingly popular due to computer hardware and software advances. And as technology continues to improve, we can expect to see even more realistic images in the future.
Advantages
Here’re some advantages of Ray Tracing:
- Realistic Rendering: Ray Tracing can create more realistic images than those created with traditional rendering techniques. This is because it calculates the light path more accurately, resulting in more realistic shadows, refraction, and reflections.
- Anti-aliasing And Depth Of Field: Ray Tracing can help you quickly get the anti-aliasing and depth of field effects.
Disadvantages
The downside of Ray Tracing technology is that it requires a lot of computing power to run, and it can be difficult to create more complex lighting effects like caustics.
Part 3. How Does Ray Tracing Work?
Ray Tracking uses the process of denoising. The algorithm starts with the camera and traces the shades of shadows and lights.
Ray Tracing uses machine learning to fill in the gaps to form a realistic image. The brighter the scene, the higher the graphics quality; the higher the quality, the more expensive it is. This is why Ray Tracing didn’t become popular in the video game industry until recently.
Part 4. Ray Tracing In Adobe After Effects
After the introduction of Ray Tracing, we will combine it with a popular video editor - Adobe After Effects to see how it works. Adobe After Effects is a useful and powerful tool for creating visual effects and animated graphics. Adobe introduced Ray Tracing or Ray-Traced 3D feature in After Effect to help graphic designers create photorealistic 3D images and render light and shadow. This feature was added in 2012 with the release of After Effects CS 6.

However, the Ray Tracing feature was later removed from After Effects in 2020 due to multiple reasons:
- The Ray Tracing tool always faced bugs and glitches.
- This feature did not work correctly if you were not using Adobe Media Encoder.
- NVIDIA would change the standards from time to time.
Functions
Though as mentioned above, the Ray Tracing feature was removed in 2020, its advanced 3D features are still worth of introducing. Here’re some functions of Ray Traced 3D After Effects:
- Ray Traced allows you to generate and place multiple lights.
- You can set a material option for 3D layers.
- Moreover, you can control how shadows are cast.
How Does It Work
3D Ray Tracing in After Effects works by giving your text and paths more depth. Extruded layers have a z-axis depth, making them three-dimensional. This extra dimension is viewable from all angles, even when the layer is rotated. In contrast, non-extruded layers have zero depth on the z-axis. So, they will disappear if you try to rotate them 90 degrees on the x or y-axis.
Part 5. Ray-Traced 3D Settings In Adobe After Effects
The release of the Ray-Traced 3D setting in After Effects CS6 made it easier than ever to create stunning 3D images and animations. Let’s focus on how to use it in After Effects appropriately.
How To Set It
Adobe After Effects has a three-dimensional space animation setting, but this doesn’t include Ray Tracing. You need to change the default settings if you want to use it in your animation. To do so:
Step1 Go to the Composition Settings panel to set up the Ray-Traced 3D composition.
Step2 Open the Advanced tab, and from the “Renderer” option, select “Ray-Traced 3D” from the drop-down menu.

A layer becomes a 3D layer when the 3D checkbox is checked in the timeline and has more options than a normal layer regarding composition. When you open the layer properties timeline, you can access two options: Geometry Options and Material Options.
The former deals with the layer’s depth and edges shape, while the latter deals with the interaction of layers with depth and includes shadow, reflection, refraction, and transparency option.

When To Use It
Here’re some instances of when to use Ray-Traced 3D compositions in After Effects:
- When you want to create true 3D types and animate them.
- If you want to get a logo extruded and present it as if it was a real object.
- When you want to create realistic shadows or reflections to create stunning motion graphics.
- You can also use it to create realistic images or simulate lighting effects.
Ray Traced 3D After Effects Plugin Download
Zaxwerks ProAnimator AE is a 3D animation plugin for After Effects that makes it easier to animate objects in three dimensions. With ProAnimator AE, you don’t have to use keyframes to animate objects.
Instead, you’re given an interface that makes it simpler to learn than traditional 3D animation programs. Moreover, ProAnimator AE is capable of near real-time Ray Tracing so that you can create realistic reflections in very little time.
Video - What is Ray Tracing?
Conclusion
In this article, we’ve discussed Ray Tracing, how it works, and its function in Adobe After Effect. We also shed light on Ray Traced 3D settings in After Effect, how to set it, and when to use it. Moreover, we discussed a plugin to help you create photorealistic reflections and shadows.
Hopefully, your queries have been resolved, and you now fully understand the Ray Tracing technology.
Free Download For Win 7 or later(64-bit)
Free Download For macOS 10.14 or later
Part 1. What Is Ray Tracing?
Ray Tracing is a powerful rendering technique that can create incredibly realistic lighting and shadows. By tracing the path of light, algorithms can simulate the way that light interacts with virtual objects in a computer-generated world.
This results in more lifelike shadows, reflections, and translucence. Ray Tracing has been responsible for the dramatic increase in realism we’ve seen in video games over the years, and its benefits are only becoming more apparent as technology improves.
In simple words, Ray Tracing is a computer graphics technique for generating realistic images and works by tracing the light’s path from the camera through the scene. This allows for accurate simulations of light interactions, such as reflection, refraction, and shadows.
Part 2. Overview Of Ray Tracing
In this part, we will explain what Ray Tracing is from the following sides and for your better understanding.
History
Albrecht Dürer first gave the idea of Ray Tracing in the 16th century through his invention, the Dürer’s door. However, it was not until 1968 that Arthur Appel used a computer for the first time to create a shaded picture through Ray Tracing.
First conceptualized in 1969, Ray Tracing is a common technique used to create computer-generated graphics for movies and TV shows today. This is because studios can use the processing power of multiple computers to get the job done quickly and efficiently. However, even with this extra processing power, Ray Tracing can be a long and difficult process.
Despite the challenges, Ray Tracing is becoming increasingly popular due to computer hardware and software advances. And as technology continues to improve, we can expect to see even more realistic images in the future.
Advantages
Here’re some advantages of Ray Tracing:
- Realistic Rendering: Ray Tracing can create more realistic images than those created with traditional rendering techniques. This is because it calculates the light path more accurately, resulting in more realistic shadows, refraction, and reflections.
- Anti-aliasing And Depth Of Field: Ray Tracing can help you quickly get the anti-aliasing and depth of field effects.
Disadvantages
The downside of Ray Tracing technology is that it requires a lot of computing power to run, and it can be difficult to create more complex lighting effects like caustics.
Part 3. How Does Ray Tracing Work?
Ray Tracking uses the process of denoising. The algorithm starts with the camera and traces the shades of shadows and lights.
Ray Tracing uses machine learning to fill in the gaps to form a realistic image. The brighter the scene, the higher the graphics quality; the higher the quality, the more expensive it is. This is why Ray Tracing didn’t become popular in the video game industry until recently.
Part 4. Ray Tracing In Adobe After Effects
After the introduction of Ray Tracing, we will combine it with a popular video editor - Adobe After Effects to see how it works. Adobe After Effects is a useful and powerful tool for creating visual effects and animated graphics. Adobe introduced Ray Tracing or Ray-Traced 3D feature in After Effect to help graphic designers create photorealistic 3D images and render light and shadow. This feature was added in 2012 with the release of After Effects CS 6.
However, the Ray Tracing feature was later removed from After Effects in 2020 due to multiple reasons:
- The Ray Tracing tool always faced bugs and glitches.
- This feature did not work correctly if you were not using Adobe Media Encoder.
- NVIDIA would change the standards from time to time.
Functions
Though as mentioned above, the Ray Tracing feature was removed in 2020, its advanced 3D features are still worth of introducing. Here’re some functions of Ray Traced 3D After Effects:
- Ray Traced allows you to generate and place multiple lights.
- You can set a material option for 3D layers.
- Moreover, you can control how shadows are cast.
How Does It Work
3D Ray Tracing in After Effects works by giving your text and paths more depth. Extruded layers have a z-axis depth, making them three-dimensional. This extra dimension is viewable from all angles, even when the layer is rotated. In contrast, non-extruded layers have zero depth on the z-axis. So, they will disappear if you try to rotate them 90 degrees on the x or y-axis.
Part 5. Ray-Traced 3D Settings In Adobe After Effects
The release of the Ray-Traced 3D setting in After Effects CS6 made it easier than ever to create stunning 3D images and animations. Let’s focus on how to use it in After Effects appropriately.
How To Set It
Adobe After Effects has a three-dimensional space animation setting, but this doesn’t include Ray Tracing. You need to change the default settings if you want to use it in your animation. To do so:
Step1 Go to the Composition Settings panel to set up the Ray-Traced 3D composition.
Step2 Open the Advanced tab, and from the “Renderer” option, select “Ray-Traced 3D” from the drop-down menu.
A layer becomes a 3D layer when the 3D checkbox is checked in the timeline and has more options than a normal layer regarding composition. When you open the layer properties timeline, you can access two options: Geometry Options and Material Options.
The former deals with the layer’s depth and edges shape, while the latter deals with the interaction of layers with depth and includes shadow, reflection, refraction, and transparency option.
When To Use It
Here’re some instances of when to use Ray-Traced 3D compositions in After Effects:
- When you want to create true 3D types and animate them.
- If you want to get a logo extruded and present it as if it was a real object.
- When you want to create realistic shadows or reflections to create stunning motion graphics.
- You can also use it to create realistic images or simulate lighting effects.
Ray Traced 3D After Effects Plugin Download
Zaxwerks ProAnimator AE is a 3D animation plugin for After Effects that makes it easier to animate objects in three dimensions. With ProAnimator AE, you don’t have to use keyframes to animate objects.
Instead, you’re given an interface that makes it simpler to learn than traditional 3D animation programs. Moreover, ProAnimator AE is capable of near real-time Ray Tracing so that you can create realistic reflections in very little time.
Video - What is Ray Tracing?
Conclusion
In this article, we’ve discussed Ray Tracing, how it works, and its function in Adobe After Effect. We also shed light on Ray Traced 3D settings in After Effect, how to set it, and when to use it. Moreover, we discussed a plugin to help you create photorealistic reflections and shadows.
Hopefully, your queries have been resolved, and you now fully understand the Ray Tracing technology.
Free Download For Win 7 or later(64-bit)
Free Download For macOS 10.14 or later
Make Super Easy Coin Magic With Filmora
Do you want to become a magician in your videos? Now, everyone can look like a magician with the magic of editing. This article will show you how to do a cool coin trick in Filmora 11 .
Part 1: What is the filmmaking technique “Cutting on action”
Cutting on action is a technique the editors use to cut in the middle of an action to another shot that matches the first shot’s action. Typically, the subject starts an action in one shot and continues the action in another, creating a smooth transition. For example, when you make the coin trick video, you need to cut on the tapping so it can trick the eyes, and the cut won’t be noticeable.

Part 2: Things You Need to Prepare for The Coin Magic Trick
- Glass and two coins

- Set the phone on a tripod. Because utilizing a tripod can significantly improve the recording’s stability.

Part 3: Start Filming
Step1 Firstly, you must show the coin and the bottom of the glass.

Step2 After that, you need to hold the coin with the fingers part of one hand and tap down on the coin. Make sure it looks like the coin is going through straight to the glass.

Step3 You need someone else to drop the other coin from the top. Meanwhile, you are pretending to tap a coin on the glass. You don’t need to worry about someone else hand in the frame. Since you can remove it easily with the masking feature in Filmora.

Step4 It would help if you had a second shot for a clean plate of the background. You can record background for 20 seconds.

Part 4: Bring the clips into Filmora 11
Step1 If you have not downloaded Filmora, you can visit filmora.wondershare.com to download Filmora’s new version.

Step2 Drag and drop the clip onto the first track of the timeline.Afterward, move the playhead to the right and find the spot where you tapped the coin last time before your friend drops the other coin. Additionally, make sure it is in the middle of the tapping action and cut.

Step3 Then move the playhead to the right and find the spot where your friend drops the coin while you tap without the coin in your hand. Make sure it is in the middle of the tapping action, and the position of your hand roughly matches that in the last cut and make a cut.

Step4 Now you need to delete the middle part and play it back. Indeed, cutting on action is the key to creating the illusion that the action is continued without editing.

Step5 Next, you must remove your friend’s hand in the frame with the Filmora masking feature. Afterwards. drag and drop the clean plate video onto the second track of the timeline.

Step6 Next, double-click the clip to open the setting video. Find the Mask Section and select the single line.

Step7 Here you can see the mask is applied.First, adjust the angle and position of the mask to only show the top part of the frame. Then you have to change the Blur Strength to add more blur to the edge of the mask.

Step8 With the mask finalized, unhide the first video track and adjust the length of the clip on the timeline. Finally, playback the video and see how it looks.

Summary
That’s how to make a coin move through a glass-like MAGIC with the cutting on action editing technique. You can pay close attention to the steps above and follow each step for perfect results.
Free Download For Win 7 or later(64-bit)
Free Download For macOS 10.14 or later
Free Download For macOS 10.14 or later
Also read:
- [New] Making Compelling Media Previews for Channels
- [Updated] 2024 Approved Perfect Virtual Screens Choosing Best Meet Backgrounds
- [Updated] In 2024, VLC versus MPC Top Free Video Players Showdown
- 11 Best Location Changers for Nokia C02 | Dr.fone
- 2024 Approved Best Guide for Setting TikTok Countdown Timer
- 2024 Approved Do You Want to Rotate Your TikTok Video to Stylize It More? This Article Will Provide Simple Methods of Rotating TikTok Videos to Improve the Audience Viewing Experience
- 2024 Approved Graphic Design Evolution Post-ACID Review
- 4 Ways to Unlock Apple iPhone 12 mini to Use USB Accessories Without Passcode | Dr.fone
- How to Make Canva Collages
- How to Make Eye Zoom Transition Effect with Filmora
- In 2024, Best Ideas on Using Filmora Green Screen
- Live Streaming with ManyCam: Premium Virtual Camera Solutions and Software
- New 2024 Approved How to Create the Night-to-Day Effect Video
- New Steps To Fade Audio In Premier Pro
- Revolutionize Mobile Banking: Explore the Power of OCR on Smartphones - Insights From the ABBYY Blog
- Step-by-Step Solutions for the Missing Connection to Our Data Centers in Halo Infinity
- Unveiling the Acer XFA240: Efficiency Takes Center Stage in This Review
- Updated In 2024, Tips to Make Cinematic Color Grading
- Updated Mastering DaVinci Resolve Scopes A Comprehensive Guide for 2024
- Title: New Create Glitch Text Effect for 2024
- Author: Chloe
- Created at : 2025-02-26 01:16:45
- Updated at : 2025-03-03 17:59:39
- Link: https://ai-editing-video.techidaily.com/new-create-glitch-text-effect-for-2024/
- License: This work is licensed under CC BY-NC-SA 4.0.