:max_bytes(150000):strip_icc():format(webp)/laptop-2443739-5b55bc7c46e0fb00378df55b.jpg)
New Create Risograph Effect In Photoshop A Beginners Guide

Create Risograph Effect In Photoshop: A Beginner’s Guide
Risograph printing is a digital printing process that combines the best features of offset and screen printing used by many small print shops and design studios to provide trendy vibes and a classic look to the images.
If you’re a novice graphic designer or illustrator, you’ve probably seen Risograph prints and wondered how they are made. Well, this article will help you create a risograph effect in Photoshop quickly!
Without further delay, let’s get started with our step-by-step tutorial!
What Is Risograph Effect?
Before we look into how to create a risograph effect in Photoshop in the later part of this article, let’s have a basic understanding of Risograph.
Risograph was created in 1986 by a Japanese company called Riso Kagaku Corporation. It’s a form of stencil printing, a technique that uses a stencil to create an image on a piece of paper.
The Risograph machine prints images by building them up one layer at a time, with each subsequent layer being a different color. Because of this, each print produced is imperfect, though some artists believe this only adds to the Risograph’s unique charm and distinct look.
The Risograph printing effect gives images a vibrant and bold look, making them perfect for ads, magazines, and abstract artworks. The printing method is also used for many products, including books, fabric, magazines, newspapers, plastic, metal, and even some forms of packaging.
How To Use Photoshop To Create Risograph Effect
The tutorial will be divided into three parts to help you master the risograph effect-creating skills to give your design project a distinct look.
Firstly, we will focus on how to use Photoshop in the following way to create the primary risograph effect.
How To Create the Basic Risograph Effect in Photoshop
Step1 Launch Adobe Photoshop on your laptop/desktop (For this tutorial, we are using Photoshop CC 2021). Click “Create New,” select the document size, and click “Create.” Now set a paper-like textured layer on the canvas. Click “Ctrl + Shift + N,” and in the new layer window, set the mode to “Multiply.” Click “OK.” to confirm your action.

Step2 Next, press “Ctrl+Shift+E” to combine your layers and select the “Edit” option from the top toolbar. Scroll down and select “Define Pattern.” Set the pattern name and click “OK.”

Click “Layer” from the toolbar and choose “New Fill Layer”> “Pattern.” Next, select your new pattern layer and click “OK” to get a grid layer.

Step3 Let’s place an object/subject onto our canvas. Set the issue to “Multiply,” right-click on it and choose “Convert to Smart Object.”

Step4 To add a Gradient Map Layer, click “Layer,” scroll down and click “New Adjustment Layer.” Select “Gradient Map…” from the drop-down menu and click “OK” to confirm.

Use the “Properties” panel and select the “gradient” colors. Here we’ve chosen shades of “White” and “Red.” Click “OK” to apply.

Step5 For the image to have less contrast, click “Image” in the top toolbar and click “Adjustments.” Select “Levels…” from the menu. Now, set the black output to 73.

Finally, click “Filter” and open the “Filter Gallery.” Select “Sketch” > “Torn Edge,” set Image balance to 30, smoothness, and contrast to 15, 15 respectively. Click “OK” to apply the changes.

How To Create A Dual-Tone Risograph Effect
After creating an image with the risograph effect, how to make it more visually vertical? At this time, the dual-tone impact will help us have a more delicate picture.
The dual-tone effect is a technique in the risograph effect that combines two or more overlapping images to give a more vibrant look to the final project or emphasize the critical concept, information, or idea.
To create a dual-tone risograph effect in Photoshop, do the following steps.
Step1 To create a dual-tone risograph effect, add another subject to the canvas and set the blending mode to Multiply. Also, change its opacity to blend the two issues well. Make sure to turn the subject to Smart Object by right-clicking on the object’s layer and selecting “Convert to Smart Object.” Adjust the position of the subject on the previous one.

Step2 Select the layer of the new subject and click “Layer” Click “New Adjustment Layer” and select “Gradient Map…” from the drop-down menu.
Open the Gradient Editor and set the gradient colors of the new subject. Click “OK” to confirm. Click “Image” and choose “Adjustments” from the drop-down menu. Select “Levels” and set the Black Output to 73.
Step3 Click “Filter” and open “Filter Gallery.” Navigate to “Swatches” > “Torn Edge” and set the Image Balance, Smoothness, and Contrast to 30, 15, and 15, respectively, if you want to smooth down the subject.
Finally, your dual-tone effect is created in Photoshop!
How To Blend Images Using Layer Modes
In this part, let’s see how to use the layer modes to add another subject to the canvas and blend it with the previous ones.
Step1 Place the new subject on the canvas and set the layer mode to Multiply by pressing the “Ctrl + Shift + N” and selecting “Multiply” from the drop-down menu in the new pop-up window. Click “Ok” to apply your changes.
To adjust the size of the object, click “Edit” from the top toolbar, and select “Transform.” From the drop-down menu, select “Scale.” Use the handles to make the object smaller or larger.
Step2 Click the “Move” icon from the left menu and drag the object to set its position. Now, copy and clip the Gradient mode from the main subject to the new one.
Step3 Apply the Level and Filter Galler to the new object (Same settings as the main subject). That’s it. You’ve successfully blended images using the layer mode.

Video Tutorial - How To Make a Risograph Texture Effect in Photoshop
Apart from the guidance above, we also prepared a tutorial video for you. Hopefully, you can create an ideal image with Risograph Texture Effect successfully.
Conclusion
In this article, we’ve explored the risograph effect and when it was created. We’ve provided a step-by-step process on how to create a risograph effect in Photoshop to give your pictures a distinctly vintage look.
Moreover, we’ve discussed creating dual-tone effects and blending images using the layer modes with simple steps and original screenshots while creating a sample project on Photoshop.
We hope you’ve enjoyed reading this article and that you can now give a distinct vibrant, and bold yet imperfect look to your images using the risograph effect in Adobe Photoshop.
Free Download For Win 7 or later(64-bit)
Free Download For macOS 10.14 or later
How to Use LUTs in Lumafusion & Free Resource
LumaFusion is one of the most complex iPad and iPhone video editing apps. Many of its customers adore it, and it has some incredible capabilities that you’d find incompetent editing software. They’ve effectively opened up the realm of LUTs to iPhone and iPad users.
LumaFusion LUTs are individual files that act as containers in LumaFusion. This container file includes standard LUT data as well as LumaFusion-specific color preset data. A LumaFusion LUT Preset file is similar to a Super LUT. LumaFusion can only employ one standard LUT at a time; however, LumaFusion LUT presets enable simultaneous Color Grading and Color Corrections.
How will LUTs help with color correction in Lumafusion
Colors in today’s cameras are vibrant, but they may continuously be improved. Color correction corrects the color that’s already there, whether it’s boosting the exposure to brighten a darker photo or increasing the saturation to make the colors pop. Color correction in other NLEs can be difficult, but not in LumaFusion.
The Color Presets tab in the Color & Effects section is where you begin color correcting footage. There are various presets from which to pick. I wouldn’t use these settings on my videos because they’re too stylized, but they’re there. You may alter any of the presets to your taste, so some of the more dramatic ones can be toned down. By picking the original setting, purists can color-fix their raw footage without using LumaFusion. Moving the sliders till the color seems perfect is all that’s required from there.
Exposure, contrast, highlights, shadows, mid-tones, and saturation and hue are all controlled by sliders. The color sliders can be used for a more forceful approach. But proceed with caution. The sliders are delicate, and it’s easy to overdo them. Play around with the sliders until you get the look you want. If you don’t like it, toss it in the trashcan and start over.
Color grading and color correction are not interchangeable terms. Color correction is a technical requirement, but color grading is primarily creative. You’ll have no command over the color grading process if you’re working with film material where primary colors aren’t even visible. Before diving into the creative LUTs, make sure you complete adequate color correcting.
Color grading, unlike color correction, adjusts the shot’s color to modify the atmosphere or feel. The only way to do that in LumaFusion is to play around with the color sliders under the Color Presets tab, but that’s not ideal. As previously stated, the three sliders are sensitive and limited. LumaFusion isn’t designed for color grading, which is OK. Thankfully, LumaFusion allows you to use LUTs.
Always color correct your footage before utilizing any LUTS, which entails changing the White-balance, Highlights, Contrast, and Shadows. Do not apply the LUTS to your footage directly.
How to use LUTs in Lumafusion?
Videographers, colorists, and editors use LUTs because they are efficient. Rather than starting from zero every time you work on a video editing project, you may speed up the color grading process using a LUT with predefined color profiles. It’s elementary to import LUTs. Simply import the preset files into LumaFusion and add the preset to your footage like an Instagram filter.
The Import button in the Color & Effects editor is the easiest way to load LUTs.
- Double click on any video/photo clip on the timeline to access the Clip Editors.
- At the bottom of the Clip Editor UI, select the Color & Effects tab.
- The import button is located directly below the effect preset library.
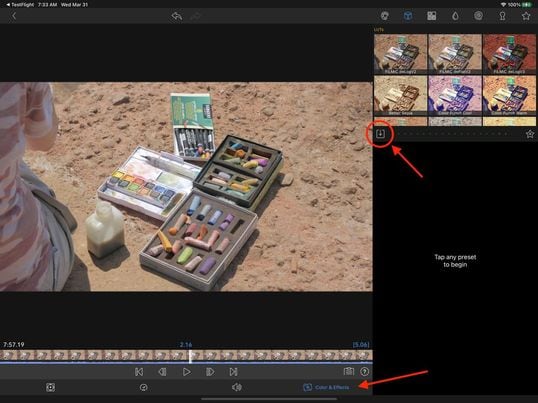
How to use LUTs in Lumafuison
LUTs must be loaded via the LumaFX clip editor at the moment. Follow the steps below to accomplish this:
- To access the LumaFX UI, double-tap any video/photo clip in the timeline.
- At the bottom of the LumaFX UI, select the ‘Color & Effects’ tool.
- In the upper right panel, press the cube icon.
- The import button is located directly below the effect preset library.
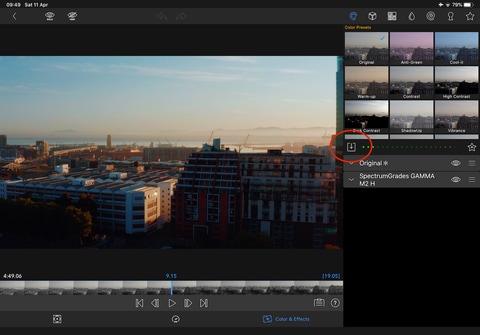
Load LumaFX LUTs
- Once hit, it will display your transfer site options; select your desired transfer site and navigate to the folder where your LUTs are stored.
- Select and import all of the LUTs in the folder.
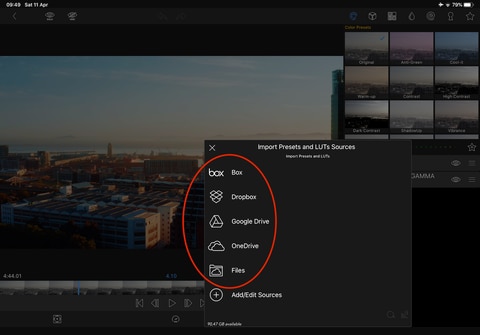
Import LUTs
Free LUTs Resource for Lumafusion
Choosing the appropriate LUT pack will boost your photography and videography immediately. With our quick guide to the top free LUTs available, you can find the appropriate one for you.
1. Jaun Melara free LUTs
LUTs aren’t simply for stylizing video. They’re frequently employed as a color correction tool to ensure that your colors are shown correctly in various formats. Juan Melara has provided a free LUT set to assist you in color correcting your footage for printing on film stock. These free LUTs will provide modest stylization to your footage if you don’t want to send it to print.
Melara developed this video to demonstrate his free LUTs in action. The colors are more subdued than in the other LUTs on this list. This free LUT pack is ideal if you’re looking to produce a modern-style cinematic color grade. Melara also has a great article about using LUTs to create a lovely color grade. DaVinci PowerGrades are available for several of these LUTs. They color correct your film in the same way as LUTs do, but you’ll have more flexibility over individual PowerGrade components.
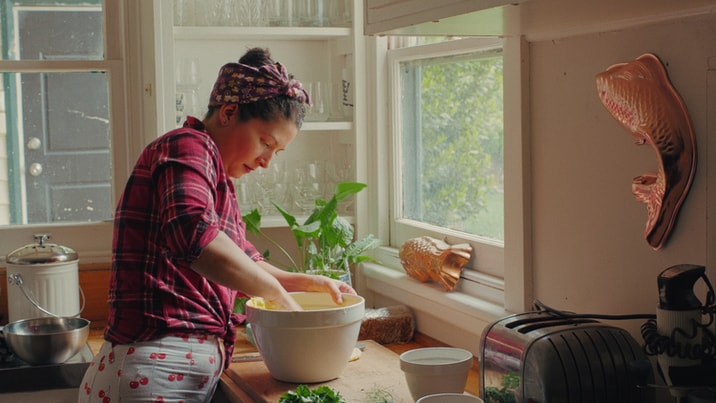
Jaun Melara free LUTs
2. Small Hd free LUTs
SmallHD, a company that makes small, full HD on-camera monitors, is giving away a free set of color grades that reproduce the appearance of seven classic movies. The company is also releasing a series of video lessons that show how to get the most out of these effects throughout production and post-production. Everything is completely free. The color grades are provided as a.zip file and are in the form of 3D LUT files created in DaVinci Resolve. If you’re unfamiliar with SmallHD, the company offers free LUTs for on-set monitoring in real-time. This free set of Movie Look LUTs is inspired by seven recent films, including Apocalypse Now’s warmth and The Matrix’s green overtones. Take use of SmallHD’s free LUT set if you want to give your footage a dramatic and cinematic vibe.

Small Hd free LUTs
3. Color Grading Central free LUTs
Color Grading Central is essential knowledge for any aspiring colorist or video editor who takes color seriously. CGC is a company that specializes in color grading. Their website has a wide range of outstanding color-related products, from grain to LUTs. They also provide their email members with a wealth of free color grading information. Free trials of some LUTs are also available, so you may try them out before you buy. They’re giving away an array of color presets, grains, and burns exclusively to their email list and the seven free color LUTs. We strongly recommend them if you want to give your footage a shot-on-film look.

Color Grading Central free LUTs
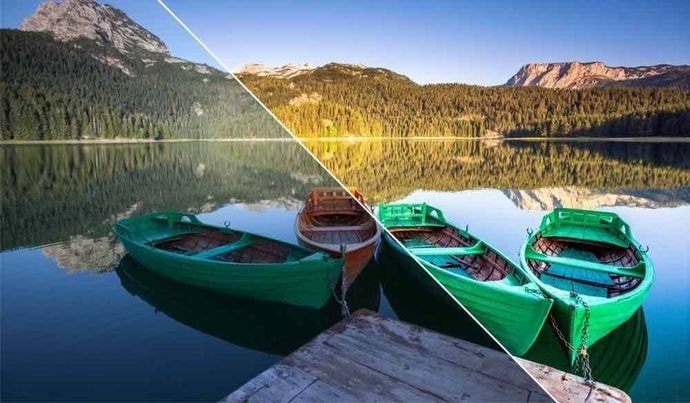
4. PremiumBeat Free LUTs
PremiumBeat has freely given countless LUT packs as well as other assets to any video editor or filmmaker over the years. Todd Blankenship has designed a fresh new set of FREE LUTs for Shutterstock, which is their latest addition. Todd chose distinct looks from films and pictures that inspire his daily work to create this bundle with attention and love. There are many options, and these looks will offer you a great place to start when it comes to grading your footage. They recently published an in-depth evaluation of Photon.io, a new color grading tool. Todd Blankenship, who ended up utilizing the tool to create these LUTs, wrote the initial review. The pack has been fine-tuned to replicate some clean, cinematic looks that you may use as a jumping-off point for your video.
PremiumBeat Free LUTs
5. Frank Glencairn free LUT
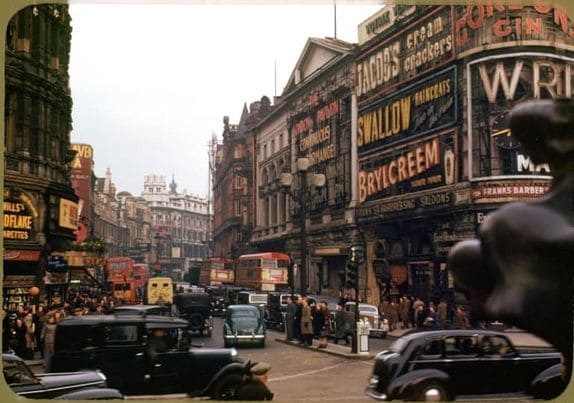
Despite having access to the most advanced filming gear, there’s something about a vintage film aesthetic that looks fantastic. Frank Glencairn has made a nice K-Tone LUT that is meant to look like vintage Kodachrome film. This film grade, which was formerly popular among photographers and filmmakers, has fallen out of favor due to the rise of digital cameras. With this free LUT, you can get the appearance of retro-looking reds, blues, and yellows.
Frank Glencairn free LUT
6. Reverse Tree Media free LUTs
Reverse Tree Media is releasing a new LUTS bundle that is absolutely free. In addition to LUTS, this LUTS collection includes utility LUTS, film grains, and a Black-Bar layer. For the color-grading procedure, this is critical. This bundle contains 56 free LUTS for various scenarios like weddings, television commercials, travel films, landscapes, Rec.709, and so on. It also has several useful LUTS and film grain overlays for 8mm, 16mm, and 35mm video, as well as a cinematic black bar PNG file with a ratio of 2.35:1 to assist you in achieving a more cinematic appearance quickly and save time. Check out the link to learn more about LUTS and to obtain their previous cinematic LUTS bundle, which is also free.

Reverse Tree
Wondershare Filmora11 Express Better
Achieve More
Grow Together
Free Download Free Download Learn More

Closing Thoughts:
LUTs are most typically used to build and store color profiles that can be utilized in other film projects. By using contrast and design, you can bring logs and flat materials to life. Everything you need to know is right here. You can now rush to your desk and fix your video.
Free Download Free Download Learn More

Closing Thoughts:
LUTs are most typically used to build and store color profiles that can be utilized in other film projects. By using contrast and design, you can bring logs and flat materials to life. Everything you need to know is right here. You can now rush to your desk and fix your video.
Learn How to Slow Down Time-Lapse Videos on iPhone to Make Detailed and Captivating Slow-Motion Effects in Your Time-Lapse Captures
There are moments that need highlighting and there are moments that need a flashing speed. You can control both moments if you are just wondering can slow down a time lapse. There are video editing softwares like Filmora if you want to know how to slow down time lapse on iPhone. Let’s discuss some of the best time lapse editing tools and also learn about how to slow down a time lapse
What Is Time-Lapse?
Time-lapse is a cinematography and photography technique that captures a series of images or frames at specific intervals over a prolonged period of time and then plays them back at a much faster rate. This creates a visually captivating effect where time appears to be moving faster than in real life.
In a time-lapse video, moments typically occur slowly or over an extended period, such as the movement of clouds, the growth of plants, or construction of buildings are compressed into a short video clip. Time-lapse is a powerful storytelling tool and if you are tempted to learn how to slow down a time lapse video because sometimes they can be faster than we intend them to be. Let’s discuss how you can slow down time lapse video.
Method 1: Using Filmora To Change Time Lapse Speed
Filmora is one of the best video editing software whose user-friendly interface allows both beginners and professionals to create compelling videos effortlessly. With Filmora, you can cut, trim, slow down time lapse video, and edit videos. You can also apply built-in effects and transitions, and adjust the playback speed to create stunning time-lapse or slow-motion effects.
Filmora also offers advanced color grading tools so that you can correct and enhance the color in your videos to make them visually appealing. Additionally, Filmora supports a wide range of video formats and allows easy exporting of edited videos to various platforms, making the sharing process convenient and straightforward. With its rich library of royalty-free music and sound effects. Let’s discuss how to change time lapse speed on iPhone.
AI Time-Lapse For Win 7 or later(64-bit)
AI Time-Lapse For macOS 10.14 or later
- Open Filmora and start a new project.
- Import your time-lapse video by either clicking on “Import” or dragging and dropping the file into the media library.
- Drag the imported video from the media library to the timeline at the bottom of the screen.
- Click on the video in the timeline to select it. You should see editing options appear.
- Look for a speed option, often represented as a speedometer icon. Click on it to open the speed settings.
- In the speed settings, you can slow down time lapse video. You can make it slower according to your preference.
- After adjusting the speed, play the video in the preview window to see if it’s at the desired speed.
- Once done with performing time lapse slower, save and export your edited time-lapse video by choosing the “Export” option.
- Choose the desired output format and save location, then click “Export” to save the edited video.
Method 2: Using Imovie To Change Time Lapse Speed
- Open iMovie on your iOS device.
- Import the time-lapse video you want to edit.
- Drag and drop the video onto the timeline.
- Select the video clip on the timeline.
- Look for the speed adjustment settings; it is usually represented by a turtle or hare icon.
- Click on the speed adjustment icon, and a slider or option to change the speed will appear.
- Adjust the speed according to your preference by dragging the slider or entering a value.
- Play the video to preview the new speed.
- Once you are done with the slow down time lapse video, you can save or export the edited video.
Summary
Learning how to slow down time lapse videos on iPhone enhances the storytelling power of your cinematography, allowing viewers to engage more deeply with your content. There are video editing tools like Filmora and iMovie which have revolutionized the editing process, making it feasible to slow down time lapse video directly on your iPhone. These tools are user-friendly
TRANSLATE with x
English
TRANSLATE with
COPY THE URL BELOW
Back
EMBED THE SNIPPET BELOW IN YOUR SITE
Enable collaborative features and customize widget: Bing Webmaster Portal
Back
5 Tried-And-True Methods to GIF Making
5 Tried-And-True Methods to GIF Making
An easy yet powerful editor
Numerous effects to choose from
Detailed tutorials provided by the official channel
GIFs are a way for teens to add a bit of fun to their private or group conversations while expressing themselves in a fun and expressive way. GIFs are trendy on sites like Twitter and Tumblr, but more and more people have started using them for their blogs and other content because it helps them connect with their readers. Making gifs is one of those skills that make you look incredible in your friend’s group nowadays.
So, the question is how to make a GIF? Is it hard? We will walk you through the process in this article.
In this article
01 [How to Make a GIF With Photoshop](#Part 1)
02 [How to Make a GIF With Canva](#Part 2)
03 [How to Make a GIF From a YouTube Video](#Part 3)
04 [How to Make a GIF on Mobile](#Part 4)
05 [How to Create Screen-Recording Gifs](#Part 5)
Part 1 How to Make a GIF With Photoshop
Photoshop is probably the best tool for gif-making available in the market right now. They provide you with the essential tools to make the best GIFs out of any video you want.
So here is a step-by-step method to help you make your GIFs in Photoshop and impress your friends.
Step 1: One of the most important steps is to choose the video you want to use in your GIF. GIFs are supposed to be short and express what you want to in that concise sequence, and that’s why choosing a correct sequence of the right length is very important.
Step 2: Now you will have to download the video file to your computer and continue to trim it down to as few frames as possible, and choose the frames that convey the message as accurately as possible.
Step 3: Import the video to Photoshop by going to “File” > “Import” > “Video frames to layers.” Choose the video file you need, and it will appear in the form of separate frames. Now you can select whether you want the entire video or small bits of it; you can also limit the import to any frame to manage the size and time of the video. You can choose different color gradients and many other things according to your preference. And then go to “file” and select “save for web.”
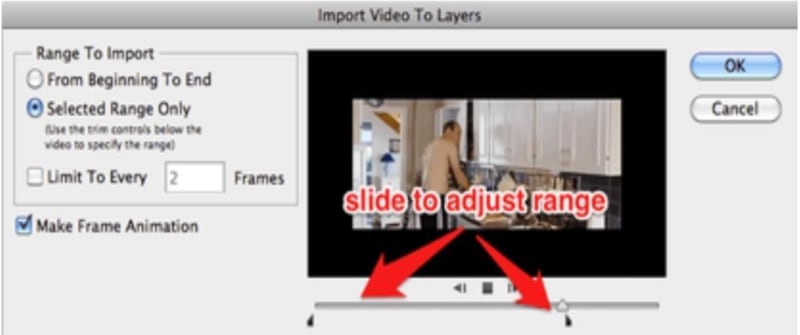
Step 4: As the next step, move ahead with selecting color gradients as per your needs and choice. And then go to “file” and select “save for web,” and select the settings for the saved file until you find the one that suits you.
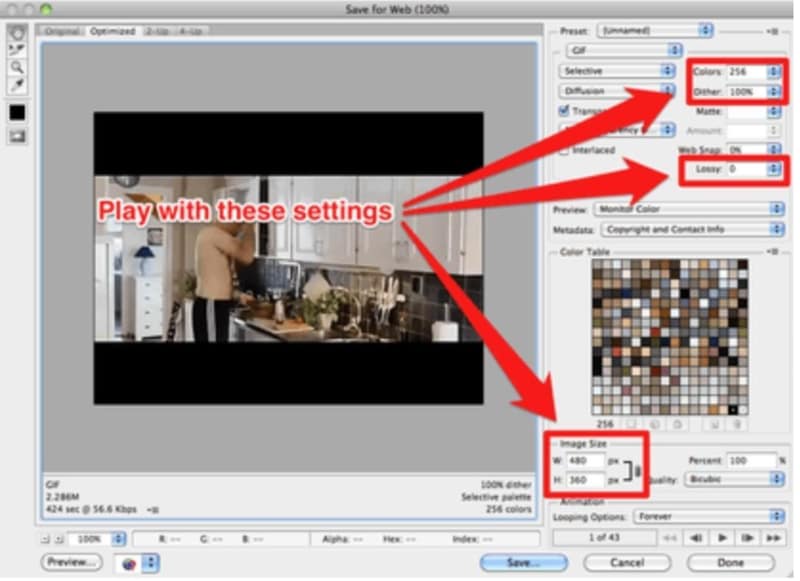
Step 5: Save the file, and now you can share it with your friends or upload it to different free image hosting sites.
Part 2 How to Make a GIF With Canva
Making GIFs on Canva is super easy; if you are someone who is not familiar with tools like Photoshop, Canva is a GIF generator that can help you out in that situation and help you make GIFs. So, how do you use a gif maker in Canva? See the steps below to get a comprehensive idea of that.
Step 1: To create your GIF design in Canva, go to Canva and open “new doc.”
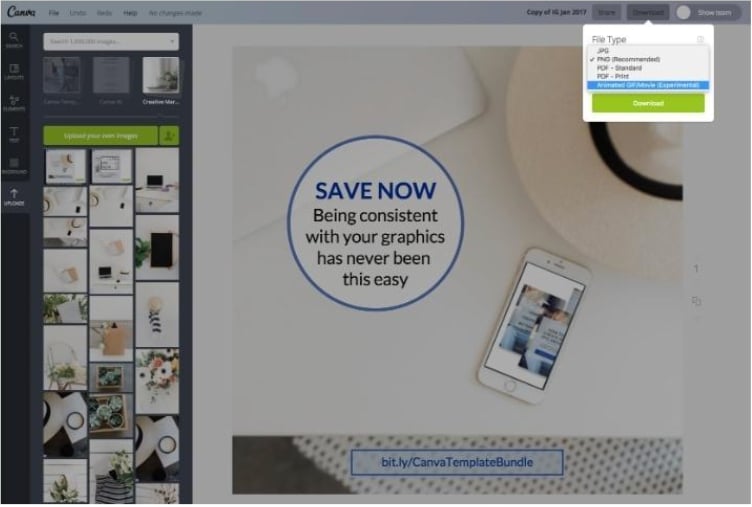
Step 2: Choose the download feature and then continue to the drop-down list and now click on “Animated gif/movie” and “preview animation.”
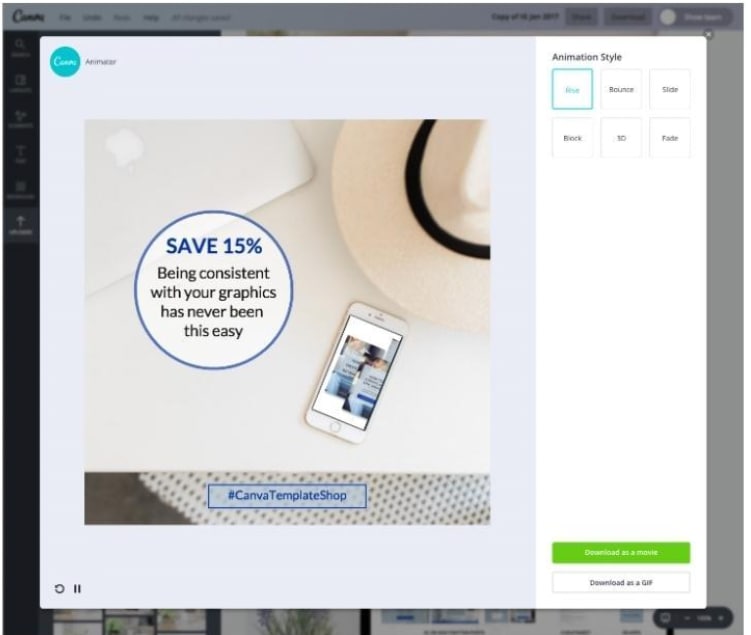
Step 3: Now you will have to select the animation style for your Gif; currently, Canva has around 6 animation styles that you can choose from.
Step 4: Now you will have to download the GIF. After that, simply share and flaunt your skills to your near ones!
Part 3 How to Make a GIF From a YouTube Video
So, how can you make Gif from any YouTube video? It’s not so hard when there are online Gif makersonline that will help you make excellent and funky Gifs easily and in a short time.
You can use Giphy, an online Gif maker, and one can make gif easily over there; you just have to follow a few simple steps mentioned below.
Step 1: First of all, you will have to choose a video that fits your need and is perfect for a gif like short, expressive, and high quality.
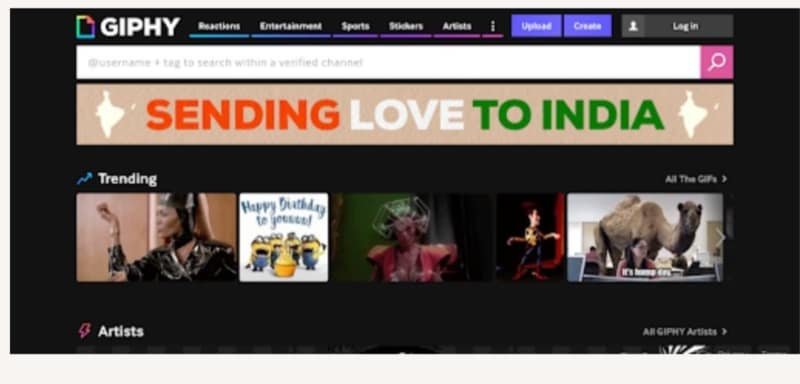
Step 2: The next step in the process is to upload the gif to Giphy, which can be done by choosing “choose file” under the gif section to make a gif online. You can also use video links if you haven’t downloaded the video in your system.
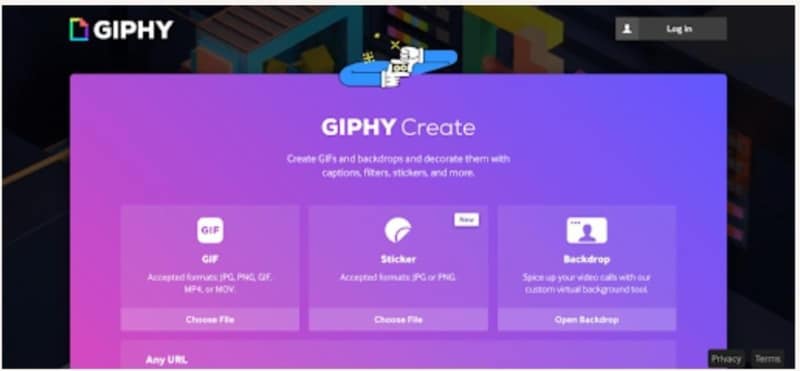
Step 3: Gif has an online gif generator that will generate a perfect gif for you from the video you selected by trimming and other required operations.
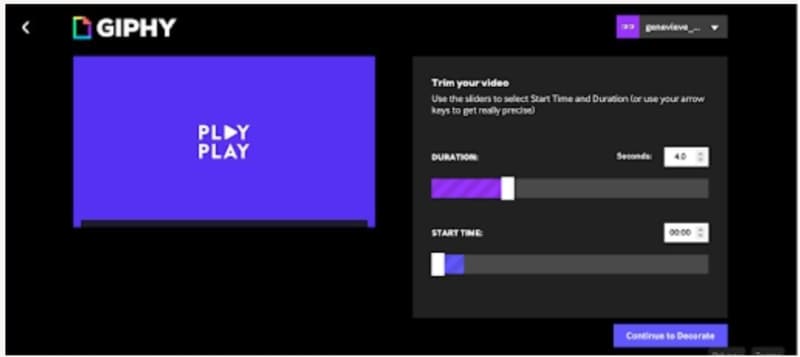
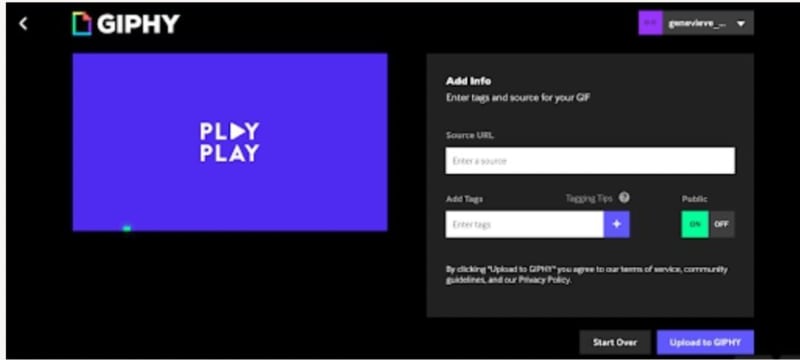
Step 4: Now you will have to click on “upload to giphy,” and the GIF you created will start uploading, and you are ready to use the online gif with your friends.
Part 4 How to Make a GIF on Mobile
What if you don’t have a pc or laptop and want tomake a gif on your phone? That’s very easy; here, we will share the steps you need to follow to easily make gifs on your iOS or Android device.
01How to create gif on your iOS device?
There are enough third-party apps that one can use to make GIFs on their iOS device. But on iPhones and iPad, some already installed programs can help you make GIFs easily.
You can use a live photos program and add effects to the shots you want to turn into gifs. You will have to go to the Photos app, select the image and click on the gray corner and add different effects as you desire. You can get a gif maker from the app store and turn your life photos into a gif quickly with all the effects you have added previously.
02How to create a gif with android?
Different Android phones offer different options to turn photos and other animations into gifs. For example, in Samsung Galaxy phones, one can use gif-making features already available in the pre-installed gallery app. In addition, Google photos have a ‘motion photos’ feature that can be converted and used to make GIFs easily using third-party apps you can easily find on Play Store.
03You can use a gif making app
Making GIFs from native tools is fantastic, but you can’t get all the features when using a native tool on your phone. However, you can download a gif generator online to help you make GIFs easily with your phone itself.
Part 5 How to Create Screen-Recording Gifs
What if you need to create screen recording gifs? That’s not hard, too. Actually, it’s super easy. So, to begin with, all you need is to get a screen recording application downloaded. It should be compatible to the device you want to record screen of. Also, keep the part of the video you want to turn into GIF.
Now, once you have the video file, things will become easy. All you have to do is upload the video file to Wondershare Filmora Video Editor and trim the video to the desired length and make the perfect gif to share with your friends and family!

Wondershare Filmora - Best Video Editor for Mac/Windows
5,481,435 people have downloaded it.
Build unique custom animations without breaking a sweat.
Focus on creating epic stories and leave the details to Filmora’s auto features.
Start a creative adventure with drag & drop effects and endless possibilities.
Filmora simplifies advanced features to save you time and effort.
Filmora cuts out repetition so you can move on to your next creative breakthrough.
Now, you must be wondering about Filmora; you must be aware of Photoshop already, but filmora is an equally appealing tool that one can use to edit videos, make gifs online, and much more. The best part is that it’s super easy to use and doesn’t need you to have any skills at all.
With Filmora, you can do professional editing and use all sorts of tools quickly, and you can also use it to make awesome gifs. Gif making is straightforward, and it’s for you to try tools that make the process fun too.
● Key Takeaways from This Episode →
● So, here are the points we can summarize through this article.
● The first and best thing is that you don’t need to have any technical knowledge to make gifs to share with all your friends and have fun. You can easily make a gif online and add all sorts of animations and filters that you like.
● You don’t need to have a PC either, you can easily use Gif generators that are available online, and they will be able to make a perfect gif for yourself on your phone itself.
● Using and making perfect gifs is an art, and you need to take care of the video you choose, time, lengths, the expression, and other filters while you make a gif online.
GIFs are a way for teens to add a bit of fun to their private or group conversations while expressing themselves in a fun and expressive way. GIFs are trendy on sites like Twitter and Tumblr, but more and more people have started using them for their blogs and other content because it helps them connect with their readers. Making gifs is one of those skills that make you look incredible in your friend’s group nowadays.
So, the question is how to make a GIF? Is it hard? We will walk you through the process in this article.
In this article
01 [How to Make a GIF With Photoshop](#Part 1)
02 [How to Make a GIF With Canva](#Part 2)
03 [How to Make a GIF From a YouTube Video](#Part 3)
04 [How to Make a GIF on Mobile](#Part 4)
05 [How to Create Screen-Recording Gifs](#Part 5)
Part 1 How to Make a GIF With Photoshop
Photoshop is probably the best tool for gif-making available in the market right now. They provide you with the essential tools to make the best GIFs out of any video you want.
So here is a step-by-step method to help you make your GIFs in Photoshop and impress your friends.
Step 1: One of the most important steps is to choose the video you want to use in your GIF. GIFs are supposed to be short and express what you want to in that concise sequence, and that’s why choosing a correct sequence of the right length is very important.
Step 2: Now you will have to download the video file to your computer and continue to trim it down to as few frames as possible, and choose the frames that convey the message as accurately as possible.
Step 3: Import the video to Photoshop by going to “File” > “Import” > “Video frames to layers.” Choose the video file you need, and it will appear in the form of separate frames. Now you can select whether you want the entire video or small bits of it; you can also limit the import to any frame to manage the size and time of the video. You can choose different color gradients and many other things according to your preference. And then go to “file” and select “save for web.”

Step 4: As the next step, move ahead with selecting color gradients as per your needs and choice. And then go to “file” and select “save for web,” and select the settings for the saved file until you find the one that suits you.

Step 5: Save the file, and now you can share it with your friends or upload it to different free image hosting sites.
Part 2 How to Make a GIF With Canva
Making GIFs on Canva is super easy; if you are someone who is not familiar with tools like Photoshop, Canva is a GIF generator that can help you out in that situation and help you make GIFs. So, how do you use a gif maker in Canva? See the steps below to get a comprehensive idea of that.
Step 1: To create your GIF design in Canva, go to Canva and open “new doc.”

Step 2: Choose the download feature and then continue to the drop-down list and now click on “Animated gif/movie” and “preview animation.”

Step 3: Now you will have to select the animation style for your Gif; currently, Canva has around 6 animation styles that you can choose from.
Step 4: Now you will have to download the GIF. After that, simply share and flaunt your skills to your near ones!
Part 3 How to Make a GIF From a YouTube Video
So, how can you make Gif from any YouTube video? It’s not so hard when there are online Gif makersonline that will help you make excellent and funky Gifs easily and in a short time.
You can use Giphy, an online Gif maker, and one can make gif easily over there; you just have to follow a few simple steps mentioned below.
Step 1: First of all, you will have to choose a video that fits your need and is perfect for a gif like short, expressive, and high quality.

Step 2: The next step in the process is to upload the gif to Giphy, which can be done by choosing “choose file” under the gif section to make a gif online. You can also use video links if you haven’t downloaded the video in your system.

Step 3: Gif has an online gif generator that will generate a perfect gif for you from the video you selected by trimming and other required operations.

Step 4: Now you will have to click on “upload to giphy,” and the GIF you created will start uploading, and you are ready to use the online gif with your friends.

Part 4 How to Make a GIF on Mobile
What if you don’t have a pc or laptop and want tomake a gif on your phone? That’s very easy; here, we will share the steps you need to follow to easily make gifs on your iOS or Android device.
01How to create gif on your iOS device?
There are enough third-party apps that one can use to make GIFs on their iOS device. But on iPhones and iPad, some already installed programs can help you make GIFs easily.
You can use a live photos program and add effects to the shots you want to turn into gifs. You will have to go to the Photos app, select the image and click on the gray corner and add different effects as you desire. You can get a gif maker from the app store and turn your life photos into a gif quickly with all the effects you have added previously.
02How to create a gif with android?
Different Android phones offer different options to turn photos and other animations into gifs. For example, in Samsung Galaxy phones, one can use gif-making features already available in the pre-installed gallery app. In addition, Google photos have a ‘motion photos’ feature that can be converted and used to make GIFs easily using third-party apps you can easily find on Play Store.
03You can use a gif making app
Making GIFs from native tools is fantastic, but you can’t get all the features when using a native tool on your phone. However, you can download a gif generator online to help you make GIFs easily with your phone itself.
Part 5 How to Create Screen-Recording Gifs
What if you need to create screen recording gifs? That’s not hard, too. Actually, it’s super easy. So, to begin with, all you need is to get a screen recording application downloaded. It should be compatible to the device you want to record screen of. Also, keep the part of the video you want to turn into GIF.
Now, once you have the video file, things will become easy. All you have to do is upload the video file to Wondershare Filmora Video Editor and trim the video to the desired length and make the perfect gif to share with your friends and family!

Wondershare Filmora - Best Video Editor for Mac/Windows
5,481,435 people have downloaded it.
Build unique custom animations without breaking a sweat.
Focus on creating epic stories and leave the details to Filmora’s auto features.
Start a creative adventure with drag & drop effects and endless possibilities.
Filmora simplifies advanced features to save you time and effort.
Filmora cuts out repetition so you can move on to your next creative breakthrough.
Now, you must be wondering about Filmora; you must be aware of Photoshop already, but filmora is an equally appealing tool that one can use to edit videos, make gifs online, and much more. The best part is that it’s super easy to use and doesn’t need you to have any skills at all.
With Filmora, you can do professional editing and use all sorts of tools quickly, and you can also use it to make awesome gifs. Gif making is straightforward, and it’s for you to try tools that make the process fun too.
● Key Takeaways from This Episode →
● So, here are the points we can summarize through this article.
● The first and best thing is that you don’t need to have any technical knowledge to make gifs to share with all your friends and have fun. You can easily make a gif online and add all sorts of animations and filters that you like.
● You don’t need to have a PC either, you can easily use Gif generators that are available online, and they will be able to make a perfect gif for yourself on your phone itself.
● Using and making perfect gifs is an art, and you need to take care of the video you choose, time, lengths, the expression, and other filters while you make a gif online.
GIFs are a way for teens to add a bit of fun to their private or group conversations while expressing themselves in a fun and expressive way. GIFs are trendy on sites like Twitter and Tumblr, but more and more people have started using them for their blogs and other content because it helps them connect with their readers. Making gifs is one of those skills that make you look incredible in your friend’s group nowadays.
So, the question is how to make a GIF? Is it hard? We will walk you through the process in this article.
In this article
01 [How to Make a GIF With Photoshop](#Part 1)
02 [How to Make a GIF With Canva](#Part 2)
03 [How to Make a GIF From a YouTube Video](#Part 3)
04 [How to Make a GIF on Mobile](#Part 4)
05 [How to Create Screen-Recording Gifs](#Part 5)
Part 1 How to Make a GIF With Photoshop
Photoshop is probably the best tool for gif-making available in the market right now. They provide you with the essential tools to make the best GIFs out of any video you want.
So here is a step-by-step method to help you make your GIFs in Photoshop and impress your friends.
Step 1: One of the most important steps is to choose the video you want to use in your GIF. GIFs are supposed to be short and express what you want to in that concise sequence, and that’s why choosing a correct sequence of the right length is very important.
Step 2: Now you will have to download the video file to your computer and continue to trim it down to as few frames as possible, and choose the frames that convey the message as accurately as possible.
Step 3: Import the video to Photoshop by going to “File” > “Import” > “Video frames to layers.” Choose the video file you need, and it will appear in the form of separate frames. Now you can select whether you want the entire video or small bits of it; you can also limit the import to any frame to manage the size and time of the video. You can choose different color gradients and many other things according to your preference. And then go to “file” and select “save for web.”

Step 4: As the next step, move ahead with selecting color gradients as per your needs and choice. And then go to “file” and select “save for web,” and select the settings for the saved file until you find the one that suits you.

Step 5: Save the file, and now you can share it with your friends or upload it to different free image hosting sites.
Part 2 How to Make a GIF With Canva
Making GIFs on Canva is super easy; if you are someone who is not familiar with tools like Photoshop, Canva is a GIF generator that can help you out in that situation and help you make GIFs. So, how do you use a gif maker in Canva? See the steps below to get a comprehensive idea of that.
Step 1: To create your GIF design in Canva, go to Canva and open “new doc.”

Step 2: Choose the download feature and then continue to the drop-down list and now click on “Animated gif/movie” and “preview animation.”

Step 3: Now you will have to select the animation style for your Gif; currently, Canva has around 6 animation styles that you can choose from.
Step 4: Now you will have to download the GIF. After that, simply share and flaunt your skills to your near ones!
Part 3 How to Make a GIF From a YouTube Video
So, how can you make Gif from any YouTube video? It’s not so hard when there are online Gif makersonline that will help you make excellent and funky Gifs easily and in a short time.
You can use Giphy, an online Gif maker, and one can make gif easily over there; you just have to follow a few simple steps mentioned below.
Step 1: First of all, you will have to choose a video that fits your need and is perfect for a gif like short, expressive, and high quality.

Step 2: The next step in the process is to upload the gif to Giphy, which can be done by choosing “choose file” under the gif section to make a gif online. You can also use video links if you haven’t downloaded the video in your system.

Step 3: Gif has an online gif generator that will generate a perfect gif for you from the video you selected by trimming and other required operations.

Step 4: Now you will have to click on “upload to giphy,” and the GIF you created will start uploading, and you are ready to use the online gif with your friends.

Part 4 How to Make a GIF on Mobile
What if you don’t have a pc or laptop and want tomake a gif on your phone? That’s very easy; here, we will share the steps you need to follow to easily make gifs on your iOS or Android device.
01How to create gif on your iOS device?
There are enough third-party apps that one can use to make GIFs on their iOS device. But on iPhones and iPad, some already installed programs can help you make GIFs easily.
You can use a live photos program and add effects to the shots you want to turn into gifs. You will have to go to the Photos app, select the image and click on the gray corner and add different effects as you desire. You can get a gif maker from the app store and turn your life photos into a gif quickly with all the effects you have added previously.
02How to create a gif with android?
Different Android phones offer different options to turn photos and other animations into gifs. For example, in Samsung Galaxy phones, one can use gif-making features already available in the pre-installed gallery app. In addition, Google photos have a ‘motion photos’ feature that can be converted and used to make GIFs easily using third-party apps you can easily find on Play Store.
03You can use a gif making app
Making GIFs from native tools is fantastic, but you can’t get all the features when using a native tool on your phone. However, you can download a gif generator online to help you make GIFs easily with your phone itself.
Part 5 How to Create Screen-Recording Gifs
What if you need to create screen recording gifs? That’s not hard, too. Actually, it’s super easy. So, to begin with, all you need is to get a screen recording application downloaded. It should be compatible to the device you want to record screen of. Also, keep the part of the video you want to turn into GIF.
Now, once you have the video file, things will become easy. All you have to do is upload the video file to Wondershare Filmora Video Editor and trim the video to the desired length and make the perfect gif to share with your friends and family!

Wondershare Filmora - Best Video Editor for Mac/Windows
5,481,435 people have downloaded it.
Build unique custom animations without breaking a sweat.
Focus on creating epic stories and leave the details to Filmora’s auto features.
Start a creative adventure with drag & drop effects and endless possibilities.
Filmora simplifies advanced features to save you time and effort.
Filmora cuts out repetition so you can move on to your next creative breakthrough.
Now, you must be wondering about Filmora; you must be aware of Photoshop already, but filmora is an equally appealing tool that one can use to edit videos, make gifs online, and much more. The best part is that it’s super easy to use and doesn’t need you to have any skills at all.
With Filmora, you can do professional editing and use all sorts of tools quickly, and you can also use it to make awesome gifs. Gif making is straightforward, and it’s for you to try tools that make the process fun too.
● Key Takeaways from This Episode →
● So, here are the points we can summarize through this article.
● The first and best thing is that you don’t need to have any technical knowledge to make gifs to share with all your friends and have fun. You can easily make a gif online and add all sorts of animations and filters that you like.
● You don’t need to have a PC either, you can easily use Gif generators that are available online, and they will be able to make a perfect gif for yourself on your phone itself.
● Using and making perfect gifs is an art, and you need to take care of the video you choose, time, lengths, the expression, and other filters while you make a gif online.
GIFs are a way for teens to add a bit of fun to their private or group conversations while expressing themselves in a fun and expressive way. GIFs are trendy on sites like Twitter and Tumblr, but more and more people have started using them for their blogs and other content because it helps them connect with their readers. Making gifs is one of those skills that make you look incredible in your friend’s group nowadays.
So, the question is how to make a GIF? Is it hard? We will walk you through the process in this article.
In this article
01 [How to Make a GIF With Photoshop](#Part 1)
02 [How to Make a GIF With Canva](#Part 2)
03 [How to Make a GIF From a YouTube Video](#Part 3)
04 [How to Make a GIF on Mobile](#Part 4)
05 [How to Create Screen-Recording Gifs](#Part 5)
Part 1 How to Make a GIF With Photoshop
Photoshop is probably the best tool for gif-making available in the market right now. They provide you with the essential tools to make the best GIFs out of any video you want.
So here is a step-by-step method to help you make your GIFs in Photoshop and impress your friends.
Step 1: One of the most important steps is to choose the video you want to use in your GIF. GIFs are supposed to be short and express what you want to in that concise sequence, and that’s why choosing a correct sequence of the right length is very important.
Step 2: Now you will have to download the video file to your computer and continue to trim it down to as few frames as possible, and choose the frames that convey the message as accurately as possible.
Step 3: Import the video to Photoshop by going to “File” > “Import” > “Video frames to layers.” Choose the video file you need, and it will appear in the form of separate frames. Now you can select whether you want the entire video or small bits of it; you can also limit the import to any frame to manage the size and time of the video. You can choose different color gradients and many other things according to your preference. And then go to “file” and select “save for web.”

Step 4: As the next step, move ahead with selecting color gradients as per your needs and choice. And then go to “file” and select “save for web,” and select the settings for the saved file until you find the one that suits you.

Step 5: Save the file, and now you can share it with your friends or upload it to different free image hosting sites.
Part 2 How to Make a GIF With Canva
Making GIFs on Canva is super easy; if you are someone who is not familiar with tools like Photoshop, Canva is a GIF generator that can help you out in that situation and help you make GIFs. So, how do you use a gif maker in Canva? See the steps below to get a comprehensive idea of that.
Step 1: To create your GIF design in Canva, go to Canva and open “new doc.”

Step 2: Choose the download feature and then continue to the drop-down list and now click on “Animated gif/movie” and “preview animation.”

Step 3: Now you will have to select the animation style for your Gif; currently, Canva has around 6 animation styles that you can choose from.
Step 4: Now you will have to download the GIF. After that, simply share and flaunt your skills to your near ones!
Part 3 How to Make a GIF From a YouTube Video
So, how can you make Gif from any YouTube video? It’s not so hard when there are online Gif makersonline that will help you make excellent and funky Gifs easily and in a short time.
You can use Giphy, an online Gif maker, and one can make gif easily over there; you just have to follow a few simple steps mentioned below.
Step 1: First of all, you will have to choose a video that fits your need and is perfect for a gif like short, expressive, and high quality.

Step 2: The next step in the process is to upload the gif to Giphy, which can be done by choosing “choose file” under the gif section to make a gif online. You can also use video links if you haven’t downloaded the video in your system.

Step 3: Gif has an online gif generator that will generate a perfect gif for you from the video you selected by trimming and other required operations.

Step 4: Now you will have to click on “upload to giphy,” and the GIF you created will start uploading, and you are ready to use the online gif with your friends.

Part 4 How to Make a GIF on Mobile
What if you don’t have a pc or laptop and want tomake a gif on your phone? That’s very easy; here, we will share the steps you need to follow to easily make gifs on your iOS or Android device.
01How to create gif on your iOS device?
There are enough third-party apps that one can use to make GIFs on their iOS device. But on iPhones and iPad, some already installed programs can help you make GIFs easily.
You can use a live photos program and add effects to the shots you want to turn into gifs. You will have to go to the Photos app, select the image and click on the gray corner and add different effects as you desire. You can get a gif maker from the app store and turn your life photos into a gif quickly with all the effects you have added previously.
02How to create a gif with android?
Different Android phones offer different options to turn photos and other animations into gifs. For example, in Samsung Galaxy phones, one can use gif-making features already available in the pre-installed gallery app. In addition, Google photos have a ‘motion photos’ feature that can be converted and used to make GIFs easily using third-party apps you can easily find on Play Store.
03You can use a gif making app
Making GIFs from native tools is fantastic, but you can’t get all the features when using a native tool on your phone. However, you can download a gif generator online to help you make GIFs easily with your phone itself.
Part 5 How to Create Screen-Recording Gifs
What if you need to create screen recording gifs? That’s not hard, too. Actually, it’s super easy. So, to begin with, all you need is to get a screen recording application downloaded. It should be compatible to the device you want to record screen of. Also, keep the part of the video you want to turn into GIF.
Now, once you have the video file, things will become easy. All you have to do is upload the video file to Wondershare Filmora Video Editor and trim the video to the desired length and make the perfect gif to share with your friends and family!

Wondershare Filmora - Best Video Editor for Mac/Windows
5,481,435 people have downloaded it.
Build unique custom animations without breaking a sweat.
Focus on creating epic stories and leave the details to Filmora’s auto features.
Start a creative adventure with drag & drop effects and endless possibilities.
Filmora simplifies advanced features to save you time and effort.
Filmora cuts out repetition so you can move on to your next creative breakthrough.
Now, you must be wondering about Filmora; you must be aware of Photoshop already, but filmora is an equally appealing tool that one can use to edit videos, make gifs online, and much more. The best part is that it’s super easy to use and doesn’t need you to have any skills at all.
With Filmora, you can do professional editing and use all sorts of tools quickly, and you can also use it to make awesome gifs. Gif making is straightforward, and it’s for you to try tools that make the process fun too.
● Key Takeaways from This Episode →
● So, here are the points we can summarize through this article.
● The first and best thing is that you don’t need to have any technical knowledge to make gifs to share with all your friends and have fun. You can easily make a gif online and add all sorts of animations and filters that you like.
● You don’t need to have a PC either, you can easily use Gif generators that are available online, and they will be able to make a perfect gif for yourself on your phone itself.
● Using and making perfect gifs is an art, and you need to take care of the video you choose, time, lengths, the expression, and other filters while you make a gif online.
Also read:
- New How to Make Subtitle Videos
- New 2024 Approved Looking For a Cheap Camera to Make Slow Motion Video? Get It Now
- New In 2024, Dubbing Videos With Voiceovers | Using Wondershare Filmora
- New 15 Best CapCut Templates for Slow Motion Editing
- New This Article Aims to Show You How to Export Videos in Filmora
- New 6 Best MP4 Mergers to Join Videos Easily for 2024
- 2024 Approved Top 18 Video Editors for PC and Mac
- In 2024, How to Zoom In and Out on Mac
- Are You Looking for Ideas for Funny YouTube Videos? Your Search Is Over. Read the Article Below and Get the Most Information Regarding Funny Videos. You Will Also Get to Know About the Best Funny Video Background Music
- New Discover the Best Game Recording Software for Your PC in This Developing Industry. Record Your Gameplay in Real Time and Enjoy the Benefits that Come with It
- New How to Create Intro Video with KineMaster
- New Best 5 Solutions on How to Add Emojis to iPhone
- 2024 Approved How to Edit A Time Lapse Video on iPhone?
- 2024 Approved How to Slow Down Time-Lapse Videos on iPhone
- Updated Best Cloud Storage Service for Videos
- New Demystifying the Vectorscope A Comprehensive Guide for Premiere Pro Color Correction
- New The Premiere Pro Video Templates Help Make Original Content of Broadcast Quality. The Article Introduces 10 Free Premiere Pro Templates that Are Sure to Make Your Life Easy
- In 2024, 11 Ways To Radial Blur To Images (iPhone/Android/Mac/Windows)
- Updated How to Create Sony Vegas Freeze Frame
- Updated 4 Solutions to Crop a Video on Android Easily
- Updated Unleash the Power of Video Slow Motion with Wondershare Filmora. Find Out How to Create Slow Motion Video with the Effective Speed Ramping Feature on Filmora
- New 3 Different Methods to Correct Color Distortion in Videos
- Updated In 2024, Best Video Editors to Add Text to a Video
- In 2024, If You Want to Replace or Delete the Sky Pictures or Background Media, Then Give a Quick Read to This Article for Effective Solutions
- 2024 Approved Using Adobe After Effects as a Pro-Level Editing Platforms Demands You to Add Expressions in After Effects. If Youre Looking for the Solutions on After Effects How to Add Expressions Then Weve Got You Covered. Learn More Here
- New In 2024, 10+ Best Unlimited FCPX Slideshow Templates
- New Do You Want to Enable the Motion Blur Effect While Playing Dying Light 2? Read This Article to Find Out How to Use Dying Light 2 Motion Blur for a Great Gaming Experience
- New 2024 Approved Best Dark Moody LUTs During Editing
- 3 Ways to Fake GPS Without Root On Infinix Note 30 | Dr.fone
- Prevent Cross-Site Tracking on Tecno Spark 20 Pro+ and Browser | Dr.fone
- 3 Ways to Change Location on Facebook Marketplace for OnePlus Nord N30 SE | Dr.fone
- How to Transfer Data from Nokia C110 to Samsung Phone | Dr.fone
- How To Transfer Data From iPhone 6s To Other iPhone 12 Pro Max devices? | Dr.fone
- Vivo V29e Music Recovery - Recover Deleted Music from Vivo V29e
- Best Methods for Nokia C210 Wont Turn On | Dr.fone
- In 2024, Full Guide to Bypass Samsung Galaxy Z Fold 5 FRP
- Complete Tutorial Sending Photos From Apple iPhone 14 to iPad | Dr.fone
- How to Hard Reset Honor X50 GT Without Password | Dr.fone
- Wondering the Best Alternative to Hola On Honor Play 8T? Here Is the Answer | Dr.fone
- Preparation to Beat Giovani in Pokemon Go For Realme Narzo 60 5G | Dr.fone
- How To Change Your SIM PIN Code on Your Realme Phone
- The Ultimate Guide How to Bypass Swipe Screen to Unlock on Realme V30 Device
- Title: New Create Risograph Effect In Photoshop A Beginners Guide
- Author: Chloe
- Created at : 2024-05-20 03:38:27
- Updated at : 2024-05-21 03:38:27
- Link: https://ai-editing-video.techidaily.com/new-create-risograph-effect-in-photoshop-a-beginners-guide/
- License: This work is licensed under CC BY-NC-SA 4.0.


