
New Create Risograph Effect In Photoshop A Beginners Guide for 2024

Create Risograph Effect In Photoshop: A Beginner’s Guide
Risograph printing is a digital printing process that combines the best features of offset and screen printing used by many small print shops and design studios to provide trendy vibes and a classic look to the images.
If you’re a novice graphic designer or illustrator, you’ve probably seen Risograph prints and wondered how they are made. Well, this article will help you create a risograph effect in Photoshop quickly!
Without further delay, let’s get started with our step-by-step tutorial!
What Is Risograph Effect?
Before we look into how to create a risograph effect in Photoshop in the later part of this article, let’s have a basic understanding of Risograph.
Risograph was created in 1986 by a Japanese company called Riso Kagaku Corporation. It’s a form of stencil printing, a technique that uses a stencil to create an image on a piece of paper.
The Risograph machine prints images by building them up one layer at a time, with each subsequent layer being a different color. Because of this, each print produced is imperfect, though some artists believe this only adds to the Risograph’s unique charm and distinct look.
The Risograph printing effect gives images a vibrant and bold look, making them perfect for ads, magazines, and abstract artworks. The printing method is also used for many products, including books, fabric, magazines, newspapers, plastic, metal, and even some forms of packaging.
How To Use Photoshop To Create Risograph Effect
The tutorial will be divided into three parts to help you master the risograph effect-creating skills to give your design project a distinct look.
Firstly, we will focus on how to use Photoshop in the following way to create the primary risograph effect.
How To Create the Basic Risograph Effect in Photoshop
Step1 Launch Adobe Photoshop on your laptop/desktop (For this tutorial, we are using Photoshop CC 2021). Click “Create New,” select the document size, and click “Create.” Now set a paper-like textured layer on the canvas. Click “Ctrl + Shift + N,” and in the new layer window, set the mode to “Multiply.” Click “OK.” to confirm your action.

Step2 Next, press “Ctrl+Shift+E” to combine your layers and select the “Edit” option from the top toolbar. Scroll down and select “Define Pattern.” Set the pattern name and click “OK.”

Click “Layer” from the toolbar and choose “New Fill Layer”> “Pattern.” Next, select your new pattern layer and click “OK” to get a grid layer.

Step3 Let’s place an object/subject onto our canvas. Set the issue to “Multiply,” right-click on it and choose “Convert to Smart Object.”

Step4 To add a Gradient Map Layer, click “Layer,” scroll down and click “New Adjustment Layer.” Select “Gradient Map…” from the drop-down menu and click “OK” to confirm.

Use the “Properties” panel and select the “gradient” colors. Here we’ve chosen shades of “White” and “Red.” Click “OK” to apply.

Step5 For the image to have less contrast, click “Image” in the top toolbar and click “Adjustments.” Select “Levels…” from the menu. Now, set the black output to 73.

Finally, click “Filter” and open the “Filter Gallery.” Select “Sketch” > “Torn Edge,” set Image balance to 30, smoothness, and contrast to 15, 15 respectively. Click “OK” to apply the changes.

How To Create A Dual-Tone Risograph Effect
After creating an image with the risograph effect, how to make it more visually vertical? At this time, the dual-tone impact will help us have a more delicate picture.
The dual-tone effect is a technique in the risograph effect that combines two or more overlapping images to give a more vibrant look to the final project or emphasize the critical concept, information, or idea.
To create a dual-tone risograph effect in Photoshop, do the following steps.
Step1 To create a dual-tone risograph effect, add another subject to the canvas and set the blending mode to Multiply. Also, change its opacity to blend the two issues well. Make sure to turn the subject to Smart Object by right-clicking on the object’s layer and selecting “Convert to Smart Object.” Adjust the position of the subject on the previous one.

Step2 Select the layer of the new subject and click “Layer” Click “New Adjustment Layer” and select “Gradient Map…” from the drop-down menu.
Open the Gradient Editor and set the gradient colors of the new subject. Click “OK” to confirm. Click “Image” and choose “Adjustments” from the drop-down menu. Select “Levels” and set the Black Output to 73.
Step3 Click “Filter” and open “Filter Gallery.” Navigate to “Swatches” > “Torn Edge” and set the Image Balance, Smoothness, and Contrast to 30, 15, and 15, respectively, if you want to smooth down the subject.
Finally, your dual-tone effect is created in Photoshop!
How To Blend Images Using Layer Modes
In this part, let’s see how to use the layer modes to add another subject to the canvas and blend it with the previous ones.
Step1 Place the new subject on the canvas and set the layer mode to Multiply by pressing the “Ctrl + Shift + N” and selecting “Multiply” from the drop-down menu in the new pop-up window. Click “Ok” to apply your changes.
To adjust the size of the object, click “Edit” from the top toolbar, and select “Transform.” From the drop-down menu, select “Scale.” Use the handles to make the object smaller or larger.
Step2 Click the “Move” icon from the left menu and drag the object to set its position. Now, copy and clip the Gradient mode from the main subject to the new one.
Step3 Apply the Level and Filter Galler to the new object (Same settings as the main subject). That’s it. You’ve successfully blended images using the layer mode.

Video Tutorial - How To Make a Risograph Texture Effect in Photoshop
Apart from the guidance above, we also prepared a tutorial video for you. Hopefully, you can create an ideal image with Risograph Texture Effect successfully.
Conclusion
In this article, we’ve explored the risograph effect and when it was created. We’ve provided a step-by-step process on how to create a risograph effect in Photoshop to give your pictures a distinctly vintage look.
Moreover, we’ve discussed creating dual-tone effects and blending images using the layer modes with simple steps and original screenshots while creating a sample project on Photoshop.
We hope you’ve enjoyed reading this article and that you can now give a distinct vibrant, and bold yet imperfect look to your images using the risograph effect in Adobe Photoshop.
Free Download For Win 7 or later(64-bit)
Free Download For macOS 10.14 or later
CapCut Lenta Template: How It Benefits Slow Motion Video
Slow-motion videos in black and white filters are trending on social media these days. You might be curious how everyone creates such cool videos. It is possible with CapCut, a video editor associated with TikTok. The question arises: is it difficult to achieve perfection in such slow-motion videos? Then, let us tell you there is a camera Lenta CapCut template for this purpose.
Using it, you just have to import the media of your choice and leave the process on CapCut. This article will guide you on making a slow-motion video with customization. Also, you will learn more about Camera Lenta CapCut to explore it quickly. Keep reading to create perfect slow motion by identifying the most powerful alternative.
Slow Motion Video Maker Slow your video’s speed with better control of your keyframes to create unique cinematic effects!
Make A Slow Motion Video Make A Slow Motion Video More Features

Part 1. An Introductory Review of CapCut Video Editor
CapCut is a smart and high-efficiency tool to ease your content creation journey. Beginners and professionals use this platform for captivating social media content. It’s a handy tool to collaborate with teammates on projects within a secure workspace. Unfortunately, it’s a full-featured software but still far from many major video editing software.

Key Features of CapCut
This versatile tool simplifies complex editing tasks with its straightforward interface. It’s a default video editor for TikTok, the most popular video-sharing platform. You can download CapCut on Windows, macOS, and smartphones or use it online. If you want to explore its functionalities before using it, then keep reading.
- Predesigned Templates: CapCut is trending on TikTok due to its templates. It offers predesigned templates in which users do nothing except import videos. Such templates contain pre-existing music, effects, text, and transitions. You can browse desired templates by tapping on categories like For You, Meme, and Beat.
- Editing Functions: Like other editing platforms, CapCut offers common trimming and merging features. You can annotate videos and add customized text with adjustable font sizes and shapes. Besides, users can adjust the speed of video to create slow-mo or fast-forward clips. It allows you to reverse footage to add a fun factor to the content.
- Audio Editing: This video editor makes copyrighted music library accessible to users. You can import audio from your gallery if you fail to find your desired music. Also, it allows you to extract a soundtrack from a video. Users can cut down audio parts to adjust their duration with the video. You will also get the flexibility to improve the audio quality of your added sound.
- Keyframe and Tracking: With AI integration, this tool detects the motion of video objects. Afterward, it changes the background of the video while retaining the main objects. Plus, you can create stunning motion graphics and animated effects with its keyframe option. It can adjust the color, opacity, shape, and position of the added keyframe animations.
Part 2. CapCut Lenta Template: What Is It and How It Benefits Slow Motion Video Creation?
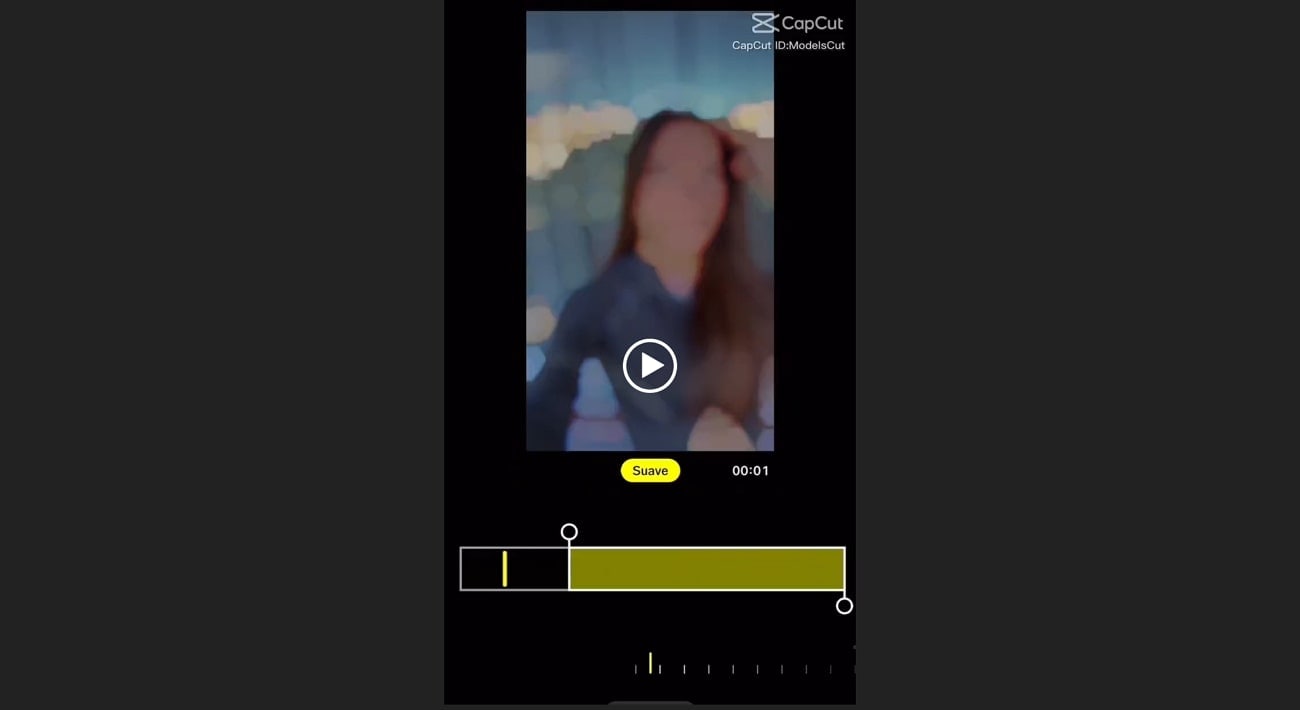
As highlighted above, CapCut is widely famous for its video templates. Among some popular and massively used templates is the Lenta video template. It shows blurry faces and objects at first glance with a black-and-white filter. Moving forward with this, you will see an unblur video revealing with a beat. The Lenta template format is now available in 10 more options added by famous creators.
Camera Lenta CapCut has crossed the usage of over 500 million. The video created with such a template provides a cool look and glorifies your social persona. Anyone without a basic knowledge of video editing can make slow-motion videos by adding clips. This template has enabled you to create a slow-motion video with effects quickly.
Part 3. A Simple Guide to Creating Slow Motion Videos with CapCut
Despite using the Camera Lenta CapCut Template, you can also create slow motion . If the template does not emphasize details in slow-mo, edit it yourself. In this regard, you should follow the steps below to access and use the slow-motion option.
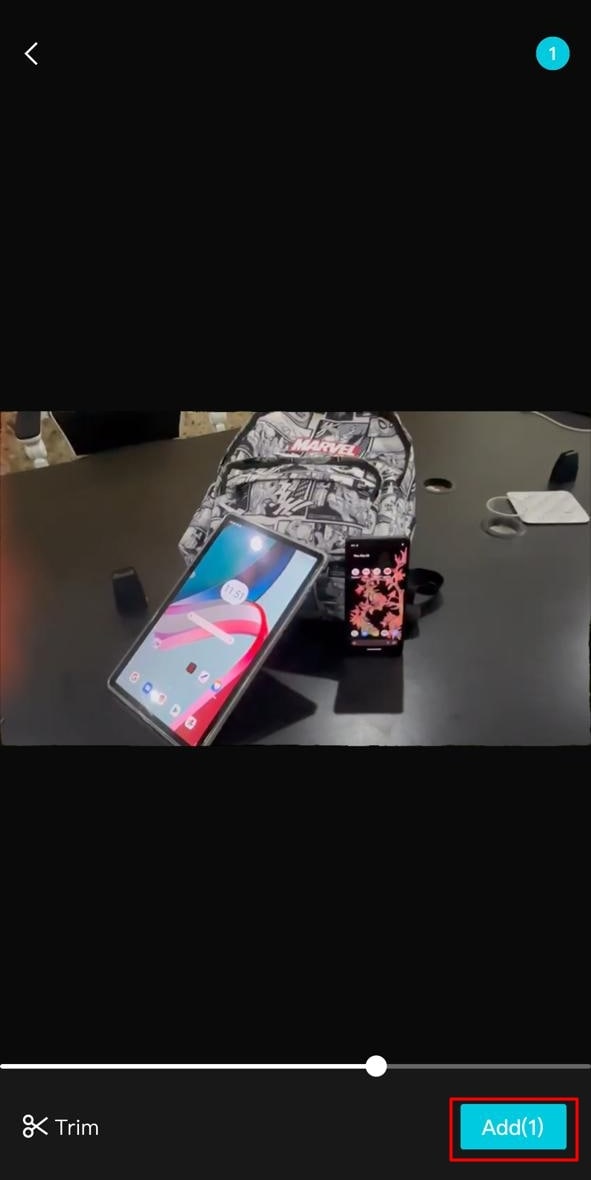
Step 1: Launch the CapCut application in your system and access its main interface. Click on the “New Project” to enter the editing window of this platform. Go to the media panel and tap “Add” to select media for the process. Drag material to the timeline section below and begin the editing.
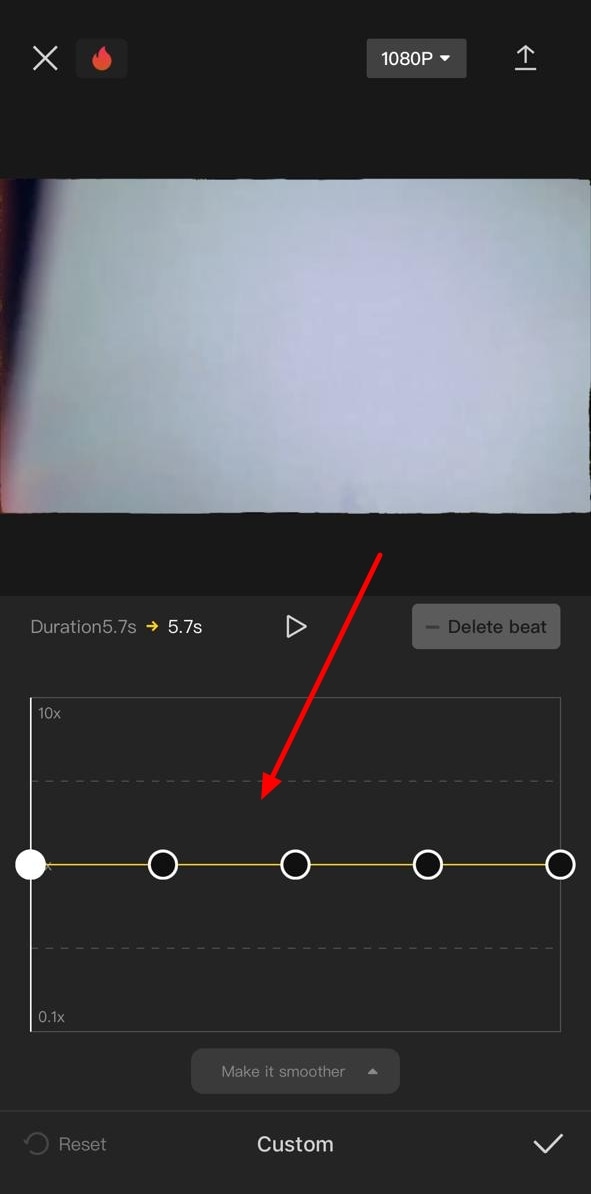
Step 2: After dropping the video, you will see the editing panel on the right side. Move there and hit the “Speed” option next to the “Split.” Then, choose “Curve” and find speed ramping templates. You can pick one otherwise, tap “Customize” and find a graph below. Adjust the dots on the graph downward to slow down or upward to fast forward the video smoothly.
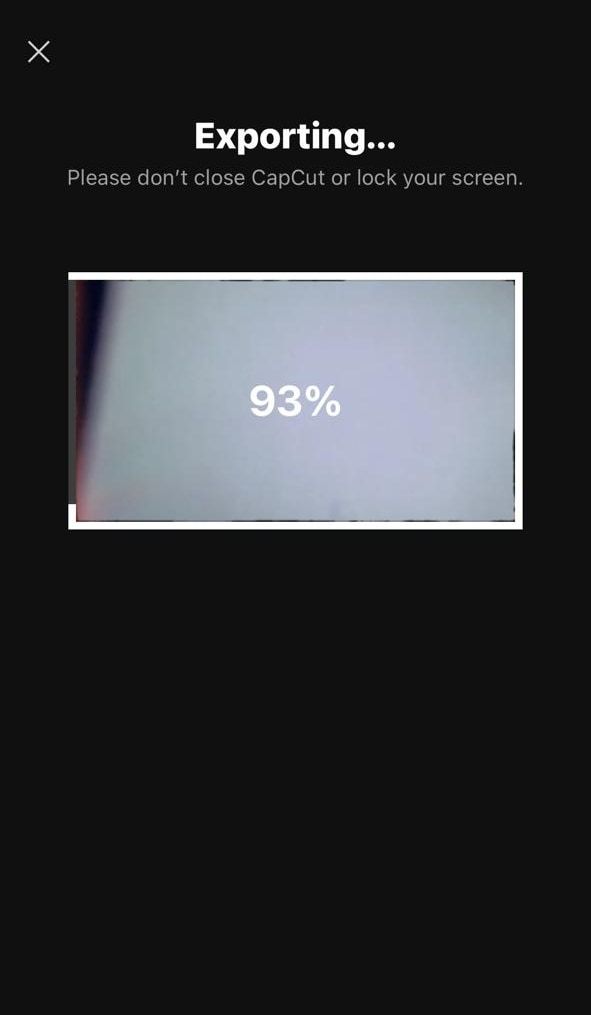
Step 3: After making the desired slow motion, go to the top right corner to hit the “Export” button. Set parameters from the “Export” screen and press the “Export” again to get the video in the gallery.
Part 4. The Perfect Desktop Alternative in the Form of Wondershare Filmora for Slow Motion Videos
There is a need to manually edit the video for desired changes. Shifting video in slow motion effect by Camera Lenta CapCut is time-consuming and difficult. The best alternative to this slow-motion video app is Wondershare Filmora . It is easily available on the desktop rather than browsing the apps on the internet. Filmora is an AI-powered video editing tool that gives high-quality results.
Users can get screen recording, AI text-to-speech, and many other benefits from this tool. They can apply the slow-motion effect in video with its Uniform Speed feature. Plus, these AI features make the editing process easier than the CapCut video editor.
Free Download For Win 7 or later(64-bit)
Free Download For macOS 10.14 or later
How to Create Slow-Motion Video by Filmora
Filmora makes the slow-motion video process easy due to advanced features. You do not need to be a professional editor to edit the video on Filmora. It has easy-to-follow steps to create a slow-motion video. So, let’s go through the steps to understand the video editing process.
Step 1Install the Filmora to Import Media
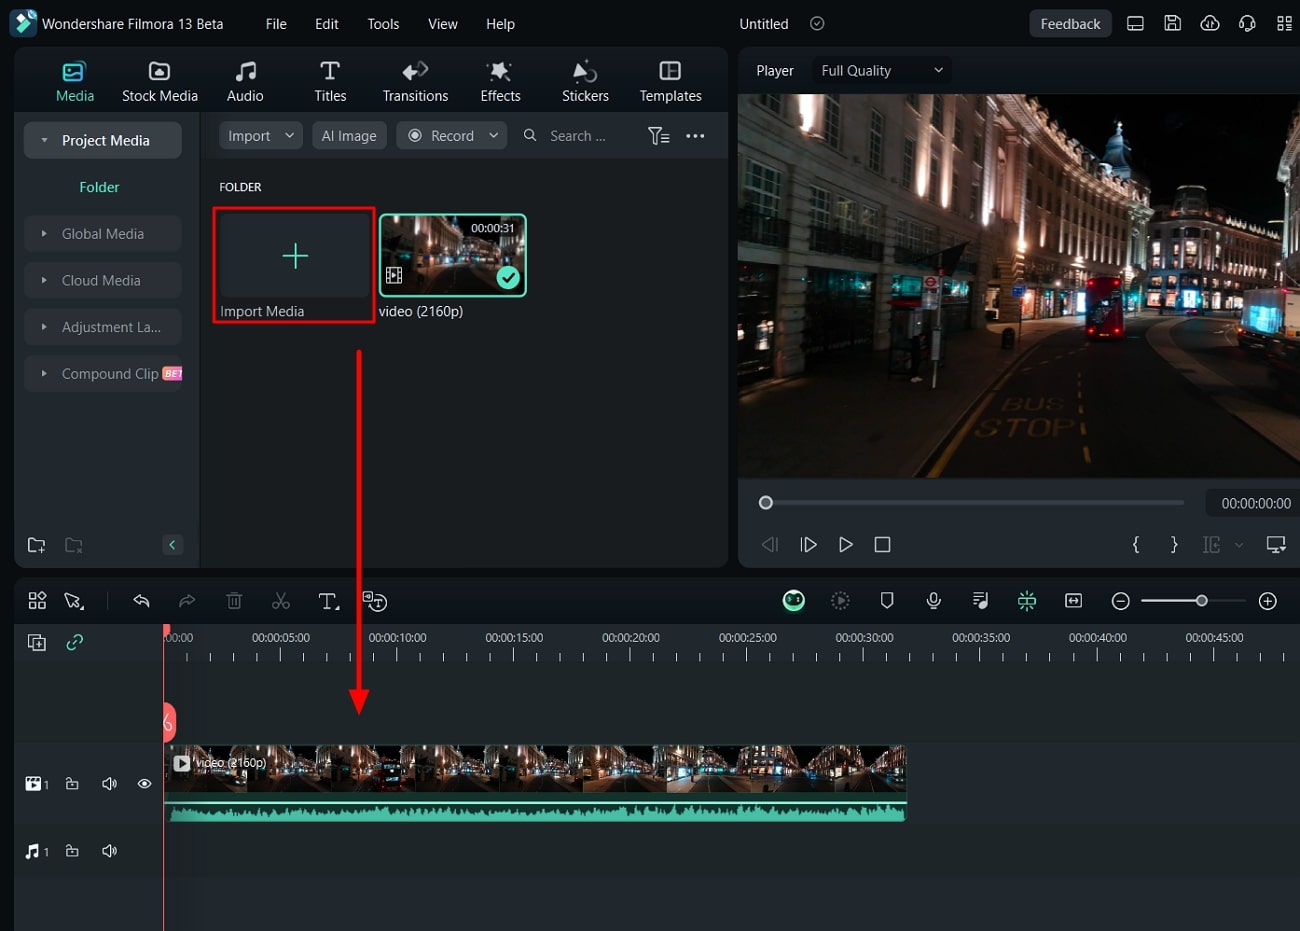
Install the Filmora on your desktop and open it to explore it. After that, click on the “New Project” option from the main interface. This option helps to access the editing screen to import the required file by pressing the “Ctrl+I” keys.
Step 2Use the Uniform Speed Feature to Slow Down the Video
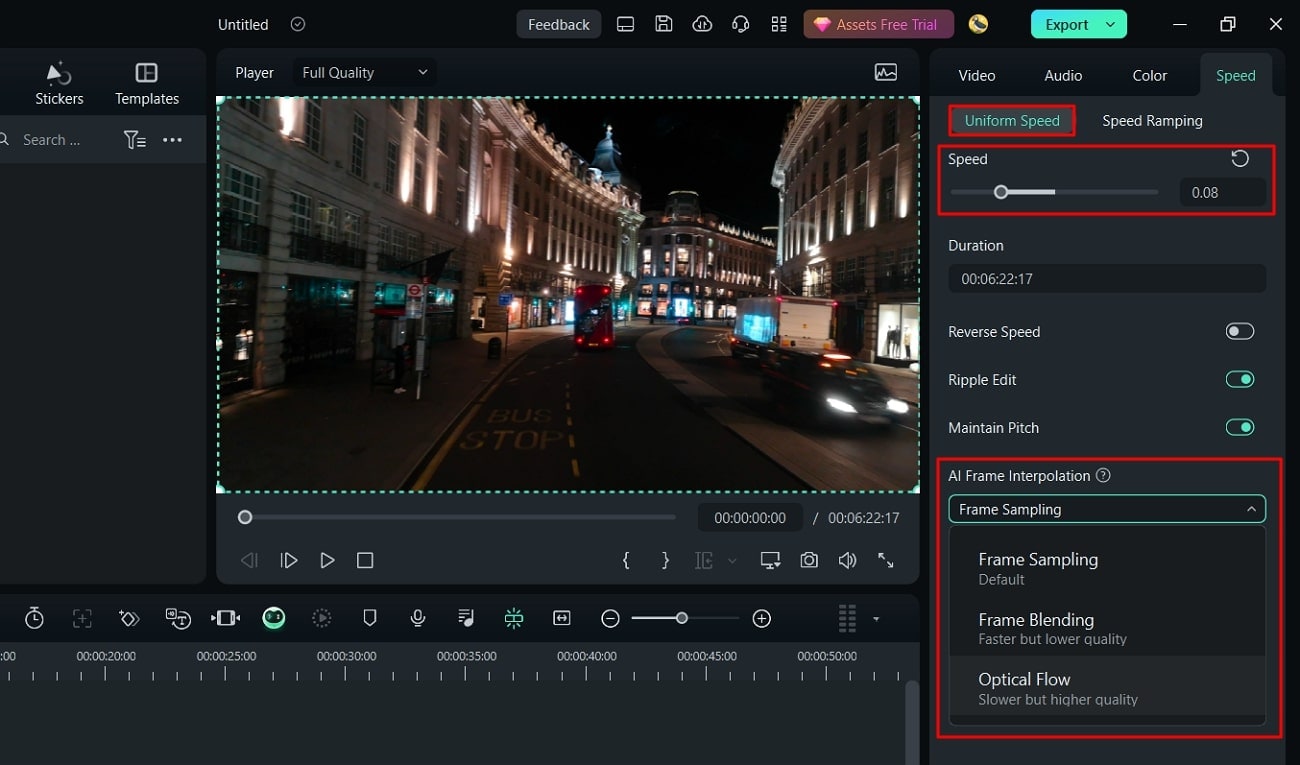
After importing the file, drag the file to the timeline panel and hit “Ctrl + R” on the video to access the speed options. From the displayed “Uniform Speed” panel, Slow down the video with the “Speed” slider. Retain the quality of the video by heading to the “AI Frame Interpolation” drop-down list. Click on the “AI Frame Interpolation” downward icon to choose the “Optical Flow” option.
Step 3Finalize the Process and Save it
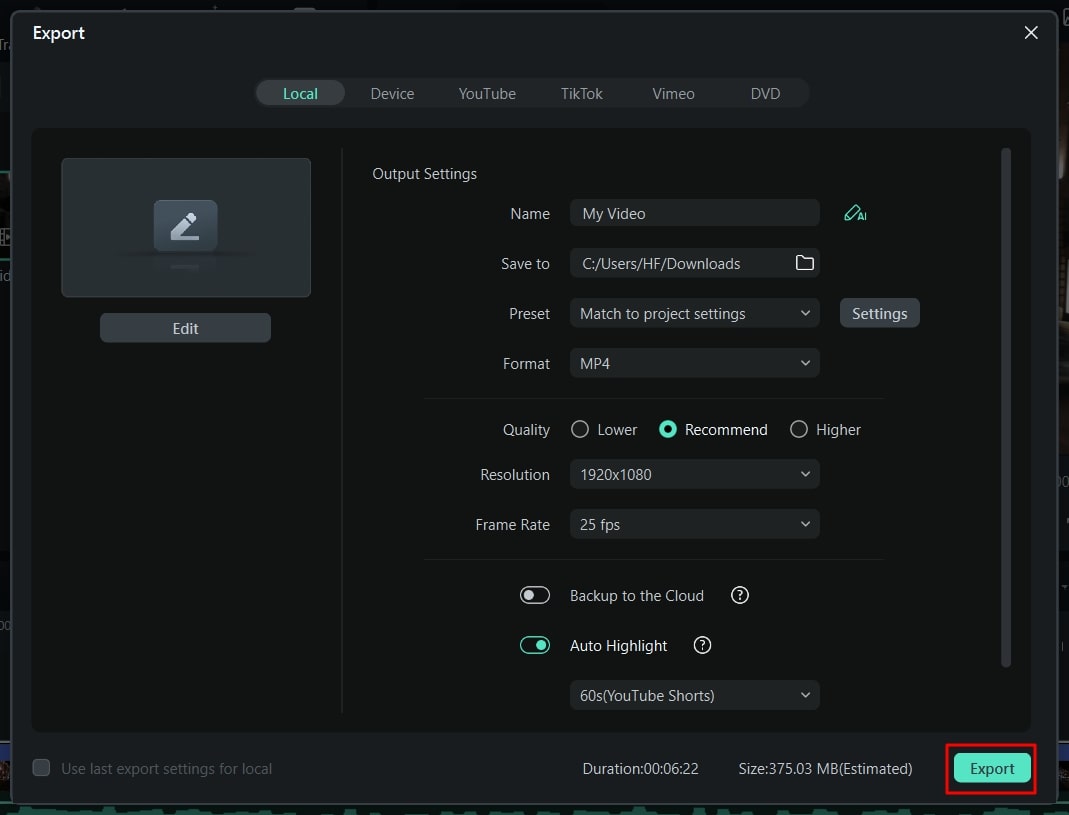
Make further editing if required or get a final preview to see the applied changes. After finalizing, save the project by selecting the “Export” button in the top right corner.
Key Features of Filmora in Video Editing
The key functionalities of this editing tool have been discussed in this part. You can go through this to understand the workings of this editor and get maximum benefits:
1. AI Image
Users can visualize their words through the AI Image generator feature of Filmora. In this regard, they should add a proper description in the text to generate the image. The description should include the composition, content, and other details for the exact image. It also offers aspect ratio and image style options to generate accurate AI images.
2. AI Thumbnail Creator
Influencers and social media activists post videos regularly. Thumbnails boost viewer engagement, so they add the thumbnail after finalizing the video. Filmora offers the AI Thumbnail feature to generate template-driven thumbnails for video. AI generates the thumbnail automatically by analyzing the best shots from the content.
3. AI Portrait
CapCut is used to change the background of the video. This background-changing process can cause errors in the final video. Filmora has an AI portrait feature to change the background accurately. It also offers versatility by offering 70+ stickers and AR effects. AI integration tracks the main object and facial features to add effects frame-by-frame.
Conclusion
CapCut is famous because it provides ease in editing to non-tech persons. As highlighted, the camera Lenta CapCut template requires clips to generate slow-mo videos. In this regard, users don’t need to put any effort and get appealing content automatically. Besides, this article has shown the steps to slow down video manually.
CapCut proves difficult for beginners to slow down video with speed ramping. So, if you need an easier but more advanced solution, you can benefit from Wondershare Filmora. It can ease your tasks and take your video editing to a professional level.
Make A Slow Motion Video Make A Slow Motion Video More Features

Part 1. An Introductory Review of CapCut Video Editor
CapCut is a smart and high-efficiency tool to ease your content creation journey. Beginners and professionals use this platform for captivating social media content. It’s a handy tool to collaborate with teammates on projects within a secure workspace. Unfortunately, it’s a full-featured software but still far from many major video editing software.

Key Features of CapCut
This versatile tool simplifies complex editing tasks with its straightforward interface. It’s a default video editor for TikTok, the most popular video-sharing platform. You can download CapCut on Windows, macOS, and smartphones or use it online. If you want to explore its functionalities before using it, then keep reading.
- Predesigned Templates: CapCut is trending on TikTok due to its templates. It offers predesigned templates in which users do nothing except import videos. Such templates contain pre-existing music, effects, text, and transitions. You can browse desired templates by tapping on categories like For You, Meme, and Beat.
- Editing Functions: Like other editing platforms, CapCut offers common trimming and merging features. You can annotate videos and add customized text with adjustable font sizes and shapes. Besides, users can adjust the speed of video to create slow-mo or fast-forward clips. It allows you to reverse footage to add a fun factor to the content.
- Audio Editing: This video editor makes copyrighted music library accessible to users. You can import audio from your gallery if you fail to find your desired music. Also, it allows you to extract a soundtrack from a video. Users can cut down audio parts to adjust their duration with the video. You will also get the flexibility to improve the audio quality of your added sound.
- Keyframe and Tracking: With AI integration, this tool detects the motion of video objects. Afterward, it changes the background of the video while retaining the main objects. Plus, you can create stunning motion graphics and animated effects with its keyframe option. It can adjust the color, opacity, shape, and position of the added keyframe animations.
Part 2. CapCut Lenta Template: What Is It and How It Benefits Slow Motion Video Creation?
As highlighted above, CapCut is widely famous for its video templates. Among some popular and massively used templates is the Lenta video template. It shows blurry faces and objects at first glance with a black-and-white filter. Moving forward with this, you will see an unblur video revealing with a beat. The Lenta template format is now available in 10 more options added by famous creators.
Camera Lenta CapCut has crossed the usage of over 500 million. The video created with such a template provides a cool look and glorifies your social persona. Anyone without a basic knowledge of video editing can make slow-motion videos by adding clips. This template has enabled you to create a slow-motion video with effects quickly.

Part 3. A Simple Guide to Creating Slow Motion Videos with CapCut
Despite using the Camera Lenta CapCut Template, you can also create slow motion . If the template does not emphasize details in slow-mo, edit it yourself. In this regard, you should follow the steps below to access and use the slow-motion option.
Step 1: Launch the CapCut application in your system and access its main interface. Click on the “New Project” to enter the editing window of this platform. Go to the media panel and tap “Add” to select media for the process. Drag material to the timeline section below and begin the editing.

Step 2: After dropping the video, you will see the editing panel on the right side. Move there and hit the “Speed” option next to the “Split.” Then, choose “Curve” and find speed ramping templates. You can pick one otherwise, tap “Customize” and find a graph below. Adjust the dots on the graph downward to slow down or upward to fast forward the video smoothly.

Step 3: After making the desired slow motion, go to the top right corner to hit the “Export” button. Set parameters from the “Export” screen and press the “Export” again to get the video in the gallery.

Part 4. The Perfect Desktop Alternative in the Form of Wondershare Filmora for Slow Motion Videos
There is a need to manually edit the video for desired changes. Shifting video in slow motion effect by Camera Lenta CapCut is time-consuming and difficult. The best alternative to this slow-motion video app is Wondershare Filmora . It is easily available on the desktop rather than browsing the apps on the internet. Filmora is an AI-powered video editing tool that gives high-quality results.
Users can get screen recording, AI text-to-speech, and many other benefits from this tool. They can apply the slow-motion effect in video with its Uniform Speed feature. Plus, these AI features make the editing process easier than the CapCut video editor.
Free Download For Win 7 or later(64-bit)
Free Download For macOS 10.14 or later
How to Create Slow-Motion Video by Filmora
Filmora makes the slow-motion video process easy due to advanced features. You do not need to be a professional editor to edit the video on Filmora. It has easy-to-follow steps to create a slow-motion video. So, let’s go through the steps to understand the video editing process.
Step 1Install the Filmora to Import Media
Install the Filmora on your desktop and open it to explore it. After that, click on the “New Project” option from the main interface. This option helps to access the editing screen to import the required file by pressing the “Ctrl+I” keys.

Step 2Use the Uniform Speed Feature to Slow Down the Video
After importing the file, drag the file to the timeline panel and hit “Ctrl + R” on the video to access the speed options. From the displayed “Uniform Speed” panel, Slow down the video with the “Speed” slider. Retain the quality of the video by heading to the “AI Frame Interpolation” drop-down list. Click on the “AI Frame Interpolation” downward icon to choose the “Optical Flow” option.

Step 3Finalize the Process and Save it
Make further editing if required or get a final preview to see the applied changes. After finalizing, save the project by selecting the “Export” button in the top right corner.

Key Features of Filmora in Video Editing
The key functionalities of this editing tool have been discussed in this part. You can go through this to understand the workings of this editor and get maximum benefits:
1. AI Image
Users can visualize their words through the AI Image generator feature of Filmora. In this regard, they should add a proper description in the text to generate the image. The description should include the composition, content, and other details for the exact image. It also offers aspect ratio and image style options to generate accurate AI images.
2. AI Thumbnail Creator
Influencers and social media activists post videos regularly. Thumbnails boost viewer engagement, so they add the thumbnail after finalizing the video. Filmora offers the AI Thumbnail feature to generate template-driven thumbnails for video. AI generates the thumbnail automatically by analyzing the best shots from the content.
3. AI Portrait
CapCut is used to change the background of the video. This background-changing process can cause errors in the final video. Filmora has an AI portrait feature to change the background accurately. It also offers versatility by offering 70+ stickers and AR effects. AI integration tracks the main object and facial features to add effects frame-by-frame.
Conclusion
CapCut is famous because it provides ease in editing to non-tech persons. As highlighted, the camera Lenta CapCut template requires clips to generate slow-mo videos. In this regard, users don’t need to put any effort and get appealing content automatically. Besides, this article has shown the steps to slow down video manually.
CapCut proves difficult for beginners to slow down video with speed ramping. So, if you need an easier but more advanced solution, you can benefit from Wondershare Filmora. It can ease your tasks and take your video editing to a professional level.
Premiere Pro Text Effects Beginner Guide
If you want to edit your raw video footage and turn ordinary clips into eye-catching videos, you will need a professional video editor. Adobe Premiere Pro is the most commonly used premium video editor that most professionals prefer. When it comes to editing videos, text effects play a major role along with video effects and animations.
If you are new to Adobe Premiere Pro, you will experience a steep learning curve. This is because the user interface is specially designed for professional video editors. Therefore, you might not get Premiere Pro text effects readily available. In this article, we will illustrate how you can add Adobe Premiere Pro text effects to your video project. We will also state the best alternative to Premiere Pro to add stunning text effects easily.
Part 1. Steps to Add Text Effects to Adobe Premiere
Text effects are an essential part of videos to enhance the video content immensely. You can add opening titles and end credits with text effects and animations. You can display the dialogues on the screen as subtitles. Showing location information and shooting date through text effects is quite regular these days. Besides, the use of lower thirds for social media promotion in videos is common. Without further ado, let us look at the steps to add Premiere text effects.
Step1 Add Your Text
First of all, you need to import your video and add text to it and apply different text effects. Here we are starting from scratch for better illustration. Go to Window> Essential Graphics> Text Tool(T). Type your text as per your requirements. You will notice a new text layer appearing under Edit tab.
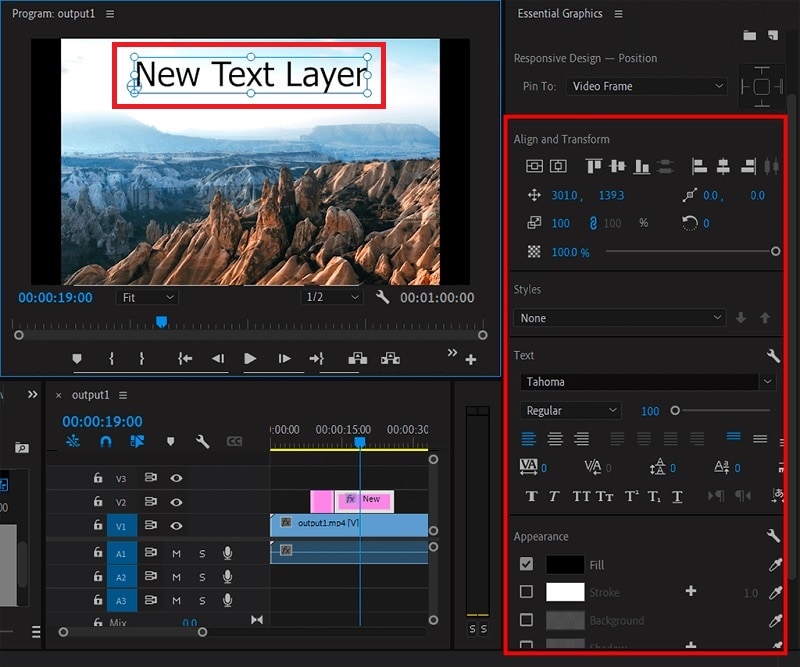
Select the text layer and you will see all the properties that you can tweak. For example, go to Align and Transform section to reposition and resize your text properly. Go to Text section to change the style of the text. Similarly, there is an Appearance section to adjust color, shadow, and much more.
Step2 Apply Pre-Animated Template
Go to Graphics> Essential Graphics and browser through the title templates available to match your requirements. Once you have selected one title template, drag and drop it into your timeline above your video clip.
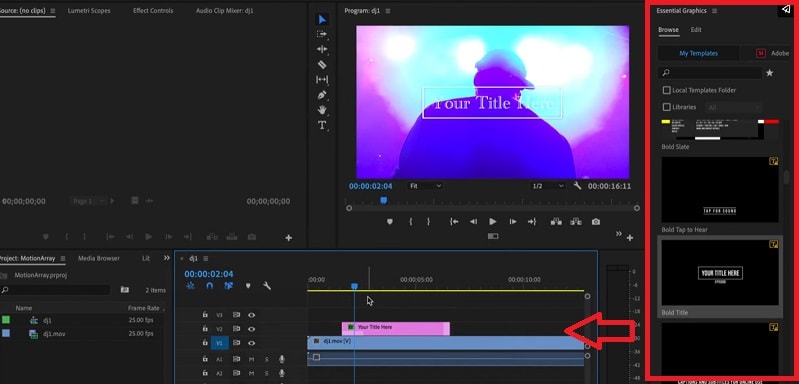
Double-click on the text to edit the content and type your title. Go to Essential Graphics panel and customize the text effect as per your preference. You can also choose the available elements included in the template to enhance the text effects as you think fit.
Step3 Edit the Text Effect and Animation
Select the text layer on your timeline to check out the keyframes applied in the template. Go to Effects Control panel and open Keyframe box by dragging it to the right. Adjust the keyframe to speed up or slow down the animation.
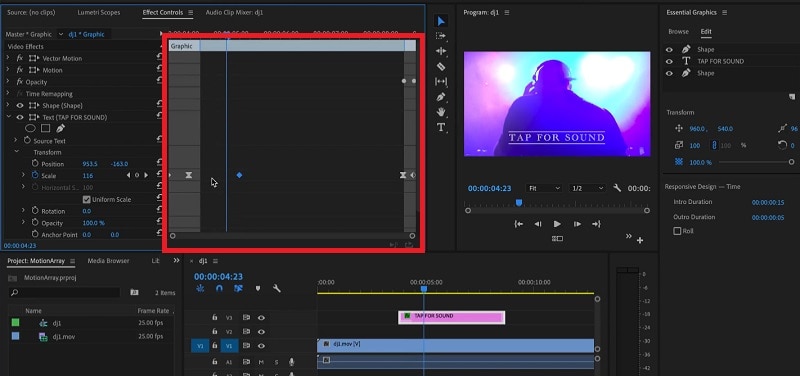
Bring the keyframes closer or spread them apart respectively. You can also adjust Velocity Controls present under different text properties as per the speed requirements.
Part 2. Alternative Way to Make Text Effects
If you are new to Adobe Premiere Pro, you will find title effects Premiere Pro difficult to add and edit as per your requirements. It is very common for amateur video editors to look for an easy alternative to Premiere Pro. We recommend Wondershare Filmora as the best alternative to Adobe Premiere text effects.
Filmora has a super intuitive user interface that is suitable for everyone including those who do not have prior video editing experience. There are more text effects and animations available that you can customize to get the desired effect. Here are the steps to add text effects to your video on Filmora.
Free Download For Win 7 or later(64-bit)
Free Download For macOS 10.14 or later
Step1 Download and install Wondershare Filmora and it is available for both Windows and macOS. Launch the application and click on New Project on the welcome screen.

Step2 Drag and drop your video clips under Project Media folder and then onto the timeline. Go to Titles and you will see different categories of text effects and templates.
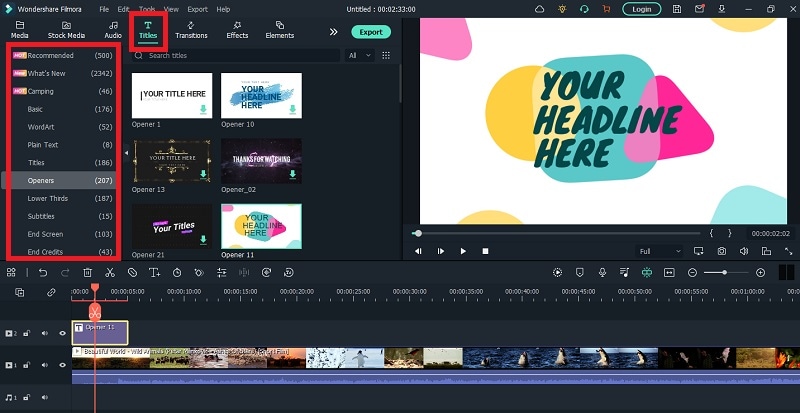
Step3 Select a template whichever you think is perfect for your project and drop it on the timeline. Adjust its position on the timeline as per where you want it to appear. Double-click on it to edit the title and type in your text. Similarly, you can reposition the text from Viewer as per your need.
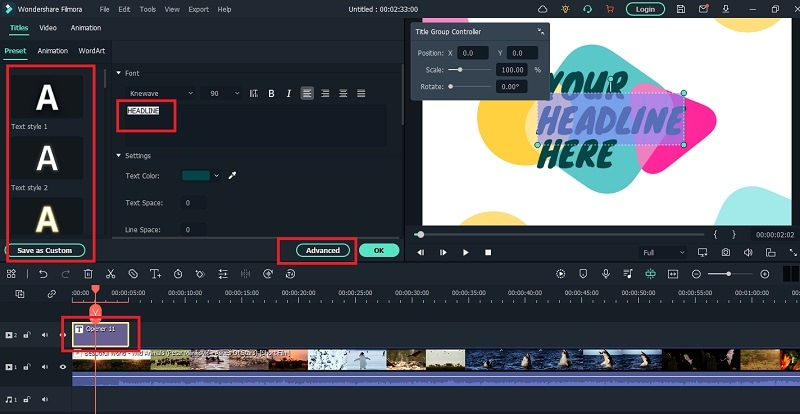
Select the text style as well as adjust fonts and settings to get different styles for your texts. There is also an Advanced section available for detailed editing and getting the desired text effect.
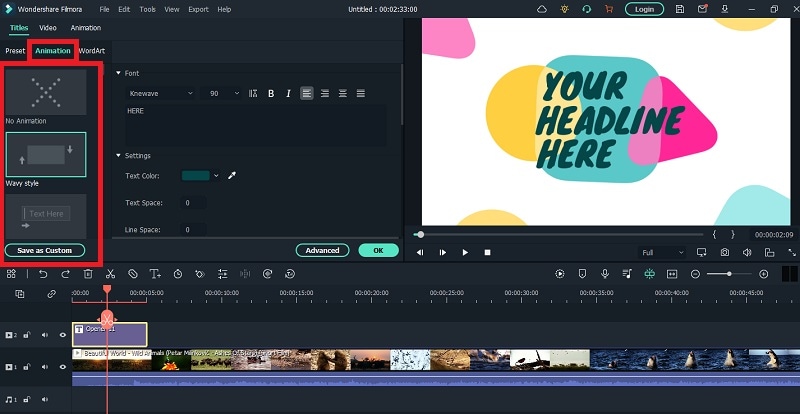
Step4 You can animate the texts in your video from Animation section. Choose from the animation presets to animate individual text in the video. Besides, you can also add keyframes and animate the text as per your preference.
Part 3. Related FAQs on Adobe Premiere Pro
1. How do you make text look good in Premiere Pro?
There are several steps you need to take to make text look good in Premiere Pro. First of all, the color of the text should be in contrast to the background. You can add a rectangle highlighter in the background. Experiment with font and text of the text. Apply a text effect from the different templates available. Customize the effect to get the desired result.
2. How do you add typing effects in Premiere?
Add your text to your video so that a text layer appears on the timeline. Animate the text Effects> Video Effects> Liner Wipe and double-click to get the typing effect. Tweak the parameters like transition completion, wipe angle, and others to smoothen out the animation. Draw a cursor icon using rectangle tool and animation it to move with the text using keyframes.
3. How do I open text effects controls in Premiere Pro?
Select the text layer from the timeline of the project. From the main menu, go to Windows> Effects Control option to open effect controls for text. Otherwise, you can directly go to Effects Control tab located below the menu bar after selecting your text layer.
The Bottom Line
Adding text effects in Premiere Pro can be slightly overwhelming for an amateur video editor who does not have enough experience with Premiere Pro. We have stated the simple steps to apply Premiere Pro text effects to your video project. However, we recommend Wondershare Filmora as the best and the easiest alternative to Premiere Pro where you get more text effects and add them instantly and effortlessly.
Free Download For macOS 10.14 or later
Step1 Download and install Wondershare Filmora and it is available for both Windows and macOS. Launch the application and click on New Project on the welcome screen.

Step2 Drag and drop your video clips under Project Media folder and then onto the timeline. Go to Titles and you will see different categories of text effects and templates.

Step3 Select a template whichever you think is perfect for your project and drop it on the timeline. Adjust its position on the timeline as per where you want it to appear. Double-click on it to edit the title and type in your text. Similarly, you can reposition the text from Viewer as per your need.

Select the text style as well as adjust fonts and settings to get different styles for your texts. There is also an Advanced section available for detailed editing and getting the desired text effect.
Step4 You can animate the texts in your video from Animation section. Choose from the animation presets to animate individual text in the video. Besides, you can also add keyframes and animate the text as per your preference.

Part 3. Related FAQs on Adobe Premiere Pro
1. How do you make text look good in Premiere Pro?
There are several steps you need to take to make text look good in Premiere Pro. First of all, the color of the text should be in contrast to the background. You can add a rectangle highlighter in the background. Experiment with font and text of the text. Apply a text effect from the different templates available. Customize the effect to get the desired result.
2. How do you add typing effects in Premiere?
Add your text to your video so that a text layer appears on the timeline. Animate the text Effects> Video Effects> Liner Wipe and double-click to get the typing effect. Tweak the parameters like transition completion, wipe angle, and others to smoothen out the animation. Draw a cursor icon using rectangle tool and animation it to move with the text using keyframes.
3. How do I open text effects controls in Premiere Pro?
Select the text layer from the timeline of the project. From the main menu, go to Windows> Effects Control option to open effect controls for text. Otherwise, you can directly go to Effects Control tab located below the menu bar after selecting your text layer.
The Bottom Line
Adding text effects in Premiere Pro can be slightly overwhelming for an amateur video editor who does not have enough experience with Premiere Pro. We have stated the simple steps to apply Premiere Pro text effects to your video project. However, we recommend Wondershare Filmora as the best and the easiest alternative to Premiere Pro where you get more text effects and add them instantly and effortlessly.
Looking for a Way to Edit Your Profile Picture for Telegram? Here’s an Easy and Quick Guide on How to Change, Delete and Hide Your Profile Picture with Simple Steps
Telegram Profile Picture is a great way to show your friends and family who you are. You can add a picture to your profile, change it at any time, and even hide it from certain people.
A profile picture for Telegram might interest you as it adds a personal touch to your searchable profile and invokes others to show more interest. However, some users don’t know how to edit their DPs.
In this article, we’ll discuss how to add a short video to your Telegram profile as well as change, delete and hide your profile picture with step-by-step instructions.
Part 1. How To Set A Short Video As Your Profile
The Detailed Steps
Following a few simple steps below, it is possible to set a video profile on Telegram instead of a regular photo profile. Let’s give your profile more magic touch:
Step1 On your device, launch the Telegram app and tap the three-line Menu icon.
Step2 Tap your profile or go to Settings and tap “Set Profile Photo.”
Step3 Tap the “Camera” icon to shoot a new video or select from your Camera Roll.
Step4 Trim the video to the required length and adjust it in the circular frame.
Step5 Select the “Brush” icon to apply stickers or text, and tap Done. You can also flip, rotate, or adjust the color of your video. Once done, tap the Check icon to upload the video and wait a few minutes to complete the uploading process.
Creating Telegram Profile Video with the Best Video Editor - Filmora
After knowing how to set the video as your profile, you may want to try it immediately. Here, we sincerely recommend an excellent video editor to create a stunning video for your Telegram profile - Wondershare Filmora . The software has an intuitive interface which makes it beginner-friendly and easy to use. You can start your Telegram profile video creation journey immediately!
Here’s how you can use Filmora to edit a video:
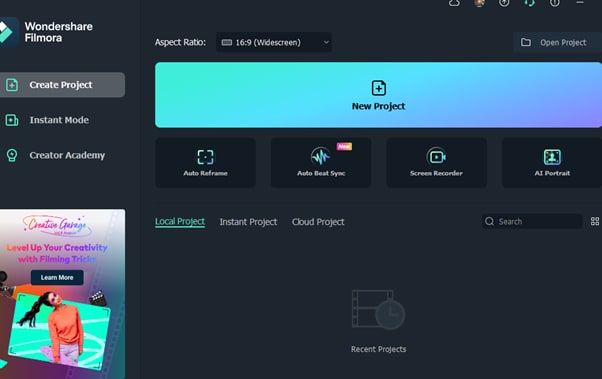
Step1 Download the Filmora software’s latest version on your PC and launch it. Select “New Project” from the main Menu, click the “Plus” icon, or drag and drop your media file to import it.
Step2 Select your media file and drop it in the Timeline, and from the top menu ribbon, add effects, filters, titles, and music to your videos.
Step3 Once satisfied with your edits, click the Export option to save the video on your PC.
Part 2. Complete Guide - How to add, change, delete, and hide Telegram Profile Pictures
After knowing how to make a video profile on Telegram and realise it with a user-friendly video editor, let’s see how to spruce up your Telegram profile with a complete guidance - the detailed steps to add, change, delete and hide you Telegram profile pictures.
- How To Add Telegram Profile Pictures
- How To Change Your Telegram Profile Pictures
- How To Delete Your Telegram Profile Pictures
- How To Hide Your Telegram Profile Pictures
How To Add Telegram Profile Pictures
Compared with making an impressing profile video, changing your profile pictures is a quick and easy process. Follow the steps below to add a profile picture for your Telegram account and have a new DP in no time:
Step1 On your device, open the Telegram app and tap the Menu icon in the top left corner.
Step2 Head to Settings and tap “Set profile photo.”

Step3 Now, select the image you want to use from your gallery, or click the Camera icon and take a picture to upload.
Step4 Once you’ve selected your image, you can crop and resize it to fit your Telegram profile.
![]()
Note: You can choose to add stickers to your Profile Pictures by tapping the Stickers icon. If you want to know how to find more exciting Telegram stickers, you can read this article: Best Telegram Sticker Sets and How to Find Stickers on Telegram.
Step5 When you’re happy with the way your image looks, tap the Done icon to save your changes.
How To Change Your Telegram Profile Pictures
If you are getting tired of the current profile, it is really easy for you to change it. Here’s how to do it:
Step1 Open the Telegram app and go to your Profile (tap the three lines and choose your username at the top of the screen).
Step2 Tap “Set Profile Photo” and select whether you want to take a new photo or choose one from your camera roll
Step3 Once you’ve selected or taken a new photo, crop it as desired or edit it. Finally, tap “Done” to change your profile picture for Telegram.

How To Delete Your Telegram Profile Pictures
When it comes to a point where you want to start over, you choose to delete all of your Telegram profile images. Here’s a quick guide on how to remove all your Telegram profile pictures:
Step1 On your device, launch the Telegram app and tap the “Menu” icon.
Step2 Select your Profile Picture and swipe to the right to find the picture you want to delete.
Step3 Now, tap the three-dots Menu icon at the top right side of the screen. Select the “Delete” option from the Menu.
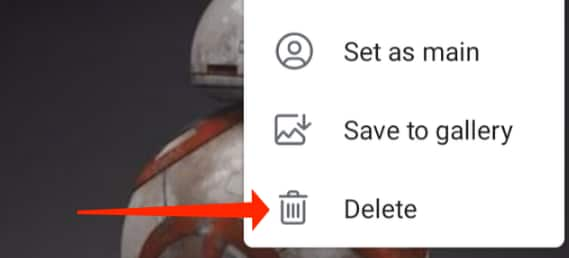
Step4 Tap “Delete” again on the pop-up message to confirm your action.
How To Hide Your Telegram Profile Pictures
Telegram’s security function allows you to hide your profile picture so that only people who you approve can see it, which is a great way to keep your privacy and avoid unwanted attention.
Follow the instructions below step-by-step to hide your Telegram profile picture on iPhone and Android.
iPhone
Step1 On your iPhone, launch the Telegram app and go to the “Settings” tab at the bottom right of the screen.
Step2 Select “Privacy and Security” and tap the “Profile Photo” option.
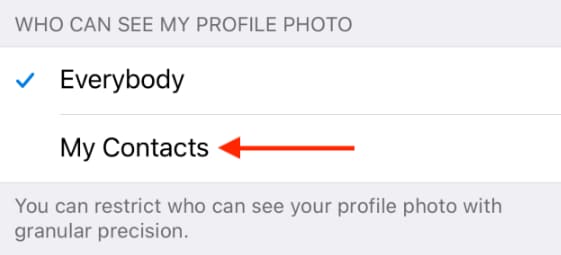
Step3 If you want to keep your profile picture private, choose the “My Contacts” option. This way, only people in your contact book will be able to see it.
Step4 You can add exceptions to your privacy settings from the “Exceptions” section. To hide your Telegram profile picture from certain users/contacts or groups, tap the “Never Share With” button. This will help prevent someone who is harassing you from seeing your profile picture.
Now, choose “Add Users or Groups,” search for and select their name from your list of contacts. Finally, tap “Done” to apply your changes.
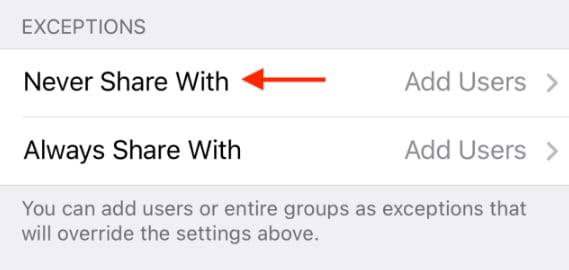
Step5 If you want to always share your profile picture with a particular user or group, you can select the “Always Share With” option.
To add contacts, tap the “Add Users or Groups” option. Next, search for and select the contacts you want to add. Finally, tap “Done” to save your changes. Your profile picture will now only be visible to the selected people.
Android
Step1 Open the Telegram app on your Android device.
Step2 In the top left corner of the screen, tap the three lines to open the Menu.
Step3 Scroll down and tap the “Settings” option.
Step4 Now, tap “Privacy and Security” and select the “Profile Photo” option. If you want to share your profile picture with only your contacts, choose the “My Contacts” option. This will hide your photo from everyone else on Telegram.

Step5 Telegram offers two great options for managing who can see your profile picture: “Always Allow” and “Never Allow.”
The “Always Allow” feature lets you add specific users or groups who will always be able to see your profile picture, even if they’re not in your contact book.
Simply tap the “Always Allow” option and search for contacts using their usernames to add them to your list. Tap the “Check” icon to apply your changes.
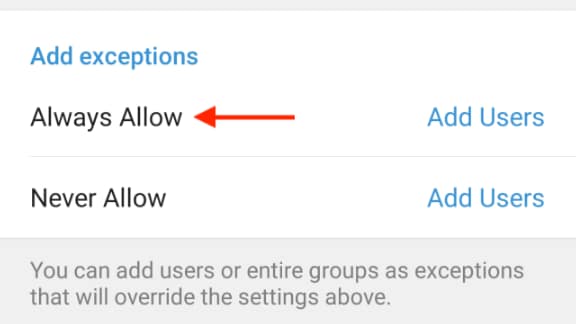
Step6 You can also choose the “Never Allow” feature to add contacts, users, or groups from whom you wish to hide your profile picture.
To do this, search for and select the contacts (or users) from whom you want to hide your profile picture. Tap the Checkmark icon to apply your changes.
Once you’re done customizing the settings, tap the Checkmark icon from the top-right corner to save the settings. Now only people who you approve will be able to see your profile picture.
Conclusion
In conclusion, this article has outlined how to set a video as yourt Telegram profile. We’ve also discussed how to add, change, delete, and hide profile picture for Telegram.
Your DP is perhaps the most important feature to personalize your profile on the messaging app, so hopefully, you’ve enjoyed this comprehensive guide and learned how to manage your Telegram account’s profile section without any issues.
Step5 When you’re happy with the way your image looks, tap the Done icon to save your changes.
How To Change Your Telegram Profile Pictures
If you are getting tired of the current profile, it is really easy for you to change it. Here’s how to do it:
Step1 Open the Telegram app and go to your Profile (tap the three lines and choose your username at the top of the screen).
Step2 Tap “Set Profile Photo” and select whether you want to take a new photo or choose one from your camera roll
Step3 Once you’ve selected or taken a new photo, crop it as desired or edit it. Finally, tap “Done” to change your profile picture for Telegram.

How To Delete Your Telegram Profile Pictures
When it comes to a point where you want to start over, you choose to delete all of your Telegram profile images. Here’s a quick guide on how to remove all your Telegram profile pictures:
Step1 On your device, launch the Telegram app and tap the “Menu” icon.
Step2 Select your Profile Picture and swipe to the right to find the picture you want to delete.
Step3 Now, tap the three-dots Menu icon at the top right side of the screen. Select the “Delete” option from the Menu.

Step4 Tap “Delete” again on the pop-up message to confirm your action.
How To Hide Your Telegram Profile Pictures
Telegram’s security function allows you to hide your profile picture so that only people who you approve can see it, which is a great way to keep your privacy and avoid unwanted attention.
Follow the instructions below step-by-step to hide your Telegram profile picture on iPhone and Android.
iPhone
Step1 On your iPhone, launch the Telegram app and go to the “Settings” tab at the bottom right of the screen.
Step2 Select “Privacy and Security” and tap the “Profile Photo” option.
Step3 If you want to keep your profile picture private, choose the “My Contacts” option. This way, only people in your contact book will be able to see it.

Step4 You can add exceptions to your privacy settings from the “Exceptions” section. To hide your Telegram profile picture from certain users/contacts or groups, tap the “Never Share With” button. This will help prevent someone who is harassing you from seeing your profile picture.
Now, choose “Add Users or Groups,” search for and select their name from your list of contacts. Finally, tap “Done” to apply your changes.

Step5 If you want to always share your profile picture with a particular user or group, you can select the “Always Share With” option.
To add contacts, tap the “Add Users or Groups” option. Next, search for and select the contacts you want to add. Finally, tap “Done” to save your changes. Your profile picture will now only be visible to the selected people.
Android
Step1 Open the Telegram app on your Android device.
Step2 In the top left corner of the screen, tap the three lines to open the Menu.
Step3 Scroll down and tap the “Settings” option.
Step4 Now, tap “Privacy and Security” and select the “Profile Photo” option. If you want to share your profile picture with only your contacts, choose the “My Contacts” option. This will hide your photo from everyone else on Telegram.

Step5 Telegram offers two great options for managing who can see your profile picture: “Always Allow” and “Never Allow.”
The “Always Allow” feature lets you add specific users or groups who will always be able to see your profile picture, even if they’re not in your contact book.
Simply tap the “Always Allow” option and search for contacts using their usernames to add them to your list. Tap the “Check” icon to apply your changes.

Step6 You can also choose the “Never Allow” feature to add contacts, users, or groups from whom you wish to hide your profile picture.
To do this, search for and select the contacts (or users) from whom you want to hide your profile picture. Tap the Checkmark icon to apply your changes.
Once you’re done customizing the settings, tap the Checkmark icon from the top-right corner to save the settings. Now only people who you approve will be able to see your profile picture.
Conclusion
In conclusion, this article has outlined how to set a video as yourt Telegram profile. We’ve also discussed how to add, change, delete, and hide profile picture for Telegram.
Your DP is perhaps the most important feature to personalize your profile on the messaging app, so hopefully, you’ve enjoyed this comprehensive guide and learned how to manage your Telegram account’s profile section without any issues.
Also read:
- [New] Elite Exploration The New Parrot AR Edition for 2024
- [Updated] Effortless Earnings Channel Size No Longer a Challenge
- [Updated] Quick-Fix Tweeter Conversion for Social Sharing
- 2024 Approved The Ultimate iPhone User Manual for Water Imagery
- 2024 Approved This Is a Recommendation About Bandicut. If You Are Confused, Please Check It Out
- Elevate Your IG Videos Tips & Templates for 2024
- Entendiendo Las Limitaciones De Bluetooth en Servidores Windows Y Buscando Opciones Distintas
- How to Do Masking in After Effects Alternative Provided for 2024
- In 2024, How to Fix Pokemon Go Route Not Working On Sony Xperia 1 V? | Dr.fone
- Mastering DaVinci Resolve Scopes A Comprehensive Guide for 2024
- Navigating Televisions Shopping: A Consumer's Roadmap to Acquiring an Ideal TV Unit for Household Enjoyment
- New 2024 Approved Complete Guide to Make a Super Easy Rotating Video Effect
- New 2024 Approved How to Add Freeze Frame to Your Video From Any Device?
- New Free Ways to Download Mobile Phone Green Screen Videos and Pictures No Copyright
- Ten Proven Methods for Correcting Phantom Inputs on iPhones
- Title: New Create Risograph Effect In Photoshop A Beginners Guide for 2024
- Author: Chloe
- Created at : 2025-03-01 04:19:10
- Updated at : 2025-03-03 22:19:46
- Link: https://ai-editing-video.techidaily.com/new-create-risograph-effect-in-photoshop-a-beginners-guide-for-2024/
- License: This work is licensed under CC BY-NC-SA 4.0.