:max_bytes(150000):strip_icc():format(webp)/the-17-best-graphic-design-software-2024-1dd6c15b34124b25b65e4b096e4e6ba4.jpg)
New Create Slide Masking Effect Intro for 2024

Create Slide Masking Effect Intro【Filmora】
Preparation
What you need to prepare:
- A computer (Windows or macOS)
- Your video materials.
- Filmora video editor
Step 1
The first thing you want to do is download the Filmora video editor . Hit Install and allow the application to start automatically.
Step 2
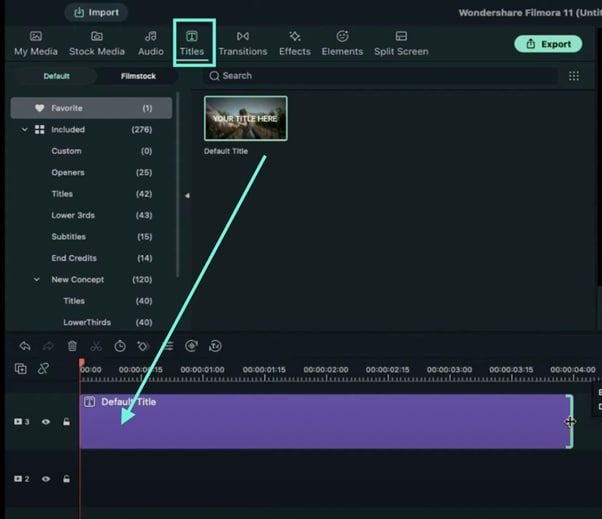
Once the program loads, head straight over to the Titles tab and drag the Basic Title to Track 3 on the Timeline.
Also, drag the clip from the right side towards the left to make it 4 seconds long.
Step 3
Double-click on the Title clip in the Timeline and edit your Title’s font and size. A panel like this one should pop up when you double-click. When you’re done, click OK.

Step 4
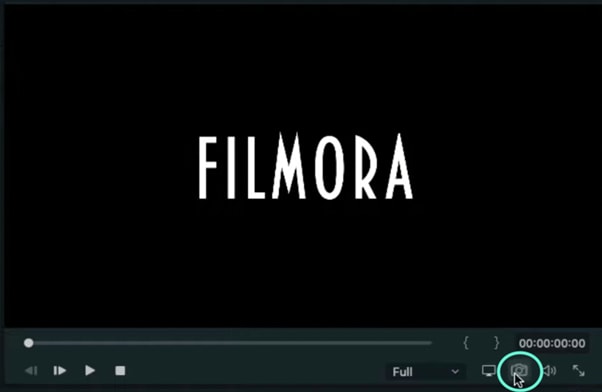
Now, take a snapshot of the new Title that you just created.
Step 5
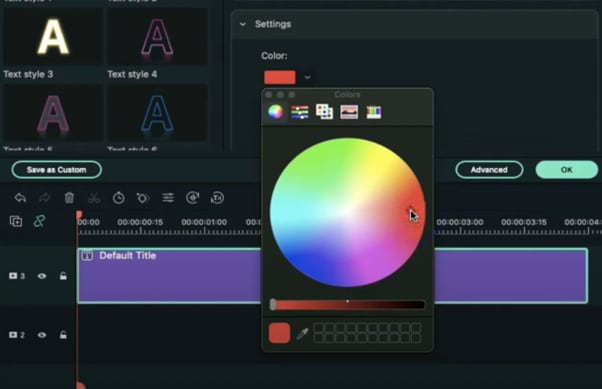
Next, we’re going to need a few more snapshots. But this time, double-click on the Title again and change its color to whichever one you like. Once you’ve changed its color, go ahead and click the same button as in Step 4 to take another snapshot.
Step 6
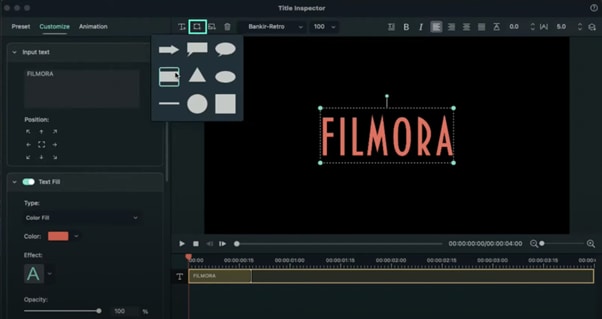
Next, double-click on the Title once again and go to “ADVANCED”. From there, go to Add Shape and select the Rectangle shape.
Step 7
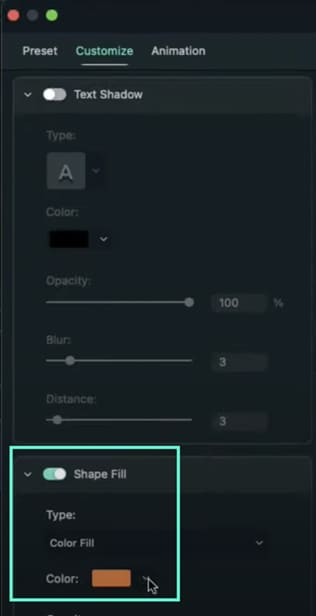
Look to the left side panel and switch OFF the Text Fill button. Then, scroll down to the bottom and change the Shape Fill color to White.
Step 8
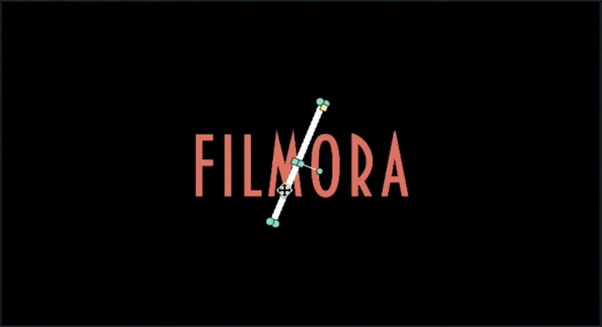
Now, adjust the rectangle’s shape to a thin line, rotate it, and move it into position like in the image.
Step 9
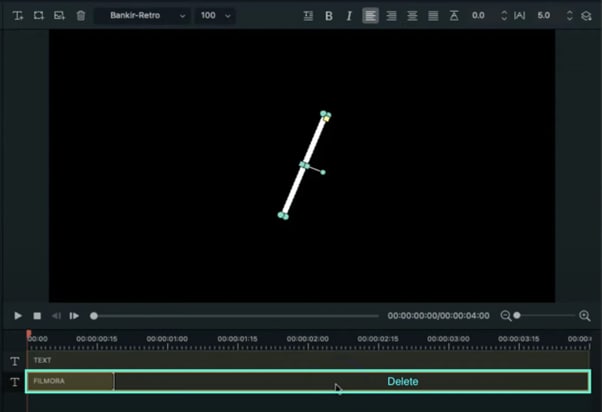
Delete the text layer from the Advanced panel.
Step 10
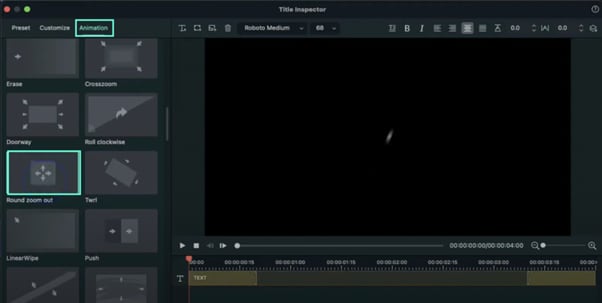
The final step in the Advanced panel is to go to the Animation tab from the left side panel and select the Round Zoom Out animation preset. Then, click OK.
Step 11
Now, it’s time to align the clips in the Timeline. First, move your Default Title clip 5 frames further. Then, drag the first snapshot to Track one and move it 8 frames forward.

Step 12
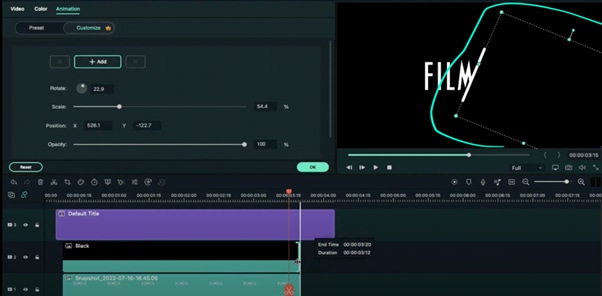
Go to Sample Color and drag the Black color to Track 3 in the Timeline. Align it directly on top of where the clip in Track 1 starts. Then, double-click on the black color clip and align it like in the image here.
Step 13
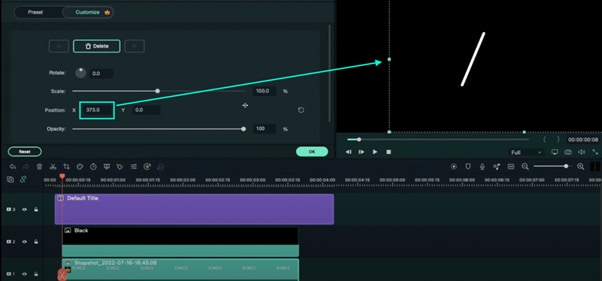
Now, place the Playhead at the beginning of the clip in Track 1. Then, double-click the snapshot clip in Track 1. Now, start increasing the value of the X-axis until it makes the text disappear, just as in this image here.
Step 14
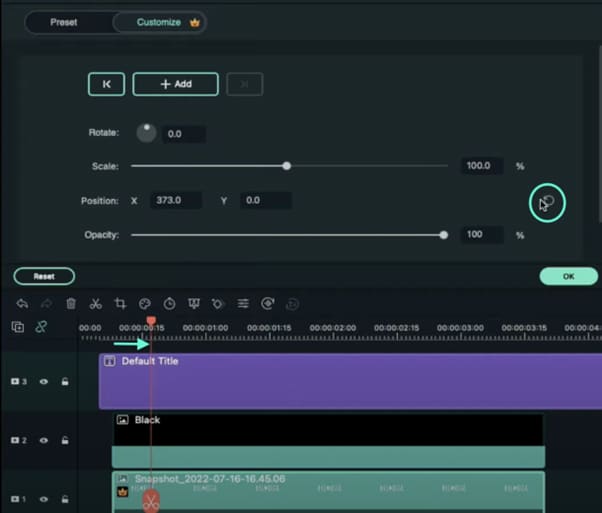
Next, move the Playhead 10 frames further. Then, reset the position values by clicking on this button.
Step 15
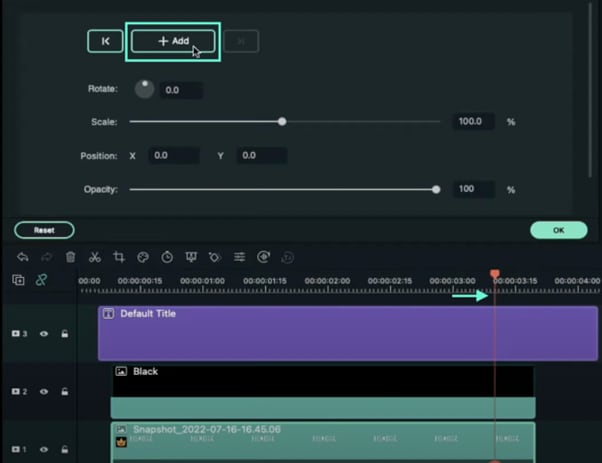
Now, move the Playhead once more and set it at 3 seconds and 10 frames. Then, click on the “+Add” button to add another keyframe.
Step 16
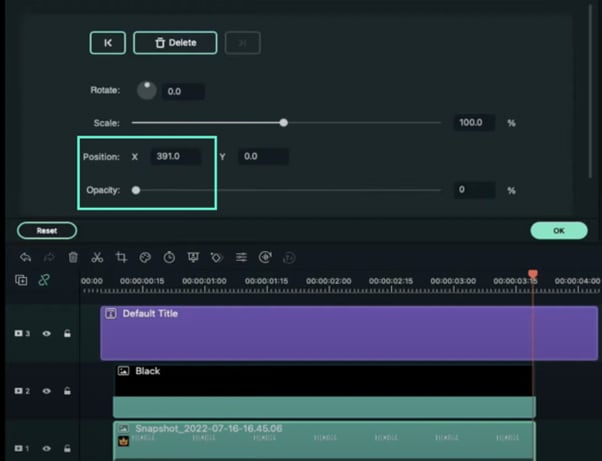
Move the Playhead to the end of the snapshot clip and set the value of the X axis to 391. Then, reduce the opacity to 0%. Move the Playhead at the start of the snapshot clip and reduce the opacity to 0% there as well.
Step 17
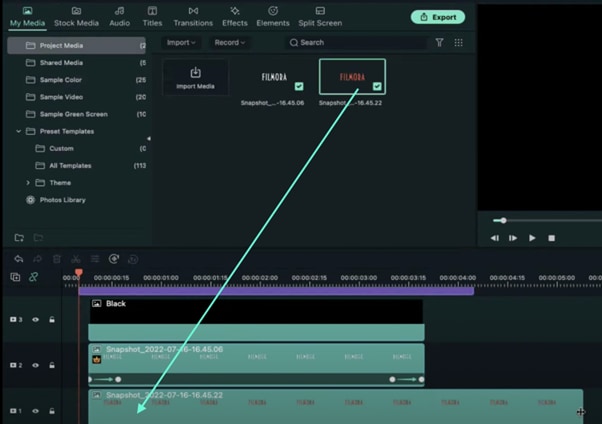
Next, Export the clip to your PC. Just hit the Export button near the top-center of the screen. Then, select all of your clips in the Timeline and move them one track above. Then, drag the second snapshot you took earlier to Track 1.
Step 18
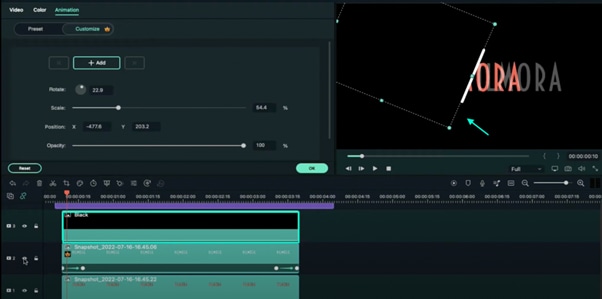
Select the Black Color clip once again and move the position of the Black box like this.
Step 19
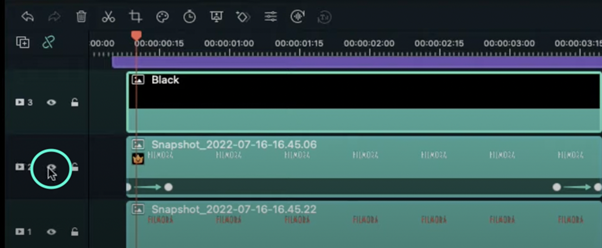
Now, hide the clip on Track 2 by pressing this button next to it.
Step 20
Click on the second snapshot clip located in Track 1. Then, repeat the process of adding keyframes just like we did with the first snapshot. Review the previous steps to get this right. This time, remember to slide the X axis to the LEFT instead of RIGHT. Just drag the values to the left.
Step 21
Export this. Then, delete all the clips in the Timeline. Now, import both clips you exported earlier during these steps. Also, import a background video that you’d like to appear behind your slide masking text effect.
Step 22
Next, drag the clips to Timeline and adjust each of them to be the same length. Four seconds is a good option.
Step 23
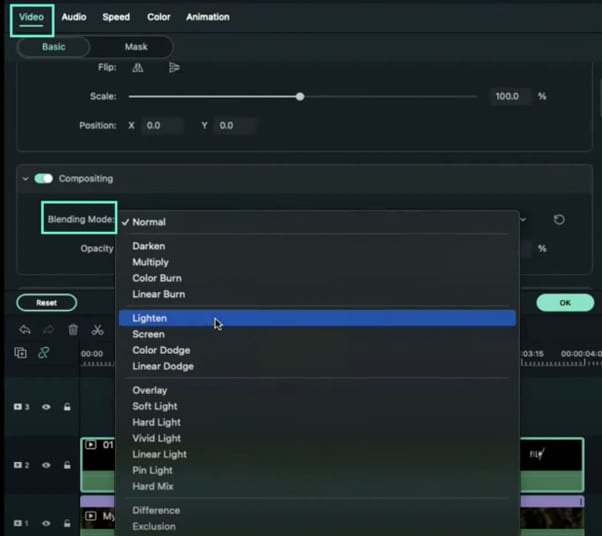
Double-click on the first clip (not the background clip). Go to Video and under Blending Mode select Lighten.
Step 24
Drop your second clip to Track three and repeat the same edits for it.
Step 25
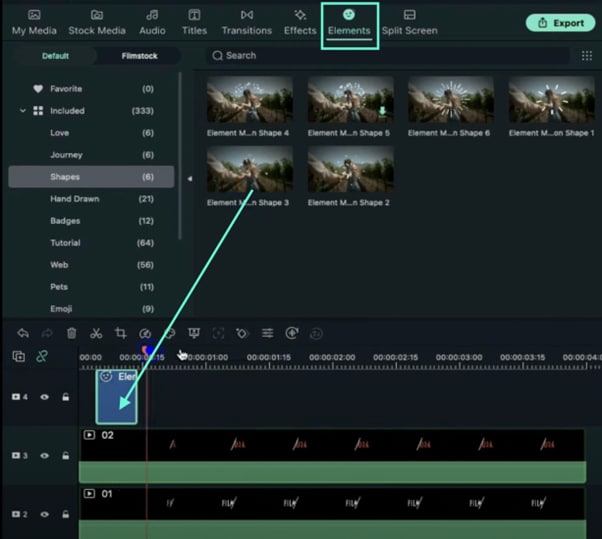
Set the Playhead on frame three and drop the Motion Shape element from the Elements tab on Track 4.
Step 26
Finally, copy and paste the element near the end of the video and Render the project. Then, review your masterpiece. That’s it!

Summary
What you’ve learned:
- Create a slide masking effect intro in Filmora
- Customize masks in the Filmora video editor
- How to take snapshots and edit them thoroughly
- Add keyframes
What you need to prepare:
- A computer (Windows or macOS)
- Your video materials.
- Filmora video editor
Step 1
The first thing you want to do is download the Filmora video editor . Hit Install and allow the application to start automatically.
Step 2
Once the program loads, head straight over to the Titles tab and drag the Basic Title to Track 3 on the Timeline.
Also, drag the clip from the right side towards the left to make it 4 seconds long.

Step 3
Double-click on the Title clip in the Timeline and edit your Title’s font and size. A panel like this one should pop up when you double-click. When you’re done, click OK.

Step 4
Now, take a snapshot of the new Title that you just created.

Step 5
Next, we’re going to need a few more snapshots. But this time, double-click on the Title again and change its color to whichever one you like. Once you’ve changed its color, go ahead and click the same button as in Step 4 to take another snapshot.

Step 6
Next, double-click on the Title once again and go to “ADVANCED”. From there, go to Add Shape and select the Rectangle shape.

Step 7
Look to the left side panel and switch OFF the Text Fill button. Then, scroll down to the bottom and change the Shape Fill color to White.

Step 8
Now, adjust the rectangle’s shape to a thin line, rotate it, and move it into position like in the image.

Step 9
Delete the text layer from the Advanced panel.

Step 10
The final step in the Advanced panel is to go to the Animation tab from the left side panel and select the Round Zoom Out animation preset. Then, click OK.

Step 11
Now, it’s time to align the clips in the Timeline. First, move your Default Title clip 5 frames further. Then, drag the first snapshot to Track one and move it 8 frames forward.

Step 12
Go to Sample Color and drag the Black color to Track 3 in the Timeline. Align it directly on top of where the clip in Track 1 starts. Then, double-click on the black color clip and align it like in the image here.

Step 13
Now, place the Playhead at the beginning of the clip in Track 1. Then, double-click the snapshot clip in Track 1. Now, start increasing the value of the X-axis until it makes the text disappear, just as in this image here.

Step 14
Next, move the Playhead 10 frames further. Then, reset the position values by clicking on this button.

Step 15
Now, move the Playhead once more and set it at 3 seconds and 10 frames. Then, click on the “+Add” button to add another keyframe.

Step 16
Move the Playhead to the end of the snapshot clip and set the value of the X axis to 391. Then, reduce the opacity to 0%. Move the Playhead at the start of the snapshot clip and reduce the opacity to 0% there as well.

Step 17
Next, Export the clip to your PC. Just hit the Export button near the top-center of the screen. Then, select all of your clips in the Timeline and move them one track above. Then, drag the second snapshot you took earlier to Track 1.

Step 18
Select the Black Color clip once again and move the position of the Black box like this.

Step 19
Now, hide the clip on Track 2 by pressing this button next to it.

Step 20
Click on the second snapshot clip located in Track 1. Then, repeat the process of adding keyframes just like we did with the first snapshot. Review the previous steps to get this right. This time, remember to slide the X axis to the LEFT instead of RIGHT. Just drag the values to the left.
Step 21
Export this. Then, delete all the clips in the Timeline. Now, import both clips you exported earlier during these steps. Also, import a background video that you’d like to appear behind your slide masking text effect.
Step 22
Next, drag the clips to Timeline and adjust each of them to be the same length. Four seconds is a good option.
Step 23
Double-click on the first clip (not the background clip). Go to Video and under Blending Mode select Lighten.

Step 24
Drop your second clip to Track three and repeat the same edits for it.
Step 25
Set the Playhead on frame three and drop the Motion Shape element from the Elements tab on Track 4.

Step 26
Finally, copy and paste the element near the end of the video and Render the project. Then, review your masterpiece. That’s it!

Summary
What you’ve learned:
- Create a slide masking effect intro in Filmora
- Customize masks in the Filmora video editor
- How to take snapshots and edit them thoroughly
- Add keyframes
What you need to prepare:
- A computer (Windows or macOS)
- Your video materials.
- Filmora video editor
Step 1
The first thing you want to do is download the Filmora video editor . Hit Install and allow the application to start automatically.
Step 2
Once the program loads, head straight over to the Titles tab and drag the Basic Title to Track 3 on the Timeline.
Also, drag the clip from the right side towards the left to make it 4 seconds long.

Step 3
Double-click on the Title clip in the Timeline and edit your Title’s font and size. A panel like this one should pop up when you double-click. When you’re done, click OK.

Step 4
Now, take a snapshot of the new Title that you just created.

Step 5
Next, we’re going to need a few more snapshots. But this time, double-click on the Title again and change its color to whichever one you like. Once you’ve changed its color, go ahead and click the same button as in Step 4 to take another snapshot.

Step 6
Next, double-click on the Title once again and go to “ADVANCED”. From there, go to Add Shape and select the Rectangle shape.

Step 7
Look to the left side panel and switch OFF the Text Fill button. Then, scroll down to the bottom and change the Shape Fill color to White.

Step 8
Now, adjust the rectangle’s shape to a thin line, rotate it, and move it into position like in the image.

Step 9
Delete the text layer from the Advanced panel.

Step 10
The final step in the Advanced panel is to go to the Animation tab from the left side panel and select the Round Zoom Out animation preset. Then, click OK.

Step 11
Now, it’s time to align the clips in the Timeline. First, move your Default Title clip 5 frames further. Then, drag the first snapshot to Track one and move it 8 frames forward.

Step 12
Go to Sample Color and drag the Black color to Track 3 in the Timeline. Align it directly on top of where the clip in Track 1 starts. Then, double-click on the black color clip and align it like in the image here.

Step 13
Now, place the Playhead at the beginning of the clip in Track 1. Then, double-click the snapshot clip in Track 1. Now, start increasing the value of the X-axis until it makes the text disappear, just as in this image here.

Step 14
Next, move the Playhead 10 frames further. Then, reset the position values by clicking on this button.

Step 15
Now, move the Playhead once more and set it at 3 seconds and 10 frames. Then, click on the “+Add” button to add another keyframe.

Step 16
Move the Playhead to the end of the snapshot clip and set the value of the X axis to 391. Then, reduce the opacity to 0%. Move the Playhead at the start of the snapshot clip and reduce the opacity to 0% there as well.

Step 17
Next, Export the clip to your PC. Just hit the Export button near the top-center of the screen. Then, select all of your clips in the Timeline and move them one track above. Then, drag the second snapshot you took earlier to Track 1.

Step 18
Select the Black Color clip once again and move the position of the Black box like this.

Step 19
Now, hide the clip on Track 2 by pressing this button next to it.

Step 20
Click on the second snapshot clip located in Track 1. Then, repeat the process of adding keyframes just like we did with the first snapshot. Review the previous steps to get this right. This time, remember to slide the X axis to the LEFT instead of RIGHT. Just drag the values to the left.
Step 21
Export this. Then, delete all the clips in the Timeline. Now, import both clips you exported earlier during these steps. Also, import a background video that you’d like to appear behind your slide masking text effect.
Step 22
Next, drag the clips to Timeline and adjust each of them to be the same length. Four seconds is a good option.
Step 23
Double-click on the first clip (not the background clip). Go to Video and under Blending Mode select Lighten.

Step 24
Drop your second clip to Track three and repeat the same edits for it.
Step 25
Set the Playhead on frame three and drop the Motion Shape element from the Elements tab on Track 4.

Step 26
Finally, copy and paste the element near the end of the video and Render the project. Then, review your masterpiece. That’s it!

Summary
What you’ve learned:
- Create a slide masking effect intro in Filmora
- Customize masks in the Filmora video editor
- How to take snapshots and edit them thoroughly
- Add keyframes
What you need to prepare:
- A computer (Windows or macOS)
- Your video materials.
- Filmora video editor
Step 1
The first thing you want to do is download the Filmora video editor . Hit Install and allow the application to start automatically.
Step 2
Once the program loads, head straight over to the Titles tab and drag the Basic Title to Track 3 on the Timeline.
Also, drag the clip from the right side towards the left to make it 4 seconds long.

Step 3
Double-click on the Title clip in the Timeline and edit your Title’s font and size. A panel like this one should pop up when you double-click. When you’re done, click OK.

Step 4
Now, take a snapshot of the new Title that you just created.

Step 5
Next, we’re going to need a few more snapshots. But this time, double-click on the Title again and change its color to whichever one you like. Once you’ve changed its color, go ahead and click the same button as in Step 4 to take another snapshot.

Step 6
Next, double-click on the Title once again and go to “ADVANCED”. From there, go to Add Shape and select the Rectangle shape.

Step 7
Look to the left side panel and switch OFF the Text Fill button. Then, scroll down to the bottom and change the Shape Fill color to White.

Step 8
Now, adjust the rectangle’s shape to a thin line, rotate it, and move it into position like in the image.

Step 9
Delete the text layer from the Advanced panel.

Step 10
The final step in the Advanced panel is to go to the Animation tab from the left side panel and select the Round Zoom Out animation preset. Then, click OK.

Step 11
Now, it’s time to align the clips in the Timeline. First, move your Default Title clip 5 frames further. Then, drag the first snapshot to Track one and move it 8 frames forward.

Step 12
Go to Sample Color and drag the Black color to Track 3 in the Timeline. Align it directly on top of where the clip in Track 1 starts. Then, double-click on the black color clip and align it like in the image here.

Step 13
Now, place the Playhead at the beginning of the clip in Track 1. Then, double-click the snapshot clip in Track 1. Now, start increasing the value of the X-axis until it makes the text disappear, just as in this image here.

Step 14
Next, move the Playhead 10 frames further. Then, reset the position values by clicking on this button.

Step 15
Now, move the Playhead once more and set it at 3 seconds and 10 frames. Then, click on the “+Add” button to add another keyframe.

Step 16
Move the Playhead to the end of the snapshot clip and set the value of the X axis to 391. Then, reduce the opacity to 0%. Move the Playhead at the start of the snapshot clip and reduce the opacity to 0% there as well.

Step 17
Next, Export the clip to your PC. Just hit the Export button near the top-center of the screen. Then, select all of your clips in the Timeline and move them one track above. Then, drag the second snapshot you took earlier to Track 1.

Step 18
Select the Black Color clip once again and move the position of the Black box like this.

Step 19
Now, hide the clip on Track 2 by pressing this button next to it.

Step 20
Click on the second snapshot clip located in Track 1. Then, repeat the process of adding keyframes just like we did with the first snapshot. Review the previous steps to get this right. This time, remember to slide the X axis to the LEFT instead of RIGHT. Just drag the values to the left.
Step 21
Export this. Then, delete all the clips in the Timeline. Now, import both clips you exported earlier during these steps. Also, import a background video that you’d like to appear behind your slide masking text effect.
Step 22
Next, drag the clips to Timeline and adjust each of them to be the same length. Four seconds is a good option.
Step 23
Double-click on the first clip (not the background clip). Go to Video and under Blending Mode select Lighten.

Step 24
Drop your second clip to Track three and repeat the same edits for it.
Step 25
Set the Playhead on frame three and drop the Motion Shape element from the Elements tab on Track 4.

Step 26
Finally, copy and paste the element near the end of the video and Render the project. Then, review your masterpiece. That’s it!

Summary
What you’ve learned:
- Create a slide masking effect intro in Filmora
- Customize masks in the Filmora video editor
- How to take snapshots and edit them thoroughly
- Add keyframes
Top 5 Best Video Denoisers
We all know that our recorded videos are not always perfect – when we use a mobile phone or digital cameras to shoot, our clips may contain hiss, compression and particles. These are the impurities that make our videos look uncomfortable, but it’s not a final result impossible to altar – help can come in the form of several video denoise software.
Editing is the guarantor that makes sure we can do different operations and achieve our desired results – computer programs, tools, opportunities that give us a hand in this process are kind of endless.
So, sometimes it’s really difficult to choose among so many options that come into waves. And if we choose our preferred ways, some people might not agree with us. Even so that it is quite subjective, we can still explain which tools and software we like to modify our videos, and fight with the impurities they have.
It looks amateur if the video is grainy, even if it is night shooting. We can get rid of the noise when we add lights or shoot in well-lit places, but there are some situations we can just depend on the ISO. So, for these grainy videos, there is a thing called denoising – when you get rid of the grains and make your shots as clear as possible. There are different ways to do this, and that happens in different software as well. What are the 5 best video denoisers in 2024 for us to work with? That, as we have already mentioned, might be something very subjective, but here is our selection: Wondershare Filmora, Neat Video, Shotcut, Adobe Premiere Pro, and DaVinci Resolve
Wondershare Filmora X
Wondershare Filmora X offers to change our damaged scene into something more acceptable. How to operate it? - You need to go to the Effects panel and type: “Smart Denoise”. right-click on the video and choose Edit Properties.
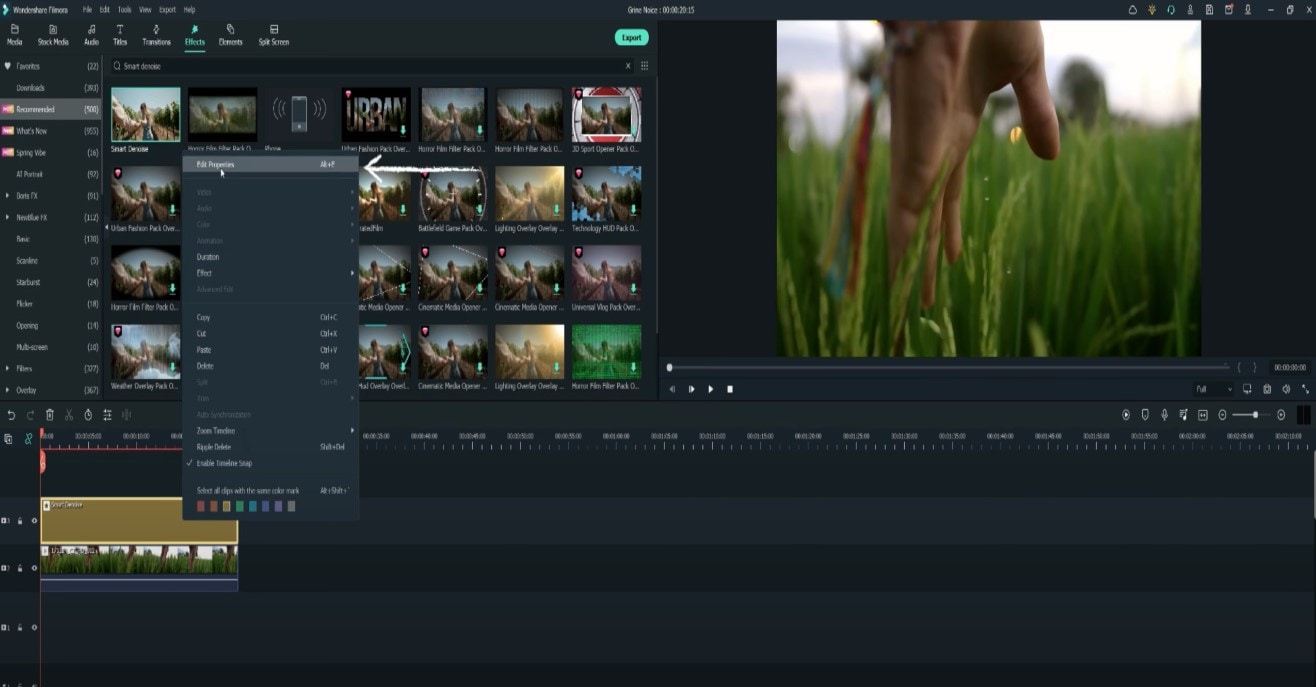
This ensures you see the Smart Denoise, where you can change opacity of the clip, threshold and radius.
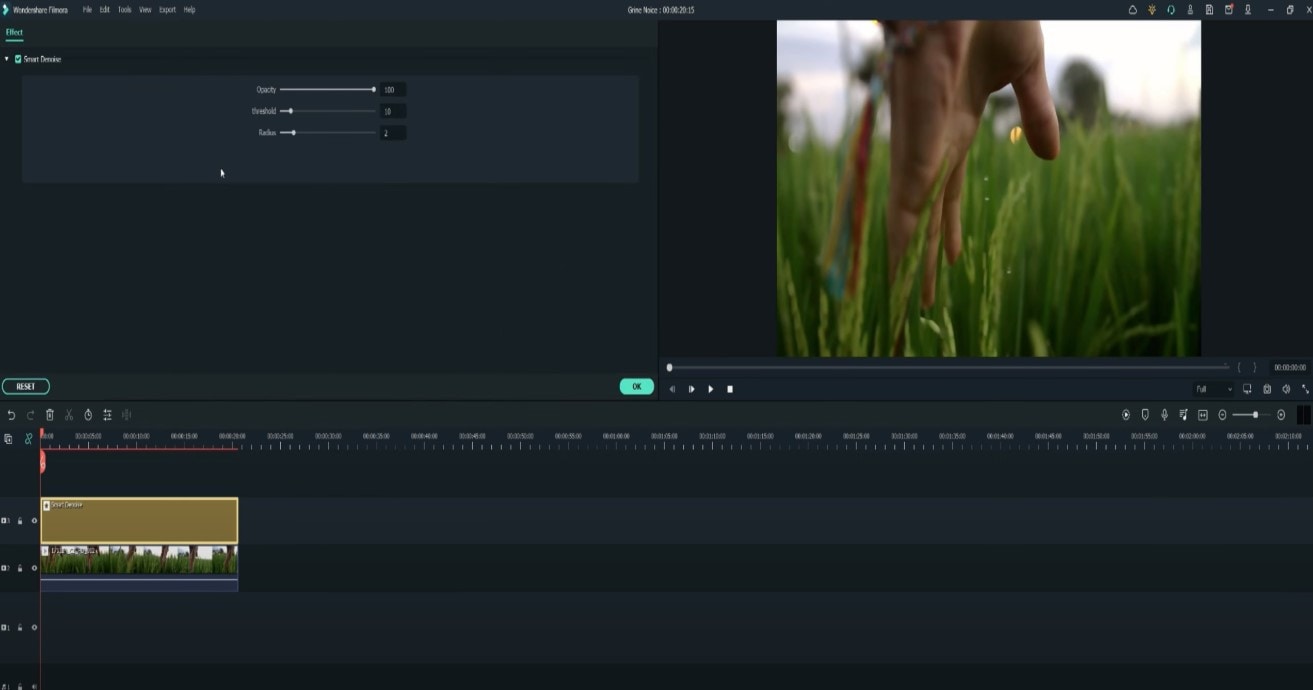
Reduce Opacity until you are satisfied with the result. The box next to Smart Denoise will show you the scene before and after the effect.
Bonus tip: Wondershare Filmora audio denoise
We already explained how video denoising works, and we will go on with our selection and explanatory article about the process, but, as we are on the Filmora topic, we might as well mention that denoising might mean another thing too – which, in this case, regards audio background noise. It means to remove unwanted hum from the audio in order for it to become more hearable. So, doing this in Wondershare Filmora works in a quite easy way. Use the guideline:
Drag and drop your video into the timeline. Right-click on the clip and hit Detach Audio, which will let you separate audio and video from one another and make sure you can work on them one by one.
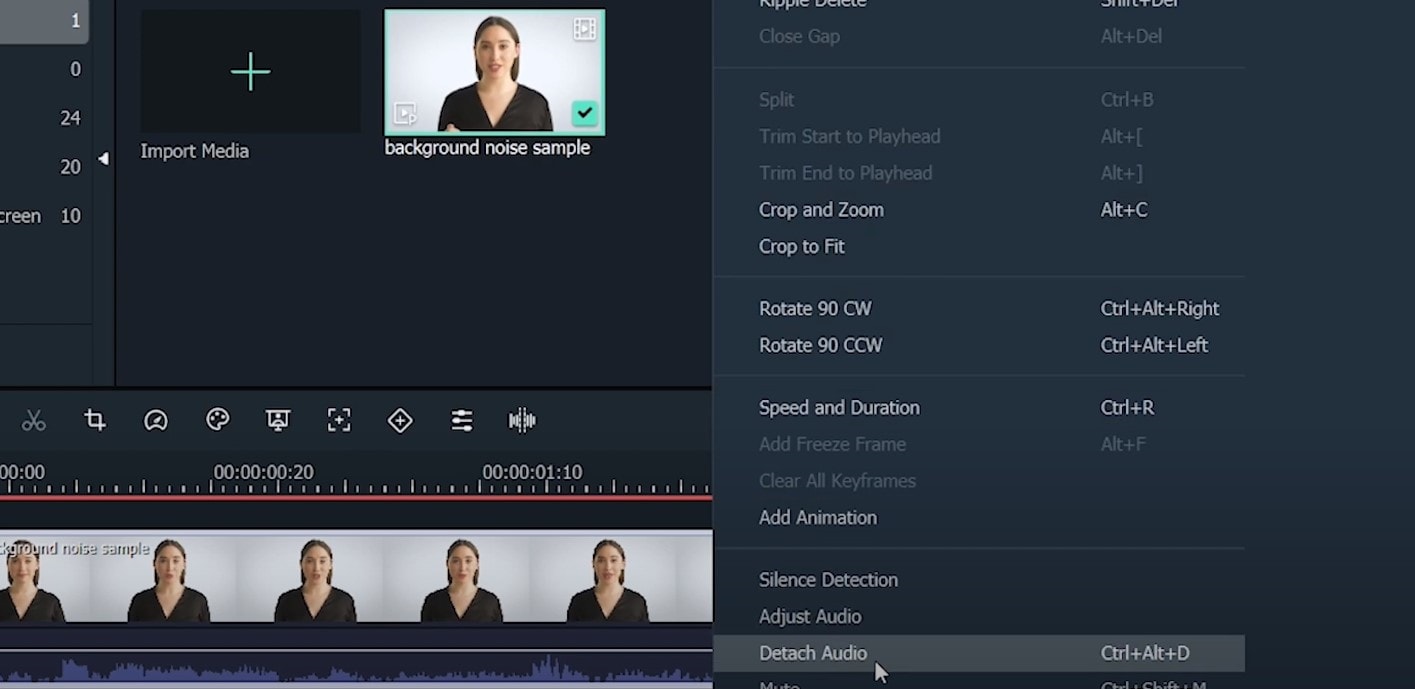
Double-click on the audio track and have access to the editing panel, where you can see Remove background noise – it is not needed to emphasize what this option does for you!
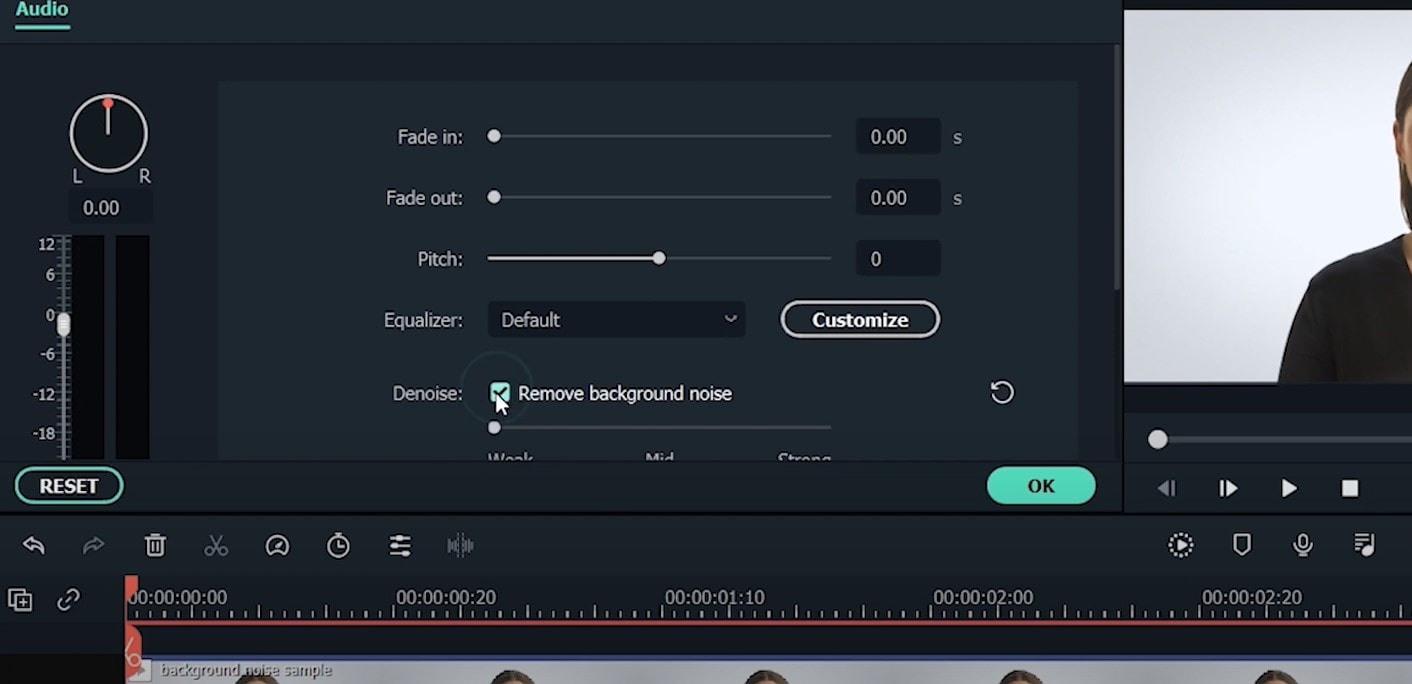
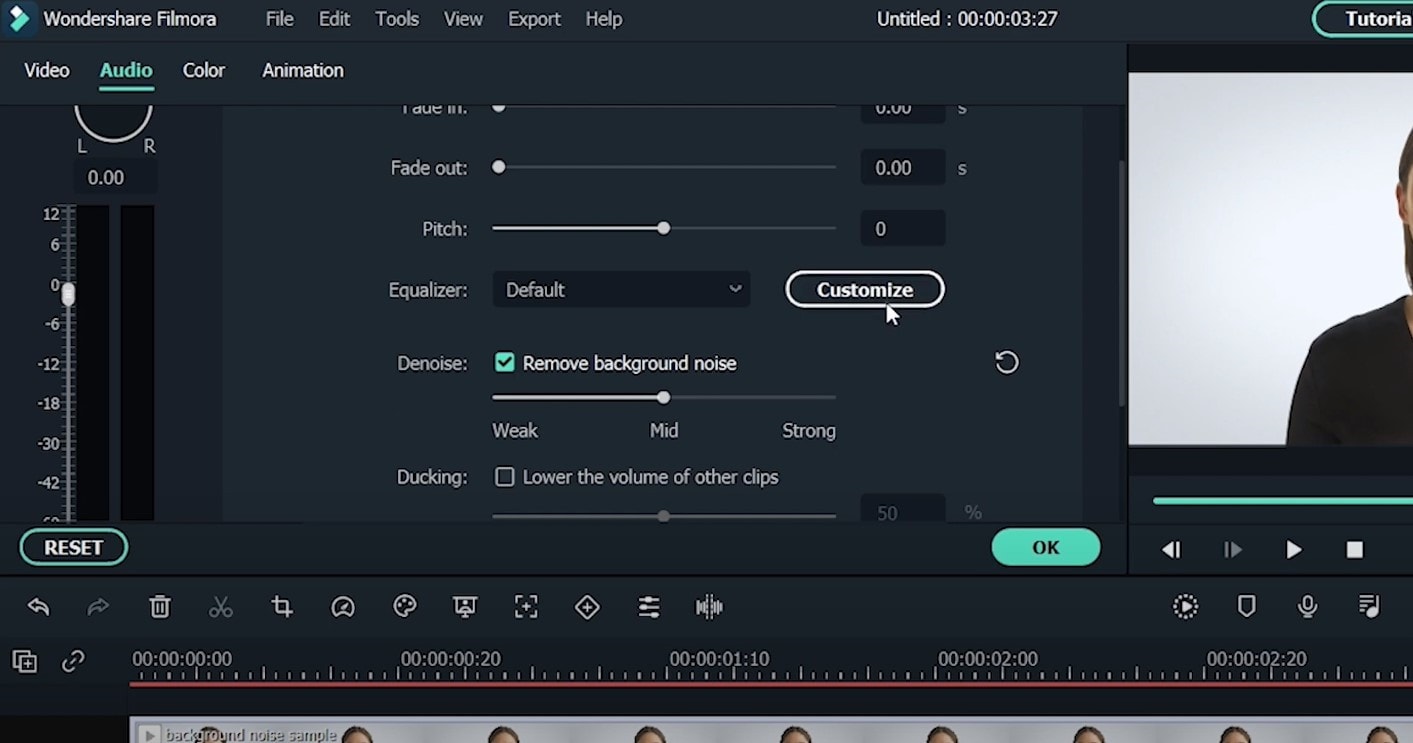
That’s it – you are done, but keep in mind that there is a second way to achieve the same result as well, but this in case you don’t want to detach the audio: Double-click on the video clip in the timeline, the editing panel opens, so switch to Audio. Checking the box next to Remove background noise will show that there are three levels – weak, mid, and strong, and of course, you can choose to your liking!
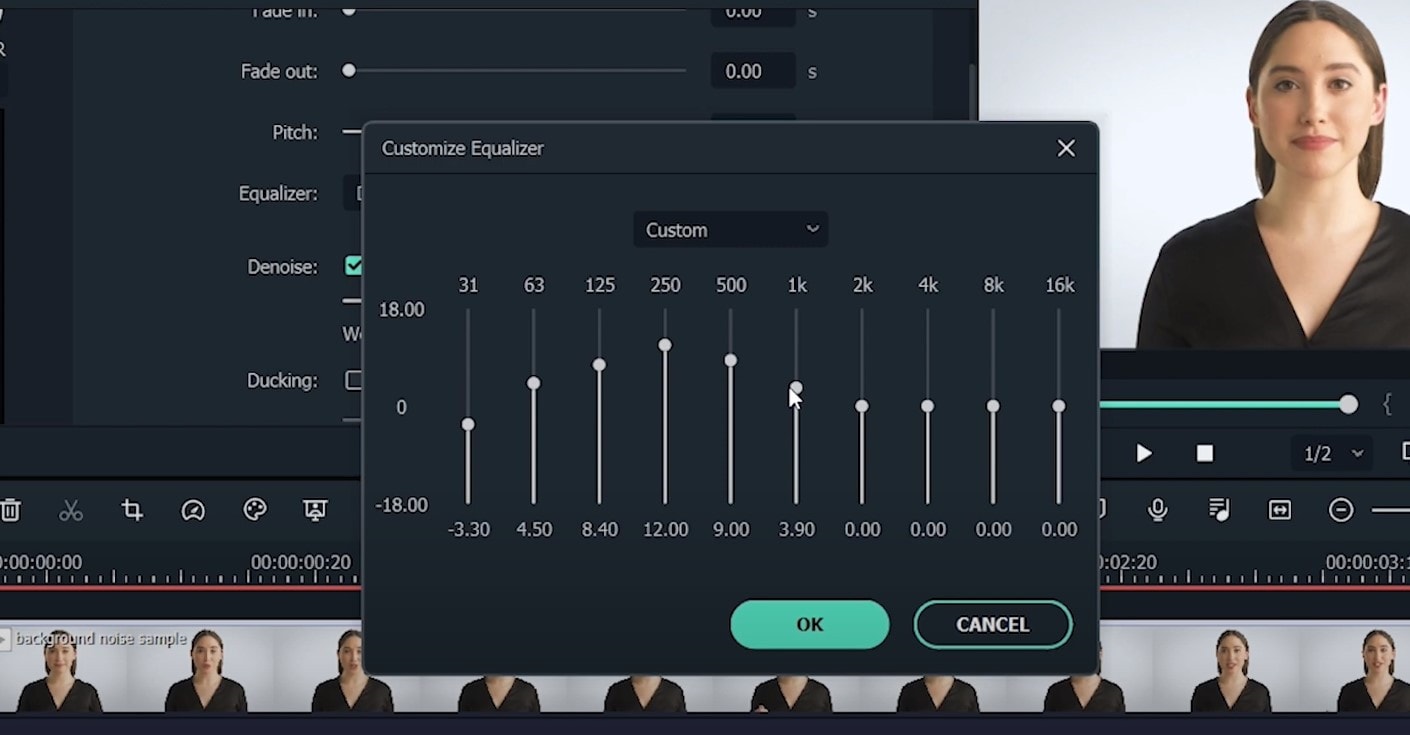
If the voice recording doesn’t sound natural anymore, you can do the following: Click on Customize and Customize Equalizer window will open.
On the left, you can see the low tunes, while the highs are on the right. Background noises are often on the left, so you can lower them to get rid of them, but in order to have a more natural sound, raise the middle ones a little – and you are done when you are content with the sound!
So, hmm… back to the original topic – denoising a video, shall we?..
Neat video
Neat Video kind of, speaks for itself… it is a powerful video editing tool suitable for Windows, macOS and Linux. It aims to reduce the digital noise, flicker, dust, scratches and other defects in the captured videos to improve the visual quality of the videos.
It is a plug-in for Premiere Pro, that does more or less what the product noise says: it makes grainy video look neater. It’s very easy to use and
How to do that in Neat Video? Here are the steps:
Find the clip you want to reduce the noise of and search for the neat video effect in the Effects Panel.
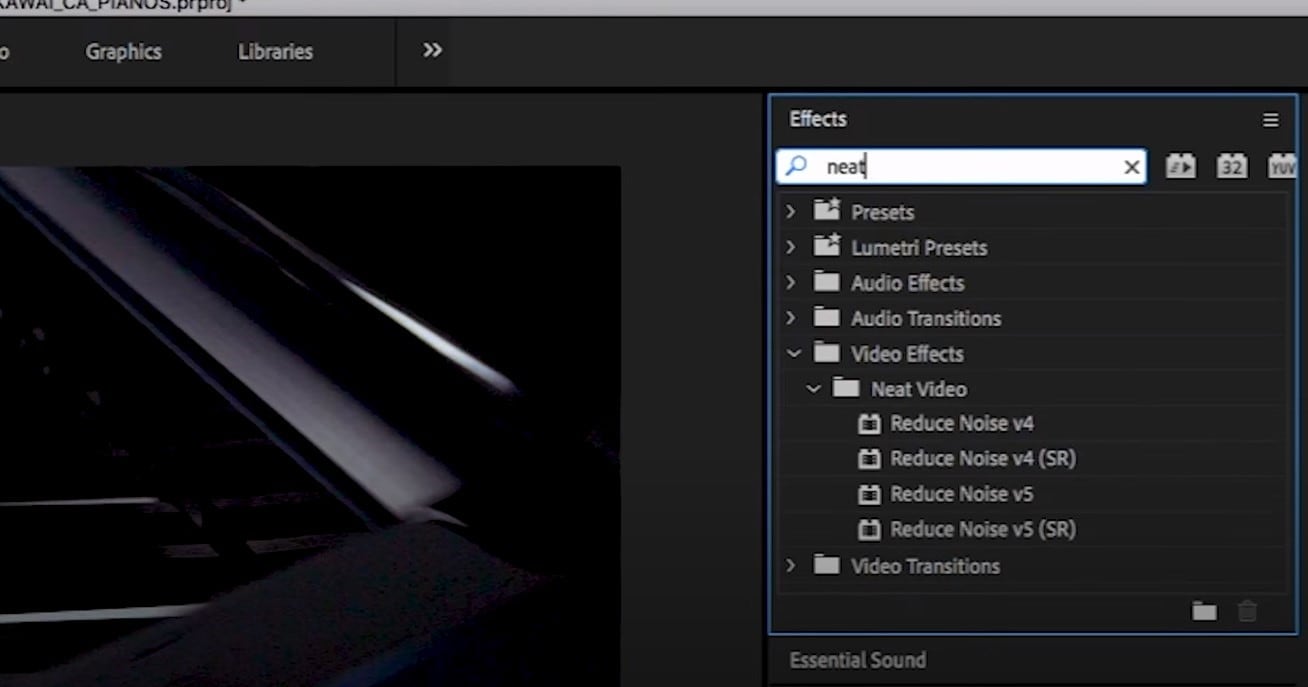
The video editors mostly use the SR version of it, because it seems faster and has kind of a better performance.
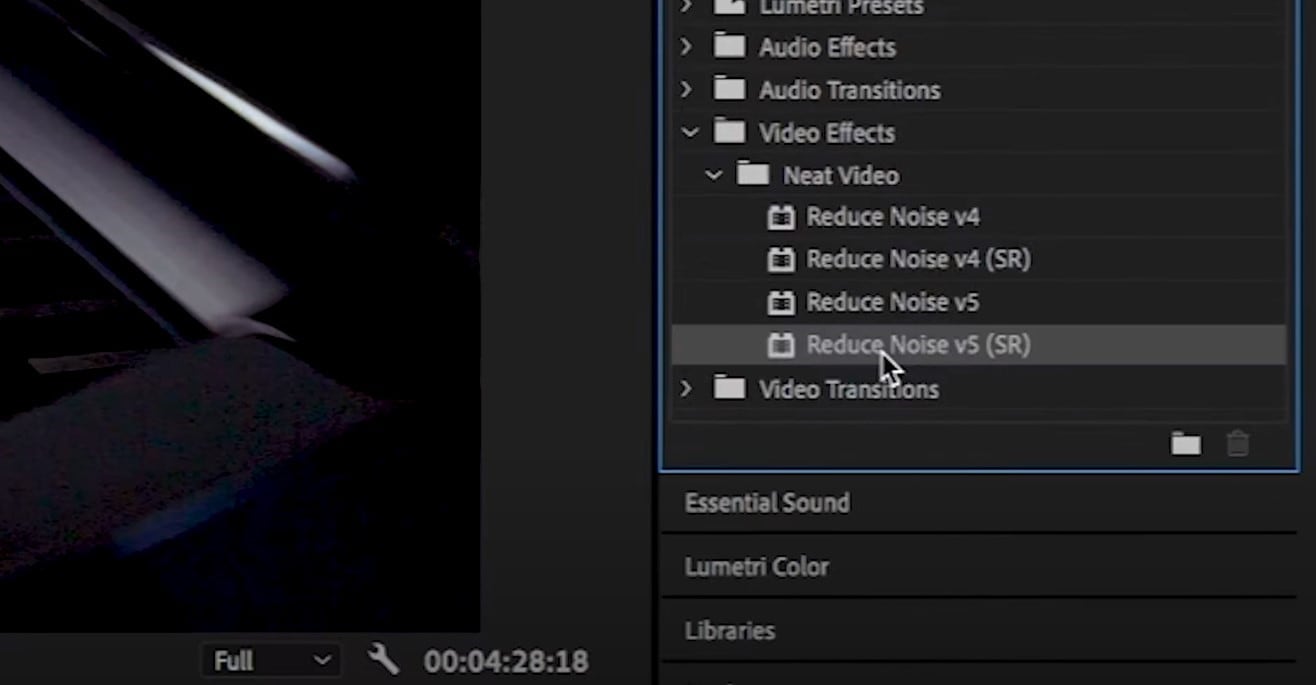
Then, you’ll have to drag the neat video plug-in to the clip to your choosing, take your attention to the Effect Controls panel on the left, and find: fx Reduce Noise v5 (SR) – press the button saying Prepare and this will open up the Build button as well, which wil open the Neat video effect window.
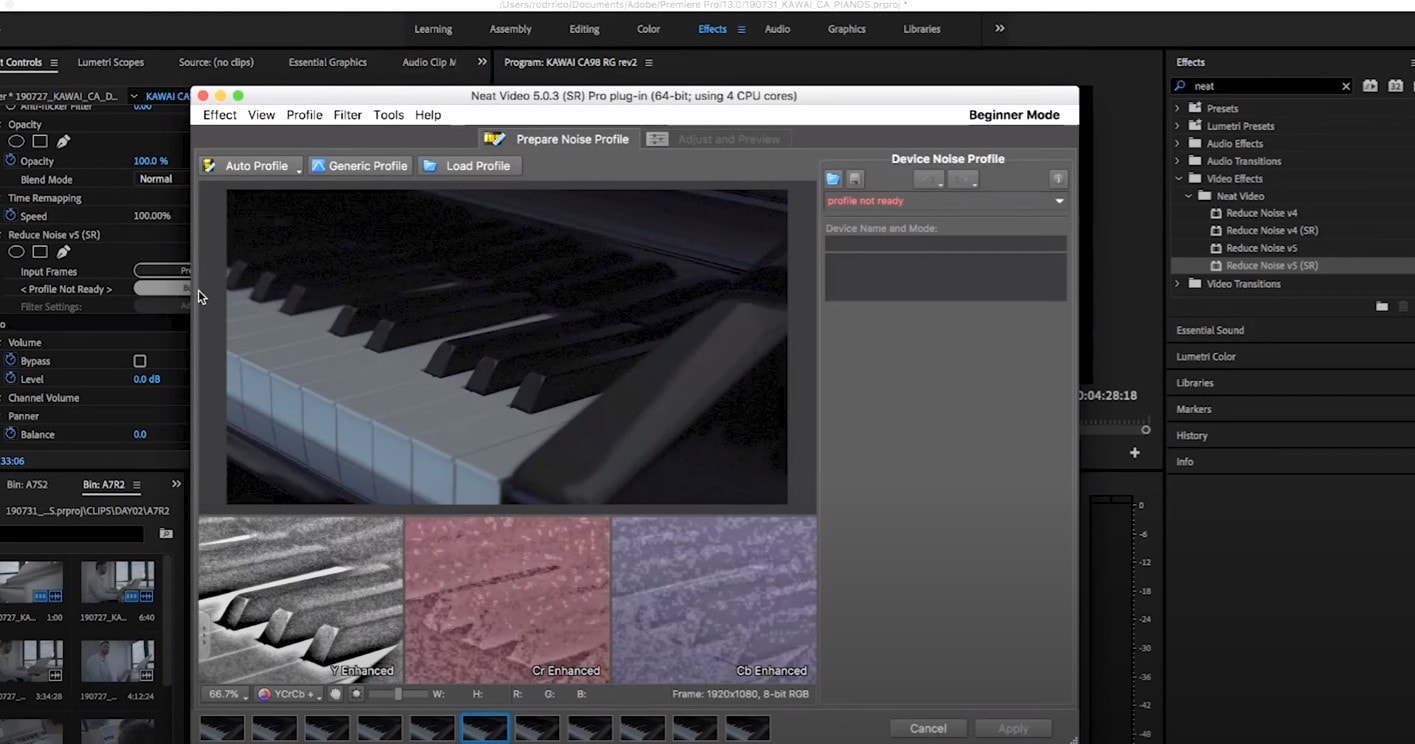
There, you’ll need to click on the Auto Profile. Selection window will appear, which you can move around the scene and resize, in order to select the noisy area of your footage. It is recommended to find the darkest or grainiest area there and select judging by this.
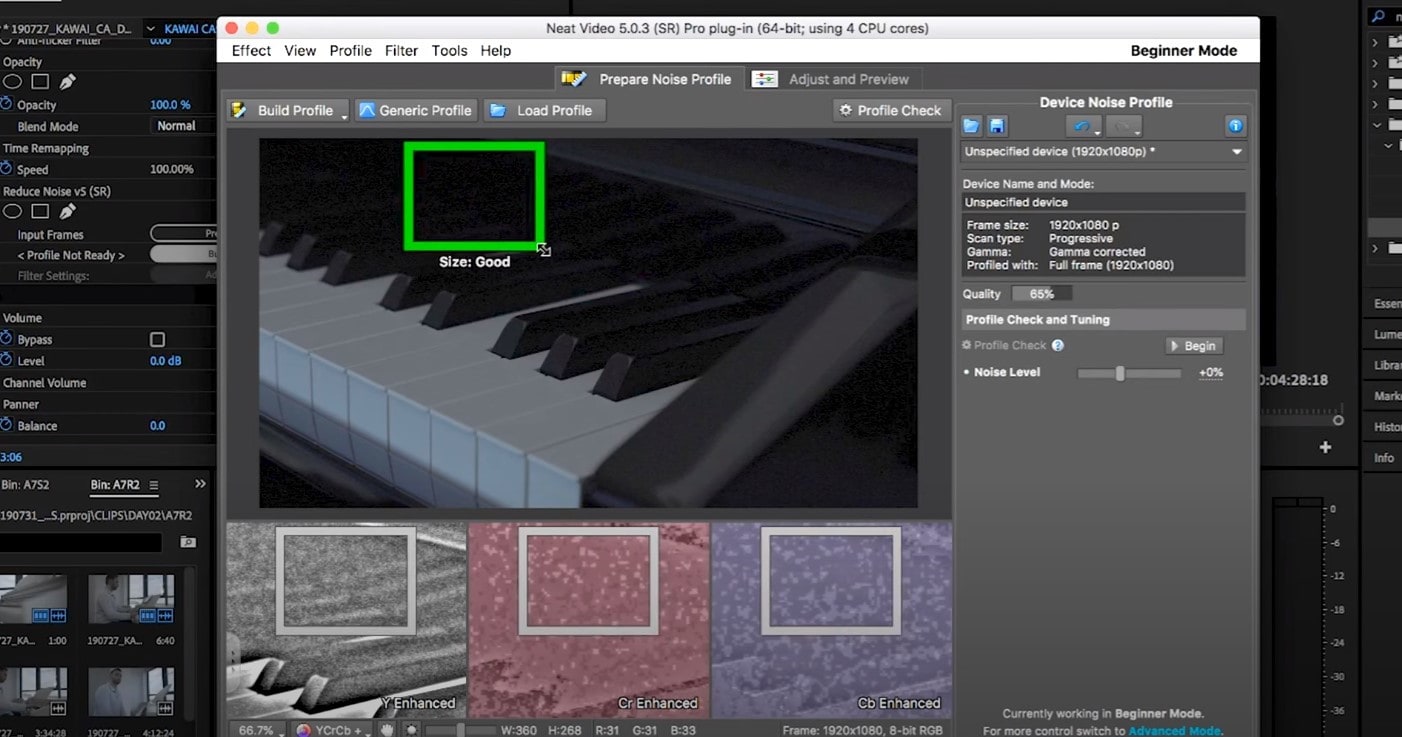
On the left side, you will find Filter Settings: under Spatial, you can play with the Noise Reduction Amount and Noise Level.
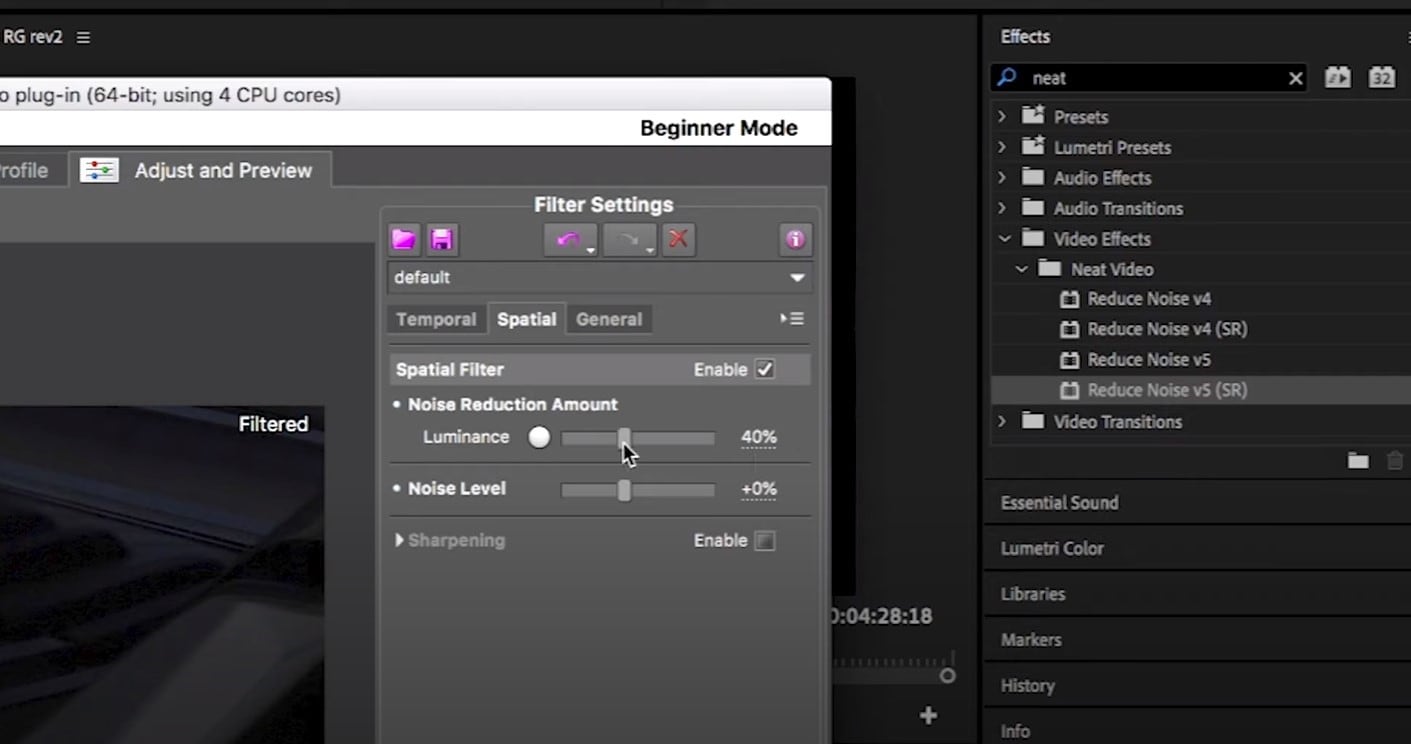
Then, you will hit Apply and – done, you can instantly see the results!
Shotcut
What about Shotcut? It is a free, open-source and cross-platform video denoiser for Windows operating system. It is also an outstanding video editor with trimming, splitting, color correction and other tools.
In order to reduce the noise there, do the following: first off, find filters, open that window and type in: Noise. This will open the options, and several of them are for noise reduction.
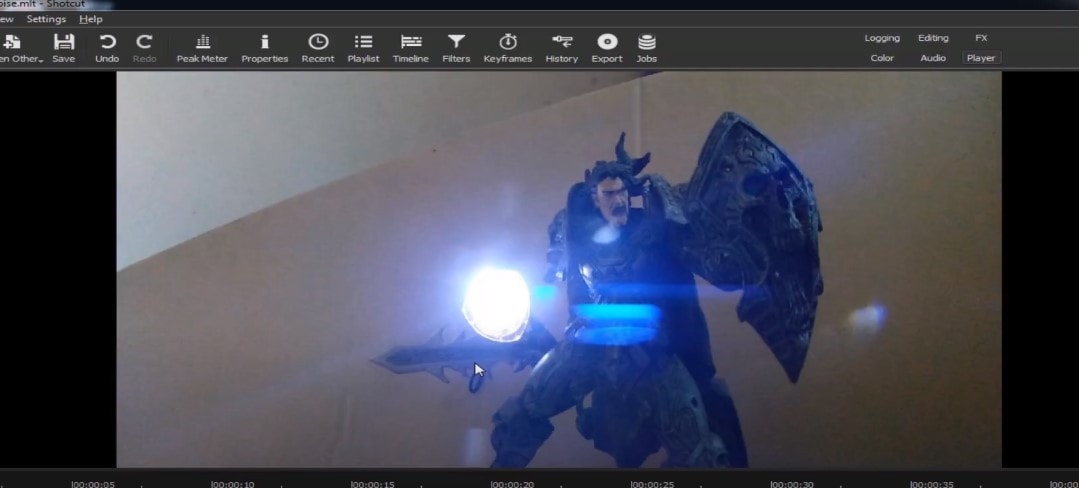
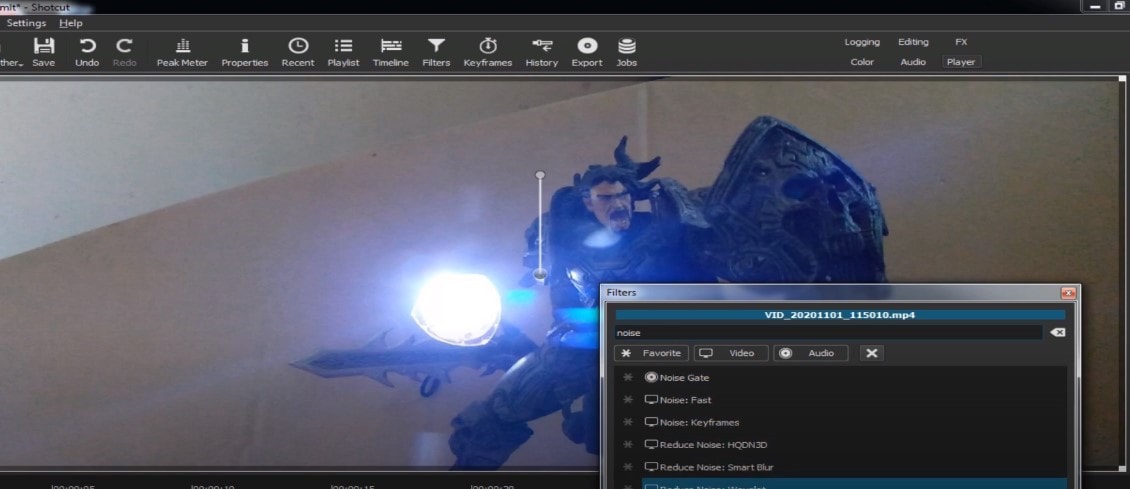
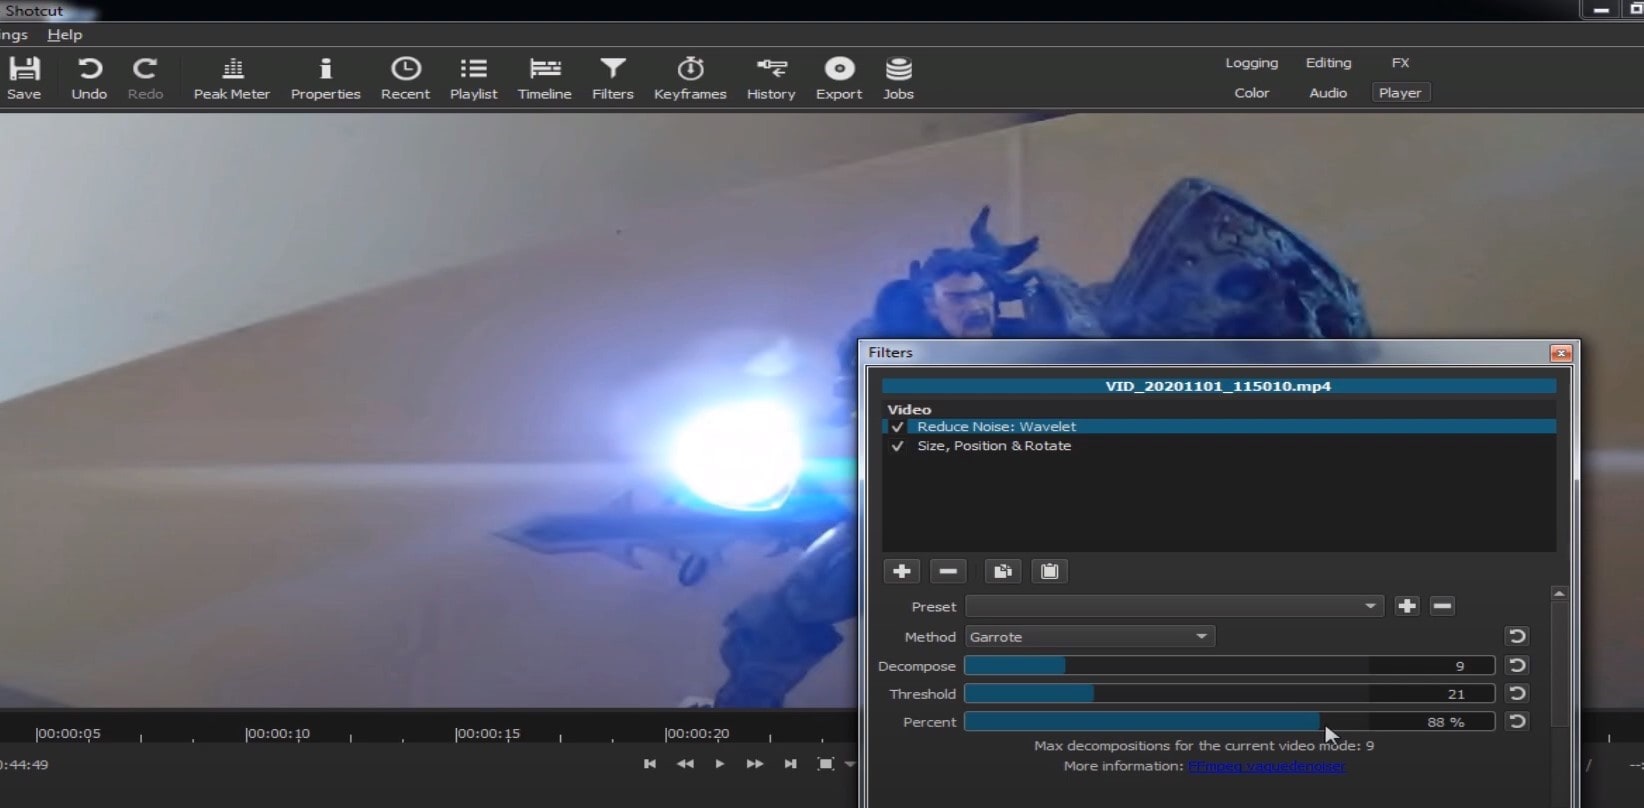
Choose Reduce Noise: Wavelet, add it to the Video and then feel free to modify the settings, such as: Decompose, Threshold, Percent. You can check and uncheck the effect in order to see the before-after difference. Then, click Apply button and it is ready to go!
Anyway, you can also try other similar effects such as Reduce Noise: HQDN3D and Reduce Noise: Smart Blur.
Adobe Premiere Pro
Even though we discussed video denoising in Adobe Premier Pro but with the help of a plug-in called Neat Video, reducing the noise in the video in this software can be achieved without the plug-in as well, through using effect which is called Median. And, Premiere Pro kind of deserves to be mentioned, so, let’s go for it!
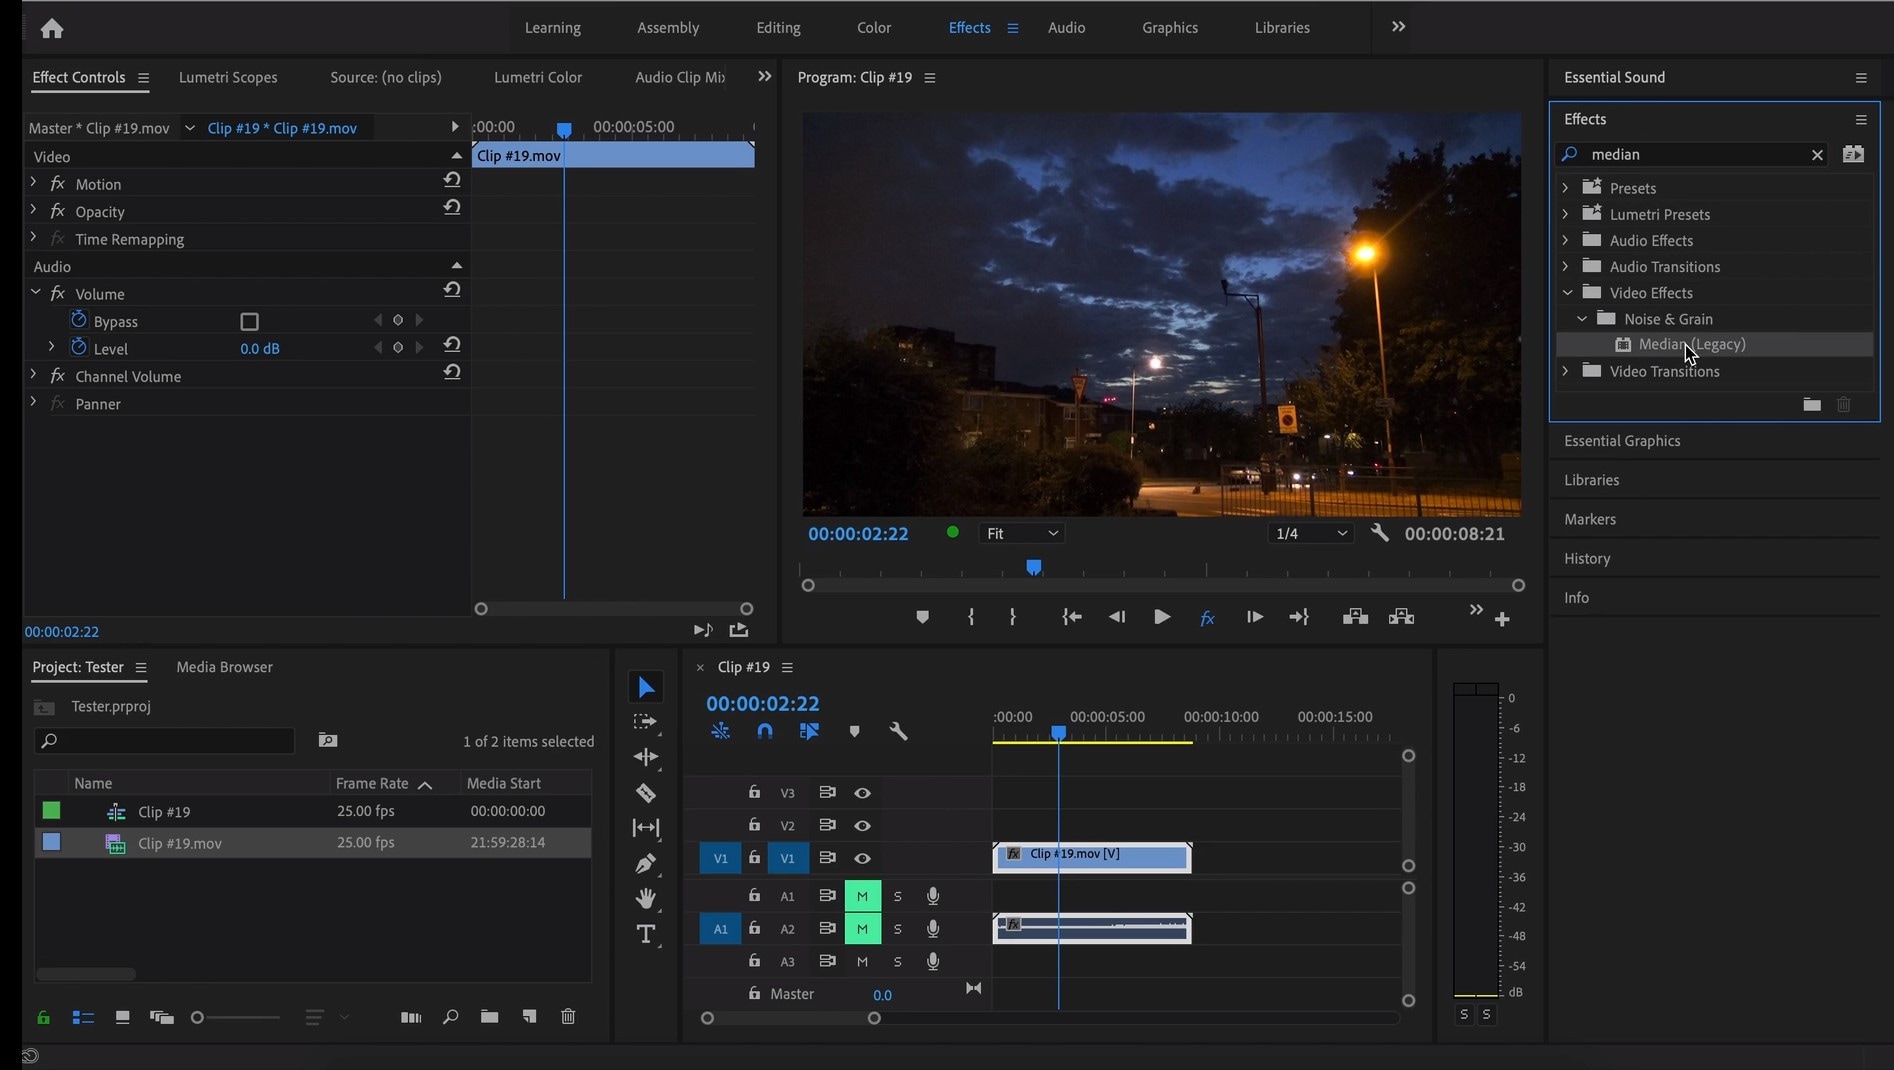
Add the desired footage into the Timeline of Premiere Pro. Then, find the Effects Panel, where our wanted Median can be found –drag and drop the effect to the clip.
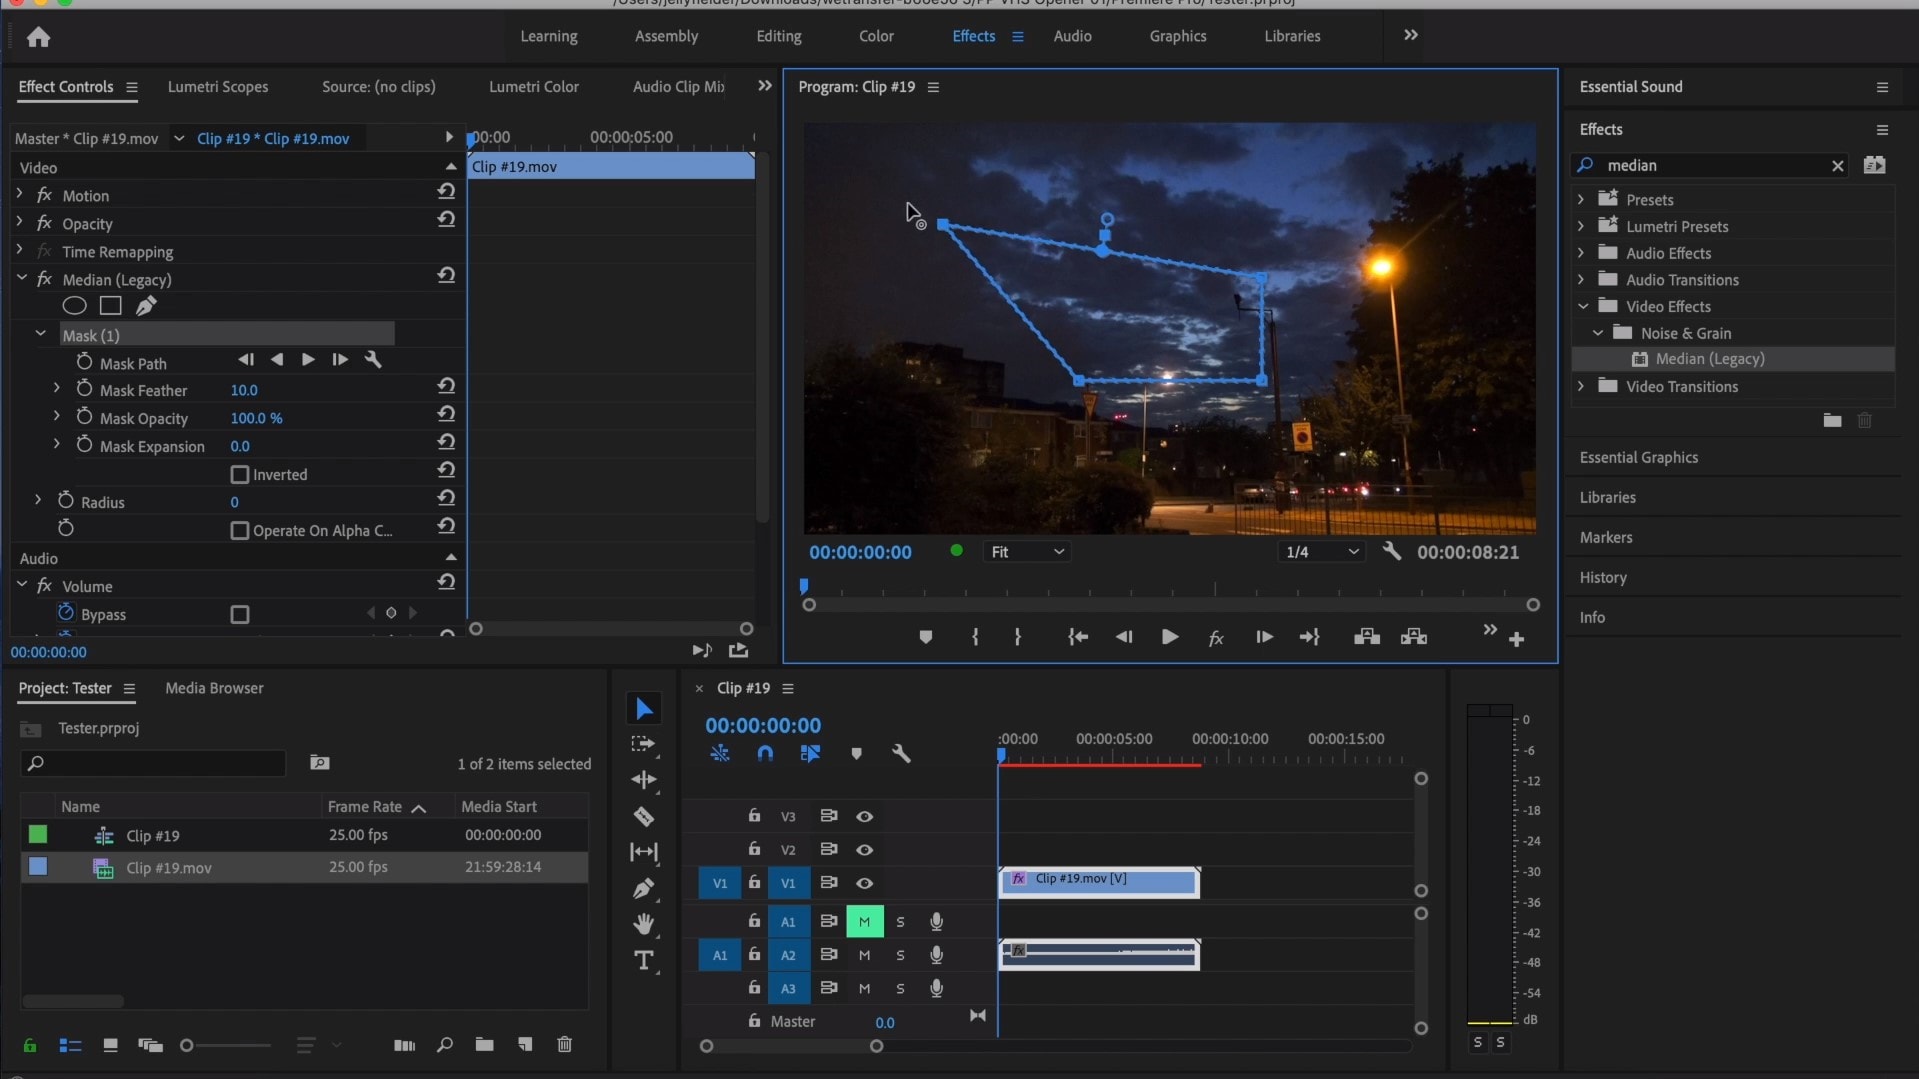
The Median should modify the grainiest parts of the whole clip, so in order to do this, we need to use masks. In the Effects Control panel, select the mask shape for the clip – the options are: rectangle, circle, or pen tool. With Pen tool, you move the Mask around the screen and resize it – the covered area will be affected.
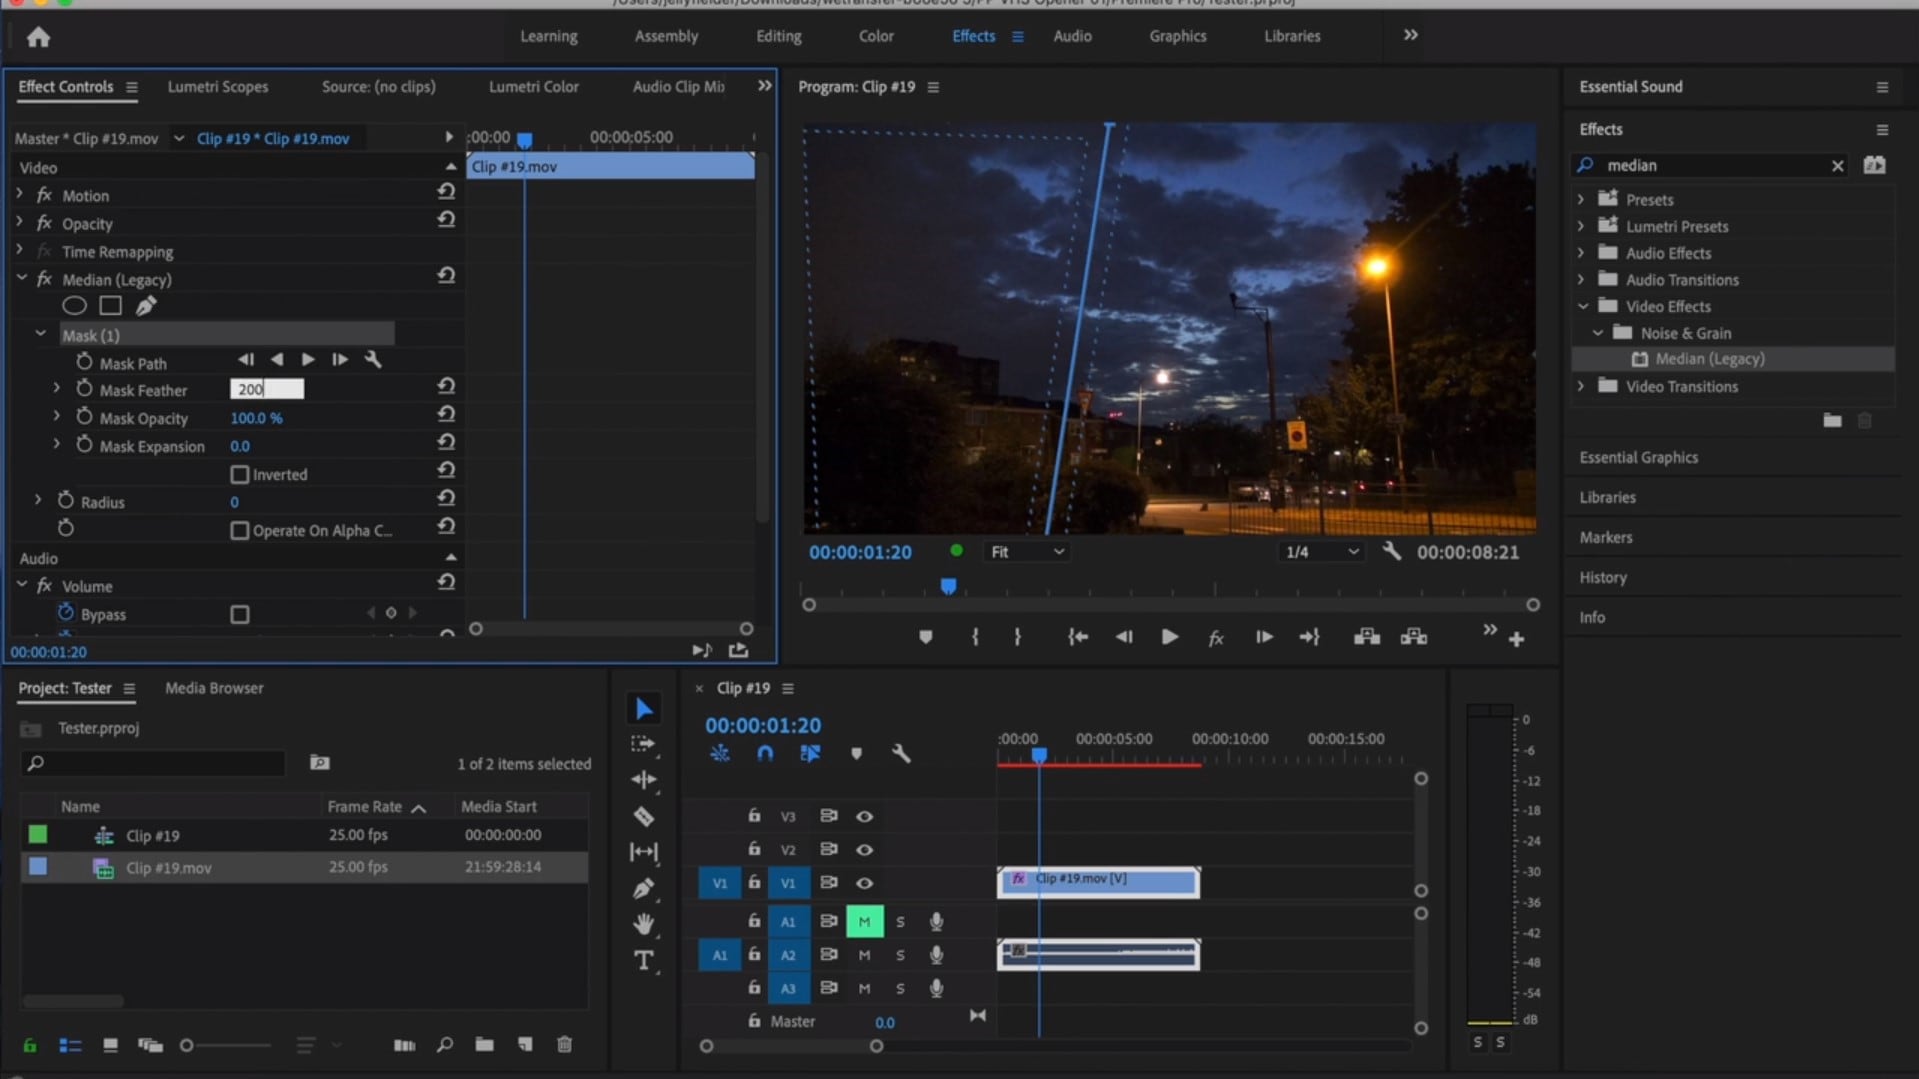
If you change Feather setting to 100, the effect will lose a sharp edge and instead, there will be a smooth border.
So, you might think it is needed to repeat these steps several time to create masks in different areas, in order to cover all of the grainy space of the scene.
And, at last, to reduce the noise, adjust the effect settings.
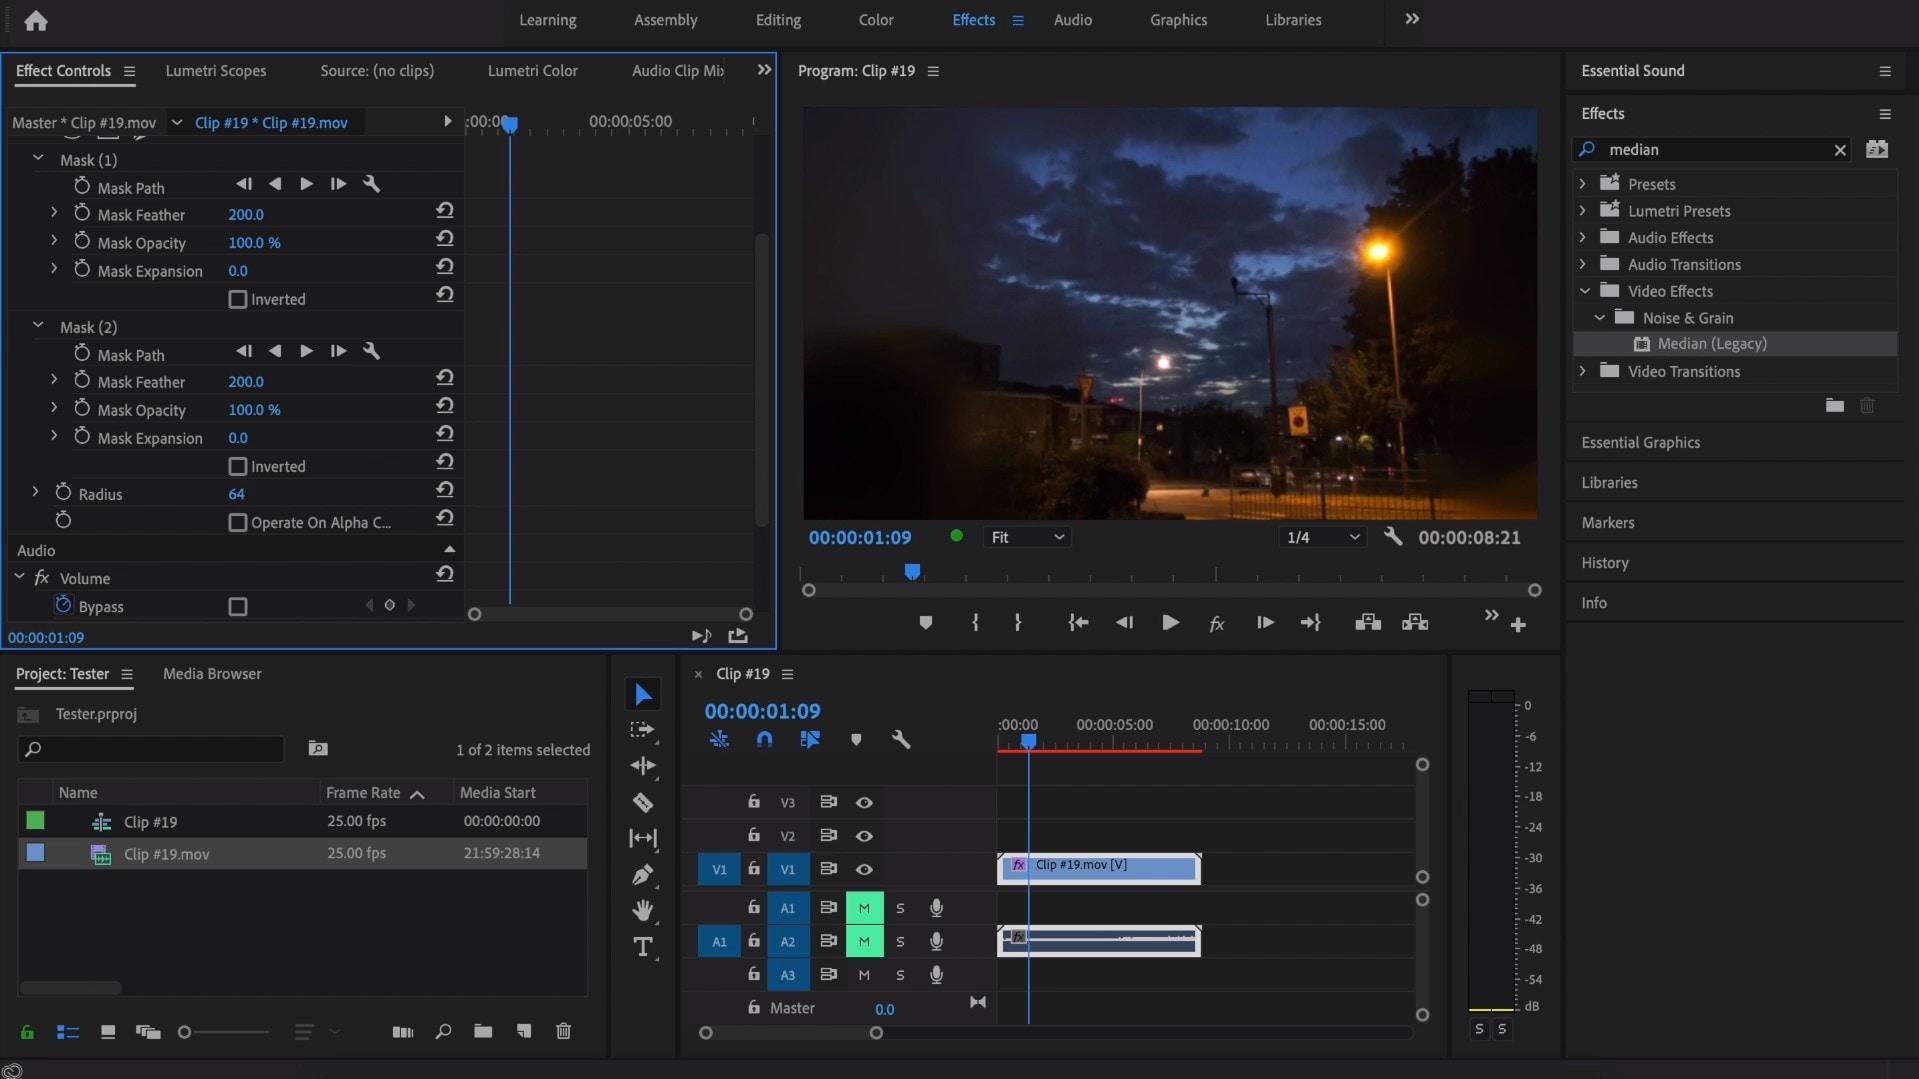
Actually, Median just blurs the grainy parts, without directly taking them away. Lastly, you can get to know the Radios settings, which will help you to achieve your most desired look!
Davinci Resolve
DaVinci Resolve is also worth mentioning in this list, in a way because it is also different from other video editors. Let’s see how it works and, meanwhile, differs:
Add the footage into the timeline. Find the fusion tab underneath the timeline panel.
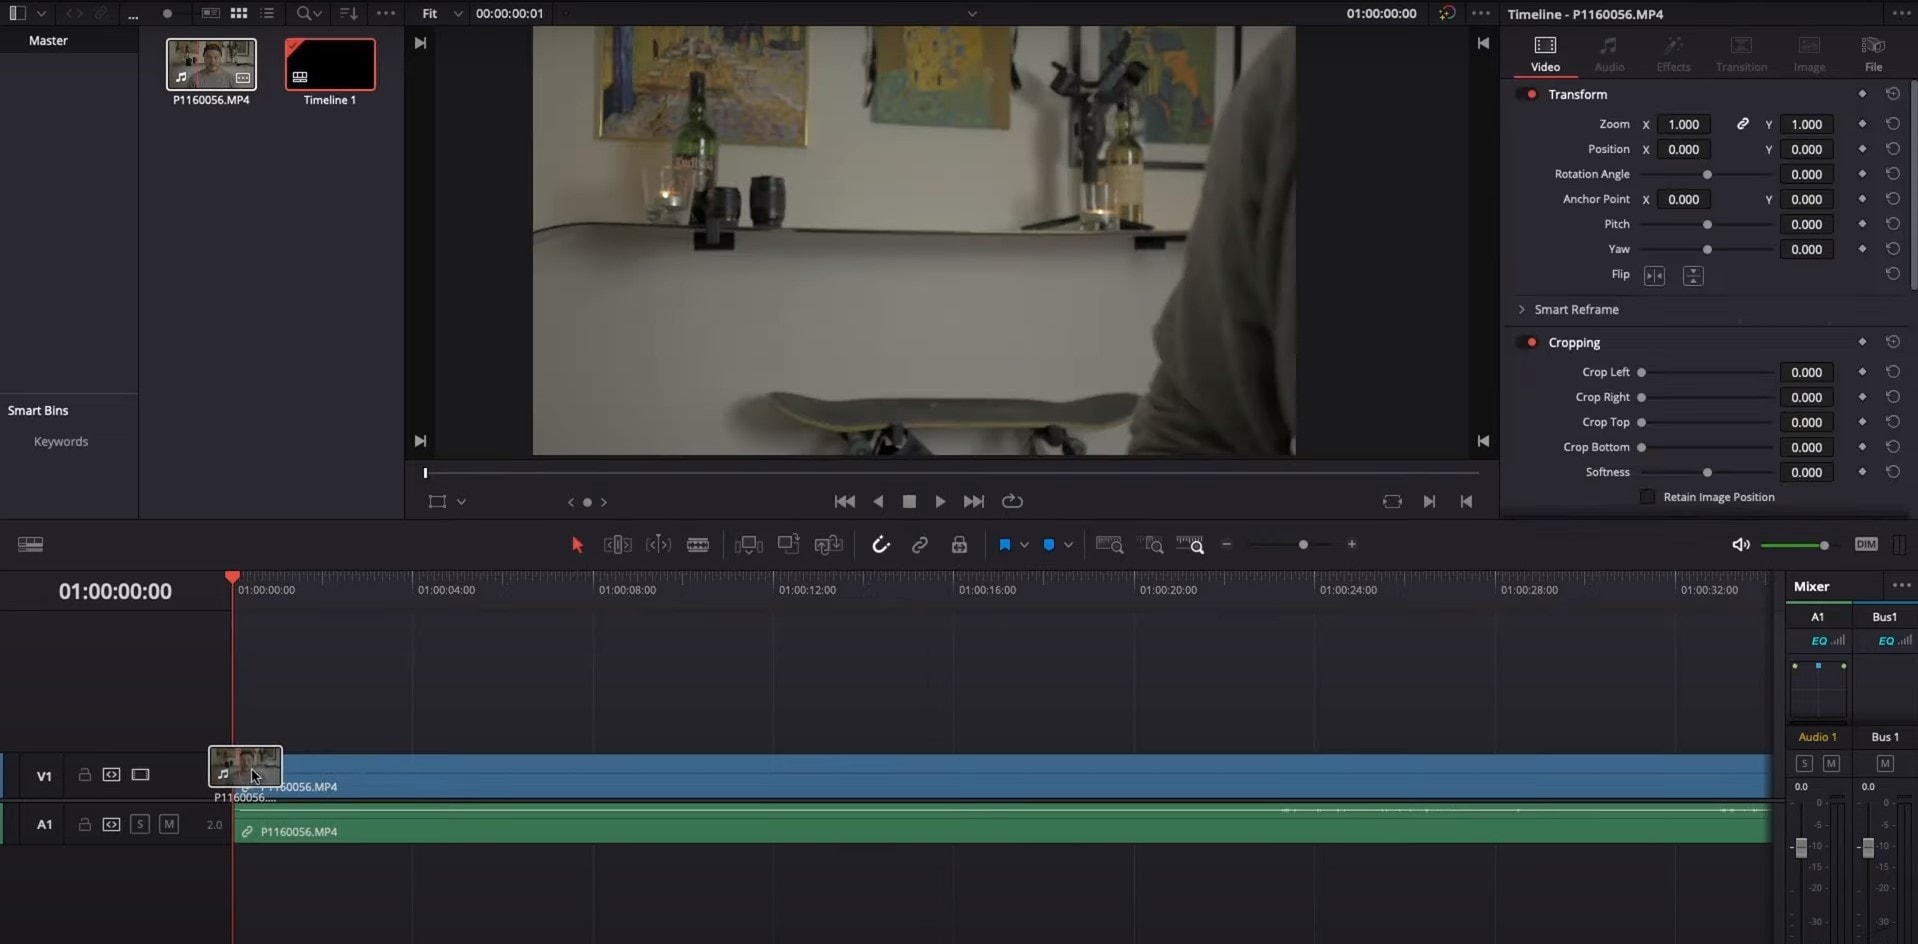
There, MediaIn1 and MediaOut1 will appear, and first, click on MediaIn1, - the scene will be shown in the first viewer – and MediaOut1 by default is appearing in the second. So, stay on MediaIn1, hit shift+spacebar, and find Remove Noise (RN). Click Add, which adds the Remove Noise1 node. On the top right corner there is an Inspector, which opens all the properties you can modify.

After going only into the second viewer, and in the top bar there is channel icons. Open it and click on red, but don’t get alarmed when your footage turns black and white – it’s just for a while. Go back to the Inspector, increase Softness Red and Detail Red.
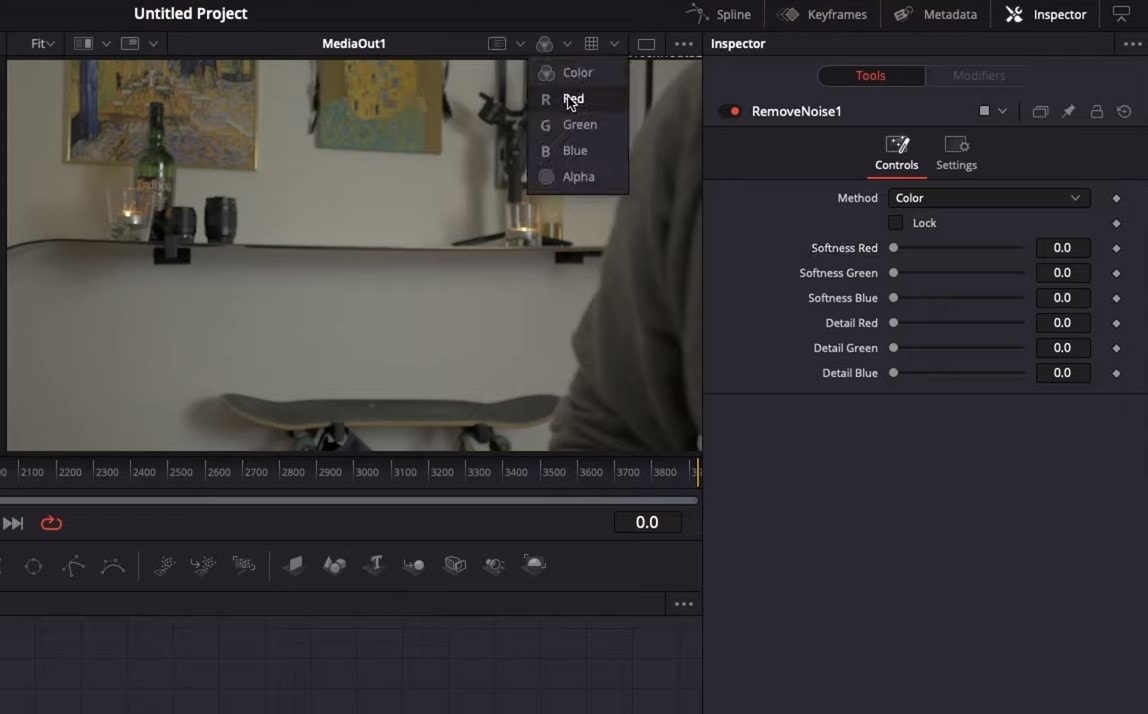
This step helps remove grain from the red channel. Then repeat the same for green and blue channels. After finishing go to the same channel button and set it to “back to color”. The clip will be colorized again and now be clearer, compared to the first viewer.
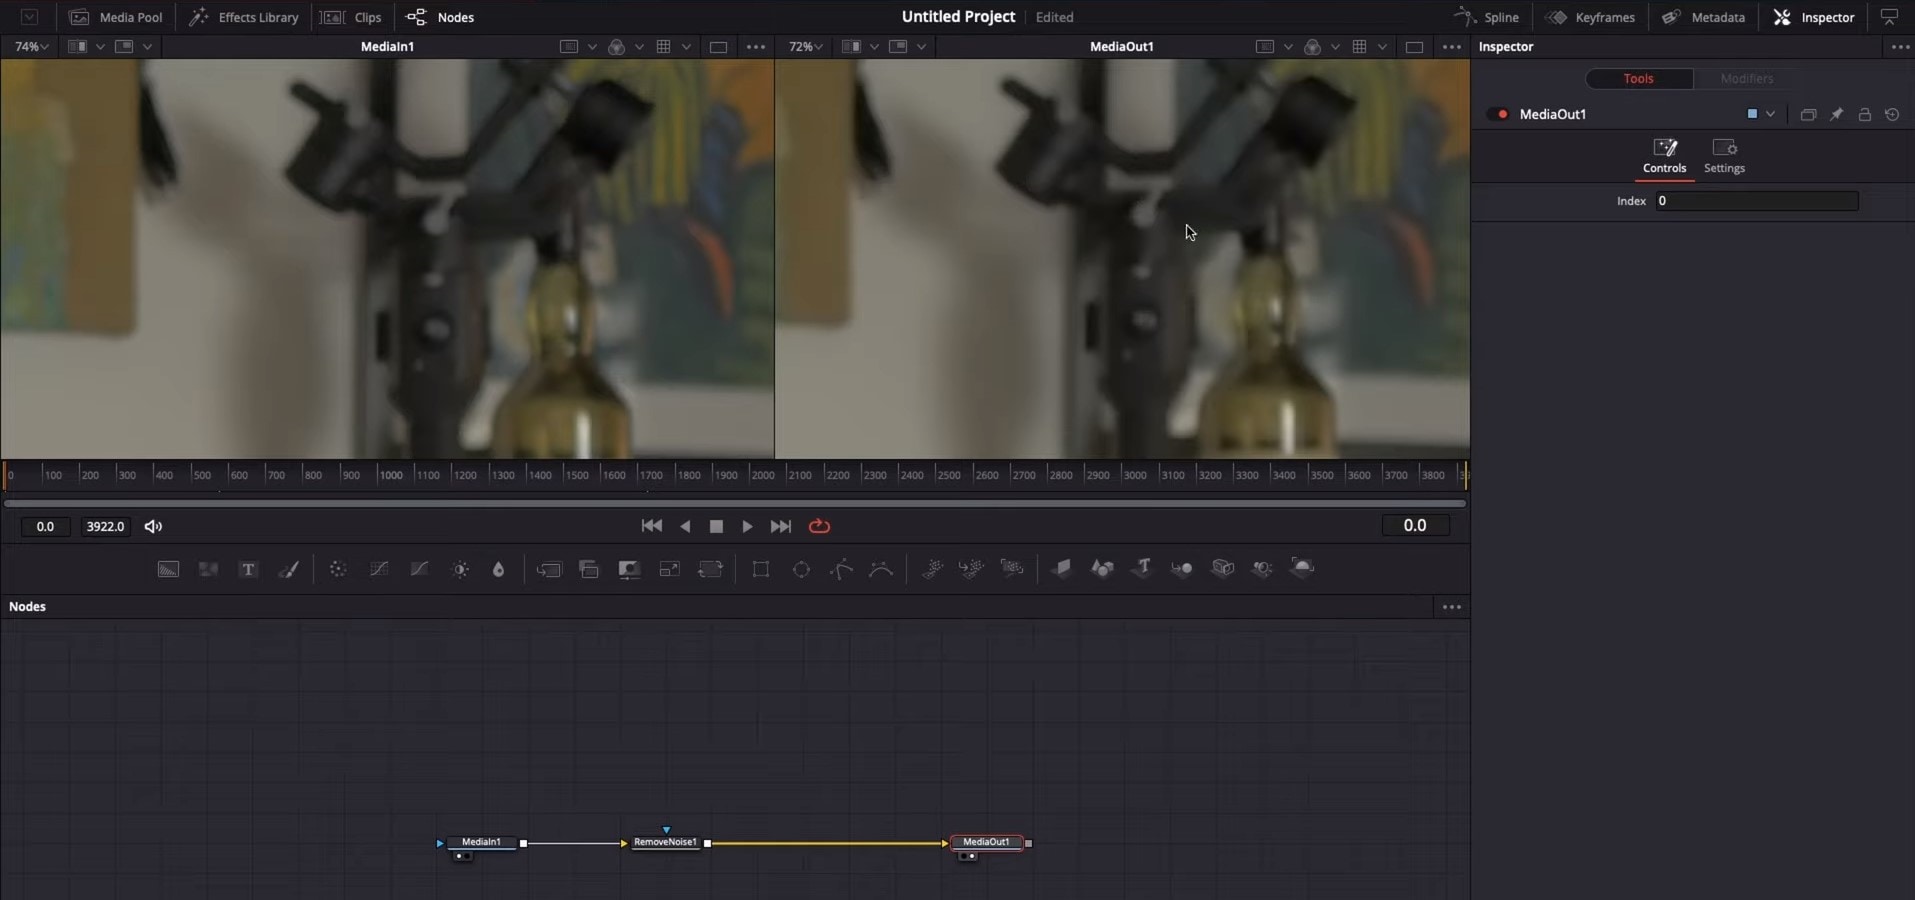
So, Evrika – we hot to know 5 best video denoisers in 2024, with the addition of audio background noise removal in Wondershare Filmora – hope you enjoyed it, and hope this will help you create better videos for yourself and your viewers!
This ensures you see the Smart Denoise, where you can change opacity of the clip, threshold and radius.

Reduce Opacity until you are satisfied with the result. The box next to Smart Denoise will show you the scene before and after the effect.
Bonus tip: Wondershare Filmora audio denoise
We already explained how video denoising works, and we will go on with our selection and explanatory article about the process, but, as we are on the Filmora topic, we might as well mention that denoising might mean another thing too – which, in this case, regards audio background noise. It means to remove unwanted hum from the audio in order for it to become more hearable. So, doing this in Wondershare Filmora works in a quite easy way. Use the guideline:
Drag and drop your video into the timeline. Right-click on the clip and hit Detach Audio, which will let you separate audio and video from one another and make sure you can work on them one by one.

Double-click on the audio track and have access to the editing panel, where you can see Remove background noise – it is not needed to emphasize what this option does for you!

That’s it – you are done, but keep in mind that there is a second way to achieve the same result as well, but this in case you don’t want to detach the audio: Double-click on the video clip in the timeline, the editing panel opens, so switch to Audio. Checking the box next to Remove background noise will show that there are three levels – weak, mid, and strong, and of course, you can choose to your liking!
If the voice recording doesn’t sound natural anymore, you can do the following: Click on Customize and Customize Equalizer window will open.

On the left, you can see the low tunes, while the highs are on the right. Background noises are often on the left, so you can lower them to get rid of them, but in order to have a more natural sound, raise the middle ones a little – and you are done when you are content with the sound!

So, hmm… back to the original topic – denoising a video, shall we?..
Neat video
Neat Video kind of, speaks for itself… it is a powerful video editing tool suitable for Windows, macOS and Linux. It aims to reduce the digital noise, flicker, dust, scratches and other defects in the captured videos to improve the visual quality of the videos.
It is a plug-in for Premiere Pro, that does more or less what the product noise says: it makes grainy video look neater. It’s very easy to use and
How to do that in Neat Video? Here are the steps:
Find the clip you want to reduce the noise of and search for the neat video effect in the Effects Panel.

The video editors mostly use the SR version of it, because it seems faster and has kind of a better performance.

Then, you’ll have to drag the neat video plug-in to the clip to your choosing, take your attention to the Effect Controls panel on the left, and find: fx Reduce Noise v5 (SR) – press the button saying Prepare and this will open up the Build button as well, which wil open the Neat video effect window.

There, you’ll need to click on the Auto Profile. Selection window will appear, which you can move around the scene and resize, in order to select the noisy area of your footage. It is recommended to find the darkest or grainiest area there and select judging by this.

On the left side, you will find Filter Settings: under Spatial, you can play with the Noise Reduction Amount and Noise Level.

Then, you will hit Apply and – done, you can instantly see the results!
Shotcut
What about Shotcut? It is a free, open-source and cross-platform video denoiser for Windows operating system. It is also an outstanding video editor with trimming, splitting, color correction and other tools.
In order to reduce the noise there, do the following: first off, find filters, open that window and type in: Noise. This will open the options, and several of them are for noise reduction.


Choose Reduce Noise: Wavelet, add it to the Video and then feel free to modify the settings, such as: Decompose, Threshold, Percent. You can check and uncheck the effect in order to see the before-after difference. Then, click Apply button and it is ready to go!
Anyway, you can also try other similar effects such as Reduce Noise: HQDN3D and Reduce Noise: Smart Blur.
Adobe Premiere Pro
Even though we discussed video denoising in Adobe Premier Pro but with the help of a plug-in called Neat Video, reducing the noise in the video in this software can be achieved without the plug-in as well, through using effect which is called Median. And, Premiere Pro kind of deserves to be mentioned, so, let’s go for it!
Add the desired footage into the Timeline of Premiere Pro. Then, find the Effects Panel, where our wanted Median can be found –drag and drop the effect to the clip.

The Median should modify the grainiest parts of the whole clip, so in order to do this, we need to use masks. In the Effects Control panel, select the mask shape for the clip – the options are: rectangle, circle, or pen tool. With Pen tool, you move the Mask around the screen and resize it – the covered area will be affected.

If you change Feather setting to 100, the effect will lose a sharp edge and instead, there will be a smooth border.

So, you might think it is needed to repeat these steps several time to create masks in different areas, in order to cover all of the grainy space of the scene.
And, at last, to reduce the noise, adjust the effect settings.

Actually, Median just blurs the grainy parts, without directly taking them away. Lastly, you can get to know the Radios settings, which will help you to achieve your most desired look!
Davinci Resolve
DaVinci Resolve is also worth mentioning in this list, in a way because it is also different from other video editors. Let’s see how it works and, meanwhile, differs:
Add the footage into the timeline. Find the fusion tab underneath the timeline panel.

There, MediaIn1 and MediaOut1 will appear, and first, click on MediaIn1, - the scene will be shown in the first viewer – and MediaOut1 by default is appearing in the second. So, stay on MediaIn1, hit shift+spacebar, and find Remove Noise (RN). Click Add, which adds the Remove Noise1 node. On the top right corner there is an Inspector, which opens all the properties you can modify.

After going only into the second viewer, and in the top bar there is channel icons. Open it and click on red, but don’t get alarmed when your footage turns black and white – it’s just for a while. Go back to the Inspector, increase Softness Red and Detail Red.

This step helps remove grain from the red channel. Then repeat the same for green and blue channels. After finishing go to the same channel button and set it to “back to color”. The clip will be colorized again and now be clearer, compared to the first viewer.

So, Evrika – we hot to know 5 best video denoisers in 2024, with the addition of audio background noise removal in Wondershare Filmora – hope you enjoyed it, and hope this will help you create better videos for yourself and your viewers!
This ensures you see the Smart Denoise, where you can change opacity of the clip, threshold and radius.

Reduce Opacity until you are satisfied with the result. The box next to Smart Denoise will show you the scene before and after the effect.
Bonus tip: Wondershare Filmora audio denoise
We already explained how video denoising works, and we will go on with our selection and explanatory article about the process, but, as we are on the Filmora topic, we might as well mention that denoising might mean another thing too – which, in this case, regards audio background noise. It means to remove unwanted hum from the audio in order for it to become more hearable. So, doing this in Wondershare Filmora works in a quite easy way. Use the guideline:
Drag and drop your video into the timeline. Right-click on the clip and hit Detach Audio, which will let you separate audio and video from one another and make sure you can work on them one by one.

Double-click on the audio track and have access to the editing panel, where you can see Remove background noise – it is not needed to emphasize what this option does for you!

That’s it – you are done, but keep in mind that there is a second way to achieve the same result as well, but this in case you don’t want to detach the audio: Double-click on the video clip in the timeline, the editing panel opens, so switch to Audio. Checking the box next to Remove background noise will show that there are three levels – weak, mid, and strong, and of course, you can choose to your liking!
If the voice recording doesn’t sound natural anymore, you can do the following: Click on Customize and Customize Equalizer window will open.

On the left, you can see the low tunes, while the highs are on the right. Background noises are often on the left, so you can lower them to get rid of them, but in order to have a more natural sound, raise the middle ones a little – and you are done when you are content with the sound!

So, hmm… back to the original topic – denoising a video, shall we?..
Neat video
Neat Video kind of, speaks for itself… it is a powerful video editing tool suitable for Windows, macOS and Linux. It aims to reduce the digital noise, flicker, dust, scratches and other defects in the captured videos to improve the visual quality of the videos.
It is a plug-in for Premiere Pro, that does more or less what the product noise says: it makes grainy video look neater. It’s very easy to use and
How to do that in Neat Video? Here are the steps:
Find the clip you want to reduce the noise of and search for the neat video effect in the Effects Panel.

The video editors mostly use the SR version of it, because it seems faster and has kind of a better performance.

Then, you’ll have to drag the neat video plug-in to the clip to your choosing, take your attention to the Effect Controls panel on the left, and find: fx Reduce Noise v5 (SR) – press the button saying Prepare and this will open up the Build button as well, which wil open the Neat video effect window.

There, you’ll need to click on the Auto Profile. Selection window will appear, which you can move around the scene and resize, in order to select the noisy area of your footage. It is recommended to find the darkest or grainiest area there and select judging by this.

On the left side, you will find Filter Settings: under Spatial, you can play with the Noise Reduction Amount and Noise Level.

Then, you will hit Apply and – done, you can instantly see the results!
Shotcut
What about Shotcut? It is a free, open-source and cross-platform video denoiser for Windows operating system. It is also an outstanding video editor with trimming, splitting, color correction and other tools.
In order to reduce the noise there, do the following: first off, find filters, open that window and type in: Noise. This will open the options, and several of them are for noise reduction.


Choose Reduce Noise: Wavelet, add it to the Video and then feel free to modify the settings, such as: Decompose, Threshold, Percent. You can check and uncheck the effect in order to see the before-after difference. Then, click Apply button and it is ready to go!
Anyway, you can also try other similar effects such as Reduce Noise: HQDN3D and Reduce Noise: Smart Blur.
Adobe Premiere Pro
Even though we discussed video denoising in Adobe Premier Pro but with the help of a plug-in called Neat Video, reducing the noise in the video in this software can be achieved without the plug-in as well, through using effect which is called Median. And, Premiere Pro kind of deserves to be mentioned, so, let’s go for it!
Add the desired footage into the Timeline of Premiere Pro. Then, find the Effects Panel, where our wanted Median can be found –drag and drop the effect to the clip.

The Median should modify the grainiest parts of the whole clip, so in order to do this, we need to use masks. In the Effects Control panel, select the mask shape for the clip – the options are: rectangle, circle, or pen tool. With Pen tool, you move the Mask around the screen and resize it – the covered area will be affected.

If you change Feather setting to 100, the effect will lose a sharp edge and instead, there will be a smooth border.

So, you might think it is needed to repeat these steps several time to create masks in different areas, in order to cover all of the grainy space of the scene.
And, at last, to reduce the noise, adjust the effect settings.

Actually, Median just blurs the grainy parts, without directly taking them away. Lastly, you can get to know the Radios settings, which will help you to achieve your most desired look!
Davinci Resolve
DaVinci Resolve is also worth mentioning in this list, in a way because it is also different from other video editors. Let’s see how it works and, meanwhile, differs:
Add the footage into the timeline. Find the fusion tab underneath the timeline panel.

There, MediaIn1 and MediaOut1 will appear, and first, click on MediaIn1, - the scene will be shown in the first viewer – and MediaOut1 by default is appearing in the second. So, stay on MediaIn1, hit shift+spacebar, and find Remove Noise (RN). Click Add, which adds the Remove Noise1 node. On the top right corner there is an Inspector, which opens all the properties you can modify.

After going only into the second viewer, and in the top bar there is channel icons. Open it and click on red, but don’t get alarmed when your footage turns black and white – it’s just for a while. Go back to the Inspector, increase Softness Red and Detail Red.

This step helps remove grain from the red channel. Then repeat the same for green and blue channels. After finishing go to the same channel button and set it to “back to color”. The clip will be colorized again and now be clearer, compared to the first viewer.

So, Evrika – we hot to know 5 best video denoisers in 2024, with the addition of audio background noise removal in Wondershare Filmora – hope you enjoyed it, and hope this will help you create better videos for yourself and your viewers!
This ensures you see the Smart Denoise, where you can change opacity of the clip, threshold and radius.

Reduce Opacity until you are satisfied with the result. The box next to Smart Denoise will show you the scene before and after the effect.
Bonus tip: Wondershare Filmora audio denoise
We already explained how video denoising works, and we will go on with our selection and explanatory article about the process, but, as we are on the Filmora topic, we might as well mention that denoising might mean another thing too – which, in this case, regards audio background noise. It means to remove unwanted hum from the audio in order for it to become more hearable. So, doing this in Wondershare Filmora works in a quite easy way. Use the guideline:
Drag and drop your video into the timeline. Right-click on the clip and hit Detach Audio, which will let you separate audio and video from one another and make sure you can work on them one by one.

Double-click on the audio track and have access to the editing panel, where you can see Remove background noise – it is not needed to emphasize what this option does for you!

That’s it – you are done, but keep in mind that there is a second way to achieve the same result as well, but this in case you don’t want to detach the audio: Double-click on the video clip in the timeline, the editing panel opens, so switch to Audio. Checking the box next to Remove background noise will show that there are three levels – weak, mid, and strong, and of course, you can choose to your liking!
If the voice recording doesn’t sound natural anymore, you can do the following: Click on Customize and Customize Equalizer window will open.

On the left, you can see the low tunes, while the highs are on the right. Background noises are often on the left, so you can lower them to get rid of them, but in order to have a more natural sound, raise the middle ones a little – and you are done when you are content with the sound!

So, hmm… back to the original topic – denoising a video, shall we?..
Neat video
Neat Video kind of, speaks for itself… it is a powerful video editing tool suitable for Windows, macOS and Linux. It aims to reduce the digital noise, flicker, dust, scratches and other defects in the captured videos to improve the visual quality of the videos.
It is a plug-in for Premiere Pro, that does more or less what the product noise says: it makes grainy video look neater. It’s very easy to use and
How to do that in Neat Video? Here are the steps:
Find the clip you want to reduce the noise of and search for the neat video effect in the Effects Panel.

The video editors mostly use the SR version of it, because it seems faster and has kind of a better performance.

Then, you’ll have to drag the neat video plug-in to the clip to your choosing, take your attention to the Effect Controls panel on the left, and find: fx Reduce Noise v5 (SR) – press the button saying Prepare and this will open up the Build button as well, which wil open the Neat video effect window.

There, you’ll need to click on the Auto Profile. Selection window will appear, which you can move around the scene and resize, in order to select the noisy area of your footage. It is recommended to find the darkest or grainiest area there and select judging by this.

On the left side, you will find Filter Settings: under Spatial, you can play with the Noise Reduction Amount and Noise Level.

Then, you will hit Apply and – done, you can instantly see the results!
Shotcut
What about Shotcut? It is a free, open-source and cross-platform video denoiser for Windows operating system. It is also an outstanding video editor with trimming, splitting, color correction and other tools.
In order to reduce the noise there, do the following: first off, find filters, open that window and type in: Noise. This will open the options, and several of them are for noise reduction.


Choose Reduce Noise: Wavelet, add it to the Video and then feel free to modify the settings, such as: Decompose, Threshold, Percent. You can check and uncheck the effect in order to see the before-after difference. Then, click Apply button and it is ready to go!
Anyway, you can also try other similar effects such as Reduce Noise: HQDN3D and Reduce Noise: Smart Blur.
Adobe Premiere Pro
Even though we discussed video denoising in Adobe Premier Pro but with the help of a plug-in called Neat Video, reducing the noise in the video in this software can be achieved without the plug-in as well, through using effect which is called Median. And, Premiere Pro kind of deserves to be mentioned, so, let’s go for it!
Add the desired footage into the Timeline of Premiere Pro. Then, find the Effects Panel, where our wanted Median can be found –drag and drop the effect to the clip.

The Median should modify the grainiest parts of the whole clip, so in order to do this, we need to use masks. In the Effects Control panel, select the mask shape for the clip – the options are: rectangle, circle, or pen tool. With Pen tool, you move the Mask around the screen and resize it – the covered area will be affected.

If you change Feather setting to 100, the effect will lose a sharp edge and instead, there will be a smooth border.

So, you might think it is needed to repeat these steps several time to create masks in different areas, in order to cover all of the grainy space of the scene.
And, at last, to reduce the noise, adjust the effect settings.

Actually, Median just blurs the grainy parts, without directly taking them away. Lastly, you can get to know the Radios settings, which will help you to achieve your most desired look!
Davinci Resolve
DaVinci Resolve is also worth mentioning in this list, in a way because it is also different from other video editors. Let’s see how it works and, meanwhile, differs:
Add the footage into the timeline. Find the fusion tab underneath the timeline panel.

There, MediaIn1 and MediaOut1 will appear, and first, click on MediaIn1, - the scene will be shown in the first viewer – and MediaOut1 by default is appearing in the second. So, stay on MediaIn1, hit shift+spacebar, and find Remove Noise (RN). Click Add, which adds the Remove Noise1 node. On the top right corner there is an Inspector, which opens all the properties you can modify.

After going only into the second viewer, and in the top bar there is channel icons. Open it and click on red, but don’t get alarmed when your footage turns black and white – it’s just for a while. Go back to the Inspector, increase Softness Red and Detail Red.

This step helps remove grain from the red channel. Then repeat the same for green and blue channels. After finishing go to the same channel button and set it to “back to color”. The clip will be colorized again and now be clearer, compared to the first viewer.

So, Evrika – we hot to know 5 best video denoisers in 2024, with the addition of audio background noise removal in Wondershare Filmora – hope you enjoyed it, and hope this will help you create better videos for yourself and your viewers!
Add Subtitles To Videos With Kapwing [Step by Step]
Content creators always prefer to add subtitles to their videos for better comprehension. The reason is that some people cannot understand your language and needs subtitles to understand the content. Moreover, if your viewer is facing an audio problem and won’t be able to hear your voice, subtitles can help there. In this article, we will introduce the Kapwing subtitle maker, through which you can add subtitles in many ways.
There are some drawbacks to using online tools, such as file size restrictions or internet availability. Yet, with the Kapwing tool, you won’t get disappointed. Kapwing is an online tool that offers various options to edit videos. One of the great features of Kapwing is its subtitle maker, which can help you in adding subtitles to your videos easily. To learn how to use the Kapwing subtitles feature, continue reading this article.
Part 1: Upload the Subtitle File to Kapwing
If you have a subtitle file for your video, Kapwing can help you. If you have a subtitle file for your video, Kapwing can help you. Without creating a user account, you can upload the subtitle file on this tool. With this subtitle editor, you can upload video files from your computer or cloud storage platforms. Moreover, it supports the subtitle files of SRT and VVT format. To use Kapwing subtitle maker for uploading a subtitle file, read the below steps:
Step 1 Navigate to the official site of Kapwing and select its “Subtitles” tool. Afterward, click on “Choose a video,” which will open a new window on your screen.

Step 2 Click on the “Upload” button given on top to import your video file on this tool. Once done, click on the “Subtitle” option displayed on the left side. On the subtitles window, click on the “Upload SRT/VVT” button to import your subtitle file.

Step 3 After uploading the file, your subtitles will sync with your video. To edit your subtitles, navigate to the right panel. From that, you can select text position, background color, opacity, font, and alignment.

Step 4 Once done with making the changes on added subtitles, you can click on the “Export Project” button to save or share the file.

Part 2: Automatically Generate your Subtitle on Kapwing
Do you want to generate subtitles for your video instantly? Kapwing subtitle maker offers an Auto-Subtitle Generator that converts your voice into subtitles. This feature supports many languages so that anyone across the world can utilize this tool. Moreover, it also offers a translating feature that can help you in converting your subtitles into another language.
However, to use this feature, you must create your user account. Also, you should upgrade your account to fully use this feature without any restrictions. If you don’t have an upgraded account, you can only auto-generate subtitles for the 7 minutes video. To use the auto-subtitle generator of Kapwing, check the below steps:
Step 1 Begin by accessing the website of the Kapwing tool. Click on “Subtitles” from the “Tools” tab and then tap on the “Choose a video” button. Upload the video file on which you want to add subtitles from your PC.

Step 2 Once done with importing the video, click on “Subtitles” from the left section. From the new window, click on “Auto-generate.” The tool will automatically create subtitles for your video by detecting the language.

Step 3 Once you created the subtitles through this feature, go to the “Translate” tab to translate subtitles into your preferred language. You can also edit the subtitles to change their background, opacity, text font, and size. Once done, click on the “Export Project” button.

Part 3: Manually Add Subtitles to the Video on Kapwing
If you don’t want to use the auto-generator and do not have a subtitle file, you can use the manual option. Kapwing allows you to add subtitles manually in its friendly user interface. After adding Kapwing captions, you can choose your preferred font and style for further enhancement.
Step 1 After accessing the website of Kapwing, select the “Subtitles” tool to proceed. Now select the “Choose a video” button to open the Kapwing editor window.

Step 2 Import your video file by tapping on the “Upload” button. Afterward, go to the “Subtitles” section and click on the “Add Subtitle” button. On the typing space, enter your subtitles. You can also choose the duration for your subtitles from the same window. To add subtitles further, you can click on the “Add Subtitles” button again.

Step 3 After adding the complete subtitles, you can choose their font, style, color, and opacity from the right panel. Once done, hit the “Export Project” button.

Part 4: How to Add Subtitles to Videos with the Best Alternative of Kapwing
If you are not satisfied with the performance of the Kapwing subtitle maker, you can try the Wondershare Filmora tool. As Kapwing is an online tool, it does come with certain restrictions. For example, the time to upload video files on this tool can be time-consuming. Moreover, you would need a strong internet connection throughout. But, with Filmora, you can add subtitles to your video files without facing file size restrictions.
Free Download For Win 7 or later(64-bit)
Free Download For macOS 10.14 or later
Filmora has an easy-to-use interface that offers multiple options to edit and alter video files. This platform is compatible with a mainstream operating system such as Windows. It provides a “Speech to Text” feature that enables you to create subtitles for your video automatically. With a single tap, you can add subtitles to your video without any hassle. To use the Speech to Text feature, check the below steps:
Step 1 Import Video File from the PC
Launch Filmora on your PC and click on the “Create New Project” button to open the Filmora editor on your device. To import your video file from your PC, tap on the “Arrow” icon. After uploading the file, drag it to the timeline.

Step 2 Enable Speech to Text Feature
From the timeline, locate the feature of “Speech to Text.” Now choose the language in which you want to create the subtitles and specify the other settings as well. Afterward, tap on the “OK” button to begin the process.

Step 3 Customize Subtitles and Save the Changes
After the conversion, you can double-click the added subtitles to make modifications. After making the adjustments, hit the “OK” button. Now go to the “Export” button and select the video format in which you want to export the video, or you can also share it on social media platforms.

Conclusion
By adding subtitles to your video, you can enhance your targeted audience and can also engage with them. It also helps in making your video content diverse for people across the globe. There are various online subtitle generators like Kapwing that can help you in adding subtitles, as described in this article. However, there are some drawbacks to using the Kapwing subtitle maker that can disrupt your work. If you want to use a proficient subtitle maker, you can use Wondershare Filmora to get the best results.
Free Download For macOS 10.14 or later
Filmora has an easy-to-use interface that offers multiple options to edit and alter video files. This platform is compatible with a mainstream operating system such as Windows. It provides a “Speech to Text” feature that enables you to create subtitles for your video automatically. With a single tap, you can add subtitles to your video without any hassle. To use the Speech to Text feature, check the below steps:
Step 1 Import Video File from the PC
Launch Filmora on your PC and click on the “Create New Project” button to open the Filmora editor on your device. To import your video file from your PC, tap on the “Arrow” icon. After uploading the file, drag it to the timeline.

Step 2 Enable Speech to Text Feature
From the timeline, locate the feature of “Speech to Text.” Now choose the language in which you want to create the subtitles and specify the other settings as well. Afterward, tap on the “OK” button to begin the process.

Step 3 Customize Subtitles and Save the Changes
After the conversion, you can double-click the added subtitles to make modifications. After making the adjustments, hit the “OK” button. Now go to the “Export” button and select the video format in which you want to export the video, or you can also share it on social media platforms.

Conclusion
By adding subtitles to your video, you can enhance your targeted audience and can also engage with them. It also helps in making your video content diverse for people across the globe. There are various online subtitle generators like Kapwing that can help you in adding subtitles, as described in this article. However, there are some drawbacks to using the Kapwing subtitle maker that can disrupt your work. If you want to use a proficient subtitle maker, you can use Wondershare Filmora to get the best results.
4 Ways to Add White Border to Video on Mobile and Desktop
Would you like to add white borders to your videos?
Are you looking to put white backgrounds to your videos without cutting them?
You have seen many videos with attractive borders on different social media platforms (Instagram, YouTube, Facebook, LinkedIn, etc.) Adding borders allows you to create an evocative effect and also adjust the cropping issues. It plays a good role in redesigning a video. It should be noted that a border can change the entire style of the video.
There are hundreds of video editing software that allow adding borders to the videos for mobile and desktop. In this article, we shall discuss different ways to add white borders in movies used on different social media platforms.

4 Ways to Add White Borders to Video
The following 4 ways can be used to add white borders to the videos.
- Add a white border to the video on the computer (using Filmora)
- Add a white border to the video online
- Add a white border to the video on Android
- Add a white border to the video on iOS
Add a white border to the video on the computer (using Filmora)
Filmora Video Editor is one of the best video editing software. It allows editing the videos in a professional way. It has built-in editing features like splitting/cutting, trimming, cropping, adding watermark, changing speed, recording voice, and many more Along with this, you can rely on this application to add borders with different colors including white borders, black borders, colored border, and customized border. Add white borders on a computer, all this can be done in a few simple steps.
For Win 7 or later (64-bit)
For macOS 10.14 or later
Let’s download the free Wonder Share Filmora 11 software to proceed.
- Go to media, and import the video from your storage.
- Drag the video into the timeline.

- Select the video by clicking on the video.
- Hit the effects You can select the colorful effects from the panel.
- Now, write borders in the search engine. You will find various borders styles in the panel.
- Select the white border at the top of the panel.
- Simply drag and drop the border to the video/image.

- You will see the white border on the selected video.

- You can change the color of the border.
- Select the video by double-clicking on it.
- Hit the Effect tab from the Image and then click on Borders.
- Here you can change the color of your borders.
- Hit the OK

Add A White Border To The Video Online
You can change white borders without launching software by editing online. Kapwing is an online video editing tool that is used to edit videos, images, and GIFs. It is very easy to use and the good thing about Kapwing is, it’s free and you don’t need to sign up or add watermarks to your edited videos/images.
However, it allows you to edit a video up to 250MB or you can only upload a video of almost 7 minutes in length. What you would need is to have a good internet connection and a Web.
Let’s start editing to add white borders step by step:
- Visit Kapwing collage maker and hit start collage maker
- You will see the below window.

- Click on Add media and select the desired video or image.
- Drag and drop the video into the timeline.

- Click on the video and drag the 4 corners to resize your video.
- It will eventually provide you with a white background and you can use it as a white border.

- Hit the Lock ratio tab once you got satisfied with your image borders.
- Double click the border to set the background color.

- You can change the background colors of your choice.

Add a white border to the video on Android
You can add white borders to your videos using android. BeeCut is a very simple and useful application for video editing. It presents a lot of stylish and beautiful frames and effects to make your video amazing. Along with this, it allows you to add text, filters, transitions, and many features to make your video stand out. It is very easy to use as takes a few steps to add frames to your video in android. To start the process follow these steps;
- Launch BeeCut on your mobile/android.
- Open the app and click on Media.
- Hit on Import file.

- Drag the video into the timeline or hit the +
- Hit the overlays
- Select your desired border.

- Drag the desired overlay border over the timeline. Here you can edit your design (change color, effect, etc.)
- Now, hit the export tab and choose the quality and format of your video.
- Save the file on your android.
Add a white border to the video on iOS
The PicsArt app is commonly used to edit videos on iPhone as well as on android. It is a very simple app, even a layman can use PicsArt and make professional white borders. This app is familiar among Instagram users. It changes the rectangular video or image into a square format. The aspect ratio of 1:1 is used for Instagram videos. It not only adds borders to the videos but also provides editing features like cut, resize, rotate, trims, text, etc. Let’s start with step-by-step instructions to add white borders to the video.
- Go to the app store and download the PicsArt app.
- Open the app and select the desired video.
- Hit the Fit tab from the bottom center.

- Select the color tool from the bottom.
- Choose the white color for white borders and you can also choose the desired color.
- Hit the ütab and the video will be saved to your phone gallery or you can directly share the video on Instagram.

Conclusion:
In the above content, we have introduced four methods to add white borders in your videos using windows, android, iPhone, and online. All the methods are free to use.
Wonder Share Filmora 11 is highly recommended to get the best and most professional results. It not only allows you to add borders but also provides you with an advanced editing panel. You can easily edit your videos and share with your social circle.
4 Ways to Add White Borders to Video
The following 4 ways can be used to add white borders to the videos.
- Add a white border to the video on the computer (using Filmora)
- Add a white border to the video online
- Add a white border to the video on Android
- Add a white border to the video on iOS
Add a white border to the video on the computer (using Filmora)
Filmora Video Editor is one of the best video editing software. It allows editing the videos in a professional way. It has built-in editing features like splitting/cutting, trimming, cropping, adding watermark, changing speed, recording voice, and many more Along with this, you can rely on this application to add borders with different colors including white borders, black borders, colored border, and customized border. Add white borders on a computer, all this can be done in a few simple steps.
For Win 7 or later (64-bit)
For macOS 10.14 or later
Let’s download the free Wonder Share Filmora 11 software to proceed.
- Go to media, and import the video from your storage.
- Drag the video into the timeline.

- Select the video by clicking on the video.
- Hit the effects You can select the colorful effects from the panel.
- Now, write borders in the search engine. You will find various borders styles in the panel.
- Select the white border at the top of the panel.
- Simply drag and drop the border to the video/image.

- You will see the white border on the selected video.

- You can change the color of the border.
- Select the video by double-clicking on it.
- Hit the Effect tab from the Image and then click on Borders.
- Here you can change the color of your borders.
- Hit the OK

Add A White Border To The Video Online
You can change white borders without launching software by editing online. Kapwing is an online video editing tool that is used to edit videos, images, and GIFs. It is very easy to use and the good thing about Kapwing is, it’s free and you don’t need to sign up or add watermarks to your edited videos/images.
However, it allows you to edit a video up to 250MB or you can only upload a video of almost 7 minutes in length. What you would need is to have a good internet connection and a Web.
Let’s start editing to add white borders step by step:
- Visit Kapwing collage maker and hit start collage maker
- You will see the below window.

- Click on Add media and select the desired video or image.
- Drag and drop the video into the timeline.

- Click on the video and drag the 4 corners to resize your video.
- It will eventually provide you with a white background and you can use it as a white border.

- Hit the Lock ratio tab once you got satisfied with your image borders.
- Double click the border to set the background color.

- You can change the background colors of your choice.

Add a white border to the video on Android
You can add white borders to your videos using android. BeeCut is a very simple and useful application for video editing. It presents a lot of stylish and beautiful frames and effects to make your video amazing. Along with this, it allows you to add text, filters, transitions, and many features to make your video stand out. It is very easy to use as takes a few steps to add frames to your video in android. To start the process follow these steps;
- Launch BeeCut on your mobile/android.
- Open the app and click on Media.
- Hit on Import file.

- Drag the video into the timeline or hit the +
- Hit the overlays
- Select your desired border.

- Drag the desired overlay border over the timeline. Here you can edit your design (change color, effect, etc.)
- Now, hit the export tab and choose the quality and format of your video.
- Save the file on your android.
Add a white border to the video on iOS
The PicsArt app is commonly used to edit videos on iPhone as well as on android. It is a very simple app, even a layman can use PicsArt and make professional white borders. This app is familiar among Instagram users. It changes the rectangular video or image into a square format. The aspect ratio of 1:1 is used for Instagram videos. It not only adds borders to the videos but also provides editing features like cut, resize, rotate, trims, text, etc. Let’s start with step-by-step instructions to add white borders to the video.
- Go to the app store and download the PicsArt app.
- Open the app and select the desired video.
- Hit the Fit tab from the bottom center.

- Select the color tool from the bottom.
- Choose the white color for white borders and you can also choose the desired color.
- Hit the ütab and the video will be saved to your phone gallery or you can directly share the video on Instagram.

Conclusion:
In the above content, we have introduced four methods to add white borders in your videos using windows, android, iPhone, and online. All the methods are free to use.
Wonder Share Filmora 11 is highly recommended to get the best and most professional results. It not only allows you to add borders but also provides you with an advanced editing panel. You can easily edit your videos and share with your social circle.
4 Ways to Add White Borders to Video
The following 4 ways can be used to add white borders to the videos.
- Add a white border to the video on the computer (using Filmora)
- Add a white border to the video online
- Add a white border to the video on Android
- Add a white border to the video on iOS
Add a white border to the video on the computer (using Filmora)
Filmora Video Editor is one of the best video editing software. It allows editing the videos in a professional way. It has built-in editing features like splitting/cutting, trimming, cropping, adding watermark, changing speed, recording voice, and many more Along with this, you can rely on this application to add borders with different colors including white borders, black borders, colored border, and customized border. Add white borders on a computer, all this can be done in a few simple steps.
For Win 7 or later (64-bit)
For macOS 10.14 or later
Let’s download the free Wonder Share Filmora 11 software to proceed.
- Go to media, and import the video from your storage.
- Drag the video into the timeline.

- Select the video by clicking on the video.
- Hit the effects You can select the colorful effects from the panel.
- Now, write borders in the search engine. You will find various borders styles in the panel.
- Select the white border at the top of the panel.
- Simply drag and drop the border to the video/image.

- You will see the white border on the selected video.

- You can change the color of the border.
- Select the video by double-clicking on it.
- Hit the Effect tab from the Image and then click on Borders.
- Here you can change the color of your borders.
- Hit the OK

Add A White Border To The Video Online
You can change white borders without launching software by editing online. Kapwing is an online video editing tool that is used to edit videos, images, and GIFs. It is very easy to use and the good thing about Kapwing is, it’s free and you don’t need to sign up or add watermarks to your edited videos/images.
However, it allows you to edit a video up to 250MB or you can only upload a video of almost 7 minutes in length. What you would need is to have a good internet connection and a Web.
Let’s start editing to add white borders step by step:
- Visit Kapwing collage maker and hit start collage maker
- You will see the below window.

- Click on Add media and select the desired video or image.
- Drag and drop the video into the timeline.

- Click on the video and drag the 4 corners to resize your video.
- It will eventually provide you with a white background and you can use it as a white border.

- Hit the Lock ratio tab once you got satisfied with your image borders.
- Double click the border to set the background color.

- You can change the background colors of your choice.

Add a white border to the video on Android
You can add white borders to your videos using android. BeeCut is a very simple and useful application for video editing. It presents a lot of stylish and beautiful frames and effects to make your video amazing. Along with this, it allows you to add text, filters, transitions, and many features to make your video stand out. It is very easy to use as takes a few steps to add frames to your video in android. To start the process follow these steps;
- Launch BeeCut on your mobile/android.
- Open the app and click on Media.
- Hit on Import file.

- Drag the video into the timeline or hit the +
- Hit the overlays
- Select your desired border.

- Drag the desired overlay border over the timeline. Here you can edit your design (change color, effect, etc.)
- Now, hit the export tab and choose the quality and format of your video.
- Save the file on your android.
Add a white border to the video on iOS
The PicsArt app is commonly used to edit videos on iPhone as well as on android. It is a very simple app, even a layman can use PicsArt and make professional white borders. This app is familiar among Instagram users. It changes the rectangular video or image into a square format. The aspect ratio of 1:1 is used for Instagram videos. It not only adds borders to the videos but also provides editing features like cut, resize, rotate, trims, text, etc. Let’s start with step-by-step instructions to add white borders to the video.
- Go to the app store and download the PicsArt app.
- Open the app and select the desired video.
- Hit the Fit tab from the bottom center.

- Select the color tool from the bottom.
- Choose the white color for white borders and you can also choose the desired color.
- Hit the ütab and the video will be saved to your phone gallery or you can directly share the video on Instagram.

Conclusion:
In the above content, we have introduced four methods to add white borders in your videos using windows, android, iPhone, and online. All the methods are free to use.
Wonder Share Filmora 11 is highly recommended to get the best and most professional results. It not only allows you to add borders but also provides you with an advanced editing panel. You can easily edit your videos and share with your social circle.
4 Ways to Add White Borders to Video
The following 4 ways can be used to add white borders to the videos.
- Add a white border to the video on the computer (using Filmora)
- Add a white border to the video online
- Add a white border to the video on Android
- Add a white border to the video on iOS
Add a white border to the video on the computer (using Filmora)
Filmora Video Editor is one of the best video editing software. It allows editing the videos in a professional way. It has built-in editing features like splitting/cutting, trimming, cropping, adding watermark, changing speed, recording voice, and many more Along with this, you can rely on this application to add borders with different colors including white borders, black borders, colored border, and customized border. Add white borders on a computer, all this can be done in a few simple steps.
For Win 7 or later (64-bit)
For macOS 10.14 or later
Let’s download the free Wonder Share Filmora 11 software to proceed.
- Go to media, and import the video from your storage.
- Drag the video into the timeline.

- Select the video by clicking on the video.
- Hit the effects You can select the colorful effects from the panel.
- Now, write borders in the search engine. You will find various borders styles in the panel.
- Select the white border at the top of the panel.
- Simply drag and drop the border to the video/image.

- You will see the white border on the selected video.

- You can change the color of the border.
- Select the video by double-clicking on it.
- Hit the Effect tab from the Image and then click on Borders.
- Here you can change the color of your borders.
- Hit the OK

Add A White Border To The Video Online
You can change white borders without launching software by editing online. Kapwing is an online video editing tool that is used to edit videos, images, and GIFs. It is very easy to use and the good thing about Kapwing is, it’s free and you don’t need to sign up or add watermarks to your edited videos/images.
However, it allows you to edit a video up to 250MB or you can only upload a video of almost 7 minutes in length. What you would need is to have a good internet connection and a Web.
Let’s start editing to add white borders step by step:
- Visit Kapwing collage maker and hit start collage maker
- You will see the below window.

- Click on Add media and select the desired video or image.
- Drag and drop the video into the timeline.

- Click on the video and drag the 4 corners to resize your video.
- It will eventually provide you with a white background and you can use it as a white border.

- Hit the Lock ratio tab once you got satisfied with your image borders.
- Double click the border to set the background color.

- You can change the background colors of your choice.

Add a white border to the video on Android
You can add white borders to your videos using android. BeeCut is a very simple and useful application for video editing. It presents a lot of stylish and beautiful frames and effects to make your video amazing. Along with this, it allows you to add text, filters, transitions, and many features to make your video stand out. It is very easy to use as takes a few steps to add frames to your video in android. To start the process follow these steps;
- Launch BeeCut on your mobile/android.
- Open the app and click on Media.
- Hit on Import file.

- Drag the video into the timeline or hit the +
- Hit the overlays
- Select your desired border.

- Drag the desired overlay border over the timeline. Here you can edit your design (change color, effect, etc.)
- Now, hit the export tab and choose the quality and format of your video.
- Save the file on your android.
Add a white border to the video on iOS
The PicsArt app is commonly used to edit videos on iPhone as well as on android. It is a very simple app, even a layman can use PicsArt and make professional white borders. This app is familiar among Instagram users. It changes the rectangular video or image into a square format. The aspect ratio of 1:1 is used for Instagram videos. It not only adds borders to the videos but also provides editing features like cut, resize, rotate, trims, text, etc. Let’s start with step-by-step instructions to add white borders to the video.
- Go to the app store and download the PicsArt app.
- Open the app and select the desired video.
- Hit the Fit tab from the bottom center.

- Select the color tool from the bottom.
- Choose the white color for white borders and you can also choose the desired color.
- Hit the ütab and the video will be saved to your phone gallery or you can directly share the video on Instagram.

Conclusion:
In the above content, we have introduced four methods to add white borders in your videos using windows, android, iPhone, and online. All the methods are free to use.
Wonder Share Filmora 11 is highly recommended to get the best and most professional results. It not only allows you to add borders but also provides you with an advanced editing panel. You can easily edit your videos and share with your social circle.
Also read:
- Adobe After Effects Review for 2024
- Updated In 2024, Best 31 Video Trimmers for Computer, Phone and Online
- New In 2024, 8 Top Premiere Pro Slideshow Templates
- Updated 2024 Approved Ideas That Will Help You Out in Making Transparent Image
- In 2024, Fascinated About Exploring Your Graphic Creativity by Experimenting with Designing Slideshow Presentations on a Variety of Software Programs? Stay Here to Get the Know-How of Using Clideo
- New How to Splice Videos Together on iPhone
- New VLC Media Player How to Merge Audio and Video Like a Pro
- Updated Blender Green Screen Effects for 2024
- 2024 Approved Do You Want to Know How to Import or Adjust Clips in Wondershare Filmora? Dont Worry because Importing or Adjusting Video Clips in This Tool Is Pretty Easy
- Updated How to Add Camera Shake to Video in Adobe After Effects
- Updated Easy Ways to Change Aspect Ratio in iMovie?
- 2024 Approved Top 6 MP4 Mergers to Join Videos Easily
- 2024 Approved How to Easily Convert SRT to VTT
- In 2024, How to Add Text Animation Online
- New In 2024, How to Color-Correct an S-Log Footage
- Updated 2024 Approved Easy Ways to Create Procreate GIFs
- Updated In 2024, Some of the Top Sites to Replace a Sky Background in Videos
- Did You Know Cameras Have a Built-In Feature to Shoot Slow-Motion Clips? This Article Is About Using Sony S&Q to Capture Slow-Motion Scenes for 2024
- In 2024, Techniques You Never Heard of for Learning AI Marketing YouTube
- 2024 Approved Want to Learn How to Make a Fortnite Montage? This Guide Will Give You the Low-Down on Creating Epic Montage Fortnite Videos that You Can Share with Other Players on Social Media Platforms
- Updated 2024 Approved Top 20 Slideshow Makers for Win/Mac/Online Review
- New 2024 Approved The Best 10 GIF to JPGPNG Converters
- New 2024 Approved How to Add the Popular Video Text Effects to Your Video?
- Updated What You Should Know About Speech-to-Text Technology
- New 4 Ways for Rotating Your GoPro Videos Professionally for 2024
- Updated How to Create a Vacation Slideshow in 5 Minutes
- Updated Top 10 Video Editing Online Makers Is Worth Your Attention
- How to Trim Video in Quicktime Player on Mac for 2024
- Updated Best Cloud Storage Service for Videos for 2024
- New Easy Steps to Loop YouTube Videos on iPhone
- New In 2024, Best Applications That Can Help Apply The Best VHS Camera Effect
- New Efficient Ways to Manage Your Timeline
- Do You Know CapCut Has some Amazing Slow-Motion Templates You Can Utilize? Read This Article to Access the Slow-Motion CapCut Templates Link
- New 2024 Approved | How to Livestream Zoom on Facebook?
- 2024 Approved How to Slow-Mo YouTube Videos
- In 2024, Frame Rates, Speed, and Wondershare Filmora An Overview
- 2024 Approved Different Ways To Trim Video In Premiere Pro
- New 2024 Approved How to Add Adjustment Layer (Clip) in DaVinci Resolve?
- 2024 Approved How to Color Grading in Final Cut Pro
- How to Create and Add an Adjustment Layer in Final Cut Pro for 2024
- In 2024, Are You Looking to Make Subscribe Channel Graphics? Here Is a Complete Guide on How to Make One on Your Own
- New 2024 Approved Enhance Your Video Color Accuracy with Video Scopes
- A Review of 3D LUT Mobile App - A Composite Application for Editing Media
- 2024 Approved Guide to Synchronizing Your Audio And Videos Properly?
- Does Life360 Notify When You Log Out On Lava Yuva 2? | Dr.fone
- New 2024 Approved Animate Graphics in Canva
- Updated 2024 Approved How to Translate Audio/Video Content From Spanish to English and Vice Versa?
- Top 5 Tracking Apps to Track OnePlus Ace 2V without Them Knowing | Dr.fone
- What is Fake GPS Location Pro and Is It Good On OnePlus Ace 2? | Dr.fone
- Fix App Not Available in Your Country Play Store Problem on Nokia C22 | Dr.fone
- In 2024, The Ultimate Guide to Samsung Galaxy F34 5G Pattern Lock Screen Everything You Need to Know
- How Do You Remove Restricted Mode on Apple iPhone 6 Plus
- Complete Tutorial to Use GPS Joystick to Fake GPS Location On Motorola G24 Power | Dr.fone
- In 2024, How to Remove Forgotten PIN Of Your Itel P55+
- In 2024, The Ultimate Guide to Get the Rare Candy on Pokemon Go Fire Red On Xiaomi Redmi A2 | Dr.fone
- How to Mirror Vivo V27 to Mac? | Dr.fone
- How To Bypass FRP on Samsung Galaxy A05
- How to Remove iPhone 7 Face ID?
- How to Change Nokia 130 Music Location on Skout | Dr.fone
- 5 Ways to Reset Realme GT 5 (240W) Without Volume Buttons | Dr.fone
- In 2024, Is pgsharp legal when you are playing pokemon On Vivo Y55s 5G (2023)? | Dr.fone
- In 2024, How to Fake Snapchat Location on Poco C55 | Dr.fone
- In 2024, Android to Apple How To Transfer Photos From Realme 12 5G to iPad Easily | Dr.fone
- In 2024, How To Unlock SIM Cards Of Oppo A59 5G Without PUK Codes
- In 2024, 4 Ways to Transfer Music from Vivo T2x 5G to iPhone | Dr.fone
- Cellular Network Not Available for Voice Calls On OnePlus 12R | Dr.fone
- 5 Ways to Restart Vivo Y17s Without Power Button | Dr.fone
- How To Transfer Data From iPhone SE To Other iPhone 12 Pro Max devices? | Dr.fone
- Can't play MP4 files on Motorola Moto G 5G (2023)
- In 2024, Tips and Tricks for Setting Up your Vivo Y27 5G Phone Pattern Lock
- Title: New Create Slide Masking Effect Intro for 2024
- Author: Chloe
- Created at : 2024-04-24 07:08:32
- Updated at : 2024-04-25 07:08:32
- Link: https://ai-editing-video.techidaily.com/new-create-slide-masking-effect-intro-for-2024/
- License: This work is licensed under CC BY-NC-SA 4.0.

