
:max_bytes(150000):strip_icc():format(webp)/computerkeyboard-5c070d3ec9e77c0001b19701.jpg)
New Do You Know What Is Motion Blur in Fortnite? Read This Article to Find Out How to Apply Motion Blur in Fortnite Efficiently and with Ease
Do You Know What Is Motion Blur in Fortnite? Read This Article to Find Out How to Apply Motion Blur in Fortnite Efficiently and with Ease
Fortnite is a special and popular game as it allows people to flaunt their skills in an enjoyable environment. It’s a multiplayer game that can be played with your friends or loved ones to spend quality time. It offers four different modes in which you can strategize with your friends to fight off zombies and enemies.
While playing Fortnite, many players like to turn on and off the motion blur effect to create a smooth effect. By reading this article, you can find out about Fortnite motion blur on or off in a detailed manner.

Part 1: What is Motion Blur in Games?
Video games display a wide variety of fast-moving animated objects. To make these movements look realistic and smooth, many game lovers prefer to add motion blur in the games. This effect has become a part of the trend in recent years as it helps to enhance the quality of the game. Moreover, the motion blur effect also increases the size of the game, due to which you would require more efficient equipment.
With the addition of the motion blur effect, the sudden movements of fast-moving objects have become smoother. However, you need to consider the FPS rate of the video to add a motion blur effect appropriately. Thus, this particular effect has drastically enhanced the video game effects that eventually improve the gaming experience.
Part 2: What is Motion Blur in Fortnite?
Are you wondering if motion blur is good for Fortnite? To know about Fortnite motion blur on or off in detail, you can watch this quick video tutorial . This video will guide you about the difference motion blur makes in Fortnite.
After watching this video, you will come to know how motion blur changes the outlook of your video gameplay. By adding this effect, you can enjoy the gameplay more aesthetically. The reason is that the motion blur quickly smoothens the video, especially for fast-moving objects.
However, the application of the motion blur effect has some minor drawbacks that you should know. Through this particular effect, it may become hard to locate other players as the background looks blurry when you move in the game.

Part 3: How to Turn On/Off Motion Blur in Fortnite?
After knowing what motion blur is in Fortnite, let’s proceed further. In this section, we will shed light on the instructions for turning on and off the motion blur effect in Fortnite easily.
Step1 Access the Fortnite Menu
To begin, open and load your Fortnite game on your PC properly. Now click on the “Three Lines” icon in the top left corner and open the menu.

Step2 Locate the Motion Blur Option
From the menu section, click on “Settings” to move further. Afterward, locate the “Advanced Graphics” section and select the “Motion Blur” option. Now you can turn it on and off according to your need.

Bonus Tips – How to Add Motion Blur to Your Fortnite Gaming Video
Do you want to add motion blur in Fortnite flawlessly? Wondershare Filmora is a professional tool that contains tons of features for video editing and enhancement. Using this tool, you can apply various trending effects and transitions to your videos with a single click. You can also create multiple adjustment layers on this tool to edit your videos professionally and accurately.
Free Download For Win 7 or later(64-bit)
Free Download For macOS 10.14 or later
Filmora can also help you in performing basic editing on your video clips. For example, you can cut and trim the unnecessary parts from your video on this platform without difficulty. Moreover, you can create keyboard shortcuts on this tool to increase the speed of your video editing. Apart from editing the video, you can also add text, graphics, images, and stickers to your videos flawlessly.
When it comes to the offered effects in Filmora, you can find various options and diversity. To add motion blur effect in your games such as Fortnite, Filmora is the best professional choice that you can consider. To learn more about Filmora, let’s highlight some of its distinct key features below:
Prominent Features of Filmora
- This tool provides various AI-powered options such as AI Smart Cutout, AI Audio Stretch, AI Audio Denoise, etc. Using these advanced options; you can make immense differences in your videos.
- You can use color grading options on Filmora to manage and adjust the brightness, saturation, contrast, hue, and other significant elements easily.
- Filmora allows you to use its Pen tool to draw complex shapes and lines accurately. After drawing them, you can also enhance and modify them efficiently.
- On this platform, you can find out various soundtracks and audio clips in its library to make your videos engaging and attractive. After choosing the soundtrack, you can also edit it according to your preferences.
Steps to Add Motion Blur Effect in Fortnite Video Recording through Filmora
To create a motion blur effect in your Fortnite recording on Filmora, you can use the below steps:
Step1 Create New Project
After launching Filmora, click on “New Project” to proceed. It will instantly open a new window where you can begin with the editing. Now tap on the “Import” button to upload the Fortnite recorded video on the project media.

Step2 Split the Fortnite Video
Once done with adding the recorded video, drag and drop it into the timeline. Now place the play head to the point where you want to add the motion blur effect. Now click on the “Scissors” icon to split the video successfully.

Step3 Locate the Blur Effect
After splitting the video, head to the “Effects” tab and click on “Video Effects” from the left side of Filmora’s interface. Afterward, type “Blur” on the search bar. From the results, drag the blur effect to the video on the timeline.

Step4 Add the Transition
To make your video look smooth after adding the effect, go to the “Transitions” tab and search for the “Dissolve” option. After finding this transition, apply it to the timeline. Once you are done with all the modifications, you can hit the “Export” button.

Conclusion
Motion blur effects in games can make a huge difference. If you want a clean and smooth display of fast-moving objects in your games, such as Fortnite, you can apply the motion blur effect. This article has guided you on how to add motion blur in Fortnite successfully. We have also suggested a powerful and professional tool called Filmora that can also create a motion blur effect in videos effectively.
Free Download For macOS 10.14 or later
Filmora can also help you in performing basic editing on your video clips. For example, you can cut and trim the unnecessary parts from your video on this platform without difficulty. Moreover, you can create keyboard shortcuts on this tool to increase the speed of your video editing. Apart from editing the video, you can also add text, graphics, images, and stickers to your videos flawlessly.
When it comes to the offered effects in Filmora, you can find various options and diversity. To add motion blur effect in your games such as Fortnite, Filmora is the best professional choice that you can consider. To learn more about Filmora, let’s highlight some of its distinct key features below:
Prominent Features of Filmora
- This tool provides various AI-powered options such as AI Smart Cutout, AI Audio Stretch, AI Audio Denoise, etc. Using these advanced options; you can make immense differences in your videos.
- You can use color grading options on Filmora to manage and adjust the brightness, saturation, contrast, hue, and other significant elements easily.
- Filmora allows you to use its Pen tool to draw complex shapes and lines accurately. After drawing them, you can also enhance and modify them efficiently.
- On this platform, you can find out various soundtracks and audio clips in its library to make your videos engaging and attractive. After choosing the soundtrack, you can also edit it according to your preferences.
Steps to Add Motion Blur Effect in Fortnite Video Recording through Filmora
To create a motion blur effect in your Fortnite recording on Filmora, you can use the below steps:
Step1 Create New Project
After launching Filmora, click on “New Project” to proceed. It will instantly open a new window where you can begin with the editing. Now tap on the “Import” button to upload the Fortnite recorded video on the project media.
Step2 Split the Fortnite Video
Once done with adding the recorded video, drag and drop it into the timeline. Now place the play head to the point where you want to add the motion blur effect. Now click on the “Scissors” icon to split the video successfully.
Step3 Locate the Blur Effect
After splitting the video, head to the “Effects” tab and click on “Video Effects” from the left side of Filmora’s interface. Afterward, type “Blur” on the search bar. From the results, drag the blur effect to the video on the timeline.
Step4 Add the Transition
To make your video look smooth after adding the effect, go to the “Transitions” tab and search for the “Dissolve” option. After finding this transition, apply it to the timeline. Once you are done with all the modifications, you can hit the “Export” button.
Conclusion
Motion blur effects in games can make a huge difference. If you want a clean and smooth display of fast-moving objects in your games, such as Fortnite, you can apply the motion blur effect. This article has guided you on how to add motion blur in Fortnite successfully. We have also suggested a powerful and professional tool called Filmora that can also create a motion blur effect in videos effectively.
Easily Combine Videos and Audios with 5 Simple Online Tools
When it comes to creating multimedia content, merging videos and audio can be a tricky task. But with the right tools, it can be a breeze. In this article, we will share the top 5 online tools for merging videos and audio quickly and easily.
These tools will streamline your editing process and help you create seamless multimedia content that will captivate your audience. Whether you are a professional video editor or just someone looking to create a personal video, these tools will come in handy. These tools have something for everyone, from basic editing features to advanced ones. So, let’s dive in and look at the best tools to merge videos and audio online.

- Merge Audio and Video Online Using Media.io for FREE
- Merge Audio and Video Online Without Watermark in 123APPS
- Mix Audio With Video Online in Clideo
- Veed.io Video Audio Merger Online
- Combine Video and Audio Online With FlexClip
- Join Video and Audio Online or Offline? Which To Choose?
- [Bonus] Merge Audio and Video Offline With Wondershare Filmora
5 Tools To Merge Video and Audio Online
There are a plethora of online tools available for merging videos and audio. However, not all tools are created equal. We have rounded up the top 5 online tools that are user-friendly, reliable, and efficient.
These tools will make it easy to merge your videos and audio and offer a range of features to help you create professional-looking multimedia content. Whether you are a beginner or an experienced video editor, these tools will help you finish the job in no time. So, without further ado, let’s look at the top 5 online tools for merging videos and audio online.
1. Merge Audio and Video Online Using Media.io for FREE

Ratings from G2: 4.5 out of 5
Pricing:
- Free - $0
- Basic - $3.95 / monthly
- Pro - $6.66 / annually
Sound is crucial in videos as it can enhance engagement, replace poor narration, and promote music videos. Use Media.io Online Video Editor to add music to videos for free easily. It’s a user-friendly program with multitrack timeline editing for all formats, allowing for adjustments such as trimming, splitting, fade effects, texts, elements, and picture overlays. Importantly, it doesn’t leave watermarks on your videos.
Pros
- Fast compression speeds
- No file limits
- No watermarks
- Smart output settings
Cons
- Lacks some advanced functionality
Here’s how to merge audio and video using Media.io:
Step1 Begin by opening Media.io Online Video Editor and uploading your video and audio files.

Step2 Improve the background audio by editing it with options such as trimming, splitting, copying, and deleting.

Step3 Adjust the aspect ratio, export the video, name the file, choose the resolution quality, then it’s finished.

You can learn more details about how to add audio to a video and how to edit videos using Media.io with the video below:
2. Merge Audio and Video Online Without Watermark in 123APPS

Ratings from G2: No rating yet
Pricing:
- Free
Add music to videos and easily edit using this powerful video editing platform. Publish videos with background audio of your choice, free and high-quality, without the need for downloads, software, or browser extensions. User-friendly interface, no learning curve, and works on any device, including Mac, PC, and mobile. The platform supports various file formats, including MP4, MOV, AVI, and WMV for video and MP3, WAV, and OGG for audio.
Pros
- Free and easy to use
- Multiple functions provided
Cons
- Lacks some advanced functionality
- Too basic for video cutting
Here’s how to merge audio and video using 123APPS:
Step1 Go to 123APPS and select “Video Tools“ > “Add Audio to Video.”

Step2 Upload the video and audio

Step3 Use the “Sound“ option to crop and adjust the audio volume

Step4 Select the output video format and download the final video with audio included.

3. Mix Audio With Video Online in Clideo

Ratings from G2: 4.8 out of 5
Pricing:
- Free - $0 with a watermark
- Monthly - $9.00
Clideo is a free, easy-to-use, browser-based video merging tool by Softo. It supports almost all video formats and allows you to add borders, choose aspect ratio templates or crop the video, apply transition effects, and add music. You can import multiple videos and arrange them in your desired order with drag and drop.
Pros
- Free to use with unlimited videos
- Easy to use
- Supports multiple video formats
Cons
- Lack of themes and design elements
Here’s how to merge audio and video using Clideo:
Step1 Go to Clideo’s page to add music to videos.

Step2 Drag and drop a video from your computer to access the editor.

Step3 Add the audio file and sync it with the video.

Step4 Select “Export“ and wait for it to finish, then download the final video.

4. Veed.io Video Audio Merger Online

Ratings from G2: 4.2 out of 5
Pricing:
- Free - $0
- Monthly - $12.00
VEED is a versatile video editor that makes it simple to merge, join, and combine various media files online. Whether using a Windows, Mac, or mobile device, you can easily cut, trim, and arrange multiple video clips into one file on a user-friendly timeline. You can also add audio, image files, and subtitles with a single click.
Compatible with all browsers and versions, VEED supports all file formats and allows you to upload multiple file types, arrange your video tracks, and export as one file. With VEED, you can easily create a seamless Instagram Story or YouTube Ad and even resize your clips in one click.
Pros
- Attractive and well-organized layout
- Compatible with all devices, including smartphones
- Simple and easy to begin using
Cons
- Cannot specify precise starting and ending times for video cuts
- The free version includes watermarks on output videos
- Limited to videos shorter than 10 minutes and 250 MB in size
Here’s how to merge audio and video using VEED:
Step1 Go to VEED’s website and upload your video files and audio.
Step2 Use the cutter/splitter tool to trim any file ends as needed.

Step3 Click the “Export“ button to merge the files into a single video. Download the newly created merged video file.

5. Combine Video and Audio Online With FlexClip

Ratings from G2: 4.0 out of 5
Pricing:
- Free - $0
- Basic - $9.99 per month
- Plus - $19.99 per month
- Business - $29.99 per month
FlexClip’s online audio and video merger is a simple solution for combining audio and video files. The process is as easy as uploading your video and audio files and then syncing them by adjusting the slider. The entire process takes just a few minutes, and there is no loss in video or audio quality, nor will a watermark be added to the output.
Once you have successfully merged your audio and video, you can easily share the video to YouTube or download it to your computer with just one click. It’s an efficient and effective way to merge audio and video.
Pros
- The stock library is royalty-free and allows for the monetization of projects without copyright restrictions
- The user interface is simple and easy to navigate
- The pricing is reasonable compared to other professional video editors
Cons
- The features are more basic compared to other professional video editors
- The video converter has limited output format options
Here’s how to merge audio and video using FlexClip:
Step1 Open the FlexClip website and drag and drop your video clip into the Media section. Add it to the timeline.
Step2 Upload your audio file from your computer to the Media section.

Step3 Adjust the audio and video on the timeline by dragging the slider.

Step4 Finish editing or select a resolution to download the merged video.
Join Video and Audio Online or Offline? Which To Choose?
Merging audio and video can be done either online or offline. Each method has its advantages and disadvantages.
Online video and audio merging join audio and video files using an online tool. The main advantage of this method is that it is easily accessible and requires no software installation. Many online tools are also free to use and offer various editing options. Additionally, online tools are often compatible with many file formats, making working with different audio and video files easy.
On the other hand, offline video and audio merging requires video editing software installed on a computer. The main advantage of this method is that it offers more advanced editing options and greater control over the final output. Offline tools also typically offer a wider range of output options and higher-quality output. However, offline tools can be more expensive and require a certain level of technical expertise to use effectively.
[Bonus] Merge Audio and Video Offline With Wondershare Filmora
Free Download For Win 7 or later(64-bit)
Free Download For macOS 10.14 or later
Merging audio and video offline with Filmora is a great option for those who want more advanced editing capabilities and are okay with downloading software to their computer. This powerful video editing software allows you to easily merge, trim, and edit multiple video and audio files, while also providing a wide range of creative tools, including effects, filters, and animations. With Filmora, you can create professional-quality videos with minimal effort.
Filmora is a powerful video editing software that allows users to merge audio and video offline easily. The software boasts a user-friendly interface that makes it easy for users to navigate and access the various features, including adding audio to video and syncing them together.
With Filmora, users can import audio and video files and use the software’s timeline to arrange and sync them. It also provides a wide range of options for editing, such as trimming, cutting, and adjusting the volume of audio tracks. Filmora also offers a variety of export options, including a choice of resolutions and file formats, making it a great choice for those looking to merge audio and video offline.
Here’s how to merge audio and video using Filmora:
Step1 Drag and drop or use the “Import Media“ button to add audio and video files to Filmora.

Step2 Arrange the media files on the timeline and sync the video with the audio.

Step3 Right-click the video, select “Detach Audio,“ delete the original audio, and replace it with new audio.

Step4 Choose a format and click “Export“ to save the final video.

Conclusion
There are many ways to merge audio and video, whether online or offline. Each method has its own set of advantages and disadvantages. It ultimately depends on your needs and preferences. Filmora is a great offline option for those looking for a professional video editor with a user-friendly interface, while online options offer a quick and easy solution for basic editing needs.
5 Tools To Merge Video and Audio Online
There are a plethora of online tools available for merging videos and audio. However, not all tools are created equal. We have rounded up the top 5 online tools that are user-friendly, reliable, and efficient.
These tools will make it easy to merge your videos and audio and offer a range of features to help you create professional-looking multimedia content. Whether you are a beginner or an experienced video editor, these tools will help you finish the job in no time. So, without further ado, let’s look at the top 5 online tools for merging videos and audio online.
1. Merge Audio and Video Online Using Media.io for FREE
Ratings from G2: 4.5 out of 5
Pricing:
- Free - $0
- Basic - $3.95 / monthly
- Pro - $6.66 / annually
Sound is crucial in videos as it can enhance engagement, replace poor narration, and promote music videos. Use Media.io Online Video Editor to add music to videos for free easily. It’s a user-friendly program with multitrack timeline editing for all formats, allowing for adjustments such as trimming, splitting, fade effects, texts, elements, and picture overlays. Importantly, it doesn’t leave watermarks on your videos.
Pros
- Fast compression speeds
- No file limits
- No watermarks
- Smart output settings
Cons
- Lacks some advanced functionality
Here’s how to merge audio and video using Media.io:
Step1 Begin by opening Media.io Online Video Editor and uploading your video and audio files.
Step2 Improve the background audio by editing it with options such as trimming, splitting, copying, and deleting.
Step3 Adjust the aspect ratio, export the video, name the file, choose the resolution quality, then it’s finished.
You can learn more details about how to add audio to a video and how to edit videos using Media.io with the video below:
2. Merge Audio and Video Online Without Watermark in 123APPS
Ratings from G2: No rating yet
Pricing:
- Free
Add music to videos and easily edit using this powerful video editing platform. Publish videos with background audio of your choice, free and high-quality, without the need for downloads, software, or browser extensions. User-friendly interface, no learning curve, and works on any device, including Mac, PC, and mobile. The platform supports various file formats, including MP4, MOV, AVI, and WMV for video and MP3, WAV, and OGG for audio.
Pros
- Free and easy to use
- Multiple functions provided
Cons
- Lacks some advanced functionality
- Too basic for video cutting
Here’s how to merge audio and video using 123APPS:
Step1 Go to 123APPS and select “Video Tools“ > “Add Audio to Video.”
Step2 Upload the video and audio
Step3 Use the “Sound“ option to crop and adjust the audio volume
Step4 Select the output video format and download the final video with audio included.
3. Mix Audio With Video Online in Clideo
Ratings from G2: 4.8 out of 5
Pricing:
- Free - $0 with a watermark
- Monthly - $9.00
Clideo is a free, easy-to-use, browser-based video merging tool by Softo. It supports almost all video formats and allows you to add borders, choose aspect ratio templates or crop the video, apply transition effects, and add music. You can import multiple videos and arrange them in your desired order with drag and drop.
Pros
- Free to use with unlimited videos
- Easy to use
- Supports multiple video formats
Cons
- Lack of themes and design elements
Here’s how to merge audio and video using Clideo:
Step1 Go to Clideo’s page to add music to videos.
Step2 Drag and drop a video from your computer to access the editor.
Step3 Add the audio file and sync it with the video.
Step4 Select “Export“ and wait for it to finish, then download the final video.
4. Veed.io Video Audio Merger Online
Ratings from G2: 4.2 out of 5
Pricing:
- Free - $0
- Monthly - $12.00
VEED is a versatile video editor that makes it simple to merge, join, and combine various media files online. Whether using a Windows, Mac, or mobile device, you can easily cut, trim, and arrange multiple video clips into one file on a user-friendly timeline. You can also add audio, image files, and subtitles with a single click.
Compatible with all browsers and versions, VEED supports all file formats and allows you to upload multiple file types, arrange your video tracks, and export as one file. With VEED, you can easily create a seamless Instagram Story or YouTube Ad and even resize your clips in one click.
Pros
- Attractive and well-organized layout
- Compatible with all devices, including smartphones
- Simple and easy to begin using
Cons
- Cannot specify precise starting and ending times for video cuts
- The free version includes watermarks on output videos
- Limited to videos shorter than 10 minutes and 250 MB in size
Here’s how to merge audio and video using VEED:
Step1 Go to VEED’s website and upload your video files and audio.
Step2 Use the cutter/splitter tool to trim any file ends as needed.
Step3 Click the “Export“ button to merge the files into a single video. Download the newly created merged video file.
5. Combine Video and Audio Online With FlexClip
Ratings from G2: 4.0 out of 5
Pricing:
- Free - $0
- Basic - $9.99 per month
- Plus - $19.99 per month
- Business - $29.99 per month
FlexClip’s online audio and video merger is a simple solution for combining audio and video files. The process is as easy as uploading your video and audio files and then syncing them by adjusting the slider. The entire process takes just a few minutes, and there is no loss in video or audio quality, nor will a watermark be added to the output.
Once you have successfully merged your audio and video, you can easily share the video to YouTube or download it to your computer with just one click. It’s an efficient and effective way to merge audio and video.
Pros
- The stock library is royalty-free and allows for the monetization of projects without copyright restrictions
- The user interface is simple and easy to navigate
- The pricing is reasonable compared to other professional video editors
Cons
- The features are more basic compared to other professional video editors
- The video converter has limited output format options
Here’s how to merge audio and video using FlexClip:
Step1 Open the FlexClip website and drag and drop your video clip into the Media section. Add it to the timeline.
Step2 Upload your audio file from your computer to the Media section.
Step3 Adjust the audio and video on the timeline by dragging the slider.
Step4 Finish editing or select a resolution to download the merged video.
Join Video and Audio Online or Offline? Which To Choose?
Merging audio and video can be done either online or offline. Each method has its advantages and disadvantages.
Online video and audio merging join audio and video files using an online tool. The main advantage of this method is that it is easily accessible and requires no software installation. Many online tools are also free to use and offer various editing options. Additionally, online tools are often compatible with many file formats, making working with different audio and video files easy.
On the other hand, offline video and audio merging requires video editing software installed on a computer. The main advantage of this method is that it offers more advanced editing options and greater control over the final output. Offline tools also typically offer a wider range of output options and higher-quality output. However, offline tools can be more expensive and require a certain level of technical expertise to use effectively.
[Bonus] Merge Audio and Video Offline With Wondershare Filmora
Free Download For Win 7 or later(64-bit)
Free Download For macOS 10.14 or later
Merging audio and video offline with Filmora is a great option for those who want more advanced editing capabilities and are okay with downloading software to their computer. This powerful video editing software allows you to easily merge, trim, and edit multiple video and audio files, while also providing a wide range of creative tools, including effects, filters, and animations. With Filmora, you can create professional-quality videos with minimal effort.
Filmora is a powerful video editing software that allows users to merge audio and video offline easily. The software boasts a user-friendly interface that makes it easy for users to navigate and access the various features, including adding audio to video and syncing them together.
With Filmora, users can import audio and video files and use the software’s timeline to arrange and sync them. It also provides a wide range of options for editing, such as trimming, cutting, and adjusting the volume of audio tracks. Filmora also offers a variety of export options, including a choice of resolutions and file formats, making it a great choice for those looking to merge audio and video offline.
Here’s how to merge audio and video using Filmora:
Step1 Drag and drop or use the “Import Media“ button to add audio and video files to Filmora.
Step2 Arrange the media files on the timeline and sync the video with the audio.
Step3 Right-click the video, select “Detach Audio,“ delete the original audio, and replace it with new audio.
Step4 Choose a format and click “Export“ to save the final video.
Conclusion
There are many ways to merge audio and video, whether online or offline. Each method has its own set of advantages and disadvantages. It ultimately depends on your needs and preferences. Filmora is a great offline option for those looking for a professional video editor with a user-friendly interface, while online options offer a quick and easy solution for basic editing needs.
How to Add Text Animation Online
Before you can publish your recorded video to your viewers, you need to polish the video so that you can get everyone’s appreciation. This is where the magic of video editing comes into the scene. Editing your video is not just about trimming unnecessary parts and adding transitions and effects. The titles and texts you display on your video play a major role in your video content. In fact, you can create a video based on texts and titles only.
Instead of showing static texts, you should create animated texts and place them in the video wherever appropriate. You do not need to download a video editor on your computer or smartphone to add animated text to your video. You can make text animation online using an online text animation maker. We will illustrate the steps to create animated text with three different online editors.
Part 1. Use Biteable Animated Text
Biteable is a popular online platform where you can create amazing animated text video using Biteable text video maker. You can add animated text to your videos as well as photos. The user interface of Biteable is extremely easy for all users. You have to first create an account for free to get started. There are various templates available to create your animated text video from scratch. Here are the steps to use Biteable online text animation maker to create a video based on animated texts.
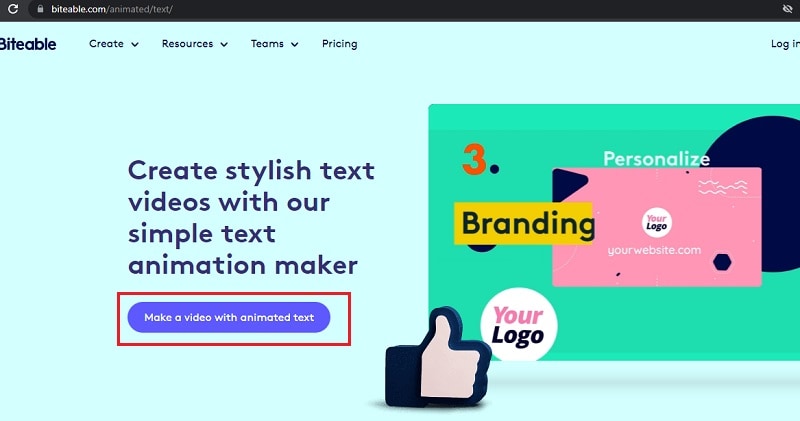
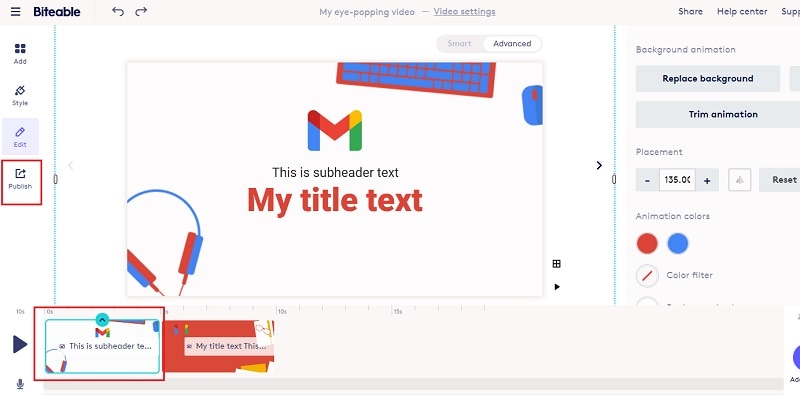
Step1Open your web browser and visit “biteable.com/animated/text”. Click on “Make a video with animated text” button.
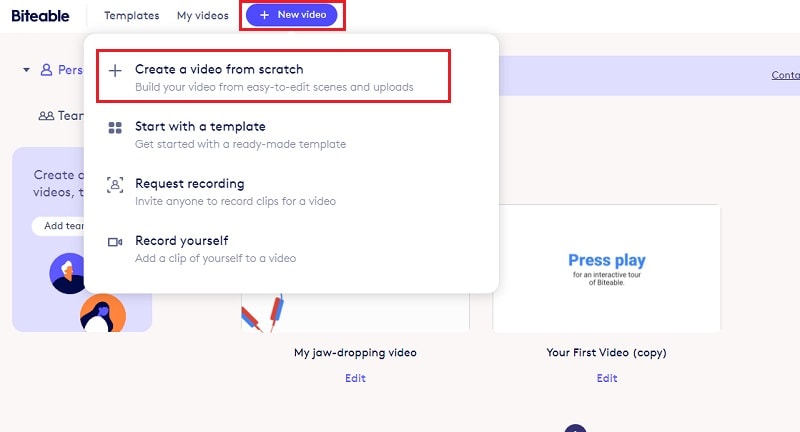
Step2Create an account by following the on-screen instructions. Click on New Video button and select “Create a video from scratch”.
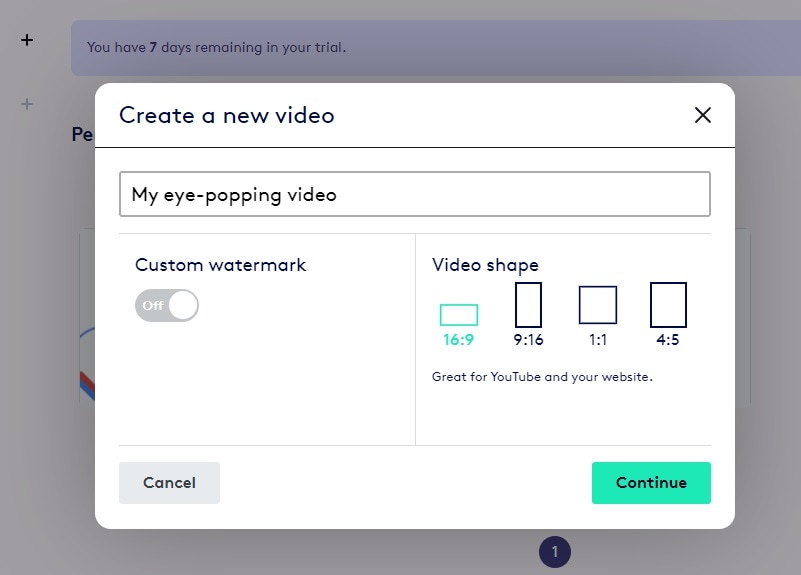
Step3Enter a name for the video and select a video shape as per your preference. Click on Continue button.
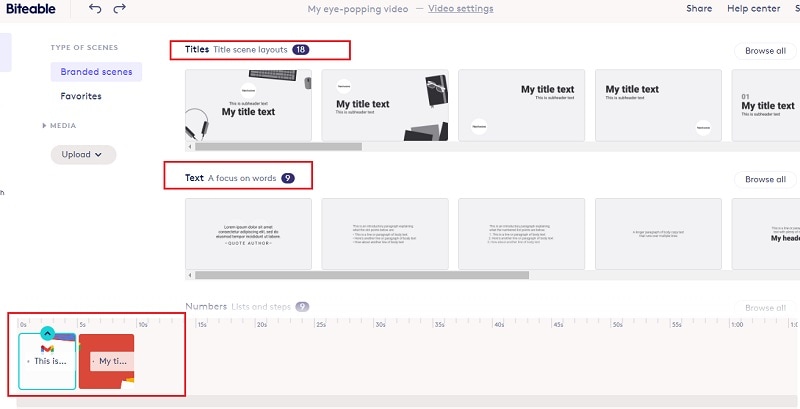
Step4Under Titles, select any template and it will be added to the Timeline. Similarly, you can add multiple titles templates, text templates, number templates and likewise. You will see them in the Timeline placed side by side. You can stretch their durations as per your requirements.
Step5Double-click on each template to edit the text in them and select the text animations as per your preference. Play the video and if you are satisfied, click on Publish button to save the video.
Part 2. Use Motionden Video Maker
Motionden is yet another powerful text animation maker where you can create free text animations instantly. There are over 1500 templates available to choose from in order to create text videos from scratch. You can choose video templates from any category as per the video theme you want. Besides, you can upload your video or photo and add texts and music as per your preference. Here are the steps to create animated text online using Motionden Video Maker.
Step1Open your web browser and visit “motionden.com/video-maker/text-animation”. Click on “Make a video for free” button.
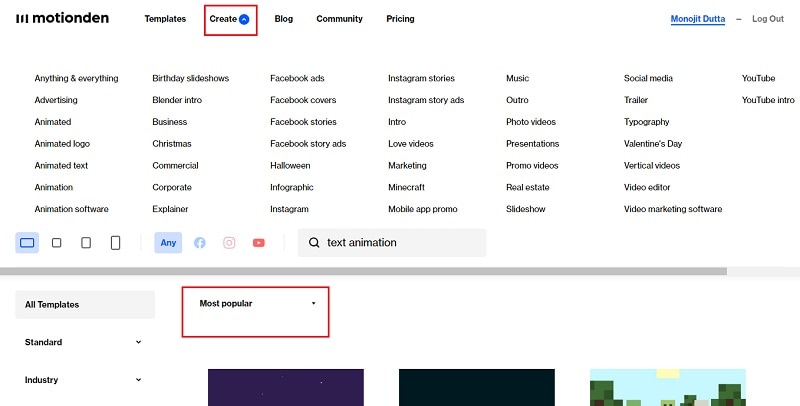
Step2Go to Create menu option and select any category of video templates. You can also check out the popular video templates and select anyone as per your preference.
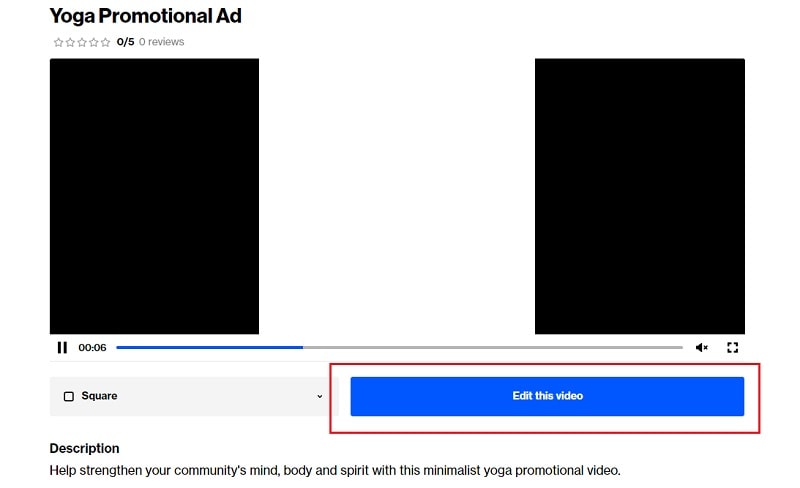
Step3For the selected category, you need to select the desired video template. Click on Edit Video and you can make changes to the template on the video editor as per your requirements. You need to sign up for free in order to continue and edit the template.
Step4Click on individual scenes and click on texts to customize them. Once the editing is done for each scene, click on Make Video button to build and save the text video.

Part 3. Use Flexclip Text Animation Tool
You can use Flexclip Text Animation Tool to create text video from scratch as well as add text to your recorded video. You should use Biteable and Motionden to create video with text effects only directly using video template while you should use Flexclip to edit your video and add text. You can add text effects to photos and videos and here are the steps to follow.
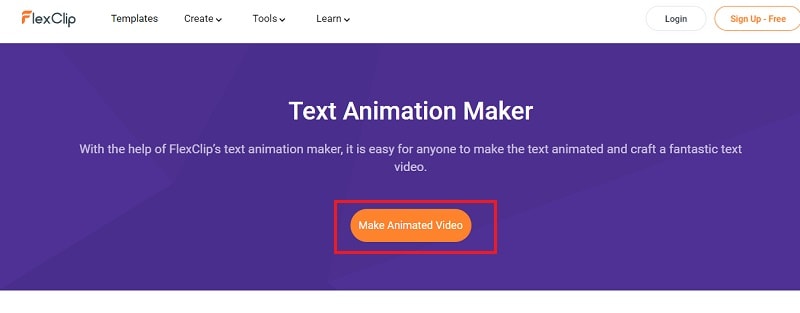
Step1Open web browser and visit “flexclip.com/features/text-animation.html”. Click on Make Animated Video button.
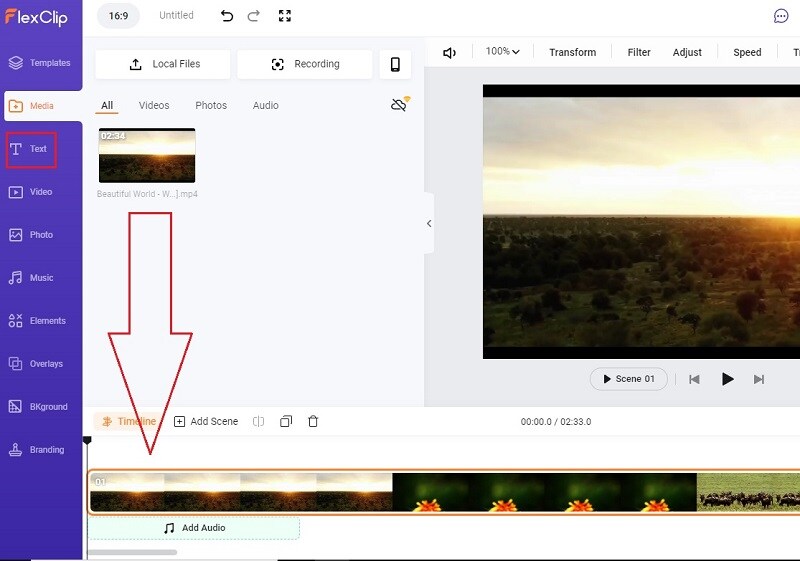
Step2You can choose from the available templates to create video with text from scratch. If you want to add text to your recorded video, go to Media tab. Click on Local Files button and upload your recorded video.

Step3Drag and drop the uploaded video into the Timeline. Thereafter, go to Text tab.
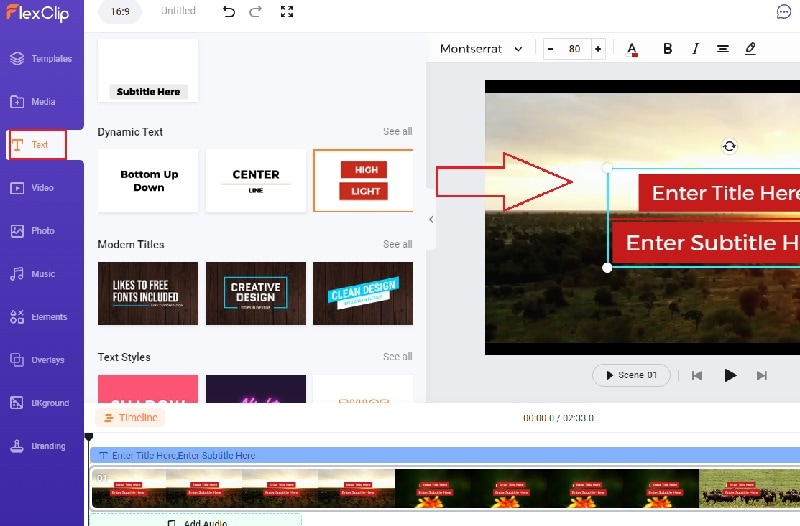
Step4You will see all the different text effects and animations. Place your mouse pointer to preview the animation. Drag and drop the select text template to the video on the Viewer. You can check the Timeline and stretch or compress the text layer as per your requirements.
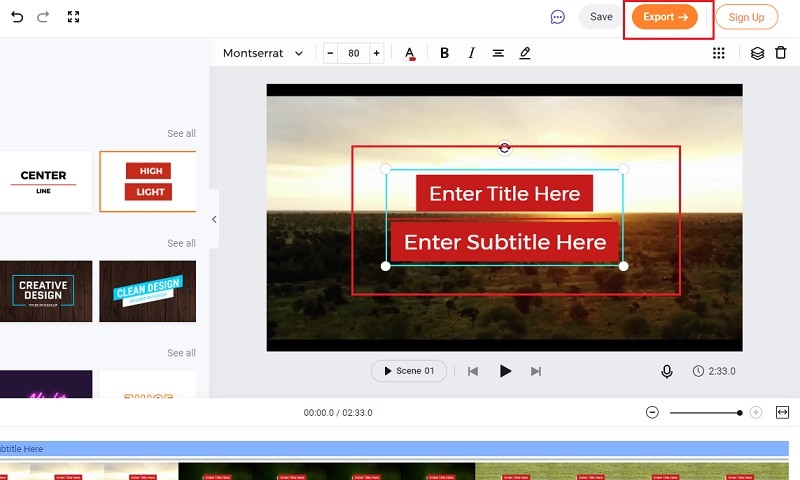
Step5Double-click on the text on Viewer window and customize the text as per your preference. Finally, click on Export button to save the edited video.
Conclusion
You can make video with animated text to make your presentation video eye-catching and attention-grabbing. We have mentioned three different online text animation makers that you can use to create animated text video from scratch by choosing different video templates. You can also edit your recorded video and add animated text wherever you want using Flexclip Text Animation Tool.
Free Download For Win 7 or later(64-bit)
Free Download For macOS 10.14 or later
How to Make Flying Objects in Wondershare Filmora
Let us be honest here, you want to create fly objects in the air but don’t want to get into the witchcraft school. In that case, we have got your back!
In this article, you can learn how to make objects fly in the air! Technically you will not do that in real-time, but with the latest technology and editing tools at your disposal, you will exactly do that.
Use Wondershare Filmora to create the flying object effect. Scroll below to get the guide to the whole process of creation.
Part 1. What will you need to make a flying object?
This is not witchcraft, so we will abstain from using potions and herbs. Instead, to fly objects in our videos, we will use simple techniques that you may also be familiar with.
Video Cameras
The camera, in this scenario, will be the essential accessory as it will capture your video with the proper aspect ratio. This video camera can now be from a mobile phone or a high-quality DSLR. It will all depend upon your preference for quality and frame rate.

Tri-Pod or camera stands
Selecting the Tri-Pod is also crucial to your quality of video taking as it will ensure stability while capturing the video from the camera.

Stability is the key here, as the captured videos will be masked and combined in the later stages of the steps. To do so, consistently capturing the video in the same ratio is necessary. You can stabilize the video with a simple gorilla pod that you can get of good quality or a simple tripod.
The prop
The prop will be the object that we will be flying in the video. It could be a fluffy toy, a ball, a box, or anything you desire to be flying in your video.
![]()
Note: In this article, we are going to use a ball as a prop.

Wondershare Filmora
Now that we have all the physical requirements for the video, our next goal is to ensure that we have the correct video editing software. And what’s best than Wondershare Filmora? Obviously, there’s nothing!
Filmora allows you to edit your videos with ease and comfort. With its interactive UI, even a beginner feels easy to edit a video. With skills on hand, an expert can edit videos ranging from green screen effects to flying objects.
Free Download For Win 7 or later(64-bit)
Free Download For macOS 10.14 or later
![]()
Good presentation
Now, if you want your video to shine like the good ones, you will need to know how to present it. In this section, the requirement will be yourself. As you are not flying an object, you must act the part.
A good presentation will allow you to make the video more natural. Because no matter how skilled you are with video editing, a video with props will only be of quality until the subject acts their part with quality.
Part 2. How to capture the footage?
Before we get into how we edit our footage, we need to know how to shoot the video to edit. Follow the steps mentioned below:
- Set up your camera on a tripod or a gorilla pod.
- After setting up the camera, record an empty frame.
![]()
Note: An empty frame video will be the one you will use to mask the original clip.
Reference video
Start recording a five-second clip of the sofa where you will be sitting without yourself or the prop. Here you don’t need to add anything except the reference. Follow the guidelines below when making the reference video:
- The video should be plain.
- It should be simple.
- There should be no moving object or subject.

Main video
After shooting the empty frame video, move on to shooting the video with yourself in it. Follow the below to achieve something unique:
- Your focus should be on the prop.
- Use a thread or a rope to attach the prop to it. (In this case, we are using a ball.)
- Attach the ball to the thread and hand it on the roof.
- Record yourself now with the prop with your desired content or script.

After completing the video, simply stop recording. Now you will end up with two video clips.
Adding these two clips in the Wondershare Filmora , you can easily create the flying object effect. To do so, follow the steps explained in the section ahead.
Part 3. Stepwise guide to making flying objects in Wondershare Filmora
Now that we have looked into our requirements, let us dive into how we will apply our skills to achieve an object to fly in Wondershare Filmora .
Of course, without the software, our editing will not be possible, so download Wondershare Filmora from the steps explained below.
Free Download For Win 7 or later(64-bit)
Free Download For macOS 10.14 or later
Step1Open the Wondershare Filmora software
- Open the Wondershare Filmora software and Click on the New Project icon on the window.
- After you have clicked on the New Project icon, our main workplace will be launched.
- Here you can see various options.
- To get started, we need to import our video clips to edit them.

- Here, you can see two ways to import your clips in Wondershare Filmora.
- Shows you how to import by Right-Clicking on File and selecting the import media option.
- Shows you to drag and drop the file from your main directory simply.
You can choose whatever suits you the best!
Step2Add your clips to your timeline
Now that we have imported our videos into the timeline, our next step will be to add our videos to the timeline.
- Simply click on the imported clips on the import window.
- Then drag it to the timeline below.
- Doing so will create a working timeline you can view and edit as you go along the editing process.

Step3Size the reference video to the original video
Now, remember that we recorded a five-second clip that we will use to create the masking effect. You will need to size it to the original video for that to work. Doing so is simple and will require you to take some easy steps.
- First, click on the clip.
- Then, when it is selected, move on to the tab above to choose the speed option from the bar.
- Here, you will also see options such as cropping, Green screen, and color.
- Choose the option of speed.
- Then, a drop-down tile will pop up. Here you can see different options available to speed up your video.

- You can speed up your video and slow it down.
- For now, we will have to slow it down.
![]()
Note: Slowing it down will increase the time of the video clip and allow you to match it with the original video clip.
Don’t worry about the speed, as the video is already empty, and there will be no distractions to disturb our editing.
Step4Add the masking effect
Now that we have our video aligned with the reference video we are using. Let’s move to the next step.
This step will try to remove the thread attached to the ball; otherwise, it will show in the video, and our effect will be ruined. However, before we do that, we will need to know what masking is.
What is the Masking effect in Wondershare Filmora?
Have you ever seen the behind-the-scenes of those big-budget movies? Then you might have seen the actors and the stunt workers hanging from big ropes performing stunts in front of green screens.
Well, the directors capture the video in real-time. But they can do those big stunts on TV with editing and CGI, and one of the effects is “Masking.”
The masking effect allows you to mask the object on the screen with a reference video. So that’s how the ropes attached to the stuntmen get removed in the original videos.
How to add a masking effect?
Although there are numerous ways to do that, the one we will use in this video is to remove the thread. For this, follow the below steps:
- Simply go to the effect icon that you can see in the bar above.
- In the effects bar, move to the utility tab.
- You will see a window showing you the many effects Wondershare Filmora provides you from default.
- Select the shape mask tile.
- Now drag and drop it on the timeline below.

![]()
Note: You must ensure the effect is applied to the main video, not the reference video.
- When you drag the effect into the main video, you will notice a transparent shape added to the video. This is your Mask.
Step5Edit the masking effect
You must hide the thread attached to the ball with the masking effect. To do this, follow the below guidelines:
- Double-click on the effect added to the main video.
- You will notice another window pop up on the import library.
![]()
Note: In the pop-up window, you will see the multiple options and edits you can apply to the masking effect, such as Transform, Compositing, Motion tracking, and stabilization.

- Scroll down on the window and notice a video effect tab.
In the effect tab, you will have multiple options, such as the shape mask, X, Y, and scale and blur strength options, as shown below.
- Now adjust the mask to hide the string. It may be easy to invert the mask.
![]()
Note: That the borders of the mask are blurred. But you can also change them by inverting the mask, which turns the borders and the space between them.
Remember the invisibility cloak from Harry Potter? It works just like that, only with a solid shape.
- Now use the X and Y options to move the mask anywhere in the video.

Step6Hide the sharp borders
You may notice the shape of borders that do not blend with the background. To blend the borders with the background, follow the steps below:
- Simply Double-click on the effect in the timeline.
- Then, in the editing tab, find out the blur strength option.

- Simply drag the bar to increase the blur strength.
![]()
Note: Please keep looking in the window on the right. Check and increase the blur strength until you are satisfied with the result.
- Lastly, click on OK when you are done.
Step7Creating the popup effect
Now, if you want your object to appear out of thin air, you must create that pop-up effect. You can create the pop-up effect in simple and easy steps, as shown below:
- First, drag the timeline dragger to the point where you want the prop or the ball to pop up.
Your presentation should be accurate and precise!
Imagine you were doing a “swoosh“ action, similar to swinging a wand. Now you want your object to appear at that time.
Split the Video:
- Drag the timeline dragger to that point.
- Now press Ctrl+B to split both videos.
Add Popup Effect:
The masking effect will be applied from the start. Our goal is to hide the masking effect before the ball pop-ups. For this, follow the below steps:
- Go into the setting by Double-Clicking the masking effect on the original video.
- Then move the mask over the ball instead of on the thread. Doing so would make the ball disappear.

Final Results:
- Lastly, click on Ok when done.
Play the clip from the start, and you will notice the ball popping up according to your action.

Congratulations! You did it. You are now able to fly objects with the power of your mind.
Following the abovementioned steps, you can control objects and make them fly in the air. The catch is that you will have to use Wondershare Filmora . But, of course, this is not a witchcraft school now.
Free Download For Win 7 or later(64-bit)
Free Download For macOS 10.14 or later
Conclusion
Well, there comes a time when one needs to make flying objects. Wondershare Filmora is an excellent tool that will allow you to add the masking effect to create the illusion of flying objects in the air.
The video quality at the end will only depend upon how clearly you show during the editing process. Try the above steps and enjoy the results!
Wondershare Filmora
Now that we have all the physical requirements for the video, our next goal is to ensure that we have the correct video editing software. And what’s best than Wondershare Filmora? Obviously, there’s nothing!
Filmora allows you to edit your videos with ease and comfort. With its interactive UI, even a beginner feels easy to edit a video. With skills on hand, an expert can edit videos ranging from green screen effects to flying objects.
Free Download For Win 7 or later(64-bit)
Free Download For macOS 10.14 or later
![]()
Good presentation
Now, if you want your video to shine like the good ones, you will need to know how to present it. In this section, the requirement will be yourself. As you are not flying an object, you must act the part.
A good presentation will allow you to make the video more natural. Because no matter how skilled you are with video editing, a video with props will only be of quality until the subject acts their part with quality.
Part 2. How to capture the footage?
Before we get into how we edit our footage, we need to know how to shoot the video to edit. Follow the steps mentioned below:
- Set up your camera on a tripod or a gorilla pod.
- After setting up the camera, record an empty frame.
![]()
Note: An empty frame video will be the one you will use to mask the original clip.
Reference video
Start recording a five-second clip of the sofa where you will be sitting without yourself or the prop. Here you don’t need to add anything except the reference. Follow the guidelines below when making the reference video:
- The video should be plain.
- It should be simple.
- There should be no moving object or subject.
Main video
After shooting the empty frame video, move on to shooting the video with yourself in it. Follow the below to achieve something unique:
- Your focus should be on the prop.
- Use a thread or a rope to attach the prop to it. (In this case, we are using a ball.)
- Attach the ball to the thread and hand it on the roof.
- Record yourself now with the prop with your desired content or script.
After completing the video, simply stop recording. Now you will end up with two video clips.
Adding these two clips in the Wondershare Filmora , you can easily create the flying object effect. To do so, follow the steps explained in the section ahead.
Part 3. Stepwise guide to making flying objects in Wondershare Filmora
Now that we have looked into our requirements, let us dive into how we will apply our skills to achieve an object to fly in Wondershare Filmora .
Of course, without the software, our editing will not be possible, so download Wondershare Filmora from the steps explained below.
Free Download For Win 7 or later(64-bit)
Free Download For macOS 10.14 or later
Step1Open the Wondershare Filmora software
- Open the Wondershare Filmora software and Click on the New Project icon on the window.
- After you have clicked on the New Project icon, our main workplace will be launched.
- Here you can see various options.
- To get started, we need to import our video clips to edit them.
- Here, you can see two ways to import your clips in Wondershare Filmora.
- Shows you how to import by Right-Clicking on File and selecting the import media option.
- Shows you to drag and drop the file from your main directory simply.
You can choose whatever suits you the best!
Step2Add your clips to your timeline
Now that we have imported our videos into the timeline, our next step will be to add our videos to the timeline.
- Simply click on the imported clips on the import window.
- Then drag it to the timeline below.
- Doing so will create a working timeline you can view and edit as you go along the editing process.
Step3Size the reference video to the original video
Now, remember that we recorded a five-second clip that we will use to create the masking effect. You will need to size it to the original video for that to work. Doing so is simple and will require you to take some easy steps.
- First, click on the clip.
- Then, when it is selected, move on to the tab above to choose the speed option from the bar.
- Here, you will also see options such as cropping, Green screen, and color.
- Choose the option of speed.
- Then, a drop-down tile will pop up. Here you can see different options available to speed up your video.
- You can speed up your video and slow it down.
- For now, we will have to slow it down.
![]()
Note: Slowing it down will increase the time of the video clip and allow you to match it with the original video clip.
Don’t worry about the speed, as the video is already empty, and there will be no distractions to disturb our editing.
Step4Add the masking effect
Now that we have our video aligned with the reference video we are using. Let’s move to the next step.
This step will try to remove the thread attached to the ball; otherwise, it will show in the video, and our effect will be ruined. However, before we do that, we will need to know what masking is.
What is the Masking effect in Wondershare Filmora?
Have you ever seen the behind-the-scenes of those big-budget movies? Then you might have seen the actors and the stunt workers hanging from big ropes performing stunts in front of green screens.
Well, the directors capture the video in real-time. But they can do those big stunts on TV with editing and CGI, and one of the effects is “Masking.”
The masking effect allows you to mask the object on the screen with a reference video. So that’s how the ropes attached to the stuntmen get removed in the original videos.
How to add a masking effect?
Although there are numerous ways to do that, the one we will use in this video is to remove the thread. For this, follow the below steps:
- Simply go to the effect icon that you can see in the bar above.
- In the effects bar, move to the utility tab.
- You will see a window showing you the many effects Wondershare Filmora provides you from default.
- Select the shape mask tile.
- Now drag and drop it on the timeline below.
![]()
Note: You must ensure the effect is applied to the main video, not the reference video.
- When you drag the effect into the main video, you will notice a transparent shape added to the video. This is your Mask.
Step5Edit the masking effect
You must hide the thread attached to the ball with the masking effect. To do this, follow the below guidelines:
- Double-click on the effect added to the main video.
- You will notice another window pop up on the import library.
![]()
Note: In the pop-up window, you will see the multiple options and edits you can apply to the masking effect, such as Transform, Compositing, Motion tracking, and stabilization.
- Scroll down on the window and notice a video effect tab.
In the effect tab, you will have multiple options, such as the shape mask, X, Y, and scale and blur strength options, as shown below.
- Now adjust the mask to hide the string. It may be easy to invert the mask.
![]()
Note: That the borders of the mask are blurred. But you can also change them by inverting the mask, which turns the borders and the space between them.
Remember the invisibility cloak from Harry Potter? It works just like that, only with a solid shape.
- Now use the X and Y options to move the mask anywhere in the video.
Step6Hide the sharp borders
You may notice the shape of borders that do not blend with the background. To blend the borders with the background, follow the steps below:
- Simply Double-click on the effect in the timeline.
- Then, in the editing tab, find out the blur strength option.
- Simply drag the bar to increase the blur strength.
![]()
Note: Please keep looking in the window on the right. Check and increase the blur strength until you are satisfied with the result.
- Lastly, click on OK when you are done.
Step7Creating the popup effect
Now, if you want your object to appear out of thin air, you must create that pop-up effect. You can create the pop-up effect in simple and easy steps, as shown below:
- First, drag the timeline dragger to the point where you want the prop or the ball to pop up.
Your presentation should be accurate and precise!
Imagine you were doing a “swoosh“ action, similar to swinging a wand. Now you want your object to appear at that time.
Split the Video:
- Drag the timeline dragger to that point.
- Now press Ctrl+B to split both videos.
Add Popup Effect:
The masking effect will be applied from the start. Our goal is to hide the masking effect before the ball pop-ups. For this, follow the below steps:
- Go into the setting by Double-Clicking the masking effect on the original video.
- Then move the mask over the ball instead of on the thread. Doing so would make the ball disappear.
Final Results:
- Lastly, click on Ok when done.
Play the clip from the start, and you will notice the ball popping up according to your action.
Congratulations! You did it. You are now able to fly objects with the power of your mind.
Following the abovementioned steps, you can control objects and make them fly in the air. The catch is that you will have to use Wondershare Filmora . But, of course, this is not a witchcraft school now.
Free Download For Win 7 or later(64-bit)
Free Download For macOS 10.14 or later
Conclusion
Well, there comes a time when one needs to make flying objects. Wondershare Filmora is an excellent tool that will allow you to add the masking effect to create the illusion of flying objects in the air.
The video quality at the end will only depend upon how clearly you show during the editing process. Try the above steps and enjoy the results!
Also read:
- Updated Are You Working on Editing a Video and Youd Like to Add Text to It? Learn the Various Ways that You Can Add Text to a Video
- New In 2024, How To Blur The Video Background in After Effects
- Updated How to Make Split Screen Videos in Filmora for 2024
- Updated How to Upload Videos to Twitch? Heres a Guide for Beginner
- Updated 2024 Approved How to Loop a Video on Vimeo?
- New Best Video Title Generators
- Updated In 2024, | Best 8 Online GIF to APNG Converters
- New Backup and Organize Your Tons of Footage in Minutes for 2024
- New In 2024, How to Apply Video Filters
- New Make A Tattoo Disappear Like A Magic
- Updated How to Comment on YouTube Live Chat
- Updated Live Stream on YouTube Using Zoom
- How to Correct Lens Distortion With Filmora for 2024
- Updated Best Way To Color Grading & Color Correction in Filmora for 2024
- New What Is a Transparent Logo and Why Do You Need It
- 2024 Approved In Todays Article, We Are Going to Show You How Adding a Simple Lower Third to Your Video Can Add a Degree of Professionalism and Polish to Your Videos While Giving It a Higher Perceived Value
- How To Make A Video Longer
- Updated How to Use OBS Chroma Key With/Without Green Screen for 2024
- Adobe Photoshop Is the Best Photo Editor to Add Green Screen Effect to Your Photo While Wondershare Filmora Is the Best Video Editor to Add Green Screen Effect to Your Video
- How to Create a Slideshow with Movavi Slideshow Maker for 2024
- In 2024, AR Is a Trend These Days. Here, You Can Browse the List of Top 10 Picks for AR Video Editing Apps
- Updated In 2024, How to Get VHS Filter and Glitch Filter to Your Images or Videos?
- Updated Creating Flawless Slow-Motion Videos Is Every Content Creators Dream. Learn About DaVinci Resolve Slow-Motion Video Creation, Amongst Other Tools
- 2024 Approved Top 9 Sparkle Effects Photo and Video Editors You Should Know
- 2024 Approved Recording Video in Slow Motion Some Considerable Points
- How to Create Liquid Water Reveal Intro, In 2024
- Looking for a Legitimate Tutorial to Create and Add Text Effects in Adobe Premiere Pro? Here Are the Simple Steps for Premiere Pro Text Effects and Find an Alternative Way
- Cropping a Video in Davinci Resolve Step by Step for 2024
- This Article Describes Different Ways for Removing Gif Backgrounds, How We Can Use Them, and How This Way Differs From One Another
- Windows Movie Maker Review for 2024
- Top Tips on How to Design Travel Slideshow for 2024
- 2024 Approved Make Videos with Pictures and Music-10 Apps
- Updated 2024 Approved How To Make a Video by Mouse in Filmora?
- 2024 Approved 15 Best Travel Vloggers That You Should Follow
- New 5 Tips for Faster Editing in Filmora Video Editor
- In 2024, Color Finale Is a Color Grading Plugin for Final Cur Pro. It Allows Users to Make Cinematic Looking Video Scenes by Adjusting the Color. Here Well Share You some Basic Information About This Plugin
- What Is Color Finale
- New 2024 Approved End This Problem! Make Transparent Background Video Today
- New Mastering Video Speed Control Slow Down, Speed Up, and Edit with Ease
- Why Does My Oppo A1 5G Keep Turning Off By Itself? 6 Fixes Are Here | Dr.fone
- In 2024, How to Remove Activation Lock On the Apple iPhone 15 Plus Without Previous Owner?
- The way to get back lost videos from Samsung Galaxy M34
- How to Recover Deleted Photos from Android Gallery App on Honor Play 40C
- How and Where to Find a Shiny Stone Pokémon For Motorola Edge+ (2023)? | Dr.fone
- In 2024, How can I get more stardust in pokemon go On Tecno Spark 10 Pro? | Dr.fone
- In 2024, Reset iTunes Backup Password Of iPhone 6s Prevention & Solution | Dr.fone
- Fix Unfortunately Settings Has Stopped on Motorola Moto G14 Quickly | Dr.fone
- How To Fix Apple ID Verification Code Not Working On Apple iPhone XS Max
- In 2024, How to Reset a Locked Itel A60 Phone
- Undelete lost contacts from Honor Magic 6.
- In 2024, Best Infinix Smart 8 Pattern Lock Removal Tools Remove Android Pattern Lock Without Losing Data
- How To Change Your SIM PIN Code on Your Itel S23 Phone
- In 2024, 5 Ways to Transfer Music from Lava Agni 2 5G to Other Android Devices Easily | Dr.fone
- How to Fix Videos Not Playing on Galaxy M34 5G?
- In 2024, How To Use Special Features - Virtual Location On Itel A60s? | Dr.fone
- How to retrieve erased videos from Google Pixel 8 Pro
- How to Hide/Fake Snapchat Location on Your Nubia Red Magic 8S Pro | Dr.fone
- In 2024, Three Ways to Sim Unlock Nokia C300
- How to Update Apple iPhone 11 Pro Max without Losing Anything? | Dr.fone
- Title: New Do You Know What Is Motion Blur in Fortnite? Read This Article to Find Out How to Apply Motion Blur in Fortnite Efficiently and with Ease
- Author: Chloe
- Created at : 2024-04-24 07:08:18
- Updated at : 2024-04-25 07:08:18
- Link: https://ai-editing-video.techidaily.com/new-do-you-know-what-is-motion-blur-in-fortnite-read-this-article-to-find-out-how-to-apply-motion-blur-in-fortnite-efficiently-and-with-ease/
- License: This work is licensed under CC BY-NC-SA 4.0.
