New Do You Want to Add a Slow-Mo Effect in Your Videos? In This Guide, We Will Discuss How to Add Slow-Motion Effects in the Videos with After Effects in an Efficient Way

Do You Want to Add a Slow-Mo Effect in Your Videos? In This Guide, We Will Discuss How to Add Slow-Motion Effects in the Videos with After Effects in an Efficient Way
A slow-motion effect in the videos can enhance the viewing experience. It can highlight a certain action by providing closer details. Moreover, it also evokes an emotional impact in any video scene. Along with creating a dramatic effect, a slow-mo effect also brings aesthetic appeal. Thus, the slow-motion effect can grasp the attention of the audience in an effortless manner.
This article will discuss how to create a slow-motion effect with Adobe After Effects. It’s a well-recognized tool for modifying videos with its powerful features. Hence, keep reading this guide to learn about After Effects slow motion.
Slow Motion Video Maker Slow your video’s speed with better control of your keyframes to create unique cinematic effects

Part 1: What Does A Perfect Slow Motion Video Contains?
To create a perfect slow-motion video, you must consider several factors. In this section, you can come across some elements through which you can generate an accurate slow-motion effect.
- Resolution: Make sure to record your video in high resolution. By doing so, the slow-motion effect will add more visual clarity. Thus, the minimum resolution should be 1080p or 4K.
- Accurate Lighting: Perfect lighting can make a video look impactful. You can either use natural or artificial lighting to make a well-exposed slow-mo effect.
- Choosing Subject: To grasp the attention, choose the subject carefully. A slow-motion effect in sports activities or water droplets can look eye-catching. Thus, you should choose a subject that looks appealing in a slow-mo effect.
- Sound Selection: A slow-mo effect will look more convincing with a relevant sound design. You should search for slow-mo sound effects to generate attractive results. Also, ensure that the speed of sound effects with the video is managed smartly.
- Frame Rate: A frame rate plays a vital role in creating slow-motion effect. Higher frame rates influence a smooth, slow-motion effect. Thus, use 240fps or higher to create a seamless slow-mo effect.
Part 2: Creating Slow Motion Effect in Adobe After Effects
Adobe After Effects is a famous program used in post-production of video making. It contains many motion graphics effects to enhance a video. You can add animated shapes and text to the video with this tool. Many people use this platform to create VFX in their videos to create stunning videos. It also supports 2D and 3D elements to produce realistic effects.
Furthermore, it offers many tools for compositing and keying. Users can change the color patterns in their videos with this robust software. Moreover, it can create After Effects slow motion with perfect accuracy. You can manually adjust the timing and speed of the slow-motion effect with this tool. Thus, Adobe After Effects is a comprehensive tool for video editing.
Here are the instructions that can guide you to produce slow-motion effects After Effects. Thus, let’s dig into the details:
Step 1
Start by uploading a video on After Effects. Drag it to the timeline and edit it in a desired manner. Now, place the cursor in the timeline to begin the process. Right-click on the timeline layer and select “Time” from the pop-up menu. From there, select “Time Stretch.” It will open a Time Stretch window on the screen.

Step 2
On the Time Stretch window, make the “Stretch Factor” value to 250. Once done, press the “OK” button.

Step 3
For high-quality results, enable the “Frame Blending” option. Right-click on the layer and select “Frame Blending” from the pop-up menu. Here, you can select two options: Frame Mix and Pixel Motion. After the frame blending, you can render the final output. Select a suitable format and then export the video.

Part 3: Quick and Unique Alternative: Making Slow Motion Effect with Wondershare Filmora
An excellent alternative to After Effects is Wondershare Filmora . With the release of its Volume 13, you can enjoy many premium features. To boost your productivity, the tool offers many AI features. You can use its AI copywriting feature to produce video outlines. By doing so, you can have AI-generated content for video production. Furthermore, it provides a smooth performance with its robust interface.
It contains a wide range of filters and overlays. It also allows you to apply transitions in the video clip from various options. To replace backgrounds in the video, try its Green Screen feature. This advanced feature can add realistic backgrounds to the videos easily. Moreover, you can color-correct the video to add perfect exposure properties. You can modify brightness, saturation, and other elements in the color-correct options.
Free Download For Win 7 or later(64-bit)
Free Download For macOS 10.14 or later
How to Add Slow-Motion Effect With Filmora
Are you ready to create a slow-mo effect in Filmora? Read the following section to learn how to create a slow-motion effect using this tool.
Step 1: Select New Project
Begin by launching this desktop tool on your PC. Choose the “Profile” icon from the top and sign into the tool. Continue to select the “New Project” button on the main screen to open a new editing window.

Step 2: Import Video to Filmora
On the main interface, press “Ctrl + I” from your keyboard. By doing so, you can import the video clip from your PC. Once done, drag and drop the imported video to the timeline.

Step 3: Choose Optical Flow
Now, select the video you have dragged to the timeline. Go to the right panel and choose the “Speed” tab. Look through the “Uniform Speed” tab and look for the “AI Frame Interpolation” option. By expanding this option, choose “Optical Flow.”

Step 4: Render and Export the Video
Now, head to the toolbar of the timeline. From there, tap on “Render Preview,” through which you can see the final results. Once done, you can export the video to the desired platform.

With the new upgrade, you can add an accurate slow-mo effect from Filmora. It uses AI technology to achieve the best results. Hence, this editing tool is a game-changer in the video production industry.
Exceptional Features of Filmora
AI Music Generator: This tool allows you to create custom music sounds. To do so, select your music style and genre from the given options. Afterward, you can edit the music by adjusting its volume and other parameters.
Screen Recorder: Do you want to capture the on-screen activities of your PC? The screen recorder of this software can capture any area of the screen. It also allows webcam and microphone recording. Afterward, you can edit the screen recording with its basic tools.
Silence Detection: To add more clarity to your videos, try the Silence Detection feature. This option removes the silent parts from your video. The process is automatic and does not need your manual efforts. Thus, with a single tap, you can eradicate unwanted parts from the video.
Speech-to-Text: The STT feature transcribes the video in the selected language. You can add subtitles to the videos in up to 26 languages. This feature increases your editing efficiency and offers great accuracy.
Conclusion
A slow-motion effect can highlight an action in a video clip. It can engage the viewers by generating a cinematic impact. The After Effects is a common program to add a slow-mo effect in videos. However, to create a more captivating slow-motion effect, we suggest Filmora. Its latest version has introduced many premium features for video editing. With AI algorithms, you can add a smooth, slow-motion effect to your videos. The process is automatic, which saves you from manual work.
Make A Slow Motion Video Make A Slow Motion Video More Features

Part 1: What Does A Perfect Slow Motion Video Contains?
To create a perfect slow-motion video, you must consider several factors. In this section, you can come across some elements through which you can generate an accurate slow-motion effect.
- Resolution: Make sure to record your video in high resolution. By doing so, the slow-motion effect will add more visual clarity. Thus, the minimum resolution should be 1080p or 4K.
- Accurate Lighting: Perfect lighting can make a video look impactful. You can either use natural or artificial lighting to make a well-exposed slow-mo effect.
- Choosing Subject: To grasp the attention, choose the subject carefully. A slow-motion effect in sports activities or water droplets can look eye-catching. Thus, you should choose a subject that looks appealing in a slow-mo effect.
- Sound Selection: A slow-mo effect will look more convincing with a relevant sound design. You should search for slow-mo sound effects to generate attractive results. Also, ensure that the speed of sound effects with the video is managed smartly.
- Frame Rate: A frame rate plays a vital role in creating slow-motion effect. Higher frame rates influence a smooth, slow-motion effect. Thus, use 240fps or higher to create a seamless slow-mo effect.
Part 2: Creating Slow Motion Effect in Adobe After Effects
Adobe After Effects is a famous program used in post-production of video making. It contains many motion graphics effects to enhance a video. You can add animated shapes and text to the video with this tool. Many people use this platform to create VFX in their videos to create stunning videos. It also supports 2D and 3D elements to produce realistic effects.
Furthermore, it offers many tools for compositing and keying. Users can change the color patterns in their videos with this robust software. Moreover, it can create After Effects slow motion with perfect accuracy. You can manually adjust the timing and speed of the slow-motion effect with this tool. Thus, Adobe After Effects is a comprehensive tool for video editing.
Here are the instructions that can guide you to produce slow-motion effects After Effects. Thus, let’s dig into the details:
Step 1
Start by uploading a video on After Effects. Drag it to the timeline and edit it in a desired manner. Now, place the cursor in the timeline to begin the process. Right-click on the timeline layer and select “Time” from the pop-up menu. From there, select “Time Stretch.” It will open a Time Stretch window on the screen.

Step 2
On the Time Stretch window, make the “Stretch Factor” value to 250. Once done, press the “OK” button.

Step 3
For high-quality results, enable the “Frame Blending” option. Right-click on the layer and select “Frame Blending” from the pop-up menu. Here, you can select two options: Frame Mix and Pixel Motion. After the frame blending, you can render the final output. Select a suitable format and then export the video.

Part 3: Quick and Unique Alternative: Making Slow Motion Effect with Wondershare Filmora
An excellent alternative to After Effects is Wondershare Filmora . With the release of its Volume 13, you can enjoy many premium features. To boost your productivity, the tool offers many AI features. You can use its AI copywriting feature to produce video outlines. By doing so, you can have AI-generated content for video production. Furthermore, it provides a smooth performance with its robust interface.
It contains a wide range of filters and overlays. It also allows you to apply transitions in the video clip from various options. To replace backgrounds in the video, try its Green Screen feature. This advanced feature can add realistic backgrounds to the videos easily. Moreover, you can color-correct the video to add perfect exposure properties. You can modify brightness, saturation, and other elements in the color-correct options.
Free Download For Win 7 or later(64-bit)
Free Download For macOS 10.14 or later
How to Add Slow-Motion Effect With Filmora
Are you ready to create a slow-mo effect in Filmora? Read the following section to learn how to create a slow-motion effect using this tool.
Step 1: Select New Project
Begin by launching this desktop tool on your PC. Choose the “Profile” icon from the top and sign into the tool. Continue to select the “New Project” button on the main screen to open a new editing window.

Step 2: Import Video to Filmora
On the main interface, press “Ctrl + I” from your keyboard. By doing so, you can import the video clip from your PC. Once done, drag and drop the imported video to the timeline.

Step 3: Choose Optical Flow
Now, select the video you have dragged to the timeline. Go to the right panel and choose the “Speed” tab. Look through the “Uniform Speed” tab and look for the “AI Frame Interpolation” option. By expanding this option, choose “Optical Flow.”

Step 4: Render and Export the Video
Now, head to the toolbar of the timeline. From there, tap on “Render Preview,” through which you can see the final results. Once done, you can export the video to the desired platform.

With the new upgrade, you can add an accurate slow-mo effect from Filmora. It uses AI technology to achieve the best results. Hence, this editing tool is a game-changer in the video production industry.
Exceptional Features of Filmora
AI Music Generator: This tool allows you to create custom music sounds. To do so, select your music style and genre from the given options. Afterward, you can edit the music by adjusting its volume and other parameters.
Screen Recorder: Do you want to capture the on-screen activities of your PC? The screen recorder of this software can capture any area of the screen. It also allows webcam and microphone recording. Afterward, you can edit the screen recording with its basic tools.
Silence Detection: To add more clarity to your videos, try the Silence Detection feature. This option removes the silent parts from your video. The process is automatic and does not need your manual efforts. Thus, with a single tap, you can eradicate unwanted parts from the video.
Speech-to-Text: The STT feature transcribes the video in the selected language. You can add subtitles to the videos in up to 26 languages. This feature increases your editing efficiency and offers great accuracy.
Conclusion
A slow-motion effect can highlight an action in a video clip. It can engage the viewers by generating a cinematic impact. The After Effects is a common program to add a slow-mo effect in videos. However, to create a more captivating slow-motion effect, we suggest Filmora. Its latest version has introduced many premium features for video editing. With AI algorithms, you can add a smooth, slow-motion effect to your videos. The process is automatic, which saves you from manual work.
Best Free Slow Motion Apps For Android and iPhone
Slow-motion videos are the recent and most popular trend of social media. Influencers are trying their best to make appealing slow-motion videos for unique content. Not everyone can afford traditional cameras to record videos in slow-mo. That’s why transforming normal video into slow-motion with free slow-motion apps is accessible to all.
For this purpose, countless apps have been developed to provide editing tools right in your palm. Regardless of the smartphone device you are using, there are solutions for everyone. Thoroughly read this article if you want to explore some free slow-mo apps for Android and iOS users.
Slow Motion Video Maker Slow your video’s speed with better control of your keyframes to create unique cinematic effects

Part 1: Progressive Android Application For Creating Free Slow-Mos
Starting with Android applications, there are some great free slow-motion apps you can come across. An overview of such apps will help you find out the best option to go with in Android:
- Velomingo - Velocity Edit Maker
- Slow Motion Video Maker
- Slow Motion Video Camera
- Splice - Video Editor & Maker
- Video Speed Changer: SlowMo F
1. Velomingo - Velocity Edit Maker
Find and transform your videos by applying multiple velocity templates using this free slow-motion app. For someone who isn’t very skilled at creating slow motions, this application can be helpful. It provides hundreds of pre-developed speed change templates for creating slow motions. After creating slo-mos, you can share them on your social handles like TikTok, Instagram, and Facebook.

Pros
- Offers high-quality export options to retain video quality while saving it.
- Offers a watermark removal option that helps in self-promotion.
Cons
- The application does not offer custom options for speed change, which limits creativity.
2. Slow Motion Video Maker
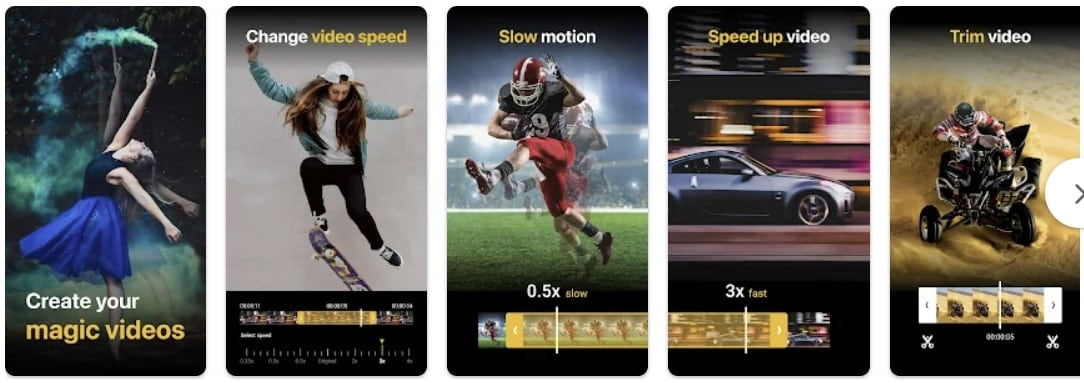
Open the doors of creativity with this free slo-mo app that is designed to modify video speed. The application slows down a video to one-fourth of its standard speed. Along with slowing down normal videos, you can bring back hyper-lapse video to normal speed. The tool offers a timeline editing panel for scene-specific editing.
Pros
- You can also increase the video speed using this application.
- Create and edit videos without worrying about their quality, as the app ensures high quality.
Cons
- Audience demand for more video playback options for fast and slow motion.
3. Slow Motion Video Camera
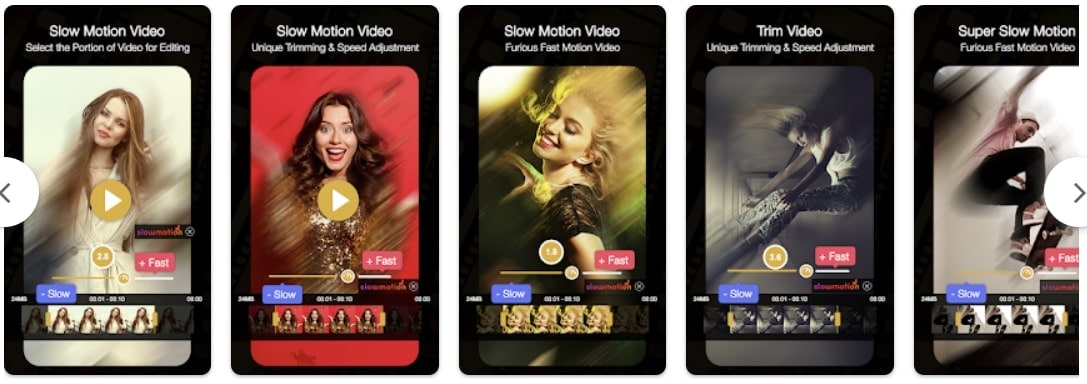
Do you want to create seamless slow motions and SloPros using a free slow-motion app? This application transforms your video into slo-mos using its playback speed options. There are five options for creating a slow motion that ranges from 1x to 5x. The application is compatible with Android version 4.3 and higher versions.
Pros
- Seamless supports all video formats to create a SloPro video.
- Offers visual and audio assets to enhance your video post-production.
Cons
- Shows a lot of Ads that annoy editors the most, especially during editing.
4. Splice - Video Editor & Maker
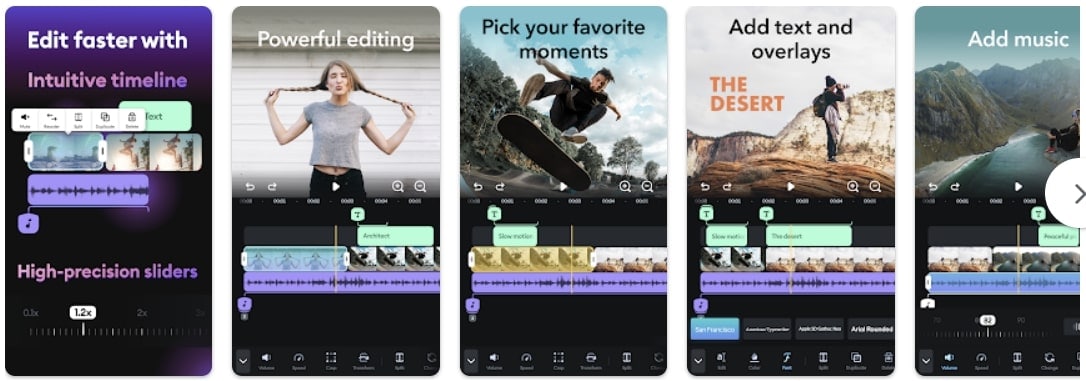
This free slow-motion app changes the speed of your video using a speed slider and timeline. The audio tracks are displayed separately on the timeline, which means you can maintain audio pitch and quality. Create slow motion for specific scenes or the whole video while providing adjustment options. There are 400+ music tracks in its audio assets library.
Pros
- A powerful interface that is an all-in-one video editor for creating compelling videos.
- Timeline editing interface to adjust text, visual, and speed effects.
Cons
- Doesn’t offer some important features like project file backup options that are on paid plans.
5. Video Speed Changer: SlowMo F
Use this free slo-mo app to create slow-motion videos in the best quality possible. The application offers distinct speed options, the slowest being 0.5x. With its timeline editing interface and trim options, you can apply an effect to specific video segments. The editor streamlines videos in any format and allows you to share them on social platforms.

Pros
- An intuitive user interface with high-quality video processing for optimized results.
- Provides regular updates in your system notifications to edit better.
Cons
- The editor comes with multiple ad displays, and there is no paid plan to avoid them.
Part 2: Directed iOS Apps For Functioning Slow Motion Video Editing
Being an iOS user, you might seek a different list of free slow-mo apps for your device. When creating a slow-motion video , it is preferred that you go by this provided list of applications. This will help you manage a good-quality of slow motion video in no time:
- SloMo Slow Motion Video Editor
- Video Editor & Maker – Vidma
- Slow Motion Video Editor
- Velomingo: Velocity Edit Maker
- InShot – Video Editor
1. SloMo Slow Motion Video Editor
Are you in search of a free slow-motion app for iPhone with an intuitive user interface? This video editor specializes in slow-motion content and assists in other speed modification tasks. Its interface reflects simplicity as it initiates editing immediately after import. Tailored to create slo-mo, the application boosts video frame rates up to 120fps and 240fps.
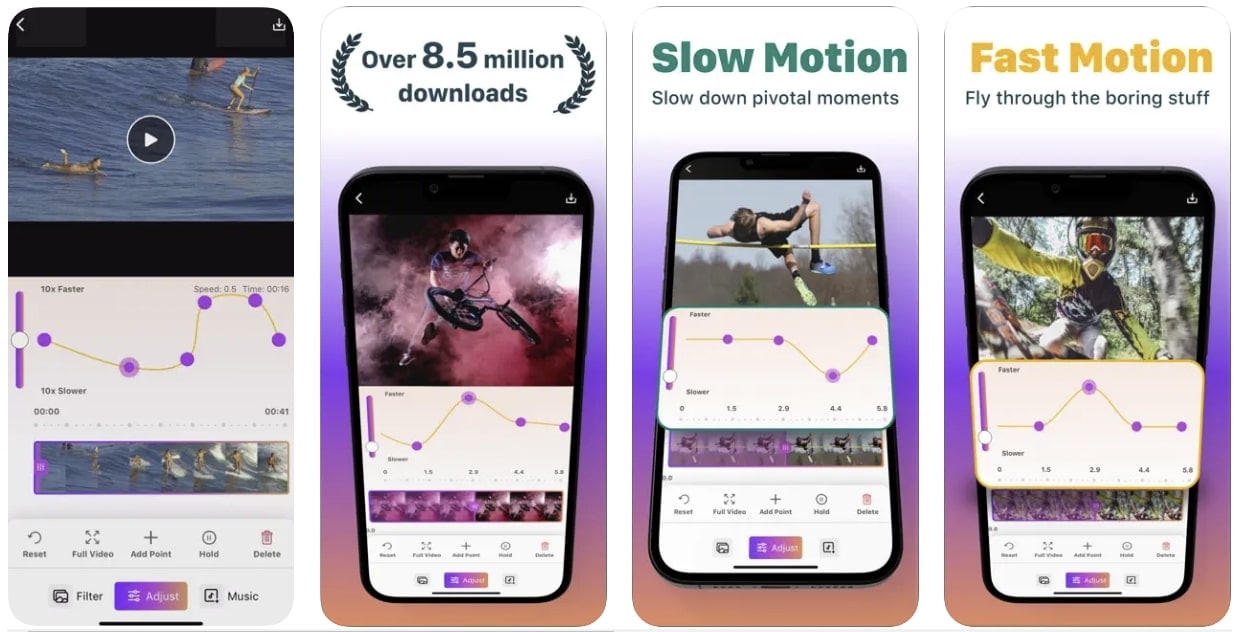
Pros
- Offers a smooth, slow motion with a still frame option to highlight a part.
- Offers 40+ visual features to enhance the graphical element in your videos.
Cons
- The application needs to fix some bugs related to its subscription plans.
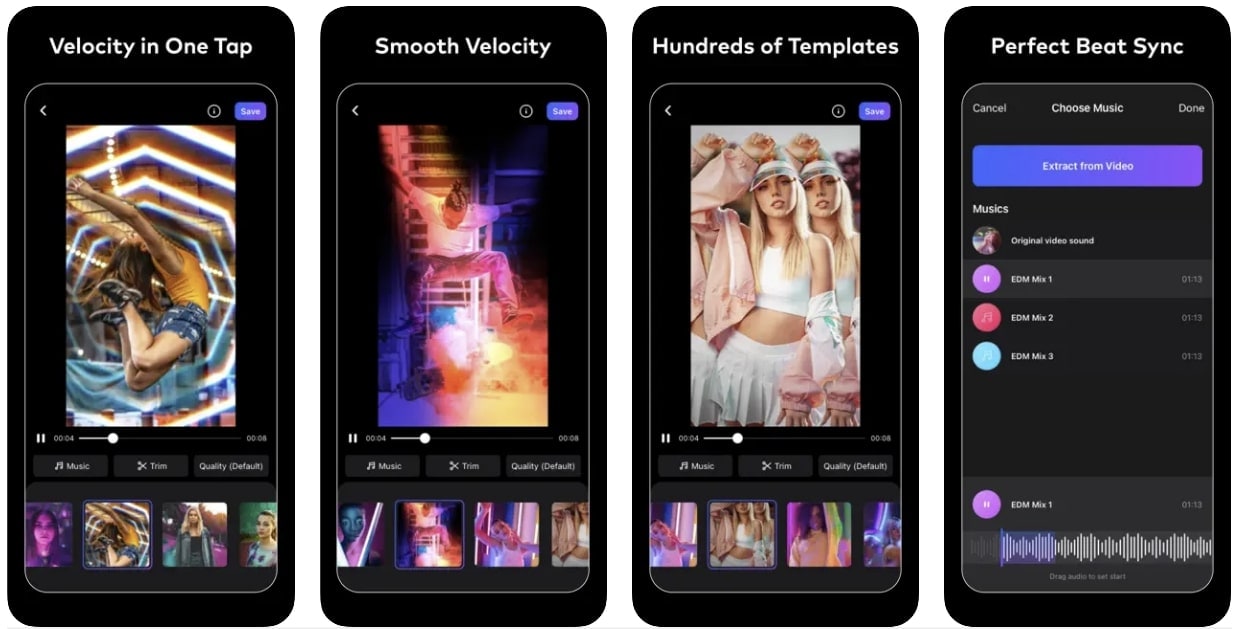
2. Video Editor & Maker – Vidma
Are you in pursuit of a free slo-mo app that seamlessly produces trending slow-motion videos? Its Velocity Edit Maker tool is tailored to meet your needs. With seamless controls over playback speed and positioning on the velocity graph, you can create amazing slo-mos. The application features a beginner’s level speed change interface with a voice edit option.

Pros
- AI-backed algorithms that allow automated art generation via prompts for graphics.
- Offers keyframing that helps you to transform boring video via animations throughout.
Cons
- The free version lacks flexibility in some features, and you’ll have to avail the paid versions.
3. Slow Motion Video Editor
If you want to attain a professional-grade slow-motion effect on your iPhone, employ this free slow-motion app. The editor comes with a wide array of customizable speed settings to achieve the speed change goals. It leverages a sophisticated interface featuring a timeline bar and velocity graph. To control speed, you can employ a downward slide gesture on different timelines.

Pros
- Built-in music assets that fit both slo-mo and time-lapse videos.
- Creates slow-motion or even high-speed videos without declining their resolutions.
Cons
- It is only specified for speed change and lacks editing features; hence, users need to switch a lot.
4. Velomingo: Velocity Edit Maker
Embarking on the journey of crafting slow-motion sequences with precision using this free slow-motion app. Users are free to use the pre-installed velocity presets on their videos. These will result in captivating slow-motion and high-speed effects. While you cannot customize these presets, the application ensures slow-motion quality along with audio and visual quality maintenance.
Pros
- Upon export, you can improve the video quality and remove the watermark.
- Avoid any quality loss upon export by directly publishing content to social applications.
Cons
- Lacks a custom preset option because if you have to add the same effect, you will need to do the editing all over again,
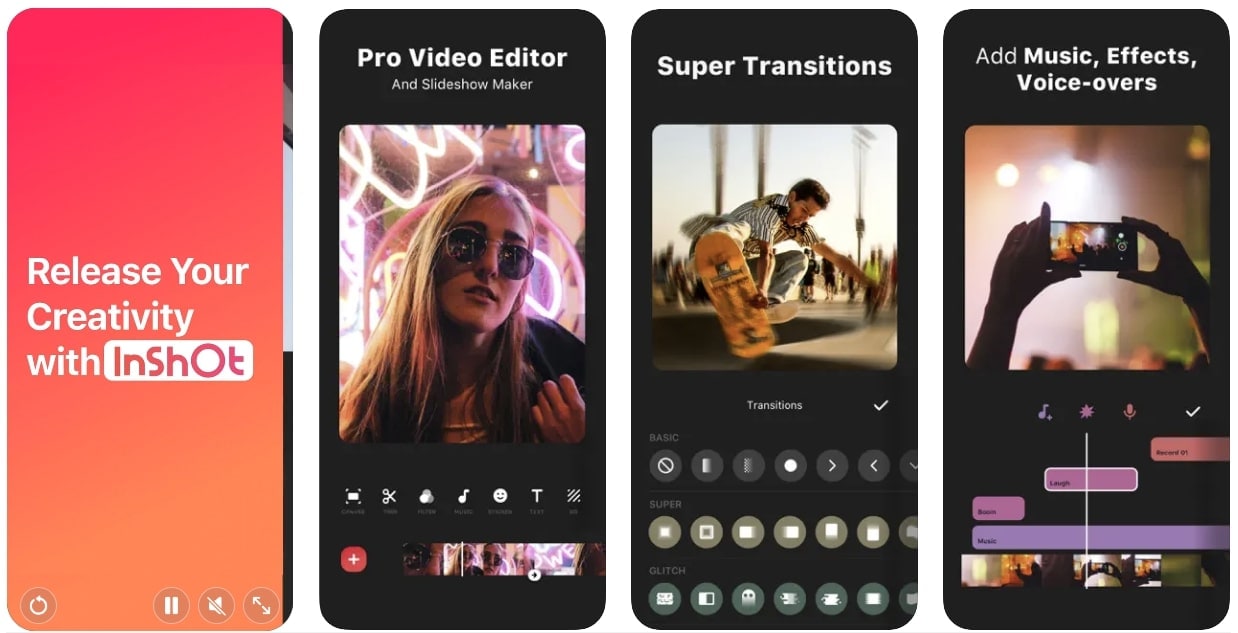
5. InShot – Video Editor
The free slow-motion app assists in the creation of effective slow motions with other features. It introduces an uncomplicated technique for decreasing video speed through a slider. With its timeline editing and selective time frame options, you can apply slow motion to specific video parts. It not only offers slow motion but also fast motion effects with an extensive interface.
Pros
- The free version allows users to remove watermarks without any hassle.
- The Chroma key function cuts out the object and removes the background efficiently.
Cons
- Restriction of creative assets in the free version, and you’ll have to avail yourself of a subscription.
Part 3: Make Slow Motion Video Making Easy With Wondershare Filmora
There is a lot of competition for free slow-motion apps in the digital market. The platform, with an intuitive interface and more advanced options, stands at the top. Among such winning platforms include Wondershare Filmora, which is a video editor. It offers the latest features with AI integrations that keep users amazed. You can embrace creativity in your projects while saving hours of effort.
This platform can assist beginners and professionals by easing their tasks. If we come to the point, Filmora allows you to slow down your videos with customization. Besides, you can use its AI feature to get desired music and assistance through copilot editors.
Free Download For Win 7 or later(64-bit)
Free Download For macOS 10.14 or later
Integral Features of Filmora to Discover
Filmora is not just limited to cutting or merging tools; you can alter imaginations into reality. If you want to know how to read the main functionalities given.
AI Thumbnail Creator
As a content creator, you must know that thumbnail grab viewer’s attention to watch the video. That’s why creating an attractive thumbnail remains integral to video editing. Filmora offers an AI feature to ease this process with creativity. It provides thumbnail templates that you can edit and align with your videos. Besides, it can automatically detect the best shots in the video and bring it out as a thumbnail.
Speed Ramping
The literal meaning of speed ramping is a smooth change in video speed. You will not find speed ramping in the above-discussed free slow-motion apps. Filmora allows you to adjust the extent you want to slow down or speed up the video simultaneously. Besides a smooth transition in speed, it ensures the high quality of your slow-motion videos.
AI Image
If you are tired of internet surfing for copyright-free images, head to Filmora. Using the AI Image generator of Filmora, you will own the legal rights of the created image. To get the desired image, you have to describe some points that you want in the image. Optionally, you can pick one of the available image styles to get accurate results.
AI Smart Masking
Discover the endless possibilities on Filmora and use advanced skills to create transitions. It provides smart masking that recognizes objects in videos and automatically generates a mask. With AI masking, you can perform color correction on your media. Also, it can freeze frames to craft stunning still images. Users can mask objects and change video backgrounds with a single brush stroke.
AI Audio Stretch
Imagine finding a perfect song for a Vlog that is shorter in length for your video. This situation confuses you about switching to another song or cutting the video duration. Not more with Filmora, because it offers AI audio stretch that understands vocals in music. Thus, you will get re-timed audio instantly. Plus, it can remix different audio clips to produce a dynamic suite of soundtracks.
Conclusion
In short, creating slow-motion videos is necessary to maintain your social persona. Anyone can turn their videos into slow motion without putting effort into editing. This article has also shown some of the best choices in free slow-motion apps for Android and iOS. However, if you want more options than just slowing down videos, you should try Wondershare Filmora.
Make A Slow Motion Video Make A Slow Motion Video More Features

Part 1: Progressive Android Application For Creating Free Slow-Mos
Starting with Android applications, there are some great free slow-motion apps you can come across. An overview of such apps will help you find out the best option to go with in Android:
- Velomingo - Velocity Edit Maker
- Slow Motion Video Maker
- Slow Motion Video Camera
- Splice - Video Editor & Maker
- Video Speed Changer: SlowMo F
1. Velomingo - Velocity Edit Maker
Find and transform your videos by applying multiple velocity templates using this free slow-motion app. For someone who isn’t very skilled at creating slow motions, this application can be helpful. It provides hundreds of pre-developed speed change templates for creating slow motions. After creating slo-mos, you can share them on your social handles like TikTok, Instagram, and Facebook.

Pros
- Offers high-quality export options to retain video quality while saving it.
- Offers a watermark removal option that helps in self-promotion.
Cons
- The application does not offer custom options for speed change, which limits creativity.
2. Slow Motion Video Maker
Open the doors of creativity with this free slo-mo app that is designed to modify video speed. The application slows down a video to one-fourth of its standard speed. Along with slowing down normal videos, you can bring back hyper-lapse video to normal speed. The tool offers a timeline editing panel for scene-specific editing.

Pros
- You can also increase the video speed using this application.
- Create and edit videos without worrying about their quality, as the app ensures high quality.
Cons
- Audience demand for more video playback options for fast and slow motion.
3. Slow Motion Video Camera
Do you want to create seamless slow motions and SloPros using a free slow-motion app? This application transforms your video into slo-mos using its playback speed options. There are five options for creating a slow motion that ranges from 1x to 5x. The application is compatible with Android version 4.3 and higher versions.

Pros
- Seamless supports all video formats to create a SloPro video.
- Offers visual and audio assets to enhance your video post-production.
Cons
- Shows a lot of Ads that annoy editors the most, especially during editing.
4. Splice - Video Editor & Maker
This free slow-motion app changes the speed of your video using a speed slider and timeline. The audio tracks are displayed separately on the timeline, which means you can maintain audio pitch and quality. Create slow motion for specific scenes or the whole video while providing adjustment options. There are 400+ music tracks in its audio assets library.

Pros
- A powerful interface that is an all-in-one video editor for creating compelling videos.
- Timeline editing interface to adjust text, visual, and speed effects.
Cons
- Doesn’t offer some important features like project file backup options that are on paid plans.
5. Video Speed Changer: SlowMo F
Use this free slo-mo app to create slow-motion videos in the best quality possible. The application offers distinct speed options, the slowest being 0.5x. With its timeline editing interface and trim options, you can apply an effect to specific video segments. The editor streamlines videos in any format and allows you to share them on social platforms.

Pros
- An intuitive user interface with high-quality video processing for optimized results.
- Provides regular updates in your system notifications to edit better.
Cons
- The editor comes with multiple ad displays, and there is no paid plan to avoid them.
Part 2: Directed iOS Apps For Functioning Slow Motion Video Editing
Being an iOS user, you might seek a different list of free slow-mo apps for your device. When creating a slow-motion video , it is preferred that you go by this provided list of applications. This will help you manage a good-quality of slow motion video in no time:
- SloMo Slow Motion Video Editor
- Video Editor & Maker – Vidma
- Slow Motion Video Editor
- Velomingo: Velocity Edit Maker
- InShot – Video Editor
1. SloMo Slow Motion Video Editor
Are you in search of a free slow-motion app for iPhone with an intuitive user interface? This video editor specializes in slow-motion content and assists in other speed modification tasks. Its interface reflects simplicity as it initiates editing immediately after import. Tailored to create slo-mo, the application boosts video frame rates up to 120fps and 240fps.

Pros
- Offers a smooth, slow motion with a still frame option to highlight a part.
- Offers 40+ visual features to enhance the graphical element in your videos.
Cons
- The application needs to fix some bugs related to its subscription plans.
2. Video Editor & Maker – Vidma
Are you in pursuit of a free slo-mo app that seamlessly produces trending slow-motion videos? Its Velocity Edit Maker tool is tailored to meet your needs. With seamless controls over playback speed and positioning on the velocity graph, you can create amazing slo-mos. The application features a beginner’s level speed change interface with a voice edit option.

Pros
- AI-backed algorithms that allow automated art generation via prompts for graphics.
- Offers keyframing that helps you to transform boring video via animations throughout.
Cons
- The free version lacks flexibility in some features, and you’ll have to avail the paid versions.
3. Slow Motion Video Editor
If you want to attain a professional-grade slow-motion effect on your iPhone, employ this free slow-motion app. The editor comes with a wide array of customizable speed settings to achieve the speed change goals. It leverages a sophisticated interface featuring a timeline bar and velocity graph. To control speed, you can employ a downward slide gesture on different timelines.

Pros
- Built-in music assets that fit both slo-mo and time-lapse videos.
- Creates slow-motion or even high-speed videos without declining their resolutions.
Cons
- It is only specified for speed change and lacks editing features; hence, users need to switch a lot.
4. Velomingo: Velocity Edit Maker
Embarking on the journey of crafting slow-motion sequences with precision using this free slow-motion app. Users are free to use the pre-installed velocity presets on their videos. These will result in captivating slow-motion and high-speed effects. While you cannot customize these presets, the application ensures slow-motion quality along with audio and visual quality maintenance.

Pros
- Upon export, you can improve the video quality and remove the watermark.
- Avoid any quality loss upon export by directly publishing content to social applications.
Cons
- Lacks a custom preset option because if you have to add the same effect, you will need to do the editing all over again,
5. InShot – Video Editor
The free slow-motion app assists in the creation of effective slow motions with other features. It introduces an uncomplicated technique for decreasing video speed through a slider. With its timeline editing and selective time frame options, you can apply slow motion to specific video parts. It not only offers slow motion but also fast motion effects with an extensive interface.

Pros
- The free version allows users to remove watermarks without any hassle.
- The Chroma key function cuts out the object and removes the background efficiently.
Cons
- Restriction of creative assets in the free version, and you’ll have to avail yourself of a subscription.
Part 3: Make Slow Motion Video Making Easy With Wondershare Filmora
There is a lot of competition for free slow-motion apps in the digital market. The platform, with an intuitive interface and more advanced options, stands at the top. Among such winning platforms include Wondershare Filmora, which is a video editor. It offers the latest features with AI integrations that keep users amazed. You can embrace creativity in your projects while saving hours of effort.
This platform can assist beginners and professionals by easing their tasks. If we come to the point, Filmora allows you to slow down your videos with customization. Besides, you can use its AI feature to get desired music and assistance through copilot editors.
Free Download For Win 7 or later(64-bit)
Free Download For macOS 10.14 or later
Integral Features of Filmora to Discover
Filmora is not just limited to cutting or merging tools; you can alter imaginations into reality. If you want to know how to read the main functionalities given.
AI Thumbnail Creator
As a content creator, you must know that thumbnail grab viewer’s attention to watch the video. That’s why creating an attractive thumbnail remains integral to video editing. Filmora offers an AI feature to ease this process with creativity. It provides thumbnail templates that you can edit and align with your videos. Besides, it can automatically detect the best shots in the video and bring it out as a thumbnail.
Speed Ramping
The literal meaning of speed ramping is a smooth change in video speed. You will not find speed ramping in the above-discussed free slow-motion apps. Filmora allows you to adjust the extent you want to slow down or speed up the video simultaneously. Besides a smooth transition in speed, it ensures the high quality of your slow-motion videos.
AI Image
If you are tired of internet surfing for copyright-free images, head to Filmora. Using the AI Image generator of Filmora, you will own the legal rights of the created image. To get the desired image, you have to describe some points that you want in the image. Optionally, you can pick one of the available image styles to get accurate results.
AI Smart Masking
Discover the endless possibilities on Filmora and use advanced skills to create transitions. It provides smart masking that recognizes objects in videos and automatically generates a mask. With AI masking, you can perform color correction on your media. Also, it can freeze frames to craft stunning still images. Users can mask objects and change video backgrounds with a single brush stroke.
AI Audio Stretch
Imagine finding a perfect song for a Vlog that is shorter in length for your video. This situation confuses you about switching to another song or cutting the video duration. Not more with Filmora, because it offers AI audio stretch that understands vocals in music. Thus, you will get re-timed audio instantly. Plus, it can remix different audio clips to produce a dynamic suite of soundtracks.
Conclusion
In short, creating slow-motion videos is necessary to maintain your social persona. Anyone can turn their videos into slow motion without putting effort into editing. This article has also shown some of the best choices in free slow-motion apps for Android and iOS. However, if you want more options than just slowing down videos, you should try Wondershare Filmora.
How to Turn On/Off Motion Blur in Dying Light 2?
Are you playing Dying Light 2 on PlayStation or PC and not satisfied with the graphics? No need to worry, as this article will introduce an efficient way through which you can improve your gaming graphics tremendously. By adding a motion blur effect in your gameplay while playing PlayStation, such as Dying Light 2, you can enhance the visual appeal of the game significantly.
By reading this article, you can come to know how to use Dying Light 2 motion blur proficiently. Thus, continue reading this guide to find out simple solutions to apply the motion blur effect.

Part 1: What is Dying Light 2?
Dying Light 2 , recently released on February 2022, revolves around survival in a zombie-apocalyptic world. It involves a protagonist known as Aiden Caldwell, who comprises different capabilities and skills. Being a player, you can perform various actions such as running, climbing, sliding, etc. This particular game is melee-based, as a majority of the players will be using melee weapons.
Moreover, players can also use other weapons, such as spears, shotguns, or crossbows. As the development occurs while playing the game, you will see that more zombies will be added to give you a thrilling experience. This game is set in the city of Villedor, having beautiful infrastructure. While accomplishing the goals, players can freely roam around the city.
While exploring the city, you would also encounter different inhibitors through which you can enhance the health and power of Aiden. You can easily find this adventurous and thrilling game on various platforms, such as PlayStation 4, PlayStation 5, Xbox One, Xbox Series X/S, Windows, and Nintendo Switch.

Part 2: How to Turn On/Off Motion Blur in Dying Light 2?
Dying Light 2 provides the players complete freedom to change the game settings. On this gaming platform, you can easily modify and adjust the settings according to your need to enhance the graphics while playing the game.
Moreover, unlike other games, you can easily adjust the motion blur quality on Dying Light 2, preferably. To turn off motion blur in Dying Light 2, you can check the following simple instructions:
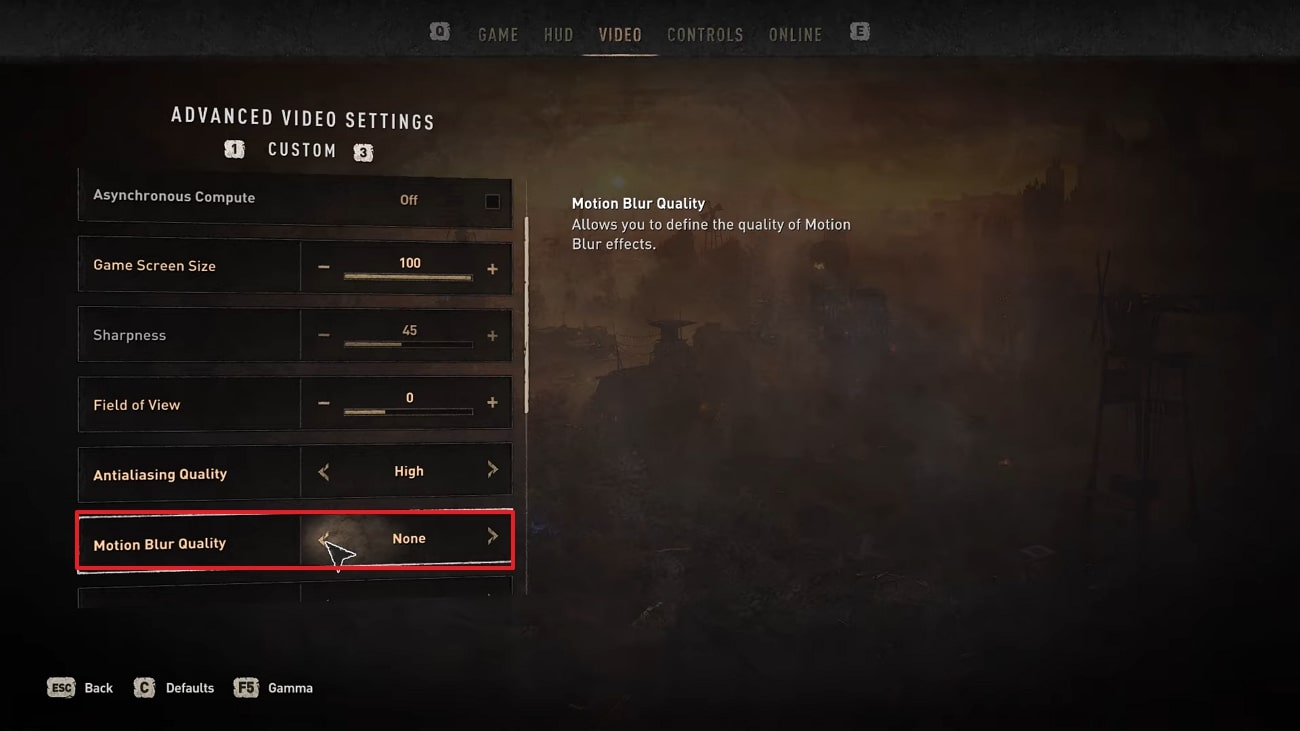
Step1 Open and load your Dying Light 2 game on your PC. Head to its Menu and select “Options.” Afterward, click on the “Video” option from the top toolbar.
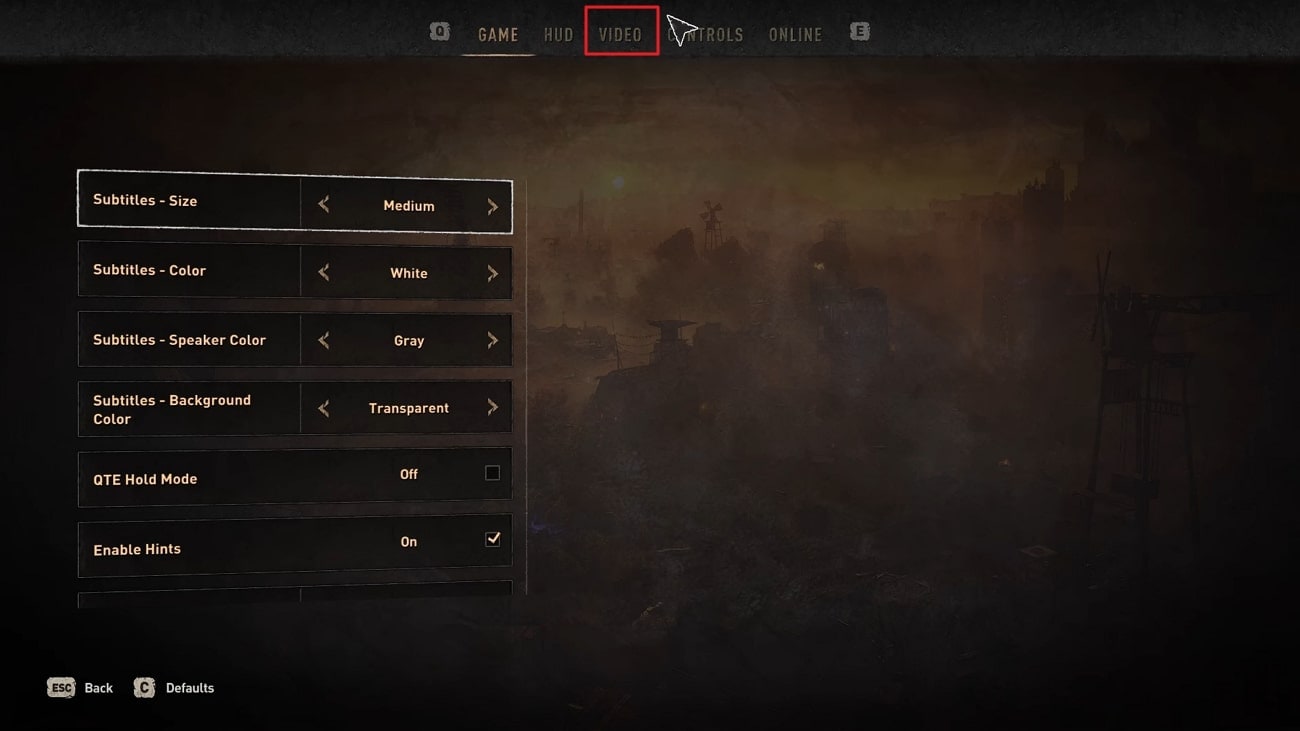
Step2 Now click on “Advanced Video Settings” from the bottom to proceed further. Afterward, scroll down and locate the option called “Motion Blur Quality.” Using this option, you can easily select the mode of motion blur quality, such as Medium, High, Low, or None.
Bonus Tips – How to Add Motion Blur to Your Dying Light Gaming Video
It may be possible that you only want to add the motion blur effect in the game’s highlight. So, if you don’t want to thoroughly add the motion blur effect in the whole gameplay, you can use professional software such as Wondershare Filmora . This platform is supported by all the major operating systems and functions effortlessly. It contains various editing features that can help you to produce a high-end quality video.
Free Download For Win 7 or later(64-bit)
Free Download For macOS 10.14 or later
Moreover, Filmora can also help you in modifying the speed of your video. Using this all-rounder tool, you can also add and synchronize the audio clips with your videos. Apart from editing your videos, you can use this platform to add a motion blur effect to your gaming videos. Hence, it’s a must-try tool to increase the visual appeal of your recorded gameplay.
Key Features of Filmora
- Using Filmora, you can add different transitions and effects to your video clips within a few clicks.
- This tool allows you to split the screen so you can tell the story through your video in a fun way.
- Using the Green Screen feature, you can craft special effects for your videos. Also you can also change and replace the backgrounds of your videos using this special feature.
- To precisely resize your videos without putting in any manual effort, you can use its AI Reframe feature.
How to Add Motion Blur to Dying Light 2 Using Filmora
Are you eager to know how to turn off motion blur Dying Light 2? In this section, we will guide you on how to use Filmora to create a motion blur effect on the desired place of your recorded gameplay. The entire process is simple and easy to follow, even for beginners. Hence, proceed to read this part to check the authentic steps of adding a motion blur effect:
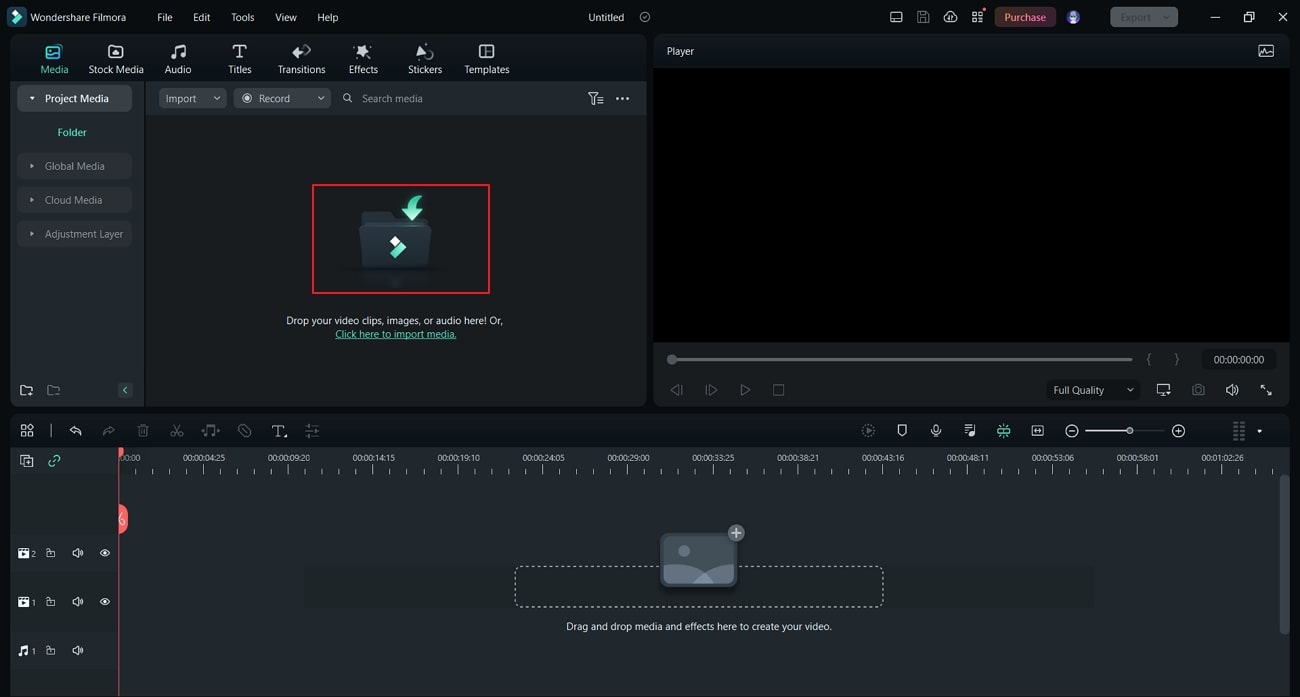
Step1 Choose New Project
Download and initiate the Wondershare Filmora on your PC or Mac. Once done, click on the “New Project” button and then tap on the “Import” icon. By doing so, you can upload the recorded gameplay of Dying Light 2.
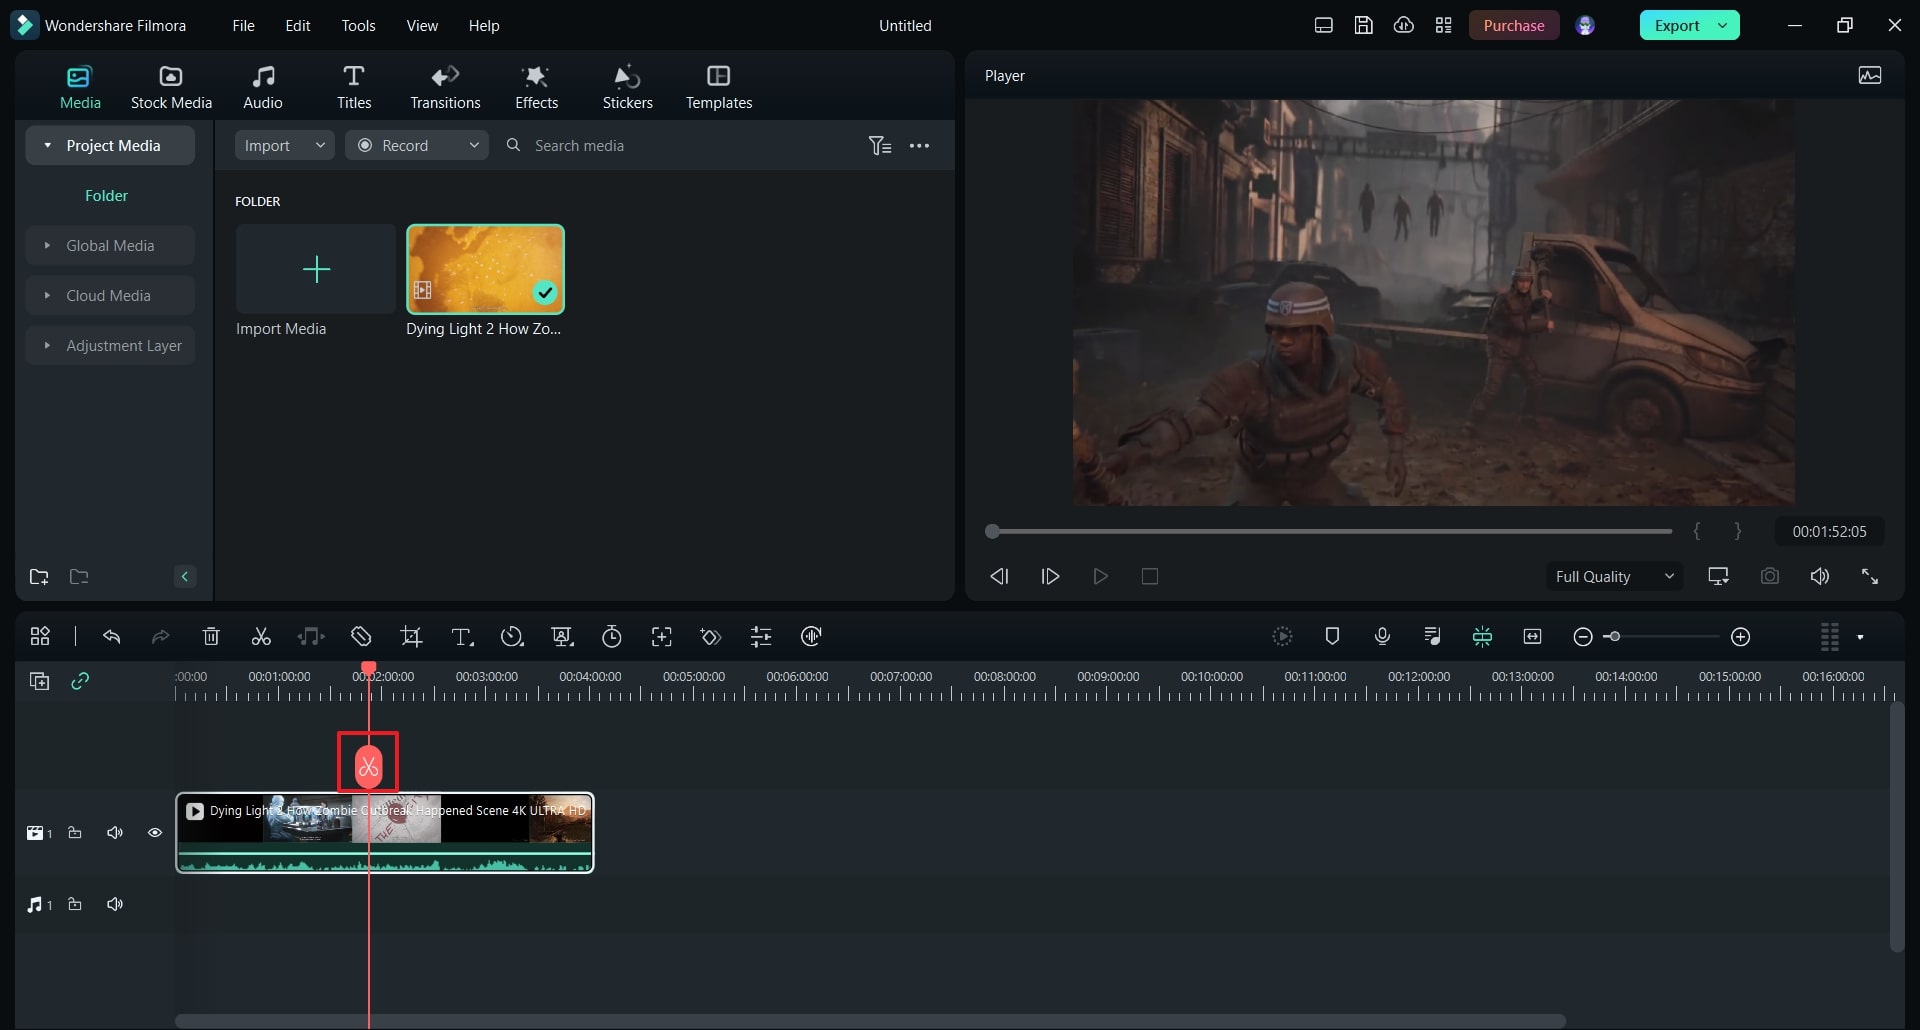
Step2 Select the Position to Apply the Effect
After uploading, make sure to drag and drop the video into the timeline. Now move the play head to the place where you wish to add a motion blur effect. Afterward, use the “Scissors” icon to split the video flawlessly.
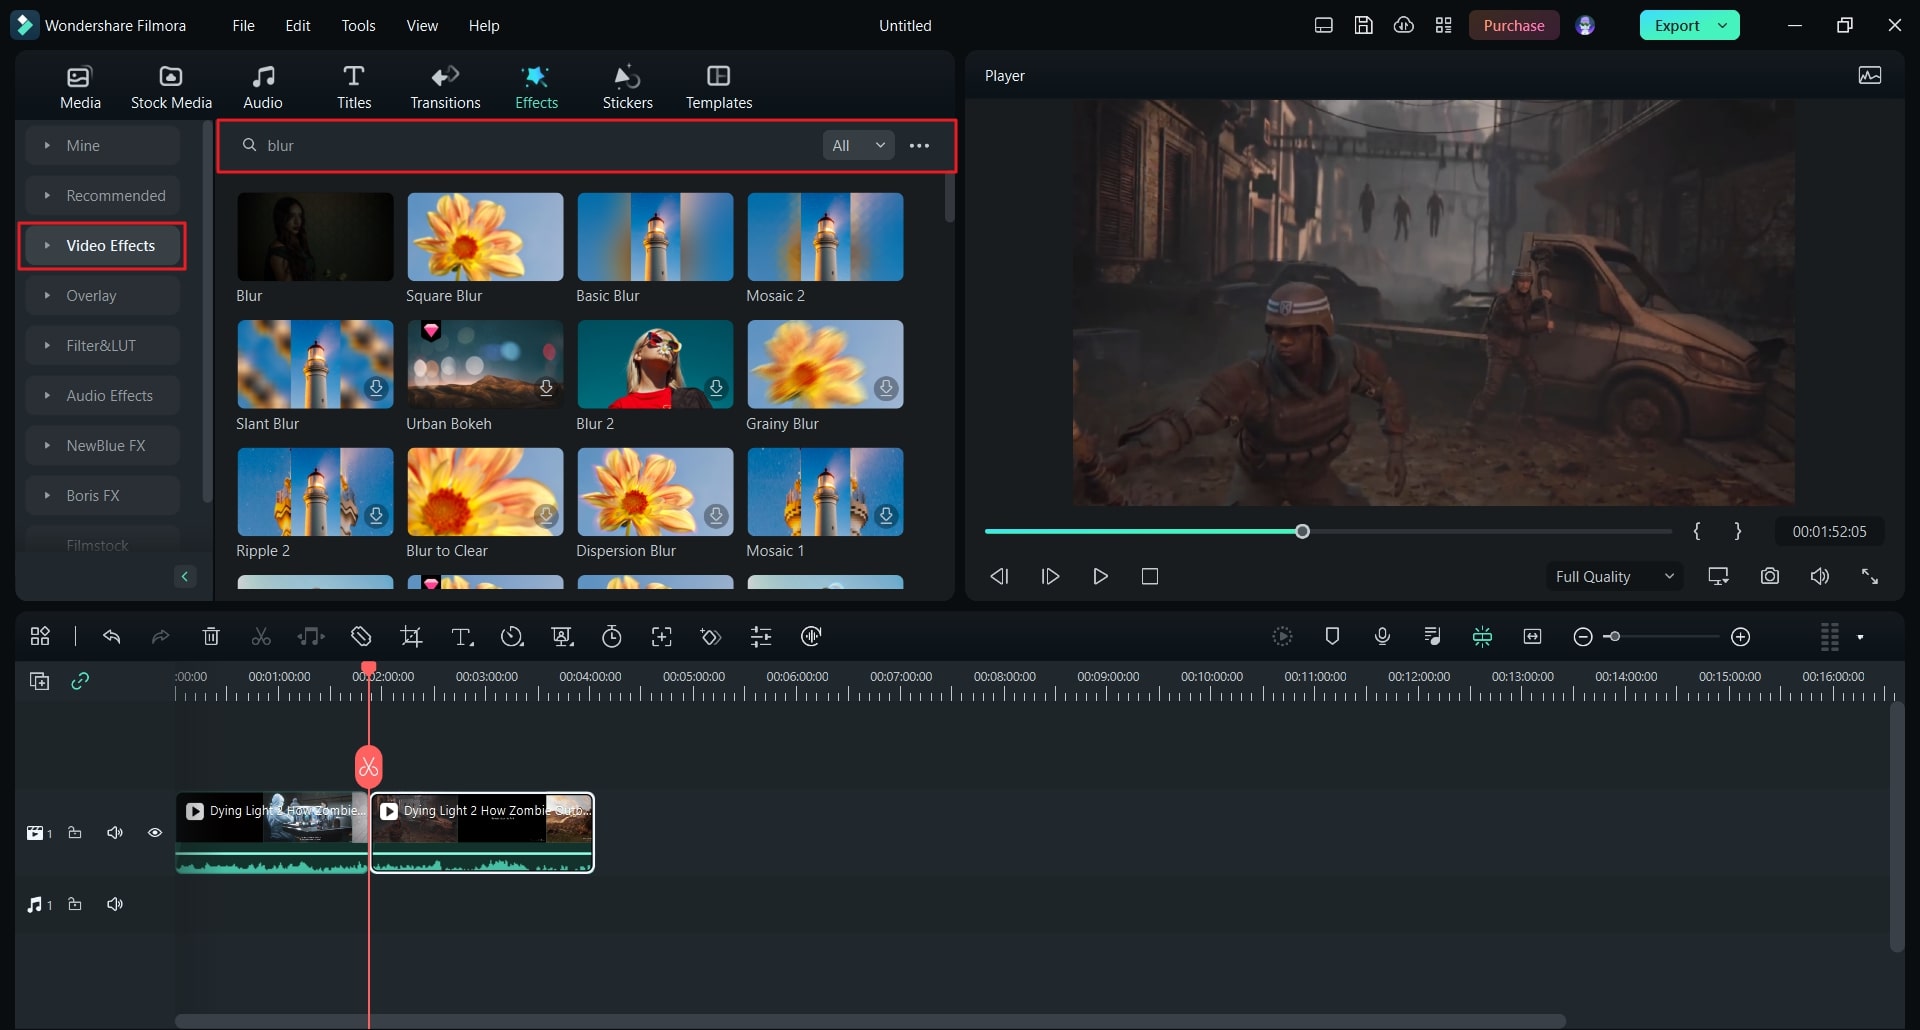
Step3 Locate the Blur Effect
To proceed further, go to the “Effects” tab and select “Video Effects” from the left panel. Search for the blur effect and choose any blur effects from the results. Once you have selected the blur effect, drag and apply it to the timeline.
Step4 Add a Suitable Transition
If you want to make the video look clean and smooth, go to the “Transitions” tab. From there, search for “Dissolve” and select it from the results. Now apply it to the timeline where you have added the motion blur. Once done, click on the “Export” button and save the edited Dying Light 2 gameplay video.
Conclusion
Motion blur effect can undoubtedly change the appearance of your gaming graphics. If you are a game lover and want to add perfection to your gameplay, this article has answered all your questions. By exploring this guide, you have learned how to use Dying Light 2 motion blur. You can also use the recommended software known as Filmora to apply the motion blur effect to the highlights of your gameplay aesthetically.
Free Download For macOS 10.14 or later
Moreover, Filmora can also help you in modifying the speed of your video. Using this all-rounder tool, you can also add and synchronize the audio clips with your videos. Apart from editing your videos, you can use this platform to add a motion blur effect to your gaming videos. Hence, it’s a must-try tool to increase the visual appeal of your recorded gameplay.
Key Features of Filmora
- Using Filmora, you can add different transitions and effects to your video clips within a few clicks.
- This tool allows you to split the screen so you can tell the story through your video in a fun way.
- Using the Green Screen feature, you can craft special effects for your videos. Also you can also change and replace the backgrounds of your videos using this special feature.
- To precisely resize your videos without putting in any manual effort, you can use its AI Reframe feature.
How to Add Motion Blur to Dying Light 2 Using Filmora
Are you eager to know how to turn off motion blur Dying Light 2? In this section, we will guide you on how to use Filmora to create a motion blur effect on the desired place of your recorded gameplay. The entire process is simple and easy to follow, even for beginners. Hence, proceed to read this part to check the authentic steps of adding a motion blur effect:
Step1 Choose New Project
Download and initiate the Wondershare Filmora on your PC or Mac. Once done, click on the “New Project” button and then tap on the “Import” icon. By doing so, you can upload the recorded gameplay of Dying Light 2.

Step2 Select the Position to Apply the Effect
After uploading, make sure to drag and drop the video into the timeline. Now move the play head to the place where you wish to add a motion blur effect. Afterward, use the “Scissors” icon to split the video flawlessly.

Step3 Locate the Blur Effect
To proceed further, go to the “Effects” tab and select “Video Effects” from the left panel. Search for the blur effect and choose any blur effects from the results. Once you have selected the blur effect, drag and apply it to the timeline.

Step4 Add a Suitable Transition
If you want to make the video look clean and smooth, go to the “Transitions” tab. From there, search for “Dissolve” and select it from the results. Now apply it to the timeline where you have added the motion blur. Once done, click on the “Export” button and save the edited Dying Light 2 gameplay video.

Conclusion
Motion blur effect can undoubtedly change the appearance of your gaming graphics. If you are a game lover and want to add perfection to your gameplay, this article has answered all your questions. By exploring this guide, you have learned how to use Dying Light 2 motion blur. You can also use the recommended software known as Filmora to apply the motion blur effect to the highlights of your gameplay aesthetically.
How to Change Frame Rate in Premiere Pro
The video’s frame rate is an important aspect of it. Too high of a frame rate makes the video seem unnatural. On the other hand, too low can make some videos choppy. You can fix that by changing the frame rate using a video editor. And we are here to help you learn how to do that. Here’s how to change the frame rate in Premiere Pro.
The frame rate sometimes makes or breaks the video. So it is important to get this setting right. Suppose you made a mistake and recorded your video in the wrong setting. You can follow this guide to solve your problem.
How To Check Video Frame Rate in Premiere Pro
Before we teach you how to change a video’s frame rate in Premiere Pro, let’s first make sure you know how to check. Maybe you don’t need to modify the video because it is already in the correct setting.
So how do you do that in Premiere Pro?
- Import the video to Adobe Premiere Pro.
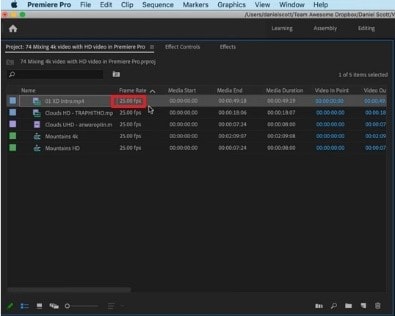
- Check the “Media” window. Next to the video file name is its frame rate. It is written in the format x.00 fps. FPS stands for “frames per second,” which is used interchangeably with the term frame rate.
Reasons for Changing Frame Rate
Suppose you have an action-packed video. It would not look great at 30 fps - it will look too choppy. That will give your audience a rotten viewing experience. By increasing the frames, you can make the motion more fluid and smoother.
Increasing the frames per second also results in better slow-motion videos. A 30 fps one would not look good with this effect because it does not show smooth motion. Thus, we recommend making the video at least 60 fps.
However, a higher frame rate does not always mean better videos. It can result in what they call the “soap opera effect.” It means the video shows too many details. That makes the videos seem “unnatural” or less cinematic.
High frame rates make videos look more realistic since there is less stuttering and motion blur between frames. That’s great. But for older audiences - the ones used to watching videos at 24 fps, it can be off-putting. So it’s also important to consider your target audience when deciding the right frame rate for your video.
With these reasons in mind, you may want to change your video’s frame rate.
How To Change FPS in Premiere Pro
Let’s dilly-dally no more. Here’s a quick guide on how to change fps in Adobe Premiere Pro. This program gives you two different ways to change fps. One is changing the frame rate of a sequence; the other is changing the frame rate of the video clip. We will teach you how to do both.
l Change the Frame Rate of a Sequence
Suppose you want to keep the frame rate of most of the video the same. Only some parts need adjusting. You can change the frame rate of the sequences that need changing instead. Here are the steps to follow to achieve this:
- Open your project in Adobe Premiere Pro.
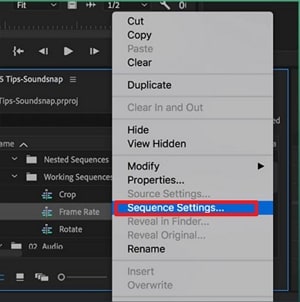
- In the Project panel, select the sequence whose frame rate you want to change. Right-click on that sequence.
- Choose “Sequence Settings” from the menu that appears.
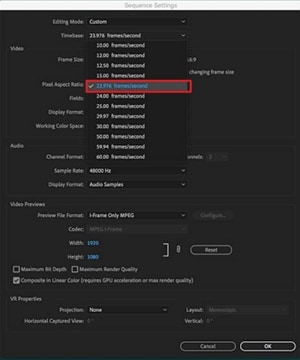
- Click the drop-down menu for “Timebase.”
- Select the frame rate you want the sequence to be in.
- Click “OK.”
l Change the Frame Rate of a Video Clip
Here are the steps you should follow if you want to change the frame rate of an entire video clip.
- Import your video clip to Premiere Pro and drag it to the timeline.
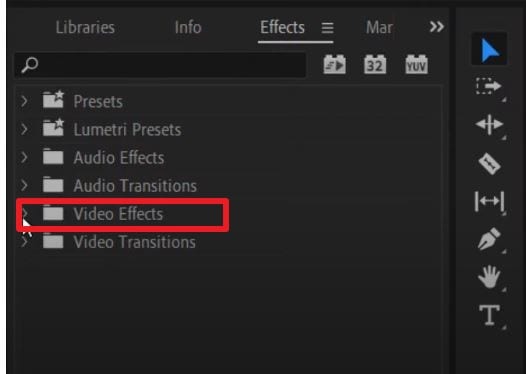
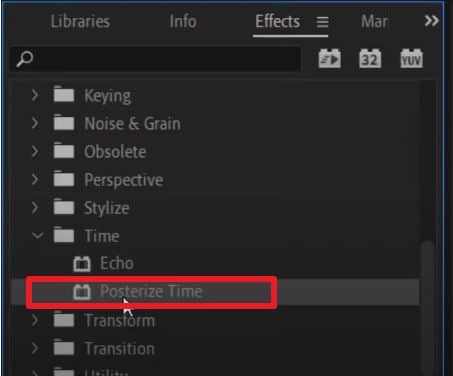
- Go to the “Effects” tab. It’s in the options at the bottom left of the screen.
- Select “Video Effects” > “Time” > “Posterize Time.”
- Drag and drop the Posterize Time effect to the clip whose frame rate you want to change.
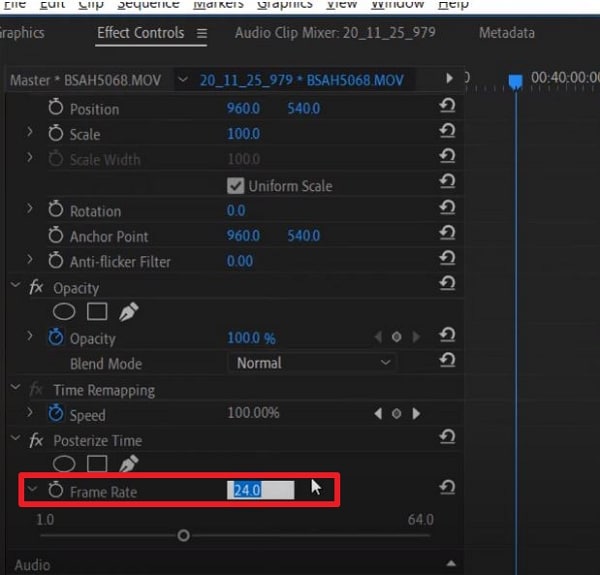
- Click “Effect Controls” at the top left of the screen.
- Select the small “arrow” button next to the “Frame Rate” text under “Posterize Time.”
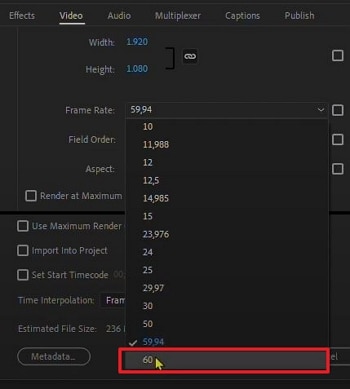
- Change the frame rate to your preferred setting. For example, type “60” to make the video 60 fps.
- Click “Sequence” > “Render Selection.”
And that’s it! That is how you change a video clip’s frame rate in Adobe Premiere Pro.
How To Make 120 FPS Videos With Premiere Pro
Videos that are 120 fps are very popular now. If you are a gaming content creator on YouTube, you probably record videos at this frame rate. You’d want to edit that footage and export it at the same frame rate.
Adobe Premiere Pro allows you to do that. But it’s a little bit of a hidden feature. When creating a sequence, you may notice that the highest the frame rate can go is 60 frames per second. That’s obviously not the number that we want. Don’t worry. There is a workaround. The best thing is that it’s super easy.
Follow these steps to change your video to 120 fps:
- Import your 120 fps video to Adobe Premiere Pro.
- Select your footage. Drag it to your timeline or the tab where the text says, “Drop media here to create sequence.”
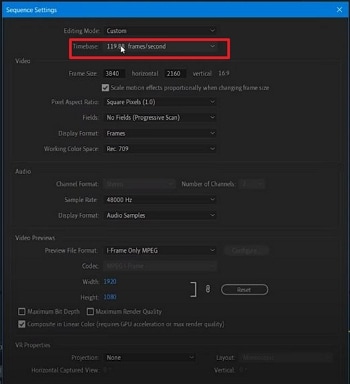
- Select the timeline panel. Click “Sequence” > “Sequence Settings.”
- Check the “Timebase” section. It should say “119.88 frames/second,” 120 fps when rounded off.
- Edit the video as needed and render it. The output should stay at 120 fps.
How To Change Video From 30 FPS to 60 FPS in Premiere Pro
Do you have a video recorded at 30 frames per second, and do you want it at 60? Here’s a simple solution to that. Follow these steps in Adobe Premiere Pro to double the video’s frame rate.
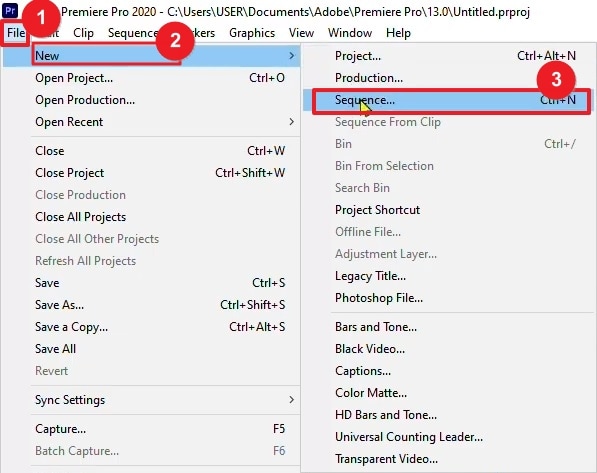
- Open Adobe Premiere Pro. Click “File” > “New” > “Sequence.”
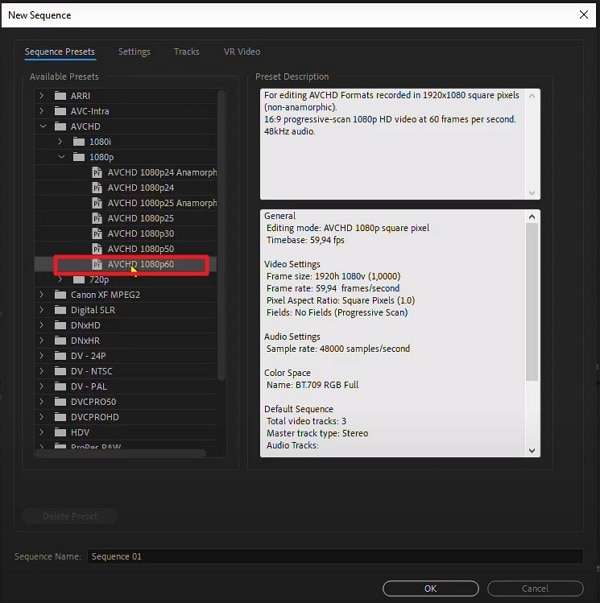
- Click “AVCHD” > “1080p” > “AVCHD 1080p60” > “OK.”
- Import your 30 fps video into Adobe Premiere Pro.
- Drag the video into the timeline.
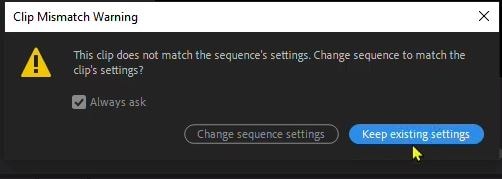
- Click “Keep existing settings.”
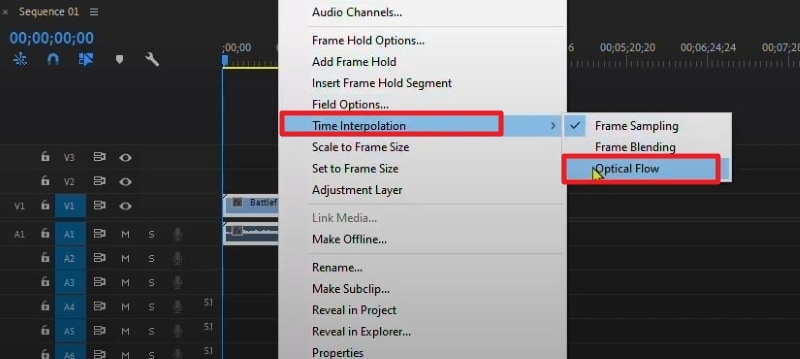
- Right-click the video in the timeline. Select “Time interpolation” > “Optical Flow.”
- Press the “Enter” key. Wait for the processing to finish. This can take hours.
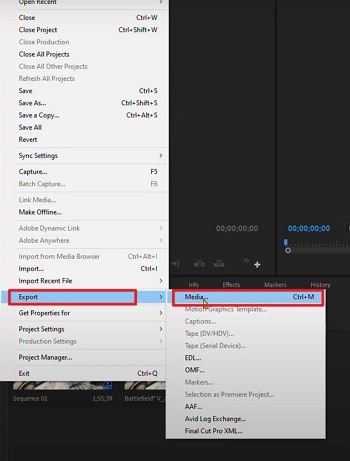
- Click “File” > “Export” > “Media.”
- Select a preset.
- Scroll down to the “Effects” section to check if the frame rate is at 60 fps. If not, change it to 60 fps.
- Click “Export.”
\ Bonus] [Wondershare Filmora
Free Download For Win 7 or later(64-bit)
Free Download For macOS 10.14 or later
What if you don’t have Adobe Premiere Pro or don’t like this tool? What’s a good alternative? That would be Wondershare Filmora.

Why use Filmora as a substitute for Premiere Pro? This video editor offers lots of great features, basic or advanced. With these at your fingertips, you can bring your videos to the next level and wow your audiences.
Among Filmora’s handy features is the ability to quickly change a video’s frame rate. You don’t even need to be a video editing expert to do it with this software! That’s how straightforward the process is.
How To Change the Frame Rate in Wondershare Filmora
Changing a video’s frame rate in Wondershare Filmora is super easy. Even a child can do it due to how simple the steps are. Here, read this 5-step guide to change a video’s frame rate using this amazing video editor.
- Launch Wondershare Filmora and create a new project.

- Import the video whose frame rate you want to change.
- Drag the video into the timeline.
![]()
- Click “Export.”
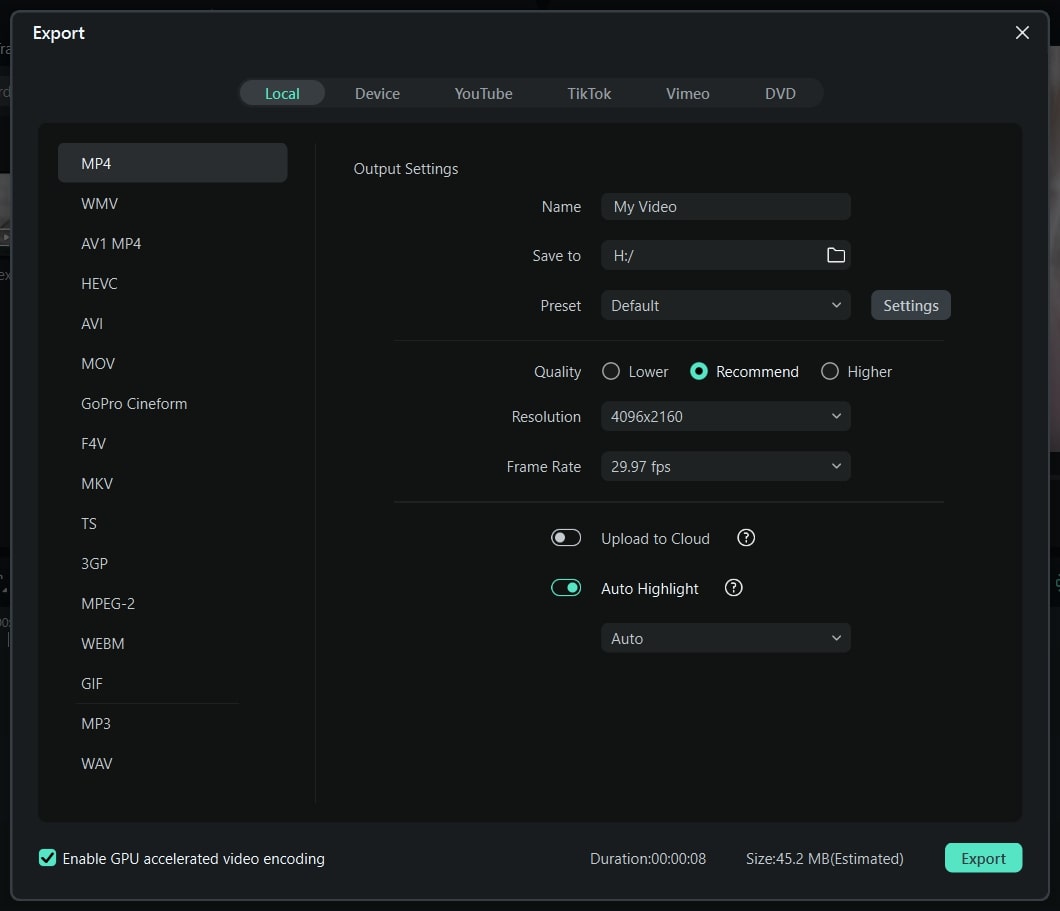
- Select the format you want the output file to be in. Find the “Frame Rate” in the options, click the drop-down menu, and select the frame rate that you want. Click “Export.”

Conclusion
Getting the frame rate of a video right is important, so you should not neglect it. It greatly affects your audience’s viewing experience. Thankfully, if you make mistakes, you can correct them with video editors like Premiere Pro. If it’s not to your liking, you can use Wondershare Filmora instead - it’s the best alternative.
Filmora lets you change a video’s frame rate very easily. Also, it gives you a bunch of other features you might enjoy using. And here’s some good news: this software app is affordable! You can also download the free trial to give it a shot.
Free Download For macOS 10.14 or later
What if you don’t have Adobe Premiere Pro or don’t like this tool? What’s a good alternative? That would be Wondershare Filmora.

Why use Filmora as a substitute for Premiere Pro? This video editor offers lots of great features, basic or advanced. With these at your fingertips, you can bring your videos to the next level and wow your audiences.
Among Filmora’s handy features is the ability to quickly change a video’s frame rate. You don’t even need to be a video editing expert to do it with this software! That’s how straightforward the process is.
How To Change the Frame Rate in Wondershare Filmora
Changing a video’s frame rate in Wondershare Filmora is super easy. Even a child can do it due to how simple the steps are. Here, read this 5-step guide to change a video’s frame rate using this amazing video editor.
- Launch Wondershare Filmora and create a new project.

- Import the video whose frame rate you want to change.
- Drag the video into the timeline.
![]()
- Click “Export.”
- Select the format you want the output file to be in. Find the “Frame Rate” in the options, click the drop-down menu, and select the frame rate that you want. Click “Export.”

Conclusion
Getting the frame rate of a video right is important, so you should not neglect it. It greatly affects your audience’s viewing experience. Thankfully, if you make mistakes, you can correct them with video editors like Premiere Pro. If it’s not to your liking, you can use Wondershare Filmora instead - it’s the best alternative.
Filmora lets you change a video’s frame rate very easily. Also, it gives you a bunch of other features you might enjoy using. And here’s some good news: this software app is affordable! You can also download the free trial to give it a shot.
Also read:
- In 2024, How to Make a Super Easy Rotating Video Effect
- In 2024, Top 6 Best Alternatives to Clownfish Voice Changer
- Updated Adding Text to Your Collage Not only Makes It Look Sophisticated but Also Versatile. So, if You Too Are Looking for Ways to Create a Collage Text, Check Out Our Article for 2024
- Easy Ways to Remove Motion Blur In Photoshop
- New Best 12 Sony Vegas Slideshow Templates for Free Download for 2024
- Updated Bored of Extraneous Software Downloads and Program Installations to Edit Your Videos? The Best Video Editing Online Utilities Are Here at Your Rescue
- In 2024, Templates Take Your Music Video From Drab to Fab and Add some Spice to the Catchy Song. Here Are some Templates You Could Use to Make Your Music Video Popular
- New 2024 Approved Thousands Already Know Ezgif and So Can You
- New 2024 Approved A Full Guide to Funcall Voice Changer and Its Alternatives
- Best Cloud Storage Service for Videos
- New When Struggling to Find a Suitable Game Recorder for Your PC, You Might Come Across Many Options. Explore the Best Game Recorders for Sharing Game Highlights
- In 2024, Change Background Color in After Effects
- New | How to Livestream Zoom on Facebook, In 2024
- New How To Film a Slow Motion Video
- In 2024, Create Chroma Key Written Text Effects in Filmora
- 2024 Approved Step-by-Step Guide to Storyboard
- Updated In This Article, We Introduce You Our Top 5 Picks of Video to Ppt Converter
- Voice Changer for Discord | Use Voicemod on Discord for 2024
- Updated Create A Freeze Frame Sequence In Your Videos for 2024
- 2024 Approved Do You Want to Make Your Background Disappear and Replace with an Attractive Background? Here Is How to Add a Green Screen to Zoom App and Add Any Virtual Background of Your Choice
- Updated How to Loop a Video in Canva Editor
- In 2024, Do You Want to Know About the DaVinci Resolve Adjustment Layer? Read This Article to Learn How to Use an Adjustment Layer (Clip) in DaVinci Resolve to Edit Videos
- New Final Cut Pro - How to Download and Install It for 2024
- In 2024, How to Unlock iPhone 12 Pro Without Passcode?
- Remove FRP Lock on Honor Magic 5
- How to Track Samsung Galaxy Z Fold 5 Location by Number | Dr.fone
- Super Easy Ways To Deal with Lava Yuva 2 Pro Unresponsive Screen | Dr.fone
- Fixing Persistent Pandora Crashes on Oppo Reno 11 5G | Dr.fone
- In 2024, How To Do OnePlus Nord N30 5G Screen Sharing | Dr.fone
- How to Change Netflix Location to Get More Country Version On Nubia Red Magic 8S Pro | Dr.fone
- How to Fake GPS on Android without Mock Location For your Xiaomi Redmi 13C | Dr.fone
- Your Complete Guide To Reset Nokia C300 | Dr.fone
- How To Leave a Life360 Group On Motorola Moto G23 Without Anyone Knowing? | Dr.fone
- In 2024, A Guide Huawei Nova Y91 Wireless and Wired Screen Mirroring | Dr.fone
- In 2024, How to Unlock iPhone XS With an Apple Watch & What to Do if It Doesnt Work
- In 2024, How to Unlock iPhone XS Online? Here are 6 Easy Ways
- How to Fix My Honor 90 GT Location Is Wrong | Dr.fone
- Title: New Do You Want to Add a Slow-Mo Effect in Your Videos? In This Guide, We Will Discuss How to Add Slow-Motion Effects in the Videos with After Effects in an Efficient Way
- Author: Chloe
- Created at : 2024-06-18 14:31:02
- Updated at : 2024-06-19 14:31:02
- Link: https://ai-editing-video.techidaily.com/new-do-you-want-to-add-a-slow-mo-effect-in-your-videos-in-this-guide-we-will-discuss-how-to-add-slow-motion-effects-in-the-videos-with-after-effects-in-an-e/
- License: This work is licensed under CC BY-NC-SA 4.0.

