
New Do You Want to Blur Faces in Your Videos? Read This Article to Find Out the Easiest Way to Blur the Faces in Videos Using Adobe Premiere Pro

Do You Want to Blur Faces in Your Videos? Read This Article to Find Out the Easiest Way to Blur the Faces in Videos Using Adobe Premiere Pro
Many times, while making videos, you may capture strangers’ faces in the background. This can divert the attention of viewers or may ruin the overall impression. To solve this issue, you can use professional video editing tools to blur the faces in the video. By reading this article, you can learn how to blur the face in Premiere Pro efficiently. Moreover, we will also provide an alternative to Premiere Pro for your further assistance.
Part 1: Why Do You Need to Blur Faces in Videos?
Do you know what the actual reasons for blurring faces in videos are? Read this part of the article to find out the main causes of blurring faces in the videos:
1. Keeping Privacy
Invasion of privacy is both morally and ethically wrong. If you are making a video in some public place, you should ensure the complete privacy of strangers. For this reason, you should blur the faces in your video’s background to protect the privacy of others.
2. For Commercial Ads
If you are creating a commercial advertisement to sell your product, it may be possible that the video may contain some unwanted people in the background. To make your commercial advertisement look professional, you must hide the unnecessary people from your video.
3. To Create Social Media Posts
While running social media campaigns to raise awareness of any social issue, you must ensure to hide the individual’s face. The reason is that showing someone’s face on your social media post without their consent can be legally or morally wrong.
4. Hiding the Minor’s Faces
Many parents don’t like to expose their children’s identity over the internet. If you have created a video including a minor, you should blur his face to display a sense of responsibility. Thus, you must know how to blur the face of people efficiently.
Part 2: How to Track and Blur Faces in Videos with Premiere Pro?
Do you have any experience using Adobe Premiere Pro ? This tool is one of the industry-leading platforms through which professionals can edit their videos effectively. Using this tool, you can edit your videos according to your preferences to express your emotions in a compelling manner. You can add music tracks to your videos to add more engagement for your viewers.
Besides being a great video editing tool, you can use this tool to add various modifications. For instance, you can add vibrant backgrounds and other elements to your videos. Moreover, you can also use Adobe Premiere to blur faces efficiently.
Steps to Blur Faces Using Adobe Premiere Pro
Are you ready to learn how to blur faces in Premiere Pro? Read this part of the article to learn how to track and blur the selected faces in the videos effortlessly:
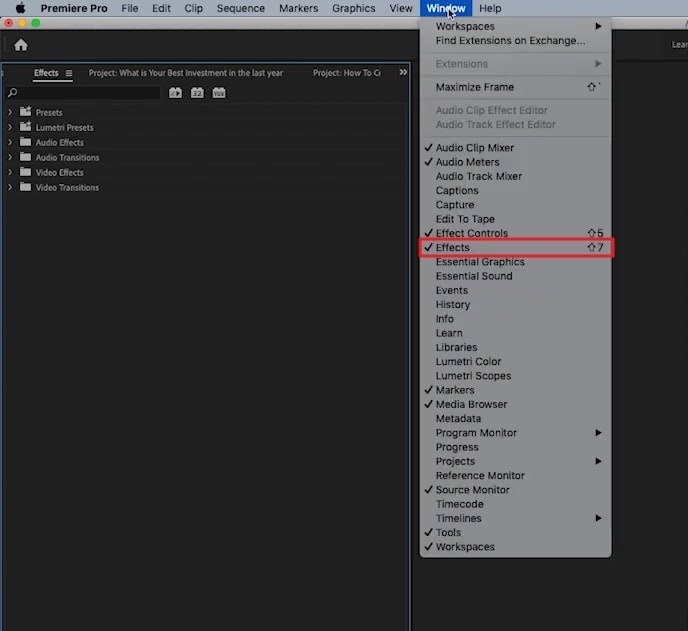
Step1 Navigate to Adobe Premiere Pro and upload the desired video. Now head to the “Effects” option by selecting the “Windows” tab.
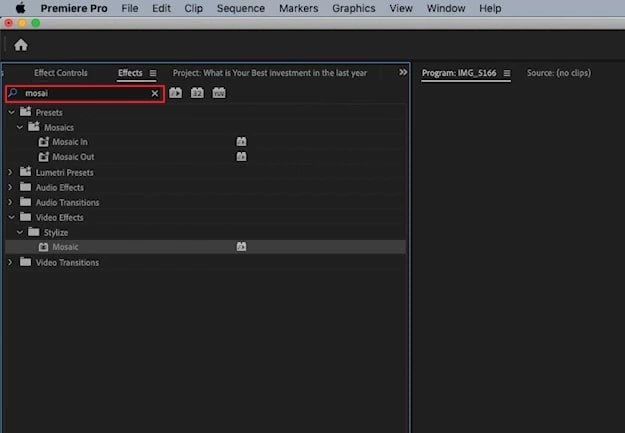
Step2 Afterward, type the word “Mosaic” in the search box and select this option in the results. Now drag and drop this effect on the timeline. It will add a blur effect to your complete video.
Step3 Now go back to the Windows section and select “Effects Controls“. From its menu, turn off the applied Mosaic effect. From the same menu, select the “Circle” shape and apply it to the face that you want to blur. Afterward, you can turn on the toggle of the added blur effect.
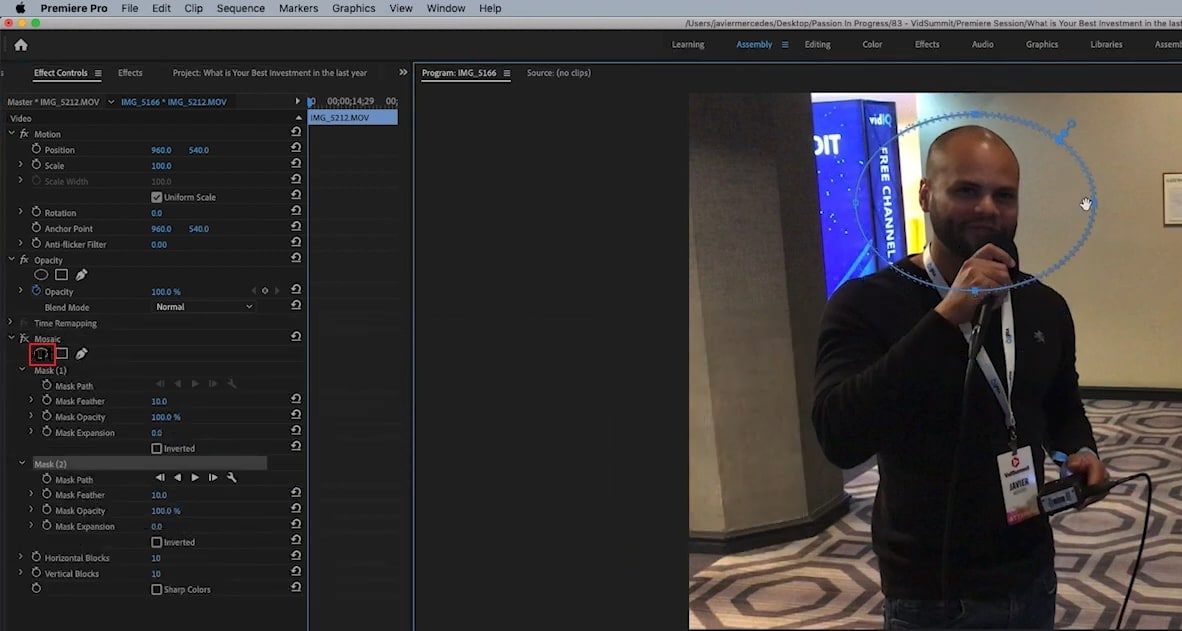
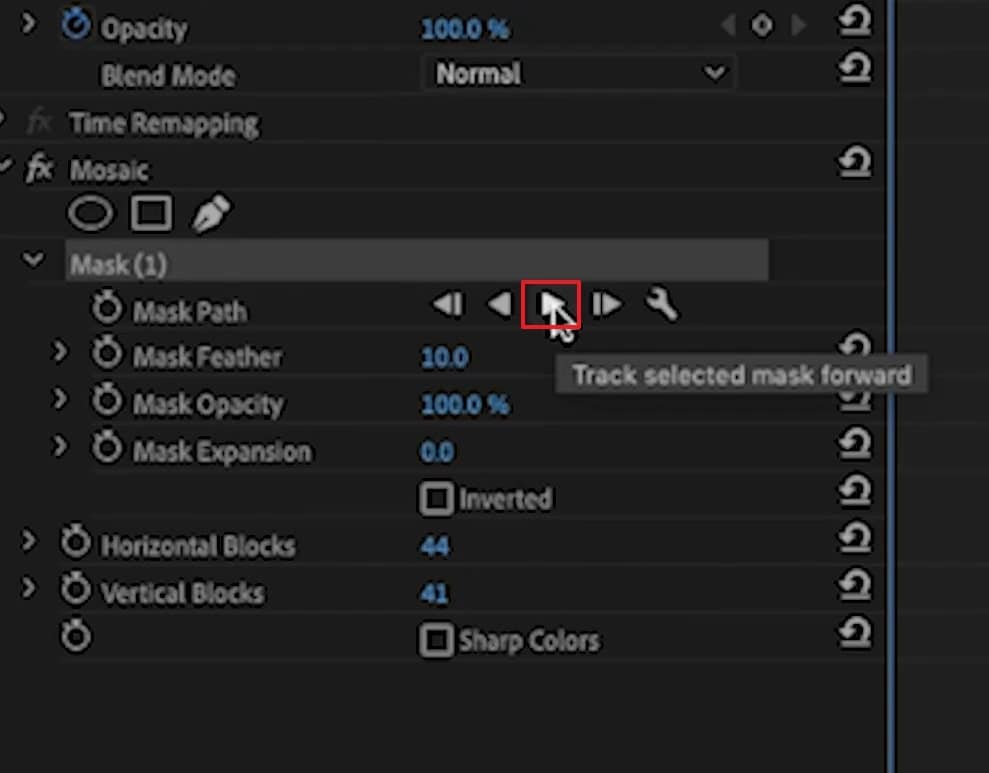
Step4 To adjust the blur strength, you can modify the Horizontal and Vertical blocks. To track the blurred face, you can go to the “Mask Path” option displayed in the left section. Just hit the “Play” button to track the selected mask forward. After some time, you can see the end results on the preview window. You can also adjust the keyframes to blur the selected mask efficiently.
Bonus Tip – The Alternative to Photoshop to Blur Face in Videos
Do you want a simpler solution to blur the faces in your videos? No need to worry, as Wondershare Filmora brings an intuitive and easy-to-use interface that allows you to blur the faces with few clicks. It’s one of the most reliable platforms that you can come across to edit and modify your videos. It also offers preset templates and an Instant Mode that can help you to create a video from scratch efficiently. Also, it provides fast rendering speed so that you can see your final results instantly.
Free Download For Win 7 or later(64-bit)
Free Download For macOS 10.14 or later
Step-by-Step Guide to Blur Faces in Filmora Video Editor
Are you wandering how to easily blur faces in a video? Follow the steps mentioned below to blur faces using the Filmora video editor:
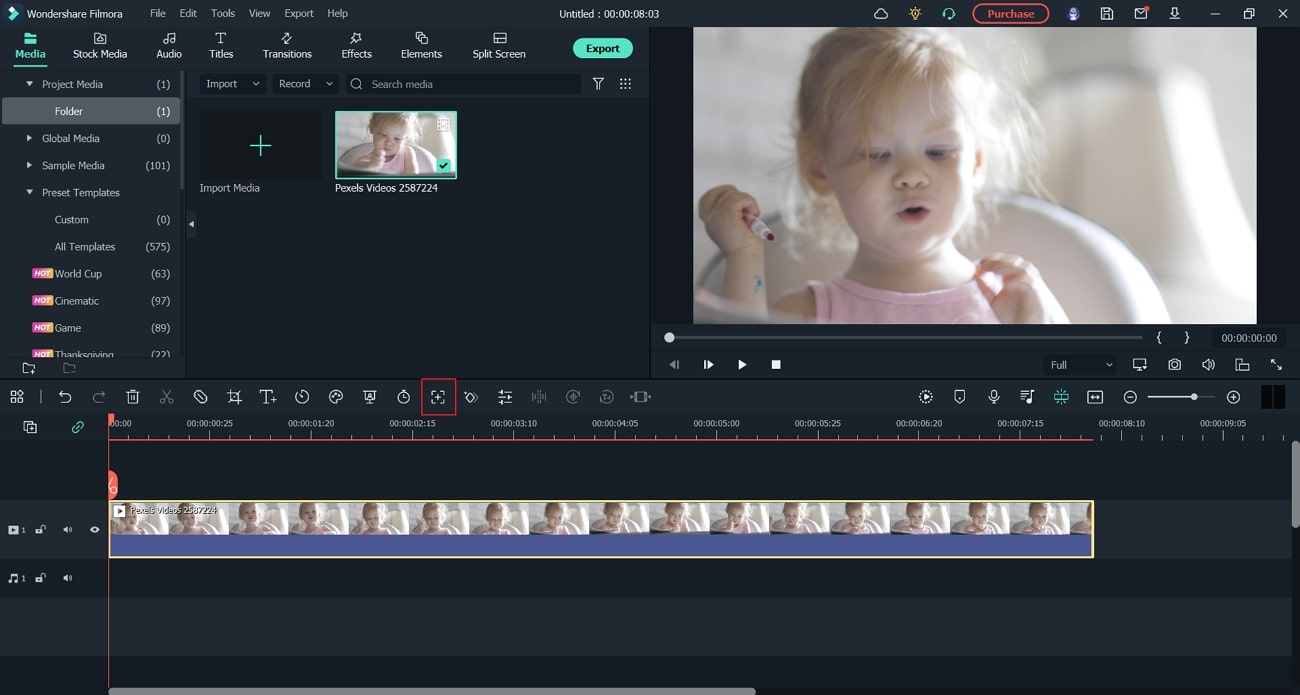
Step1 Select Motion Tracking Tool
Once you are done launching Filmora, select “Create New Project.” Afterward, import and drop the video into the timeline. Now place the play head at the start and proceed with the “Motion Tracking” tool.
Step2 Start Motion Tracking Process
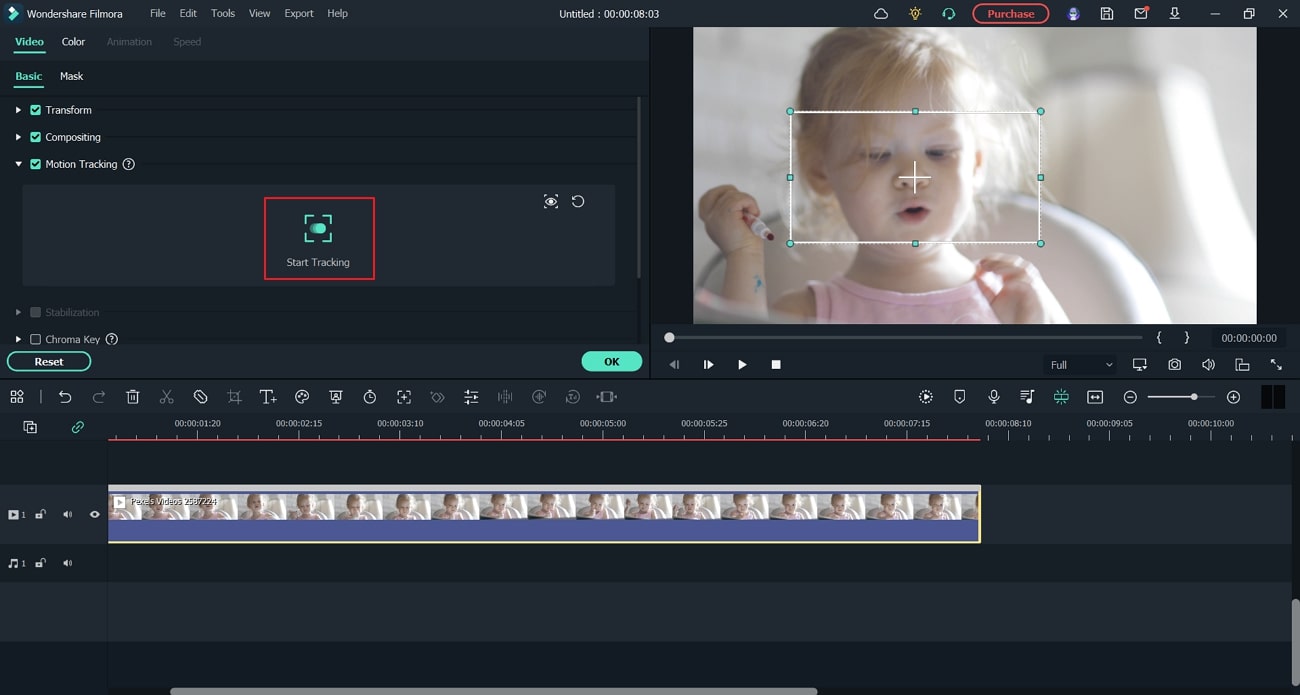
Now adjust the motion tracking space from your preview window. Once done, hit the “Start Tracking” button. Within a few minutes, you will be able to finish this process. Click the “OK” button to proceed.
Step3 Choose the Mosaic Effect
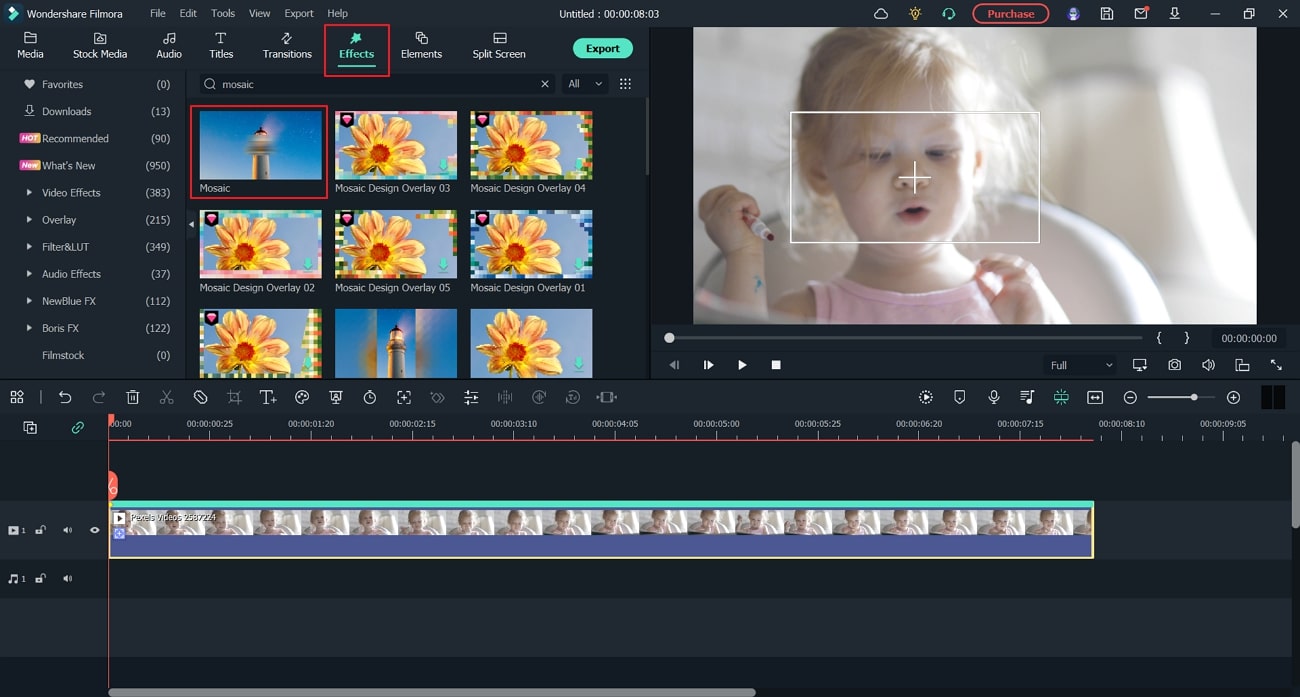
To proceed, head to the “Effects” section and locate the “Video Effects” section. From there, search for the effect called “Mosaic.” From the results, drag and drop the effect to the timeline and extend it according to your clip.
Step4 Adjust the Blur Settings
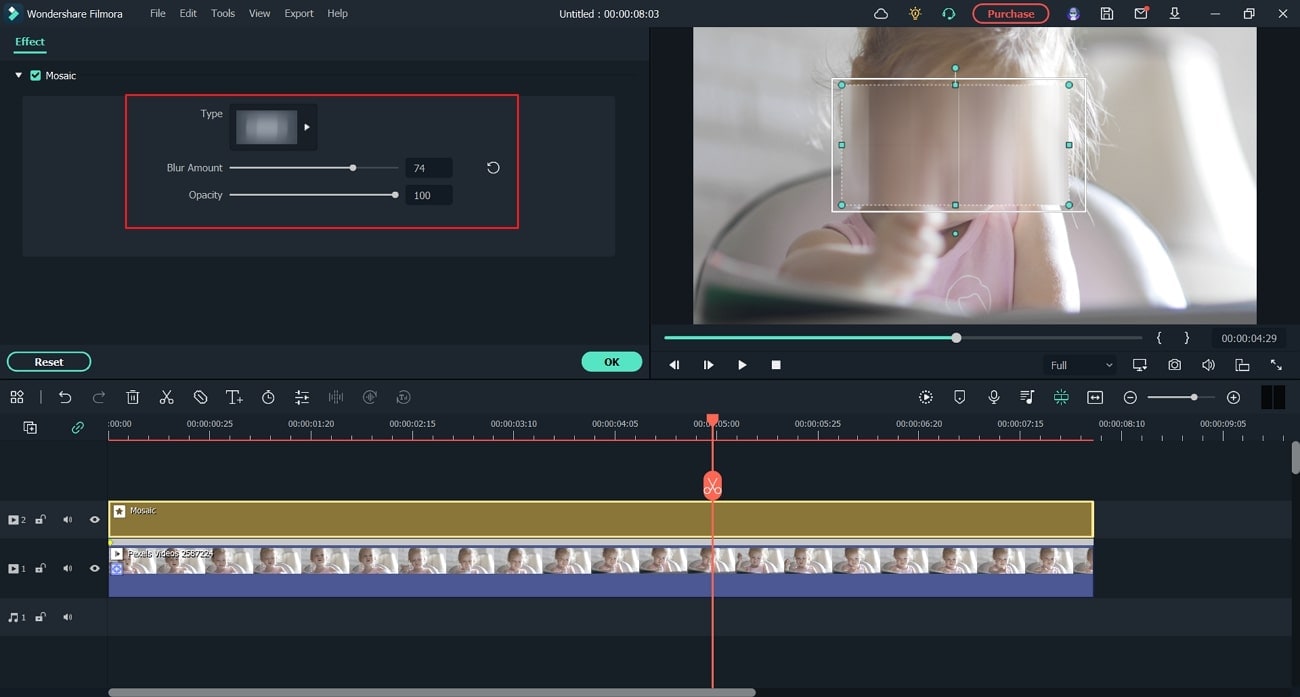
Now, double-click on the effect to open settings. You can choose your desired “Blur Type” for your Mosaic effect from the settings. Also, you can change the opacity and blur strength. Afterward, adjust the blurred space on your preview window. Press “OK” to continue.
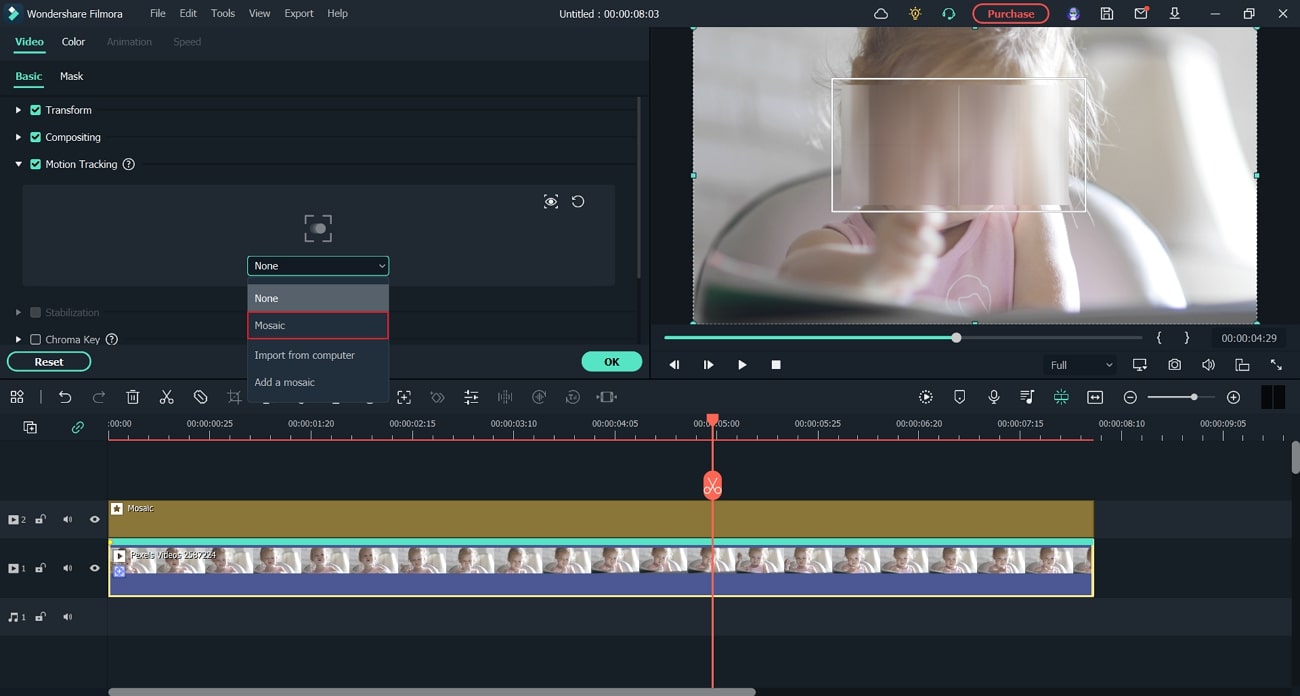
Step5 Choose Mosaic in Motion Tracking
Double-click on the video clip on your timeline and select “Motion Tracking.” On the drop-down menu, select “Mosaic.” Afterward, press “OK,” and you can see the final results in the preview window.
Conclusion
Have you accidentally captured the strangers’ faces in your video? No need to worry, as this article can help you to blur the faces in the video with professional tools. By reading this article, you can learn how to blur the face in Premiere Pro instantly. You can also try our recommended alternative to Premiere Pro, known as Filmora, to get fast and high-end results effortlessly.
Free Download For macOS 10.14 or later
Step-by-Step Guide to Blur Faces in Filmora Video Editor
Are you wandering how to easily blur faces in a video? Follow the steps mentioned below to blur faces using the Filmora video editor:
Step1 Select Motion Tracking Tool
Once you are done launching Filmora, select “Create New Project.” Afterward, import and drop the video into the timeline. Now place the play head at the start and proceed with the “Motion Tracking” tool.

Step2 Start Motion Tracking Process
Now adjust the motion tracking space from your preview window. Once done, hit the “Start Tracking” button. Within a few minutes, you will be able to finish this process. Click the “OK” button to proceed.

Step3 Choose the Mosaic Effect
To proceed, head to the “Effects” section and locate the “Video Effects” section. From there, search for the effect called “Mosaic.” From the results, drag and drop the effect to the timeline and extend it according to your clip.

Step4 Adjust the Blur Settings
Now, double-click on the effect to open settings. You can choose your desired “Blur Type” for your Mosaic effect from the settings. Also, you can change the opacity and blur strength. Afterward, adjust the blurred space on your preview window. Press “OK” to continue.

Step5 Choose Mosaic in Motion Tracking
Double-click on the video clip on your timeline and select “Motion Tracking.” On the drop-down menu, select “Mosaic.” Afterward, press “OK,” and you can see the final results in the preview window.

Conclusion
Have you accidentally captured the strangers’ faces in your video? No need to worry, as this article can help you to blur the faces in the video with professional tools. By reading this article, you can learn how to blur the face in Premiere Pro instantly. You can also try our recommended alternative to Premiere Pro, known as Filmora, to get fast and high-end results effortlessly.
8 Best Sites to Get Glitch Transition for Premiere Pro
Glitch effects have made a comeback on the internet. You are free to use, download, and play with them. But the question that comes to everyone’s mind is which website is reliable for it? What are the best effects to download and use? We’ll go through 8 different websites where you can get free glitch transitions. Every website has its personality and Screen Glitchy Effects. So, let’s start looking at some of the top ones right away.
8 Best Sites to Download Glitch Transitions for Premiere Pro
1. Motion Array
You may create a variety of glitch effects with Motion Array. Adobe Premiere Pro and Adobe After Effects are among the best systems it supports. You may get some of the most excellent transitions and aesthetic effects with Adobe Premiere Pro, such as the vertical rhythmic glitchy start, geometric openers, and more.
You can make the most incredible shaky slideshow or even abstract promo slideshow. Download these fantastic effects like neon-colored glitch logos, quick glitch openers, and other bizarre effects.
2. Velosofy
Velosofy, is the next best place to download Glitch Effect for free. It features some of the most stylish effects like modern glitch intro templates, glitchy logo designs, and much more.
This site allows you to download an unlimited number of files. Other products supported by Velosofy include the well-known After Effects, Adobe Photoshop, and Premiere Pro.
3. Storyblocks
Storyblocks is the next in line. The site supports Adobe After Effects and Premiere Pro. Transitions, distortion, logo reveals, VHS, and more effects are available here. The Glitch Transition bundle includes greens and blues distortion.
Premiere Pro provides several packs containing various elements. Color Bars Data Glitches is Premiere Pro’s most impressive collection. It is a one-of-a-kind effect seen on Storyblocks, and there are plenty more like it. In addition, Storyblocks includes footage and background as well.

4. Placeit
Placeit is a website where anyone can download and use any glitch transition. Almost every application and piece of software is supported on the site. You have a long list of options on Placeit. Go ahead and select any of the numerous screen effects.
One can also make a slideshow with Placeit and its spectacular glitch effects. Add other astounding effects with a VHS feel to make the video look more impressive.

5. Adobe Stock
Adobe Stock is another excellent website that offers you free glitch transition. The site supports a variety of applications and has some incredible effects. You will like the effect that is “Simple & Bold”. As its name implies, the glitch effect is simple, yet it is highly bold because of the neon-bright colors.
Another astounding effect is 12 Glitchy Transition. The Anaglyph Glitch Effect is a photoshop effect that is perfect for video creators.

6. Motion Elements
You should never limit yourself to the basics when you have sites like Motion Elements. You may create a professional film by downloading and applying the various glitch art effects.
The site works well with multiple programs, including After Effects and Premiere Pro. It features some bizarre but entertaining templates like neon glitchy transitions.

7. MixKit
With Mixkit, you can create unique and spectacular screen glitch effects.
Mixkit supports Premiere Pro and After Effects. You can easily employ its mind-blowing color effects to give your material a whole distinct feel. It includes digital static transitions, urban glitch openers, logo animation, and other elements.

8. Videohive
Videohive has over 7000 glitch templates. Each of the 7000 effects is unique and mind-blowing.
On the other hand, Premiere Pro has some jaw-dropping aesthetic effects. You can use elegant and trendy ones like the urban opener, glitch transition, and many more on Premiere Pro. Videohive’s Trailer effect is its most attractive feature.
5 Newest Glitch Transition Packs for Premiere Pro
Are you looking to add some extra colorful movement to your movie? There are many aesthetic effects and transitions available to add to the videos. You can create high-level YouTube videos, birthday clips, and holiday vlogs with Glitch art.
We’ll help explore these transition packs in Premiere Pro. Be sure to go to the website and check out the tutorials of these packs. You’ll find various effects within them.
1. FILM CRUX Glitch Transitions Vol. 1
This new pack by Film Crux has 15 free drag-and-drop free glitch transitions. These are designed specifically for Adobe Premiere Pro. You can just download the file and drag it into your Premiere Pro ‘Presets’ folder on your computer. Add the effects and enjoy the animated video!!
2. Glitch Templates for Premiere Pro by Mixxit
Mixxit has 30 Free Premiere Pro Templates for Glitch. All these templates are free to download for Premiere Pro. You can find every type of transition you need. Edit and add textures, make the videos enjoyable with zoom and outs and different sound effects.
3. 95+ Glitch Transitions - Premiere Pro by flatpackfx
You can try any of these glitch transitions and transform your videos. Simply drag and drop your videos to use with Adobe Premiere Pro. Moviemakers and video editors can save time and create unique-looking transitions all inside of Premiere Pro.
4. FREE 30 Glitch Transitions Preset for Premiere Pro by EnamAlamin
You can make your videos exciting with these 30 animated glitch transitions. The sound effects are also available to add to the videos. You’ll find detailed tutorials on the website. You don’t need any plugins. Just Drag & Drop the movie on Premiere Pro.
5. 10 Free Glitch transitions for Premiere Pro by 911templates
You can get 10 free digital distortion effects on 911templates. Import the video on Adobe Premiere Pro and turn them into art masterpieces. These effects can help you create a stunning opening of the video and the striking transitions between shots.
With these 5 newest transition packs, you can edit your video in many ways. The film industry has been using these transitions to impact the viewers. So, choose the styles that go well with your movie and catch your eyes. These are seen commonly in horror films to keep the viewers engaged. You can even add them on TikTok videos and other product description videos.
Conclusion
Glitch Transitions is a fun way to “transition” from one shot to the other. Drag and drop any of these transitions over two or more clips on your timeline. You can insert these free transitions nicely for educational videos, YouTube videos, event movies, or even documentaries. It adds fun, energetic energy to the project.
These transitions can make your work appear more professional and add to the final movie. We hope this article can help you find free assets for your next video project.
How to Make a Countdown Video
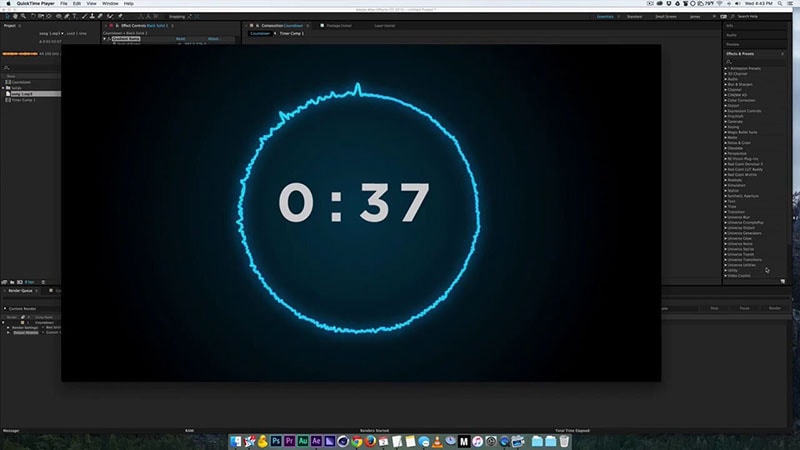
Have you ever wanted to use Adobe After Effects to recreate a countdown timer for a rocket launch or simply create a suspenseful moment in a video by displaying how the time runs out? This tutorial will show you how. It is imperative that you become familiar with the process of creating a countdown in After Effects.
In this article, we will demonstrate how to use Adobe After Effects to put together a countdown video. This procedure is a straightforward one, and it will handle expressions as well as plugins. Stay here and read on to find out more about the various methods in which we might accomplish this goal!
Let’s begin!
Part 1. Create a new composition
It’s possible that you only want to show the minutes and seconds. Make a mask around the entire area you intend to use in order to quickly remove undesired information.
1. Create a new Text Layer.
2. Alt + Click (on a PC) or Option + Click (on a Mac) on the stopwatch in the Source Text to display text options.
3. Place the expression “timeToCurrentFormat” within the expression box (). You must set your composition frame rate to 60 frames per second in order to make it appear to be a real digital countdown timer.
4. Everything should be pre-composed, and the composition’s tempo should be reversed to make it count down. Right-click the composition and choose Time > Time Reverse Layer to change its pace.
Part 2. Using the timecode plugin
To make a countdown timer, you can use the Timecode plugin rather than the “timeToCurrentFormat()” statement. The timer layout will be immediately created when the plugin is added to a New Solid; use the same steps as before to convert it to a countdown timer.
Here is a quick video that demonstrates how simple it is to set up a countdown timer in this manner:
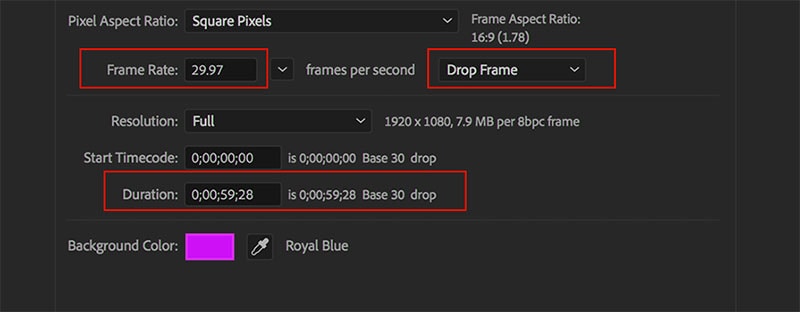
Step1 Ctrl-click (Windows) or Command-click (Mac OS) the time display to cycle through Timecode Base or Frames/Feet + Frames (depending on whether the “Use Feet + Frames” option is checked in the Project Settings). The Timeline panel’s upper-left corner, as well as the bottoms of the Layer, Composition, and Footage panels, all indicate the current time. Timeline panel (See.)
Step2 A smaller text version of the option that is not selected in the project settings will be seen underneath. Do the following to limit the display to the Timecode or Frames option that was chosen in the Project Settings:
Step3 Choose After Effects > Preferences > Display (Mac OS) or Edit > Preferences > Display to access the display preferences window (Windows). Remove the check mark next to “Show Timecode and Frames in Timeline Panel” (this option is selected by default).
Step4 Change the time display units by selecting File > Project Settings and then selecting a different choice from the list in the Time Display Style section.
Timecode:
Displays the current time as timecode in the time rulers of the Timeline, Layer, and Footage panels. You have the option of utilizing the timecode from the source media (Use Media Source) or beginning at 00:00:00:00. To use timecode rather than frames, select the Timecode option from the menu. It is important to take note that there are no options available for changing the frame rate or whether or not to delete frames, as the source timecode is recognized and used instead.
Part 3. Source timecode
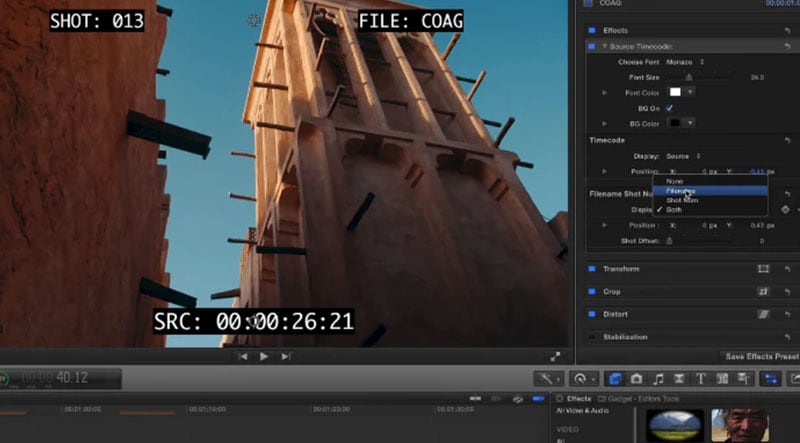
Support for various file formats for the source timecode QuickTime, DV, AVI, P2, MPEG-2, MPEG-4, H.264, AVCHD, RED, XDCAM EX, XDCAM HD, and WAV image sequence importers are just some of the formats that After Effects is able to read and apply timecode for.
Project panel
The Project panel includes several columns that display the source timecode. These columns are titled as follows: Media Start, Media End, Media Duration, and Tape Name. These are the beginning, ending, and overall length of time for the source. There are columns labeled “In,” “Out,” and “Duration,” which reflect the In and Out points that the user has set in the Footage panel for the footage item or the work area for the composition, respectively. These columns also show the duration of the clip.
Context of the Project
The source timecode feature set can be found in the dialog box that is used to configure the Project. Check out the Options for Time Display Units page for more information.
Box for Configuring Composition Settings
The source timecode feature set is located in the dialog box that is called Composition Settings.
Box for Specifying Preferences
The Import section of the Preferences dialog box is capable of handling source timecode functions.
That’s it! You are now familiar with the process of creating a straightforward countdown and a countdown timer in After Effects, and you have three options to choose from. Make use of this information to give your videos an interesting spin and to round out the experience for the audience.
Free Download For Win 7 or later(64-bit)
Free Download For macOS 10.14 or later
Free Download For macOS 10.14 or later
[7 Ways] Add Subtitles to MKV Videos on All Platforms
Many people use MKV files as it’s an open-source format and does not require licenses. This file format functions as a multimedia file container that can help you in storing audio and video tracks. However, there are some key disadvantages of using MKV files, as this format is not supported by various platforms or devices. So, the most suitable video file formats that you can use are FLV and MP4. These two formats offer high-quality results and are supported by multiple platforms.
If you still want to use MKV files and want to add subtitles, this article can assist you. By reading this article, you can learn how to add subtitles to MKV with different methods.
Part 1: How to Add Subtitles to MKV on Windows?
Are you a Windows user and want to add subtitles to MKV? Read this section to find out compatible tools that can add subtitles to your MKV videos efficiently.
1. Wondershare Filmora
Free Download For Win 7 or later(64-bit)
Free Download For macOS 10.14 or later
Wondershare Filmora is a popular tool that provides you with multiple options to edit video files. If you are interested in adding subtitles to your MKV files, you can navigate to its “Speech-to-Text” feature. This feature automatically transcribes the voice used in the video into subtitles. It supports 16 different languages for creating subtitles through this feature.
This feature can also enhance your editing efficiency as you don’t have to write the subtitles on your own. Moreover, the STT feature utilizes advanced algorithms that help the tool create subtitles with high precision. Furthermore, you can also manually add the subtitles to your MKV file using this MKV subtitle editor.
Key Features
- Filmora offers various effects, such as a green screen that can help you to change your background dramatically.
- If you want to resize your videos efficiently, this tool provides the Auto Reframe feature.
- Filmora also offers various preset templates that can help you to craft captivating videos easily.
Step-by-Step Guide to Add Subtitles Using Filmora
Step1 Create a New Filmora Project
Download and install Filmora on your PC and click “Create Project.” Afterward, import the MKV video from your PC to this tool by clicking on the “Arrow” icon.

Step2 Go to Titles Tab
After importing the video, drag it to the timeline. Once done, click on the “Titles” section given on top. Afterward, click on “Subtitles” from the left section. Now you will be able to see different types of subtitles on your screen. Select your favorite style of subtitles and tap on its “Download” icon.

Step3 Choose the Preferred Subtitle Style
After that, tap on the “Plus” icon to add your selected subtitle style to the timeline. Double-click on the added subtitles, which will open the settings. You can manually add the subtitles on the “Input Text” box easily. Moreover, you can easily change the text font, color, opacity, and alignment.

Step4 Export and Save Video
Once you have created subtitles for your imported video, click the “Export” button on top. Using this option, you can save the video file to your device or share it on other platforms.

2. Cisdem Video Converter
Cisdem is an efficient tool that can be used by content creators for various purposes. Along with editing the videos, this tool can help you add subtitles to your video files in any format. It supports various formats for adding subtitles, such as MKV, MP4, AVI, etc. This tool also offers a built-in editor to modify the MKV videos flawlessly. Hence, it’s a basic tool that generates quality results instantly.
Key Features
- Cisdem can function as a video converter that supports more than 300 file formats. You can convert to and from MKV files using this platform easily.
- Through this software, you can professionally add watermarks to your MKV files. It provides various options to add a customized watermark to your desired video files.
- It offers a built-in media player that allows you to play and watch MKV files without interruption.
Steps to Add Subtitles to MKV Using Cisdem Video Converter
Step1 Launch the Cisdem tool on your system and navigate to its “Converter”. Afterward, import the MKV file instantly. Now tap on the “Pencil” icon given on top to open the editing window.

Step2 From the editing window, go to “Subtitle and Audio” and click on “No subtitles.” From the drop-down box, click on “Load Subtitles” to upload your SRT or ASS subtitle file from your system.

Step3 Now press the “Save” button to proceed. As the default output format in this tool is MP4, navigate to the “General Video” section to change it. From this option, select “MKV Video” as the output format. Afterward, hit the “Convert” button to embed the added subtitles easily.

3. VLC Media Player
The VLC Media Player is a commonly used platform that offers various functions. It can be easily accessed and shows compatibility with tons of platforms. It has a simple interface that allows you to operate it easily. Through this tool, you can also add subtitles to MKV proficiently. This MKV subtitle editor supports various caption formats such as VobSub, SubRip, SubViewer, etc.
Key Features
- While watching a video on the VLC media player, you can take instant snapshots of your favorite moments in high resolution.
- This tool offers a screen recorder through which you can capture your activities on a desktop. You can also choose the frame rate and output format for your screen recording.
- You can enhance your video files by adding effects from this tool. Along with applying attractive video effects, you can also change the brightness and hue of your video.
Step-by-Step Guide to Add Subtitles Using VLC
Step1 Open your VLC media player and click on the “Media” tab given on top. From there, tap on the “Convert/Save” option.

Step2 A new dialogue box will open regarding “Open Media.” Now you can instantly upload your MKV file on this tool. By staying on the same window, check the box saying, “Use a subtitle file.” Afterward, browse the SRT file from your computer.

Step3 Now tap on the “Convert/Save” arrowhead and choose the “Convert” option from the drop-down menu. A new window will open from where you have to tap on the “Wretch” icon. On the “Encapsulation” section, select “MKV.”

Step4 By going to the “Audio codec” and “Video codec” sections, check the box “keep original video or audio track.” Now go to the “Subtitle” section and enable the option of “Overlay subtitles on the video.” Once done, hit the “Create” button.

Part 2: How to Add Subtitles to MKV on Mac?
Are you looking for MKV subtitle editors that are compatible with Mac? In this section, you can learn how to add subtitles to MKV on your Mac devices easily.
1. HD Video Converter Deluxe
This tool is highly compatible with Mac users and provides tons of advanced features. Besides being a great video editor, this tool can help you add subtitles to your MKV video files. It supports popular subtitle formats such as ASS, SSA, and SRT. If you want to embed hardcode subtitles into your MKV files, this is the most compatible tool.
Key Features
- If you want to decrease the video file size without harming its high quality, you can use this platform. This tool offers a video compressor through which you can reduce file sizes effectively.
- To combine your various video chunks or clips, this software offers a reliable video merger.
- If you are facing audio problems in your video, this tool can permanently adjust the volume according to your preference.
Step-by-Step Guide to Add Subtitles Using HD Video Converter Deluxe
Step1 Start by launching HD Video Converter Deluxe on your MacBook. Afterward, tap on the “+Video” button to import your MKV file.

Step2 On the Output Profile window, choose “MKV” as your output format. Click on the “OK” button to proceed. Now navigate to the “Edit” tab and select “Subtitle.” From there, check “Enable Subtitle.” Also, check “Extra” and then click on the “Add” button. Now you can import the subtitle file to this tool.

Step3 Click the “Done” button and then hit the “RUN” button to embed the subtitles.

2. Wondershare UniConverter
UniConverter is one of the famous tools that many people prefer due to its high reliability. Among its various advanced features, you can use its “Subtitle Editor” to add subtitles to MKV videos. You can create subtitles manually in your preferred font. Moreover, it provides an auto generator to create subtitles by extracting audio from the video file. This feature supports more than 100 languages to offer more diversity.
Key Features
- The MKV subtitle editor of UniConverter is also capable of converting text into subtitle lines through its TXT to SRT feature.
- You can remove backgrounds from your video and add a new one with a few clicks. This can make your video more captivating.
- It offers a vocal remover that can separate instrumental sounds and vocals from an audio or video file easily.
Step-by-Step Guide to Use the Subtitle Editor of UniConverter
Step1 Run UniConverter on your PC and click on “Subtitle Editor” from its homepage. A new window will open in which you have to import the MKV video file.

Step2 You can click on the “Manual Subtitles” button to add your subtitles with respect to the time duration. Or, you can tap on ‘Import Subtitles’ to upload the subtitles file from your MacBook. Other options are also available such as Text to Subtitles and Auto Subtitles.

Step3 You can edit the added subtitles by going to the “Styles” section. Here, you can change the font, color, and style of your subtitles. Once done, click on the “Save” button.

Part 3: How to Add Subtitles to MKV Online?
If you want to use online platforms to merge subtitles with MKV, here are the top two online tools.
1. Veed
Veed is an easy-to-use online tool that allows you to edit your video clips with high accuracy. Through this online tool, you can add subtitles to your MKV files in 3 different ways. You can upload subtitle files in formats like VVT, TXT, SSA, SRT, and ASS. Otherwise, you can enter the subtitles manually by selecting their color, font, size, and time duration. Moreover, you can use its voice recognition software to auto-create subtitles instantly.
Key Features
- To make your video clips funny and engaging, this tool enables you to add various emojis and stickers to your video files.
- You can explain the content in your video by adding annotations such as text boxes using this tool.
- To remove unwanted objects from your video, you can use the crop feature of Veed.
Step-by-Step Guide to Add Subtitles Using Veed
Step1 Access the official website of Veed and click on “Add Subtitles To video” from its tools. Afterward, click the “Choose Files” button and import your MKV file.

Step2 Once done with uploading, click on “Upload Subtitle File.” You can upload any of its supported subtitle files. Also, choose the language from the given box.

Step3 After importing the subtitles, you can modify them by altering their text color, color effect, style, and alignment. Once done, hit the “Export” button.

2. Flixier
Do you want an interesting tool to create subtitles? Flixier is an efficient online tool that can edit your video and audio files. Without making a user account, you can use this tool to add subtitles to MKV video files. You can upload MKV files from different platforms, such as your device, Google Drive, Zoom, Dropbox, etc. This tool also provides different ways to flawlessly create subtitles for your video files.
Key Features
- The subtitle editor of this tool offers more than 1000 fonts. Thus, you can make your subtitles look stylish by choosing a preferred font.
- To edit your videos, this tool allows you to collaborate with your friends in real-time.
- It offers more than 50 transitions that you can apply to your videos easily.
Step-by-Step Guide to Add Subtitles Using Flixier
Step1 Visit the website of Flixier and click on “Add subtitles to your videos” from its tools. Afterward, tap on “Get Started” to proceed. The tool will ask you to upload your video file.

Step2 Once you have uploaded the MKV video, click on “Text” given on the left side. Afterward, tap “Add Subtitle” to create subtitles for your video. You can add text to the given space to create subtitles. You can also tap on the “Import Subtitle” button to upload the subtitle file. To change the properties of your subtitles, you can edit them from the provided options on your screen.

Step3 Once done with creating and adjusting subtitles, click on the “Export” button.

Conclusion
Subtitles are shown at the bottom of a video and help make the video content comprehensive. If you are dealing with MKV files and want to add subtitles in an instant way, this article has provided all the details. By reading this guide, you can learn how to add subtitles to MKV files on different platforms.
To attain the best results and utilize advanced features, we will highly recommend you use Wondershare Filmora. This tool creates a comfortable environment and gives an intuitive interface to create subtitles.
Part 1: How to Add Subtitles to MKV on Windows?
Are you a Windows user and want to add subtitles to MKV? Read this section to find out compatible tools that can add subtitles to your MKV videos efficiently.
1. Wondershare Filmora
Free Download For Win 7 or later(64-bit)
Free Download For macOS 10.14 or later
Wondershare Filmora is a popular tool that provides you with multiple options to edit video files. If you are interested in adding subtitles to your MKV files, you can navigate to its “Speech-to-Text” feature. This feature automatically transcribes the voice used in the video into subtitles. It supports 16 different languages for creating subtitles through this feature.
This feature can also enhance your editing efficiency as you don’t have to write the subtitles on your own. Moreover, the STT feature utilizes advanced algorithms that help the tool create subtitles with high precision. Furthermore, you can also manually add the subtitles to your MKV file using this MKV subtitle editor.
Key Features
- Filmora offers various effects, such as a green screen that can help you to change your background dramatically.
- If you want to resize your videos efficiently, this tool provides the Auto Reframe feature.
- Filmora also offers various preset templates that can help you to craft captivating videos easily.
Step-by-Step Guide to Add Subtitles Using Filmora
Step1 Create a New Filmora Project
Download and install Filmora on your PC and click “Create Project.” Afterward, import the MKV video from your PC to this tool by clicking on the “Arrow” icon.

Step2 Go to Titles Tab
After importing the video, drag it to the timeline. Once done, click on the “Titles” section given on top. Afterward, click on “Subtitles” from the left section. Now you will be able to see different types of subtitles on your screen. Select your favorite style of subtitles and tap on its “Download” icon.

Step3 Choose the Preferred Subtitle Style
After that, tap on the “Plus” icon to add your selected subtitle style to the timeline. Double-click on the added subtitles, which will open the settings. You can manually add the subtitles on the “Input Text” box easily. Moreover, you can easily change the text font, color, opacity, and alignment.

Step4 Export and Save Video
Once you have created subtitles for your imported video, click the “Export” button on top. Using this option, you can save the video file to your device or share it on other platforms.

2. Cisdem Video Converter
Cisdem is an efficient tool that can be used by content creators for various purposes. Along with editing the videos, this tool can help you add subtitles to your video files in any format. It supports various formats for adding subtitles, such as MKV, MP4, AVI, etc. This tool also offers a built-in editor to modify the MKV videos flawlessly. Hence, it’s a basic tool that generates quality results instantly.
Key Features
- Cisdem can function as a video converter that supports more than 300 file formats. You can convert to and from MKV files using this platform easily.
- Through this software, you can professionally add watermarks to your MKV files. It provides various options to add a customized watermark to your desired video files.
- It offers a built-in media player that allows you to play and watch MKV files without interruption.
Steps to Add Subtitles to MKV Using Cisdem Video Converter
Step1 Launch the Cisdem tool on your system and navigate to its “Converter”. Afterward, import the MKV file instantly. Now tap on the “Pencil” icon given on top to open the editing window.

Step2 From the editing window, go to “Subtitle and Audio” and click on “No subtitles.” From the drop-down box, click on “Load Subtitles” to upload your SRT or ASS subtitle file from your system.

Step3 Now press the “Save” button to proceed. As the default output format in this tool is MP4, navigate to the “General Video” section to change it. From this option, select “MKV Video” as the output format. Afterward, hit the “Convert” button to embed the added subtitles easily.

3. VLC Media Player
The VLC Media Player is a commonly used platform that offers various functions. It can be easily accessed and shows compatibility with tons of platforms. It has a simple interface that allows you to operate it easily. Through this tool, you can also add subtitles to MKV proficiently. This MKV subtitle editor supports various caption formats such as VobSub, SubRip, SubViewer, etc.
Key Features
- While watching a video on the VLC media player, you can take instant snapshots of your favorite moments in high resolution.
- This tool offers a screen recorder through which you can capture your activities on a desktop. You can also choose the frame rate and output format for your screen recording.
- You can enhance your video files by adding effects from this tool. Along with applying attractive video effects, you can also change the brightness and hue of your video.
Step-by-Step Guide to Add Subtitles Using VLC
Step1 Open your VLC media player and click on the “Media” tab given on top. From there, tap on the “Convert/Save” option.

Step2 A new dialogue box will open regarding “Open Media.” Now you can instantly upload your MKV file on this tool. By staying on the same window, check the box saying, “Use a subtitle file.” Afterward, browse the SRT file from your computer.

Step3 Now tap on the “Convert/Save” arrowhead and choose the “Convert” option from the drop-down menu. A new window will open from where you have to tap on the “Wretch” icon. On the “Encapsulation” section, select “MKV.”

Step4 By going to the “Audio codec” and “Video codec” sections, check the box “keep original video or audio track.” Now go to the “Subtitle” section and enable the option of “Overlay subtitles on the video.” Once done, hit the “Create” button.

Part 2: How to Add Subtitles to MKV on Mac?
Are you looking for MKV subtitle editors that are compatible with Mac? In this section, you can learn how to add subtitles to MKV on your Mac devices easily.
1. HD Video Converter Deluxe
This tool is highly compatible with Mac users and provides tons of advanced features. Besides being a great video editor, this tool can help you add subtitles to your MKV video files. It supports popular subtitle formats such as ASS, SSA, and SRT. If you want to embed hardcode subtitles into your MKV files, this is the most compatible tool.
Key Features
- If you want to decrease the video file size without harming its high quality, you can use this platform. This tool offers a video compressor through which you can reduce file sizes effectively.
- To combine your various video chunks or clips, this software offers a reliable video merger.
- If you are facing audio problems in your video, this tool can permanently adjust the volume according to your preference.
Step-by-Step Guide to Add Subtitles Using HD Video Converter Deluxe
Step1 Start by launching HD Video Converter Deluxe on your MacBook. Afterward, tap on the “+Video” button to import your MKV file.

Step2 On the Output Profile window, choose “MKV” as your output format. Click on the “OK” button to proceed. Now navigate to the “Edit” tab and select “Subtitle.” From there, check “Enable Subtitle.” Also, check “Extra” and then click on the “Add” button. Now you can import the subtitle file to this tool.

Step3 Click the “Done” button and then hit the “RUN” button to embed the subtitles.

2. Wondershare UniConverter
UniConverter is one of the famous tools that many people prefer due to its high reliability. Among its various advanced features, you can use its “Subtitle Editor” to add subtitles to MKV videos. You can create subtitles manually in your preferred font. Moreover, it provides an auto generator to create subtitles by extracting audio from the video file. This feature supports more than 100 languages to offer more diversity.
Key Features
- The MKV subtitle editor of UniConverter is also capable of converting text into subtitle lines through its TXT to SRT feature.
- You can remove backgrounds from your video and add a new one with a few clicks. This can make your video more captivating.
- It offers a vocal remover that can separate instrumental sounds and vocals from an audio or video file easily.
Step-by-Step Guide to Use the Subtitle Editor of UniConverter
Step1 Run UniConverter on your PC and click on “Subtitle Editor” from its homepage. A new window will open in which you have to import the MKV video file.

Step2 You can click on the “Manual Subtitles” button to add your subtitles with respect to the time duration. Or, you can tap on ‘Import Subtitles’ to upload the subtitles file from your MacBook. Other options are also available such as Text to Subtitles and Auto Subtitles.

Step3 You can edit the added subtitles by going to the “Styles” section. Here, you can change the font, color, and style of your subtitles. Once done, click on the “Save” button.

Part 3: How to Add Subtitles to MKV Online?
If you want to use online platforms to merge subtitles with MKV, here are the top two online tools.
1. Veed
Veed is an easy-to-use online tool that allows you to edit your video clips with high accuracy. Through this online tool, you can add subtitles to your MKV files in 3 different ways. You can upload subtitle files in formats like VVT, TXT, SSA, SRT, and ASS. Otherwise, you can enter the subtitles manually by selecting their color, font, size, and time duration. Moreover, you can use its voice recognition software to auto-create subtitles instantly.
Key Features
- To make your video clips funny and engaging, this tool enables you to add various emojis and stickers to your video files.
- You can explain the content in your video by adding annotations such as text boxes using this tool.
- To remove unwanted objects from your video, you can use the crop feature of Veed.
Step-by-Step Guide to Add Subtitles Using Veed
Step1 Access the official website of Veed and click on “Add Subtitles To video” from its tools. Afterward, click the “Choose Files” button and import your MKV file.

Step2 Once done with uploading, click on “Upload Subtitle File.” You can upload any of its supported subtitle files. Also, choose the language from the given box.

Step3 After importing the subtitles, you can modify them by altering their text color, color effect, style, and alignment. Once done, hit the “Export” button.

2. Flixier
Do you want an interesting tool to create subtitles? Flixier is an efficient online tool that can edit your video and audio files. Without making a user account, you can use this tool to add subtitles to MKV video files. You can upload MKV files from different platforms, such as your device, Google Drive, Zoom, Dropbox, etc. This tool also provides different ways to flawlessly create subtitles for your video files.
Key Features
- The subtitle editor of this tool offers more than 1000 fonts. Thus, you can make your subtitles look stylish by choosing a preferred font.
- To edit your videos, this tool allows you to collaborate with your friends in real-time.
- It offers more than 50 transitions that you can apply to your videos easily.
Step-by-Step Guide to Add Subtitles Using Flixier
Step1 Visit the website of Flixier and click on “Add subtitles to your videos” from its tools. Afterward, tap on “Get Started” to proceed. The tool will ask you to upload your video file.

Step2 Once you have uploaded the MKV video, click on “Text” given on the left side. Afterward, tap “Add Subtitle” to create subtitles for your video. You can add text to the given space to create subtitles. You can also tap on the “Import Subtitle” button to upload the subtitle file. To change the properties of your subtitles, you can edit them from the provided options on your screen.

Step3 Once done with creating and adjusting subtitles, click on the “Export” button.

Conclusion
Subtitles are shown at the bottom of a video and help make the video content comprehensive. If you are dealing with MKV files and want to add subtitles in an instant way, this article has provided all the details. By reading this guide, you can learn how to add subtitles to MKV files on different platforms.
To attain the best results and utilize advanced features, we will highly recommend you use Wondershare Filmora. This tool creates a comfortable environment and gives an intuitive interface to create subtitles.
Also read:
- [New] Fresh Perspectives on Digital Health Promotion for 2024
- [New] In 2024, Seeking Outstanding User Contributions
- [Updated] Amplify Visual Narratives with Audio in Premiere Pro for 2024
- [Updated] From Captured Moment to Moving Picture
- Essential Steps to Create YouTube Beginnings & Ends on a Budget
- Essential YouTube Video Editing Techniques
- How to Correct Lens Distortion With Filmora
- In 2024, How to Find iSpoofer Pro Activation Key On Nokia 105 Classic? | Dr.fone
- New In 2024, 6 Tips for Your First Facebook Ads
- New In 2024, How to Convert Images Into Video - Kapwing Tutorial
- New Motion Blur Photo With GIMP Step-By-Step Guide for 2024
- New Something About Skin Care Vlog Ideas
- Solving CS2 Crashing Problems on PC: Updated Solutions for 202^
- Updated How Do You Create In-Camera Transitions in Your Videos? A Complete Guide for Beginners to Create These Transitions Using Their Camera at Home
- Updated Making Slow Motion Videos in Premiere Pro A Review on The Best Method
- Title: New Do You Want to Blur Faces in Your Videos? Read This Article to Find Out the Easiest Way to Blur the Faces in Videos Using Adobe Premiere Pro
- Author: Chloe
- Created at : 2025-02-25 17:24:05
- Updated at : 2025-03-03 22:46:22
- Link: https://ai-editing-video.techidaily.com/new-do-you-want-to-blur-faces-in-your-videos-read-this-article-to-find-out-the-easiest-way-to-blur-the-faces-in-videos-using-adobe-premiere-pro/
- License: This work is licensed under CC BY-NC-SA 4.0.