
:max_bytes(150000):strip_icc():format(webp)/GettyImages-104626001-5c34f065c9e77c00010b8cd5.jpg)
New Do You Want to Know How to Remove Audio From a Video without a Watermark? Keep Reading This Article Since We Have the Answers for You. Complete with the Guide on How to Do It
Do You Want to Know How to Remove Audio From a Video without a Watermark? Keep Reading This Article Since We Have the Answers for You. Complete with the Guide on How to Do It
Remove audio from video without watermark is easy if you use the right tool. Nonetheless, many tools to remove audio are bad, since they have a hard user interface. Therefore, some beginners will take time to remove audio from the video. Moreover, many tools also have a slow problem, which is time-consuming. Fortunately, this article provides you with some tools to remove audio from video online free without watermark and open-source tools. It will also be complete with a tutorial on how to do it in each tool.
Part1: Method 1: Use online free tools to remove audio without watermark (800 words)
1. AudioRemover
As the name suggests, AudioRemover is an online service that lets you take out audio from videos without re-encoding. This site also has a simple user interface that makes it easy for anyone to use. Moreover, AudioRemover allows you to remove audio from video without watermark.

How to remove audio from video with AudioRemover
Step1 First, open any browser on your computer and go to the AudioRemover site. After that, click “Browse” and add your video to AudioRemover. After choosing your video, click the “Upload Video” to upload your video into AudioRemover.

Step2 Wait until the uploading video is done. Once it is done, you just need to click “Download file.” The video that you download when it is played will no longer have sound in the video

2. Veed.io
If you are seeking for a tool for mute video online free no watermark, then you should try VEED. VEED is an exceptional online video editing tool that allows you to take out audio from video in just a few clicks. Since VEED is an online video editor, there is no installation. Instead, you do it straight from your favorite browser.

How to mute video online without watermark with VEED.io
Step1 Firstly, open any browser on your computer and search for “remove a voice from video with VEED.” After that, go click “Choose video” to import your video to VEED

Step2 In the next window, simply click “Upload a file” to browse the video file you want to remove the audio on your computer.

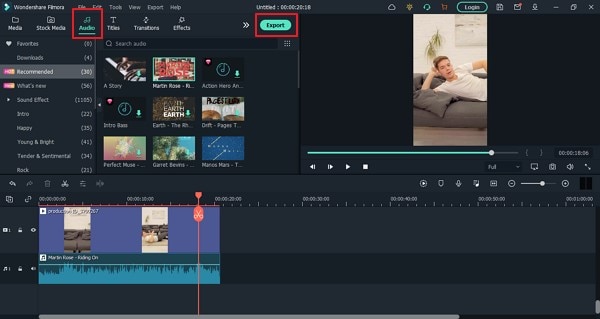
Step3 Once you import your video to the editing page, go to the sound icon and swipe down the bar to remove the audio. Next, click “Export” in the most top right on your screen.

Step4 If you want to save the video to your computer after the exporting process is complete, click “download.”

3. Canva
Canva is not only for creating image designs, templates, and post designs for social media, but Canva is also a very good tool for removing audio from videos. Indeed, you can easily remove audio from video online without watermark. Follow all the steps below to know how to remove audio from video with Canva.

Step1 First, you can visit Canva to remove audio from video , then click “Remove audio from the video.”

Step2 Drag your video to the black space.

Step3 After you import your video to the black space, you click on the “Sound” icon at the top of your screen. Then, drag the bar to the left to remove the audio.

Step4 Once you have removed the sound from your video, you can click “Share” in the top right corner of your screen. Then, click “Download” to save the file on your computer.

Part2: Method 2: Use free and open source video editors (800 words)
1. VideoLAN Client (VLC)
VLC is a widely known media player that works on Windows and Mac. In fact, VLC is a free, open-source, cross-platform multimedia player and framework that can perform many multimedia files and several streaming protocols. Even though VLC is mostly a media player and not a video editor, you can remove a video’s audio using the built-in converter.

Follow the simple steps below to discover how to use VLC to remove audio from a video.
Step1 First, you must download and launch VLC on your computer. After that, navigate to “Media” and “Convert/save.”

Step2 Select the video you wish to mute by clicking the “Add” button in the Open Media window. Afterward, click the” Convert/Save” in the lower right corner of the same window.

Step3 Click the “wrench” icon in the Convert window, as seen in the picture below.

Step4 lick on “Media codec” in the next window. After that, untick the Audio checkbox. Next, click the Create button in the bottom right corner of the same window. You’ll now come back to the Convert window.

Step5 Click “Browser” to choose the location of your video to save. Lastly, click “Start” to save the video.

2. Shotcut
The Shotcut Video Editor is a cross-platform (Windows, macOS, Linux, and Chrome OS) free and open-source video editor. If you are looking for an open-source editor to remove audio from video without watermark you should try Shotcut.

Follow easy steps below to remove audio from video with Shotcut
Step1 Download and launch the Shotcut on your computer. When the Shotcut is open, click “Open file” to import the file.

Step2 After importing the video file into Shotcut, you must drag it to the timeline.

Step3 Next, right click in audio track of the video, then click “Detach audio.”

Step4 Right-click on the audio track in the Output section on the left and then click on “Remove Track.”

Step5 After you remove the audio, then click “Export.”

Step6 Finally, click “Export file” to save your mute video on your computer.

3. OpenShot
The OpenShot Video Editor is a cross-platform (Linux, Mac, Windows) free and open-source video editor. OpenShot is a video editor that aims to be intuitive, simple to use, yet unexpectedly potent. The video or film can be easily sliced, cut, and edited.

Step1 You must download and launch the Openshot on your computer.

Step2 Drag your video you want to mute in the time line.

Step3 Right-click on the clip, then navigate “Volume,” “Entire clip,” and “Fade out (entire clip).

Step4 Once you done removing the audio from the video, click “Save project” to save your video.

Part3: Method 3: Get a video editor that can do everything for you (500 words)
1. Filmora
Step1 Download Filmora and launch it on your computer before starting. At this point, you can start a “new project” by selecting that option.

Step2 Here, you’ll find the video on your hard drive and upload it into Filmora. Upload the clip to Filmora’s timeline after that.

Step3 The next thing you need to do after dragging the video onto the Filmora timeline is to right-click on the Filmora timeline. After that, click “Detach audio” option.

Step4 The audio track will appear underneath the video track. To delete an audio track, you need only to click on it and then click the “trash” icon. At long last, you have successfully silenced the audio track in your video.

Step5 Simply click “Export” after you’re finished to save your video to your computer..

Filmora doesn’t just let you remove audio from videos; it also has a lot of other tools for editing audio that you can use to improve your videos. Some of Filmora’s audio editing features will be talked about below.
Free Download For Win 7 or later(64-bit)
Free Download For macOS 10.14 or later
#1. Silence Detection
Filmora has some great audio features, and silence detection is one of them. Silence detection simply recognizes instances of silence and removes them from your video instantly. Silence can make people confused or disappointed. Indeed, Filmora can instantly find the part of no sound and cut it out.
#2. Audio Ducking
Moreover, there is audio ducking, another great audio feature from Filmora. When recording voiceovers, narrations, translations, podcasts, etc., you can automatically lower the volume of one track to make another track clearer by using a Filmora audio feature called “audio ducking.”
#3. Auto Synchronization
Meanwhile, you can record videos and additional audio to improve the video’s audio quality. Filmora’s audio synchronization feature will help the video’s sound by perfectly matching the two simultaneously. With audio sync, it’ll be easier to match the sound to the video, making it sound clearer.
#4. Speech to Text (STT)
With Filmora’s Speech to Text (STT) feature, you can quickly turn your voice into subtitles. Furthermore, using speech-to-text will save you a lot of time on subtitling and speed up the editing process. When you hover on the Speech to Text button, Filmora will instantly detect the speech in your video and turn it into text.
#5. Text to Speech (TTS)
With Filmora’s Text to Speech (TTS) feature, adding voice to your video is straightforward. When you click on the button, Filmora could well turn your text files into speech instantly.
#6. Audio Visualizer
Last but not least, Audio Visualizer is an exceptional audio feature that Filmore offer. The Filmora Audio Visualizer will bring your music video to life. The effect will dynamically sync with the sound in your video.
Conclusion
Remove audio from video without watermark is fairly easy. You can choose a tool that has been recommended and read a complete tutorial on how to do it. However, if you are looking for a good online editing maker, we recommend Filmora, considering that Filmora is rich in features.
This Is a Recommendation About Bandicut. If You Are Confused, Please Check It Out
Bandicut Video Cutter is super-fast video editing software, known for its ability to cutting and join videos. It is an easy-to-use interface for small and professional users. While maintaining the video quality, Bundicut enables the user to trim parts of the video quickly. With this software, users can split videos into multiple video files or join multiple video files and as well extract audio from the video to MP3.
According to Bandicut reviews, Bandicut is one of the best video cutting and joining programs for Windows. Its free version features are limited to support AVI, MP4, and MOV but it is set to watermark the final results. If you download the Bandicut premium version you will get features that can join videos, do the fast cutting and offer high-speed encoding without watermarking the final results. It is also important to understand that Bandicut software is not just a video cutter. This tool entertains its users with a range of features that are easy to understand and use.
Key Features of Bandicut
Crop Video: Bandicut is a video clipping program that enables its users to crop-specific sections of the video. It specifies the beginning and the end of the video and with this, you can split a long recorded video into multiple frames.
Split Video: The split video function available in the Bandicut software can help users to split a large video into many video clips. This allows the video editor to collect and join those video clips that are theme-related.
Merge Video: Bandicut software has a merge video feature used to combine video clips of different formats and from different files to create a new file. This feature provides two merging modes; the high-speed merging mode and the conversion merging mode.
Special Section Removal: This software allows the user to delete specific sections of the video. It is easy to remove the unwanted section of the video like those advertisements inserted in the middle of the videos. The bad sections are removed with a click.
Extract MP3 audio Files: Bandicut has a “Rip MP3’ function to extract the audio of the video to an MP3 file. When you download a video and you are only interested in audio, you can extract it from the video using this function.
Convert Video Format: This feature allows the user to convert the videos that are not able to play automatically on their gadgets and those that are not editable in the video edit programs.
How to Use Bandicut
Bandicut is an easy-to-use video cutter for windows even for those who are not familiar with video editing tools. You can trim or cut your videos with Bandicut by just adjusting the start point and endpoint for the video with simple sliders. For those that want to use High-speed mode to edit their videos, they should download Bandicut software and make sure it is correctly installed then start to join the video clips.
Here are a few steps that you can take when editing multiple video clips with Bandicut Video Cutter;
Step 1: Download and Install Bandicut

You can start by downloading and installing the software on your computer. Then run the program and start video editing.
Step 2: Join your multiple videos into one with high-speed mode

1.Now that you have successfully recorded and saved your multiple videos in your Bandicam recorder, click the ‘Join’ button and then select those multiple video files. This will transfer your videos from the Bandicam recorder to the Bandicut software for editing.
2.Press the Start button and then merge the videos with high-speed mode.
Step 3: Cut certain parts of a merged video in high-speed mode

1.Click the ‘Cut’ button, open the Merge Video file in ‘Step 2’
2.Then set the certain parts you want to use and click the add segment (+) button.
3.Click the ‘Merge Segments’ option and click the ‘Start’ button with high-speed mode.
If you follow the above steps carefully, you can successfully edit your multiple video clips with Bandicut Video Cutter software without losing the quality of your video.
Best Alternatives to Bandicut
There are several alternatives to Bandicut Video Cutter for Windows, MAC, Linux, and Web-based. Below are some of the best alternatives and their key features;
1. Filmora
Filmora is a powerful video editing tool for windows. This popular software is intended for those users who want to concentrate on editing and making high-quality videos. It is an affordable program built with cool features for both video and audio. It can provide you with a plethora of options when you are styling, adding effects, or customizing your videos. The ‘Tilt-shift’ feature is used to blur out selective video sections when one wants to emphasize a certain object in the video.

Additionally, the tools in this software make it possible for the users to put an overlay, create animations and specific elements as well as add audio and insert texts. It is an appropriate feature to use especially for those that want to make tributes, dedications, or put stories in the videos. To help you understand this software better here are some of its key features.
For Win 7 or later (64-bit)
For macOS 10.12 or later
Filmora Features
- Split Screen: Easily make video and photo collages with animation by applying split-screen template.
- Speed Ramping: Adjust your video’s speed with better control of your keyframes to create unique cinematic effects.
- Key Framing: Bring dynamism and energy to your videos with smooth animated effects.
- Motion Tracking: Track the movement of an object in the video, and pin graphics and media files.
- Instant Mode: Easily create a video within a few minutes. No editing skills are needed
- Green Screen: Reimagine your world by changing backgrounds and creating special effects.
- Speech to Text: Allows you to transcript voice to subtitles in one click. Save plenty of time on transcribing
2. Camtasia
Camtasia Studio is a user-friendly software and handy app that can make your experience gigantic and impressive. It is perfect for both amateur and professional video creators as it allows the user to generate quality videos for presentation. The Camtasia Studio possesses an easy-to-use setup that allows its users with limited experience to make polished videos and share them with the community.

Camtasia Studio software is built with cool and unique features for ideal video editing. This app can help you create tutorial videos, YouTube videos as well as other impressive videos for your presentations or marketing. With its abundance of powerful video editing tools, all level users can create professional videos without assistance from professionals. It is easy to use, quick, and professionally built with numerous features to generate the most effective-looking videos willing to be exported. There are several features of Camtasia but we will discuss a few of them below.
Features of Camtasia
- Record screen.
- Proxy video.
- Versatile transitions.
- Audio emphasis.
- Include royal free sounds.
- Apply Direct Video Effects.
- Insert Icons, shapes, texts, or clips.
- LUT (Look Up Table) and Media mats.
3. Lightworks
Lightworks is described as cloud-based video cutting and joining software used to edit both amateur and professional videos. This software is created with powerful tools and unique functionalities to enhance the creation of quality videos for social media uses, 4K film projects, YouTube, and other professional uses. This software can integrate with YouTube, Boris FX, Blackmagic Fusion, and Boris Grafitti. The video editors can apply the key-framing feature in this software to make smooth translations between clips.

This software is highly reputable in cinema history and is widely used as a video editor to make some of the finest movies in Hollywood. With Lightworks it is easy to edit clips using the drag-and-drop method. It’s color blending and grading, it is easy to enhance video images. Lightworks works with post-production image composition solutions for visual effects and the software plug-in to help users achieve visual effect solutions.
Features of Lightworks
- Drag and Drop interface.
- Video routing.
- Fusion composition.
- Content management.
- Color correction and blend modes.
- Chromakey application.
- Apply Color LUTs.
- Edit Multicam sources.
Related FAQs
Is Bandicut free to use?
Bandicut Video editor is not a free program and it requires the regular users to purchase a Bandicut license. Bandicut Video Cutter pricing begins at $29.95 for a one-time payment per user. The license does not expire or get revoked and can provide unlimited access to the user.
Is Bandicut a good video editor?
Bandicut is one of the best video editors available in the market today and can be used for small and professional purposes. Its results are incredible and can add audio, trim, and join video files without losing video quality.
Does Bandicut leave a watermark?
When using the free version of Bandicut you are likely to enjoy some great features but there will be a watermark on the final results. Professionals prefer using the premium version as it does not add watermarks to the final result.
Conclusion
Bandicut video editor and its alternative software is a video creation solution that everyone should embrace if they aim to archive quality. They are available in the online stores, and you can download Bandicut and install it without much effort. This article gives you knowledge on the above-discussed video creators to make your video creation journey a success. Clicking on individual software websites can add some more information on the above. Other sources of information are such as the Bandicut reviews.
For macOS 10.12 or later
Filmora Features
- Split Screen: Easily make video and photo collages with animation by applying split-screen template.
- Speed Ramping: Adjust your video’s speed with better control of your keyframes to create unique cinematic effects.
- Key Framing: Bring dynamism and energy to your videos with smooth animated effects.
- Motion Tracking: Track the movement of an object in the video, and pin graphics and media files.
- Instant Mode: Easily create a video within a few minutes. No editing skills are needed
- Green Screen: Reimagine your world by changing backgrounds and creating special effects.
- Speech to Text: Allows you to transcript voice to subtitles in one click. Save plenty of time on transcribing
2. Camtasia
Camtasia Studio is a user-friendly software and handy app that can make your experience gigantic and impressive. It is perfect for both amateur and professional video creators as it allows the user to generate quality videos for presentation. The Camtasia Studio possesses an easy-to-use setup that allows its users with limited experience to make polished videos and share them with the community.
Camtasia Studio software is built with cool and unique features for ideal video editing. This app can help you create tutorial videos, YouTube videos as well as other impressive videos for your presentations or marketing. With its abundance of powerful video editing tools, all level users can create professional videos without assistance from professionals. It is easy to use, quick, and professionally built with numerous features to generate the most effective-looking videos willing to be exported. There are several features of Camtasia but we will discuss a few of them below.
Features of Camtasia
- Record screen.
- Proxy video.
- Versatile transitions.
- Audio emphasis.
- Include royal free sounds.
- Apply Direct Video Effects.
- Insert Icons, shapes, texts, or clips.
- LUT (Look Up Table) and Media mats.
3. Lightworks
Lightworks is described as cloud-based video cutting and joining software used to edit both amateur and professional videos. This software is created with powerful tools and unique functionalities to enhance the creation of quality videos for social media uses, 4K film projects, YouTube, and other professional uses. This software can integrate with YouTube, Boris FX, Blackmagic Fusion, and Boris Grafitti. The video editors can apply the key-framing feature in this software to make smooth translations between clips.
This software is highly reputable in cinema history and is widely used as a video editor to make some of the finest movies in Hollywood. With Lightworks it is easy to edit clips using the drag-and-drop method. It’s color blending and grading, it is easy to enhance video images. Lightworks works with post-production image composition solutions for visual effects and the software plug-in to help users achieve visual effect solutions.
Features of Lightworks
- Drag and Drop interface.
- Video routing.
- Fusion composition.
- Content management.
- Color correction and blend modes.
- Chromakey application.
- Apply Color LUTs.
- Edit Multicam sources.
Related FAQs
Is Bandicut free to use?
Bandicut Video editor is not a free program and it requires the regular users to purchase a Bandicut license. Bandicut Video Cutter pricing begins at $29.95 for a one-time payment per user. The license does not expire or get revoked and can provide unlimited access to the user.
Is Bandicut a good video editor?
Bandicut is one of the best video editors available in the market today and can be used for small and professional purposes. Its results are incredible and can add audio, trim, and join video files without losing video quality.
Does Bandicut leave a watermark?
When using the free version of Bandicut you are likely to enjoy some great features but there will be a watermark on the final results. Professionals prefer using the premium version as it does not add watermarks to the final result.
Conclusion
Bandicut video editor and its alternative software is a video creation solution that everyone should embrace if they aim to archive quality. They are available in the online stores, and you can download Bandicut and install it without much effort. This article gives you knowledge on the above-discussed video creators to make your video creation journey a success. Clicking on individual software websites can add some more information on the above. Other sources of information are such as the Bandicut reviews.
Want to Make a Funny Vlog on TikTok? Trying to Find the Right Topic for It? This Article Presents some Impressive Options for Making a Funny Vlog for TikTok
TikTok has been among the few social media platforms that have gained an exponential following in a truly short time. Regardless of this stunted digital environment, the platform made its statement of becoming part of the all-time greats.
TikTok became known as a short-video platform that influenced the making of funny vlogs. If you are interested in making a funny vlog, you are at the right place.
In this article
01 Ideas for Creating A Funny Vlog for TikTok
02 5 Popular Funny Vloggers on TikTok
Part 1: Ideas for Creating A Funny Vlog for TikTok
When creating a funny vlog across TikTok, there are numerous ideas that one can think of. However, since TikTok videos are of small lengths, achieving diversity is difficult yet possible. You’ll surely get your break if you understand the following ideas for creating a funny vlog.

React to Other Videos
While it may seem the most mainstream style of creating funny content across TikTok, it is also the most effective way of making people laugh while watching your video. This will also bring recurring viewers across your channel.
Display Failure Videos
It is always great to see people trying and doing something funny across the video. Failure videos are believed to be the other way of creating content for a funny vlog on your TikTok, which shall make people laugh hard.
Use Goofy and Peculiar Voices
Unrealistic and weird voices can make your short video seem funny. If you consider talking about something in a silly voice, it will make people burst out of laughter.
Trolling Family Members
One of the best ways to make something good out of TikTok is creating candid moments. This can always be done if you troll or prank your family members out of nowhere. Just keep reminding that you have to ensure no one gets injured due to it.
Impersonations
Making impersonated videos of major celebrities is another way of showing funny content to the viewers on TikTok. If you consider some funny examples for this, it will surely bring you effective results.
Make Puns and Funny Statements
Another great way to create a funny vlog for your TikTok is to be good at making puns. This is purely hilarious content and needs someone to be highly great in it.
Physical Challenges
This can be a bit risky, but it can become quite fun to make and show to the world if executed with care. However, this can be conducted individually or in a group of people, as you find it appropriate.
Use Effects of TikTok
TikTok makes sure to provide something funny in effects to its users. The use of effects for TikTok is an excellent technique to make funny vlogs; however, it can get funny if the elements used across it have a dubious meaning.
Run Everything in Reverse
One of the most straightforward techniques to make a funny vlog is to run everything in reverse order. The simplest thing of a video becomes the funniest to watch.
Part 2: 5 Popular Funny Vloggers on TikTok
This part will provide some popular examples of TikTokers who have made a considerate performance in providing funny content to people across the platform.
Khaby Lame
This is, without a doubt, the first-choice in TikTok accounts that would always come while relating to funny content. Khaby started his journey as a TikToker with a remarkably simple motive of pointing out the simplicity in different tasks, which were displayed to be difficult. Although it sounds pretty basic, the technique taken by Khaby has been so considerate it brought him millions of followers for creating funny content.

Sarah Cooper
Want to see a great impersonation of Donald Trump? It is undoubtedly great to see every time. With Sarah Cooper, it just becomes an entirely different story. Her impersonation has been so perfect that she has been referred to as one of the best funny vloggers on TikTok. Her likes across the platform may not be that great, but she has shown some stature in presenting funny content in a great way.
Dobre Twins
This twin duo is known across many social media platforms for its funny content. As the twins started using TikTok, they started creating good funny vlogs, which gained quite the traction for them. Their unique ideas to present different things have presented the following worth 23 million likes across TikTok, which is quite commendable. However, Lucas and Marcus are only known to operate this TikTok account.

Image alt: dobre twins funny tiktoker
Brittany Broski
Quite a few TikTokers actually make funny videos with impressive comedy. Brittany Broski is a celebrity in this genre, where she has taken great use of her comedy skills to present great vlogs with different and unique topics. Her take on comedy is entirely different, which makes her funny vlog unique and better than others.

Cole LeBrant
This TikToker makes a good collection of funny vlogs across his account with his family. The variety and variability in his videos make him a different version of fun compared to other TikTokers. He has built a great reach across the account, which makes him an impressive choice.

Part 3: How to Make a Funny Vlog?
Funny vlogs are a fabulous way to interact with people of different tastes. It can be something that cherishes the moods of the viewers, regardless of their current emotions. To make this happen, you need a good platform that helps you create a video for your viewers to watch. Wondershare Filmora fulfills the needs of a video editor by providing you with the perfect options while editing the video for TikTok.
For Win 7 or later (64-bit)
For macOS 10.12 or later
If you are looking forward to understanding how to create a funny vlog for your TikTok using Filmora, you need to follow a set of simple steps. These are shown as follows:
Step 1: Launch and Import Video
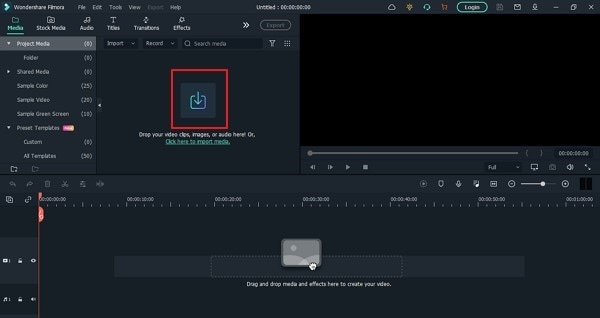
To start, you need to have Wondershare Filmora installed across your device. Launch the tool and click on “New Project” to start from scratch. Once the screen opens up, you need to click on the “Arrow Head” icon across the ‘Media’ Tab to import the audio you wish to amend for TikTok.
Step 2: Perform Basic Editing
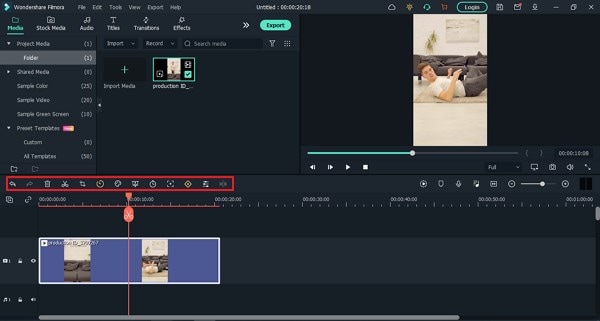
Wondershare Filmora provides users with multiple options for editing their files. At first, drag the file onto the timeline. Following this, you can merge different videos or enhance the video by trimming it. Along with that, you can also consider splitting the image or changing its playback speed for different results.
Step 3: Add Effects and Transitions
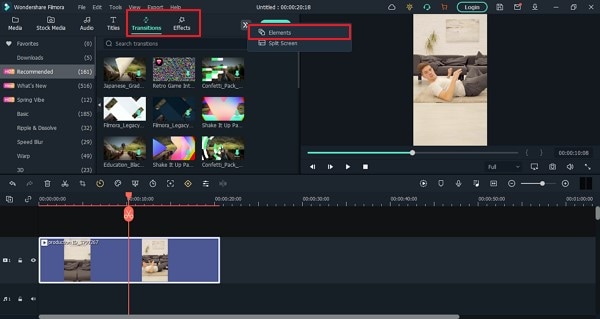
After you are done with some basic editing, you can add different effects from the “Effects” section. To make the video look exclusive, you can also include “Transitions” across it. Use the “Elements” tab to include stickers and emojis to enhance your TikTok video.
Step 4: Manage the Audio
For managing the audio of your video, you can make several changes across it. You can detach audio and change the audio with another soundtrack. Filmora also allows you to add audio from the “Audio” section, which contains royalty-free music to add. Once you are done, click on the “Export” button to set the settings of the video before exporting it back onto the device.
Closing Words
This article has presented some of the finest tips that can be utilized for creating funny vlogs on your TikTok. If you coherently use these tips, you can get significant results across your account in the name of the followers. Along with that, you can also use Filmora for making the best funny vlog with different editing tools.
Wondershare Filmora
Get started easily with Filmora’s powerful performance, intuitive interface, and countless effects!
Try It Free Try It Free Try It Free Learn More >

02 5 Popular Funny Vloggers on TikTok
Part 1: Ideas for Creating A Funny Vlog for TikTok
When creating a funny vlog across TikTok, there are numerous ideas that one can think of. However, since TikTok videos are of small lengths, achieving diversity is difficult yet possible. You’ll surely get your break if you understand the following ideas for creating a funny vlog.
React to Other Videos
While it may seem the most mainstream style of creating funny content across TikTok, it is also the most effective way of making people laugh while watching your video. This will also bring recurring viewers across your channel.
Display Failure Videos
It is always great to see people trying and doing something funny across the video. Failure videos are believed to be the other way of creating content for a funny vlog on your TikTok, which shall make people laugh hard.
Use Goofy and Peculiar Voices
Unrealistic and weird voices can make your short video seem funny. If you consider talking about something in a silly voice, it will make people burst out of laughter.
Trolling Family Members
One of the best ways to make something good out of TikTok is creating candid moments. This can always be done if you troll or prank your family members out of nowhere. Just keep reminding that you have to ensure no one gets injured due to it.
Impersonations
Making impersonated videos of major celebrities is another way of showing funny content to the viewers on TikTok. If you consider some funny examples for this, it will surely bring you effective results.
Make Puns and Funny Statements
Another great way to create a funny vlog for your TikTok is to be good at making puns. This is purely hilarious content and needs someone to be highly great in it.
Physical Challenges
This can be a bit risky, but it can become quite fun to make and show to the world if executed with care. However, this can be conducted individually or in a group of people, as you find it appropriate.
Use Effects of TikTok
TikTok makes sure to provide something funny in effects to its users. The use of effects for TikTok is an excellent technique to make funny vlogs; however, it can get funny if the elements used across it have a dubious meaning.
Run Everything in Reverse
One of the most straightforward techniques to make a funny vlog is to run everything in reverse order. The simplest thing of a video becomes the funniest to watch.
Part 2: 5 Popular Funny Vloggers on TikTok
This part will provide some popular examples of TikTokers who have made a considerate performance in providing funny content to people across the platform.
Khaby Lame
This is, without a doubt, the first-choice in TikTok accounts that would always come while relating to funny content. Khaby started his journey as a TikToker with a remarkably simple motive of pointing out the simplicity in different tasks, which were displayed to be difficult. Although it sounds pretty basic, the technique taken by Khaby has been so considerate it brought him millions of followers for creating funny content.
Sarah Cooper
Want to see a great impersonation of Donald Trump? It is undoubtedly great to see every time. With Sarah Cooper, it just becomes an entirely different story. Her impersonation has been so perfect that she has been referred to as one of the best funny vloggers on TikTok. Her likes across the platform may not be that great, but she has shown some stature in presenting funny content in a great way.
Dobre Twins
This twin duo is known across many social media platforms for its funny content. As the twins started using TikTok, they started creating good funny vlogs, which gained quite the traction for them. Their unique ideas to present different things have presented the following worth 23 million likes across TikTok, which is quite commendable. However, Lucas and Marcus are only known to operate this TikTok account.
Image alt: dobre twins funny tiktoker
Brittany Broski
Quite a few TikTokers actually make funny videos with impressive comedy. Brittany Broski is a celebrity in this genre, where she has taken great use of her comedy skills to present great vlogs with different and unique topics. Her take on comedy is entirely different, which makes her funny vlog unique and better than others.
Cole LeBrant
This TikToker makes a good collection of funny vlogs across his account with his family. The variety and variability in his videos make him a different version of fun compared to other TikTokers. He has built a great reach across the account, which makes him an impressive choice.
Part 3: How to Make a Funny Vlog?
Funny vlogs are a fabulous way to interact with people of different tastes. It can be something that cherishes the moods of the viewers, regardless of their current emotions. To make this happen, you need a good platform that helps you create a video for your viewers to watch. Wondershare Filmora fulfills the needs of a video editor by providing you with the perfect options while editing the video for TikTok.
For Win 7 or later (64-bit)
For macOS 10.12 or later
If you are looking forward to understanding how to create a funny vlog for your TikTok using Filmora, you need to follow a set of simple steps. These are shown as follows:
Step 1: Launch and Import Video
To start, you need to have Wondershare Filmora installed across your device. Launch the tool and click on “New Project” to start from scratch. Once the screen opens up, you need to click on the “Arrow Head” icon across the ‘Media’ Tab to import the audio you wish to amend for TikTok.
Step 2: Perform Basic Editing
Wondershare Filmora provides users with multiple options for editing their files. At first, drag the file onto the timeline. Following this, you can merge different videos or enhance the video by trimming it. Along with that, you can also consider splitting the image or changing its playback speed for different results.
Step 3: Add Effects and Transitions
After you are done with some basic editing, you can add different effects from the “Effects” section. To make the video look exclusive, you can also include “Transitions” across it. Use the “Elements” tab to include stickers and emojis to enhance your TikTok video.
Step 4: Manage the Audio
For managing the audio of your video, you can make several changes across it. You can detach audio and change the audio with another soundtrack. Filmora also allows you to add audio from the “Audio” section, which contains royalty-free music to add. Once you are done, click on the “Export” button to set the settings of the video before exporting it back onto the device.
Closing Words
This article has presented some of the finest tips that can be utilized for creating funny vlogs on your TikTok. If you coherently use these tips, you can get significant results across your account in the name of the followers. Along with that, you can also use Filmora for making the best funny vlog with different editing tools.
Wondershare Filmora
Get started easily with Filmora’s powerful performance, intuitive interface, and countless effects!
Try It Free Try It Free Try It Free Learn More >
AVI Editor for Windows 11/10/8.1/8/7: Easily Edit AVI Files on PC
Video is continually changing the way we express and communicate with the world. Several people record vlogs and share them with their family and friends. The same goes for YouTubers and business owners who create videos to boost their business online. Due to this, different video editors are available for various video formats. A common video format is AVI, and if you’re wondering what the best AVI editor for different Window versions is, you’re in luck.
If you’re new to the video editing space, you might be wondering which is the best choice for your Windows format. This article explores the best AVI editors available. We cover both paid and free editors that you can use to edit AVI files on PC easily. So without further ado, let’s begin.
Best AVI Editor to Edit AVI Video on Windows - Filmroa Video Editor

Supported System: Windows and Mac
Most free editing software is usually too simple to meet your immediate demands, or they’re too challenging for you to understand the workflow. Some AVI editors for Windows lack crucial editing features like audio editing and color correction features. An AVI editor that successfully bridges the gap to become the best AVI editor for Windows on our list is Filmora Video Editor .
This editor offers excellent performance and a fast editing process that takes user experience to a new level. It is ideal for beginners because of its intuitive interface. Additionally, intermediate and professional AVI editors can also use this video editor to create stylish videos and utilize its built-in professional effects.
For Win 7 or later (64-bit)
For macOS 10.14 or later
Wondershare Filmora Features
- It is versatile and supports other video formats like MKV, MP4, MOV, etc.
- Users can crop, cut, trim, split, and combine with just a few clicks.
- Access to advanced video effects like motion elements, royalty-free music, transition, animated titles, and more
- Footage can look like Hollywood videos with Filmora color tuning features.
- With background noise removal, audio keyframing, and the audio equalizer tool, you can edit sounds.
- It provides you with real-time rending to ensure a smooth editing experience.
- You can burn videos to DVD, transfer them to various devices or upload them on YouTube or other video streaming platforms.
How to Edit Videos on Windows 11/10/8/7 Using Wondershare Filmora
Editing your videos on Filmora is relatively easy and takes just a few minutes. Keep reading to learn how to edit AVI videos on Windows 11/10/8/7 using Wondershare Filmora.
Step 1: Import AVI Video
The first step you have to take is adding the AVI video you would like to edit with Filmora. You can do this by creating a new project. Then, click on New Project on the homepage.

Once it opens a new page, click the + icon to browse the files on your device or import them from an external device.

Step 2: Edit AVI Videos
After importing your videos, you can start editing and arranging elements in your video timeline. You can overwrite, append, and carry out other editing options.

You can also add effects, titles, filters, and music using Filmora.

Step 3: Save and Share Edited AVI Video Files

Once you’re done editing your video using Filmora Video Editor, you’re ready to save your file. You can choose to save your video in a new format. There are different video formats available to choose from. You can either save it to a select location on your PC or export it to any preferred device. Filmora Video Editor also allows you to upload directly to a video streaming platform or burn to a DVD.
More Free AVI Editor for Windows to Edit AVI Videos
This section will list some of the best free AVI editors for Windows to successfully edit your AVI editors. You would have to download these programs as they offer you more editing tools than an online AVI editor.
Microsoft Windows 10/11 Photos App

Supported System: Windows
This free AVI video editor is compatible with Windows 10/11 and comes prebuilt into your Windows 10 PC. If you’re looking for free AVI editing software, this is one of the best options you would find. One of the benefits of using this AVI video editor is that it eliminates the need for additional downloads. It comes pre-installed. However, if you can’t find this Photos App on your Windows 10/11, you can download it from Microsoft Store.
It is lightweight and allows you easily edit your AVI videos. You can also convert images into an AVI video under the Automatic Video mode. This helps save time if you don’t want to do much editing. However, if there are features you would like to edit in your video, you can use the custom video mode to trim, change audio volume, resize video, and include filters, motion, text, and several 3D effects in your AVI video.
However, you should note that there’s no timeline, and there are some advanced features like video stabilization, split tools, and much more missing on this free AVI editor for Windows. However, it is versatile and supports several other video formats.
Pros
- It supports several video formats, including AVI, MPE, MPG, ASF, MP2, and many more
- It is entirely free
- Ideal for beginners with few editing needs
- There’s no need for a new download as it comes built-in
Cons
- It doesn’t support several modern file formats
- The output formats are limited
- It lacks advanced video editing features
How to Edit Using Microsoft Windows 10/11 Photos App
Editing your AVI video with Microsoft Photos App is relatively easy; follow the steps below.
- First, click the ‘add’ button in the left corner of the page and select the video you want to edit

- Next, check the media elements necessary for your video and then tap on ‘place in storyboard.’

- Now you can start editing your video. One of the ways to edit your video is to extend the duration of your video by clicking the duration button.

- You can also add motion to the video under the ‘storyboard’ section. Select the media element you would like to edit and hit the ‘motions’ button. You can then select different motion effects.

- Additionally, you can add filters under the storyboard section.

- Editors can also trim and split AVI video on this Photos app.

- Once you’re done editing, click on ‘save as’ to save your edited AVI video.
OpenShot – Open Source Video Editor

Supported System: Windows, Mac and Linus
If you want an AVI editor compatible with Windows 10/11/8/7, you should try OpenShot – Open Source Video Editor. It is ideal for carrying out basic video editing like trimming and slicing. This video editor also offers several transitions and audio effects to help you make simple videos.
There are unlimited video tracks available on OpenShot; this means you can add as many audio and video clips.
It also offers you tile templates and video formats. If you want to add more touches to your video, this free AVI editor for Windows will help you achieve that. Other impressive editing features are available on this AVI editor, like slow-motion effects, blending modes, 3D animations, and many more. Additionally, the frame and keyframes accuracy feature helps you create detailed edits. You’ll easily customize your AVI video to your preference with this platform.
When exporting your file, you can export it in varying formats. You can also upload your AVI video directly to YouTube or your social media accounts. Despite the professional-level tool, the user interface is intuitive, which simplifies the editing process. However, you might find that it lacks some of the advanced editing features you would find in other AVI editors.
Pros
- It features an intuitive user interface
- It offers several editing tools for beginners and intermediate users
- It allows you to add as many audio and video tracks as you would prefer
- It is entirely free
- There are varying output formats for your selection
Cons
- Limited advanced editing tools
- OpenShot can be slow and laggy sometimes
How to Edit AVI Video With OpenShot
Using OpenShot to edit your AVI videos is relatively easy. The steps below will explain the basics and how you can edit within minutes.
- First, you have to import your media file into OpenShot.

- Next, arrange the videos on the timeline. If two or more clips overlap, this AVI editor automatically creates a smooth fade between them.

- You can then edit using the different available tools. OpenShot also allows you to add music to the timeline.

- After editing, preview the video project and export. You can also share directly to streaming platforms like YouTube, Vimeo, and more.

VSDC Video Editor – Free Movie Editor

Supported System: Windows and Mac
This AVI video editor is designed to ensure an excelling editing process for users on Windows 10. Therefore, even beginners can utilize this video editor to edit their media projects. Although it is free, it offers powerful editing features to take your AVI video to the next level. There are many features like filters, transition effects, overlays, color correction, and many more you can use.
Although it supports AVI video files, it also supports several popular media file formats. You can also save your AVI video in a new format after editing due to its effective video converter tools. Additionally, VSDC Video Editor is a non-linear tool that allows you to easily place video clips in the timeline.
You can save your edited AVI videos to your PC or upload them directly to different video streaming platforms like YouTube, Instagram, Vimeo, etc. We also love that it allows you to edit HD and 4k videos without compromising the quality. This isn’t a common feature with most free AVI video editing software.
Pros
- It is a free video editing software for Windows 10
- It is versatile and supports different video and audio formats
- There is an excellent selection of filters, effects, and transitions
- You can convert AVI videos to a new format with its built-in video converter
- It features an intuitive interface that’s friendly to beginners
Cons
- Technical support isn’t free
- It doesn’t offer professional video editing tools
Steps to Edit AVI Videos Using VSDC Video Editor
This is a simple AVI editor to use, and the steps below simplify the process for you even further; let’s take a look.
- Firstly, import your video into the VSDC Video editor by clicking the ‘import content’ button.

- Once you choose a file on your Windows PC, the app will ask if you would like to change the resolution and several more parameters.
- You can start editing your videos with the different tools available, like cutting and splitting.

- You can also crop the video if necessary.

- Another option is to apply different effects and transitions to your AVI video.

- Once you’re done editing your video, you can then export it. VSDC allows you to choose the output format. This is the best time to select a different format if that’s the goal.

- Alternatively, you can share your video directly to YouTube and other video streaming platforms.
More Paid AVI Editor for Windows to Edit AVI Videos
Although there are free AVI editors, they usually come with limited editing features. If you want an AVI editor that offers more editing features for professionals, you should try paid AVI editor for Windows. This section explores the top three paid AVI editors you can use to edit AVI videos on Windows.
Movavi Video Editor Plus

Supported System: Windows and Mac
This paid AVI video editor is compatible with Windows 10 and higher. It is an AVI editing tool that offers a user-friendly interface and advanced editing features for professionals. This video editor is compatible with Windows and Mac and supports all the popular video codecs to provide more options. It is pretty easy to navigate and master, so beginners can also utilize this AVI editor to improve their editing skills.
The best part is that you don’t need it offers all you need for basic editing and advanced video enhancement. You can expect a professional quality when you utilize this editing tool. It is great for all experience levels. You can integrate various visual and audio effects in your video using Movavi Video Editor Plus. It also allows you easily edit, trim, crop, and rotate your videos. Additionally, you can include subtitles, headings, and titles in your AVI video.
If you want to take your video to the next level, you can explore the different media options like filters, animations, music, transitions, and many more from its library. You can also save your AVI video to your PC or share it directly to YouTube to save space on your PC.
Pros
- It offers you an easy to use and intuitive interface
- Ideal for beginners and professionals
- Ensures professional and top-quality results
- It supports various file formats
- Allows direct sharing to video streaming platforms
Cons
- The free trial is relatively limited
- It doesn’t allow more than one project at a time
Steps to Edit AVI Video Using Movavi Video Editor Plus
Using this AVI editor for Windows is quite easy. However, the step-by-step guide below will help you get through the editing process within minutes.
- First, install the Movavi Video Editor Plus software on your PC
- Next, click ‘add files’ to add your AVI video files. Afterward, drag the selected video into the video editor timeline.

- You can then start editing your video by applying filters, enhancing the quality, adding filters and transitions, etc.

- After editing, save your video by hitting the ‘export’ button. Choose how you would like to save your video and hit ‘start.

This will save your video to your chosen location.
PowerDirector 365

Supported System: Windows and Mac
An AVI editor compatible with Windows 11/10/8/8.1 or 7 is PowerDirector 365. It offers an intuitive user interface and advanced video editing features. Using this editing software is quite easy, making it ideal for beginners, intermediates, and professionals. In addition, it is compatible with Windows and Mac OS, making it a versatile choice. You can easily create Hollywood-level videos from your Windows computer using PowerDirector 365.
Some of the editing features on this AVI editor include green-screen, royalty-free music, and many more advanced visual filters. It also offers thousands of templates, overlay effects, and built-in transitions to speed up the editing process. It is an excellent option if you’re looking to enhance your raw footage using cool filters and graphics. Additionally, PowerDirector 365 offers users a dual-screen and customizable editing workspace for streamlining your AVI video editing process.
While it preserves the quality of your AVI video, it allows you to save the output in other high-resolution formats like Ultra HD 4K and many more. You can also share your video directly to various streaming platforms to save you time and space on your device.
Pros
- User-friendly interface and ideal for professionals, intermediate, and beginners
- Access to built-in transitions and overlay effects
- Compatible with Windows and Mac
- Allows users to save output AVI files in higher resolution video formats
- Access to royalty-free iStock and Shutterstock library
Cons
- Limited free version
- It can be complex for beginners to understand
Steps to Edit Using PowerDirector 365
- Firstly, launch the app and choose ‘full mode’ to begin the editing process.

- Next, select ‘import media folder’ to import the media files you want to edit.

- Browse the folders on your PC and choose the folder with the videos you want; click ‘select folder’ to import them into the editor’s media library.

- Now you can select the video you want to edit from the media library and drag it into the video timeline.

- The editing process can begin. PowerDirector 365 allows you to split and trim your video clips.

- You can also add transitions between the clips by selecting the transition room.

- You can also add title texts to your AVI video if you prefer.

- After editing, select the ‘produce’ tab to export your video.

- You can choose to change the video format before exporting.

- Once you choose your preferred format, it will save your edited AVI video file.
Which Should I Choose: Free or Paid AVI Editor?
Many AVI editors for Windows (free and paid) are available on the internet. Therefore, it can be pretty challenging to determine the right AVI editor for Windows to choose. You need to consider many factors to make your choice, and below are some of them.
- Experience Level: One of the most crucial features you need to consider is your experience level. If you’re a beginner, you don’t want an AVI editor that offers complex features you can use. The same goes for professionals; you don’t want an editor without comprehensive editing tools to meet your editing needs. You should lookout for an editor that supports beginners and professionals. This will eliminate the need to look for a new editor once your skills improve.
- Interface: You also need to consider the user interface of your video editor before choosing between paid and free AVI editors for Windows. A friendly user interface can save you a lot of time getting familiar with the editing software. Check out the user interface to determine how easy it would be to navigate when editing your AVI videos.
- Formats: Ensure that the software you choose doesn’t limit you to specific video formats. You want an AVI editor that also supports the common and modern video formats. This allows you to convert your AVI videos when you need to share your video to streaming platforms that don’t support AVI file formats.
Most free AVI editors offer limited features to users, limiting your editing process. Additionally, some paid AVI editors focuses on professional and makes it difficult for beginners to use. Always opt for an AVI editor that succinctly supports all your editing needs and allows you to develop your skills.
Conclusion
Although AVI is an old video format, it is quite popular. Therefore, it’s crucial to have an AVI video editor if you prefer this file format. This article covered the best free and paid AVI editor for Windows. Most of the reviewed editing software offers you unique features to fulfill your editing needs. We also mentioned the pros and cons of each AVI editor for Windows to help you determine which option suits you best. If you want a video editor that will help you take your videos to the next level, you will need an editor that provides you with access to many special effects and unique editing tools. Filmora Video Editor provides you with an intuitive interface and a feature-packed library to start editing your AVI videos.
FAQs About Editing AVI Video
- How can I edit AVI videos like a pro? To edit an AVI video like a pro, you need to learn to use advanced editing features. One of the ideal ways is to pick an AVI editor with an intuitive interface that allows you to master professional concepts.
- What is the best AVI video editor for Windows 10? The best AVI editor for Windows 10 depends on your experience and if you’re looking for free or paid software.
- Can I edit an AVI file? Yes, you can. You need to find an AVI editing software compatible with your operating system and version. Also, you need to ensure it is ideal for your level of experience.
Supported System: Windows and Mac
Most free editing software is usually too simple to meet your immediate demands, or they’re too challenging for you to understand the workflow. Some AVI editors for Windows lack crucial editing features like audio editing and color correction features. An AVI editor that successfully bridges the gap to become the best AVI editor for Windows on our list is Filmora Video Editor .
This editor offers excellent performance and a fast editing process that takes user experience to a new level. It is ideal for beginners because of its intuitive interface. Additionally, intermediate and professional AVI editors can also use this video editor to create stylish videos and utilize its built-in professional effects.
For Win 7 or later (64-bit)
For macOS 10.14 or later
Wondershare Filmora Features
- It is versatile and supports other video formats like MKV, MP4, MOV, etc.
- Users can crop, cut, trim, split, and combine with just a few clicks.
- Access to advanced video effects like motion elements, royalty-free music, transition, animated titles, and more
- Footage can look like Hollywood videos with Filmora color tuning features.
- With background noise removal, audio keyframing, and the audio equalizer tool, you can edit sounds.
- It provides you with real-time rending to ensure a smooth editing experience.
- You can burn videos to DVD, transfer them to various devices or upload them on YouTube or other video streaming platforms.
How to Edit Videos on Windows 11/10/8/7 Using Wondershare Filmora
Editing your videos on Filmora is relatively easy and takes just a few minutes. Keep reading to learn how to edit AVI videos on Windows 11/10/8/7 using Wondershare Filmora.
Step 1: Import AVI Video
The first step you have to take is adding the AVI video you would like to edit with Filmora. You can do this by creating a new project. Then, click on New Project on the homepage.
Once it opens a new page, click the + icon to browse the files on your device or import them from an external device.
Step 2: Edit AVI Videos
After importing your videos, you can start editing and arranging elements in your video timeline. You can overwrite, append, and carry out other editing options.
You can also add effects, titles, filters, and music using Filmora.
Step 3: Save and Share Edited AVI Video Files
Once you’re done editing your video using Filmora Video Editor, you’re ready to save your file. You can choose to save your video in a new format. There are different video formats available to choose from. You can either save it to a select location on your PC or export it to any preferred device. Filmora Video Editor also allows you to upload directly to a video streaming platform or burn to a DVD.
More Free AVI Editor for Windows to Edit AVI Videos
This section will list some of the best free AVI editors for Windows to successfully edit your AVI editors. You would have to download these programs as they offer you more editing tools than an online AVI editor.
Microsoft Windows 10/11 Photos App
Supported System: Windows
This free AVI video editor is compatible with Windows 10/11 and comes prebuilt into your Windows 10 PC. If you’re looking for free AVI editing software, this is one of the best options you would find. One of the benefits of using this AVI video editor is that it eliminates the need for additional downloads. It comes pre-installed. However, if you can’t find this Photos App on your Windows 10/11, you can download it from Microsoft Store.
It is lightweight and allows you easily edit your AVI videos. You can also convert images into an AVI video under the Automatic Video mode. This helps save time if you don’t want to do much editing. However, if there are features you would like to edit in your video, you can use the custom video mode to trim, change audio volume, resize video, and include filters, motion, text, and several 3D effects in your AVI video.
However, you should note that there’s no timeline, and there are some advanced features like video stabilization, split tools, and much more missing on this free AVI editor for Windows. However, it is versatile and supports several other video formats.
Pros
- It supports several video formats, including AVI, MPE, MPG, ASF, MP2, and many more
- It is entirely free
- Ideal for beginners with few editing needs
- There’s no need for a new download as it comes built-in
Cons
- It doesn’t support several modern file formats
- The output formats are limited
- It lacks advanced video editing features
How to Edit Using Microsoft Windows 10/11 Photos App
Editing your AVI video with Microsoft Photos App is relatively easy; follow the steps below.
- First, click the ‘add’ button in the left corner of the page and select the video you want to edit
- Next, check the media elements necessary for your video and then tap on ‘place in storyboard.’
- Now you can start editing your video. One of the ways to edit your video is to extend the duration of your video by clicking the duration button.
- You can also add motion to the video under the ‘storyboard’ section. Select the media element you would like to edit and hit the ‘motions’ button. You can then select different motion effects.
- Additionally, you can add filters under the storyboard section.
- Editors can also trim and split AVI video on this Photos app.
- Once you’re done editing, click on ‘save as’ to save your edited AVI video.
OpenShot – Open Source Video Editor
Supported System: Windows, Mac and Linus
If you want an AVI editor compatible with Windows 10/11/8/7, you should try OpenShot – Open Source Video Editor. It is ideal for carrying out basic video editing like trimming and slicing. This video editor also offers several transitions and audio effects to help you make simple videos.
There are unlimited video tracks available on OpenShot; this means you can add as many audio and video clips.
It also offers you tile templates and video formats. If you want to add more touches to your video, this free AVI editor for Windows will help you achieve that. Other impressive editing features are available on this AVI editor, like slow-motion effects, blending modes, 3D animations, and many more. Additionally, the frame and keyframes accuracy feature helps you create detailed edits. You’ll easily customize your AVI video to your preference with this platform.
When exporting your file, you can export it in varying formats. You can also upload your AVI video directly to YouTube or your social media accounts. Despite the professional-level tool, the user interface is intuitive, which simplifies the editing process. However, you might find that it lacks some of the advanced editing features you would find in other AVI editors.
Pros
- It features an intuitive user interface
- It offers several editing tools for beginners and intermediate users
- It allows you to add as many audio and video tracks as you would prefer
- It is entirely free
- There are varying output formats for your selection
Cons
- Limited advanced editing tools
- OpenShot can be slow and laggy sometimes
How to Edit AVI Video With OpenShot
Using OpenShot to edit your AVI videos is relatively easy. The steps below will explain the basics and how you can edit within minutes.
- First, you have to import your media file into OpenShot.
- Next, arrange the videos on the timeline. If two or more clips overlap, this AVI editor automatically creates a smooth fade between them.
- You can then edit using the different available tools. OpenShot also allows you to add music to the timeline.
- After editing, preview the video project and export. You can also share directly to streaming platforms like YouTube, Vimeo, and more.
VSDC Video Editor – Free Movie Editor
Supported System: Windows and Mac
This AVI video editor is designed to ensure an excelling editing process for users on Windows 10. Therefore, even beginners can utilize this video editor to edit their media projects. Although it is free, it offers powerful editing features to take your AVI video to the next level. There are many features like filters, transition effects, overlays, color correction, and many more you can use.
Although it supports AVI video files, it also supports several popular media file formats. You can also save your AVI video in a new format after editing due to its effective video converter tools. Additionally, VSDC Video Editor is a non-linear tool that allows you to easily place video clips in the timeline.
You can save your edited AVI videos to your PC or upload them directly to different video streaming platforms like YouTube, Instagram, Vimeo, etc. We also love that it allows you to edit HD and 4k videos without compromising the quality. This isn’t a common feature with most free AVI video editing software.
Pros
- It is a free video editing software for Windows 10
- It is versatile and supports different video and audio formats
- There is an excellent selection of filters, effects, and transitions
- You can convert AVI videos to a new format with its built-in video converter
- It features an intuitive interface that’s friendly to beginners
Cons
- Technical support isn’t free
- It doesn’t offer professional video editing tools
Steps to Edit AVI Videos Using VSDC Video Editor
This is a simple AVI editor to use, and the steps below simplify the process for you even further; let’s take a look.
- Firstly, import your video into the VSDC Video editor by clicking the ‘import content’ button.
- Once you choose a file on your Windows PC, the app will ask if you would like to change the resolution and several more parameters.
- You can start editing your videos with the different tools available, like cutting and splitting.
- You can also crop the video if necessary.
- Another option is to apply different effects and transitions to your AVI video.
- Once you’re done editing your video, you can then export it. VSDC allows you to choose the output format. This is the best time to select a different format if that’s the goal.
- Alternatively, you can share your video directly to YouTube and other video streaming platforms.
More Paid AVI Editor for Windows to Edit AVI Videos
Although there are free AVI editors, they usually come with limited editing features. If you want an AVI editor that offers more editing features for professionals, you should try paid AVI editor for Windows. This section explores the top three paid AVI editors you can use to edit AVI videos on Windows.
Movavi Video Editor Plus
Supported System: Windows and Mac
This paid AVI video editor is compatible with Windows 10 and higher. It is an AVI editing tool that offers a user-friendly interface and advanced editing features for professionals. This video editor is compatible with Windows and Mac and supports all the popular video codecs to provide more options. It is pretty easy to navigate and master, so beginners can also utilize this AVI editor to improve their editing skills.
The best part is that you don’t need it offers all you need for basic editing and advanced video enhancement. You can expect a professional quality when you utilize this editing tool. It is great for all experience levels. You can integrate various visual and audio effects in your video using Movavi Video Editor Plus. It also allows you easily edit, trim, crop, and rotate your videos. Additionally, you can include subtitles, headings, and titles in your AVI video.
If you want to take your video to the next level, you can explore the different media options like filters, animations, music, transitions, and many more from its library. You can also save your AVI video to your PC or share it directly to YouTube to save space on your PC.
Pros
- It offers you an easy to use and intuitive interface
- Ideal for beginners and professionals
- Ensures professional and top-quality results
- It supports various file formats
- Allows direct sharing to video streaming platforms
Cons
- The free trial is relatively limited
- It doesn’t allow more than one project at a time
Steps to Edit AVI Video Using Movavi Video Editor Plus
Using this AVI editor for Windows is quite easy. However, the step-by-step guide below will help you get through the editing process within minutes.
- First, install the Movavi Video Editor Plus software on your PC
- Next, click ‘add files’ to add your AVI video files. Afterward, drag the selected video into the video editor timeline.
- You can then start editing your video by applying filters, enhancing the quality, adding filters and transitions, etc.
- After editing, save your video by hitting the ‘export’ button. Choose how you would like to save your video and hit ‘start.
This will save your video to your chosen location.
PowerDirector 365
Supported System: Windows and Mac
An AVI editor compatible with Windows 11/10/8/8.1 or 7 is PowerDirector 365. It offers an intuitive user interface and advanced video editing features. Using this editing software is quite easy, making it ideal for beginners, intermediates, and professionals. In addition, it is compatible with Windows and Mac OS, making it a versatile choice. You can easily create Hollywood-level videos from your Windows computer using PowerDirector 365.
Some of the editing features on this AVI editor include green-screen, royalty-free music, and many more advanced visual filters. It also offers thousands of templates, overlay effects, and built-in transitions to speed up the editing process. It is an excellent option if you’re looking to enhance your raw footage using cool filters and graphics. Additionally, PowerDirector 365 offers users a dual-screen and customizable editing workspace for streamlining your AVI video editing process.
While it preserves the quality of your AVI video, it allows you to save the output in other high-resolution formats like Ultra HD 4K and many more. You can also share your video directly to various streaming platforms to save you time and space on your device.
Pros
- User-friendly interface and ideal for professionals, intermediate, and beginners
- Access to built-in transitions and overlay effects
- Compatible with Windows and Mac
- Allows users to save output AVI files in higher resolution video formats
- Access to royalty-free iStock and Shutterstock library
Cons
- Limited free version
- It can be complex for beginners to understand
Steps to Edit Using PowerDirector 365
- Firstly, launch the app and choose ‘full mode’ to begin the editing process.
- Next, select ‘import media folder’ to import the media files you want to edit.
- Browse the folders on your PC and choose the folder with the videos you want; click ‘select folder’ to import them into the editor’s media library.
- Now you can select the video you want to edit from the media library and drag it into the video timeline.
- The editing process can begin. PowerDirector 365 allows you to split and trim your video clips.
- You can also add transitions between the clips by selecting the transition room.
- You can also add title texts to your AVI video if you prefer.
- After editing, select the ‘produce’ tab to export your video.
- You can choose to change the video format before exporting.
- Once you choose your preferred format, it will save your edited AVI video file.
Which Should I Choose: Free or Paid AVI Editor?
Many AVI editors for Windows (free and paid) are available on the internet. Therefore, it can be pretty challenging to determine the right AVI editor for Windows to choose. You need to consider many factors to make your choice, and below are some of them.
- Experience Level: One of the most crucial features you need to consider is your experience level. If you’re a beginner, you don’t want an AVI editor that offers complex features you can use. The same goes for professionals; you don’t want an editor without comprehensive editing tools to meet your editing needs. You should lookout for an editor that supports beginners and professionals. This will eliminate the need to look for a new editor once your skills improve.
- Interface: You also need to consider the user interface of your video editor before choosing between paid and free AVI editors for Windows. A friendly user interface can save you a lot of time getting familiar with the editing software. Check out the user interface to determine how easy it would be to navigate when editing your AVI videos.
- Formats: Ensure that the software you choose doesn’t limit you to specific video formats. You want an AVI editor that also supports the common and modern video formats. This allows you to convert your AVI videos when you need to share your video to streaming platforms that don’t support AVI file formats.
Most free AVI editors offer limited features to users, limiting your editing process. Additionally, some paid AVI editors focuses on professional and makes it difficult for beginners to use. Always opt for an AVI editor that succinctly supports all your editing needs and allows you to develop your skills.
Conclusion
Although AVI is an old video format, it is quite popular. Therefore, it’s crucial to have an AVI video editor if you prefer this file format. This article covered the best free and paid AVI editor for Windows. Most of the reviewed editing software offers you unique features to fulfill your editing needs. We also mentioned the pros and cons of each AVI editor for Windows to help you determine which option suits you best. If you want a video editor that will help you take your videos to the next level, you will need an editor that provides you with access to many special effects and unique editing tools. Filmora Video Editor provides you with an intuitive interface and a feature-packed library to start editing your AVI videos.
FAQs About Editing AVI Video
- How can I edit AVI videos like a pro? To edit an AVI video like a pro, you need to learn to use advanced editing features. One of the ideal ways is to pick an AVI editor with an intuitive interface that allows you to master professional concepts.
- What is the best AVI video editor for Windows 10? The best AVI editor for Windows 10 depends on your experience and if you’re looking for free or paid software.
- Can I edit an AVI file? Yes, you can. You need to find an AVI editing software compatible with your operating system and version. Also, you need to ensure it is ideal for your level of experience.
Also read:
- 2024 Approved 15 Camera Shake Preset for Premiere Pro to Add Camera Shake with Simple Keyframes. Each Preset Is Editable with Easy Steps. Make Your Video Shocking and Impressive with These Camera Shake Effects
- In 2024, Are You Convincingly Fascinated by the Whole Idea of Augmented Reality and Want to Level up Your Marketing Skills with an AR Integration? Rest Assured, Youve Found the Right Place
- 2024 Approved How to Make a Slideshow GIF?
- 5 Excellent Tools To Convert Video to 60 FPS
- How to Fade to Black Premiere Pro for 2024
- In 2024, Top 8 Video Editor with Useful Masking
- Updated | How to Share YouTube Video on Zoom, In 2024
- In 2024, 100+ Best TikTok Captions Enhance Your Content
- 2024 Approved Wondering How to Edit a Video to Slow Motion on iPhone and Android Devices? Find Out How to Use Wondershare Filmora to Create and Edit Slo Mo Videos in a Few Clicks
- A Guide to Effective Video Marketing for 2024
- In 2024, How to Add the Popular Video Text Effects to Your Video?
- In 2024, Do You Wish to Make Changes Across Your Video? Are You Looking to Record Your Desktop Screen on Mac? Worry Not, as This Article Provides Details About QuickTime Player that Caters to All User Requirements
- Updated Best Ways to Blur Zoom Background for Free
- New 2024 Approved Top 20 Slideshow Makers for Win/Mac/Online Review
- New In 2024, Add Flesh to Your Video Content Before Posting Them for Your Audience to See Using Meme Texts. Use the Tutorial Guide Shared in This Post
- Updated In 2024, How to Create a Glitch Text Effect?
- Updated 2024 Approved Perfecting the Art of Slowing Down Video on Instagram
- 2024 Approved How to Set Up Twitch Green Screen
- S-Log Is a Gamma Curve Optimized for Digital Cameras to Maximize the Image Sensors Performance. Although These Videos May Look Flat and Washed Out, They Contain Lots of Color Information for 2024
- New Best PDF to GIF Converters
- In This Article Ill Share to You some of the Skin Care Vlog Ideas for You to Start Doing a Skin Care Review on Your YouTube Channel. But Before that Ill Share with You How Important Is Skin Care?
- 7 Solutions to Cut Video on Mac without Using FFmpeg, In 2024
- Updated Detailed Steps to Resize Video in Davinci Resolve
- Updated Do You Know There Are Websites to Download Free Glitch Transition Effects for Premiere Pro? You Can Easily Download Them and Make Awesome Videos
- What Are the Best 10 GIF Creator, In 2024
- Want Make a Slide Show Video? Heres How
- Linkedin Posts Can Be Made Engaging by Using the Emojis. This Article Will Tell You Its Importance and Different Ways to Add Them for 2024
- New In 2024, | How to Livestream Zoom on Facebook?
- 2024 Approved AVI Video Format Is Known and Famous for Its Features. Many of You Must Have Heard About It but Do You Know some Details About AVI? Lets Increase Your Knowledge and Talk About It
- Updated In This Article, You Will Learn How to Create an Attractive and Engaging Slideshow Video Using Tools Available in the Wondershare Filmora
- Top 10 Secret Tips & Tricks to Use in Wondershare Filmora
- Updated 2024 Approved 8 Excellent Video and Photo Mergers on Desktop/Mobile/Online
- Updated In 2024, Figuring Out Proper Ways to Play a Video in Slow Motion on iPhone
- In 2024, How to Make an Adobe Slideshow the Easy Way
- New How to Delete White Background in Photoshop. How to Create a Transparent Background in Photoshop? Steps to Get Rid of White Background in Photoshop
- Updated 10 Top Free GIF Background Remover for PC and Online
- Updated How to Blur Faces in Your Video on iPhone
- If You Are Looking for Reliable Solutions to Export Your Musical Slideshow Through a DVD Burning Process, Take a Breath, You Have Landed at the Right Place for 2024
- Updated 2024 Approved Best Shortcut Towards Timeline Template
- 2024 Approved Slow-Motion Edits Are Pretty Mesmerizing, and Weve All Imagined Ourselves in One of Those Visually Appealing, Slowed-Down Movies. Well Teach You How to Make a Smooth Slo-Mo Video Using Twixtor in This Article. Stay Tuned Until the End
- How to Quickly Fix Bluetooth Not Working on Oppo A56s 5G | Dr.fone
- How to Track a Lost Xiaomi Redmi K70 for Free? | Dr.fone
- Top 6 Animated Emoji Video Effects
- In 2024, How to Unlock a Network Locked Realme Narzo 60 5G Phone?
- Read This Guide to Find a Reliable Alternative to Fake GPS On Samsung Galaxy F04 | Dr.fone
- In 2024, How To Change Your SIM PIN Code on Your Samsung Galaxy M34 Phone
- In 2024, How to Bypass Android Lock Screen Using Emergency Call On Infinix Hot 40 Pro?
- How To Transfer WhatsApp From Apple iPhone 15 Pro Max to other iPhone 11 devices? | Dr.fone
- Best Anti Tracker Software For Vivo X Flip | Dr.fone
- 8 Solutions to Fix Find My Friends Location Not Available On Vivo V27 | Dr.fone
- In 2024, How To Unlock Vivo Y77t Phone Without Password?
- In 2024, How to Cast Apple iPhone 11 Pro Max to Chromecast? | Dr.fone
- Useful ways that can help to effectively recover deleted files from Tecno Spark 20C
- How to Remove Find My iPhone without Apple ID On your iPhone 15?
- Title: New Do You Want to Know How to Remove Audio From a Video without a Watermark? Keep Reading This Article Since We Have the Answers for You. Complete with the Guide on How to Do It
- Author: Chloe
- Created at : 2024-04-24 07:08:18
- Updated at : 2024-04-25 07:08:18
- Link: https://ai-editing-video.techidaily.com/new-do-you-want-to-know-how-to-remove-audio-from-a-video-without-a-watermark-keep-reading-this-article-since-we-have-the-answers-for-you-complete-with-the-g/
- License: This work is licensed under CC BY-NC-SA 4.0.
