:max_bytes(150000):strip_icc():format(webp)/switcheshero-4f3b792cb7014baf919e7c68b91e96ab.jpg)
New Do You Want to Make Your Background Disappear and Replace with an Attractive Background? Here Is How to Add a Green Screen to Zoom App and Add Any Virtual Background of Your Choice

Do You Want to Make Your Background Disappear and Replace with an Attractive Background? Here Is How to Add a Green Screen to Zoom App and Add Any Virtual Background of Your Choice
If you are a regular user of Zoom app because you have to attend meetings and video conferences every now and then, you should know how to create a green screen for Zoom calls. There are going to be times when you would not want to show what is in your background because it might look distracting. Besides, changing the background from time to time breaks the monotony of your Zoom calls.
Zoom app allows you to change your background and set any available virtual background. However, the effect of virtual background may not be accurate and smooth unless you have a uniform background color. If you use green screen background for Zoom, you can replace it with any virtual background that will look very realistic to your audiences. We will illustrate how to create a green screen background for Zoom.
Part 1. How to add green screen to Zoom on computer?
Regular Zoom users prefer arranging and attending video conferences from their computers. Zoom desktop app makes it more convenient to attend Zoom conference with a wider screen and better visibility. Make sure you have a uniform green screen in your background before attending Zoom call so that you can replace it with any available virtual background on Zoom. Here are the steps on how to create a green screen for Zoom app on your computer.
Step1Open Zoom app and make sure you are logged into your account. Adjust the webcam so that only you and your green screen should be visible in the frame.
Step2Click on Settings (gear icon) located in the top-right corner.
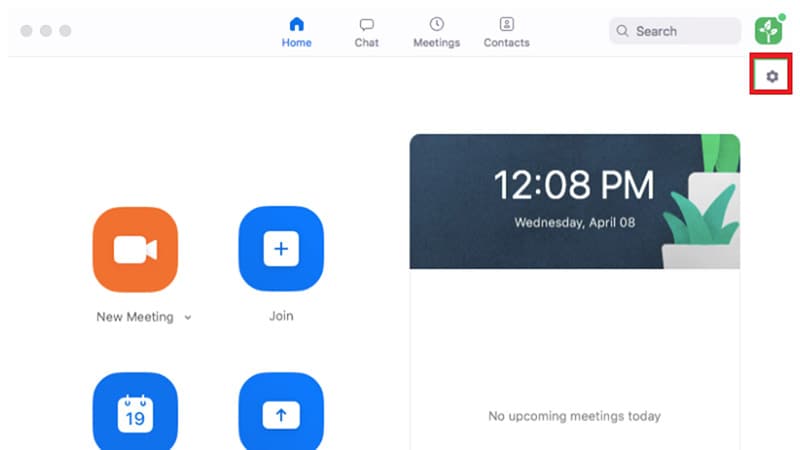
Step3Once Settings window opens, click on Virtual background option on the left panel.
Step4Turn on the option “I have a green screen” located at the bottom. Thereafter, choose a virtual background with which you want to replace the green screen in your video.
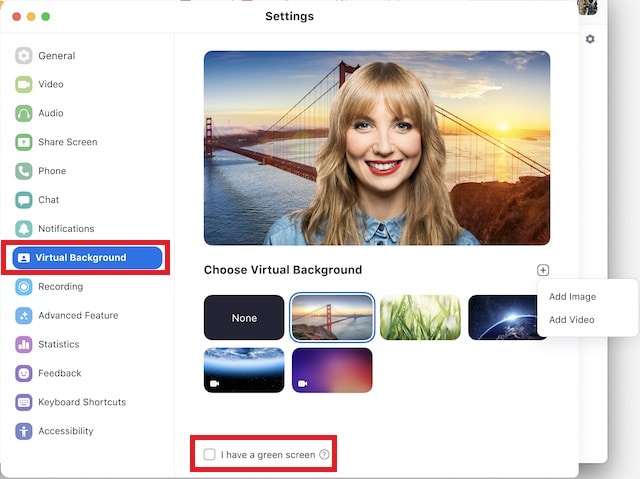
Step5Apart from the present virtual background, you can add photo or video to replace green screen background.
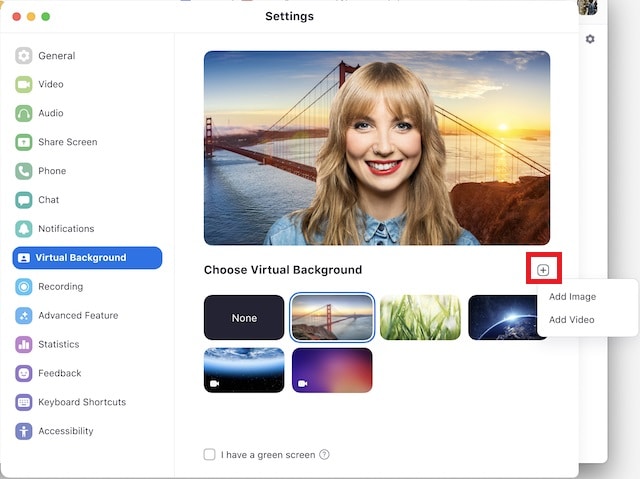
Step6Close Settings window and you will see that your green screen is replaced by your selected virtual background.
Part 2. How to add green screen to Zoom on mobile?
If you are an occasional Zoom user, you are more likely to use your smartphone to attend Zoom conferences. If you want green screen effect on your Zoom call, make sure you have a sizeable green screen in your background. This is because even if you happen to move your phone during the meeting, green screen background should come in the video frame all the time.
It is recommended to use a tripod to keep your smartphone fixed in one spot for better and consistent green screen effect. Here are the steps to answer your question how do you add a green screen to Zoom app on your mobile phone. The steps are the same for Android and iOS users.
Step1Open Zoom app on your smartphone and make sure you are signed into your account.
Step2Start a Zoom meeting and tap on More option located in the bottom-right corner.

Step3Tap on Virtual background and you can select any preset virtual background.
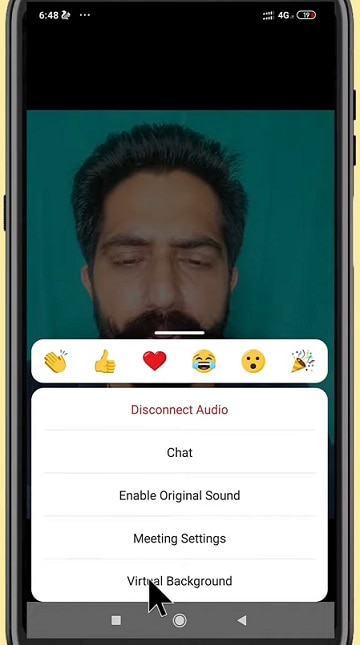
Step4If you want to replace green screen with a customized background, tap on “+” icon and select any photo or video from your phone.
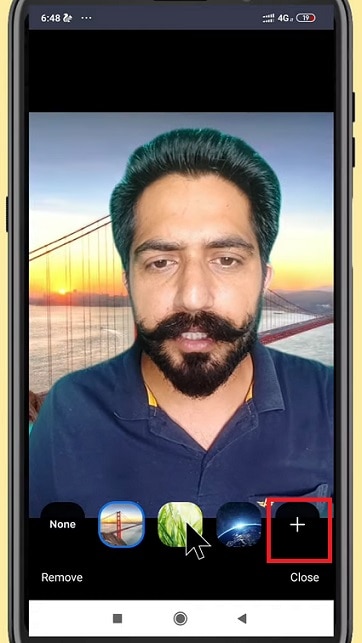
Step5Tap on Close option and the selected virtual background will be applied to your Zoom video.
Part 3. Tips to use green screen on Zoom video
Here are some important tips to use green screen on Zoom video for a better outcome.
Buy Large Green Screen - Since you are going to invest in buying green screen, you should buy a large green screen instead of buying two. Firstly, when you have one large green screen, you can set it up without any wrinkles or overlaps.
Secondly, a large green screen means greater surface area, and even when you slightly change the angle of your camera, your background will still have green screen instead of the exterior wall showing up and ruining virtual background effect.
Buy Green Screen Stand - Along with green screen, you should buy a sizeable green screen stand. A regular green screen stand contains two vertical supports at both ends and one horizontal support where you hand the green screen.
You can buy it according to the size of green screen you have bought. And you need to buy stand because you cannot fix the green screen on the wall properly. If you use any other means, there are going to be wrinkles and uneven virtual background effect.
Green Screen Quality - You can purchase any shade of green screen, but we recommend you opt for vibrant green color for a better outcome. Most importantly, the color should be even across the surface, and there should not be light and dark patches to dampen the virtual background effect and make it look unrealistic. That is why you should not compromise with quality.
Avoid Green Objects - You should not wear anything green. If your green screen has a lighter shade, you can wear deep color dresses and vice versa. Most importantly, you should not keep anything that is green while attending Zoom attending as it will disturb the green screen effect and it will look embarrassing. If you need to keep any green objects in your Zoom meetings, you should have blue screen instead of green screen.
Focus On Lighting - Lighting is extremely important when you want to use green screen. You should place the light so that it spreads evenly across the green screen. Otherwise, there are going to be light and dark patches, and the effect can get disturbed. Make sure you do not cast any shadow on the green screen by positioning the green screen accordingly.
Select A Proper Background - Last but not least, when you change your green screen to any virtual background photo or video, make sure you keep your audiences in mind. If you are attending a meeting, you should keep a professional-looking background. The background should not be distracting and match the theme of your meeting.
Conclusion
We have answered your question, “How do you add a green screen to zoom?” You can use green screen on your Zoom desktop app as well as smartphone app. This will help you to make your usual background cover up with green screen and replace green screen with any virtual background. Keep in mind all the tips we have provided you so that the green screen effect is perfect.
Free Download For Win 7 or later(64-bit)
Free Download For macOS 10.14 or later
Instagram Doesn’t Offer Native Support for GIF Files. So, in This Post, We’ll Learn How to Convert a GIF to a Video for Instagram Using Multiple Methods. ‘
Instagram is one of the best apps to share fun and relatable animated GIFs. But unfortunately, you’ll have to convert GIF to video for Instagram before transferring. The thing is that Instagram only supports PNG, JPG, and MP4 formats. But fret not if you want to share a compelling GIF file on Instagram. You can convert GIFs to MP4 and upload them on the app without restrictions. So, this article discusses the best desktop, mobile, and online apps to convert GIF to video for Instagram.
Part 1: Convert GIF to Video for Instagram on Desktop
Let’s begin this post with the best desktop solutions to convert GIFs to MP4 for Instagram. Remember, the video aspect ratio for Instagram videos is 9:16 or 1:1.
Wondershare Filmora
Rating: 4.5/5
Compatibility: macOS and Windows
Wondershare Filmora is a professional-grade video editing program for both macOS and Windows computers. It features an intuitive, multitrack interface with advanced video editing features and templates to help you create the best Instagram videos. This program lets you exploit themed elements like filters, effects, transitions, and emojis.
In the meantime, you can customize your video with the inbuilt royalty-free music and sound effects. You can also cut, trim, resize, and crop your video before exporting it to various formats, including MP4, MOV, WebM, GIF, etc.
But here is a reminder; free users will have a “Wondershare Filmora” watermark on their outputs. However, you can still exploit all the features with the free account.
Free Download For Win 7 or later(64-bit)
Free Download For macOS 10.14 or later
Follow these steps to convert a GIF to a video for Instagram using Filmora :
Step1Run Filmora and start a project.
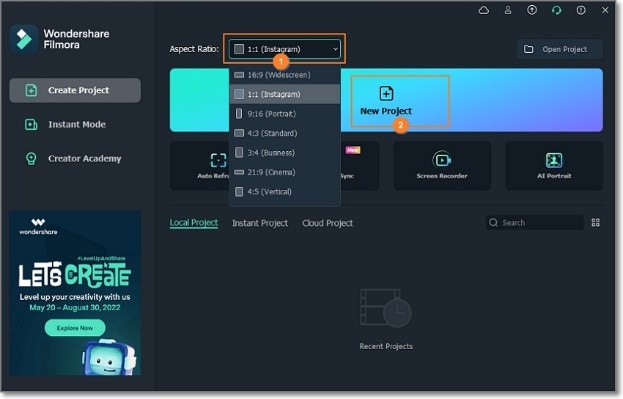
Install and run Wondershare Filmora on your PC and select the Project Aspect Ratio. To create an Instagram video, choose 1:1. Now tap New Project and click File to browse and load the GIF file from your local storage. Then, drag the GIF file to the editing timeline.
Step2 Edit and customize the GIF file (Optional).
Before exporting GIF to MP4, it’s vital to add a few touches to it. For example, you may want to speed up or slow down the GIF’s playback speed. In that case, right-click the video track and then tap Edit Properties. Now click the Speed tab to ramp up the speed or slow it down.
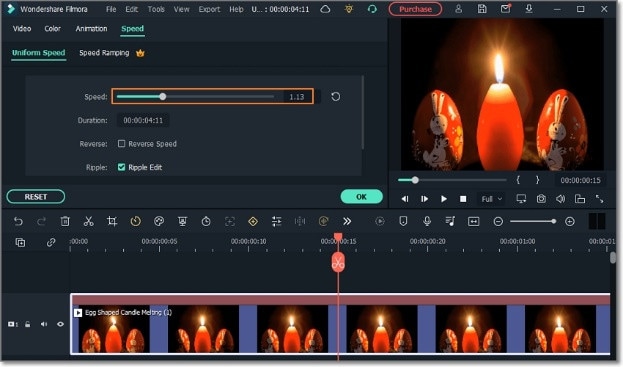
You’ll also see tabs for adding animations, color enhancements, stabilization, and more. So, play around with the video editing tools until you get what works for you. Just remember not to overdo your video.
Step3Customize the video settings and export it to MP4.
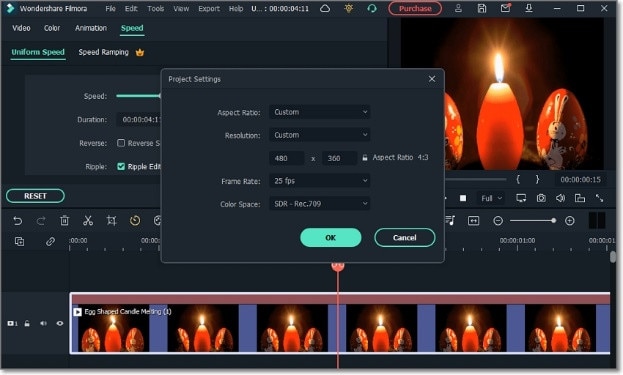
Last but not least, click File > Project Settings to crosscheck the file properties. You can change the aspect ratio, video resolution, frame rate, and color space before clicking Ok.
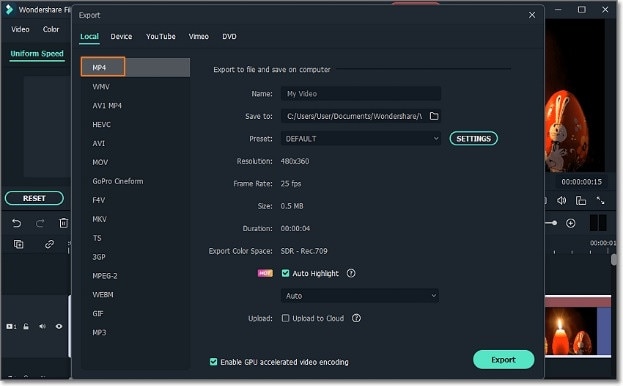
Finally, tap Export, then select Crete Video. Now choose MP4 under the Local tab before setting the video name and folder path. If satisfied, press Export to convert GIF to a video for Instagram. That’s all there is!
Pros
- Easy enough for green hands.
- High-quality sound/video effects and transitions.
- Fast rendering speed.
- Reasonably priced.
Cons
- Watermarked outputs for free users.
- Hidden advanced features.
Movavi Video Converter Premium
Rating: 4.3/5
Compatibility: macOS and Windows
As the name hints, Movavi Video Converter is a video converter cum editor for macOS and Windows PCs. It’s a simple-to-use program that easily converts any video, audio, or image format. Actually, it supports 180+ formats, including MP4, GIF, MOV, AVI, VOB, MP3, and many others.
Besides converting, Movavi Video Converter allows you to trim, cut, merge, and crop your videos. Also, you can losslessly compress files and add subtitles automatically using artificial intelligence. And lest I forget that you can convert videos to device-optimized formats like iPhone, iPad, Samsung Galaxy, Apple TV, and more.
Follow these steps:
Step1Download, install, and open Movavi Video Converter and click the Add Media button to load your GIF file on the program.
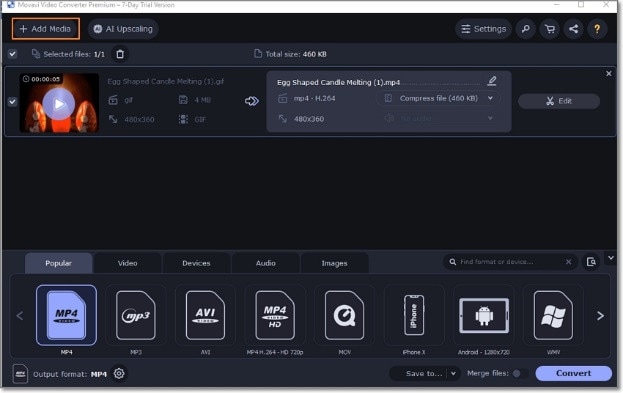
Step2Next up, edit your video to make it look more attractive. For instance, you can trim, cut, and merge it. Movavi Video Converter also allows you to add effects, watermarks, and audio/sound effects.

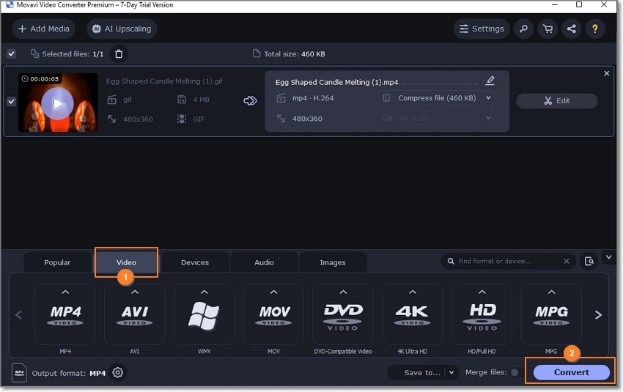
Step3Click the Video tab at the bottom of the screen and choose MP4 as the target format. Lastly, click Convert to encode GIF to MP4 with Movavi Video Converter.
Pros
- Super easy to use.
- Multiple input/output formats.
- Affordable pricing.
- Essential video editing tools.
Cons
- No free account.
- Professional editors should stick to Filmora .
MiniTool Movie Maker
Rating: 4.4/5
Compatibility: Windows
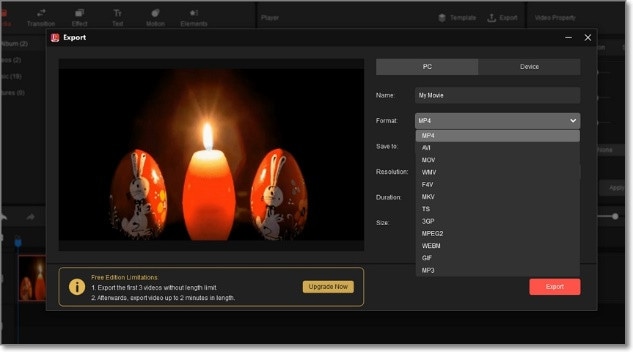
MiniTool Movie Maker is a video editing program for Windows 7, 8, 10, and 11. It boasts an intuitive user interface with rich and advanced features to give your Instagram videos stunning looks. After uploading your GIF file to this video editor, you can trim, crop, and add elements like emojis, arrows, and props.
Also, MiniTool Movie Maker allows you to adjust the video contrast, brightness, and saturation. In addition, you can adjust the video playback speed to make it quicker or slower. Another thing, this program houses hundreds of free video templates to exploit.
Steps to convert a GIF file to MP4 for Instagram with MiniTool Movie Maker:
Step1Install and run MiniTool Movie Maker on your PC and create a new project. Then, click Media > Import Media Files to upload the GIF file.

Step2Now drag and drop the GIF file to the editing timeline and tap the Split icon to trim and cut the video. After that, press the Speed icon to make the video playback speed faster, slower, or reverse the video. You can also add texts, emojis, effects, and more.
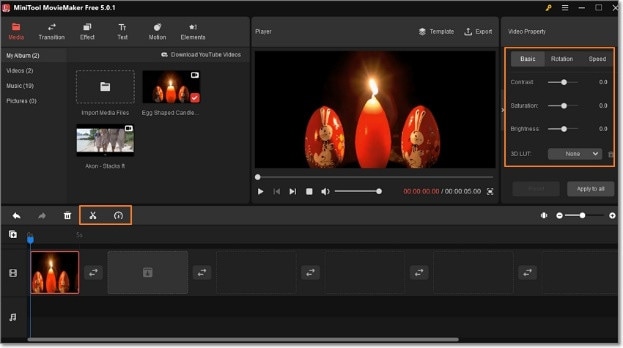
Step3Click the Export button on the preview screen to name the video and set the folder path. Remember to choose MP4 as the target format before clicking Export to save your video.
Pros
- Multiple input/output formats.
- Export 1080P MP4 for free.
- Export videos without watermarks.
- Multiple video effects, texts, sounds, elements, etc.
Cons
- Free users can create 2-minute videos only.
- No macOS version.
Part 2: How to Turn a GIF into an Instagram video on iPhone or Android
What desktops can do, smartphones can equally do these days. So, without dilly-dallying, let’s list the best GIF to Instagram converters for Android/iPhone.
GIF Cracker

Rating: 4.3/5
GIF Cracker is a highly rated iPhone app for converting GIF files to videos and pictures. It’s simple to use and comes with multiple video customization options. For example, you can look, adjust the playback speed, rotate, and resize the GIF file before converting it to MP4. GIF Cracker also boasts multiple filters to spice up your new video or image. What’s more, you can access files from Camera Roll Album.
Pros
- Multiple video customization options.
- Easy to understand and use.
- Convert and edit files from Camera Roll.
Cons
- Annoying adverts.
- Slow conversion speed.
GIF to MP4
Rating: 4.7/5
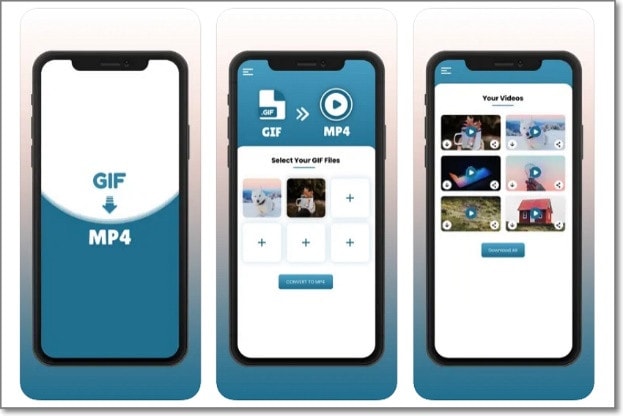
GIF to MP4 is another highly-rated iPhone app to help you convert any GIF file to MP4. It’s easy to use as you only need to upload the GIF file, choose the video format, and tap “Save” to convert. That’s not all. This GIF-to-video converter allows you to export the converted video to Gmail, Facebook, and other social networks.
Pros
- It’s 100% free to use.
- Easy to use and export videos.
- Fast rendering.
Cons
- Multiple adverts.
- Lagging video frames.
Video2Me
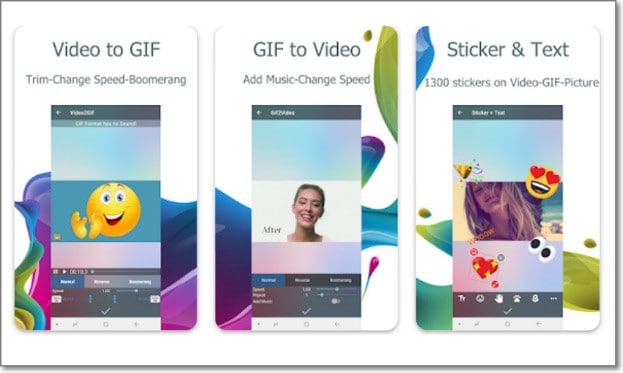
Come, close Android users! Video2Me is an excellent Android video editor, GIF maker, and GIF-to-video converter. With it, you can convert any GIF file to an MP4 video. But before converting, you can adjust the playback speed, repeat the video, add background audio, and reverse. Interestingly, you can convert GIFs to a boomerang video for Instagram.
Pros
- Fast and easy to use.
- Convert GIF to Instagram Boomerang.
- Create high-quality GIF files.
Cons
- It crashes sometimes.
- Watermarked outputs.
GifVid

Rating: 2.7/5
GifVid is another free app to convert GIF files to MP4 on an iPhone or iPad. As expected, it’s quick and easy to use. Just load the GIF file, and GifVid will automatically convert it to MP4. After conversion, you can share the video with your friends on Imgur, Tumblr, iMessage, Gmail, etc. Unfortunately, it will cost you $0.99 to get the app.
Pros
- Quick and easy to use.
- No watermarks.
- Direct exports to social apps.
Cons
- Not free to download and use.
- Pesky adverts.
GIF to Video
Rating: 4.0/5
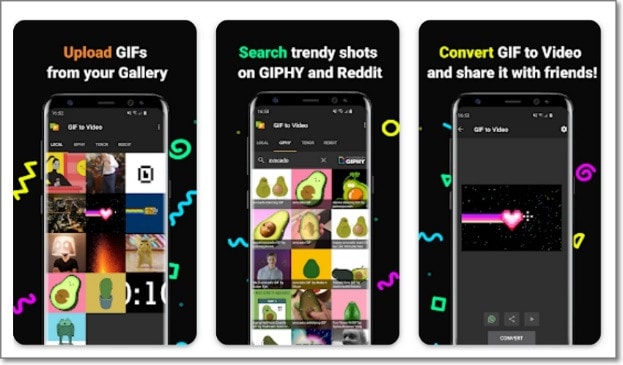
GIF to Video is an Android app with more than 1 million downloads so far. This app allows you to browse local GIF files or search for animated GIFs from websites such as Tenor, GIPHY, and Reddit. After adding the GIF file to this app, you’ll losslessly convert it to a short video before sharing it with your friends on Instagram, Facebook, WhatsApp, TikTok, and more. You can also trim, cut, crop, and loop before converting.
Pros
- Intuitive video editing features.
- Upload GIFs from galleries or GIF websites.
- Directly export GIF to Instagram.
Cons
- Every conversion triggers an ad.
- Lots of in-app purchases.
Part 3: Top 5 Online Tools to turn a GIF into a video on Instagram
The good thing about online GIF converters is that they can convert video to GIF instantly on a browser. In other words, you don’t need to install anything to convert a GIF to a video for Instagram. And yes, most online apps are compatible with mobile and PC browsers. Let’s look at the best five!
Adobe Express
Rating: 4.5/5
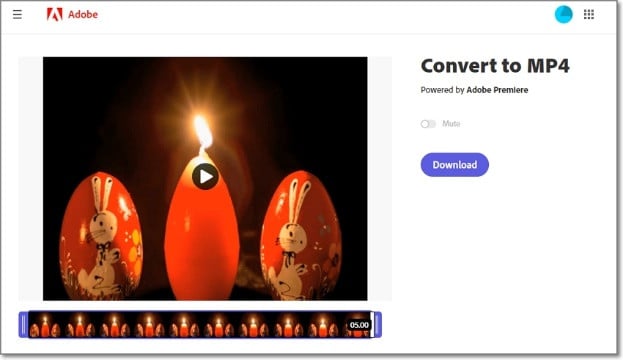
Adobe Express is an online service for creating amazing graphics without any experience. It replaces the Adobe Spark product, coming with a simplified and feature-rich platform. With Adobe Express, you can create designs from scratch or choose from the hundreds of free templates. You can customize your video with texts, stickers, emojis, background audio, and more. Even better, you can directly share your project on social apps.
Pros
- Free to use.
- Thousands of free templates.
- Excellent file conversion capabilities.
- 2GB free cloud storage.
Cons
- Not so intuitive.
- Lots of hidden tools.
GIFtoMP4
Rating: N/A
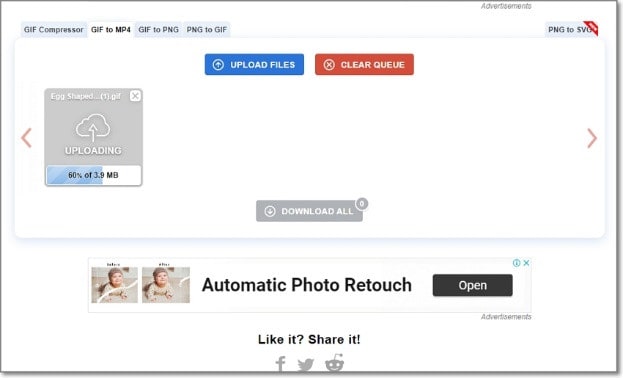
GIFtoMP4 is a relatively straightforward website that lets you convert GIF animations to high-quality MP4 videos. It can convert up to 20 GIF animations at a go. The conversion process is super-fast, and you can download all converted files in a ZIP folder. In addition to converting GIF to MP4, you can also convert GIF to PNG, PNG to GIF, and compress GIF files. Moreover, the site offers maximum file security by deleting all converted GIFs after an hour.
Pros
- Straightforward user interface.
- Batch conversion is supported.
- Excellent GIF compression capability.
Cons
- Lots of annoying adverts.
- Not for advanced users.
AConvert
Rating: 4.4/5
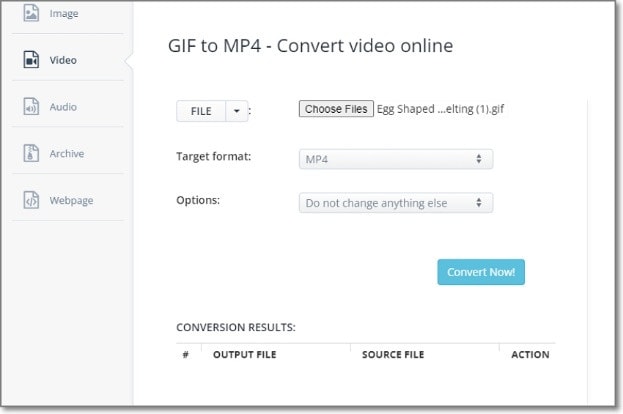
AConvert is a popular online converter for images, videos, audio, and GIF files. This software can convert GIFs to a host of formats, including MP4, AVI, 3GP, VOB, MTS, and more. Also, AConvert supports batch conversions up to 200MB. And after converting, you can download the file using a QR code or save the video on Google Drive and Dropbox.
Pros
- Multiple video output formats are supported.
- Resize and customize the GIF frame.
- Batch conversion is supported.
Cons
- Limited video editing features.
- 200MB maximum file size.
Ezgif

Rating: 4.6/5
Ezgif is an excellent online GIF maker and editor. It’s free, simple, fast, and converts GIFs to MP4 for Instagram without watermarks. You can upload GIF files from local storage or paste the image URL from cloud services. Just upload your GIF file, then click the “Convert to MP4” button to process it. But before converting, you can crop, resize, speed up, cut, split, and more. Sadly, the maximum file conversion limit is a mere 50MB.
Pros
- It supports batch conversion.
- Fast and straightforward to use.
- Multiple GIF editing tools.
Cons
- 50MB maximum file limit.
- Annoying adverts.
Convertio
Rating: 4.5/5
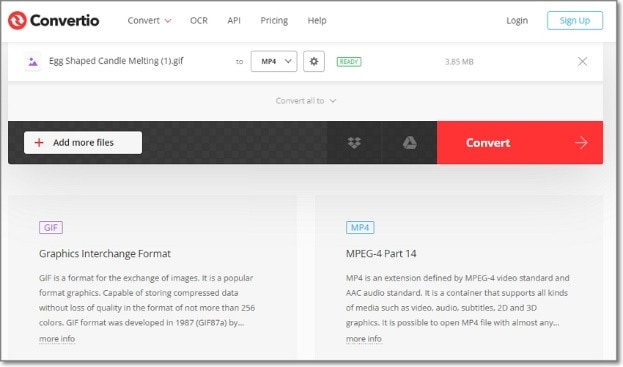
Still unimpressed by the online GIF to MP4 converters above? Try Convertio! It’s an easy GIF converter for mobile and PC browsers. To convert GIF to MP4 on Convertio, upload the GIF file on local storage or cloud and customize the frame rate, playback duration, codec, etc. But like all online GIF converters on this list, Convertio has a maximum file limit of 100MB.
Pros
- Multiple GIF customization tools.
- 200+ formats supported.
- Batch GIF to MP4 conversion.
Cons
- 100MB file limit.
- Ad-supported conversion.
Part 4: Hot FAQs on GIF Instagram
How can I send a GIF on Instagram DM?
You can easily share a GIF file directly on Instagram DM by clicking the Share icon at the top-right corner before opening a chat. Now tap the Stickers icon on the text message field and choose GIF. Search for a GIF file from GIPHY and click GIF to share it. It’s that easy!
How can I add a GIF to Instagram Story using a sticker?
To add a GIF Sticker on Instagram, you’ll first need to convert GIF to APNG (Animated PNG) using a program like Ezgif . Then, upload the APNG file on GIPHY Sticker Maker and generate a sticker. Now launch Instagram and choose a photo to post on your story. Then, click the Sticker icon and search for your username on GIPHY. Lastly, choose the GIF sticker you had created earlier and upload it.
How can I post GIFs to my Instagram Feed and Stories?
Posting a GIF file on Instagram Feeds and Stories is nothing complex. Simply install the GIPHY app and then choose a GIF file you want to share. After that, hit the Share button and then click the Instagram logo. Finally, select Post or Stories and share the GIF file.
Final Words
Although you may not be able to upload GIFs on Instagram directly, the above methods make it a breeze by converting GIFs to MP4 with lossless quality. Remember that you can easily share a GIF on your Instagram Story or Feed directly from GIPHY. But you can only do that using the iPhone or Android GIPHY app. Give it a try!
- GIF Cracker
- GIF to MP4
- Video2Me
- GifVid
- GIF to Video
- Top 5 Online Tools to turn a GIF into a video on Instagram
Part 1: Convert GIF to Video for Instagram on Desktop
Let’s begin this post with the best desktop solutions to convert GIFs to MP4 for Instagram. Remember, the video aspect ratio for Instagram videos is 9:16 or 1:1.
Wondershare Filmora
Rating: 4.5/5
Compatibility: macOS and Windows
Wondershare Filmora is a professional-grade video editing program for both macOS and Windows computers. It features an intuitive, multitrack interface with advanced video editing features and templates to help you create the best Instagram videos. This program lets you exploit themed elements like filters, effects, transitions, and emojis.
In the meantime, you can customize your video with the inbuilt royalty-free music and sound effects. You can also cut, trim, resize, and crop your video before exporting it to various formats, including MP4, MOV, WebM, GIF, etc.
But here is a reminder; free users will have a “Wondershare Filmora” watermark on their outputs. However, you can still exploit all the features with the free account.
Free Download For Win 7 or later(64-bit)
Free Download For macOS 10.14 or later
Follow these steps to convert a GIF to a video for Instagram using Filmora :
Step1Run Filmora and start a project.

Install and run Wondershare Filmora on your PC and select the Project Aspect Ratio. To create an Instagram video, choose 1:1. Now tap New Project and click File to browse and load the GIF file from your local storage. Then, drag the GIF file to the editing timeline.
Step2 Edit and customize the GIF file (Optional).
Before exporting GIF to MP4, it’s vital to add a few touches to it. For example, you may want to speed up or slow down the GIF’s playback speed. In that case, right-click the video track and then tap Edit Properties. Now click the Speed tab to ramp up the speed or slow it down.

You’ll also see tabs for adding animations, color enhancements, stabilization, and more. So, play around with the video editing tools until you get what works for you. Just remember not to overdo your video.
Step3Customize the video settings and export it to MP4.

Last but not least, click File > Project Settings to crosscheck the file properties. You can change the aspect ratio, video resolution, frame rate, and color space before clicking Ok.

Finally, tap Export, then select Crete Video. Now choose MP4 under the Local tab before setting the video name and folder path. If satisfied, press Export to convert GIF to a video for Instagram. That’s all there is!
Pros
- Easy enough for green hands.
- High-quality sound/video effects and transitions.
- Fast rendering speed.
- Reasonably priced.
Cons
- Watermarked outputs for free users.
- Hidden advanced features.
Movavi Video Converter Premium
Rating: 4.3/5
Compatibility: macOS and Windows
As the name hints, Movavi Video Converter is a video converter cum editor for macOS and Windows PCs. It’s a simple-to-use program that easily converts any video, audio, or image format. Actually, it supports 180+ formats, including MP4, GIF, MOV, AVI, VOB, MP3, and many others.
Besides converting, Movavi Video Converter allows you to trim, cut, merge, and crop your videos. Also, you can losslessly compress files and add subtitles automatically using artificial intelligence. And lest I forget that you can convert videos to device-optimized formats like iPhone, iPad, Samsung Galaxy, Apple TV, and more.
Follow these steps:
Step1Download, install, and open Movavi Video Converter and click the Add Media button to load your GIF file on the program.

Step2Next up, edit your video to make it look more attractive. For instance, you can trim, cut, and merge it. Movavi Video Converter also allows you to add effects, watermarks, and audio/sound effects.

Step3Click the Video tab at the bottom of the screen and choose MP4 as the target format. Lastly, click Convert to encode GIF to MP4 with Movavi Video Converter.

Pros
- Super easy to use.
- Multiple input/output formats.
- Affordable pricing.
- Essential video editing tools.
Cons
- No free account.
- Professional editors should stick to Filmora .
MiniTool Movie Maker
Rating: 4.4/5
Compatibility: Windows
MiniTool Movie Maker is a video editing program for Windows 7, 8, 10, and 11. It boasts an intuitive user interface with rich and advanced features to give your Instagram videos stunning looks. After uploading your GIF file to this video editor, you can trim, crop, and add elements like emojis, arrows, and props.
Also, MiniTool Movie Maker allows you to adjust the video contrast, brightness, and saturation. In addition, you can adjust the video playback speed to make it quicker or slower. Another thing, this program houses hundreds of free video templates to exploit.
Steps to convert a GIF file to MP4 for Instagram with MiniTool Movie Maker:
Step1Install and run MiniTool Movie Maker on your PC and create a new project. Then, click Media > Import Media Files to upload the GIF file.

Step2Now drag and drop the GIF file to the editing timeline and tap the Split icon to trim and cut the video. After that, press the Speed icon to make the video playback speed faster, slower, or reverse the video. You can also add texts, emojis, effects, and more.

Step3Click the Export button on the preview screen to name the video and set the folder path. Remember to choose MP4 as the target format before clicking Export to save your video.

Pros
- Multiple input/output formats.
- Export 1080P MP4 for free.
- Export videos without watermarks.
- Multiple video effects, texts, sounds, elements, etc.
Cons
- Free users can create 2-minute videos only.
- No macOS version.
Part 2: How to Turn a GIF into an Instagram video on iPhone or Android
What desktops can do, smartphones can equally do these days. So, without dilly-dallying, let’s list the best GIF to Instagram converters for Android/iPhone.
GIF Cracker

Rating: 4.3/5
GIF Cracker is a highly rated iPhone app for converting GIF files to videos and pictures. It’s simple to use and comes with multiple video customization options. For example, you can look, adjust the playback speed, rotate, and resize the GIF file before converting it to MP4. GIF Cracker also boasts multiple filters to spice up your new video or image. What’s more, you can access files from Camera Roll Album.
Pros
- Multiple video customization options.
- Easy to understand and use.
- Convert and edit files from Camera Roll.
Cons
- Annoying adverts.
- Slow conversion speed.
GIF to MP4

Rating: 4.7/5
GIF to MP4 is another highly-rated iPhone app to help you convert any GIF file to MP4. It’s easy to use as you only need to upload the GIF file, choose the video format, and tap “Save” to convert. That’s not all. This GIF-to-video converter allows you to export the converted video to Gmail, Facebook, and other social networks.
Pros
- It’s 100% free to use.
- Easy to use and export videos.
- Fast rendering.
Cons
- Multiple adverts.
- Lagging video frames.
Video2Me

Come, close Android users! Video2Me is an excellent Android video editor, GIF maker, and GIF-to-video converter. With it, you can convert any GIF file to an MP4 video. But before converting, you can adjust the playback speed, repeat the video, add background audio, and reverse. Interestingly, you can convert GIFs to a boomerang video for Instagram.
Pros
- Fast and easy to use.
- Convert GIF to Instagram Boomerang.
- Create high-quality GIF files.
Cons
- It crashes sometimes.
- Watermarked outputs.
GifVid

Rating: 2.7/5
GifVid is another free app to convert GIF files to MP4 on an iPhone or iPad. As expected, it’s quick and easy to use. Just load the GIF file, and GifVid will automatically convert it to MP4. After conversion, you can share the video with your friends on Imgur, Tumblr, iMessage, Gmail, etc. Unfortunately, it will cost you $0.99 to get the app.
Pros
- Quick and easy to use.
- No watermarks.
- Direct exports to social apps.
Cons
- Not free to download and use.
- Pesky adverts.
GIF to Video

Rating: 4.0/5
GIF to Video is an Android app with more than 1 million downloads so far. This app allows you to browse local GIF files or search for animated GIFs from websites such as Tenor, GIPHY, and Reddit. After adding the GIF file to this app, you’ll losslessly convert it to a short video before sharing it with your friends on Instagram, Facebook, WhatsApp, TikTok, and more. You can also trim, cut, crop, and loop before converting.
Pros
- Intuitive video editing features.
- Upload GIFs from galleries or GIF websites.
- Directly export GIF to Instagram.
Cons
- Every conversion triggers an ad.
- Lots of in-app purchases.
Part 3: Top 5 Online Tools to turn a GIF into a video on Instagram
The good thing about online GIF converters is that they can convert video to GIF instantly on a browser. In other words, you don’t need to install anything to convert a GIF to a video for Instagram. And yes, most online apps are compatible with mobile and PC browsers. Let’s look at the best five!
Adobe Express

Rating: 4.5/5
Adobe Express is an online service for creating amazing graphics without any experience. It replaces the Adobe Spark product, coming with a simplified and feature-rich platform. With Adobe Express, you can create designs from scratch or choose from the hundreds of free templates. You can customize your video with texts, stickers, emojis, background audio, and more. Even better, you can directly share your project on social apps.
Pros
- Free to use.
- Thousands of free templates.
- Excellent file conversion capabilities.
- 2GB free cloud storage.
Cons
- Not so intuitive.
- Lots of hidden tools.
GIFtoMP4

Rating: N/A
GIFtoMP4 is a relatively straightforward website that lets you convert GIF animations to high-quality MP4 videos. It can convert up to 20 GIF animations at a go. The conversion process is super-fast, and you can download all converted files in a ZIP folder. In addition to converting GIF to MP4, you can also convert GIF to PNG, PNG to GIF, and compress GIF files. Moreover, the site offers maximum file security by deleting all converted GIFs after an hour.
Pros
- Straightforward user interface.
- Batch conversion is supported.
- Excellent GIF compression capability.
Cons
- Lots of annoying adverts.
- Not for advanced users.
AConvert

Rating: 4.4/5
AConvert is a popular online converter for images, videos, audio, and GIF files. This software can convert GIFs to a host of formats, including MP4, AVI, 3GP, VOB, MTS, and more. Also, AConvert supports batch conversions up to 200MB. And after converting, you can download the file using a QR code or save the video on Google Drive and Dropbox.
Pros
- Multiple video output formats are supported.
- Resize and customize the GIF frame.
- Batch conversion is supported.
Cons
- Limited video editing features.
- 200MB maximum file size.
Ezgif

Rating: 4.6/5
Ezgif is an excellent online GIF maker and editor. It’s free, simple, fast, and converts GIFs to MP4 for Instagram without watermarks. You can upload GIF files from local storage or paste the image URL from cloud services. Just upload your GIF file, then click the “Convert to MP4” button to process it. But before converting, you can crop, resize, speed up, cut, split, and more. Sadly, the maximum file conversion limit is a mere 50MB.
Pros
- It supports batch conversion.
- Fast and straightforward to use.
- Multiple GIF editing tools.
Cons
- 50MB maximum file limit.
- Annoying adverts.
Convertio

Rating: 4.5/5
Still unimpressed by the online GIF to MP4 converters above? Try Convertio! It’s an easy GIF converter for mobile and PC browsers. To convert GIF to MP4 on Convertio, upload the GIF file on local storage or cloud and customize the frame rate, playback duration, codec, etc. But like all online GIF converters on this list, Convertio has a maximum file limit of 100MB.
Pros
- Multiple GIF customization tools.
- 200+ formats supported.
- Batch GIF to MP4 conversion.
Cons
- 100MB file limit.
- Ad-supported conversion.
Part 4: Hot FAQs on GIF Instagram
How can I send a GIF on Instagram DM?
You can easily share a GIF file directly on Instagram DM by clicking the Share icon at the top-right corner before opening a chat. Now tap the Stickers icon on the text message field and choose GIF. Search for a GIF file from GIPHY and click GIF to share it. It’s that easy!
How can I add a GIF to Instagram Story using a sticker?
To add a GIF Sticker on Instagram, you’ll first need to convert GIF to APNG (Animated PNG) using a program like Ezgif . Then, upload the APNG file on GIPHY Sticker Maker and generate a sticker. Now launch Instagram and choose a photo to post on your story. Then, click the Sticker icon and search for your username on GIPHY. Lastly, choose the GIF sticker you had created earlier and upload it.
How can I post GIFs to my Instagram Feed and Stories?
Posting a GIF file on Instagram Feeds and Stories is nothing complex. Simply install the GIPHY app and then choose a GIF file you want to share. After that, hit the Share button and then click the Instagram logo. Finally, select Post or Stories and share the GIF file.
Final Words
Although you may not be able to upload GIFs on Instagram directly, the above methods make it a breeze by converting GIFs to MP4 with lossless quality. Remember that you can easily share a GIF on your Instagram Story or Feed directly from GIPHY. But you can only do that using the iPhone or Android GIPHY app. Give it a try!
Zoom In and Out on Snapchat
Abundant Video Effects - Wondershare Filmora
Provide abundant video effects - A creative video editor
Powerful color correction and grading
Detailed tutorials are provided by the official channel
People make Snapchat videos for various purposes, such as capturing beautiful natural scenery or a funny video of a friend. To capture the details or to focus on a specific part, the zoom in and out feature is commonly used. By doing so, you can manually focus on a particular area clearly with your fingers.
The following article will focus on how to zoom in on Snapchat by offering detailed and easy steps. Moreover, we will suggest a powerful tool that can help you in zooming in and out on Snapchat flawlessly, along with additional distinct features.
In this article
Part 1: How to Zoom In and Out a Video on Snapchat While Recording?
Part 2: How to Zoom In and Out a Pre-Recorded Video on Snapchat?
Part 3: How to Zoom In and Zoom Out Videos using Wondershare Filmora?
Part 1: How to Zoom In and Out a Video on Snapchat While Recording?
In this section, we will provide you with two methods of how to zoom in and out on Snapchat videos instantly:
Method 1: Without Locking Snapchat Recorder
Step 1: Start by opening your Snapchat from on your mobile device to access the camera screen for recording a video. Now, start capturing the video by holding the center red button from the middle of your screen.

Step 2: While holding the center recording button, use your finger and slide it in the upward direction to zoom in.

Step 3: To zoom out, use the same finger by sliding it to the bottom direction. Once done, leave the recording button by removing your finger to finish the recording. Now you can save the recorded video on Snapchat.

Method 2: By Using the Snapchat Lock Feature
Step 1: Begin with opening your Snapchat account and stay on your camera screen to record the video. Now start the recording by holding the center red button from your displayed screen.

Step 2: To “Lock” the recording, move your finger towards the left side, after which you can see the padlock icon on your screen.

Step 3: After recording the video is locked, use your two fingers simultaneously and move them apart to zoom in on the specific part. Conversely, for zooming out, use your two fingers and move them in an inward direction.

Step 4: To finalize the recording, simply tap on the recording icon, and the recording will stop. You can now edit your snap and send it to your friends or post it on your Snapchat.

Part 2: How to Zoom In and Out a Pre-Recorded Video on Snapchat?
In this section, we will offer detailed steps on how to zoom in and out on Snapchat with pre-recorded videos:
Step 1: Open your Snapchat from your smartphone and then tap on the icon showing on the left side depicting “Two Mobiles Overlapping Each Other.” From this icon, navigate to your “Camera Roll.”
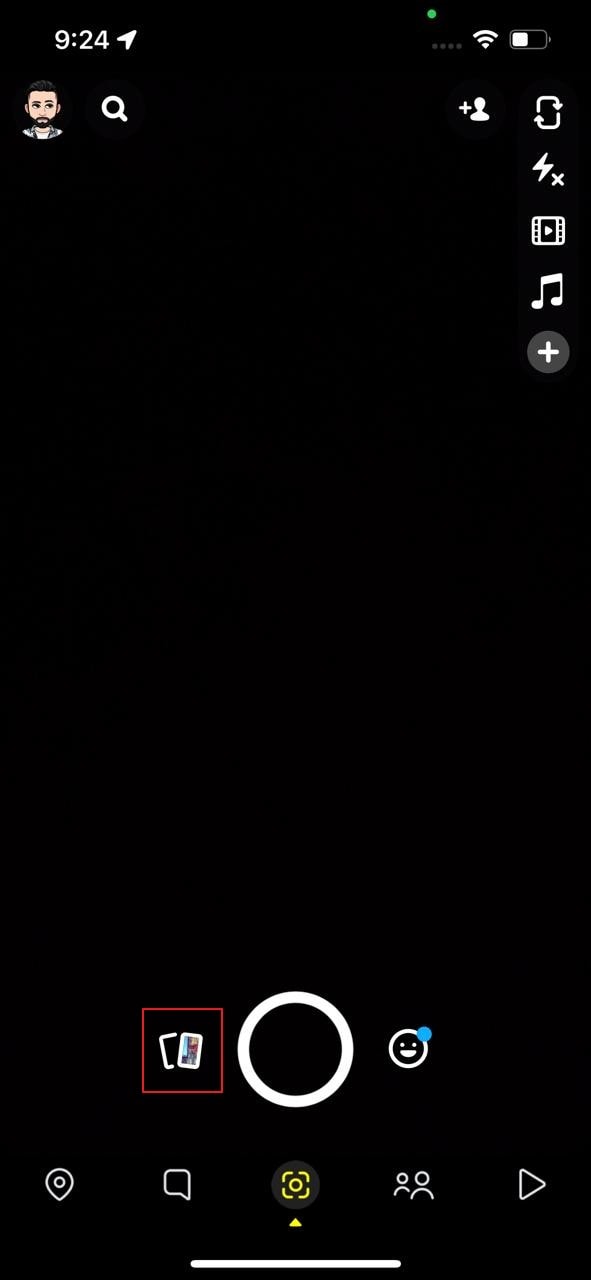
Step 2: From your camera roll, choose the video you want to edit. Then click on the “Pencil” icon by going to the bottom left corner to zoom in and out on your video.

Step 3: On the next screen, you will see various editing options on the right side. Select the second last option, which is for cropping and can be used to zoom in on the videos.

Step 4: By using this selected option, you can zoom in and out on the video according to your preference. Just use your two fingers and place them on the screen. To zoom in, stretch the fingers and move them apart and control the zoom value manually.

Step 5: For zooming out, move the fingers in an inward direction. Once done with all the changes, tap on the “Tick” button. Afterward, click on the “Done” option and save the changes by tapping on “Save Changes.”

Part 3: How to Zoom In and Zoom Out Videos using Wondershare Filmora?
If you are finding it difficult how to zoom in on Snapchat effortlessly, we will recommend Wondershare Filmora as a complete toolbox for editing videos. Through this tool, you can not only flawlessly zoom in on the multiple Snapchat videos but can also perform various editing functions. The user interface is specially designed in a way to assist beginners in executing the editing process.
You can take advantage of tons of advanced features in Filmora like auto reframing, video effects, transitions, and instant mode. The user interface is so simple that within seconds you can zoom in and out on any video perfectly.
Collectively, this tool functions as a complete professional toolbox for video editing and does not require technical experience or additional tools. Steps to Zoom In and Out through Wondershare Filmora:
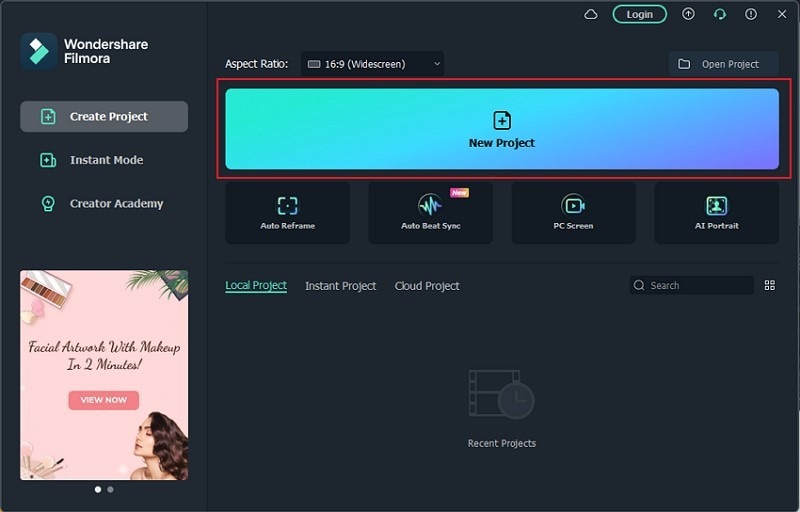
Step 1: Select New Project
Begin with launching Wondershare Filmora on your computer and click to open its user interface. Afterward, tap on the option “New Project” to continue with the process.
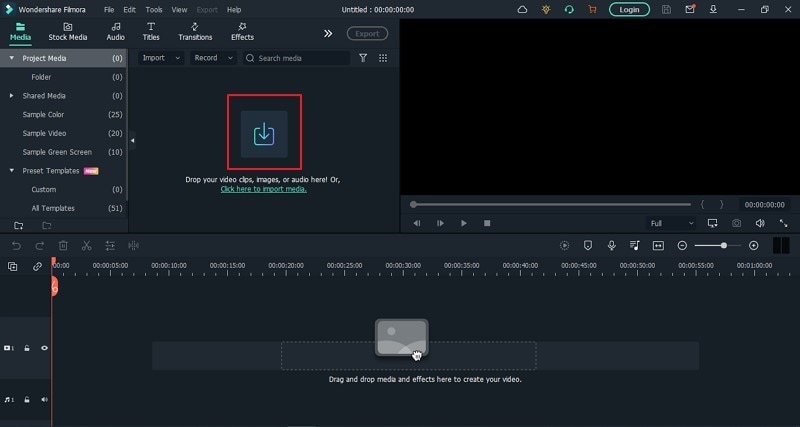
Step 2: Import your Snapchat Video
On the new window, click on the icon of the “Arrowhead” to import the video on this tool. Once done with uploading the video, drag the video to the timeline of this tool.
Step 3: Go to Transitions Tab
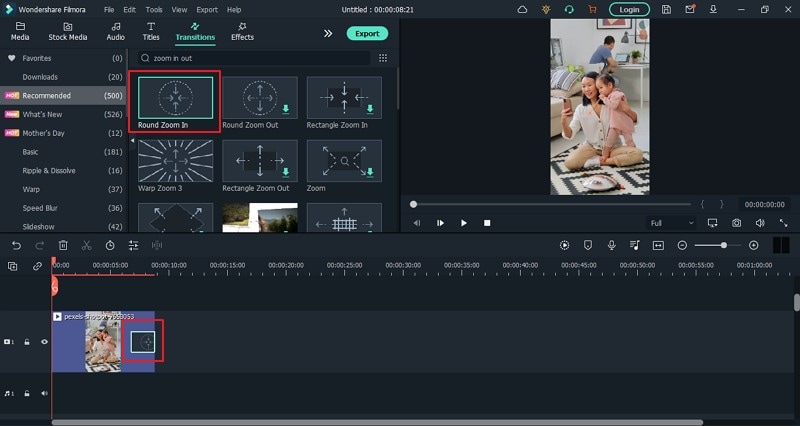
From the tabs displayed on the left side, navigate to the “Transitions” tab by clicking on them. On its search box, type “Zoom In Out,” and the tool will automatically fetch transitions related to it.
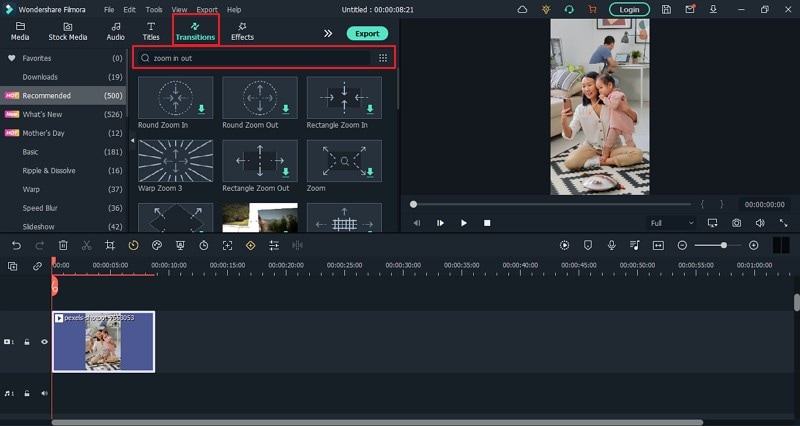
Step 4: Choose Transitions
From the displayed transitions, select any transition of your choice. Apply the transition to your video by dragging it to the video available on the timeline.
Step 5: Preview the video
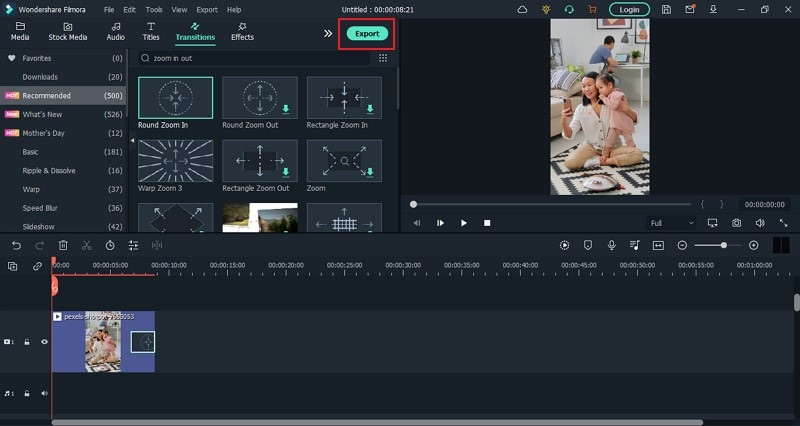
If you find the results satisfactory in the preview window, tap on the “Export” button displayed on top and save the video on your computer.
Conclusion
Snapchat videos are highly popular due to their high-quality results and features. However, if you are struggling to focus on certain parts while recording a video through Snapchat, this article has offered a well-structured guide on how to zoom in and out on Snapchat quickly. If you are finding manual methods confusing, you can rely on the top-notch tool called Wondershare Filmora for Snapchat zoomed in.
People make Snapchat videos for various purposes, such as capturing beautiful natural scenery or a funny video of a friend. To capture the details or to focus on a specific part, the zoom in and out feature is commonly used. By doing so, you can manually focus on a particular area clearly with your fingers.
The following article will focus on how to zoom in on Snapchat by offering detailed and easy steps. Moreover, we will suggest a powerful tool that can help you in zooming in and out on Snapchat flawlessly, along with additional distinct features.
In this article
Part 1: How to Zoom In and Out a Video on Snapchat While Recording?
Part 2: How to Zoom In and Out a Pre-Recorded Video on Snapchat?
Part 3: How to Zoom In and Zoom Out Videos using Wondershare Filmora?
Part 1: How to Zoom In and Out a Video on Snapchat While Recording?
In this section, we will provide you with two methods of how to zoom in and out on Snapchat videos instantly:
Method 1: Without Locking Snapchat Recorder
Step 1: Start by opening your Snapchat from on your mobile device to access the camera screen for recording a video. Now, start capturing the video by holding the center red button from the middle of your screen.

Step 2: While holding the center recording button, use your finger and slide it in the upward direction to zoom in.

Step 3: To zoom out, use the same finger by sliding it to the bottom direction. Once done, leave the recording button by removing your finger to finish the recording. Now you can save the recorded video on Snapchat.

Method 2: By Using the Snapchat Lock Feature
Step 1: Begin with opening your Snapchat account and stay on your camera screen to record the video. Now start the recording by holding the center red button from your displayed screen.

Step 2: To “Lock” the recording, move your finger towards the left side, after which you can see the padlock icon on your screen.

Step 3: After recording the video is locked, use your two fingers simultaneously and move them apart to zoom in on the specific part. Conversely, for zooming out, use your two fingers and move them in an inward direction.

Step 4: To finalize the recording, simply tap on the recording icon, and the recording will stop. You can now edit your snap and send it to your friends or post it on your Snapchat.

Part 2: How to Zoom In and Out a Pre-Recorded Video on Snapchat?
In this section, we will offer detailed steps on how to zoom in and out on Snapchat with pre-recorded videos:
Step 1: Open your Snapchat from your smartphone and then tap on the icon showing on the left side depicting “Two Mobiles Overlapping Each Other.” From this icon, navigate to your “Camera Roll.”

Step 2: From your camera roll, choose the video you want to edit. Then click on the “Pencil” icon by going to the bottom left corner to zoom in and out on your video.

Step 3: On the next screen, you will see various editing options on the right side. Select the second last option, which is for cropping and can be used to zoom in on the videos.

Step 4: By using this selected option, you can zoom in and out on the video according to your preference. Just use your two fingers and place them on the screen. To zoom in, stretch the fingers and move them apart and control the zoom value manually.

Step 5: For zooming out, move the fingers in an inward direction. Once done with all the changes, tap on the “Tick” button. Afterward, click on the “Done” option and save the changes by tapping on “Save Changes.”

Part 3: How to Zoom In and Zoom Out Videos using Wondershare Filmora?
If you are finding it difficult how to zoom in on Snapchat effortlessly, we will recommend Wondershare Filmora as a complete toolbox for editing videos. Through this tool, you can not only flawlessly zoom in on the multiple Snapchat videos but can also perform various editing functions. The user interface is specially designed in a way to assist beginners in executing the editing process.
You can take advantage of tons of advanced features in Filmora like auto reframing, video effects, transitions, and instant mode. The user interface is so simple that within seconds you can zoom in and out on any video perfectly.
Collectively, this tool functions as a complete professional toolbox for video editing and does not require technical experience or additional tools. Steps to Zoom In and Out through Wondershare Filmora:
Step 1: Select New Project
Begin with launching Wondershare Filmora on your computer and click to open its user interface. Afterward, tap on the option “New Project” to continue with the process.

Step 2: Import your Snapchat Video
On the new window, click on the icon of the “Arrowhead” to import the video on this tool. Once done with uploading the video, drag the video to the timeline of this tool.

Step 3: Go to Transitions Tab
From the tabs displayed on the left side, navigate to the “Transitions” tab by clicking on them. On its search box, type “Zoom In Out,” and the tool will automatically fetch transitions related to it.

Step 4: Choose Transitions
From the displayed transitions, select any transition of your choice. Apply the transition to your video by dragging it to the video available on the timeline.

Step 5: Preview the video
If you find the results satisfactory in the preview window, tap on the “Export” button displayed on top and save the video on your computer.

Conclusion
Snapchat videos are highly popular due to their high-quality results and features. However, if you are struggling to focus on certain parts while recording a video through Snapchat, this article has offered a well-structured guide on how to zoom in and out on Snapchat quickly. If you are finding manual methods confusing, you can rely on the top-notch tool called Wondershare Filmora for Snapchat zoomed in.
People make Snapchat videos for various purposes, such as capturing beautiful natural scenery or a funny video of a friend. To capture the details or to focus on a specific part, the zoom in and out feature is commonly used. By doing so, you can manually focus on a particular area clearly with your fingers.
The following article will focus on how to zoom in on Snapchat by offering detailed and easy steps. Moreover, we will suggest a powerful tool that can help you in zooming in and out on Snapchat flawlessly, along with additional distinct features.
In this article
Part 1: How to Zoom In and Out a Video on Snapchat While Recording?
Part 2: How to Zoom In and Out a Pre-Recorded Video on Snapchat?
Part 3: How to Zoom In and Zoom Out Videos using Wondershare Filmora?
Part 1: How to Zoom In and Out a Video on Snapchat While Recording?
In this section, we will provide you with two methods of how to zoom in and out on Snapchat videos instantly:
Method 1: Without Locking Snapchat Recorder
Step 1: Start by opening your Snapchat from on your mobile device to access the camera screen for recording a video. Now, start capturing the video by holding the center red button from the middle of your screen.

Step 2: While holding the center recording button, use your finger and slide it in the upward direction to zoom in.

Step 3: To zoom out, use the same finger by sliding it to the bottom direction. Once done, leave the recording button by removing your finger to finish the recording. Now you can save the recorded video on Snapchat.

Method 2: By Using the Snapchat Lock Feature
Step 1: Begin with opening your Snapchat account and stay on your camera screen to record the video. Now start the recording by holding the center red button from your displayed screen.

Step 2: To “Lock” the recording, move your finger towards the left side, after which you can see the padlock icon on your screen.

Step 3: After recording the video is locked, use your two fingers simultaneously and move them apart to zoom in on the specific part. Conversely, for zooming out, use your two fingers and move them in an inward direction.

Step 4: To finalize the recording, simply tap on the recording icon, and the recording will stop. You can now edit your snap and send it to your friends or post it on your Snapchat.

Part 2: How to Zoom In and Out a Pre-Recorded Video on Snapchat?
In this section, we will offer detailed steps on how to zoom in and out on Snapchat with pre-recorded videos:
Step 1: Open your Snapchat from your smartphone and then tap on the icon showing on the left side depicting “Two Mobiles Overlapping Each Other.” From this icon, navigate to your “Camera Roll.”

Step 2: From your camera roll, choose the video you want to edit. Then click on the “Pencil” icon by going to the bottom left corner to zoom in and out on your video.

Step 3: On the next screen, you will see various editing options on the right side. Select the second last option, which is for cropping and can be used to zoom in on the videos.

Step 4: By using this selected option, you can zoom in and out on the video according to your preference. Just use your two fingers and place them on the screen. To zoom in, stretch the fingers and move them apart and control the zoom value manually.

Step 5: For zooming out, move the fingers in an inward direction. Once done with all the changes, tap on the “Tick” button. Afterward, click on the “Done” option and save the changes by tapping on “Save Changes.”

Part 3: How to Zoom In and Zoom Out Videos using Wondershare Filmora?
If you are finding it difficult how to zoom in on Snapchat effortlessly, we will recommend Wondershare Filmora as a complete toolbox for editing videos. Through this tool, you can not only flawlessly zoom in on the multiple Snapchat videos but can also perform various editing functions. The user interface is specially designed in a way to assist beginners in executing the editing process.
You can take advantage of tons of advanced features in Filmora like auto reframing, video effects, transitions, and instant mode. The user interface is so simple that within seconds you can zoom in and out on any video perfectly.
Collectively, this tool functions as a complete professional toolbox for video editing and does not require technical experience or additional tools. Steps to Zoom In and Out through Wondershare Filmora:
Step 1: Select New Project
Begin with launching Wondershare Filmora on your computer and click to open its user interface. Afterward, tap on the option “New Project” to continue with the process.

Step 2: Import your Snapchat Video
On the new window, click on the icon of the “Arrowhead” to import the video on this tool. Once done with uploading the video, drag the video to the timeline of this tool.

Step 3: Go to Transitions Tab
From the tabs displayed on the left side, navigate to the “Transitions” tab by clicking on them. On its search box, type “Zoom In Out,” and the tool will automatically fetch transitions related to it.

Step 4: Choose Transitions
From the displayed transitions, select any transition of your choice. Apply the transition to your video by dragging it to the video available on the timeline.

Step 5: Preview the video
If you find the results satisfactory in the preview window, tap on the “Export” button displayed on top and save the video on your computer.

Conclusion
Snapchat videos are highly popular due to their high-quality results and features. However, if you are struggling to focus on certain parts while recording a video through Snapchat, this article has offered a well-structured guide on how to zoom in and out on Snapchat quickly. If you are finding manual methods confusing, you can rely on the top-notch tool called Wondershare Filmora for Snapchat zoomed in.
People make Snapchat videos for various purposes, such as capturing beautiful natural scenery or a funny video of a friend. To capture the details or to focus on a specific part, the zoom in and out feature is commonly used. By doing so, you can manually focus on a particular area clearly with your fingers.
The following article will focus on how to zoom in on Snapchat by offering detailed and easy steps. Moreover, we will suggest a powerful tool that can help you in zooming in and out on Snapchat flawlessly, along with additional distinct features.
In this article
Part 1: How to Zoom In and Out a Video on Snapchat While Recording?
Part 2: How to Zoom In and Out a Pre-Recorded Video on Snapchat?
Part 3: How to Zoom In and Zoom Out Videos using Wondershare Filmora?
Part 1: How to Zoom In and Out a Video on Snapchat While Recording?
In this section, we will provide you with two methods of how to zoom in and out on Snapchat videos instantly:
Method 1: Without Locking Snapchat Recorder
Step 1: Start by opening your Snapchat from on your mobile device to access the camera screen for recording a video. Now, start capturing the video by holding the center red button from the middle of your screen.

Step 2: While holding the center recording button, use your finger and slide it in the upward direction to zoom in.

Step 3: To zoom out, use the same finger by sliding it to the bottom direction. Once done, leave the recording button by removing your finger to finish the recording. Now you can save the recorded video on Snapchat.

Method 2: By Using the Snapchat Lock Feature
Step 1: Begin with opening your Snapchat account and stay on your camera screen to record the video. Now start the recording by holding the center red button from your displayed screen.

Step 2: To “Lock” the recording, move your finger towards the left side, after which you can see the padlock icon on your screen.

Step 3: After recording the video is locked, use your two fingers simultaneously and move them apart to zoom in on the specific part. Conversely, for zooming out, use your two fingers and move them in an inward direction.

Step 4: To finalize the recording, simply tap on the recording icon, and the recording will stop. You can now edit your snap and send it to your friends or post it on your Snapchat.

Part 2: How to Zoom In and Out a Pre-Recorded Video on Snapchat?
In this section, we will offer detailed steps on how to zoom in and out on Snapchat with pre-recorded videos:
Step 1: Open your Snapchat from your smartphone and then tap on the icon showing on the left side depicting “Two Mobiles Overlapping Each Other.” From this icon, navigate to your “Camera Roll.”

Step 2: From your camera roll, choose the video you want to edit. Then click on the “Pencil” icon by going to the bottom left corner to zoom in and out on your video.

Step 3: On the next screen, you will see various editing options on the right side. Select the second last option, which is for cropping and can be used to zoom in on the videos.

Step 4: By using this selected option, you can zoom in and out on the video according to your preference. Just use your two fingers and place them on the screen. To zoom in, stretch the fingers and move them apart and control the zoom value manually.

Step 5: For zooming out, move the fingers in an inward direction. Once done with all the changes, tap on the “Tick” button. Afterward, click on the “Done” option and save the changes by tapping on “Save Changes.”

Part 3: How to Zoom In and Zoom Out Videos using Wondershare Filmora?
If you are finding it difficult how to zoom in on Snapchat effortlessly, we will recommend Wondershare Filmora as a complete toolbox for editing videos. Through this tool, you can not only flawlessly zoom in on the multiple Snapchat videos but can also perform various editing functions. The user interface is specially designed in a way to assist beginners in executing the editing process.
You can take advantage of tons of advanced features in Filmora like auto reframing, video effects, transitions, and instant mode. The user interface is so simple that within seconds you can zoom in and out on any video perfectly.
Collectively, this tool functions as a complete professional toolbox for video editing and does not require technical experience or additional tools. Steps to Zoom In and Out through Wondershare Filmora:
Step 1: Select New Project
Begin with launching Wondershare Filmora on your computer and click to open its user interface. Afterward, tap on the option “New Project” to continue with the process.

Step 2: Import your Snapchat Video
On the new window, click on the icon of the “Arrowhead” to import the video on this tool. Once done with uploading the video, drag the video to the timeline of this tool.

Step 3: Go to Transitions Tab
From the tabs displayed on the left side, navigate to the “Transitions” tab by clicking on them. On its search box, type “Zoom In Out,” and the tool will automatically fetch transitions related to it.

Step 4: Choose Transitions
From the displayed transitions, select any transition of your choice. Apply the transition to your video by dragging it to the video available on the timeline.

Step 5: Preview the video
If you find the results satisfactory in the preview window, tap on the “Export” button displayed on top and save the video on your computer.

Conclusion
Snapchat videos are highly popular due to their high-quality results and features. However, if you are struggling to focus on certain parts while recording a video through Snapchat, this article has offered a well-structured guide on how to zoom in and out on Snapchat quickly. If you are finding manual methods confusing, you can rely on the top-notch tool called Wondershare Filmora for Snapchat zoomed in.
How to Make an Intro Video [Easy Solution]
You scroll through different social media platforms which lead you to different bloggers and content creators who introduce themselves through the precise intro videos. It the point where a viewer either turns towards or turns away from a person presenting a brand or a business. Intro videos are a must, particularly when you are new in business and promotions. Bringing your story to life in your intro video requires a propaganda to ensure that it evokes feelings of trust, confidence, and curiosity among your target viewers.
The pillar on which a striking intro videos stands is not just a monotonous visualization with poor graphics and music. It requires expertise and moreover, it requires a ‘point’. Your boring intro video would be purposeless for the people who’re watching it. Each second, you express something new, yet filled with intricate details about your work and brand. Let’s dig in a little deeper to know how exactly your introduction video will generate leads and connects you with your target audience.
Part 1: Why Intro Video is Important
An intro video, just like it sounds, is an introduction of your brand, your content or anything that you’re promoting. It appears as soon as the viewers are all set to explore your content and brand. To make the viewer’s first glimpse of your work worthwhile, it is crucial that you explain your value preposition through a precise and appealing intro video. It is through the intro videos that your work is noticed and promoted. It is important to create a story highlight for your viewers while you’re setting the decorum of your business, brand or other content.
Additionally, your video must fulfill components of a striking intro video. Whatever you are trying to say should be clear in your video. Besides being clear enough, your intro video must be short, precise and goal-oriented. You are attracting viewers so make their view purposeful with your intro video which should tell your story. The intro video, if presented flawlessly, can captivate the visitors to interact with you and can even inspire them to add into the growth of your business/content. In a nutshell, an intro video brings your business to life, increase your boost and grabs your visitors’ attention.
Part 2: When to Use Intro Video
Apart from a variety of benefits it offers, the intro video basically forms the balusters of your brand or content. Intro videos are commonly used in the following domains:
Boost Sales : Incorporating a precise piece of work in the form of an intro video can help you boost sales magically. It is far the most effective strategy you company or brand can adopt. Your brief intro video can tell your story and convey your message in an emotional and dramatic way, which consequently attracts more viewers and ultimately, results in the boost of your sales. It is just as similar to you playing with the minds of your audience. A higher audience engagement due to your intro video can definitely prove that intro video is an asset which you can offer in addition to your marketing strategies.

More Social Shares: Social media is undoubtedly far the most highly competitive space for your brands and businesses to work like magic. It is insane how brands and businesses are promoted on the tip of your fingers by sharing the gist of your work. That gist, is of course what we are talking about here in this article. Intro videos are brief and appealing which can easily by shared over multiple platforms. The more the social shares of your intro video, the more you receive the nectar of your input.

Build Personality: If you’re socially awkward or on the contrary, a social freak; the intro video covers you all. Whoever you are and whatever you do, is most creatively presented through a precise intro video. The intricately woven description of your work in an intro video definitely does wonders. People see you through your work and they see your work and you simultaneously through an intro video, then why risk creating it conventionally?

Increase Brand Awareness: Creating a brand awareness video which narrates your story in a presentable manner is like wining the internet’s mode of lottery. A thoroughly considered and precise piece of your intro video can go viral at an unbelievable pace and before you even know, your marketing has done wonders all over the digital media. What is your brand, what it offers, how it benefits you and who is the target audience; all these queries are explained through a short intro video which would ultimately result in your brand recognition and thus the growth.

Part 3: Best Intro Video Maker
Out there, the market is jam-packed with people witnessing millions of videos on different media platforms every day. This only leads to crowded digital market but only your intro video can stand out and flaunt your work charmingly. Filmora is one best choice to professionally craft your intro video which can give your brand a head start in no time.
Wondershare Filmora is a time effective and easy to use video editing software that enable the users to create variety of videos by choosing among some great presets and powerful editing tools. Maintaining and improving the quality of videos, Filmora enables the users to choose across a variety of different video editing features. This video editing software is developed by Wondershare and it includes features for a range of users from beginner to intermediate levels.

For a composition of your intro video, Filmora is the best go-to software so why wait another minute? Currently, Filmora is compatible with Windows and macOS computers. Some of the features offered by Filmora include the following:
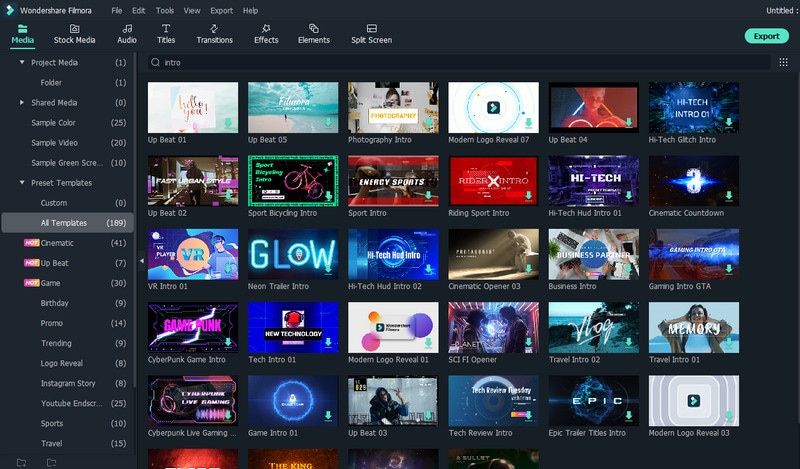
Rich Intro Templates
A wide variety of professionally crafted templates are available on your fingertips so instead of conventionally editing your videos, get your hands on the stunning templates offered by Filmora. Filmora is equipped with multiple templates which provide the users a plethora of options when it comes to customizing videos. These templates are easy to use and your intro videos can turn into a magic movie with presets offered by Filmora so grab your setup today and enjoy the affordable software now.
Numerous Video Effects
Importing media and editing it on the timeline to create a compelling tale is the first step in a video editor’s post-production process. Following those foundational steps, an editor applies various effects to the video in order to fix issues, improve mood, intensify suspense, and add magic to the video. Filmora offers a great variety of customizable filters, effects, transitions and the best part? You don’t even have to be a pro to use these effects.

Title Editing
Filmora enables the intro video makers to adorn the titles of their videos by selecting among multiple text editing options. Both short videos and full-length movies must have opening titles and closing credits. You may catch the audience’s attention from the first frame of your video by coming up with inventive methods to employ text which precisely conveys the tale of your film. You may utilize more than a hundred text settings in Filmora’s Titles tab to add text to the video.

Text to Speech/STT
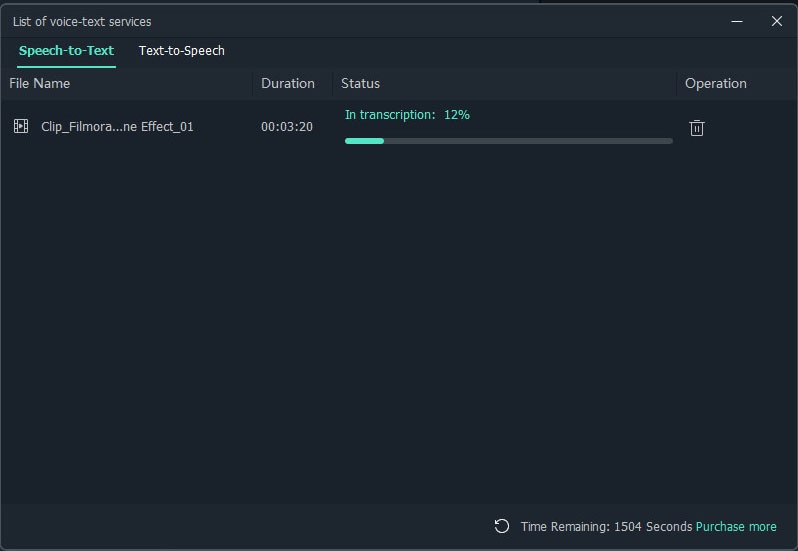
Speaking in your videos may increase engagement and make it simpler for viewers to grasp what you’re saying. But how can you add audio without first recording it? Are you considering hiring a voice actor? Don’t worry! Filmora got your back by offering Text to Speech (TTS) function, which enables the users to add voice to your video. Filmora automatically transcripts your text files into speech on the click of a button.
Audio Editing
Filmora additionally offers an audio panel where the software helps to manipulate audio added to your intro videos. The audio editing feature of Filmora enables users to improve the quality of the audio, to remove unwanted noises, balance pitch or change the length of a particular audio file.

Part 4: How to Create Intro Videos
To maintain consistency and to provide your brand with a unique identity, it is essential to carefully craft an intro video. Following is a step-by-step guide through which you can get your hands on this effective video editing software:
Free Download For Win 7 or later(64-bit)
Free Download For macOS 10.14 or later
Step1Download and Install the Software
The first step in creating an intro video requires the user to download and install the Filmora software in Windows or MacOS computers. To download the setup, go to https://filmora.wondershare.com/ and click ‘Download’. Afterwards, when the setup is downloaded, run the setup and install Filmora on your computer:

Step2Add Color Templates
After installing, wait until the installation is finished. Launch Wondershare Filmora and go to MEDIA tab at the top left of the interface and select the best suitable background color for your intro video from the dropdown menu in the MEDIA tab. Drag your cursor over the tile of the color you wish to use as a background and click to add the icon that appears in the center to add it to the timeline.
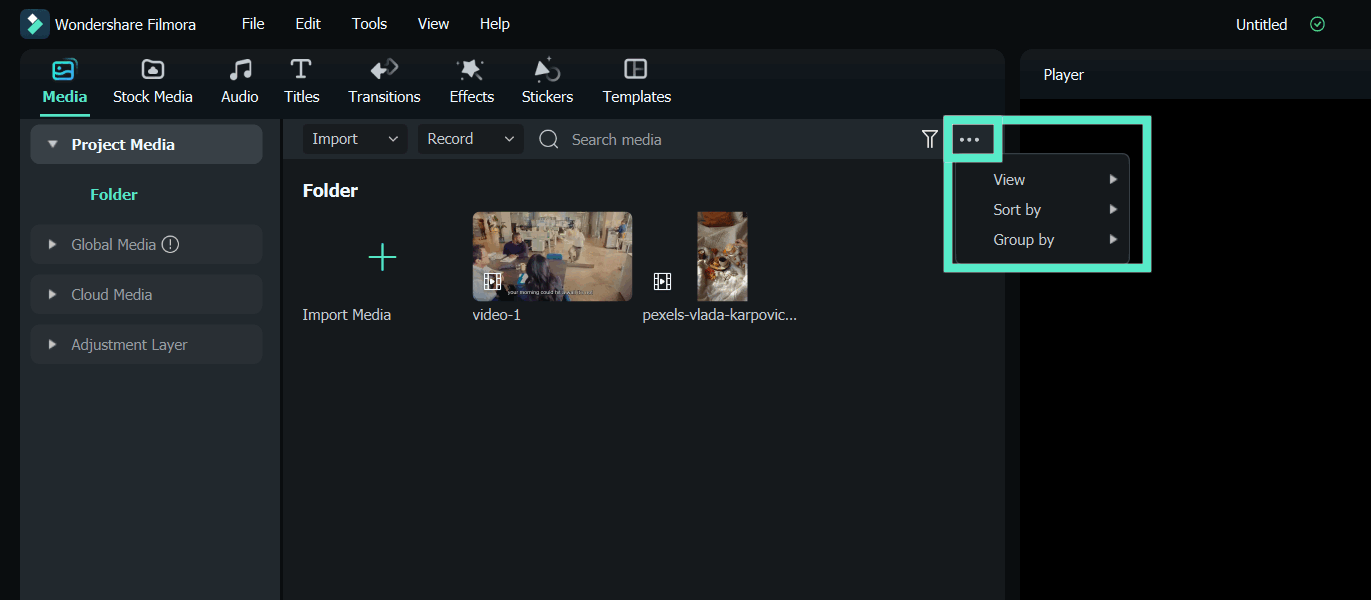
Additionally, if you don’t prefer the preset backgrounds and colors, Filmora lets you use your own background image or video clip. For this, select PROJECT MEDIA > click anywhere inside the media window > import media file of your choice. After importing the file, click on the imported file to add it to the timeline.
Step3Select and add audio effect to your Intro Video
Your video automatically grasps a lot of viewers’ attention with a spice of some music/audio in the background. To adorn your intro video further, you can add audio/music effect to your intro video using the inbuilt music and sound effects from the library. If you want to listen to a track from the inbuilt library collection of audio and music, double click on the thumbnail.

Click the AUDIO tab. Choose from Recommended audio files or import your own audio. Once, you find your desired audio/music file, drag and drop it to the audio track below the video.
Step4Add Text/Logo to your Intro Video
Click the ‘TITLE’ tab. To customize, choose title options from Recommended or add your own custom design. To change, format, and animate the text as needed, click on your desired preset or custom title and double click or drag it to the bottom area of the main library to insert a title.

Also, you need to adjust the position and duration of the title to get a better view. In the intro video, it is recommended to add your logo or slogan as well. To add your logo, drag and drop it to the track above the video, and adjust its position and size.
Step5Add Effects to your Intro Video
Go to ‘EFFECTS’ tab, choose a category from the top-left pane, and click and drag your preferred effect from the Effects library to the timeline. Adjust the playback duration by dragging the right handle of the track in the timeline as explained above. Optionally, double-click the Effects track to customize the appearance as needed.
Step6Export the Intro and Add to Shared Media
Once you’re done making your intro video, click on the ‘EXPORT’ tab in the center > go to LOCAL tab on export box > choose your preferred output format (e.g., MP4) > adjust other preferences such as destination location, resolution etc. from the right pane of the box > Click EXPORT.

Free Download For macOS 10.14 or later
Step1Download and Install the Software
The first step in creating an intro video requires the user to download and install the Filmora software in Windows or MacOS computers. To download the setup, go to https://filmora.wondershare.com/ and click ‘Download’. Afterwards, when the setup is downloaded, run the setup and install Filmora on your computer:

Step2Add Color Templates
After installing, wait until the installation is finished. Launch Wondershare Filmora and go to MEDIA tab at the top left of the interface and select the best suitable background color for your intro video from the dropdown menu in the MEDIA tab. Drag your cursor over the tile of the color you wish to use as a background and click to add the icon that appears in the center to add it to the timeline.

Additionally, if you don’t prefer the preset backgrounds and colors, Filmora lets you use your own background image or video clip. For this, select PROJECT MEDIA > click anywhere inside the media window > import media file of your choice. After importing the file, click on the imported file to add it to the timeline.
Step3Select and add audio effect to your Intro Video
Your video automatically grasps a lot of viewers’ attention with a spice of some music/audio in the background. To adorn your intro video further, you can add audio/music effect to your intro video using the inbuilt music and sound effects from the library. If you want to listen to a track from the inbuilt library collection of audio and music, double click on the thumbnail.

Click the AUDIO tab. Choose from Recommended audio files or import your own audio. Once, you find your desired audio/music file, drag and drop it to the audio track below the video.
Step4Add Text/Logo to your Intro Video
Click the ‘TITLE’ tab. To customize, choose title options from Recommended or add your own custom design. To change, format, and animate the text as needed, click on your desired preset or custom title and double click or drag it to the bottom area of the main library to insert a title.

Also, you need to adjust the position and duration of the title to get a better view. In the intro video, it is recommended to add your logo or slogan as well. To add your logo, drag and drop it to the track above the video, and adjust its position and size.
Step5Add Effects to your Intro Video
Go to ‘EFFECTS’ tab, choose a category from the top-left pane, and click and drag your preferred effect from the Effects library to the timeline. Adjust the playback duration by dragging the right handle of the track in the timeline as explained above. Optionally, double-click the Effects track to customize the appearance as needed.
Step6Export the Intro and Add to Shared Media
Once you’re done making your intro video, click on the ‘EXPORT’ tab in the center > go to LOCAL tab on export box > choose your preferred output format (e.g., MP4) > adjust other preferences such as destination location, resolution etc. from the right pane of the box > Click EXPORT.

Free Download For macOS 10.14 or later
Step1Download and Install the Software
The first step in creating an intro video requires the user to download and install the Filmora software in Windows or MacOS computers. To download the setup, go to https://filmora.wondershare.com/ and click ‘Download’. Afterwards, when the setup is downloaded, run the setup and install Filmora on your computer:

Step2Add Color Templates
After installing, wait until the installation is finished. Launch Wondershare Filmora and go to MEDIA tab at the top left of the interface and select the best suitable background color for your intro video from the dropdown menu in the MEDIA tab. Drag your cursor over the tile of the color you wish to use as a background and click to add the icon that appears in the center to add it to the timeline.

Additionally, if you don’t prefer the preset backgrounds and colors, Filmora lets you use your own background image or video clip. For this, select PROJECT MEDIA > click anywhere inside the media window > import media file of your choice. After importing the file, click on the imported file to add it to the timeline.
Step3Select and add audio effect to your Intro Video
Your video automatically grasps a lot of viewers’ attention with a spice of some music/audio in the background. To adorn your intro video further, you can add audio/music effect to your intro video using the inbuilt music and sound effects from the library. If you want to listen to a track from the inbuilt library collection of audio and music, double click on the thumbnail.

Click the AUDIO tab. Choose from Recommended audio files or import your own audio. Once, you find your desired audio/music file, drag and drop it to the audio track below the video.
Step4Add Text/Logo to your Intro Video
Click the ‘TITLE’ tab. To customize, choose title options from Recommended or add your own custom design. To change, format, and animate the text as needed, click on your desired preset or custom title and double click or drag it to the bottom area of the main library to insert a title.

Also, you need to adjust the position and duration of the title to get a better view. In the intro video, it is recommended to add your logo or slogan as well. To add your logo, drag and drop it to the track above the video, and adjust its position and size.
Step5Add Effects to your Intro Video
Go to ‘EFFECTS’ tab, choose a category from the top-left pane, and click and drag your preferred effect from the Effects library to the timeline. Adjust the playback duration by dragging the right handle of the track in the timeline as explained above. Optionally, double-click the Effects track to customize the appearance as needed.
Step6Export the Intro and Add to Shared Media
Once you’re done making your intro video, click on the ‘EXPORT’ tab in the center > go to LOCAL tab on export box > choose your preferred output format (e.g., MP4) > adjust other preferences such as destination location, resolution etc. from the right pane of the box > Click EXPORT.

Free Download For macOS 10.14 or later
Step1Download and Install the Software
The first step in creating an intro video requires the user to download and install the Filmora software in Windows or MacOS computers. To download the setup, go to https://filmora.wondershare.com/ and click ‘Download’. Afterwards, when the setup is downloaded, run the setup and install Filmora on your computer:

Step2Add Color Templates
After installing, wait until the installation is finished. Launch Wondershare Filmora and go to MEDIA tab at the top left of the interface and select the best suitable background color for your intro video from the dropdown menu in the MEDIA tab. Drag your cursor over the tile of the color you wish to use as a background and click to add the icon that appears in the center to add it to the timeline.

Additionally, if you don’t prefer the preset backgrounds and colors, Filmora lets you use your own background image or video clip. For this, select PROJECT MEDIA > click anywhere inside the media window > import media file of your choice. After importing the file, click on the imported file to add it to the timeline.
Step3Select and add audio effect to your Intro Video
Your video automatically grasps a lot of viewers’ attention with a spice of some music/audio in the background. To adorn your intro video further, you can add audio/music effect to your intro video using the inbuilt music and sound effects from the library. If you want to listen to a track from the inbuilt library collection of audio and music, double click on the thumbnail.

Click the AUDIO tab. Choose from Recommended audio files or import your own audio. Once, you find your desired audio/music file, drag and drop it to the audio track below the video.
Step4Add Text/Logo to your Intro Video
Click the ‘TITLE’ tab. To customize, choose title options from Recommended or add your own custom design. To change, format, and animate the text as needed, click on your desired preset or custom title and double click or drag it to the bottom area of the main library to insert a title.

Also, you need to adjust the position and duration of the title to get a better view. In the intro video, it is recommended to add your logo or slogan as well. To add your logo, drag and drop it to the track above the video, and adjust its position and size.
Step5Add Effects to your Intro Video
Go to ‘EFFECTS’ tab, choose a category from the top-left pane, and click and drag your preferred effect from the Effects library to the timeline. Adjust the playback duration by dragging the right handle of the track in the timeline as explained above. Optionally, double-click the Effects track to customize the appearance as needed.
Step6Export the Intro and Add to Shared Media
Once you’re done making your intro video, click on the ‘EXPORT’ tab in the center > go to LOCAL tab on export box > choose your preferred output format (e.g., MP4) > adjust other preferences such as destination location, resolution etc. from the right pane of the box > Click EXPORT.

Also read:
- How to Use Lumetri Color in Adobe After Effects
- Updated In 2024, Best Video Editing Courses Online with Certificate
- Updated Are You a Gaming YouTuber or Content Creator Whose Main Game Is COD Warzone? How Kickass Are Your Warzone Thumbnails? Heres a Guide on How to Make One for Free
- In 2024, Splitting the Clips in Adobe After Effects Step by Step
- New In 2024, Create Chroma Key Written Text Effects in Filmora
- Updated Best Shortcut Towards Timeline Template
- Merging MP4 Videos Made Simple Top 5 Online Tools
- New In 2024, How to Be a YouTube Vlogger
- New Detailed Tutorial to Merge Videos in VLC Media Player for 2024
- 2024 Approved Basic Introduction of LumaFusion Color Grading
- Updated Benefits of Live Streaming on YouTube
- Updated 2024 Approved Splice Video Editor Online - Get Your Videos Splice Easily
- New 2024 Approved 4 Solutions to Add White Border to Video on Mobile and Desktop
- Updated 2024 Approved How to Create Loop Videos with Filmora
- 2024 Approved How to Create Fantastic Glitch Effects with Filmora? Read This Guide to Find Out How to Apply Glitch Effects on Your Videos and Make Custom Glitch Effects
- New Practical Ways to Resize Video in Handbrake
- Updated A Guide to Create Your Own LOL Montage Video for 2024
- New AVI Editor for Windows 11/10/8.1/8/7 Easily Edit AVI Files on PC
- Updated 20 Must-Have Graduation Songs
- Updated Hitfilm Express Video Editor Review for 2024
- Updated Searching for the Best Video Editor to Make Your Video More Attractive? This Article Introduce You Everything About Choosing a Video Editing Software
- Updated In 2024, Top 9 Best Solutions To Go For When Creating an AI Thumbnail
- Updated 2024 Approved Top 7 MP4 Video Editors on Mac Edit MP4 Videos Easily
- Making Slow Motion Videos in Premiere Pro A Review on The Best Method
- Easy Steps on How To Create a New Apple ID Account On iPhone SE (2020)
- A Detailed Guide on Faking Your Location in Mozilla Firefox On Vivo Y100t | Dr.fone
- How To Change Your Apple ID on iPhone X With or Without Password | Dr.fone
- Complete Guide to Hard Reset Your Realme Narzo 60 Pro 5G | Dr.fone
- A Detailed Guide on Faking Your Location in Mozilla Firefox On Tecno Pop 7 Pro | Dr.fone
- In 2024, What is the best Pokemon for pokemon pvp ranking On Samsung Galaxy A25 5G? | Dr.fone
- How To Remove the Two Factor Authentication From iPhone 13 Pro
- In 2024, Removing Device From Apple ID For your Apple iPhone SE (2022)
- In 2024, Why is iPogo not working On Huawei P60? Fixed | Dr.fone
- 8 Solutions to Solve YouTube App Crashing on Tecno Pop 7 Pro | Dr.fone
- Hard Resetting an Tecno Spark 20 Device Made Easy | Dr.fone
- 5 Quick Methods to Bypass Honor Magic 5 Lite FRP
- How To Repair iOS System Issues of Apple iPhone 6? | Dr.fone
- In 2024, How To Unlock Any Vivo S18e Phone Password Using Emergency Call
- How to Change Spotify Location After Moving to Another Country On Vivo V29 | Dr.fone
- Android Screen Stuck General OnePlus Ace 2 Partly Screen Unresponsive | Dr.fone
- In 2024, How To Unlock A Found iPhone 12 mini?
- Complete Guide to Hard Reset Your OnePlus Nord N30 5G | Dr.fone
- How To Fix Part of the Touch Screen Not Working on Vivo Y17s | Dr.fone
- In 2024, How to Unlock Apple iPhone 13 Passcode Screen?
- Title: New Do You Want to Make Your Background Disappear and Replace with an Attractive Background? Here Is How to Add a Green Screen to Zoom App and Add Any Virtual Background of Your Choice
- Author: Chloe
- Created at : 2024-04-24 07:08:18
- Updated at : 2024-04-25 07:08:18
- Link: https://ai-editing-video.techidaily.com/new-do-you-want-to-make-your-background-disappear-and-replace-with-an-attractive-background-here-is-how-to-add-a-green-screen-to-zoom-app-and-add-any-virtua/
- License: This work is licensed under CC BY-NC-SA 4.0.

