:max_bytes(150000):strip_icc():format(webp)/ScreenShot2018-12-08at3.04.00PM-5c0c23f6c9e77c00018eae4e.png)
New Do You Want to Remove the Video Background in Premier Pro Using the Ultra Key but Dont Know About the Whole Process? Please Read Our Complete Step-by-Step Tutorial and Learn From Scratch as a Beginner

Do You Want to Remove the Video Background in Premier Pro Using the Ultra Key but Don’t Know About the Whole Process? Please Read Our Complete Step-by-Step Tutorial and Learn From Scratch as a Beginner
Adobe Premiere Pro is one of the leading video editing software. You can use to create or remove a video’s background. Advanced Chroma Key features such as Color Key and Ultra Key make it possible to produce background-free content quickly.
Although both Keys work similarly, many users prefer to use the Ultra key for a better result in the video. This article will explain how to remove video background in Premiere Pro if you are a newbie.
Let’s get right to it and start the tutorial!
How to Use Premiere Pro to Remove Video Background?
Adobe Premiere Pro can remove video backgrounds quickly using the Ultra Key feature with the following steps:
Step1 In the first step, launch a browser, and download the appropriate Adobe Premiere Pro version for your Windows PC or Mac . Next, install the software on your system and launch it from your Desktop or Dock.
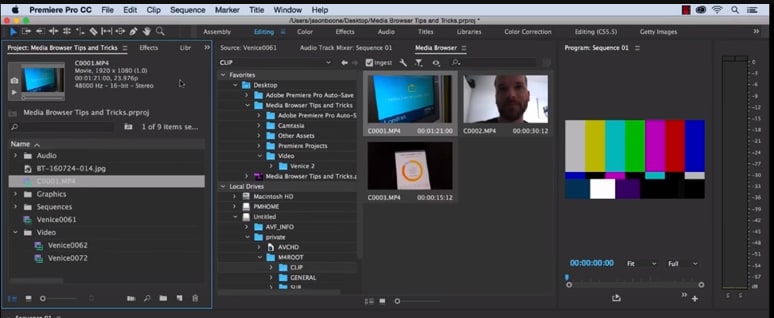
Step2 Now, use the Media Browser panel in the software to browse the video clips you want to import into the software. Next, right-click on your selected video file in which you want to remove the background and choose the “Import” option.
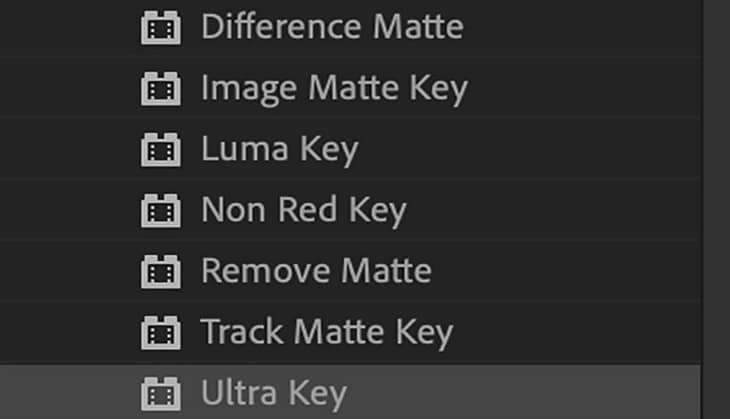
Step3 Click the “Effects” tab in the software panel and select Video Effects. Here, you will see the “Keying” option; select the Ultra Key, press and hold it to grab the key, and place it on your video clip.
![]()
Note: You can also search for the Ultra Key in the Adobe Premiere Pro search bar. Drag it to the video clip containing a background you want to remove.
Step4 As soon as you drop the Ultra Key to your footage, an Effects Control panel will pop up. Next, use the eyedropper tool in the Effects Control panel. Finally, select the background color on your video that you want to remove.
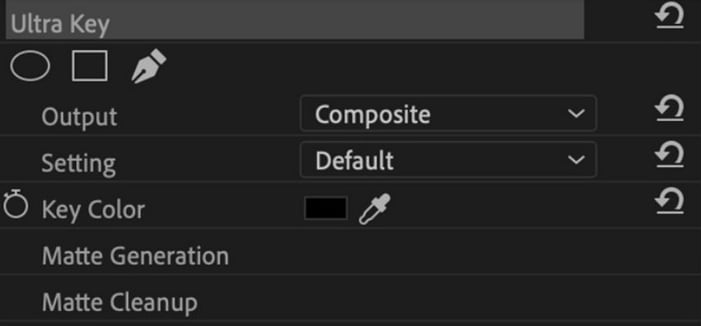
Step5 In the next step, click the drop-down menu next to the “Output” option, and select “Alpha Channel” from the list. This will reveal the details of your video and the edits. Also, click the “Setting” drop-down menu and select the Relaxed, Aggressive, or Custom option for the video effect.

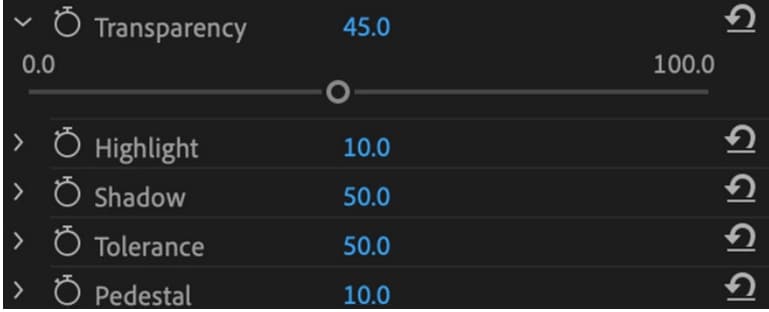
Step6 Select the “Matte Generation“ below Key Color. Try different levels for Highlight, Shadow, Tolerance, Transparency, Pedestal, and other settings to further clean the matte for a premium effect.
Step7 In this step,choose the “Matte Cleanup” option to expand its settings and clean up the edges of your clip. You will see various options here, but the most important one is “Choke.” It will shrink the object’s borders and “Soften” to add fuzz.
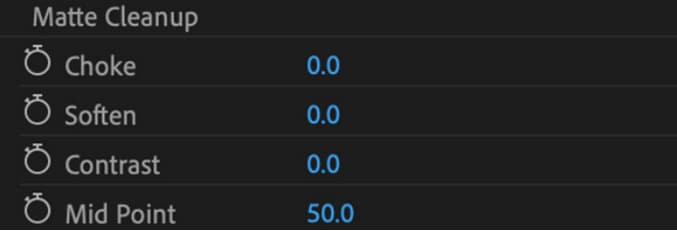
If you see a background color spill on your video after playing with the above settings, click “Spill Suppression” beneath Matte Cleanup to expand its options and choose the desired settings to resolve this issue.
That’s about it! You have successfully removed the video background in Premiere Pro.
Step8 In the last step, you need to save, render, and export your video with the removed background. To do this, click the “File” option on the Premiere Pro Media Browser, and choose “Export” to explore the “Media” menu.
Choose the format in the Export Settings, as it is compatible with most devices. Next, choose a valid Preset and resolution, and click “Export” to begin the rendering process. Finally, save your edited background video again, and export the video to the desired destination.
Is There Any Best Alternative to Remove Video’s Background?
Although Adobe Premiere Pro is an excellent choice, the software can be a little overzealous for beginners. But don’t fret; there is an alternative for newbie to remove the video background.
Many video content creators recommended Wondershare Filmora as a user-friendly video editing software. This software loads with customization options and compact feature, including the Human Segmentation effect. With it, you can isolate objects from the background of a video without a green screen.
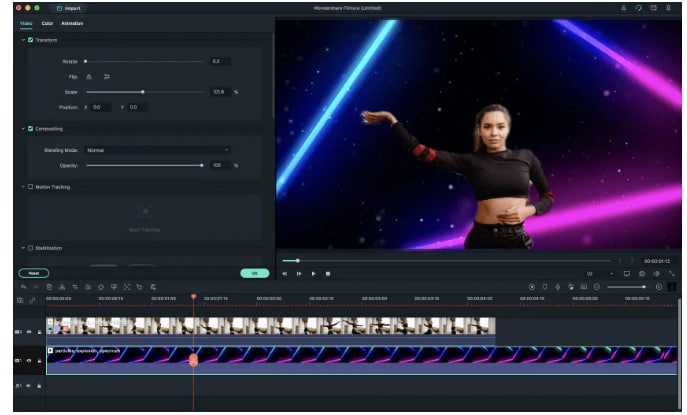
Let’s take a quick look at Filmora video editing marvel features:
- Comes with a free trial and is priced to meet most video designers’ production needs.
- Remove the video background with four quick steps.
- View the foreground of your video in real-time after background removal.
- Numerous customization options to add a different background or an image to the original content.
- Add the removed background as an overlay on top of another clip.
- Drag and drop a video clip to another track in the timeline for cutting, trimming, and elimination purposes.
- Using the “Human Segregation effect” in the AI Portrait on any imported video is simple.
- See objects isolated from the background in the Preview mode, which allows you to adjust the edges, feathers, and thickness accordingly.
- Easy export options supporting various compatible formats.
Additionally, we have provided you with a video tutorial about How to Remove and Change Video Background Without Green Screen with Filmora:
Free Download For Win 7 or later(64-bit)
Free Download For macOS 10.14 or later
Conclusion
This comprehensive guide explains how to remove the video background in Premier Pro using the Ultra key instead of the Color Key.
We have also discussed an excellent alternative to Premier Pro that can eliminate any background in your video content within minutes.
This article helped solve your queries. As a result, you can now create quality video content for your audience without paying thousands of dollars to professional video editors to do the background removal for you.
Step4 As soon as you drop the Ultra Key to your footage, an Effects Control panel will pop up. Next, use the eyedropper tool in the Effects Control panel. Finally, select the background color on your video that you want to remove.

Step5 In the next step, click the drop-down menu next to the “Output” option, and select “Alpha Channel” from the list. This will reveal the details of your video and the edits. Also, click the “Setting” drop-down menu and select the Relaxed, Aggressive, or Custom option for the video effect.

Step6 Select the “Matte Generation“ below Key Color. Try different levels for Highlight, Shadow, Tolerance, Transparency, Pedestal, and other settings to further clean the matte for a premium effect.

Step7 In this step,choose the “Matte Cleanup” option to expand its settings and clean up the edges of your clip. You will see various options here, but the most important one is “Choke.” It will shrink the object’s borders and “Soften” to add fuzz.

If you see a background color spill on your video after playing with the above settings, click “Spill Suppression” beneath Matte Cleanup to expand its options and choose the desired settings to resolve this issue.
That’s about it! You have successfully removed the video background in Premiere Pro.
Step8 In the last step, you need to save, render, and export your video with the removed background. To do this, click the “File” option on the Premiere Pro Media Browser, and choose “Export” to explore the “Media” menu.
Choose the format in the Export Settings, as it is compatible with most devices. Next, choose a valid Preset and resolution, and click “Export” to begin the rendering process. Finally, save your edited background video again, and export the video to the desired destination.
Is There Any Best Alternative to Remove Video’s Background?
Although Adobe Premiere Pro is an excellent choice, the software can be a little overzealous for beginners. But don’t fret; there is an alternative for newbie to remove the video background.
Many video content creators recommended Wondershare Filmora as a user-friendly video editing software. This software loads with customization options and compact feature, including the Human Segmentation effect. With it, you can isolate objects from the background of a video without a green screen.

Let’s take a quick look at Filmora video editing marvel features:
- Comes with a free trial and is priced to meet most video designers’ production needs.
- Remove the video background with four quick steps.
- View the foreground of your video in real-time after background removal.
- Numerous customization options to add a different background or an image to the original content.
- Add the removed background as an overlay on top of another clip.
- Drag and drop a video clip to another track in the timeline for cutting, trimming, and elimination purposes.
- Using the “Human Segregation effect” in the AI Portrait on any imported video is simple.
- See objects isolated from the background in the Preview mode, which allows you to adjust the edges, feathers, and thickness accordingly.
- Easy export options supporting various compatible formats.
Additionally, we have provided you with a video tutorial about How to Remove and Change Video Background Without Green Screen with Filmora:
Free Download For Win 7 or later(64-bit)
Free Download For macOS 10.14 or later
Conclusion
This comprehensive guide explains how to remove the video background in Premier Pro using the Ultra key instead of the Color Key.
We have also discussed an excellent alternative to Premier Pro that can eliminate any background in your video content within minutes.
This article helped solve your queries. As a result, you can now create quality video content for your audience without paying thousands of dollars to professional video editors to do the background removal for you.
Are You Ready to Learn About Something Free yet Amazing? We Are Talking About All Format Video Players for PC that You Should Know , Let’s Begin
Whether it’s work or entertainment, you come across videos of different file formats almost daily. It is so annoying that you play a video on your device, and it displays some errors. This is because not every video player is good and up to the mark.
Do you know what way to go in this scenario? Let us guide you. The article below will walk you through the 10 best and free all format video players for PC, which are a must to know in 2024. Let’s begin!
For Win 7 or later (64-bit)
For macOS 10.14 or later
download filmora app for ios ](https://app.adjust.com/b0k9hf2%5F4bsu85t ) download filmora app for android ](https://app.adjust.com/b0k9hf2%5F4bsu85t )
Click here to get Filmora for PC by email
List of 10 Best Free Video Players for Win 11
Not every Windows 11 video player supports all file formats, but certain amazing video players are free to use, and additionally, they support a wide range of formats. Let’s discuss them one by one.
| 1 - Windows 11 Media Player | 2 - VLC Media Player |
|---|---|
| 3 - PotPlayer | 4 - GOM Player |
| 5 - 5KPlayer | 6 - MPV Player |
| 7 - DivX Player | 8 - PowerDVD |
| 9 - MediaMonkey | 10 - Kodi Player |
1. Windows 11 Media Player
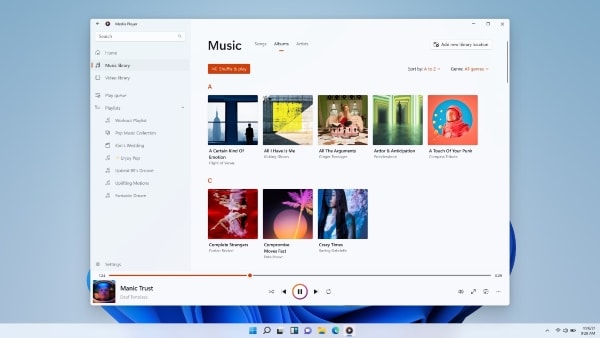
For all Windows 11 users, this video player is great news for you because Microsoft has finally released a media player app for Windows 11. With this, the struggle of using a third-party video player will now come to an end.
The user interface for this media player app is sleek, clean, and minimal. The video player for Windows 11 offers a dark mode, semi-transparent materials, accent colors, and other options. Windows 11 Media Player is great and made it to the top 10 because it is an all-format video player for PC, for instance, AVI , WAV, MPG, WMV , MP3, and others.
Find a Useful Video Editor to Make Video on Windows 11? Try This Out!
Filmora Video Editor is an expert in creating and editing videoson Windows 11. You can add cool visual effects and popular emojis to decorate your video. Plus, there is a vast media library to add audio and filter! You can edit video with high quality and play with the below video players at anytime!
Free Edit Videos on Windows 11 Free Edit Videos on Windows 11 Free Edit Videos on Windows 11 Learn More >
2. VLC Media Player
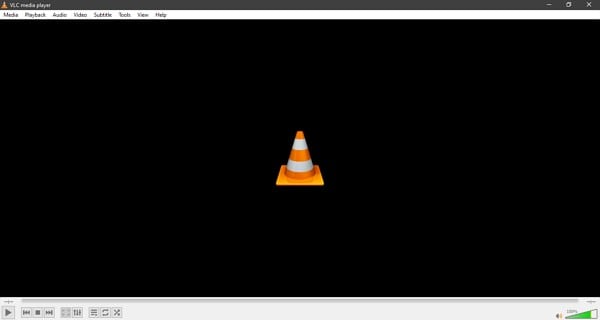
Do you know about any open-source media players? VLC Media Player is not only an open-source but also a cross-platform multimedia player. This Windows 11 video player supports video compression. Users can play any video files from webcams, discs, and even streams with this video player.
VLC Media Player is famous because it supports almost all file formats and supports codecs like , WMV, MPEG-2, MPEG-4, etc. The media player does not contain ads, user tracking, or spyware. Moreover, the software also offers a video filtration feature. VLC Media Player can also decode videos, and it is highly trusted and widely used.
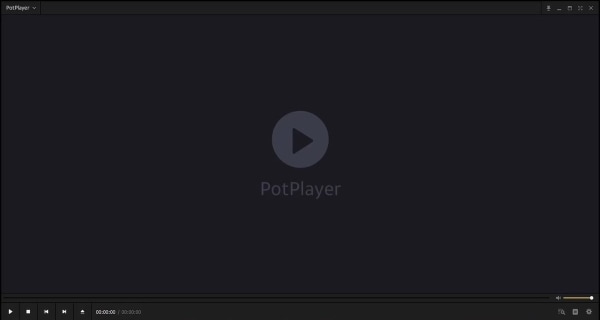
3. PotPlayer
Are you ready to learn about a media player that can play 360-degree video and 3D videos? We are talking about PotPlayer, a media player developed by a South Korean Internet Company. As the media player supports 3D videos, it also supports various types of 3D glasses for a better experience.
Do you know what else it has? Overlay support and also Direct3D9 Ex Flip Mode. The video player for Windows 11 is compatible with various devices like TV, HDTV, DVD. Along with all this, PotPlayer also supports many subtitle formats like DVD, Blu-Ray, SRT & SMI.
4. GOM Player
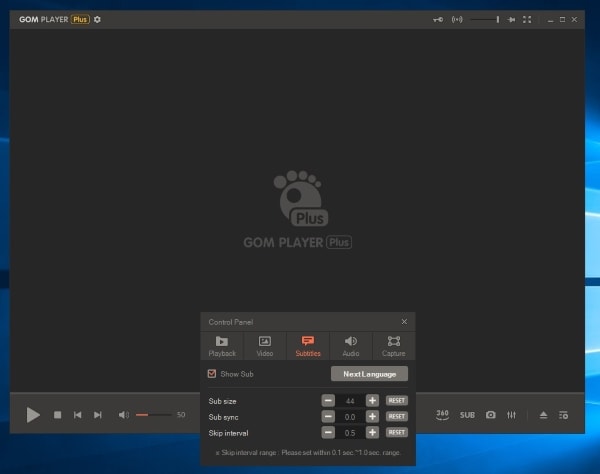
Let’s share another worth trying video player for Windows 11, GOM Player. The media player offers great features like speed control, screen capture, video/audio effects, A-B repeat, etc. Moreover, GOM Player supports a massive list of file formats like MP4 , AVI, MKV , MPG, MOV , and others.
The video player is a practical codec finder with a clean and simple interface. Additionally, the free-to-use video player also supports 360-degree video views. The design of the software is very minimal, with countless features.
Best Windows 11 Video Editor
Help you create and edit videos like a pro on Windows 11. Start your creation.
Edit Video Free Edit Video Free Edit Video Free Learn More >
5. 5KPlayer
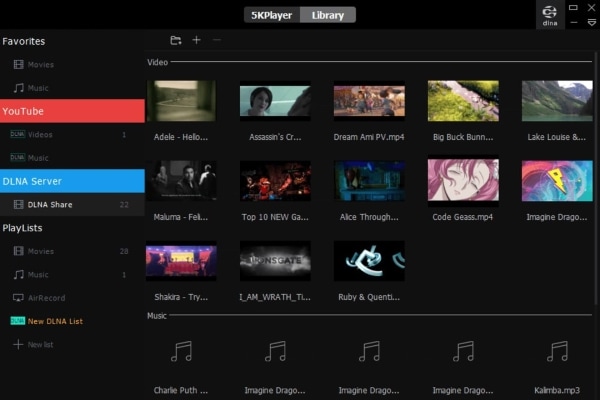
Do you know any media player that has a built-in video codec library? Well, 5KPlayer does have a codec library that supports different video formats, DVDs, etc. The media player is GPU accelerated and is very powerful. Moreover, it is an HD and 4K video player.
This Windows 11 video player supports a lot of video formats like WEBM, MPEG, WMV, FLV, MP4, and it is free to use. With 5KPlayer, you can easily stream media files as it supports DNLA wireless and AirPlay. The media player can even play ultra-high-definition clips easily.
6. MPV Player
MPV Player is a top-notch video player for Windows 11. It is free and open-source software. It is famous for its wide range of supported media formats, like DXVA2 and VAAPI too. MPV Player does not have a good interface but still provides basic video controls.
MPV Player is simple and effective at the same time. You won’t find a Windows 11 video player that does not consume a large number of system resources. MPV Player supports scripting like JavaScript and Lua Script, unlike normal media players.

7. DivX Player
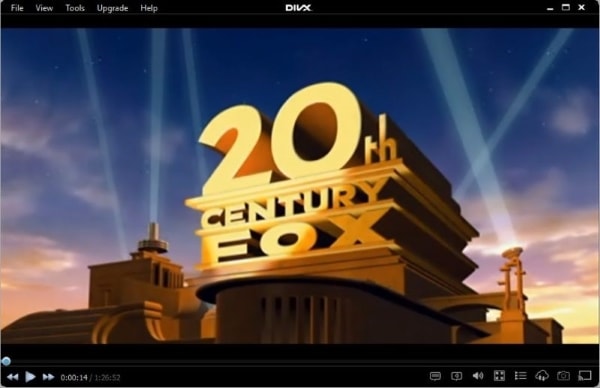
DivX Player is considered the best Windows 11 video player. This software allows playing advanced codecs like HECV, MKV, and AVI. You can play media up to 4K resolution. DivX Player is free software that allows you to stream on DLNA (Digital Living Network Alliance).
The interface for DivX Player might be simple, but they have not compromised on the features provided. DivX Player is the first media player that is offering free playback. It has a built-in media library from which you can keep track of your videos.
A cross-platform for making videos anywhere for all creators

Why your video editing isn’t good enough? How about some creative inspo?
- 100 Million+ Users
- 150+ Countries and Regions
- 4 Million+ Social Media Followers
- 5 Million+ Stock Media for Use
* Secure Download

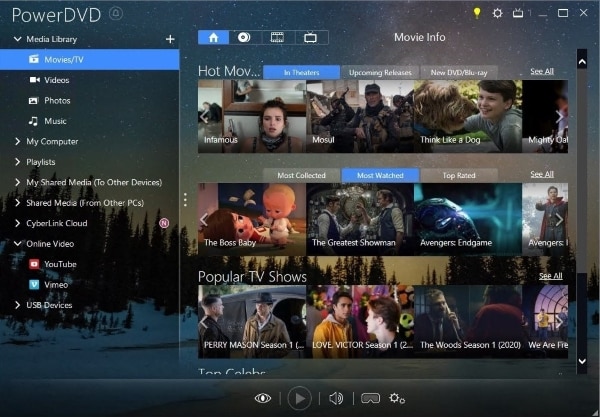
8. PowerDVD
PowerDVD is media-playing software that is compatible with Android, iOS, and Windows. It allows you to watch up to 8K resolution media content while providing an amazing cinema-style audio experience. It allows the downloading of videos for offline usage. PowerDVD is of its kind video player for Windows 11.
PowerDVD allows you to share media through the software. It also has cloud storage that is capable of saving 40 HD movies. You can use formats like and AVC along with XAVC-S. XAVC-S is high-definition video playback. You can manage your library, including photos, videos, music, and even DVD movies can be managed through the application.
9. MediaMonkey
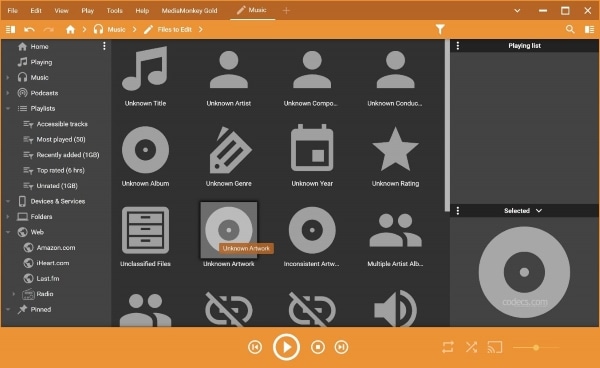
MediaMonkey is a digital video player for Windows 11; it allows the users to record and download movies and podcasts. MediaMonkey supports plug-ins for user advantage. Along with using MediaMonkey on Windows, also use it on Android and iOS devices. You can play high-quality audio on your TV, home stereo, or any other device.
Most collectors use MediaMonkey. It allows you to manage 100,000+ audio and media files. You can organize the media you have and keep it in a representable way. MediaMonkey will enable you to share media files between Windows, Android, and Apple devices. It can change audio and video formats as per consumer demand.
10. Kodi Player
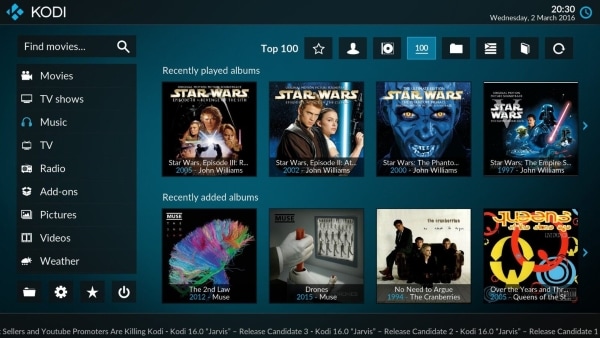
Kodi Player is a well-known video player for Windows 11. It is free software to use. Does free mean low quality? Not in Kodi Player’s case. Kodi player allows live sports streams. It is efficient and has a wide range of compatibility. Kodi Player is open-source software for home theatre.
Does Kodi support different file formats? Yes, the Kodi player allows multiple file formats. These formats include MIDI, and WavPack for audio and MP4 and real-time for videos. Kodi Player is not only used as a Window 11 video player; it can play games and record live TV too. You can also do browsing using the Kodi Player.
Conclusion
We discussed 10 top and free all format video players for PC as we committed. This article will provide great help whenever file-formats bother you. Moving on to a little surprise, let’s share a brilliant video editor, Wondershare Filmora .
The software offers chroma key background, green-screen effect, split-screen effect, and a lot more than this. Filmora is a full-fledged video editor with endless features and limitless editing opportunities. You can add cool and crazy effects, transitions, and titles to your video. Moreover, it has advanced AI portrait features, cut, trim, join, and many more facilities.
For Win 7 or later (64-bit)
For macOS 10.12 or later
For Win 7 or later (64-bit)
For macOS 10.14 or later
download filmora app for ios ](https://app.adjust.com/b0k9hf2%5F4bsu85t ) download filmora app for android ](https://app.adjust.com/b0k9hf2%5F4bsu85t )
Click here to get Filmora for PC by email
List of 10 Best Free Video Players for Win 11
Not every Windows 11 video player supports all file formats, but certain amazing video players are free to use, and additionally, they support a wide range of formats. Let’s discuss them one by one.
| 1 - Windows 11 Media Player | 2 - VLC Media Player |
|---|---|
| 3 - PotPlayer | 4 - GOM Player |
| 5 - 5KPlayer | 6 - MPV Player |
| 7 - DivX Player | 8 - PowerDVD |
| 9 - MediaMonkey | 10 - Kodi Player |
1. Windows 11 Media Player
For all Windows 11 users, this video player is great news for you because Microsoft has finally released a media player app for Windows 11. With this, the struggle of using a third-party video player will now come to an end.
The user interface for this media player app is sleek, clean, and minimal. The video player for Windows 11 offers a dark mode, semi-transparent materials, accent colors, and other options. Windows 11 Media Player is great and made it to the top 10 because it is an all-format video player for PC, for instance, AVI , WAV, MPG, WMV , MP3, and others.

Find a Useful Video Editor to Make Video on Windows 11? Try This Out!
Filmora Video Editor is an expert in creating and editing videoson Windows 11. You can add cool visual effects and popular emojis to decorate your video. Plus, there is a vast media library to add audio and filter! You can edit video with high quality and play with the below video players at anytime!
Free Edit Videos on Windows 11 Free Edit Videos on Windows 11 Free Edit Videos on Windows 11 Learn More >
2. VLC Media Player
Do you know about any open-source media players? VLC Media Player is not only an open-source but also a cross-platform multimedia player. This Windows 11 video player supports video compression. Users can play any video files from webcams, discs, and even streams with this video player.
VLC Media Player is famous because it supports almost all file formats and supports codecs like , WMV, MPEG-2, MPEG-4, etc. The media player does not contain ads, user tracking, or spyware. Moreover, the software also offers a video filtration feature. VLC Media Player can also decode videos, and it is highly trusted and widely used.

3. PotPlayer
Are you ready to learn about a media player that can play 360-degree video and 3D videos? We are talking about PotPlayer, a media player developed by a South Korean Internet Company. As the media player supports 3D videos, it also supports various types of 3D glasses for a better experience.
Do you know what else it has? Overlay support and also Direct3D9 Ex Flip Mode. The video player for Windows 11 is compatible with various devices like TV, HDTV, DVD. Along with all this, PotPlayer also supports many subtitle formats like DVD, Blu-Ray, SRT & SMI.

4. GOM Player
Let’s share another worth trying video player for Windows 11, GOM Player. The media player offers great features like speed control, screen capture, video/audio effects, A-B repeat, etc. Moreover, GOM Player supports a massive list of file formats like MP4 , AVI, MKV , MPG, MOV , and others.
The video player is a practical codec finder with a clean and simple interface. Additionally, the free-to-use video player also supports 360-degree video views. The design of the software is very minimal, with countless features.

Best Windows 11 Video Editor
Help you create and edit videos like a pro on Windows 11. Start your creation.
Edit Video Free Edit Video Free Edit Video Free Learn More >
5. 5KPlayer
Do you know any media player that has a built-in video codec library? Well, 5KPlayer does have a codec library that supports different video formats, DVDs, etc. The media player is GPU accelerated and is very powerful. Moreover, it is an HD and 4K video player.
This Windows 11 video player supports a lot of video formats like WEBM, MPEG, WMV, FLV, MP4, and it is free to use. With 5KPlayer, you can easily stream media files as it supports DNLA wireless and AirPlay. The media player can even play ultra-high-definition clips easily.

6. MPV Player
MPV Player is a top-notch video player for Windows 11. It is free and open-source software. It is famous for its wide range of supported media formats, like DXVA2 and VAAPI too. MPV Player does not have a good interface but still provides basic video controls.
MPV Player is simple and effective at the same time. You won’t find a Windows 11 video player that does not consume a large number of system resources. MPV Player supports scripting like JavaScript and Lua Script, unlike normal media players.

7. DivX Player
DivX Player is considered the best Windows 11 video player. This software allows playing advanced codecs like HECV, MKV, and AVI. You can play media up to 4K resolution. DivX Player is free software that allows you to stream on DLNA (Digital Living Network Alliance).
The interface for DivX Player might be simple, but they have not compromised on the features provided. DivX Player is the first media player that is offering free playback. It has a built-in media library from which you can keep track of your videos.
A cross-platform for making videos anywhere for all creators

Why your video editing isn’t good enough? How about some creative inspo?
- 100 Million+ Users
- 150+ Countries and Regions
- 4 Million+ Social Media Followers
- 5 Million+ Stock Media for Use
* Secure Download


8. PowerDVD
PowerDVD is media-playing software that is compatible with Android, iOS, and Windows. It allows you to watch up to 8K resolution media content while providing an amazing cinema-style audio experience. It allows the downloading of videos for offline usage. PowerDVD is of its kind video player for Windows 11.
PowerDVD allows you to share media through the software. It also has cloud storage that is capable of saving 40 HD movies. You can use formats like and AVC along with XAVC-S. XAVC-S is high-definition video playback. You can manage your library, including photos, videos, music, and even DVD movies can be managed through the application.

9. MediaMonkey
MediaMonkey is a digital video player for Windows 11; it allows the users to record and download movies and podcasts. MediaMonkey supports plug-ins for user advantage. Along with using MediaMonkey on Windows, also use it on Android and iOS devices. You can play high-quality audio on your TV, home stereo, or any other device.
Most collectors use MediaMonkey. It allows you to manage 100,000+ audio and media files. You can organize the media you have and keep it in a representable way. MediaMonkey will enable you to share media files between Windows, Android, and Apple devices. It can change audio and video formats as per consumer demand.

10. Kodi Player
Kodi Player is a well-known video player for Windows 11. It is free software to use. Does free mean low quality? Not in Kodi Player’s case. Kodi player allows live sports streams. It is efficient and has a wide range of compatibility. Kodi Player is open-source software for home theatre.
Does Kodi support different file formats? Yes, the Kodi player allows multiple file formats. These formats include MIDI, and WavPack for audio and MP4 and real-time for videos. Kodi Player is not only used as a Window 11 video player; it can play games and record live TV too. You can also do browsing using the Kodi Player.

Conclusion
We discussed 10 top and free all format video players for PC as we committed. This article will provide great help whenever file-formats bother you. Moving on to a little surprise, let’s share a brilliant video editor, Wondershare Filmora .
The software offers chroma key background, green-screen effect, split-screen effect, and a lot more than this. Filmora is a full-fledged video editor with endless features and limitless editing opportunities. You can add cool and crazy effects, transitions, and titles to your video. Moreover, it has advanced AI portrait features, cut, trim, join, and many more facilities.
For Win 7 or later (64-bit)
For macOS 10.12 or later
For Win 7 or later (64-bit)
For macOS 10.14 or later
download filmora app for ios ](https://app.adjust.com/b0k9hf2%5F4bsu85t ) download filmora app for android ](https://app.adjust.com/b0k9hf2%5F4bsu85t )
Click here to get Filmora for PC by email
List of 10 Best Free Video Players for Win 11
Not every Windows 11 video player supports all file formats, but certain amazing video players are free to use, and additionally, they support a wide range of formats. Let’s discuss them one by one.
| 1 - Windows 11 Media Player | 2 - VLC Media Player |
|---|---|
| 3 - PotPlayer | 4 - GOM Player |
| 5 - 5KPlayer | 6 - MPV Player |
| 7 - DivX Player | 8 - PowerDVD |
| 9 - MediaMonkey | 10 - Kodi Player |
1. Windows 11 Media Player
For all Windows 11 users, this video player is great news for you because Microsoft has finally released a media player app for Windows 11. With this, the struggle of using a third-party video player will now come to an end.
The user interface for this media player app is sleek, clean, and minimal. The video player for Windows 11 offers a dark mode, semi-transparent materials, accent colors, and other options. Windows 11 Media Player is great and made it to the top 10 because it is an all-format video player for PC, for instance, AVI , WAV, MPG, WMV , MP3, and others.

Find a Useful Video Editor to Make Video on Windows 11? Try This Out!
Filmora Video Editor is an expert in creating and editing videoson Windows 11. You can add cool visual effects and popular emojis to decorate your video. Plus, there is a vast media library to add audio and filter! You can edit video with high quality and play with the below video players at anytime!
Free Edit Videos on Windows 11 Free Edit Videos on Windows 11 Free Edit Videos on Windows 11 Learn More >
2. VLC Media Player
Do you know about any open-source media players? VLC Media Player is not only an open-source but also a cross-platform multimedia player. This Windows 11 video player supports video compression. Users can play any video files from webcams, discs, and even streams with this video player.
VLC Media Player is famous because it supports almost all file formats and supports codecs like , WMV, MPEG-2, MPEG-4, etc. The media player does not contain ads, user tracking, or spyware. Moreover, the software also offers a video filtration feature. VLC Media Player can also decode videos, and it is highly trusted and widely used.

3. PotPlayer
Are you ready to learn about a media player that can play 360-degree video and 3D videos? We are talking about PotPlayer, a media player developed by a South Korean Internet Company. As the media player supports 3D videos, it also supports various types of 3D glasses for a better experience.
Do you know what else it has? Overlay support and also Direct3D9 Ex Flip Mode. The video player for Windows 11 is compatible with various devices like TV, HDTV, DVD. Along with all this, PotPlayer also supports many subtitle formats like DVD, Blu-Ray, SRT & SMI.

4. GOM Player
Let’s share another worth trying video player for Windows 11, GOM Player. The media player offers great features like speed control, screen capture, video/audio effects, A-B repeat, etc. Moreover, GOM Player supports a massive list of file formats like MP4 , AVI, MKV , MPG, MOV , and others.
The video player is a practical codec finder with a clean and simple interface. Additionally, the free-to-use video player also supports 360-degree video views. The design of the software is very minimal, with countless features.

Best Windows 11 Video Editor
Help you create and edit videos like a pro on Windows 11. Start your creation.
Edit Video Free Edit Video Free Edit Video Free Learn More >
5. 5KPlayer
Do you know any media player that has a built-in video codec library? Well, 5KPlayer does have a codec library that supports different video formats, DVDs, etc. The media player is GPU accelerated and is very powerful. Moreover, it is an HD and 4K video player.
This Windows 11 video player supports a lot of video formats like WEBM, MPEG, WMV, FLV, MP4, and it is free to use. With 5KPlayer, you can easily stream media files as it supports DNLA wireless and AirPlay. The media player can even play ultra-high-definition clips easily.

6. MPV Player
MPV Player is a top-notch video player for Windows 11. It is free and open-source software. It is famous for its wide range of supported media formats, like DXVA2 and VAAPI too. MPV Player does not have a good interface but still provides basic video controls.
MPV Player is simple and effective at the same time. You won’t find a Windows 11 video player that does not consume a large number of system resources. MPV Player supports scripting like JavaScript and Lua Script, unlike normal media players.

7. DivX Player
DivX Player is considered the best Windows 11 video player. This software allows playing advanced codecs like HECV, MKV, and AVI. You can play media up to 4K resolution. DivX Player is free software that allows you to stream on DLNA (Digital Living Network Alliance).
The interface for DivX Player might be simple, but they have not compromised on the features provided. DivX Player is the first media player that is offering free playback. It has a built-in media library from which you can keep track of your videos.
A cross-platform for making videos anywhere for all creators

Why your video editing isn’t good enough? How about some creative inspo?
- 100 Million+ Users
- 150+ Countries and Regions
- 4 Million+ Social Media Followers
- 5 Million+ Stock Media for Use
* Secure Download


8. PowerDVD
PowerDVD is media-playing software that is compatible with Android, iOS, and Windows. It allows you to watch up to 8K resolution media content while providing an amazing cinema-style audio experience. It allows the downloading of videos for offline usage. PowerDVD is of its kind video player for Windows 11.
PowerDVD allows you to share media through the software. It also has cloud storage that is capable of saving 40 HD movies. You can use formats like and AVC along with XAVC-S. XAVC-S is high-definition video playback. You can manage your library, including photos, videos, music, and even DVD movies can be managed through the application.

9. MediaMonkey
MediaMonkey is a digital video player for Windows 11; it allows the users to record and download movies and podcasts. MediaMonkey supports plug-ins for user advantage. Along with using MediaMonkey on Windows, also use it on Android and iOS devices. You can play high-quality audio on your TV, home stereo, or any other device.
Most collectors use MediaMonkey. It allows you to manage 100,000+ audio and media files. You can organize the media you have and keep it in a representable way. MediaMonkey will enable you to share media files between Windows, Android, and Apple devices. It can change audio and video formats as per consumer demand.

10. Kodi Player
Kodi Player is a well-known video player for Windows 11. It is free software to use. Does free mean low quality? Not in Kodi Player’s case. Kodi player allows live sports streams. It is efficient and has a wide range of compatibility. Kodi Player is open-source software for home theatre.
Does Kodi support different file formats? Yes, the Kodi player allows multiple file formats. These formats include MIDI, and WavPack for audio and MP4 and real-time for videos. Kodi Player is not only used as a Window 11 video player; it can play games and record live TV too. You can also do browsing using the Kodi Player.

Conclusion
We discussed 10 top and free all format video players for PC as we committed. This article will provide great help whenever file-formats bother you. Moving on to a little surprise, let’s share a brilliant video editor, Wondershare Filmora .
The software offers chroma key background, green-screen effect, split-screen effect, and a lot more than this. Filmora is a full-fledged video editor with endless features and limitless editing opportunities. You can add cool and crazy effects, transitions, and titles to your video. Moreover, it has advanced AI portrait features, cut, trim, join, and many more facilities.
For Win 7 or later (64-bit)
For macOS 10.12 or later
For Win 7 or later (64-bit)
For macOS 10.14 or later
download filmora app for ios ](https://app.adjust.com/b0k9hf2%5F4bsu85t ) download filmora app for android ](https://app.adjust.com/b0k9hf2%5F4bsu85t )
Click here to get Filmora for PC by email
List of 10 Best Free Video Players for Win 11
Not every Windows 11 video player supports all file formats, but certain amazing video players are free to use, and additionally, they support a wide range of formats. Let’s discuss them one by one.
| 1 - Windows 11 Media Player | 2 - VLC Media Player |
|---|---|
| 3 - PotPlayer | 4 - GOM Player |
| 5 - 5KPlayer | 6 - MPV Player |
| 7 - DivX Player | 8 - PowerDVD |
| 9 - MediaMonkey | 10 - Kodi Player |
1. Windows 11 Media Player
For all Windows 11 users, this video player is great news for you because Microsoft has finally released a media player app for Windows 11. With this, the struggle of using a third-party video player will now come to an end.
The user interface for this media player app is sleek, clean, and minimal. The video player for Windows 11 offers a dark mode, semi-transparent materials, accent colors, and other options. Windows 11 Media Player is great and made it to the top 10 because it is an all-format video player for PC, for instance, AVI , WAV, MPG, WMV , MP3, and others.

Find a Useful Video Editor to Make Video on Windows 11? Try This Out!
Filmora Video Editor is an expert in creating and editing videoson Windows 11. You can add cool visual effects and popular emojis to decorate your video. Plus, there is a vast media library to add audio and filter! You can edit video with high quality and play with the below video players at anytime!
Free Edit Videos on Windows 11 Free Edit Videos on Windows 11 Free Edit Videos on Windows 11 Learn More >
2. VLC Media Player
Do you know about any open-source media players? VLC Media Player is not only an open-source but also a cross-platform multimedia player. This Windows 11 video player supports video compression. Users can play any video files from webcams, discs, and even streams with this video player.
VLC Media Player is famous because it supports almost all file formats and supports codecs like , WMV, MPEG-2, MPEG-4, etc. The media player does not contain ads, user tracking, or spyware. Moreover, the software also offers a video filtration feature. VLC Media Player can also decode videos, and it is highly trusted and widely used.

3. PotPlayer
Are you ready to learn about a media player that can play 360-degree video and 3D videos? We are talking about PotPlayer, a media player developed by a South Korean Internet Company. As the media player supports 3D videos, it also supports various types of 3D glasses for a better experience.
Do you know what else it has? Overlay support and also Direct3D9 Ex Flip Mode. The video player for Windows 11 is compatible with various devices like TV, HDTV, DVD. Along with all this, PotPlayer also supports many subtitle formats like DVD, Blu-Ray, SRT & SMI.

4. GOM Player
Let’s share another worth trying video player for Windows 11, GOM Player. The media player offers great features like speed control, screen capture, video/audio effects, A-B repeat, etc. Moreover, GOM Player supports a massive list of file formats like MP4 , AVI, MKV , MPG, MOV , and others.
The video player is a practical codec finder with a clean and simple interface. Additionally, the free-to-use video player also supports 360-degree video views. The design of the software is very minimal, with countless features.

Best Windows 11 Video Editor
Help you create and edit videos like a pro on Windows 11. Start your creation.
Edit Video Free Edit Video Free Edit Video Free Learn More >
5. 5KPlayer
Do you know any media player that has a built-in video codec library? Well, 5KPlayer does have a codec library that supports different video formats, DVDs, etc. The media player is GPU accelerated and is very powerful. Moreover, it is an HD and 4K video player.
This Windows 11 video player supports a lot of video formats like WEBM, MPEG, WMV, FLV, MP4, and it is free to use. With 5KPlayer, you can easily stream media files as it supports DNLA wireless and AirPlay. The media player can even play ultra-high-definition clips easily.

6. MPV Player
MPV Player is a top-notch video player for Windows 11. It is free and open-source software. It is famous for its wide range of supported media formats, like DXVA2 and VAAPI too. MPV Player does not have a good interface but still provides basic video controls.
MPV Player is simple and effective at the same time. You won’t find a Windows 11 video player that does not consume a large number of system resources. MPV Player supports scripting like JavaScript and Lua Script, unlike normal media players.

7. DivX Player
DivX Player is considered the best Windows 11 video player. This software allows playing advanced codecs like HECV, MKV, and AVI. You can play media up to 4K resolution. DivX Player is free software that allows you to stream on DLNA (Digital Living Network Alliance).
The interface for DivX Player might be simple, but they have not compromised on the features provided. DivX Player is the first media player that is offering free playback. It has a built-in media library from which you can keep track of your videos.
A cross-platform for making videos anywhere for all creators

Why your video editing isn’t good enough? How about some creative inspo?
- 100 Million+ Users
- 150+ Countries and Regions
- 4 Million+ Social Media Followers
- 5 Million+ Stock Media for Use
* Secure Download


8. PowerDVD
PowerDVD is media-playing software that is compatible with Android, iOS, and Windows. It allows you to watch up to 8K resolution media content while providing an amazing cinema-style audio experience. It allows the downloading of videos for offline usage. PowerDVD is of its kind video player for Windows 11.
PowerDVD allows you to share media through the software. It also has cloud storage that is capable of saving 40 HD movies. You can use formats like and AVC along with XAVC-S. XAVC-S is high-definition video playback. You can manage your library, including photos, videos, music, and even DVD movies can be managed through the application.

9. MediaMonkey
MediaMonkey is a digital video player for Windows 11; it allows the users to record and download movies and podcasts. MediaMonkey supports plug-ins for user advantage. Along with using MediaMonkey on Windows, also use it on Android and iOS devices. You can play high-quality audio on your TV, home stereo, or any other device.
Most collectors use MediaMonkey. It allows you to manage 100,000+ audio and media files. You can organize the media you have and keep it in a representable way. MediaMonkey will enable you to share media files between Windows, Android, and Apple devices. It can change audio and video formats as per consumer demand.

10. Kodi Player
Kodi Player is a well-known video player for Windows 11. It is free software to use. Does free mean low quality? Not in Kodi Player’s case. Kodi player allows live sports streams. It is efficient and has a wide range of compatibility. Kodi Player is open-source software for home theatre.
Does Kodi support different file formats? Yes, the Kodi player allows multiple file formats. These formats include MIDI, and WavPack for audio and MP4 and real-time for videos. Kodi Player is not only used as a Window 11 video player; it can play games and record live TV too. You can also do browsing using the Kodi Player.

Conclusion
We discussed 10 top and free all format video players for PC as we committed. This article will provide great help whenever file-formats bother you. Moving on to a little surprise, let’s share a brilliant video editor, Wondershare Filmora .
The software offers chroma key background, green-screen effect, split-screen effect, and a lot more than this. Filmora is a full-fledged video editor with endless features and limitless editing opportunities. You can add cool and crazy effects, transitions, and titles to your video. Moreover, it has advanced AI portrait features, cut, trim, join, and many more facilities.
For Win 7 or later (64-bit)
For macOS 10.12 or later
Detailed Steps to Rotate Videos in Blender
Blender is a 3D animation software that can be used to create stunning 3D models and videos. It is free and open source, which means that it is available to anyone who wants to use it. Blender is also very versatile, and can be used to create anything from simple 3D models to full-blown 3D movies.
One of the biggest benefits of Blender is that it is easy to learn. The interface is intuitive and user-friendly, and there are plenty of tutorials available online that can help you get started. Blender also has a very active community, so if you ever get stuck, there is likely someone out there who can help you. It is a complex software, but there are many online tutorials like this article that can help you get started.
To download Blender, go to https://www.blender.org/download/ . Click on the link that says “Download Blender” and then select the version that you want to download. After you have downloaded Blender, install it on your computer.
Step-by-Step on how to rotate videos in Blender
The first way to rotate a video in Blender is by using the Strip option.
Step 1: To do this, open the video that you want to rotate in Blender.

Step 2: Then, click on the “Strip” menu and select “Transform.”

Step 3: In the Transform Properties window, you will see a list of different tools for the video. Scroll down until you see the “Rotation” property. This is where you can manually rotate the video.

Step 4: Click on Enter to save the rotation of the video.
The second way to rotate a video in Blender is by using the Transform Properties window. To do this…
Step 1: Open the video that you want to rotate in Blender.

Step 2: Next, go to ‘Transform’ in the Active Tool portion of the screen.
Figure 5
Step 3: Go to the ‘Transform’ option in the properties window and adjust based on the rotational angle that you want.

Step 4: Click on ‘Enter’ to apply it to the video.
In this tutorial, we have shown you two different ways to rotate a video in Blender. The first way is by using the Transform Properties window, and the second way is by using the 3D Viewport.
Which method you use is up to you. However, we recommend using the 3D Viewport method, as it is more accurate.
Rotating a video in Blender can be used for other purposes than just rotating it.
Here are some other things that you can do with a rotated video:
- Scale the video up or down
- Flip the video horizontally or vertically
- Change the position of the video in the 3D Viewport
How to rotate videos in Filmora
Meanwhile, you can also use Filmora Video Editor to rotate a video without any watermark. Filmora is a video editing software that lets you rotate videos easily. It is simple to use, and has many powerful features that let you edit your videos like a pro. It also has a built-in video converter that lets you convert your videos to different formats, so they can be played on any device. You can also export your videos in 4K resolution, so they look great no matter what device you are watching them on.
For Win 7 or later (64-bit)
For macOS 10.14 or later
There are two main ways to rotate video in Filmora: through the use of keyframes or by using the Transform Tool.
Step-by-step on how to rotate videos in Filmora
To rotate a video clip using keyframes…
Step 1: Import the video clip you want to rotate to your project.

Step 2: In the timeline, place the playhead at the beginning of the clip.

Step 3: With the playhead still at the beginning of the clip, drag the rotation handle in the preview window to rotate the video.

Step 4: Move the playhead to the end of the clip and drag the rotation handle again to rotate it further.

To rotate a video clip using the Transform Tool…
Select the “Edit” tool from the toolbar.

Go to the “Transform” selection, then select the rotate option.

Adjust the rotation angle using the tool.

Both methods are fairly straightforward and easy to use. Experiment with each to see which works best for your project.
Step 2: Then, click on the “Strip” menu and select “Transform.”

Step 3: In the Transform Properties window, you will see a list of different tools for the video. Scroll down until you see the “Rotation” property. This is where you can manually rotate the video.

Step 4: Click on Enter to save the rotation of the video.
The second way to rotate a video in Blender is by using the Transform Properties window. To do this…
Step 1: Open the video that you want to rotate in Blender.

Step 2: Next, go to ‘Transform’ in the Active Tool portion of the screen.
Figure 5
Step 3: Go to the ‘Transform’ option in the properties window and adjust based on the rotational angle that you want.

Step 4: Click on ‘Enter’ to apply it to the video.
In this tutorial, we have shown you two different ways to rotate a video in Blender. The first way is by using the Transform Properties window, and the second way is by using the 3D Viewport.
Which method you use is up to you. However, we recommend using the 3D Viewport method, as it is more accurate.
Rotating a video in Blender can be used for other purposes than just rotating it.
Here are some other things that you can do with a rotated video:
- Scale the video up or down
- Flip the video horizontally or vertically
- Change the position of the video in the 3D Viewport
How to rotate videos in Filmora
Meanwhile, you can also use Filmora Video Editor to rotate a video without any watermark. Filmora is a video editing software that lets you rotate videos easily. It is simple to use, and has many powerful features that let you edit your videos like a pro. It also has a built-in video converter that lets you convert your videos to different formats, so they can be played on any device. You can also export your videos in 4K resolution, so they look great no matter what device you are watching them on.
For Win 7 or later (64-bit)
For macOS 10.14 or later
There are two main ways to rotate video in Filmora: through the use of keyframes or by using the Transform Tool.
Step-by-step on how to rotate videos in Filmora
To rotate a video clip using keyframes…
Step 1: Import the video clip you want to rotate to your project.

Step 2: In the timeline, place the playhead at the beginning of the clip.

Step 3: With the playhead still at the beginning of the clip, drag the rotation handle in the preview window to rotate the video.

Step 4: Move the playhead to the end of the clip and drag the rotation handle again to rotate it further.

To rotate a video clip using the Transform Tool…
Select the “Edit” tool from the toolbar.

Go to the “Transform” selection, then select the rotate option.

Adjust the rotation angle using the tool.

Both methods are fairly straightforward and easy to use. Experiment with each to see which works best for your project.
Step 2: Then, click on the “Strip” menu and select “Transform.”

Step 3: In the Transform Properties window, you will see a list of different tools for the video. Scroll down until you see the “Rotation” property. This is where you can manually rotate the video.

Step 4: Click on Enter to save the rotation of the video.
The second way to rotate a video in Blender is by using the Transform Properties window. To do this…
Step 1: Open the video that you want to rotate in Blender.

Step 2: Next, go to ‘Transform’ in the Active Tool portion of the screen.
Figure 5
Step 3: Go to the ‘Transform’ option in the properties window and adjust based on the rotational angle that you want.

Step 4: Click on ‘Enter’ to apply it to the video.
In this tutorial, we have shown you two different ways to rotate a video in Blender. The first way is by using the Transform Properties window, and the second way is by using the 3D Viewport.
Which method you use is up to you. However, we recommend using the 3D Viewport method, as it is more accurate.
Rotating a video in Blender can be used for other purposes than just rotating it.
Here are some other things that you can do with a rotated video:
- Scale the video up or down
- Flip the video horizontally or vertically
- Change the position of the video in the 3D Viewport
How to rotate videos in Filmora
Meanwhile, you can also use Filmora Video Editor to rotate a video without any watermark. Filmora is a video editing software that lets you rotate videos easily. It is simple to use, and has many powerful features that let you edit your videos like a pro. It also has a built-in video converter that lets you convert your videos to different formats, so they can be played on any device. You can also export your videos in 4K resolution, so they look great no matter what device you are watching them on.
For Win 7 or later (64-bit)
For macOS 10.14 or later
There are two main ways to rotate video in Filmora: through the use of keyframes or by using the Transform Tool.
Step-by-step on how to rotate videos in Filmora
To rotate a video clip using keyframes…
Step 1: Import the video clip you want to rotate to your project.

Step 2: In the timeline, place the playhead at the beginning of the clip.

Step 3: With the playhead still at the beginning of the clip, drag the rotation handle in the preview window to rotate the video.

Step 4: Move the playhead to the end of the clip and drag the rotation handle again to rotate it further.

To rotate a video clip using the Transform Tool…
Select the “Edit” tool from the toolbar.

Go to the “Transform” selection, then select the rotate option.

Adjust the rotation angle using the tool.

Both methods are fairly straightforward and easy to use. Experiment with each to see which works best for your project.
Step 2: Then, click on the “Strip” menu and select “Transform.”

Step 3: In the Transform Properties window, you will see a list of different tools for the video. Scroll down until you see the “Rotation” property. This is where you can manually rotate the video.

Step 4: Click on Enter to save the rotation of the video.
The second way to rotate a video in Blender is by using the Transform Properties window. To do this…
Step 1: Open the video that you want to rotate in Blender.

Step 2: Next, go to ‘Transform’ in the Active Tool portion of the screen.
Figure 5
Step 3: Go to the ‘Transform’ option in the properties window and adjust based on the rotational angle that you want.

Step 4: Click on ‘Enter’ to apply it to the video.
In this tutorial, we have shown you two different ways to rotate a video in Blender. The first way is by using the Transform Properties window, and the second way is by using the 3D Viewport.
Which method you use is up to you. However, we recommend using the 3D Viewport method, as it is more accurate.
Rotating a video in Blender can be used for other purposes than just rotating it.
Here are some other things that you can do with a rotated video:
- Scale the video up or down
- Flip the video horizontally or vertically
- Change the position of the video in the 3D Viewport
How to rotate videos in Filmora
Meanwhile, you can also use Filmora Video Editor to rotate a video without any watermark. Filmora is a video editing software that lets you rotate videos easily. It is simple to use, and has many powerful features that let you edit your videos like a pro. It also has a built-in video converter that lets you convert your videos to different formats, so they can be played on any device. You can also export your videos in 4K resolution, so they look great no matter what device you are watching them on.
For Win 7 or later (64-bit)
For macOS 10.14 or later
There are two main ways to rotate video in Filmora: through the use of keyframes or by using the Transform Tool.
Step-by-step on how to rotate videos in Filmora
To rotate a video clip using keyframes…
Step 1: Import the video clip you want to rotate to your project.

Step 2: In the timeline, place the playhead at the beginning of the clip.

Step 3: With the playhead still at the beginning of the clip, drag the rotation handle in the preview window to rotate the video.

Step 4: Move the playhead to the end of the clip and drag the rotation handle again to rotate it further.

To rotate a video clip using the Transform Tool…
Select the “Edit” tool from the toolbar.

Go to the “Transform” selection, then select the rotate option.

Adjust the rotation angle using the tool.

Both methods are fairly straightforward and easy to use. Experiment with each to see which works best for your project.
Video in Text Cinematic Intro【Filmora Tutorial】
Preparation
What you need to prepare:
- A computer (Windows or macOS)
- Your video materials.
- Filmora video editor
Step 1
Visit filmora.wondershare.com and download the Filmora video editor . Hit Install. When it’s done installing, the app will start automatically. When it does, click on New Project.
Step 2
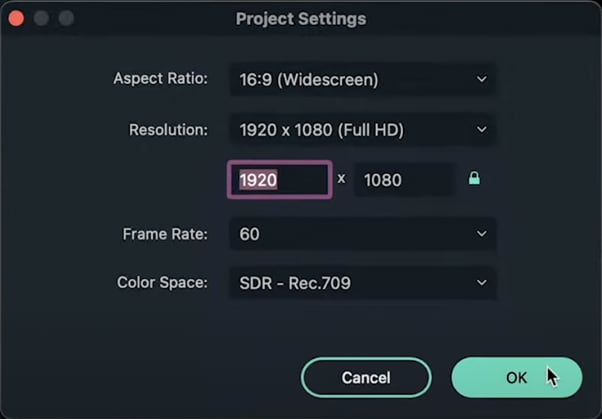
Before we start editing, go to File from the navigation panel at the top and select Project Settings. Then, set the resolution settings like in the example here.
Step 3
Now, download any background image you want. Make sure its resolution is 1920x1080. Import it and drag it to the Timeline.
Step 4
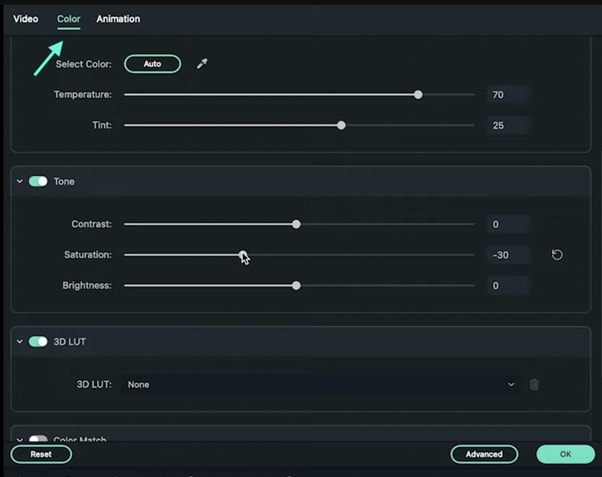
From the Timeline, double-click on the Background clip and decrease its opacity to 70%. Then, click on Color from the upper-left corner and change the settings as you wish.
Step 5
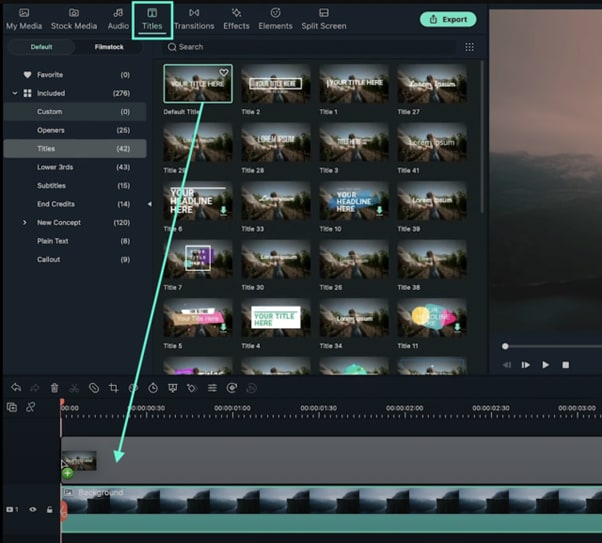
Go to the Titles tab and drag the Default Title to the Timeline. Double-click on the Default Title clip and change fonts, type in your text, etc.
Step 6
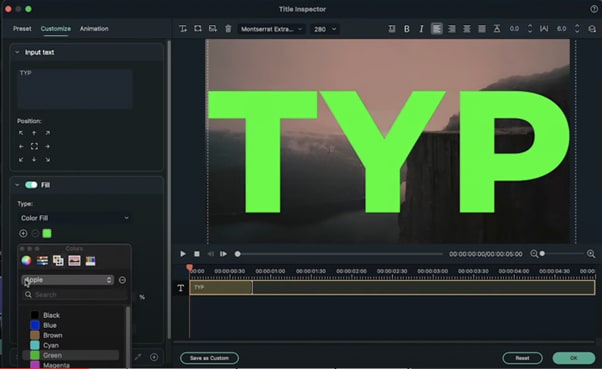
Drag the text to enlarge it so it fits the entire screen. Then, change its color to green. Press OK. Now, Export this clip and name it “1st Text”.
Step 7
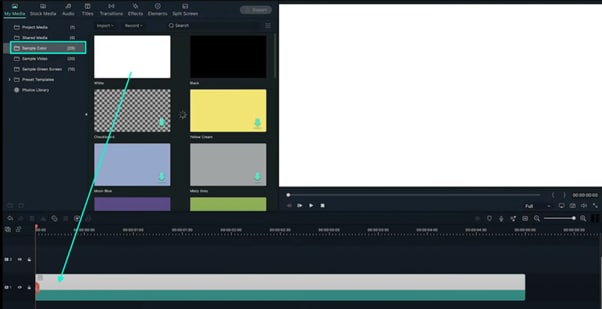
Now, open a new Filmora project and edit the Project Settings like we did before. Then, go to Sample Color and drag the white color to the Timeline.
Step 8
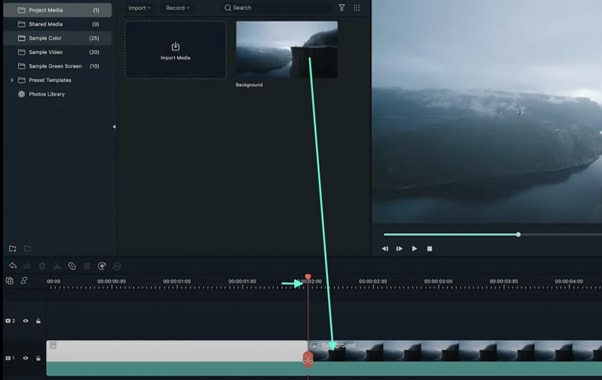
Drag the Playhead to the 2-second marker. Drag the same Background image as before to this point. Then, double-click on the Background clip and increase the Brightness and Saturation bars to 50. Click OK.
Step 9
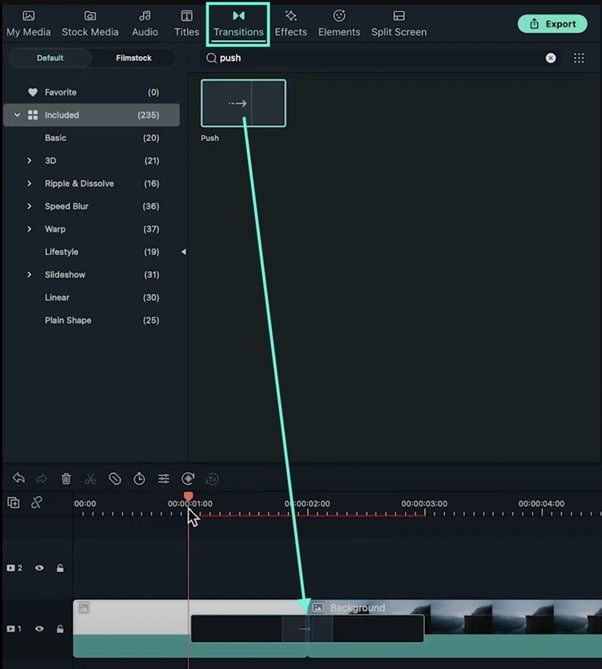
Go to Transitions and type in “Push”. Drag the Push transition between the White layer and your Background image. Click on Export once again and name this clip “Transition”.
Step 10
Open a new Filmora project and adjust the Project Settings like we did the first time. Then, go to Sample Color and drag the White color to the Timeline once more.
Step 11
Go to Titles and drag the Default Title to the Timeline, above the White Sample Color clip. Now, double-click the Default Title clip and go to ADVANCED. Here, set the text color to green, choose a font you like, and increase the text size. Click OK. Export it and name it “Temporary”.

Step 12
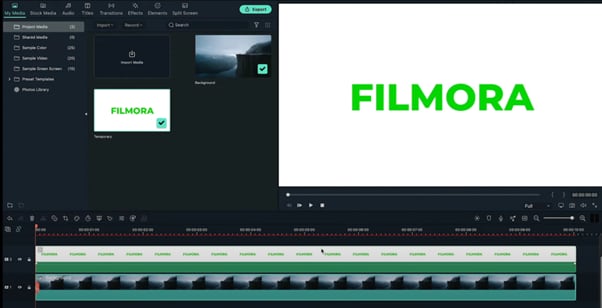
Open a new project in Filmora. Import and Drag the same background image you used before to the Timeline. Double-click on it and drag the Saturation bar to -100. Now, drag the file you named “Temporary” into the Timeline.
Step 13
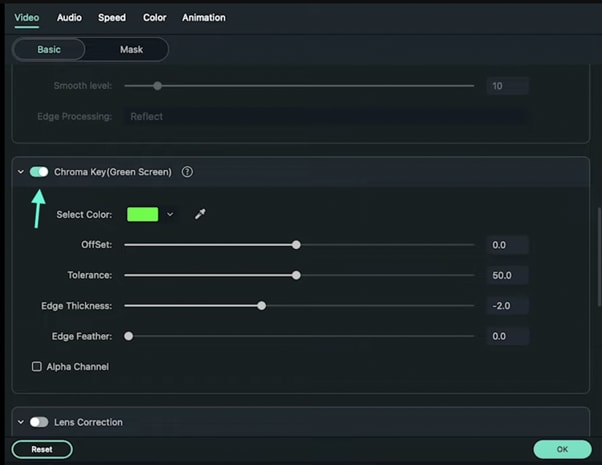
Double-click on the Temporary clip, scroll down when the new window appears, and find the Chroma key section. Enable this. Now, drag the Edge Feather bar to 0. Export this video and name it “2nd Text”.
Step 14
Open one more new project in Filmora and import the following files. There should be four, titled “Background”, “Transition”, “1st Text”, and “2nd Text”.
Step 15
Click on Sample Color and drag the Black color to the 1st Track of the Timeline. Then, move the Playhead to the 1-second marker and drag the “Transition” clip to the same Track within the Timeline.
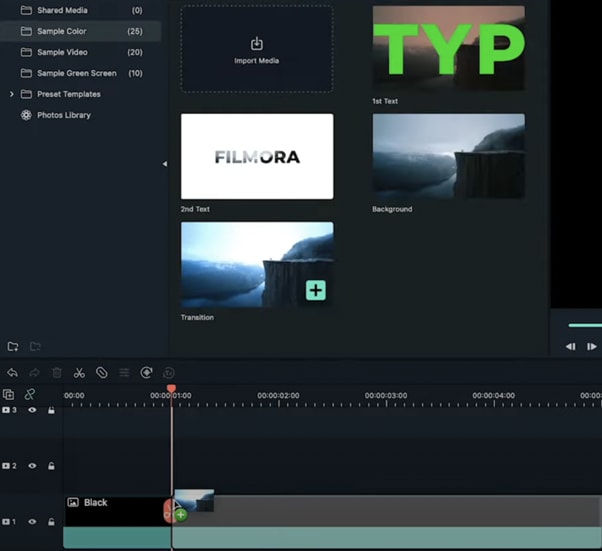
Step 16
From the Transitions tab, select the Push transition and drag it to the Timeline.
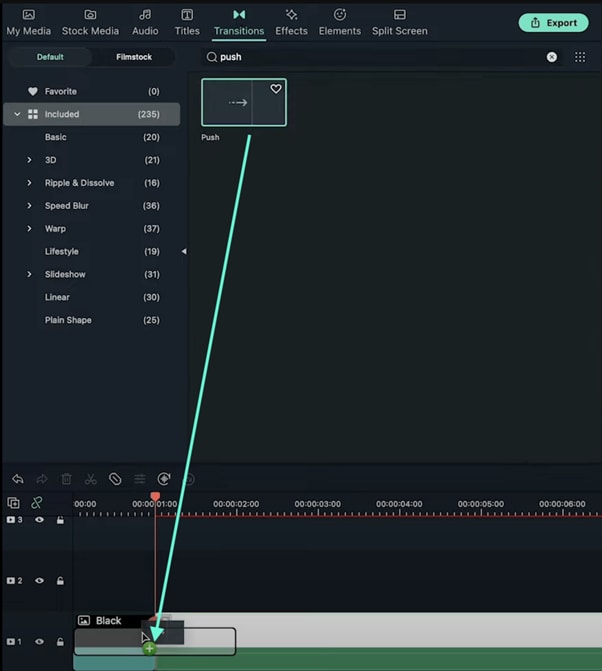
Step 17
Set the Playhead at the 1-second marker once again. First, add the “1st Text” clip into Track 2 of the Timeline. Then, add another Push transition at the beginning of this clip.
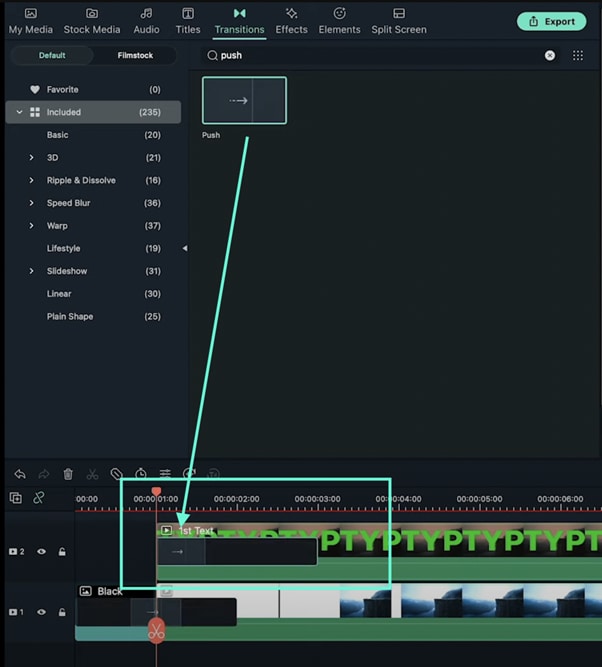
Step 18
Now, double-click on the “1st Text” clip and enable the Chroma Key option. Then, set the Edge Thickness and Edge Feather bars to 0.
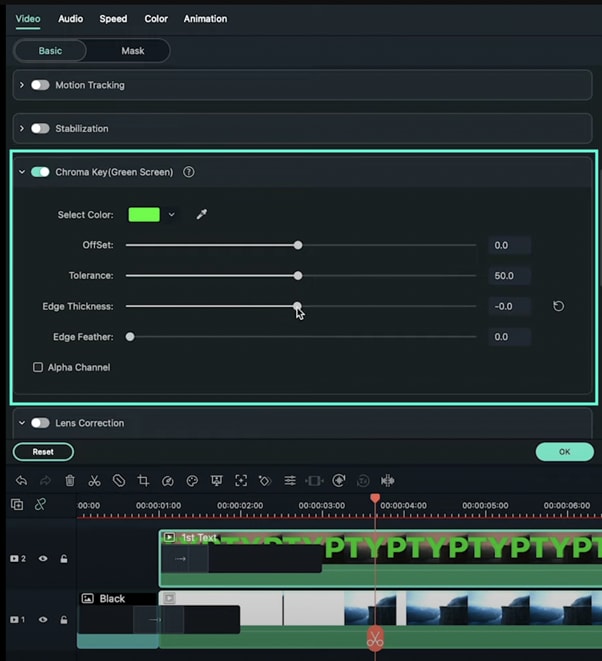
Step 19
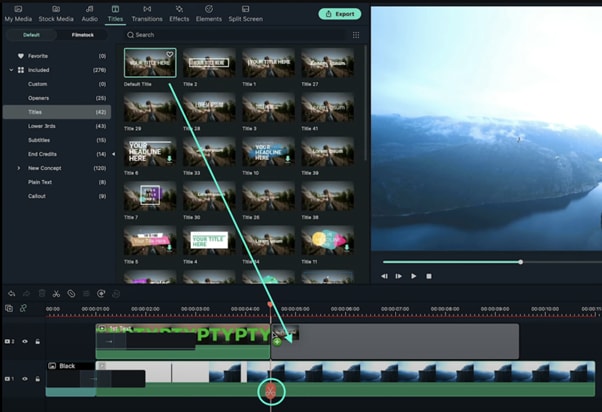
Set the Playhead at 4.5 seconds. Snip the Timeline. Then, add a new Default Title on the right side of the Playhead on Track 2.
Step 20
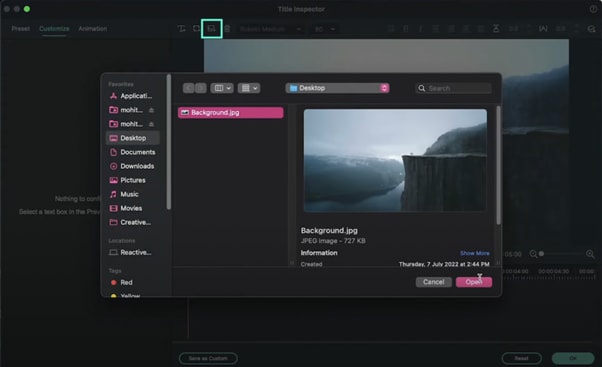
Double-click on the Default Title and go to Advanced settings. From there, delete the default text and click on the highlighted button like in the image below to add a new background to this clip. Add the same background you’ve used throughout the entire video.
Step 21
Add a new text here and customize it to match the text style in your “2nd Text” clip you exported earlier. Click OK.

Step 22
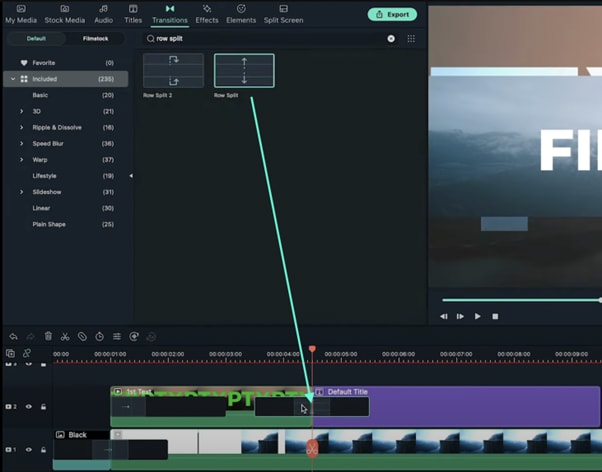
Next, go to the Transitions tab and drag the “Row Split” transition clip between Track 2 and the New Default Title you just created. Then, double-click on the transition and change its duration to 1 second.
Step 23
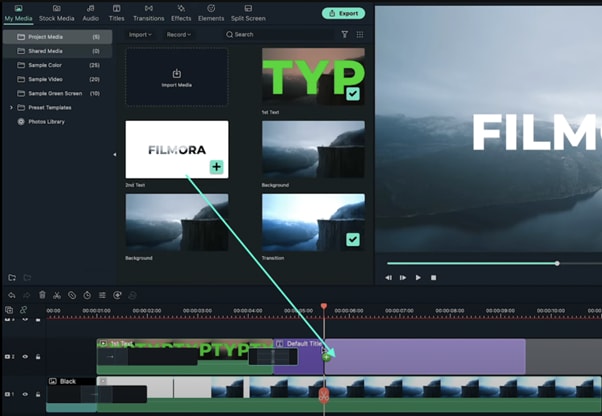
Set the Playhead to the 5.5 seconds marker. Drag the “2nd Text” clip you exported earlier here. Then, simply add another Row Split transition between this clip and the Default Title.
Step 24
That’s it! You’re done. All that’s left is to Render and export the video. Congratulations on creating a video in text cinematic intro in Filmora.
Summary
What you’ve learned:
- How to make advanced edits on titles in Filmora
- Basics of using green screen effects on text
- Using transitions in Filmora
- Exporting and re-using edited clips
- Creating a unique video in text cinematic intro
What you need to prepare:
- A computer (Windows or macOS)
- Your video materials.
- Filmora video editor
Step 1
Visit filmora.wondershare.com and download the Filmora video editor . Hit Install. When it’s done installing, the app will start automatically. When it does, click on New Project.
Step 2
Before we start editing, go to File from the navigation panel at the top and select Project Settings. Then, set the resolution settings like in the example here.

Step 3
Now, download any background image you want. Make sure its resolution is 1920x1080. Import it and drag it to the Timeline.
Step 4
From the Timeline, double-click on the Background clip and decrease its opacity to 70%. Then, click on Color from the upper-left corner and change the settings as you wish.

Step 5
Go to the Titles tab and drag the Default Title to the Timeline. Double-click on the Default Title clip and change fonts, type in your text, etc.

Step 6
Drag the text to enlarge it so it fits the entire screen. Then, change its color to green. Press OK. Now, Export this clip and name it “1st Text”.

Step 7
Now, open a new Filmora project and edit the Project Settings like we did before. Then, go to Sample Color and drag the white color to the Timeline.

Step 8
Drag the Playhead to the 2-second marker. Drag the same Background image as before to this point. Then, double-click on the Background clip and increase the Brightness and Saturation bars to 50. Click OK.

Step 9
Go to Transitions and type in “Push”. Drag the Push transition between the White layer and your Background image. Click on Export once again and name this clip “Transition”.

Step 10
Open a new Filmora project and adjust the Project Settings like we did the first time. Then, go to Sample Color and drag the White color to the Timeline once more.
Step 11
Go to Titles and drag the Default Title to the Timeline, above the White Sample Color clip. Now, double-click the Default Title clip and go to ADVANCED. Here, set the text color to green, choose a font you like, and increase the text size. Click OK. Export it and name it “Temporary”.

Step 12
Open a new project in Filmora. Import and Drag the same background image you used before to the Timeline. Double-click on it and drag the Saturation bar to -100. Now, drag the file you named “Temporary” into the Timeline.

Step 13
Double-click on the Temporary clip, scroll down when the new window appears, and find the Chroma key section. Enable this. Now, drag the Edge Feather bar to 0. Export this video and name it “2nd Text”.

Step 14
Open one more new project in Filmora and import the following files. There should be four, titled “Background”, “Transition”, “1st Text”, and “2nd Text”.
Step 15
Click on Sample Color and drag the Black color to the 1st Track of the Timeline. Then, move the Playhead to the 1-second marker and drag the “Transition” clip to the same Track within the Timeline.

Step 16
From the Transitions tab, select the Push transition and drag it to the Timeline.

Step 17
Set the Playhead at the 1-second marker once again. First, add the “1st Text” clip into Track 2 of the Timeline. Then, add another Push transition at the beginning of this clip.

Step 18
Now, double-click on the “1st Text” clip and enable the Chroma Key option. Then, set the Edge Thickness and Edge Feather bars to 0.

Step 19
Set the Playhead at 4.5 seconds. Snip the Timeline. Then, add a new Default Title on the right side of the Playhead on Track 2.

Step 20
Double-click on the Default Title and go to Advanced settings. From there, delete the default text and click on the highlighted button like in the image below to add a new background to this clip. Add the same background you’ve used throughout the entire video.

Step 21
Add a new text here and customize it to match the text style in your “2nd Text” clip you exported earlier. Click OK.

Step 22
Next, go to the Transitions tab and drag the “Row Split” transition clip between Track 2 and the New Default Title you just created. Then, double-click on the transition and change its duration to 1 second.

Step 23
Set the Playhead to the 5.5 seconds marker. Drag the “2nd Text” clip you exported earlier here. Then, simply add another Row Split transition between this clip and the Default Title.

Step 24
That’s it! You’re done. All that’s left is to Render and export the video. Congratulations on creating a video in text cinematic intro in Filmora.
Summary
What you’ve learned:
- How to make advanced edits on titles in Filmora
- Basics of using green screen effects on text
- Using transitions in Filmora
- Exporting and re-using edited clips
- Creating a unique video in text cinematic intro
What you need to prepare:
- A computer (Windows or macOS)
- Your video materials.
- Filmora video editor
Step 1
Visit filmora.wondershare.com and download the Filmora video editor . Hit Install. When it’s done installing, the app will start automatically. When it does, click on New Project.
Step 2
Before we start editing, go to File from the navigation panel at the top and select Project Settings. Then, set the resolution settings like in the example here.

Step 3
Now, download any background image you want. Make sure its resolution is 1920x1080. Import it and drag it to the Timeline.
Step 4
From the Timeline, double-click on the Background clip and decrease its opacity to 70%. Then, click on Color from the upper-left corner and change the settings as you wish.

Step 5
Go to the Titles tab and drag the Default Title to the Timeline. Double-click on the Default Title clip and change fonts, type in your text, etc.

Step 6
Drag the text to enlarge it so it fits the entire screen. Then, change its color to green. Press OK. Now, Export this clip and name it “1st Text”.

Step 7
Now, open a new Filmora project and edit the Project Settings like we did before. Then, go to Sample Color and drag the white color to the Timeline.

Step 8
Drag the Playhead to the 2-second marker. Drag the same Background image as before to this point. Then, double-click on the Background clip and increase the Brightness and Saturation bars to 50. Click OK.

Step 9
Go to Transitions and type in “Push”. Drag the Push transition between the White layer and your Background image. Click on Export once again and name this clip “Transition”.

Step 10
Open a new Filmora project and adjust the Project Settings like we did the first time. Then, go to Sample Color and drag the White color to the Timeline once more.
Step 11
Go to Titles and drag the Default Title to the Timeline, above the White Sample Color clip. Now, double-click the Default Title clip and go to ADVANCED. Here, set the text color to green, choose a font you like, and increase the text size. Click OK. Export it and name it “Temporary”.

Step 12
Open a new project in Filmora. Import and Drag the same background image you used before to the Timeline. Double-click on it and drag the Saturation bar to -100. Now, drag the file you named “Temporary” into the Timeline.

Step 13
Double-click on the Temporary clip, scroll down when the new window appears, and find the Chroma key section. Enable this. Now, drag the Edge Feather bar to 0. Export this video and name it “2nd Text”.

Step 14
Open one more new project in Filmora and import the following files. There should be four, titled “Background”, “Transition”, “1st Text”, and “2nd Text”.
Step 15
Click on Sample Color and drag the Black color to the 1st Track of the Timeline. Then, move the Playhead to the 1-second marker and drag the “Transition” clip to the same Track within the Timeline.

Step 16
From the Transitions tab, select the Push transition and drag it to the Timeline.

Step 17
Set the Playhead at the 1-second marker once again. First, add the “1st Text” clip into Track 2 of the Timeline. Then, add another Push transition at the beginning of this clip.

Step 18
Now, double-click on the “1st Text” clip and enable the Chroma Key option. Then, set the Edge Thickness and Edge Feather bars to 0.

Step 19
Set the Playhead at 4.5 seconds. Snip the Timeline. Then, add a new Default Title on the right side of the Playhead on Track 2.

Step 20
Double-click on the Default Title and go to Advanced settings. From there, delete the default text and click on the highlighted button like in the image below to add a new background to this clip. Add the same background you’ve used throughout the entire video.

Step 21
Add a new text here and customize it to match the text style in your “2nd Text” clip you exported earlier. Click OK.

Step 22
Next, go to the Transitions tab and drag the “Row Split” transition clip between Track 2 and the New Default Title you just created. Then, double-click on the transition and change its duration to 1 second.

Step 23
Set the Playhead to the 5.5 seconds marker. Drag the “2nd Text” clip you exported earlier here. Then, simply add another Row Split transition between this clip and the Default Title.

Step 24
That’s it! You’re done. All that’s left is to Render and export the video. Congratulations on creating a video in text cinematic intro in Filmora.
Summary
What you’ve learned:
- How to make advanced edits on titles in Filmora
- Basics of using green screen effects on text
- Using transitions in Filmora
- Exporting and re-using edited clips
- Creating a unique video in text cinematic intro
What you need to prepare:
- A computer (Windows or macOS)
- Your video materials.
- Filmora video editor
Step 1
Visit filmora.wondershare.com and download the Filmora video editor . Hit Install. When it’s done installing, the app will start automatically. When it does, click on New Project.
Step 2
Before we start editing, go to File from the navigation panel at the top and select Project Settings. Then, set the resolution settings like in the example here.

Step 3
Now, download any background image you want. Make sure its resolution is 1920x1080. Import it and drag it to the Timeline.
Step 4
From the Timeline, double-click on the Background clip and decrease its opacity to 70%. Then, click on Color from the upper-left corner and change the settings as you wish.

Step 5
Go to the Titles tab and drag the Default Title to the Timeline. Double-click on the Default Title clip and change fonts, type in your text, etc.

Step 6
Drag the text to enlarge it so it fits the entire screen. Then, change its color to green. Press OK. Now, Export this clip and name it “1st Text”.

Step 7
Now, open a new Filmora project and edit the Project Settings like we did before. Then, go to Sample Color and drag the white color to the Timeline.

Step 8
Drag the Playhead to the 2-second marker. Drag the same Background image as before to this point. Then, double-click on the Background clip and increase the Brightness and Saturation bars to 50. Click OK.

Step 9
Go to Transitions and type in “Push”. Drag the Push transition between the White layer and your Background image. Click on Export once again and name this clip “Transition”.

Step 10
Open a new Filmora project and adjust the Project Settings like we did the first time. Then, go to Sample Color and drag the White color to the Timeline once more.
Step 11
Go to Titles and drag the Default Title to the Timeline, above the White Sample Color clip. Now, double-click the Default Title clip and go to ADVANCED. Here, set the text color to green, choose a font you like, and increase the text size. Click OK. Export it and name it “Temporary”.

Step 12
Open a new project in Filmora. Import and Drag the same background image you used before to the Timeline. Double-click on it and drag the Saturation bar to -100. Now, drag the file you named “Temporary” into the Timeline.

Step 13
Double-click on the Temporary clip, scroll down when the new window appears, and find the Chroma key section. Enable this. Now, drag the Edge Feather bar to 0. Export this video and name it “2nd Text”.

Step 14
Open one more new project in Filmora and import the following files. There should be four, titled “Background”, “Transition”, “1st Text”, and “2nd Text”.
Step 15
Click on Sample Color and drag the Black color to the 1st Track of the Timeline. Then, move the Playhead to the 1-second marker and drag the “Transition” clip to the same Track within the Timeline.

Step 16
From the Transitions tab, select the Push transition and drag it to the Timeline.

Step 17
Set the Playhead at the 1-second marker once again. First, add the “1st Text” clip into Track 2 of the Timeline. Then, add another Push transition at the beginning of this clip.

Step 18
Now, double-click on the “1st Text” clip and enable the Chroma Key option. Then, set the Edge Thickness and Edge Feather bars to 0.

Step 19
Set the Playhead at 4.5 seconds. Snip the Timeline. Then, add a new Default Title on the right side of the Playhead on Track 2.

Step 20
Double-click on the Default Title and go to Advanced settings. From there, delete the default text and click on the highlighted button like in the image below to add a new background to this clip. Add the same background you’ve used throughout the entire video.

Step 21
Add a new text here and customize it to match the text style in your “2nd Text” clip you exported earlier. Click OK.

Step 22
Next, go to the Transitions tab and drag the “Row Split” transition clip between Track 2 and the New Default Title you just created. Then, double-click on the transition and change its duration to 1 second.

Step 23
Set the Playhead to the 5.5 seconds marker. Drag the “2nd Text” clip you exported earlier here. Then, simply add another Row Split transition between this clip and the Default Title.

Step 24
That’s it! You’re done. All that’s left is to Render and export the video. Congratulations on creating a video in text cinematic intro in Filmora.
Summary
What you’ve learned:
- How to make advanced edits on titles in Filmora
- Basics of using green screen effects on text
- Using transitions in Filmora
- Exporting and re-using edited clips
- Creating a unique video in text cinematic intro
Also read:
- Updated 2024 Approved 10 Best Video Editing Apps With Templates
- New In 2024, 10 Best Free Video Player for Windows 11
- Updated In 2024, 10 Best Voice Over Generators Windows, Mac, Android, iPhone, and Online
- New YouTube Zoom to Fill Is a Great Feature for Viewing Things in Depth. This Article Answers All Questions About Fixing YouTube Zoom to Fill Not Working on Your Device
- New Step by Step to Split a Clip in VLC
- Updated WMV File Format Has Many Benefits over the Video Industry. If You Are Excited to Know More About the Format and Its Pros and Cons, Then Lets Start the Discussion
- New Doable Ways to Create Transparent Background in Procreate for 2024
- Best Online YouTube Video Trimmer
- New 10 Top Free GIF Background Remover for PC and Online
- In 2024, Ways to Find Free Online Slideshow Maker with No Watermark
- Learn How to Seamlessly Merge Audio and Video in VLC Media Player with This Easy-to-Follow Guide. Step-by-Step Instructions Are Included for 2024
- New 20 Best Video Background Templates for 2024
- 6 Tips for Your First Facebook Ads for 2024
- Updated 2024 Approved Color Lut in Video - Color Grade Your Video
- New In the Realm of Creating Graphic Presentation, People Also Ask About Designing Professionally Sound Slideshow Word Presentations. Heres How You Can Go About the Process
- 2024 Approved Ways to Merge Videos in HandBrake? Expectation Vs. Reality
- Updated Create Chroma Key Written Text Effects in Filmora for 2024
- Updated How To Mirror a Video Clip in Premiere Pro for 2024
- New Do You Want to Be Aware of VHSs Meaning? There Is Nothing to Be Worried About because We Will Guide You in This Article
- 2024 Approved How To Make A Do-It-Yourself Video
- 2024 Approved Top Tips on How to Design Travel Slideshow
- Best 10 Options Slow Down Video Online with Perfection
- New In 2024, How To Cut Videos For Instagram On Mac
- 7 Solutions to Cut Video on Mac without Using FFmpeg, In 2024
- How to Create a Dynamic Text Animation in Filmora — Step-By-Step for 2024
- Updated 2024 Approved Turn Your Text Into a Podcast Made Possible (+ EASY Editing Tips)
- Updated 4 Solutions to Crop a Video on Android Easily
- Updated In 2024, Best 10 3D Slideshow Software Review
- 2024 Approved Do You Want to Create a Zoom Motion Blur Effect Using Photoshop? If You Are Unaware of How to Do This, Read This Article to Learn Simple yet Authentic Instructions
- 2024 Approved How to Edit Facebook eCommerce Video Ads
- Steps to Create Green Screen Videos in After Effects
- New Unlink Audio and Video in DaVinci Resolve Detailed Steps for 2024
- Do You Want to Rotate Your TikTok Video to Stylize It More? This Article Will Provide Simple Methods of Rotating TikTok Videos to Improve the Audience Viewing Experience
- In 2024, Top 15 Augmented Reality Games Like Pokémon GO To Play On Vivo T2x 5G | Dr.fone
- In 2024, The Most Useful Tips for Pokemon Go Ultra League On Vivo T2x 5G | Dr.fone
- In 2024, Unlock Nokia C12 Phone Password Without Factory Reset Full Guide Here
- How to Bypass MDM on iPhone 14 Pro with Ease Via third Tools?
- How to Hard Reset Realme GT 5 (240W) Without Password | Dr.fone
- Updated 2024 Approved The Best Tools to Convert Text to MP3 With the Best Natural Voices
- Unlocking Made Easy The Best 10 Apps for Unlocking Your Vivo T2x 5G Device
- Online electronic signature for PDF v1.4 document
- 8 Workable Fixes to the SIM not provisioned MM#2 Error on Oppo A1 5G | Dr.fone
- Can You Unlock Apple iPhone 14 Plus After Forgetting the Passcode? | Dr.fone
- In 2024, Remove the Lock Screen Fingerprint Of Your Oppo A38
- How To Change Samsung Galaxy F54 5G Lock Screen Clock in Seconds
- In 2024, How to Reset a Vivo S18 Pro Phone that is Locked?
- Complete guide for recovering contacts files on Y100 5G.
- How to Change Lock Screen Wallpaper on ZTE Nubia Flip 5G
- How to Screen Mirroring Itel P55 5G to PC? | Dr.fone
- How Can I Catch the Regional Pokémon without Traveling On Vivo V29 | Dr.fone
- All Must-Knows to Use Fake GPS GO Location Spoofer On Poco M6 Pro 5G | Dr.fone
- How to Upgrade Apple iPhone 15 Pro Max without Data Loss? | Dr.fone
- In 2024, How to Get and Use Pokemon Go Promo Codes On Lava Blaze Pro 5G | Dr.fone
- In 2024, How to Reset your Xiaomi Redmi Note 13 5G Lock Screen Password
- In 2024, Apple iPhone 11 Pro Backup Password Never Set But Still Asking? Heres the Fix
- In 2024, Device/Network/Browser Requirements | Virbo AI Live Stream
- In 2024, How to Transfer Contacts from Vivo Y02T to Other Android Devices Devices? | Dr.fone
- Catch or Beat Sleeping Snorlax on Pokemon Go For Nokia C110 | Dr.fone
- Top 7 iCloud Activation Bypass Tools For your iPhone 14 Plus
- Planning to Use a Pokemon Go Joystick on Honor 90 Lite? | Dr.fone
- Top 4 Android System Repair Software for OnePlus Open Bricked Devices | Dr.fone
- Title: New Do You Want to Remove the Video Background in Premier Pro Using the Ultra Key but Dont Know About the Whole Process? Please Read Our Complete Step-by-Step Tutorial and Learn From Scratch as a Beginner
- Author: Chloe
- Created at : 2024-04-24 07:08:18
- Updated at : 2024-04-25 07:08:18
- Link: https://ai-editing-video.techidaily.com/new-do-you-want-to-remove-the-video-background-in-premier-pro-using-the-ultra-key-but-dont-know-about-the-whole-process-please-read-our-complete-step-by-ste/
- License: This work is licensed under CC BY-NC-SA 4.0.


