
New Do You Want to Stream and Record at the Same Time but Cant Find an Easy Solution? This Guide Will Help You Get This Done Using Three Easy-to-Follow Methods
Do You Want to Stream and Record at the Same Time but Can’t Find an Easy Solution? This Guide Will Help You Get This Done Using Three Easy-to-Follow Methods
The popularity of live streaming has exploded recently. A live stream is simply a video broadcast in real-time over the internet. It’s a great way to connect with people directly, whether for a gaming session, a cooking show, or a Q&A.
Many reasons are there for which why you might want to live stream and record at the same time. For instance, keep a record of your gameplay or stream highlights for future editing or use your live stream to generate content for your YouTube channel.
Whatever your reasons, this article will show you how to do live streaming and recording at the same time using three different methods.
Way 1. Use OBS To Stream And Record Video At The Same Time
OBS, or Open Broadcaster Software, is a free and open-source tool that allows you to stream and record video at the same time, which can be useful if you want to live-stream your gameplay on Twitch or record a tutorial for YouTube.
Key Features of OBS
- Compatible with Mac OS X, Linux, and Windows operating systems.
- Requires at least 4 GB of storage space and an Intel i5 2000-series processor or higher DirectX 10 capable graphics card.
- High-performance video capturing and mixing in real-time.
- With Custom Transitions, you can set up an unlimited number of scenes you can switch between seamlessly.
- Intuitive audio mixer.
- Easy-to-use and simple configuration options.
Steps
Here’s an easy and quick guide on how to use OBS Studio to stream and record videos simultaneously:
Step1 Download OBS Studio from the official website and install it on your computer or laptop.
Step2 Launch OBS Studio and go to the Settings menu. Find the Recording section under the Output tab.
Step3 Click “Start Recording” to manually start the recording or head to the General Tab and checkmark the box before “Automatically Record When Streaming.”
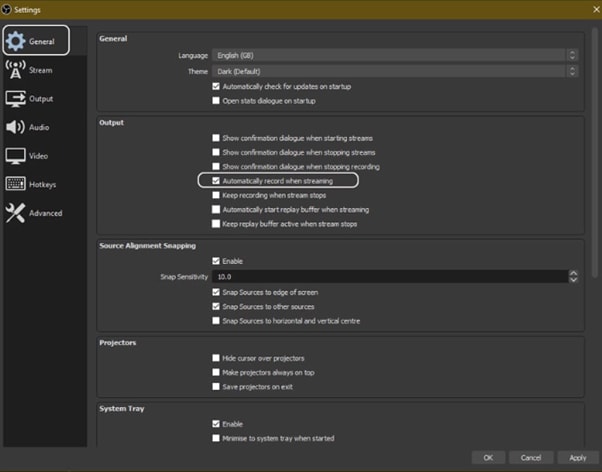
Step4 Finally, click “Apply” to save your settings. Now when you start your stream, the recording will also begin simultaneously.
Way 2. Use Twitch To Save Your Streams
Twitch is the most popular and best live streaming platform that allows gamers to broadcast their gameplay to a live audience and also gives them the ability to save their past broadcasts, or “streams.”
This feature can be useful to save your live stream for later viewing or share your stream with someone who missed it.
Features
Twitch offers a variety of features that make it a unique and powerful game streaming platform. Some of the most notable ones are:
- Live streaming: Twitch allows gamers to share their gameplay in real-time with other gamers around the world. This live aspect of the platform makes it unique and engaging.
- Social interaction: Twitch offers a variety of features that allow gamers to connect with each other, including chat rooms, forums, and user-generated content.
You can save your stream on Twitch in two ways:
- Use the “Highlights” feature, which allows you to save specific moments from your live stream.
- Download your stream’s entire VOD (video on demand) after it has ended.
Steps
Here are the quick steps to saving a stream on your PC from Twitch. But first, you need to enable Twitch VODs before starting your broadcast in the following way:
Step1 Visit Twitch and sign in to your account. Now, click the “Profile” icons and go to “Creator Dashboard.”
Step2 Head to Setting from the left-sidebar and click the “Stream” option. Scroll down and find the VOD Settings. Toggle the buttons next to “Store Past Broadcasts.”
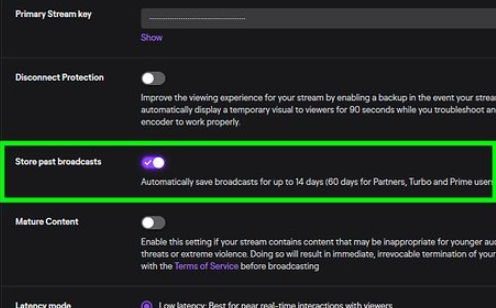
Step3 To publish your VODs instantly after broadcasting, toggle the button next to “Always Publish VODs.”
Now, to download the recordings of your broadcasts to your PC, do the following steps in sequence:
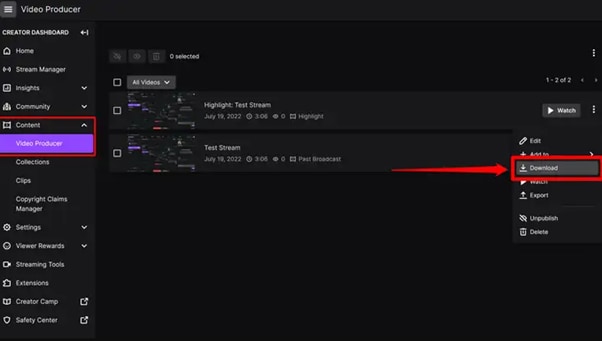
Step1 Head to the Creator Dashboard, find the “Content” section in the left sidebar, and click “Video Producer.”
Step2 Find the stream (VOD or Highlights) you want to download and on the right side, click the three dots.
Step3 Finally, click the “Download” option and let Twitch prepare your video. You will then get the stream’s recording in MP4 format.
Way 3. Use Screen Recorder To Record Your Streams
Using a screen recorder is a great way to record your live stream because it lets you capture the full screen of your PC. Although there are many different screen recorders to choose from, we recommend using Filmora.
Wondershare Filmora is a powerful editor with easy-to-use screen recording capabilities, giving you everything you need to record and stream your video at the same time. The software is free to use and has an intuitive interface.
Features of Filmora
- Support for both Mac OS X and Windows operating systems.
- Ability to record your PC screen, audio, and webcam all at once
- A variety of video editing features
- An easy-to-use interface
Steps
Here’s how to use Filmora for recording while streaming:
Step1 Head to the official Filmora website, download the software and install it on your PC.
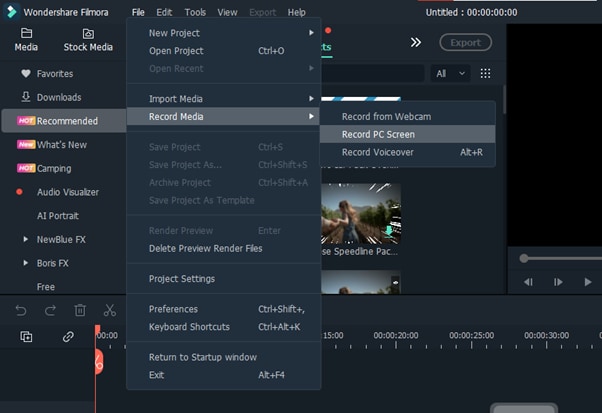
Step2 Launch Filmora 11 and click “New project” in the main interface. Click “File” from the top toolbar and scroll down to “Record media.” From the drop-down menu, select “Record PC Screen.”
Step3 A new “Wondershare Screen Recorder” window will pop up. You can set up a full screen, custom or target screen recording, speaker, and microphone settings. If you want more Settings, click the drop-down icon.
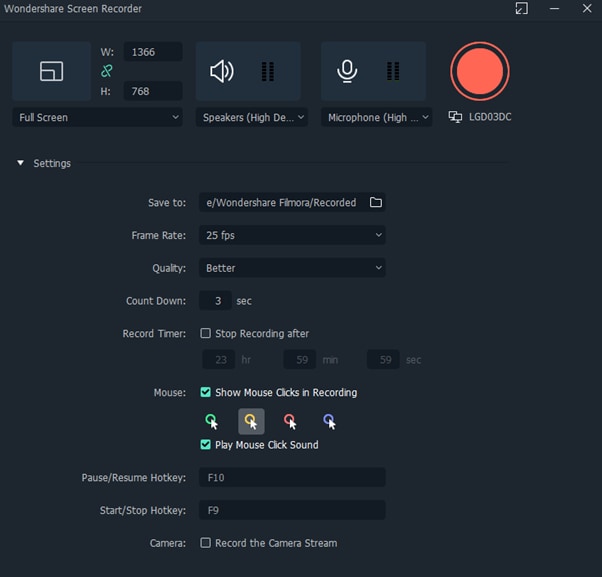
Step4 Click the Start icon to begin your recording. Afterward, click the Stop icon to stop the recording, and your stream will be saved in the selected destination.
Conclusion
In this article, we’ve discussed three step-by-step methods to help you do live streaming and recording at the same time. With these solutions at your disposal, you’ll be able to save your VODs with ease.
It is best to choose only one software to start with to avoid the time-consuming trial-and-error process. If you want to add another tool, do so later; otherwise, you will waste your precious time and resources.
Give these methods a shot, and eventually, you will find your groove—and become accustomed to just how easy it is to record and stream a video simultaneously.
Free Download For Win 7 or later(64-bit)
Free Download For macOS 10.14 or later
Free Download For macOS 10.14 or later
Making Slow Motion Videos in Premiere Pro: A Review on The Best Methods
Slow-motion videos can give your videos more depth, drama, and emotion. Your viewers will find your films more interesting if you use slow-motion effects. It can bring attention to a shot, produce an artistic effect, or relive a memorable scene. Slow-motion video has been used for decades to add dramatic effects to films and videos.
If you’re interested in how to do slow-mo in Premiere Pro, this article is your ultimate solution. Read the article and add artistic to dramatic slow-mo to your videos. You will eventually come to know how to do slow mo on Premiere Pro with ease.
Slow Motion Video Maker Slow your video’s speed with better control of your keyframes to create unique cinematic effects!
Make A Slow Motion Video Make A Slow Motion Video More Features

Part 1: What Are Some Potential Real-Life Use Cases of Having Slow Motion Videos?
Slow-motion movies can be utilized to record and examine events in greater depth. Before delving into how to make a slow-motion video in Premiere Pro, learn its use cases. Thus, below are a few applications of the slow motion in real life:
- Medical Research and Imaging: Slow-motion videos are used in medical research and education. They thoroughly examine surgical methods and practices. This promotes medical practice improvement and student’s better comprehension of concepts.
- Cinematography and Filmmaking: Filmmakers use slow motion to add dramatic and creative effects. It can arouse feelings, highlight particular movements, or produce a dreamlike mood. In commercials, these videos create sequences of the message you want to convey.
- Wildlife Observation: Slow-motion recordings can be very useful in animal research. They can be used to watch and record animal activity more closely. It gives researchers a better knowledge of the animal’s habits.
- Sports analysis: Slow-motion effect can analyze an athlete’s movement mechanics and give reviews. Coaches and athletes pinpoint areas where their technique needs to be improved.
- Product Testing and Quality Control: Video effects also prove useful in industries. It allows engineers to inspect high-speed operations and identify any flaws or malfunctions.
- **Crash Test Analysis:**Analyzing slow-motion video is essential for examining vehicle crash tests. It aids in improving car designs and evaluating the performance of safety systems.
Part 2: Performing Slow Mo in Adobe Premiere Pro: Using A Good Option
Adobe Premiere Pro’s editing interface makes its reputation high in the market. It is known as the industry standard tool because of its unparalleled features. Content developers and filmmakers can arrange and edit video files on it. It can also improve audio and image quality with its extensive editing toolkit.
Premier Pro offers many more functions than basic video editing. It offers some features that can change your content creation journey. Following are some of its basic features that you should know before learning Premiere Pro how to slow motion:
- Auto Reframe: This feature keeps the object of the image in the frame no matter which frame you choose. You can easily auto-frame a single clip or go for the entire video.
- Text-Based Editing: Text-based editing can give you more control over the transcript. It can deal with multi-channel audio recordings and remove gaps with a single click.
- Color Settings: Color settings allow you to adjust colors quickly and easily. It can check the result by combining multiple color selections into a single tab.
- Audio Auto-Tagging: This feature classifies audio files as either dialogue, music, or ambiance. It then provides access to the most useful tools for producing high-quality audio.
This guide will tell you how to make a slow-motion video on Premiere Pro. Follow the steps below to decrease the speed of your video across Adobe Premiere Pro:
Step 1
Import your video into the timeline and right-click on the icon you see with the video file on the timeline. From here, go to “Time-Remapping” and click on “Speed.” You will know the function has been activated when you see the white line on your timeline.

Step 2
Expand the timeline to see the ramping line. Now click on the ramping line by using the “Ctrl + click” command. You can also add keyframes by going to the toolkit on the left side of the screen and selecting the “Add Keyframe” button. Another option is the time remapping speed settings from the top and activating the keyframe.

Step 3
Move the timeline cursor to the right side and add another keyframe there. Now, double-click on the first keyframe and drag it to the right side just a bit. After that, drag the speed ramping line downwards to create a ramp. To change the length of keyframes more precisely, go to “Effects Control” from the top and manage its length.

Part 3: Quick Alternative: Wondershare Filmora and Slow-Motion Clips
You might have gotten the answer to “how to make slow-motion video in Premiere Pro” until now. But another question comes into mind: “How to make slow-mo videos easily ?” Using Adobe Premiere Pro can be tricky for starters, so they look for alternative tools. Filmora is a great option if you struggle with using Adobe Premier Pro.
The tool is easy to use and can process heavy videos, keeping its quality intact. With its AI features, the edits that used to take hours can now be done within minutes. The tool has amazing options for all kinds of media editing.
Step-by-Step Guide to Perform Slow Motion in Filmora Using Different Methods
Remarkable features of Filmora do not end here. If you want to know more about Filmora, you should download it, but first, learn how to add slow motion in reels. In this read, follow the guide below:
Free Download For Win 7 or later(64-bit)
Free Download For macOS 10.14 or later
Method 1: Using Uniform Speed
Using this method, you can slow down your video smartly with the help of AI. Some options in uniform speed will help you to automate the process while ensuring the quality of the content. Look at the steps below to add slo-mo to your video like a pro:
Step 1Import Media to the Timeline and Explore Uniform Speed
Install Filmora 13 on your device and open it to access “New Project” from the main interface. When you enter the editing window, import your file into the media panel.

Step 2Adjust the Speed and Other Use Advanced Options
Later, drag that file to the timeline and right-click on it to get a list. Select the “Uniform Speed” option from that list and head to the editing panel opened to the right. Under the “Speed,” there will be a slider. You have to move it to the left for slow-motion video. While adjusting speed with that slider, track video duration from the “Duration” section. Below that option, you can toggle the “Reverse Speed” option if required.

Otherwise, check the “Ripple Edit” and “Maintain Pitch” option for good. Now, extend the “AI Interpolation” menu and choose “Optical Flow.” It will let AI automatically adjust the video speed in slow motion with high quality.

Method 2: Using Speed Ramping
If you want to bring a professional look to Slow-motion videos, use Speed Ramping. It will ensure a smooth change in video speed when it increases or decreases. To add this refined touch to videos, look at the given steps:
Step 1Access the Speed Ramping Option in 2 Ways
Tap the “Speed Ramping” next to the “Uniform Speed” in the right-side panel. Optionally, you can right-click on your videos in the timeline. There, you will find the “Speed Ramping” option below the “Uniform Speed” option in the list.

Step 2Speed Ramping Your Videos and Get Render Preview
In the Speed Ramping Section, you will get 6 templates. Pick one or hit the “Customize” to design your own speed ramping in videos. Later, move to the toolbar of the timeline section and choose “Render Preview” next to the “Copilot” icon. It will bring a smooth playback of your speed ramping in videos.

Matchless Features of Wondershare Filmora
Wondershare Filmora offers a creative editing experience. It has a number of important features, some of which are discussed below:
AI Copilot: You can speed up your video editing process with the AI Copilot Editing function. It offers AI assistance anytime you need it and gives a quick response. This feature directs you towards the required feature with a button. To get assistance, users just have to prompt questions in natural language.
AI Text-Based Editing: You can edit your video content with the AI Text-Based Editing tool. This feature can transcribe your spoken words into editable text. Afterward, you can edit the text based on your preferences, and the changes in the video will be added. Moreover, Filmora allows you to save the generated text to reuse it in articles and blogs later.
AI Copywriting: If you are stuck creating a unique script, get help from AI copywriting in Filmora. It gives several video ideas to generate YouTube video titles and descriptions. This creative personal assistant will bring content aligning with your video goals. The generated script can be used to make videos from Filmora’s text-to-video feature.
Conclusion
Regular videos do not always generate the same level of response from viewers. Slow-mo videos can make a video more entertaining and improve the film’s narrative. It’s good to use when you want to draw attention to the most significant shot in a video. This article shows how to make slow motion in Premiere Pro and offers an amazing alternative. Thus, try to use Filmora and improve your editing experiences with ease.
Make A Slow Motion Video Make A Slow Motion Video More Features
Part 1: What Are Some Potential Real-Life Use Cases of Having Slow Motion Videos?
Slow-motion movies can be utilized to record and examine events in greater depth. Before delving into how to make a slow-motion video in Premiere Pro, learn its use cases. Thus, below are a few applications of the slow motion in real life:
- Medical Research and Imaging: Slow-motion videos are used in medical research and education. They thoroughly examine surgical methods and practices. This promotes medical practice improvement and student’s better comprehension of concepts.
- Cinematography and Filmmaking: Filmmakers use slow motion to add dramatic and creative effects. It can arouse feelings, highlight particular movements, or produce a dreamlike mood. In commercials, these videos create sequences of the message you want to convey.
- Wildlife Observation: Slow-motion recordings can be very useful in animal research. They can be used to watch and record animal activity more closely. It gives researchers a better knowledge of the animal’s habits.
- Sports analysis: Slow-motion effect can analyze an athlete’s movement mechanics and give reviews. Coaches and athletes pinpoint areas where their technique needs to be improved.
- Product Testing and Quality Control: Video effects also prove useful in industries. It allows engineers to inspect high-speed operations and identify any flaws or malfunctions.
- **Crash Test Analysis:**Analyzing slow-motion video is essential for examining vehicle crash tests. It aids in improving car designs and evaluating the performance of safety systems.
Part 2: Performing Slow Mo in Adobe Premiere Pro: Using A Good Option
Adobe Premiere Pro’s editing interface makes its reputation high in the market. It is known as the industry standard tool because of its unparalleled features. Content developers and filmmakers can arrange and edit video files on it. It can also improve audio and image quality with its extensive editing toolkit.
Premier Pro offers many more functions than basic video editing. It offers some features that can change your content creation journey. Following are some of its basic features that you should know before learning Premiere Pro how to slow motion:
- Auto Reframe: This feature keeps the object of the image in the frame no matter which frame you choose. You can easily auto-frame a single clip or go for the entire video.
- Text-Based Editing: Text-based editing can give you more control over the transcript. It can deal with multi-channel audio recordings and remove gaps with a single click.
- Color Settings: Color settings allow you to adjust colors quickly and easily. It can check the result by combining multiple color selections into a single tab.
- Audio Auto-Tagging: This feature classifies audio files as either dialogue, music, or ambiance. It then provides access to the most useful tools for producing high-quality audio.
This guide will tell you how to make a slow-motion video on Premiere Pro. Follow the steps below to decrease the speed of your video across Adobe Premiere Pro:
Step 1
Import your video into the timeline and right-click on the icon you see with the video file on the timeline. From here, go to “Time-Remapping” and click on “Speed.” You will know the function has been activated when you see the white line on your timeline.
Step 2
Expand the timeline to see the ramping line. Now click on the ramping line by using the “Ctrl + click” command. You can also add keyframes by going to the toolkit on the left side of the screen and selecting the “Add Keyframe” button. Another option is the time remapping speed settings from the top and activating the keyframe.
Step 3
Move the timeline cursor to the right side and add another keyframe there. Now, double-click on the first keyframe and drag it to the right side just a bit. After that, drag the speed ramping line downwards to create a ramp. To change the length of keyframes more precisely, go to “Effects Control” from the top and manage its length.
Part 3: Quick Alternative: Wondershare Filmora and Slow-Motion Clips
You might have gotten the answer to “how to make slow-motion video in Premiere Pro” until now. But another question comes into mind: “How to make slow-mo videos easily ?” Using Adobe Premiere Pro can be tricky for starters, so they look for alternative tools. Filmora is a great option if you struggle with using Adobe Premier Pro.
The tool is easy to use and can process heavy videos, keeping its quality intact. With its AI features, the edits that used to take hours can now be done within minutes. The tool has amazing options for all kinds of media editing.
Step-by-Step Guide to Perform Slow Motion in Filmora Using Different Methods
Remarkable features of Filmora do not end here. If you want to know more about Filmora, you should download it, but first, learn how to add slow motion in reels. In this read, follow the guide below:
Free Download For Win 7 or later(64-bit)
Free Download For macOS 10.14 or later
Method 1: Using Uniform Speed
Using this method, you can slow down your video smartly with the help of AI. Some options in uniform speed will help you to automate the process while ensuring the quality of the content. Look at the steps below to add slo-mo to your video like a pro:
Step 1Import Media to the Timeline and Explore Uniform Speed
Install Filmora 13 on your device and open it to access “New Project” from the main interface. When you enter the editing window, import your file into the media panel.
Step 2Adjust the Speed and Other Use Advanced Options
Later, drag that file to the timeline and right-click on it to get a list. Select the “Uniform Speed” option from that list and head to the editing panel opened to the right. Under the “Speed,” there will be a slider. You have to move it to the left for slow-motion video. While adjusting speed with that slider, track video duration from the “Duration” section. Below that option, you can toggle the “Reverse Speed” option if required.
Otherwise, check the “Ripple Edit” and “Maintain Pitch” option for good. Now, extend the “AI Interpolation” menu and choose “Optical Flow.” It will let AI automatically adjust the video speed in slow motion with high quality.
Method 2: Using Speed Ramping
If you want to bring a professional look to Slow-motion videos, use Speed Ramping. It will ensure a smooth change in video speed when it increases or decreases. To add this refined touch to videos, look at the given steps:
Step 1Access the Speed Ramping Option in 2 Ways
Tap the “Speed Ramping” next to the “Uniform Speed” in the right-side panel. Optionally, you can right-click on your videos in the timeline. There, you will find the “Speed Ramping” option below the “Uniform Speed” option in the list.
Step 2Speed Ramping Your Videos and Get Render Preview
In the Speed Ramping Section, you will get 6 templates. Pick one or hit the “Customize” to design your own speed ramping in videos. Later, move to the toolbar of the timeline section and choose “Render Preview” next to the “Copilot” icon. It will bring a smooth playback of your speed ramping in videos.
Matchless Features of Wondershare Filmora
Wondershare Filmora offers a creative editing experience. It has a number of important features, some of which are discussed below:
AI Copilot: You can speed up your video editing process with the AI Copilot Editing function. It offers AI assistance anytime you need it and gives a quick response. This feature directs you towards the required feature with a button. To get assistance, users just have to prompt questions in natural language.
AI Text-Based Editing: You can edit your video content with the AI Text-Based Editing tool. This feature can transcribe your spoken words into editable text. Afterward, you can edit the text based on your preferences, and the changes in the video will be added. Moreover, Filmora allows you to save the generated text to reuse it in articles and blogs later.
AI Copywriting: If you are stuck creating a unique script, get help from AI copywriting in Filmora. It gives several video ideas to generate YouTube video titles and descriptions. This creative personal assistant will bring content aligning with your video goals. The generated script can be used to make videos from Filmora’s text-to-video feature.
Conclusion
Regular videos do not always generate the same level of response from viewers. Slow-mo videos can make a video more entertaining and improve the film’s narrative. It’s good to use when you want to draw attention to the most significant shot in a video. This article shows how to make slow motion in Premiere Pro and offers an amazing alternative. Thus, try to use Filmora and improve your editing experiences with ease.
Why Vimeo Slideshow Maker Become More and More Popular
Why Vimeo Slideshow Maker Become Popular
An easy yet powerful editor
Numerous effects to choose from
Detailed tutorials provided by the official channel
Have you recently heard about Vimeo from any of your friends or colleagues? Or have you come through it and want to know more about it? Then here you can get all information needed about the platform. Vimeo slideshow creator is a wonderful tool launched by a group of filmmakers in 2004.

It has gained a lot of popularity over the past decade and appears as the competitor of largest video sharing giant YouTube. The platform has approximately 80 million users and 1 million subscribers. In some ways, Vimeo is even better than YouTube.
In this article
01 [What Is Vimeo for & Why It Become Popular](#Part 1)
02 [Tips for a Great Slideshow Video](#Part 2)
Part 1: What Is Vimeo for & Why It Become Popular
Vimeo is an online video streaming and editing tool which is designed for video creators and artists. The platform provides various tools to its users including monetization, marketing, collaboration, post-production, management, storage, etc. It provides a great user experience because it is ad-free. The mode of revenue for the owners of Vimeo is a software as a service (SaaS). They provide paid subscription plans for creating and editing videos, broadcasting tools, connecting with clients, etc.

It works in a “freemium” model. That means the users have limited access to the platform if they are using it for free. For example, a basic free membership allows the user to have access to a total of 5GB of storage and can upload 500MB on a weekly basis. As a free or paid member of Vimeo Slideshow maker, you can like, comment on videos, and at the same time save, watch, and upload them. Also, you can create playlists. What features you will be able to access totally depends on your membership level and plan.
Vimeo is becoming popular due to the following reasons:
01Vimeo offers better encoding and video quality
Vimeo is more focused on the quality of the video that gets uploaded on it. Its processing load is lighter and it follows strict guidelines to accept videos. The platform uses better encoding techniques to maximize the quality of the video.
02Vimeo offers greater prestige
Being on Vimeo is a matter of prestige. Vimeo videos are considered more professional as compared to Youtube. There is a limit on what kind of channels one can run on Vimeo.
03Vimeo has a more sophisticated audience
Because of the high quality of videos and its prestigious nature, Vimeo has a more sophisticated fan base. The content offered by the platform is more knowledgeable and determined. The audience here is more sophisticated. Also, the creators are more insightful, mature, and constructive.
04Vimeo offers greater artistic freedom
Vimeo always welcomes the creators with their videos to show their art. It offers artistic freedom to its users. The platform checks the artistic value of the video and talent of the creator and allows them to upload, unlike Youtube.
05Vimeo boasts unique features and customizations
There are certain unique features of YouTube which make it a great platform for its users.
● Plus, Pro, Business, Premium Plans
Vimeo is funded by its community and you have to purchase the plan to use it apart from the free features. Different Vimeo plans are:
Vimeo - $7/month
Pro - $20/month
Business - $50/month
Top-tier Vimeo Premium - $75/month.
● Make money with pay per view
Just like Google’s PPC program, Vimeo also features a pay per program view where viewers need to pay in order to watch certain videos. With this, you can sell your art anywhere in the country or worldwide and make money with it.
● Advanced analytics
The subscribers of Vimeo are offered different levels of analytics. You will get the analytics according to your subscription level. The analytics levels on Vimeo consist of Google Analytics integration, engagement graphs, custom reports, and a traffic dashboard.
● Web player branding
Vimeo allows the users to use their own branding and logo in their videos. It makes all the embedded videos share the same look and ends with an unsightly suggestions page.
● Domain-restricted embeds
Vimeo offers the users a feature of domain-restricted embeds. It means the users can set the domains to embed any particular or a set of videos. This feature lets you hide the video on Vimeo and make it visible on the allowed domain.
● Password protection
It is an extraordinary feature that Vimeo offers. The user can set a password for the particular video to restrict the video’s visibility. Only those people who will have access to the password will be able to watch that particular video.
● Replace video but keep URL
This one is also an amazing and unique feature of Vimeo. With this feature, you can replace any existing video with the new one by keeping the same URL. Also, it will keep the stats, comments, likes, etc as it is.
Part 2 Tips for a Great Slideshow Video
Videos are gaining much popularity these days. It is an easy way to connect with people and show emotions to them. In the same way, slideshow videos also are important in their place. Slides are the collection of traditional photos or negatives which are out of trend now. And slideshow videos are the perfect way to use those slides and relieve those faded memories with loved ones. Creating the slideshow video is also easy and can be done easily with the help of some tools. You don’t need to be professional, but the only need is to follow certain tips carefully. Here, we are sharing the essential tips to prepare a great slideshow video. Also, you will get to know about the best tool for video creation.
● Tell a story
Prepare the slideshow video in the form of storytelling. Whatever is the theme of your slideshow, prepare the script of the video right from the start. Make a meaningful and impressive story. Select and collect the raw materials according to the requirement.
● Keep it cohesive
The cohesion of photos or images is very important in a video slideshow. It is advised not to mix and match still photos and videos in 1 slideshow. Also, choose the photos belonging to the same color family. Mixing different varieties of photos divert the attention of the viewer. Also, one warm photo, then one cool and so on are not the efficient choices for a slideshow. All the images should appear as part of one color family and are similar to one another. Always maintain the quality of photos throughout the slideshow. Gradual jumps between grainy portrait mode photos and some screenshots, meanwhile photos of other modes lead to distracting the viewer and blurring their experience.
● Make it personal
Video slideshows are a powerful tool to show your personality and your personal message. The videos should contain your feelings. So, customize them and make them as personal as you can. Give your uniqueness to your slideshows. For this, you can customize the color palette, text, etc and make them unique and personal. So that the people with whom you share the videos may also feel your touch.
● Keep slideshow videos short
There might be different aims for creating a slideshow video. You might want to share it with loved ones or any of your friends’ circle. Or you might be wanting it to post as an ad on social media platforms such as Instagram, or Facebook. Whatever the purpose of your making the video, keep them concise and short. Short video clips are best for grabbing the attention of the viewers. Everyone does not find it interesting to watch long-form videos. If you are aiming to make a longer-form video slideshow which contains both images and video clips, then keep each photo for 3 to 5 seconds and each video clip a maximum of 20 seconds. It is recommended to maintain the user’s interest throughout.
● Create a storyboard to plan your slideshow video
As we have already discussed in the above point, the video should depict your story. Also, it should be in sync to make it more compelling. Creating a storyboard or outline is the perfect way to predict the right flow as well as choose the right elements for the video.
The storyboard helps to prepare a plan and develop the logical sequence of the photos. Also, if you want to add photos, video clips, texts, etc in a single slideshow, the storyboard can help to outline the sequence. With this, you will be able to create a video that will be logically correct.
● Add text to videos and images to convey your message clearly
Text or captions are very crucial to be added to the slideshow especially if you are preparing them for social media. People these days do watch the videos by keeping the sound off on social media. So, they will not be able to get your message without captions. Keep all your key messages highlighted in the video. The first few seconds of the video play an important role. It is the deciding factor whether the viewer will watch the whole video or will just bounce back. So, give a captivating hook to the slideshow to capture the viewer’s attention and make them hit the unmute button.
Wondershare Filmora Video Editor is an effective tool which can help you to create wonderful video slideshows. It provides all the functionalities which you need to make the slideshow convincing. You can make appealing videos to show your impressions to the viewers. It enables you to create slideshows with photos, videos, and captions. The color correction and gradient option in the Filmora allow you to change the look of the photos or old slides according to your choices. You can edit the slides with this tool, to make them cohesively right and create a slideshow out of them. In short, Filmora is the perfect way to make a slideshow video that can be interesting and engaging for the viewers.
For Win 7 or later (64-bit)
For macOS 10.12 or later

● Ending Thoughts →
● So, here we can conclude that Vimeo slideshow maker is an impressive platform. Despite having a smaller user base, it is gaining much popularity because of its unique features.
● Moreover, you can generate great videos by following the tips we have shared. By uploading those videos on Vimeo, you will be able to gain a decent audience base. If you are aiming to have a genuine and sophisticated fanbase for your videos, then Vimeo would be a great choice.
● Using Filmora will make your process of creating slideshows easy. The variety of features available by the tool will let you create wonderful storytelling out of your old memories.
Have you recently heard about Vimeo from any of your friends or colleagues? Or have you come through it and want to know more about it? Then here you can get all information needed about the platform. Vimeo slideshow creator is a wonderful tool launched by a group of filmmakers in 2004.
It has gained a lot of popularity over the past decade and appears as the competitor of largest video sharing giant YouTube. The platform has approximately 80 million users and 1 million subscribers. In some ways, Vimeo is even better than YouTube.
In this article
01 [What Is Vimeo for & Why It Become Popular](#Part 1)
02 [Tips for a Great Slideshow Video](#Part 2)
Part 1: What Is Vimeo for & Why It Become Popular
Vimeo is an online video streaming and editing tool which is designed for video creators and artists. The platform provides various tools to its users including monetization, marketing, collaboration, post-production, management, storage, etc. It provides a great user experience because it is ad-free. The mode of revenue for the owners of Vimeo is a software as a service (SaaS). They provide paid subscription plans for creating and editing videos, broadcasting tools, connecting with clients, etc.
It works in a “freemium” model. That means the users have limited access to the platform if they are using it for free. For example, a basic free membership allows the user to have access to a total of 5GB of storage and can upload 500MB on a weekly basis. As a free or paid member of Vimeo Slideshow maker, you can like, comment on videos, and at the same time save, watch, and upload them. Also, you can create playlists. What features you will be able to access totally depends on your membership level and plan.
Vimeo is becoming popular due to the following reasons:
01Vimeo offers better encoding and video quality
Vimeo is more focused on the quality of the video that gets uploaded on it. Its processing load is lighter and it follows strict guidelines to accept videos. The platform uses better encoding techniques to maximize the quality of the video.
02Vimeo offers greater prestige
Being on Vimeo is a matter of prestige. Vimeo videos are considered more professional as compared to Youtube. There is a limit on what kind of channels one can run on Vimeo.
03Vimeo has a more sophisticated audience
Because of the high quality of videos and its prestigious nature, Vimeo has a more sophisticated fan base. The content offered by the platform is more knowledgeable and determined. The audience here is more sophisticated. Also, the creators are more insightful, mature, and constructive.
04Vimeo offers greater artistic freedom
Vimeo always welcomes the creators with their videos to show their art. It offers artistic freedom to its users. The platform checks the artistic value of the video and talent of the creator and allows them to upload, unlike Youtube.
05Vimeo boasts unique features and customizations
There are certain unique features of YouTube which make it a great platform for its users.
● Plus, Pro, Business, Premium Plans
Vimeo is funded by its community and you have to purchase the plan to use it apart from the free features. Different Vimeo plans are:
Vimeo - $7/month
Pro - $20/month
Business - $50/month
Top-tier Vimeo Premium - $75/month.
● Make money with pay per view
Just like Google’s PPC program, Vimeo also features a pay per program view where viewers need to pay in order to watch certain videos. With this, you can sell your art anywhere in the country or worldwide and make money with it.
● Advanced analytics
The subscribers of Vimeo are offered different levels of analytics. You will get the analytics according to your subscription level. The analytics levels on Vimeo consist of Google Analytics integration, engagement graphs, custom reports, and a traffic dashboard.
● Web player branding
Vimeo allows the users to use their own branding and logo in their videos. It makes all the embedded videos share the same look and ends with an unsightly suggestions page.
● Domain-restricted embeds
Vimeo offers the users a feature of domain-restricted embeds. It means the users can set the domains to embed any particular or a set of videos. This feature lets you hide the video on Vimeo and make it visible on the allowed domain.
● Password protection
It is an extraordinary feature that Vimeo offers. The user can set a password for the particular video to restrict the video’s visibility. Only those people who will have access to the password will be able to watch that particular video.
● Replace video but keep URL
This one is also an amazing and unique feature of Vimeo. With this feature, you can replace any existing video with the new one by keeping the same URL. Also, it will keep the stats, comments, likes, etc as it is.
Part 2 Tips for a Great Slideshow Video
Videos are gaining much popularity these days. It is an easy way to connect with people and show emotions to them. In the same way, slideshow videos also are important in their place. Slides are the collection of traditional photos or negatives which are out of trend now. And slideshow videos are the perfect way to use those slides and relieve those faded memories with loved ones. Creating the slideshow video is also easy and can be done easily with the help of some tools. You don’t need to be professional, but the only need is to follow certain tips carefully. Here, we are sharing the essential tips to prepare a great slideshow video. Also, you will get to know about the best tool for video creation.
● Tell a story
Prepare the slideshow video in the form of storytelling. Whatever is the theme of your slideshow, prepare the script of the video right from the start. Make a meaningful and impressive story. Select and collect the raw materials according to the requirement.
● Keep it cohesive
The cohesion of photos or images is very important in a video slideshow. It is advised not to mix and match still photos and videos in 1 slideshow. Also, choose the photos belonging to the same color family. Mixing different varieties of photos divert the attention of the viewer. Also, one warm photo, then one cool and so on are not the efficient choices for a slideshow. All the images should appear as part of one color family and are similar to one another. Always maintain the quality of photos throughout the slideshow. Gradual jumps between grainy portrait mode photos and some screenshots, meanwhile photos of other modes lead to distracting the viewer and blurring their experience.
● Make it personal
Video slideshows are a powerful tool to show your personality and your personal message. The videos should contain your feelings. So, customize them and make them as personal as you can. Give your uniqueness to your slideshows. For this, you can customize the color palette, text, etc and make them unique and personal. So that the people with whom you share the videos may also feel your touch.
● Keep slideshow videos short
There might be different aims for creating a slideshow video. You might want to share it with loved ones or any of your friends’ circle. Or you might be wanting it to post as an ad on social media platforms such as Instagram, or Facebook. Whatever the purpose of your making the video, keep them concise and short. Short video clips are best for grabbing the attention of the viewers. Everyone does not find it interesting to watch long-form videos. If you are aiming to make a longer-form video slideshow which contains both images and video clips, then keep each photo for 3 to 5 seconds and each video clip a maximum of 20 seconds. It is recommended to maintain the user’s interest throughout.
● Create a storyboard to plan your slideshow video
As we have already discussed in the above point, the video should depict your story. Also, it should be in sync to make it more compelling. Creating a storyboard or outline is the perfect way to predict the right flow as well as choose the right elements for the video.
The storyboard helps to prepare a plan and develop the logical sequence of the photos. Also, if you want to add photos, video clips, texts, etc in a single slideshow, the storyboard can help to outline the sequence. With this, you will be able to create a video that will be logically correct.
● Add text to videos and images to convey your message clearly
Text or captions are very crucial to be added to the slideshow especially if you are preparing them for social media. People these days do watch the videos by keeping the sound off on social media. So, they will not be able to get your message without captions. Keep all your key messages highlighted in the video. The first few seconds of the video play an important role. It is the deciding factor whether the viewer will watch the whole video or will just bounce back. So, give a captivating hook to the slideshow to capture the viewer’s attention and make them hit the unmute button.
Wondershare Filmora Video Editor is an effective tool which can help you to create wonderful video slideshows. It provides all the functionalities which you need to make the slideshow convincing. You can make appealing videos to show your impressions to the viewers. It enables you to create slideshows with photos, videos, and captions. The color correction and gradient option in the Filmora allow you to change the look of the photos or old slides according to your choices. You can edit the slides with this tool, to make them cohesively right and create a slideshow out of them. In short, Filmora is the perfect way to make a slideshow video that can be interesting and engaging for the viewers.
For Win 7 or later (64-bit)
For macOS 10.12 or later
● Ending Thoughts →
● So, here we can conclude that Vimeo slideshow maker is an impressive platform. Despite having a smaller user base, it is gaining much popularity because of its unique features.
● Moreover, you can generate great videos by following the tips we have shared. By uploading those videos on Vimeo, you will be able to gain a decent audience base. If you are aiming to have a genuine and sophisticated fanbase for your videos, then Vimeo would be a great choice.
● Using Filmora will make your process of creating slideshows easy. The variety of features available by the tool will let you create wonderful storytelling out of your old memories.
TikTok Face Zoom | Create Your Face Zoom TikTok Now
Abundant Video Effects - Wondershare Filmora
Provide abundant video effects - A creative video editor
Powerful color correction and grading
Detailed tutorials are provided by the official channel
TikTok videos are very popular across the youth of the world. With millions of users in support of the platform, there are many content creators that gained popularity through making small videos on TikTok. These videos are, however, incomplete without the existence of a proper effect on them. To emphasize something across a video, the zoom effect is always preferred in the market.
This article discusses the face zoom effect of TikTok and provides users with the appropriate methods that can be adapted to utilize this function to perfection. With this feature, you can make your perfect videos with an emphasis on the important elements to view on the screen.
In this article
Part 1: What is TikTok Face Zoom?
Part 2: Create A Face Zoom TikTok Video in Minutes
Part 3: Bonus | Create Face Zoom Video in Wondershare Filmora
Part 1: What is TikTok Face Zoom?
The face zoom TikTok effect is referred to the zooming effect that is covered by putting the focus on the facial presence within the video. The use of the face zoom effect on TikTok has a significant utility in highlighting the importance of the person within the video and creating an illusion that would make people watch the video all along.
Many TikTokers like using this effect in scenes where they wish to highlight something new about their face, e.g., new makeup.
Part 2: Create A Face Zoom TikTok Video in Minutes
There are some direct approaches to zooming the face across a TikTok video. To understand these methods, you should go through the provided details and understand the face zoom effect on TikTok.
Method 1: Create A Face Zoom TikTok Video in Minutes
Step 1: Before coming onto adding effects across your TikTok video, you need to record it across the social platform or have it recorded before on your smartphone under the requirements of TikTok.
Step 2: For uploading a video on TikTok, you need to continue by clicking the “+” icon and locating the “Upload” button for adding a pre-recorded video across TikTok.

Step 3: Once you have added the video for editing, navigate into the “Effects” section and find yourselves in the “Visuals” section. Let the cursor of the video be at the point where the facial features are prominent, and you wish to face zoom the video from there. With the cursor across the required place, find the “Zoom” effect in the list and hold the button until you’ve successfully added the effect across the required length of the video.

Step 4: After editing the video and adding the face zoom effect successfully, you need to click on “Save” to preview the video before you click “Next” to share it across the necessary platforms. TikTok provides you with the ability to share your videos across Instagram, Facebook, or WhatsApp.

Method 2: Do Face Zoom Easily by Finding a Face Zoom Video
Step 1: To use the TikTok face zoom effect on your video, you need to launch the platform and click on “Discover” present on the bottom of the screen. In the search bar, you need to type “Face Zoom” to locate the effect across TikTok.

Step 2: Once you have found the effect, open it on another screen. Locate the “Try this effect” button to use a similar effect across your video.

Step 3: Record the video on TikTok by clicking on the red recording button. Make changes to the recorded video and save the video on your device or share it across the social media platforms as desired.

Part 3: Bonus | Create Face Zoom Video in Wondershare Filmora
TikTok produces impressive content that can be commended for many reasons. This, however, does not make the professional video that you might be looking for. What to do if you cannot create such a professional video that would help you get the right reach you are looking for? Wondershare Filmora includes an exceptional experience of using the TikTok face zoom effect across its easy-to-use platform with the right set of tools.
To understand how you can successfully execute the procedure without putting yourselves in any difficulty, go through the steps as shown below:
Step 1: Download and Install Wondershare Filmora
For starters, you need to have Wondershare Filmora installed on your computer. Proceed to launch it and click on the “New Project” button to start a new project.

Step 2: Upload Media
As a new window opens up on the front, you need to click on the arrowhead icon against the “Media” tab to import the video that is to be edited across Wondershare Filmora. On adding it, drag it across the timeline successfully.

Step 3: Track the Face using Motion Tracking
To track the facial features across the video, you need to double-click the video on the timeline and proceed to open the “Motion Tracking” menu that you can find across the pane. Enable the option if necessary and set the position of the box across the “Preview” window that would track the face. Click on “Start Tracking” to successfully motion track the face.

Step 4: Add Magnify Effect to the Face
Proceed into the “Effects” tab and write “Magnify” in the search bar. Select the effect and place it across the video in the timeline. To align the effect with the face, you need to double-click the video and move into the “Motion Tracking” section again. Select the specific magnify effect in the drop-down menu and select “Start Tracking.”

Step 5: Preview and Export the Face Zoom Video
Once you are done editing the video, preview it across the window to check if any edits are required. Once confirmed, click on the “Export” button to save the video across the computer.

Conclusion
The TikTok face zoom effect can be quite impressive if used perfectly. However, since the intent is to highlight the facial parts in the video, the appropriate use of the effect can give an exceptional result. For this, the article has discussed the best methods that can be applied to understanding how to use face zoom in TikTok with ease.
TikTok videos are very popular across the youth of the world. With millions of users in support of the platform, there are many content creators that gained popularity through making small videos on TikTok. These videos are, however, incomplete without the existence of a proper effect on them. To emphasize something across a video, the zoom effect is always preferred in the market.
This article discusses the face zoom effect of TikTok and provides users with the appropriate methods that can be adapted to utilize this function to perfection. With this feature, you can make your perfect videos with an emphasis on the important elements to view on the screen.
In this article
Part 1: What is TikTok Face Zoom?
Part 2: Create A Face Zoom TikTok Video in Minutes
Part 3: Bonus | Create Face Zoom Video in Wondershare Filmora
Part 1: What is TikTok Face Zoom?
The face zoom TikTok effect is referred to the zooming effect that is covered by putting the focus on the facial presence within the video. The use of the face zoom effect on TikTok has a significant utility in highlighting the importance of the person within the video and creating an illusion that would make people watch the video all along.
Many TikTokers like using this effect in scenes where they wish to highlight something new about their face, e.g., new makeup.
Part 2: Create A Face Zoom TikTok Video in Minutes
There are some direct approaches to zooming the face across a TikTok video. To understand these methods, you should go through the provided details and understand the face zoom effect on TikTok.
Method 1: Create A Face Zoom TikTok Video in Minutes
Step 1: Before coming onto adding effects across your TikTok video, you need to record it across the social platform or have it recorded before on your smartphone under the requirements of TikTok.
Step 2: For uploading a video on TikTok, you need to continue by clicking the “+” icon and locating the “Upload” button for adding a pre-recorded video across TikTok.
Step 3: Once you have added the video for editing, navigate into the “Effects” section and find yourselves in the “Visuals” section. Let the cursor of the video be at the point where the facial features are prominent, and you wish to face zoom the video from there. With the cursor across the required place, find the “Zoom” effect in the list and hold the button until you’ve successfully added the effect across the required length of the video.
Step 4: After editing the video and adding the face zoom effect successfully, you need to click on “Save” to preview the video before you click “Next” to share it across the necessary platforms. TikTok provides you with the ability to share your videos across Instagram, Facebook, or WhatsApp.
Method 2: Do Face Zoom Easily by Finding a Face Zoom Video
Step 1: To use the TikTok face zoom effect on your video, you need to launch the platform and click on “Discover” present on the bottom of the screen. In the search bar, you need to type “Face Zoom” to locate the effect across TikTok.
Step 2: Once you have found the effect, open it on another screen. Locate the “Try this effect” button to use a similar effect across your video.
Step 3: Record the video on TikTok by clicking on the red recording button. Make changes to the recorded video and save the video on your device or share it across the social media platforms as desired.
Part 3: Bonus | Create Face Zoom Video in Wondershare Filmora
TikTok produces impressive content that can be commended for many reasons. This, however, does not make the professional video that you might be looking for. What to do if you cannot create such a professional video that would help you get the right reach you are looking for? Wondershare Filmora includes an exceptional experience of using the TikTok face zoom effect across its easy-to-use platform with the right set of tools.
To understand how you can successfully execute the procedure without putting yourselves in any difficulty, go through the steps as shown below:
Step 1: Download and Install Wondershare Filmora
For starters, you need to have Wondershare Filmora installed on your computer. Proceed to launch it and click on the “New Project” button to start a new project.
Step 2: Upload Media
As a new window opens up on the front, you need to click on the arrowhead icon against the “Media” tab to import the video that is to be edited across Wondershare Filmora. On adding it, drag it across the timeline successfully.
Step 3: Track the Face using Motion Tracking
To track the facial features across the video, you need to double-click the video on the timeline and proceed to open the “Motion Tracking” menu that you can find across the pane. Enable the option if necessary and set the position of the box across the “Preview” window that would track the face. Click on “Start Tracking” to successfully motion track the face.
Step 4: Add Magnify Effect to the Face
Proceed into the “Effects” tab and write “Magnify” in the search bar. Select the effect and place it across the video in the timeline. To align the effect with the face, you need to double-click the video and move into the “Motion Tracking” section again. Select the specific magnify effect in the drop-down menu and select “Start Tracking.”
Step 5: Preview and Export the Face Zoom Video
Once you are done editing the video, preview it across the window to check if any edits are required. Once confirmed, click on the “Export” button to save the video across the computer.
Conclusion
The TikTok face zoom effect can be quite impressive if used perfectly. However, since the intent is to highlight the facial parts in the video, the appropriate use of the effect can give an exceptional result. For this, the article has discussed the best methods that can be applied to understanding how to use face zoom in TikTok with ease.
Also read:
- New Top Ever Ways Make Tiktok Slideshow Solved
- Updated Start Your Creative Journey Now. Follow This Step-by-Step Guide on How to Add Double Exposure Effects to Your Personal Videos by Using the Filmora Video Editor
- In 2024, Making Creative and Engaging Youtube Videos Is Now Easy with Several Tools. Now, YouTube Also Offers You Its Own Built-In Video Editor Through Which You Can Edit and Enhance the Video Quality
- Updated In 2024, Step by Step to Add Border to Video Using Premiere Pro
- New 2024 Approved Splice Video Editor Online - Get Your Videos Splice Easily
- Updated 2 Easy Methods | How To Zoom In On TikTok Videos, In 2024
- 2024 Approved 20 Best Video Background Templates
- In 2024, How to Use Canva Color Match
- In 2024, Splitting a Video Into Frames with the FFmpeg Step by Step
- In 2024, How to Create Text Animation for Videos
- Updated What Is TS Format and How To Play TS Files? Basic Tips
- Updated 10 Matching Color Combination That Works Together
- Updated In 2024, Best Tips on How to Design Travel Slideshow
- New 4 Ways to Loop a Video on Vimeo for 2024
- New 2024 Approved Competitive Guide To Use Slow Motion in After Effects
- In 2024, How to Make an Intro Video Easy Solution
- New Best AR Video App - Top 10 Picks
- Updated How to Make a Video Slideshow in iMovie
- New Clone Yourself in Videos with Filmora for 2024
- New 2024 Approved Focusing On The Best Ways To Convert Slow-Motion Video to Normal
- New 2024 Approved How to Add Video Effects with Movavi Slideshow Maker
- New In 2024, How To Create a Polaroid Collage?
- New Wish to Rock on YouTube, but Lacking Tricks? Here, We Will Tell You Everything About How the YouTube Algorithm AI Works and How You Can Perform Well According to AI
- Updated Best Guide of 8 Photo Collage Apps for PC for 2024
- New Sync Audio With Video With Filmora
- Detailed Tutorial to Merge Videos in VLC Media Player
- Updated A Complete Guide to Use Distortion Effect in Premiere Pro
- 2024 Approved What Is Animated GIF
- Working Through the Details of iMovie Slow Motion Video Making 100 Effective
- 2024 Approved Hyperlapse VS Timelapse Videos
- New Create A Freeze Frame Sequence In Your Videos for 2024
- New You Have to Get It Right when It Comes to Cinematic Grading. We Highlight the Most Common Mistakes to Avoid While Focusing on Various Tips to Apply in the Process
- 2024 Approved The Best Peter McKinnon LUTs Recommendation
- New In 2024, How to Make a PowerPoint Looping Slideshow
- In 2024, The Article Introduces Three Recommended Apps to Download Royalty-Free Cinematic Music and Covers an Extensive Procedure to Create a Cinematic Travel Intro for a Travel Vlog
- MP3 Cutter Download for Computer and Mobile
- New 4 Methods to Resize a WebM File for 2024
- In 2024, 5 Methods to Denoise a Video
- Updated 2024 Approved 20 Must-Have Graduation Songs for Slideshow
- Updated How to Turn Text Into a Podcast
- A Guide Infinix Zero 30 5G Wireless and Wired Screen Mirroring | Dr.fone
- Easy Guide How To Bypass Motorola Moto G13 FRP Android 10/11/12/13
- In 2024, How to Use Pokémon Emerald Master Ball Cheat On Apple iPhone 15 Plus | Dr.fone
- In 2024, Process of Screen Sharing Realme GT 5 to PC- Detailed Steps | Dr.fone
- In 2024, Change Location on Yik Yak For your Oppo Reno 8T to Enjoy More Fun | Dr.fone
- In 2024, How to Screen Mirroring Lava Agni 2 5G? | Dr.fone
- How Do I Stop Someone From Tracking My Apple iPhone XS? | Dr.fone
- In 2024, How to Change Tecno Camon 30 Pro 5G Location on Skout | Dr.fone
- My Videos Arent Playing on OnePlus Open – What Can I Do? | Dr.fone
- 4 Ways to Fix Android Blue Screen of Death On Motorola Moto G24 | Dr.fone
- In 2024, Unlock Your Boost Mobile Apple iPhone 11 Pro Before the Plan Expires
- Preparation to Beat Giovani in Pokemon Go For Motorola Edge 40 Neo | Dr.fone
- How to Repair corrupt MP4 and MOV files of Tecno Pova 5?
- In 2024, iCloud Separation How To Disconnect Apple iPhone SE (2022) and iPad
- Forgot Apple iPhone 13 Pro Max Backup Password? Heres What to Do | Dr.fone
- Can I view AVCHD .mts files on Samsung Galaxy XCover 6 Pro Tactical Edition?
- PassFab Apple iPhone 14 Pro Max Backup Unlocker Top 4 Alternatives
- How to Change Google Play Location On Vivo S17t | Dr.fone
- Ultimate Guide to Catch the Regional-Located Pokemon For Honor Magic 6 | Dr.fone
- In 2024, iPogo will be the new iSpoofer On Oppo A1 5G? | Dr.fone
- How to Unlock Apple iPhone 14 Plus When We Dont Have Apple ID or Password?
- How To Check if Your Huawei P60 Is Unlocked
- How and Where to Find a Shiny Stone Pokémon For Samsung Galaxy S24? | Dr.fone
- Tutorial to Change Samsung Galaxy F34 5G IMEI without Root A Comprehensive Guide
- Title: New Do You Want to Stream and Record at the Same Time but Cant Find an Easy Solution? This Guide Will Help You Get This Done Using Three Easy-to-Follow Methods
- Author: Chloe
- Created at : 2024-04-24 07:08:19
- Updated at : 2024-04-25 07:08:19
- Link: https://ai-editing-video.techidaily.com/new-do-you-want-to-stream-and-record-at-the-same-time-but-cant-find-an-easy-solution-this-guide-will-help-you-get-this-done-using-three-easy-to-follow-metho/
- License: This work is licensed under CC BY-NC-SA 4.0.
