
New Easy Steps to Export Video in Filmora for 2024

Easy Steps to Export Video in Filmora
After you edit your video with Filmora you may wonder how to export your video in Filmora Indeed, you can export your video in Filmora in various options. This article will show you the multiple options you can get if you want to export your video in Filmora.
Steps to export your video with Filmora
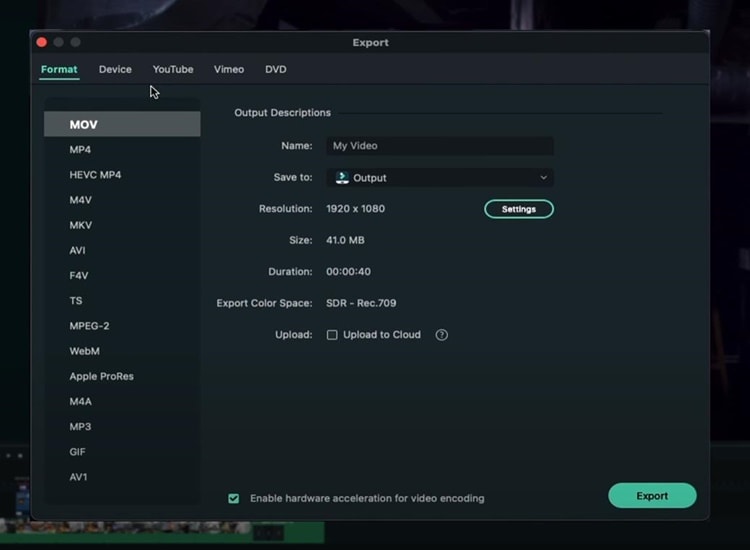
To open the export box, press “CTRL+E” on your keyboard. After that, you’ll see many export options you can do.
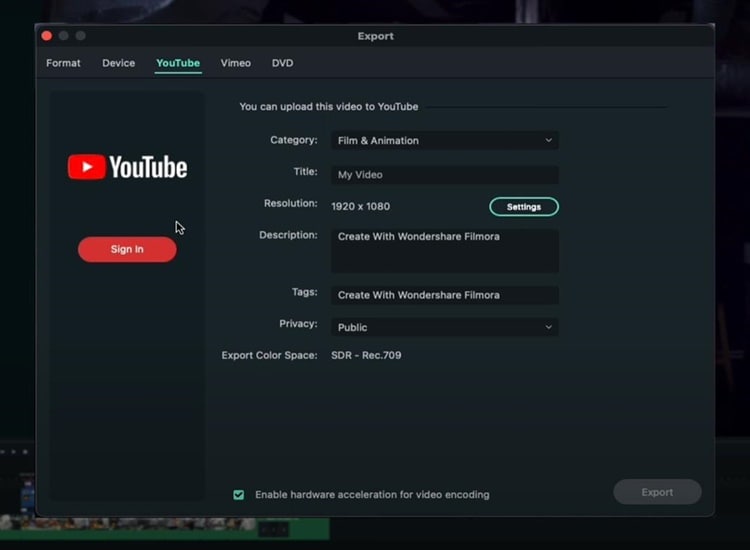
Export Video Platform
If you want your video to end up on YouTube, you can click on the “YouTube” option, sign in, and enter all the basic metadata you need for your YouTube video. Then you can click “Export”, and the video will go straight to YouTube. Also, you can have all of your privacy settings, descriptions, and everything else.
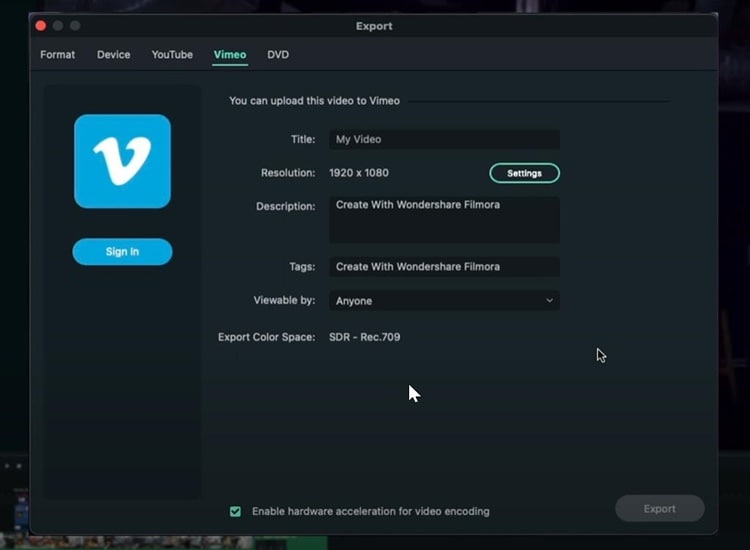
Similar to YouTube, you can do the same thing if you want to export your video on Vimeo.
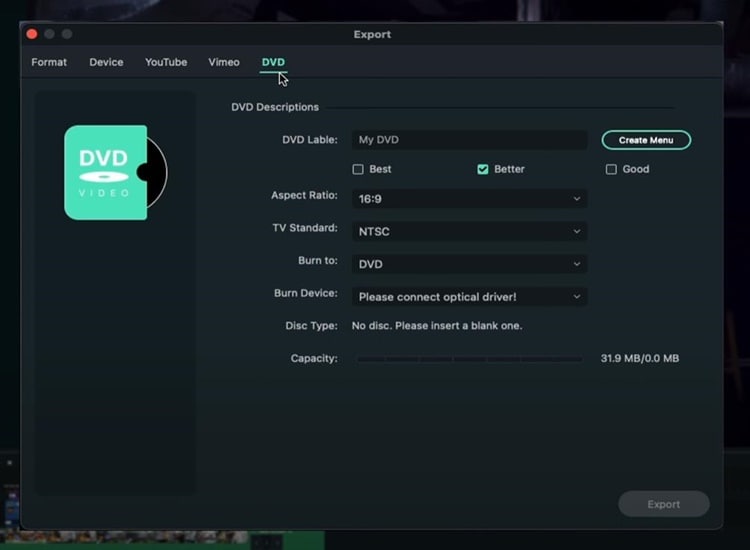
Export and Burn Video into DVD
You can also directly burn your video to a DVD. Even though video to DVD isn’t as common as it used to be, it’s still nice to be able to do it, especially if you like making DVDs.
Export Video to Other Devices
Go to the “Devices” option if you want to export your video to specific devices with everything looking good on that particular device. For instance, if you want to export your video to iPhone, you can see the size will be 41MB, and the resolution will be 1080p. All those things are going to look much better on an iPhone.
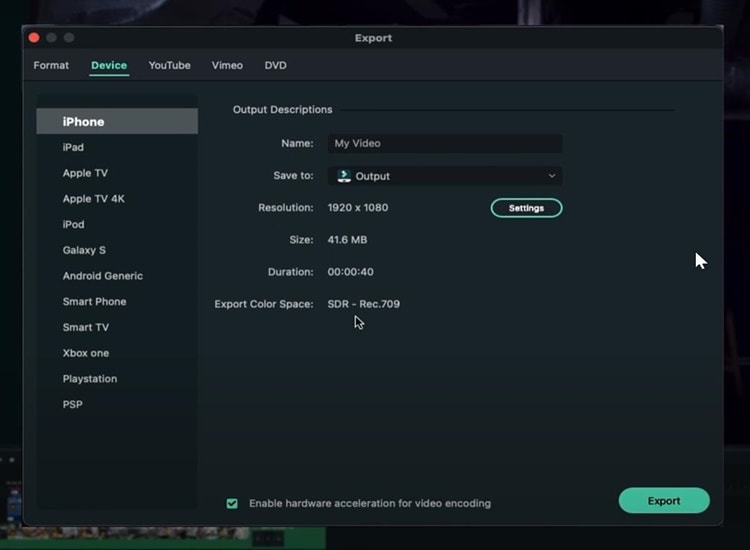
You can also adjust the quality of your video based on your needs by clicking on “Setting.”
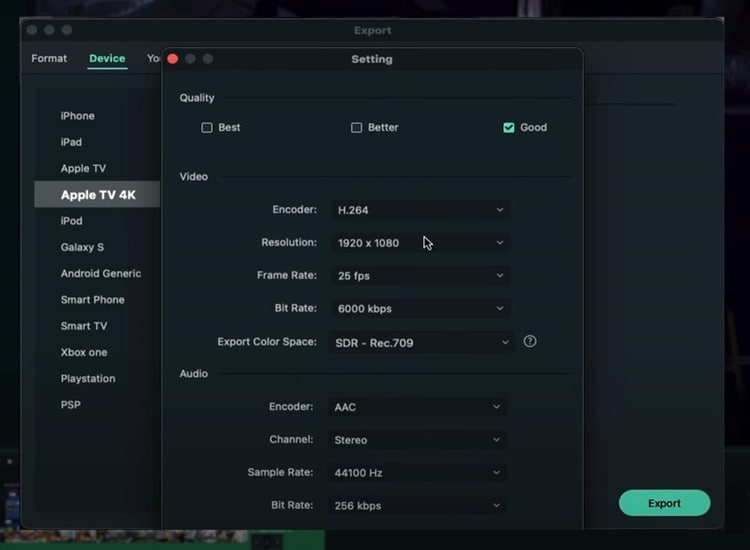
Export Videos in High Res Quality
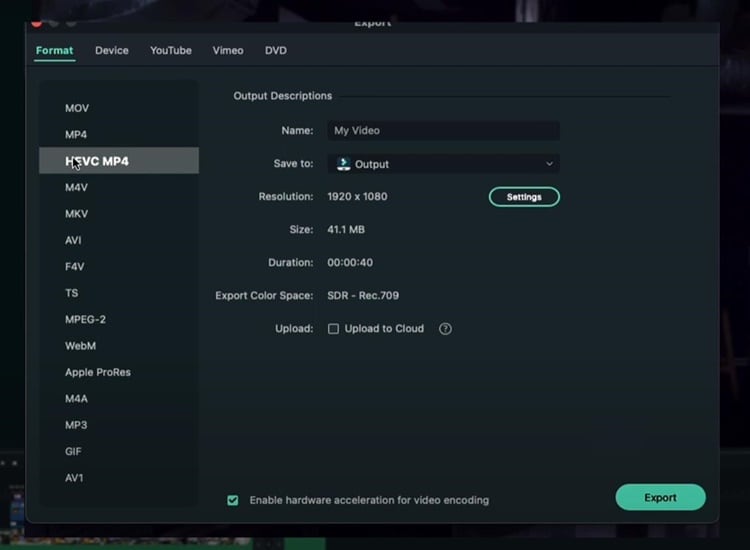
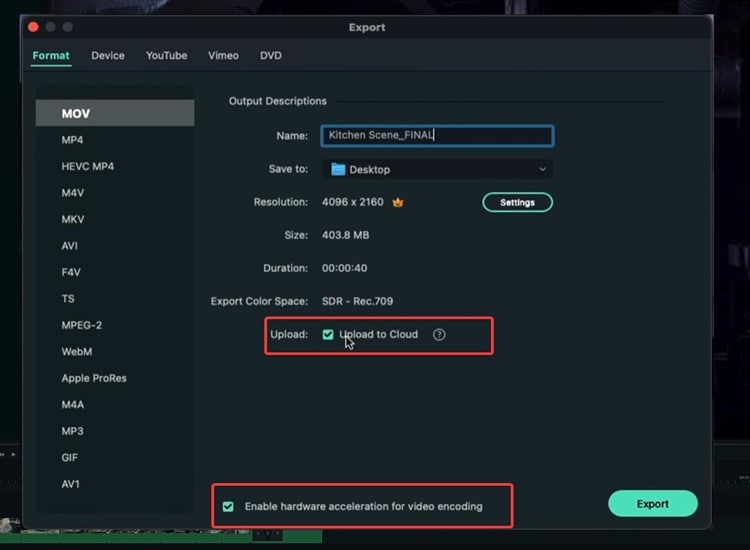
In the “Format” option you can choose the file extension, the format, or the codec. Exporting your video based on format is good if you prefer to save your video on your computer since maybe you may upload your video on YouTube, Instagram or other social media platforms.
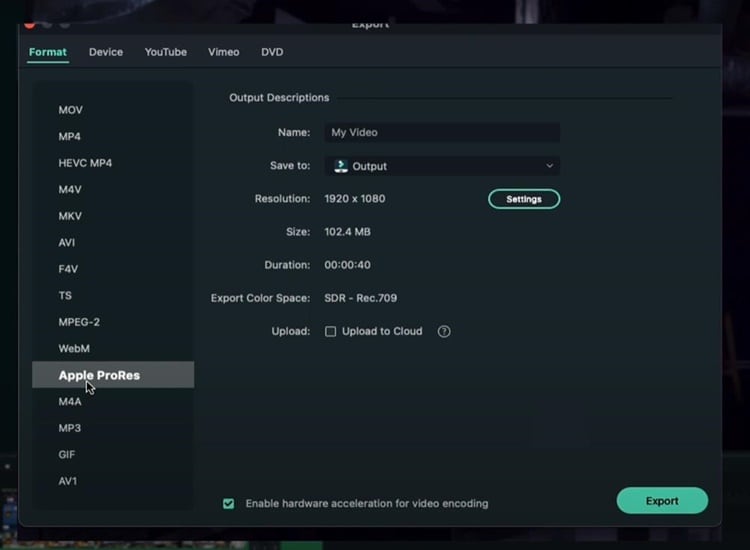
You can choose “Apple Prores” if you want the least amount of compression possible and don’t care about the file size. For example, if you want to export a video from Filmora and then import it into another video editor without losing too much quality, you should definitely choose “Apple Prores.”
Before exporting, there is the option to upload to the cloud. If you do not know what it is, Wondershare has its own Drive, which allows you to save and remotely view your video files.
In the meantime, if you have a decent PC, you can enable “Hardware acceleration for video encoding.” This option will utilize as much computer power as you have to export the video and make the process significantly faster. Once everything is finished, click “Export.”
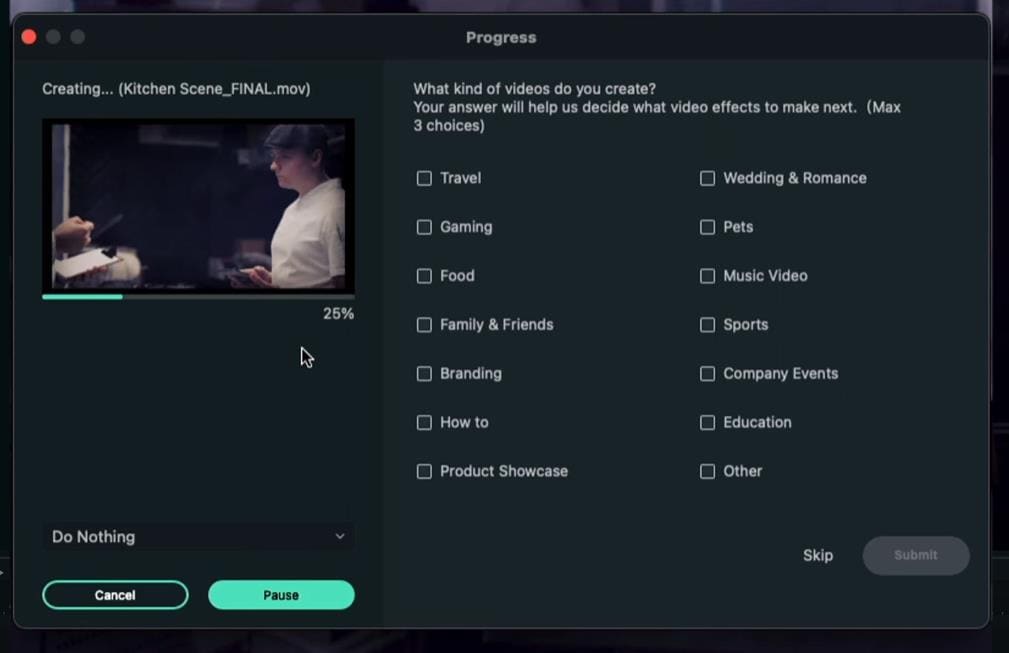
When you click Export, you can see the progress with thumbnails and everything. Lastly, your video has been exported successfully when the exporting process reaches 100%.
Summary
Indeed, there are many options to export your video using Filmora. If you wish to export your video directly to YouTube, simply select the YouTube option in the Export box. Meanwhile, if you want to export your video on your computer and upload it to various social media platforms, it’s much better to export it with a format option.
Free Download For Win 7 or later(64-bit)
Free Download For macOS 10.14 or later
Free Download For macOS 10.14 or later Free Download For macOS 10.14 or later Free Download For macOS 10.14 or later
Create the Night-to-Day Effect Videos
Do you wish you could control when it’s nighttime to daytime? It would make getting ready in the morning much faster! This tutorial will show you how to use the keyframe and mask feature in Filmora to make a remarkable night-to-day transition.
How-to Guide
1) Preparation
For this effect, you will need to shoot two footage shots with the same frame. The first is for the daytime clip, and the second is for nighttime.
But before that, you need to prepare some things, such as:
- Tripod to ensure your camera stays at the same point, so the frame doesn’t change.
- Mark the place where you want to shoot the scene. You can put a marker on the floor to ensure that you perform at the same spot in different shots.
Once done, let’s start shooting to get the footage.
2) Steps
Shooting footages
First, get the daytime shot. For this tutorial, we will pretend that you are walking and transitioning into nighttime at the spot you have marked.

Now, let’s film the nighttime clip. You will walk through the living room and do the same movement again at the same spot. You can dim the light and change the camera’s white balance settings to bluer to create a night feeling.

After you have both clips that you need, let’s go to Filmora and start editing.
Night-to-day transition
Step1 Launch Filmora and import the footage into the program. If you haven’t installed it, you can download Filmora on their website here: https://filmora.wondershare.com
Step2 Place the nighttime video clip on the first video track of the timeline and place the daytime clip on the top.

Step3 Find the spot where you want to create a transition between the day and nighttime. Then, you can delete the unwanted part.

Step4 Since the transition for this tutorial is where the subject started waving, make sure to place the daytime clip at the same time the subject started waving in the nighttime clip. Hence, the timing in both clips syncs.
Masking transition
For the next step, we will make a masking transition with the Filmora mask feature.
Step1 Double-click the daytime clip on the timeline. In the Filmora setting, find the Mask section > Circle. You can see the mask is applied in the preview screen.

Step2 Scroll down the setting and click add a keyframe at the beginning of the clip.

Step3 Change the scale of the mask to the smallest number and adjust the Width and Height down to 0. You can set the blur strength to 15 to make the transition edge smoother.

Step4 Move the play head to find the spot where you want the mask fully opens up, then add another keyframe. Change the scale of the mask to 2 and the Width and Height to 50. Make sure the mask occupies the whole frame.

Now, if you play back, you can see the nighttime becomes daytime through the mask.

If the movement in the two clips is a bit off, you can fix it by adding more keyframes on the mask.
3) Pro tips
You can add one more effect in Filmora to make it more magical. To do this, open the Effects window on the top left and find “Heartbeat” under the Basic section.

Drag and drop it onto the third video track and start the effect when the mask opens up. Then, trim the effect length to match the movement. Adjust the speed of this effect if needed.

The final result will look like this:

Summary
That is how to do this night-to-day transition night-to-day time shift effect in Filmora. By the end of this tutorial, you should be able to use the masking transition technique. You can apply and adjust it based on your needs.
Free Download For Win 7 or later(64-bit)
Free Download For macOS 10.14 or later
Free Download For macOS 10.14 or later
Final Cut Pro for iPad- Is It Available?
Final Cut Pro by Apple is the most popular premium video editor among macOS users. Starting from social media videos to short films and movies, Final Cut Pro is a popular choice. Even though video editing using FCP is mostly done on Mac, there are many who prefer video editing on their powerful phones. It is quite shocking that Final Cut Pro for Android and iOS users is not yet available.
Since it is an Apple-exclusive application, you would have expected FCP mobile app for iPhone and iPad. But Apple is yet to develop a mobile app for Final Cut Pro. Naturally, we have to look for Final Cut Pro alternative mobile apps for smartphone users. The alternatives need to be as feature-rich and powerful as FCP. Here is the list of the best Final Cut Pro alternative apps for Android and iOS users.
Part 1. Final Cut Pro Alternative App for Android
There is no Final Cut Pro app available for Android users. It is not surprising because Final Cut Pro is an Apple product. When you search for Final Cut Pro on Play Store, you will come across an FCP app. But it is a fake app and not developed by Apple. Here is our recommendation of the best Final Cut Pro alternative app for Android users.
1. Filmora
Filmora is the best alternative to Final Cut Pro for Android users. The app has a super high rating on Play Store. Filmora is available for free and you can create amazing HD videos. You can add stunning effects, animations, texts, filters, backgrounds, and much more. You can obviously perform the basic video edits such as trim, cut, join, and likewise. The app allows easy sharing of edited videos on social media platforms.
You can add keyframes for personalized creativity animations. There is a wide range of music available to pick from. Besides, there are amazing stickers and emojis available to apply to your video. The user interface is super intuitive for everyone to use easily without prior experience. The free version attaches a watermark and you can remove it by upgrading to VIP membership.

Link – https://play.google.com/store/apps/details?id=com.wondershare.filmorago&hl=en\_IN&gl=US
2. InShot
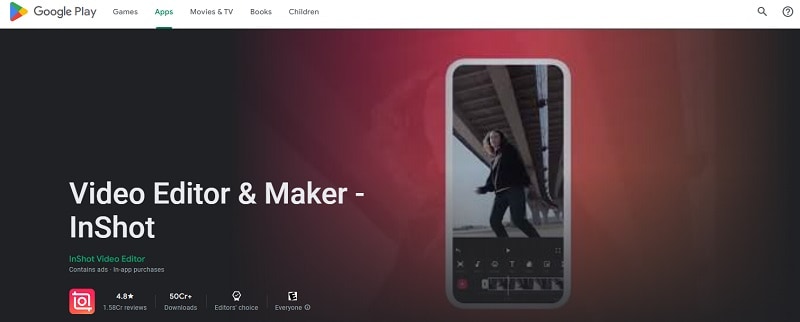
InShot is an extremely popular video editor app among Android users. It is featured as the Editor’s Choice on Play Store. The app has all the features and functionalities you need for basic and advanced video editing. In spite of being a powerful app, the graphical interface is user-friendly.
There are beautiful transitions, stickers, text effects, voice effects, and frames available. You can make picture-in-picture videos, slideshow videos, and slow-motion videos. You can also create stories and GIFs for social media. Besides, there is a keyframe option for texts and stickers. You can easily add voiceover, music, and voice effect to enhance the video content.
Link –https://play.google.com/store/apps/details?id=com.camerasideas.instashot&hl=en\_IN&gl=US
3. KineMaster
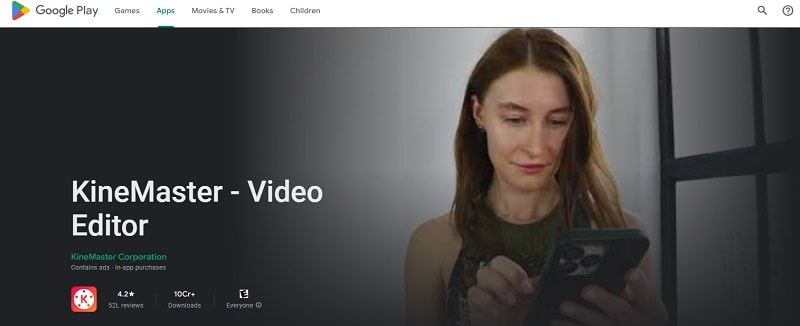
KineMaster is a popular video editing app among beginners. You can create your video from scratch using its video templates. KineMaster has a wide range of different categories of video templates to get started. Starting from basic adjustments to adding filters and effects, everything is available on KineMaster.
The user interface is super easy to operate. The app comes with an incredible collection of assets such as animations and clip graphics. You can remove the background from your video or photo instantly. Besides, you can save the edited video in desired video quality and share it instantly on social media platforms.
Link – https://play.google.com/store/apps/details?id=com.nexstreaming.app.kinemasterfree&hl=en\_IN&gl=US
4. Funimate
Funimate is a relatively new video editing app. But in a short time, the app has managed to become a top video editor app on Play Store. This is because it is extremely powerful and it is comparable to Final Cut Pro in terms of features. The app has a stunning collection of video and text effects that will enhance video content. You can work with multiple video layers just like Final Cut Pro.
The keyframe effect is a strong point for customized and personalized animations. You can choose from the different transitions, overlays, and backgrounds. Besides, there is a wide range of chic effects and filters to go with modern video trends. There is a dedicated 3D space available to experiment with object and text animations. You can sync music and choose AI effects and video masks.

Link – https://play.google.com/store/apps/details?id=com.avcrbt.funimate&hl=en\_IN&gl=US
5. Splice
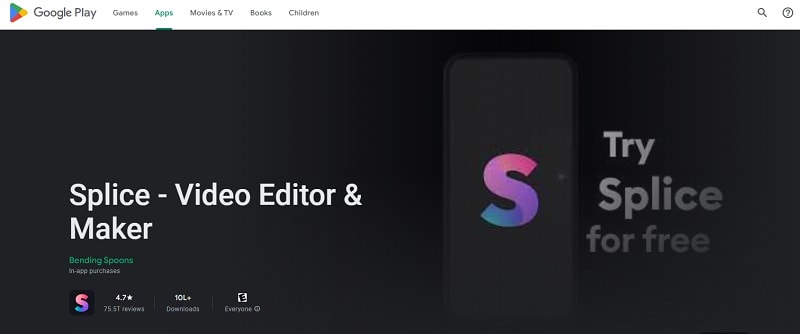
This is another relatively new video editor app but has a superb rating from users. The powerful video editor app makes it easy for beginners to edit videos comfortably. It has a dedicated timeline to work on your video clip and edit as per your requirements. There are beautiful text effects and overlays available.
Besides, you can add and sync music perfectly. Moreover, you can adjust the speed of your video to get the slow-motion effect. The basic video editing tools are available and you can create videos from your photos. There are amazing transitions and video effects present to apply to your photos and video clips. Overall, the video editor is suitable for beginners as well as professionals.
Link – https://play.google.com/store/apps/details?id=com.splice.video.editor&hl=en\_IN&gl=US
Part 2. Final Cut Pro Alternative App for iPhone
Since Final Cut Pro is from Apple, you would have expected an FCP app for iPhone and iPad. Unfortunately, Apple has no plan yet to launch Final Cut Pro mobile app. Here are the Final Cut Pro alternative apps for iPhone and iPad users.
1. iMovie
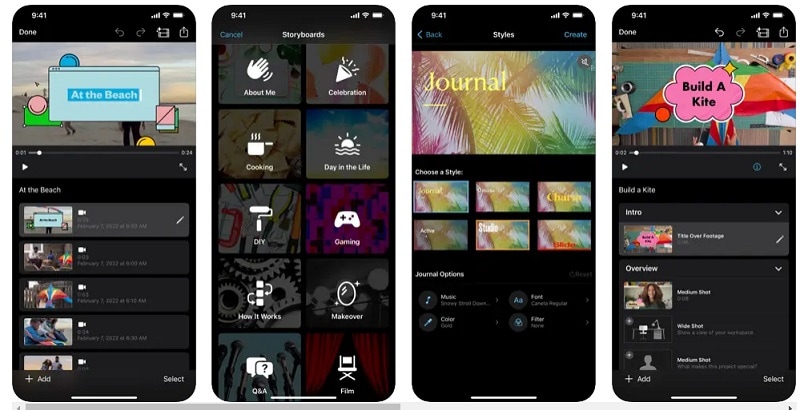
iMovie by Apple is considered to be an ideal alternative to Final Cut Pro. Even though it is not as advanced as FCP, but there are powerful features for professionals as well. You can create videos from scratch and there are beautiful templates available to get started. You can also make Hollywood-style cinematic trailers to get your viewers excited.
Apart from templates of different categories, there are different text styles and textures available to pick from. You can get the popular picture-in-picture, split screen, and green screen effect options. It supports editing 4K videos at 60 fps. You can send your video projects to iPad and Mac conveniently.
Link – https://apps.apple.com/us/app/imovie/id377298193
2. Quik
Quik by GoPro is one of the most popular video editors. GoPro is the leading action camera brand. Naturally, there is huge traction for its video editor. First of all, its speed adjustment feature is the highlight of the app. You can go for super slow, regular slow, freeze, timelapse, hyper-lapse, and fast motion.
Select from a wide range of themes to get started. There is no dearth of filters, transitions, and effects. Some of the filters are super exclusive to the app. You can share your edited video on social media platforms instantly. The multi-selection timeline is suitable for advanced video editors. The app has exclusive features for GoPro owners.

Link – https://apps.apple.com/us/app/gopro-quik-video-editor/id561350520
3. Magisto
If you are into storytelling with your videos, this is the best app to edit your videos. It has all the features and options to make your video look classic and eye-catching. As a matter of fact, it is arguably the best video editor for social media video creators. You can use its artificial intelligence feature to select the best parts of your video automatically.
There are ready-made templates available to make your video look professional as well as entertaining. You can perform all the basic video editing tasks swiftly. You can work with the music part comfortably so that your video content enhances. Starting from slideshow videos to short videos for social media, the app is perfect for different genres of video making.

Link – https://apps.apple.com/us/app/magisto-video-editor-maker/id486781045
4. VivaVideo
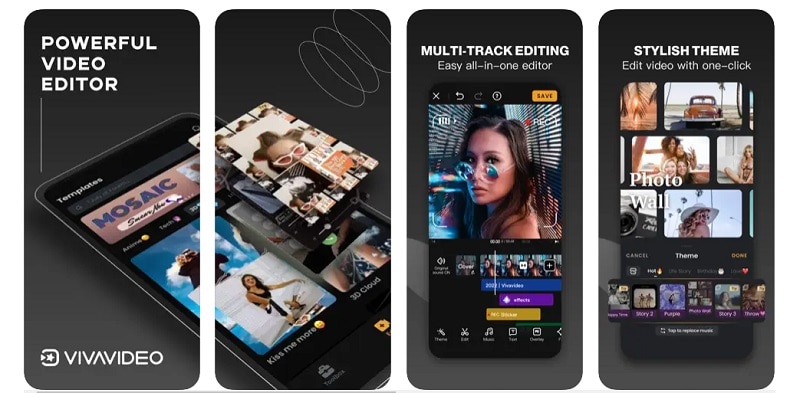
VivaVideo is a highly rated video editing app. The app lets you change video speed, supports high-resolution output, and comes with dynamic effects. You can make short videos with your photos. You can decorate them beautifully with frames and objects available.
There are several cinematic filters available to enhance video quality. Apart from these, you get to select from a wide collection of text effects and emojis. You can work with keyframes and export video in 4k resolution. You can also create GIFs for social media platforms instantly.
Link – https://apps.apple.com/us/app/vivavideo-video-editor-maker/id738897668
5. Adobe Premiere Rush
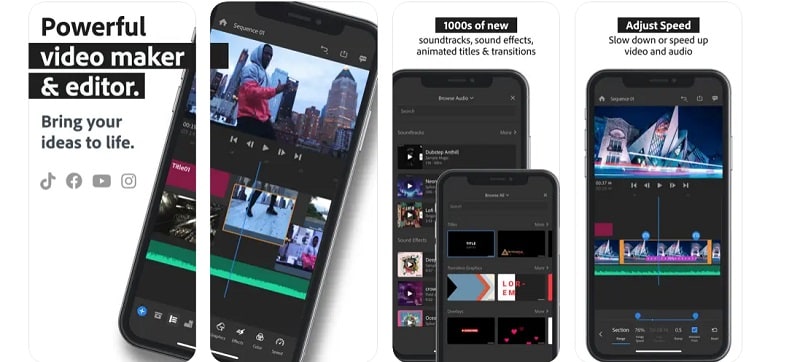
Adobe Premiere is the biggest competitor of Final Cut Pro. But Adobe has gone one step ahead of FCP by releasing its mobile app. Adobe Premiere Rush is undoubtedly a powerful video editor. It is true that all the features of the Adobe Premiere desktop application are not available. But it is still great for a professional video creator.
There are multi-track timeline, customizable animated templates, and stunning video and text effects. The app has AI sensors for automated color balancing. The premium content library has everything you need. There are different aspect ratios available for creating videos for all devices. You can export edited videos in 4K resolution.
Link – https://apps.apple.com/us/app/adobe-premiere-rush-edit-video/id1188753863
Part 3. Related FAQs
1. Is Final Cut Pro a free app?
No, Final Cut Pro is not a free app. It is a paid app that costs $299.99 for lifetime access. However, you can download the free trial version of Final Cut Pro. You can use the trial version for 90 days before purchasing the product.
2. Does Final Cut Pro have a mobile app?
No, Final Cut Pro does not have any mobile app as of now. It is exclusively for iMac and MacBook users. You can use Filmora mobile app if you are looking for an FCP alternative.
3. Is Final Cut Pro Apple only?
Apple is the developer of Final Cut Pro. Therefore, it is an Apple-exclusive product. Naturally, it works only on macOS-based devices such as iMac and MacBook.
Free Download For Win 7 or later(64-bit)
Free Download For macOS 10.14 or later
Part 1. Final Cut Pro Alternative App for Android
There is no Final Cut Pro app available for Android users. It is not surprising because Final Cut Pro is an Apple product. When you search for Final Cut Pro on Play Store, you will come across an FCP app. But it is a fake app and not developed by Apple. Here is our recommendation of the best Final Cut Pro alternative app for Android users.
1. Filmora
Filmora is the best alternative to Final Cut Pro for Android users. The app has a super high rating on Play Store. Filmora is available for free and you can create amazing HD videos. You can add stunning effects, animations, texts, filters, backgrounds, and much more. You can obviously perform the basic video edits such as trim, cut, join, and likewise. The app allows easy sharing of edited videos on social media platforms.
You can add keyframes for personalized creativity animations. There is a wide range of music available to pick from. Besides, there are amazing stickers and emojis available to apply to your video. The user interface is super intuitive for everyone to use easily without prior experience. The free version attaches a watermark and you can remove it by upgrading to VIP membership.

Link – https://play.google.com/store/apps/details?id=com.wondershare.filmorago&hl=en\_IN&gl=US
2. InShot
InShot is an extremely popular video editor app among Android users. It is featured as the Editor’s Choice on Play Store. The app has all the features and functionalities you need for basic and advanced video editing. In spite of being a powerful app, the graphical interface is user-friendly.
There are beautiful transitions, stickers, text effects, voice effects, and frames available. You can make picture-in-picture videos, slideshow videos, and slow-motion videos. You can also create stories and GIFs for social media. Besides, there is a keyframe option for texts and stickers. You can easily add voiceover, music, and voice effect to enhance the video content.

Link –https://play.google.com/store/apps/details?id=com.camerasideas.instashot&hl=en\_IN&gl=US
3. KineMaster
KineMaster is a popular video editing app among beginners. You can create your video from scratch using its video templates. KineMaster has a wide range of different categories of video templates to get started. Starting from basic adjustments to adding filters and effects, everything is available on KineMaster.
The user interface is super easy to operate. The app comes with an incredible collection of assets such as animations and clip graphics. You can remove the background from your video or photo instantly. Besides, you can save the edited video in desired video quality and share it instantly on social media platforms.

Link – https://play.google.com/store/apps/details?id=com.nexstreaming.app.kinemasterfree&hl=en\_IN&gl=US
4. Funimate
Funimate is a relatively new video editing app. But in a short time, the app has managed to become a top video editor app on Play Store. This is because it is extremely powerful and it is comparable to Final Cut Pro in terms of features. The app has a stunning collection of video and text effects that will enhance video content. You can work with multiple video layers just like Final Cut Pro.
The keyframe effect is a strong point for customized and personalized animations. You can choose from the different transitions, overlays, and backgrounds. Besides, there is a wide range of chic effects and filters to go with modern video trends. There is a dedicated 3D space available to experiment with object and text animations. You can sync music and choose AI effects and video masks.

Link – https://play.google.com/store/apps/details?id=com.avcrbt.funimate&hl=en\_IN&gl=US
5. Splice
This is another relatively new video editor app but has a superb rating from users. The powerful video editor app makes it easy for beginners to edit videos comfortably. It has a dedicated timeline to work on your video clip and edit as per your requirements. There are beautiful text effects and overlays available.
Besides, you can add and sync music perfectly. Moreover, you can adjust the speed of your video to get the slow-motion effect. The basic video editing tools are available and you can create videos from your photos. There are amazing transitions and video effects present to apply to your photos and video clips. Overall, the video editor is suitable for beginners as well as professionals.

Link – https://play.google.com/store/apps/details?id=com.splice.video.editor&hl=en\_IN&gl=US
Part 2. Final Cut Pro Alternative App for iPhone
Since Final Cut Pro is from Apple, you would have expected an FCP app for iPhone and iPad. Unfortunately, Apple has no plan yet to launch Final Cut Pro mobile app. Here are the Final Cut Pro alternative apps for iPhone and iPad users.
1. iMovie
iMovie by Apple is considered to be an ideal alternative to Final Cut Pro. Even though it is not as advanced as FCP, but there are powerful features for professionals as well. You can create videos from scratch and there are beautiful templates available to get started. You can also make Hollywood-style cinematic trailers to get your viewers excited.
Apart from templates of different categories, there are different text styles and textures available to pick from. You can get the popular picture-in-picture, split screen, and green screen effect options. It supports editing 4K videos at 60 fps. You can send your video projects to iPad and Mac conveniently.

Link – https://apps.apple.com/us/app/imovie/id377298193
2. Quik
Quik by GoPro is one of the most popular video editors. GoPro is the leading action camera brand. Naturally, there is huge traction for its video editor. First of all, its speed adjustment feature is the highlight of the app. You can go for super slow, regular slow, freeze, timelapse, hyper-lapse, and fast motion.
Select from a wide range of themes to get started. There is no dearth of filters, transitions, and effects. Some of the filters are super exclusive to the app. You can share your edited video on social media platforms instantly. The multi-selection timeline is suitable for advanced video editors. The app has exclusive features for GoPro owners.

Link – https://apps.apple.com/us/app/gopro-quik-video-editor/id561350520
3. Magisto
If you are into storytelling with your videos, this is the best app to edit your videos. It has all the features and options to make your video look classic and eye-catching. As a matter of fact, it is arguably the best video editor for social media video creators. You can use its artificial intelligence feature to select the best parts of your video automatically.
There are ready-made templates available to make your video look professional as well as entertaining. You can perform all the basic video editing tasks swiftly. You can work with the music part comfortably so that your video content enhances. Starting from slideshow videos to short videos for social media, the app is perfect for different genres of video making.

Link – https://apps.apple.com/us/app/magisto-video-editor-maker/id486781045
4. VivaVideo
VivaVideo is a highly rated video editing app. The app lets you change video speed, supports high-resolution output, and comes with dynamic effects. You can make short videos with your photos. You can decorate them beautifully with frames and objects available.
There are several cinematic filters available to enhance video quality. Apart from these, you get to select from a wide collection of text effects and emojis. You can work with keyframes and export video in 4k resolution. You can also create GIFs for social media platforms instantly.

Link – https://apps.apple.com/us/app/vivavideo-video-editor-maker/id738897668
5. Adobe Premiere Rush
Adobe Premiere is the biggest competitor of Final Cut Pro. But Adobe has gone one step ahead of FCP by releasing its mobile app. Adobe Premiere Rush is undoubtedly a powerful video editor. It is true that all the features of the Adobe Premiere desktop application are not available. But it is still great for a professional video creator.
There are multi-track timeline, customizable animated templates, and stunning video and text effects. The app has AI sensors for automated color balancing. The premium content library has everything you need. There are different aspect ratios available for creating videos for all devices. You can export edited videos in 4K resolution.

Link – https://apps.apple.com/us/app/adobe-premiere-rush-edit-video/id1188753863
Part 3. Related FAQs
1. Is Final Cut Pro a free app?
No, Final Cut Pro is not a free app. It is a paid app that costs $299.99 for lifetime access. However, you can download the free trial version of Final Cut Pro. You can use the trial version for 90 days before purchasing the product.
2. Does Final Cut Pro have a mobile app?
No, Final Cut Pro does not have any mobile app as of now. It is exclusively for iMac and MacBook users. You can use Filmora mobile app if you are looking for an FCP alternative.
3. Is Final Cut Pro Apple only?
Apple is the developer of Final Cut Pro. Therefore, it is an Apple-exclusive product. Naturally, it works only on macOS-based devices such as iMac and MacBook.
Free Download For Win 7 or later(64-bit)
Free Download For macOS 10.14 or later
How to Add Motion Blur in After Effects
Everyone has seen those transition or animation video cuts when something doesn’t quite seem right; the movement appears forced or the playback is choppy. Typically, this occurs because a motion blur effect was not used while editing. Learning the ins, outs, rights, and wrongs of Motion Blur in After Effects is one of the most thrilling early steps in the motion graphics adventure. Learning how and when to utilize it successfully is a true “level up” moment for most designers.
Making everything you add to a motion graphic or animation project appear like it belongs there organically and hasn’t been “artificially” inserted is a crucial component. Adding motion blur After Effects Is a fantastic tool for making items mix more naturally in your compositions. Let’s quickly examine Motion Blur with all of this in mind. To help you better grasp motion blur and how to add motion blur to flawlessly merge objects in your video projects or even create styled effects, we’ve put up a detailed guide here.
Part 1. What is Motion Blur Effects
Let’s start with a little introduction before learning how to apply motion blur. The visual result of an item moving while being photographed in conjunction with the shutter speed of the camera is called motion blur. When we swiftly move our heads from side to side, this effect also naturally occurs with our eyes, but we aren’t aware of it since our brains “edit” it for us. It may be startling and awkward to watch when items are moving on the screen, particularly rapid motion, without any kind of blurring effect.
Motion blur was introduced into animation to aid in the blending of frames and replicate the blurring that was seen in earlier cameras as a result of fast-moving objects. When a moving item keeps moving while light is still reaching our eyes, motion blur results. The goal of Motion Blur in After Effects is to replicate this phenomenon. After Effects will duplicate your layer several times when it changes in size or location. Then, it will offset it in various ways. This is closely related to the direction and pace of your layer’s animation.
These days, we have cameras with fast shutter speeds, which allows us to almost completely remove motion blur. Without motion blurring, each frame of your animation is like a flawless still image, making the action seem a little disorienting. Each picture captures the exact moment in time, despite the fluid motion. However, the absence of motion blur is what viewers do notice. Because of this, visual effects creators often use artificial motion blur in their effects to replicate what the viewer would experience if the element were really there in the picture.
Part 2. How to Add Motion Blur in After Effects
In videos, slow-motion may be used in a variety of ways, such as to convey the emotional context of a story or make beautiful slideshow backdrops. It doesn’t matter why you want to make a slow-motion sequence; After Effects’ slow-motion effect will work well. Click the Motion Blur layer switch to turn Motion Blur on or off. Make sure you can render out Motion Blur by turning on the Enable Motion Blur composition option at the top of the Timeline panel.
Using the motion blur option in your layer settings is the first and easiest approach to apply motion blur in After Effects. You’ll see many choices on the left and right sides of the screen after choosing a certain video. There are several techniques to motion blur a video, which we wish to accomplish. But because this guide is for novices, we will choose the simpler option. Follow the steps below to learn how to add motion blur to a video in AE:
Steps to Add Motion Blur to After Effects:
So, it goes without saying that After Effects makes it simple to access Motion Blur’s magic. You should shoot the movie at a frame rate that is faster than the average if you want the greatest slow-motion effects. How many photos are being captured each second is indicated by the frame rate.
Step1 Download and install Adobe After Effects if it isn’t already on your PC. Since Adobe After Effects is a commercial program, it is not available for free. Open the program after installation. After installation, launch it and choose “New Project” to begin editing a brand-new file. Look through the video you wish to alter.

Step2 You have a variety of settings in Adobe After Effects on the right side. Then, choose “Effects & Presets.” A search bar will appear as a result. Enter “CC Force Motion Blur” in the search field if you wish to add motion blur to the video. You may apply this effect to whatever layer you choose since your movie is made up of layers.

Step3 Next, drag the “CC Force Motion Blur” to the layers that represent your imported video at the bottom left of the screen. On the left side of the screen, under “CC Force Motion Blur,” you will find settings for motion blur. Here, you may change the motion blur to suit your needs. You may type in the values and watch the video as appropriate. There are several choices available for you to modify.

![]()
Note: Before applying any speed effects, first trim your film to the proper length. Once the speed effects have been included, you need also make sure that your composition is lengthy enough for your clip. Once you’re satisfied with the footage you want to slow down, choose one of the ways—Time warp or Time Stretch.
Step4 Customize “Shutter Angle” and “Motion Blur Samples.” Always be careful to preview the video after any modifications. Adjust to your needs and specifications. Additionally, if you wish, you may add any additional effect to the video. When finished, save the video by selecting “File” in the upper left corner.

Step5 Finally, hit the OK button and afterwards, export the project with the Motion Blur embedded inside the main video. Adobe AE also gives you flexibility to export to the desired format with the preset project settings.
Part 3. Other Video Editor to Add Effects to Videos
Due to its cost and adaptability, Adobe After Effects is quite expensive; especially for the beginners. So, we’ve a handy option, Filmora by Wondershare, that is a fantastic option since most high-end video editors are, to put it mildly, expensive. It may seem natural to just add motion blur to everything before rendering while working on a conventional 2D project in After Effects, but there are occasions when having no motion blur at all is preferable. When used properly, After Effects’ slow-motion features are extensive and reliable.
Wondershare: A video-making and editing program has its flagship product called Filmora . You may use the tools to create a wide variety of styles and appearances. Less complicated and user-friendly for beginners, the program. With the help of this program, you may edit your video at home like an expert. With this user-friendly tool and stylish effects, making excellent films doesn’t have to be difficult. When you open the app and choose Editor mode as it will walk you through each stage of the procedure.
Free Download For Win 7 or later(64-bit)
Free Download For macOS 10.14 or later
Import Files
Media files may be easily added to the timeline in Filmora from the device’s library. .mpg,.mpeg, and many more file types are supported for this video file format’s input.

Utilize Filmstock
On Wondershare Filmora , there is a full-service shop called Filmstock that offers a ton of exciting media and after-effects for download. You may get free sound effects and short video clips to add to your videos on this website.
Edit Effect
Download films from the effect store or import them from your device and add them to your timeline in Filmora to modify your videos. Utilize the software’s drag-and-drop feature to modify the video.

Apply filters
Overlays and video filters are effects used to enhance the appeal of the video. Open the effects tab and select your desired filter to apply overlays and filters. To apply it, drag and drop it into the timeline’s video. Additionally, filters may be adjusted to change the time scale and transparency.
Export
Exporting a video to a variety of platforms comes after editing it. Filmora allows users to export video in a number of different file types, including mp4, Wmv, Mkv, ts, 3gp, f4v, Mkv, MOV, mpg, 3gp, GIF 4K, and mp3.
Conclusion
Motion blur is crucial when animating characters to move. Your videos require some blur to seem realistic when there is motion, particularly when there is quick movement. You have learnt how to include motion blur into your animation project from this guide. To add motion blur effects to your movie or animation, After Effects offers a wide variety of options. To inform you about this wonderful gesture, we utilized Filmora and Adobe After Effects and recommend Filmora for easiness and handy outputs.
Let’s start with a little introduction before learning how to apply motion blur. The visual result of an item moving while being photographed in conjunction with the shutter speed of the camera is called motion blur. When we swiftly move our heads from side to side, this effect also naturally occurs with our eyes, but we aren’t aware of it since our brains “edit” it for us. It may be startling and awkward to watch when items are moving on the screen, particularly rapid motion, without any kind of blurring effect.Motion blur was introduced into animation to aid in the blending of frames and replicate the blurring that was seen in earlier cameras as a result of fast-moving objects. When a moving item keeps moving while light is still reaching our eyes, motion blur results. The goal of Motion Blur in After Effects is to replicate this phenomenon. After Effects will duplicate your layer several times when it changes in size or location. Then, it will offset it in various ways. This is closely related to the direction and pace of your layer’s animation.
These days, we have cameras with fast shutter speeds, which allows us to almost completely remove motion blur. Without motion blurring, each frame of your animation is like a flawless still image, making the action seem a little disorienting. Each picture captures the exact moment in time, despite the fluid motion. However, the absence of motion blur is what viewers do notice. Because of this, visual effects creators often use artificial motion blur in their effects to replicate what the viewer would experience if the element were really there in the picture.
Part 2. How to Add Motion Blur in After Effects
In videos, slow-motion may be used in a variety of ways, such as to convey the emotional context of a story or make beautiful slideshow backdrops. It doesn’t matter why you want to make a slow-motion sequence; After Effects’ slow-motion effect will work well. Click the Motion Blur layer switch to turn Motion Blur on or off. Make sure you can render out Motion Blur by turning on the Enable Motion Blur composition option at the top of the Timeline panel.
Using the motion blur option in your layer settings is the first and easiest approach to apply motion blur in After Effects. You’ll see many choices on the left and right sides of the screen after choosing a certain video. There are several techniques to motion blur a video, which we wish to accomplish. But because this guide is for novices, we will choose the simpler option. Follow the steps below to learn how to add motion blur to a video in AE:
Steps to Add Motion Blur to After Effects:
So, it goes without saying that After Effects makes it simple to access Motion Blur’s magic. You should shoot the movie at a frame rate that is faster than the average if you want the greatest slow-motion effects. How many photos are being captured each second is indicated by the frame rate.
Step1 Download and install Adobe After Effects if it isn’t already on your PC. Since Adobe After Effects is a commercial program, it is not available for free. Open the program after installation. After installation, launch it and choose “New Project” to begin editing a brand-new file. Look through the video you wish to alter.

Step2 You have a variety of settings in Adobe After Effects on the right side. Then, choose “Effects & Presets.” A search bar will appear as a result. Enter “CC Force Motion Blur” in the search field if you wish to add motion blur to the video. You may apply this effect to whatever layer you choose since your movie is made up of layers.

Step3 Next, drag the “CC Force Motion Blur” to the layers that represent your imported video at the bottom left of the screen. On the left side of the screen, under “CC Force Motion Blur,” you will find settings for motion blur. Here, you may change the motion blur to suit your needs. You may type in the values and watch the video as appropriate. There are several choices available for you to modify.

![]()
Note: Before applying any speed effects, first trim your film to the proper length. Once the speed effects have been included, you need also make sure that your composition is lengthy enough for your clip. Once you’re satisfied with the footage you want to slow down, choose one of the ways—Time warp or Time Stretch.
Step4 Customize “Shutter Angle” and “Motion Blur Samples.” Always be careful to preview the video after any modifications. Adjust to your needs and specifications. Additionally, if you wish, you may add any additional effect to the video. When finished, save the video by selecting “File” in the upper left corner.

Step5 Finally, hit the OK button and afterwards, export the project with the Motion Blur embedded inside the main video. Adobe AE also gives you flexibility to export to the desired format with the preset project settings.
Part 3. Other Video Editor to Add Effects to Videos
Due to its cost and adaptability, Adobe After Effects is quite expensive; especially for the beginners. So, we’ve a handy option, Filmora by Wondershare, that is a fantastic option since most high-end video editors are, to put it mildly, expensive. It may seem natural to just add motion blur to everything before rendering while working on a conventional 2D project in After Effects, but there are occasions when having no motion blur at all is preferable. When used properly, After Effects’ slow-motion features are extensive and reliable.
Wondershare: A video-making and editing program has its flagship product called Filmora . You may use the tools to create a wide variety of styles and appearances. Less complicated and user-friendly for beginners, the program. With the help of this program, you may edit your video at home like an expert. With this user-friendly tool and stylish effects, making excellent films doesn’t have to be difficult. When you open the app and choose Editor mode as it will walk you through each stage of the procedure.
Free Download For Win 7 or later(64-bit)
Free Download For macOS 10.14 or later
Import Files
Media files may be easily added to the timeline in Filmora from the device’s library. .mpg,.mpeg, and many more file types are supported for this video file format’s input.

Utilize Filmstock
On Wondershare Filmora , there is a full-service shop called Filmstock that offers a ton of exciting media and after-effects for download. You may get free sound effects and short video clips to add to your videos on this website.
Edit Effect
Download films from the effect store or import them from your device and add them to your timeline in Filmora to modify your videos. Utilize the software’s drag-and-drop feature to modify the video.

Apply filters
Overlays and video filters are effects used to enhance the appeal of the video. Open the effects tab and select your desired filter to apply overlays and filters. To apply it, drag and drop it into the timeline’s video. Additionally, filters may be adjusted to change the time scale and transparency.
Export
Exporting a video to a variety of platforms comes after editing it. Filmora allows users to export video in a number of different file types, including mp4, Wmv, Mkv, ts, 3gp, f4v, Mkv, MOV, mpg, 3gp, GIF 4K, and mp3.
Conclusion
Motion blur is crucial when animating characters to move. Your videos require some blur to seem realistic when there is motion, particularly when there is quick movement. You have learnt how to include motion blur into your animation project from this guide. To add motion blur effects to your movie or animation, After Effects offers a wide variety of options. To inform you about this wonderful gesture, we utilized Filmora and Adobe After Effects and recommend Filmora for easiness and handy outputs.
Also read:
- [Updated] Beyond Indexation Understanding YouTube's Unlisted Mechanism for 2024
- 10 Free Location Spoofers to Fake GPS Location on your Itel S23+ | Dr.fone
- 2024 Approved How to Loop a Video with iMovie on Mac and iPhone
- 4 solution to get rid of pokemon fail to detect location On Vivo Y36i | Dr.fone
- Best Tools To Create Blend Image Collage
- In 2024, How Can We Unlock Our Infinix GT 10 Pro Phone Screen?
- In 2024, Unlock Apple ID without Phone Number From iPhone 11 Pro Max
- New In 2024, How to Apply Video Filters
- New Ultimate Guide on How to Plan and Storyboard a Music Video
- Pokemon Go Error 12 Failed to Detect Location On Realme GT 3? | Dr.fone
- Preventing Junk Text Alerts on Your iOS Device with These Three Quick Fixes - Insights From ZDNet
- Solution Found: Adobe Media Encoder Setup for Premiere CC & AE Integration
- Updated How Can You DIY VHS Overlay in After Effects for 2024
- Updated In 2024, Create Neon Text Like a Pro Top Online Tools and Resources
- Title: New Easy Steps to Export Video in Filmora for 2024
- Author: Chloe
- Created at : 2025-02-25 20:19:38
- Updated at : 2025-03-04 08:08:21
- Link: https://ai-editing-video.techidaily.com/new-easy-steps-to-export-video-in-filmora-for-2024/
- License: This work is licensed under CC BY-NC-SA 4.0.